1
NovaBACKUP®
Virtual Dashboard
User Manual
NovaStor / April 2015
© 2015 NovaStor, all rights reserved. All trademarks are the property of their respective owners. Features and
specifications are subject to change without notice. The information provided herein is provided for informational
and planning purposes only.
NovaBACKUP Virtual Dashboard
Introduction
Virtual Dashboard for VMware Hypervisors
Adding a VMware Hypervisor
Editing a VMware Hypervisor
Removing a Hypervisor
Backing up Virtual Machines
Creating and Configuring a Backup Job
Restoring a Backup
VMware Replication
Setting up VMware Replication
Virtual Dashboard for Hyper-V Hypervisors
Adding a Hypervisor
Editing a Hyper-V Hypervisor
Removing a Hypervisor
Backing up Hyper-V Hypervisors
Creating a Backup Job for a Hyper-V Hypervisor
Restoring a Hyper-V
Hyper-V Replication
Setting up Hyper-V Replication
3
3
4
4
6
8
9
10
14
17
18
21
21
23
25
26
27
31
35
35
NovaBACKUP Virtual Dashboard
Introduction
The Virtual Dashboard is where all VMware and Hyper-V backups that are capable of restoring individual files take place. It is also the center of VMware and Hyper-V replication operations. These
backups are not the same as backups that are done through the Backup tab.
In order to access the Virtual Dashboard users will need to start NovaBACKUP and then click the
"Virtual Dashboard" from the "Home" tab.
Virtual Dashboard for VMware
Hypervisors
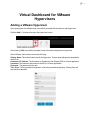
Adding a VMware Hypervisor
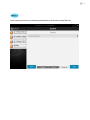
Upon opening the Virtual Dashboard, users will be prompted with the option to add a hypervisor.
Click the Add ("+") button at the top of the Hypervisor's menu.
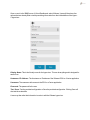
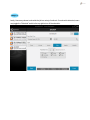
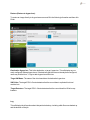
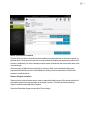
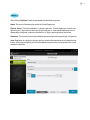
Once clicking "Add" users will be prompted to enter information relating to their hypervisor.
Select VMware, then continue to enter the following:
Display Name: This is the friendly name for the hypervisor. This can be anything and is designed for
ease of use.
Hostname / IP Address: The Hostname or IP address of the VMware ESXi or vCenter application
Username: The username with access to the ESXi or vCenter application
Password : The password for the user
Test / Save: Test the provided configuration or Save the provided configuration. Clicking Save will
also test the credentials.
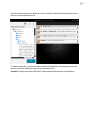
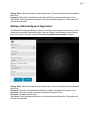
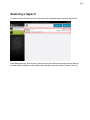
Once the VMware hypervisor is added, you can then select the individual Virtual Machines that you
want to run a backup and restore on.
To create a backup job, you must select the individual Virtual Machine once it pops up on the right
side of the screen by selecting the panel that is associated with it.
Example: Clicking on the panel "AB-WIN07" above will select that particular Virtual Machine.
Editing a VMware Hypervisor
To edit a hypervisor, click "Edit" after selecting the hypervisor to be edited under the "Select
machines to protect" list.
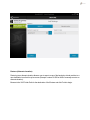
Once a user is in the "Edit" menu of Virtual Dashboard, select VMware. Users will then have four
options that are already filled out with preexisting information from the initial addition of the HyperV hypervisor.
Display Name: This is the friendly name for the hypervisor. This can be anything and is designed for
ease of use.
Hostname / IP Address: The Hostname or IP address of the VMware ESXi or vCenter application
Username: The username with access to the ESXi or vCenter application
Password: The password for the user
Test / Save: Test the provided configuration or Save the provided configuration. Clicking Save will
also test the credentials.
A user may then alter that information in order to edit the VMware hypervisor.
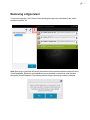
Removing a Hypervisor
To remove a hypervisor, click "Remove" after selecting the hypervisor to be edited on the "select
machines to protect" list.
Note: Removing a Hypervisor will remove all protected virtual machines and their backups from the
Virtual Dashboard. Remove a virtual machine removes the ability to restore that virtual machine
through the Virtual Dashboard. The following window will pop up ensuring a deletion is desired.
Backing up Virtual Machines
After adding a specific virtual machine to the list of protected virtual machines, users are able to create backup jobs that are capable of restoring individual files directly back into the hypervisor.
When creating a backup job, files will be stored in a hierarchical folder structure rather than a single
file. After selecting a target folder on the user's machine, the Virtual Dashboard will automatically create another folder labeled NovaBACKUP underneath that folder. Users may continue to select the
original destination for all future backup jobs.
Example: A user selecting C:\Backups\ may continue to select this folder for all future backup jobs.
After the first backup job runs, users will see a separate folder:
C:\Backups\NovaBACKUP\
VMware backups can be performed from any Windows 7 or Server 2008 R2 machine or greater.
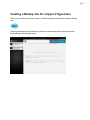
Creating and Configuring a Backup Job
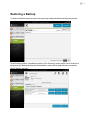
Click on a specific Virtual Machine and then click on the Backup tab in the top right corner.
Create a Backup name, Select the type, and choose the Destination. Then click Next
o
o
o
Full: A full backup is a backup of the entire virtual machine all at once. These backups can be
very large in nature and users should be aware of how much storage space is available on the
destination.
Incremental: Incremental backup jobs are backup jobs that base themselves on the last incremental backup job run. This means each incremental job is dependent upon the previous incremental backup in order to restore any particular file.
Differential: Differential backup jobs are backup jobs that base themselves on the last full
backup job run. This means that each differential backup job is independent from each other
and only the last full backup and the desired differential backup are required to restore a particular file.
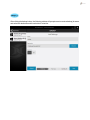
Next, users may choose to run the backup job as either a current user or a specified user
Lastly, Users may choose to schedule the job in a variety of methods. If no schedule is desired, users
may toggle the "Schedule" switch in the top right to turn off the scheduler.
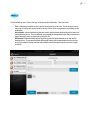
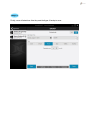
Restoring a Backup
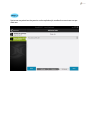
To restore a VMware backup, browse to the previously configured VMware backup job and click it.
On the following window, immediately below the "Run Summary" section will be a list of old and new
backup job logs. Backup jobs that are still available for restore will be listed with three commands:
Mount, Restore, and Log.
To restore a VMware backup, users are given two options:
Mount (individual file restore):
Clicking the "Mount" button will mount the virtual machine's virtual hard drives on the local computer
as physical drives. Once the drive has been mounted a Windows Explorer will appear to browse the
file structure. Additionally, if a drive is already mounted, users will be shown the current drive letter of
the mounted image.
Once mounted, the Mount button will switch to read "Unmount." After a user is finished restoring any
requested individual files from the Virtual Machine, clicking Unmount will disconnect that virtual
machine's virtual hard drive.
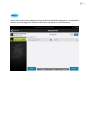
Restore (Restore to hypervisor):
To restore an image directly to a hypervisora user must fill in the following information and then click
Finish.
Destination Hypervisor: This is the destination, or target, hypervisor. This will display any currently configured VMware hypervisors. If the desired hypervisor has not already been configured,
users may click the blue "+" sign to add a hypervisor at this time.
Target VM Name: The name of the virtual machine at its destination hypervisor.
VM Folder: The target ESXi / vCenter datastore that the user wishes to replicate this virtual
machine into
Target Datastore: The target ESXi / vCenter datastore that the user wishes this VM to be replicated to
Log
This will display the information about that particular backup, including which files were backed up
and the duration of the job.
VMware Replication
VMware replication uses the NovaBACKUP Backup / Copy Engine to copy data from either a single
ESXi / vCenter host to itself or from one host to another.
Changed Block Tracking
Changed Block Tracking (CBT) is a VMware feature that helps perform incremental backups. After
clicking on a protected virtual machine, users will see an option for CBT in the bottom right of the virtual machine's individual dashboard. Checking this box will enable CBT or show the current status of
CBT on that virtual machine.
Without CBT enabled, replication jobs will be transferred in full each time the job is executed, which
could increase replication time significantly.
Note: Enabling or disabling CBT may take time, as this is a VMware function change.
VMware Replication Retention
VMware backups are able to maintain a retention value in either generations (count) or days for Full
or Differential backups. In order to apply retention to and Incremental backup, users will need to target the same folder as their incremental backup with a scheduled or manually run full backup job that
includes a retention value.
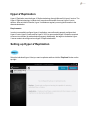
Setting up VMware Replication
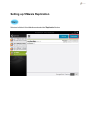
Select an individual Virtual Machine and select the "Replication" button
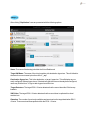
After clicking "Replication" users are presented with the following options:
Name: The name of the backup job within the Virtual Dashboard
Target VM Name: The name of the virtual machine at its destination hypervisor. This will default to
whatever the current name is plus the suffix of "_rep"
Destination Hypervisor: This is the destination, or target, hypervisor. This will display any currently configured VMware hypervisors. If the desired hypervisor has not already been configured,
users may click the blue "+" sign to add a hypervisor at this time.
Target Datastore: The target ESXi / vCenter datastore that the user wishes this VM to be replicated to
VM Folder: The target ESXi / vCenter datastore that the user wishes to replicate this virtual
machine into
Retention: The number of previously available versions stored on the target destination ESXi /
vCenter. These are stored as snapshots within the ESXi / vCenter.
Next, the following screen will prompt how you want to run the replication job as.
Here, users may choose to schedule the job in a variety of methods. If no schedule is desired, users may toggle the
"Schedule" switch in the top right to turn off the scheduler.
Virtual Dashboard for Hyper-V
Hypervisors
Adding a Hypervisor
Upon opening the Virtual Dashboard users will be prompted with the option to add a hypervisor.
Click the Add "+" button at the top of the Hypervisor's menu.
Once clicking "Add" users will be prompted to enter information relating to their Hypervisor.
Note: If there are already VMware hosts added through the legacy backup functionality in
NovaBACKUP, those servers will already be added to the Virtual Dashboard.
Once a user is in the "Add" menu of the Virtual Dashboard, select Hyper-V. Users will then be
presented with two options.
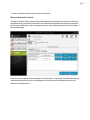
Adding a Local Hyper-V Hypervisor
If NovaBACKUP is being installed onto a local Hyper-V host, users will not need to enter user credentials to access the Hyper-V service. Users will need to add two fields on information as seen in
the picture above.
Display Name: This is the friendly name for the hypervisor. This can be anything and is designed for
ease of use.
Hostname: This is the Fully Qualified Domain Name (FQDN) or hostname of the Hyper-V host.
Test / Save: Test the provided configuration or Save the provided configuration. Clicking Save will
also test the credentials.
Adding a Remote Hyper-V Hypervisor
If NovaBACKUP is being installed on a machine to manage a remote Hyper-V host, users will need
to enter user credentials to access the Hyper-V service. Users will need to add four fields of information. If the Hyper-V is remote, check the "Connect using different credentials"checkbox.
Display Name: This is the friendly name for the hypervisor. This can be anything and is designed for
ease of use.
Hostname: This is the Fully Qualified Domain Name (FQDN) or hostname of the Hyper-V host.
Username: The local or domain username with access to the Hyper-V host
Password: The password for the user
Test / Save: Test the provided configuration or Save the provided configuration. Clicking Save will
also test the credentials.
Editing a Hyper-V Hypervisor
To edit a hypervisor, click "Edit" after selecting the hypervisor to be edited on the "Select machines
to protect" list.
Once a user is in the "Edit" menu of Virtual Dashboard, select Hyper-V. Users will then be presented with two options that are already filled out with preexisting information from the initial addition of
the Hyper-V Hypervisor.
Editing a Local Hyper-V Hypervisor
In which a user can alter the Display Name and Hostname that were filled out in the initial addition of the
Hyper-V hypervisor.
Editing a Remote Hyper-V Hypervisor
Here a user can alter the Display Name, Hostname, Username, Password and retest the credentials to save
the provided configuration.
Removing a Hypervisor
To remove a hypervisor, click "Remove" after selecting the hypervisor to be edited
Note: Removing a Hypervisor will remove all protected virtual machines and their backups from the
Virtual Dashboard. Remove a virtual machine removes the ability to restore that virtual machine
through the Virtual Dashboard.
The following dialog will appear upon clicking "Remove" to ensure that removal of the hypervisor
was intentional.
Backing up Hyper-V Hypervisors
After adding a virtual machine to the list of protected virtual machines, users are able to create
backup jobs that are able to restore individual files as well as directly back into the hypervisor.
When creating a backup job, files will be stored in a hierarchical folder structure rather than a single
file. After selecting a target folder on the user's machine, the Virtual Dashboard will automatically create another folder labeled NovaBACKUP underneath that folder. Users may continue to select the
original destination for all future backup jobs.
Example: A user selecting C:\Backups\ may continue to select this folder for all future backup jobs.
After the first backup job runs, users will see a separate folder:
C:\Backups\NovaBACKUP\
Hyper-V backups can be performed from either the Hyper-V 2012 or Hyper-V 2012 R2 host
machine. Unlike VMware backups, NovaBACKUP must be installed on the Hyper-V host where the
virtual machine desired to be backed up is located.
Setting up Hyper-V backups.
For Local Hyper-V connections, select the individual Hyper-V that you want to create a backup plan
for and skip the following paragraph.
For remote Hyper-V connections, first connect to the remote Hyper-V by accessing the remote
desktop connection and providing the hostname of the Hyper-V and your credentials to access it.
From there, a user must install NovaBACKUP and access the Virtual Dashboard on the HyperV machine.
When creating a new backup job, users will be presented with the following options:
Name: The name of the backup job as it appears in the Virtual Dashboard
Retention: In either "Generations" (number of versions to keep or count) or "Days old" (number of
days to keep available)
Run as: Users may choose to run the job as either the current user or as a specified user
Schedule: Users may choose to schedule a job in a variety of methods. If no schedule is desired,
users may toggle the "Schedule" switch in the top right to turn off the scheduler.
Hyper-V Retention
Hyper-V backups can currently only be run in a full mode. Retention maintains either a Generation
(count) or number of Day's
Creating a Backup Job for a Hyper-V Hypervisor
Once a user is locally connected to a Hyper-V the following steps can be taken to create a backup
plan.
Select the individual Hyper-V machine you want to create a backup job for and then select the
Backup Button on the top right corner.
After clicking the backup button, the following window will prompt users to create a backup job name
and select the destination and the selection of retention.
Next a user will select how the backup job will be run
Finally, a user will select how often they want the Hyper-V backup to occur.
Restoring a Hyper-V
To restore a Hyper-V backup, browse to the previously configured Hyper-V backup job and click it.
Immediately below the "Run Summary" section will be a list of old and new backup job logs. Backup
jobs that are still available for restore will be listed with three commands: Mount, Restore, and Log.
Mount (individual file restore)
Click the "Mount" button will mount the virtual machine's virtual hard drives on the local computer as
physical drives. Once the drive has been mounted a Windows Explorer will appear to browse the file
structure. Additionally, if a drive is already mounted, users will be shown the current drive letter of the
mounted image.
Once mounted, the Mount button will switch to Unmount. After a user is finished restoring any
requested individual files from the Virtual Machine, clicking Unmount will disconnect that virtual
machine's virtual hard drive.
Restore (Original Location)
Restoring to the original location allows a user to place the backed up copy of the virtual machine directly back in place to its original location in the Hyper-V server. This will overwrite any existing
Hyper-V machines that might still be in place.
Select the Destination Hypervisor and click Finish to begin.
Restore (Alternate Location)
Restoring to an alternate location allows a user to export a copy of the backed up virtual machine to a
new destination in so that it may be moves (Example: restore to USB or NAS to manually move to an
alternate location).
Browse to the VHD Folder Path for the destination of the Restore and click Finish to begin.
Hyper-V Replication
Hyper-V Replication uses the Hyper-V Replica technology through Microsoft's Hyper-V service. The
Hyper-V Replica technology is a block-level, asynchronous transfer from one Hyper-V host to
another. After an initial full transfer, Hyper-V maintains a regularly occurring block transfer to the
alternate destination.
Requirements
In order to successfully configure Hyper-V replication, users will need to properly configure their
Hyper-V hosts. Hyper-V hosts must be Hyper-V 2012 or newer and all Hyper-V hosts are required
to connect to a domain (for authentication purposes). Additionally, the target or destination HyperV server needs to be configured as a Hyper-V Replica destination.
Setting up Hyper-V Replication
Select the individual Hyper-V that you want to replicate and then click the "Replicate" button on the
top right.
After clicking "Replicate" users are presented with the following options:
Name: The name of the backup job within the Virtual Dashboard
Replica Server: This is the destination, or target, hypervisor. This will display any currently configured Hyper-V hypervisors that are not the source Hyper-V. If the desired hypervisor has not
already been configured, users may click the blue "+" sign to add a hypervisor at this time.
Retention: The number of previously available versions stored on the target Hyper-V hypervisor
Note: Replication is a single-run job type and only needs to be executed once to initialize the replication. After being configured, the Virtual Dashboard reports on the current health of the virtual
machine's replication.
Next a user may select how they want to run the replication job, as either the current user or a specified user.
Lastly, users may choose a schedule for when the first initial replication takes place. If no schedule is
desired, users may toggle the "Schedule" switch in the top right to turn off the scheduler.


![PDF [Deutsch]](http://vs1.manualzilla.com/store/data/006797997_1-c9045cd66eae30723aff946cf752a6aa-150x150.png)