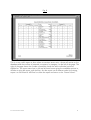
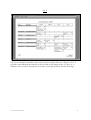
1
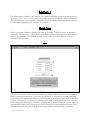
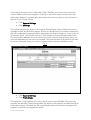
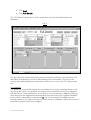
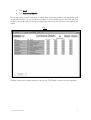
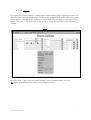
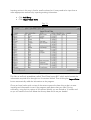
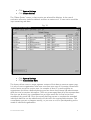
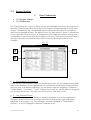
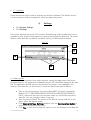
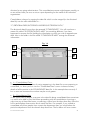
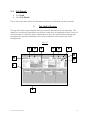
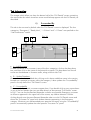
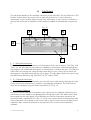
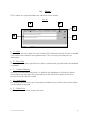
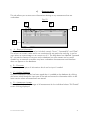
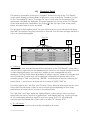
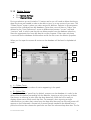
Succession Wizard
User Guide
Succession planning is an increasingly important activity for ensuring targets are met. More
and more surveys of business practice identify it as a growing influence in determining the
success of an enterprise. The primary purpose of Succession Wizard is as a tool to identify
potential succession gaps within organizations. It does this by using a powerful, yet userfriendly, interface making it a straightforward program to use and enabling managers to
easily identify which key positions in an organization are exposed.
Key Features
•
Powerful search facility allows the database to be filtered in many ways to allow
specific criteria to be retrieved and candidates easily identified.
•
The program can be run over a network with information shared amongst a
number of users; or alternatively on a single PC by an administrator looking after a
number of different divisions or client organizations.
•
Reports displaying management planning information can be configured to match
user-defined criteria.
•
Additional information such as job history, individual attributes, notes and
photographs can also be easily added to the database.
•
Information can be imported from (and exported to) other systems, allowing existing
information, in other formats, to be quickly added to the system.
•
Intuitive design allows users to quickly and effectively benefit from the various
functions of the program.
•
An inexpensive yet flexible solution which can be tailored to an organizations
specific requirements incorporating their own terminology.
•
Microsoft "look and feel". Users with knowledge of MS Word or MS Excel will be
familiar with the generic layout of the various screens and program commands.
•
Risk free evaluation – the “Lite” version of the program is free of charge and can be
used indefinitely before deciding whether to purchase. The only restriction is that
the number of entries is limited to 10.
•
90 days free E-Mail support following purchase.
•
Five versions available to suit all needs with simple upgrade if required.
Succession WizardTM 2004
1
Contents
Installation Instructions
Technical Specification
3
3
Section 1 - Quick Tour
4
Section 2 - Detailed Information
2.1 Home Screen
2.2 System Settings
i)
User Preferences
ii)
Settings
iii)
Consolidate Data
2.3 Full Details
i)
Top Half of Screen
ii)
Succeeded By
iii)
Job History
iv)
Notes
v)
Assessments
vi)
Attributes
vii)
Successor To
viii)
Snapshot Panel
ix)
Attribute Search Panel
2.4 Summary Details
2.5 Staff Search
2.6 Reports
2.7 Report Preview
2.8 Inputting Information
2.9 Input Data
2.10 Delete Entries
17
18
20
20
21
22
25
25
28
30
32
33
34
35
36
38
39
41
44
46
49
51
53
Section 3 - General Information
3.1 User manual
3.2 Removal Instructions
3.3 Report Page Size
3.4 Drop-down boxes
3.5 Remembering Inputs
3.6 Switching between different functions
3.7 Moving between entries
3.8 Sorting Information
3.9 Data Formats
3.10 Optimising Performance
3.11 Data Backup
55
56
56
56
57
57
57
58
58
58
58
58
Index
60
Contact Details
62
Succession WizardTM 2004
2
Installation Instructions
If you are installing from a CD then follow these notes to load the program. Users who
have downloaded the application from our website need to proceed slightly differently in
that they should double-click the file called SW-Setup.exe which was downloaded and
then continue from point 2) below.
1)
2)
3)
4)
5)
6)
Insert the CD and the installation program should start automatically (if it doesn’t
then click Start, then Run and then type in d:\sw-setup, where "d" is the CD drive.
Occasionally the CD has been set up using a different letter in which case use that
instead. Click OK)
The License Agreement will then appear which must be agreed to before the
software can be installed. Click the I Agree button to proceed.
Your computer is then checked to make sure that there is enough space to load all
the necessary files. Click the Next button to continue.
To start the transferring of files click the Install button.
Once all the files have been transferred a message will appear indicating that the
program has been successfully installed. Click Finish.
To run the program, double-click the Succession Wizard icon on your desktop.
Alternatively, click the Start button followed by Programs and then Succession
Wizard twice.
Succession Wizard is now fully installed and you can commence using the application.
Remove the CD and store it somewhere safely as you may need to reinstall the program at
a later date.
Technical Specification
•
Requires 35MB of disk space on a PC with a P166 processor (or higher) and at least
32MB of RAM. Operating system to be Windows 95 or above, including XP or NT.
•
Written using a combination of VB, Microsoft Access and VBA and rigorously tested to
ensure no compatibility issues with any existing software solutions.
•
Designed for a screen resolution of 800x600 (1024x768 version available imminently)
•
Documentation is included in Adobe Acrobat format.
Succession WizardTM 2004
3
Section 1
The information included in this section is a rapid run-through of the program giving an
over-view of the various screens and major features within Succession Wizard. Access to
the comprehensive user-manual is available once Succession Wizard has been installed.
Further details regarding this are given on page 57.
Quick Tour
When Succession Wizard is started (see point 6 on page 3) the first screen to appear is
called the “Home Screen” which shows some basic statistics relating to the information
held on the database. Pre-loaded is some dummy data to help illustrate the various
features of the program.
Fig. 1
The box in the centre of the screen indicates how many people currently on the database
have no potential successors in the various categories. Its purpose is to show where the
business may be exposed because critical roles have no successors identified. Those roles
with no “Emergency” successor are those which should be addressed first of all, with the
other categories looked at in sequence. Clicking the “Animated Tutorials” button opens a
web browser screen which allows you to view a series of tutorials explaining many of the
key features within Succession Wizard; an active internet connection isn’t necessary.
Succession WizardTM 2004
4
At the top of the screen is the “Menu Bar” (Staff, Add Entry etc) where users access the
various different parts of the program. Clicking on any of the options on the menu-bar
(other than “Reports”) automatically closes down the screen currently in view and returns
the user to the “Home Screen”.
•
•
Click System Settings
Click Settings
This screen indicates the version of Succession Wizard being used and allows the user to
upgrade to other levels of the program. Should you decide to buy Succession Wizard then
you will be allocated a password which determines your level of usage, ie. Junior (max. of
50 entries), Senior (100 entries), Executive (250 entries) or Corporate (unlimited entries).
This section also indicates how many entries you have currently input and how many you
have left dependent on the version purchased. The initial location of the data file can also
be moved, using this screen, for security or administrative reasons (disabled in Lite).
Fig. 2
•
•
Click System Settings
Click Preferences
This opens the “User Preferences” screen, where various user-definable choices for the
program are specified. These settings affect the whole of the program and feed through to
many other screens. The labels for the user-definable choices are shown throughout the
program in dark blue (as opposed to black).
Succession WizardTM 2004
5
Fig. 3
The default choice for each option is shown in parenthesis next to where the choices are
input. To the right of each box is a small square button which when clicked allows you to
edit the default settings as they are initially locked to prevent changes being made by
mistake. The screen is divided into three sections, namely :1. Succeeded By / Successor To
These are the most important choices as they determine how everybody held on the
database is categorised. Some organizations will use different classifications simply
because they may work to a different timeframe, eg. the options might be changed to
“Substitute”, “Almost Ready”, “6 months”, “1 year”.
2. User Defined Choices
This is where details may be stored which specifically suit the users circumstances. Options
1-4 can be changed to whatever is relevant to the user. However, options 5-8 should be
kept to mean the same sort of thing as they have implications elsewhere in the program,
eg. “Line Manager” could be changed to “Team Leader”.
3. Attributes
These choices are used in order to evaluate a particular individual. The default choices
can be overwritten and/or reordered to reflect any particular priority.
Succession WizardTM 2004
6
•
•
Click Staff
Click Full Details
The “Full Details” screen shows all the information on each individual held on the
database.
Fig. 4
The top half of the screen shows key personal information relating to the individual, with
the bottom half showing a series of tabs holding further information. Clicking on the
various tab heading brings that information to the front to view or edit. The various tabs
are :Succeeded By
This holds the names of the people who could take over from the individual shown in the
top half of the screen. The potential successors can be classified into the four categories
specified on the “User Preferences” screen (Fig.3). A new successor is added by selecting
their name from the appropriate red drop-down box and clicking the “Update Database”
button, which is denoted by a red asterix (¹). As new successors are added, then the
summary panel on the right in the top half of the screen is updated to reflect the number of
potential successors within each category.
Succession WizardTM 2004
7
Job History
This is where the details of the various jobs undertaken by an individual are stored. New
information is added by typing into the red boxes and then clicking the “Add Info” button.
If the information input relates to the individuals’ most recent role then the details input
into Division, Department, Line Manager and Location is moved into the appropriate
boxes in the top half of the screen.
Notes
This is the place to store free text on a person. All notes can be edited, added to, or
deleted after they have been entered.
Assessments
This is a simple method of evaluating an individual. Score is a numeric value but is not
limited in any way. For example, some users may use a scale of 1-5, whereas others may
use percentages.
Attributes
This shows the fifty attributes specified on the “User Preferences” screen and allows you to
allocate a value and comment for each.
Successor To
This shows those people for whom the individual in the top half of the screen could take
over from. Information isn’t input using this tab, instead it is populated as a consequence
of what is added in the “Succeeded By” panel.
Succession WizardTM 2004
8
•
•
Click Staff
Click Summary Details
This screen gives a quick indication of where there may be a problem with particular roles
in that there are few, or no, possible successors. In this example there is an issue with Tim
Hughes, as can be seen by the zero’s appearing in the first two columns to the right of his
name.
Fig. 5
Double-clicking on a name takes the user to the “Full Details” screen for that individual.
Succession WizardTM 2004
9
•
•
Click Staff
Click Staff Search
This is where the database can be interrogated in order to identify people who satisfy
certain criteria. This tool is useful in identifying suitable candidates for roles. The dropdown boxes contain all of the values previously input which makes it easy to build up a
user-defined filter. Inputting a value into one box and then clicking the Find button will
retrieve everybody who satisfies that filter and takes you directly to the “Full Details” screen
for the first person satisfying that criteria. Inputting values into multiple boxes results in a
more complex filter.
In the following example we have specified a filter where we are interested in seeking
people who work in the “Corporate Office” division, have a grade of “C” and who also
exceed specific minimum attribute values. Clicking the Find button then takes us to the
“Full Details” screen for people satisfying this filter.
Fig. 6
Succession WizardTM 2004
10
•
Click Reports
This opens the “Report Settings” screen where choices about paper reports are made. The
top half of the screen is similar to the “Staff Search” screen (Fig.6) and is where the content
of any report is filtered, ie this is where you determine what will appear in the rows of the
report. The panel in the lower half of the screen is where the particular report format is
chosen.
Fig. 7
Once the filter (if any) has been specified and a report format chosen, then the
Go button is clicked and the report is previewed on-screen.
Succession WizardTM 2004
11
Fig. 8
This is a very useful report to show where succession issues exist; it shows all entries on the
database and the number of potential successors, by category, on the left of the page. The
right of the page shows the number of possible moves the same individual could be
eligible for. The report menu-bar in the top left hand corner gives the available options ie,
whether to print the report, edit the filter, sort the report into a different order for printing,
export it to MS Word or MS Excel or close the report and return to the “Home Screen”.
Succession WizardTM 2004
12
Fig. 9
Fig.9 is an example of another report which may be chosen from the “Report” menu. It
provides more detailed information of the left side of the report shown in Fig.8, ie. in
addition to the number of potential successors it also gives Name, Position and Age.
Succession WizardTM 2004
13
Adding new entries is very straightforward.
•
•
Click Add Entry
Click Input New Entry
Fig. 10
The relevant details of the new entrant are input as required; the only mandatory piece of
information is Surname and once the details have been input, the Confirm Entry button is
clicked. Other entries would be input in the same way and once the input session was
over, clicking the Finish button returns the user to the “Home Screen”.
Succession WizardTM 2004
14
Inputting entries in this way is fine for small numbers but if many need to be input then a
more appropriate method is by importing existing information.
•
•
Click Add Entry
Click Import Excel Data
Fig. 11
This links to an Excel spreadsheet called “Excel Data Import.XLS” which would contain the
information required to be brought into Succession Wizard. Then clicking the Import Data
button automatically adds the information to the program.
Once you have had a quick review of the various screens the best thing to do is to start
inputting real information to see if the program really does what you need. During
evaluation, using the Lite version of Succession Wizard, you are limited to 10 entries and
so you will need to first of all delete the dummy data which was pre-loaded.
Succession WizardTM 2004
15
•
•
Click System Settings
Click Delete Entries
The “Delete Entries” screen is where entries are selected for deletion. In the case of
evaluation all entries would be deleted and then a maximum of 10 new entries would be
input containing real data.
Fig. 12
•
•
Click System Settings
Click Consolidate Date
This feature allows users to merge separate versions of their data to create a master copy.
It is only of use to organizations who have more than one copy of Succession Wizard who
wish to restrict access for certain users. An example of when it is used would be an
organization which has a defined planning process where the divisional HR administrators
draft the initial succession information. Then at a prearranged data all of the separate data
files (one per division) are consolidated into a single master file for final review and
amendment by central HR. Once the overall planning process is complete the amended
individual data files can be redistributed to the divisions for ongoing administration. This
consolidation process my happen monthly, or just once or twice a year depending on the
needs of individual organizations.
Succession WizardTM 2004
16
Section 2
Detailed Information
This section contains a detailed look at the various screens within Succession Wizard and
indicates the various features within the program.
Succession WizardTM 2004
17
2.1 Home Screen
This is the first screen shown once the program has loaded and shows some basic statistics
relating to the information held on the database.
Fig. 13
B
F
C
A
D
E
• A – Menu Bar
Clicking on any of the options on the menu bar (other than “Reports”) automatically closes
down the screen currently open and returns the user back to the “Home Screen”. Clicking
on a menu bar command displays various other choices dependant on which command
was clicked.
• B – Staff with Zero Successors
This panel tells you how many entries on the database have no successors identified for
each specific category defined on the “User Preferences” screen. In this example we have
1 individual who has not got anybody identified as an Emergency successor ie. if he left
tomorrow there is nobody identified who could fill his role. There are 7 individuals who
haven’t got anybody identified who is “Ready Now” to step into their roles. This isn’t as
critical a category as the first one but it should still be regarded as a major issue. Next we
have 6 people with nobody identified as being able to fill their role in the “< 2 Years”
category and finally 5 people with no successors in the “>2 Years” category.
• C – Successor Toggle
Clicking here switches from showing “Staff with Zero Successors” to “Staff with Zero
Potential Moves”. What this means is that it shows those people who have got no identified
roles that they would be suitable to move into.
Succession WizardTM 2004
18
• D – Go to Full Details
These buttons take the user straight to the individuals identified eg. clicking the button to
the right of the number 6 takes you to the “Full Details” screen for these 6 people. This is
useful for quickly moving to people who could be of concern due to little or no cover for
their role or because they have no possible role to move into.
• E - Quick Find
Clicking on this drop-down indicator and selecting any entry takes you straight to the “Full
Details” screen for that individual.
• F – Animated Tutorials
A series of animated tutorials can be accessed by clicking this button. The tutorials are
shown using a web browser but do not require a live internet connection to be seen.
Succession WizardTM 2004
19
2.2
System Settings
i)
•
•
User Preferences
Click System Settings
Click Preferences
The “User Preferences” screen is where various user-definable choices for the program are
specified. These settings affect the whole of the program and feed through to many other
screens. The labels for the user-definable choices are shown throughout the program in
dark blue as opposed to black. The default choice for each option is shown in parenthesis
next to where the values are input. If changes are to be made to the default settings then it
is preferable to make these when the program is first used. Click the small square button to
the right of the box concerned and this unlocks the entry allowing the default to be
changed.
Fig. 14
A
C
B
• A - Succeeded By / Successor To
These are the most important choices as they determine how you will categorise everybody
held on the database. Some organizations will use different classifications simply because
they may work to a different timeframe, eg. the options might be changed to “Substitute”,
“Almost Ready”, “6 months”, “1 year”. Irrespective of what you call the different categories
you should make choice 1 the most critical with choice 4 the least critical.
• B - User Defined Choices
These are where you can store details on anything important to your own organization.
Options 5-8 should be kept to mean the same sort of thing as they have implications
elsewhere in the program, eg. “Line Manager” could be changed to “Team Leader”.
Options 1-4 can be changed to whatever is relevant to you.
Succession WizardTM 2004
20
•
C – Attributes
These choices are used in order to evaluate a particular individual. The default choices
can be overwritten and/or reordered to reflect any particular priority.
ii)
•
•
Settings
Click System Settings
Click Settings
This screen indicates the version of Succession Wizard being used and allows the user to
upgrade to other levels of the program by inputting the appropriate password. The initial
location of the data file can also be moved for security or administrative reasons.
Fig. 15
E
D
A
C
B
A - Data Location
Succession Wizard consists of two major elements, namely the application itself and a
separate data file. The application is loaded onto your PC’s hard disk along with the data
file. The application should remain in the location into which it was installed but the
location of the data file can be moved. To move the data file proceed as follows :•
•
•
•
Take a copy of the existing “Succession Data.MDE” file which is loaded by
default into “C:\PROGRAM FILES\SUCCESSION WIZARD\SUCCESSION
DATA” and move the copy to the location where you would like to store the
data file. You can change its name if required
Start Succession Wizard. The version of the data file being used will, at this
point, still be the default version.
Click System Settings, Settings and then click the New Location button in
the bottom left corner of the screen.
Click Yes, ie. you are sure that you want to use a new location for the data file.
Succession WizardTM 2004
21
•
•
A new panel is then displayed titled “Please select a new location”. Using
standard Windows procedures move to the location where the copy of the data
file was stored and select the file. Click the Open button and wait whilst the link
is established.
A message appears indicating that the data connection to the new data source
is complete. Click OK.
The data file has now been moved and to avoid any confusion as to which data file is
being used it’s advisable that you remove the original version from “C:\PROGRAM
FILES\SUCCESSION WIZARD\SUCCESSION DATA”. The Data Location box indicates
where the data file is stored. The ability to move the data file is not available with the Lite
version of Succession Wizard and as such the “New Location” button is only visible once a
valid password has been input.
• B – System Variables
The values in these boxes enable a unique user password to be allocated if you decide to
purchase the program.
• C – File Sizes
These two boxes enable you to track the sizes of both the data and main application file.
When first installed the data file is c. 308kb and the program file c. 2,160kb. Over time
the data file will obviously grow but the program file should stay relatively static. If it grows
to more than 3,000kb then you should run the “Optimise Database” function to prevent
any performance issues occurring.
• D – Software Version
This section indicates which version of the program is being used, which is dependent on
the password issued. There are four versions of the program, Junior (allows a maximum of
50 entries), Senior (100 entries), Executive (250 entries) and Corporate (unlimited entries).
It also shows how many entries have been made and how many are still available.
• E – Animated Tutorials
A series of animated tutorials can be accessed by clicking this button. The tutorials are
shown using a web browser but do not require a live internet connection to be seen.
iii)
•
•
Consolidate Data
Click System Settings
Click Consolidate Data
This feature is for organizations with more than one copy of Succession Wizard who wish
to restrict certain users from seeing all of their succession related data. A scenario in which
it would be used is when an organization with several divisions allows each division to
administer their own divisional succession plans. At some point in their planning cycle the
central HR administrator, who has access to all of the separate divisional HR data files,
would consolidate these “draft” divisional succession plans into one master data file for
further review and amendment. Once complete these could then be returned to the
Succession WizardTM 2004
22
divisions for on-going administration. This consolidation process might happen monthly, or
on an ad-hoc basis just once or twice a year depending on the needs of the individual
organization.
Consolidation is begun by copying the data file which is to be merged (ie. the divisional
data file) into the main data folder ie. :“C:\PROGRAM FILES\SUCCESSION WIZARD\SUCCESSION DATA\”
The divisional data file must then be renamed “CONSOLIDATE”. You will now have a
master file called “SUCCESSION DATA.MDE” (or something different if you have
happened to rename the file) holding the information to which you wish to append more
data. Also in the folder is the file called “CONSOLIDATE.MDE” storing the divisional
information.
Fig. 16
C
E
B
D
A
F
• A – Consolidation Count
This simply indicates the number of entries appearing in the data file we are preparing to
consolidate, ie. when you first view the “Consolidate Data” screen it shows summary
details of all the entries in the CONSOLIDATE data file. In this example there are only 3
but in most real instances this number may be much greater.
• B – Consolidation Filter
As the screen lists, by default, everyone in the data file being consolidated then sometimes
it is useful to be able to filter this before proceeding with the consolidation. Inputting a
value into any of these filter boxes, or selecting a value from the drop-down box, filters the
full list and displays those entries which match the filter. For example, if you wished to
consolidate only those people from a particular department then you would select the
particular department from the relevant drop down box. The list below will now contain
Succession WizardTM 2004
23
only those people from that department, making the selection of those to be consolidated
easier than if all the entries were being displayed.
• C – Show All
Having applied a consolidation filter you can return to the full listing by clicking this button.
• D – Consolidation Selection
To make your selection of entries to consolidate change the marker to “Yes” for the
individuals concerned, leaving the rest equal to “No”.
• E – Consolidation All
Sometimes it is easier to mark everybody for consolidation and then change some back to
“No”. For example, suppose we wish to consolidate 55 people out of a total of 60 people
from the Retail division. We would first of all set a consolidation filter so that all 60
appeared and then click this button to mark all 60 for deletion. Next, we would
individually change the 5 not being deleted from “Yes” back to “No”. It’s just a quicker
way than having to click “Yes” for the relevant 55.
• F – Consolidate
Once entries have been marked to be consolidated clicking this button will complete the
process and add all of their details to the main data file. To help prevent anything getting
consolidated in error a confirmation panel indicating how many entries are about to be
deleted appears, to which “Yes” must be clicked. Once that is done the information is
consolidated and the user is returned to the “Home Screen”.
The process of consolidation is very straightforward and simply requires that appropriate
data files are positioned in the data folder and renamed as CONSOLIDATE. Once this
has been done for one division, or region etc, then simply delete the CONSOLIDATE file
and repeat for the next file requiring consolidation.
Following consolidation and subsequent amendment of the information it may be
necessary for central HR to send back the amended information to the individual divisions.
Assuming that each division is only to receive the information relating to themselves this is
done by using the delete feature to strip out all entries not required for a particular
division.
A master copy of SUCCESSION DATA.MDE would be saved under a different name and
then repeatedly amended for each specific division, or whatever classification is required
eg. department, country etc. For example, suppose you have a master data file with
information relating to three separate divisions. You would first of all make a copy of the
master data file calling it something like “SUCCESSION DATA (MASTER).MDE” and then
edit the original master data file. Next, you would use the deletion feature to remove all of
the entries from two of the divisions . This file would then be returned to the appropriate
division. You would then copy “SUCCESSION DATA (MASTER).MDE” into “SUCCESSION
DATA.MDE” and repeat the process twice more, each time retaining the details for a
different division.
Succession WizardTM 2004
24
2.3 Full Details
•
•
Click Staff
Click Full Details
This is the screen from which all information held on an individual can be accessed.
i)
Top Half of Screen
The top half of the screen displays the key personnel information for an individual. The
labels for user-defined information are shown in dark blue as opposed to black. Some of
the information is read-only and is indicated as such by the relevant boxes having grey
backgrounds, whereas information which can be edited is within boxes with white
backgrounds.
Fig. 17
C
D
E
F
G
H
I/J
B
K
L
A
Succession WizardTM 2004
25
• A – Entry Indicator
This tells you how many entries are on the database, or satisfy your filter if you have
applied one ie. “Record 2 of 9” means you are looking at the 2nd entry out of 9 in
ascending Surname order.
takes you to the first entry.
takes you to the previous entry.
takes you to the next entry.
takes you to the last entry.
• B – Summary Details
Clicking here takes you to the “Summary Details” view for the same set of entries currently
displayed on the “Full Details” screen.
• C – ALL
If “Full Details” is currently only showing a subset of all entries, because you are using a
filter, then clicking here removes the filter and shows all entries in surname order.
• D – Quick Find
Clicking on this drop-down indicator and selecting any entry takes you straight to that
individual.
• E – Photographs
To view an image (or create the link to one) click this icon.
• F – Snapshot
Clicking here opens the “Snapshot” window. This is described in more detail later.
• G – Edit Search
This takes you to the “Staff Search” screen retaining any existing filter allowing you to edit it
as required.
• H – New Search
This takes you to the “Staff Search” screen, removing any previous filter, allowing you to
construct a new filter.
• I – “Succeeded By” Panel
This tells you how many potential successors exist on the database for the individual whose
details are being shown. The information is read-only and is updated when changes are
made using the “Succeeded By” tab eg. you can see that the numbers shown in this panel
correspond to the number of names in the “Succeeded By” tab below it.
• J – “Successor To” Panel (not shown)
This tells you how many positions the individual being reviewed is a potential candidate
for. Again it is read-only and corresponds to the details shown on the “Successor To” tab
beneath it.
Succession WizardTM 2004
26
• K – Succession Toggle
Clicking here switches between showing the “Succeeded By” panel and “Successor To”
panel.
• L – Tab Information
This is where other information relating to the individual shown in the top half of the screen
is stored. To access any particular tab just click on its heading and that particular
information is brought to the front.
Succession WizardTM 2004
27
Tab Information
The images which follow just show the bottom half of the “Full Details” screen containing
the various tabs but when viewed on-screen would always appear with the Full Details just
described.
ii)
Succeeded By
This tab is the one seen by default when the “Full Details” screen is displayed. The four
categories, “Emergency”, “Ready Now”, “<2 Years” and “>2 Years” are specified on the
“User Preferences” screen.
A
B
Fig. 18
D
E
C
F
• A – Add Successor
To add somebody as a successor in any of the four categories, click on the drop-down
box, and then click on the name of the potential successor. The drop-down box lists all
entries on the database in Surname order, along with their Job Title.
• B – Update Database
Once a name has been added then clicking on this button adds that name in the section
beneath as a potential successor within that category. It also updates the “Succeeded By”
panel in the top half of the “Full Details” screen.
• C – Succeeded By
The names of all potential successors appear here. If you double-click on any name shown
in any of the four panels then you are taken directly to that persons “Full Details” screen.
In Fig.17 we can see that Bernard Alexander is shown as a possible Emergency successor
to whoever appeared in the upper half of the screen, say Andrew Mansion. Double
clicking directly onto the name Bernard Alexander takes us to his Full Details screen and
shows the “Successor To” panel with Andrew Mansion appearing in the Emergency
category. Whenever you add somebody as a potential successor using the “Succeeded By”
panel it automatically updates the other persons “Successor To” panel.
Succession WizardTM 2004
28
• D – Snapshot
Clicking this button displays some summary details of the potential successor shown
immediately to the right of the button. This discussed in more detail later.
• E – Delete Entry
Clicking on this icon deletes that individual as a potential successor.
• F – Multiple Entries
If somebody has many possible successors within a particular category then this slider is
used for accessing the full list.
Succession WizardTM 2004
29
iii)
Job History
This tab shows details of the complete job history of an individual. The top half of the “Full
Details” screen shows the current role in read-only format but it is here where the
information is input and the history stored. New information is input into the red boxes in
the top half of the tab ie. labelled A and B and then added to the database using button
C.
Fig. 19
A
B
C
D
E
F
• A – Required Information
For Job History the minimum amount of information which can be input is “Job Title” and
“Start” (ie. the start date for that position). Mandatory information is denoted throughout
the program with underlined descriptions to indicate that it needs to be input. For Job Title
either select an existing role using the drop-down box or input a new job title which will
then appear in the drop-down box for future inputs. The start date needs to be input using
the date format dd/mm/yy eg. 22/03/00 for 22nd March 2000.
• B – Optional Information
In addition to the required information you can also input other details relating to the role.
These are Division, Department, Location, Line Manager and Notes. The final three of
these are accessed by using the slider indicated by F in Fig. 19.
• C – Update Database
Once the required information has been input, along with any optional information, the
information can be added to the database by clicking this button. The details which had
been typed into the input boxes is then blanked out and the information moved to the
section beneath, indicated by D in Fig. 19, which can contain details of all positions held.
If the information input relates to the current role ie. has the most recent start date for this
individual, then several of the boxes in the top half of the screen are automatically
updated.
Succession WizardTM 2004
30
• D – Job History
The lower part of this tab is where the full job history of an individual can be stored in date
order.
• E – Delete Entry
Clicking this icon removes a particular role from an individuals job history.
• F – Optional Information Slider
These sliders are used to access the other information which is initially hidden from view.
Succession WizardTM 2004
31
iv)
Notes
This is where any comments about an individual can be stored.
Fig. 20
A
B
C
D
E
• A – Note
This is where the text is typed. You are limited to 255 characters and so if more is needed
it will need to be entered as two separate notes. This is the only required piece of
information.
• B – Entry Date
Once the note has been typed the entry date is automatically included when the database
is updated.
• C – Update Database
Once the note has been typed then it is added to the database by clicking this button
which blanks the input part of the tab and moves the information down to the lower
section where all notes are stored.
• D – Note History
This contains all previously input information and both the text of the note and entry date
can be edited as required.
• E – Delete Entry
Clicking this icon removes a particular note.
Succession WizardTM 2004
32
v)
Assessments
This tab allows you to store some information relating to any assessments that are
undertaken.
Fig. 21
A
B
C
D
• A – Required Information
Three pieces of information must be included, namely “Score”, “Assessed By” and “Date”.
The score is a numeric value and is not constrained to any particular scale eg. it can be
input either as a percentage or as a score out of 5. The drop-down box labelled “Assessed
By” includes the names of everyone on the database but other names can be used if
needed eg. an external consultant may have undertaken the assessment and therefore
does not appear on the database.
• B – Comment
This is an optional piece of information which can be input if needed.
• C – Update Database
Once the assessment details has been typed then it is added to the database by clicking
this button which blanks the input part of the tab and moves the information down to the
lower section where all assessments are stored.
• D – Assessment Average
This simply calculates the average of all assessments for the individual whose “Full Details”
screen is being displayed.
Succession WizardTM 2004
33
vi)
Attributes
This tab holds attribute scores and allows qualitative analysis of candidates to be
undertaken.
Fig. 22
A
B
C
F
D
E
• A – Attributes
These are set on the “User Preferences” screen.
• B – Score
The score is a numeric value and is not constrained to any particular scale eg. it can be
input as a percentage or score out of 10 etc but should remain consistent for all entries in
order that meaningful comparative analysis can be undertaken.
• C – Comment
This is an optional piece of information useful to explain attribute score.
• D – Entry Date
Every time a score is input the date is automatically updated to the current date. If the
information relates to an earlier date then simply overtype what is there.
• E – Delete Entry
Clicking here against a specific attribute deletes what appears in the “Score”, “Comment”
and “Entry Date” boxes. Useful if a new attribute score is being input.
• F – Attribute Search
Clicking this button opens the “Attribute Search” panel enabling entries to be retrieved
based on specific attribute scores. This is looked at in more detail later.
Succession WizardTM 2004
34
vii)
Successor To
This is the flip-side to the Succeeded By tab and shows those roles for which the individual
displayed in the top half of the screen is a possible candidate for.
Fig. 23
A
B
E
D
C
• A – Successor To
The names appearing in the various categories indicate that the person displayed in the
top half of the screen could possible succeed them. These are read-only and cannot be
added to here; they appear on this tab as a result of changes made to the “Succeeded By”
tab.
• B – Delete Entry
Clicking on this icon deletes the person whose details are being viewed in the top half of
the “Key Details” screen from being a possible successor to the named individual in the
“Successor To” tab.
• C – Succeeded By
The names of all the possible new roles for the individual being reviewed appear here. If
you double-click on any name shown in any of the four panels then you are taken directly
to that persons “Full Details” screen.
• D – Snapshot
Clicking this button displays some summary details of the individual shown immediately to
the right of the button.
• E – Multiple Entries
If somebody has many possible future roles within a particular category then this slider is
used for accessing the full list.
Succession WizardTM 2004
35
viii)
Snapshot Panel
This panel is accessed by clicking the “Snapshot” button at the top of the “Full Details”
screen which displays summary details of all entries, or by clicking the “Snapshot” button
on the “Succeeded By” tab or “Successor To” tab in which case just the details of the
appropriate individual are displayed. The panel appears over the top of the “Full Details”
screen and needs to be closed down (by clicking x in the top right corner of the panel)
before any other feature can be accessed.
The purpose of the Snapshot panel is to give a brief overview of an individual indicating
their Job Title and how long they have been in that role, their Division and age and also a
link to any stored photograph
Fig. 24
A
B
F
E
C
D
A – Filtering
Assuming you have accessed the panel from the button on the “Full Details” screen then it
will show every single entry on the database which could run into several thousand and this
is where filtering becomes very useful as it enables a more manageable list to be
displayed. Clicking on the Name drop-down list allows a specific name to be selected and
once clicked then just that entry will be displayed. Wildcards can also be used, so for
example typing in *SMI* and pressing <ENTER> would display all entries containing the
letters SMI ie. it would return all those with a surname of SMITH, SMIT etc.
The same goes for the “Job Title” and “Division” filters, although selecting a specific value
from either of these boxes is likely to return multiple entries depending on how many
people have the same job title or work in the same division.
The “Job Start” and “Age” boxes are slightly different in that typing a value into these
boxes looks for entries “equal to or greater than” and displays them eg. inputting an age
of 35 would display all entries aged 35 and over; typing 12/01/01 would display
everyone who had started their current role on or after 12th January 2001.
• B – All Entries
Click this button to quickly remove a filter and display all entries.
Succession WizardTM 2004
36
• C – Snapshot Slider
Use this to move up and down the list of entries.
• D – Photographs
To view an image (or create the link to one) click this icon to the right of the individual
concerned.
• E – Snapshot Details
Details of entries are displayed here. Double-clicking on any of the values in the “Name”,
“Job Tile” or “Division” boxes will filter the entries being shown on the “Full Details” screen
eg. assume you double-click on “Finance” within the division column then the information
behind the Snapshot panel is filtered accordingly so that if you were now to close the
Snapshot panel you would be looking at the “Full Details” screen of somebody in the
Finance Division. The Entry Indicator in the bottom left corner of the screen indicates how
many entries satisfy the filter ie. how many people are in the Finance Division. The
resultant list is displayed in Surname order.
• F – Close Snapshot
To close the snapshot panel and access other areas of the program click x in the top right
corner of the panel.
Succession WizardTM 2004
37
ix)
Attribute Search Panel
This panel is displayed by clicking the “Attribute Search” button whilst viewing the
“Attributes” tab. Its purpose is to allow the database to be filtered and return individuals
who satisfy a particular criteria.
Fig. 25
C
B
A
F
E
D
• A – Attributes
These are set on the “User Preferences” screen.
• B – Score
The score is a numeric value and once a value has been input then the program
automatically assumes the user wants to retrieve those people who have attribute scores
which exceed the value and therefore the “>” symbol is inserted immediately to its left.
• C – Greater than, Equal To, Less Than
The default choice is “greater than” but this can be overwritten and changed to “less than”
or “equal to” if required.
• D – Attribute Find
Clicking this button filters the database and displays all those people who satisfy the
criteria and displays their details in the “Full Details” screen behind the “Attributes Search”
panel. The example in Fig. 25 is looking for everybody who has scored more than 50 for
Ambition and more than 80 for Creativity and more than 45 for Leadership.
• E – Reset
Clicking here removes any filter already input allowing another to be entered.
• F – Close Attributes Panel
To close the attribute panel and access other areas of the program click x in the top right
corner of the panel.
Succession WizardTM 2004
38
2.4 Summary Details
•
•
Click Staff
Click Summary Details
This screen gives a quick indication of where there may be a problem with particular staff,
in that there are few, or no, possible successors. In the example below we can see there is
an issue with Tim Hughes by the zero’s appearing in the first two columns to the right of his
name.
Fig. 26
B
C
D
A
E
F
• A – Full Details
Clicking here takes you to the “Full Details” view for the same set of entries currently
displayed on the “Summary Details” screen.
• B – ALL
If “Summary Details” is currently only showing a subset of all entries, because a filter is
being used, then clicking here removes the filter and shows all entries in surname order.
• C – Succession Toggle
Clicking here switches the information being displayed from “Successed By” to “Successor
To” ie. it shows the number of roles each individual could possibly move into.
• D – Edit Search
This takes you to the “Staff Search” screen retaining any existing filter allowing you to edit it
as required.
Succession WizardTM 2004
39
• E – New Search
This takes you to the “Staff Search” screen, removing any previous filter, allowing you to
construct a new filter.
• F – Summary Details
The information on this screen is read-only and any changes necessary would need to be
made on the “Full Details” screen. Double-clicking on a name takes you directly to the
“Full Details” screen for that person.
Succession WizardTM 2004
40
2.5 Staff Search
•
•
Click Staff
Click Staff Search
This screen allows the user to interrogate the database and retrieve entries which satisfy
certain criteria. The drop-down boxes contain all of the values previously input making it
easy to build up a user-defined filter. Inputting a value into one box and then clicking the
Find button will retrieve everybody who satisfies that filter and takes you directly to the
“Full Details” screen for the first person satisfying that criteria.
Fig. 27
G
C
A
D
B
E
F
• A – Find
Clicking this button takes the user to the “Full Details” screen finding everybody who
satisfies the filter which has been applied. For example, suppose “Administrator” was put
into the “Job Title” box and “Finance” into the “Division” box and then the “Find” button
was clicked. What then happens is that the database is filtered and all entries are tested to
see if they satisfy the criteria where :Job Title = Administrator
AND
Division = Finance
Succession WizardTM 2004
41
Those entries for which this statement is true are then displayed and all others omitted.
Inputting values into more boxes results in a more complex filter and therefore the
possibility that fewer entries will satisfy the whole of the filter.
• B – View Selected
The default view which is displayed once the “Find” button has been clicked is the “Full
Details” screen. If the user wanted to first of all see the summary view for everybody
satisfying the criteria it simply requires that the marker is clicked against “Summary”.
• C – New Filter
Sometimes a filter may be applied which retrieves too few people, or perhaps, nobody at
all. The user can manually remove and adjust the filter but sometimes it’s easier to specify
the filter from scratch ie. blank out all of the boxes removing the previous filter, in which
case the “New” button is clicked.
• D – Succession Toggle
The “Staff Screen” can be used to find people who have few, or many, possible successors
and to do that the particular values sought are input into the “Succeeded By” panel. To
search for people who perhaps have not yet been identified as possible successors to
others then click this button and input the values into the “Successor To” panel.
• E – Show Attributes
In addition to being able to filter the database by the various bits of information shown eg.
Name, Division, Job Title, Age etc it is also possible to filter by attribute. Clicking against
“Yes” displays the attributes filter panel so that you can set even more complex filters such
as :Job Title = Administrator
AND
Division = Finance
AND
Ambition > 75
AND
Creativity > 75
This feature can prove to be very useful in identifying suitable candidates for roles.
• F – Numeric filters
Filters involving numeric data can be specified so that values “less than”, “equal to” and
“greater than” are applied. Numeric data have two boxes to the right of the data
description. The box immediately to the right of each description contains “=”, “>” and
“<” symbols. Using these in conjunction with numeric value allows filters to be set where
minimum or maximum criteria are established.
• G – Wildcards
Sometimes it is useful to set a filter which is less precise eg. you may wish to retrieve a list
of all directors but the problem is that they all have different job titles ie. Finance Director,
Marketing Director, Director of HR etc. We cannot therefore retrieve them by specifying a
Succession WizardTM 2004
42
specific Job Title and clicking the “Find” button. What we can do however is use
“wildcards”. The wildcards symbol is an asterix (*) and can be used before, after or both
sides of some text we type in and relates to multiple characters. To resolve our example we
would type “*director*” (without the quotations) into the “Job Title” box and then click the
“Find button”. Putting an asterix either side of the word “director” means that the job title
can start with anything and end in anything but must contain the word “director”
somewhere.
Succession WizardTM 2004
43
2.6 Reports
•
Click Reports
This opens the “Report Settings” screen where choices about paper reports are made. The
top half of the screen is similar to the “Staff Search” screen and is where the content of any
report is filtered, ie this is where you determine what rows will appear in the report. The
panel in the lower half of the screen is where the particular report format is chosen.
Fig. 28
A
F
G
C
B
D
E
• A – Filter
Building the filter is practically the same as using the “Staff Search” screen, the major
difference is that once the filter is applied a report is produced as opposed to the entries
being displayed on screen for review.
• B – Report Selection
Once the filter has been constructed then a report format needs to be selected and this is
done in the “Options” panel in the lower half of the screen. To select a particular report
just click against the one required.
• C – Preview Report
Having specified the filter and chosen the report format the report can be previewed on
screen by clicking the “Go” button.
Succession WizardTM 2004
44
• D – Show Attributes
In the same way that attributes can be included in the filter on the “Staff Search” screen
they can also be used here by clicking against “Yes”.
• E – Show Filter
Sometimes it can be confusing as to what filter has been applied on a report and so
clicking against “Yes” produces a report footer detailing the filter.
• F – Succession Toggle
The “Report Settings” screen can be used to find people who have few, or many, possible
successors and to do that the particular values sought are input into the “Succeeded By”
panel. To search for people who perhaps have not yet been identified as possible
successors to others then click this button and input the values into the “Successor To”
panel.
Succession WizardTM 2004
45
2.7 Report Preview
When you have selected a report and applied a filter, if any, then a preview of how the
report will look on paper is displayed on screen. You then have the opportunity to revise
the filter before printing, or go ahead and print it as it is. You can also change the sort
order in which the report appears and even, if necessary, export the information on the
report to another application. Fig. 29 is an example showing one of the report formats but
the notes given beneath it apply to all of the different reports. When a report is initially
previewed it is shown in such a way as to fit the whole of the page onto the screen. To
focus on a particular part of the report simply click the left mouse button anywhere on the
report preview and the screen will “zoom-in” and magnify that part of the report. To return
to the full page view simply click the left mouse button again.
Fig. 29
A
B
• A – Preview Menu Bar
This is where the various choices about a report can be made.
i) Print
Clicking here allows you to open the print settings menu and print what is seen on
screen.
ii) Edit Search
This takes you back to the “Report Settings” screen and allows you to refine your filter
further or select another report.
iii) Sort
Each report has a default sort order which is used each time the report is printed;
however clicking “Sort” opens the “Sort Report” panel and allows you to order the
report in whatever order you like.
Succession WizardTM 2004
46
Fig. 30
A
B
C
E
D
• A – Sort By
By using the four sort boxes it is possible to sort the report by different pieces
of information eg. Age, Division, Job Start and Surname. To sort just by
Division all that needs to be done is click on the drop-down box and select
Division. For a two level sort insert something into the first two boxes etc.
• B – Descending Sort
Having inserted what to sort by, there is also the option to sort in ascending
or descending order. The default choice is ascending and so the box shown
by B would be left unchecked. For a descending sort simply click in the
small box and the report will be sorted accordingly.
• C – Preview Report
Once the sort has been determined clicking this button will reorder the
report and preview it in its new order.
• D – Close Button
Having resorted the report clicking here closes down the “Sort Report” panel
and returns the user to the “Print Preview” window to be printed or refined
further.
• E – Clear Button
If the sort order, having been applied, needs to be changed then clicking
the “Clear” button removes anything input into the boxes shown by A or B in
Fig. 30 above. It can then be re-input as required.
iv) Export
Succession WizardTM 2004
47
Clicking here gives the user the ability to export the information shown on the “Print
Preview” screen into either Microsoft Word or Microsoft Excel format.
v) Close
Clicking here closes the “Print Preview” screen and returns the user to the “Home Screen”.
• B – Page Selector
For a multi-page report clicking these indicators allows the user to move about the report
and preview the various different pages of the report.
Succession WizardTM 2004
48
2.8 Inputting Information
•
•
Click Add Entry
Click Input New Entry
This is the screen used to add new entries to the database. The only piece of information
which must be input is “Surname”, the rest is optional.
Fig. 31
C
B
A
• A – Input Data
Information is simply typed into as many boxes as is relevant for the new entry. If both
“Start Date” and “Job Title” are both input then the “Job History” tab will be populated for
the new entry.
• B – Confirm Entry
Once the information has been input then clicking this button brings up a confirmation
panel asking if the details are correct. If they are correct clicking “Yes” will blank out all
the input boxes allowing input of other entries as required. If some of the details are
incorrect eg. spelling mistake then click the “No” button and retype as needed.
• C – Finish
Once the input session is over clicking this button returns the user back to the “Home
Screen”. Clicking “Finish” prior to clicking the “Confirm” button will not add the current
entry to the database but other entries in the same input session which have been
individually confirmed will have been added.
Succession WizardTM 2004
49
You then just type in the appropriate details of the new entrant. The only mandatory piece
of information is Surname and once you have input the details you just click the “Confirm
Entry” button. Other entries would be input in the same way and once the input session
was over clicking the “Finish” button would return you to the “Home Screen”.
Succession WizardTM 2004
50
2.9 Import Data
•
•
Click Add Entry
Click Import Excel Data
There are times when inputting information individual is laborious especially when many
new entries need to be added to the database. This facility allows you to import
information from an existing source via a link to a Microsoft Excel spreadsheet (in order to
be able to use this function you will need to have a copy of Microsoft Excel installed). The
information shown on the screen comes directly from the excel file called “Excel Data
Import.XLS” which can be found in “C:\PROGRAM FILES\SUCCESSION WIZARD”. For the
link to work neither the file name nor file location can be altered. When Succession Wizard
is first loaded the spreadsheet contains some example data which is displayed on the
“Import Data” screen. During evaluation you are limited to a maximum of ten entries and
so this feature only really becomes useful once you have registered for full access.
Information needs to be brought into the Excel spreadsheet and manipulated such that the
column headings shown on the spreadsheet match the data from other sources. Excel is
able to read many different data formats and so it is relatively straightforward to convert
existing data. Not all columns in the Excel spreadsheet need to be completed; in fact the
minimum requirement is that Surname only exists. Only 250 rows at a time can be
imported at a time and so if more need to be done then the process will need undertaking
several times. It is preferable to have the data being imported as accurate as possible
within the Excel spreadsheet although changes can be made on the “Import Excel Data”
screen prior to the entries being added to the database.
Fig. 32
A
C
D
E
B
Succession WizardTM 2004
51
• A – Record Selector
Having manipulated the data in the Excel spreadsheet, opening this screen displays the
data which is now available to be imported. If necessary rows can be excluded from the
import by selecting them and pressing the <DELETE> key on the keyboard. This doesn’t
remove them from the Excel spreadsheet but will exclude them from being imported into
Succession Wizard.
• B – Horizontal Slider
Using this allows other information to be viewed.
• C – Vertical Slider
Depending on how many entries are on the Excel spreadsheet they can be viewed using
this slider.
• D – Record Count
Indicates how many entries are available to import.
• E – Import Data
Clicking here adds the entries to the database and returns the user to the “Home Screen”.
Once information has been added, care should be taken that the data is not duplicated.
The easiest way to make sure this doesn’t happen is to delete the data from the Excel
spreadsheet so that it no longer appears on the “Import Excel Data” screen, otherwise it
may be imported again and would result in duplicate entries.
Succession WizardTM 2004
52
2.10 Delete Entries
•
•
Click System Settings
Click Delete Entries
During evaluation you are limited to 10 entries and so you will need to delete the dummy
data which was pre-loaded in order to be able to input up to ten entries of your own. The
“Delete Entries” screen is where you select entries for deletion. Deletion is the permanent
removal of the individual from the database. Quite often users will have a “Status” box
defined on the “User Preferences” screen to differentiate between “current” staff and
“previous” staff. In which case they do not delete people from the database when they
leave the organization but keep the data for review purposes. Other users only keep
current staff on the database and therefore would use this screen for deletion purposes.
When you first open the screen all entries on the database will be listed in alphabetical
order.
Fig. 33
C
E
B
D
A
F
• A – Delete Count
This simply indicates the number of entries appearing in the panel.
• B – Delete Filter
As the “Delete Entries” panel lists, by default, everyone on the database it is useful to be
able to filter this before proceeding with the deletion. Inputting a value into any of these
filter boxes, or selecting a value from the drop-down box, filters the full list and just
displays those entries which match the filter. For example, when inputting a single
individual then just select their name from the drop down box and just that one person will
appear on the list beneath. Alternatively if several people needed to be deleted from a
particular division then choose the particular one from the relevant drop down box. The list
Succession WizardTM 2004
53
will now contain everyone from that division only, making the selection of those to be
deleted easier than if the full database was being displayed.
• C – Show All
Having applied a deletion filter you can return to the full listing by clicking this button.
• D – Delete Selection
To make your selection of entries to delete charge the marker to “Yes” for the individuals
concerned, leaving the rest equal to “No”.
• E – Delete All
Sometimes it is easier to mark all for deletion and then change some back to “No”. For
example suppose we were removing 75 entries from the database all from the Marketing
division and we only have 80 entries in total within Marketing. We would first of all set a
deletion filter so that all 80 appeared and then click this button to mark all 80 for deletion.
Next we would change the 5 not being deleted from “Yes” back to “No”. It’s just a quicker
way than having to click “Yes” for the relevant 75.
• F – Delete
Once entries have been marked to be deleted clicking this button will completely remove
these individuals from the database. To help prevent anything getting deleted in error a
confirmation panel indicating how many entries are about to be deleted appears to which
“Yes” must be clicked twice. Once that is done the information is permanently deleted and
the user is returned to the “Home Screen”.
Succession WizardTM 2004
54
Section 3
General Information
Succession WizardTM 2004
55
3.1 User Manual
The Succession Wizard user manual can be viewed and if necessary printed out by clicking
the Start button followed by Programs and then User Manual. The document is in PDF
format, ie it has been designed and distributed using Adobe Acrobat. If you haven’t got
this program on your computer (you’ll know his because if you try and access the manual
without it, nothing will appear) then you will need to install the free Acrobat reader from
the Succession Wizard CD. To do this proceed as follows :1)
Insert the CD and at the same time hold down the Shift key on your keyboard,
otherwise the Succession Wizard installation program will automatically restart (if it
does don’t worry simply click Cancel and then Exit Setup)
Click Start, then Run and then type in d:\acrobat followed by the OK button.
Click Open, then OK. A message now appears saying that Acrobat Reader is
being unpacked. After this follow the on-screen instructions to finish installing
Acrobat Reader.
Once the installation has completed you may be prompted to restart your PC.
2)
3)
4)
You will now be able to view and print the Succession Wizard manual.
3.2 Removal Instructions
If you decide not to purchase Succession Wizard then it can be removed from your
computer as follows :1)
Click Start, then Settings, then Control Panel. Double-click Add/Remove
Programs.
2) On the list of programs which appear select Succession Wizard and then click the
Add/Remove button.
3) Leave the indicator against Automatic and then click the Next button, followed by
the Finish button.
You may be prompted to confirm that certain files need to be deleted and if so click the
Yes to All button. Succession Wizard and all changes made by the installation will then be
removed from your computer.
3.3 Report Page Size
All of the pre-defined reports within Succession Wizard are based on US Letter size. If when
you print out, or preview on screen, these reports they have some information missing off
the edge of the paper it is probably because your default paper size is not set to US Letter.
In order to change the size to US Letter do the following :•
•
•
Click Start
Click Settings
Click Printers
The list of all available printers will now be displayed, one of which has been designated
as the default printer.
Succession WizardTM 2004
56
•
•
Click on the icon representing the default printer with your right mouse
button.
Click Properties
What now appears depends on your printer-specific software. However, somewhere you
should a Paper option which you should select and ensure that the description in the Paper
Size box matches A4 and not anything else. Quite a lot of machines have a default size of
Letter which is only slightly different to A4, but it will nonetheless still distort the way the
reports are viewed.
3.4 Drop-down Boxes
Throughout Succession Wizard you will see many boxes with the symbol next to them.
By clicking on this symbol it allows you to select from a list of choices.
To select the relevant value for the individual being input, or amended, simply click on it.
Alternatively when you come to a box with a next to it just type in the initial letter of the
value you want and Succession Wizard completes it for you.
You can select a value from the list, or depending on what it is, enter a new value.
3.5 Remembering Inputs
When you first start using Succession Wizard most of the drop down boxes are empty, so
you have to input values via the keyboard. For example, you may be inputting information
relating to a particular Job Title. For the first person with this Job Title the user will need to
type it in. From then on that value will appear in the drop-down box and for all future
movements you simply have to click on it or type its initial letter and the system will enter
the rest. This means that over time the amount of actual keyboard input is reduced to an
absolute minimum and is replaced by simply clicking with the mouse.
3.6 Switching Between Different Functions
Succession Wizard allows you to move to wherever you want to by simply clicking on the
particular option you require on the menu bar at the top of the screen.
You can move straight to where you want to go irrespective of which function you are
currently undertaking. For example you may just have been inputting some data and now
want to view the report selection screen. There is no need to close down what you are
currently doing just click where you want to go and the system automatically closes down
what you were doing and opens up your new choice.
This means that many screens do not have any particular method of being closed down
e.g. a close button, simply because one isn’t needed.
Succession WizardTM 2004
57
3.7 Moving Between Entries
The boxes which are visible at the bottom of many screens allow you to move between
different people. Clicking on a particular symbol takes you to the relevant individual
depending on the criteria you have specified : takes you to the first animal.
takes you to the previous animal.
takes you to the next animal.
takes you to the last animal
3.8 Sorting Information
Frequently throughout Succession Wizard you are working with a number of entries. It is
useful at times to be able to sort the data into a different order and be able to view entries
by date of birth or job title etc. To do this all you have to do is click the mouse on the
particular field which you wish to sort by and then click either the Sort Ascending or Sort
Descending buttons which can be found at the top of the screen. When this option isn’t
available, because of the particular function being carried out, the buttons are still visible
at the top of the screen but they are greyed out to indicate they are temporarily
unavailable.
3.9 Data Formats
Certain fields have predetermined formats to make the input process more straightforward.
For example when you enter dates you type out just the 6 digits i.e. 220397 and as you do
this the system automatically incorporates the slashes ie.22/03/97.
3.10 Optimising Performance
In order to make sure that the program is performing optimally you should on a regular
basis (after using the program every dozen or so times) run a quick-fix program included
with Succession Wizard. Do this (without any programs running) by clicking Start,
Programs, Succession Wizard, Optimize Database.
3.11 Data Backup
As with all computer software you must make sure to back up the data which you input
into the program in case of hardware failure, fire or theft etc.
It isn’t a problem to re-install Succession Wizard but it is the data which you will build up
over time which is the most valuable and the most vulnerable to being lost or corrupted.
Most of the Succession Wizard files are held in the folder C:\Program Files\Succession
Wizard. Within this there is a subdirectory called Succession Data, in which is a file
called Data.MDB. This is the file which you should ensure is regularly backed up. It’s full
name and location is therefore :C:\Program Files\Succession Wizard\Succession Data\Data.MDB
Succession WizardTM 2004
58
There are a number of different ways this can be done. What follows is probably the
simplest :1)
2)
3)
4)
5)
6)
7)
8)
9)
Insert a formatted floppy disk into your computer.
Click the Start button
Click Find
Click Files or Folders
Type Data.MDB in the Named box
Click Find Now
Position the mouse pointer so that it touches the Data.MDB file in the Find
box. (It will probably be identified as having the name Data, with a small
icon next to it with a key on a piece of paper)
Press the right mouse button and the file is highlighted and at the same time
a list appears. Click Send To and then 31/2 Floppy (A). You should then
see the file being copied from the hard disk to the floppy disk.
Close down the Find window.
You should repeat this exercise frequently. If possible use a series of disks so that you have
a history of backups. A floppy disk can hold a maximum of 1.44MB of information. If your
DATA.MDB file becomes bigger than this then you need to first of all compress it before
copying it to a floppy disk for backing up. The method to do this is as follows :1)
2)
3)
4)
5)
6)
7)
8)
9)
10)
11)
12)
13)
14)
15)
16)
17)
Click the Start button
Click Programs
Click Accessories
Click System Tools
Click Backup. Depending on whether or not you have used Backup before
a couple of introductory message screens may now appear. Click to remove
the messages until you're looking at the standard Backup screen which
shows, on the left hand side of the screen an area where you select files to
back up.
Click the + symbol to the left of (C:) on the left of the screen.
Click the + symbol to the left of Program Files.
Click the + symbol to the left of Succession Wizard.
Click on the yellow folder icon immediately to the left of Succession Data.
The right hand side of the screen now shows details of the files within this
folder, namely Data.
Click inside the little box to the left of Data on the right of the screen and a
tick appears.
Click on the Next Step button in the top right hand corner.
Click on the words 31/2 Floppy (A) in the left of the screen.
Click on the Start Backup button in the top right hand corner.
Type in Data in the Backup Set Label box and click OK. The data is now
being compressed and then copied on to the floppy disk.
Click OK twice once the Backup Operation is complete.
Click the X in the top right corner of the Backup box to finish the backup
process, remove the floppy disk and store securely.
Succession WizardTM 2004
59
Index
Excel Data Import.XLS
Export
“
“Succeeded By” Panel
“Successor To” Panel
27
27
A
Add Entry
Add Successor
ALL
All Entries
Assessment Average
Assessments
Attribute Find
Attribute Search
Attribute Search Panel
Attributes
50
29
27, 40
37
34
8, 34
39
35, 39
39
6, 8, 21, 35, 39
F
File Sizes
filter
Filter
Filtering
Find
Finish
Full Details
22
10
45
37
10, 42
14, 50
7, 26, 40
G
Go button
Go to Full Details
Greater than, Equal To, Less Than
C
classifications
Clear Button
Close
Close Attributes Panel
Close Button
Close Snapshot
Comment
Confirm Entry
Consolidate Data
Contents
15
49
11
19
39
H
6, 20
48
49
39
48
38
34, 35
14, 50, 51
22
2
Home Screen
Horizontal Slider
4, 18, 51
53
I
Import Data
Import Excel Data
Input Data
Input New Entry
Inputting Information
Installation Instructions
15, 52, 53
15, 52, 53
50
14, 50
50
3
D
data file
Data Location
Delete
Delete All
Delete Count
Delete Entries
Delete Entry
Delete Filter
Delete Selection
Descending Sort
Detailed Information
21
21
24, 55
55
54
16, 54
30, 32, 33, 35, 36
54
55
48
17
E
Edit Search
Entry Date
Entry Indicator
Excel
Succession WizardTM 2004
27, 40, 47
33, 35
27
15
J
Job History
8, 31, 32
K
Key Features
key personnel information
1
26
L
labels
License Agreement
26
3
M
Menu Bar
Multiple Entries
5, 18
30, 36
60
N
New Filter
New Location button
New Search
Note
Note History
Notes
Numeric filters
43
21
27, 41
33
33
8, 33
43
O
Optimise Database
Optional Information
Optional Information Slider
22
31
32
P
Page Selector
performance issues
Photographs
Preview Menu Bar
Preview Report
Print
program file
49
22
27, 38
47
45, 48
47
22
Q
Quick Find
Quick Tour
Record Count
Record Selector
Report Preview
Report Selection
Report Settings
Reports
Required Information
Reset
53
53
47
45
11
11, 45
31, 34
39
S
Succession WizardTM 2004
Tab Information
Technical Specification
Top Half of Screen
28, 29
3
20, 21, 22, 26
U
Update Database
7, 29, 31, 33, 34
User Defined Choices
6, 20
User Preferences 5, 7, 8, 18, 20, 29, 35, 39, 54
user-definable choices
20
V
Vertical Slider
View Selected
53
43
W
Wildcards
35, 39
4
17
55
43, 46
46
27, 30, 36
38
37
38
47
48
10, 42
18
7, 29, 36
6, 20
21
1
28, 40, 43, 46
8, 36
18
9, 27, 40, 41
3
5
22, 23
T
19, 22, 27
4
R
Score
Section 1
Section 2
Show All
Show Attributes
Show Filter
Snapshot
Snapshot Details
Snapshot Panel
Snapshot Slider
Sort
Sort By
Staff Search
Staff with Zero Successors
Succeeded By
Succeeded By / Successor To
Succession Data.MDE
Succession planning
Succession Toggle
Successor To
Successor Toggle
Summary Details
SW-Setup.exe
System Settings
System Variables
43
Z
zoom-in
47
61
If you have any problems with installing or running Succession Wizard, or would simply
like to discuss a particular aspect of the program then please contact us.
Norchard Solutions Limited
Norchard House
Manorbier
Pembrokeshire
United Kingdom SA70 8LD
Phone +44(0)1834 871190
E Mail [email protected]
Succession WizardTM 2004
Fax +44(0)870 7063146
Web [email protected]
62