1
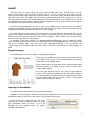
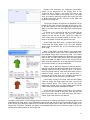
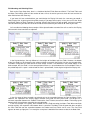
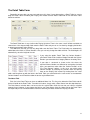
Catalog Creator by On-site Custom Software
Thank you for purchasing or evaluating this software. If you are only evaluating Catalog Creator, the Free
Trial you downloaded is fully-functional and all the data you enter during the evaluation period will still be there
should you later decide to purchase and activate the software.
This manual uses some screenshots from the Professional version of Catalog Creator which is sold under the
name – CleverCat and can be downloaded from www.CleverCatalogs.com. CleverCat is very similar to Catalog
Creator but imports the spreadsheet into a database where it can be manipulated to create other types of output
such as a Table of Contents, Index Page and even HTML pages. With Catalog Creator, your data remains in the
spreadsheet. This means that Catalog Creator is much simple to use but has fewer features.
Table of Contents
Introduction
2
Getting Started
4
Preparing your Spreadsheet
4
Category Editor Form
6
Template Editor
8
Display Units
10
Detail Table
14
Formatting Text
15
Printing
16
Troubleshooting and Support
18
Introduction
Before getting started, a brief description of databases and catalog software is useful.
Catalog software products can be grouped into two categories; Page Layout and Database-driven.
Page Layout software gives the user full control over every element on the page. Individual graphics, text,
borders, fonts and colors can all be placed and adjusted independently. Page Layout software is the better
choice when the emphasis is on creating artistic or stylistic pages.
Database-driven products are the better choice when the emphasis is on ease-of-use or when there are a
large number of products to be displayed or frequent changes are required to the product line. At the simplest
end of this range, a database-driven software should be able to import a spreadsheet and print a catalog in only
a few minutes. Catalog Creator is similar to Database-drive software except that the content is stored in a
spreadsheet and not imported into a database.
Each software has its own advantages and disadvantages. The most obvious advantage of a Databasedriven software is its ability to quickly insert a new product into the middle of a category. The user should be able
to simply enter the data and re-print the category. To do the same using the Page Layout approach might
require re-sizing other elements on the page to accommodate the new product or even moving products from
one page to the next. In extreme cases, this could require cascading changes through the entire catalog.
The biggest advantage of Page Layout software is its flexibility. At the upper-end of this range, you should be
able to create, on paper, almost anything you can imagine. This is also its biggest disadvantage. Creating a
large catalog can take many hours, days or even months.
In contrast, Database-driven softwares are typically very rigid. The printed output is very uniform in
appearance and, at the lower-end of this range, there are very few presentation options to choose from: Every
user’s catalog looks just like every other user’s catalog. However, using a Database-driven software, a user
might be able to create a catalog in only a few minutes.
Catalog Creator is a hybrid of Page Layout and Database-driven softwares. With Catalog Creator you create,
just once, a printing template for your products. Using this template, a full catalog can be quickly created using
the products recorded in the database.
Catalog Creator has the ability to create an artistic layout, within a modest range of options, as well as the
ability to quickly produce a large catalog of hundreds or thousands of items.
We hope that this short manual will help you decide if Catalog Creator is the best software for your individual
needs. If you need assistance or require more information, please contact: [email protected]
2
Flat vs. Relational Databases
You may have only ever viewed the products that you sell in a “flat” format. The most common example of
this is a spreadsheet pricelist with a long list of SKUs or Part Numbers and their prices, one item per row. While
Catalog Creator is useful for this type of data, its true strength is in its ability to represent products in a relational
format.
As shown in the illustrations below, flat databases comprise one image for every item. Similar items may be
represented by the same picture and similar descriptions. Depending on the products, this can be a very
inefficient way to display your data.
Flat Database
Item
Description
CD-ROM
16x
Item
Description
CD-ROM
24x
Item
Description
CD-ROM
32x
Item
Description
CD-ROM
48x
Price
$14.00
Price
$16.00
Price
$18.00
Price
$22.00
Relational databases comprise one image, plus an unlimited number of associated sub-items, for every item.
Relational Database
Item
Description
Price
CD-ROM
16x
$14.00
24x
$16.00
32x
$18.00
48x
$22.00
In this example, the two structures present the same data but the relational database presents it in a more
efficient manner. This is true when many items can be represented by a single image. For some items, such as
vehicles, a relational database does not work at all and items can only be represented properly with a flat
structure.
Your catalog may even be a mix of flat and relational data. Catalog Creator’s Dynamic Print Templates are
ideally suited for this type of variable data and this tutorial will demonstrate how a “flat” source document, such
as an Excel spreadsheet, can be imported to create a relational database.
3
Getting Started
Many of our users have created their first catalog in as little as fifteen minutes. When you start Catalog
Creator, the first form you see is the Main Menu and there is a button there labelled “Quick Start Guide”. Click
this button to open an online PDF document with a short tutorial designed to walk you through the basics of
preparing your spreadsheet and creating a simple printing template. This manual will cover all of the features of
Catalog Creator in greater detail but the Quick Start Guide is the best place to start if this is your first time using
the software
Saving your Data
As you work with Catalog Creator, your changes are automatically saved as you make them. There is no
Save button in Catalog Creator.
Company Banner
The Company Banner is an image file that can be printed in the header of your catalog pages. Click the
Configuration button to select the image file. The company banner you select will be displayed at the top of
every form in Catalog Creator.
The banner space is optimized for the dimensions, 728 by 90 pixels. This is a common banner size so you
may be able to use the same banner file you currently use for internet advertising.
Keep in mind that most graphics intended for displaying on your monitor are formatted at a resolution of 72
dpi. This means that they may be too coarse for printing. While most printers are capable of printing at
resolutions of 600, 1,200 or even higher dpi, you will probably want a file formatted for a minimum of 300 dpi if
you intend to publish your catalog on paper. If you are only creating a PDF catalog, 72 dpi may be sufficient.
You can use a banner image of any dimensions you choose but the ratio, 728 by 90, is the optimum to fill the
banner space. Images are automatically “zoomed” to fill the space without distortion. This means that a higher
resolution image of the same ratio but with dimensions of 1,456 by 180 pixels will also completely fill the banner
space but that one of 728 by 180 will be displayed at half-width in order to accommodate the greater height.
Preparing the Spreadsheet
A sample spreadsheet of home and office electronics is included with the software but for this example, we’ll
use the following much simpler data set.
Your spreadsheet must contain at least 13 columns. The first three columns, as shown in the example above,
must be “Index”, “Category”, and “Photo”.
Your spreadsheet must also contain 10 data columns. If your spreadsheet does not have 10 columns of data,
be sure to enter some text into the first row to create blank columns. In the spreadsheet example, you can see
that the text “Spare” has been entered for this purpose.
4
AutoFill
The Index column is used for sorting and can be quickly created using Excel’s AutoFill function. Insert an
empty column and type “Index” in the first row. Next, type “1”, “2” and “3” in the three rows below. Use your
mouse to select these three numbered cells. When selected, a thick black border should be around all three
cells. Move your mouse to the bottom-right corner of the selected group where it will change into a “+” cursor.
Click and hold the left mouse button while dragging the cursor down the column. As you drag the cursor, you will
see it automatically create sequential numbers. Continue dragging the cursor to the last row of data and release
the button to fill in the column with the Index numbers.
Every row in the spreadsheet must contain an entry in the Category column. You can use the same AutoFill
feature described above to quickly create this column. With text, you only need to select one row containing the
category name and then drag it down through the rest of the category.
The Photo column has two purposes. The first purpose is to record the name of the photo which will be
printed in your catalog. Normally, you would only record the name of the photo here and later, on the Category
Editor form, you will record the name of the folder where the photo is stored. However, you could also record
part or all of the folder path in the spreadsheet.
For example, if your photo is stored as “C:\MyCatalog\MyPhotos\Photo1.jpg”, you can record this several
ways. You could record just “Photo1.jpg” in the spreadsheet and “C:\MyCatalog\MyPhotos\” in the Image Folder
field on the Category Editor. You could also record “MyPhotos\Photo1.jpg” in the spreadsheet and
“C:\MyCatalog\” on the Category Editor form. Either way, the two will be combined at print time to display the
photo.
Product Grouping
The second purpose for the Photo column is to group related products.
Referring to the spreadsheet sample on the previous page and the
print sample to the left, you can see that the products are arranged
into groups of three related products.
By giving the products the same photo name, Catalog Creator knows
that these products are related and can create the Detail Table
shown below the photo.
Of course, your own data may be “flat” and not require duplicate
photo names or you may have data that does not require a photo at
all. If your data does not require photos, you should copy the number
from the Index Column into this column so that it is not grouped
together with other duplicate “blanks”.
Importing the Spreadsheet
On the Main Menu, click the Import File Selection button to begin.
Important: This form provides a “Window” into the actual spreadsheet. You cannot open the same file with
two different programs so be sure to close the file in Excel before selecting a file.
On the Import form, double-click the “File to be
imported box” to open a browsing window and select
your spreadsheet. When you select a file to be
imported, only the Category names are actually
recorded in the database.
5
The Category Editor Form
After you have imported the category names, you should visit the Category Editor form. On the Main Menu,
click the name of a category in the selection list to open the Editor for that category or, click the Category Editor
button and then click the Find button to select a category.
Category Label
Every category must have a unique name and this applies across spreadsheets as well. For example, if you
regularly switch between two spreadsheets, and if these spreadsheets have the same categories, Catalog
Creator will only recognize one unique category between these spreadsheets. For most users, this feature is
useful as it will allow them to create separate spreadsheets with different pricing for separate markets but use
the same Printing Template and category settings. If you need to use multiple spreadsheets with the same
category names, but you want to use different Printing Templates, you’ll need to switch templates at printing time
or rename the categories in one of the spreadsheets.
The Category Label / Printed Name is the text that prints in the header of your catalog. You can use this to
have the same name appear in the header of multiple categories even if your actual category name is different.
Default Image Folder
You can use this form to select the Image Folder for the current category. Each category can have its own
folder to make it easier to organize large numbers of photos and the folder name is combined with the photo
filename to define the full path and name of the image file.
For example, if your photo is: C:\MyCatalog\MyPhotos\Photo1.jpg you can record this several ways.
Normally you would record C:\MyCatalog\MyPhotos\ in the Image Folder field and Photo1.jpg as the filename
but you could also record C:\MyCatalog\ in the Image Folder field and MyPhotos\Photo1.jpg as the filename.
URLs cannot be used as the image folder but network locations can. For example, \\network\folder\ is a valid
entry for the Image Folder.
Most forms in Catalog Creator have a Print Preview button. This allows you to view the printed page
on the screen without wasting paper. For complete control of all printing options, start your printing
jobs from the Printing Menu.
6
Category Banner
Most users will print their company logo or banner at the top of the page but you can also give each category
its own logo or banner. This image file can be in a different folder than the categories photos. Double-click the
box to search for a file. If you enter a filename without a folder prefix, Catalog Creator assumes the file is in the
Image Folder for the category.
WaterMark
Each category can have also have a Watermark Image. This image prints the full width and height of the
page behind the text and product images. The watermark will be visible behind the text but not behind the
product images, even if their background is white.
Price Markup / Discount
Prices in your catalog can be easily marked up or discounted without changing the recorded data. On the
Printing Menu there is a Global Markup / Discount box that applies to all categories but each category can have
its own Markup / Discount. This is entered as a percentage. For example, if you enter a value of -20, prices will
be discounted by 20%. This feature is useful if you print catalogs for different customers or currencies.
Starting Page Number (T.O.C. Order)
If you need to reprint an individual category in the middle of your catalog, you can change the page numbers
so that they continue from the previous category instead of restarting at page one. This value is also the T.O.C.
(Table of Contents) order and determines the printing order of categories. It can also be changed on the Printing
Menu.
Active Category Option
You may create categories of products that you do not use frequently. Instead of deleting those categories
you can uncheck the Active Category box and the category will not show up on the Selection Lists. To reactivate an inactive category, click the Find button on this form to select and re-activate it.
Option Text, Page Prefix and Category Footer
Each category can have its own Category Footer text and this is printed centered in the footer. The Option
Text prints on the side opposite the page number. This text is aligned against the page margin but if you enter
too many characters, it could run into the Category Footer text. Each category can have its own Optional Text
but on the Printing Menu there is another Optional Text box. If the field on the Printing Menu is filled in, it will
over-ride the individual category text and print on every category.
The Page Prefix is added onto the Page Number. If your catalog uses data that is frequently updated, it may
not be practical to try to use a continuous page number across all categories. In this case you may need to
number each category starting at page 1 and a Prefix will help identify pages. For example, you might use a
Prefix of “Supplies-“ for a page numbering of Supplies-1, Supplies-2, and so on.
Selecting a Printing Template
If you have not copied any templates from the “Sample Templates” list to the “My Templates list”, then the
Template Selection list will show the samples. Once you copy a template to the “My Template” list, the selection
list will change to show only those templates.
Column Header Labels
These labels will be used later on the Template Editor to identify fields and they are also the Column Headers
that will be printed at the top of a Detail Table. If all your categories use the same Labels, use the Copy Headers
button to quickly update them to match an already defined category.
7
The Template Editor
Catalog Creator can create and store an unlimited number of Printing Templates. Click the Template
Designer button on the Main Menu to begin.
There are two grouping of Templates. Click either “Sample Templates” or “My Templates” to view these
groups. Template that you create or copy are placed in the My Templates group. Additionally, when you make a
template selection on the Category Editor form, the selection lists contains only sample templates if the My
Templates group is blank. Once you have added a template to the My Templates group, only this group will be
available in the Template Selection drop-down boxes.
Most users will find that they will need to create only one or two templates. In this case, the name really
doesn’t matter. Depending on your data, you may find that you need to create a separate template for each
category. In this case you may find it easier to name each template for the category it will print.
If you have already created one template you may find it easier to create additional templates by clicking the
Copy button to create a new template matching an existing one. This is also a good strategy if you want to make
significant changes to a template. Make a copy of the current template so that you can return to the original
template if you are not satisfied with the changes.
You can export your Printing Templates to a file that you can share with other Catalog Creator users. Click
the Export button to display checkboxes on the Template List. Select all the templates that you want to export
and click the Export button again to create the file.
If you need technical support or advice regarding Printing Templates, we may ask you to use the Export
function to send us your template.
The Import function will allow you to install templates created by other users. Click the Import button to
search for a downloaded file containing templates. For each template in the download file, you will be asked to
provide a new name. If you require technical assistance with templates, this is the method we will use to send
you a custom template or updates to a template you sent to us.
Also on this form is the option for Inches or Millimetres. You can change this option as required and your
page margins and other values will be converted as required. If you are exporting a template, you do not have to
be concerned about the units used by the recipient of the file. Exported templates are converted to millimetres
and then converted back to the units used by the recipient when the file is downloaded.
The Index Page and Table of Contents are Printing Templates like any other with the exception that they
draw data from all categories. There are Index and Table of Contents buttons on this form used to select those
templates. You can make all the same Page and Display Unit customizations for these templates as you would
for any other.
NOTE: If you are sending a template file to [email protected], you do not have to zip it or rename
it. *.mdb and *.mdt files are frequently blocked by mail servers because they might contain viruses. As we
frequently receive these files, our mail server does not block them. However, when we return a file to you, unless
you let us indicate otherwise, we will normally “zip” it to get past your mail server.
8
Creating a Printing Template
You can experiment with creating templates now if you want but most of the options will be explained in detail
later. For the purposes of this brief tutorial, click the Template Designer button on the Main Menu and then select
an existing template from the Sample Templates menu.
If you create a new template, you will be prompted to provide a name. You can create as many templates as
you need. Most users will find that they will need to create only one or two templates. In this case, the name
really doesn’t matter. Depending on your data, you may find that you need to create a separate template for
each category. In this case you may find it easier to name each template for the category it will print.
Click the Page Setup button to open the designer for the currently selected template.
Experimentation or “Trial-and-Error” is the best method for using this form. Explore different options to get the
look you want. Remember to make copies of Templates so that you can go back to previous settings.
Page Header and Page Footer
The Page Header is the area at the top of the page where the company logo and Category Label can be
displayed. Use the checkbox next to the Header label to enable or disable the Header. Change the height of the
Header to better fit your logo or banner. You can select an image file for your banner on the Configuration form.
Your logo or banner will be automatically “zoomed” to fit the available space. For example, if you are using a
banner of 8” x 2” and set the Header height 1”, then the banner will be shrunken to 4” x 1” so that it will not be
distorted.
The controls for the Page Footer are identical to those for the Header. Use the drop-down boxes to select the
Header or Footer Option. The sample page will display a rough preview of the selected option. Use the Print
Preview button at the bottom of the form to get an accurate preview.
If you need to increase the space between your catalog data and the Header or Footer, use the Header or
Footer spacer. You can also change the color of this space by clicking the colored boxes next to the Spacer
settings and choosing a color from the selection dialog.
Select a “Working Category” from the drop-down box at the bottom of the form. When you look at a Print
Preview on any of the Template Design forms, this will be the category that will be printed and it is the Column
Headers from this category that will be displayed in the next step. Double-click any of the Display Units on the
sample page or click the Display Unit button to continue.
9
Designing a Display Unit
The product photo, its description and associated Detail Table are collectively referred to as a Display Unit.
The number of Display Units that can fit on a page can vary depending on the options you choose.
If you change the number of Data Columns, the sample page will change to display that number of columns.
While some of the templates are given a name describing their layout, for example “2 x 2” refers to a grid of two
Display Units tall by two Display Units wide, you may be able to change the number of Units that fit on a page by
changing the number of Data Columns or the “Fields Grow and Shrink” option.
When the “Fields Grow” option is selected, the number of items that fit on a page becomes variable. The
entire Display Unit, as well as the fields it contains, will grow to accommodate the data. The sample page above
shows how Display Units might be arranged when the amount of data is variable.
When “Fields Grow” is not selected, the Display Units will all be the same size. In this case, the Display Units
will be arranged as a simple grid. This option is best suited to catalogs where the amount of data does not
change much between products. Also, because the fields do not grow to accommodate larger amounts of text,
some fields may be truncated.
The Layout selection is either “Across then Down” or “Down then Across”. When Across the Down is
selected, the Display Units are printed in rows, not columns. This means that the top edge of the Display Unit will
line up with the top edge of other Units in the same row, regardless of the height of Units in the row above.
When Down then Across is selected, the Display Units will print in columns. This is the better option when the
goal is to reduce the number of pages as it compacts more Display Units onto a page. With this option, the top
edge of one Display Unit may not line up with the top edge of another unit in the next column.
You can change these options at any time and look at a Print Preview to find the best option for your data.
On the Page Setup form, click the Display Unit button or double-click any of the Display Units on the page
sample to open the Display Unit design form. This form is where you select and place the fields you want to
print. In the lower-left corner of the form is the “Stack” of available fields, organized into two columns of labels
and fields. You can place labels as well as fields on the Design Pad. Each label / field pair is identified by the
Column Header name you gave them on the Category Editor form.
Simply “drag-and-drop” fields or labels from the stack and place them on the Design Pad. Change the width
or height of a field by moving your mouse cursor to the edge of the field and “dragging” the border to the desired
size. Optionally, you can enter the field dimensions manually. This is useful if you are trying to align fields
exactly. When you click a field on the Design Pad, its name appears in the “Active Cell” box. You can now enter
its relative dimensions and position in the value boxes
If you decide that you do not want one of the fields that you have placed, click it again to make it the “Active
Cell” and click the Return to Stack button.
10
Positions and dimensions are recorded in percentages
relative to the dimensions of the Display Unit. In the
screenshot above, Photo1 is the Active Cell and its Left
value is 0%, the left edge of the Display Unit, its top edge
starts at a point 8% down the height of the Display Unit and
its Width and Height are 54% and 56% of the width and
height of the Display Unit.
The Design Pad does not represent the proportions of the
printed Display Unit. Instead, the height of the Display Unit
on the form represents half the printed page height and its
width on the form represents the width of the printed Display
Column.
As shown in the screenshot on the left, the fields do not
have to fill the entire Design Pad but are normally
compressed near the top. As well, some of the fields are
much shorter than the expected height of the text. This is
because we expect the fields will grow to fit the text.
On the Page Setup form, there is an option to turn off the
“Fields Grow and Shrink” option. In this case, your template
design might resemble the one in the screenshot at the top
of this page.
When a field grows, the fields below it are pushed down.
You can see how this works in this Print Preview which uses
the template design from the previous page. The Product
field has grown and pushed down the Photo and all the other
fields as well. The SKU Label and the SKU Field have grown
and pushed down the Notes Field. On the Design Pad, the
Notes field starts about 25% of the way down the Photo but,
on the Print Preview, it is closer to about 40%.
Another way of looking at Dynamic Template design is
that you are setting the Minimum height of the Display Unit.
Although fields will shrink to nothing if there is no data in
them, they do not move up if the fields above them shrink. A
minimum height, enough to fit all the placed fields, is
reserved for the Display Unit. In this example, the bottom of
the Detail Table sets the minimum reserved height.
If there were no data in the Detail Table and the Product
Field was empty, the Photo would not move up to fill the
empty Product space. The Display Unit will not shrink
beyond the reserved space so, when printed, there would be
a blank white space above and below the Photo.
The Display Unit will grow to fit the fields as they grow to
fit the text. In the second Display Unit, there are only two
rows in the Detail Table. As a result, the Display Unit itself is
shorter, by one row, than the one above it.
TIP: When starting from a blank template, begin by turning on the Display Unit Borders using the button on the
Page Setup form. Next, drag a single field onto the design pad and click the Print Preview button to see the size
of the Display Unit. Move the single field up or down on the Design Pad to adjust the minimum height of the
Display Unit. A Dynamic Template can grow to accommodate more text and its minimum height is set by the
position of the lowest element on the Design Pad.
11
Field Growing and Shrinking Rules
Back on the Page Setup form, there is a checkbox labelled “Fields Grow and Shrink”. The Detail Table and
the Notes Field always grow to fit the number of rows or lines of text but you must check this box to make the
other fields behave the same way.
If you leave this box unchecked then you could design the Display Unit much the same way you would a
Static Display Unit, by placing and sizing fields exactly as you want them to print. In fact, you can use the “Grow
and Shrink” option on Static Templates as well but, because the Display Unit will not grow, you have to carefully
consider how much your data will cause other fields to move around or you could cut off some of your data.
Let’s consider the following three examples. We’ve placed borders around all the cells as well as the Display
Unit to make it clear how fields are adjusted.
In the first two designs, the only difference is the heights of the Notes and Cost Fields. However, the bottom
of the Cost Field has not changed so the minimum height reserved for the Display Unit has not changed either.
The Notes Field grows the same amount in either design so there is no difference in the printed output. In the
third example, the Cost Field is in the same position but there is a space between the Cost and Notes Fields. In
the printed output, this space is retained and the Cost is printed lower, increasing the height of the Display Unit.
In the first group of three examples we referred only to the separation between the Cost and Notes Fields.
However, the separation rule actually applies between every field and every other field. The design has a
minimum separation between the Product Field and the Cost Field but, because the Notes Field always grew
between them, that minimum separation was not noticeable.
In the first example in this group, we’ve allowed the Cost Field to overlap the Notes Field. When two fields
overlap vertically, the separation rule between them is cancelled. The Notes Field still grows but does not affect
the Cost Field and now the separation between the Product and Cost Fields can be seen. The Cost Field
appears to move up slightly but is in exactly the same place it would be if there were no data in the Notes field.
12
In the second example in this group, we’ve allowed the Notes and Cost Fields to touch. The separation rule
still applies except that the separation distance is zero.
In the last example in this group we’ve allowed fields to overlap horizontally. This has no effect on separation.
The separation and cancellation rules apply only to vertically overlapping fields.
The vertical separation rule applies even
if fields are not aligned vertically. In this
example, the separation between Notes
and Description stays the same as
Notes grows.
There is a minimum separation between Product and Color in this design
but it is forced to be greater than that minimum by the growth of Notes. Cost
and Color overlap vertically so there is no separation rule between them.
If some of your fields will contain no data, then you need to consider how this will affect the separations. For
example, using the same design, if the Product, Cost and Notes Fields are
empty, as shown below, there would be a number of blanks spaces as all the
various separation rules are applied.
Creating a better design may take some experimenting. You can start by
decreasing the heights of the field that you know will occasionally be empty.
Consider this design. Although it cannot be seen, the Cost Field is still
placed between the Product and Description Fields. The height has been
reduced in the design to just 0.3%.
The Notes Field overlaps the Product, Cost
and Description Fields, cancelling the
separation rule between them and the Notes
Field. If the Cost Field has a value, it grows to
fit. If it is blank, it disappears and leaves only
the small reserved space between Product and
Description.
The separation rule is still in place for the Color Field and the fields above it so, if the Notes field were blank,
it would still start a little below the Cost Field.
Empty fields can affect the minimum
height of the Display Unit itself. In this
example, the Size Field is blank but a
space was reserved for it so the Display
Unit has a blank space when printed.
The best approach to Dynamic Template Design is to set the size of the field to be roughly equal to the size it
needs to be for the smallest amount of text in your data. When designing a Static Template, or when the Fields
Grow and Shrink option is disabled, the best approach is to set the size of the field equal to the largest amount
of text.
If you have any difficulty with Template Design, send us a sample of your data along with a picture or link to
the type of template you are trying to design and we’ll create one for you at no charge. We can even do custom
designs that go beyond what is possible using the Template Editor. For example, we have created custom
templates where the data in a field is the result of a formula which varies depending on the contents of two or
three other fields. This type of custom work is well beyond what can be done with the Template Designer so we’ll
provide you with samples and a quote for the design costs before you commit to making a purchase.
13
The Detail Table Form
Depending on your data, you may not need to use this form. If your data requires a Detail Table, be sure to
drag the “Detail Table” field onto your Display Unit. Double-click the Detail Table field or click the Detail Table
button to continue.
The Detail Table form is very similar to the Display Unit form. There is the same “stack” of fields and labels to
choose from. You drag-and-drop fields onto the Detail Table and you can re-size them by dragging the borders
or entering percentage values directly.
The differences are that you can only drag fields onto the Detail Table. The Field Labels are automatically
added above the fields as Column Headers. Also, you can only change the widths of fields. The field heights are
automatically set to the height of the row.
If you select the option “Detail Table has Column Headers”,
your Detail Table will be include a Header Row with the Column
Headers you entered on the Category Editor or Inventory Form.
If your data is structured as shown to the left, where the
required Column Headers are different for each group of related
items, you would not select either the “Column Header” or the
“First Line Repeats” options. In this case, you could create
Column Headers by selecting the “Header” fields and placing
them on the Display Unit instead. By making them the same
width, and lining them up with the fields in the Detail Table, you could achieve the same results as the automatic
Column Headers on the Detail but allow the text to vary between items.
The Notes Field
Each line in the Detail Table can have an additional Notes line. This line prints below the Data Fields and will
be the full width of the Detail Table. To enable this feature, simply select a Data Source from the drop-down box.
The Data Source selection does not have to be the special Notes field, the one that can hold an unlimited
amount of text. However, if you choose that field as your Data Source, then this Notes field on the Detail Table
will expand to print an unlimited amount of text the same way the Notes field on the Display Unit does.
14
Formatting Text
Both the Display Unit and Detail Table forms have a Formatting button. Click this to go the last form where
you can change the formatting of text and borders.
Click any field placed on the Display Unit or Detail Table to make it the Active Cell, and then click any button
for the attribute that you want to adjust. The best way to use this form is trial-and-error. Change an attribute and
then click the Print Preview button to see how it looks.
Text, Numbers and Currency
The default field type is Text. If you select a field and change its attribute to “Number” or “Currency”, when
printed, Catalog Creator will examine the field and format it as follows. If the field is empty, then nothing will be
printed. If the value is zero, then nothing will be printed. If the value is a number, then it will be formatted as a
number or computer as defined by your computer’s Regional Settings. If the value is not a number at all, but text,
then the text will be printed.
Alignment and Justification
By default, all text will be Left-Aligned but you can change this to Centered, Right-Aligned or Justified. You
can also change the alignment of your photo. Unless your photos are exactly the same shape as the space
reserved for them, there will be some empty space on either side or below the photo. Use the Alignment buttons
to Left, Center or Right-align the photo.
For the photo, the Justification button has a special function. Normally, your photos are fitted to the reserved
space in such a way as to show them as large as possible without distortion. The Justification function fits your
photos exactly to the size of the reserved space. This could distort the photos so you would normally only use
this if your photos are very close to the required dimensions.
Colors and Backgrounds
You can change the color of any text and the background (shading) of any field. You can also add borders to
any field. Click the field you want to change to make it the Active Cell and then click the Cell Borders or Color /
Shading boxes. You can change the color of the Borders as well but not for individual fields. All Field / Cell
Borders will be the same color.
On the Detail Table Formatting form, there are some additional buttons for formatting Table Rows. Click the
Header or Detail buttons to see what Color Attributes can be changed. For example, if you click the Detail Button
beside Boxes / Rows, the Color text will be grayed-out to indicate that you can only set a Background Shade. If
you click the Detail Button beside Dividing Lines, the Shading text will be grayed-out to indicate that you can only
select a Color, not a Background Shading.
To make long Detail Tables easier to read, click the Alternating Rows Button and then select a Shading color.
To change the background color of the entire Detail Table, you will need to change the background for
Alternating Rows and also click the Detail button and change the Shading color for the other rows as well.
The Sample Table below the buttons will show you the color changes you have made so the best way to use
this form is to experiment with settings until you get the look you like.
15
Printing
Most forms in Catalog Creator have a Print Preview button. You can send a print job to your printer from any
Print Preview but for greater control of printing options, start your print jobs from the Printing Menu.
Select individual or multiple categories to Print or Preview using the Category Selection list. When you click
the Preview button, only the first selected category in the list will be shown. When you click the Print button, all
selected categories will be printed. Categories are printed in the order indicated by the T.O.C. (Table of
Contents) number and each category is sent to your printer as a separate print job. The T.O.C. number does not
have to be an accurate indicator of the starting page of a category but it should be unique. If you are printing
multiple categories and they have the same T.O.C. number, the data could be mixed together.
There is an option beside the Print Button labelled “Compact?” This option combines all categories into a
single category using the Template and other settings of the first category. Individual categories normally start
printing on a new page but, because the Compact option considers all data to be part of single category, there
will be no page break between them. This can save a number of pages if you have many categories that would
normally end on a partial page. However, because all data is printed as a single category, it only prints using the
Template of the first category. It is not possible to switch Templates mid-page.
Printing Options
Page Numbering
Most users will want to print a catalog with
sequential numbering across all categories.
Check the AutoNumber option to do this. If you
are including other pages before your catalog
data such as a Table of Contents or an
Introduction page, you may want your page
numbering to begin on a page other than 1. Enter
the starting Page number as required.
The Starting Page number option is also useful if you are re-printing an individual category. If the category is
from the middle of your catalog, you would not want it to start with page 1. You can also print categories with
page numbers starting at the value recorded in the T.O.C. column.
16
Duplex Printing
The Duplex option is provided for those users who will be printing on both sides of the page and want to
format their catalog so that the Page Numbers and Category Label are always on the outside, unbound, edge of
the page.
The Duplex option does not instruct your printer to print on both sides of the page. This is a function of your
printer and must be done using your printer’s own controls. For some printers, you may have to start your print
job from a Print Preview and then click the Print command on the Menu Bar to access these controls.
Every printer capable of duplexing will be different so these instructions are only a guideline. Some printers
will have an option for increasing the page margin on one side of the page to allow more room for binding. If your
printer does not have this option, you can increase the Page Margin on the Page Setup.
If printing double-sided, your first page can be on either the left or right. Change this option as required.
If your printer is not capable of double-side printing, you can print just the even or odd pages, flip and sort
them and then print the other side of the page. The easiest way to do this may be to use a PDF writer and print
the catalog as a PDF first. When you later print from the PDF to your printer, there will be an option in the Print
Setup for printing odd or even.
Using a PDF writer is often the only way to prepare your catalog for printing if you are sending it out to be
printed in larger volumes. We recommend www.PDF995.com for an easy-to-use PDF writer that also has an
option to combine the separate printing jobs of multiple categories into a single PDF document.
Optional Text
On the Category Editor form, there is also a box for Optional Text. This prints in the Page Footer on the
opposite side from the Page Number. If the field on the Printing Menu is left blank, then the Optional Text on the
Category Editor form will be used. If the field on the Printing Menu is filled in then it will be used as the Optional
Text for all categories.
Currency Symbol
If this field is left blank, then your computer’s Regional Settings will be used be used to determine the
currency symbol. If you need to print a catalog for a different market, you can change this symbol as required.
Markup / Discount
On the Category Editor form, each category can have an individual Markup / Discount Value. This adjusts the
printed prices without affecting the recorded data. This is useful if you are printing catalogs for different markets.
You can also enter a Global value here that will adjust prices for all categories. If you need to print a catalog
without pricing, select the Blank option.
17
Troubleshooting and Support
Technical support for Catalog Creator is available by e-mail. Our office hours are 8:30am to 4:30pm Pacific
Standard Time.
If you see an error message screen in Catalog Creator, you can take a screenshot of this by pressing and
holding down the Alt key and then pressing the Print Screen (Prt Sc on some keyboards) keys. This will copy an
image of the current window into memory. In your e-mail program, you can paste this image into the body of your
message by pressing the Ctrl+V keys or Paste from the Menu Bar.
Sending a screenshot of the error message is not necessary but will help us identify the problem very quickly.
Please include a description of what you were doing when the error occurred.
Problems with Importing
In the Spreadsheet Window on the Import Selection form, you may notice that some of the data in your
spreadsheet is replaced with the characters: “#Num!”. Before a spreadsheet can be imported, all numbers, dates
and cells derived from formulas must be formatted as text. Even if you do not see these characters, your
spreadsheet data may still need to be reformatted. This is especially true if one of the spreadsheet columns
contains a mix of text and numbers.
In Excel, select the column by clicking the Column Header. Next, select “Text to Columns” from the Data
Menu to open the formatting wizard. On the first two steps of the wizard, just click the Next button. On step three,
select Text as the Column Data Format and click Finish. Repeat this process for all columns containing
numbers.
Memory Errors
When Catalog Creator creates a Print Preview, it must load all the photos on a page into memory at the same
time. It must also load some information about all the other pages in a category at the same time. If your
category has hundreds of items, this can be a significant drain on your computer’s resources. Print Previews
from the Design Forms are limited to just the first page of items but repeated Previews could use up your
system’s memory and cause slowdowns or crashes. Try to limit the number of Print Previews you look at while
designing templates.
The biggest cause of memory errors relates to the size of the photo itself. Photos directly out a digital camera
can be anywhere from 800Kb to 5,000Kb or even larger on newer high-resolution cameras. In contrast, the
photos you see on many websites are only 10Kb or 20Kb.
For printing, photos need to be a higher resolution than the 72dpi used on webpages. Photos in the range of
20Kb to 100Kb usually provide very good print quality without placing a drain on system resources.
There are many different utilities available online for reformatting photos and we recommend Omniformat
from www.omniformat.com as a utility which can quickly resize an entire folder of images.
Send your questions or comments to: [email protected]
18