1
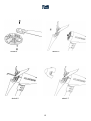
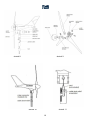
instructions for use / installation manual SILENTWIND 12V / 24V Dear customer We thank you having bought our product. You have decided on a new generation of windgenerator. Compared to traditional windgenerators the essential advantages of our product are: safety, efficiency very low noise emission. You will also profit from our experience of more than 30 years with various windgenerators used at offshore sailing. For long distance cruising the availability of electric energy without the possibility of grid connection is essential. Fair winds at any time The Spreco Team Please note that this manual is part of the product and must be read closely. Please study the information carefully before installing the SILENTWIND. This manual should always be kept near the product and passed on to future owners. This manual is addressed to the person installing the SILENTWIND. This person should be familiar with electric wiring and the use of appropiate tools. Otherwise the SILENTWIND should be installed by a specialist. Contents: 1. Operation and use 2 2. Safety instructions 2 2.1. Mechanical risks 2 2.2. Electrical risks 3 2.3. Installation risks 3 3. Technical data 4 3.1. Windgenerator 4 3.1.1. Electrical data 4 3.1.2. Mechanical data 4 3.2. Charge controller 4 3.2.1 Electrical data 4 3.2.2 Mechanical data 4 3.3. Dimensions 5 3.4. Power diagram 6 4. List of enclosed parts 6 5. Operation description 7 6. Diameters of cables 7 7. Installation 7 8. Getting started 9 9. Run and stop 10 10. Charging indicator 10 11. Check ups 10 11.1. Blades 11 11.2. Screw terminals 11 11.3. Bearings / Gaskets 11 11.4. Corrosion protection 11 11.5. Mounting construction 11 11.6. Electrical system 11 12. Maintenance 12 13. Trouble shooting 12 14. Attachment / sketches 14 15. Warranty 17 16. Certificate of warranty 19 1 1. Operation and use It´s most efficient to use the regenerative electric sources of both, wind and sun, combined to charge your batteries so that you can make use of daylight and wind for 24 hours. Our hybrid charge controller is suitable for both sources, windpower and max. 180Wp solarpower Hybrid-charge controller. You can also charge the batteries of an electric vehicle with this unit. Further applications are: Any application without grid connection, research units, traffic management systems, emergency systems, street lamps, billboard illumination, projects in developing countries, wireless LAN access points, holiday homes with inverters for independent provision of electricity, wherever there is no grid connection available or too complicated to install. The SILENTWIND is ultralight and aerodynamic, so that it is possible to connect various windgenerators in case your need for energy is high. As noise emission is very low you can operate the SILENTWIND in neighbourhoods and on sailing yachts without annoying your neighbours. Our charge controller HYBRID 600 is suitable for 12 and 24 volt usage and can be connected to the SILENTWIND and solar panel. Another advantage of the SILENTWIND is that it does not have any inbuilt electronics which means that there is hardly any maintenance work on the mounted windgenerator. The electric power is led down to the charge controller by 3 cables. The hand laminated carbon fiber blades were successfully tested in a wind tunnel up to wind speeds of 35m/s 63 knots according to DIN EN 61400-2. Therefore you need not worry about the SILENTWIND in any storm conditions. For maintenance work there is an additional manual stop switch. 2. Safety instructions Due to the high RPM and the electric energy that windgenerators generate their use may be dangerous. Therefore carefully read the following safety instructions. 2.1. Mechanical risks For various reasons the turning rotor system must be handled with caution. You cannot see the end of the blades in high wind speeds so that you do not recognise the inherent danger. Due to their aerodynamic shape the blades have very sharp edges that may hurt you in high wind conditions. Never ever try to touch the turning rotor system! Never ever try to stop the turning rotor system manually! Make sure that you install the windgenerator in a position that nobody can touch the blades. Especially on boats ensure a sufficient height above deck. The blades are produced from carbon fibre, which is extremely solid even in high wind speeds. Therefore keep away from the turning blades in any case. However they can break because of ropes or other parts touching the blades in very strong winds. 2 If one of the blades is damaged, activate the brake function manually with the stop switch of the charge controller. If one of the blades is damaged, the rotor system will be out of balance which may be a risk for the whole mounting construction. This has to be considered before mounting the windgenerator in a safe position. Before you install the windgenerator on a mast construction make sure that the 3phase wiring is disconnected from the charge controller or fix one blade so that the system cannot turn. You can also connect the 3 AC wires to block the system during mounting. Another possibility to install the system is to screw the hub with the blades to the shaft at the very end of the mounting procedure. The mast must be well fixed so that it is safe in strong wind and sea conditions. Furthermore the mast-fixation and the mast-stays should be well assembled that applied vibrations will be not enhanced. Please ask a professional who is able to assess the load that the system generates in strong wind conditions. 2.2. Electrical risks An idle running windgenerator can generate an AC voltage of 40V AC /15A per phase. Only connect all components if you are familiar with electric wiring. The high voltage can cause serious injuries and fire if you do not pay attention to safety. Caution at use of cardiac pacemakers, etc. Never ever touch the open end of the wires. The currents on charging the batteries can reach more than 30 A DC. The whole wiring electric components and connection points must be able to carry a current of 40 A. Find information about suitable cable dimensions on page 7. Warning: Wires with insufficient diameters can cause fire. Make sure that the wires are run so that mechanical damages cannot occur. A damaged cable is a severe safety risk. Install a fuse (50A, included) to the batteries positive pole as close as possible to the battery. In any case a short circuit of the poles must be avoided. Warning: A short circuit can cause fire and explosion. Never ever install batteries where sparks can cause this risk. Always ensure sufficient ventilation! The electrical installation should be carried out by persons with suitable skills who know what they do. Before a storm the SILENTWIND should be manually stopped with the stop switch on the charge controller. In case of storms we recommend to fix one rotorblade to the mast because of the risk of flying objects. 2.3. Installation risks Only use mounting constructions that can take the load of the generator and the blast pressure of the wind in any condition. Working on the mounting unit should only be carried out on a calm day. Make sure that nobody is close to the mast. Disconnect the battery from the charge controller when working at the system. The turning of the blades must be avoided by fixing one blade to the mast. If not the charge controller will be destroyed. 3 3. Technical data 3.1. Windgenerator 3.1.1. Electrical data Permanent magnet generator, 3 phases, AC 12 VDC / 24VDC 400 Watt 13,5 m/s 2,2 m/s 3 m/s Blue LED on the buttom of housing Type of generator Rated voltage Rated power Rated peak power at Start up speed Start of charging Charge indicator 3.1.2. Mechanical data Safety test in wind tunnel Rotordiameter Number of blades Weight of blades Material of blades 122 km/h without failure 1,15m 3 140g/blade Carbon fibre, hand laminated 12V: 480 – 1420 Upm 24V: 480 – 1390 Upm 6,8kg (Generator) 740x370x220mm weight: 9,8kg white RAL 9010, powder coated 36 months RPM range weight Package dimensions Colour Warranty 3.2. Charge controller Charge and power management of the provided external hybrid-charge controller Hybrid 600 Maximum voltage adjustable for acid-, gel- and AGM-batteries. Brake mode: electronically or manually with integrated Stopp-switch (see enclosed manual) 3.2.1. Electrical data System voltage Max. power input windgenerator Max. current input windgenerator Max. power input solar Max. current input solar Max. open circuit voltage input solar LCD + LED displays 3.2.2 12/24 VDC 600 W 30 A 180Wp 10A 50VDC W, V, A, kWh, Ah, load data Mechanical data Weight Package dimensions Warranty 1,15kg (controller) 190x120x65mm 24 months 4 3.2. Dimensions 5 3.4. Power diagram 4. List of enclosed parts All information is reliable. The producer does not take any responsibility for inaccuracies. The user of both the instructions and the product takes any responsibility and any risk. All specifications are subject to change without notice. 6 5. Operation description All windgenerators use the kinetic energy of the wind. This energy is turned into a turning motion by the blades and thereby changed into 3-phase AC power. The power of the energy increases in line with the wind speed exponentionally. This means that a double wind speed generates octuple power. This must be especially considered in storm conditions. Our spbΩ blades are produced of high-tensil carbon fibre and are hand laminated with epoxy resin. This material provides the maximum consistency at lowest weight. This material is also used in Formula 1 and airspace industry. Therefore these CFblades are extremely light, but resist even strongest wind conditions. They have been successfully tested at Deutsche WindGuard – according to DIN EN 61400-2 (VDE 0 127-2) at windspeed of 122 km/h at 5480 RPM This is an equivalent of sonic velocity at the tips of the blades. For every-day use and safety reasons we have equipped the charge controller with an electronical and manual stop switch. 6. Diameters of cables System voltage 12 Volt Distance from windgenerator to the charge controller in m Cable cross section mm2 AWG Distance from the charge contr. to the battery in m Cable cross section mm2 AWG System voltage 24 Volt Distance from windgenerator to the charge controller in m Cable cross section mm2 AWG Distance from the charge contr. to the battery in m Cable cross section mm2 AWG 0-9 10 – 19 20 – 29 30 – 44 45 – 69 70 – 110 6 10 0-9 10 8 10 – 19 16 6 20 – 29 25 4 30 – 44 35 2 45 – 69 50 1 70 – 110 10 8 16 6 25 4 35 2 ----- ----- 0-9 10 – 19 20 – 29 30 – 44 45 – 69 70 – 110 2.5 14 0-9 4 12 10 – 19 6 10 20 – 29 10 8 30 – 44 16 6 45 – 69 25 4 70 – 110 10 8 16 6 25 4 35 2 ----- ----- 7. Installation Before mounting the SILENTWIND onshore find a suitable position for the windgenerator. It is an ideal position if the wind flows against the blades without any obstructions. This means that the generator is mounted as high as possible. 7 Fixed installation: The height depends on the distraction of the wind by surrounding objects. You can simply test this by fixing a 3 m long – 4cm wide plastic band at the top of a min. 4 meter pole. You can use a 2 nd band at 2 meter height. This does not apply to mounting the generator on boats. If the upper band flows horizontely straight or up to 30 degrees only you have found the suitable position. In case the band shows more than 30 degrees or turns round the mast, the position is unsuitable. This test should be carried out at moderate wind conditions and only gives an orientation. We recommend to do various tests to get a better assessment. You need not do this test if the windgenerator is mounted far away from obstructions. Mobile installation on a sailing boat: The assembly height must be chosen such that no member of the crew is endangered by the rotor. The mechanical fixation of the foot of the mast has to withstand the mechanical loads occurring especially in rough seas. We recommend additional rigging to the sea rail or the deck of the ship. Note: Please note that the SILENTWIND can never be fully efficient if it is not mounted in the prevailing wind direction or distracted by obstructions. Therefore it is important to find a position that is not obstructed by obstacles! Having found the suitable position an appropriate mast with suitable equipment must be chosen. The outer mast diameter must have 48mm and it should be stainless steel or aluminum. Please also consider possible maintenance work. The mast with mounted windgenerator should be able to take a wind blast pressure of 250Nm. Grounding of the mast is highly recommendable. On boats you can use the central ground for mast and engine. Ask a specialist for advice. Once the mast is mounted you can start the relatively simple installation of the SILENTWIND. First connect the 3 CF blades to the assembly hub (see page 15, sketch 4) with the enclosed screws (page 16, sketch 9, assembly- and safety instructions attached to the rotor-blade box). The enclosed nylon discs protect against electrolytic corrosion. The fastening torque is 7-8Nm equivalent to a weight of 7-8 kg on a 10cm long lever arm, upright to the lever arm. If the fastening torque is too high, this will destroy or damage the blades. If the fastening torque is not high enough, the blades can get lose. A wrong fastening torque is a considerable safety risk. Before you are doing the final tightening of the blade screws, move each rotorblade in running direction towards the edge of the blade guide of the hub. The running direction is clockwise looking from the front. Then fix the blades as described above. The blades should not be out of balance then. The blades have been balanced statically and dynamically. In case of damage of only one blade you can buy a single one. When ordering one blade the purchasing department needs the exact weight of the undamaged blades. 8 An incorrect tightening torque represents a significant security risk. Regularly control the fixation of the blades! After connecting the blades the set is fixed to the generator shaft with the enclosed screw nut and enclosed hexagon socket screw key. After that you snap the nose cone into place on the assembly hub. (see page 15, sketch 5,6 and 7) Then you connect the three AC outlet cables which have to be led from the SILENTWIND to the charge controller. Use the 3 enclosed crimp connectors. We also enclose a strain relief gadget for these connections. (see page 16, sketch 10,11) Attention During this procedure the 3 AC wires at the end must be connected together. Otherwise the rotor system may start running and you can get injured. At last you mount the SILENTWIND to the mast. Fix the 4 hexagon screws to the yaw clamp after having put in the rubber pad (see page 16, sketch 8) When tightening the screws take care for a uniform, circumferential tightening of the 4 screws. The steps of tightening should be done in small increments to avoid damaging of the screws. 8. Getting started Before getting started your SILENTWIND check the correct mounting and installation according to the following check list: OK Test Mast construction: Optional; check according to instruction, especially all screw connections, bracing, vertical position. Grounding and lightning protection according to local regulations? Electric installation: Check battery status and correct polarity Charge controller: Charge controller securely fastened to the mounting location? battery connected with correct polarity, otherwise controller will be destroyed Caution: Connect always first the battery to the charge controller. Are all screw terminals firmly tightened? Is stop switch in position ON? Fuse: 50 A fuse connected as close as possible to the battery? STOP switch: Should be installed from a previous installation a stop switch in the cable connection between charge controller and the battery, it must always be removed or secured against switching off. The actuating of the stop switch during the wind generator is running will destroy immediately the charge controller. 9 Wiring: All cables connected in line with plan? Check the polarity of all wires on the screw connection poles. Is the 3-phase cable of the SILENTWIND connected to the charge controller? Are the cables correctly crimped and is the strain relief mounted? Yaw shaft: Is the rubber pad well placed? Rotor blades: Mounted in line with instructions? Assembly hub: Is the assembly hub fixed to the generator shaft? Is the central screw nut fastened with 30 Nm? Connection to 3-phase rectifier (optional) or the enclosed charge controller. According to the charge controller ordered please read the enclosed manual. Congratulations! now you can go ahead 9. Run and Stop Switch the enclosed stop-switch or the stop-switch of the charge controller in position “RUN”. If the wires are correctly connected to the battery (without having mixed up the polarity) the SILENTWIND should start charging if windspeed is sufficient. You can control this on the LCD-display of the charge controller. 10. Charging indicator A blue LED at the bottom of the body shows you when the charging process starts. This depends on the state of charge of the battery – normally 12,5V. 11. Check ups Your SILENTWIND was constructed for long term use without any maintenance. However, simple and regular check ups ensure the necessary security. Saftey first! Before you start the check up, make sure that the blades are stopped and the battery is not connected to the charge controller. 10 The following check ups should be carried out at regular 12 months intervals: 11.1 Rotor blades Check if the blades show damages like broken edges, damaged surface or cracks. If you notice any damage, the generator must not be used any longer. Check the screwing one day after mounting and after that every 3 months. Eventually then you can turn to a longer interval. 11.2 Screws Check that all accessible screws are correctly fixed. Especially the hexagon srews of the connection to the hub, the central shaft nut and the fixing of the mast must be checked (see page 7, 8, 9 and page 15, sketch 4, 5 ,6 ,7 and page 16, sketch 8, 9). 11.3 Bearings and gaskets The bearing of the generator shaft and the bearing of the yaw shaft are permanently lubricated. Please check these bearings as to free movement, bearing play and watertightness. Deficient bearings must be replaced. 11.4 Corrosion protection The complete housing is made of seaworthy aluminum and additionally powder coated. If the outer layer is damaged, there is a risk of corrosion. Please paint these spots with suitable varnish (RAL9010) 11.5 Mounting construction Check this construction in line with the instructions concerned (optional). 11.6 Electrical system Please first stop the SILENTWIND generator so that all wires carry no voltage. Check if all connections are properly fixed and not corroded. Possible corrosions must be removed and treated with contact spray. Give special attention to the battery connections: they must be clean and greased with vaseline. Check the battery in line with the instructions of the producer and (if necessary) refill with destilled water. In case more than 1 battery is used check that all batteries have the same capacity and state of charge. 11 12. Maintenance Maintenance of the SILENTWIND is not necessary. The SILENTWIND is produced for troublefree long-term use. 13. Trouble shooting In case of problems, however, these can be easily solved by using the following check list: Windgenerator doesn´t start to run: Possible Cause Not enough wind Test Measure the wind speed (Anemometer) Wait for more wind, start up speed is 2,2m/s Switch to „RUN“ Turn manually Connection windgeneratorcharge controller damaged, short circuit of AC cables, short circuit of generator, customer service Stop switch activated Generator shaft sluggish Solution Windgenerator doesn´t charge: Possible cause Not enough wind Test Measure the wind speed Solution Start up of charging depends on the battery status, check the adjustment of the charge controller Electric wiring interrupted Check wires, connections Replace damaged wires or and gadgets gadgets Fuse is gone Check fuse Replace fuse or cool down the automatic circuit breaker Carbon brushes in the yaw Check carbon brushes and Replace carbon brushes shaft have no contact springs and reactivate springs 12 Battery is not fully charged: Possible cause Test Solution Old, damaged battery deficient Test battery status and liquid of every battery Fuse gone Check fuse Charge controller wrongly installed Charge controller stopswitch is in position “STOP” Deficient generator Check in line with manual Replace battery, refill destilled water (not necessary for gel- or AGMbattery) Replace fuse, find cause of deficiences Correct installation Switch stop switch in position “RUN” Observe manual instructions Check AC voltage, AC screw terminals Check all 3 AC cables after disconnecting from charge controller as to short circuit Repair customer service / replacement Deficient charge controller, Check adjustments mix up of polarity according to instructions 13 14. Attachment / sketches sketch 1 sketch 2 sketch 3 14 sketch 4 sketch 5 sketch 6 sketch 7 15 sketch 8 sketch 9 sketch 10 sketch 11 16 15. Warranty Spreco Lda. guarantees that all appliances sold by the company do not show any material or processing defects within the period of warranty. Period of warranty for Silentwind generator: Charge controller HYBRID 600 36 months 24 months If material or processing defects are detected in this period, Spreco Lda. will repair the appliance or replace broken parts of the appliance at their expense. Guaranty is only provided if the warranty note (page 21) is filled in properly and the original invoice can be presented. Guaranty does not cover: Regular checkups, maintenance, repair or replacement of worn out parts. Charges for transport, freight and the risk of transport which are directly related to the case of warranty. Damages that have been caused by wrong use or mistreatment of the appliance, especially if the damage is due to mounting the system to an inappropriate / unsuitable mast (construction). In case of damage the customer will have to prove that the windgenerator has been mounted to an appropriate mast (construction). Damages caused by acts of nature beyond control, Spreco Lda. cannot be held responsible for, especially lightning, flooding, snow (ice) load, fire etc. If the appliance must be demounted for a warranty case and mounted again after repair or replacement, the expenses for these procedures are not covered by Spreco Lda. Whether repair or replacement is appropriate or necessary, is up to Spreco Lda. decision only. If neither repair nor replacement are possible, the customer is only entitled to withdraw the order. As far as mandatory law provides otherwise, the rights of the buyer against the company Spreco Lda. restrict to this warranty terms, and neither Spreco Lda. nor the distributor of the products take over additional liability for direct or indirect damages. Otherwise the general terms of delivery for products and services of the electricity industry in Portugal are applied. 17 Notes: 18 Certificate of warranty -------------------------------------------------------------------------------------------------------------- Garantieschein Warranty card Name und Anschrift des Käufers / Name and address of the purchaser: Seriennummer Windgenerator / Serialnumber windgenerator: Seriennummer Laderegler Serialnumber charge controller: Verkäufer (Firmenstempel / Unterschrift) / Purchaser (company stamp / signature): Kaufdatum / date of purchase: Die genauen Garantie-Bedingungen finden Sie in der Gebrauchsanweisung auf Seite 17. The exact warranty conditions you can find in the user manual on page 17. -------------------------------------------------------------------------------------------------------------- 19