1
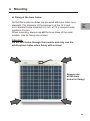
SunWare Solar Module Solar modules Bedienungsanleitung Installation Manual Inhalt Teil I: (Deutsche Version) D 1 Vorwort . . . . . . . . . . . . . . . . . . . . . . . . . . . . . . 2 2 Wichtige Hinweise . . . . . . . . . . . . . . . . . . . . . 3 3 Produktbeschreibung . . . . . . . . . . . . . . . . . . . . 4 4 Montage . . . . . . . . . . . . . . . . . . . . . . . . . . . . . 6 a) Befestigung an den Bohrungslöchern . . . . b) Befestigung durch Verkleben . . . . . . . . . . c) Befestigung mit Clips. . . . . . . . . . . . . . . . . 7 8 9 5 Zellprotektor . . . . . . . . . . . . . . . . . . . . . . . . . . 11 6 Elektrischer Anschluss . . . . . . . . . . . . . . . . . . 13 7 Technischer Aufbau . . . . . . . . . . . . . . . . . . . . . 17 8 Wartung und Pflege . . . . . . . . . . . . . . . . . . . . 18 9 Service . . . . . . . . . . . . . . . . . . . . . . . . . . . . . . 18 10 Allgemeine Gewährleistungsbedingungen . . . 19 Part II: (English Version) . . . . . . . . . . . . . . . 23 1 1 Vorwort Herzlichen Glückwunsch! Sie haben ein hochwertiges Solarmodul der SunWare Solartechnik erworben und sich damit für höchste Qualität “Made in Germany” entschieden. Damit Sie lange Freude an Ihrem neuen Solarmodul haben, lesen Sie bitte die nachfolgenden Hinweise sorgfältig durch. Sollten Ihre Fragen hier nicht ausreichend beantwortet werden, wenden Sie sich bitte zunächst an Ihren Fachhändler. Selbstverständlich geben auch wir Ihnen jederzeit die gewünschten Auskünfte. Direkte Informationen erhalten Sie unter www.sunware.de Verpackungsinhalt: 1 x Solarmodul 1 x Bedienungsanleitung nur bei Modulen mit 3-adrigem Anschlusskabel: 1 x Zellprotektor bestehend aus: 1 x Gehäuse 1 x Platine 2 x Rasterbänder 2 x Schrauben 2 2 Wichtige Hinweise In dieser Bedienungsanleitung finden Sie wichtige Sicherheitshinweise, die Sie genau lesen und beachten sollten. D Bitte bewahren Sie für den Zeitraum des Garantieanspruchs unbedingt Ihre Originalrechnung und die Originalverpackung auf. Öffnen Sie in keinem Fall die wasserdichte Kabelanschlussdose und nehmen Sie keine zusätzlichen Bohrungen (z. B. für eine spezielle Befestigung) an Ihrem Solarmodul vor. SunWare Solarmodule sind nicht biegbar! Die Module können unter leichter Krümmung montiert werden maximal 3 cm je 1 Meter Modullänge! maximal 3cm Modullänge 1m Solarmodule sind maximal 3% krümmungsfähig Es ist besonders darauf zu achten, dass das Modul nicht schwingen kann! Schwingungen und zu starke Krümmungen können das Modul beschädigen oder zerstören! Verwenden Sie grundsätzlich alle am Modul vorhandenen Befestigungspunkte! 3 3 Produktbeschreibung Typ: SunWare Standard Solarmodule Kabelausgang Anschlussdose salzwasserdicht vergossen und mit Trägerplatte verschraubt Aufkleber Seriennummer mit 6 Ziffern Bohrungslöcher Kantenschutz (optional erhältlich) kann einfach aufgesteckt und wieder entfernt werden 4 3 Produktbeschreibung Typ: SunWare Kompakt Solarmodule D Kabelausgang rechts Anschlussdose salzwasserdicht vergossen und mit Trägerplatte verschraubt Aufkleber Seriennummer mit 6 Ziffern Bohrungslöcher 5 4 Montage Installationsort: Ihr Solarmodul liefert die optimale Leistung, wenn die Sonne möglichst in einem senkrechten Winkel einfällt. Da eine Montage dieser Art jedoch platzbedingt selten realisierbar ist, ist die Montage auf waagerechter Fläche eine sinnvolle Alternative. Montieren Sie Ihr Solarmodul immer auf einer steifen und ausreichend tragfähigen Fläche! Geeignete Montageflächen sind z. B. Kajütdächer, das Bootsdeck und Schiebeluk-Garagen, wenn diese begehbar und nicht flexibel sind. Beachten Sie bei der Montage, dass das Solarmodul maximal 3% krümmungsfähig ist. (siehe S. 3) Achten Sie besonders darauf, dass das Modul nicht schwingen kann. Ungeeignete Montageflächen sind z. B. eine Plane oder Persenning. Schwingungen und zu starke Krümmungen können das Modul beschädigen oder zerstören! Möchten Sie Ihr Solarmodul mit Bootsschuhen betreten, ist unbedingt darauf zu achten, dass das Modul fest und ohne Abstand zum Untergrund auf einer tragfähigen und steifen Fläche montiert wird. Lagern Sie Ihr Solarmodul bei Nichtverwendung ausschließlich auf fester und ebener Fläche in der Originalverpackung! Hinweis: Alle Solarmodule mit einer Leistung von 24Wp und mehr sollten fest montiert werden! Von einer mobilen Verwendung raten wir ab, Schwingungen können die Module beschädigen! 6 4 Montage a) Befestigung an den Bohrungslöchern: D Alle SunWare Solarmodule sind mit Bohrungslöchern ausgestattet. Der Durchmesser der Bohrungen beträgt bei den 12V und 24V Standard Solarmodulen 5,6 mm, bei 12V Kompakt Solarmodulen 4,5 mm. Benutzen Sie für die Montage immer alle Bohrungslöcher des Solarmoduls. Verwenden Sie zur Befestigung ausschließlich Schrauben. Achtung: Bohren Sie keine Löcher durch das Modul und benutzen Sie zur Befestigung durch Verschrauben ausschließlich die vorhandenen Bohrungen! Benutzen Sie immer alle Bohrungslöcher zur Befestigung! 7 4 Montage b) Befestigung durch Verkleben: Möchten Sie Ihr Solarmodul auf dem Untergrund verkleben, empfehlen wir für diese Art der Montage einen 1-Komponenten-PUR-Kleber z.B. Helmipur SH100 oder Sikaflex 221. Je nach Modulgröße benötigen Sie etwa 300 g Kleber. Tragen Sie den Kleber auf die Modulrückseite wie im folgenden Bild dargestellt auf. Skizze: Beispielhafte Verteilung des Klebers auf der Modulrückseite (bei vollflächiger Verklebung) Modulrückseite Kleber 8 4 Montage c) Befestigung mit den SunWare Befestigungsclips: D Die Befestigungsclips sind für alle SunWare Solarmodule ohne Kantenschutz verwendbar. Die Clips werden mit dem Untergrund verschraubt. Passende Schrauben liegen den Befestigungssets bei. SunWare Befestigungsclips erhalten Sie bei Ihrem Fachhändler. Modul mit Clips Befestigungsclip 9 4 Montage Optional können Sie auf Ihr Solarmodul einen Kantenschutz aufstecken. Sparen Sie den Kantenschutz bei der Montage mit Clips an den Befestigungsstellen aus. SunWare Befestigungsclips erhalten Sie bei Ihrem Fachhändler. Weitere Informationen zu den Clips finden Sie auf unserer Homepage: www.sunware.de Befestigungsset: Side-Clip Befestigungsset: Mid-Clip 10 5 Zellprotektor Betrifft nur SunWare Solarmodule mit dreiadrigem Anschlusskabel! D Achtung: Bevor Sie Ihr Solarmodul in Betrieb nehmen können, muss zunächst der mitgelieferte Zellprotektor angeschlossen werden! Der Zellprotektor darf auf keinen Fall feucht oder nass werden. Jedes einzelne SunWare Solarmodul muss am Kabelende mit dem zugehörigen Zellprotektor verbunden werden. Erst nachdem der Zellprotektor angeschlossen wurde, dürfen die Solarmodule in Reihe oder parallel geschaltet werden. 1) Verbinden Sie das Solarmodul mit der Platine. Klemmen Sie die drei Flachstecker fest auf die drei Stecksockel der Platine. Beachten Sie die richtige Farbcodierung gemäß dem Aufdruck auf der Platine. Aufstecken der Kabel (Solarmodul), ähnliche Abbildung 11 5 Zellprotektor 2) Verbinden Sie den Zellprotektor mit dem Laderegler. 2 Verwenden Sie ein Standardkabel (2x 1,5 mm ) und beachten Sie die Polarität der Leitungen, siehe Aufdruck der Platine. Anschluss Laderegler, ähnliche Abbildung Fixieren der Kabel, ähnliche Abbildung 3) Fixieren Sie die Kabel an der Platine mit den beigefügten Rasterbändern. 4) Schrauben Sie den Gehäusedeckel auf die Grundplatte. ähnliche Abbildung 12 6 Elektrischer Anschluss Nachdem Sie den Zellprotektor installiert haben, können Sie das Solarmodul über einen Laderegler an die Batterie anschließen. D Nehmen Sie zuerst das Masseband von der Batterie ab und decken Sie das Modul ab, um unnötige Kurzschlüsse und Funkenbildung zu vermeiden. Vom Solar-Laderegler wird eine Leitung direkt zur Batterie verlegt und dort an die Pole + und - angeklemmt (siehe Anleitung des Reglers). Die Kabellänge sollte nicht über die doppelte Länge hinaus verlängert werden. Bei 12 V Modulen und 24 Volt Systemspannung müssen je 2 Module in Reihe geschaltet werden (siehe Skizze Seite 14). Paralleler Anschluss der Solarmodule 12 V 12 V Cell prot Cell prot - + 12 V - + 12 V Cell prot - + - + zum Laderegler 13 6 Elektrischer Anschluss Serieller Anschluss der Solarmodule 12 V 12 V Cell prot - + Cell prot - 12 V Cell prot + - Cell prot - + 24 V + 24 V - + - + + 24V zum Laderegler 14 12 V 6 Elektrischer Anschluss Anschluss an einen Laderegler D Solarmodule (max. 260 Watt) Cell prot - Cell prot + - + FOX-350 Battery = 12,6 V I Solar = 8,5 A + Solar + B1 + B2 + Load + Verbraucher (max 12A) + Batterie 1 + Batterie 2 15 6 Elektrischer Anschluss Kombination mit anderen Solarmodulen: SunWare Solarmodule können problemlos untereinander und mit Solarmodulen von anderen Herstellern kombiniert werden, wenn die Solarmodule 33 oder mehr Solarzellen beinhalten. Der Einbau von zusätzlichen Rückstromdioden ist nicht empfehlenswert, da diese permanent einen Spannungsverlust von 0,55 V erzeugen. Kombination mit Ladereglern: Ergänzen Sie Ihr SunWare Solarmodul mit einem SunWare FOX-Solar Laderegler zu einem kompletten Solarenergiesystem. SunWare Solarmodule können auch an jeden anderen Ladereglertyp angeschlossen werden. 16 7 Technischer Aufbau der Module Komponente Beschreibung Trägerplatte 1 mm starkes VA Edelstahlblech, pulverlackiert Solarzellen kristalline Solarzellen, innerhalb eines TPU Laminats auf die Trägerplatte aufgeschweißt Kabelausgang Anschlussdose salzwasserdicht vergossen und mit der Trägerplatte verschraubt Kantenschutz schwarzer, gummierter Kantenschutz, mit innenliegendem Edelstahlklemmprofil - optional erhältlich - Bohrungslöcher D Standard Solarmodule 12V u. 24V Durchmesser 5,6 mm Kompakt Solarmodule 12V Durchmesser 4,5 mm Nur bei Modulen mit 3-adrigem Anschlusskabel: Zellprotektor Kunststoffgehäuse mit Platine, 2 Rasterbänder, 2 Schrauben Hinweis: Zellprotektor muss unbedingt wassergeschützt und unter Deck montiert werden! Die technischen Detaildaten Ihres Solarmodultyps finden sie unter www.sunware.de 17 8 Wartung und Pflege Die SunWare Solarmodule sind wartungsfrei! Um eine optimale Leistungsausbeute zu erzielen, sollte die Moduloberfläche frei von Verunreinigungen und Schatten erzeugenden Gegenständen sein (insbesondere Blättern und Möwendreck). Benutzen Sie bei einer evtl. Reinigung der Moduloberfläche keine scharfen Reinigungsmittel und spitzen Gegenstände! Verwenden Sie nur Wasser mit ein wenig Geschirrspülmittel. 9 Service Bitte wenden Sie sich bei technischen Problemen zunächst an Ihren Fachhändler. In den allermeisten Fällen können Probleme auch telefonisch gelöst oder geklärt werden. Um die Abwicklung bei einer Reklamation zu erleichtern, halten Sie bitte die Seriennummer Ihres Produktes und Ihre Originalrechnung bereit. Bevor Sie ein Modul oder Laderegler an SunWare oder Ihren Händler zurückschicken, nehmen Sie bitte vorher Kontakt auf! Bitte haben Sie dafür Verständnis, dass Reklamationen ohne Originalrechnung nicht angenommen werden können. 18 10 Allgemeine Gewährleistungsbedingungen Die Gewährleistungszeit für die Leistungsabgabe aller SunWare Solarmodule beträgt 3 Jahre ab dem Zeitpunkt des Verkaufs an den ursprünglichen Verbraucher und Käufer. D SunWare wird bei Verschlechterung der Leistungsabgabe bei Solarmodulen um mehr als 10 % der Nennleistung unter Standardtestbedingungen (1.000W/qm, 25 °C, 1,5 AM) diesen Leistungsverlust ersetzen, sofern diese Verschlechterung auf Material- oder Fertigungsfehler zurückzuführen ist. Bei den rahmenlosen Solarmodulen beträgt die maximal zulässige Verformung 3 cm pro 1 Meter Modullänge. Die Module müssen so montiert werden, dass diese nicht schwingen können. Ausgeschlossen von der Gewährleistung sind Schäden, die auf unsachgemäße Modifikationen zurückzuführen sind. Die Gewährleistungszeit für alle Produkte der SunWare GmbH & Co KG, insbesondere Laderegler und Digitalanzeigen, beträgt 2 Jahre ab dem Zeitpunkt des Verkaufs an den ursprünglichen Verbraucher und Käufer. Die Gewährleistung beinhaltet Material und Arbeitslohn. Fehlerhafte Produkte, die laut Gewährleistungsbedingungen repariert, ergänzt oder ausgetauscht werden, müssen frachtfrei an die Verkaufsstelle zurückgebracht werden unter Beilegung der Rechnungskopie und der Garantiekarte. Die Seriennummer muss eindeutig aus der Gewährleistungskarte oder Rechnung hervorgehen. Anderweitige oder weitergehende Gewährleistungen aufgrund eventueller Leistungsreduzierungen oder Folgeschäden, insbesondere Nachbesserungen oder Schadensersatz, sind ausgeschlossen. 19 E 20 E Installation Manual English Version 21 22 Content Part II: (English Version) 1 Foreword . . . . . . . . . . . . . . . . . . . . . . . . . . . . . . . 24 2 Important information . . . . . . . . . . . . . . . . . . . . . 25 3 Product description . . . . . . . . . . . . . . . . . . . . . . . 26 4 Mounting . . . . . . . . . . . . . . . . . . . . . . . . . . . . . . . a) Fixing at bore holes. . . . . . . . . . . . . . . . . . . . . b) Fixing by gluing . . . . . . . . . . . . . . . . . . . . . . . c) Fixing with clips . . . . . . . . . . . . . . . . . . . . . . . 28 29 30 31 5 Cell protector . . . . . . . . . . . . . . . . . . . . . . . . . . . . 33 6 Electrical connection . . . . . . . . . . . . . . . . . . . . . . 35 7 Technical structure . . . . . . . . . . . . . . . . . . . . . . . . 39 8 Maintenance and care . . . . . . . . . . . . . . . . . . . . . 40 9 Service . . . . . . . . . . . . . . . . . . . . . . . . . . . . . . . . 40 10 General Terms and Conditions . . . . . . . . . . . . . . 41 Part I: (German Version) . . . . . . . . . . . . . . . 1 E 23 1 Foreword Congratulations! You have purchased a high-quality solar module from SunWare Solartechnik and thus have opted for the highest quality “made in Germany”. To enable you to enjoy your new solar module for as long as possible, please read the following information carefully. If this does not answer any queries you may have sufficiently, please contact your specialist dealer in the first instance. Of course, we are also very happy to help as much as we can. Direct information is available at www.sunware.de Content: 1 x Solar module 1 x Installation manual Concern only modules with 3 wired connection cable: 1 x Cell protector including: 1 x Housing 1 x PCB-Board 2 x Cable ties 2 x Screws 24 2 Important information This user manual provides important safety instructions that you should read carefully and follow. Please retain your original invoice and the original packaging at least for the period of the warranty. E Do not, under any circumstances, open the watertight cable connection box and do not drill any additional holes (e.g. for a special type of fixing) into your solar module. SunWare solar modules are not flexible! The modules can be slightly bent for mounting a maximum of 3 cm per 1 m of module length! 3 cm max. Module length of 1 m Solar modules can be bent a maximum of 3% In particular, please make sure that the module cannot swing! Swinging and overbending can damage or destroy the module! Always use all the fixing points of the module! 25 3 Product description Type: SunWare standard solar modules Cable outlet Connection box sealing impermeable to salt water and screwed to base plate Label Serial number with 6 digits Bore holes Edge protection (optionally available) only pushed on, can be removed if required 26 3 Product description Type: SunWare Compact solar modules E Cable outlet to the right Connection box sealing impermeable to salt water and screwed to base plate Label Serial number with 6 digits Bore holes 27 4 Mounting Place of installation: Your solar module works optimally with the sun shining onto it at vertical angle. However, since such positioning is rarely possible due to a lack of space, a sensible alternative would be to mount the module on a horizontal surface. The ground to which you wish to fix your solar module must always be rigid and sufficiently strong. An appropriate space for mounting is the roof of the cabin, the deck or the sliding hatch, provided that it can be walked on and is not flexible. Pay attention that the maximum bending of the solar module is 3 % (see page 25). Especially take care that the module may not swing. Canvas, for example, is unsuitable for mounting. Swinging and overbending can damage or destroy the module! If you want to walk on your solar module with boating shoes, please make sure that the module is firmly mounted on a stable, solid surface without a gap between module and ground. In case that the solar module is not in use, solely stock it on a rigid and flat surface and in its original packing! Attention: All solar modules with power output of 24 WP and upwards must be fixed rigid! We dissuade from a mobile use as swinging can damage the module! 28 4 Mounting a) Fixing at the bore holes: All SunWare solar modules are provided with bore holes as a standard. The diameter of the borings is at the 12 V and 24 V standard solar modules 5.6 mm, at 12 V compact solar modules 4.5 mm. When mounting, always use all the bore holes of the solar module. Use for fixing only screws. E Attention: Do not drill holes through the module and only use the existing bore holes when fixing with screws! Always use all the bore holes for fixing! 29 4 Mounting b) Fixing by gluing: If you want to glue your solar module to the ground, we recommend using a 1-component PUR adhesive such as Helmipur SH100 or Sikaflex 221 for this type of mounting. Depending on the size of the module, you will need around 300 g of the glue. Apply the adhesive to the back of the module as shown in the following illustration. Illustration: Example of arrangement of the gluing at the back of the module (when glued flush to the desk) Back of the module Adhesive 30 4 Mounting c) Fixing with the SunWare fixing clips: The fixing clips may be used for all SunWare solar modules without edge protection. The clips are screwed to the ground. The appropriate screws are included in the fixing kit. E module with clips fixing clips 31 4 Mounting Optionally you can push on an edge protection onto your solar module. When mounted with clips omit the edge protection at the mounting parts. SunWare fixing clips are available from your specialist dealer. Information on the clips is available at our home page: www.sunware.de fixing clips set: side-Clip fixing clips set: midi-Clip 32 5 Cell protector Concern only modules with 3 wired connection cable: Important: Before using your solar module, you have to connect E the enclosed cell protector! The cell protector has to be mounted/operated in a dry place, it must not become wet or moist with dew. The cable of each single SunWare solar module has to be connected to one single cell protector. The series or parallel connection of SunWare solar modules has to be done BEHIND the cell protector. 1) Connect the three solar module cable`s blade terminals on the cirquit board. Be sure to connect each coloured cable to its corresponding terminal as printed on the cirquit board. The terminals fit very tightly to ensure good electric contact. Connection of the cables (solar module), similar illustration 33 5 Cell protector 2) When the solar module is connected to the cell protector you can connect the cell protector to the charge controller by using a standard cable (2x 1,5 mm2). Be sure to use the correct polarity according to the notes on the cirquit board. Connection charge controller (similar illustration) Fixing of the cables (similar illustration) 3) Please use the two supplied cable ties to fix the wires to the ciquit board. 4) Now you can screw the cap to the base plate. (similar illustration) 34 6 Electrical connection Firstly, remove the ground strap from the battery and cover the module to avoid unnecessary short circuits and sparking. The cables of the module are directly connected to the solar charge controller. From the solar charge controller, a new cable is then laid directly to the battery, where it is connected to poles + and - (see instructions for controller). E The cable length should not exceed twice its standard length. With 12 V modules and 24 volt system voltage, 2 modules have to be connected in series (see illustration on page 36). Parallel connection of the solar modules 12 V Cell prot 12 V Cell prot - + 12 V 12 V - + Cell prot - + - + Connection to the charge controller 35 6 Electrical connection Serial connection of the solar modules 12 V 12 V Cell prot - + Cell prot - 12 V 12 V Cell prot + - 24 V Cell prot + - + 24 V - + - + + 24V Connection to the charge controller 36 6 Electrical connection Connection to a charge controller solar modules ( 260 Watt max.) E Cell prot - Cell prot - + + FOX-350 Battery = 12,6 V I Solar = 8,5 A + Solar + B1 + B2 + Load + Consumer (12A max.) + + Battery 1 Battery 2 37 6 Electrical connection Combination with other solar modules: SunWare solar modules can easily be combined with each other and with solar modules from other manufacturers, if the solar modules have at least 33 solar cells. It is not recommended to fit additional reverse current diodes since they can constantly cause a loss of voltage of 0.55 V. Combination with charge controllers: Complement your SunWare solar module with a SunWare FOX solar charge controller for a complete solar energy system. SunWare solar modules can also be connected to any other type of charge controller. 38 7 Technical structure of the modules Component Description Base plate 1 mm strong VA stainless steel sheet, powder coated Solar cells crystalline solar cells in an TPU laminate welded onto the base plate Cable outlet Connection box sealing impermeable to salt water and screwed to the base plate Edge protection black rubber edge protection with E - optionally available - stainless-steel clamping profile inside Bore holes diameter of 5.6 mm for 12V and 24V standard solar modules diameter of 4.5 mm for 12V compact solar modules Concern only modules with 3 wired connection cable: Cell protector 1 x Housing 1 x PCB-Board 2 x Cable ties 2 x Screws Attention: The cell protector has to be fitted under deck and safe from water! Detailed technical data of your type of solar module are available at www.sunware.de 39 8 Maintenance and care The SunWare solar modules do not require maintenance! In order to achieve an optimal power output, the surface of the modules should be free from dirt and shadow-causing objects (leaves and gull dirt in particular). If the module surface needs to be cleaned, do not use any harsh cleaning agents or sharp objects! Only use water and some washing-up liquid. 9 Service In the event of technical problems, please contact your specialist dealer in the first instance. In most cases, problems can also be solved or clarified over the telephone. To facilitate the handling of complaints, please keep the serial number of your product and your original invoice handy. Before returning a module or a charge controller, please get in contact first! Please understand that complaints can only be dealt with if you still have your original invoice. 40 10 General Terms and Conditions The warranty period for the power delivery of all SunWare solar modules is 3 years from the time of sale to the original user and buyer. SunWare will replace any deterioration in the power delivery of the solar modules exceeding 10% of the rated capacity under standard test conditions (1,000 W/sqm, 25°C, 1.5 AM), provided such deterioration is the result of material or production faults. E The frameless solar modules may be bent a maximum of 3 cm per 1 m of module length. The modules must be fixed such that they cannot swing. Damage resulting from improper modifications is excluded from the warranty. The warranty period for any products from SunWare GmbH & Co KG, in particular charge controllers and digital displays, is 2 years from the time of sale to the original user and buyer. The warranty shall cover material and labour. Faulty products that are to be repaired, supplemented, or exchanged under warranty must be returned to the sales outlet freight paid, together with a copy of the original invoice and the warranty card. The serial number must clearly ensue from the warranty card or the invoice. Any other or more extensive warranties due to a reduction in power or consequential damage, in particular subsequent improvements or compensation, are excluded. 41 S O L A R T E C H N I K GmbH & Co KG P H O T O V O L T A I K M A D E I N G E R M A N Y e-mail: [email protected] Internet: http://www.sunware.de Printed: August 2007 Doc.No.: {D869BE78-4D68-4DBD-A3BA-98D0FB8CF5DC}