1
TotalView®
Installation Guide
Version 8.12
Copyright © 2010-2013 by Rogue Wave Software, Inc. All rights reserved.
Copyright © 2007-2009 by TotalView Technologies, LLC
Copyright © 1998–2007 by Etnus LLC. All rights reserved.
Copyright © 1996–1998 by Dolphin Interconnect Solutions, Inc.
Copyright © 1993–1996 by BBN Systems and Technologies, a division of
BBN Corporation.
No part of this publication may be reproduced, stored in a retrieval system,
or transmitted, in any form or by any means, electronic, mechanical, photocopying, recording, or otherwise without the prior written permission of
Rogue Wave Software, Inc. ("Rogue Wave").
Use, duplication, or disclosure by the Government is subject to restrictions
as set forth in subparagraph (c)(1)(ii) of the Rights in Technical Data and
Computer Software clause at DFARS 252.227-7013.
Rogue Wave has prepared this manual for the exclusive use of its customers, personnel, and licensees. The information in this manual is subject to
change without notice, and should not be construed as a commitment by
Rogue Wave. Rogue Wave assumes no responsibility for any errors that
appear in this document.
TotalView and TotalView Technologies are registered trademarks of Rogue
Wave Software, Inc. TVD is a trademark of Rogue Wave.
Rogue Wave uses a modified version of the Microline widget library. Under
the terms of its license, you are entitled to use these modifications. The
source code is available at:
http://www.roguewave.com/support/knowledge-base.aspx.
All other brand names are the trademarks of their respective holders.
ii
Contents
1
Installing TotalView Using tar Files 1
Step 1: Unbundling Downloaded Files 2
Step 2: Running the Install Program 2
Step 3: Installing a Demo License 4
Setting the License File Variable 4
Step 4: Configuring Your Environment 5
Cray XT Installation 5
Installing 5
About the Install 6
2
Installing or Changing a Regular License 7
Planning for a Regular License 8
Choosing a License Server 8
Finding a License Server Host ID 8
Creating a FLEXlm User Account 9
Installing your Permanent License 9
Accessing a License Server 9
Starting the License Manager Manually 10
Stopping the License Manager 10
Testing the License Manager 10
Starting the License Manager When the System Boots 11
Choosing a Standalone FLEXlm Version 12
Starting the Install Program 12
More FLEXlm Information 13
3
Installing License Keys 15
Step 1: Locating the FLEXlm License Server Directory 16
Step 2: Deleting Older License Keys 17
Step 3: Adding New License Keys 18
Step 4: Starting and Stopping the License Server 20
Step 5: Configuring TotalView to Use the License Server 21
Reporting Problems with License Installation 22
TotalView Installation Guide
iii
4
Installing TotalView Individual 23
5
Uninstalling TotalView 25
The Three-Step Removal Process 25
Index 27
iv
Contents
Installing TotalView Using tar Files
This document provides information about installing the TotalView® Debugger
Team and TotalView® Team Enterprise using tar files.
c
h
a
p
t
e
r
The TotalView tar bundle includes the code for both TotalView and MemoryScape.
At the end of installation you will have both products installed on your system. If
you have purchased both products, when you complete the license procedure both
products will be activated. If you purchased only TotalView, only TotalView will be
activated.
1
If you are using the installer, you’ll find a link to a replacement for this chapter at
http:// www.roguewave.com/support/product-documentation/totalview.aspx.
Please contact us if you have problems installing TotalView, questions that are not
answered in the product documentation or on our Web site, or suggestions for new
features or improvements.
[email protected]
1-800-856-3766 in the United States
(+1) 508-652-7700 worldwide
TotalView Installation Guide
1
Step 1: Unbundling Downloaded Files
Step 1: Unbundling Downloaded Files
Use the tar command to extract the TotalView files contained within the installation
tar file. These files are either downloaded from our web site or obtained from a CDROM. For example:
tar xvf totalview-version-platform.tar
tar xvf totalview-version-doc.tar
Step 2: Running the Install Program
Before you can run TotalView, you must obtain a licence. You can obtain one by filling in the form located at http://www.roguewave.com/request-demo.aspx.
This section describes how you install a new version of TotalView. Before starting,
you should read the Release Notes on our web site. In addition, some operating systems may need to be patched. For more information, see the TotalView Platforms and
System Requirements guide.
Here is the procedure for installing TotalView:
1 (Optional) Go to the system upon which you will be installing TotalView and
become the root user:
su root
In some circumstances (particularly on a Macintosh), you’ll want to use the
sudo command instead of su. If you use the sudo command, you’ll be typing
sudo ./Install instead of ./Install in step 2.
Installing TotalView as the root user prevents users from modifying the software. However, you should not run TotalView as root.
2 Go to the directory containing the files extracted from the downloaded tar file
and then start the Install program by typing:
./Install
For information on using this command, type ./Install -help. If you use any of
the options described in this displayed information, the installation procedure
is no longer interactive.
3 The Install program asks you to accept the license terms for TotalView. You can
respond Yes to accept, No to decline, or ? to view the license terms. You must
accept the license terms to continue the installation.
4 The Install program asks that you name an installation directory. If the directory
you specify does not exist, the program requests a new location, effectively
meaning the directory you specify must already exist.
2
Chapter 1: Installing TotalView Using tar Files
Step 2: Running the Install Program
If you do not enter a name, the installation directory will either be
/usr/toolworks or /opt/toolworks—this is system-dependent. Type a period “.”
to place TotalView in your current directory.
This manual refers to the installation directory’s pathname as installdir.
The Install program then creates a toolworks directory and places two subdirectories within it:
totalview.version. This is where Install places TotalView.
flexlm-version: This is where Install places the license manager.
If you are installing TotalView on a Cray XT system, you should go to Step 7 on
Page 3. For more information about your Cray installation, see “Cray XT Installation” on page 5.
5 You are now asked to select which components you wish to install.
If you are installing TotalView for multiple platforms in a common NFS directory,
you only need to install the common components once.
6 The Install program asks if it should create a symbolic link (named totalview) to
this installation directory.
If you are not the root user, Install cannot create the link, so you should answer
“n” (no). If Install cannot create the link, you can ignore its complaints and continue installing TotalView by pressing Enter.
7 If you became root using su, exit from root after Install concludes by typing:
exit
8 Test if TotalView was successfully installed by typing:
installdir/toolworks/totalview.version/bin/totalview
TotalView prints information that includes a version number and a message
indicating that a license file is not installed.
If TotalView cannot initialize the license manager, it prints the following message:
Unable to initialize TotalView license
If you see this message, you need to confirm that you did install the license.
You may need to set the LM_LICENSE_FILE environment variable to the installation directory. (This variable is described in the next step.)
TotalView Installation Guide
3
Step 3: Installing a Demo License
Step 3: Installing a Demo License
Before you can use TotalView, you must place the demo license into the flexlm-version directory. This license file, which is called license.demo, was attached to the
email message confirming your download request. If your email system didn’t
retain this name, you must rename it after you save it to disk.
1 If you installed TotalView as the root user, become the root user again. If you
used sudo to install TotalView, use sudo in the following step.
2 Copy the license file to the flexlm-version directory.
cp license.demo installdir/toolworks/flexlm-version
3 To test that TotalView can use the license file, type:
installdir/toolworks/totalview.version/bin/totalview
TotalView responds by displaying its Root window.
After you purchase TotalView, you will receive a permanent license.
Setting the License File Variable
If you do not want to install the license.demo file in the installdir/toolworks/flexlmversion directory, you must set your LM_LICENSE_FILE environment variable to the
file’s full pathname. For example:
setenv LM_LICENSE_FILE
nonstandard-dir/license.demo
If a LM_LICENSE_FILE environment variable already exists, add the pathname for
license.demo to this variable’s declaration. Notice that the LM_LICENSE_FILE variable contains a colon-separated list of license file pathnames. For example:
setenv LM_LICENSE_FILE \
nonstandard-dir/license.demo:${LM_LICENSE_FILE}
4
Chapter 1: Installing TotalView Using tar Files
Step 4: Configuring Your Environment
Step 4: Configuring Your Environment
Before you can begin using TotalView, you must add TotalView to your PATH variable. On some systems, you may need to mount the /proc directory.
Cray XT Installation
Install TotalView where it is visible from your Linux login nodes. Do not install
TotalView on your compute nodes. TotalView communicates with these nodes using
a library created Cray.
Installing
Installing on a Cray XT system requires that you run the Install script on the boot
node (not the login node). First, log into the boot node as root, run xtopview, and
then run Install. Here are the required steps:
1 From the boot node as root, copy the TotalView software archive
cray-xt-totalview-8.9.1-0-totalview-support-1.1.2-0.tar
to
/rr/current/software/
2 From the boot node as root, run
xtopview -m "Installing TotalView"
3 In the xtopview session, enter the following:
cd /software
tar -xvf cray-xt-totalview-8.9.1-0-totalview-support-1.1.2-0.tar
./Install
4 Install the license (see Step 3: Installing a Demo License).
5 Exit xtopview
TotalView Installation Guide
5
Cray XT Installation
About the Install
When you install TotalView on a Cray XT CNL system, the Install script begins
by unbundling the tar file. It then invokes the rpm files contained within it.
In contrast to the standard TotalView installation, the Cray installation
doesn’t ask where it should install TotalView as it knows where to install
files.
The Install script also places the Cray bulk launching system and other support
modules within the installation directory.
TotalView on Cray XT systems uses totalview-support product components to provide essential interface components that allow TotalView to execute in Cray environments. Included within totalview-support are the totalview-support module, a
configuration file, and a set of bulk launcher executables.
The bulk launcher is a paired set of executables that use ALPS to scalably launch
the TotalView Debugger Server (tvdsvr) executable on compute nodes.
If you are running your program on an XT3 Catamount system
The tvdsvr process is called tvdsvr_rs.
In many cases, you will need to use the -nodes_allowed server command-line
option to tvdsvr_rs.
Your environment must set the RS_DBG_CLIENTS_PER_SERVER variable.
6
Chapter 1: Installing TotalView Using tar Files
Installing or Changing
a Regular License
c
h
a
p
t
e
r
2
This chapter describes the procedure for installing or changing a regular license.
To install TotalView software for the first time with a permanent license, begin
with the next section.
To create a FLEXlm user account, see “Creating a FLEXlm User Account” on
page 9.
To install TotalView software and use an existing license, see “Accessing a License Server” on page 9.
To shutdown and restart the license manager, see “Starting the License Manager Manually” on page 10.
If you are installing TotalView Individual, the information you need is Chapter 4,
“Installing TotalView Individual”.
TotalView Installation Guide
7
Planning for a Regular License
Planning for a Regular License
TotalView uses the FLEXlm® license management software to grant or reject
requests to use TotalView.
You do not need to install FLEXlm if you are using an evaluation license. That is, you
only need the information in this chapter after you purchase TotalView and have
received your regular license.
Your regular license is associated with a FLEXlm license manager host (the license
server) and is for a specific number of concurrent licenses or tokens, depending
upon the version you purchased.
Rogue Wave provides tools and HTML documentation for using FLEXlm.
Choosing a License Server
You will need to install the FLEXlm license server the first time you install a regular
license. In most cases, the license manager and TotalView reside on the same system. However, you can install them on different systems.
The license manager should reside on a machine that is reliable, always running,
and a permanent part of your local network. And, most importantly, it is accessible.
For example, do not place it on the other side of your firewall.
If you already have a FLEXlm license manager in your network, you should not
include your TotalView license with the other licenses managed by that license manager. If you must combine license managers, consult the FLEXlm documentation.
The TCP/IP port number used for the Rogue Wave license manager daemon must be
unique and not used elsewhere. You can find port numbers that other FLEXlm
license managers use in their license files.
Finding a License Server Host ID
When you install TotalView, the installer placed the files for the FLEXlm license
manager in installdir/tooworks/flexlm-version.
To obtain host information, run the toolworks_hostid script, as follows:
installdir/flexlm-version/bin/toolworks_hostid
Do not use the UNIX hostid command.
This script writes the host name and the FLEXlm host ID value to standard output;
for example:
The host name for this machine is: fast-server
The host ID for this machine is:
08122b2cf32d
After sending us this information and completing your order we’ll send you a permanent license key.
8
Chapter 2: Installing or Changing a Regular License
Creating a FLEXlm User Account
Creating a FLEXlm User Account
While you can run the FLEXlm license manager as root, you should run it as a
unique non-privileged (that is, non-root) user. Do this by creating a user account
reserved for FLEXlm’s use. You many need to refer to your operating system’s documentation or your site’s operating procedures for information on creating this
account. The user name does not have to be flexlm. Any unique name will do.
The account from which the license manager is run must have the following properties:
password is set to ‘*’ because interactive access is not required.
There is a unique user ID.
There is a unique group ID.
The login shell is /bin/sh.
The
Installing your Permanent License
This procedure is described in Chapter 3, “Installing License Keys,” on page 15.
Accessing a License Server
When you start TotalView, it must be able to find the license.dat file in the flexlmversion directory. If TotalView and the active license manager are installed on the
same host and you place the license.dat file in its default location, you can skip to
the next section, Starting the License Manager Manually.
If you are installing TotalView and the license server on different machines, you will
must place a license.dat file within each installation. Do this by copying the
license.client file from the license server to flexlm-version/license.dat in each installation. If you are using an existing license server, this is all that you have to do.
The format for the license.client file is:
SERVER host-name host-id port-number
USE_SERVER
For example:
SERVER fast-server 08122b2cf32d 7127
USE_SERVER
FLEXlm ignores all lines after USE_SERVER.
TotalView Installation Guide
9
Starting the License Manager Manually
Starting the License Manager Manually
You can start or stop the license manager by using the toolworks_init script. (This
script is created by the Configure_License script when you install the license.) If, for
example, the license manager software is installed in /usr/local/toolworks, the following commands start the license manager. Before entering these commands, use
the su shell command to become the root user.
In some environments, you’ll need to use the sudo command. If you use this command, you’ll type something like sudo ./toolworks_init start. Also, before you run
this program, make sure that you have write permission to this directory.
cd /usr/local/toolworks/flexlm-version/bin
./toolworks_init start
Although the start-up script should be run as super-user (root), the license manager is started using the FLEXlm user ID.
Check that the license manager started. Do this by examining the following file:
/usr/local/toolworks/flexlm-version/license.log
Stopping the License Manager
The way you stop the license manager is very similar to the way you started it. If the
license manager software resides in /usr/local/toolworks, the following commands
stop the license manager. (Before entering these commands, use the su shell command to become the root user or use the sudo command to directly invoke the following program.)
cd /usr/local/toolworks/flexlm-version/bin
./toolworks_init stop
Testing the License Manager
To verify that you installed the license manager correctly, you should manually start
the license manager and then run TotalView —don’t do this as root. After the
license manager starts, set the license file variable and test the license installation
by typing:
installdir/toolworks/totalview/bin/totalview
TotalView should respond by displaying its Root window. If it isn’t displayed, you
should:
at the flexlm-version/license.log log file. This file contains status and error
messages from the lmgrd license server.
Use the flexlm-version/platform/bin/lmstat command, which lists license manager
activity. For example, to list the number of licenses that are currently checked
out on a sun5 platform, type:
cd /usr/local/toolworks/flexlm-version/sun5/bin
Look
./lmstat -a -c ../../license.dat
10
Chapter 2: Installing or Changing a Regular License
Starting the License Manager When the System Boots
Starting the License Manager When the
System Boots
Most of our customer want the license manager to automatically start when the
license server boots. Do this by adding the toolworks_init command (see “Starting
the License Manager Manually” on page 10) to the appropriate system start-up file.
(Ask your system manager where this should go.) On most systems, you should
also automatically stop the license manager when the system shuts down to singleuser mode.
You can edit your startup files by running the Configure_Autostart shell script,
which must be run as root. For example, if the license manager software is in the /
usr/local/toolworks directory, run Configure_Autostart using the following commands. (Before entering these commands, use the su shell command to become
the root user or use the sudo command to directly invoke the following program.)
cd /usr/local/toolworks/flexlm-version/bin
./Configure_Autostart
Configure_Autostart prompts you with some configuration questions and then
makes its changes.
TotalView Installation Guide
11
Choosing a Standalone FLEXlm Version
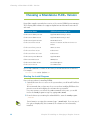
Choosing a Standalone FLEXlm Version
Rogue Wave supplies a stand-alone version of the version FLEXlm license manager.
The following table indicates the supported platforms and the tar file associated
with each.
Distribution Name
FLEXlm license manager for ..
flexlm-version-darwin-power.tar
Apple Mac OS X running on Power
flexlm-version-darwin-x86.tar
Apple Mac OS X running on Intel
flexlm-version-hpux11-ia64.tar
HP HP-UX for IA-64
flexlm-version-linux-ia64.tar
HP Linux for Itanium, Red Hat IA-64 Linux 7.2
and 8.0
flexlm-version-linux-power.tar
IBM Power Linux
flexlm-version-linux-x86.tar
RedHat Linux
flexlm-version-linux-x86-64.tar
RedHat Linux
flexlm-version-power-darwin.tar
Apple Mac OS X
flexlm-version-RS6000.tar
IBM RS/6000
flexlm-version-solaris-x86.tar
Sun Solaris Opteron
flexlm-version-sun5.tar
Sun SPARC Solaris
Use the tar command to extract the files that you downloaded from our web site.
For example:
tar xvf flexlm-version-platform.tar
Starting the Install Program
Here is the procedure for installing FLEXlm:
1 (Optional) Become the root user on the system where you will install TotalView:
su root
We recommend that you become the root user when installing FLEXlm as this
prevents users from modifying the software after you install it.
On some systems, you will use the sudo command. In this case, you would
invoke the Install program in step 2 by typing sudo ./Install.
2 From the directory containing the unbundled files, start the Install program:
./Install
For information on using this command, type “./Install -help”. If you use any of
the options displayed by this command, the software is non-interactively
installed.
12
Chapter 2: Installing or Changing a Regular License
Choosing a Standalone FLEXlm Version
3 The Install program asks you to accept the license terms for FLEXlm. You can
respond Yes to accept, No to decline, or ? to view the license terms. You must
accept the license terms to continue the installation.
4 The Install program asks that you name an installation directory. If the directory
you specify does not exist, the program requests a new location, effectively
meaning the directory you specify must already exist. The Install program then
creates a toolworks directory and places the flexlm-version directory within it.
Type a period “.” if you want Install to place FLEXlm 10.8 in your current directory.
If you do not enter a name, the installation directory is either
/usr/toolworks or /opt/toolworks—this is system dependent.
5 You are then asked which components you wish to install. You should answer
yes to all questions.
6 If you became root to install FLEXlm, use the exit command.
More FLEXlm Information
These instructions provide only basic information on installing the FLEXlm license
manager. For more information, see:
User Guide
An HTML version of the FLEXlm user manual is installed in
flexlm-version/doc/flexuser.
Flexera Software Web Site
FLEXlm is a product of Flexera Software. The web site at support.flexerasoftware.com/main/Default.aspx contains additional information about FLEXlm as well as utilities that can
help you manage your license server.
TotalView Installation Guide
13
Choosing a Standalone FLEXlm Version
14
Chapter 2: Installing or Changing a Regular License
Installing License Keys
c
h
a
p
t
e
r
This chapter describes the procedure for installing or changing a regular license.
The topics in this chapter are:
“Step 1: Locating the FLEXlm License Server Directory” on page 16
“Step 2: Deleting Older License Keys” on page 17
“Step 3: Adding New License Keys” on page 18
“Step 4: Starting and Stopping the License Server” on page 20
“Step 5: Configuring TotalView to Use the License Server” on page 21
“Reporting Problems with License Installation” on page 22
3
If you are installing TotalView Individual, the installer will install the license keys for
you. You should go to Chapter 4, “Installing TotalView Individual,” on page 23 for
more information.
You must install the FLEXlm version license management software on the machine
you have selected as your license server. FLEXlm is included in the TotalView distribution and was installed by the installation script.
TotalView Installation Guide
15
Step 1: Locating the FLEXlm License Server Directory
Step 1: Locating the FLEXlm License
Server Directory
Locate the flexlm-version directory that was installed in Step 1. This directory should
be located in the directory installdir/toolworks.
The default values for installdir are /usr and /opt depending on your platform.
Set the FLEXLM environment variable to:
installdir/toolworks/flexlm-version
For example:
setenv FLEXLM /usr/toolworks/flexlm-version
The FLEXLM environment variable is only used during this installation process. The
license management daemons do not use or need it.
16
Chapter 3: Installing License Keys
Step 2: Deleting Older License Keys
Step 2: Deleting Older License Keys
If you received new licenses keys because you moved your server or traded in existing license keys, the older license keys are no longer valid and must be removed in
order for you to be in compliance with the Rogue Wave Permanent License Agreement.
If you do not need to remove previous license keys, skip to “Step 3: Adding New
License Keys” on page 18.
The host information and license key information for the license keys that you need
to remove are included in the email we sent you. For each of these license keys,
that email listed:
The hostname of the license server.
The hostid of the license server.
The FLEXlm INCREMENT lines that contain the now invalid license key.
Here is how to remove an invalid license key:
1 Locate the machine that corresponds with the hostid for the invalid key. Since
hostnames are dynamic, you can use the ${FLEXLM}/bin/toolworks_hostid
script to validate the hostid of the license server.
The FLEXlm hostid is unique for each license server regardless of hostname and
IP address changes.
2 Locate the installdir/toolworks/flexlm-version directory on the license server.
3 If necessary, become the root user.
4 Make a temporary backup of the existing ${FLEXLM}/license.dat file. For example:
cp ${FLEXLM}/license.dat ${FLEXLM}/license.dat.bak
5 Using a text editor, edit the ${FLEXLM}/license.dat file to delete the INCREMENT
and comment lines—comment lines begin with ##—matching the key being
removed. Save this file.
6 If other license keys still exist in the license.dat file, tell the license server to
reread the license.dat and verify that these licenses still work. If they do, you
can delete the license.dat.bak temporary backup file.
Use the following command to tell the license server to reread your license.dat
file:
${FLEXLM}/bin/toolworks_lmreread
If no license keys remain in the license.dat file, use the following command to
stop the license server:
${FLEXLM}/bin/toolworks_init stop
TotalView Installation Guide
17
Step 3: Adding New License Keys
Step 3: Adding New License Keys
This step describes how to update and create the license.dat file that the license
manager uses to allow access to TotalView.
If your license server is already serving one or more TotalView licenses (that is, the
file ${FLEXLM}/license.dat already exists), go to “Revising Your license.dat File” on
page 18.
Adding a New
license.dat
File
The Configure_License script, which is located in the ${FLEXLM}/bin directory—creates the license.dat file and the toolworks_init script. Configure_License needs to
read the license.src file. This file, which you will create, contains TotalView license
keys.
Here is the procedure for creating this license.src file:
1 Change to the flexlm-version directory on the license server
cd ${FLEXLM}
2 Copy and paste the new Rogue Wave license keys—this is the information that
you received through email—into a file named license.src in the flexlm-version
directory.
The text in your license.src is derived from your host information, number of
license keys, and license configurations.
3 Run the ${FLEXLM}/bin/Configure_License script on the license server. You must
run this script while your current directory is flexlm-version. The script creates
the following files:
${FLEXLM}/license.dat
${FLEXLM}/license.opt
${FLEXLM}/license.client
${FLEXLM}/license.log
${FLEXLM}/bin/toolworks_init
Proceed to “Step 4: Starting and Stopping the License Server” on page 20.
Revising Your
license.dat
File
If you are currently using TotalView, you need to revise your ${FLEXLM}/license.dat
file. You do not need to create a new ${FLEXLM}/license.src file nor do you need to
rerun the Configure_License script unless you have deleted or changed the location
of the flexlm-version directory.
If the ${FLEXLM}/license.dat does not exist, you will need to follow the procedure
described in Adding a New license.dat File at the beginning of this topic. Since
Rogue Wave does not resupply all of your license keys when there is a license
change, you will need to combine the license keys that you already have with the
newly delivered keys.
Here is the procedure for revising your existing license.dat file:
1 Backup your existing ${FLEXLM}/license.dat file. For example,
cp ${FLEXLM}/license.dat ${FLEXLM}/license.dat.bak
18
Chapter 3: Installing License Keys
Step 3: Adding New License Keys
2 Using a text editor, edit the ${FLEXLM}/license.dat file and append the new
TotalView license keys delivered in this email message to the end of the
${FLEXLM}/license.dat file.
3 Tell the license server to reread your license.dat file:
${FLEXLM}/bin/toolworks_lmreread
TotalView Installation Guide
19
Step 4: Starting and Stopping the License Server
Step 4: Starting and Stopping the License
Server
Run the following command as root to start the license server.
${FLEXLM}/bin/toolworks_init start
As an alternative, you can run the commands within this section as an argument to
the sudo command.
If you configured your license server to run as a non-privileged user, the initialization script ensures that the license management daemons are started and run
under the non-privileged user even if you run the script as root.
To stop the license manager, become root, and then use the following command:
${FLEXLM}/bin/toolworks_init stop
If you would like the license manager to automatically start when the system is
booted, run the following script as root:
${FLEXLM}/bin/Configure_Autostart
20
Chapter 3: Installing License Keys
Step 5: Configuring TotalView to Use the License Server
Step 5: Configuring TotalView to Use the
License Server
TotalView must be able to find the ${FLEXLM}/license.dat file. If you are running
TotalView and the license server in the installation directory on the same machine,
you can skip this step.
If TotalView and the license manager are not running on the same machine, you will
need to place a ${FLEXLM}/license.dat file on each additional installation. Copy the
${FLEXLM}/license.client file from the license server into the flexlm-version directory
on each remote machine and rename that file to license.dat.
As an alternative, you can specify the full path to the license.dat file in your
LM_LICENSE_FILE environment variable. A client-style license.dat has the following
form:
SERVER hostname hostid port-number
USE_SERVER
TotalView Installation Guide
21
Reporting Problems with License Installation
Reporting Problems with License
Installation
If you have difficulties installing your license keys, please send email to
[email protected]. Please include the following:
Your license.dat file.
Your license.src file (if applicable).
The license delivery email.
The license.log file that was created when you attempted to start the license
manager and TotalView.
The text displayed in your window when you tried to start the license manager.
The text displayed in you window when you tried to start TotalView.
22
Chapter 3: Installing License Keys
Installing TotalView Individual
c
h
a
p
t
e
r
This chapter outlines the steps to install TotalView Individual. The installation is
less complex than the installation of the full product, and is guided by an installation script.
Before you install TotalView Individual, you must obtain an entitlement code. An entitlement code is a string that we display in your browser and that we also send to
you after you purchase the product.
4
In addition, you will need to go to our download area (http://www.roguewave.com/
support/contact-support/request-an-update.aspx) and download the version for
the platform for which you registered TotalView. TotalView Individual supports the
following platforms:
Apple
Mac OS X on Intel
Mac OS X on Power (G5)
Linux x86
Linux x86-64
Solaris-Opteron
Apple
The file you download is an executable shell file. For example:
sh darwin-x86.sh
We recommend that you install TotalView Individual running as root.
After entering this command, the installer displays a window. Just follow the
instructions. One of the screens asks that you enter your entitlement code.
The installer attempts to contact the Rogue Wave website to validate the entitlement code. If your computer is not connected to the internet, the installer will not
install TotalView Individual. During installation is the only time that an internet connection is required.
The installer sends your host ID to Rogue Wave, where we associate your entitlement code with this ID. In response, you are sent a license. After accepting the
license, the installer installs TotalView Individual and a license manager.
TotalView Installation Guide
23
If you lose your entitlement code we will have it on file. You can contact your salesperson directly or [email protected] to request that we re-send your entitlement code to you.
24
Chapter 4: Installing TotalView Individual
Uninstalling TotalView
The Three-Step Removal Process
c
h
a
p
t
e
r
5
If you need to remove or uninstall TotalView, the procedure is very straight-forward:
1 If the license server is running, stop it. If the license manager software is
installed in /usr/local/toolworks, the following commands stop the license manager. Before entering these commands, use may need to use the su shell command to become the root user or use the sudo command to directly invoke the
following program.
cd /usr/toolworks/flexlm-version/bin
./toolworks_init stop
2 Remove the installation directory. The default location is:
/usr/toolworks
If you have more than one version of TotalView, you can just remove what you
don’t want. If you are just removing a version, you do not need to stop the
license manager.
3 The home directories of all TotalView users will have a .totalview subdirectory.
Remove it.
If you’re not interested in using TotalView after trying it, we’d really appreciate you
sending email to [email protected] and letting us know why.
TotalView Installation Guide
25
The Three-Step Removal Process
26
Chapter 5: Uninstalling TotalView
Index
A
E
accessing a remote license server 9
adding new license keys 18
automatically starting license
server 11
entitlement code 23
environment variables
FLEXLM 16
LM_LICENSE_FILE 4
evaluation license 4
B
bulk launcher, Cray 6
C
changing license keys 15
changing licenses 7
checking if license manager is
started 10
choosing a license server 8
common components, installing 3
Configure_Autostart script 11, 20
Configure_License script 10, 18
configuring the license server 22
configuring your environment 5
Cray
bulk launcher 6
bulk launching system 6
installation 6
rpm files 6
totalview-support product
components 6
creating FLEXlm user account 9
F
finding a license server host ID 8
FLEXlm
host ID 8
information about 8
license management software
8
license manager, see also
license manager
license manager, stand-alone
12
license server directory 16
user account 9
user ID 10
FLEXLM environment variable 16
flexlm-version directory 4
flexlm-version/license.log log file
10
H
host ID, finding a license server 8
host ID, sending 23
D
debugger server, tvdsvr_rs 6
default installation directory 3
deleting older license keys 17
demo license
installing 4
TotalView Installation Guide
I
Install program 2, 2–3
-help command 2
installation directory 2
running 2
symbolic link creation 3
testing 3
Install program,
starting 12
installation directory 2, 13
default 3
default directory 13
symbolic link to 3
installation tar file 2
installation, Cray 6
installdir 3
installing a demo license 4
installing common components 3
installing license keys 15
installing licenses 7
installing new versions 2
installing the license server 8
L
license
changing 7
installing 7
planning for 8
license file variable 4
license keys
adding 18
changing 15
deleting older 17
email 17
installing 15
removing invalid 17
license manager 3
activity, listing 10
limitations 8
starting manually 10
stopping 10
testing 10
user account 9
27
license manager host 8
license manager not found error
message 3
license manager, checking if
started 10
license server 8
accessing 9
automatically starting 11
choosing 8
configuring 22
directory 16
host ID 8
installing 8
starting 20
stopping 20
license.client file 9, 21
license.dat file 9, 17, 21
revising 18
license.demo evaluation license 4
license.demo pathname 4
license.log log file. 10
license.src file 18
creating 18
list license manager activity 10
LM_LICENSE_FILE environment
variable 3, 4, 21
lmgrd license server 10
lmstat command 10
locating the license server 21
M
manually starting license manager
10
mounting proc directory 5
N
new versions, installing 2
-nodes_allowed server commandline option 6
O
obtaining an entitlement code 23
P
pathname for license.demo 4
proc directory
mounting 5
programs
Configure_Autostart 11
Install 2
toolworks_hostid 8
toolworks_init 10
28
R
reinstallations 3
remove invalid license keys 17
RS_DBG_CLIENTS_PER_SERVER
environment variable 6
running install program 2
S
sending host ID 23
software version 3
stand-alone license manager 12
starting Install program 12
starting license manager manually
10
starting the license server 20
starting TotalView 3
stopping the license manager 10
stopping the license server 20
sudo, using on Mac 2
symbolic link to installation
directory 3
T
tar file 2
tar file, unbundling 2
TCP/IP port number 8
test installation 3
testing license manager 10
toolworks directory 3
toolworks_hostid script 8, 17
toolworks_init script 10, 20
toolworks_init start command 10
toolworks_init stop command 10,
25
TotalView
listing the version 3
starting 3
uncompressing 2
untar’ing 2
TotalView Individual 23
connecting to internet 23
platforms supported 23
totalview-support product
components, Cray 6
tvdsvr_rs debugger server 6
U
unbundling tar file 2
uncompressing download 2
uninstalling TotalView 25
untar’ing download 2
user account for FLEXlm 9
Index