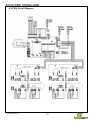
1
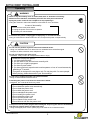
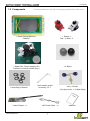
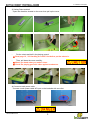
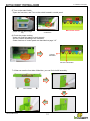
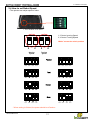
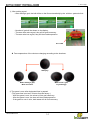
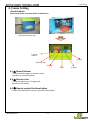
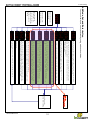
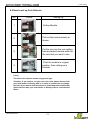
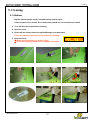
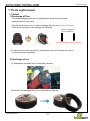
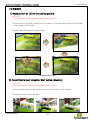
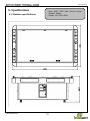
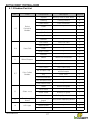
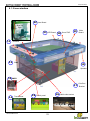
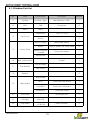
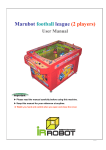
Marubot Football League (4 players) User Manual ★ Specifications including design and color are subjected to change without notice. Important ▶ Please read the manual carefully before using this machine. ▶ Keep this manual for your reference at anytime. www.irrobot.com Table of Contents Precautions for use ---------------------------------------------------------------------------- 2 1. Introduction 1.1 Product Information --------------------------------------------------------------------- 6 1.2 Components ----------------------------------------------------------------------------- 7 2. Installation Description 2.1 General Instructions --------------------------------------------------------------------- 8 2.2 Installation -------------------------------------------------------------------------------- 8 2.3 Handling the robot ----------------------------------------------------------------------- 11 2.4 How to set the robot speed -------------------------------------------------------------- 12 3. How to play? ----------------------------------------------------------------------------------- 13 4. Game Setting 4.1 Sound Volume --------------------------------------------------------------------------- 15 4.2 Service Coin ----------------------------------------------------------------------------- 15 4.3 How to Control the blow button ------------------------------------------------------------ 15 4.4 Mode, set, and enter button --------------------------------------------------------------- 16 4.5 How to set up Coin Selector ------------------------------------------------------------ 19 5. Cleaning --------------------------------------------------------------------------------------- 20 6. Trouble Shooting A. The Robot is not moving B The ball does not come out ---------------------------------------------------------------- 21 ----------------------------------------------------------- 22 7. Parts replacement 7.1 Robot ------------------------------------------------------------------------------------ 23 1) Exchange of pins 2) Exchange of Tire 7.2 Stadium ---------------------------------------------------------------------------------- 24 1) Exchange of LED in the playgound. 8. Specifications 8.1 Stadium specifications -------------------------------------------------------------------- 25 8.2 Robot specifications ------------------------------------------------------------------- 30 8.3 PCB Circuit Diagram -------------------------------------------------------------------- 35 9. Appendix 9.1 Core technologies 10. Customer Service www.irrobot.com ---------------------------------------------------------------------- 36 ---------------------------------------------------------------------------- 37 1 ☞PRECAUTIONS FOR USE The following safety precautions are given throughout this manual. They must be strictly followed to protect those who install, use or maintain this product as well as to prevent other people’s injuries and property damages. Be sure to read the following people's injuries and property damages. • The following suggestions show the degree of danger and damage caused WARNING Indicates a situation where disregarding the suggestions could result in death or serious injury. CAUTION Indicates a situation where disregarding the suggestions could result in injury or product damage. • The following graphic suggestions describe the types of precautions to be followed. Indicates a matter of which care should be taken. Indicates a matter which is forbidden. Indicates a matter which should be performed without fail. • The following graphic suggestions describe the types of precautions to be followed. In this instruction manual, some procedures require a qualified in-shop maintenance person or industry specialist. For such instructions, a qualified person must take care of the jobs. • Otherwise an electric shock, machine trouble, or a serious accident may result. • Replacing the machine parts, inspecting and maintaining the machines, and troubleshooting must be assigned only to a qualified in-shop maintenance person or industry specialist. This booklet gives instructions that hazardous jobs in particular must be handled by an industry specialist. Qualified in-shop maintenance person and industry specialist are defined as follows. Qualified in-shop maintenance person • A qualified in-shop maintenance person must have experience in maintaining amusement machines. Under the supervision of an amusement machines shop owner or manager, he or she routinely assembles, installs, inspects and maintains the amusement machines, or replaces their component units and consumable parts, in the amusement machines workshop and/or location. Jobs handled by qualified in-shop maintenance person • Assembling, installing, inspecting and maintaining amusement machines and replacing their component units and consumable parts. Industry specialist • An industry specialist must be engaged in designing, manufacturing, inspecting and servicing amusement machines. Or he or she must have an education in electrical, electronic and mechanical engineering, and routinely maintain and repair amusement machines. Jobs handled by industry specialist • Assembling and installing amusement machines and repairing and adjusting their electrical, electronic and mechanical component parts. www.irrobot.com 2 Setting Up WARNING Be sure to consult your nearest dealer when setting up, moving or transporting this product. • This product should not be set up, moved or transported by any one other than an industry specialist. Doing so could result in injury or product damage. • When installing this product, set the 4 leg levelers evenly on the floor and make sure that the product is installed stably in a horizontal position. Unstable installation may result in injury or accident. • When installing this product, use caution not to apply undue force to opening and closing parts and other movable parts. Otherwise, injury and accident may result, or the product may be damaged. This product is an indoor game machine. Never set the game machine up outside. • Setting this product up outside could result in accidents or equipment failure. Do not set the game machine up near emergency exits. • Doing so could block exits in time of emergency and could result in death or serious injury. Do not set the game machine up. 1. In a place exposed to rain or moisture. 2. In a place exposed to direct sunlight. 3. In a place exposed to direct heat from air-conditioning and heating equipment, etc.. 4. Near hazardous flammable substance such as thinner and kerosene . • Otherwise an accident or malfunction may result. Do not place containers holding chemicals or water on or near the game machine. • Electrical shock or damage could be caused by water or foreign matter entering the inside of the machine. Do not place objects near the ventilating holes. • Doing so could cause the internal temperature to rise excessively, resulting in fire or equipment failure. Do not bend the power cord by force or place heavy objects on it. • Doing so could result in electrical shock or fire. Never plug or unplug the power cord with wet hands . • Doing so could result in electrical shock or fire. Never unplug the game machine by pulling the power cord. • Doing so could damage the cord, resulting in electrical shock or fire. CAUTION Be sure to use indoor wiring for within the specified voltage range. For extension cord, use indoor wiring of the specified rating or more. • Failure to do so could result in fire or equipment failure. Be sure to use the attached power cord. • Otherwise a fire or machine trouble may result. Never plug more than one cord at a time in the electrical receptacle. • Doing so could result in fire or electrical shock. Do not lay the power cord where people walk through. You may trip on or stumble over the cord. • You may stumble down and get injured, or damage the power cord. Be sure to ground this product. • Otherwise an electrical shock or machine trouble may be caused. Do not apply a strong force for moving the machine. • Otherwise, it may result in an accident or breakage of the units. Clearance of 100 mm (3.94in) or more should be created between the game machine and walls. • Otherwise the machine (s) cannot be ventilated well, resulting in malfunction. Do not change the DIP switch setting of this product to other than factory setting. • Otherwise, the game can not be played properly. www.irrobot.com 3 Operating WARNING If there is any abnormality such as smoke, bad smell or abnormal noise being emitted from the machine, immediately turn OFF the main power switch and unplug the power cord from the receptacle to stop operating it. • Using the machine in abnormal conditions could result in fire or accidents. In case of abnormality 1. Turn OFF the main power switch. 2. Unplug the power cord from the receptacle. 3 . Contact your nearest dealer. Do not leave the power cord plugged in improperly or covered with dust. • Doing so could result in electrical shock or fire,so inspect the power cord periodically. CAUTION Do not use this product anywhere other than industrial areas. • Using in a residential area or an area next to a residential area could affect signal reception of radios, television sets, telephones, etc.. Do not give impact to the glass cover. • Otherwise, it may result in an unexpected accident or injury. • Please do not play this game if 1. you have been drinking. 2. you are tired or sick or have been recently sick. 3. you think you might be pregnant. 4. you have a pace maker. 5. you have previously experienced muscle spasms or loss of consciousness by watching a TV screen. • This game is designed for one player only. Do not play with 2 or more people. • When playing, please be aware of your surroundings. Do not plug or unplug the power cord with wet hands. • Doing so could result in electrical shock. In handling the power cord, follow the instructions below. • Otherwise, fire or electrical shock may result. • Do not damage the power cord. • Do not bend the power cord excessively. • Do not heat the power cord. • Do not bind the power cord. • Do not sandwich the power cord. • Do not modify the power cord. • Do not twist the power cord. • Do not pull the power cord. • Do not stand on the power cord. • Do not drive a nail into the power cord. If the power cord or power plug becomes damaged, stop using the machine immediately and ask your nearest dealer to replace the parts. • Using a damaged power cord or power plug could result in fire or electrical shock. www.irrobot.com 4 Inspection and cleaning Moving and transportation WARNING Be sure to turn OFF the main power switch and unplug the power cord from the receptacle before inspecting or cleaning the machine. • Failure to do so could result in electrical shock. When replacing parts, be sure to use parts of the correct specifications. Never use parts other than the specified ones. • Using improper parts could result in fire or equipment failure. There is high voltage inside the machine. Only qualified industry specialist is allowed to open the machine's back door. With the back door open, be very careful not to touch the monitor and its nearby parts. • Otherwise an accident or electric shock may result. If the sub power switch of the service panel is turned OFF without turning OFF the main power switch of the power supply unit, some parts in the units remain live. When opening the back door, be sure to turn OFF the main power switch and unplug the power cord from the receptacle. • Otherwise, there may be danger an accident or electric shock. Strictly refrain from disassembly and repair of parts which are not indicated in this manual, as well as settings and remodeling. • Otherwise, a fire, malfunction or trouble may result. In case of any trouble, ask your nearest dealer for repairs and other services. ANDAMIRO will not resume any responsibility for the damage to the product attributable to disassembly and repair of parts which are not indicated in this manual, as well as settings and remodeling. To clean the game machine, wipe it with a soft cloth dampened in a neutral detergent. • Using thinner of other organic solvent or alcohol may decompose the material. • Electrical shock or equipment failure could be caused by water entering the inside of the machine. CAUTION The game machine contains parts such as electronic components and precision components which are sensitive to vibrations and impacts. Great care therefore should be taken when moving and transporting the game machine. Be sure not to let the machine tip over. Before moving the machine, be sure to turn OFF the main power switch, unplug the power cord form the receptacle and remove the power cord form the machine. • Stepping on or tripping over the power cord may result in an accident or damage to the machine. Before moving the machine, be sure to fully lift the four levelers and move it on the casters. • Otherwise, an accident, breakage or trouble may result. Do not apply a strong force for moving the machine. • Otherwise, it may result in an accident or breakage of the units. PRECAUTIONS IN HANDLING • When setting up, inspecting, maintaining, moving or transporting this product, follow the procedures and instructions set forth in this manual and perform such work safely. • Do not set up, handle, inspect, maintain, move or transport this product under conditions equivalent to the condition of "WARNING" or "CAUTION" specified in this manual. • If a new owner is to have this product as a result of transfer, etc., be sure to give this manual to the new owner. www.irrobot.com 5 1. Introduction 1. Introduction Welcome! Thank you for purchasing our Marubot Football League game machine. It is brand-new model of the robot game machines that we have developed this category since 2003. The basic techniques under patent pending are stable power supplying method without any power cable or battery and infrared ray control system. Our techniques make it possible to operate the robot without any additional countermeasure to play the game once it is launched. Please read this manual carefully before operating the machine to avoid any trouble from wrong use. Thank you and enjoy with our robots. 1.1 Product Information Game Name : Marubot Football League (4 players) Main Features : - Using our patented technologies, 4 players control wireless robots one by one in the play ground using the joystick. - Football or battle game can be played. Since there is no need additional battery charging, players are able to last enjoying the game. Specifications : - Dimension : 2000 * 1500 * 864 (W x D x H)mm - Weight : 300 kg - Power AC 110/220V, 50/60Hz www.irrobot.com 6 1. Introduction 1.2 Components All components are in the box on the play ground inside of the cover. < Game Playing Machine > “Stadium” < Robots > Red : 2, White : 2 < 2 Balls > < Spare Part : Power supplying Pin Total 24 ea (4 robots, each 6 pins) > < Snap Ring for Wheel> < the hexagon socket screw key, 2.5” > <Key : 2 kinds> (1for glass cover , 1 for Main Body) < Hand Cleaner : 1> www.irrobot.com <AC Power Cable : 1> 7 <Manual> 2. Installation Description 2. Installation Description 2.1 General Instructions 1) Consider to avoid the place such as humid, dusty or any possibility to damage the machine during transportation or storing the machine, otherwise it can be major reason to damage the machine. 2) Do not disassemble, repair, or remodeling the machine except authorized expert. 3) Avoid direct sunlight or placing the machine beside heating machine. 4) Do not put wet hands or articles on the power supplying board once the power in “On”. 5) Before cleaning the machine, the power should be “Off”. Do not put the water or chemical cleanser inside of the machine and just clean up with dried towel. Get rid of any wetness. 6) Make sure to remove any dust and especially metallic articles on the power supplying board, otherwise it is caused to short the power or create possible burning. 2.2 Installation • Installation or dismantling should be made by authorized expert. Contact your local dealer if you have any trouble on the machine. • Avoid any shock during transportation or installation. • Keep the machine horizontally and hold it with stopper provided. • The Z/B signal might be jammed up, if you install more than 2 machines in same area(within20m) 1) Location - Find stable and flat place. Avoid moisture place. - Avoid a direct light, heat, and the place changes humidity and temperature dramatically. - All machines must use proper power outlet. - Please check total amperage when you use an extension line. 2) Set up - Fix the machine with stoppers under the machine. www.irrobot.com 8 2. Installation Description 3) Setting Robot and ball - Open the chemloks located on the cover then pull up the cover. - Put the robots and ball in the playing ground. Read page 12, “2.3 Handling the robot” first before put the robots in. - Then, pull down the cover carefully. Watch you hand when you make it close. Check the playing ground is clean against conductors. 4) Connect a main power cable - Connect a main power cable AC input on the backside with an outlet. www.irrobot.com 9 2. Installation Description 5) Turn on the main Switch - Open the front door, and Turn on the switch located in control panel. ①Open the front door using a key ② Turn on the switch on the control box Main Power switch 6) Check the proper working - Insert coin and play game to work properly. - Set the volume according to the condition. - Other functions of control panel are described on page “16” Volume Controller Service Coin button 7) When you see the front side of Machine, you can find coin/bill assembly. Coin module www.irrobot.com Coin Collect box 10 2. Installation Description 2.3 Handling the robot 1) Position the power switch to "On" which is located on the lower side of the robot and lay down it on the power supplying board. ♣ Remark : On/Off switch of the robot The switch is Off LED lamp is off The switch is On LED lamp is on 2) Since very sensitive electronic parts are used for the control unit and the robot, avoid any shock. 3) It is recommendable to play the game after 20~30 minutes from the power “On” because warmup is needed to avoid troubles if the machine is not operated in the long time. 4) The wheel of the robot can be worn away or changed its shape after long time operated, check the condition of it periodically and replace it if it is not good shape. If the wheel is cleaned out from time to time, it will drive more smoothly. 5) You have to check the power supplying pins peroidically. They are needed to replace immediately when they are run out. (Every 500plays are recommended) 5) In case the storage battery is discharged, the robot is inactive, position the power switch to “On” and place the robot on the power supplying board at least 30 minutes. Make sure that the power of the control unit should be “On” and not to play the game until full charged. www.irrobot.com 11 2. Installation Description 2.4 How to set Robot Speed. * The operator can adjust speed of robot. < The location of ID S/W > 1, 2 Control moving Speed 3, 4 Control Turning Speed *White” means the switch position 1 2 Moving Speed 3 4 Turning Speed Fastest 1 2 3 4 OFF OFF OFF OFF 1 2 3 4 OFF OFF OFF OFF Fast 1 2 3 4 ON OFF OFF OFF 1 2 3 4 OFF OFF ON OFF Normal 1 2 3 4 OFF ON OFF OFF 1 2 3 4 OFF OFF OFF ON Slow 1 1 2 3 4 ON ON OFF OFF 3 4 OFF OFF ON ON * When setting is finished, the power should be off and on. www.irrobot.com 2 12 3. How to play? 3. How to play ? ① Insert Designated Coin. - When you insert coin, the start button is lighted on. - The FND shows Credit number. - Give 10 seconds to find players robot and prepare. Push the “Start” Button on both display panel. - The both side “Start” buttons must be pushed for starting game. - “Start “ button’s light turns off when the game is started. - Even if player doesn’t push the start button, The game starts automatically after 10 seconds. - The LED lamps in the playing ground are turn in white. - Start the game with whistle. - “Time” FND shows remaining game time. - The Operator can adjust the game time Time Credit Start 버튼 - Default game time is 3 minutes. . (Refer to page 16,17) ③Control the robot using joystick and steering. - Joystick control push up : Go forward Pull down : Go backward - Steering control Turn left : Turn left Turn right : Turn right 조이스틱 터보버튼 - Turbo Button (It turns on when you push the button) It moves faster when you control the robot pushing the turbo button. There is no function individually. ④Robot function - Dribble : the player control the ball with magnetic on the front of the robot. - Battle : Beat the enemy when you want to intercept the ball.. It’s not easily broken with crash. - Ceremony : The robot does ceremony when you make a goal or win the game. - Face expression : The face expression change occasionally.(refer to page14) www.irrobot.com 13 핸들 3. How to play? ⑤ After making a goal - After making a goal, the ball will be on the floor automatically by the air blow system built-in. - Number of goal will be shown on the display. - The team who make a goal, they will do goal ceremony. - The team who lose a goal, they will show sad expression. Score FND ♣ Face expressions of the robot are changing according to the situations. Start play When making a goal, Wink and smile. When loose a goal, Cry and angry. ⑥ The game is over after designated time is passed. (The game time is set as 3 minutes from the factory.) - After the game is over, the winner will do goal ceremony. - After the game is over, the loser will show sad expression. - If the game is over in a tie, both teams will do final ceremony. www.irrobot.com 14 4. Game Setting 4. Game Setting •Control panel The Control panel is located inside of small door. Open a lock with a key. ① Sound Volume ⑥ Blow ② Service Coin ③ Mode ④Set 4.1 ① Sound Volume The sound will be bigger to turn the volume controller to counter clockwise. 4.2 ② Service coin To play the game free of charge, push the service coin button. 4.3 ⑥ How to control the blow button In case of the ball does not come out push the blow button. www.irrobot.com 15 ⑤ Enter 4. Game Setting This number means how often the “attracting sound” comes out. When you push the mode button, displayed time go back to 0 (minimum). Whenever you push the set button, displayed number is increased by 30 up to 9930 This number means how many tickets are dispensed for both player when they draw. When you push the mode button, displayed ticket amount go back to 0 (minimum). Whenever you push the set button, displayed number is increased by 1 up to 250 This number means how many tickets are dispensed for Winner. When you push the mode button, displayed Winner Ticket Amount go back to 0 (minimum). Whenever you push the set button, displayed number is increased by 1 up to 250 This number means how many tickets are dispensed for looser. When you push the mode button, displayed Looser Ticket Amount go back to 0 (minimum). Whenever you push the set button, displayed number is increased by 1 up to 250 This number means how many tickets are dispensed. When you push the mode button, displayed count goes back to 0. It shows how many credits are loaded now. The credits are remaining although the machine are turned off and on. (Service credits are removed) It shows how many plays have been done by coin. (Service plays are not counted). When you push the mode button, displayed count go back to 0. This number means how many coin is needed for a play. When you push the mode button, displayed coin go back to 0 (minimum). Whenever you push the set button, displayed Coin is increased by 1. “0” means free game. When you push the mode button, displayed time go back to 30 (minimum). Whenever you push the set button, displayed time is increased by 30 up to 570 You can set time, coin, count, and credit by using mode and set button. 4.4 Mode, Set, and Enter button Push set button for 2-3 seconds. You can see “robo” sign on the display. With pushing the mode button, you can set 4 functions. Push the enter button which you need to change This number means how often the “Demo sound”, lightning and sound, comes out. When you push the mode button, displayed time go back to 0 (minimum). Whenever you push the set button, displayed number is increased by 30 up to 9930 Blank function If you push the enter button under “End mode”, It means that you save the configurations. Push the enter button after setting 16 www.irrobot.com 4.4.1 Coin Setting. . ◈ Set the coin number for a game ◈ How to set? Set (Push 2~3 Sec) push Mode (1time) Enter button Increase the number by 1, when you push the set button. From to When you push the mode button, the number goes back to . After setting the number, push the enter button Push the enter button again. 4.4.2 Time Setting. . ◈ Set the play time for a game ◈ How to? : It can be adjust from 30 to 570 seconds. Set (Push 2~3 Sec) push Mode (2time) Enter button Increase the number by 30, when you push the set button. From to When you push the mode button, the number goes back to . After setting the number, push the enter button Push the enter button again. 4.4.3 Credit reset . ◈ The number of credit goes back to “0” ◈ How to? Set (Push 2~3 Sec) push Mode (3time) Enter button It shows the loaded credit number. EX) 2coins the count goes back to “0” Push the mode button After setting the number, push the enter button Push the enter button again. www.irrobot.com 17 4.4.4 Attract sound time. . ◈ Attract sound (the sound when the games are not playing) interval setting.. ◈ How to? : It can be adjusted from 0 to 240 by 30. I you set “0”, the function does not work. Set (Push 2~3 Sec) push Mode (9time) Enter button Increase the number by 30, when you push the set button. From to When you push the mode button, the number goes back to . After setting the number, push the enter button www.irrobot.com Push the enter button again. 18 4. Game Setting 4.5 How to set up Coin Selector No Photos Setting Up 1 Setting Module 2 Pull out the module slowly as shown. 3 Put the coin into the coin setting hole and adjust module width for the coin that you want to use. 4 Push the module to original position, then setting-up is finished. [ Note ] The above coin selector shows only general type. Therefore, If you want to use your own coin, then please discuss with your local dealer or directly with us in order to confirm how to change. And also if you want to use bill selector or ticket dispenser additionally, please discuss with your local dealer or directly with us as mentioned above. www.irrobot.com 19 5. Cleaning 5. Cleaning 5.1 Stadium Regular cleaning helps robot’s smooth moving and life cycle. It need at least once a month. If it’s under dusty condition, it is needed once a week 1) Turn off the main switch before cleaning. 2) Open the cover 3) Clean with the cleaner that we supplied(Strongly recommended). If you use wet towel, you have to dry up before operating. 1) Close the cover Watch you hand when you make it close. Check the playing ground is clean against conductors. www.irrobot.com 20 6. Trouble shooting 6. Trouble shooting A. Robots are not moving 1) Check the main power is on. If every powers are on, go to next step. 2) Even every powers are on, FND, and LED are out, there are conductors on the playing ground. Check point : ①Turn off the main power switch on the control panel. ②Disconnect the main AC cable. ③Pull up the cover and clean the playing ground. ④Check the power 6 supplying pins on the bottom of the robot. (Six pins are need exactly. If there are not enough, please reinstall all of six) ⑤Check the condition of power supplying pins. If they are abnormal condition, need to replace. ⑥Turn on the robot and put them on the playing ground. ⑦ Pull down the cover and connect AC cable. ⑧Turn on the main power switch on the control panel. ⑨Try to play game, that it works properly. ⑩If there is still a problem, go to next step. 3) You need to check Main Board and transportation. Call to the engineer. B. One of two robot is not moving. 1) Check the robot switch is on. 2) Check the power 6 supplying pins on the bottom of the robot. (Six pins are need exactly. If there are not enough, please reinstall all of six) 3) Check the condition of power supplying pins. If they are abnormal condition, need to replace. 4) If it’s still not moving, it might be discharged. Lay down the robot on the playing ground for 30 minutes then play again. If it’s discharged, face LED blinking frequently. (Refer to page11) 5) If it’s still not working, replace the robot. 6) After all, you cannot solve the problem, call to the engineer. www.irrobot.com 21 6.3 The ball does not come out Once the ball goes in goal area, the ball move through the guide to the center pipe. And Air Blow System will blow the ball to the playing ground. The balls might be jammed at the entrance. Push the blow button on the control panel. 1) Try to test with blow button on the control panel in the front door 2) The ball is still not come out : If there is any foreign element, particle, or dust in the goal area or in the guide, the ball will not come out to the ground and it needs to remove them immediately. 3) How to remove particles : Use THE vaccum cleaner to remove particles in the ground especially in the goal area and remove particles in the guide with hands after opening the door behind the machine. www.irrobot.com 22 7. Parts replacement 7. Parts replacement 7.1 Robot 1) Exchange of Pins The power supplying pins are for supplying the power from the power supplying board to the robot. If the tip of pin is worn out, it needs to change with new one.(Every 500 plays) There are 6 extra pins in the package for replacing. Power Supplying Pins condition (Normal Condition) (Need to replace) It is easy to take out pin by pulling it and push the pin until the gold color part is not showing when replacing it. 2) Exchange of tire (1) Disentangle the wheel with a Snap Ring remover. (2) Remove the damaged tire on the wheel and set new tire. www.irrobot.com 23 7. Parts replacement 7.2 Stadium 1) Replacement of LED in the playing ground. * NOTICE. You must turn off the machine before you do work. 1) Pull up the cover and check the LED location. Unscrew 2 bolt that fix LED board, then replace LED board. 2) Install the LED board in reverse way. < Disassemble order> 2) Robot Control part (Joystick, Start button, Steering) * NOTICE. You must turn off the machine before you do work. 1) Unscrew all bolts pix the panel, then uncover the part, and replace. 2) Install the part in reverse way. www.irrobot.com 24 8. Specifications 8. Specifications 8.1 Stadium specifications www.irrobot.com • Size : 2000 * 1500 * 864 (W x D x H)mm • Weight : 300kg • Power : AC 100V, 50Hz 25 8. Specifications 8.1.1 Stadium part’s name 9 Playing ground 8 Glass Cover 1 Robot Control part 1 10 Ball dispenser LDE Score FND Robot Control part 2 7 2 Coin Acceptor Turbo button Speaker 6 Time 3 Start FND Credit Coin Collect box 4 Start button 5 www.irrobot.com 26 Wheel / Stoper 8.1.2 Stadium Part List NO. 1/2 3/4 5 6/7 8 9 10 www.irrobot.com Parts Robot Controller Module Start FND Wheel/Stopper Coin Collect Module Glass cover Electric supply board LED Light Components Description Amount Joystick Moving Control (Red, Blue) 4 Steering Turning Control 4 Turbo Button Fast movement 4 Panel - 4 Acrylic cover - 4 Joystick Bracket - 4 Steering Bracket - 4 Harness - 4 FND Board Time/coin FND 2 Start Butoon - 2 Panel - 2 Acrylic Cover - 2 Harness - 2 Wheel Wheel for movement 4 Stopper Set the machine 4 Coin Acceptor Sample Coin acceptor 1 Coin Collect Coin Collect box 1 Bill acceptor cap Block it when you don’t need a bill acceptor 1 Key Door Lock 2 Coin Box Bracket - 1 Coin acceptor Door - 1 Coin collect Door - 1 Glass Reinforced glass 1 Door frame - 1 Glass Guide Bracket for glass 1 Handle Rolling Type handle 1 Auto power supplying board 1 - 4 Reflect panel - 4 Harness - 4 Electric supply board LED Board 27 8. Specifications 8.1.2 inner stadium 22 User Board Blow Up Pipe 21 11 12 LED Board 20 19 Score FND Main Board Air Blow FAN 18 Speaker 13 SMPS 17 14 Transformer www.irrobot.com 16 15 Control panel 28 Multi-outlet socket Coin Box Bracket 8.1.2 Stadium Part List NO. Parts Components Description Amount 11 Air Blow Air Blow + pipe Ball dispenser. 220V 1 12 FAN FAN Cooing fan 2 13 SMPS SMPS - 1 Transformer 110V ==> 220V 1 Out-let - 1 ON/OFF Switch Main power switch 1 Button Service, Mode, Set, enter, blow 5 Volume controller + Handle Control the volume 1 control FND - 1 - 6 outlet 1 Coin acceptor - 1 Key + lock - 1 14 Transformer 15 16 Control Panel Multi-outlet socket 17 18 19 Coin Bracket Speaker 2 Main Board - 1 MCU Control the main board 1 Coin MCU Control the coin board 1 Sound MCU Control the sound 1 Main Board 20 Score FND - Show the score 2 21 LED light LED PCB - 4 22 User Board Board + Z/B PCB Robot contoller 2 www.irrobot.com 29 8. Specifications 8.2 Robot specifications Head Part Body part wheel Ball guide Magnetic [MARUBOT(game robot)] www.irrobot.com 30 8. Specifications Robot PCB part Head Cover 6 7 1 2 Left body cover Right body cover 4 3 Left wheel Right wheel 5 Bottom part www.irrobot.com 31 8. Specifications 1 2 Left/Right Cover 3 4 Left/Right Wheel 5 Left/Right BLDC Motor / Base Cover www.irrobot.com 32 8. Specifications 6 7 Head Cover / Reflector Face PCB / Sensor PCB / Control PCB www.irrobot.com Power PCB 33 8.2.2 Robot Part List NO. 1/2 3 4 5 6 7 www.irrobot.com Parts Body Case Wheel set (left) Wheel set (right) Components Description Amount Robot body (Left) Plastic cover 1 Robot body (Right) Plastic cover 1 Wheel - 1 Tire - 1 Snap ring - 1 Wheel - 1 Tire - 1 Snap ring - 1 Bottom Case Plastic cover 1 Motor cover Plastic cover 1 BLDC Motor Planet gear motor 2 Rear wheel Bearing 2 Rear wheel tire Robber tire 2 Harness - 2 Head case Plastic cover 1 Top corn Plastic cover 1 Face PCB Control the face expression 1 Sensor PCB Main Control PCB 1 Power PCB Power supplying system 1 Harness - 1 Robot bottom part Head part Robot PCB set 34 8.3 PCB Circuit Diagram www.irrobot.com 35 9. Appendix 9. Appendix 9.1 Core technologies : Electric Supply System Supplying the necessary electric power from the supplying board to robot - No Battery Required. Robot in action ▶ Electric Supplying Board Supplying the electric power DC 12V +, - electricity ▶ Supply and Demand part Located at robot’s bottom part Gets electric supply from the board ※ The main reason of unpopularity of robot game is due to battery issue in the past. ※ At present electric supply system is patent registered in Korea (2004.6.22) & patent applied in Japan. www.irrobot.com 36 10. Customer Service 10. Customer Service If you have questions concerning this product, please contact your local dealer. IR ROBOT CO., LTD. Head Office : 1302-2, 401-dong, Bucheon TechnoPark, 193 Yakdae-dong, Wonmi-gu, Bucheon-si, Gyeonggi-do, Korea Tel.+82-32-326-3466 / Fax.+82-32-326-3468 / Mobile.+82-10-4185-3466 E-mail : [email protected] Homepage : www.irrobot.com www.irrobot.com 37