1
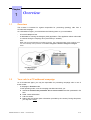
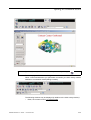
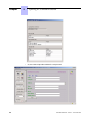
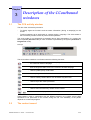
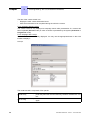
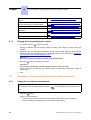
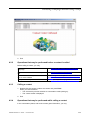
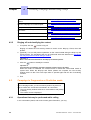
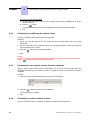
Alcatel-Lucent OmniTouch Contact Center
Standard Edition
CCoutbound
User Manual R10.0
Legal notice:
Alcatel, Lucent, Alcatel-Lucent and the Alcatel-Lucent logo are trademarks of
Alcatel-Lucent. All other trademarks are the property of their respective
owners.
The information presented is subject to change without notice.
Alcatel-Lucent assumes no responsibility for inaccuracies contained herein.
Copyright © 2012 Alcatel-Lucent. All rights reserved.
The CE mark indicates that this product conforms to the following Council
Directives:
- 2004/108/EC (concerning electro-magnetic compatibility)
- 2006/95/EC (concerning electrical safety)
- 1999/5/EC (R&TTE)
Chapter 1
Overview
Overview .................................................................................................... 1.1
Your role in a CCoutbound campaign ............................................ 1.1
Chapter 2
Opening a CCoutbound session
Opening a CCoutbound session in the CCA application ......... 2.1
Chapter 3
Description of the CCoutbound windows
The CCA activity window .................................................................... 3.1
The contact record ................................................................................. 3.1
The CCO script editor window .......................................................... 3.3
Campaign without a script ............................................................................. 3.3
Campaign with a script .................................................................................. 3.4
0-1
Chapter 4
Processing a campaign without using a script
Campaign in Preview mode (only one contact presented) ..... 4.1
Asking for a contact to be presented. ............................................................ 4.1
Operations that may be performed before the contact is called .................... 4.1
Calling the contact. ........................................................................................ 4.1
Operations that may be performed while calling a contact ............................ 4.1
Ringing off and classifying the contact .......................................................... 4.2
Campaign in Preview mode (several contacts presented) ...... 4.2
Asking for a contact to be presented. ............................................................ 4.2
Operations that may be performed before a contact is called ....................... 4.3
Calling a contact ............................................................................................ 4.3
Operations that may be performed while calling a contact ............................ 4.3
Ringing off and classifying the contact .......................................................... 4.4
Campaign in Progressive or Predictive mode ............................. 4.4
Operations that may be performed while calling ........................................... 4.4
Ringing off and classifying the contact .......................................................... 4.5
0-2
List of operations that can be performed during the campaign
........................................................................................................................ 4.5
Rejecting the contact presented .................................................................... 4.5
Completing or modifying the contact's data ................................................... 4.6
Permanently removing the contact from the campaign ................................. 4.6
Scheduling a contact callback request .......................................................... 4.6
Removing the contact from the campaign ..................................................... 4.7
Viewing all directory numbers saved for the contact ..................................... 4.7
Adding a new directory number for the contact ............................................. 4.8
Masking/Viewing the contact record .............................................................. 4.8
Chapter 5
Processing a campaign using a script
Campaign in Preview mode (only one contact presented) ..... 5.1
Modifying the work setup ............................................................................... 5.1
Asking for a contact to be presented. ............................................................ 5.2
Operations that may be performed before the contact is called .................... 5.2
Calling the contact. ........................................................................................ 5.2
Operations performed while calling a contact ................................................ 5.2
Ringing off and classifying the contact .......................................................... 5.3
Campaign in Preview mode (several contacts presented) ...... 5.3
Modifying the work setup ............................................................................... 5.3
Asking for a contact to be presented. ............................................................ 5.4
Operations that may be performed before a contact is called ....................... 5.5
Calling a contact ............................................................................................ 5.5
Operations performed during the call ............................................................ 5.5
Ringing off and classifying the contact .......................................................... 5.6
Campaign in Progressive or Predictive mode ............................. 5.6
Modifying the work setup ............................................................................... 5.6
Operations performed during the call ............................................................ 5.7
Ringing off and classifying the contact .......................................................... 5.8
List of operations that can be performed during the campaign
........................................................................................................................ 5.8
Rejecting the contact presented .................................................................... 5.8
Completing or modifying the contact's data ................................................... 5.9
Permanently removing the contact from the campaign ................................. 5.9
Scheduling a contact callback request .........................................................5.10
Removing the contact from the campaign ....................................................5.10
Viewing all directory numbers saved for the contact ....................................5.10
Adding a new directory number for the contact ............................................5.10
0-3
0-4
1.1
Overview
This manual is intended for agents responsible for processing (treating) calls from a
CCoutbound campaign.
As a CCoutbound agent, you should have the following items on your workstation:
-
A Pro-ACD telephone set.
-
A dedicated PC running the CCagent (CCA) application. This application allows calls made
to contacts during the campaign to be processed (or "treated").
Note:
Make sure the CCA application is installed on the PC. This is indicated either by the presence of an
icon or the desktop or the presence of the Start > Programs > Alcatel > CCagent > CCagent
menu.
1.2
Your role in a CCoutbound campaign
As a CCoutbound agent, you may be responsible for processing campaign calls in one of
these modes:
-
A campaign in Preview mode.
In this operating mode, once the campaign has been launched, you:
a. Ask for a contact to be presented. One or more contacts are then presented in list
form.
b. Read contact information.
c. Call the contact.
d. Dialog with the contact (enter information provided by the contact). During this phase,
you may use a script.
1-1
Chapter
1
Reminder 1:
The script corresponds to an on-line questionnaire that you complete as the contact answers the
questions.
e. Ring off and classify the contact in order to save contact information in a database.
During the different call phases, you may perform operations such as refuse the contact,
agree on a scheduled callback with the contact, etc. All such operations are described in
this manual.
-
A campaign in Predictive or Progressive mode.
The operating modes of these campaigns are similar from the agent's point of view. The
only difference is the way in which the system distributes contacts. When a campaign is
launched, CCoutbound makes calls to different campaign contacts. When a contact
answers, the call is transferred to you (automatic connection).
In this operating mode, you:
a. Dialog with the contact (enter information provided by the contact). During this phase,
you may use a script.
Reminder 2:
The script corresponds to an on-line questionnaire that you complete as the contact answers the
questions.
b. Ring off and classify the contact to save the information provided by the contact in a
database.
During the different call phases, you may perform operations such as, agree on a
scheduled callback with the contact, delete the contact when requested by the contact, etc.
All such operations are described in this manual.
1-2
2.1
Opening a CCoutbound session in the CCA application
Prerequisites:
The PC must be powered up and a Windows™ session open.
1. Click the menu Start > Programs > Alcatel > CCagent > CCagent.
The CCA activity window is displayed:
2. Click the
button to log on to your station.
The [Logon] dialog box opens.
3. Enter your agent number and click OK.
The [Agent logon] dialog box opens.
Example:
2-1
Chapter
2
!" 4. Enter your password (if required).
5. Select your processing group from the [Assigned group] field. You may search for a
processing group either by name or by number by checking the check box to the right of
the drop-down menu.
6. Check the Outbound campaign box.
7. Check the Script editor box if you are to use a script.
8. Click OK.
The window then displayed differs according to whether the campaign has been launched
or not.
a. The campaign has not been launched:
Only the CCA activity window is displayed (whatever the type of campaign).
An empty frame (with no icons) is displayed in the window. If this is not the case,
perform the following operations:
i. Right-click in the CCA activity window to open the shortcut menu.
ii. Select Toolbar, then Outbound bar.
An empty frame is displayed in the CCA activity window.
iii. End of the procedure.
When the campaign is launched, the display changes to become as shown in section b
below.
b. The campaign has been launched.
• For a campaign in Preview mode:
The presence of the
button in the CCA activity window indicates that the
campaign has been launched. If a script is used the CCO script editor window is
also displayed. The presence of the
button (enabled) in this window also
indicates that the campaign has been launched.
2-2
!" In this configuration, you may ask for a contact to be presented by clicking the
•
button.
For a campaign in Predictive or Progressive mode:
When a call is transferred to you (automatic connection), the CCA activity window
switches to conversation mode (talking to status).
The following windows may be displayed (in addition to the CCA activity window):
• Either, the contact record, if no script is used.
2-3
Chapter
!" 2
•
2-4
Or, the CCO script editor window if a script is used.
!" 9. End.
2-5
Chapter
2-6
2
!" 3.1
The CCA activity window
The role of the CCA activity window is:
-
To display agent set functions and set status information (during a campaign) on the
screen.
-
To allow operations to be performed on contacts during a campaign. The CCO toolbar in
the CCA activity window is used to perform these operations.
The CCO toolbar is only displayed at campaign launch after presentation of a contact has
been requested (Preview mode) or when a contact is presented by the system (Predictive or
Progressive mode).
Example:
The CCO toolbar contains a set of buttons with the following functions:
/
:
Used to remove a contact from the campaign. The contact can be called in
the context of another campaign
:
Used to permanently remove a contact from the campaign. The contact can
then no longer be called, even in the context of another campaign
:
Used to update (save) contact data
:
Used to program a scheduled callback
:
Used to classify contact data for it to be saved at system level
:
Used to reject the contact presented
:
Used to display all directory numbers saved for the contact
:
Used to add a new directory number for the contact
:
Used to mask or display the contact data presentation window
These buttons, used in combination with the different panels in the contact record, allow
operations to be performed on the contact during the call. The availability of the panels
depends on contact call progress.
3.2
The contact record
3-1
Chapter
3
#$! % & The role of the contact record is to:
-
Display the main contact information items.
-
Allow this information to be completed during the call to the contact.
For a campaign without a script:
The contact record is only displayed at campaign launch after presentation of a contact has
been requested (Preview mode) or when a contact is presented by the system (Predictive or
Progressive mode).
For a campaign with a script:
The contact record is not initially displayed. You may use the appropriate button in the CCO
toolbar to display it.
Example:
The contact record is composed of four panels:
3-2
[Contact list]
:
Displays contact call number. Depending on the configuration, this
panel may also offer the other directory numbers saved for the contact
[Do not call]
:
Used to enter comments if the contact does not want to be called
again
#$! % & [Reschedule call]
:
To schedule a callback
[Classify call]
:
To enter contact information
These panels, used in combination with the buttons in the CCO toolbar, allow operations to be
performed on the contact during the call.
3.3
The CCO script editor window
3.3.1
Campaign without a script
In Preview mode and depending on campaign configuration, a list of contacts may be
presented in the CCO script editor window.
Example:
The CCO script editor window contains several panels:
[Contact number]
:
Displays contact call numbers.
[Message]
:
Displays comments if the contact does not want to be
called again
[Type of callback] and
[Date and time of callback]
:
Displays callback type, date, and time if callback is scheduled
[Call result]
+ following panels
:
Displays contact data
3-3
Chapter
3
#$! % & Note:
When the list is reduced following calls or contact deletion or classification, a system request is made to
obtain a new contact list.
3.3.2
Campaign with a script
In this configuration, the role of the CCO script editor window changes during the contact call.
At idle (campaign not launched), all CCO script editor panels are shaded. The availability of
the panels depends on contact call progress.
For a campaign in Preview mode configured to present several contacts, the CCO script editor
window changes (as described in Campaign without a script ) when presentation of a contact
is requested.
When a contact call is taken, and whatever the type of campaign launched, the script editor
window changes to become:
Example:
3-4
#$! % & The CCO script editor window is composed of three separate parts:
1. The left part of the window, with the following panels:
• [Phone Panel]: this panel contains a set of buttons with the following functions:
:
For fast return to idle when the set is in the Wrap-up or Pause phase
(after ringing off)
:
To dial the number
:
To take the call
:
To ring off
This panel also contains a box showing contact call number (
•
•
•
).
Depending on the configuration (if there is a drop-down menu), this box may also
contain a list of saved contact directory numbers.
[Reschedule Panel]: Used to schedule contact callback.
[Call Result Panel]: Used to enter call result (as soon as it is known).
[CCO Panel]: this panel contains a set of buttons with the following functions:
:
To request presentation of a contact.
:
Used to partially remove a contact from the campaign. The contact can
be called in the context of another campaign
:
Used to refuse the contact presented
:
Used to permanently remove a contact from the campaign. The contact
can then no longer be called in the context of another campaign
:
Used to classify contact data for it to be saved at system level
:
Used to update (save) contact data
2. The central part of the window, that displays the script.
The script corresponds to the online questionnaire that you will run through when
conversing with a campaign contact. The script allows you to complete the parameters
required for the campaign with the information provided by the contact.
Two buttons may be used to display the script in full-screen mode:
Show/Hide CCO button :
To mask or display the left part of the window
Show/Hide history
To mask or display the right part of the window
:
3. The right part of the window allows you to find your place in the script by means of an icon
that shows the page (or step) you are at. It also allows you to return to the previous pages
or scroll through the pages.
3-5
Chapter
3-6
3
#$! % & 4.1
Campaign in Preview mode (only one contact presented)
4.1.1
Asking for a contact to be presented.
Prerequisites:
The campaign must have been launched and the
button displayed in the CCA activity
window.
1. Click the
button.
When you click the button:
• The CCA activity window switches to reservation mode (Reserved for campaign).
• The contact record is displayed.
2. End.
4.1.2
Operations that may be performed before the contact is called
Before making the call, you may:
Remove the contact from the campaign
See Removing the contact from the campaign
Reject the contact presented
See Rejecting the contact presented
Complete or modify the contact's data
See Completing or modifying the contact's data
Ask to view all directory numbers saved for See Viewing all directory numbers saved for the
the contact
contact
4.1.3
Calling the contact.
1. Press the Enter key on the keyboard if a single call number is displayed in the [Contact
list] panel. If you asked to view all the contact's directory numbers, you may select a
number to call the contact.
Principle:
a. Select the new directory number from the drop-down menu in the [Call list] field.
b. Press the Enter key on the keyboard to call the contact at this new number.
c. End of the procedure.
The CCA activity window switches to conversation mode (talking to).
2. End.
4.1.4
Operations that may be performed while calling a contact
In the conversation phase, and as the contact gives information, you may:
4-1
Chapter
4
'$" $(!" & " $!
Agree on a scheduled callback with the
contact
See Scheduling a contact callback request
Permanently remove (delete) the contact
from the campaign on contact request
See Permanently removing the contact from the
campaign
Complete or modify the contact's data
See Completing or modifying the contact's data
Ask to view all directory numbers saved for See Viewing all directory numbers saved for the
the contact
contact
Add a new directory number for the contact See Adding a new directory number for the contact
Mask the contact record
4.1.5
See Masking/Viewing the contact record
Ringing off and classifying the contact
1. If required, click the
button to ring off.
Ringing off causes the CCA activity window to switch to the Wrap-up, Pause, then Idle
phases.
2. (Optional). You can still perform operations on the contact's data during the Wrap-up and
Pause phases. The operations that may be performed are those described in Operations
that may be performed while calling a contact .
Important 1:
Bear in mind the time allocated for the Wrap-up and Pause phases.
3. Click the
button to classify the contact.
Important 2:
This operation is mandatory if another campaign contact call is to be taken.
When the contact is classified, the contact record is closed and contact data saved at
system level.
4. End.
4.2
Campaign in Preview mode (several contacts presented)
4.2.1
Asking for a contact to be presented.
Prerequisites:
The campaign must have been launched and the
icon displayed in the CCA activity win-
dow.
1. Click the
button.
When you click the button:
• The CCA activity window switches to reservation mode (Reserved for campaign).
• Several contacts are displayed in the CCO script editor window.
4-2
'$" $(!" & " $!
2. End.
4.2.2
Operations that may be performed before a contact is called
Before calling a contact, you may:
Remove one or more contacts from the
campaign
See Removing the contact from the campaign
Reject one or more of the contacts presen- See Rejecting the contact presented
ted
Ask to view all directory numbers saved for See Viewing all directory numbers saved for the
one or more contacts
contact
Complete or modify the contact's data
4.2.3
See Completing or modifying the contact's data
Calling a contact
1. Double-click the contact or select the contact and press Enter.
When you click the button:
• The CCA activity window switches to conversation mode (talking to).
• The contact record is displayed.
2. End.
4.2.4
Operations that may be performed while calling a contact
In the conversation phase, and as the contact gives information, you may:
4-3
Chapter
4
'$" $(!" & " $!
Agree on a scheduled callback with the
contact
See Scheduling a contact callback request
Permanently remove (delete) the contact
from the campaign on contact request
See Permanently removing the contact from the
campaign
Complete or modify the contact's data
See Completing or modifying the contact's data
Ask to view all directory numbers saved for See Viewing all directory numbers saved for the
the contact
contact
Add a new directory number for the contact See Adding a new directory number for the contact
Mask the contact record
4.2.5
See Masking/Viewing the contact record
Ringing off and classifying the contact
1. If required, click the
button to ring off.
Ringing off causes the CCA activity window to switch to the Wrap-up, Pause, then Idle
phases.
2. (Optional). You can still perform operations on the contact's data during the Wrap-up and
Pause phases. The operations that may be performed are those described in Operations
that may be performed while calling a contact .
Important 1:
Bear in mind the time allocated for the Wrap-up and Pause phases.
3. Click the
button to classify the contact.
Important 2:
This operation is mandatory if another campaign contact call is to be taken.
When the contact is classified, the contact record is closed and contact data saved at
system level. When the Wrap-up and Pause phases are complete, the CCA activity
window returns to idle. The CCO script editor is opened again with the list of remaining
contacts.
4. End.
4.3
Campaign in Progressive or Predictive mode
Reminder:
In this campaign mode, you do not need to perform any action to
take a contact call. Connection is automatic. On connection:
- The CCA activity window switches to conversation mode (talking
to status).
- The contact record is displayed.
4.3.1
Operations that may be performed while calling
In the conversation phase, and as the contact gives information, you may:
4-4
'$" $(!" & " $!
Agree on a scheduled callback with the
contact
See Scheduling a contact callback request
Permanently remove (delete) the contact
from the campaign on contact request
See Permanently removing the contact from the
campaign
Complete or modify the contact's data
See Completing or modifying the contact's data
Ask to view all directory numbers saved for See Viewing all directory numbers saved for the
the contact
contact
Add a new directory number for the contact See Adding a new directory number for the contact
Mask the contact record
4.3.2
See Masking/Viewing the contact record
Ringing off and classifying the contact
1. If required, click the
button to ring off.
Ringing off causes the CCA activity window to switch to the Wrap-up, Pause, then Idle
phases.
2. (Optional). You can still perform operations on the contact's data during the Wrap-up and
Pause phases. The operations that may be performed are those described in Operations
that may be performed while calling .
Important 1:
Bear in mind the time allocated for the Wrap-up and Pause phases.
3. Click the
button to classify the contact.
Important 2:
You must perform this operation before the Pause phase ends.
When the contact is classified, the contact record is closed and contact data saved at
system level. When the Wrap-up and Pause phases are complete, the CCA activity
window returns to idle.
Caution:
When the CCA activity window returns to idle, a new contact is presented and your set rings.
4. End.
4.4
List of operations that can be performed during the campaign
4.4.1
Rejecting the contact presented
You may reject the contact presented. However, the contact remains in the campaign and may
be distributed to another agent or be presented to you again.
Principle:
-
If a single contact is presented:
a. Click the
button.
The contact record is closed.
b. End.
4-5
Chapter
4
-
'$" $(!" & " $!
If several contacts are presented:
a. Successively click the contacts to be rejected (hold down the Shift key to select
several contacts).
b. Click the
button.
The selected contacts are no longer displayed in the CCO script editor window.
c. End.
4.4.2
Completing or modifying the contact's data
You may complete contact data as the call progresses.
Principle:
1. When you know the result of the call, select this from the drop-down menu in the [Call
result] field.
2. For the other fields to be completed, click in the corresponding box to enter or modify the
value provided by the contact.
3. Click the
button to save the data entered.
4. End.
Caution:
If you do not save the data you have entered at regular intervals, do not forget to do this by clicking the
button during the call classification phase.
4.4.3
Permanently removing the contact from the campaign
When a contact does not want to be called again, you may remove the contact from the
campaign permanently. The contact can then no longer be called in the context of another
campaign
Principle:
1. Enter a comment in the [Message] field in the [Do not call] panel.
2. Click the
button to confirm removal (deletion).
The contact record is closed.
3. End.
4.4.4
Scheduling a contact callback request
You can schedule a contact request for a callback at a specified date and time.
4-6
'$" $(!" & " $!
Principle:
1. Select the contact to be called back in the [Type of callback] field:
• Personal: you will be called back.
• Campaign: an agent in the group will be called back.
2. Right-click the [Date and time of callback] field to display the date and time.
3. Successively click the date and time to modify their values.
4. Click the
button to save the callback.
5. End.
4.4.5
Removing the contact from the campaign
You may remove a contact from the current campaign. Unlike the operation to permanently
remove a contact from the campaign, this contact may still be called in the context of another
campaign.
Principle:
-
If a single contact is presented:
a. Click the
button.
The contact record is closed.
b. End.
-
If several contacts are presented:
a. Successively click the contacts to be removed (hold down the Shift key to select
several contacts).
b. Click the
button.
The selected contacts are no longer displayed in the CCO script editor window.
c. End.
4.4.6
Viewing all directory numbers saved for the contact
4-7
Chapter
4
'$" $(!" & " $!
You may ask to view all directory numbers saved for the contact
Principle:
-
If a single contact is presented:
a. Click the
button.
The [Contact list] panel changes and the drop-down menu is displayed.
b. End.
-
If several contacts are presented:
a. Right-click to select the contact(s) (hold down the Shift key to select several contacts).
b. Click the
button.
All the directory number(s) saved for the selected contact(s) are displayed in the CCO
script editor window.
c. End.
4.4.7
Adding a new directory number for the contact
You may add a new directory number for the contact
Principle:
1. Click the
button.
The [Contact number] dialog box opens.
2. Enter the directory number in the appropriate field.
3. Check (select) the [Chained record] box if you want the number to be associated with the
contact's other directory number(s).
4. Click OK to save the new directory number.
The [Contact list] panel changes to display two new buttons.
5. Click Add contact.
The [Contact list] panel changes, the two buttons are no longer displayed. The new
directory number is now available in the drop-down menu in the [Contact list] panel if the
[Chained record] box was selected previously. Otherwise, only this number is displayed.
6. End.
4.4.8
Masking/Viewing the contact record
You may mask and view (hide and show) the contact record.
Principle:
1.
4-8
'$" $(!" & " $!
button to mask the contact record.
2. Click the
button to view the contact record.
3. End.
4-9
Chapter
4-10
4
'$" $(!" & " $!
5.1
Campaign in Preview mode (only one contact presented)
5.1.1
Modifying the work setup
Before requesting presentation of a contact, you may optimize your work setup to display only
the CCO script editor. To do this, you must first minimize (collapse) the CCA activity window to
the Windows™ task bar.
The final result should be the CCO script editor window displayed as shown below:
Example:
Important:
In the remainder of this document, it is assumed that only the CCO script editor window is displayed on the screen. However, some operations may require the CCA activity window and/or
5-1
Chapter
5
'$" $(!" " $!
contact record to be displayed. This is specified when it is the case.
5.1.2
Asking for a contact to be presented.
Prerequisites:
The campaign must have been launched and the
button displayed in the CCO script ed-
itor window.
1. Click the
button.
When you click the button:
• The CCA activity window switches to reservation mode (Reserved for campaign).
• The script is displayed in the CCO script editor window.
2. End.
5.1.3
Operations that may be performed before the contact is called
Before making the call, you may:
Remove the contact from the campaign
See Removing the contact from the campaign
Reject the contact presented
See Rejecting the contact presented
Complete or modify the contact's data
See Completing or modifying the contact's data
Ask to view all directory numbers saved for See Viewing all directory numbers saved for the
the contact
contact
5.1.4
Calling the contact.
1. Click the
button.
2. End.
5.1.5
Operations performed while calling a contact
As the contact provides information, progressively complete the script presented in the central
part of the CCO script editor window.
You may also perform one of the following operations:
Agree on a scheduled callback with the
contact
See Scheduling a contact callback request
Permanently remove (delete) the contact
from the campaign on contact request
See Permanently removing the contact from the
campaign
Complete or modify the contact's data
See Completing or modifying the contact's data
Ask to view all directory numbers saved for See Viewing all directory numbers saved for the
the contact
contact
5-2
'$" $(!" " $!
Add a new directory number for the contact See Adding a new directory number for the contact
5.1.6
Ringing off and classifying the contact
1. If required, click the
button to ring off.
Ringing off causes your set to switch to the Wrap-up, Pause, then Idle phases.
2. (Optional). You can still perform operations on the contact's data during the Wrap-up and
Pause phases. The operations that may be performed are those described in Operations
performed while calling a contact .
Important 1:
Bear in mind the time allocated for the Wrap-up and Pause phases.
3. Click the
button to classify the contact.
Important 2:
This operation is mandatory if another contact call is to be taken.
Classifying the contact results in contact data being saved at system level. When the
Wrap-up and Pause phases are complete, the CCO script editor window returns to idle.
4. (Optional). Click the
button for fast return to the idle state.
5. End.
5.2
Campaign in Preview mode (several contacts presented)
5.2.1
Modifying the work setup
Before requesting presentation of a contact, you may optimize your work setup to display only
the CCO script editor. To do this, you must first minimize (collapse) the CCA activity window to
the Windows™ task bar.
The CCO script editor window should be displayed as shown below:
5-3
Chapter
5
'$" $(!" " $!
Important:
In the remainder of this document, it is assumed that only the CCO script editor window is displayed on the screen. However, some operations may require the CCA activity window and/or
contact record to be displayed. This is specified when it is the case.
5.2.2
Asking for a contact to be presented.
Prerequisites:
The campaign must have been launched and the
button displayed in the CCA activity
window.
1. Click the
button.
When you click the button:
• The CCA activity window switches to reservation mode (Reserved for campaign).
• A list of contacts is displayed in the CCO script editor window.
5-4
'$" $(!" " $!
2. End.
5.2.3
Operations that may be performed before a contact is called
Before calling a contact, you may:
Remove one or more contacts from the
campaign
See Removing the contact from the campaign
Reject one or more of the contacts presen- See Rejecting the contact presented
ted
Ask to view all directory numbers saved for See Viewing all directory numbers saved for the
one or more contacts
contact
Complete or modify the contact's data
5.2.4
See Completing or modifying the contact's data
Calling a contact
1. Double-click the contact or select the contact and press Enter.
When you click the button:
• The CCA activity window switches to conversation mode (talking to).
• The script and the contact data are displayed in the CCO script editor window.
2. End.
5.2.5
Operations performed during the call
5-5
Chapter
5
'$" $(!" " $!
As the contact provides information, progressively complete the questionnaire presented in the
central part of the CCO script editor window.
You may also perform one of the following operations:
Agree on a scheduled callback with the
contact
See Scheduling a contact callback request
Permanently remove (delete) the contact
from the campaign on contact request
See Permanently removing the contact from the
campaign
Complete or modify the contact's data
See Completing or modifying the contact's data
Ask to view all directory numbers saved for See Viewing all directory numbers saved for the
the contact
contact
Add a new directory number for the contact See Adding a new directory number for the contact
5.2.6
Ringing off and classifying the contact
1. If required, click the
button to ring off.
Ringing off causes your set to switch to the Wrap-up, Pause, then Idle phases.
2. (Optional). You can still perform operations on the contact's data during the Wrap-up and
Pause phases. The operations that may be performed are those described in Operations
performed during the call .
Important 1:
Bear in mind the time allocated for the Wrap-up and Pause phases.
3. Click the
button to classify the contact.
Important 2:
This operation is mandatory if another campaign contact call is to be taken.
Classifying the contact results in contact data being saved at system level. When the
Wrap-up and Pause phases are complete, the CCO script editor window re-displays the
contact list minus the previously classified contact.
4. (Optional). Click the
button for fast return of your Pro-ACD set to the idle state.
5. End.
5.3
Campaign in Progressive or Predictive mode
Reminder:
In this campaign mode, you do not need to perform any action to take a contact call. Connection is
automatic. On connection:
- The CCA activity window switches to conversation mode (talking to status).
- The script is displayed in the CCO script editor window.
5.3.1
5-6
Modifying the work setup
'$" $(!" " $!
During a conversation, you may optimize your work setup to display only the CCO script editor.
To do this, you must first minimize (collapse) the CCA activity window to the Windows™ task
bar.
The CCO script editor window should be displayed as shown below:
Important:
In the remainder of this document, it is assumed that only the CCO script editor window is displayed on the screen. However, some operations may require the CCA activity window and/or
contact record to be displayed. This is specified when it is the case.
5.3.2
Operations performed during the call
As the contact provides information, progressively complete the questionnaire presented in the
central part of the CCO script editor window.
You may also perform one of the following operations:
5-7
Chapter
5
'$" $(!" " $!
Agree on a scheduled callback with the
contact
See Scheduling a contact callback request
Permanently remove (delete) the contact
from the campaign on contact request
See Permanently removing the contact from the
campaign
Complete or modify the contact's data
See Completing or modifying the contact's data
Ask to view all directory numbers saved for See Viewing all directory numbers saved for the
the contact
contact
Add a new directory number for the contact See Adding a new directory number for the contact
5.3.3
Ringing off and classifying the contact
1. If required, click the
button to ring off.
Ringing off causes your set to switch to the Wrap-up, Pause, then Idle phases.
2. (Optional). You can still perform operations on the contact's data during the Wrap-up and
Pause phases. The operations that may be performed are those described in Operations
performed during the call .
Important 1:
Bear in mind the time allocated for the Wrap-up and Pause phases.
3. Click the
button to classify the contact.
Important 2:
This operation must be performed before the end of the Pause phase.
Classifying the contact results in contact data being saved at system level. When the
Wrap-up and Pause phases are complete, the CCO script editor window returns to idle.
Caution:
When the CCO script editor activity window returns to idle, a new contact is presented and
your set rings.
4. (Optional). Click the
button for fast return to the idle state.
5. End.
5.4
List of operations that can be performed during the campaign
5.4.1
Rejecting the contact presented
You may reject the contact presented. However, the contact remains in the campaign and may
be distributed to another agent or be presented to you again.
Principle:
1. Click the
button.
The CCO script editor returns to idle.
2. End.
5-8
'$" $(!" " $!
5.4.2
Completing or modifying the contact's data
You may complete contact data as the call progresses. This operation differs according to the
content of the CCO script editor window.
1. If a contact list is displayed:
a. Click the box to be modified and enter or modify the value provided for the contact.
b. End.
2. If the script is displayed, you can only enter the call result in the CCO script editor window.
For other contact data, you must use the contact record and the CCA activity window.
To enter the call result, perform the following operations in the CCA activity window:
a. Select the call result from the drop-down menu in the [Call result panel].
b. Click the
button to save the data entered.
c. End.
To complete or modify other contact data, perform the following operations:
a. Display the contact record and the CCA activity window.
b. For the fields to be completed, click in the corresponding box to enter or modify the
value provided by the contact.
c. Click the
button to save the data entered.
d. Display the CCO script editor full screen again.
e. End.
Caution:
If you do not save the data you have entered at regular intervals, do not forget to do this by clicking the
button during the call classification phase.
5.4.3
Permanently removing the contact from the campaign
When a contact does not want to be called again, you may remove the contact from the
campaign permanently. The contact can then no longer be called in the context of another
campaign
You may enter a comment giving the reason for removal. This operation is performed in the
contact record and the CCA activity window.
Principle:
1. Display the contact record and the CCA activity window.
2. Enter a comment in the [Message] field in the [Do not call] panel of the contact record.
3. Click the
button in the CCA activity window to save the removal (withdrawal).
5-9
Chapter
5
'$" $(!" " $!
The contact record is closed and the CCA activity window returns to idle.
4. Display the CCO script editor full screen again.
5. End.
5.4.4
Scheduling a contact callback request
You can schedule a contact request for a callback at a specified date and time in the
[Reschedule Panel].
Principle:
1. Successively click the callback date and time to modify their values.
2. Select the contact to be called back. Click:
• Personal callback if you are the person to be called back.
• Campaign callback if an agent in the group is to be called back.
The callback request is automatically saved in the contact data.
3. End.
5.4.5
Removing the contact from the campaign
You may remove a contact from the current campaign. The contact may still be called in the
context of another campaign
Principle:
1. Click the
button.
The CCO script editor returns to idle.
2. End.
5.4.6
Viewing all directory numbers saved for the contact
You may ask to view all directory numbers saved for the contact
This operation can only be performed in the contact record and the CCA activity window.
Principle:
1. Display the contact record and the CCA activity window.
2. Click the
button.
The [Contact list] panel changes and a drop-down menu with a list of the contact's
directory numbers is displayed.
3. Display the CCO script editor full screen again.
The [Phone Panel] changes and a drop-down menu with a list of the contact's directory
numbers is displayed.
4. End.
5.4.7
Adding a new directory number for the contact
You may add a new directory number for the contact
5-10
'$" $(!" " $!
This operation can only be performed in the contact record and the CCA activity window.
Principle:
1. Display the contact record and the CCA activity window.
2. Click the
button in the CCA activity window.
The [Contact number] dialog box opens.
3. Enter the directory number in the appropriate field.
4. Check (select) the [Chained record] box if you want the number to be associated with the
contact's other directory number(s).
5. Click OK to save the new directory number.
The [Contact list] panel in the contact record changes to display two new buttons.
6. Click Add contact.
The [Contact list] panel changes, the two buttons are no longer displayed. The new
directory number is now available in the drop-down menu in the [Contact list] panel if the
[Chained record] box was selected previously. Otherwise, only this number is displayed.
7. Display the CCO script editor full screen again.
The new directory number is now available in the drop-down menu in the [Phone Panel] if
the [Chained record] box was selected previously. Otherwise, only this number is
displayed.
8. End.
5-11
Chapter
5-12
5
'$" $(!" " $!