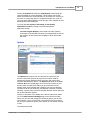
1
Contents
I
Table of Contents
Foreword
Part I Introduction to VoiceBlast
0
4
1 Getting Started
................................................................................................................................... 5
2 Navigating VoiceBlast
................................................................................................................................... 9
3 The Search...................................................................................................................................
Function
15
4 Glossary of...................................................................................................................................
Terms
17
5 Frequently Asked
...................................................................................................................................
Questions
23
Part II Creating & Managing Phone Lists
28
1 The Two Types
...................................................................................................................................
of Phone Lists
28
2 Using Calling
...................................................................................................................................
Lists as DNC Lists
29
3 Professional
...................................................................................................................................
List & Data Services
30
4 Typing or Pasting
...................................................................................................................................
Phone Lists
31
5 Uploading Phone
...................................................................................................................................
Lists
33
6 Field Mapping
................................................................................................................................... 36
7 Downloading
...................................................................................................................................
Phone Lists
39
8 Deleting Phone
...................................................................................................................................
Lists
40
Part III Creating & Managing Messages
42
1 Creating Your
...................................................................................................................................
Message
42
2 Professional
...................................................................................................................................
Message Services
44
3 Uploading Your
...................................................................................................................................
Message
47
4 Self-Recording
...................................................................................................................................
Your Message
48
5 Listening to...................................................................................................................................
Saved Messages
50
6 Deleting Messages
................................................................................................................................... 51
Part IV Creating Campaigns
53
1 QuickCreate...................................................................................................................................
a New Campaign
54
2 Creating a New
...................................................................................................................................
Campaign
55
3 Business Campaign
...................................................................................................................................
Options
61
4 Campaign Cost
...................................................................................................................................
Estimates
63
5 Testing Your
...................................................................................................................................
Campaign
63
6 Viewing The...................................................................................................................................
Campaigns List
64
7 Aborting Scheduled
...................................................................................................................................
Campaigns
65
Part V Options & Interactive Features
68
1 Smart Call ................................................................................................................................... 70
VoiceBlast Help v 1.1 © 2007 SmartReply
II
VoiceBlast Help & User Manual
2 Setting Up Interactive
...................................................................................................................................
Programs
70
3 Calling Canada
................................................................................................................................... 73
4 Requesting...................................................................................................................................
New Options
73
Part VI Legal Topics in Voice Marketing
77
1 Your Legal ...................................................................................................................................
Responsibilities
77
2 Do Not Call...................................................................................................................................
Lists
78
3 Message Content
...................................................................................................................................
Requirements
80
4 Delivery Time
...................................................................................................................................
Limitations
81
Part VII Reports - Overview
84
1 Campaign Reports
................................................................................................................................... 85
2 Interactive Program
...................................................................................................................................
Reports
85
Part VIII Managing Your Account - Overview
88
1 The "My Account"
...................................................................................................................................
Page
88
2 Billing Activity
................................................................................................................................... 89
3 Managing Credit
...................................................................................................................................
Cards
91
4 Account Plans
................................................................................................................................... 93
5 Changing Your
...................................................................................................................................
Password
94
6 Support/Contact
...................................................................................................................................
Us
95
Index
96
VoiceBlast Help v 1.1 © 2007 SmartReply
Top Level Intro
This page is printed before a
new top-level chapter starts
Part
I
4
1
VoiceBlast Help & User Manual
Introduction to VoiceBlast
Introduction to VoiceBlast
Thank you for choosing VoiceBlast!
We hope you take a few minutes to look through this document to
familiarize yourself with:
·
How to create campaigns,
·
How to prepare the elements that go into a campaign,
·
The legal issues surrounding voice marketing, and
·
How to manage your account.
Reviewing this documentation before you start will help you better
understand the system and make VoiceBlast both easier to use and more
effective.
In this section you will find:
·
An orientation to Navigating VoiceBlast,
·
An explanation how the Search Function works in different
parts of the application.
·
A Glossary of Terms used in VoiceBlast.
·
Some Frequently Asked Questions about VoiceBlast and
voice broadcasting in general.
The following sections of the Help manual will cover:
·
Legal Topics in Voice Marketing
·
Creating & Managing Phone Lists
·
Creating & Managing Messages
·
Interactive Options
VoiceBlast Help v 1.1 © 2007 SmartReply
Introduction to VoiceBlast
1.1
·
Creating Campaigns
·
Managing Your Account
Getting Started
Getting Started
Welcome to VoiceBlast! If you're a new user or are new to voice
broadcasting in general, the following is a brief overview of how to create
and launch a VoiceBlast campaign.
The easiest way to understand the VoiceBlast process is to think of the
three basic elements of a marketing strategy:
1. Who do you want to contact?
Start with a list or lists of your current customers or sales prospects
whom you want to patronize your store or business. In VoiceBlast,
these people are included in your Phone Lists.
2. What do you want to tell them?
Next, decide what you want to tell them -- perhaps a sale, a special
discount, or a new product. Your offers and announcements
becomes the Messages you record for an upcoming campaign.
3. When do you want to deliver your message?
Last, after you have prepared your Phone Lists and Messages, and
set up any Interactive functions, you put those elements together
and select the date and time to launch your VoiceBlast Campaign.
These three elements each have their own "tab" on the VoiceBlast screen,
as shown below. You click on each of these tabs to begin working on
creating Phone Lists or uploading lists to your account, to start recording
and managing Messages, and for assembling these elements and
launching your Campaigns.
VoiceBlast Help v 1.1 © 2007 SmartReply
5
6
VoiceBlast Help & User Manual
Let's look at each of these three basic steps in more detail. We suggest you
also follow the links provided with each topic for complete instruction on
how to perform specific tasks.
1. Phone Lists
On this tab, you can add and manage your contact lists. Working from your
existing customer database, you can upload files and import phone
numbers into your VoiceBlast account. VoiceBlast can accept the following
file formats: Microsoft Excel (.xls), comma separated values (.csv),
Microsoft Access (.mdb), and zipped or compressed files (.zip).
VoiceBlast operates in both the United States and Canada, so your
contacts may be in either country. For more information, pricing and to add
the serviceof calling into Canada to your account plan, please contact
customer service at [email protected].
If you upload a list file, you can also import other data fields from your
existing file in addition to phone numbers, such as customer name, account
number, or their location.
You can also type or paste phone numbers into a text box provided on
screen.
To learn more about adding phone lists to your account to use in upcoming
campaigns, please go to Creating & Managing Phone Lists for specific
topics of interest.
You should also familiarize yourself with
Legal Topics in Voice Marketing, and specifically Do Not Call Lists.
2. Messages
The second step is to create effective messages – one played to a live
listener and one for voice mail delivery and add it to your VoiceBlast
account. Your message is a brief opportunity to inform your listener and to
persuade her or him to take action.
For suggestions on writing an effective, on-target communications please
click to Creating Your Message. You can self-record your message over
the telephone through the user-friendly VoiceBlast system; or record it on
your own system and upload it to the system as a .wav or .vox file. If you
have an .mp3 file and need to convert it to .wav, there are free media
services online that can do this for you.
VoiceBlast Help v 1.1 © 2007 SmartReply
Introduction to VoiceBlast
You can also have your message professionally written and recorded by
professional voice talent using VoiceBlast's
Professional Message Services. For more information please review
Uploading Your Message and Self-Recording Your Message, which
also offers tips for a successful recording.
You may also want to review all topics under
Creating & Managing Messages, as well as
Legal Topics in Voice Marketing and specifically
Message Content Requirements.
3. Campaigns
After you have added one or more Phone Lists and one or more
Messages to your account, you can create a Campaign.
Under the Campaign tab, Create New Campaign screen, you name your
campaign, choose phone lists and messages, and specify certain delivery
options including time and date for the campaign to start. For specific
instructions, please click to Creating a New Campaign. You may also
want to review all topics of interest in Creating Campaigns - Introduction,
including QuickCreate a New Campaign for setting up a simple campaign.
In addition, you should become familiar with
Legal Topics in Voice Marketing specifically Delivery Time Limitations.
Other Tabs on the VoiceBlast screen
Options
VoiceBlast users on the Members Only account plan have the ability to add
interactive Options to a campaign, so VoiceBlast can essentially be your
"automated call center." (These functions are optional and do not need to
be used in every campaign.) These Options allow "Live ear" listeners to
interact with your call and access a number of possible options by pressing
digits on their telephone keypad. Depending on which functions you select,
you can allow your listener to:
·
hear a message that provides more information about your business
or offer,
·
transfer to a live operator or call center,
VoiceBlast Help v 1.1 © 2007 SmartReply
7
8
VoiceBlast Help & User Manual
·
hear a privacy policy message, or
·
reach the automated opt-out service.
In addition to managing interactive options, all users can use this tab to
view and manage all of the toll-free numbers assigned to their account,
including those numbers which include only the free opt-out feature in
VoiceBlast. User can also request additional toll-free numbers, additional
features to existing toll-free numbers, and/or caller ID numbers on the
Requesting New Options submenu.
For a description of the various Interactive functions, please go to
Options & Interactive Features. For detailed instructions on setting up an
interactive program to use on a campaign, please click to
Interactive Options & Setup.
Reports
After your VoiceBlast campaign has run, you can view or download various
reports detailing campaign delivery results, including:
·
how many calls resulted in leaving a voice mail;
·
how many live answers;
·
how many redials were made;
·
how many telephone numbers failed or were invalid;
·
how many numbers were scrubbed by a Do-Not-Call list.
The various Reports available in VoiceBlast can help you evaluate the
overall effectiveness and efficiency of your campaigns.
Please go to Reports Overview for more information.
My Account
The My Account tab allows you to access information that helps you know
where you stand before you plan your next step. The submenus under My
Account let you review billing activity, manage credit cards and make
payments, change your password, and review and change your account
plan.
For complete information, please click to Managing Your Account Overview.
VoiceBlast Help v 1.1 © 2007 SmartReply
Introduction to VoiceBlast
Contacting VoiceBlast:
To reach VoiceBlast customer support, please send an email to:
[email protected]
You may also contact us by telephone from 8:00 a.m. to 6:00 p.m. Pacific
Standard Time at:
(800) 461-2556
Other important information:
Before you begin using VoiceBlast, you may also want to review these
important information sources:
Navigating VoiceBlast
Glossary of Terms
Frequently Asked Questions
1.2
Navigating VoiceBlast
Navigating VoiceBlast
The VoiceBlast interface is designed to make creating new campaigns
quick and easy. The VoiceBlast interface is arranged in different screens to
help you prepare the phone lists and messages that go into a campaign,
assemble those elements to launch a new campaign, and manage your
account.
The screen for each major category or function is opened by clicking on a
subject in the top row of "tabs." Each major function will display additional
"submenus," which access more specific activities within that category.
The VoiceBlast Screens
Phone Lists
VoiceBlast Help v 1.1 © 2007 SmartReply
9
10
VoiceBlast Help & User Manual
The opening screen under Phone Lists is View Calling Lists, which
displays all Calling Lists and Do Not Call Lists stored in your account.
Clicking on a list name will take you to a detailed view of that list. You
may also search for a specific phone list by name or any part of a
name, or by date or range of dates it was entered into the VoiceBlast
system.
To help you find a particular Calling List, you can sort the list by
ascending or descending alphanumeric order by List Name, Upload
Date or Valid Phone Numbers, by clicking on the column headers.
The submenus include:
Create Calling List, where you can type in or paste in a new list,
or upload a new list to your account, as well as select whether it is
a Calling List or Do Not Call List.
Clicking on the name of any phone list in View Calling Lists opens
the List Details screen where you can view complete information
on that list. In List Details you can also search for a specific phone
number in that list.
Messages
VoiceBlast Help v 1.1 © 2007 SmartReply
Introduction to VoiceBlast
The Messages tab first opens to the View Messages screen, which
lists all messages stored in your VoiceBlast Account. You may also
search for messages by name or any part of a name, or by any date or
range of dates when it was created in the VoiceBlast system.
To help you in finding a particular message, you can sort the list in
ascending or descending alphanumeric order by Message ID,
Message Name, PIN, Created Date and Duration by clicking on the
column headers.
The submenus include:
Create Message, where you can upload a message you have
previously recorded, or get instructions on self-recording your
message.
Clicking on the name of any message in View Messages opens
the View Message Details screen where you can view complete
information on the selected message. You can also listen to the
message (you must have Windows Media Player and speakers
installed on your computer) or download it to your computer.
The Professional Services tab allows you to request a
professionally-written message for your campaign, and/or to have
the message recorded by a professional voice talent. You can
request a script, request that we record your script, or use the
services of VoiceBlast professionals to both write and record your
message.
Campaigns
VoiceBlast Help v 1.1 © 2007 SmartReply
11
12
VoiceBlast Help & User Manual
The opening screen under the Campaigns tab is View Campaign
List, showing all campaigns, including those scheduled for future
delivery, currently being delivered, or planned campaigns that have not
been successfully processed. You may also search for a particular
campaign from this page.
To help you in finding a particular campaign, you can sort the list in
ascending or descending alphanumeric order by Campaign Name,
Type (Dials or Redials), Scheduled Count, Dialed Count, Percentage
Complete and Start Date, by clicking on the column headers.
Submenus include:
Create New Campaign, where you enter the appropriate set-up
details and select messages, phones lists, and delivery options for
a new campaign.
Clicking on the name of any campaign in View Campaign List
opens the View Campaign Details screen where you can see
complete information on the selected campaign.
Reports
VoiceBlast Help v 1.1 © 2007 SmartReply
Introduction to VoiceBlast
Clicking the Reports tab opens the View Reports screen listing the
reports available on recent campaigns. These reports can provide
useful information such as the summary of call results, etc. Clicking on
the name of a report will open it in a separate window as a .PDF file.
You must have Adobe Reader to view this type of file, available as free
download from www.adobe.com.
You may also sort reports in ascending or descending
alphanumeric order by clicking on the column headers.
Submenus include:
Toll-Free Program Reports, which detail how many listeners
chose each of the interactive features you programmed for this tollfree number, for the most recent campaign in which the number
was used.
Options
The Options tab in where you view the toll-free numbers in your
account, control the functions of any toll-free numbers used for
interactive programs (Members Only accounts), and request new
numbers and interactive options. The Options tab opens to the View
Toll-Free #s screen, displaying a list of all toll-free numbers in your
account. Each is listed by the Name you give it and the toll-free
Number itself, each indicates that it allows a free Opt-Out capability
(included on all toll-free numbers), and whether it includes a Custom
Greeting. A green check mark here indicates that this number has been
set up with interactive options.
Clicking on the Name or the Modify link in the far right column takes
you to the Edit Interactive Settings page for this toll-free number,
where you can view and change the interactive options you will offer
your listeners. If your Account Plan or this specific toll-free number is
not set up for interactive options, there will be no user-chosen settings
to edit.
The submenus include:
VoiceBlast Help v 1.1 © 2007 SmartReply
13
14
VoiceBlast Help & User Manual
Request New Options, where all users can request new toll-free
numbers, submit new Agent Transfer numbers for verification, etc.
My Account
The opening screen under My Account is Account Information,
listing general details on the account, including user name, set-up date,
account plan, billing information, etc. The submenus include:
Billing Activity, listing purchases for campaign dials or other
services, charges to your credit card, and debits to your account
balance. This is where you can make a payment to replenish your
account balance.
View Credit Cards, showing all credit cards on file, and indicating
which is the primary card, the name on the card, last four digits of
the account number, and expiration date. This is where you may
change your choice of primary card or add new cards.
Account Plan, listing details on the VoiceBlast account plan you
have selected. You may also change your account plan on this
screen.
Other Elements of the Main Screen
Search Campaign Items
The Search Campaign Items function is visible and accessible at all
times. It will display all campaigns, phone lists and messages that
match your search criteria. Search by typing in the name, or any part of
VoiceBlast Help v 1.1 © 2007 SmartReply
Introduction to VoiceBlast
the name or description of the item you seek and clicking Go. For more
information please see The Search Function.
QuickCreate
After you have created messages in VoiceBlast, QuickCreate lets you
set up and launch a simple campaign in minutes. Just select a
message; type, paste or select a calling list of up to 1,000 numbers;
and choose a delivery date. For more information, see the
QuickCreate entry in the Glossary or detailed instructions in
QuickCreate a New Campaign.
Accounts Stats
The information displayed in this area allows you to easily monitor
important details of your account, such as account balance, disk space
used and remaining, etc.
Quick Start
These links go to specific topics in this Help documentation.
Compliance
These links access Federal and state compliance information, Direct
Marketing Association and Canadian Marketing Association rules, and
links to additional helpful information.
Help
Various links in this section access Help files, Technical Support, the
Glossary of Terms and Frequently Asked Questions.
Miscellaneous
Look here for the VoiceBlast Privacy Policy, Product Updates and other
news and information.
1.3
The Search Function
The Search Function
Search Campaign Items
In VoiceBlast, the Search Campaign Items function is visible and
accessible at all times. This function will locate any campaign, phone list or
message matching your search criteria. To Search Campaign Items:
1. Type in the name, or any part of the name or description of the list,
message or campaign you want to find.
VoiceBlast Help v 1.1 © 2007 SmartReply
15
16
VoiceBlast Help & User Manual
2. Click Go.
3. The results of your search will appear in the main window. Every
item matching your search will display, including campaigns, calling
lists, Do Not Call lists and messages.
4. Click on the name of any item to open the detail view of that
item.
Searching Lists of Campaigns, Phone Lists and Messages
A Search function also appears on each of the opening screens for
Campaigns, Phone Lists and Messages. These Search functions only
look for items within that category. Clicking on the name of any item found
in a Search will open the detail view of that item. To Search an item to see
its detail view:
1. Click the Search button. A new window appears.
2. Type in the name, or any part of the name or description of the item
you want to find, or
3. Type in a date or a range of dates when this item was created in
your VoiceBlast account.
4. Click Search.
5. The window will refresh to display only those items matching your
search criteria.
6. Click Select for any item displayed to open its detail view.
Searching For Lists or Messages When Creating a
Campaign
In Create Campaign, a specific Search function is used in selecting the
phone lists and messages used in that campaign. This works differently
than the Search functions described above. To select lists or message
when setting up a campaign:
1. Click the appropriate search button, for example, next to Voice Mail
Message, click Search Message.
2. A window will open showing all your voice mail messages. This
window includes an optional search function of its own to help
narrow your search.
3. To narrow your search, enter the name or any part of the name or
description, or a date or date range it was created.
4. Click Search. The window will refresh to show only those items
matching your search criteria.
5. Click Select in the row containing the item you seek. The item will
be added to this campaign.
NOTE: This process is the same for selecting Live Messages,
Voice Mail Messages, Calling Lists and Do Not Call Lists.
VoiceBlast Help v 1.1 © 2007 SmartReply
Introduction to VoiceBlast
1.4
Glossary of Terms
Glossary of Terms
Agent Transfer
Agent Transfer is an interactive option that may
be used in a campaign that allows a listener to
press a digit on the telephone keypad and be
immediately transferred to a live agent or
customer service representative. Live listeners
can do this while they are still on the line, while
voice mail listeners can call the toll-free number
you provide to access that choice. Depending on
your campaign needs, your listener could then
get more information, place an order, make a
payment, etc. This interactive option is available
with the Members Only account plan.
Caller ID
The Caller ID number that appears on your
listeners' phones when a campaign goes out is
the toll-free number assigned to your VoiceBlast
account. This is also the number a listener can
call, at no cost to themselves, in order to opt-out
of your calling list as required by Federal law.
This number should be included in all of your
messages, and will connect listeners to
VoiceBlast's automated opt-out system. These
opt-outs are then automatically added to your Do
Not Call List.
(There can be exceptions to using a VoiceBlast
toll-free number as your Caller ID; please contact
a customer service representative for more
information.)
Calling List
List of phone numbers that you want to dial in the
campaign. In VoiceBlast, your lists can include
telephone numbers in both the United States and
Canada. (Please contact customer support for
information, pricing and to initiate service to
Canada.) Please note that not every number in
your list may be called, because cell phones, tollfree numbers, duplicate numbers and numbers
on a Do Not Call List will be removed from the
final list of numbers actually dialed.)
Campaign
A VoiceBlast campaign includes all the
necessary elements and the actual delivery of
your recorded message to individuals and
businesses you want to communicate with. A
campaign includes:
VoiceBlast Help v 1.1 © 2007 SmartReply
17
18
VoiceBlast Help & User Manual
1) your calling list or lists of customers, sales
prospects, or perhaps club or association
members;
2) a pre-recorded message, or a live message
and a voice mail message, that can be selfrecorded or uploaded to the VoiceBlast system;
3) a time and date to deliver the message.
Client Opt-Out List
VoiceBlast automatically collects the phone
numbers of all those who have requested to optout, and have their number removed from future
campaigns. This information is saved in a
separate list for each client, and that list is used
as a Do Not Call list on all your future
campaigns. By automatically keeping a client
DNC list, VoiceBlast gives you the tools to help
stay in legal compliance.
CMA
The Canadian Marketing Association, a trade
group that sets rules for voice marketing in
Canada and provides an important Do Not Call
list for that country.
Compliance
Compliance is following all relevant Federal and
State laws regarding whom and when you may
call. Compliance includes using all applicable
DNC lists and calling only during mandated
hours of the day (9 a.m. - 5 p.m. for residential
calls, 9 a.m. - 9 p.m. for business-to-business
calls). Please click the Compliance link on every
VoiceBlast screen for more information.
Custom Greeting
In an interactive campaign, when a live listener
presses 1 to access further options or when a
voice mail listener calls into the toll-free number
you provide in your message, they will first hear
a Custom Greeting. This Custom Greeting is
created by the system and informs listeners of all
choices available by pressing digits on their
telephone keypad. (It can also be called a "menu
greeting" because it gives live listeners the menu
of further choices.) If your campaign includes
Interactive Options, the system will automatically
generate your Custom Greeting based on the
options you have programmed.
Dials
Dials refers to the quantity of dials that will be
attempted in a campaign. Each campaign
includes fresh dials, for the first attempt, and
may also include redials if specified in creating a
campaign. The number of fresh dials equals the
number of valid contacts on your calling list. In
the Campaigns List view of an upcoming
campaign, the number of redials is only an
VoiceBlast Help v 1.1 © 2007 SmartReply
Introduction to VoiceBlast
estimate. The final quantity of redials needed will
depend on the actual results of each fresh dial,
either busy or no answer.
DMA
The Direct Marketing Association, a national
professional organization in the United States
that provides an important Do Not Call list.
DNC List
Do Not Call List. A list of phone numbers that will
be blocked from being called in a campaign.
These include DNC Lists created by national,
state or provincial governments, provided by the
Direct Marketing Association (DMA), or one
supplied by the user. VoiceBlast also
automatically creates a "client opt-out list" of
those who have asked to be removed from future
campaigns, which is used as a DNC list on that
client's campaigns.
EBR
Existing Business Relationship. By law, you may
only call people with whom you have an existing
business relationship. These include current
customers and individuals who have recently
contacted you for information about your product
or service. The time period you may keep these
people on your lists varies by state, and can
range from 6 months to 3 years. For more
information on state-by-state requirements
please see the Compliance link on screen or
contact Support.
Fresh Dials
(see Dials)
Interactive Options
Interactive options in VoiceBlast include several
functions you can pre-program into your
campaigns that will allow a live listener to interact
with your message, usually by pressing certain
digits on their telephone keypad. Depending on
your account plan and the specific needs of your
campaign, you can allow the listener to access a
menu from which they can choose: 1) to hear a
detailed message on your product or offer; 2) to
transfer to a live operator for such purposes as to
get more information, place an order, make a
payment, etc.; 3) hear the privacy policy
statement; or 4) to opt-out of future notifications.
All campaigns for all users will include the
automated opt-out feature; additional interactive
features are available with the Members Only
account plan.
Another general term for interactive options is
"Interactive Voice Response" or IVR.
IVR
VoiceBlast Help v 1.1 © 2007 SmartReply
Interactive Voice Response. See Interactive
Options.
19
20
VoiceBlast Help & User Manual
Live Transfer
Also called "Agent transfer" this is an
Interactive Option that allows a live listener to
transfer the call to hear a more detailed
message, speak to a customer service
representative, etc.
Message
The final recording that will be played during the
campaign. You can record separate messages
for live listeners and voice mail, or use one
message for both types of delivery. When
discussing interactive campaigns, this is
sometimes called a Primary Message to
distinguish it from a More Info Message. In that
case it refers to both the live and voice mail
messages used in the campaign.
More Info Message
In an interactive campaign, one choice you can
provide listeners is to hear a More Info Message
containing additional details on your sale,
product or offer not included in your Primary
Message. This could also repeat the same
information as your Primary Message, but it must
be recorded separately.
Naming Conventions
This is a comprehensive system for naming your
calling lists and messages. You should create
your own naming system that works for you.
Elements of the filename could provide
information on when the message or list were
created or when the campaign they will be used
in will run, or perhaps which location or
department of your company the campaign was
for, etc.
For example, a voice mail message for
OutsideOutfitters offering a 20% off on all shoes
and boots, to be delivered on September 22,
2007 could be named "OOF_VM_20%_footwear
09-22-07"; while another message for a live
listener, offering $20 off a minimum $100
purchase on baseball equipment, delivered on
March 1, 2008 could be named
"OOF_Live_$20_off_$100_all_bball 03-01-08".
For phone lists, your list name should definitely
include the letters "DNC" if you will be using it as
a Do Not Call list. This way you won't
accidentally call everyone who has opted out.
Depending on your segmentation strategy, list
names could include a reference to women,
juniors, people who have purchased in the men's
department, rewards card members, inactive in
the past 6 months, etc.
Opt Out
To request to be removed from a calling list for
future campaigns or notifications. It is a legal
VoiceBlast Help v 1.1 © 2007 SmartReply
Introduction to VoiceBlast
requirement that you provide a no-cost opt-out
option for the listener. For voice mail messages,
this is accomplished by including the toll-free
number assigned to your account in your
message, which will reach VoiceBlast's
automated opt-out system. Live listeners can
simply press a key on their telephone keypad to
reach the automated opt-out system.
Phone List
A list of phone numbers used in a campaign,
either as a Calling List or as a Do Not Call List.
Press 1 #
In Creating a New Campaign, the Press 1 # you
are asked to select refers to a toll-free number in
your account which you have set up with optional
interactive features. This term comes from the
fact that your listener will "press 1" to access the
additional choices you provide in this interactive
campaign. This appears only in Members Only
accounts.
Primary Card
The primary card is the credit card on file in the
VoiceBlast system that will be billed for campaign
costs and service fees. If you have more than
one card on file, one must be selected as the
primary card. You may change which card is the
primary card at any time.
Primary Message
In an interactive campaign the primary message
is the main campaign message, and refers to
both Live Messages and Voice Mail Messages.
This term is used to distinguish those messages
from the More Info Message.
Privacy Notice
The privacy notice is a pre-recorded statement
telling listeners how their personal information
and privacy is protected. This can be offered in
interactive campaigns as the Press 4 option.
Professional Services
VoiceBlast offers professional expertise to
enhance the power of your voice marketing
campaigns with professional services for script
writing and voice talent for creating new
messages, and in creating new calling lists, list
management and data processing. Contact
customer support for more information.
QuickCreate
QuickCreate is a streamlined process for
creating and launching a simple campaign. In
QuickCreate, you may choose only one message
created for live delivery, then select, type or
paste in a list of up to 1,000 numbers. Calls will
be made during residential delivery hours only, 9
a.m. to 5 p.m. local time; you may not select a
more specific time period. The calling list will be
scrubbed against Federal and State DNC lists as
VoiceBlast Help v 1.1 © 2007 SmartReply
21
22
VoiceBlast Help & User Manual
well as the Smart Call DNC list created within
VoiceBlast for each account.
Redials
Redials are the number of second attempts that
will be made to call a valid phone number in your
campaign. The number of redials shown on the
Campaigns List view of upcoming campaigns is
only an estimate. The final number of redials
made in your campaign will be determined by the
actual results of each fresh dial, either busy or no
answer. (See Dials)
Reports
After a campaign is completed, you may pull
reports to analyze the results. Campaign
Reports are available in two forms: the
Campaign Summary Report lists the overall
results of all calls, while the Campaign Detail
Report shows the call result by individual phone
numbers dialed. Interactive Program Reports
show how many listeners chose each the various
options you have progrmmed into that interactive
campaign.
Scrubbing
When a campaign is submitted, the system will
process the data and "scrub" or block from being
dialed any phone numbers from your calling list
that appear on the National Do Not Call List or
any other DNC lists you selected. The system
also scrubs your list of any cell phone numbers,
toll-free numbers, duplicate numbers or invalid
numbers.
Smart Call
Every VoiceBlast account includes our Smart
Call feature which provides your listeners with an
easy, no-cost way to opt out of your marketing
list, ensuring your campaign meets that legal
requirement. VoiceBlast assigns your account a
toll-free number for this purpose which you
should include in your messages. A listener to a
voice mail message can call that number to
access VoiceBlast's automated opt out system.
Live message listeners can simply press 2 on
their telephone keypad during the message to be
transferred to the opt-out system.
Valid Phone Numbers
There are two meanings for this term in
VoiceBlast: 1) a valid phone number is an actual
phone number, not an incorrect entry nor a nonexistent number such as one with no such area
code; 2) valid phone numbers also refers to the
final count of phone numbers to be dialed in your
campaign after your calling lists are scrubbed to
block any numbers on any Do Not Call list.
VoiceBlast Help v 1.1 © 2007 SmartReply
Introduction to VoiceBlast
1.5
Frequently Asked Questions
Frequently Asked Questions
How do I add lists to my account?
Phone lists of your customers' or prospects' phone numbers can be
uploaded to the system in common file formats such as Excel (file extension
.xls), Access (file extension .mdb), as comma-separated values files (.csv)
or as compressed or Zipped files (.zip). You may also type in the numbers
or copy-and-paste your list from your original file into VoiceBlast. For more
information, start at Creating & Managing Phone Lists.
VoiceBlast also offers Professional List & Data Services for list and data
management, including pulling numbers to create a new list of qualified
contacts, or data processing on existing lists and customer information.
These are available as additional services.
How do I create messages?
For writing messages, this Help documentation includes tips on how to write
an effective and persuasive message, as well as information on what is
legally required in the content of your message. Please see
Creating Your Message and Message Content Requirements.
For recording messages, you can record a message on your own computer
(if properly equipped) and upload it to VoiceBlast as a .vox or .wav file, or
self-record your message over the telephone using VoiceBlast's toll-free
message recording system.
VoiceBlast also offers Professional services for writing and/or recording
your messages for you using experienced marketing personnel and
professional voice talent. Go to Professional Message Services for
complete details.
How do I schedule campaigns?
Once you've added lists and created messages, launching a campaign is as
easy as 1-2-3. To create a campaign, you select a list or lists that you've
added to the system, chose either one or two messages you'd like to send
to those lists (one for live ear listeners and one for voice mail listeners), and
select the date and time of day when the calls will be made. The system will
estimate the cost and once you approve the estimate, the campaign will go
out as planned. For Members Only accounts, you can also utilize optional
interactive features that can improve the effectiveness of your campaigns.
See Creating Campaigns for more information and detailed step-by-step
instructions.
What are interactive options and how can they help my
marketing?
VoiceBlast Help v 1.1 © 2007 SmartReply
23
24
VoiceBlast Help & User Manual
Interactive features, also called IVR for "interactive voice response", allow
your live listeners to press digits on their telephone keypad during your call
and access additional options. These may include a detailed More info
message on your sale or offer, an Agent transfer allowing a listener to
speak to a representative at your call center, reaching the automated optout system, or hearing a privacy policy message.
Interactive features can improve the usefulness of your campaigns by
letting your listeners act immediately while your selling message is still
fresh in their minds, to get more information about your sale or product, or
to speak to a live representative to place an order, make a payment, or to
continue the sales consultation process. For more information please click
to Options & Interactive Features.
Who can I include on my calling lists?
Federal and state regulations require that you may include on your calling
list any current customer who has purchased in the past 6 to 36 months
(depending on the state) or any person who has inquired about your
product, service, or pricing in the past 90 days, except those who have
opted out of your calling list. State requirements also apply, check the
Compliance link on the VoiceBlast screen after you login.
What countries can I call? Can I call contacts in Canada?
VoiceBlast accounts are normally configured to only call numbers within the
United States. However if also do business there, you can add calling to
Canada to your account plan as an optional service. Please be aware that
telephone rates and compliance requirements are different from those in
the United States. For current pricing, more information on compliance
issues, or to request this service be included in your account, please
contact VoiceBlast customer support at the email address or telephone
number listed below.
Will customers like getting my phone message trying to
sell them something?
Most listeners appreciate receiving your information. That's because, in
most cases, your calls are going to people who will be interested in hearing
about a promotion or sale opportunity because:
1) they are already current customers who are familiar with your
business or product, or
2) they are people who have contacted your business within a certain
period of time, which varies by state, for product or business
information.
These are people with whom you have an existing business relationship
(EBR).
In addition, since most messages are delivered to an answering machine
when your customers are not at home, they can listen to your message
when it's convenient for them. When they do, hearing your friendly,
informative and brief voice message will leave a positive impression that is
also unobtrusive.
VoiceBlast Help v 1.1 © 2007 SmartReply
Introduction to VoiceBlast
Is there a limit to the number of contacts I can include in
my campaign calling list?
There is no limit to the number of contacts you can include on a calling list.
How important is tone of voice when I self-record my
message?
Most customers respond best to a friendly, neighborly voice. Messages that
tend to work best are designed to sound like a call from a real person.
What hours of the day will my calls be made?
In compliance with Federal and state regulations, residential calls will be
automatically scheduled between 9 a.m. and 5 p.m. local time, and between
9 a.m. and 9 p.m. for business calls. If you do not specify a time, the system
will schedule the calls for any time within that range. You can also choose a
more specific time frame when you want the calls to be made. For
residential, you may choose either All Day (9-5 local time), Morning (9Noon), or Afternoon (12-5). For business calls, you may choose All Day (99 local time), Morning (9-Noon), Afternoon (12-5), Evening (5-9 pm) or
Night (7-9 pm).
Do I need to use Do Not Call (DNC) Lists in my marketing
campaigns?
Yes, if you're creating a business-to-consumer campaign you must have
your calling list "scrubbed" against any National and State DNC Lists that
cover the locations where your contacts reside. VoiceBlast will perform this
function in the campaign creation process. In addition, you may create DNC
Lists of your own, for example a segment of customers you would like to
exclude from the current campaign. You must also scrub any people who
have opted-out of receiving phone calls from your company or organization.
Please note that the laws and regulations concerning DNC Lists do NOT
apply if you are running a business-to-business (B2B) campaign or have an
existing business relationship (EBR) with your list. Keep in mind that the
Create a New Campaign screen automatically includes all the DNC lists as
a default, so for B2B calls or EBR campaigns you must "clear all" during the
campaign creation process. See Federal and State Laws for more detailed
information on telemarketing laws.
Can I upgrade my Account Plan to get a more economical
pricing structure?
Certainly. Your account plan can be upgraded at any time. Account billing
information can be updated immediately or changed to another valid credit
card with no interruption of service.
How do I know if my calls went out?
VoiceBlast includes a campaign summary report you can run any time after
the campaign has completed. Detail reports will run the night of the
campaign and will be available the next day. These will show the results of
every call made in your campaign.
VoiceBlast Help v 1.1 © 2007 SmartReply
25
26
VoiceBlast Help & User Manual
How to I get help if I have a problem in VoiceBlast?
To reach VoiceBlast customer support, please send an email to:
[email protected]
You can also access an online form for your email simply by clicking the
Support link in the upper right of every screen. A notification with email and
phone contact information will appear, as well as another link to open the
email form titled Report a Problem.
You may also contact us by telephone from 8:00 a.m. to 6:00 p.m. U.S.
Pacific Standard Time at:
(800) 461-2556
VoiceBlast Help v 1.1 © 2007 SmartReply
Top Level Intro
This page is printed before a
new top-level chapter starts
Part
II
28
2
VoiceBlast Help & User Manual
Creating & Managing Phone Lists
Creating & Managing Phone
Lists
In this section you can familiarize yourself with the process of preparing one
of the two principle elements needed for a new campaign, Phone Lists.
Click Next above to continue, or click on a subject of interest below.
2.1
·
The Two Types of Phone Lists
·
Typing or Pasting Phone Lists
·
Uploading Phone Lists
·
Creating Your Message
·
Self-Recording Your Message
·
Uploading Your Message
·
Field Mapping
·
Downloading Phone Lists
·
Deleting Phone Lists
The Two Types of Phone Lists
The Two Types of Phone Lists
In VoiceBlast, you will be creating and using two types of Phone Lists:
1.
Calling Lists, the phone numbers you will call in your campaign.
VoiceBlast Help v 1.1 © 2007 SmartReply
Creating & Managing Phone Lists
2.
Do Not Call Lists, phone numbers that may not and must not be
called in your campaign.
In processing your campaign for dialing, the VoiceBlast system
automatically blocks out any number that appears on any of the Do
Not Call List or lists. This process is also known as "scrubbing."
In addition to the links below, also see the Compliance link on the
VoiceBlast screen for more information.
See also
Glossary of Terms
Do Not Call Lists
2.2
Using Calling Lists as DNC Lists
Using Calling Lists as DNC Lists
As a telephone marketer you are subject to Federal and state laws, as well
as the Federal Trade Commission's Telemarketing Sales Rule, which forbid
you from calling customers too frequently. In fact, experienced voice
marketers recommend that you call a particular customer not more than
once each month. A valuable method method to help you stay in
compliance and keep customers happy is to use phone lists called in
previous campaign as Do Not Call Lists to carefully target your campaign
messages.
A single customer may appear on many different lists within one
organization's database, depending on how they organize and manage
their customer information. One customer may appear on lists arranged by
such factors as geographical region or store frequented, type of goods or
services purchased, credit limit, loyalty or frequency of purchase, etc. If that
organization were to create a campaign for each separate list, and all
campaigns will be going out over a short period of time such as the same
day, any customer who appears on more than one list will get multiple
messages. This creates a compliance and customer relations problem.
To solve this problem, you can use your Calling Lists as DNC Lists. This
technique allows you to scrub your campaign calling lists of customers you
have called or will call on other campaigns. This way, your customers will
receive only the single message you decide is most advantageous for your
marketing efforts.
For example, let's say the Smart Shopper Stores has three calling lists and
wants to do three campaigns, one for each customer category.
Management wants all three campaigns to go out on the Wednesday before
a big shopping weekend. Without using some calling lists as DNC lists,
some customers might get all three messages in one day. Here's how Smart
VoiceBlast Help v 1.1 © 2007 SmartReply
29
30
VoiceBlast Help & User Manual
Shopper Stores can prevent that from happening.
First, Smart Shopper Stores decides that everyone on List A will receive
Campaign One. In this case it is not necessary to scrub this list against
other user-created lists.
Secondly, for Campaign Two, they select List B as a Calling List, and List A
as a Do Not Call list. This ensures that no one who received Campaign One
will also be called in Campaign Two; Smart Shopper Stores has scrubbed
out people on List A from the new campaign.
Finally, for Campaign Three, List C is chosen as the Calling List and List A
and List B are selected as DNC Lists. This eliminates from Campaign Three
any customers already selected to be called in other campaigns. In this
scenario, as the campaigns go out, each customer will receive one and only
one message no matter how many of the store's lists they actually appear
on.
It is important to note that in the above example, it does not matter how
large each list is; List C could be bigger than List A. The determining factor
is how you prioritize as to which customers should receive which messages.
Also, since they are scrubbing each campaign against the other campaigns'
calling lists, the three campaigns could be scheduled to all go out
simultaneously.
See also
Do Not Call Lists
2.3
Professional List & Data Services
Professional List & Data Services
Effective marketing requires accurate information. To assist clients in
making sure their calling lists are as carefully targeted, current and useful
as possible, VoiceBlast offers professional services list and data
management.
These services are custom-tailored to meet each client's specific marketing
needs. VoiceBlast team can pull numbers from various databases to create
a new list of qualified contacts for upcoming campaigns, to extend your
marketing reach into new markets or a new customer segment.
VoiceBlast can also perform data processing on existing lists and customer
information, such as building specialized calling lists from a more
comprehensive database.
To find solutions to your calling list and data processing concerns, please
contact customer support to discuss your needs.
Use the online form on the Phone Lists tab, Professional Services submenu
VoiceBlast Help v 1.1 © 2007 SmartReply
Creating & Managing Phone Lists
to describe your needs or contact customer support by email at:
[email protected]
You may also contact us by telephone from 8:00 a.m. to 6:00 p.m. Pacific
Standard Time at:
(800) 461-2556
2.4
Typing or Pasting Phone Lists
Typing or Pasting Phone Lists
Adding Phone Lists
There are two ways in which you can add a Phone List to your account:
1.
Typing or pasting in a list into either QuickCreate or in the Phone
Lists tab, Add New List screen;
2.
Uploading a list file from your system, as described in
Uploading Phone Lists.
NOTE: In QuickCreate, only Calling Lists can be created or added.
Do Not Call Lists must be created or added under the Phone Lists
tab, Add New List, either by typing, pasting or uploading.
NOTE: Currently in VoiceBlast, once lists are added to the system
they can not be deleted.
This page will describe how to type or paste a list into VoiceBlast.
VoiceBlast Help v 1.1 © 2007 SmartReply
31
32
VoiceBlast Help & User Manual
Typing a Calling List into QuickCreate
In the QuickCreate function, after entering a Campaign Name, selecting a
Campaign Date, and choosing a Campaign Message stored in your
account, you can create a new calling list by typing or pasting the phone
numbers into the text box provided.
NOTE: The system will automatically save your new calling list under the
campaign name.
To type in your calling list:
1. Click the check box for Type Numbers.
2. Click your cursor in the text box below.
3. Type in the phone numbers of the individuals or businesses you
want to contact, making sure to follow these three requirements:
a. Include the area code for each number, but not a "1" before the
area code (example: 2305554567) so that each phone number
only includes 10 digits;
b. Do not use parentheses, dashes, hyphens, or periods to
separate digits (example: 2305554567);
c.
Separate the phone numbers with either a comma (,), the
"pound" or "number" sign (#), or by a return (enter key) on your
keyboard. Do not use spaces.
4. When you are finished, click Go to launch your campaign.
NOTE: In QuickCreate, only Calling Lists can be created or added.
Do Not Call Lists must be created or added under the Phone Lists
tab, Add New List, either by typing, pasting or uploading.
Pasting a Calling List into QuickCreate
To paste in your calling list:
1. On your computer, open the database file that includes your calling
list in its native application (such as Excel), and select the column
holding the phone numbers. The selected column should appear
highlighted.
2. Copy the column of phone numbers by choosing Edit/Copy on the
top menu bar, Control+c on your keyboard, or right-click/Copy on
your mouse.
3. Go back to QuickCreate in VoiceBlast screen, and click the check
box for Type Numbers.
4. Click your cursor into the text box below.
5. Paste the numbers into the text box by choosing Edit/Paste from
the top menu bar, Control+v on your keyboard, or rightclick/Paste on your mouse. (In processing the data, the system will
automatically delete any parentheses, dashes, hyphens, spaces or
periods.)
6. When you are finished, click Go to launch your campaign.
VoiceBlast Help v 1.1 © 2007 SmartReply
Creating & Managing Phone Lists
Typing or Pasting Lists in Add New List
You may also add a new phone list by typing or pasting numbers into
VoiceBlast under the Phone Lists tab, Add New List screen. Phone Lists
added here can be designated as either a Calling List or Do Not Call List.
To add a calling list:
1. Enter a Name for your Phone List.
Naming Convention Tip: When creating or adding a Do Not Call
List, make sure the file name includes the letters "DNC." For more
information on Naming Conventions, please go to the
Glossary of Terms.
2. Enter a Description of the Phone List.
3. Click to indicate if this list is or is not a Do Not Call List.
4. Click the button to indicate you want to type or paste in a list. The
screen refreshes to display a text box.
5. Type or paste the phone numbers into the text box by following the
instructions above for either typing or pasting a Phone List into
QuickCreate:
a. Include the area code for each number, but not a "1" before the
area code (example: 2305554567);
b. Do not use parentheses, dashes, hyphens, or periods to
separate digits (example: 2305554567);
c.
Separate the phone numbers with either a comma (,), the
"pound" or "number" sign (#), or by a return (enter key) on your
keyboard. Do not use spaces.
6. When you are finished, click Save. The system will process your
data and add the list to your VoiceBlast account.
2.5
Uploading Phone Lists
Uploading Phone Lists & Approved
Formats
Approved File Formats, Database Tips
You can upload a new Calling List or DNC List from your computer to your
VoiceBlast account.
Before attempting the upload, make sure your database file is in one of
these approved formats:
VoiceBlast Help v 1.1 © 2007 SmartReply
33
34
VoiceBlast Help & User Manual
·
a Microsoft Access (.mdb) file,
·
a comma separated value (.csv) file, or
·
an Microsoft Excel (.xls) file.
NOTE: Your data file must contain a header row so the system
can properly process the data, unless the file contains only a single
column of phone numbers.
NOTE: If your database file contains many fields besides phone
numbers, it may be quite large in size. This could cause uploading
and processing to take a long time, and take up a great deal of disk
space in your account. It is recommended that you trim the data by
reducing the number of fields to import. To do this, open your
database in its original application, copy only the phone numbers,
paste them into a new file, and then save the new file with a new
filename in .csv format.
NOTE: One advantage of uploading a file versus typing or pasting
is that you can include additional customer information such as
names or account numbers along with the phone numbers.
NOTE: Currently in VoiceBlast, once lists are added to the system
they can not be deleted.
Uploading a New Phone List
To begin, click the Phone Lists tab, then the Add Phone Lists submenu.
1. Enter a List Name.
2. Enter a brief Description of the list.
3. Click the check box if this is a Do Not Call List.
VoiceBlast Help v 1.1 © 2007 SmartReply
Creating & Managing Phone Lists
4. From the drop-down menu, select the overall location of the phone
numbers (the available choices depend on your account plan).
5. Click the button for Upload. The screen will refresh to show an
Upload New Phone List interface, which will also list the Valid
File Types for a successful upload.
6. Click Browse. A new window will appear showing your computer's
filing system.
7. Browse your system to locate the correct file to upload. Click the
file to highlight it and click Open. The selected file will appear on
the VoiceBlast screen.
8. Click Next.
9. The screen will refresh and ask you on which spreadsheet the data
can be found (Excel file instructions). Click on the appropriate
sheet.
10. Click Next.
The screen will refresh and show a list of fields (the titles of the
different columns) found in your database. Now you must perform
Field Mapping so the system can identify the phone numbers in
your database.
11. In the column of buttons under Phone Field, click the field that
includes the phone numbers. You must select one, and only one
field as the phone field, as seen below.
12. In the Import column of check boxes on the right, click any number
of additional fields you want to include in the uploaded file. You
VoiceBlast Help v 1.1 © 2007 SmartReply
35
36
VoiceBlast Help & User Manual
can upload all or none of the additional fields, as seen below.
13. When you have completed your selection, click Upload Now.
14. The system will process the upload. This may take a few moments
depending on file size, Internet connection speed, etc. The screen
will refresh to display the main Phone List page showing all of your
Calling Lists and DNC Lists. A moving icon next to your newly
uploaded file will indicate that the file is being processed. After a
few moments, you may click the Refresh button to see if the
processing is complete. The screen will not automatically refresh to
indicate the upload is successful.
If successful, the spinning icon will become a green check mark,
indicating the file is now available for use. You will also receive an
email indicating the upload is successful. If the upload is
unsuccessful, an error message will appear with additional
information.
See Also
Field Mapping
2.6
Field Mapping
Field Mapping
VoiceBlast Help v 1.1 © 2007 SmartReply
Creating & Managing Phone Lists
37
When you upload a Calling List, the VoiceBlast system needs to identify
which part of your data includes the phone numbers. Making sure the
system knows which of your fields contains phone numbers is called Field
Mapping.
This page explains in more detail the field mapping process described in
Uploading Phone Lists.
To recap the steps before Field Mapping, on the Create Calling List screen:
·
You selected Upload file.
·
You have browsed your computer and selected the correct list and clicked Open.
·
The file appeared on the VoiceBlast screen and you clicked Next.
·
You identified which sheet in your database contains the data you want to upload (usually
Sheet 1) and clicked Next.
·
The next screen displays the fields included in your file.
To complete the field mapping process:
1. The screen will display a list of fields (the titles of the different
columns) found in your database, and two columns of buttons to
make your upload selections, as seen below.
2. In the column column titled Phone Field, click the button of the
field that contains the phone numbers in your list. You must select
one, and there can be only one field selected as the phone field,
as seen below.
VoiceBlast Help v 1.1 © 2007 SmartReply
38
VoiceBlast Help & User Manual
NOTE: You do not need to upload any additional fields to create a
useable calling list in VoiceBlast. Any additional data is only useful
in reports you generate later relating to the delivery results of your
campaign.
3. In the Import column of check boxes on the right, click any number
of additional fields you wish to include in the uploaded file. You can
upload all or none of the additional fields, as seen below.
VoiceBlast Help v 1.1 © 2007 SmartReply
Creating & Managing Phone Lists
4. When you have made your selections, click Upload Now. The file
will process as described in Uploading Phone Lists.
See also
Uploading Phone Lists
2.7
Downloading Phone Lists
Downloading Phone Lists
You may download a calling list from VoiceBlast to your computer, perhaps
if you want to review the data included in the list. The downloaded list will
be in .csv (comma separated values) format.
To begin, on the Phone Lists tab, click the Calling Lists submenu. The
View Calling Lists screen will display.
1. Identify the calling list you want to download in the table.
2. In the row for the list you wish to download, click the Download List
link.
3. A dialog box will open asking if you want to open the file or save it to
your computer. Click Save.
4. A Save As window will open allowing you to choose where on your
computer the file will be saved, and to give the list a new filename if
VoiceBlast Help v 1.1 © 2007 SmartReply
39
40
VoiceBlast Help & User Manual
you prefer. ( A new filename may be easier to remember and find
than the system-generated name.)
5. When you have specified the location, click Save.
2.8
Deleting Phone Lists
Deleting Phone Lists
You may delete a Calling List from your account only if it has not been used
on any campaign. If a list has been called and a campaign created it
remains in the VoiceBlast system.
To delete a phone list:
1. On the View Calling Lists screen, identify the Calling List you want
to delete on the table.
2. To the right of the name, click the Delete link for the List.
3. A dialog box will appear asking you to confirm that you want to delete
this list.
4. If you do want to delete the Calling List, click Yes.
VoiceBlast Help v 1.1 © 2007 SmartReply
Top Level Intro
This page is printed before a
new top-level chapter starts
Part
III
42
3
VoiceBlast Help & User Manual
Creating & Managing Messages
Creating & Managing
Messages
In this section you can familiarize yourself with the process of preparing the
second of the two main ingredients needed for a new campaign, Messages.
To continue, click Next in the upper right corner of this window or click one
of the links below.
3.1
·
Creating Your Message
·
Uploading Your Message
·
Self-Recording Your Message
·
Listening to Saved Messages
·
Deleting Messages
Creating Your Message
Creating Your Message
Voice mail messages and live messages
VoiceBlast gives you the ability to use two different messages in a single
campaign, one to leave on your listener's answering machine, and one to
play when a live listener picks up the phone. You may use only one
message in your campaign, but tailoring your messages to the two different
delivery methods could make them more effective. Particularly if your
account plan and this campaign include interactive options, your live
message should inform the listener that more information or other choices
are available immediately simply by pressing a key.
VoiceBlast Help v 1.1 © 2007 SmartReply
Creating & Managing Messages
Another consideration is courtesy. When someone checks their answering
machine, they expect a recorded message. When they pick up the phone,
they don't expect a recording. One way to deflect those feelings in a
message specifically for live listeners is to acknowledge up front that this is
a recorded message. It comes across as professional, might take the edge
off, and if blended into your normal speech pattern does not call undue
attention to the issue.
Examples of correct voice mail message and live message:
A typical voice mail message:
Hello, this is Kris calling from SmartShoppers at 800-5551212 with great news for special customers like you. To
show our appreciation, you can take $20 off a purchase of
$100 or more this weekend, August 3rd and 4th at our
exclusive preview sale on the newest Fall and back-toschool fashions. That's $20 off a $100 purchase on
everything in the store, including specially priced or
previously discounted items. Just visit your nearest
SmartShopper store this weekend and stop by the
customer service desk for your special coupon. Thank
you, and we hope to see you at SmartShoppers this
weekend! Goodbye.
A typical live message:
Hello, this is Kris from SmartShoppers at 800-555-1212
calling with a pre-recorded message to thank special
customers like you. To show our appreciation for your
past business, you can take $20 a purchase of $100 or
more this weekend, August 3rd and 4th at our exclusive
preview sale on the newest Fall and back-to-school
fashions. That's $20 off a $100 purchase on everything in
the store, including specially priced or previously
discounted items. Just visit your nearest SmartShopper
store this weekend and stop by the customer service desk
for your special coupon, or press 1 now for more
information or to be removed from our special customer
calling list. Thank you, and we hope to see you at
SmartShoppers this weekend! Goodbye.
These messages include all legally required content and incorporate
several elements of writing an effective message.
Legally required content
As a telephone marketer you are subject to Federal and state laws, as well
as the Federal Trade Commission's Telemarketing Sales Rule, which
requires that in every message you create, including both live messages
and voice mail messages, you must promptly state the following
information:
·
The caller must identify himself or herself by name.
·
The message must state the name of the business making the call,
the purpose of the call and the nature of the goods and services
VoiceBlast Help v 1.1 © 2007 SmartReply
43
44
VoiceBlast Help & User Manual
offered.
·
You must provide a phone number, preferably a toll-free number,
the listener can call to opt out.
NOTE: Federal regulations require that listeners must have a way
to opt out at no cost to them. They can do this by calling the tollfree number assigned to your VoiceBlast account to access an
automated system for opting out. Depending on your account plan,
your campaign could also include interactive options that would let
a live listener opt out immediately by using the telephone keypad.
Tips on writing an effective message
·
Write and review your message ahead of time to ensure it includes
all the necessary information the listener needs to respond to your
offer. In addition to your company's name it should include:
- The "offer" or purpose of your call (i.e., a sale or new service).
- When the offer will be available.
- A call to action ("Don't miss this opportunity, stop by this
weekend").
- Perhaps brief directions if they need to travel to your location to
take advantage of the offer.
·
Give your message a single, specific focus. Customers are usually
not prepared to listen to or remember a great deal of information on
a voice message.
·
Use "trigger words" that create a feeling of urgency or exclusivity,
such as:
- Exclusive, private sale, unadvertised, customer alert, important
news
- Customer appreciation, thank you sale, valued customer
- Hurry, immediate, this weekend only
·
3.2
Consider repeating the most essential information at the close of
the message. Summarize the offer and reinforce key details such
as the store name and location.
Professional Message Services
Professional Message Services
To help make your campaign messages more effective, you can use
VoiceBlast's professional scriptwriting and voice talent. These services are
available on all account plans for an additional fee. (Contact your
VoiceBlast Help v 1.1 © 2007 SmartReply
Creating & Managing Messages
VoiceBlast Customer Support representative for pricing information.)
With the help of VoiceBlast professional services, you can:
·
have VoiceBlast write a professional script that you self-record;
·
write a message yourself and have it recorded by professional voice
talent;
·
have VoiceBlast both write the script and record the message using
our experienced personnel.
Requesting A Professional Script
To request a professionally-written script for your message, from the
Messages tab, click the Professional Services submenu. The
Professional Message Services page will display.
1. Confirm the contact information at the top of the page. This is
necessary because our support staff will need to contact you if there
are any questions and when the script is finished and ready for your
approval.
2. Click the check box at the top of the Script Services section of the
page.
3. Select if this script will be for a live listener message or a voice-mail
message. If it will be used for both, choose One Recording for both
Live and Voicemail.
4. Select that you would like a script written. Clicking this button
activates the text box to the right.
5. In the text box, provide the information needed to create an effective
script within legal compliance. For a reminder on what is needed, let
your mouse hover over the yellow triangle alert icon, and an onscreen tip will appear. For complete information on legally required
content go to Message Content Requirements. For information on
the elements needed in an effective message, please go to
Creating Your Message.
6. If you would also like VoiceBlast to professionally record the
message, proceed to Requesting Professional Voice Talent below.
If your request if for a script only, click the SUBMIT REQUEST button
at the bottom of the page.
You will receive an email acknowledgement of your request. VoiceBlast
customer service representative will contact you if there are any questions
and/or when your message is complete and ready for your approval.
Requesting Professional Voice Talent
To request that a professional voice talent record your message, after you
have requested a script and provided all necessary information, or you
have typed or pasted in a script you have written:
1. Click the check box at the top of the Voice Talent Services section
of the page.
VoiceBlast Help v 1.1 © 2007 SmartReply
45
46
VoiceBlast Help & User Manual
2. In the text box provided, give the voice talent any appropriate
direction for their performance. For example, you can direct the talent
to speak in an urgent, concerned voice; in a friendly next-doorneighbor tone; in a youthful, bubbly voice, etc., whatever you think
would be the most appropriate tone that will make your message its
most effective.
3. Select whether you wish the voice talent to be a female or male
voice. The selection for Female is chosen by default.
4. When you are finished, click the SUBMIT REQUEST button at the
bottom of the screen.
Submitting Your Own Script for Professional Recording
If you would like VoiceBlast voice talent to record a script you write, on the
Professional Service submenu:
1. Click the check box at the top of the Script Services section of the
page.
2. Select if this script is for a live listener message or a voice mail
message. If it will be used for both, choose One Recording for both
Live and Voicemail..
3. Type in your script, or copy-and-paste a script you created using the
Message Timing Template available through the link under Help on
the lower right of your screen.
The Message Timing Template is a Microsoft Word template with a
text box for your script. On the side of this text box are number
indicating seconds, which as you type will indicate approximately how
long of a message that amount of text will create.
For a reminder on what is needed, let your mouse hover over the
yellow triangle alert icon, and an on-screen tip will appear. For
complete information on legally required content go to
Message Content Requirements. For information on the elements
needed in an effective message, please go to
Creating Your Message.
4. When you are finished entering your script text, click the check box
at the top of the Voice Talent Services section of the page.
5. In the text box provided, give any appropriate direction for the voice
talent. For example, you can direct the talent to speak in an urgent,
concerned voice, in a friendly next-door-neighbor tone, in a youthful,
bubbly voice, etc., whatever you think would be the most appropriate
tone that will make your message the most effective.
6. Select whether you wish the voice talent to be a female or male
voice. The selection for Female is chosen by default.
7. When you are finished, click the SUBMIT REQUEST button at the
bottom of the screen.
See also
Message Content Requirements
VoiceBlast Help v 1.1 © 2007 SmartReply
Creating & Managing Messages
Creating & Managing Messages
Creating Your Message
Self-Recording Your Message
3.3
Uploading Your Message
Uploading Your Message
For an upcoming campaign, you may decide to use a previously recorded
message. It may have been professionally recorded in a studio or perhaps
on a desktop computer with a good quality microphone and the proper
software. However, when you upload a file to the VoiceBlast system, it
must be in either a .wav or .vox file format.
To upload a message,
1. Click on the Messages tab, Create Message submenu.
2. Enter the Message Name.
Naming Convention Tip: To make it easy to distinguish between
the two types of message, include the letters "VM" in the filename
for a voice mail message, and the letters "LV" in the filename for a
live message. For more information on Naming Conventions,
please go to the Glossary of Terms.
3. Enter a brief Description of the message.
4. Click the Upload radio button. The screen will refresh and display
an upload function.
VoiceBlast Help v 1.1 © 2007 SmartReply
47
48
VoiceBlast Help & User Manual
5. Click Browse. A new window will appear showing your computer's
filing system.
6. Browse your system to locate the file you wish to upload. Make
sure it is in either a .wav or .vox file format.
7.
Click the file to highlight it and click Open. The browse window will
close and the selected file will appear in the Upload Your Message
text box on the Add New Message screen.
8. Click Upload. The system will process the upload. This will take a
few moments. When processing is complete, the system will
display a message indicating the upload has been successful and
the file is available for immediate use, or the upload has failed. If
the upload has failed, an error message will appear with additional
information.
NOTE: Currently in VoiceBlast, once messages are added to the
system they can not be deleted.
3.4
Self-Recording Your Message
Self-Recording Your Message
The simplest way to create your message for a voice broadcast campaign is
to self-record it by telephone through the VoiceBlast system. Following the
tips below will help you make a successful, clearly audible message.
Tips for a Successful Recording
Below are some helpful tips for creating an effective and clearly audible
voice message:
·
Use a land telephone line, not a cell phone or cordless handset, to
ensure the highest quality audio transmission.
·
Consider whether a male or female voice would be the most
effective presenter of the campaign message.
·
Before calling the toll-free number, practice your message a few
times. Work out awkward phrasing or eliminate tongue-twisters that
may not be apparent in written form.
·
Ask someone to listen to your message. Ask if they understood the
point of the message and if it is clear what to do in response to the
message.
·
Time your message. Try to keep the message within 120 seconds
in length. Remember, radio and TV commercials are typically only
30 or 60 seconds long yet convey a great deal of information and
motivate the listener to take action.
VoiceBlast Help v 1.1 © 2007 SmartReply
Creating & Managing Messages
·
As defined in your account plan, messages 61 seconds in length or
longer will be incur a higher cost per dial. Also, the system can not
accept messages over 120 seconds in length.
·
Make sure you are in a quiet room with no noises in the
background such as a radio, television, people talking or outside
noises.
·
Speak "with a smile in your voice" to create a friendly, welcoming
image. Picture yourself speaking one-on-one with your favorite
customer. Messages that tend to work best are designed to sound
like a call from a real person.
Recording the Message
To create a new message, on the Messages tab click the Create Message
submenu.
The Create New Message screen will display.
In the Create New Message dialog box:
1. Enter a message name.
Naming Convention Tip: To make it easy to distinguish between
the two types of messages, include the letters "VM" in the filename
for a voice mail message, and the letters "LV" in the filename for a
live message. For more tips on Naming Conventions, please go to
the Glossary of Terms.
2. Enter a description that will distinguish it from other messages
and be helpful in a search.
3
Click Self Record. The Self Record By Phone information box will
appear.
4. Self-record your message:
a. Call the toll-free number provided on your screen.
VoiceBlast Help v 1.1 © 2007 SmartReply
49
50
VoiceBlast Help & User Manual
b. At the prompts, enter the Message ID and the PIN provided on
screen.
c.
At the tone, record your message. Remember, the system
cannot accept messages over 120 seconds in length.
d. When you have completed your message, press #. The
message will play back for your review.
e. If you are satisfied with the message, press 1 to accept it. The
system will automatically save it with the name and description
you entered above.
f.
If you want to re-record the message, press 3.
At the tone, record your message again, repeating steps (c)
through (f) above until you are satisfied.
5. Hang up when finished. In a few minutes your new message will be
available for use in an upcoming campaign.
NOTE: Once messages are added to the system they can not be
changed or edited.
See also
Creating Your Message
Message Content Requirements
Uploading a Message
3.5
Listening to Saved Messages
Listening to Saved Messages
You can listen to messages that have been previously recorded, to ensure
you choose the appropriate message for your campaign. There are two
ways to listen to messages, either on your computer or by phone.
Listening to Messages on Your Computer
To listen to a message directly within VoiceBlast:
On the Message List tab, click the Listen icon for the message you want to
hear. The system will start your default media player program and begin
playing the message automatically.
NOTE: To hear messages on your computer your system requires a media
player program and speakers.
To download a message to your computer to listen at a later time:
Click the Download icon for the message you want to download. A dialog
VoiceBlast Help v 1.1 © 2007 SmartReply
Creating & Managing Messages
box will open asking where on your computer the file should be saved.
When you have entered or browsed to the correct location, click Save.
Listening to Messages by Phone
You can also listen to messages that have been previously recorded via
telephone. To do so:
1. On the Message List tab, click the name of the message you want
to listen to. The screen will refresh to the Message Detail view.
2. Call the toll-free number shown in the message details.
3. At the prompts, enter the Media ID number and the PIN shown on
screen.
4. The message will play.
NOTE: You may only review messages that are complete. You can
not make changes to the message after it has been recorded.
3.6
Deleting Messages
Deleting Messages
If a message becomes out of date, or for any other reason, you may delete
it from your VoiceBlast account.
Messages used on any active or pending campaign can not be deleted.
To delete a message, click on the Messages tab, Message List submenu.
The View Messages screen will display.
1. Identify the message you want to delete on the list.
NOTE: You can listen to the message to confirm if you do indeed
want to delete it. Go to Listening to Saved Messages for more
information.
2. If you want to delete the list, to the right of the Message name click
the Delete link.
A notification will ask you to confirm that you want the media (the
message) deleted.
3. If you want to delete the Message, click Yes.
See also
Listening to Saved Messages
VoiceBlast Help v 1.1 © 2007 SmartReply
51
Top Level Intro
This page is printed before a
new top-level chapter starts
Part
IV
Creating Campaigns
4
Creating Campaigns
Creating Campaigns
This section will describe the steps in creating a basic campaign using the
QuickCreate option, and using the system's full flexibility to design a more
customized campaign in the Create New Campaign screen.
In addition to incorporating the required elements of a campaign, Create
New Campaign offers more flexibility in choosing your own
Do Not Call Lists.
QuickCreate: Overview
There are five basic steps required in QuickCreate:
1. Name the campaign.
2. Choose a Date.
3. Select a Message.
4. Select a Calling List.
5. Click Go & Approve. The system checks for bandwidth
availability, account balance, etc., then presents an estimated cost
for the campaign for your approval.
Creating a New Campaign: Overview
There are six basic steps required on the Create New Campaign screen:
1. Campaign Details, where you enter a name (required) and
description (optional) for the campaign, choose Residential or
Business delivery, and whether the campaign should include
redials.
2. Message Details, where you select which of your stored messages
will be played for Live Message calls and Voice Mail calls. You
need to make a choice for both, even if it's the same message for
both types of delivery.
3. Calling Lists, where you select one or more of your stored Calling
Lists to be dialed in this campaign.
4. Do Not Call Lists, where you can select any number of Do Not
VoiceBlast Help v 1.1 © 2007 SmartReply
53
54
VoiceBlast Help & User Manual
Call Lists, including your own, to scrub against your calling list. (All
campaigns will scrub against the National Do Not Call List.)
5. Delivery Details, where you pick the day the campaign will launch
and choose a specific time period.
6. Save & Approve, where you submit the campaign for processing.
The system checks for bandwidth availability, account balance,
etc., then totals the cost for the campaign for your approval.
To continue, click Next above or on one of the following topics within this
chapter:
4.1
·
QuickCreate a New Campaign
·
Creating a New Campaign
·
Business Campaign Options
·
Campaign Cost Estimates
·
Testing Your Campaign
·
Viewing The Campaigns List
·
Aborting Scheduled Campaigns
QuickCreate a New Campaign
QuickCreate a New Campaign
The QuickCreate option always appears on the left of the screen while
working in VoiceBlast.
The QuickCreate option allows you to easily set up and launch a basic
campaign. Select a Message already stored in your VoiceBlast account
and a Calling List, either stored in your account or one you type or paste
into the window provided. Any campaign launched from QuickCreate will
automatically scrub your calling list against the National Do No Call List
and any VoiceBlast DNC lists.
QuickCreate is a good option to use when your calls can be made at any
time of the day, do not require redials, and when you do not need to
customize your distribution by using your own Do Not Call Lists. All calls
will be made between 9 a.m. and 5 p.m. in the listener's time zone, per state
and Federal regulations.
Using QuickCreate to start a new campaign
VoiceBlast Help v 1.1 © 2007 SmartReply
Creating Campaigns
To create a new campaign using QuickCreate:
1. Enter a unique Campaign Name.
2.
Enter the Campaign Date the campaign will be broadcast.
3. Choose a Campaign Message, by browsing and selecting a
message from those stored in your account.
4. Provide a Campaign List for your Calling List, either:
a. By selecting one of your lists already stored in your account,
(see Uploading Phone Lists for more information) or
b. By typing or pasting in contact numbers in the window
provided. See Typing or Pasting Phone Lists for step-bystep instructions.
NOTE: If you type or paste in a calling list, the list will be saved
under the Campaign Name.
5. When all information has been correctly entered, click GO.
6. The system will process the campaign request to determine if
sufficient bandwidth is available to broadcast the campaign as
created. When processing is complete, a notification will appear
stating that processing was successful and asking you to Approve
Purchase.
7. Click Yes to approve purchase or No to cancel.
If campaign processing was not successful, typical errors include:
the current balance in your account will not cover the estimated
costs of the campaign and you need to replenish the account
funds; or available bandwidth is insufficient for the day or time of
day you want the campaign to run. For the current status of your
account and upgrade options, go to the My Account tab.
8. As a VoiceBlast user, your account plan is set up to automatically
bill your credit card for the cost of the campaign, within limits you
established in account set-up.
4.2
Creating a New Campaign
Creating a New Campaign
To create a new campaign, start by clicking the Campaigns tab, then the
Create Campaign submenu.
The Create New Campaign screen displays.
VoiceBlast Help v 1.1 © 2007 SmartReply
55
56
VoiceBlast Help & User Manual
Complete these six basic steps to assemble the elements of your new
campaign, schedule delivery and approve purchase.
Step 1: Campaign Details
1. Enter a unique Campaign Name, (i.e., Spring 2008 Shoes) up to
30 characters in length. (The campaign name may only include
letters, numbers, and spaces.)
2. Enter a campaign Description that will help you distinguish it from
other campaigns and would be useful in a search, up to 250
characters in length (i.e., West Region Women's Shoes 10% off).
3. Select target, whether the campaign will be delivered to
Residential or Business contacts.
VoiceBlast Help v 1.1 © 2007 SmartReply
Creating Campaigns
NOTE: If this is a Business-to-Business Campaign, please see
Business Campaign Options for additional information on
choices available in setting up your campaign.
4. Select whether the system should redial each number in case of a
busy or no answer.
Step 2: Message Details
1. Select a Voice Mail Message.
a. Click the Select Message icon. A window will open showing all
stored messages and a search function.
b. If the message you seek is not immediately visible, you can
narrow your choices by using the Search function. Type in a
name or any part of the name or description, or enter a date or
date range in which the message was created, and click
Search. All messages matching your search criteria will be
displayed.
c.
You can confirm which message is the correct one by listening
to it, either by clicking the Listen button for that message (your
system must have a media player program and speakers on
your computer), or by dialing the toll-free displayed on screen
and entering the PIN number for that message. You cannot rerecord or change the message.
d.
Once you locate the correct message, click Select at the end
of the row. That message will appear on the main Create
Campaign screen as your selected Voice Mail Message.
NOTE: A campaign must include a choice for both live messages
and voice mail. They can be different messages or both the same.
You must make a selection for both a live message and a voice
mail message even if both delivery methods use the same
message.
2. Select a Live Message.
NOTE: To use the same message you have just selected as your
Voice Mail Message for your Live Message, click the button
marked Copy next to the Select Live Message text.
To select a different Live Message than your Voice Mail Message:
a. Click the Select Message icon. A window will open showing all
stored messages and a search function.
b. If the message you seek is not immediately visible, you can
narrow your choices by using the Search function. Type in a
name or any part of the name or description, or enter a date or
date range in which the message was created, and click
Search. All messages matching your search criteria will be
displayed.
c.
In the Message selection window, you can determine if you are
selecting the correct message by listening to it, either by
clicking the Listen button for that message (you must have
Windows Media Player and speakers on your computer), or by
VoiceBlast Help v 1.1 © 2007 SmartReply
57
58
VoiceBlast Help & User Manual
dialing the toll-free number displayed on screen and entering
the PIN number for that message. You cannot re-record or
change the message.
d. Once you locate the correct message, click Select at the end
of the row. That message will appear on the main Create
Campaign screen as your selected Live Message.
3. To change your selection for any reason, for either Voice Mail
Message or Live Message, click the Select Message icon for the
message you want to replace and simply make another selection.
The new selection will automatically replace your previous choice.
4. Select a Press #1 toll-free number. Your choice here depends on
your account plan and if you have programmed any interactive
options.
a. Pay as you go account holders would select the default tollfree number provided to your account. It should already appear
as the default selection. Calling this number lets listeners
access the free automated opt-out function, known as Smart
Call. This number should already appear as the default
selection. For more information on Smart Call, go to
Smart Call.
b. Members only account holders may choose from the drop
down menu either:
· an agent transfer phone number that has been submitted to
and authorized by VoiceBlast,
· a toll-free number from the drop-down menu that you have
already programmed with the features you desire.
Remember, choosing a number will automatically activate
any options you have set up that are connected with that
number (For more information and related topics, see
Options & Interactive Features.), or
· a toll-free number that is not programmed with interactive
features, if you do not wish this campaign to be interactive.
This may be any toll-free number assigned to your account
that does not have, or for which you have deactivated, any
interactive functions.
NOTE: Because interactive options are set up before a
campaign starts, make sure your More info message and
other settings are up to date for your current campaign.
Otherwise, the campaign will run with the More info message
and/or other settings you established for an earlier campaign
using that number. In addition, setting up new interactive
features erases the previous settings, including the More info
message. See Setting Up Interactive Programs for complete
details.
5. For Display this Caller ID #, your default caller ID will be
displayed. If additional numbers have been approved for your
account, you may make another selection from the drop-down
menu. Using your assigned toll-free number here will activate the
Smart Call function.
VoiceBlast Help v 1.1 © 2007 SmartReply
Creating Campaigns
Step 3: Calling Lists
Select one or more Calling Lists of contacts to be called in this campaign:
1. Click the Select List button. A window opens displaying all your
Calling Lists in the left box. After each list name, the total number
of contacts on that list will be displayed. The box on the right is
empty.
2. Choose your Calling Lists by left-clicking your mouse to highlight
a single file, shift+click to highlight a continuous sequence of files,
or control+click to highlight multiple files separately.
3. Click the Add button between the boxes to select the highlighted
list or lists for this campaign. The lists will appear in the right box.
(You may also click Add All if you want to use every list in your
account.)
4.
When your choice is complete, click Save.
5. The selected lists will be displayed on the main screen. You will
also see the total number of contacts in those lists.
6.
To change your selection for any reason, click the Clear All link,
then repeat steps 1 through 4 above.
Step 4: Do Not Call Lists
In Campaign Details above (Step 1), if you chose Residential for Select
Target, all applicable, legally required DNC lists are automatically applied
in this campaign. These include the US National Do Not Call list and other
national, state, provincial or industry lists.
Business targeted campaigns have fewer restrictions; please review
Business Campaign Options for information.
To select one or more Do Not Call (DNC) Lists to scrub against your
Calling Lists.
1. Click the Select List button. In the new window in the left box you
will see a list of all of your own Do Not Call Lists in your
VoiceBlast account, and your calling lists. Do Not Call lists are
labeled "(DNC)" after the list name; Calling Lists are labeled
"(Calling)" after the list name. Following each list name will be the
total number of contacts on the uploaded list.
2. Choose your Do Not Call Lists by left-clicking your mouse to
highlight a single file, shift+click to highlight a continuous
sequence of files, or control+click to highlight multiple files
separately.
3. Click the Add button between the box to select the highlighted list
or lists for this campaign. The lists will then appear in the right box.
(You may also click Add All if you want to use every Do Not Call
list in your account.)
4. When your selection is complete, click Save.
5. The selected list or lists will be displayed on the main screen. You
will also see the total number of contacts in those lists.
VoiceBlast Help v 1.1 © 2007 SmartReply
59
60
VoiceBlast Help & User Manual
6. To change your selection for any reason, click the Clear All link,
then repeat steps 1 through 4 above.
Step 5: Delivery Details
1. Select a Delivery Date from the drop-down calendar.
2. Select a Local Time from the drop-down list to specify when you
want the messages to be delivered. This indicates the local time for
each area code you are calling.
Step 6: Save & Approve
1. When you have completed all five steps above and reviewed your
entries, click Continue.
The system will process the lists and messages and check the
available line capacity, or bandwidth, to determine if it can send out
your campaign within the delivery time frame you requested. The
system will also check your account balance. This will take a few
moments.
2. When processing is complete, a message will notify you if
bandwidth check is successful and show the estimated cost to
broadcast this campaign. Click the View Terms & Conditions box,
and click Yes to approve the purchase.
You may get a message stating that you need to replenish your
account balance to cover the estimated cost of this campaign.
Follow the instructions on screen to make a payment from your
primary credit card.
If bandwidth is insufficient for the time period you requested, you
will have to schedule your calls for another time.
If successful, a message will appear stating that your campaign
has been accepted and will run as planned. You will also receive
an email notification indicating the campaign has been accepted.
If there is a problem, an error message will appear with additional
information. (Typical problems include lack of available bandwidth
for the time you requested, the estimated cost exceeds your current
account balance or cost limits you have established.) The error
message will indicate the steps needed to correct the problem,
such as rescheduling the campaign or authorizing an additional
charge to your account.
NOTE: If you have scheduled the campaign to begin immediately,
there will be a 5-minute delay from the time you approve the
estimated campaign cost to the start of dialing. In this case, be
ready to act quickly to abort the campaign immediately if you
discover any problem with the message when testing your
campaign. See Aborting Scheduled Campaigns for instructions.
If the campaign is scheduled to begin farther in the future, you
have until the scheduled starting time to abort the campaign.
VoiceBlast Help v 1.1 © 2007 SmartReply
Creating Campaigns
Testing Your Campaign
After you have approved purchase and before the campaign runs, you have
one opportunity to test the campaign. After campaign approval, a Detail
View of the new campaign will appear. At the top is a text box.
1. To test your campaign, enter in a phone number into the text box.
2. Click Send.
A message will appear indicating your test message has been successfully
submitted. The test call should be made within a few minutes.
NOTE: Even if you have scheduled the campaign to begin immediately, you
still have a 5-minute delay from the time you approve the estimated
campaign cost to the start of dialing. In this case, be ready to act quickly to
abort the campaign immediately if testing your campaign reveals any
problem.
If you abort a campaign after it has started, there is a chance some calls
were made. Your account will be debited only for the calls that have gone
out.
For more information please see Aborting Scheduled Campaigns.
See also
QuickCreate a New Campaign
Business Campaign Options
Creating & Managing Phone Lists
Creating & Managing Messages
Options & Interactive Features
Smart Call
Billing Activity
Managing Credit Cards
Aborting Scheduled Campaigns
4.3
Business Campaign Options
Business Campaign Options
There are certain additional choices available if you are setting up a
Business-to-Business Campaign. These include options for:
VoiceBlast Help v 1.1 © 2007 SmartReply
61
62
VoiceBlast Help & User Manual
·
Not Scrubbing with Do Not Call Lists, and
·
Expanded Delivery Times.
These options will only be available if you choose Business for Select
Target in Creating a New Campaign.
Not Scrubbing with Do Not Call Lists
For calling within the United States only, you may elect not to scrub your
campaign calling lists against a Federal or State Do Not Call Lists, but only
if one of the following three conditions is met:
·
You have an Existing Business Relationship (EBR) with the contact
(generally a purchase in the past 18 months);
·
The contact has registered for a contest or sweepstakes in the past
90 days;
·
The contact has requested to be contacted (never expires).
If this relationship is not in effect and can not be proven, substantial
penalties of up to $11,000 per call may be incurred for violating
National Do Not Call legislation.
To remove a Do Not Call List from your campaign, under Do Not Call Lists
you may either
a. Click Clear All, or
b. Click Select List. The selection window will open.
In the right box, select any DNC lists you do not want to use and click
Remove.
When you are satisfied with your selection click Save.
When you make either choice, a warning notice will appear stating the
above requirements and penalties.
To change your selection, click Select List and choose the DNC lists you
want to use as you normally would.
Business-to-Business Delivery Times
As also explained in Delivery Time Limitations, calls to businesses are
allowed from 9 a.m. to 9 p.m., local time. VoiceBlast allows you to be more
specific in the time of day the calls will be made.
In Create New Campaign, Choose Delivery, click the drop-down menu for
Select Time of Day. You may choose:
1) All Day (the default selection), from 9 a.m. to 9 p.m.,
2) Morning, from 9 a.m. to 12 noon,
3) Afternoon, from 12 noon to 5 p.m.,
4) Evening, from 5 p.m. to 9 p.m., or
5) Night, from 7 p.m. to 9 p.m.
VoiceBlast Help v 1.1 © 2007 SmartReply
Creating Campaigns
See also
Legal Topics in Voice Marketing
Your Legal Responsibilities
Do Not Call Lists
Delivery Time Limitations
4.4
Campaign Cost Estimates
Campaign Cost Estimates
In Creating a New Campaign, when set-up and processing is complete, you
are asked to approve the estimated cost of the campaign. Please note that
this cost is only an estimate, which is based on the projected number of
dials plus redials that will be needed to execute the campaign. The
projected number of redials is based on the average percentage of dials
that do not go through on the first attempt in a typical voice broadcast
campaign. Because the actual number of redials needed depends on the
results of the first attempts, the final total of dials and redials in your
campaign – and the final cost – can not be known until the campaign is
completed.
Once the campaign is completed successfully and the actual cost is
established, your account balance will be adjusted accordingly. These
adjustments will appear at the beginning of each month when a new billing
period begins. The activity will be listed as a debit to your account in the
Billing Activity page or submenu, under the My Account tab.
4.5
Testing Your Campaign
Testing Your Campaign
After you have approved purchase and before the campaign runs, you have
one opportunity to test the campaign. After campaign approval, a Detail
View of the new campaign will appear. At the top is a text box.
VoiceBlast Help v 1.1 © 2007 SmartReply
63
64
VoiceBlast Help & User Manual
1. To test your campaign, enter in a phone number into the text
box.
2. Click Send.
A message will appear indicating your test message has been successfully
submitted. The test call should be made within approximately five minutes.
Please note the test call will be charged as a regular campaign call. See
you account plan for more details.
NOTE: If you have scheduled the campaign to go out immediately, there
will be a 5-minute delay from the time you approve the estimated campaign
cost to the start of dialing. In this case, be ready to act quickly to abort the
campaign immediately if there is any problem with the message.
If there is a problem with the campaign, such as using the wrong message,
you can abort the campaign. If you abort a campaign after it has started,
there is a chance some calls were made. Your account will be debited only
for the calls that have gone out.
For more information please see Aborting Scheduled Campaigns.
4.6
Viewing The Campaigns List
Viewing The Campaigns List
To view or work on a new or existing campaign, click the Campaigns tab.
The View Campaigns List summary screen will display. The Create
Campaign tab also appears on this page.
VoiceBlast Help v 1.1 © 2007 SmartReply
Creating Campaigns
The Campaigns List shows Current/Upcoming Campaigns which have not
yet run, Completed Campaigns, and Failed Campaigns which have been
cancelled or aborted for any reason.
The Campaigns List page will display the following information for each
campaign:
·
Name: The name of the campaign.
·
Type: Whether this campaign will be making fresh dials or redials
(if you specify both for a single campaign, each will be shown
separately).
·
Scheduled Count: the total number of valid phone numbers in
your selected calling lists.
·
Dialed Count: How many dials have been made so far. This is
always "zero" for upcoming campaigns.
·
% Complete: for an active campaign, showing the percent
currently dialed. For Redials, this number may be over 100% if the
actual number of redials required to complete the campaign is
more then the estimated number of redials.
·
Start Date/Time: when campaign dialing began or is scheduled to
begin.
·
Caller ID # used on this campaign.
·
Status: Scheduled, Active (currently being dialed), Completed, or
Failed.
·
Abort: clicking the link will to cancel the campaign.
Only campaigns with completed set-up information will appear under
Scheduled Campaigns.
To find and continue working on a campaign that requires additional
information, click on the name of the campaign or click to the View A
Campaign tab and then click Search.
Viewing Campaign Details
To view detailed information on a particular campaign, simply click on the
campaign name in the Campaigns List. The Campaign Details view will
open.
4.7
Aborting Scheduled Campaigns
Aborting Scheduled Campaigns
VoiceBlast Help v 1.1 © 2007 SmartReply
65
66
VoiceBlast Help & User Manual
You may Abort a campaign and avoid any campaign charges up until the
time the campaign is scheduled to begin, but if a campaign is aborted after
its scheduled start time you will incur campaign and/or dialing charges.
Please consult your account plan details for more information on potential
costs and fees.
You may only Abort a campaign that is scheduled at a future time or date,
or any campaign that has begun but is not yet complete. If the campaign
had already started when you aborted it, some calls may have already been
made. Your account will be debited only for the calls that have gone out.
To Abort a campaign:
1. Go to the Campaigns List screen.
2. Locate the campaign you want to cancel.
3. In the list, to the right of the campaign name, click Abort.
You may also Abort a campaign from the Campaign Details page for that
particular campaign.
To do so, on the Campaigns List, click the name of the campaign you want
to abort. The Campaign Details page opens. The Abort button appears
prominently below the Search Campaigns image. Click the button to Abort
the campaign.
VoiceBlast Help v 1.1 © 2007 SmartReply
Top Level Intro
This page is printed before a
new top-level chapter starts
Part
V
68
5
VoiceBlast Help & User Manual
Options & Interactive Features
Options & Interactive
Features
Interactive Features
VoiceBlast includes valuable interactive features and optional functions that
will help keep you in legal compliance regarding opt-outs and increase the
power of your voice marketing campaigns.
All VoiceBlast accounts will offer our Smart Call feature which, as required
by law, gives listeners a no-cost way to opt-out of receiving future calls or
notifications.
Users with the Members Only account plan can also choose to add
Interactive Features to a campaign. With these functions, a live listener to
your initial message can access a menu of choices. Depending on the
specific needs of your campaign, you can allow listeners the following
choices:
1. hear a More info message, an extended message with more details
on your product or offering;
2. access the automated opt-out system;
3. make an Agent transfer to a live representative at your call center
and get more information, make a purchase, make a payment, etc.;
4. listen to an automated privacy policy message.
NOTE: When a Members Only account is first created, only the More info
message and automated opt-out options are activated. To use them for
future campaigns, click to the Requesting new options page to activate
the agent transfer and the privacy message options.
Other Options in VoiceBlast
The VoiceBlast team offers several other optional professional services to
enhance the function and effectiveness of your voice marketing campaigns.
VoiceBlast Help v 1.1 © 2007 SmartReply
Options & Interactive Features
Professional message services
To help make your campaign messages more effective, you can use
VoiceBlast's professional scriptwriting and voice talent. These services are
available on all account plans for an additional fee. (Contact your
VoiceBlast Customer Support representative for pricing information.)
With the help of VoiceBlast professional services, you can:
·
have VoiceBlast write a professional script that you self-record;
·
write a message yourself and have it recorded by professional voice
talent;
·
have VoiceBlast both write the script and record the message using
our experienced personnel.
To request Professional message services, click to the online form on the
Professional services submenu of the Messages tab and provide the
requested information. You will get a response within two business days.
For pricing and other questions, please contact VoiceBlast customer
support.
Professional List & Data Services
Effective marketing relies on accurate, useful information. To optimize your
marketing information, VoiceBlast is able to assist clients with professional
list management and data processing services. Our expertise and flexibility
allow us to package services to meet your organization's specific needs,
including:
·
pulling numbers from our database resources to create new calling
lists tailored to your target market,
·
creating distinct calling lists reflecting market segments from your
existing customer data,
·
design custom reports to analyze campaign effectiveness.
To place your request, select the Professional list and data services
checkbox on the online form under the Options tab, Request New Options
submenu. Or customer support by email at [email protected].
For more information, click Next above or one of these topics:
·
Smart Call
·
Setting Up Interactive Programs
·
Calling Canada
·
Requesting New Options
VoiceBlast Help v 1.1 © 2007 SmartReply
69
70
5.1
VoiceBlast Help & User Manual
Smart Call
Smart Call
Smart Call is a standard feature on all VoiceBlast Accounts, and gives your
listeners an easy, no-cost method to opt out of your marketing list.
Providing listeners a free opt-out method is legally required, so Smart Call
is an ideal solution to help keep you in compliance with applicable laws and
regulations.
These opt-outs are collected into a Do Not Call list specifically for your
account. This is used as a DNC list on all your future residential campaigns
to scrub those opting out from your final calling list.
Another advantage to Smart Call is that this list is automatically updated so
your opt-out list is always current.
How Smart Call Works
The Smart Call system is connected to the toll-free Caller ID number
assigned to your VoiceBlast account, and it works in two ways.
·
Live listeners can press 2 on their telephone keypad anytime during
your message and their phone number will immediately added to
your Do Not Call list.
·
By including the assigned Caller ID # in your message, voice mail
listeners who call that number will access VoiceBlast's automated
opt-out system, at no cost to themselves as legally required.
Smart Call is activated when you select this assigned toll-free number for
your Caller ID in Creating a New Campaign. This number appears as the
default number unless you have requested and been approved for an
alternate Caller ID number. In that case, activate Smart Call by selecting
your assigned number from the drop-down menu.
See also
Setting Up Interactive Programs
5.2
Setting Up Interactive Programs
Setting Up Interactive Programs
Interactive Options - Definitions
VoiceBlast Help v 1.1 © 2007 SmartReply
Options & Interactive Features
With the Members Only account plan, VoiceBlast users can include
Interactive Options to increase the power of their voice marketing
campaigns. But before explaining how to setup each option, it will be helpful
to define some of the terms specifically related to interactive features and
functions. For additional terms and definitions, please click to
Glossary of Terms.
Agent Transfer is the function allowing a live listener to be transferred to
a live operator or customer service representative at your office or
call center. You do not have to use the agent transfer option on every
campaign, even if that option is available in your account and you
use it on other campaigns. NOTE: The number to which listeners will
be transferred must be a local number not a toll-free number, and
must be authorized by VoiceBlast before it will be available for
campaign use.
Custom Greeting In an interactive campaign, when a live listener
presses 1 to access further options or when a voice mail listener calls
your toll-free number for more information, they will first hear your
optional Custom Greeting. It is not necessary to include a Custom
Greeting in your interactive program.
More Info Message is a repeat of, or a more detailed version of your
Primary Message. It is self-recorded. This can be one of the choices
you can give a live ear listener. Including a More info message in
your campaign is optional, even if other interactive functions are in
use.
Opt-Out is when a listener requests to be removed from future calls or
notifications. The ability to opt-out immediately is automatically
included as the Press 1 or Press 2 option in every campaign. On Pay
As You Go accounts, live listeners can Press 1 to opt out. On
interactive campaigns, live listeners can press 1 to access options,
then press 2 to opt out.
Primary Message is the main message used in your campaign. It refers
to both live and voice mail messages, and is used to distinguish it
from the More Info Message. If you are using Interactive Features in
this campaign, your primary message should instruct listeners to
Press 1 for more information and to access additional choices.
Privacy Notice is a pre-recorded statement explaining VoiceBlast's
policy on protecting our client's and your customer's personal
information, and is offered in every interactive campaign as the Press
4 option. Your Menu greeting must inform listeners they can Press 4
to hear the privacy policy message.
Smart Call is VoiceBlast's automated opt-out system which is a service
included in all account plans. Your live ear message should instruct
listeners that during the message they can Press 2 if they wish to
opt-out of future campaigns.
A note about Caller ID #'s and Interactive campaigns: The toll-free
number originally assigned to each account as the default Caller ID # for
campaigns is also used in Members Only accounts for programming
interactive features. (You can also request additional toll-free numbers if
needed). Once this toll-free number is programmed with interactive options
VoiceBlast Help v 1.1 © 2007 SmartReply
71
72
VoiceBlast Help & User Manual
as described below, you activate the interactive campaign by selecting this
number for Select Press 1 # in Creating a New Campaign. In this way, the
toll-free number acts as the "name" of the interactive program; selecting
that number activates those interactive features.
It is also important to note that interactive options are also available to
voice mail listeners, if you include the interactive program's toll-free number
in your primary message. Voice mail listeners can call that number and
access the same menu of choices as your live message listeners.
Setting Up Interactive Options
To initially setup or modify the options in an interactive program, on the
Option tab, View Toll-Free #s submenu, then click on the Name, toll-free
number, or Modify link for the toll-free number associated with interactive
programs. The Edit Interactive Program page will display, showing up to
four options you may use on a campaign.
To set or modify the settings for this interactive program:
1. Select the checkbox if your program will include a More Info
Message. Using a More Info Message is optional.
2. Dial the toll-free number displayed on your screen. When the call
connects, press * (the star key) to enter the system. Then follow the
voice prompts to enter the PIN # on screen and to record your new
More info message for this campaign. As with other self-recorded
messages, using a telephone land line in a quiet environment will
produce a better quality recording. If you are not using a More info
message, just skip this recording step.
3. The Press 2 option for accessing the opt-out system will be
automatically activated.
4. If an agent transfer number has been submitted to VoiceBlast and
authorized, select the check box to indicate if the Press 3 option for
an Agent Transfer will be activated for the upcoming campaign.
5. Select the phone number to which Agent Transfers will be
connected. If you have more than one authorized Agent Transfer
number in your account, select the appropriate number from the drop
down menu.
6. Select the number of simultaneous transfers to your call center that
will be allowed. This is the number of calls your personnel can
handle at any one time, and will meter or limit the pace of outbound
calls in VoiceBlast so as to not overwhelm your system, and to
prevent interested customers from being disappointed by hearing a
busy signal rather than reaching one of your representatives.
7. Indicate if the Press 4 option for accessing the Privacy Policy
message will be activated.
8. When you have completed your setup or modifications, press SAVE
at the bottom of the screen. You will return to the View Toll-Free #s
page.
VoiceBlast Help v 1.1 © 2007 SmartReply
Options & Interactive Features
See also
Options & Interactive Features
Requesting New Options
5.3
Calling Canada
Calling Canada
VoiceBlast can also be used to call Canada in your voice marketing
campaigns as an additional service. For more information on our service or
Canadian legal requirements, for pricing and to initiate service to Canada,
please contact your customer representative by email at
[email protected]
of by telephone from 8:00 a.m. to 6:00 p.m. Pacific Standard Time at:
(800) 461-2556
5.4
Requesting New Options
Requesting New Options
VoiceBlast is committed to accommodating your changing marketing needs
to make sure your VoiceBlast campaigns are always as powerful and
effective as possible. You can utilize this available extra flexibility in your
voice marketing campaigns by such means as adding new toll-free numbers
to your VoiceBlast account, adding a new agent transfer number, or adding
interactive features to an existing number in your account. Additional tollfree numbers may be useful in differentiating between distinct offers to
separate target markets; or if you want to run more than one campaign at
the same time, but with a different interactive program for each.
NOTE: When a Members Only account is first created, only the first two of
options listed above will be active: the extended message or More info
message, and the automated opt-out option. Members Only users can
activate the agent transfer option and the privacy message at any time on
the Requesting new options page.
The new options and toll-free number services you may request are:
New Caller ID number: You may submit a request that an existing
VoiceBlast Help v 1.1 © 2007 SmartReply
73
74
VoiceBlast Help & User Manual
number for your business be made available for use as the caller ID
number on a future campaign or campaigns. Because by law this
number must also be the cost-free number a listener can call to optout, it must be a toll-free number or be a local number for your
listener.
New Agent Transfer Number: You may request to add a new agent
transfer number to your account for use in future campaigns. This
number should be a toll-free number or be a local number for your
listener, as after completion of the transfer the remainder of the call is
billable to your listener and should not incur unexpected long
distance charges.
New Toll-Free Number: You may request a new Toll-Free number
for your VoiceBlast account, perhaps to use on a different campaign
than one using the toll-free number originally assigned to your
account.
New Options for Toll-Free Number: For Members Only accounts,
you may request additional options be activated for an existing tollfree number previously used for opt-out only.
The above services are available for an additional fee. Consult you
VoiceBlast account executive for more details.
How to request new options
To request new options or modified options, go to the Options tab,
Request New Options submenu.
VoiceBlast Help v 1.1 © 2007 SmartReply
Options & Interactive Features
On the Request New Options screen:
1. Find the option you wish to add or modify, and click the check box for
that selection.
The window for that selection will expand, displaying text boxes that
need to be filled out.
2. For New Caller ID and New Agent Transfer numbers, enter the
number you wish to add to the system as well as a brief description to
help you identify it in the future.
3. For New Toll-Free Number, enter a description for the new number;
the actual number will be assigned to your account by VoiceBlast.
4. For New Options for Toll-Free Number (available only on Members
Only account plans), select the toll-free number (if you have more
than one) to which you want to add interactive functions. Then select
the interactive function you wish to include in the program.
5. Press SUBMIT.
The VoiceBlast customer support team will process your request, which
may include verifying numbers or assigning new options or numbers to your
account, and respond within one business day.
See also
Options & Interactive Features
Setting up Interactive Programs
VoiceBlast Help v 1.1 © 2007 SmartReply
75
Top Level Intro
This page is printed before a
new top-level chapter starts
Part
VI
Legal Topics in Voice Marketing
6
Legal Topics in Voice Marketing
Legal Topics in Voice
Marketing
This section explains the legal requirements for voice marketing campaigns,
including Your Legal Responsibilities, Do Not Call Lists, Message
Content Requirements, and Delivery Time Limitations.
To continue, click Next above or on one of the links below:
6.1
·
Your Legal Responsibilities
·
Do Not Call Lists
·
Message Content Requirements
·
Delivery Time Limitations
Your Legal Responsibilities
Your Legal Responsibilities
Individuals and organizations involved in voice broadcast marketing are
under the jurisdiction of, and are required to operate in compliance with all
applicable Federal, state and local government laws, as well as the Federal
Trade Commission's Telemarketing Sales Rule established for the
protection of consumers.
As a VoiceBlast user, you agreed to utilize this service in compliance with
those laws and regulations when you approved the Terms of Service
Agreement. It is important that you understand the law and your
responsibilities, and to comply with these requirements, or you may be
subject to fines or other financial penalties from government agencies.
VoiceBlast Help v 1.1 © 2007 SmartReply
77
78
VoiceBlast Help & User Manual
Please understand that under the Terms of Service Agreement, you have
agreed to use VoiceBlast to telephone your established customers and
eligible sales prospects only (within the legal time limit in their state of
residence), and warrant that your use of this service will comply with all
applicable state and federal laws, including the Telemarketing Sales Rule
and the Telephone Consumer Protection Act.
See also
Do Not Call Lists
Message Content Requirements
Delivery Time Limitations
6.2
Do Not Call Lists
Do Not Call Lists
To protect consumers, telephone and voice broadcast marketers are
required to operate under strict Federal, state and local governments' laws,
as well as the Federal Trade Commission's Telemarketing Sales Rule. As
stated in your Terms of Service Agreement, VoiceBlast users are subject to
these laws and regulations and subject to financial penalties by government
for not complying. One of the most important requirements for marketers is
to exclude from their marketing lists any individual who has had their name
and number added to a Do Not Call List (DNC List).
The Federal and State governments maintain several lists, and more than
one may apply to your campaign. To help you avoid legal liabilities,
VoiceBlast will automatically "scrub" your calling lists against all Federal,
state, DMA and client Smart Call DNC lists, to exclude from your calling
lists any contact that appears on any of these lists.
You may also use one of your calling lists as a DNC List to fine-tune your
campaign to reach only those customers who are most likely to be
interested in the particular offer you are making. This is described in more
detail below and at Using Calling Lists as DNC Lists.
For additinal information, please click the Compliance link in the lower right
corner of the VoiceBlast screen.
Do Not Call Lists include:
National
This is the DNC List created and
maintained by the United States
government. Every voice marketing
campaign broadcast to any location
within the United States must utilize the
National DNC List.
VoiceBlast Help v 1.1 © 2007 SmartReply
Legal Topics in Voice Marketing
State
Many states have created and maintain
their own DNC Lists for their residents.
Many of these individuals have not
added their name to the National DNC
List, so campaigns reaching individuals
in those states must use the relevant
DNC List.
Direct Marketing Association Some individuals may have added their
name to the DMA's DNC List but not to
any government list, so you must use the
DMA list on every campaign sent to
anywhere in the 50 United States.
Smart Call DNC List
In your messages you must provide a
toll-free phone number for listeners to
opt out. If you use the toll-free number
assigned to your VoiceBlast account –
the Smart Call number – these opt-out
callers' numbers will be automatically
added to your account's Smart Call DNC
List or client opt-out list. VoiceBlast
helps you stay compliant by maintaining
a current DNC list specific to your
account that you can use to scrub
against your campaign calling lists.
When you first start using VoiceBlast
and your assigned toll-free number, the
Smart Call DNC list will be empty. It will
not appear on the list of available DNC
lists when you are creating yur first new
campaign. It will only appear when it
includes at least one opt out number.
NOTE: If you choose to provide your
own toll-free number in your message, it
becomes your responsibility to maintain
your own opt-out DNC list, keep it
updated, and then upload the most
current version before every campaign to
stay in compliance.
Your own DNC lists
There are two types of DNC Lists you
may create on your own. The first is a list
of people who have opted-out of your
company's calling list. It is an essential
business courtesy to exclude these
individuals from your campaigns, as well
as a legal requirement in many
jurisdictions.
The second type of DNC List that you
create is one that includes current
customers or sales prospects who you
don't want to call on this particular
campaign. For example, you may decide
VoiceBlast Help v 1.1 © 2007 SmartReply
79
80
VoiceBlast Help & User Manual
to exclude older adults from a campaign
announcing a sale on children's clothing.
By making DNC Lists for different
customer segments you can make your
campaigns more targeted and less
costly.
See also
Your Legal Responsibilities
Message Content Requirements
Delivery Time Limitations
Smart Call
6.3
Message Content Requirements
Message Content Requirements
As a telephone marketer you are subject to Federal and state laws, as well
as the Federal Trade Commission's Telemarketing Sales Rule, which
requires that in every message you create, including both live messages
and voice mail messages, you must promptly state the following
information:
·
The caller must identify himself or herself by name.
·
The message must state the name of the business making the call,
the purpose of the call and the nature of the goods and services
offered.
·
You must provide a telephone number, preferably a toll-free
number, the listener can call to opt out.
NOTE: Federal regulations require that listeners must have a way
to opt out at no cost to them. They can do this by calling the tollfree number assigned to your VoiceBlast account to access an
automated system for opting out. Depending on your account plan,
your campaign could also include interactive options that would let
a live listener opt out immediately by using the telephone keypad.
See also
Your Legal Responsibilities
Do Not Call Lists
VoiceBlast Help v 1.1 © 2007 SmartReply
Legal Topics in Voice Marketing
Delivery Time Limitations
6.4
Delivery Time Limitations
Delivery Time Limitations
As a telephone marketer you are subject to Federal and state laws, as well
as the Federal Trade Commission's Telemarketing Sales Rule, which
require that telephone and voice broadcast calls must be restricted to
specific hours of the day. Residential calls, also known as business-toconsumer calls, may only be made from 9 a.m. and 5 p.m. local time, and
business-to-business calls from 9 a.m. to 9 p.m. local time.
Within these overall limitations, VoiceBlast gives you the flexibility to
schedule your calls for specific periods during the day, as described below.
Residential Calls
Calls to residences must be within the hours of 9 a.m. to 5 p.m. local time.
VoiceBlast gives you several options to customize your delivery times.
In Create Campaign, Delivery Details section, a drop-down menu will
allow you to Select Time of Day. You may choose:
1) Day (the default selection), from 9 a.m. to 5 p.m.,
2) Morning, from 9 a.m. to 12 noon, or
3) Afternoon, from 12 noon to 5 p.m.
Business Calls
Calls to businesses are allowed from 9 a.m. to 9 p.m., local time. VoiceBlast
allows you to be more specific in the time of day the calls will be made.
In Create New Campaign, Choose Delivery, click the drop-down menu for
Select Time of Day. You may choose:
1) All Day (the default selection), from 9 a.m. to 9 p.m.,
2) Morning, from 9 a.m. to 12 noon,
3) Afternoon, from 12 noon to 5 p.m.,
4) Evening, from 5 p.m. to 9 p.m., or
5) Night, from 7 p.m. to 9 p.m.
See also
Your Legal Responsibilities
Do Not Call Lists
VoiceBlast Help v 1.1 © 2007 SmartReply
81
82
VoiceBlast Help & User Manual
Message Content Requirements
Creating a New Campaign
VoiceBlast Help v 1.1 © 2007 SmartReply
Top Level Intro
This page is printed before a
new top-level chapter starts
Part
VII
84
7
VoiceBlast Help & User Manual
Reports - Overview
Reports - Overview
There are two types of reports available in the VoiceBlast system:
·
Campaign Reports, which include the calling results of a particular
campaign. Campaign Reports are available in two formats, either a
Campaign Results Report or Campaign Detail Report. The
Campaign Results Report shows results of the overall campaign,
while the Campaign Detail Report shows the results of each call by
individual phone number
·
Interactive Program Reports, which detail the results of an
interactive program used in a campaign. Depending on how you set
up your interactive program, the report will include totals on either
how many calls reached a live listener, how many transferred to your
extended message, how many opted out, how many listeners
transferred to a live operator, and how many listened to your privacy
notice.
Campaign Reports can be viewed on your computer, printed directly from
the screen, or saved to your computer to be view and/or printed at a later
time. It is recommended that users save reports on their own system for
future analysis of marketing efforts and campaign strategies.
VoiceBlast Help v 1.1 © 2007 SmartReply
Reports - Overview
7.1
Campaign Reports
Campaign Reports
Overall calling results from each campaign can be seen in Campaign
Reports, which are available in two versions:
· The Campaign Results Report includes table showing the number of
total dials, delivery method (voice mail or live message), and how
many were non-delivered and the reason (either Busy, No Answer,
Fax or Other, which includes disconnected, no longer in service, etc.).
This report also includes a pie chart as a quick visual reference of the
campaign results.
· The Campaign Detail Report is a list of each phone number dialed in
the campaign, and the result for each individual call, as described
above (Voice Mail, Live Answer, No Answer, Fax, etc.).
To view a report on the calling results of a particular campaign:
1. Click the Reports tab. The Campaign Reports page will display.
2. In the list of campaigns, find the name of the campaign for which
you want a report. To the right of the name and date of the
campaign are two columns for Results Report and Campaign
Detail Report; click on View Report in either column to generate
that report for this campaign.
3. The requested report will display in a new window as a .PDF file
that can be viewed on screen, printed or saved to your computer for
viewing and analysis at a future time.
7.2
Interactive Program Reports
VoiceBlast Help v 1.1 © 2007 SmartReply
85
86
VoiceBlast Help & User Manual
Interactive Program
Reports
Interactive Program Reports provide detailed results from an interactive
campaign, and will list:
· How many live listeners listened to your More Info Message,
· How many chose an Agent Transfer to your call center,
· How many chose to opt out,
· How many listened to your privacy policy message.
To generate an Interactive Program Report:
1. On the Reports tab, click the Interactive Program Report
submenu. The Interactive Program Report screen will display.
2. Select the date range in which the campaign you're looking for ran,
choosing a start date and end date from the drop-down calendars.
3. Select the toll-free number used in the interactive campaign you
wish to view.
4. Press Run Report.
The report will appear in a new window as a .PDF file that can be viewed
online, printed or saved to your computer.
See also
Setting Up Interactive Programs
VoiceBlast Help v 1.1 © 2007 SmartReply
Top Level Intro
This page is printed before a
new top-level chapter starts
Part
VIII
88
8
VoiceBlast Help & User Manual
Managing Your Account - Overview
Managing Your Account Overview
In this section you will find explanations and instructions on how to read the
My Account Page for details on your account and primary credit card;
Billing Activity which covers recent purchases, charges to your credit card,
and debits to your VoiceBlast account balance; Managing Credit Cards for
making a payment, adding a credit card or changing your primary card;
Account Plans lists details on the plan you selected as well as other plans;
and Getting Reports to review the results of a campaign.
To continue, click on Next above or on one of the links below.
8.1
·
The "My Account" Page
·
Billing Activity
·
Managing Credit Cards
·
Account Plans
·
Change Your Password
·
Support/Contact Us
·
Reports
The "My Account" Page
The "My Account" Page
The My Account Information page displays:
VoiceBlast Help v 1.1 © 2007 SmartReply
Managing Your Account - Overview
Account Information, including
·
Company name
·
Account plan
·
Date the account was created and activated
·
Primary User ID #
·
Call Center PIN (for listening to recorded and stored
messages)
·
Primary User email address
·
Total, Used and Available Storage capacity details
·
The Caller ID toll-free number assigned to your account
·
The Change Password link
·
The Edit Account Contact Information link
Primary Credit Card Details, including
·
Credit Card type
·
Name on card
·
Last 4 digits
·
Expiration date
·
Billing address, etc.
See also
Billing Activity
Managing Credit Cards
Account Plans Page
Changing Your Password
8.2
Billing Activity
Billing Activity
On the Billing Activity page, you can review your entire Purchase History,
all past Credit Card Charges, and all Account Debits from your
VoiceBlast account. It also displays your Current Account Balance.
VoiceBlast Help v 1.1 © 2007 SmartReply
89
90
VoiceBlast Help & User Manual
On this page you may also Make a Payment to replenish your VoiceBlast
account. You may want to do this before launching a new VoiceBlast
campaign, to ensure you have sufficient funds to cover anticipated
campaign costs and avoid a delay in the process.
Billing Activity Search
Since the Billing Activity page lists all items since you opened your
VoiceBlast account, it may be helpful to perform a Billing Activity Search if
you want to review Billing Activity for a more narrow period of time. Enter a
start date and an ending date that includes that time period you want to
review, and click Search.
The Billing Activity Search function may be very helpful once you have
been using VoiceBlast for a while and have built up a number of purchase,
charges and debits.
Purchase History
The Purchase History lists all the specific invoiced items purchased using
VoiceBlast, with the most recent items appearing at the top of the list.
Your Purchase History will include the cost of dials and redials for a
campaign, monthly minimum charges, and any optional services or fees
incurred in developing or delivering a campaign.
Credit Card Charges
The Credit Card Charges history list all payments made to your credit card
to your VoiceBlast account. Please note that individual purchases and
debits are not billed directly to a credit card, except when account funds are
too low to cover the campaign's estimated costs. In that case the entire
campaign cost will be charged to the primary credit card. In all other cases,
credit card charges only are used to replenish funds in your account.
Account Debits
The Account Debits list shows the actual debits, or deductions, from your
VoiceBlast account to cover campaign dials, monthly fees, or the cost of
any options or additional services.
Please note that a specific Account Debit may include more than one
purchased item. For example, for one campaign it may include the cost of
the dials and the cost of implementing an agent transfer option.
Make a Payment
Near the top of the page to the right of Current Account Balance, is a
Make Payment button.
Clicking Make Payment opens a new screen. It displays your primary credit
card information so you can confirm this is the card to which the payment
should be applied.
Below that, enter in the amount you want to pay, and a brief description,
VoiceBlast Help v 1.1 © 2007 SmartReply
Managing Your Account - Overview
perhaps noting why you are making a payment at this time.
Then click the Make Payment button at the bottom of the page.
A message will appear indicating your payment has been successfully
submitted. You will also receive an e-mail notification of the successful
payment.
See Also
Managing Credit Cards
8.3
Managing Credit Cards
Managing Credit Cards
View Credit Cards
Click the View Credit Cards submenu to see all credit cards on file with
your VoiceBlast account. The screen will show the following information for
each card:
·
Primary or Make Primary, indicating which is the default card for
account charges
·
Name on Card
·
Type (Visa, MasterCard, etc.)
·
Last 4 digits on card
·
Expiration Date
·
Make Payment button
·
Edit link to change the name, billing address expiration date or
security code on this credit card (not to change the number)
·
Delete link to remove this credit card form the system, unless it is the
primary credit card.
To Add a New Credit Card, click the link below the View Credit Cards list.
Changing The Primary Card
On the View Credit Cards page, you can change which of the credit cards
on file will be your primary card, the one to which campaign and other fees
will be charged.
1. In the list of credit cards on file, locate the credit card you want to
make your Primary Card.
2. Click the Make Primary button.
3. Confirm your selection.
VoiceBlast Help v 1.1 © 2007 SmartReply
91
92
VoiceBlast Help & User Manual
Once you have approved the change, the change will take effect
immediately.
If you have only one credit card on file, it is automatically considered the
primary card.
Add New Credit Card
On the View Credit Cards page, you can add a new credit card to those
listed in your account.
1. Below the list of credit cards currently on file, click the Add New
Credit Card button.
2. A new screen will appear. Enter the required information: credit card
type, name on card, account number, security code and billing
address.
At this time you may also indicate if you want this new card to be your
Primary Card.
3. When complete, click Add Credit Card.
A message will appear indicating that the new card has been successfully
added to your account. You will also receive an email notification that the
new card has been added.
Making A Payment
You may make a payment at any time to replenish funds or make
purchases.
1. On the list of credit cards, the row for your primary card includes a
Make Payment button. Click Make Payment to proceed.
A new screen opens displays your primary credit card information.
Confirm that this is the correct card to which the payment should be
charged.
2. Enter in the amount you want to pay, and a brief optional description,
perhaps noting the purpose for making a payment at this time.
3. Click the Make Payment button at the bottom of the page.
A message will appear indication your payment has been successfully
submitted. You will also receive an e-mail notification of the successful
payment.
Editing Credit Card Information
To change the billing address, expiration date or name that appears on a
credit card currently in your VoiceBlast account:
1. Click the Edit link. A new screen appears.
2. Enter the necessary changes.
3. When complete click Save.
VoiceBlast Help v 1.1 © 2007 SmartReply
Managing Your Account - Overview
Deleting A Credit Card
If you have more than one credit card in use in your account, you can
delete a particular credit card whenever you no longer want to use that
card.
NOTE: The credit card designated as your Primary Card cannot be
deleted. You must choose another card as the Primary Card before
proceeding.
1. On the View Credit Cards page, locate the credit card you want to
delete from the system.
2. In the far right column, click the Delete button.
A message will appear asking you to confirm that you want to delete
this credit card.
3. If you want to delete this card, click Yes.
See Also
The "My Account" Page
Billing Activity
8.4
Account Plans
Account Plans
Service Plan Overview
The following are a brief description of the service plans available in
VoiceBlast. For more information and current pricing, please go to the My
Account tap and click the Account Plans submenu. Your current Account
Plan will appear at the top of the listing.
Pay As You Go Plan
No set-up cost or minimum monthly fees
$.10 per dial and redial for messages up to 60 seconds in length. Messages
from 61 to 120 seconds will incur additional fees.
Includes:
·
Toll-free phone number for your account
·
Smart Call automatic opt-out capability
·
Detailed reports
VoiceBlast Help v 1.1 © 2007 SmartReply
93
94
VoiceBlast Help & User Manual
Members Only Plan
$50 monthly fee
$.08 per dial and redial for messages up to 60 seconds in length. Messages
from 61 to 120 seconds will incur additional fees.
$.18 per minute for toll-free use of interactive options only.
Includes:
·
Toll-free number for your account
·
Opt-out capability
·
Detailed reports
·
Interactive campaign options capabilities
For more information on features, benefits and pricing for VoiceBlast
account plans, please contact customer support by email at
[email protected]
or by telephone from 8:00 a.m. to 6:00 p.m. U.S. Pacific Standard Time at:
(800) 461-2556
8.5
Changing Your Password
Changing Your Password
To change your password, begin by clicking the Change Password link on
the My Account Information screen.
The Change Password screen will display.
1. Type in your current password.
2. Type in your new password.
NOTE: Passwords must be at least 6 characters in length, are casesensitive (upper and lower case) and must include at least one
numeral.
3. Type in the new password again to confirm it.
4. Click Submit.
You will now need to login to the system again, using the new
password.
You will also receive an e-mail notification that your password has been
successfully changed.
VoiceBlast Help v 1.1 © 2007 SmartReply
Managing Your Account - Overview
See also:
The "My Account" Page
8.6
Support/Contact Us
Contact Us
To reach VoiceBlast customer support, please send an email to:
[email protected]
You can also access an online form for your email simply by clicking the
Support link in the upper right of every screen. A notification will appear
with email and phone contact information, and another link to open the
email form titled Report a Problem.
You may also contact us by telephone from 8:00 a.m. to 6:00 p.m. U.S.
Pacific Standard Time at:
(800) 461-2556
VoiceBlast Help v 1.1 © 2007 SmartReply
95
96
VoiceBlast Help & User Manual
Index
-AAborting Scheduled Campaigns
Account Billing Activity 89
Account Management 88
My Account Page 88
Account Plans 93
Agent Transfer Option 17
65
-BBilling Activity 89
Account Debits History 89
Credit Card Charges History 89
Purchase History 89
Business Campaign Options 61
-CCaller ID 17
Calling List 17
Calling Lists 28
Adding Lists 31
Typing or Pasting Lists 31
Calling Lists as DNC Lists 29
Campaign 17
Campaign Cost Estimates 63
Campaign Reports 85
Overview 84
Campaigns 53, 54, 55
Aborting Scheduled Campaigns 53, 65
Business Campaign Options 53, 61
Campaign Cost Estimates 53
Creating a New Campaign 53, 55
Estimated Costs 63
Making a Test Call 55
New 53, 54, 55
QuickCreate a New Campaign 53, 54
Testing Your Campaign 53, 55, 63
Veiwing Campaign Details 64
Veiwing the Campaigns List 64
Viewing The Campaigns List 53
Cancelling a Campaign 65
Changing Your Password 94
Client Opt-Out List 17
CMA 17
Compliance 17
Contact VoiceBlast 95
Creating & Managing Messages 51
Deleting Messages 51
Listening to Saved Messages 50
Creating & Managing Phone Lists 28
Introduction 28
Creating a New Campaign 55
Searching for Messages and Lists 15
Creating Campaigns 53
Credit Cards 91
Add a New Credit Card 91
Changing Primary Credit Card 91
Deleting A Credit Card 91
Editing Credit Card Information 91
Making a Credit Card Payment 91
View Credit Cards 91
Custom Greeting 17
Customer Service Contact Information 95
-DData Processing 30
Definitions 17
Deleting Messages 51
Deleting Phone Lists 40
Delivery Time Limitations 61, 81
Business-to-Business Calls 81
Residential Calls
81
Dials 17
DMA 17
DNC List 17
DNC Lists 77, 78
Do Not Call List 17
Do Not Call Lists 28, 77, 78
Adding Lists 31
Typing or Pasting Lists 31
Using Calling Lists as DNC Lists
Downloading Messages 50
Downloading Phone Lists 39
29
-EEBR
17
VoiceBlast Help v 1.1 © 2007 SmartReply
Index
List & Data Services 30
Listening to Saved Messages
Live Transfer 17
-FFAQ 23
Field Mapping 36
Frequently Asked Questions
23
-GGetting Started 5
Glossary of Terms 17
-IInteractive 68, 70
Agent Transfer 68, 70
Custom Message 68, 70
Interactive Features Overview 68
Menu Greeting 68, 70
Options Setup 68, 70
Opt-Out 68, 70
Privacy Message 68, 70
Request New 800 Number 73
Request New Agent Transfer Number 73
Request New Caller ID Number 73
Request New Options for Toll-Free Number
73
Smart Call 70
Interactive Options 17
InteractiveProgram Reports 85
Introduction 4
Frequently Asked Questions 23
Getting Started 5
Glossary of Terms 17
Navigating VoiceBlast 9
Search Function 15
Introduction to VoiceBlast 4
IVR 17
-LLegal Topics 77
Delivery Time Limitations 77, 81
DNC Lists 77
Do Not Call Lists 77, 78
Message Content Requirements 77, 80
Your Legal Responsibilities
77
VoiceBlast Help v 1.1 © 2007 SmartReply
97
50
-MMaking a Credit Card Payment 89
Managing Your Account 88
Account Debits History 89
Account Plans 88, 93
Add a New Credit Card 91
Billing Activity 88, 89
Changing Primary Credit Card 91
Changing Your Password 94
Credit Card Charges History 89
Deleting a Credit Card 91
Editing Credit Card Information 91
Making a Credit Card Payment 91
Making a Payment 89
Managing Credit Cards 88, 91
My Account Page 88
Overview 88
Purchase History 89
The My Account Page 88
View Credit Cards 91
Message 17
Message Content Requirements 42, 80
Messages 47, 48
Creating & Managing 42
Creating Your Message 42
Deleting 51
Deleting Messages 42
Downloading Messages 50
Listening to Saved Messages 42, 50
Message Content Requirements 42, 80
Overview 42
Professional Script Services 44
Professional Services 44
Professional Voice Talent 44
Recording Tips 48
Required Formats for Uploaded Messages
Self-Recording 48
Self-Recording Your Message 42
Tips for an Effective Message 42
Uploading Messages 47
Uploading Your Message 42
Voice Mail vs. Live Answer Messages 42
More Info Message 17
47
98
VoiceBlast Help & User Manual
My Account 89
Billing Activity
Primary Message
17
89
-NNaming Conventions 17
Navigating VoiceBlast 9
Navigation 9
New Campaign 53, 54, 55
Creating a New Campaign 53, 55
QuickCreate a New Campaign 53, 54
-OOpt Out 17
Options 68
Interactive Features 68
Requesting New Options 73
Setup Interactive Features 70
Smart Call 68, 70
Opt-Out With Smart Call 70
-PPassword 94
Password Reset 88, 94
Phone List 17
Phone Lists 28
Adding Lists 31
Approved File Formats for Uploads 33
Calling Lists 28
Deleting Lists 40
Deleting Phone Lists 28
Do Not Call Lists 28, 78
Downloading Lists 39
Downloading Phone Lists 28
Field Mapping 28, 33, 36
Introduction 28
Professional Services 30
Two Types of Phone Lists 28
Typing or Pasting Lists 31
Typing or Pasting Phone Lists 28
Uploading Lists 33
Uploading Phone Lists 28, 33
Using Calling Lists as DNC Lists 28, 29
Press 1 number 17
Primary Card 17
-QQuickCreate 17
QuickCreate a New Campaign
54
-RRedials 17
Reports 85
Campaign Detail Report 85
Campaign Reports 84, 85
Campaign Results Report 85
Inbound Reports 84
InteractiveProgram Reports 85
Overview 84
Request New Options 73
800 Number 73
Agent Transfer Number 73
Caller ID Number 73
New Options for Toll-Free Number
Reset Password 88, 94
73
-SScrubbing 17
Search All 15
Search Function 15
Self-Recording Your Mesage 48
Recording Tips 48
Self-Recording Your Message 48
Service Plan 88
Bandwidth status 88
Options 88
Storage status 88
Upgrading 88
Smart Call 17, 70
-TTerms 17
Testing Your Campaign 63
Tips for an Effective Message
Typing or Pasting Phone Lists
42
31
VoiceBlast Help v 1.1 © 2007 SmartReply
Index
-UUploading Calling Lists
33
Uploading Do Not Call Lists 33
Uploading Messages 47
Required File Formats 47
Uploading Phone Lists 33
Approved File Formats 33
Field Mapping 33, 36
-VValid Phone Numbers 17
Viewing Campaign Details 64
Viewing The Campaigns List 64
Voice Mail vs. Live Answer Messages
-YYour Legal Responsibilities
77
VoiceBlast Help v 1.1 © 2007 SmartReply
42
99