1
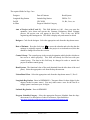
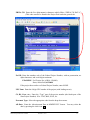
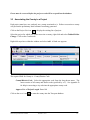
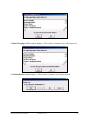
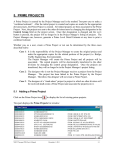
3. PROJECTS
This chapter covers adding, changing and deleting projects. Please note that the specifics for
entering maintenance-funded projects are given in Chapter 4.
3.1 Responsibility
Whether you, the user, actually initiate the creation of the project or wait to receive your copy
from another user can be determined by the three cases described below:
Case 1: The Project Manager will create the project and make copies to send to the
control groups of the other designers involved. Before copies are sent out, a
Prime Project will be made and the projects will be associated to it.
Case 2: The designer who is not a Project Manager will not create the project himself.
He will find his copy of the project in his listing of projects once the Project
Manager has sent it into his control group. The designer will review this project
as submitted to him and make appropriate revisions.
Case 3: For a “stand-alone” project (a project in which no other division will be
involved), the designer will create the project(s). A Prime Project will be
created, and the project(s) will be associated to it.
3.2 Adding a Project
Click on the Project List icon
to display the existing list of projects.
Right-click within the list of the projects and select Tabbed Folder Add.
An Add Project tabbed folder window displays. Use the [TAB] key to move between fields and
enter the project information on the General tab.
Some fields have Reference Tables. As you [TAB] to such a field, a drop-down arrow will
appear. A selection MUST be made from the available choices in the table.
Some fields are required; the project will not be saved to the database unless the required fields
are filled-in. The required fields on Page 1 of the General tab of the Project are:
PCN
Location (line 1)
Road Section No.
Item Code Table
Project Type
State Project No.
Federal Project No.
Co./City
Disres
Description (line 1)
Route Number
Federal Oversight
Project Work Type
The Add Project tabbed folder window is displayed below:
VDOT Trns·port PES User’s Manual
December 1, 2011
3-1
IMPORTANT: It cannot be stressed enough how crucial it is that complete and correct
information is entered into the Project fields. The project will eventually pass to the LAS and
Site Manager modules and will interface with other programs.
PCN: The Project Control Number (PCN) may consist of as many as 11 characters (12
characters for maintenance-funded (Maintenance Division) projects). Refer to
Appendix A for instructions for creating the PCN.
(Once the project is completed and added to the database, this field becomes
display-only and cannot be changed.)
State Project No.: Enter the state project number in its entirety, complete with dashes,
commas, etc.
VDOT Trns·port PES User’s Manual
December 1, 2011
3-2
Description: For all projects (other than bridge), enter the description of the type of
work being performed on this project. For Bridge projects, enter the description
from the front sheet title block.
Location: For L&D projects, use the first line for FROM: (location) and the second line
for TO: (location). For Bridge projects, enter the location from the front sheet title
block.
Unit System: Defaults to E (English Project). Enter M for a Metric Project.
Federal Project No.: Enter the federal project number, if applicable, in its entirety,
complete with dashes, parentheses, etc. If the project is not federally-funded, enter
NONE.
EXAMPLE: NH-5401(876)
Route Number: Enter the route number exactly as it appears in the State Project
Number (4 digits):
Ex. #1: Project number is 0064-122-101, C501. Route number is 0064.
Ex. #2: Project number is U000-124-110, B610. Route number is U000.
Ex. #3: Project number is 6007-058-102, C502. Route number is 6007.
Road Section No.: Enter the section number of the project number (the third part of the
State Project Number).
Ex.: Project number is 0064-122-101, C501. Section number is 101.
Co./City: Select the appropriate code from the drop-down menu. The reference table
consists of all county and city codes.
Federal Oversight: Select the appropriate code from the drop-down menu. Select NFO
for a federal project with no federal oversight, FO for a federal project with federal
oversight and N/A for a state project.
Beginning Station: Enter the station from STATION BEGIN PROJECT including the
“+” and the “.”. (Ex.: 1290+10.72)
Ending Station: Enter the value from STATION END PROJECT including the “+” and
the “.”. (Ex.: 1360+15.95.)
Item Code Table: Select from the drop-down menu. Select 07 for English projects;
select 08 for Metric projects.
Status: Status of the project. Select the appropriate code from the drop-down menu.
VDOT Trns·port PES User’s Manual
December 1, 2011
3-3
Const. Eng. Pct.: If your project uses Lump Sum CEI, then the % field is blank or
zero. This lump sum Construction Engineering amount will be reflected on the
Fund Distribution Sheet. The Construction Engineering Percentage will not be
figured automatically by Trns·port. The percentage shall be entered by the user
after the estimate is run and will be determined by the project total. Consider the
entire project’s total, including road, bridge(s), etc. At this time, the construction
engineering rates are as follows:
Contract Dollar Value in Millions
$0 - $1
Over $1 up to $2
Over $2 up to $3
Over $3 up to $4
Over $4 up to $5
Over $5 up to $6
Over $6 up to $7
Over $7 up to $8
Over $8 up to $9
Over $9 up to $10
Over $10 up to $11
Over $11 up to $12
Over $12
Construction Engineering %
17.50%
17%
16.50%
16%
15.50%
15.00%
14.50%
14.00%
13.50%
13.25%
13.00%
12.75%
12.50%
Lump Sum Construction Engineering: You are encouraged to utilize the lump sum
construction engineering item code 25580 as a non bid item in category 3001 on your Trns·port
estimate to capture your lump sum construction engineering costs. The District Construction or
Maintenance Staff can assist you when calculating this amount.
If there is more than one federal project number, the CE cost should be allocated to each federal
project. The cost may be divided among other PCN’s, if the Project Manager desires.
The District Construction or District Maintenance Engineer will provide this cost to the Project
Manager. If there is more than one federal project number, the CE cost should be allocated to
each federal project. The cost may be divided among other PCN’s, if the Project Manager
desires.
Disres: The reference table consists of all District/Residency codes. Select the
appropriate code from the drop-down menu. See Appendix C for help in
converting a county, and Appendix D for help in converting a city.
Median: Select the appropriate code from the drop-down menu.
Project Work Type: Select the appropriate code from the drop-down menu (Bridge
New, Construction Upgrade Existing Lanes, Maintenance Asphalt Resurfacing,
etc.).
Project Type: Select the appropriate code from the drop-down menu
The following table will assist you in determining the type you should select.
VDOT Trns·port PES User’s Manual
December 1, 2011
3-4
Project Type Code
Use
When
CR
when adding capacity
Regular advertisement
CS
when adding capacity
SAAP advertisement
CMMR
when maintenance only (not
adding capacity)
Regular advertisement
CMMS
when maintenance only (not
adding capacity)
SAAP advertisement
CMSR
when maintenance schedule
only
regular advertisement
CMSS
when maintenance schedule
only
SAAP advertisement
These types must have unique UPC’s that are opened to phase 9104 and x31 activities
Click on the radio button for page 2 of Project:
VDOT Trns·port PES User’s Manual
December 1, 2011
3-5
The required fields for Page 2 are:
Designer
Longitude Beg Station
Fed ID
Ad Date
Date of Estimate
Latitude Beg Station
UPC NUM
Progress Schedule Category
Road System
FHWA 534
C#, B#, Crew, etc.
Amt of Project (with E and C): This field defaults to 0.00. Once you enter the
quantities, price them and execute the Generate Preliminary Detail Estimate
process, the project cost will appear in this field. This is the cost WITH
engineering and contingencies. This field is display-only and cannot be edited.
Designer: Code for the designer. Select the appropriate code from the drop-down menu.
Date of Estimate: Press the clock icon
to access the calendar and select the date the
estimate is originally entered. Each time the project is revised and saved, this date
should be changed to reflect the revision.
Control Group: The control group is the security designation which decides which user
has access to which project(s). This field will already be filled out with your
control group. The data in this field may be changed in order to transfer the
project to another control group.
Road System: The functional class of the road (obtained from the title sheet of the road
plans). Select the appropriate code from the drop-down menu.
Urban/Rural Class: Select the appropriate code from the drop-down menu: U, R or S.
Longitude Beg Station: Enter in DDDMMSS. (Trns·port allows for three digits for the
degrees needed in some states.) You may either enter a zero for the first D or
simply ignore it and enter your six digits.
Latitude Beg Station: Enter in DDMMSS.
Progress Schedule Category: Select the appropriate Progress Schedule from the dropdown menu. For description of codes or references, open link below:
http://www.virginiadot.org/business/resources/const/projectcategories.pdf
VDOT Trns·port PES User’s Manual
December 1, 2011
3-6
FHWA 534: Enter the five alpha-numeric characters which follow “FHWA 534 DATA ”
(This code can also be found in the Project Pool under the general tab:
Fed ID Enter the numbers only of the Federal Project Number, with no punctuation, no
alpha characters, and seven digits maximum.
EXAMPLE: Fed. Project No. is BR-6-129(008).
Enter, in this field, 6129008.
If the project does not have a Federal Project Number, enter NONE.
UPC Num: Enter the 8-digit UPC number of the project (with leading zeroes).
C#, B#, Crew, etc.: Enter the “Type” part of the project number (the fourth part of the
State Project Number). Ex.: C502, B601, R201, etc.
Pavement Type: Select the appropriate code from the drop-down menu.
AD Date: Enter the Advertisement Date in MMDDYYYY format. You may select the
date by pressing the clock icon.
VDOT Trns·port PES User’s Manual
December 1, 2011
3-7
When both pages of the project have been completed, click on the SAVE icon
project into the Trns·port database.
to enter the
o If you have completed all required field criteria satisfactorily and the PCN is a unique
number, the project will be added. You will notice that the PCN field has turned blue,
indicating it is now display-only and cannot be changed.
o If a required field was not filled-in or incorrect data entered at a field which is supported
with a reference table, a warning window will display with information. For example, if
you left a required field blank or entered invalid data, you will see an Project Tab
Folder - Errors window giving information as to what field was left blank or contains an
invalid value:
If you attempted to create a project with a PCN already in existence in the Trns·port
database, you will see an Error window with the message that the primary key must be
unique. A project could already exist in another control group with the PCN you have
just attempted to create. Trns·port will not allow duplicate PCNs.
VDOT Trns·port PES User’s Manual
December 1, 2011
3-8
Errors must be corrected before the project record will be accepted into the database.
3.3 Associating the County to a Project
Each project must have one, and only one, county associated to it. Failure to associate a county
will prevent the preliminary detail estimate from being generated.
Click on the Project List icon
to display the existing list of projects.
Select the project for which you wish to associate a county, right-click and select Tabbed Folder
Change. Click on the Counties tab.
Right-click anywhere within the window and select Add. A blank row appears.
The required field for County is: County/District Code
County/District Code: Select the appropriate code from the drop-down menu. The
menu consists of all county and district codes (prefixed by a C). See Appendix D
for help in converting a city code into the appropriate county code.
Approx. Pct. of Project Length: Enter 100.
Click on the SAVE icon
VDOT Trns·port PES User’s Manual
to enter the county into the Trns·port database.
December 1, 2011
3-9
3.4 Disassociating the County from a Project
Click on the Project List icon
to display the existing list of projects.
Select the project for which you wish to disassociate a county, right-click and select Tabbed
Folder Change. Click on the Counties tab.
Right-click on the county you wish to disassociate and select Delete. A Delete Rows window
will display:
Click on the YES button. The county will be disassociated.
3.5 Changing a Project
Click on the Project List icon
to display the existing list of projects.
Select the project for which you wish to make changes, right-click and select Tabbed Folder
Change.
The Project tabbed folder window displays. After making the changes, click on the SAVE icon.
Note that changes cannot be made to the PCN field as it is display-only. If an error was made at
the PCN field, you can copy the project (see 3.7 Copying a Project) and give the correct PCN
when copying. After the copy is made, the incorrect project can be deleted (see 3.6 Deleting a
Project).
3.6 Deleting a Project
Note: Prior to deleting a project, PLEASE disassociate from prime and proposal
if attached.
Click on the Project List icon
to display the existing list of projects.
On the project for which you wish to delete, right-click and select Delete. A Delete Warning
(1 of 2) window displays. Click on the YES button if you wish to proceed.
VDOT Trns·port PES User’s Manual
December 1, 2011
3-10
A Delete Warning (2 of 2) window displays. Click on the YES button if you wish to proceed.
A Confirm Delete window displays. Click on the YES button if you wish to proceed.
VDOT Trns·port PES User’s Manual
December 1, 2011
3-11
3.7 Copying a Project
Click on the Project List icon
to display the existing list of projects.
Highlight the project you wish to copy with one left-click of the mouse. From the Edit menu,
select Copy Special. A Copy Project window displays.
Enter the PCN of the new (copied) project in the New Project Control Number field. Click on
the OK button. The project listing will be re-displayed.
VDOT Trns·port PES User’s Manual
December 1, 2011
3-12