1
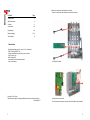
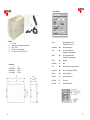
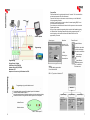
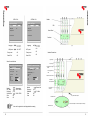
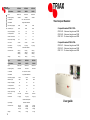
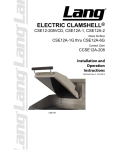
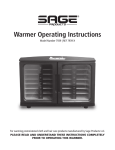
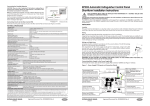
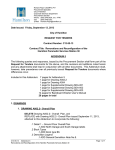
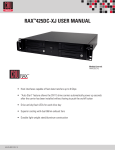
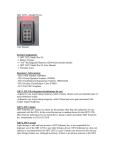
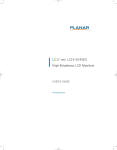
Type Technical Data Part Number. Input Frequency (MHz) CSE0601 CSE0801 CSE1201 324949 324950 324951 DVB-T PAL DVB-T PAL DVB-T PAL 470-862 470-862 470-862 TV Standard PAL I, B/G, DK, Secam L Audio Mode Single Mono Modulator Triax Compact Headend Channels (fully agile) 21-68 21-68 21-68 Modulator Type DSB DSB DSB 85 85 85 0-15 0-15 0-15 6 8 12 Output Level (dBµV) Level Adjustment Number of Channels Output Loop Through No No No Line Power 12VDC 12VDC 12VDC Connections F-Type (f) F-Type (f) F-Type (f) Input Voltage Dimensions mm Weight Type Part Number. Input Frequency (MHz) AC90-264 / 50/60Hz 253 (H) 300 (W) 200 (D) 253 (H) 428 (W) 200 (D) 253 (H) 567 (W) 200 (D) 5.5 Kg 8.8 Kg 11.5 Kg CSE0811 CSE1211 CSE0611 324952 324953 324954 DVB-S PAL DVB-S PAL DVB-S PAL 950-2150 950-2150 950-2150 TV Standard 21-68 21-68 21-68 Modulator Type DSB DSB DSB 85 85 85 0-15 0-15 0-15 6 8 12 Number of Channels Output Loop Through No No No Line Power 0/14V DC 0/14V DC 0/14V DC Connections F-Type (f) F-Type (f) F-Type (f) Quattro LNB Required Input Voltage Dimensions mm Weight 12 Compact Headend DVB-S-PAL CSE 0611: 6 channel single mono DSB CSE 0811: 8 channel single mono DSB CSE 1211: 12 channel single mono DSB Single Mono Modulator Channels (fully agile) Level Adjustment CSE 0601: 6 channel single mono DSB CSE 0801: 8 channel single mono DSB CSE 1201: 12 channel single mono DSB PAL I, B/G, DK, Secam L Audio Mode Output Level (dBµV) Compact Headend DVB-T-PAL User guide AC90-264 / 50/60Hz 253 (H) 300 (W) 200 (D) 253 (H) 428 (W) 200 (D) 253 (H) 567 (W) 200 (D) 5.5 Kg 8.8 Kg 11.5 Kg 4) Remove the connection cables between the modules Remove the connection cables between the modules and combiner Contents Page Characteristics 2 Safety instructions 3 Contents 4 Connections 5-6 Programming 6-9 Module changing Technical data 10-11 12 Characteristics Modular Headend system for up to 6, 8 or 12 channels DVB-T-PAL and DVB-S -PAL Simple installation and operation by remote control High Output Level Multi-lingual OSD Accessories for wall mounting included Easy maintenance Copyright Triax UK Ltd Triax reserves the right to change specification at any time without prior notice. Date 04/09-V01 2 5) Change the modules 6) Reassemble in reverse order Do Not Connect the mains power connector until the Headend is fully assembled 11 Module changing Attention! Switch Headend off at the wall socket and remove the plug. Safety Instructions Before mounting the Headend please read the instruction manual carefully. 1) Unscrew the four cross head screws from the lid and remove. The permissible operating temperature is –10-+50 deg. Excessive heat, heat accumulation or operating outside the permissible temperature range may affect the durability and are a source of danger (risk of fire)! Keep ventilation slots free and maintain significant ventilation around the unit. When using fans with the installation of the Headend in electrical cabinets in order to ensure the permissible ambient temperature you have to take appropriate measures to guarantee a shut-down of the unit (power-off) in the case of a failure of the fan. The mounting ground should be: - even and flame-proof 2) Unplug the Data & DC cables from the Control panel PCB - dust-free - protected against moisture - not under direct radiation of sunlight at a sufficient distance from heating sources Complete the installation before switching the power on or in the case of installations or addition of assembly components! Avoid short circuits! Switch off the Headend at the wall socket and remove the mains plug. 3) Unscrew the two cross head screws in the Control Panel PCB and remove Make sure that the power cable is not damaged, as this will increase the risk of electric shock or fire. Electrical Installations must comply to the latest version of the BS 7671Electrical Installations Regulations Opening of the Headend must only be carried out by qualified or competent persons In case of condensation, switch Headend off at the wall socket, remove plug and wait until the unit is completely dry before it is turned on again. 10 3 Output Settings 2 4 5 3 1 Contents 1) Headend 2) Brackets for wall mounting+ screws, earth crimp. 3) Mains Cable 4) Remote control incl. batteries 5) AV cable (monitor) SCART to Phono Dimensions X CSE06 338mm CSE08 467mm CSE12 604mm Y 300mm 428mm 567mm X Y 4 Source 215mm 200mm DVB-decoder Master / AV-IN DVB-decoder Slave / AV-IN Service Name ◄► Switch to programme list Audio ◄► Auto / Select audio channel (dependent on selected program) Subtitle ◄► Auto / Select subtitle channel (dependent on selected program) Volume ◄► Bar display Audio Mode n/a Mono 16:9 ◄► Normal / Letterbox / combined / Pan Scan Video System ◄► PAL I / PAL B/G (default) / SECAM L Channel ◄► Select output channel Frequency [ 0...9] Input only possible on list Save & Exit OK (close menu) Save & Exit OK Switches modulator “ON” 9 QPSK—PAL System settings Language English LNB power 14V COFDM—PAL Module System settings Language PSU English ANT power Factory reset Factory reset Save and Exit Save and Exit Control Panel Combiner Language German / English France / Spanish German / English France / Spanish LNB power 14V / OFF ANT power Out Factory reset OK Factory reset OK Save & Exit OK Save & Exit OK Language Headend Connections Signal Input Search for new Services Search for new services Method Search for new services Transponder Method Frequency (MHz) Channel 634 Frequency (MHz) 10773 Bandwidth (MHz) 8 Symbol Rate 22000 Scan now Back LOF (MHz) 9750 Scan now Back Level BER Quality / SNR Method LOF (MHz) Frequency Symbol Rate Scan Scan Loop Through Red LED un-configured module Amber programming LED Update/ connect monitor Level BER LED power on Level adjustment Transponder 09750 / 10600 (0...9) 22000 / 27500 OK OK Method Frequency Bandwidth Scan Scan Channel / all (0...9) Signal output connector 7 / 8 MHz OK OK Infra Red sensor Combined RF Output Audio Video outputs: connection for Spectrum Analyser Note: wait for signal level to be displayed before scanning 8 Module selector 5 Polarity 2 Polarity 1 Quattro LNB Software Update Program Flow Press and hold down the module select button for 3 seconds. The 1st module will be activated and an amber LED will be illuminated. Press the “Menu” button on the remote control, this takes you to the “Main Menu”, follow programming flowchart. Important: for each module, you have to allow a 2 channel spacing (DSB). Set out put channel before exiting the menu. Once exited, press the module select button this will step across to the next module. Repeat steps as above. When you have completed programming the last module in the Headend, pressing the ”Module Select” button again automatically exits the programming mode. To enter this again you will need to hold down the “Module Select” button for approximately 3 seconds. Screen Layout Programming Method LOF (MHz) Frequency Symbol Rate Menu item Remote Control Numerical Buttons Input box (0...9) Input of numeric's Transponder 10600 11954 (0...9) 22000 Back Button, steps back to previous menu page Menu-back to main menu Scan now Back Programming Factory Reset: English LNB Power ON 14V (QPSK) Antenna Power ON (COFDM) Modulator OFF Important: Connect only full Headend to PSU. Control buttons Input settings Selecting box Level BER Quality / SNR Information box Control ButtonsSelecting menus OK– Confirmation Exit-leave menu Quality 15-16 dB readings are excellent Do not fall below 8dB BER– 10-4 good, do not fall below 10-3 Main Menu System Settings Search for new services Output settings Exit Programming only possible without cover! Main Menu Connect the signal sources with the signal inputs of the Headend Channel Plan information required Loop the required number of modules together using the same input polarity Connect the monitor using the audio video outputs on the front panel Infrared Sensor System Settings Output Settings System Settings Search for new services Output Settings Language English LNB power 14V Factory reset Method Transponder LOF (MHz) 10600 Frequency 11954 Symbol rate Scan now Back Source Services Audio Volume 16:9 Video Channel Exit Module selector Program Settings DVB-S Five auto Combined PAL I 21 Save & Exit Audio / Video Outputs 6 7 Polarity 2 Polarity 1 Quattro LNB Software Update Program Flow Press and hold down the module select button for 3 seconds. The 1st module will be activated and an amber LED will be illuminated. Press the “Menu” button on the remote control, this takes you to the “Main Menu”, follow programming flowchart. Important: for each module, you have to allow a 2 channel spacing (DSB). Set out put channel before exiting the menu. Once exited, press the module select button this will step across to the next module. Repeat steps as above. When you have completed programming the last module in the Headend, pressing the ”Module Select” button again automatically exits the programming mode. To enter this again you will need to hold down the “Module Select” button for approximately 3 seconds. Screen Layout Programming Method LOF (MHz) Frequency Symbol Rate Menu item Remote Control Numerical Buttons Input box (0...9) Input of numeric's Transponder 10600 11954 (0...9) 22000 Back Button, steps back to previous menu page Menu-back to main menu Scan now Back Programming Factory Reset: English LNB Power ON 14V (QPSK) Antenna Power ON (COFDM) Modulator OFF Important: Connect only full Headend to PSU. Control buttons Input settings Selecting box Level BER Quality / SNR Information box Control ButtonsSelecting menus OK– Confirmation Exit-leave menu Quality 15-16 dB readings are excellent Do not fall below 8dB BER– 10-4 good, do not fall below 10-3 Main Menu System Settings Search for new services Output settings Exit Programming only possible without cover! Main Menu Connect the signal sources with the signal inputs of the Headend Channel Plan information required Loop the required number of modules together using the same input polarity Connect the monitor using the audio video outputs on the front panel Infrared Sensor System Settings Output Settings System Settings Search for new services Output Settings Language English LNB power 14V Factory reset Method Transponder LOF (MHz) 10600 Frequency 11954 Symbol rate Scan now Back Source Services Audio Volume 16:9 Video Channel Exit Module selector Program Settings DVB-S Five auto Combined PAL I 21 Save & Exit Audio / Video Outputs 6 7 QPSK—PAL System settings Language English LNB power 14V COFDM—PAL Module System settings Language PSU English ANT power Factory reset Factory reset Save and Exit Save and Exit Control Panel Combiner Language German / English France / Spanish German / English France / Spanish LNB power 14V / OFF ANT power Out Factory reset OK Factory reset OK Save & Exit OK Save & Exit OK Language Headend Connections Signal Input Search for new Services Search for new services Method Search for new services Transponder Method Frequency (MHz) Channel 634 Frequency (MHz) 10773 Bandwidth (MHz) 8 Symbol Rate 22000 Scan now Back LOF (MHz) 9750 Scan now Back Level BER Quality / SNR Method LOF (MHz) Frequency Symbol Rate Scan Scan Loop Through Red LED un-configured module Amber programming LED Update/ connect monitor Level BER LED power on Level adjustment Transponder 09750 / 10600 (0...9) 22000 / 27500 OK OK Method Frequency Bandwidth Scan Scan Channel / all (0...9) Signal output connector 7 / 8 MHz OK OK Infra Red sensor Combined RF Output Audio Video outputs: connection for Spectrum Analyser Note: wait for signal level to be displayed before scanning 8 Module selector 5 Output Settings 2 4 5 3 1 Contents 1) Headend 2) Brackets for wall mounting+ screws, earth crimp. 3) Mains Cable 4) Remote control incl. batteries 5) AV cable (monitor) SCART to Phono Dimensions X CSE06 338mm CSE08 467mm CSE12 604mm Y 300mm 428mm 567mm X Y 4 Source 215mm 200mm DVB-decoder Master / AV-IN DVB-decoder Slave / AV-IN Service Name ◄► Switch to programme list Audio ◄► Auto / Select audio channel (dependent on selected program) Subtitle ◄► Auto / Select subtitle channel (dependent on selected program) Volume ◄► Bar display Audio Mode n/a Mono 16:9 ◄► Normal / Letterbox / combined / Pan Scan Video System ◄► PAL I / PAL B/G (default) / SECAM L Channel ◄► Select output channel Frequency [ 0...9] Input only possible on list Save & Exit OK (close menu) Save & Exit OK Switches modulator “ON” 9 Module changing Attention! Switch Headend off at the wall socket and remove the plug. Safety Instructions Before mounting the Headend please read the instruction manual carefully. 1) Unscrew the four cross head screws from the lid and remove. The permissible operating temperature is –10-+50 deg. Excessive heat, heat accumulation or operating outside the permissible temperature range may affect the durability and are a source of danger (risk of fire)! Keep ventilation slots free and maintain significant ventilation around the unit. When using fans with the installation of the Headend in electrical cabinets in order to ensure the permissible ambient temperature you have to take appropriate measures to guarantee a shut-down of the unit (power-off) in the case of a failure of the fan. The mounting ground should be: - even and flame-proof 2) Unplug the Data & DC cables from the Control panel PCB - dust-free - protected against moisture - not under direct radiation of sunlight at a sufficient distance from heating sources Complete the installation before switching the power on or in the case of installations or addition of assembly components! Avoid short circuits! Switch off the Headend at the wall socket and remove the mains plug. 3) Unscrew the two cross head screws in the Control Panel PCB and remove Make sure that the power cable is not damaged, as this will increase the risk of electric shock or fire. Electrical Installations must comply to the latest version of the BS 7671Electrical Installations Regulations Opening of the Headend must only be carried out by qualified or competent persons In case of condensation, switch Headend off at the wall socket, remove plug and wait until the unit is completely dry before it is turned on again. 10 3 4) Remove the connection cables between the modules Remove the connection cables between the modules and combiner Contents Page Characteristics 2 Safety instructions 3 Contents 4 Connections 5-6 Programming 6-9 Module changing Technical data 10-11 12 Characteristics Modular Headend system for up to 6, 8 or 12 channels DVB-T-PAL and DVB-S -PAL Simple installation and operation by remote control High Output Level Multi-lingual OSD Accessories for wall mounting included Easy maintenance Copyright Triax UK Ltd Triax reserves the right to change specification at any time without prior notice. Date 04/09-V01 2 5) Change the modules 6) Reassemble in reverse order Do Not Connect the mains power connector until the Headend is fully assembled 11 Type Technical Data Part Number. Input Frequency (MHz) CSE0601 CSE0801 CSE1201 324949 324950 324951 DVB-T PAL DVB-T PAL DVB-T PAL 470-862 470-862 470-862 TV Standard PAL I, B/G, DK, Secam L Audio Mode Single Mono Modulator Triax Compact Headend Channels (fully agile) 21-68 21-68 21-68 Modulator Type DSB DSB DSB 85 85 85 0-15 0-15 0-15 6 8 12 Output Level (dBµV) Level Adjustment Number of Channels Output Loop Through No No No Line Power 12VDC 12VDC 12VDC Connections F-Type (f) F-Type (f) F-Type (f) Input Voltage Dimensions mm Weight Type Part Number. Input Frequency (MHz) AC90-264 / 50/60Hz 253 (H) 300 (W) 200 (D) 253 (H) 428 (W) 200 (D) 253 (H) 567 (W) 200 (D) 5.5 Kg 8.8 Kg 11.5 Kg CSE0811 CSE1211 CSE0611 324952 324953 324954 DVB-S PAL DVB-S PAL DVB-S PAL 950-2150 950-2150 950-2150 TV Standard 21-68 21-68 21-68 Modulator Type DSB DSB DSB 85 85 85 0-15 0-15 0-15 6 8 12 Number of Channels Output Loop Through No No No Line Power 0/14V DC 0/14V DC 0/14V DC Connections F-Type (f) F-Type (f) F-Type (f) Quattro LNB Required Input Voltage Dimensions mm Weight 12 Compact Headend DVB-S-PAL CSE 0611: 6 channel single mono DSB CSE 0811: 8 channel single mono DSB CSE 1211: 12 channel single mono DSB Single Mono Modulator Channels (fully agile) Level Adjustment CSE 0601: 6 channel single mono DSB CSE 0801: 8 channel single mono DSB CSE 1201: 12 channel single mono DSB PAL I, B/G, DK, Secam L Audio Mode Output Level (dBµV) Compact Headend DVB-T-PAL User guide AC90-264 / 50/60Hz 253 (H) 300 (W) 200 (D) 253 (H) 428 (W) 200 (D) 253 (H) 567 (W) 200 (D) 5.5 Kg 8.8 Kg 11.5 Kg