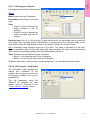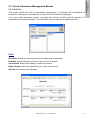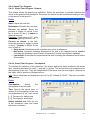
1
PRONET PLUS – User Manual – 1 Table of Content 1. WELCOME........................................................................................................................................... 6 1.1. ABOUT PRONET PLUS ................................................................................................................... 6 1.2. MONITORING TOOL ........................................................................................................................... 6 1.2.1. Access Control .......................................................................................................................... 6 1.2.2. Alarm Management................................................................................................................... 7 1.2.3. Lift Management ....................................................................................................................... 7 1.2.4. Parking Management................................................................................................................ 7 1.2.5. Time & Attendance Management.............................................................................................. 7 1.3. TYPES OF INSTALLATIONS ................................................................................................................. 7 1.4. MODULES .......................................................................................................................................... 8 1.4.1. Database ................................................................................................................................... 8 1.4.2. Communication ......................................................................................................................... 8 1.4.3. Operation .................................................................................................................................. 8 1.5. BASIC CONFIGURATION..................................................................................................................... 8 1.5.1. Operating System and Computer .............................................................................................. 8 1.5.2. Controllers ................................................................................................................................ 8 1.5.3. Readers ..................................................................................................................................... 8 1.5.4. Other Materials......................................................................................................................... 9 1.6. GENERAL USE OF PRONET PLUS ................................................................................................... 9 1.6.1. First Installation ....................................................................................................................... 9 1.6.2. Demonstration Version ............................................................................................................. 9 1.6.3. Plug ......................................................................................................................................... 10 1.6.4. Running PRONET PLUS ........................................................................................................ 10 1.6.5. Modifying Data Entry ............................................................................................................. 11 1.6.6. New Data Entry....................................................................................................................... 11 1.6.7. Exiting the Application............................................................................................................ 12 1.6.8. Update an PRONET PLUS version ........................................................................................ 12 1.6.9. PRONET PLUS Database Protection..................................................................................... 12 2. GENERAL SCREENS ....................................................................................................................... 13 2.1. MAIN SCREEN ................................................................................................................................. 13 2.2. TOOL BAR ....................................................................................................................................... 14 2.3. SCROLLING MENUS ......................................................................................................................... 14 2.4. NAVIGATION BAR ........................................................................................................................... 15 2.5. PERSONALIZED NAVIGATION BAR .................................................................................................. 15 3. “PARAMETER” MENU.................................................................................................................... 16 3.1. COMPUTER ...................................................................................................................................... 16 3.2. CONTROLLER NETWORK ................................................................................................................. 17 3.2.1. Controller Network - General................................................................................................. 17 3.2.2. Controller Network - Definition.............................................................................................. 18 3.2.3. Controller Network, advanced settings................................................................................... 21 3.3. CONTROLLER .................................................................................................................................. 24 3.3.1. Controller - General ............................................................................................................... 24 3.3.2. Controller - Readers ............................................................................................................... 26 3.3.3. Controller - Input .................................................................................................................... 40 3.3.4. Controller - Output ................................................................................................................. 43 3.3.5. Controller - Local Reflexes ..................................................................................................... 45 3.4. TIME ZONE ...................................................................................................................................... 47 3.4.1. Basic Concepts........................................................................................................................ 47 3.4.2. Daily Program ........................................................................................................................ 48 3.4.3. Weekly Program...................................................................................................................... 49 3.4.4. Holiday.................................................................................................................................... 50 2 PRONET PLUS – User Manual – 3.5. ACCESS GROUP ............................................................................................................................... 51 3.6. DEPARTMENT .................................................................................................................................. 52 3.7. BADGE ............................................................................................................................................ 53 3.7.1. Badge Search .......................................................................................................................... 55 3.7.2. Group of Badges ..................................................................................................................... 56 3.8. ALL CARDHOLDERS ......................................................................................................................... 58 3.8.1. All cardholders - Basic Concepts............................................................................................ 58 3.8.2. All cardholders - General ....................................................................................................... 58 3.8.3. All cardholders - Badge Printing Module............................................................................... 62 3.8.4. All cardholders - Biometrics data........................................................................................... 63 3.8.5. All cardholders - Personal...................................................................................................... 65 3.8.6. All cardholders - Location ...................................................................................................... 66 3.8.7. All cardholders - Customized.................................................................................................. 66 3.8.8. All cardholders - Exceptions................................................................................................... 67 3.8.9. All cardholders - Schedule AG................................................................................................ 67 3.9. VISITOR ........................................................................................................................................... 68 3.10. MULTI COMPANY MODULE ........................................................................................................... 69 3.10.1. Multi Company Module - Basic Concepts ............................................................................ 69 3.10.2. Company ............................................................................................................................... 70 3.10.3. Super-User ............................................................................................................................ 70 3.10.4. Shared Information ............................................................................................................... 71 3.11. AUTHORIZATION LEVELS .............................................................................................................. 72 3.12. USER ............................................................................................................................................. 73 3.13. CUSTOMISED LABELS AND FIELDS ................................................................................................ 74 3.14. LOG OFF........................................................................................................................................ 74 3.15. EXITING THE APPLICATION ........................................................................................................... 74 4. “EVENT HANDLING” MENU......................................................................................................... 75 4.1. ICON ................................................................................................................................................ 75 4.2. MAP ................................................................................................................................................ 76 4.2.1. Map - General......................................................................................................................... 76 4.2.2. Map - Icon............................................................................................................................... 76 4.3. POSITION ......................................................................................................................................... 77 4.4. INPUT GROUP .................................................................................................................................. 78 4.4.1. Input Group - General ............................................................................................................ 78 4.4.2. Input Group - Inputs ............................................................................................................... 80 4.5. OUTPUT GROUP ............................................................................................................................... 81 4.6. ACTION ........................................................................................................................................... 82 4.7. PROCESS .......................................................................................................................................... 84 4.8. COUNTER ........................................................................................................................................ 85 4.9. GLOBAL REFLEX ............................................................................................................................. 86 4.9.1. Global Reflex - Basic Concepts .............................................................................................. 86 4.9.2. Global Reflex - General .......................................................................................................... 87 4.9.3. Global Reflex - Properties ...................................................................................................... 88 4.10. EVENT-HANDLING PROGRAM ....................................................................................................... 90 4.10.1. Event-Handling Program - Basic Concepts.......................................................................... 90 4.10.2. Event-Handling Program - General ..................................................................................... 90 4.10.3. Event-Handling Program - Alarms....................................................................................... 91 4.10.4. Event-Handling Program - Alarm Properties ...................................................................... 92 4.10.5. Event-Handling Program - Global Reflexes......................................................................... 93 4.11. ACTIVE ALARMS ........................................................................................................................... 94 4.11.1. Active Alarms - Basic Concepts ............................................................................................ 94 4.11.2. Active Alarms - Map ............................................................................................................. 95 4.11.3. Active Alarms - Input Status.................................................................................................. 99 4.11.4. Active Alarms - Output Status............................................................................................. 101 PRONET PLUS – User Manual – 3 5. “MODULES” MENU ....................................................................................................................... 102 5.1. PARKING MODULE ........................................................................................................................ 102 5.1.1. Parking Module - Basic Concepts ........................................................................................ 102 5.1.2. Parking Lot ........................................................................................................................... 104 5.1.3. Parking Users Group ............................................................................................................ 105 5.1.4. Parking Zone......................................................................................................................... 106 5.1.5. Reset Parking Zones ............................................................................................................. 108 5.2. LIFT MODULE................................................................................................................................ 109 5.2.1. Lift Module - Basic Concepts................................................................................................ 109 5.2.2. Lift Program.......................................................................................................................... 110 5.2.3. Lift Authorization Group....................................................................................................... 112 5.3. TIME & ATTENDANCE MANAGEMENT MODULE ........................................................................... 113 5.3.1. Roll Call ................................................................................................................................ 113 5.4. GUARD PATROL MODULE ............................................................................................................. 114 5.4.1. Guard Patrol Module - Basic Concepts................................................................................ 114 5.4.2. Guard .................................................................................................................................... 114 5.4.3. Checkpoint - General ............................................................................................................ 114 5.4.4. Guard Tour Program ............................................................................................................ 115 5.4.5. Guard Tour Status................................................................................................................. 116 5.4.6. Patrol Report......................................................................................................................... 117 5.5. VIDEO MODULE ............................................................................................................................ 118 5.5.1. Video Module - Basic Concepts ............................................................................................ 118 5.5.2. Video Module - DVR ............................................................................................................. 120 5.5.3. Video Module - Camera........................................................................................................ 120 6. “COMMUNICATION” MENU....................................................................................................... 121 6.1. STOP / RESUME POLLING ............................................................................................................... 121 6.2. DIAGNOSE ..................................................................................................................................... 121 6.3. VIEW / CLEAR LOG........................................................................................................................ 124 6.4. DISPLAY PHOTO ............................................................................................................................ 125 7. “MANUAL ACTION” MENU ........................................................................................................ 126 7.1. CRISIS LEVEL ................................................................................................................................ 126 7.2. RELAYS CONTROL ......................................................................................................................... 128 7.3. EXECUTE PROCESS ........................................................................................................................ 129 8. “TOOLS” MENU.............................................................................................................................. 130 8.1. REPORT WIZARD ............................................................................................................................ 130 8.1.1. Report wizard - Basic Concepts............................................................................................ 130 8.1.2. Report wizard - Step 1 / 4: Report Selection......................................................................... 130 8.1.3. Report wizard - Step 2 / 4: Data Selection............................................................................ 133 8.1.4. Report wizard - Data Viewing .............................................................................................. 134 8.1.5. Report wizard - Step 3 / 4: Data Filtering ............................................................................ 135 8.1.6. Report wizard - Step 4 / 4: Data Organization..................................................................... 136 8.2. CREATE NEW DATABASE .............................................................................................................. 137 8.3. SAVE DATABASE ........................................................................................................................... 137 8.4. RESTORE DATABASE ..................................................................................................................... 138 8.5. SWITCH DATABASE ....................................................................................................................... 139 8.6. CREATE NEW JOURNAL ................................................................................................................. 139 8.7. SAVE JOURNAL.............................................................................................................................. 140 8.8. RESTORE JOURNAL ........................................................................................................................ 141 4 PRONET PLUS – User Manual – 8.9. CARDHOLDERS IMPORT PROFILE ................................................................................................... 142 8.9.1. Cardholders Import Profile - General .................................................................................. 142 8.9.2. Cardholders Import Profile - Connection Settings ............................................................... 144 8.9.3. Default profiles ..................................................................................................................... 145 8.9.4. More on SQL statement ........................................................................................................ 146 8.10. CREATE A GROUP OF BADGES ...................................................................................................... 147 8.11. OPTIONS ...................................................................................................................................... 148 8.11.1. Files Location ..................................................................................................................... 148 8.11.2. Language............................................................................................................................. 149 8.11.3. Communication ................................................................................................................... 149 8.11.4. Journal / Log Screen ........................................................................................................... 151 8.11.5. Messages ............................................................................................................................. 152 8.11.6. General................................................................................................................................ 153 8.11.7. Server .................................................................................................................................. 155 8.11.8. SQL Server .......................................................................................................................... 156 9. “HELP” MENU................................................................................................................................. 157 9.1. AMADEUS HELP CONTENT ............................................................................................................. 157 9.2. AMADEUS HELP INDEX .................................................................................................................. 157 9.3. AMADEUS HELP SEARCH................................................................................................................ 157 9.4. AMADEUS ON THE WEB ................................................................................................................. 157 9.5. ABOUT PRONET PLUS ............................................................................................................... 157 APPENDIX A: PRONET PLUS AND OPC SERVER...................................................................... 158 PRONET PLUS – User Manual – 5 1. WELCOME 1.1. About PRONET PLUS The ACTEC PRONET PLUS, the sophisticated yet user-friendly access control and alarm management software, centralizes security requirements within all types of installation irrespective of their complexity. PRONET PLUS offers intelligent and flexible access control that manages cardholders’ information, time zones, access levels and relays activation. Controllers and badge holders are automatically created with a click of a mouse. The set-up process is therefore reduced to minutes instead of hours. PRONET PLUS alarm management module monitors all alarm events and movements in real time. All the information needed to react immediately with full knowledge of the facts is provided on the screen. Security is reinforced as alarm conditions and events automatically trigger predefined reactions: flashing icons on relevant displayed maps, written and vocal instructions, alarms, CCTV or any programmed relay activation, zone on/off alarm, card invalidation, etc. PRONET PLUS transforms your facility into a smart building. The passage of a badge at the exit automatically switches off the lights and heating in any designated area, thus allowing for energy savings. Switching on the heating in the office of the person who has passed its badge at the car park entrance. 1.2. Monitoring Tool 1.2.1. Access Control Access Control tool allow you to define "who is going where and when". Smart multitechnology controllers, linked to advance identification systems, allow to equip each person with a personalised card or another ID that controls access. Your organization can prevent material or information robbery, by limiting / supervising the access to all or part of your facility (lab, computer room, or storage areas) to authorized persons, during specific time periods. When a badge holder requests permission to access a particular area, the information is relayed from the reader to the controller. The controller either grants or denies access according to the parameters defined (access authorization, time zones, etc.) All these parameters are down-loaded from the central station (through PRONET PLUS) to the controllers into authorization tables and therefore, controllers decide by themselves to grant or deny access, without involving the central station. The transactions are then sent to the central station and listed in the log and the journal. Access control parameters are mainly defined in the “ Parameter” section of the application. 6 PRONET PLUS – User Manual – 1.2.2. Alarm Management Your organization can prevent catastrophes or limit damage by being informed of abnormal events and reacting to them in real time. Alarm Monitoring usually functions in coordination with Access Control. Alarm management consists in supervising alarm inputs. Different sensors, such as magnetic contacts, motion detectors, broken window sensors and temperature indicators are connected to intelligent controllers that centralize the information. As soon as an alarm is activated the system reacts: CCTV cameras, alarms, heating switched on or off, display of pre-defined maps and instructions on the screen, etc. Alarm management parameters are mainly defined in the “Parameter” and “Event Handling” sections of the application. 1.2.3. Lift Management PRONET PLUS provides a solution for supervising access in lifts. The user passes his badge into a lift reader: If access is granted within the time zone, only the floor buttons corresponding to his authorization may be used. In case of buildings shared by several firms, each person will only be able to select the floor(s) attributed to the company he/she belongs. Lift management parameters are mainly defined in the “Lift Program” menus in the “Modules” section of the application. 1.2.4. Parking Management PRONET PLUS enables to monitor access to designate parking spaces. The software monitors the filling up of parking zones with respect to groups of users and pre-defined number of places in the cardholder zone, and allows establishing attendance sheets. The necessary parameters are mainly defined in the “Parking” menus of the “Modules” section of the software. 1.2.5. Time & Attendance Management Time & attendance management facilitates the computation of employee attendance, overtime, absences and lateness. It allows calculating pay slips more efficiently. Time & attendance parameters are mainly defined in the “Roll call” menu of the “Modules” section of the software. 1.3. Types of Installations PRONET PLUS centralizes security within any type of on-line installation: ¾ Big or small installation ¾ TCP/IP, RS485 or modem networks ¾ Single or remote sites ¾ Single or multiple company sites PRONET PLUS – User Manual – 7 1.4. Modules 1.4.1. Database The database module allows creating and modifying databases (reader, systems, badge holders, time zones, etc.) As soon as a data is created or modified, it is recorded in a file, which is then sent to the controller via the communication module. Database parameters are defined in the “Create”, “Save” and “Restore Database” screens in the “Tools” section of the application. Similar options exist for the journal. 1.4.2. Communication The communication module coordinates the data transfer between the main computer and the controllers that detect the events. The information collected is recorded in the journal and displayed in the log. 1.4.3. Operation The operational module interprets information collected by the communication module. Its role is to activate predefined tasks such as alarms, reflexes, etc. The events to consider, and the resulting actions, are specified in the different screens of the “Event Handling” section. 1.5. Basic Configuration 1.5.1. Operating System and Computer Operating system: Windows 2000 Pro or Windows XPRO or Windows 2003 Server The manufacturer recommends these two operating systems and is not responsible for errors occurring while using other operating systems. Computer: Pentium IV minimum 256 MB RAM (or 1 GB RAM for installations with more than 100 controllers or with SQL Server) 500 MB free hard disk space CDROM Drive 1 free serial COM port and 1 parallel port or USB port Recommended enhancement: Sound Card , Speakers , SVGA definition (800*600) 1.5.2. Controllers All ACTEC controllers for on-line networks are compatible with PRONET PLUS. 1.5.3. Readers The vast majority of readers available on the market are compatible with the PRONET PLUS system: magnetic, proximity, bar code, smart card, biometry, Wiegand, contact, infrared, keypad, etc. Consult with your PRONET PLUS reseller for further information. 8 PRONET PLUS – User Manual – 1.5.4. Other Materials In order to successfully install and run the PRONET PLUS system, other materials are required. These vary according to each installation: computer network, devices to open doors, alarm detectors, etc. Consult with your PRONET PLUS provider for further details. Note: This product uses software developed by Spread Concepts LLC for use in the Spread toolkit. For more information about Spread see http://www.spread.org. 1.6. General Use of PRONET PLUS 1.6.1. First Installation Insert the PRONET PLUS Installation CD: the Installation Wizard is automatically launched. If not, run the ‘autorun.exe’ file in the ‘autorun’ folder of the PRONET PLUS Installation CD. Follow then the step by step instructions. Note: Do not install the application using the ‘setup.exe’ file of the CD; should you do so, the following warning message will be displayed: “Setup will not start. Contact your vendor”. PRONET PLUS on Server/Workstation architecture: During the installation, the user is asked to select if the application must run as a Server or as a Workstation. If PRONET PLUS runs on one computer only, select ‘Server’. If on several computers (for a Server/Workstations architecture), do as follows: 1- Install PRONET PLUS on the computer that will be the Server and specify ‘Server’ during the installation process. 2- Share the PRONET PLUS folder to the required Workstation(s). 3- Once installed, run the application and define all the computers, Server and Workstation(s), through the ‘Parameter - Computer’ screen. 4- Install PRONET PLUS on each workstation and specify ‘workstation’ during the installation process. It will ask the user to select the Server network path. Database type: During the installation, the user is asked to select the database format: ‘Access’ or ‘SQL’. If ‘SQL’ has to be requested, ensure first that the Microsoft SQL server or MSDE (the SQL server engine) is already running in the computer or in the network and the PRONET PLUS plug has the SQL license. 1.6.2. Demonstration Version A demo version of the PRONET PLUS software is available. It includes all functions referring to alarms, graphics, lift management and time management. Nevertheless the capability of the demo version is restricted to two controllers, four readers and ten cardholders. In order to exceed these capabilities and to use the software in a real situation, a plug is requested. PRONET PLUS – User Manual – 9 1.6.3. Plug (Dongle) Different plugs are available. The combination of plugs purchased is described in the ‘Help – About PRONET PLUS’ screen and defines the system capability. ¾ nC: ¾ nR: ¾ nB: ¾ nW: ¾ A: ¾ G: ¾ P: ¾ L: Maximum No. (‘n’) of Controllers allowed Maximum No. (‘n’) of Readers allowed Maximum No. (‘n’) of Badgeholders allowed Maximum No. (‘n’) of Workstations allowed Alarm Module Graphic Module Parking Module Lift Module ¾ T: ¾ M: ¾ U: ¾ O: ¾ SQL: ¾ BP: ¾V : Time & attendance Module Multi-company Module Guard patrol Module OPC Server Module MS-SQL database support Badge Printing Module Video Module Tips & Notes NetHasp support for Terminal Server application compatibility PRONET PLUS can work either from a Terminal Server PC or from a Terminal Client. However, this requires the use of a special plug (NetHasp) that is a type of plug being able to work with the Terminal application. With a regular plug, the Terminal Client workstation looks for the installed plug on the PC. Using the NetHasp plug, the plug can be physically installed on the Server or on any other PC on the LAN, and to be read by PRONET PLUS through the network. Operating Mode : ¾ Order the special NetHasp plug (looks the same, though it is colored red), ¾ Install it on the machine where PRONET PLUS is installed, or on any other PC on the LAN. ¾ Install the “Aladdin License Manager” application on the PC where the plug is physically located. (It is better to install it as a ‘Service’. This way doesn’t need to log on to Windows in order to make it run after a PC start). ¾ Exit PRONET PLUS and look for the Amadeus5.ini file in the PRONET PLUS folder. ¾ Open this file with Notepad and check that the following command exists: NetHasp = 1 If this line does not exist, run the application, go to “Tools - Options” and click “OK”. This operation rebuilds the ini file and inserts all the possible entries according to the latest application version. ¾ Set the value to 1 ¾ Save and close this file, then restart PRONET PLUS. 1.6.4. Running PRONET PLUS Start the PRONET PLUS application by double-clicking on its shortcut or by clicking on Start/Programs/PRONET PLUS/PRONET PLUS from Windows Desktop. Type the User name and the Password and click OK. The application main menu appears on the screen. 10 PRONET PLUS – User Manual – Tips & Notes Significance of lower case and capital letters The “User name” and “Password” fields notice the difference between lower case and capital letters. For example: the computer will interpret AFI, afi, and aFi differently. Three attempts If the user name and the password are not correctly entered after three attempts, the start window will disappear from the screen. Using the software for the first time It is recommended to change the user name and the password at the first use of PRONET PLUS and to store this information in a secure place. Skip the user name and password request Start your application without being prompted for a user name and a password every time the application is started, by setting them in the initialisation parameters, as follow: ¾ Point the mouse to the shortcut of the application ¾ Press on the right click of the mouse ¾ Select “Properties” ¾ Add the user name and password at the end of the “Target” field (after “Amadeus5.exe”) as follow: [space]/us:user name [space]/pw:password ¾ Click OK 1.6.5. Modifying Data Entry To modify an existing entry: ¾ Select the desired screen ¾ Choose a data entry ¾ Modify the fields (Choose self-explanatory names) ¾ Click on the “Save” icon from the navigation bar to confirm the modification of the data captures ¾ Click on the “Close” icon to terminate the data entry operations and to return to the general screen or click on the “F12” function key. 1.6.6. New Data Entry To create a new data entry: ¾ Select the required screen ¾ Click on the “New” icon from the navigation bar, to create a new data entry ¾ Give a name to the new data entry in the field entitled “Name” (Choose self-explanatory names) ¾ Define the new data entry in the field entitled “Description” ¾ Fill in the other fields ¾ Click on the “Save” icon from the navigation bar to confirm the creation of the data or press the “F3” function key ¾ Click on the “Close” icon to terminate entry operations and to come back to the general screen or press the ‘’F12’’ function key PRONET PLUS – User Manual – 11 Tips & Notes Emptying fields By clicking on the “New” icon all the fields are cleared away or set to their default value to allow new data entry. 1.6.7. Exiting the Application In order to terminate a work session and exit the application, choose one of the following steps: ¾ Click on the “Exit” icon represented by a door, at the far right of the navigation bar ¾ Double-click on the icon represented by a magical wand, in the upper left corner of the screen ¾ Click on the cross X, in the upper right corner of the screen ¾ Click on the “F4” function key and, at the same time, on the “Alt” key ¾ Open the “Parameter” menu and choose the “Exit” option (at the bottom of the list) The system offers the possibility to log off unauthorized users, without closing the application. 1.6.8. Update an PRONET PLUS version To update an application already installed, do one of the two following procedures: 1- Using an ‘Update’ file: Exit the application and run the ‘Update’ file (for example: ‘update_v1.3.023.exe’). Run it on the Server and on each Workstation. 2- Using a full new version of PRONET PLUS setup: 2.1 From PRONET PLUS, save the database and the journal from the ‘Tools – Save database’ and ‘Tools – Save journal’ menus. 2.2 Save the ‘Amadeus5.ini’ file from the PRONET PLUS folder. 2.3 Uninstall PRONET PLUS from the computer. 2.4 Install the new version in the same folder where the previous version was installed. 2.5 Copy the saved ‘Amadeus5.ini’ file in the PRONET PLUS folder, overwritting the existing file. 2.6 Enter the application. If the database and the journal have not been automatically restored by the process, restore them from the ‘Tools – Restore database’ and ‘Tools – Restore journal’ menus. 1.6.9. PRONET PLUS Database Protection In the application folder there is a utility that allows password protection to the main database (Amadeus5.mdb). This protection prevents opening the database using Microsoft Access or any other application. To protect the database, follow the next steps: Operating Mode : ¾ Exit PRONET PLUS, ¾ Run ‘LockDB.exe’ from the main application folder, ¾ Click on ‘Select Database’ to select the main db (Amadeus5.mdb), ¾ Click on ‘Lock Database’. 12 PRONET PLUS – User Manual – 2. GENERAL SCREENS 2.1. Main Screen The main screen of PRONET PLUS allows an access to all system options through the use of: ¾ Scrolling menus, leading to all capture screens, information tables and system options ¾ Toolbar, providing shortcuts towards some important screens ¾ Log display, presenting the list of events in real time ¾ Progress bar, at the bottom of the screen, showing the current status of the commands. Tips & Notes Tutorial The help screen is available from any screen by pressing the “F1” function key and displays explanations of the current screen. Reminding of consulted screens The fields of the scrolling menus in the main screen appear in black before use. However after consultation, they appear in blue. Multi-Windows Several windows can be opened simultaneously. Authorization Level The options displayed depend on the authorization level of the user. Certain options are not suitable for certain users and therefore do not appear on the screen. Dissociating the alarm log from the access log By default, a single log shows access, alarms and system messages. It is possible to dissociate the alarm log from the access log, in the “Options – Tools – Journal / Log screen” screen. PRONET PLUS – User Manual – 13 2.2. Tool Bar The icons of the toolbar provide shortcuts to some important screens: Controller, Badge, All cardholders, Event handling program, Active alarms, Report wizard, Polling, Number of active alarms, Number of acknowledged alarms, Number of pending commands to be sent, Exit. 2.3. Scrolling Menus Capture screens and menus are organized as follow: These menus are those of the Version 1.5.002. New ones may be added on further versions. 14 PRONET PLUS – User Manual – 2.4. Navigation Bar The function keys correspond to the icons on the navigation bar are discribed here after. They are available from each capture screen. F2 New Define a new data entry F3 Save Save the current data information F4 Delete Delete the data selected F5 First Select the first data entry of the list F6 Previous Select the previous data entry F7 Next Select the next data entry F8 Last Select the last data entry of the list F9 Download Transfer all the parameters to the corresponding controllers even if the information has not been modified F10 Search Look for the desired data in the list F11 Print Generate automatically the report corresponding to the current data F12 Close Close the screen and return to the previous screen Tips & Notes Tutorial F1 Help Display the help screen of the current screen New Data By clicking on the F2 key, the fields of the newly created item are empty to allow entry of new data. If existing information has not yet been saved, a message appears requesting the user to save or cancel the changes. Saving (F3 key) transfers automatically the modified parameters to corresponding controllers. 2.5. Personalized Navigation Bar A customized toolbar gives added flexibility to the system. Creating a customized toolbar ¾ Place the mouse on the original toolbar ¾ Click on the mouse right button ¾ Select “Customize” in the menu that appears on the screen for opening the tools screen ¾ Click on the "New" button and give a name to the new toolbar ¾ In the “Tools” tab, select the desired group of icons ¾ Select the tools in the list and drag and drop them on the new toolbar Saving a customized toolbar Check the box “Save user customized toolbar” in the “Tools – Options – General” screen for restoring the customized toolbar at each work session. Toolbar initialisation To execute this command, click on the “Reset toolbar to original state” button in the ‘’Tool Options - General’’ screen. PRONET PLUS – User Manual – 15 3. “Parameter” MENU 3.1. Computer If PRONET PLUS is installed on a single computer, ignore this screen. For Server/Workstation(s) architecture, use this screen to define all computers parameters, Server and Workstations (PC name as defined in the network with its IP address). A separate record must be created for the Server and for each Workstation. Fields Name: Name the computer (any name: for information only) Computer Parameters: Select from the list the name of the computer (within the network). IP address: Enter the IP address of the computer or click on the [IP] button for an automatic detection. Subnet mask: Type the subnet mask. This allows to create workstations located on a different network segment, i.e., over routers. Description: Describe the new item (for information only). Shared: Check the box for sharing the information between different companies (for use with multi-company application ONLY). 16 PRONET PLUS – User Manual – 3.2. Controller Network A network is an electrical physical support - or bus - to which controllers are connected and which can be connected to a PC. The different networks, to which groups of controllers are connected, are defined in this screen. The PC can be connected to the networks by its communication ports (one by network), by its Ethernet TCP/IP board (for LAN or WAN network) or by Modem. The controller network parameters are divided into two tabs: ¾ General, for name and description ¾ Definition, for selection of the different parameters 3.2.1. Controller Network - General Fields Name: Name the new network Description: Describe the new data entry Company: Company the item refers to (for use with multi-company application ONLY). Shared: Check the box for sharing the information between different companies (for use with multi-company application ONLY). PRONET PLUS – User Manual – 17 3.2.2. Controller Network - Definition Three network types are recognised by the system: Port COM, Port TCP and Port MODEM. For each kind of network the following fields may be defined: Password: This password allows to secure the data traffic between the PC and the controllers by encoding the information that passes over the communication bus (whether serial or TCP/IP). Each controller network may have a user defined 32-bit password, written in hexadecimal characters. When the PC and the controllers communicate, each data packet is encrypted using this password, preventing a hacker that has a copy of PRONET PLUS application from accessing the controllers. The password can be defined after checking the ‘Password’ box in this screen. The user can use decimal digits or a combination of decimal and hexadecimal characters. Example: 1A E3 5F 7B (Min. value: 01 00 00 00 / Max value: 7F FF FF FF) Time out delay: The maximum delay, measured in milliseconds, beyond which a controller must answer to a command sent by PRONET PLUS. If the controller does not answer within this delay, PRONET PLUS will try two more times (value adjustable in the ‘Tools – Options – Communication’ menu) to send the command. If still no answer from the controller, the command will be put in the pending commands. The default value is 1000 msec. (keep this value unless specified otherwise) Time out polling: Polling a controller means asking it if some events just occurred, i.e. either a card transaction (granted or denied) or an alarm. In the polling mode, PRONET PLUS continuously polls all the controllers which must answer either by an empty message, if nothing happened, or by the last event(s) occurred. The ‘Time out polling’ is the maximum delay, measured in milliseconds, beyond which a controller must answer to a polling. If the controller does not answer within this delay, PRONET PLUS will try two more times to poll it. If still no answer from the controller, it will jump to the next controller. The default value is 1000 msec. (keep this value unless specified otherwise) PRONET PLUS will declare a Communication problem if a same controller does not answer to polling during a pre-defined ‘communication error time-out' delay. The number of trials (3 by default) PRONET PLUS will poll a controller which does not answer and the ‘communication error time-out' delay (30 seconds by default) is adjustable in the ‘Tools – Options – Communication’ menu. Waiting delay: Specify the delay between two communication operations between the computer and the controllers (polling or commands) - measured in milliseconds. This function will help slow down the system so as to free up the PC. The default value is 50 msec. (keep this value unless specified otherwise) Note: The communication baud rate between controllers and PRONET PLUS is defined in the ‘Tools – Options – Communication’ screen. 18 PRONET PLUS – User Manual – 3.2.2.1. COM Network Fields Port: Choose “COM” and specify the port address; by default the serial port COM 1 is created. 3.2.2.2. TCP Network Fields Port: Select “TCP” to establish a link to remote controllers via TCP/IP Phone No. or TCP address: Specify the TCP address requested in the format <Address>:<Port>, for example: 10.0.0.1:10001 3.2.2.3. Modem Network Fields Port: Select “Modem” to establish a link to remote controllers via modem Phone No. or TCP address: Specify the phone number of the modem requested Modem: Select the required modem among the drop-down list showing the current Windows predefined connections. PRONET PLUS – User Manual – 19 Note: ¾ Set the remote modem in auto answer mode ¾ Fit the specific wiring and settings to installation instructions of controllers ¾ Establish modem port selection at the server Connect: Click on the connect button to start the connection procedure; this button is enable after saving the network definition only. The server application will show messages such as “Proceeding”, “Line Busy” or “Connected”. The connect button is available on any workstation of the system, nevertheless the status messages are only sent to the server computer. Disconnect: Click to stop the connection procedure; this button is only enabled while the controller network is connected. Note: In case of off-line network, all the controllers are considered as inactive by the system. Database modifications are saved and automatically transferred during the next successful connection. Tips & Notes Updating dial up controllers When a remote controller network is connected via dial up modem, and the user makes changes in the database while these networks are not connected, there are 3 ways of updating controllers with the new definitions: 1. Manually: Open Controller Network screen and connect to the relevant network. Once connected, all pending commands are sent to the controller, and in addition, the events buffer is uploaded to the PC. 2. By user defined schedule: Modem dial-up may be automatically performed within predefined schedules. Define a new action and select the type: “Connect distant network and read transactions”. Select the relevant remote controller network. Save. Click “Make it a process”. Define a new global reflex. Select the type “Scheduler” and select the relevant time and dates. For example: Any day, any month, at 23:00. Select the newly created process. Save. This will make the program dial up that modem every night at 23:00, update the pending commands, read the events, and disconnect. 3. Automatic dial up every time there pending are to be sent: When a local controller does not answer to controller commands, (usually due to a communication problem), these commands are left as pendings and sent, by default, every half an hour minutes. (That 30 minutes period may be changed, down to a minimum of 1 minute, though Tools - Options Communication - Resend pending every…). In order to set the application to update pendings, (at the same method and at the same delay), also remote dial up networks, it is required to choose the “Distant connect on pending” option in the “Tools - Options - Communication” screen. Note: When this option is activated, the AM5 would not dial up every pending updates period to all remote controllers, but only to those who have to be updated with database changes. Therefore, if a certain controller does not have to be updated, AM5 will not connect to it and would not empty its buffer. (See the paragraph which explains what happens when buffer is full on remote controller). 20 PRONET PLUS – User Manual – 3.2.3. Controller Network, advanced settings. Pressing Shift+F12 at the “Controller Network” screen reveals on the “General” tab some advanced features about communication bus: Fields Bus type: Select the network type: ¾ Bus 1 (main communication bus) (default) ¾ Bus 2 (for redundancy, fast alarms …): Network connecting the controller secondary communication ports. Bus 1: When the Controller Network is defined as Bus 1, this bus must be connected to serial port 1 of all the controllers. This bus may be set to one of the 2 communication types: ¾ Polling: In this type of communication (selected by default), the PC continuously polls the controllers, in order to check if there are any new events to be reported. ¾ Event mode: In this type communication, the PC listens quietly to the port, waiting for the controller(s) messages. There is no polling, the events are being sent at the controller’s initiative. As soon as access or alarm event happens, the controller reports it to the PC. Obviously, the communication lines are much less busy. Notes for technicians: Unlike polling mode, where the 2 onboard controller communication LEDS work continuously, in event mode they would just blink briefly after an event has occurred. Has a second bus: Select the second bus, if needed. This bus must have been defined as Bus 2 preliminarily. PRONET PLUS – User Manual – 21 By pressing on the ‘Bus 2’ button, other fields are displayed. For the TPL Rev.D, Rev.D1, and the DS216 Rev.C it is optional to support a secondary RS485 communication port called ‘Bus2’. This additional port can be connected to a bus that may be used as redundant bus, alarm priority bus or network reflex bus: Fields Bus 2: When the Controller Network is defined as ‘Bus 2’, this bus must be connected to the secondary serial port (Connector J10) of all the controllers equipped with a second RS485 communication port. ((U29) and (U30) components must be present on the controller board). This bus may have three different uses. Check the option box for which this bus must be used: ¾ Redundant bus: Backup communication bus for acting as an alternative communication bus for the controller in case of main communication port failure (connected to a TCP/IP network, for example). If this option is set, then when the PRONET PLUS detects a communication error with one or more controllers of the network, it swaps the communication of all the controllers of that network to ‘Bus 2’. This change is done after the ‘Communication error time out’ delay (30 sec. by default, changeable in the “Tools Options - Communication” screen). At that point the communication will continue on the secondary bus. However, maximum 5 minutes later, PRONET PLUS will test the main bus: if all the controllers answer, the main bus is automatically restored; otherwise, communication will continue on the ‘Bus 2’ for another 5 minutes. This feature is required the use of EPROM TPL from 03/09/2002 or later. 22 PRONET PLUS – User Manual – ¾ Alarm priority bus: Bus dedicated to alarms. During this mode, the controller ACTIVELY sends all the alarm events immediately as they occur, without waiting to be ‘polled’ by the PC. Therefore, the user can receive the alarm messages as soon as they happen, EVEN when the controller buffer is still load with thousands of access, and other, events. This bus runs in Event mode only (mode previously defined). Controller may be connected simultaneously to the same PC via its two communication ports: cardholder transactions are transferred to the PC through Bus 1 (either serial or TCP) connected to the main controller communication port while alarm events are transferred to the PC through Bus 2 (either serial or TCP) connected to the second controller communication port. This feature is required the use of EPROM TPL from 01/03/2003 or later. A simple test can be applied by disconnecting the main controller port and see that alarms event are still received. You may notice that the PRONET PLUS aACTEC 2 asterisks (**) before each event sent in event mode. Example: 21/08/05 17:53:47 ** Start of Alarm From input 'Input1 / Controller 1' Note 1: What is “Alarms Priority Bus” good for? During polling mode, transactions are sent to the computer only after an answer to a polling interrogation. Without polling (due to power cut, PC or LAN failure, etc.), transactions are not sent and are recorded in the FIFO events buffer. When communication and polling are back, transactions are sent in the order they were recorded (‘FIFO’=First In, First Out) and therefore, newly arrived alarms are sent only after all the transactions previously recorded have been sent, and this might take few precious minutes if the controller events buffer is loaded with few thousands of events. Another case, in the installations with numerous controllers, the regular FIFO system forces new alarm messages to wait until their turn arrives. This may take time when the controller event buffer is loaded with events. The “Alarms Priority Bus” comes to help exactly at this point. With the “Alarms Priority Bus” alarms do not have to wait till the PC finish reading the events previous in the queue – but rather reach the PC as soon as they are created, using the 2nd bus as a shortcut route to bypass all the old events. Note 2: In case the alarm priority bus goes over TCP/IP it is required to remove the time connection timeout (in Tibbo DS-Manager application set “Connection timeout = 0”) otherwise the TCP socket will be automatically closed after 5 minutes without an alarm message. ¾ Network reflex: Communication bus that allows controllers to perform global reflexes between themselves, without a PC. These reflexes are defined in the “Global Reflex General" screen. The controller will execute the network reflexes through this second bus, even at times when the PC is not running. This feature is required the use of EPROM TPL from 01/03/2003 or later. Note: Check list : Before setting/testing the Bus 2, make sure that: - The needed hardware components and the corresponding firmware date are installed. - There is a RS485 wiring on Bus 2. - Bus 2 is defined to perform Redundant bus, Alarm priority bus or Network Reflexes - Bus 1 is linked in the software to Bus 2 (i.e., on Bus 1 definition, Bus 2 appears at the ‘Has a second bus’ field). - At the “Controller - General” screen, the network of all the corresponding controllers is Bus 1. PRONET PLUS – User Manual – 23 3.3. Controller A controller is an electronic card that has a huge memory capacity for storing the parameters monitored, such as cardholders, time zones, reflexes, etc. It supervises the following components of the security system: ¾ Readers, and consequently the corresponding doors ¾ Inputs (Alarm, RTX buttons, etc.) ¾ Outputs relays Information regarding controllers is organized into 5 tabs: ¾ General tab ¾ Output tab ¾ Readers tab ¾ Local reflexes tab ¾ Input tab 3.3.1. Controller - General The “Parameter - Controller - General” menu allows to define the controller parameters in the system. Fields Name: The following names appear by default: Controller 1, Controller 2, etc. Modify the default name by a name linked to the geographical position of the controller or to the department it monitors. In case the controller monitors many readers at a time, the name chosen must be logical. Examples: main entrance, stairs –1, parking 2, R&D Description: Describe the new data entry Active: 5: to activate communication (parameters download and polling) with the controller. : to disengage communication between the PC and the controller. Polling is not done in this case; the controller is not polled and is not downloaded by the system. Set as default: Check the box if the current controller should serve as a reference. Its parameters are automatically copied as default parameters for newly created controllers, thus preventing to have to parameter newly created future controllers. Company: Company the item refers to (for use with multi-company application ONLY). Controller address: Network: Select an existing network from a list of previously defined networks or create a new network by clicking on the […] button. Controller address (00-31): Mention the physical address of the controller in the selected network. The address is contained between 00 and 31; it is defined on the controller itself by the position of the address selection dip switches. Controller type: Select the type of controller in the displayed list. This will enable PRONET PLUS to set all the parameters (readers, inputs and outputs) with their default values, according to the type selected. 24 PRONET PLUS – User Manual – Tips & Notes Saving and downloading Saving the data entered will automatically result in downloading initialisation data, updating date and hour and transfering group parameters, daily and weekly programs for access, reader parameters, card format and access authorizations. Parameters by default When entering information with respect to name, network, address and controller type, the system will define all the other controller parameters (readers, inputs and outputs) by default which therefore do not need to be entered if these default values are convenient. ACNET PRO 4X4 parking controllers In the case of ACNET PRO 4X4(D4) or ACNET PRO 4X4(D4) 16-relay parking controllers (2 and 4-door), select the requested parking in the field that appears at the bottom of the screen. ACNET PRO 4X4 lift & ACNET PRO 4X4 D4 lift A single controller can pilot several lifts independently. Types of controllers and associated readers, inputs and outputs Type of controller Doors Readers Inputs Outputs ACNET PRO 4X4 Access 2 2 8 4 Access control ACNET PRO 4X4 parking 2 2 8 4 Access control in parking ACNET PRO 4X4 parking 16 relays 2 2 8 16 Access control in parking ACNET PRO 4X4 lift 2 2 8 64 Lift monitoring ACNET PRO 4X4D4 Access 4 4 16 8 Access control ACNET PRO 4X4D4 parking 4 4 16 8 Access control in parking ACNET PRO 4X4D4 parking 16 relays 4 4 8 16 Access control in parking ACNET PRO 4X4D4 lift 4 4 8 64 Lift monitoring NSL4 2 2 4 3 Access control DS216 - - 24 4 Alarm control PRONET PLUS – User Manual – Notes 25 3.3.2. Controller - Readers The informative table synthesizes reader parameters that are associated to a controller. Default parameters are defined according to the type of controller. To obtain full information and modify the reader data, click on the […] button situated to the right of the table of the corresponding tab. Table analysis Name: Reader name Door alarm: Name of the input signalling the closure of a door Relay 1: Name of the first output in the system Weekly program: Weekly program that automatically flipflops the way the reader operates between the two security levels Button […] (on the line of the reader): Click on the button to display the “Reader” screen for creating, consulting or modifying data Button [2] (on the line of the reader): Click on this button to remove a reader from the line Button […] (outside the table): Click on the button to display the “Reader” screen even if no record is selected Tips & Notes Modifying default parameters Suppress readers that automatically appear in the table and are not physically connected. If the default parameters of a reader are not suitable, eliminate the reader from the list and manually create a new data entry. In case of an empty list, click on the […] button to create a reader. Saving current information As soon as a new tab is selected all the current information is saved. Table of default connections for inputs, relays and RTX: 26 Reader 1 Reader 2 Reader 3 Reader 4 Door alarm i1 i2 i5 i6 Door relay r1 r2 r3 r4 RTX i3 i4 i7 i8 PRONET PLUS – User Manual – 3.3.2.1. Controller - Readers - General The “Reader” screen enables the reader parameters specification. It is accessible from the corresponding tab in the “Controller” screen, by pressing on the […] button situated to the right of the table. Reader parameters are divided into five categories: ¾ Miscellaneous / Badge format tab ¾ General tab ¾ Door control tab ¾ Finger Print tab (if a biometric reader is ¾ Access mode tab selected) 2 Fields Name: Name the reader Number: Indicate the number of the reader (choose from 1 to 2 for a two doors controller, and from 1 to 4 for a four doors controller). Shared: Check the box for sharing the information between different companies (for use with multicompany application ONLY). Description: Describe the new data entry Camera: Select the camera video to associate with this reader, if needed (for use with the Video Module ONLY). Company: Company the item refers to (for use with multi-company application ONLY). Has a slave reader: Check the box; if checked, specify the name of the slave reader. Note: When a reader is deleted its slave reader is also deleted. Technology: Select the reading technology from the displayed list (Magnetic, Wiegand, etc.) The information downloaded to the readers is limited to the badges which have the same technology as specified above. The badge technology is specified in the “Type” field in the “Parameter - Badge” screen. Note on Badge Technology: A badge, or card, is a physical support that has a unique code enabling its identification. Generally, this code is randomly attributed and unknown to the user. Badges identification requires the registration of their code in the system memory. When a badge is being read the system checks if the badge is known and if yes, to whom it is attributed, for checking the access authorization of the cardholder. Numerous card technologies are available: magnetic, bar code, Wiegand, proximity, smart cards, etc. PRONET PLUS, as well as ACTEC controllers, is compatible with the majority of reader technologies on the market today. The reading technology is defined in the “Controller – Reader - General” screen and badges technology is defined in the “Parameter - Badge" screen. The technology must be the same as the one selected on the controller electronic board through its technology selection jumpers. Biometrics: If the reader is a biometric reader, select its type from the displayed list (BioPass, etc.). PRONET PLUS – User Manual – 27 Tips & Notes Motorized Reader It is possible to use the ACTEC magnetic motorized readers by selecting the ‘Motorized Reader’ technology in this screen. Two additional fields are displayed: in the first, select the controller input connected to the badge detection signal (S1). In the second, select the controller relay to which the Common is connected to the signal (MFC/MRC) that controls the sense of the reader motor. ‘Wiegand’, ‘Wiegand 2’ and ‘Wiegand Keypad’ Technologies When several readers are defined with a same technology, they must have the same badge format. If some readers need a different format from the current badge format (i.e. a different Wiegand format), their technology must be different and they must be connected on a different controller. The Wiegand reader technologies (‘Wiegand’, ‘Wiegand 2’ and ‘Wiegand Keypad’) allow to choose up to three different Wiegand format type. This helps for instance on sites where one or more controllers support biometric readers and other controllers support other Wiegand readers. Example: A site has 2 readers; each one is connected on a different controller: ¾ Reader 1 / Controller 1 is a Bio-pass, ¾ Reader 1 / Controller 2 is a simple Wiegand reader. Reader 1 / Controller 1 Reader 1 / Controller 2 Defined Technology Wiegand Wiegand2 Biometrics BioPass - Badge Format Decimal Decimal In this case, if a cardholder needs to pass on both readers, he may have two badges: one ‘Wiegand’ badge (to be used on the BioPass reader defined as “Wiegand”) and one ‘Wiegand2’ badge (for the other reader defined accordingly). The PC will download cards of a defined technology only to readers of the same technology. Wiegand cards to Wiegand readers, Wiegand2 cards to Wiegand2 readers, etc. 28 PRONET PLUS – User Manual – 3.3.2.2. Controller - Readers - Door Control This screen defines the way the door is wired Fields Inputs: Door alarm: Select the controller input to which the door opening control device is wired; an alarm is set off when a door is forced or stays open beyond a predefined delay Feedback: Check the box in order to verify the physical entry or exit of a badge holder that has been granted access Operation mode: A badge holder swipes his badge through a reader. The controller authorizes access to the badge holder by activating a door relay. During the predefined door alarm delay, during which the door can be opened, the controller goes into a waiting mode. If the door has been opened and closed - as will attest the door opening control device activation - the badge holder is supposed to have passed and the controller records the access transaction in memory. If the door has not been opened, the door opening control device is not activated and the controller records the transaction “access refused” in memory. APB level (for Global Anti-Passback function): From: Select a reader APB level to be the ‘Previous level’ of the reader from the list or click on the […] button to define a new APB level To: select a reader APB level to be the ‘Actual level’ of the reader from the list or click on the […] button to define a new APB level Operation mode: See the Global Anti-Passback function in the next paragraph. Outputs: First and Second Outputs: Select the relays to be activated upon a granted access. Door type: Select from the list: ¾ Standard: Access is granted if badge is authorized ¾ Controlled by Input: A door is controlled by the status of an input. Specify the input in question in the ‘Controlled by’ field. the door opens if the input is inactive but remains closed if the input is active. (If, for example, the input selected is a second door alarm input, the door will be opened only if this second door is closed) ¾ Man Trap 1, 3, 4: Select if the doors operate in the man trap mode, which means that the passage through two consecutive doors is a requisite in order to access a site. ¾ Manually Controlled: Access is manually regulated PRONET PLUS – User Manual – 29 Note on the Mantrap mode: The man trap mode supervises the activation process of a double door entrance. The first door opening and the possible activation of an input are the conditions for the opening of a second door. PRONET PLUS supervises three types of man traps: ¾ Man trap 1: The first door will open only if the second door is closed. Both readers of a same controller monitor two doors (reader 1 with reader 2 or reader 3 with reader 4). The door of each reader must be defined as ‘Man trap 1’. When access is granted at a reader, this reader is locked untill the personn passes through the second door. The door opening control device status attests to the opening or closure of doors. ¾ Man trap 3: The second door opens automatically following the opening and closure of the first door. Both readers of a same controller monitor two doors (reader 1 with reader 2 or reader 3 with reader 4). The door of each reader must be defined as ‘Man trap 3’. When the first door opens and closes the second door automatically opens. The door opening control device status attests to the opening or closure of doors. ¾ Man trap 4: The second door automatically opens consecutively to the following two conditions: Opening and closure of the first door and Receipt of a signal - activation of an input Both readers of a same controller monitor two doors (reader 1 with reader 2 or reader 3 with reader 4). The door of each reader must be defined as ‘Man trap 4’. When the first door opens and closes, and a predefined input is activated, the second door opens automatically. The required input must be defined in the ‘Controleld by’ field. The door opening control device status attests to the opening or closure of doors. 3.3.2.3. Controller - Readers - Access Mode The reader can operate differently according to predetermined time zones. The parameters of these two operation modes - or security levels - are defined in this screen. Example During office hours, access is freely granted (no need to swipe a badge). After office hours, badges need to be swiped (controlled door). 30 PRONET PLUS – User Manual – Fields Weekly program: Choose the weekly program that automatically flip-flops the reader functioning mode between the two security levels. The default weekly program is always associated with security level Number 1. Click on the […] button to create or modify the weekly program Door remote input: Select the controller input to which the Request to Exit device (RTX) is wired (see in this chapter the Table of default connections for inputs, relays and RTX) Security level 1 and 2: (must be filled out separately for both access modes) Access authorization: Define the way in which the authorization access must be required: ¾ With Card, through the reader ¾ With Keypad, for the entry of a PIN code (Personal identification number) ¾ With Card OR Keypad ¾ With Card AND Keypad Anti-Passback & Time APB: (use with the “Feedback” option) - Local Anti-Passback: The Local Anti-Passback feature provides a mean of stopping a card from being used for successive entries without a valid exit, or vice-versa. For example, when two readers are connected to control the same door, entrance/exit (Reader 1/3 control entrance/exit of door 1 and reader 2/4 control entrance/exit of door 2), the same card will not be accepted twice successively at the same reader. It has to be passed once at one reader (i.e. entrance) and once at the second reader (i.e. exit). This prevents a person, who has been granted access, to give his card to somebody else that will try to access immediately after the first person. To activate the Local Anti-Passback, check the Anti-Passback box and leave empty the fields ‘From’ and ‘To’ of the ‘APB level’ in the ‘Reader – Door Control’ screen. - Time Anti-Passback: also called “lock out delay”, this feature prevents a card to be granted access twice at a same reader in a pre-defined delay of time. A second access will only be authorized after the lockout delay. To activate the Time Anti-Passback, fill the ‘Time APB’ field with the lockout delay (between 1 and 15 minutes) as required. For activating in the same time the Local AntiPassback feature, check the Anti-Passback box. - Global Anti-Passback: defines a path that cardholders must follow to access specific locations. The facilities is divided into levels and each reader allows to pass from a level (“previous level”) to the next one (“actual level”). When the feature is active, the controller will grant access only to cardholders who are coming from the zone classified “previous level”. Once access is given, the cardholder will be located in the “actual level” zone. Because the new cardholder level is updated in all controllers by PRONET PLUS as soon as it receives the access transaction, the PC must be on-line when this feature is used. Examples: ¾ Enforce discipline by having cardholders passing through a main entrance checkpoint before they go to their respective offices. ¾ Prevent a second person (or car) from entering with an authorized one: it will be stopped at the next checkpoint because not registered at the previous level. To activate the Global Anti-Passback, check the Anti-Passback box and fill the fields ‘From’ and ‘To’ with the previous level and the next level as required, in the ‘APB level’ section of the ‘Reader – Door control’ screen. PRONET PLUS – User Manual – 31 - Soft Anti-Passback (requires special controller firmware): When a cardholder requests to access a second time from a same reader which is defined in Anti-Passback mode, the controller denies the access AND reports the event as “Access Denied - AntiPassback”. With the Soft Anti-Passback mode, the controller grants the access and only reports the event. Before setting the Soft Anti-PassBack: 1. Verifying with your vendor that the controller firmware supports this feature. 2. Check the Soft Anti-PassBack box on the “Tools – Options – Server” screen. To activate the Soft Anti-PassBack, checking the “Anti-Passback” box will reveal the “Soft” option. Checking that box would apply the Soft Anti-PassBack to that reader. When Soft Anti-PassBack is selected – it applies at ALL times when the Anti-Pass back works, i.e., it is not possible to have full Anti-PassBack on green periods and soft on red periods or vice versa. Note: The Anti-Passback feature may however be cancelled for specific cardholders by selecting the ‘No APB, No timed Anti-Passback’ box in the ‘All cardholders – Personal’ screen. It can be also re-initialized in the ‘All cardholders – Location’ screen. Free access: Select to grant unlimited access to all badge holders registered in the system without checking of their validation date or their access group Escort: Select this function to require a double valid card reading - the cardholder who needs escort and his escort - to authorize access at the reader. The escort has 10 sec. to present his badge. The second escort may be any cardholder or a Supervisor only (see the ‘All cardholders – Personal’ chapter). Close if buffer is full: Select this function to refuse access when the corresponding transaction cannot be registered in the system memory, because it is full. If this option is not selected, access is granted even if the buffer is full and, as a consequence, transactions are not recorded. Door mode: ¾ Door Open: Access mode in which the door is permanently open ¾ Door Closed: Access mode in which the door is permanently closed; access is always refused even with valid badges ¾ Door Controlled: Standard access control mode, in which access depends on the badge and its authorizations Door open time (from 0 to 120 seconds): Delay during which the badge holder has to pass through the door after receiving access authorization; it corresponds to the activation delay of the relay(s) which control the door. Note: Alternated mode (Door open time set to 122): The door relay opens after the first valid swipe and stays open; the door relay closes only after a valid second badge reading and stays closed, and so on. Door alarm delay (from 0 to 75 seconds, by multiples of 5): Delay during which the door must be closed; if the door is still open after this delay, a ‘Door left open Alarm’ is raised. 32 PRONET PLUS – User Manual – 3.3.2.4. Controller - Readers - Miscellaneous/Badge Format Fields Card issue reader: Select this option to create new badges using a reader. If the reader is in the card issue reader mode, it cannot be used for access control purposes. The card issue reader is generally situated close to the computer. When a badge is read, its code is directly transmit to the PC for recording purpose, without any authorization checks, and this to prevent the small waiting delay this check may take. Unsuccessful attempts: specify the number of successive unsuccessful attempts tolerated by the system before an alarm is raised; choose a number from 00 to 99 Default Transaction code: specify the transaction code sent by the controller to the PC when an access is granted; the user via the reader keypad can modify this code Transaction code F1, F2, F3: attribute a specific transaction code to the keypad function keys (if exist). This code is sent when access is granted and the function key was used. Note: Pre-defined action(s) may be triggered by PRONET PLUS upon reception of specific transaction codes. (Refer to ‘Global Reflex’ Chapter) Leave door relay open during all “Door Open Time”: If not selected (by default), the controller deactivates the door relay as soon as it detects (through the door contact device) that the door has been opened. Selecting this option will leave the relay activated during the door open time. Badge Format Fields: There are various formats of magnetic, bar code and Wiegand technologies. By default the system reads the first 8 encoded numbers on magnetic or bar code badges or the 8 hexadecimal digits of a Wiegand badge but this way of reading can be modified. These fields allow to change this badge format. Controllers may recognize many kind of badge technologies (Magnetic, Barcodes, Wiegand, etc…). The reading technology used must be specified in the ‘Controller – Reader – General’ screen. Within a same technology, different formats may be defined through this ‘Miscellaneous-Badge format’ screen as described hereunder. PRONET PLUS – User Manual – 33 Magnetic and Barcode technologies: When one of these technologies is selected in the ‘Controller – Reader – General’ screen, the following fields of the ‘Controller - Readers - Miscellaneous/Badge Format’ screen may be used to parameter the badge format (Card code position and Customer code, if needed). Fields System card: Card on which a four-digit number between 0001 and 9999 has been inscribed; since the card number is already on the badge, it enables immediate recognition of the badge holder and therefore, a system badge need not be recorded up in the system. Card code position: The ‘card code’ is a unique code, which identifies the card. The system records card code of 8 digits only. A bar code or magnetic code may contain many numbers or characters; by default, the first 8 characters of the code are recorded as the ‘card code’. It is possible however to read another 8-digit by specifying the position of the first one in the “Card Code Position” field (Value between 0 and 37, the default value 0 corresponds to the first encoded character). Customer (or site) code: It is a same code, which appears on all the cards of a same company, besides the badge code; the use of a customer code value is optional and strengthens system security by identifying the company. By the default this option is not used. To use it, fill out the following three fields: ¾ Customer code position: Specify the position of the first character of the code; choose a value between 0 and 37 (0 corresponds to the position of the first number encoded in the badge). ¾ Customer code length: Specify the size of the code to be read; choose a value between 1 and 7. Note that 0 is the default value, which means that the customer code value is not checked. ¾ Customer code value: Enter the customer code value into the squares that appear on the screen. Wiegand technology: When Wiegand technology is selected in the ‘Controller – Reader – General’ screen, different formats may be selected in the ‘Controller - Readers - Miscellaneous/Badge Format’ screen. Fields ¾ Hexadecimal: ‘Hexadecimal’ format is selected by default. Many standards exist on the market. ACTEC controllers may read up to 50 bits Wiegand badges (Wiegand codes are read in a binary format), within 48 bits of data (12 hexadecimal digits) and 2 parity bits, as follows: E b47 ……. b b b b0 O Where: b47 … b0 = 48 bits of data maximum (may be less) and E,O = 2 parity bits In this hexadecimal format, the system keeps as the ‘card code’ the 32 least significant bits of the data string (b31…b0), in other words the last 8 digits of the code, which may be hexadecimal. 34 PRONET PLUS – User Manual – Two parity bits are added to the card besides the badge code for confirmation of a proper reading. Most Wiegand standards use a similar algorithm to calculate these parity bits and this algorithm has been integrated into the ACTEC controllers. It is thus preferable to use it by selecting the corresponding jumpers on the controllers’ electronic card. However, certain card standards have original algorithm for the calculation of the parity bits. In order to enable these controllers to read these badges, the jumper position “no parity bits” must be selected. (See the controller installation manual for further details). ¾ Wiegand 44: ‘Wiegand 44’ format is a particular format of 44 bits, which includes 40 bits of data (10 hexadecimal digits) and 4 parity bits, as follows: b43 ……. b4 b3 b2 b1 b0 Where: b43 … b4 = 40 bits of data and b3 … b0 = 4 parity bits. In this format, the system keeps as the ‘card code’ the 32 least significant bits of the data string (b35…b4), in other words the last 8 digits of the code, which may be hexadecimal. ¾ Decimal: This format is a particular format, where badge code consists on a 5 digits decimal number (generally printed on the badge) sometimes associated with a 3 digits decimal code site. ACTEC controllers may read a 50 bits Wiegand string as in the hexadecimal format but convert the information in decimal as follows: E b47 ……. b b b b0 O Where: b15 … b0 = 16 bits for ‘card code’, b23 … b16 = 8 bits for ‘site code’ and E,O = 2 parity bits. In this format, the system keeps as the ‘card code’ the 16 least significant bits of the data string (b15…b0), in other words the last 4 hexadecimal digits of the code, and converts them into a 5 digits decimal number, the unique code which identifies the card. In addition, the system converts the 8 previous bits of the data string (b23…b16), in other words the 2 previous hexadecimal digits of the code, into a 3 digits decimal number which may be used as a ‘site code’, an identical code for all the cards of the site. If this site code has not to be checked, leave ‘0’ in the ‘Customer code length’ field. If this code has to be checked (and therefore is present in all the cards of the site), select the value ‘3’ in this field and type the 3-digit code in the ‘Customer code value’ field. For example: If the Wiegand hexadecimal code is 12AB08, the site code is 018 (the decimal value of h12) and the Card code is 00043784 (the decimal value of hAB08). ¾ Decimal 24 bits: In this format, ACTEC controllers may read up to 50 bits Wiegand string and convert it in two decimal numbers as per the ‘Decimal’ format but the 3 digit site code is add to the first 5 digits code. The 3 digit Site code may or may not be checked as per the ‘Decimal’ format. For example: If the Wiegand hexadecimal code is 12AB08, the site code is 018 (the decimal value of h12) and the Card code is 01843784 (43784 is the decimal value of hAB08). PRONET PLUS – User Manual – 35 3.3.2.5. Controller - Readers - Finger Print This screen configurates the biometric readers. This tab will NOT be displayed if the reader has NOT been defined as a biometric reader, in the 'Controller - Reader - General’ tab. Note: Biometric readers received from ACTEC (from Bioscrypt technology) are pre-configured so they can be directly installed in a system managed by the PRONET PLUS application. This configuration is written on the back of each reader and is as follows: - Type (BioFlex, BioProx, BioPass), - Address (each manufactured reader has a unique address), - Default baud rate is set to 38400bps, - Port mode is set to "2". (I.e., the reader may communicate with the PC either through its Host port RS485, or via its Aux port in RS232). If the biometric reader is not provided by ACTEC, the reader must be configured according to the mentioned configuration, through VeriAdmin (Bioscrypt software utility). In this case, once the unit is properly configured, it is important to check that the communication between this software and the reader is correct before using it with PRONET PLUS. Operating Mode Each biometric reader is connected to the system via 2 links simultaneously: - One from its Wiegand OUT to the controller Wiegand IN (in order to send the cardholder code), - One from its communication port (Host or Aux) to the PC (to receive configuration and templates). ¾ In the “Controller Network” screen, define the network on which the biometric reader is connected. Controllers and readers can communicate on the same bus, so this network can be an existing controller network. For TCP network, port 10001 must be used; this means that the TCP/RS485 interface must be configured with the port 10001. Note: With a BioPass reader type, the “Waiting Delay” parameter of the network must be at least 500 msec. ¾ In the “Tools - Options - Communication” screen, select the Bioscrypt readers Baudrate. This baud rate can be different from the controllers baud rate. By default, the baud rate of the ACTEC biometric readers is 38400 bauds. This is the default value indicated in the Options screen too. Note: If the biometric readers network is a TCP type network, the controllers baud rate must be identical to the biometric readers baud rate (required to 38400). ¾ In the 'Controller - General’ screen, select the controller on which the biometric reader is connected, click on the ‘Reader’ tab and open the “Reader” screen of the corresponding reader. In the ‘Technology’ field, choose ‘Wiegand’ and in the ‘Biometrics’ field, select the required biometric reader type (the reader type is written at the back of the reader). For BioFlex readers with keypad, select the ‘Wiegand Keypad’ Technology. Note: It is recommended to give a reader name that includes the word ‘bio’ (like ‘Bio Rdr1’) to make the identification and future searches easy. 36 PRONET PLUS – User Manual – ¾ Click on the ‘Miscellaneous / Badge format’ tab and select the badge format according to the cards in use. For BioPass readers (not using badges) and BioFlex readers with keypad, select the ‘Decimal’ Format. Note: When several readers are defined with the same technology, they must have the same badge format. If some readers need a different format, their technology must be different (i.e. ‘Wiegand 2’) and they must be connected on a different controller. ¾ Click the ‘Finger Print’ tab and configure the current biometric reader by specifying the Reader communication network and the reader address (written on the back of the reader). Specify if the reader also serves for enrollment and set the Bio Wiegand format. For BioPass readers and BioFlex readers with keypad, select the ‘Standard 26 bits’. 2 Note: On any given controller, all readers must be identical regarding the three following points: Technology, Badge format, Bio Wiegand format. ¾ Test the communication by opening the “Diagnose” screen (‘F8’ function key): click on the ‘Biometric readers’ button, on the right top of the screen, then on the + symbol located a the left of the network name and highlight the biometric reader created previously. The communication is established if a V is displayed next to the reader name. Then, on the right window, you can see the memory usage and the reader name with its address. ¾ In the “Parameter - All Cardholders - General” screen, create a cardholder and define his access authorization. Click on the ‘Create new’ button for creating a badge. Save. Note: To each cardholder, the system attributes two codes: the card code and the Bio ID code (or Bio template ID). ¾ From the “Parameter - All Cardholders - General” screen of this cardholder, press the ‘Biometrics data’ button. Select from the list the required enrollment reader and press the ‘Enroll’ button for a fingerprint enrollment. Follow the instructions displayed at the screen. Once the enrollment is finished, an image of the fingerprint template is displayed on the screen. To save it and to download it to the biometric readers, press ‘Save’. After the template data is well received by the readers, the "Save" button is greyed out. Fields Network: Select the reader communication network or create a new network by clicking on the […] button. Unit address: Enter the biometric reader address (written on the back of the reader). Active: Check this box if the reader is physically connected with the network. PRONET PLUS communicates only with the active readers. Enrollment reader: Check this box if the reader also serves for enrollment. Note: A biometric reader can act as an enrolment reader in addition to its normal function as a regular access reader. PRONET PLUS – User Manual – 37 Global security threshold: This parameter determines the reader security strictness (this option is not visible for BioPass readers). Note: Since the verification process always uses the lower of the two security levels (the global one and the personal template one), a global setting of ‘Very High’ means that the verification threshold used will always be the one stored on the template. If the global threshold is set to ‘Medium’, the threshold used will never exceed medium. Bio Wiegand Format: Select the Wiegand format in which the biometric reader sends the user code to the controller following a successful identification had been achieved. This format must be defined according to the badge format in use (26 bits, etc.). The default format is ‘Standard 26 bit’. The three following options apply only to the standard Bio Wiegand format (not with Custom formats): ¾ Fail string Code: Checking this box displays a text box through which the user can define a code that will be sent to the controller following a failed verification (i.e. wrong finger). This code should be a number from 1 to 65535. If this option is not checked then no code will be sent in case of biometric failures. ¾ Alt Site code: This option, when enabled, will cause the unit to replace the real Site Code (normally sent, in addition to the user code, as a part of the Wiegand string upon a successful verification) with the alternate Site Code specified in the edit box. ¾ Invert Parity if denied: Checking this option causes the biometric readers to send to the controllers a special code (card code with inverted parity bits) upon a fingerprint failed verification (i.e. the right badge with the wrong finger): PRONET PLUS will therefore be able to display the cardholder name of the rejected transaction. This option (not visible for BioPass readers) is only available on controllers where the ‘Wiegand WITH parity check’ option is enable (through the technology dip switches controller selection) with EPROM from 20/07//2004 or later. Inverse code if Duress Finger: The duress finger mode offers users a way to indicate a duress situation (such as when an employee cardholder is being forced to open a door). In this case the employee should identify himself to the system using a finger predesignated as a "duress finger". Each template can be specified as such by checking the ‘Make Duress Finger’ checkbox within the “Biometrics data” screen of a cardholder. When a successful verification occurs with such a template, the unit will perform the special action specified, such as reversing the Wiegand output to alert the door controller of the duress situation. The controller will grant the access and send to PRONET PLUS the event ‘Access Granted (Duress Code)’. This option is available only if the Technology/Badge Format/Bio Wiegand Format is ‘Wiegand/Hexadecimal/Standard 26 bits’ and when the controllers are set to ‘Wiegand WITHOUT parity check’ option (through the technology dip switches controller selection) and EPROM from 20/07//2004 or later. Without Biometric Verification: This option is visible after pressing Shift and F12 keys. This option apply with BioFlex or BioProx readers. It allows the user to turn biometric verification off (i.e. no finger required for access) and send the badge code directly to the controller. Turning fingerprint authentication off will result in a less secure system and is not recommended! USING THIS OPTION DISABLES THE FINGER VERIFICATION AND IS A SECURITY RISK! Keyboard Mode: This option is only visible for BioFlex readers. Select the way to send the user Keypad PIN to the BioFlex reader: ¾ Buffered keys in string 26 Bits: The code as a whole is sent in one string. ¾ Key by key: Each time a key is pressed, its code is sent. 38 PRONET PLUS – User Manual – Tips & Notes ‘Custom’ Bio Wiegand Format Each template needs to be downloaded to the biometric readers with an identification number (Called "Bio ID" or "Bio template ID"), which identifies the person. This Bio ID depends on the Bio Wiegand format defined (as the card code depends on the Badge format defined). Normally, the Bio ID is calculated by the system from the last numbers of the card code. For example, the ‘Standard 26 bits’ Bio Wiegand format calculates the Bio ID from the 4 last digits of the card code. Nevertheless, the length of this number could be not sufficient in some cases. For example, when 2 badges have the same 4 last digits (561234 and 781234), they will have the same Bio ID. To prevent this risk of duplicates, there are ‘Custom’ formats which allow to customize the Bio ID computation. Examples of Bio Wiegand formats: ¾ ‘Standard 26 bits’ format: The Bio ID is the decimal conversion of the last 4 hexadecimal digits of the card code. This format allows also the ‘Inverse parity’ and ‘Duress code’ features. ¾ ‘Standard 37 bits’ format: The Bio ID is the decimal conversion of the last 6 hexadecimal digits of the card code. This format allows also the ‘Inverse parity’ and ‘Duress code’ features. ¾ ‘Custom Pass-Thru’ format: A customized Bio format which allows the user to define which bits to use in the Wiegand bits string to define the Bio ID. This format get three parameters: Total bits: Bits total number of the Wiegand card code read by the reader. ID Start bit: First bit position of the Bio ID among the card code. ID Length bits: Bits total number which compose the Bio ID. ¾ ‘Custom 6 digits’ format: The Bio ID is the decimal conversion of all the 6 hexadecimal digits which compose the 26 bits card code. Total bits = 26 ID Start bit = 1 ID Length bits = 24 Note: The calculation method used by the application to compute the Bio ID from the card code depends on: (1) the Badge Format and (2) the Bio Wiegand Format. If the Badge format and the Bio Wiegand format are the same for all the controllers and all the biometric readers, the algorithm which links the card code and the Bio ID is the same for all the system and therefore the cardholders Bio ID are similar on all the biometric readers. The templates and their Bio ID numbers may be broadcasted to all the biometric readers. Therefore, in a normal situation, it is recommended to have the same format definitions throughout the whole system. PRONET PLUS – User Manual – 39 3.3.3. Controller - Input The informative table summarizes the input parameters connected to the controllers. Default parameters are defined according to the controller type. To obtain more detailed information and modify input data click on the […] button situated to the right of the table of the corresponding tab. Inputs are used for access control or for alarm monitoring purposes: ¾ Access control: - Door control: A door contact device is connected to an input: the two input states open or closed correspond to the two door status: open or close. An alarm is activated in case a door is forced or left open beyond the specified ‘door alarm delay’ period - Exit request: A RTX button (‘Request to Exit’) is connected to the input: pushing this button will lead to the activation of the corresponding door relay ¾ Alarm monitoring: - General alarm input: A sensor/detector (magnetic contacts, movement detectors, etc.) is connected to an input: the two input states open or closed correspond to the two possible status of the detector: normal or under alarm. The ‘normally’ state (either ‘normally open’ or ‘normally closed’) of an input is the status, open or closed, into which the input is not under alarm. When an armed input goes under its alarm status, it triggers: An alarm at the central station Predefined relays or local reflexes Automatic processes or predefined global reflexes Table analysis Num: Number of the selected input Name: Name of the input Type: Mention if the input type is Digital, Digital 4 states or Analog. Status: Input normal status, i.e. normally open (NO), normally closed (NC) or State 1 to 4. Button […] (on the input line): Click on this button to display the “Input” screen for creating, consulting or modifying data Button [2] (on the input line): Click on this button to remove the input from the list displayed Button […] (outside the table): Click on this button to display the “Input” screen even if no input is selected 40 PRONET PLUS – User Manual – 3.3.3.1. Controller - Input - General Screen The “Input” screen enables the input parameter definition. It can be reached from to the corresponding tab of the “Parameter - Controller” screen, by clicking on the […] button situated to the right of the table. Fields Name: Name the input Number: Choose the input number; the maximum input number connectable depends on the type of controller used (See ‘Types of controllers and associated readers, inputs and outputs’ in the “Controller – General” Chapter) Description: Describe the new data entry Input ON: Select the icon that graphically represents the input in its physically ‘ON’ position in the maps or click on the […] button for creating a new one. Input OFF: Select the icon that graphically represents the input in its physically ‘OFF’ position in the maps or click on the […] button for creating a new one. Camera: Select the camera video to associate with this input, if needed (for use with the Video Module ONLY). Weekly program: Assign a program to the input to define alarm arming or disarming periods; to create or modify the program, called also Event handling program, click on the […] button (see also the “Event Handling Program” Chapter) Input delay type: ¾ No delay: An alarm is raised as soon as the input is activated ¾ After… (if on alarm): Specify the number of seconds beyond which an alarm is raised if the input is still activated ¾ After… (even if no more on alarm): Specify the number of seconds beyond which an alarm is raised, even if the input is not activated Input type: ¾ Digital (2 states): The input may have two states only: open or closed, which correspond to the two possible states of the sensor/detector connected to the input. ¾ Digital 4 states: In addition to the two basic states of the sensor/detector (open or closed), the input may detect two supplementary states which correspond to the status of the line used to connect the sensor/detector to the input: line cut or line short. ¾ Analog: The input can take different decimal values according to the sensor connected to it (temperature, etc.) and triggers alarms or specific action when it reaches predefined values (by default, three limit values are defined: 2 / 2.88 / 4). Consult the controller documentation to check which type of inputs is available in the controller. Status: Choose the status among: NO, normally open or NC, normally closed or State 1 to 4, in which the input is NOT under alarm. PRONET PLUS – User Manual – 41 3.3.3.2. Controller - Input - Alarm status This tab gives information related to the alarmes. The system displays this information automatically, without possibility of modification. Data displayed Latest action: Latest PC action sent to this input (PC actions always overwrite the input status as defined by its weekly program). Note: Such action may be sent manually, through the “EventHandling – Active alarms” screen or automatically through a pre-defined input group deactivation global reflex. Last event date: Exact time of the last physical event on this input. This refers to a real event, (i.e., not a PC action). Last event type: Type (start/end of alarm, line cut/short) of the last physical event on this input. This refers to a real event, (i.e., not a PC action). Input group: Input group to which the selected input belongs. This field is visible after selecting ‘Alarm definition for group of input’ option in the “Tools - Options - General” screen. Note: Allocating an input to an input group is done at the “Event Handling - Input group” screen. Weekly program: The weekly program of the input group (the weekly program of the individual input can be seen at the General tab of the input screen. In a case of a conflict between the two, the individual weekly program has the higher priority). This field is visible after selecting ‘Alarm definition for group of input’ option in the “Tools - Options - General” screen. 42 PRONET PLUS – User Manual – 3.3.4. Controller - Output The informative table summarizes the parameters of the controllers outputs. An output is materialized by a relay located on the controller board (or on its extension board) to which an external device may be connected and therefore activated by the controller. (Door opener, siren, etc.) Default relays numbers are defined according to controller definition. To obtain more detailed information and modify input data, click on the […] button situated to the right of the table of the corresponding tab. Table analysis Name: Name of the output Num: Number of the output selected WP: Name of the weekly program associated to the output, defining the activation and nonactivation periods Lastest action: Mention of the last action that could have affected the output; for instance, the action that closed a “normally open” output by a global reflex Button […] (on the relay line): Click on this button to display the “Output” screen for creating, consulting or modifying data Button [2] (on the relay line): Click on this button to delete the output from the list displayed Button […] (outside the table): Click on this button to display the “Output” screen even if no item is selected PRONET PLUS – User Manual – 43 3.3.4.1. Controller - Output - General Screen The “Output” screen allows output parameter definition. It is accessible by going to the corresponding tab of the “Parameter - Controller” screen and clicking on the […] button located to the right of the table. Fields Name: Name the output Description: Describe the new data entry Number: Choose the output number; the maximum number depends on the type of controller used (See ‘Types of controllers and associated readers, inputs and outputs’ in the “Controller – General” Chapter) Weekly program: When a Weekly program is selected, the relays will be automatically activated during the ‘green periods’ defined by this program (and deactivated during the ‘red periods’ of the program). Click on the […] button to create or modify the weekly program. Note: Do not allocate weekly program to door relays. Time activation of door relays has to be set from the ‘Controller – Reader – Door control’ screen. Allocating weekly program through this ‘Output’ screen may result in a definition conflict. Latest action: Mention the last action that could have affected the output; for instance, the action that closed a “normally open” output by a global reflex. 44 PRONET PLUS – User Manual – 3.3.5. Controller - Local Reflexes A local reflex defines the outputs activation following the trigger of an input of this same controller. The reflex occurs even if communication with the controller is interrupted. The “Local reflex” screen defines the link between the inputs and the outputs. The informative table summarizes the parameters of the local reflexes associated to the controller. To obtain more detailed information and modify the data, click on the […] button situated to the right of the table of the corresponding tab. Table analysis Name: Name of the reflex WP: The local reflex weekly program defines the reflex activation and non-activation periods Input: Name of the input that sets off the local reflex Mode: Type of action set off by the local reflex (Image, Constant ON, During) Button […] (on the line of the reflex): Click on this button to display the “Local reflex” screen, in order to consult or modify data Button [2] (on the line of the reflex): Click on this button to delete the reflex from the list displayed Button […] (outside the table): Click on this button to display the “Local reflex” screen, even if no item is selected PRONET PLUS – User Manual – 45 3.3.5.1. Controller - Local reflex - General Screen A local reflex defines the outputs activation following the trigger of an input of this same controller. The “Local reflex” screen allows the definition of the reflex parameters. It is accessible by going to the corresponding tab of the “Parameter - Controller” screen and clicking on the […] button located to the right of the table. Fields Name: Name the reflex Weekly program: Choose from the list the weekly program which defines the reflex activation and non-activation periods or click on the […] button to create or modify the weekly program Description: Describe the new data entry Input: From the list, choose the input setting off the local reflex or click on the […] button to create a new input Input status: Select the status of the input which sets off the local reflex: Start of alarm, End of alarm, Line short, Line cut, Open, Close, <Any Status>. Outputs: Click on the V or X buttons, to declare which relays to activate or to deactivate Action type: Choose the type of action set off by the local reflex: ¾ Image: When the input is activated, the reflex is activated and when the input is deactivated, the reflex is deactivated at the same time ¾ Constant ON: When the input is activated, the reflex is activated and stays activated, even if the input is deactivated ¾ During: When the input is activated, the reflex is activated during a predefined delay (to define from 1 – 120 sec.). Note: Alternated mode (During = 122 Sec): The reflex is activated after the input is activated and stays activated; the reflex is only deactivated after a second input activation and stays deactivated, and so on. 46 PRONET PLUS – User Manual – 3.4. Time Zone 3.4.1. Basic Concepts Time zones consist of calendar divisions into daily, weekly and holiday time segments associated to predetermined system functions. The system recognizes: ¾ Daily program: division of a 24-hour day into access zones (‘green’ time periods) and non-access zones (‘red’ time periods) ¾ Weekly program: made up of a daily program for each day of the week and a supplementary daily program for holidays ¾ Holiday: dates specified as holidays During the ‘green’ periods of a Daily Program, the system behaves as follows: ¾ Cardholders may access different areas of a site according to their access group ¾ Readers operate in predefined the access mode recorded as ‘Security Level 1’ ¾ Alarms are armed ¾ Relays are automatically activated Time zone application table Within the limits of the Time Zones (‘Green’ periods) Beyond the limits of the Time Zones (‘Red’ periods) Access control Access granted according to access group Access denied Readers Access mode Security Level 1 Access mode Security Level 2 Alarm zones Armed Not armed Relays Activated Non activated Tips & Notes Arming alarms Refer to the “Event Handling Program - Alarm” paragraph for more information regarding how to arm an alarm. Importance of a proper definition Properly defining time zones is essential for the system to work optimally. It is highly recommended to successively specify the daily, weekly and holiday programs prior to defining the other parameters of the system. Maximum number of usable programs Many daily, weekly and holiday programs can be created in the whole the system but each controller may include a restricted number of usable programs (99 Daily Programs, 32 Access Weekly Programs, 80 Event Weekly Programs and 60 holidays). An error message appears if the limit of usable programs has been exceeded for a specific controller. PRONET PLUS – User Manual – 47 3.4.2. Daily Program The division of days (24H) into time zones, to which are associated the system predetermined functions, is defined in this screen. A Daily Program divides a 24H day in 2 time zones which therefore defines 5 time periods, 3 ‘Red’ and 2 ‘Green’. Note that it is possible to divide each day into 4 times zones and therefore create 5 ‘red’ and 4 ‘green’ periods. (by changing the option ‘2 times zones’ to ‘4 time zones’ in the field ‘Daily Program Time zones’ on the ‘Tools – Options – Communication’ screen) Fields Name: Name the new daily program; examples: part-time AM, night team Company: Company the item refers to (for use with multi-company application ONLY). Description: Describe the new data entry Time zones 1 - 2 (or 1 - 4): Define the limits of the 2 (or 4) time zones using the format XX:YY, where X = hour and Y = minute The ruler at the bottom of the screen gives the time frames in a visual manner. ¾ The green frames represent the ‘Green periods’ (4 maximum) ¾ The red frames represent the ‘Red periods’ (5 maximum) Tips & Notes Programs by default The two daily programs “Always” and “Never” are defined by default. Their denomination can be modified but the two programs can neither be erased or their contents modified. New daily program By default, the time frames for a new daily program are from 8 AM to12 AM and from 2 PM to 6 PM. 48 PRONET PLUS – User Manual – 3.4.3. Weekly Program A weekly program is made up of 8 daily programs, one for each day of the week and an extra program for holidays. Two more daily programs can be added (in the “Tools - Options General” screen) for having other access control in some days in the year (i.e. the day before a National day, annually closure or exceptional opening, etc.). This last feature requires the use of controllers equipped with an EPROM from 01/06/2004 or later. Fields Name: Name the new weekly program Company: Company the item refers to (for use with multi-company application ONLY). Description: Describe the new data entry Daily programs: One for each day of the week (Su - Sa), one for holidays (Hd) and if needed, one for each special day (S1 – S2); select the adequate program from the list or create a new daily program by clicking on the corresponding button associated to the day Time frames corresponding to the program selected are displayed on a grey background. Tips & Notes Programs by default The two weekly programs “WP Always” and “WP Never” are defined by default. Their denomination can be modified but both programs can neither be deleted nor modified. Deactivating Holiday and Special Days Holiday and special days daily programs can be defined as <usual daily program of the day> in order to deactivate the rule of these specific days, for some employees if needed. PRONET PLUS – User Manual – 49 3.4.4. Holiday Days considered holidays by the system are defined in this screen. During these holidays, Daily Program in use (and therefore system behaviour) is the 8th program defined in the Weekly Program (or the 9th or the 10th program in case of using special days; see the previous paragraph). Fields Name: Name the new holiday Description: Describe the new data entry Company: Company the item refers to (for use with multi-company application ONLY). Single Day & Many Days: Select if the new data concerns one single day or a several days period. From: The current date is listed by default. In the calendar, it will appear circled in red. To call up the calendar, click on the arrow situated to the right of the current date. Select the day, month and year in the calendar that appears on the screen or enter directly the date. On the calendar, by clicking on “Today” the actual date is selected. To select a given month ¾ Produce the list of months by pressing on the name of the month displayed ¾ Skip from one month to the next by pressing on one of the double arrow keys ends (next to the month) ¾ Scroll the calendar from month to month by pressing and maintaining depressed on one of the double arrow keys ends (next to the month) To select the desired year ¾ By clicking on the displayed year appear double arrow keys (next to the year). Skip from one year to the next by pressing on one of the double arrow keys ¾ Scroll the calendar from year to year by pressing and maintaining depressed on one of the double arrow keys ends (next to the year) To: If the holidays last several days, select the ‘Many days’ option and enter here the last day. Each year: Select to repeat the definition of a holiday for coming years; for example, Christmas always falls on the 25th of December. Day type: Select the holiday type (Holiday, Special Day 1 or Special Day 2). 50 PRONET PLUS – User Manual – 3.5. Access Group This function determines “who can go where and when”. The access group attributed to employees determines the doors accessible, the weekly programs associated to the doors and the door crisis level. To use this function: ¾ Select the authorized doors for the individuals of a group ¾ Associate the corresponding weekly programs ¾ Attribute a crisis level to each access group, door by door ¾ Attribute an access group to each employee, in the “Parameter - All Cardholders General” screen Fields Name: Enter a name for the access group Description: Describe the new data entry View: ¾ Check V button to display readers list for which access is granted for the selected group ¾ Check X button to display readers list for which access is refused for the selected group First column of the table: V or X ¾ Select V to include the reader in the access group ¾ Select X to exclude the reader from the access group Reader: List of readers and doors associated Weekly program: Select the weekly programs associated to the reader from the list Crisis level: Select the crisis level (Refer to the “Manual Action - Crisis Level” chapter for more information). PRONET PLUS – User Manual – 51 Tips & Notes Access group by default An access group “Anytime Anywhere” is defined by default. It guarantees permanent free access to all doors. Its denomination can be modified but this group can neither be deleted nor modified. Minimal authorization by default When a new data is created, status for all doors is checked. By default, minimal authorization is granted. Many access groups The system does not limit the number of access groups. However if a large number of access groups are required due to the variability of the badge holders’ work hours, it is recommended: ¾ To create an access group that guarantees permanent free access at authorized doors, with the weekly program: <Use Personal WP> and the crisis level: <Use personal crisis level> ¾ To restrict access by using personal weekly programs and individual crisis levels, in the personalized data of the badge holder. Different error message Please note the difference in the error message associated to an access refusal in the following two cases: Reader … Weekly Program … Error message if access denied: V Rdr1 / Controller 1 WP Never “Not authorized at this time” X Rdr1 / Controller 1 WP Always “Reader not allowed” 3.6. Department A department is a functional notion, which allows site division into various work areas. This function is mostly informative. A department can be chosen as a selection criterion to display and print reports. Examples Administration, Top Management Fields Name: Name the new department Description: Describe the new data entry 52 PRONET PLUS – User Manual – 3.7. Badge This screen defines the badges used and displays their owners. Fields Create a group of badges: Click for creating a series of badges (in another new window, see Group of Badges paragraph). Advanced settings: Displays advanced features related to biometric readers. Code: Enter directly the card code. Generally, this code is written on the badge as a sequence of 8 characters using numbers from “0” to “9” and letters from “A” to “F”. If the length of the code is shorter than 8 characters the system will complement it by adding zeros at the beginning of the code. A default badge code can be automatically inserted at the beginning of all badge codes with the “Tools -Options - General” screen. Note: This code is downloaded to the controllers and saved in the application database. The code may be read differently according to the reading technology defined in the “Reader General” tab and the Badge format defined through the ‘Reader - Miscellaneous/Badge format’ tab. Get from card: Click for opening the following screen in order to get the code by reading the card: ¾ To get the card code from a regular reader, pass the card on one of these readers: when the card code appears on the window, select it and press OK. ¾ To get the card code from a biometric reader, select the relevant reader in the lower ‘get card code from bio reader’ window, press the button right to this list and pass the card to the selected reader: when the card code appears on the window, select it and press OK. Type: Select the badge technology from the displayed list (Magnetic, Wiegand, etc.). Note: Reading technology is defined in the ‘Technology’ field in the “Parameter - Controller Reader - General” screen. Only badges data compatible with the selected technology will be downloaded to the readers. PRONET PLUS – User Manual – 53 Status: Specify the badge status: Used, Cancelled, Free (default), Lost, Stolen. A badge cancelled, lost or stolen is automatically invalidated by the system. Bio template ID: Each template needs to be downloaded to the biometric readers with an identification number (Bio ID or Bio template ID), which identifies the person. This number, displayed and editable in this field, is automatically computed by the system from the card code (see the “‘Custom’ Bio Wiegand Format” paragraph), based on the Badge format (defined through the “Reader - Miscellaneous/Badge format” tab) and the Bio Wiegand format (defined in the “Reader - Finger Print” tab). 2 Note: Make sure that the system has calculated the Bio ID and that is not 0. Cards that were defined prior to the creation of the first biometric reader, will have Bio ID = 0. For these cards, calculation of the corresponding Bio Template ID will be done automatically only when the card owners will enroll the finger. After a biometric reader definition, each new badge will receive automatically a Bio ID code, which is displayed in the ‘Bio template ID’ field after saving. A manual calculating is also possible by selecting the "Advance settings" box and pressing ‘Calculate 1’ (to re-calculate the selected badge) or ‘Calculate all’ (for all badges in the database, including those that are not 0). If the field remains empty or null it means that the system cannot calculate the Bio ID and it has to be entered manually or be read directly from the biometric reader. To obtain the code from the card itself, use the ‘Get Bio ID’ window field. There you need to select the reader from the list, click on the ‘ID’ button, and pass the badge at the biometric reader. Owner: Select to assign a badge to an employee; when an attributed code is selected, the name and surname of the badge holder appear in this field. The field remains empty if the code entered is not attributed. Click on the […] button to display the employee’s screen. Description: Describe the new data entry Get Bio ID: Visible by checking the ‘Advanced settings’ box. To enroll directly the Bio ID from a biometric reader (BioProx or BioFlex), select the relevant enrollment reader from the list, click on the ‘ID’ button and then pass the badge at the selected biometric reader. The Bio ID should appear on the ‘Bio template ID’ field. Tips & Notes Recording Bio ID with BioPass and BioFlex + Keypad When only BioPass or BioFlex with keypad readers are used in the system, cards are not requested. However, a badge (even if it does not physically exist) must be attributed to each person. Therefore, the ‘Technology/Badge format’ of these readers must be ‘Wiegand/Decimal’ (even if no cards are used) and the Bio Wiegand format must be ‘Standard 26 bits’. Card codes may be manually entered through the ‘Code’ field or using the ‘Create a group of badges’ function. The system then may calculate the Bio ID which is, in this case, equal to the card code. The PIN code to use at the keypad connected to the BioFlex will be this Bio ID, which is a maximum 5 digits code (max. 65535). Card code or badge format change After changing a card code, a re-calculation of the Bio ID is needed for that card only (‘Calculate 1’ button). However, in a case of modification of the ‘Badge format’ or the ‘Bio Wiegand Format’, a re-calculation of the Bio ID for all card (‘Calculate ALL’ button) is needed plus initialization of all the Biometric readers (from the “Diagnose” screen). 54 PRONET PLUS – User Manual – 3.7.1. Badge Search Displaying the list of all the attributed badges Double click on the “Search” icon of the icon bar. Performing a search on a specific type, status or owner To find a badge from its type, status or owner: ¾ Click on the “Search” icon of the icon bar (or type “F10” key) ¾ Select the desired type, status or owner ¾ Click on the “Search” icon a second time If the badge is attributed, details of the badge will be displayed on the screen If no badge has been found, the fields remain empty and the screen has a grey shade ¾ Click on the “Search” icon to display the list of all the attributed badges Searching a badge from all or part of its code When pressing on the “Search” icon, if the first characters of the code have been entered, the system will display all the badges that start with the desired sequence, after pressing on the “Search” icon a second time. Examples: In the “Code” field type The system displays all the card codes attributed 32 Beginning with “32” 32%45 Beginning with “32”, which contain the characters “45” _ _ _ _32_ _ Which contain the characters "32" at the 5th and 6th position Note: % will replace several characters _ (underscore) will replace one single character PRONET PLUS – User Manual – 55 3.7.2. Group of Badges This screen allows the creation and deletion of a group of badges in a single command. It is accessible via the “Parameter - Badge” or “Tools - Create a group of badges” menu. 3.7.2.1. Group of Badges - Create Create a group of badges in a single command using this tab. Fields First card code: Type the 8-character code assigned to the first badge Note: A beginning card code common to all badges can be set in the “Tools - Options General” screen. Quantity: Type or select the number of badges to create; the list has been provided for information. The maximum number of badges depends on the plug limitation. Type: Choose the badge technology from the displayed list (Magnetic, Wiegand, etc.). Note: The choice of reading technology will enable selective data download to the readers. Only data compatible with the selected technology will be downloaded to the readers. Position to increment (between 0 and 8): Define the position of the character to increment in the 8-character sequence making up the code. This allows keeping a constant group of characters as code endings. To use this function, it is necessary that only decimal numbers compose the beginning of the code, till the position to increment. Example First card code Position to increment The next code: 12345ABC 5 12346ABC Create also cardholders: Create simultaneously a group of badges and their associated badge holders, which will have: ¾ Basic parameters: Valid employee parameters to whom the “Anytime Anywhere” access group is attributed ¾ Set parameters same as: Specify the name of the badge holder whose parameters will serve as reference for the new badges 56 PRONET PLUS – User Manual – 3.7.2.2. Group of Badges - Remove Remove a group of badges in a single command using this tab. Fields First card code: Type the 8-character code assigned to the first badge Quantity: Type or select the number of badges to delete; the list has been provided for information. The maximum number of badges depends on the controller and plug limitation. Position to increment (between 0 and 8): Define the position of the character to increment in the 8-character sequence making up the code. This allows keeping a constant group of characters as code endings. To use this function, it is necessary that only decimal numbers compose the beginning of the code, till the position to increment. Example First card code Position to increment The next code: 12345ABC 5 12346ABC Remove also cardholders: Delete simultaneously a group of badges and their corresponding badge holders Remove all non allocated badges: Delete all cards that are not allocated anymore, i.e. temporary cards Remove all deleted cardholders: Select to remove all deleted cardholders from the database PRONET PLUS – User Manual – 57 3.8. All cardholders 3.8.1. All cardholders - Basic Concepts Each badge holder, employee, visitor or guard, that requires access authorization to the site must be recorded beforehand in the database. To access or modify information related only to visitor or guard, consult the screens “Parameters - Visitor” or “Guard Module”. The “Parameter - All cardholders” screen defines the details of all the users, employee and visitor alike. The menu is divided into six tabs: ¾ General information ¾ Customized fields ¾ Exceptions ¾ Personal information ¾ Schedule AG ¾ Location data Tips & Notes Quick definition The family name is the only obligatory field for creating a new badge. Nevertheless, in order to grant access, the field “Badge” is necessary. The “Anytime Anywhere” access group is associated by default to the new cardholder. 3.8.2. All cardholders - General This screen records general information about the badge holder. 58 PRONET PLUS – User Manual – Fields Display photo: Check this box to display the employee’s picture Show deleted: Check this box to display the deleted badge holders; by default, this box is unchecked Click on the Delete button (in the tool bar) to delete the badge holder from the database. Deleted badge holders are not erased from the database but saved under the type ”Deleted”. They are not displayed by default. Actions following the badge holder deletion: ¾ The badge holder is classified as “Deleted” ¾ The corresponding badge allocation is removed ¾ The badge is added to the non-allocated badges list ¾ The validation case is unchecked ¾ The record disappears from the badge holder screen, unless the “Show deleted” box is checked Note: Only allocated cards are taken into account into the computation of the plug limitation. Last name & First name: Type the last name and the first name of the cardholder. It is possible to create cardholders with the same last and first name. In this case, it is necessary to enter a unique number per person in the “Number” field and to check the “Allow duplicate name of cardholders” option in the “Tools – Options - General". Number: Enter an identification number Type: Choose the cardholder type (Employee, Visitor or Guard); the “Type” field does not appear in the “Parameters - Visitor” or “Guard Module” screens Company: Mention the name of the company the badge holder works for Employee’s picture: Click on the following button ¾ Select a picture: To select the name of the file beholding the employee’s picture (jpeg or bmp format) ¾ Remove picture: To remove the employee’s picture ¾ Take a snapshot: To open the following “Video Capture” screen: Users which have a camera video or a web cam can play and pause the live video stream, select the required image size, and then move the mouse over the paused image to select the part of the image they wish to keep as the cardholder image. ¾ Print a badge or define badge printing layouts: To open the screen of badge printing layouts (Refer to the “All cardholders - Badge Printing Module” paragraph for more information). Location: Department: Select the department the employee works for from the list provided or create a new department by clicking on the […] button Office phone: Mention the office phone number, the cell phone number, etc. PRONET PLUS – User Manual – 59 Badge: ¾ Create new: Create a new badge and associate it to an employee (in “Badge” screen) ¾ Allocate: Allocate an existing badge ¾ Edit: Display details of the badge in use (i.e. for modification) ¾ Remove: Remove the badge allocation Note: A cardholder cannot have several badges of the same technology. ¾ Biometrics data: Create, modify or delete the employee’s fingerprint templates (Refer to the “All cardholders - Biometrics data” paragraph for more information). Access: Access group: Select an access group from the list or click on the […] button Personal weekly program: Select the personal weekly program from the list or create a new program by clicking on the […] button; this program is only used if the access group of the selected cardholder has been predefined with the <Use Personal WP> weekly program PIN code: Mention the badge holder personal identification code to enter on the reader keypad; this code is common to all the reading technologies used Personal crisis level: Select the individual crisis level, between 0 and 7; this crisis level is only used if the access group of the selected cardholder has been predefined with the <Use personal crisis level> crisis level From date: Specify the beginning date of the validation period of the badge holder. Type data in directly or select a date by using the direction arrows. To date: Specify the date and hour when the badge validity will end. Type data in directly or select a date by using the direction arrows. Validated: Check this box to validate badge use; a non-validated badge exists in the database but its use will be forbidden To define a validation period ¾ Uncheck (clear) the “Validation” box ¾ Check the “From Date” box and / or check the “To Date” box ¾ Set the validation period in date in the “From Date” and / or “To Date” fields ¾ Save Note: If the validation date chosen belongs to the past, the “Validation” box will be checked automatically. Beyond the specified validity date, the badge will automatically become invalid. Every 30 minutes, at xx:15 and xx:45, the program checks if new cardholders need validating or invalidating, in which case the corresponding cardholders definitions are sent to the controllers. The frequency of this checking may be modified through the ‘Tools - Options Communication’ screen (default: 30 minutes). Set as default: By checking this box, the badge holder selected serves as a reference. His parameters are automatically copied as default parameters for newly created badge holders. This function saves the trouble of having to define the same parameters for each cardholder that will be created in the future. 60 PRONET PLUS – User Manual – Tips & Notes Automatic card inhibition if a card not used after X days It is possible to inhibit automatically cardholders who have not used their card during X days. The checking is done each night at 00:45. Example: Let us take a system configured to inhibit all the cardholders that did not pass their badge during 3 days. 1 2 3 4 5 Day 00:45 John SMITH cannot access anymore 23:00 John SMITH passes his badge for the last time A cardholder that passed his badge the day ‘1' (at any hour!) will have access on days ‘2', ‘3' and ‘4'. If he did not pass his badge at a reader of the system during these 3 days, the system will invalidate automatically his badge on day ‘5' at 00:45 a.m. Operating Mode : ¾ Exit the application and look for the ini file at the main application folder. ¾ Open it with Notepad and look for the following entry: AutomaticInhibition = 0 If this line does not exist, run the application, go to “Tools - Options” and click “OK”. This operation rebuilds the ini file and inserts all the possible entries according to the latest application version. ¾ Set the value according to the required days number before inhibition. Example, to inhibit all the cardholders that did not pass their badge during 3 days, set: AutomaticInhibition = 3 ¾ Save and close this file, and restart PRONET PLUS. Note : If the PC is turned off all the nights, the inhibition command will not be able to be sent to the readers at 00:45 a.m. This function works only if the application is runing at that time. PRONET PLUS – User Manual – 61 BADGE PRINTING Module (BP) 3.8.3. All cardholders - Badge Printing Module This module allows creating and printing cardholder badges to a designated card printer directly from the “All cardholders - General” screen of PRONET PLUS. This module is opened through the “Print a badge or define badge printing layouts” button of the “All cardholders General” screen, at the lower left side of the photo. Clicking this button opens a two-tab screen: ¾ Preview tab: Show a preview of the edited layout. The first editing shows a default layout. ¾ Design tab: Allows editing the layout. Operating Mode The design tab is based on a professional tool of Active Report ®. In this manual we will not cover the large variety of options but we only give some basic instruction and tips: ¾ Moving selected fields: Select an existing field from the ‘Detail’ window and drag and drop to the required position of the layout. ¾ Add a new field: Select the field type from the toolbar on the left and drop it in the layout. ¾ Add a field from the cardholder database: Click the View - Explorer menu. Two windows will appear on the left. On the lower one, click the “refresh” icon. All the fields of the cardholder screen will appear. Drag any field and drop it in the layout area. ¾ Change the background: Select the current background. On the ‘Property ToolBox’, go to the “Picture” field, click on the […] button and browse your PC for any graphic file. ¾ Change the text in a label/text box: Select the field and edit the text on the ‘Property ToolBox’ window, in ‘Caption’ (for a label) or ‘Text’ (for a text box). Don’t change ‘Name’. ¾ Save changes to the current layout: Click on the “Preview” tab. All editing changes are saved into the default layout when the “Preview” tab is displayed. The default layout is called “_bp.rpx” and is located on the application folder. Different customized badge layouts can be saved on the \Reports\BP folder under the application folder with RPX format. Saved layouts will appear in a combo box in the “All cardholders - General” screen, left to the badge printing button (the former layout is automatically saved as « layout1 »). This leads to create and print different format badges into a same database. It is possible to save many layouts as required and for printing a specific badge layout to a cardholder, it just needs to select it on the layout list. ! Warnings: ¾ ¾ ¾ ¾ 62 Do not delete the default photo (cardholder image) field from any layout. Do not delete the icon ADO from any layout. Do not move, close or resize the ‘Property ToolBox’ window. If by mistake you have done any of the above action, you may need to go back to the default layout: Exit the “All cardholders” screen, go to the application folder and delete the “_bp.rpx” file. PRONET PLUS – User Manual – 3.8.4. All cardholders - Biometrics data This screen allows creating, modifying and deleting cardholder fingerprint templates directly from the “All cardholders - General” screen, through the ‘Biometrics data’ button. Operating Mode Once a biometric reader is configured for use as an ‘Enrollment reader’, it is possible to enroll fingerprints for existing users. The information created during the enrollment process is stored as a ‘Template’. Template contains one fingerprint, its associated card code and other related data. Each template is save twice: in the PRONET PLUS database, as well as in all the active biometric readers. ¾ In the current screen, select the relevant biometric reader from the combo list (This list displays only readers defined as ‘Enrollment readers’). ¾ Press the ‘Enroll’ button for fingerprint enrollment, then follow the instructions on the screen. The message “PLACE your finger on the sensor” should appear. ¾ Put the finger on the reader until the graphical image of the fingerprint appears on the screen and the message changes to “Remove finger. Ready to save”. ¾ Press the ‘Save’ button for saving this fingerprint and for downloading it to all the active biometric readers. Fields Select an enrollment reader: from the active enrollment biometric readers drop-down list. Step 1: Enroll your fingerprint: Enroll: Click to enroll a fingerprint or to re-enroll an existing fingerprint. New: Add supplementary templates for same cardholder. In each new template a different finger can be enrolled or a previous existing finger. Enrolling an existing finger twice, enhances the chance that fingerprint will be recognized by the biometric unit. Delete: Delete the template from database and remove it from biometric readers. A progress bar in bottom of the screen will give indication of the delete process. the the the an Fingerprint picture: ¾ Quality: Template quality score. The minimum satisfying score is 50 (3 blue stars). ¾ Content: Template content score. The minimum satisfying score is 70 (4 blue stars). PRONET PLUS – User Manual – 63 Step 2: Accept the template: Finger: Indicate which hand finger has been enrolled. ¾ Make duress finger: Check this box if this finger is only use in duress situation. Security Threshold: Threshold related to the quality and content of the fingerprint information. Note: The ‘None’ threshold may be selected, enabling, for instance, the director’s fingerprint to be accepted even with a failed verification. (Note however, that such setting creates a security risk in case the director's card was stolen). Download Template: Click to download the current template to all the biometric readers of the system. A progress bar in the bottom of the screen will indicate the status of the download. Buttons [⎥e][e] [f][f⎢]: Browse between the different templates of the cardholder. Save: Click for saving the current template and for downloading it to all the biometric readers. Exit: Click for close this screen. Tips & Notes Suggested Fingers type It is recommended to use index, middle or ring fingers. Avoid using thumb and pinky fingers since they are typically awkward to consistently position on the sensor. Finger Placement By putting the finger on the reader, cover completely the entire area of the sensor with the fingerprint for providing the best performance. Touching the sensor as if pressing a button creates an image that lacks information-rich fingerprint data. Deleting Cardholder Templates When a cardholder is deleted, all his templates regardless of the card serial number are removed from the biometric readers and deleted from the database. Managing Badges If a cardholder loses his badge and wishes to receive a new badge without the need to reenroll his entire fingerprints, follow these steps: ¾ In the “All cardholders” screen, select the relevant cardholder from the combo list. ¾ Press the ‘Edit’ button to open the “Badge” screen. ¾ In the ‘Code’ field enter the code of the new badge, and save the record. ¾ Select the ‘Advanced setting’ checkbox and press the ‘Calculate 1’ button. This will recalculate the Bio ID according to the new card code. ¾ Save and exit this screen and return to the “All cardholders” screen. ¾ Click ‘Biometric data’ and press ‘Download template’: the application will then remove the old templates and download the same templates but with the new Bio template ID. Downloading Interruption In case of temporary communication failure during the templates download process, the action will be stored as a pending command. Later, when communication is regained, the pending commands will be executed. 64 PRONET PLUS – User Manual – 3.8.5. All cardholders - Personal This screen records personal information about the badge holder. Fields Address: Enter the badge holder’s address, including phone and fax numbers Description: Describe the new data entry Car number: Enter the employee’s car licence number; the parking lot module of the application will use this data. ID: Give an employee identification number such as a social security number, employee number, etc. Privileges: Certain privileges can be granted or restricted to badge holders ¾ Keep the cards if motorized reader ¾ No APB, No timed Anti-Passback ¾ No access during holidays ¾ Reset APB level when downloaded, (selected by default) ¾ Supervisor: Check the box to define a cardholder as supervisor. Note: The supervisor is an employee who can escort other cardholders and/or initiate automatically a global reflex, which sends the code 99 to the PC, by presenting his card twice consecutively – within 15 second - to a single reader. ¾ Need escort: Check the box to request an escort for this cardholder. Note: The escort function requires a double valid card reading within a 10 seconds delay - the employee who needs escort and his escort - to authorize access at certain readers. To set this feature at a specific reader, first select ‘Escort’ at this reader in the “Parameter – Controller – Reader – Access Mode” screen. Simple escort: Neither “Need Escort”, nor “Supervisor” options have been selected. All cardholder can be escorted by any other (authorized) cardholder. Escort with supervisor: The “Need Escort” option has been selected. This cardholder can be escorted only by a Supervisor, i.e. another cardholder for which the “Supervisor” option is selected. Note: If the “Need Escort” and “Supervisor” options are selected, the cardholder will not need any escort to access, even on a reader where the ‘Escort’ option is selected. Parking user group: Select a parking users group from the list or create a new group by clicking on the […] button; this information is for use in the parking module Lift program: Select the lift authorization group from the list or create a new group by clicking on the […] button; this information is for use in the lift module PRONET PLUS – User Manual – 65 3.8.6. All cardholders - Location Locating employees enables to check attendance and to evacuate designated areas in case of emergency. The information regarding the where abouts of a badge holder is supplied by his last passage through a reader. Fields Data of the last badge swipe through a reader is automatically updated by the system. ¾ Last pass date of the selected cardholder’s last swipe ¾ Last reader pass of the selected cardholder ¾ Anti-passback level after the selected cardholder’s passage Reset button: Click on this button to reset the global Anti-Passback level for this badge holder Reset all button: Click on this button to reset the global Anti-Passback level for all badge holders 3.8.7. All cardholders - Customized The number of given badges and the date when the last badge was given is displayed on cardholders screen. These fields are also available in all of the cardholders reports: All cardholders, Visitors, Guards, Door pass, Patrol details). Moreover, on the present screen there are some fields to fill. Four of them can be filled with free text. The titles of these fields, called “customized labels”, may be set at the “Parameter - Customized labels” screen. In addition to these four labels, users can add an unlimited number of new fields through the “Parameter - Customized fields” screen. The fields types can be defined as Text, Date, Boolean or Number. Text and Number type fields can have a combo box for selecting customized options. The list values should be typed, separated by <;> in the appropriate field of the “Customized fields” screen. Note: Once saved, the relevant field can be seen at the ‘All cardholders - Customized’ screen. After saving a new field, it is NOT possible to rename it or change its type. However, it is possible to delete it. 66 PRONET PLUS – User Manual – 3.8.8. All cardholders - Exceptions This screen permits to allow or cancel one (or more) door access to someone temporarily. Select the relevant cardholder in the cardholders’ list and click on Add exception button. PRONET PLUS checks all exceptions with the same frequency as cardholder validation frequency (30 min by default. Can be changed in the ‘Tools - Options Communication’ screen). For each cardholder this screen summarizes its exceptions. One row corresponds to one reader. To delete an exception, just click on the [2] Button at the end of the exception line. After clicking on Add exception button, a new screen is opened for typing the dates and hours of the access modification and for selecting the relevant reader with the relevant weekly program. By clicking on the Save button, the new exception is entered in the system and displayed in the previous screen. Note: Exception bypasses the access group definition for the selected reader(s) and comes as a complement of the current access group. However, if a cardholder access is not validated it will not be granted access on the reader even if an exception has been defined. 3.8.9. All cardholders - Schedule AG This screen permits to swap the access group (AG) of someone to another AG temporarily. Select the relevant cardholder in the cardholders’ list and click on Add schedule AG button. PRONET PLUS checks all AG schedules with the same frequency as cardholder validation frequency (30 min by default. Can be changed in the ‘Tools - Options Communication’ screen). For each cardholder this screen summarizes its AG schedules. One row corresponds to one AG schedule. To delete an AG schedule, just click on the [2] Button at the end of the line. After clicking on Add schedule AG button, a new screen is opened for typing the dates and hours of the AG modification and for selecting the new temporary AG. If the modification is immediate, there is no need to define a starting date. If the end date is omitted, the modification is considered as definitive. For saving, just click on the Save button. Note: The new temporary AG is not added to the current AG but it replaces it. PRONET PLUS – User Manual – 67 3.9. Visitor The system distinguishes occasional visitors from employees. The “Parameter - Visitor” screen allows consulting and modifying information with respect to visitors only. Example This enables the secretary at the entrance of the building, or the guard, to create a temporary badge for visitors without having the need to access the main employees database. Note: This screen is identical to the “Parameter - All Cardholders” screen except that the “Type” field is set to visitor and does not appear on the screen. When a cardholder is defined as “Visitor”, the new tab “Visitor” is added, to specify visit information. Fields Visited person: Select in the list of cardholders Visited person location: Specify the requested information Visit purpose: Specify the requested information 68 PRONET PLUS – User Manual – MULTI-COMPANY Module (M) 3.10. Multi Company Module 3.10.1. Multi Company Module - Basic Concepts The "Company" screen is used in multi-company applications, in which several independent entities are sharing the PRONET PLUS software. In practice, each company works virtually independently from the others. When a user logs into the system, he will only be able to consult the portion of the database (cardholder, controller, etc.) related to his company. A single user cannot consult records from all the different companies unless he gets a username and a password for each entity and logs in and off accordingly. All the controllers are linked to the main workstation, which executes the actual polling job for the all system. Usually, the installer will log in as the default user of the default company (Building Management) and has the capacity of a super-user. One entity will be created for each company. An extra-entity will be created to manage shared premises (readers). What to do: ¾ Check that the plug allows the multi-company application: Open the ‘Help - About PRONET PLUS’ screen and check in the plug definition that the pug contains the letter “M“. ¾ Activate the multi-company capability and display the fields related to the multi-company application: Select the “Multi-company” function in the “Tools - Options -Server” screen. ¾ Create the different companies sharing the application: A user should create the companies in the "Parameter - Company" screen. ¾ Allocate a user within each company: Create in the "Parameter - User" screen each user who will be responsible for system set up definitions for his own company. ¾ Modify the default name, password and company of the default user: Change it in the "Parameter - User" and "Parameter - Company" screens and remember it. ¾ Each user sets up the system parameters for his own company. Example A building beholding two companies: Company A and Company B; each company occupies its own floor and is totally independent from the other. The installer enters in the system as the default user and activate the “Multi-company” function in the “Tools - Options - Server” screen. Then, he creates the following companies: “Company A”, “Company B” and “Shared Premises” and modifies the name of the default company; the common entrance is managed by a separate entity created for this purpose. Then, he creates the following users: Irvin from Company A, Alan from Company B and Patrick from Shared Premises, allocate each of them his own company and modifies the default user name and his default password. Irvin can enter in the system and sets all Company A parameters, such as controllers, cardholders... Alan can enter in the system and sets all Company B parameters and Patrick can enter in the system and sets all “Shared Premises” parameters. PRONET PLUS – User Manual – 69 MULTI-COMPANY Module (M) Tips & Notes Default User By default, the system defines a user (name: ACTEC, password: ACTEC) for the default company called "Building Management". Displaying the current user name The name and the company of the current user are always displayed in a white box at the far right of the tool bar. Multi-site application The multi-company application can be used for multi-site installations. The central database encompasses the information about all the companies. The multi-site manager will receive a user name and password for each site. He will be able to enter the different sites and control the events within each entity. 3.10.2. Company The "Company" screen is used to create new companies in a multi-company application. Fields Name: Name the new company Description: Describe the new item 3.10.3. Super-User The super-user is a special user whose functions are: ¾ Creation and deletion of new companies sharing the application ¾ Allocation of a first user for each new each entity ¾ Decision on who the other super-user(s) will be ¾ Creation and restoration of database and journal One super-user is required for the default company and optional for the other entities. The default user is defined as default super-user by the system. The default super-user cannot be erased; nevertheless his name can be modified. All further super-users created can be modified and erased. Only a super-user can delete companies, all entities but his company or the default one. The possibility to create and delete a company database will not even appear on the screen of a user. A user is defined as a super-user by selecting the option in the "Parameter - User" screen. 70 PRONET PLUS – User Manual – MULTI-COMPANY Module (M) 3.10.4. Shared Information 3.10.4.1. Ownership of records: General Rule Each company creates its own records and can only display, modify or erase their own data. Log and displays are related to a specific company. Two companies cannot choose the same record name. 3.10.4.2. Exceptions Cross companies If an employee from Company A presents his badge to a reader from Company B, the access denial message will be notified to both companies. Shared Items The shared items and its definition are available to all in a read only mode. Only the company that owns the item can modify it. A. Shared controller networks By default, the default network (Network 1 on COM 1) is shared. The sharing possibility can be manually removed. B. Shared readers Example: Company A owns the main entrance reader. It lets Company B use that reader. A company that owns a reader can share it, by checking the corresponding box in the "Parameter - Reader - General" screen. By doing so, the ground is set to allow all employees all companies to use the reader. The system will automatically insert this reader into the "Anytime - Anywhere" default access group of all companies and update the controllers correspondingly. From now on, all companies will be able to select the shared reader for any access group manually created. The weekly program associated should either be: ¾ "Always", or whatever modified name it has, in which case the company it originates from is of no significance - recommended to keep full control of the access. ¾ Any other weekly program of the company that has shared the reader. C. Shared computer A computer can be shared between different companies. The "Log Off" function can be useful in this case. D. Shared icons By default, icons created by a company can be seen and used by all companies. Only the company that has created the icons can modify them. PRONET PLUS – User Manual – 71 3.11. Authorization Levels An authorization level is a group of options and screens which can be viewed and/or modified by users who belong to the level. Examples ¾ The site manager has access to all the information ¾ The parking lot attendant can only modify information regarding parking and view user details ¾ The secretary at the entrance of the building can only create visitors’ badges Once authorization levels have been created (through the following screen), they must be attributed to users in the “Parameter - User” screen. Fields Name: Name authorization level the new Description: Describe the new data entry View: Determine the authorization level for each option and menu. The + symbol indicates a head of chapter. In order to produce the sub-menus click on the symbol + located to the left of the name of the menu. Screen status: V or X or R The application allows differentiating within a head chapter, the screens that are accessible, restricted and forbidden. Viewing status can be modified by clicking successively on the sign to the left of the screen definition: ¾ Select V, to define accessible screen (read, write and delete) ¾ Select X, to define forbidden screen ¾ Select R, to define restricted screen (read only, without modification) By changing the status of the head chapter, it applies automatically the same status to all sub-menus that it contains. For example, if access to a head chapter is X to a group of users, access to all sub-menus will automatically be X. But, the status of sub-menus can be changed individually. Tips & Notes Authorization level by default By default, an authorization level – “All screens” – is defined. It corresponds to a maximum accessibility (all options and screens are accessible). Its denomination can be modified but this level can neither be deleted nor modified. 72 PRONET PLUS – User Manual – 3.12. User An User is a person who can access the PRONET PLUS application. Creation of users with attribution of authorization level and password are allowed in this screen. In order to limit authorization levels within the system, it is advised to define the authorization levels before creating user data. Fields Name: Name the new user Password: Type the password that the user will use to enter the system Authorization level: Select an authorization level from the existing list or click on the […] button to create another authorization level Company (only visible by Super user): Mentions the company the item refers to or click on the […] button to create another company (for use with multi-company application ONLY). Super user (only visible by Super user): Special user whose functions are the creation of new companies, the allocation of first users within each entities and the decision of who the other super-users will be (for use with multi-company application ONLY). Description: Describe the new data entry Creation date: Displayed automatically by the system without possibility of modification Tips & Notes See the password Double click on the password to make it appear on the screen. PRONET PLUS – User Manual – 73 3.13. Customised Labels and Fields These screens allow to define the four labels of the four additional free fields and to create an unlimited number of supplementary fields available in the “Parameter - All Cardholders Customized” screen. (See details on the ‘Parameter - All Cardholders - Customized’ paragraph) 3.14. Log Off The "Log Off" function allows different users to log in and off the system. After log off, the "Login" screen is displayed. Only authorized user, with adequate user name and password, can access the PRONET PLUS system. This can be used to prevent system access to unauthorized users, while the program is running. An automatic log off can be set in the system. The log off delay can be modified or cancelled in the “Tools - Options - General” screen. If selected, it is set by default to 10 minutes. 3.15. Exiting the Application In order to terminate a work session and exit the application, choose one of the following steps: ¾ Click on the “Exit” icon represented by a door, at the far right of the navigation bar ¾ Double-click on the icon represented by a magical wand, in the upper left corner of the screen ¾ Click on the cross X, in the upper right corner of the screen ¾ Click on the “F4” function key and, at the same time, on the “Alt” key ¾ Open the “Parameter” menu and choose the “Exit” option (at the bottom of the list) 74 PRONET PLUS – User Manual – The “Event Handling” section of the application manages alarms, presents them graphically on maps, creates actions and processes and combines them in global reflexes following certain events. Icons, maps and position The graphical functions of the PRONET PLUS software integrate the dynamic display of inputs on installation maps. ¾ Define icons (“Event-Handling - Icon” screen), certain icons are defined by default ¾ Link the icons to the inputs (“Parameter - Controller - Input” screen) ¾ Define site maps (“Event-Handling - Maps” screen) ¾ Position the inputs on the maps (“Event-Handling - Position” screen) ¾ Display the final status in the “Event-Handling – Active alarms” screen Operating Mode of the “Event Handling” menu ¾ ¾ ¾ ¾ ¾ ¾ ¾ Define the inputs Gather the inputs into an input group (if necessary) Define the outputs Gather the outputs in an output group (if necessary) Define the action to set off, following an input or group of inputs activation Define the process, in other words, the sequence of actions Define the global reflex, in other words, the events that generates the reflex and the actions to trigger 4.1. Icon Icons are graphical symbols, attributed to input, output, map, process or action. They will positioned on maps and will be used dynamically in the “Event-handling – Active Alarms” screen. Icons of controllers’ inputs and outputs are created by default. Basic graphical symbols are supplied in the directory: “C:\Program Files\Amadeus5\Media\Icons” Other icons can be added by specifying their name, description and location on the disc. They are automatically stored with all the icons in the directory mentioned above. Fields Name: Type the icon name Description: Describe the new data entry File: Select the name of the file beholding the associated graphical symbol; click on the […] button to chose another file and specify its address. Preview: Display the image of the selected icon PRONET PLUS – User Manual – 75 GRAPHIC Module (G) 4. “Event handling” MENU GRAPHIC Module (G) 4.2. Map The “Maps” screen allows the integration of maps into the software. In order to use the “Active Alarms” function, inputs must be positioned on maps. It is advised to store all maps in the following directory: “C:\Program Files\Amadeus5\Media\Maps” 4.2.1. Map - General A cascade of maps can be defined. For instance, the maps representing the different floors can be linked to the map of a multi-floor building. Fields Name: Type the name of the map File: Display the name of the file beholding the map; click on the […] button to choose another file and to specify its address. Description: Describe the new data entry Default map: Check the box for setting the selected map as default map; it will be displayed automatically on opening the “Active Alarms” screen. Preview: Display the map selected 4.2.2. Map - Icon This screen enables the association of icons to maps. Field Icon: Select the icon to associate to the map from the list, or select the […] button to create a new one. 76 PRONET PLUS – User Manual – The “Position” option allows the positioning of inputs, outputs, maps, processes and actions on the maps. In the left window are listed active controllers, inputs, outputs, maps, process and actions. Drag the icon form the left column and drop it into the map, then save the positioning. Finetune the placing with the arrows. Once positioned, the item will disappear from the list, indeed each icon can only be positioned once on one map. The icons will be used in the “EventHandling - Active Alarms” screen. Fields Show map: Choose the map to be displayed from the list Left Window: ¾ Controllers list with inputs and relays ¾ Maps list ¾ Processes list ¾ Actions list Buttons [e], [c], [d] & [f]: Click on the four direction arrows to refine the selected icon positioning on the map with accuracy. Button [] : Click to save the selected icon positioning Button [] : Click to remove the selected icon from the map and place it in the list again “Exit” Button (at the far right): Click to exit from the “Position” screen. Tips & Notes Positioning Modifying the input position on the map can be done using a mouse: select the object, maintain the left mouse button depressed and move the mouse towards the new position. PRONET PLUS – User Manual – 77 GRAPHIC Module (G) 4.3. Position ALARM Module (A) 4.4. Input Group Inputs can be logically associated into group of inputs. The inputs can belong to one controller or to a series of controllers. The group is activated or deactivated in a single command. If a group of inputs has been activated, then all the components of that group are activated. This screen enables the definition of the group and its components. A group of inputs is used to define global reflexes. Example Grouping all the protection system inputs of a room, such as movement detectors or windows and doors opening devices. A single command will allow render the group status from active by night to normal mode by day. 4.4.1. Input Group - General Fields Name: Name the input group Description: Describe the new data entry Pre alarm process: If needed, select the process that must be triggered before the input group activation. Pre alarm delay: Delay between the pre alarm notification process and the input group activation. Each alarm zone may have a pre alarm notification delay from 1 to 120 minutes prior to the input group activation. 78 PRONET PLUS – User Manual – ALARM Module (A) Tips & Notes Intrusion pre-alarm notification This function allows the application to notify the occupants of a site about a soon coming activation of the intrusion alarm system in their current area. To activate this function, select in this screen the warning process and the delay that the users have either to leave the zone or to postpone the activation of that zone for X minutes by a pre-defined action (such as pass a card, push a button, etc.). Operating Mode : ¾ Exit the application and look for the ini file at the main application folder. ¾ Open it and look for the following entry: ControllerInputGroup = 0 If this line does not exist, run the application, go to “Tools - Options” and click “OK”. This operation rebuilds the ini file and inserts all the possible entries according to the latest application version. ¾ Set the value to 1 ¾ Save and close this file, then restart the application. ¾ Make sure the ‘Alarm definition for group of input’ option from the “Tools - Options General” screen is selected, ¾ Create an input group that defines the alarm zone. ¾ In the “Event-Handling Program – Alarms” screen, choose the “View groups of inputs” option and select a weekly program for the input group, ¾ Create a process that will serve to notify the occupants about a soon coming activation of the intrusion alarm system (for example, by activating a relay connected to a buzzer during 20 sec., lighting a red light, etc.), ¾ In the input group screen, select this warning process and a pre alarm delay from 1 and 120 minutes. ¾ Initialize all the controllers. ¾ To set a postponing of the input group activation, create a global reflex that triggers an action from the type: “Input Group Deactivation During...”, by setting the input group to postpone and the number of seconds/minutes for which the input group activation should be postponed. Example : The alarm inputs of the 3rd floor are set, as an input group, to be activated at 20:00. ¾ The pre-alarm delay is set to 15 minutes, with a warning process that activates a buzzer for 20 sec. ¾ A global reflex postpones the intrusion system activation for 60 minutes in case a valid card is passed at the kitchen reader. At 19:45 the PC activates the buzzer, reminding the employees of the 3rd floor that they have 15 minutes to leave the building or to postpone the intrusion system activation. At 19:55 one of the employees passes a card and by that moves the activation one hour forward to 20:55. (I.e., the PC sends a command to the controller to postpone the inputs activation.) The PC will activate the next buzzer warning 20:40, 15 minutes before the new activation time. PRONET PLUS – User Manual – 79 ALARM Module (A) 4.4.2. Input Group - Inputs Fields View: ¾ Check V button to display the inputs list included in the input group ¾ Check X button to display the inputs list excluded from the input group Controllers list: Select the required controllers. Inactive controllers are represented in grey. First column of the table: V or X ¾ Select V to include the input in the input group ¾ Select X to exclude the input in the input group By default, all the inputs from the list are excluded from the input group. Input: List of all inputs of the selected controllers 80 PRONET PLUS – User Manual – Outputs can be logically associated into group of outputs. In a group, the outputs can belong to one controller or to several controllers. The group is activated or deactivated in a single command. If a group of outputs has been activated then activation of all the components of that group is set off. This screen enables the definition of the group and its components. A group of outputs may be used in actions (through the ‘Action’ screen), which can be triggered by global reflexes. Example Activating of an output group (for example all the door relays) upon a fire alarm. Fields Name: Name the output group Description: Describe the new data entry View: ¾ Check V button to display the outputs list included in the output group ¾ Check X button to display the outputs list excluded from the output group First column of the table: V or X ¾ Select V to include the output in the output group ¾ Select X to exclude the output in the output group By default, all the outputs from the list are excluded from the output group. Output: List of all outputs of the database PRONET PLUS – User Manual – 81 ALARM Module (A) 4.5. Output Group ALARM Module (A) 4.6. Action All actions available in the application are listed in the “Event handling - Action” screen. They can be sequenced within a process and incorporated into global reflexes. The actions are created in this screen; they can be activated via: ¾ Icons positioned on maps ¾ Processes encompassing these actions ¾ Global reflexes encompassing these processes New and personalized graphical interfaces can be created using the actions by linking several menus and sub-menus through actions icons. When specific users log in, the new interface will appear while the software application stays hidden in the background. This is achieved by opening the “Event Handling - Active Alarm” screen on the login of a specific user with a selected default map. Operating Mode ¾ ¾ ¾ ¾ Select a new background / new map (“Event Handling – Map” screen) Create new actions (“Event Handling – Action” screen) Place the actions icons on the new interface (“Event Handling – Position” screen) Visualise the new interface (“Event Handling – Active Alarms” screen) Fields Make it a process: Click on this button to create directly a process beholding this single action. The action needs to be saved prior to the process creation. Test: Click on this button to test the selected action. Name: Name the new action Description: Describe the new data entry Icon: Choose the icon representing the action in the list, or click on the […] button to create a new one. Action type: Select the action type from the list Other Parameters: Complete the supplementary fields depending on the type of action selected (see the “Types of actions with parameters” table). 82 PRONET PLUS – User Manual – ALARM Module (A) Types of actions with parameters Action type Relay Activation First parameter Output Relay Group Activation Output group Activate group of inputs Input Group Deactivation Input Group Deactivation During … Input Group Input Group Input Group Input Group Return to Normal Mode Input Group Display a Message on PC Message (3) Play a sound Choose a sound file Open a screen Select a screen Execute external application Command line (3) Print existing report Report (.rpx) Preview existing report Report (.rpx) Export existing report Report (.rpx) Invalidate cardholder Cardholder Validate cardholder Cardholder Import cardholders Select a profile Save database Save as… (1) Save journal (2) Save as… (1) (2) Create new journal (clean) Save as… Resume polling Stop polling Send message to communication Communication port settings Connect distant network and read Controller network transactions Reset parking zones Parking zone Start a guard tour Guard tour program Increment Counter Counter Decrement Counter Counter Set a counter value Counter Display a Message on Controller Controller Send a crisis level Crisis level Insert Comment in Journal Message (3) Display live video Camera Record video Camera Second parameter - Return to Automatic Mode NORMAL - Activated during: Delay (sec) - Always activated - constant ON - Never activated - constant OFF - Return to Automatic Mode NORMAL - Activated during: Delay (sec) - Always activated - constant ON - Never activated - constant OFF - Deactivated during X (Sec) - Deactivated during X (Min) - Constantly deactivated - Cancel previous delay Computer Computer Computer Computer Filename / Export format Command line (3) Guard Value Message (3) Computer Message (3) (1) The name of the saved file can contain the saving time and date by adding to the name <DT> (time and date) or <D> (date only). (2) Exist only with database in ‘Access’ format. (3) When using it in a global reflex, the following symbols permit to display the corresponding dynamic text: Cardholder Name (%c) Reader Name (%r) Input Name (%i) Log Date (%d) Log transaction type (%t) Full description like in log (%f). PRONET PLUS – User Manual – 83 ALARM Module (A) 4.7. Process A process is a set of actions used to define global reflexes. In this screen the different actions are selected and organized; their activation depends on the activation of the global reflexes they are part of. Fields Test: Click on this button to test the selected process. Name: Name the new process Icon: Select the icon associated to the process in the list or create a new icon by clicking on the […] button. Add to toolbar: Any user-defined process may be simply added to the main toolbar of the application just by checking the “add to toolbar” box on the process screen. The icon would appear on the tool bar on the next login. It is recommended to select an icon for the process that reflects its actions, such as open-door icon for a process that opens one or more doors. Description: Describe the new data entry Create new action…: Click on this button to create a new action. Available actions: Predefined actions list for the process creation. Buttons [] & []: Use the horizontal arrows for inserting or extracting the predefined actions into the current process; an action can be repeated several times in the process. Actions in current process: Sequence of the current process actions. Buttons [ ] & []: Use the vertical arrows for organizing the different actions into the current process. 84 PRONET PLUS – User Manual – A counter is a tool that measures things and activate a process according to the value of the counter. The “Event Handling - Counter” screen defines a particular global reflex type, whose main object is the increment of a counter. Examples ¾ Count the number of persons in a room (so as not to leave a room empty, to signal excess of maximum capacity, to switch office lights off when all the occupants have left, to activate an alarm system when all the employees have left the building, etc.). ¾ Decrement the number of entries of a membership club card after each passage and refuse access if credit is null. ¾ Check the filling up of a parking zone or cinema and refuse access to a full zone. Operating Mode ¾ ¾ ¾ ¾ ¾ Create a counter Create an action/process incrementing the counter Create an action/process decrementing the counter Create a global reflex determining which event increments the counter Create a global reflex determining which event decrements the counter Warning: Conditions linked to a counter may also trigger some processes: be aware not to create a logical loop: a process which trigger a counter which trigger under certain conditions the same process. PRONET PLUS – User Manual – 85 ALARM Module (A) 4.8. Counter ALARM Module (A) Fields Name: Name the new counter Description: Describe the new data entry Min: Enter the minimum value of the counter Max: Enter the maximum value of the counter Actual value: Enter the actual value of the counter; this value is automatically modified by the system, when the counter is incremented or decremented. Condition 1 & Condition 2: Define the processes to trigger following the actual counter value True condition: Select the condition to apply from the displayed list: ¾ Actual value <, >, =, or not equal Min value ¾ Actual value <, >, =, or not equal Max value ¾ Min value < Actual value < Max value ¾ Actual value = Min value +1 ¾ Actual value = Max value -1 Process to activate when the condition becomes true: Choose a process from the list or create a new process using the […] button. Note: The both conditions are independent. Tips & Notes Multiple condition counters If more than two conditions are required, create a second counter, named as the first one, using two further conditions. Repeat this procedure as many times as necessary. 4.9. Global Reflex 4.9.1. Global Reflex - Basic Concepts A global reflex defines the events to take into consideration and the process to activate. The “Event Handling - Global Reflex” screen is made up of two tabs: ¾ General tab, used to define global reflexes ¾ Properties tab, used to define the event and process making up the global reflex Note: A global reflex can be deactivated/activated in the “Event handling program - Global Reflexes” screen. Examples ¾ ¾ ¾ ¾ ¾ ¾ ¾ ¾ 86 Print instructions Sound a vocal file Display the activation of a camera in the area concerned Being informed of the arrival of a specific person Send a message to an employee when he badges Activation or deactivation of alarms Switching on the air conditioning in the office of the employee that badges at the entrance Light a red light if a parking is full PRONET PLUS – User Manual – ALARM Module (A) 4.9.2. Global Reflex - General The name, description and activation status of the global reflex are defined in this screen. Fields Name: Name the new reflex Description: Describe the new data entry Status in event handling program: The current global reflex is either included or excluded from the eventhandling program; by default the global reflex is included. In order to be activated, the reflex must be included in the eventhandling program. A global reflex, which is not included, will not be activated by the system when the defined events of the program arise. Modify the status by selecting the […] button, which will lead to the display of the “Event handling program - Global Reflexes” screen. Active when: ¾ Always: Select if the global reflex is constantly activated ¾ During weekly program: Select if the activation of the global reflex is dependent of a weekly program. The activation will occur only during the green zones of the program. Click on the […] button to create or modify the weekly program. Executed by: ¾ PC software: Check this box if the global reflex must be executed by the PC. That needs PC and controllers communication during the reflex activation. ¾ Controller (only on same network): Check this box if the global reflex must be executed directly by the controller on which the triggering event has been defined. With the supporting controller firmware (TPL from 01/03/03 and later), CERTAIN global reflexes (Network Reflex) can be performed between the controllers themselves even at times when the PC is not running (see in the next table for type of events which can be Network Reflex). Only processes with ONE action are supported. The only supported action type is “Relay Activation” (except ‘Never activated - constant OFF’, not supported yet). Obviously the controller that transmits the command and the one that receives it, both need to be on the same network, either via their main communication port, or via their secondary communication port. So, there are two different modes of operation: Mode 1: Network Reflexes via the main communication port In this mode the controller will perform network reflexes via the main communication bus, but only after 50 seconds of not receiving any polling or other commands from the PC. To activate this mode set the controllers either without secondary bus (default), or with it, but when ‘Bus 2’ is not set to do network reflexes (see the “Network Reflex” paragraph). Mode 2: Network Reflexes via the secondary communication port In this mode the controller will perform network reflexes via the secondary communication bus, whether or not the PC communication keeps on communicating on the main bus. To activate this mode set the controllers with secondary bus, and make sure that this bus is set to do network reflexes (see the “Network Reflex” paragraph). PRONET PLUS – User Manual – 87 ALARM Module (A) 4.9.3. Global Reflex - Properties This screen defines the specific events that are going to set off the actions and their parameters. Fields Event: The screen is modified according to the type of event selected, displaying the appropriate number of parameters in each case. Event type: Select the suitable event from the list (Access granted or denied at specific reader for a specific cardholder, Start or end of alarm for digital inputs, Unknown or nonallocated badge at specific reader, Scheduler, etc.). The table hereafter sums up all the event types of with the parameters. Other Parameters: Complete the supplementary fields depending on the type of event selected (see the “Types of events with parameters” table). Note: For each parameter, the “<Any>” item is used for selecting all the elements of the list. Process: From the list, select the process to activate following the occurrence of an event, or create a new process using the […] button. Time out: Maximum delay, between the time of the event (date and hour registered in the controller) and the time of the PC when it receives the event, beyond which the process is not carried out and the global reflex associated will not be performed (Expressed in second, maximum of 9 hours, default value = 3600 sec). A global reflex is performed only if the delay between the recording of an event by the controller and the processing of the data by the PC is inferior or equal to this time out delay. Example A global reflex has been defined as follows: An input under alarm triggers the activation of a group of relays. At 10:00 AM, the input detects an alarm but the controller is ‘off-line’ (no communication with the computer). At 12:00 AM, the communication is back, and the computer receives the alarm event. Should the global reflex be triggered two hours after the event has occurred? Therefore, if the time out is 3600 sec (1 hour) the global reflex will not be triggered. 88 PRONET PLUS – User Manual – ALARM Module (A) Types of events with parameters Event type From 1st parameter Access granted(6) Reader(1) Access granted + duress code(6) Reader(1) Access denied (6) Reader(1) Transaction code(2) Transaction code(2) Transaction code(2) Reader(1) Transaction code(2) Input(3) Input(3) Input(3) Input(3) Input (analog) (3) Controller Controller Controller Controller Controller Controller User User Reader(1) Reader(1) User User User User User Guard Tour Program Guard Tour Program Guard Tour Program Guard Tour Program Day Input status(5) Access denied + unsuccessful trials(6) Start of alarm(6) End of alarm(6) Line short(6) Line cut(6) Status 1 to 4 Table error Low battery Power down Power up(6) Communication OK Communication error User acknowledgement User confirmation Unknown card Non allocated badge New record Save record Delete record Application login Application logout Arrival Early arrival No arrival on time Late arrival Scheduler (1) 2nd parameter Cardholder Cardholder Cardholder / Denied reason(4) Table Input Input Checkpoint Checkpoint Checkpoint Checkpoint Month Guard Guard Guard Guard Hour / Minute An access group can be selected as a trigger for global reflexes associated with access. The group is signalled by a “>” sign before the access group name. (2) When a transaction code is selected, the event is only set off if the badge holder types the transaction code on the reader’s keypad prior to swiping his badge. The transaction code is a sequence of two numbers between “00” and “99”. In case of supervisor cards, a second badge reading within 10 seconds will send the transaction code 99 to the system, without need of a keypad. (3) An input group can be selected as a trigger for global reflexes associated with inputs. The group is signalled by a “>” sign before the input name. Note: there is no input group by default. (4) A specific denial can be chosen to trigger a global reflex. The different reasons of access denial are : Any denied reasons, Wrong keypad code, Full / Lock / No answer from door, Time not OK, Anti-passback not OK, Reader not allocated, Site code not OK, Inhibited cardholder, Access group. (5) Input status are: Immediate or delayed, Immediate, Delayed. (6) Potential Network Reflexes. Caution, for Access Granted only "any reader" or "one reader only" (Group of readers not supported yet), for Access Denied only "without denied reason", for Alarms only "one input" (Group of inputs not supported yet) and without a specific status, for Power Up only "from a specific controller" (“Any controller” not supported yet). PRONET PLUS – User Manual – 89 ALARM Module (A) 4.10. Event-Handling Program 4.10.1. Event-Handling Program - Basic Concepts The “Event-Handling Program” allows the attribution of activation time zones (weekly programs) to alarm inputs and the inhibition of Global Reflexes. It is accessible either from the Main menu tool bar or from the […] button near the Weekly Program of the ‘Controller - Input - General’ screen. The “Event-Handling Program” screen is divided into three tabs: ¾ General tab: allows to describe the event program ¾ Alarm tab: allows to display the defined inputs, include/exclude them in the program and to change their alarm behaviour. ¾ Global reflexes tab: allows displaying the defined reflexes, include/exclude them in the program and, eventually, modify or create new reflexes. 4.10.2. Event-Handling Program - General This screen allows the visualization of the active event handling program; it does not allow the creation of a new event-handling program. Fields Name: Name the new event handling program Active: Check the box to activate the selected event handling program. If a program is not “active”, it will not be taken into consideration by the system Temporary: Check the box if the selected event handling program is temporary only Description: Describe the new data entry 90 PRONET PLUS – User Manual – This screen allows the attribution of activation time zones to alarm inputs and to input groups. Fields View: ¾ Check V button to display the inputs list included in the event handling program ¾ Check X button to display the inputs list excluded from the event handling program Option selection: View inputs / View group of inputs: This selection is visible after selecting ‘Alarm definition for group of input’ option in the “Tools - Options - General” screen. ¾ View inputs: Click on this button to display a list of the individual inputs ¾ View group of inputs: Click on this button for displaying the input group list with their weekly program and setting a weekly program for each input group. This saves allocating a weekly program to each individual input. In case of a conflict, the definition of the individual input always gets the higher priority. Controllers list: Select the required controllers. Inactive controllers are represented in grey First column of the table: V or X ¾ Select V to include the input in the event handling program ¾ Select X to exclude the input from the event handling program By default, all the inputs from the list are excluded from the event handling program. Input: List of all inputs of the selected controllers Weekly program: Select the weekly program associated to the input. Note: An alarm input is only armed during allowed periods (‘Green’ periods) of the Daily Programs defined by the selected weekly program. Instructions: Enter the instruction to display in the “Active Alarms” screen when the corresponding alarm is raised. Button […] (on the input line): Click on this button to display the properties screen of the selected alarm. PRONET PLUS – User Manual – 91 ALARM Module (A) 4.10.3. Event-Handling Program - Alarms ALARM Module (A) 4.10.4. Event-Handling Program - Alarm Properties The screen summarizing the alarm properties is accessible by clicking on the […] button on the line right end of the input in the “Event handling program - Alarms” screen. Fields Input: Input name Inclusion status in event handling program: ¾ Select V to include the input in the event handling program ¾ Select X to exclude the input in the event handling program Weekly program: Select the weekly program from the list or click on the […] button to create a new program Instruction: Enter the instruction to display in the “Active Alarms” screen when the alarm is raised Use only for reflex: Selecting this box indicates that the alarm is only to execute the process triggered by the input (defined in a global reflex) without raising or recording the alarm event in the journal history. Process not repeated until confirmation: If a process must be triggered by the input and if this box is selected, the process will be activated only the first time the input goes under alarm and not on next repeated alarms (as it is the case for a movement detector, for instance). To ‘rearm’ the process, the alarm must be confirmed. Priority: Select from 0 to 9, the importance order of the selected alarm Direction arrows: Click to review the properties of the previous / next alarm 92 PRONET PLUS – User Manual – ALARM Module (A) 4.10.5. Event-Handling Program - Global Reflexes This screen lists all the global reflexes defined in the database. Table analysis View: ¾ Check V button to display the global reflexes list included in the event handling program ¾ Check X button to display the global reflexes list excluded from the event handling program First column of the table: V or X ¾ Select V to include the global reflex in the event handling program ¾ Select X to exclude the global reflex from the event handling program By default, all the global reflexes are included in the event handling program. Name: Name of the global reflex Event: Event associated with the global reflex, i.e. the event that will trigger the process defined in the reflex. Process: Process associated with the reflex, i.e. the process to be executed when the event is occurred. Button […] (on the line of the reflex): Click on this button to display the general screen of the selected global reflex for creating, consulting or modifying data. Button […] (outside the table): Click on this button to display the general screen of the global reflexes, even if no item is selected. PRONET PLUS – User Manual – 93 GRAPHIC Module (G) 4.11. Active Alarms The Active alarms screen graphically presents inputs, relays and alarms status on a site map. Actions and processes can be triggered by clicking on icons and it is possible to skip from one map to the next. 4.11.1. Active Alarms - Basic Concepts Hereunder some concepts used in this manual: ¾ Inputs concepts: Digital Input or Alarm input: a controller input point to which a sensor/detector (magnetic contacts, movement detectors, door contact device to reflect the door position, etc…) is connected. In general, controllers have by default 4 or 8 inputs and may be extended to 16 or more. The two input status open or closed correspond to the two possible physical status of such sensor/detector: open or close. 4 states or supervised input: in addition to the two basic states of the sensor/detector (open or closed), the input may detect two supplementary states which correspond to the status of the line used to connect the sensor/detector to the input: line cut or line short. Note that the alarm linked to this two supplementary status, line cut or short, is always armed, i.e. it is not possible to attribute to them a weekly program. The input type (‘digital’ or ‘digital 4 states’) must be indicated in the input definition screen. Consult the controller documentation to check which type of inputs is available in the controller and how to connect a 4 states input. Input status or input physical status: the physical status of the sensor/detector connected to the input: either open or close. Input normal status: The ‘normally’ status of an input, either ‘NO’ for ‘Normally Open’ or ‘NC’ for ‘Normally Closed’, is the status, open or close, into which the sensor/detector connected to this input is not under alarm. This normal status must be indicated in the input definition screen (see ‘Controller - Input’ paragraph). Input off/on or input logical status: An input is ‘off’ when it is in its normal status and ‘on’ when it is not in its normal status. It represents the logical status of the input. From the Input definition screen, two icons may be defined (and positioned on a map, as described in the ‘Position’ paragraph) to represent the logical status of the input, either ‘on’ or ‘off’. Armed/disarmed input: To each input may be attributed a Weekly Program (from the Input definition screen): the input is ‘armed’ during the green periods defined in the Weekly Program and ‘disarmed’ during the red periods (See ‘Time zone’ chapter for details). Activated input: an input is activated when the following conditions are true: it is armed and its status is ‘on’, i.e. it is under alarm during green periods of its Weekly program. 94 PRONET PLUS – User Manual – GRAPHIC Module (G) Table of the different Digital Input Status Input Physical status Normal status Logical status WP Activation Alarme status i1 Open NO Off Armed i2 Close NO On Armed i3 Close NC Off Disarmed i4 Open NC On Disarmed Activated ¾ Outputs concepts: Output: a controller output point which is in fact the output contact of a controller relay. In general, controllers have by default 4 relays and may be extended to 16 or more. Such relay gives a dry contact, and may be represented by an electrical switch which can be either open or close. When the relay is closed, the device (door, siren, etc.) which is connected to the relay is activated. Output status: the status of the relay, i.e. open (or activated or ‘on’) or close (or deactivated or ‘off’). As for an input, two icons may be defined to represent the output status. (in the Output definition screen) The Active alarms screen is accessible from the Main menu tool bar. It is divided into three tabs: ¾ Map tab: allows to display the site maps, ¾ Input status tab: allows to display the different status of the inputs, ¾ Output status tab: allows to display the different status of the outputs. 4.11.2. Active Alarms - Map This screen graphically presents the Input/Output status and alarms on a site map. The upper table shows the alarm name, date, priority and alarm type. Only items (inputs, outputs, maps, actions or processes), which have an icon, positioned on the map may be displayed. How to set the icons in the map is described in the chapter “Position”. Actions and processes can be triggered from the same screen by a right click on an icon. It is possible to skip from map to map. PRONET PLUS – User Manual – 95 GRAPHIC Module (G) Toolbar 1 2 3 4 5 6 7 8 9 10 11 12 13 14 15 16 17 18 The functions available from the toolbar are as follows: 1: Action menu: allows more useful actions like Execute a process, Confirm all alarms, etc. 2: Acknowledge the alarm: Select an alarm from the table and acknowledge it; this allows the differentiation between new and already acknowledged alarms. It is advisable to use this function to facilitate alarm management. When an alarm is acknowledged, the following events take place in the table of the “Event Handling - Active Alarms” screen as well as on the navigation bar: ¾ The alarm icon goes from red to green ¾ The count of acknowledged and non-acknowledged alarms are updated 3: Confirm the alarm: confirm a specific alarm, already acknowledged; a new screen appears displaying the following information: ¾ Name ¾ Event date and hour ¾ Alarm type: start of alarm, line cut or line short. ¾ Comment: type in an optional comment, such as importance, user name, etc. the comment will appear in the journal “data” column Confirm all (from the ‘Action’ menu only): confirm all the displayed alarms using a single command. This option is useful in case of prolonged communication failure. The computer will ask for confirmation. Individual alarm acknowledgement and confirmation are not required. 4: Auto select last alarm / remain on selected alarm: to conserve or not the focus on the last occurred alarm. 5: Show / hide the active alarm table: to maximize the map on the screen 6: Communication error indication: appears when PRONET PLUS does not succeed to communicate with one controller. 7: Polling off indication: appears when the polling has been manually stopped (from the ‘communication’ menu) 8: Refresh: manual refresh when there is no polling or when the polling exists but the “Autorefresh of Input/Output status” is not requested in the “Tools - Options - Server” screen 9: Open the “Execute Process” screen 10: Map selection list: Choose the map to display in the list 11: Show all inputs: Press to show all inputs / only active alarms. 12: Show outputs: Press to show / to hide relays. 13: Show maps: Press to show / to hide maps. 14: Show processes: Press to show / to hide processes. 15: Show actions: Press to show / to hide actions 16: Number of active alarms: as well as in the tool bar of the main screen 17: Number of acknowledged alarms: as well as in the tool bar of the main screen 18: Exit 96 PRONET PLUS – User Manual – GRAPHIC Module (G) Data displayed Alarm Table: The window below the toolbar shows the actual alarms status (active, acknowledged or confirmed): Name: Name of the alarm input. The icon before the name shows the alarm status: ¾ Active (red icon) ¾ Acknowledged (green icon) ¾ Confirmed (the alarm disappear) Date: Date and time of the alarm Priority: Alarm priority (defined in the “Event-Handling Program - Alarm Properties” screen) Alarm type: Start of alarm, line cut or line short Buttons [c] & [d]: Click on the direction arrows to select the requested alarm Instruction: Instruction which appears when the alarm is raised (defined in the “EventHandling Program - Alarm Properties” screen). On the site map: Point the mouse on an icon in the map, click on the right button and choose among the following functions: Input icons ¾ Acknowledge (when under alarm) ¾ Confirm (when under alarm) ¾ Open input properties ¾ Return to normal mode ¾ Input deactivation Relay icons ¾ Open relays properties ¾ Return to normal mode ¾ Deactivate relay continuously (constant off) ¾ Activate relay continuously (constant on) ¾ Activate relay during, specify the number of seconds Process icons ¾ Execute process ¾ Open process properties Action icons ¾ Execute action ¾ Open action properties Note: Only the actions allowed for the user will appear. PRONET PLUS – User Manual – 97 GRAPHIC Module (G) Tips & Notes Automatic refresh The icons status can be automatically updated by selecting the “Auto-refresh Input/Output status” option in the “Tools - Options - Server” screen. Alternatively, when the Auto Refresh is off, a manual refresh button can be used on the top bar. Dynamic map management In case of several maps, the displayed map is the one encompassing the activated inputs. If no alarm is signalled, the default map is displayed. If several alarms are activated, the map containing the most recent alarm raised will be displayed. If the “Event Handling - Active Alarms” screen is already open and a new alarm belonging to the displayed map is triggered, this map is dynamically updated. Actions and process can be directly executed by right clicking on their icons. It is possible to swap from map to map by selecting the required map either using the map selection drop down menu or by clicking on the appropriate icons, if such icon has been previously positioned. How Alarms are shown ¾ If the ‘show all inputs’ button is not selected, the screen shows only the logical status of activated inputs, i.e. the armed inputs actually ‘on’ (active alarms). The icon appears immediately when the alarm is detected, without the need of using the ‘refresh’ button. The icon of an activated input stays in the map until the operator acknowledges and confirms it. ¾ If the ‘show all inputs’ button is selected, the screen shows the logical status of all the inputs defined in the “Position” screen. The dynamic swap of icons allows for visual follow-up of input and output status: activation or deactivation of alarm points, door open or close and relays supervision. Example: If a door alarm is detected, an icon will show an open door. If the door is closed, the icon will be updated to a closed door. When an alarm is raised the system reacts ¾ Log display: alarm displayed in red ¾ Journal: event is recorded ¾ Navigation bar: increase in the number of alarms raised ¾ “Active Alarms” screen: the icon connected to the alarm appears on the site map displayed ¾ “Active Alarms” screen: mention of the name of the input activated and the date of the event in the top table ¾ “Active Alarms” screen: instructions related to the alarm input are displayed in the “Instruction” window. When several alarms are detected, the last alarm is displayed in the table at the top of the “Active Alarms” screen. By clicking on an alarm icon, the cursor automatically moves towards the corresponding row. The instructions displayed correspond to the alarm selected. Note that the order of the active alarm table can be manually sorted, by clicking on the column header. Such a sort cancel the default sort (by date), and therefore the last alarm may appear in the middle of the list. 98 PRONET PLUS – User Manual – This screen displays a dynamic activation status of the input. Before displaying the data, it may take about 15 seconds for checking all input status. Table analysis Controllers list: Select the required controllers. Inactive controllers are represented in grey Name: Input name Controller: Controller name that the input belongs to Num: Input number in the controller. Type: Mention if the input type is Digital, Digital 4 states or Analog. NO/NC: Input normal status, i.e. normally open (NO), normally closed (NC) or State 1 to 4. Physical status: Open, Close, Line short or Line cut. During reading time or communication problems with the controller, a ‘?’ mark is displayed to show that the status is unknown. Logical status: On, Off, Line short or Line cut (or ‘?’ if the status is unknown). Armed: The arm status switches between: ¾ (Red icon) Armed: The current time falls within the activation boundaries of the input weekly program (‘green’ periods’). ¾ (Black icon) Not now: The current time falls outside the activation boundaries of the input weekly program (‘red’ periods). ¾ Disarmed: The input is not included within the Event Handling Program. The system automatically goes from “Not now” to “Armed”, and vice versa, according to time zones. Active alarm: Coloured icons signal the alarm status (active, acknowledge and confirmed) in the table as well as in the tool bar ¾ (Red icon) Active: Active alarm ¾ (Green icon) Acknowledge: Acknowledge alarm ¾ No icon: Not in alarm or alarm confirmed Latest action: Shows if the normal situation has not temporarily been affected manually or by the activation of an action, a process or a global reflex. PRONET PLUS – User Manual – 99 GRAPHIC Module (G) 4.11.3. Active Alarms - Input Status GRAPHIC Module (G) Tips & Notes Manual action Point the mouse on an input name, click on the right button and choose among the following functions: ¾ Acknowledge (when under alarm) ¾ Confirm (when under alarm) ¾ Open input properties ¾ Return to normal mode ¾ Input deactivation Sorting out information The information in the table can be sorted out. Each column can serve as a sorting criterion. To organize information in an increasing order, click on the column header. To sort the information in a decreasing order, click again on the column header. Alarm prevention To prevent the alarm apparition, resulting from input activation, choose one of the following methods: ¾ Delete the input from the input list (in “Controller - Input” screen). ¾ In the “Event-Handling Program - Alarms” screen, select X to exclude the input from the event-handling program. ¾ In the “Event-Handling Program - Alarms” screen, attribute the “WP Never” weekly program to the input. ¾ From the “Active Alarms - Map” screen or from the “Active Alarms - Input Status” screen, right click on the input and select ‘Input deactivation’. Example How to set an alarm that would be active only at night: The opening of a door must raise an alarm during the night (arming period) but not during the day (disarming period). Perform as follows: ¾ In the “Controller - Input” screen, define the input to which the sensor that checks the door opening is connected. ¾ Define the arming period, in other words, the daily and weekly programs, which are activated at night and inactivated during the day (in the “Parameter - Daily Program” and “Parameter - Weekly Program” screen) ¾ In the “Event-Handling - Alarms” screen, select V to include the input in the eventhandling program, and select the required Weekly program. ¾ If necessary, position the corresponding icon in a map. During the night, the alarm will be activated if the door is opened. During the day, the input is disarmed by its weekly program and will not trigger an alarm. Note: The “WP Always” weekly program permits to arm incessantly an input; the “WP Never” weekly program never arms an input. An input must be armed for its activation triggers an alarm in the “Active Alarms” screen. 100 PRONET PLUS – User Manual – This table displays the output status, in real time. It is also accessible from the “Manual Action Relays control” screen. Table analysis Controllers list: Select the required controllers. Inactive controllers are represented in grey Name: Relay name Controller: Controller name that the relay belongs to Num: Output number in the controller. Physical status: Open or Close. During reading time or communication problems with the controller, a ‘?’ mark is displayed to show that the status is unknown. Time activation: This column shows if a Weekly Program has been attributed to the relay: ¾ V ON by weekly program: The relay is activated because a weekly program has been attributed and the current time falls within the activation boundaries of the weekly program (‘green’ periods’). The relay is automatically activated according to time zones. ¾ X OFF by weekly program: The relay is deactivated because a weekly program has been attributed and the current time falls outside the activation boundaries of the weekly program (‘red periods’). The relay is automatically released according to time zones. ¾ No text: No weekly program has been attributed to the relay. Note: The “WP Always” weekly program permits to trigger incessantly a relay while the “WP Never” weekly program ensues in a constant deactivation. Latest action: Shows if the normal situation has not temporarily been affected manually or by the activation of an action, a process or a global reflex. Tips & Notes Manual action Point the mouse on an output name, click on the right button and choose among the following functions: ¾ Open relays properties ¾ Return to normal mode: To cancel all actions described below. ¾ Deactivate relay continuously (Constant OFF): To close a door permanently for example ¾ Activate relay continuously (Constant ON): To open a door permanently for example ¾ Activate relay during: To switch on / off an indication light, during a defined delay for example. Specify the number of seconds (between 1 to 120 sec.). Sorting out information The information in the table can be sorted out. Each column can serve as a sorting criterion. To organize information in an increasing order, click on the column header. To sort the information in a decreasing order, click again on the column header. PRONET PLUS – User Manual – 101 GRAPHIC Module (G) 4.11.4. Active Alarms - Output Status PARKING Module (P) 5. “Modules” MENU PRONET PLUS, according to the plug used, may contain several modules which are described in this chapter (the plug description, and therefore the installed modules, can be displayed in the “Help - About PRONET PLUS” screen). 5.1. Parking Module 5.1.1. Parking Module - Basic Concepts The parking module allows for access control to parking lots and for management of parking zone fill-up, according to user groups. The system ability to manage the parking activity is based on three concepts: ¾ Parking lot: Physical area where cars are parked, controlled by one or several access points (card readers). PRONET PLUS may manage one or more parking lots. ¾ Parking users group: Any company or entity that rents or owns parking spaces. Each cardholder of this company may belong to a parking users group. ¾ Parking zone: A certain number of spaces allocated to a parking user group in a specific parking lot. A defined parking zone will be only accessible by the corresponding parking users group. For each parking zone, two types of information are available: ¾ A counter displaying the amount of available spaces at any time in the zone, ¾ A list of access points used to enter in the parking zone. For each access point, the counter may increment (+1), decrement (-1) or remain unchanged after a badge has been swiped. A cardholder may access a parking lot only if his parking users group has a parking zone in this requested parking lot, and this parking zone is not full. Zone 6 Lot C Zone 5 Zone 2 (company Y) Zone 1 (Company X) Lot A Zone 3 (company X) Lot B Zone 4 (company Y) : Free Space : Occupied Space Fig. 5.1 : Example of parking architecture. 102 PRONET PLUS – User Manual – PARKING Module (P) Example The previous diagram (Fig. 5.1) illustrates the map of a building car park. The Company X and the Company Y rent parking spaces in this building: -The Company X rents 4 parking spaces in the Lot A and 2 parking spaces in the Lot B. -The Company Y rents 3 parking spaces in the Lot A and 5 parking spaces in the Lot B. To implement this requirement, it is necessary to create the following items: ¾ Two parking lots: Lot A and Lot B ¾ Two parking users groups: Company X and Company Y ¾ Four parking zones: o Zone 1 (4 spaces): Company X in Lot A o Zone 2 (3 spaces): Company Y in Lot A o Zone 3 (2 spaces): Company X in Lot B o Zone 4 (5 spaces): Company Y in Lot B All the cardholders of a user group are interdependent. Access to members of a user group is contingent to the space available in the zone allocated to the group. If five employees of Company X arrive at the same time in parking lot A, access will be granted to the first four cars and denied to the other cars of the group. Access permissions to a parking lot are independent of authorizations to other parking lots. An access denial in Lot A does not prevent access in Lot B. If all the parking spaces of a company are occupied, other cars of this company will be denied access. Nevertheless other cars from other companies could still reach their respective zones in the same parking lot according to their own occupancy rate. Operating Mode ¾ In the “Modules - Parking Lot - General” screen, create parking Lot A and Lot B. ¾ In the “Controller - General” screen, create two controllers as ‘parking’ and allocate to one the parking Lot A and to the other, the parking Lot B. ¾ In the “Modules - Parking Users Group - General” screen, create two user groups, Company X and Company Y. ¾ Allocate each member to his user group, by selecting from the “Parking user group” list from the “All Cardholders - Personal” screen. ¾ In the “Modules - Parking Zone - General” screen, create the 4 parking zones, by defining the parking user group, the parking lot and the maximal number of places. ¾ The “Modules - Parking Zone - Access” screen gives a list of the relevant readers. For each parking zone, indicate which reader is used for entrance in the zone, for exit the zone or is ‘neutral’, i.e. not used for this zone (it not modifies the places number). Specify whether it should allow/deny access when the zone is full (for example, if it is used for exit, exit must be granted when the zone is full). Managing space availability A free space counter is linked to each parking zone. The movement of vehicles affects the counter level. For each car that enters, the amount of space is reduced. Each time a car goes out, the counter is incremented by one unit. The number of space available can be computed at any time with respect to maximal parking capacity and counter status. A zone is full when the free spaces counter indicates zero. PRONET PLUS – User Manual – 103 PARKING Module (P) 5.1.2. Parking Lot The parking lot is an area where cars are parked. Many parking lots can be supervised simultaneously. This menu is divided into two tabs: ¾ General tab: Define parking lots ¾ Presence list tab: Follow up on all vehicle movements, within each parking lot, according to user groups 5.1.2.1. Parking Lot - General This screen defines the different parking lots supervised by the system. Fields Name: Name the different lots Description: Describe the new data entry Note: After creating the different parking lots, it is necessary to define controllers as ‘parking’, in the “Controller - General” screen, and allocate the new parking lots to them. 5.1.2.2. Parking Lot - Presence List This screen allows the monitoring of vehicle movements within each parking lot. This information, which is displayed automatically, can be manually modified in the “Modules Parking Zone - Presence update” screen. Data displayed User group: Company or group to whom the vehicle belongs Name: Name of the cardholder requesting access Car number: Car license number Reader: Reader recording access to parking Date: Transaction date 104 PRONET PLUS – User Manual – A parking user groups is any company, or other body, leasing or owning parking spaces. Each group is allocated a specific parking zone, which can be identified by an identity number. All group members are interdependent. Each group member has access to all the lots allocated to his company. If the lot allocated to his group is full, access will be refused to all the members of that group. This menu is divided into two tabs: ¾ General tab: Define user groups ¾ Presence list tab: Monitor car movements within each parking lot 5.1.3.1. Parking Users Group - General This screen defines the different user groups supervised by the system. Fields Name: Name the different user groups Description: Describe the new data entry 5.1.3.2. Parking Users Group - Presence List This screen displays details about the cars parked and their movements, according to user groups. This information, which is displayed automatically, can be manually modified in the “Modules - Parking Zone - Presence update” screen. Data displayed Parking lot: Lot name Name: Name of the cardholder requesting access Car number: Car license number Reader: Reader recording access to parking Date: Transaction date PRONET PLUS – User Manual – 105 PARKING Module (P) 5.1.3. Parking Users Group PARKING Module (P) 5.1.4. Parking Zone The members of a user group can only access the parking spaces allocated to their group. Access to the parking lot is granted insofar as there are spaces available in the zone allocated to a group of users to which the driver belongs. This menu is divided into three tabs: ¾ General tab: for parking zone definition ¾ Access tab: for access management ¾ Presence update tab: for modification of database information 5.1.4.1. Parking Zone - General Fields Name: Name the parking zone Description: Describe the new data entry Zone identification: Parking user group: Select the group that rents or owns parking spaces or press on the […] button to create a new group. Parking lot: Select the parking lot for which a filling up list has been established, or press on the […] button to create a new parking lot. Max number of places: Enter the parking zone maximal capacity Actual free places: Automatically displayed Actual occupied places: Automatically displayed Process to activate when full: Define the process to trigger if the parking lot is full (example: lighting of a red light); choose from the list or press the […] button to create a new process. Process to activate when not full: Define the process to trigger if the parking lot is not full (example: lighting of a green light and opening of a gate); choose from the list or press on the […] button to create a new process. 106 PRONET PLUS – User Manual – PARKING Module (P) 5.1.4.2. Parking Zone - Access Fields Reader: List of the relevant readers Count mode: For the parking zone, indicate which reader is used for entrance in the zone, for exit the zone or is ‘neutral’, i.e. not used for this zone (it not modifies the places number). If zone full: Specify whether the reader should allow/deny access when the zone is full (for example, if it is used for exit, exit must be granted when the zone is full). 5.1.4.3. Parking Zone - Presence update In this screen, the system displays automatically for each parking zone, driver names and car license numbers of cars, which are currently in the parking zone and all members of the current user group. This screen is particularly useful when cars movements are not registered by the system (i.e. because of a power supply failure or a communication failure between readers and controllers). Then, it is possible to modify manually the list of cars, which are currently in the parking zone. This presence list is viewable from the “Parking Lot - Presence List” screen or from the “Parking Users Group - Presence List” screen. Fields Currently IN: Cars currently in the parking zone Name: Driver name Car number: License number of the car plate Actual free places: The counter displays the unused capacity of the parking zone, in real time. Buttons [] & []: Use the horizontal arrows for inserting or deleting a car from the parking zone. People in parking users group: Name: Driver name Car number: License plate number of the car PRONET PLUS – User Manual – 107 PARKING Module (P) Tips & Notes Duplicated items In the list of cars currently in the parking zone, duplicated items can be exist in case of the badge has been swiped twice at the entrance or if the same badge has been used for two cars. To avoid such a situation, the solution consists to define the readers with the (Global, Time or Local) Anti-Passback function. 5.1.5. Reset Parking Zones This function allows resetting all parking zone counters, i.e. after this action, all parking places will be free. Confirmation of the request is displayed on the screen. The application provides three ways to reset the parking zone counters: ¾ Punctually, by choosing the “Reset Parking Zones” menu and by answering “Yes“ to the question, ¾ Daily, in automatic way, by selecting this option in the “Tools - Options - Server” screen and by specifying the requested time for this operation, ¾ Automatically, by global reflex, by creating an action with the “Reset parking zones” type and by selecting which parking zone to update. Then, a global reflex may reset a specific parking zone counter by any trigger of the system (by swiping or by changing input status). It may reset the counter at a specific time, by choosing the “Scheduler” as global reflex event type and specifying the date and hour when the parking zone needs resetting (For more details, see the “Event handling - Actions” and “Event handling - Global Reflex” screens). 108 PRONET PLUS – User Manual – LIFT Module (L) 5.2. Lift Module 5.2.1. Lift Module - Basic Concepts This function manages access to the floors served by one or several lifts. The floor buttons of a lift are controlled by controller relays. The badge holder swipes his card through a lift reader: according to its authorizations, one or several relays are activated which unlock the corresponding floor buttons so that the badge holder may then press the button of the floor requested. A lift program defines the floors combination accessible by a group of users. This function does not control access to the lifts, nor to the areas served by these lifts. Lift programs can be identical for all lift readers belonging to the same controller or specific for each reader. The later is especially useful in big installations (a controller may have up to 64 relays). In a building shared by many companies, the lift program allows each person to select only the floors allocated to his company. Note: If the badge holder has not selected a floor within a specified delay, access will be denied to all floors. This prevents unauthorized persons from using the lifts. Example A site consists on two buildings. The first is made up of three floors and the second is made up of six floors. Each building has its own lift. Three user groups are defined: ¾ Top management can access all floors in both buildings ¾ Technical staff can access floors 1 and 2 of the first building and floors 1, 3, 4 and 5 of the second building ¾ Administrative people can access floors 1 and 3 of the first building and floors 1, 3 and 6 of the second building 6 floors building 3 floors building Lift To fill the needs of this site, three lift programs must be created with the following authorizations: Lift program User group A: Top management Top management B: Technical Division Technical personnel C: Administration Administrative personnel Accessible Accessible floors Building 1 floors Building 2 1, 2, 3 1, 2 1, 3 PRONET PLUS – User Manual – 1, 2, 3, 4, 5, 6 1, 3, 4, 5 1, 3, 6 109 LIFT Module (L) Operating Mode ¾ In the “Controller - General” screen, create two controllers as ‘Lift’, one by building. ¾ In the “Modules - Lift Program - General” screen, create three lift program groups, Top management, Technical Division and Administration, and for each group, allocate outputs to the lifts floor buttons, ¾ Allocate each member to his lift program group, by selecting from the “Lift program” list from the “All Cardholders - Personal” screen. Tips & Notes Maximum Controllers capacity: 64 floors A basic controller has 4 relays. With a 12-relay extension card plugged in and three 16 relays satellite cards connected to its port 2, the controller may have 64 relays and therefore control 64 floors. Several controllers can supervise different lifts in parallel. Many lifts A controller can manage several lifts with identical authorizations (in “Modules - Lift program” screen) or with specific authorizations for each reader (in “Modules - Lift authorization group” screen, when the ‘Different lift program for each reader’ option is selected in the “Tools Options - Server” screen that only appears in the server computer). This feature is required the use of EPROM TPL from 01/03/2003 or later. Example: a controller has 64 relays available Reader 1 - Lift 1: Reader 2 - Lift 2: Reader 3 - Lift 3: Reader 4 - Lift 4: 10 relays – 10 floors 20 relays – 20 floors 30 relays – 30 floors 4 relays – 4 floors Information with respect to the lift program is divided in two screens: ¾ Lift program, where the same relays / lift buttons applies for all readers of a same controller. ¾ Lift authorization group, where specific relays / lift buttons applies per reader. This case is particularly useful for significant sites. 5.2.2. Lift Program The screen “Modules - Lift Program” is used in the majority of lift applications, where the same relays / lift buttons applies for all readers. It is divided into two tabs: ¾ General tab: Define lift programs ¾ Cardholders tab: Refer to the persons belonging to the lift groups 110 PRONET PLUS – User Manual – LIFT Module (L) 5.2.2.1. Lift Program - General Lift programs are defined in this screen. Fields Name: Name the new lift program Description: Describe the new data entry View: ¾ Check V button to display the relays included in the lift program ¾ Check X button to display the relays excluded from the lift program Duration time (from 0 to 120 seconds): Delay during which the cardholder has to press the floor button after receiving access authorization; it corresponds to the activation delay of the relay which control the floor button selection. By default, a delay of 3 seconds is set. Note: Alternated mode (Duration time set to 122 Sec): The relay is activated (i.e. the floor button is available) after the first valid swipe and stays activated; the relay is only deactivated after a valid second badge reading and stays deactivated, and so on. Table: Relays list of the defined lift type controllers ¾ Select V to include the relay in the lift program ¾ Select X to exclude the relay from the lift program By default, the relays - and thus the corresponding floors - are excluded from the program. 5.2.2.2. Lift Program - Cardholders The informative table displays the names and surnames of the member the user group to which the lift program is related. This is not a presence list. This tab disappears when the ‘Different lift program for each reader’ option is selected in the “Tools - Options - Server” screen. PRONET PLUS – User Manual – 111 LIFT Module (L) 5.2.3. Lift Authorization Group This screen appears when the ‘Different lift program for each reader’ option is selected in the “Tools - Options - Server” screen. It is used in the lift applications, where specific relays / lift buttons applies per reader. It is divided into two tabs: ¾ General tab: Define lift authorization groups ¾ Cardholders tab: Refer to the member the user group to which the lift authorization group is related 5.2.3.1. Lift Authorization Group - General Lift authorization groups are defined in this screen. Fields Name: Name the authorization group new lift Description: Describe the new item Table: Controller: The list of the controllers associated to the lift Reader: The list of the readers associated to the lift Lift: Select a Lift Program from the list. 5.2.3.2. Lift Authorization Group - Cardholders The informative table displays the names and surnames of the member the user group to which the lift authorization group is related. This is not a presence list. This tab appears when the ‘Different lift program for each reader’ option is selected in the “Tools - Options Server” screen. 112 PRONET PLUS – User Manual – 5.3.1. Roll Call This screen allows the time & attendance management. It facilitates the computation of employees’ attendance, to provide the number of hours worked by employees. It is a very basic calculation, which only takes into account the first and last access of a cardholder at pre-defined readers. The calculation can be restricted to specific periods. Fields Start date: Specify the date and hour of the beginning of the period End date: Specify the date and hour of the end of the period Left window: Select the reader(s) to take into account Right window: Select the cardholders(s) to take into account Preview: Preview the roll call report PRONET PLUS – User Manual – 113 TIME & ATTENDANCE Module (T) 5.3. Time & Attendance Management Module GUARD PATROL Module (U) 5.4. Guard Patrol Module 5.4.1. Guard Patrol Module - Basic Concepts A guard patrol consists of a path of checkpoints reached by an authorized employee - the guard - within predefined deadlines. Arrival at a checkpoint is signalled via input activation or reading of a badge and results in a message sent to the PC. Each expected time allows for tolerance deadlines. Several tours can be defined and run in parallel. The log and the reports will show them. Example 8:00 Guard tour beginning 8:06 - 8:15 Predefined authorized arrival period at the first checkpoint, the guard should activate an input to signal his passage (expected time: 8:10, tolerance (-):04 min, (+): 05 min) 5.4.2. Guard A guard is an employee habilitated to perform guard tours. An employee is defined as a guard in one of the two following screens: ¾ "All cardholders - General" screen, by manually setting his type to "Guard" ¾ "Guard", in which the type is automatically set to "Guard". 5.4.3. Checkpoint - General Checkpoints, as well as the inputs or readers that are used to confirm the arrival, are defined in this screen. Note: The identity of the person changing the input status is not known by the system. If the security level requests the guard identity verification, readers should be installed at each checkpoint. Fields Name: Name the checkpoint Description: Describe the new data entry Input: Select the input that signals the arrival of the guard among the list of system inputs; it must be armed (through its Weekly Program) before the start of the tour. Reader: Select the reader that will signal the arrival of the guard among the list of system readers. Event: Choose event in the list ¾ Start of alarm (if input) ¾ Access granted (if reader) ¾ Access granted (duress code) (if reader) ¾ Access denied (if reader) ¾ Access denied (unsuccessful attempts) (if reader) Example of access denied: The guard must pass in front of the computer room but is not allowed entering it. 114 PRONET PLUS – User Manual – GUARD PATROL Module (U) 5.4.4. Guard Tour Program 5.4.4.1. Guard Tour Program - General This screen allows the guard tours definition. Select the processes to activate following the arrival of the guard at the checkpoint. Processes on alarms can be activated according to early or late arrival or the lack of it. Fields Name: Name the new tour Description: Describe the new item Process on arrival: Select the process to trigger on arrival in the list or press on the […] button to define a new one. Examples: Voice alarm on PC, relay activation triggering a buzzer, etc. Process on alarms: In the lists, select the process to trigger or press on the […] button to define a new one, in case of: ¾ Early arrival: Arrival before the expected time minus its allowance. ¾ Not arrival: Automatic message displayed at the end of the expected arrival deadline (including the allowance and a further 60 seconds) if arrival has not been signalled. ¾ Late arrival: Arrival after the expected arrival time (including the allowance and a further 60 seconds). 5.4.4.2. Guard Tour Program - Checkpoints To complete the definition of the guard tour, this screen defines for each checkpoint the arrival time, including allowance for early (-) and late (+) arrival. The arrival times are computed from the beginning of the tour. They are independent of the actual time the tour begins - unknown at this state - and of previous checkpoints time. Note: Some computers will display the time as "0::00" instead of "00:00". This does not affect the operation. Fields Checkpoints: Select checkpoints of the tour path. the Time: Specify the arrival time, in relation to the beginning of the tour and expressed in a "hh : mm" format [ – ]: Tolerance for early arrival [ + ]: Tolerance for late arrival Delete selected row: Point on one of the checkpoint rows and press this button to delete it. PRONET PLUS – User Manual – 115 GUARD PATROL Module (U) 5.4.5. Guard Tour Status This screen displays the current guard tours, with their details (checkpoints list, expected times of arrival with tolerance limits and arrival status) in real time. Data displayed Refresh: Click on this button to update manually the guard tour information. Refresh each: Click on this button to update automatically the guard tour information. Define the refresh delay in Sec. before. Currently running: List of the current guard tours with mention of the guard, which patrols and with the date and time of the beginning of the tour. By selecting a guard, the right window displays the selected guard tour details. Details: Information concerning the guard tour selected in the left window, including checkpoints name with its upper and lower time limit of arrival time. Different icons are showing the type of arrival at each checkpoint: : Not arrived yet : Arrival (on time) : Early arrival : Late arrival : No arrival on time (inside the limit of time) Bottom window: Log restricted to the selected guard tour. Note: In addition to this screen, when a guard arrives at a checkpoint (by activating an input or by presenting a card to a checkpoint reader) two messages are displayed in the main log: ¾ Message of activated input or badge reading event, ¾ Message of guard tour events (arrival on time, late arrival, etc.) Example A guard tour has the following check point: Time: 00:10 [–]: 00:04 [+]: 00:05 8:00 8:00 - 8:06 8:06 - 8:15 8:16 8:16 - 8:31 8:31 116 Guard Tour start-up: The guard starts the tour Arrival time: 8h10 (–4 min / +5 min) Early arrival: Arrival before the lower limit of the expected arrival period Arrival on time: Arrival within expected arrival period No arrival on time: If the guard has not shown up at the checkpoint at the upper limit of the expected arrival period Late arrival: Arrival at the checkpoint after the expected time (+60 sec. for system synchronization) End of tour: 15 min after the last checkpoint expected time, plus the tolerance for late arrival (plus 60 sec. for system synchronization). PRONET PLUS – User Manual – GUARD PATROL Module (U) 5.4.5.1. Beginning a Guard Tour The application provides two ways to launch a guard tour: ¾ Punctually, by executing a launching process: In the “Event handling - Actions” screen, create an action with the type "Start a guard tour", by specifying the corresponding guard tour program and the guard name. In the “Event handling - Process" screen, create a process including this action. Launch the process via the "Manual action - Execute Process" screen. ¾ Automatically, by global reflex, after defining a tour process as explained above. Then create in the “Event handling - Global Reflex” screen, a global reflex, which will launch the tour process by any trigger of the system (by swiping or by changing input status). The guard tour may be launched at a specific time and date, by choosing the “Scheduler” as global reflex event type. Tips & Notes Scheduler weekly program A specific weekly program may be allocated to each global reflex. Therefore the guard tour will not be launched at the ‘red periods’ of the selected weekly program. Restarting a tour Restarting a running tour will stop this tour and replace it by a new instance. 5.4.5.2. Ending a Guard Tour The guard tour ends 15 minutes after the expected arrival time at the last checkpoint. After this delay, the guard tour is removed from the “Guard Tour Status” screen. 5.4.6. Patrol Report By opening this screen, the system links directly to the simple patrol report of the report generator. Two types of patrol reports are available: ¾ Simple, with the date, transaction, from and data fields. ¾ Detailed, with the date, transaction, reader, name in journal, denied reason, full name, type, badge, number, department, access group and ID fields. Consult the “Report wizard” section for further explanations. PRONET PLUS – User Manual – 117 VIDEO Module (V) 5.5. Video Module 5.5.1. Video Module - Basic Concepts This module opens the application abilities to the video supervision camera management. It is needed to define the Digital Video Recorder (DVR) with its associated cameras and it is then possible to view live or recorded video from any linked cameras, at any time and on any workstation. On site maps, clicking on cameras icons displays live image from each camera or records video from each camera. In addition, live video display and video recording may be defined as actions, and as such, may be triggered by a global reflex. Moreover, a camera can be linked to an event (start of alarm, badge presentation, etc.) and then it is possible to analyze the video records corresponding to this event. These records are accessible at any time in the log display and in the reports. Note: It is required to use DVR manufactured by Dedicated Micros (Digital Sprite 2 – DS2 and Eco 4). For more information about its products, see www.dedicatedmicros.com. Examples ¾ The access of a room is forbidden; it is possible to display automatically live image of the room, as soon as someone tries to enter. ¾ An object was stolen; the software will allow viewing all video recordings from the relevant camera. Operating Mode ¾ In the “DVR” screen, create the different DVR, by defining their IP address, their user name and their password. ¾ In the “Camera” screen, create all the video cameras, by defining on which DVR they are linked and what is their no. on that DVR. In case of PTZ (Pan/Tilt/Zoom) cameras, select one of the pre-defined positions. 118 PRONET PLUS – User Manual – VIDEO Module (V) Available functions: ¾ To display live image from any linked cameras: Create a ‘Display live video’ action, add it to a process. Activate this process either by: o global reflex (after start of alarm, badge presentation, etc.) o adding this process in the toolbar o adding the action/process icon to the active alarm map, (to enable opening the camera view directly from the “Event-Handling - Active Alarms” screen). ¾ To record video from any linked cameras: Create a ‘Record video’ action, add it to a process. It is possible to activate this process in the same way as the previous process. ¾ To view a history video record from the log: Select a video camera from the camera list of the “Reader” or the “Input” screen in order to link this camera with all events of that reader/input. In the “Tools - Options - Journal / log screen” screen, change the log type into ‘Rich log’. Then, in the log display, a ‘camera’ icon will be displayed near each transaction associated with this reader/input (see also the “Rich Log” paragraph). Each transaction on that reader/input is automatically associated to the corresponding video recording. By right clicking on the events with a camera icon, users can see the corresponding video record. ¾ To view a history video record using the report wizard: Select a video camera from the camera list of the “Reader” or the “Input” screen in order to link this camera with all events of this reader/input. Then, through the report wizard, click Next, select "Journal Simple" from the list of available reports and click on the “View data". Events from these readers/inputs linked are shown with a camera icon. Right clicking on these events gives an option to view the corresponding video records. Tips & Notes Video recording synchronization Every hour, the application sends the PC time and date to the DVR to allow correct synchronization between video and access components. PRONET PLUS – User Manual – 119 VIDEO Module (V) 5.5.2. Video Module - DVR This screen allows the different digital video recorders definition. Fields Name: Name the new DVR DVR type: Select the DVR type IP address: Specify the IP address of the DVR User: Specify the user name of the DVR Password: Specify the password of the DVR Description: Describe the new item Company: Company the item refers to (for use with multi-company application ONLY). 5.5.3. Video Module - Camera This screen allows the different video cameras definition. Fields Name: Name the new video camera DVR: Select from the list the DVR on which the video camera is linked or create a new DVR by clicking on the […] button. Number: Select the camera number on the DVR. Preview: Click on this button to display the live image from the selected video camera. Dome: This field enables selecting a preset for PTZ cameras. Preset: Select the preset for PTZ cameras. Description: Describe the new item. Company: Company the item refers to (for use with multi-company application ONLY). 120 PRONET PLUS – User Manual – 6. “Communication” MENU 6.1. Stop / Resume Polling Polling allows the transfer to the PC of events (card transactions and alarms) processed by the controllers. Polling consists in interrogating controllers at regular intervals. Detection of events in real time allows for rapid information update and decision making with full knowledge of the facts. The time interval between two polling transactions is defined in the “Waiting Delay” function in the “Parameter - Controller Network - Definition” screen. Commands Resume polling (shift + F8): Select this option to activate the polling Stop polling (shift + F8): Select this function to stop polling Tips & Notes Keyboard Shortcut Use the “shift F8” key at any time, from any screen, to modify polling status. Polling at start-up By default, the system carries out a polling activity at the start of the application. This option can be modified in the “Tools - Options - Communication” screen by changing the status of the “Do polling at start-up” function. 6.2. Diagnose The diagnose screen allows the visualization of the controllers status and the biometric readers status. This screen is made up of two windows: ¾ Left window: Controllers list / biometric readers list ¾ Right window: Information regarding the selected controller or biometric reader Selecting a controller or biometric reader from the left window activates the right window where the details of the selected controller or biometric reader are displayed. PRONET PLUS – User Manual – 121 Menu Download: Menu of the available downloads for the selected controller or biometric reader Communication: allows to check the communication with controllers: ¾ Check communication (All) ¾ Check communication (selected): Select the controller(s) to check (by clicking on the button next to the controller name) ¾ Refresh every: For automatic checking. Select the controller(s) to check and define the refresh delay in Sec. Hardware: allows to check the inputs/outputs status of the controller displayed in the right window: ¾ Refresh status: Display before the selected controller details in the right window ¾ Refresh every: For automatic checking. Select the controller(s) to check and define the refresh delay in Sec. Status for: Choose the information to display: ¾ Controller: Press this button to display the controllers status ¾ Biometric readers: Press this button to display the biometric readers status: From the ‘Download’ menu it may be possible to initialize one or several biometric readers by re-sending all the database templates after deleting all the fingerprint templates from the reader memory. Data displayed Left Window: The controllers / biometric readers list, is sorted by their controller network. Controller or biometric reader communication status is graphically represented as follows: ¾ Grey: if the controller or the biometric reader is not active, (the communication is not monitored by the system) ¾ Bold: if the controller or the biometric reader is active, (the communication is controlled by the system) in which case, by clicking on the controller or biometric reader name, V or X icon is displayed next to the name: X: absence of communication V (with date and hour): communication established; the controller or the biometric reader details are displayed in the right window Right window: Details of the controller or the biometric reader selected in the left window Controller or Biometric reader name Status received at: Date and hour of the event (the controller time when request was put in can differ from time of request if internal controller clock is late) Network type: Network name, which the selected controller or biometric reader belongs to: ¾ Port and address of the network: COM, TCP or Modem ¾ Communication speed (in bauds) ¾ Time out delay (in milliseconds) ¾ Time out polling (in milliseconds) ¾ Waiting delay (in milliseconds) Controller address (from 00 to 31) or Biometric reader address 122 PRONET PLUS – User Manual – Controllers specific data: Click here to get firmware version: The date and the checksum of the firmware (Eprom or Flash) is displayed on the screen; this operation avoids checking physically, if needed. Inputs: Inputs list with [input number] and [NO or NC definition]. An icon next to the input name specifies the input status (normal status, activated or undetermined) in real time. Outputs: Outputs list with [relay number]. An icon next to the output name specifies the relay status (activated, deactivated or undetermined) in real time. Pending: Selected controller commands list and their status. When downloading a nonconnected controller, for instance, the information downloaded is signalled by the V symbol and the information pending by the X symbol. Biometric readers specific data: Unit type: Biometric reader type (1:N means BioPass, 1:1 means BioProx or BioFlex). Memory Usage: Appears in X / Y format where: ¾ X = Used templates ¾ Y = Maximum templates capacity. Pending: Some actions related to the biometric readers may be not executed i.e. following to a temporary communication failure. These actions are stored in a buffer as pending commands and are executed later when communication is regained. These are the following actions: ¾ Delete the entire template of a cardholder ¾ Delete all templates of a given badge ¾ Delete all template of a biometric reader ¾ Delete a specific template ¾ Download all templates to a specific biometric reader ¾ Download cardholder templates to all the biometric readers ¾ Download a single template to all the biometric readers ¾ Replace an old badge with a new badge When the V symbol is displayed near the title ‘Pending’, it means that all the fingerprint templates have been received well by the biometric reader. Tips & Notes Keyboard Shortcut Use the “F8” function key at any time, to display the diagnose screen from the software main screen. PRONET PLUS – User Manual – 123 6.3. View / Clear Log The log display is a temporary linear colour display that indicates events as they occur. Information to display in the log (and in the journal) can be customized in the “Tools - Options Messages” screen. Through that screen an audit of records modifications can be recorded. Note: Similar information can be recorded in the journal for later reference and printing. Although they appear similar, the contents of the log display and those of the journal are not 100% identical. For example, the user login appears in the journal but not in the log display, by default. Messages By default different colours indicate the type of information available: Burgundy: For signalling unknown badges (not recognized by the system), non-allocated badge (recognized by the system but not allocated) or system alarms, such as weak battery, power up after failure, memory deleted, etc. Red: For signalling the start and end of input activation Green: For signalling an access authorization and a normal communication status (OK) Black: For signalling an access denied and its denied reason Grey: For signalling system commands, provided for informational purposes. They are not displayed by default. Tips & Notes Customization of the Log Display The “Tools - Options - Journal / log screen” screen displays different customization: view/hide log windows at start-up, separate log windows for alarms and access, define a personal log windows size, show system commands for information. Rich Log Rich log allows seeing icons linked to events and a context menu. It is available by choosing the ‘Rich log’ option on the “Tools - Options - Journal / log screen” screen. Its main use is for viewing historical video records directly from the event log. 124 PRONET PLUS – User Manual – ¾ Icons: They are displayed at the left of the log event row : A video camera is linked to this event (see the ‘Reader’ and ‘Input’ screens). : An action « Record video » is linked to this event (see the “Types of actions with parameters” table). ¾ Context menu: By clicking right on some log events, here are the available commands: Launch video: Open the history video record linked to the associated event (i.e., event that has one of the above icons). See the “Video Module” chapter. Open cardholder screen: Open the associated cardholder screen. Open reader screen: Open the associated reader screen. Open input screen: Open the associated input screen. Open controller screen: Open the associated controller screen. 6.4. Display Photo This screen displays the cardholder’s picture which asks for access at a specific reader. It allows to compare the appearance of the person presenting his badge at a reader to the photograph associated to the badge and stored in the system. Note: The screen size can be adjusted. Fields From readers: Select the reader(s) or the access group(s) for which the identification check is requested Always on top: Check this box to show this screen even if other screens are opened Open employee screen: Click on this button to open the current employee screen Clear all records: Clear the displayed employees list Buttons [e] & [f]: Click on these buttons to skip from one record to the next Number/Number: Number of the current employee on the total number of displayed employees PRONET PLUS – User Manual – 125 7. “Manual action” MENU 7.1. Crisis Level The crisis level function enables simple and quick modification of access authorizations for a group of employees. Access denial for all doors could have been achieved through a specific action. However, since this action is connected to an individual, it would have been necessary to repeat this procedure for each employee separately. Downloading access authorization modifications, for a group of 1000 employees at 30 controllers, could have taken up to thirty minutes. The “Crisis Level” function solves this problem. This feature is required the use of EPROM dated beyond the year 2000. In order for a door to open, the following conditions must be met: ¾ Badge recognition ¾ Employee validity ¾ Access validation through the door ¾ Employee access time zone compatibility ¾ Door open time zone compatibility ¾ Absence of global reflex closing the door relay When using the ‘Crisis level’ function a further question need asking: What is the relative value of the door crisis level regarding the general crisis level? Each access group has on each door, a crisis level to compare with the general crisis level. Following to the general crisis level, defined in the previous screen, access will be granted or denied. ¾ If the door crisis level is > or = to the general crisis level: Î Access is granted ¾ If the door crisis level is < to the general crisis level: Î Access is denied ¾ If the door crisis level is on <Use personal crisis level>: If the Personal crisis level of the cardholder is > or = to the general crisis level: Î Access is granted If the Personal crisis level of the cardholder is < to the general crisis level: Î Access is denied The Personal crisis level is defined in the “All cardholders - General" screen. By default, the general crisis level is equal to zero and the one for doors depends on the access group, which means that everybody can go through any door. When creating a new access group, by default the crisis level of all doors from the group is null. In order for the system to run optimally all the readers connected to a controller must have an identical crisis level. 126 PRONET PLUS – User Manual – Example A site is composed of three doors: Entrance Door, Office Door and R&D Door. In a normal situation, all authorized employees can enter at the Entrance Door, the engineers are denied access to the Office Door and some secretaries can enter at the R&D Door. In case of emergency, even the engineers are denied access to the R&D Door. To do so, create three access groups as follows: ¾ Top Management access group, with the door crisis level 6 (then, with all general crisis level, the members of this group will always have access): ¾ Administration access group, with the door crisis level 4 for the Office Door and the door crisis level on <Use personal crisis level> for the R&D Door: ¾ Engineering access group, with the door crisis level 3 for the R&D Door: Reader … Weekly Program … Crisis level V Entrance Door WP Always 6 V Office Door WP Always 6 V R&D Door WP Always 6 Reader … Weekly Program … Crisis level V Entrance Door WP Always 6 V Office Door WP Always 4 V R&D Door WP Always <Use personal crisis level> Weekly Program … Crisis level Reader … V Entrance Door WP Always 6 X Office Door WP Always 3 V R&D Door WP Always 3 In a normal situation, the general crisis level is 1: ¾ For the Office Door: - The door crisis level of the Administration access group is 4 (> 1) ¾ For the R&D Door: - The door crisis level of the Engineering access group is 3 (> 1) - For secretaries which have a Personal crisis level > or = 1 - For secretaries which have a Personal crisis level = 0 (< 1) Î Access is granted Î Î Î Access is granted Access is granted Access is denied In case of emergency, the general crisis level is changed and increased to 4: ¾ For the Office Door: - The door crisis level of the Administration access group is 4 (= 4) Î Access is granted ¾ For the R&D Door: - The door crisis level of the Engineering access group is 3 (< 4) Î Access is denied - For secretaries which have a Personal crisis level > or = 4 Î Access is granted - For secretaries which have a Personal crisis level < 4 Î Access is denied Tips & Notes Last defined crisis level The last crisis level specified to the system is shown in the “Manual action - Crisis Level“ screen. Back to a normal situation When the crisis is over, allocate a normal value (0 or 1) to the crisis level to regularize the situation. PRONET PLUS – User Manual – 127 7.2. Relays Control This screen displays in real time the dynamic status of relay activation. It is accessible from the “Active Alarms - Output Status” screen too. This screen is made up of two windows: ¾ Left window: System controllers list ¾ Right window: Relays regarding the controllers selected Menu Action: ¾ Refresh: Click on this button to update manually the relays information. ¾ Return to normal mode: To cancel all actions described below. ¾ Activate relay continuously (Constant ON): Constant relay activation, for a permanent door opening for example. ¾ Deactivate relay continuously (Constant OFF): Constant relay deactivation, for a permanent door closing for example. ¾ Activate relay during: Temporary relay activation, for switching on / off an indication light, during a defined delay for example. Specify the number of seconds (from 1 to 120 sec.). Table analysis Left Window: System controllers list sorted by controller network. Select the required controllers. Inactive controllers are represented in grey. Name: Relay name Controller: Controller name that the relay belongs to Num: Output number in the controller. Physical status: Open or Close. During reading time or communication problems with the controller, a ‘?’ mark is displayed to show that the status is unknown. Time activation: This column shows if a Weekly Program has been attributed to the relay: ¾ V ON by weekly program: The relay is activated because a weekly program has been attributed and the current time falls within the activation boundaries of the weekly program (‘green’ periods’). The relay is automatically activated according to time zones. ¾ X OFF by weekly program: The relay is deactivated because a weekly program has been attributed and the current time falls outside the activation boundaries of the weekly program (‘red periods’). The relay is automatically released according to time zones. ¾ No text: No weekly program has been attributed to the relay. Note: The “WP Always” weekly program permits to trigger incessantly a relay while the “WP Never” weekly program ensues in a constant deactivation. Latest action: Shows if the normal situation has not temporarily been affected manually or by the activation of an action, a process or a global reflex. 128 PRONET PLUS – User Manual – ALARM Module (A) Tips & Notes Sorting out information The information in the table can be sorted out. Each column can serve as a sorting criterion. To organize information in an increasing order, click on the column header. To sort the information in a decreasing order, click again on the column header. 7.3. Execute Process The following screen reassembles all processes of the database with their associated icons. Command Buttons Execute: Click for executing the selected process. Large icons, Small icons, List & Details: Click on these buttons to display the existing processes with large icons, small icons, simple list or detailed list. Exit: Click to close the “Execute Process” screen and go back to the main screen. Note: Double-Clicking on one of the icon of the screen launches the associated process automatically. PRONET PLUS – User Manual – 129 8. “Tools” MENU 8.1. Report wizard 8.1.1. Report wizard - Basic Concepts PRONET PLUS system incorporates a powerful report wizard for generation, modification and update of personalized reports. Reports are compiled from the journal or from any other information of the database (parameters, events or modules). They are generated in the language of the application. They can be displayed, printed or exported. Four user-friendly screens lead, step by step, the user to the widespread functions. They fit the need of the layman as well as those of the confirmed user. 8.1.2. Report wizard - Step 1 / 4: Report Selection The first screen of the report wizard allows for consultation of existing report and creation of new ones. It is accessible via the icon of the navigation bar or via the ‘’Tools‘’ menu. Note: The last report is automatically saved. Command Buttons Large icons, Small icons & List: The three blue icons allow the organization of the list of the existing reports into the screen. Print: Click to print the selected report Preview: Click preview on the screen the selected report, as it will be printed Design: Click to re-design the report printing (for confirmed users only) Simple reports: Click to create quickly a standard journal report or to display a journal query Next: Click to go to the next step of the report wizard Exit: Click to close the report wizard and go back to the main screen What to do: ¾ To create a pre-defined standard journal report: press the “Simple reports” button. ¾ To create a new report: select the ‘Create a new report’ icon from the list and press the “Next” button. ¾ To print an existing report: select it from the list and click on “Print” button ¾ To edit or export an existing report: select it from the list and click on “Preview” button ¾ To modify an existing report: select it from the list and click on “Next” button 130 PRONET PLUS – User Manual – 8.1.2.1. Report wizard - Step 1 / 4 - Simple reports This screen allows the creation of a standard journal report based on customized queries. Fields Select the report data to display: ¾ From Current Journal (by default) ¾ From another journal: Select the journal by using the […] button (with “Access” database ONLY) All records: Check this box to display all the information available in the system; the bottom part of the screen is shaded grey. If this option is not checked, the bottom part of the screen is activated to allow the selection of the data filtering criteria. Filtering and Sorting out data: Select the data filtering criteria from the journal ¾ According to date: Select the date and hour of the start and the date and hour of the end. ¾ According to reader: Select the required reader(s). ¾ According to events: Choose the events to keep: Inputs alarms, Access granted, Access denied, System alarm, User comments, Unknown badge. ¾ According to cardholders: Select the required cardholder(s). ¾ Sort order: Select the desired display order of the data. Show: Click to display the report data. Close: Click to close the report wizard and go back to the main screen. 8.1.2.2. Report wizard - Step 1 / 4 - Preview This screen allows the preview of an existing report before printing and/or exporting. Toolbar Buttons Export: Click to export the selected report in the following formats: ¾ RTF - Rich Text Format ¾ PDF - Portable Document Format ¾ HTML - Hyper Text Markup Language ¾ XLS - Microsoft Excel ¾ TIF - Tagged Image Format ¾ TEXT Print: Click to print after having specified printing parameters. Copy this page in the clipboard: Click to copy the current page only Find: Click to search for a specific word in the selected report. Single Page, Multiple Page, Zoom Out, Zoom In, Zoom: Click to adjust the report preview. Previous Page, Next Page, Page: Click to navigate in the report. PRONET PLUS – User Manual – 131 8.1.2.3. Report wizard - Step 1 / 4 - Design This screen is reserved for confirmed users only. It allows the design of an existing report. Clicking on the ‘Preview’ tab displays the preview of the report; it is useful to check the new modifications in real time. Operating Mode The Design tab is based on a professional tool of Active Report ®. In this manual we will not cover the large variety of options but we only give some basic instruction and tips: ¾ Moving selected fields: Select an existing field and drag and drop to the required position in the window. ¾ Lengthen or shorten the space allocated to a field: Select an existing field and drag the blue squares around the field to resize it. ¾ Delete a field: Select an existing field and delete it. ¾ Change the text in a label/text box: Select the field and edit the text on the ‘Property ToolBox’ window, in ‘Caption’ (for a label) or ‘Text’ (for a text box). Don’t change ‘Name’. ¾ Change the font: Select an existing field and change the font on the ‘Property ToolBox’ window, in the ‘Font’ field. ¾ Add a new field or a picture: Select the field type from the toolbar on the left and drop it in the layout. If it is a picture field, go to the “Picture” field of the ‘Property ToolBox’, click on the […] button and browse your PC for any graphic file. ¾ Change the Report Header background: Select the Report Header window and change in the ‘Property ToolBox’ window, the “BackColor” field and set the “BackStyle” field to 1. ¾ Save all changes: Select the ‘File/Save’ menu and save the report on the ‘Reports’ folder under the application folder with RPX format. 132 PRONET PLUS – User Manual – 8.1.3. Report wizard - Step 2 / 4: Data Selection This step of the report wizard and the next steps allow creating a new report or modifying the structure of an existing report. This second step enables the selection of the data source and the choice of the columns that appear in the report. By default, certain columns are automatically selected by the system. This choice and their order are easily modified. Note: This screen is also displayed at any time from any screen, by clicking on the “Print” button (“F11” function key), to display the report of the corresponding parameters. Data displayed Left Window: Data sources list sorted by report type. Select the required data source Right Window: The list of available fields to display in the report. The wordings on blue background appear by default in the report; the others will not be displayed in further stages. Click on a field to include or exclude it from the selection. Buttons [ ] & []: Click on these buttons to move a selected field in order to re-order the columns in the report as required. Select the report data to display: PRONET PLUS allow the choice of the journal (period) of the report: ¾ From current journal (by default) ¾ From another journal (with “Access” database ONLY): Select any other journal of the system by using the […] button, and specify its name and its directory. View data: Click on this button to preview the content of the data; click again on the “View data” button to quit this mode. Previous: Click on this button to return at the previous step of the report wizard. Next: Click on this button to go to the next step of the report wizard. Exit: Click on this button to close the report wizard and go back to the main screen. What to do: ¾ To display the available data sources of a report type: double-click on the required report type from the left window ¾ To display the available fields of a data source: click on the required data source from the left window; the list of available fields appear in the right window, some of them already selected (in blue). ¾ To select the required fields: click on the available fields from the right window for changing the default selection according to your requirement ¾ To re-order the fields as required: use the arrows button to move the fields. The “View data” button may be used to preview the data of the report. ¾ To continue the creation or the modification of a report: press the “Next” button to go to the next step of the report wizard PRONET PLUS – User Manual – 133 8.1.4. Report wizard - Data Viewing Open the “Report Wizard”, click ‘Next’, select "Journal Simple" from the list of available reports and click on the “View data". This screen allows previewing the content of the current report data at the different steps of the report wizard. Clicking on the “View data” button opens it. Data displayed Date, Transaction, etc.: Data fields that will be printed in the final report. The report data are discribed below, row by row. : A video recording is linked to this event. A context menu is displayed by clicking Icon right on it, proposing to launch the video record linked to the corrsponding event (for use with the Video Module ONLY). Command Buttons Buttons [e] & [f]: Click on these buttons to skip from one record to the next. Buttons [⎥e] & [f⎢]: Click on these buttons to select the first or the last record. View data: Click on this button to exit the screen and return to the report wizard. Exit: Click on this button to close the report wizard and go back to the main screen. 134 PRONET PLUS – User Manual – 8.1.5. Report wizard - Step 3 / 4: Data Filtering The third screen of the report wizard allows to fine tune the report by filtering the data. The fields selected in the previous screen are displayed at the top of the list. Fields non-withheld appear below the separation lines. When appropriate, fill the filtering criteria in the right window. It is possible to specify filtering criteria for fields not mentioned in the report. Data displayed Left Window: The list of the fields. Select the fields to filter Right Window: The filtering criteria of the selected field. Fill the criteria, if needed Options: ¾ Select from all available values: All the data of the selected field appear on the right window ¾ Select from current query values: For restricting the criterion choice to current query. View Data, Previous, Next, Exit: Same functions as described in the previous step. What to do: ¾ If filter is not required, press the “Next” button to go to the next step of the report wizard. ¾ To keep into the report only specific data: select from the left window the fields to which the data belong in order to display in the right window the associated filters: If the selected field has a date format, use the filters: ‘From’, ‘To’, ‘In the last X Months’, ‘In the last X Days’ for limiting the report to a specific period. If the selected field has a number format (i.e. Personal crisis level), use the filters: ‘Greater than’, ‘Smaller than’, ‘Equal to’ for limiting the report to one or several specific values. If the selected field has a Boolean format (i.e. No access during holidays), use the filters: ‘Yes / true’, ‘No / False’ for limiting the report to a specific answer. If the selected field has a text format (i.e. Full name), unselect the ’All’ option and then, select the data which must remain in the rapport. The ‘Select all’, ‘Select none’ and ‘Invert’ buttons may help the selection. The ‘<NULL>’ selection of the selected field allows to leave in the report only the records for which this field is empty. ¾ To preview the data of the report: press the “View data” button (see the “Report wizard Data Viewing” paragraph). ¾ When only the data requested are filtered: press the “Next” button to go to the next step of the report wizard. PRONET PLUS – User Manual – 135 8.1.6. Report wizard - Step 4 / 4: Data Organization This last step allows data organization before preview for printing or exporting. Data displayed Left Window: Double-click on the fields for sorting it by alphabetical order or by reverse order (Z to A) or for cancelling the sorting; by default, the data are sorted alphabetically on the first field from the list. Right Window: Double-click on the fields for grouping the sorted data by the selected criterion; by default, no field grouping is selected. Buttons [ ] & []: Click on these buttons to classify the sorted fields or the grouped fields by importance order. Orientation: Specify the report orientation (Portrait or Landscape) Save report as: Specify the name and the saving directory of the file. Accept the system choice or modify it with the […] button. What to do with the report: Print the report, Preview the report, Design the report Finish: Click to save the report and to execute the selected option (Print the report, Preview the report or Design the report). View Data, Previous, Exit: Same functions as described in the previous step. What to do: ¾ To name the report: type the name in the “Save report as” field. This name will appear in the available reports list, in the “Report wizard - Step 1 / 4: Report Selection” screen and then, it could be opened easily. ¾ If sorting the report is not required: press the “Finish” button to save and preview the report, as it will be printed (see the “Report wizard - Step 1 / 4 - Preview” paragraph). ¾ To sort or group the data into the report: double-click on fields from the left window for data sorting or from the right window for data grouping. ¾ To preview the data of the report: press the “View data” button (see the “Report wizard Data Viewing” paragraph). ¾ When the data are sorted or/and grouped: press the “Finish” button to save and preview the report, as it will be printed (see the “Report wizard - Step 1 / 4 - Preview” paragraph). ¾ To print directly the report: select the “Print the report” option and press the “Finish” button. ¾ To modify the structure of the report: select the “Design the report” option and press the “Finish” button (see the “Report wizard - Step 1 / 4 – Design” paragraph). 136 PRONET PLUS – User Manual – 8.2. Create New Database The PRONET PLUS application allows the storage of several databases. The application installer has thus a constant access to all sites databases. This command permits to create a new clean database, which becomes the active database. This command is NOT available with SQL database. If using the Multi-company Module, this option will be available for super-users only (See the “Multi Company Module” chapter for further reference). A warning message is displayed before applying the request in case of wrong action. Information from the current database is saved. The system displays in a message (see opposite) the name of the saved file. A database creation leads to create a new journal. The system displays in a message (see opposite) the filename, which contains the former journal. The extension of the file is ‘mdb’ (Access database only). By default, the files are saved in the directory: “C\ProgramFiles\Amadeus5\Backup”. The default destination can be modified in the “Tools - Options - Files Location” screen. 8.3. Save Database This command permits to save the database. The size of the PRONET PLUS database cannot exceed 70Mb for good operating condition. Once a month, it is therefore advisable to clean the system of unnecessary data. By selecting this command, the system opens a saving window with the Windows functions. By default, the system names the saving file with the current time and date automatically, but the name can be modified. To overwrite a database, select it from the displayed list and confirm or cancel the operation. The system displays in a message (see opposite) the name of the saved file. By default, the files are saved in the directory: “C:\ProgramFiles\Amadeus5\Backup”. The default destination can be modified in the “Tools - Options - Files Location” screen. PRONET PLUS – User Manual – 137 8.4. Restore Database This command permits to restore a saved database. By selecting this command, the system opens a loading window with the Windows functions. If using the Multi-company Module, this option will be available for super-users only (See the “Multi Company Module” chapter for further reference). To restore a database, select it from the list displayed and confirm or cancel the operation. If the operation is confirmed (and if the chosen file contains a valid Amadeus database), then the system saves the current database and replaces it with the new one. Fields Look in: Select the folder where is located the required database. By default, the selected folder is: “C:\ProgramFiles\Amadeus5\Backup”. This default destination can be changed in the “Tools - Options - Files Location” screen File name: Enter the filename containing the database Files of type: Select the file type ¾ Database files (*.mdb): Default extension for Access database ¾ Database files (*.bak): Default extension for SQL database ¾ All files (*.*): Ability to open a database created by other applications Open as read-only: Check this box if the database is loaded for consultation only. Once the restoring is done, the system displays a message (see opposite), with the filename of the former database. 138 PRONET PLUS – User Manual – 8.5. Switch Database This menu is automatically displayed when a secondary database (redundant connection string) is indicated in the “Tools - Options - SQL Server” screen. This menu is ONLY available with SQL database. It allows switching from a database to another one (from the main database to the secondary database, and vice versa). 8.6. Create New Journal A journal is a database of all the events that have occurred in the system. The PRONET PLUS application allows the storage of several event journals and permits to consult them easily. For good operating condition, it is recommended not to let the journal grow more than 150Mb. When the journal reaches this size, it is time to use this command for creating a new journal. This command automatically saves the current journal in a back-up file and creates a new clean one. Then, this clean journal becomes the current journal. This command is NOT available with SQL database. If using the Multi-company Module, this option will be available for super-users only (See the “Multi Company Module” chapter for further reference). A warning message is displayed before applying the request in case of wrong action. The system displays in a message (see below) the filename, which contains the former journal. The system automatically names the saving files with the current time and date. The extension of the file is ‘mdb’ (Access database only). By default, the files are saved in the directory: “C\ProgramFiles\Amadeus5\Backup”. The default destination can be modified in the “Tools - Options - Files Location” screen. Tips & Notes Automatic Journal creation It can be useful to create a global reflex that will renew the journal on an automatic and a regular basis, each 2 months for example (For more details, see the “Event handling - Action” and “Event handling - Global Reflex” screens). PRONET PLUS – User Manual – 139 8.7. Save Journal This command permits to save regularly the entire or a part of the journal. For good operating condition, it is recommended not to let the journal grow more than 150Mb. By selecting this command, the system opens the following screen. By default, the system names the saving file with the current time and date automatically, but the name can be modified. Fields Save as: Accept or modify the name suggested or select an existing filename using the […] button. Choose one of the following options: ¾ Save all journal in as a new file (delete if exists) (default option) ¾ Save a part of the journal and append it into the selected file From: Specify start date and hour of journal To: Specify end date and hour of journal Records: Number of selected records and total records number Delete records in the current journal: Default option Once the saving is done, the system displays in a message (see below) the name of the saved file. By default, the files are saved in the following directory: “C:\ProgramFiles\Amadeus5\Backup”. The default destination can be modified in the “Tools Options - Files Location” screen. 140 PRONET PLUS – User Manual – 8.8. Restore Journal This command permits to restore the data of a saved journal. By selecting this command, the system opens a loading window with the Windows functions. If using the Multi-company Module, this option will be available for super-users only (See the “Multi Company Module” chapter for further reference). To restore a journal, select it from the list displayed and confirm or cancel the operation. If the operation is confirmed (and if the chosen file contains a valid Amadeus journal), then the system saves the current journal and replaces it with the new one. Fields Look in: Select the folder where is located the required journal. By default, the selected folder is: “C:\ProgramFiles\Amadeus5\Backup”. This default destination can be changed in the “Tools - Options - Files Location” screen File name: Enter the filename of the journal Files of type: Select the file type ¾ Database files (*.mdb): Default extension for Access database ¾ Database files (*.jrn): Default extension for SQL database ¾ All files (*.*): Ability to open a journal created by other applications Open as read-only: Check this box if the journal is loaded for consultation only. Once the restoring is done, the system displays a message (see below), with the filename of the former journal. PRONET PLUS – User Manual – 141 8.9. Cardholders Import Profile Usually the employees’ database is created and kept up-to-date in the human resource department. All databases compatible with ODBC (Open DataBase Connectivity like SQL server, Oracle, MS Access, etc.) can easily be transferred to the PRONET PLUS application. The cardholder database information can include cardholder, badge, access group and department records. By default the system provides two Data Sources (DSN): Microsoft Access and Microsoft Excel. Operating mode ¾ Create a DSN from the ODBC DS Wizard (consult ODBC help for further information) or used one of the DSN created by default (HRAccess and HRExcel). ¾ Check that the table format is compatible with PRONET PLUS or write a request to modify it. ¾ Define an import database profile, as described hereafter, and import the table. ¾ In the “Event Handling – Action” screen, create and execute the action “Import Cardholders” with the selected profile. Tips & Notes Export the employees’ database To export an employees’ database, create an action with the “Export Existing Report” type, in the “Event Handling - Action” screen. 8.9.1. Cardholders Import Profile - General This screen allows the import profiles creation. Fields Select a profile: Choose a profile; two profiles have been provided by default (HrAccess and HrExcel). Import now: Press on this button to launch the import operation. Name: Name the new import profile. Default Access Group: Specify the default access group defining the profile or create a new one with the […] button. Import log file: Specify the filename of the import log file that records information about the import process. The beginning and end of import messages will be displayed in the log screen. By default the name of this log file is “Import.log” and is located in the Amadeus5 running directory. To modify this location, click on the […] button. See also the “Import Database Log only errors” option in the “Tools - Options - Server” screen. Description: Describe the new import profile Synchronize and delete: Check this box for deleting existing cardholders if they do not appear in the employees’ database. 142 PRONET PLUS – User Manual – Note: It is not recommended to use this function when the database is a combination of different databases from different sources. Cardholders that do not belong to the remote database will be removed from the Amadeus5 database. PRONET PLUS – User Manual – 143 8.9.2. Cardholders Import Profile - Connection Settings ODBC (Open DataBase Connectivity) is a standard database access method for accessing any data from any application, regardless of which DBMS (DataBase Management System) is handling the data. DBMS is a collection of programs that enables you to store, modify, and extract information from a database. ODBC manages this by inserting a middle layer, called a database driver, between an application and the DBMS. The purpose of this layer is to translate the application's data queries into commands that the DBMS understands. For this to work, both the application and the DBMS must be ODBC ‘compliant’, that is, the application must be capable of issuing ODBC commands and the DBMS must be capable of responding to them. ODBC used SQL as a data access standard. SQL (Structured Query Language) is a standardized query language for requesting information from a database. SQL is being supported by PC database systems because it supports distributed databases (databases that are spread out over several computer systems). This enables several users on a local-area network to access the same database simultaneously. The ODBC standard allows a link between PRONET PLUS and the client database. The following screen allows the import profiles definition. It is possible to import a table or to execute an SQL query. Fields Select a profile: Choose a profile. Import now: Press on this button to launch the import operation. ODBC Database Source Name (DSN): Name the database connection. User name: Enter a user name. Password: Enter a password. Choose one of the following options: ¾ Table name: Enter the name of the table containing the data information. ¾ SQL statement: Type in the request that selects the records to import and defines a new table format compatible with PRONET PLUS. Set connection: This button is a shortcut to ODBC user data source, which stores information about how to connect the indicated data provider (refer to ODBC help for further information). Connection test: Select to check that the database has been successfully opened. 144 PRONET PLUS – User Manual – 8.9.3. Default profiles By default, two profiles with identical fields are supplied: HrAccess and HrExcel. These profiles use respectively the ‘Hr.mdb’ and ‘Hr.xls’ files located in the PRONET PLUS folder. The user may fill the first or the former file uncaringly by using Microsoft Access or Microsoft Excel, with the cardholders’ details to import. Once the file filled, the file can be imported by launching the import operation under PRONET PLUS. Example The fields of the ‘Hr.xls’ file are built as follows : Number 201 202 Last Name First Name Smith John Johnson Linda Type 1 0 Badge Technology Company 12345678 1 22334455 1 Etc… Note: In these two files, the name of the fields cannot be modified. The two first fields are MANDATORY. Fields Number: Mandatory field. Use unique values (no duplications). Modifying this number after the first import will create a new cardholder in the access control database. Last Name: Mandatory field. First Name: Optional field. First or last name may be recurring, but not both jointly. For example, two John Smith cannot be created. Type: Optional numerical field (0-Visitor, 1-Employee, 2-Guard, 3-Deleted). Badge: Optional alphanumerical field. Up to 8-digit code, authorized digits: 0 to 9 and A to F. Technology: Optional numerical field (1-Magnetic, 2-Bar code, 3-Wiegand, 4-Smart card 1, 5Smart card 2, 6-Smart card 3, 7-Touch, 8-Radio). Company: Optional free text. Department: Optional free text. Office Phone: Optional free text. Access Group: Optional free text. Use the same name as in the access control application; if not a new access group will be created. PIN code: Optional numerical field. Up to 4-digit number, authorized digits are 0 to 9. To Date: Optional date field; set the same format as your Windows regional settings. Validated: Optional numerical field (0-Not validated, 1-Validated) Street: Optional free text. City: Optional free text. ZIP: Optional free text. Personal Phone: Optional free text. Description: Optional free text. Car Number: Optional free text. ID: Optional free text. Supervisor: Optional numerical field (0-Supervisor, 1-Not supervisor). Label 1 to 4: Optional free text. PRONET PLUS – User Manual – 145 Tips & Notes Existing Cardholders Database Update The cardholders import procedure allows updating existing cardholders by using source databases (HR.xls, HR.mdb, etc.), even when this database does not contain a ‘Last Name’ column. However, the following cases are considered errors: ¾ A new cardholder without a Last Name. ¾ An existing cardholder without last name, i.e., when the ‘Last Name’ column is present at the source database but the field has been deleted. Importing of ‘Lift program’ and ‘Parking Users Group’ Importing cardholders with their Lift program name or their Parking Users Group name is possible by adding two columns in the source database file (HR.xls, HR.mdb, etc.). The column headers in the source HR file must bear exactly the following names: ¾ Lift program ¾ Parking Users Group When using a Microsoft Excel file, make sure that the two columns are included in the "HR" range. Note: The range of the included cells can be edited with Excel through ‘Insert - Name - Define’. In that screen, select the HR and edit the range details at the bottom field of that window. Updating the deleted employees PRONET PLUS supports the import of type ‘Deleted’. The value 3 in the column "Type" means cardholder deleted. This way cardholders can be deleted even when the ‘Synchronize and Delete’ option is not checked. 8.9.4. More on SQL statement The SQL statement is a request that selects the records to import and defines a new table format compatible with PRONET PLUS. The field “Number” is a primary key field which corresponds to the “Number” field of the “Cardholder” screen in PRONET PLUS. The “Last Name” field is also mandatory. The following rules needs to be respected: ¾ Each cardholder receives a unique cardholder number. ¾ Names are case sensitive. ¾ The first and last names combination has to be different for each cardholder; first or last name may be repeat, but not both. ¾ Cardholders that do not belong to the remote database are removed from the PRONET PLUS database, when the option “Synchronize and delete” is selected. ¾ New access group names are automatically created in the Amadeus5 database ¾ If an imported badge number is already allocated to an existing cardholder in the Amadeus5 database, the old badge is removed from the existing cardholder and the ID number is associated to the imported cardholder. ¾ If an imported cardholder has already a badge in the Amadeus5 database, the system is deleting the other badge. 146 PRONET PLUS – User Manual – Example This example explains how to import cardholders from a database that has a different structure (different fields name, etc.): 1. Create a simple database: ¾ Create an empty database under MS Access and save it under “db1.mdb” ¾ Create a table with 4 columns and name each column (ex. Index, First, Last, Badge) ¾ Save the table with a significant name as “users” ¾ Enter at least 2 data lines for 2 cardholders (for card codes keep 8 digits) ¾ Save and close this database 2. Create the import profile: ¾ Start PRONET PLUS and create a new cardholders import profile ¾ Name this profile and select the second tab “Connection Settings” and click the “Set connection” button ¾ On the “User DSN” tab, click the “Add” button and select “Microsoft Access” from the displayed list ¾ In the “Data Source Name” field type a logical name (ex. MyHRimport) and click on the “Select” button for selecting the previous Access database (db1.mdb) ¾ Click twice on the “OK” button to go back to the import profile screen. ¾ In the “ODBC” field, type the name that corresponds to the data source (MyHRimport) ¾ Select the “SQL Statement” option for entering the following SQL query: SELECT [Index] AS [Number], [Last] AS [Last Name], [First] AS [First Name], Badge FROM users ¾ Save and click on the “Connection test” button; the “Database connection successful” message must be displayed. By doing this the application confirms both the connection to the external DB and also the query syntax. 3. Automatic import: Now, the external database is connected. It just needs to create an “Import Cardholders” action with the selected profile and create the associated process and global reflex and then the import can be done automatically, triggered either by an event (input alarm, card pass, etc.) or at a predefined schedule. 8.10. Create a group of badges This menu allows creating or removing a group of badges in a single command. It is accessible via the “Parameter - Badge” or “Tools - Create a group of badges” menu. Refer to the “Group of Badges” paragraph for further information. PRONET PLUS – User Manual – 147 8.11. Options This screen defines the different using parameters of PRONET PLUS. It is divided into eight tabs: ¾ Files location ¾ Messages ¾ General ¾ Language ¾ Server ¾ Communication ¾ SQL Server ¾ Journal / log screen At the botton of each tab, three buttons are always displayed: ¾ Restore default values: Click for recovering the original configuration. ¾ OK: Click for saving the new changes and back to the main screen. ¾ Cancel: Click for cancelling the new changes and back to the main screen. 8.11.1. Files Location This tab defines the folder location of the database files and the background picture of the main screen. Fields Databases folder: Choose the database files location: Current folder: The software folder, by default. At: Indicate the desired databases directory by using the […] button. Background filename: Select the desired file by using the […] button. Stretched: Check this box to stretch the selected background picture on the entire screen. Report folder: Choose the reports files location: “Report” folder in current folder: The software folder, by default. At: Indicate the desired directory by using the […] button. 148 PRONET PLUS – User Manual – 8.11.2. Language PRONET PLUS supports many languages. Specify the requested language and confirm your choice. Screens and functions are translated instantaneously, with no need to reboot the application. Fields Translate in: Select from the list the required language. All screens and menus will be translated. Application font: Select the desired font. It concerns all menus and screens. Font according to the language: Select the font type according to the alphabet used (Chinese, Western, etc.) Test: Example that serves for checking how the selected font is displayed. 8.11.3. Communication Default communication parameters are defined in this tab. This tab will NOT be displayed if the application runs as a Workstation. Fields Do polling at start-up: Check this box to execute polling when loading the application. By default, this option is selected. The polling can be manually stopped by choosing the “Communication - Stop Polling” menu or by pressing on “SHIFT” and “F8” keys simultaneously. “Minilock” controllers support: Check if this specific controller is used. Relay definition: use old command: Check if TPL revision B controller is used. Daily program time zones: Choose among 2 (by default) or 4 for modifying the number of daily programs (consult also the “Daily Program” chapter). PRONET PLUS – User Manual – 149 Trial number of sending messages: Choose between 1 to 10 (3 by default) for modifying the number of times a command will be sent to the controller in case of absence of communication between PC and controller (see the “Time out delay” paragraph in the “Controller Network” chapter). If the command is still not received, this command joins the “Pending” commands and the PC will try to send it with the other pending commands once the communication established (see the “Resend pending” option below). Communication error time out (in seconds): Choose between 1 to 300 (30 by default) for modifying the delay beyond which the computer will signal a communication problem, in case of absence of communication between PC and controller (see the “Time out polling” paragraph in the “Controller Network” chapter). Distant connect on pending: Check this box for performing modem dial-up when pending commands are sent (see the ‘Updating dial up controllers’ section). Resend pending every X Min.: Enter a value (30 by default). Pending commands are commands that a controller has not received (usually in case of a communication problem) and will be sent again, by default, every 30 minutes (default value) till the communication recovering. Check validation of cardholders every X Min.: Enter a value (30 by default). Every 30 minutes (default value), the program checks if new cardholders need validating or invalidating, in which case the corresponding cardholders definitions are sent to the controllers. The default frequency of this checking (30 minutes) may be modified here. Baud rate (bps): Select from the list the controller baud rate. This rate is the same for all the controllers. Set current Baud rate: Click on this button for sending immediately the selected baud rate to all the controllers. Bioscrypt Baud rate: Select from the list the biometric reader baud rate. This rate is the same for all the biometric readers. Second precision in controller memory: Check this box for setting the controllers to send the exact seconds value of an event. A one-time init of all controllers is required after this setting is being changed. Sleeping Delay (ms): Waiting delay between two consecutive commands that PC sends to the controllers. TCP: Ping Timeout (ms): Maximum delay that PC gives to the TCP/RS485 converter to answer after a Ping (question from the PC to the converter). Wait until next ping (s): When the TCP/RS485 converter does not answer after the first ping, the PC awaits this delay before pinging it again. 150 PRONET PLUS – User Manual – 8.11.4. Journal / Log Screen This tab allows the log window customizing. The log display is a temporary linear colour display that indicates events as they occur in the system. The events are displayed as they take place (consult also the “View / Clear Log” chapter). Changes take effect instantaneously, no need to reboot the application. Fields View log window at start-up: Select ‘Yes’ or ‘No’ as required. Separated logs for alarm and access: Select ‘Yes’ in order to divide the log window in two parts: one with the access and system messages, and the other with the alarm messages. By default, a single log shows access, alarms and system messages. Log window size: To modify the size of the log window, choose among the following options: Standard window: By default (Height: 3735, Width: 9015, Top: 480, Left: 240). Maximized window: Depends on the screen definition. Personal adjustment: Specify the required values for height, width and the window positioning at the top and at the left. Log type: Simple log: By default Rich log (with icons and context menu): Enables using a right-click menu with some shortcut option at the main log. Such as getting historical video records from the events rows of the log (see details at the “Rich Log” paragraph). Show commands for information: Check this box for showing the system commands in the log display. This option is purposed for application developers mostly; this is the reason why it is not selected by default. PRONET PLUS – User Manual – 151 8.11.5. Messages This tab gives the possibility to choose which are event types to save in the journal and which are event types to display on the log. In this last case, it is possible to modify the messages colour of the log (see also the “View / Clear Log” chapter). Changes take effect instantaneously, no need to reboot the application. By default, all event types are saved in the journal and most of them are viewable on the log window. Fields Message: Name of the event type. Save: Select ‘Yes’ for saving this event type in the journal. Display: Select ‘Yes’ for displaying this event type on the log. Colour: Select the message colour for log display; consult the “View / Clear Log” chapter for the default colours of the messages. Tips & Notes Audit of the Database changes To perform an audit of the database modifications entered by different users, save (and eventually display) the following event types: ¾ New Record, ¾ Save Record, ¾ Delete Record. Then, for each record modification, the following information is accessible: ¾ What: Record creating, changing or deleting ¾ Which Screen: Name of the screen in which the database modification has been done ¾ Which Record: Name of the record on which the modification has been done ¾ Details of the modification (for badges and cardholders): Old value => New value ¾ Who: Name of the user which has modified the record 152 PRONET PLUS – User Manual – 8.11.6. General This screen defines default values for some parameters like badge technology, badge code, main screen toolbar and automatic log off. Fields Badge: Default badge technology: Each site works generally with a main badge technology; the system creates new badges using the technology, which is selected here, without having to specify the technology used at each badge creating. Default Badge Code: Type a beginning card code common to all badges, if needed; this is useful when the site code is not written on the badges. Main screen toolbar: A customized toolbar gives added flexibility to the system: Save user customized toolbar: Check this box for keeping the customized toolbars after restarting the application; if this box is unchecked, all customized toolbars will be lost after closing the application. Customize main screen toolbars: Click on this button to display the customize screen here opposite in order to create or modify toolbars. For more details, see the “Personalized Navigation Bar” paragraph. Reset toolbar to original state: Click on this button to recover the toolbars at their original state. This leads to delete all customized toolbars. Automatic Log Off: Automatic Log Off after X Min: Check this box for locking automatically the session after X minutes of inactivity. The login will be performed after typing the username and its password. No automatic Log Off: Option (by default) for cancelling the Automatic Log Off of the session. PRONET PLUS – User Manual – 153 Alarm Confirmation: Select the active alarm confirmation mode for the “Active Alarms” screen: Unconditional: At any moment the user can confirm the acknowledge of an alarm, no matter if this alarm is currently active or not. This action allows the alarm to disappear from the active alarm list. While input is ON: do not enable: The user is not allowed to confirm the acknowledge of an alarm, if this alarm is currently active or if there is a communication failure with the relevant controller. While input is ON: warn user: At any moment the user can confirm the acknowledge of an alarm, but when this alarm is active a warning message appears before confirming with the alternative to confirm this alarm or not. Multi company: Check this box to display the multi-company fields where appropriate (see “Multi Company Module” section). This option requires that the plug has the Multi Company Module (the letter “M” is included in the plug definition). Alarm definition for group of input: Check this box for displaying the fields related to input groups in the “Input - Alarm status” screen and defining an input group weekly program in the “Event-Handling Program – Alarms” screen. Allow duplicate name of cardholders: Check this box for creating cardholders with the same last and first name. In this case, it is necessary to enter a unique number per person in the “Number” field of the “All cardholders” screen. Special days: Check this box for adding two supplementary daily programs (S1-S2). See more details at the “Weekly Program” chapter. Note: This feature requires a supporting firmware, please check with your vendor. 154 PRONET PLUS – User Manual – 8.11.7. Server This tab customizes options, which are only available from the PC server. This tab will NOT be displayed if the application runs as a Workstation. Fields Auto refresh input/Output status: Check this box for the automatic refresh of the I/O physical status in the “Active Alarms” screen. Refresh period for Input/Output status: Type the refresh delay in milliseconds (1000 by default). Different lift program for each reader: Check the box for using a different lift program per reader (see “Lift Module” section). This feature is required the use of EPROM TPL from 01/03/2003 or later. Re-sending card definitions after “Denied” event: Check this box for downloading instantaneously card information in case of access denial; when the cardholder will instinctively present his badge for a second reading, access authorization will be based on up-to-date card information. Controller max. cardholders capacity: When creating a new badge, a unique identification number is associated to the badge, filling an allocation table in the controller. Generally, the systems can create badges till the maximum capacity limit (defined by the plug). But deleting badges causes in the badge allocation table suspends, which can slow down the allocation process if the table has an important size. Type here the cardholders maximum capacity limit (5000 by default) in order to reduce this risk of slowing down. The limit must be lower than the plug and controller (RAM and ROM) capacities. Reset parking zones at X:X: Check this box for daily resetting all parking zone counters; each day at the fixed time specified in the 2 boxes (hh:mm), all parking spaces will be free (see “Parking Module” section). OPC server activation: Check this box to enable the integration of PRONET PLUS with buildin OPC client applications, in order to control and execute PRONET PLUS commands from a SCADA application. This option requires that the plug has the OPC Module (the letter “O” is included in the plug definition). Consult the Appendix A about OPC server for further explanations. Don’t create spread.conf file: Check this box in order to set the application not to create automatically the file spread.conf each start-up. This feature is only needed in the rare cases when it is needed to create the Spread configuration file manually. (Advanced users only). Soft Anti-Pass back: Check this box to activate this function (see ‘Soft Anti-Passback’). Import Database Log only errors: Check this box to not fill the ‘Import.log’ file with the detailed information during import process and then conserve space on hard disk. Import errors, if there are some, will be saved on this file (see also the “Cardholders Import Profile General” paragraph). PRONET PLUS – User Manual – 155 8.11.8. SQL Server This tab defines the SQL database parameters. It is only usable with a MS-SQL format type database. It requires the SQL module in the plug (dongle) license. Fields Connection string: Connection parameters related to the main database. Clicking the […] button allows modifying these parameters. Redundant Connection string: Enter the connection parameters related to a secondary database, if needed. Clicking the […] button allows accessing these parameters directly. Auto database fail over: Select this box when it is needed to automatically switch to the backup database in case of main database failure and vice versa. SQL Server date format: Modify the date format as defined in MS-SQL Server application, if needed. SQL Server restore timeout (s): Indicate the maximum required time of a database restoration, if needed. After the end of this time, if the restoration is not done the application will stop the restore operation. Tips & Notes Switching from a database to another one A secondary database can be added here. This database can be identical to the main database (but located on another PC) to allow the data source redundancy and guarantee the stability of the system in case the main SQL database, or the connection to it, fails. In this case, the server, as well as the workstations, may be preset to automatically switch to a backup SQL database, by checking the ‘Auto database fail over’ box. But this database can be different from the main database too, and then, it is possible to switch from a database to another one using the « Tools - Switch Database » menu. 156 PRONET PLUS – User Manual – 9. “Help” MENU 9.1. Amadeus help content The explanation of the current screen can be obtained by pressing on “F1” function key at any time or via the “Help - Amadeus help content”. Data displayed Left Window: The list of the available topics. Click on a book or on any topic. Right Window: The help content about the selected topic is automatically displayed. Note: The help content can be displayed on the screen or printed. 9.2. Amadeus help index The “Index” tab of the previous screen contains all help topics sorted by alphabetical order. ¾ To display quickly all available topics: enter the first letters of the requested topic in the text box from the left window ¾ To display the requested topic: click on the requested topic from the list of the left window and then on the “Display” button 9.3. Amadeus help search The “Search” tab of the previous screen enables the search of words or specific expressions in the help of the software instead of looking for information by category. ¾ To display all available topics which contain the request: enter the requested words in the text box from the left window and confirm with the “List Topics” button ¾ To display the requested topic: click on the requested topic from the list of the left window and then on the “Display” button 9.4. Amadeus on the web Update from latest version is available through our Web site: 9.5. About PRONET PLUS This screen provides the software version, the plug definition and system information. PRONET PLUS – User Manual – 157 Our access control solution based on PRONET PLUS can be integrated into any SCADA supervision application through software module, via proprietary or OPC protocol. Tags allow on-line bi-directional communication between the installation inputs, relays, doors, all communication transactions, on one hand, and the SCADA relays, processes activation and screens opening, on the other hand. OPC defines an open industry-standard interface for the data exchange between devices, PLC's and Windows applications. It is based on OLE and ActiveX technology that provides interoperability between different field devices, automation/control and business systems. The “PRONET PLUS: an OPC Server” document is at your disposal on the PRONET PLUS Installation CD. Consult your reseller to integrate access control into your SCADA application. PRONET PLUS provides the following information to OPC Client: ¾ Communication status of controller: Com OK or Com Error ¾ Logical status of all inputs: Open/Close depending on NO/NC, manually deactivated or normal status, etc. ¾ Physical status of all relays: Open/Close, open by global reflex, etc. ¾ All PRONET PLUS events, such as: Access: granted, denied, granted with duress code, denied too much trials Alarm: start of immediate alarm or delayed alarm, end of alarm Technical alarms, such as: power off, table error, etc. Unknown badge 158 PRONET PLUS – User Manual – OPC SERVER Module (O) Appendix A: PRONET PLUS and OPC server OPC SERVER Module (O) An OPC Client can perform the following operations in PRONET PLUS: ¾ Relay control: Activate continuously - Constant ON Deactivate continuously - Constant OFF Activate during x sec Return to normal mode ¾ Inputs: Input deactivation Return to normal mode ¾ Execute PRONET PLUS actions ¾ Execute PRONET PLUS processes ¾ Open PRONET PLUS screens Operating mode ¾ Check that the OPC module has been purchased; the letter “O” should appear in the plug definition. ¾ Select “OPC Server Activation” in the "Tools - Options - Server” screen. ¾ Restart the application. ¾ Read the “PRONET PLUS: an OPC Server” document available on the PRONET PLUS Installation CD. PRONET PLUS – User Manual – 159