1
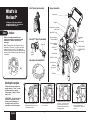
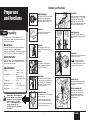
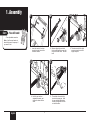
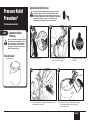
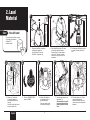
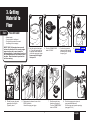
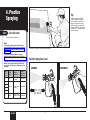
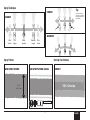
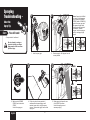
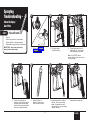
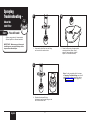
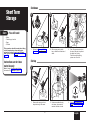
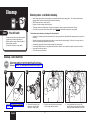
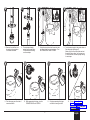
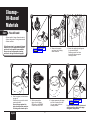
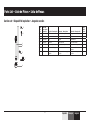
PROCOAT 9185G
™
Gas-Powered Airless
Paint Sprayer
Owner’s Manual
Read this manual for complete instructions
Français (page 25) / Español (página 49)
Contents
2 Important Safety Information
4 What’s in the Box?
5 Proper Use and Functions
6 Assembly
7 Pressure Relief Procedure
8 Load Material
9 Getting Material to Flow
10 Practice Spraying
12 Clear the Spray Tip
13 Clean the Spray Gun Filter
0412
• Form No. 0293922E
14 Clean the Inlet Filter
15 Short Term Storage
16 Cleanup - latex materials
18 Cleanup - oil-based materials
19 Cleaning the Spray Gun Components
20 Long-Term Storage
21 Cleaning the Sureflo™ Valve
22 Troubleshooting
72 Parts List
76 Warranty
Questions?
Call Wagner Technical Service at:
Register your product online at:
1-800-880-0993
www.wagnerspraytech.com
Español
Proper registration will serve as proof
of purchase in the event your original
receipt becomes misplaced or lost.
Français
English
Important
Safety Safety
Information
Read all safety information before operating
the equipment. Save these instructions
Indicates a hazardous situation which, if not
avoided, could result in death or serious injury.
a) To reduce the risks of fire or explosion, electrical
shock and the injury to persons, read and
understand all instructions included in this manual.
Be familiar with the controls and proper usage of
the equipment.
b) WARNING - To reduce the risk of fire
or explosion:
1. Do not spray flammable or combustible
materials near an open flame, pilot lights or sources
of ignition such as hot objects, cigarettes, motors,
electrical equipment and electrical appliances. Avoid
creating sparks from connecting and disconnecting
power cords.
2. Use extreme caution when using materials with
a flashpoint below 70ºF (21ºC). Flashpoint is the
temperature that a fluid can produce enough vapors to
ignite.
3. Paint or solvent flowing through the equipment is able
to result in static electricity. Static electricity creates
a risk of fire or explosion in the presence of paint or
solvent fumes. All parts of the spray system, including
the pump, hose assembly, spray gun and objects in
and around the spray area shall be properly grounded
to protect against static discharge and sparks. Use only
conductive or grounded high-pressure airless paint
sprayer hoses specified by the manufacturer.
4. Verify that all containers and collection systems are
grounded to prevent static discharge.
5. Connect to a grounded outlet and use grounded
extension cords (electric models only). Do not use a 3
to 2 adapter.
6. Do not use a paint or solvent containing halogenated
hydrocarbons. Such as chlorine, bleach mildewcide,
methylene chloride and trichloroethane. They are not
compatible with aluminum. Contact the coating supplier
about compatibility of material with aluminum.
English
7. Keep spray area well ventilated. Keep a good
supply of fresh air moving through the area to keep
the air within the spray area free from accumulation
of flammable vapors. Keep pump assembly in well
ventilated area. Do not spray pump assembly.
8. Do not smoke in the spray area.
9. Do not operate light switches, engines, or similar
spark producing products in the spray area.
10. Keep area clean and free of paint or solvent
containers, rags, and other flammable materials.
11. Know the contents of the paint and solvents being
sprayed. Read all Material Safety Data Sheets
(MSDS) and container labels provided with the
paints and solvents. Follow the paint and solvent
manufacture’s safety instructions.
12. Place pump at least 25 feet (7.62 meters) from the
spray object in a well ventilated area (add more
hose if necessary). Flammable vapors are often
heavier than air. Floor area must be extremely well
ventilated. The pump contains arcing parts that
emit sparks and can ignite vapors.
13. Plastic can cause static sparks. Never hang plastic
to enclose spray area. Do not use plastic drop
cloths when spraying flammable material.
14. Fire extinguisher equipment shall be present and
working.
c) WARNING - To reduce the risk of skin
injection:
1. Do not aim the gun at, or spray any person
or animal.
2. Keep hands and other body parts away from the
discharge. For example, do not try to stop leaks
with any part of the body.
3. Always use the nozzle tip guard. Do not spray
without the nozzle tip guard in place.
4. Only use a nozzle tip specified by the
manufacturer.
5. Use caution when cleaning and changing nozzle
tips. In the case where the nozzle tip clogs while
spraying, ALWAYS lock gun trigger, shut pump
off, and release all pressure before servicing,
cleaning tip or guard, or changing tip. Pressure
will not be released by turning off the motor. The
PRIME/SPRAY valve or pressure bleed valve must
be turned to their appropriate positions to relieve
system pressure. Refer to PRESSURE RELIEF
PROCEDURE described in the pump manual.
6. Do not leave the unit energized or under pressure
while unattended. When the unit is not in use, turn
off the unit and relieve the pressure in accordance
with the manufacturer’s instructions.
7. High-pressure spray is able to inject toxins into
the body and cause serious bodily injury. In the
2
8.
9.
10.
11.
12.
13.
event that injection occurs, seek medical attention
immediately.
Check hoses and parts for signs of damage, a
leak can inject material into the skin. Inspect hose
before each use. Replace any damaged hoses or
parts.
This system is capable of producing 3000 PSI / 207
Bar. Only use replacement parts or accessories
that are specified by the manufacturer and that are
rated a minimum of 3000 PSI. This includes spray
tips, nozzle guards, guns, extensions, fittings, and
hose.
Always engage the trigger lock when not spraying.
Verify the trigger lock is functioning properly.
Verify that all connections are secure before
operating the unit.
Know how to stop the unit and bleed pressure
quickly. Be thoroughly familiar with the controls.
Pressure will not be released by turning off the
motor. The PRIME/SPRAY valve or pressure bleed
valve must be turned to their appropriate positions
to relieve system pressure. Refer to PRESSURE
RELIEF PROCEDURE described in the pump
manual.
Always remove the spray tip before flushing or
cleaning the system.
NOTE TO PHYSICIAN:
Injection into the skin is a traumatic injury. It is
important to treat the injury as soon as possible.
DO NOT delay treatment to research toxicity.
Toxicity is a concern with some coatings injected
directly into the blood stream. Consultation with
a plastic surgeon or reconstructive hand surgeon
may be advisable.
d) WARNING - To reduce the risk of injury:
1. Always wear appropriate gloves, eye protection,
clothing and a respirator or mask when painting.
Hazardous vapors – Paints, solvents, insecticides,
and other materials can be harmful if inhaled or
come in contact with body. Vapors can cause
severe nausea, fainting or poisoning.
2. Wear ear protection. This unit can produce noise
levels above 85 dB(A).
3. Do not operate or spray near children. Keep
children away from equipment at all times.
4. Do not overreach or stand on an unstable support.
Keep effective footing and balance at all times.
5. Stay alert and watch what you are doing.
6. Do not operate the unit when fatigued or under the
influence of drugs or alcohol.
7. Do not kink or over-bend the hose. Airless hose can
develop leaks from wear, kinking and abuse. A leak
can inject material into the skin.
8. Do not expose the hose to temperatures or pressures in
excess of those specified by manufacturer.
9. Do not use the hose as a strength member to pull or lift
the equipment.
10. Use lowest possible pressure to flush equipment.
11. Follow all appropriate local, state and national codes
governing ventilation, fire prevention and operation.
12. The United States Government Safety Standards have
been adopted under the Occupational Safety and
Health Act (OSHA). These standards, particularly part
1910 of the General Standards and part 1926 of the
Construction Standards should be consulted.
13. Before each use, check all hoses for cuts, leaks,
abrasion or bulging of cover. Check for damage or
movement of couplings. Immediately replace hose if
any of those conditions exist. Never repair a paint hose.
Replace with a conductive high-pressure hose.
14. Do not spray outdoors on windy days.
15. Always unplug cord from outlet before working on
equipment (electric models only).
Gasoline Engine Safety
•
•
•
•
•
•
•
The engine exhaust from this unit contains
chemicals known to the State of California to
cause cancer, birth defects, or other
reproductive harm.
Gas engines are designed to give safe and dependable
service if operated according to instructions. Read
and understand the engine Owner’s Manual before
operating the engine. Failure to do so could result in
personal injury or equipment damage.
To prevent fire hazards and to provide adequate
ventilation, keep the engine at least 1 meter (3 feet)
away from buildings and other equipment during
operation. Do not place flammable objects close to the
engine.
To prevent fire or explosion hazard, avoid spraying or
splashing any flammable solvent near the engine.
Children and pets must be kept away from the area of
operation due to a possibility of burns from hot engine
components or injury from any equipment the engine
may be used to operate.
Know how to stop the engine quickly, and understand
the operation of all controls. Never permit anyone to
operate the engine without proper instructions.
Gasoline is extremely flammable and is explosive under
certain conditions.
Refuel in a well-ventilated area with the engine stopped.
Do not smoke or allow flames or sparks in the refueling
area or where gasoline is stored.
• Do not overfill the fuel tank. After refueling, make
sure the tank cap is closed properly and securely.
• Be careful not to spill fuel when refueling. Fuel
vapor or spilled fuel may ignite. If any fuel is
spilled, make sure the area is dry before starting
the engine.
• Never run the engine in an enclosed or confined
area. Exhaust contains poisonous carbon
monoxide gas; exposure may cause loss of
consciousness and may lead to death.
• The muffler becomes very hot during operation
and remains hot for a while after stopping the
engine. Be careful not to touch the muffler while
it is hot. To avoid severe burns or fire hazards, let
the engine cool before transporting it or storing it
indoors.
• Never ship/transport unit with gasoline in the tank.
• Never dispose of the unit when it is filled with oil
or gas. Follow all appropriate local, state, and
national regulations when disposing of the unit.
Safety Shut-Off Switch
The safety shut-off switch is pre-set by the factory to
shut down the sprayer to prevent over-pressurization.
Do not attempt to adjust or tamper with the safety shutoff switch. Contact an authorized service center if this
setting requires adjustment.
NOTE: The safety shut-off switch should be set
to shut down the sprayer between 3200 –
3300 PSI.
Fueling (gas engine)
Gasoline is extremely flammable and is
explosive under certain conditions.
• ALWAYS turn the engine off before refueling.
• Refuel in a well-ventilated area.
• Do not smoke or allow flames or sparks in the
refueling area or where gasoline is stored.
• Do not overfill the fuel tank. After refueling, make
sure the tank cap is closed properly and securely.
• Be careful not to spill fuel when refueling. Spilled
fuel or fuel vapor may ignite. If any fuel is spilled,
make sure the area is dry before starting the
engine.
• Avoid repeated or prolonged contact with skin or
breathing of vapor.
• Keep out of the reach of children.
Fuel Specifications
• Use automotive gasoline that has a pump octane
number of 86 or higher, or that has a research
3
octane number of 91 or higher. Use of a lower
octane gasoline can cause persistent “pinging”
or heavy “spark knock” (a metallic rapping noise)
which, if severe, can lead to engine damage.
NOTE: If “spark knock” or “pinging” occurs
at a steady engine speed under normal
load, change brands of gasoline. If
spark knock or pinging persists, consult
an authorized dealer of the engine
manufacturer. Failure to do so is
considered misuse, and damage caused
by misuse is not covered by the engine
manufacturer’s limited warranty.
NOTE: Occasionally you may experience light
spark knock while operating under heavy
loads. This is no cause for concern, it
simply means your engine is operating
efficiently.
• Unleaded fuel produces fewer engine and spark
plug deposits and extends the life of the exhaust
system components.
• Never use stale or contaminated gasoline or an oil/
gasoline mixture. Avoid getting dirt, dust, or water
in the fuel tank.
Gasolines Containing Alcohol
If you decide to use a gasoline containing alcohol
(gasohol), be sure its octane rating is at least as high as
that recommended by the engine manufacturer. There
are two types of “gasohol”: one containing ethanol, and
the other containing methanol. Do not use gasohol that
contains more than 10% ethanol. Do not use gasoline
containing methanol (methyl or wood alcohol) that does
not also contain co-solvents and corrosion inhibitors for
methanol. Never use gasoline containing more than
5% methanol, even if it has co-solvents and corrosion
inhibitors.
NOTE: Fuel system damage or engine performance problems resulting from the
use of fuels that contain alcohol is not
covered under the warranty. The engine
manufacturer cannot endorse the use of
fuels containing methanol since evidence
of their suitability is incomplete at this time.
Before buying gasoline from an unfamiliar
station, try to find out if the gasoline
contains alcohol. If it does, confirm the
type and percentage of alcohol used. If
you notice any undesirable operating
characteristics while using a gasoline that
contains alcohol, or one that you think
contains alcohol, switch to a gasoline
that you know does not contain alcohol.
English
GS-07 Spray Gun Assembly
What’s in
the box?*
Sprayer Assembly
Hose wrap
Engine
*Certain parts of the sprayer will not be
assembled out of the box. Be sure to read
Assembly instructions, page 6.
Start
DirectLink™ pressure
control knob
AutoOiler™ cap
Notice:
Refer to the engine manufacturer’s
instruction manual for complete engine
information. Heed all cautions and
warnings.
VersaTip™ Spray Tip Assembly
Note: The engine on the sprayer will come
filled with oil. However, it is still a good idea
to check it prior to startup. The engine has
sufficient oil when you can see it just below the
opening in the oil reservoir when the oil cap (a)
is removed.
Spray tip
Grounding
cable
Spray hose port
(reverse side)
Cart knob (2)
Pump cleaning
adapter
Shutoff switch
AutoOiler™
button
Spray
guard
PRIME/SPRAY
knob
Pail bracket
Spray Hose Assembly (50 ft)
Sureflo™ valve
Suction tube
Material
return tube
(a)
Inlet filter
Starting the engine:
Follow these steps to start the
engine when it is “cold”, or has
not been recently running.
If the engine is “warm”, follow
step 3 only.
important: Do not pull starter
cord to full extension. Doing
so may result in damage to
the engine recoil, and is not
necessary to start this engine.
English
1
(a)
1. Make sure the gas tank is full.
Move the choke lever (a) up to
the full choke position.
2
3
4
(c)
(b)
(d)
2. Push the rubber prime button
(b) 7-10 times.
4
3. Pull the starter rope (c) rapidly
and firmly. Continue to hold
the rope as you let it return.
Pull and return the rope until
the engine starts.
4. Once the engine is running,
slowly move the choke
lever (d) down to the closed
position.
DirectLink™:
PRIME/SPRAY knob:
SPRAY
PRIME
Proper use
and functions
Controls and Functions
Spraying pressure is determined
by the motor throttle. The throttle
is regulated by adjusting the
DirectLink™ pressure control
knob. The higher the throttle, the
higher the spraying pressure.
The PRIME/SPRAY knob directs
material to the material return
tube when set to PRIME or to
spray hose when set to SPRAY.
Spray hose:
Capability:
The spray hose connects the
spray gun to the pump.
Sprays a variety of paints (oil-based and
latex), primers, stains, preservatives and other
nonabrasive materials.
Do not use. . .
This pump should not be used with textured
materials, block filler, asphalt sealer or
materials containing HHC. See coating supplier
if flash point is not listed on the container
NARROW
Start
WIDE
Specifications:
Power���������������������������������Ruitao 37.7 cc
engine, 1.6 Hp
Gas capacity�����������������������0.65 l
(approximately 1
hour spraying time)
Oil capacity�������������������������0.08 l
Maximum pressure�������������3000 PSI
Flow rate�����������������������������0.33 gal/min (1.25 l)
Max tip size������������������������0.017”
The spray gun controls the
delivery of the material being
pumped.
GS-07
Trigger lock:
Engage the trigger lock whenever
the gun is not in use.
GS-07 - The gun is locked
when the trigger lock is at a
90º angle (perpendicular to the
trigger in either direction).
AutoOiler:
The AutoOiler is designed to
provide lubrication to the fluid
section of the pump.
Sureflo Valve:
The Sureflo Valve is designed
to keep the inlet valve open and
from sticking to dried materials.
The Sureflo Valve is activated
manually by the user.
Suction tube (a):
The suction tube draws the fluid
from the original container into
the pump.
Material return tube (b):
Collapsible handle:
Burn hazard. When collapsed,
the cart handle is very close to
the exhaust port of the engine,
which can be very hot after
use. It is recommended that
the cart handle NOT be
collapsed until after the engine
has cooled.
The VersaTip spray tip can be
adjusted based on your spraying
needs.
Spray gun:
Safety features:
Spray gun trigger lock and pressure diffuser;
built-in tip safety guard; PRIME/SPRAY knob
for safe pressure release.
VersaTip spray tip:
The cart handle can be collapsed
for easier storage.
Turn the cart knobs counterclockwise to unlock the handle.
Turn the cart knobs clockwise to
lock the handle into place.
5
(a)
(b)
Fluid is sent out through the
return tube and back into the
original container when the
PRIME/SPRAY knob is in the
PRIME position.
English
1. Assembly
Start
1
2
3
You will need:
• Two adjustable wrenches
Note: It will be much easier to
attach the hose to the sprayer if
you uncoil it first.
1. Insert the ends of the hose
bracket into the holes of the
handle as shown.
English
2. Remove the plug from inside
the hose fittings and remove the
cap on the outlet valve. Discard
both.
4
5
4. Hold the port with an
adjustable wrench, and
tighten the hose with the
other.
5. Thread the other end of the
hose to the spray gun. Hold
the gun with one adjustable
wrench, and tighten the hose
nut with the other.
6
3. Thread one end of the high
pressure spray hose to the
spray hose port.
Pressure
Safety Relief
Procedure*
*Perform when instructed
Start
Important Safety Warning
Be careful when handling the spray gun so you don’t
accidently spray yourself. The high pressure paint
stream could pierce your skin causing serious injury. If
an accident happens see detail procedures in the Safety
Information section on pages 2-3. See physician
immediately and bring this instruction manual.
1
2
3
1. Lock the spray gun.
2. Turn the DirectLink pressure
control knob to minimum.
3. Turn the PRIME/SPRAY knob
to PRIME.
Important Safety
Warning
You will need:
• A waste bucket
SPRAY
4
5
4. Press and hold the red engine shutoff switch until
the engine stops running.
7
5. Unlock the spray gun. Briefly pull the trigger
to fully relieve pressure from the system.
Lock the spray gun.
English
PRIME
Be sure to follow the Pressure Relief
Procedure when shutting the unit off
for any purpose. This procedure is
used to relieve pressure from the
spray hose. Failure to do so could
result in serious injury.
2. Load
Material
Start
•
•
•
•
1
2
3
(a)
You will need:
The material you plan to spray
Flat blade screwdriver
Piston Oil™
Waste bucket
1. Remove AutoOiler cap with a
flat blade screwdriver.
Squirt Piston Oil into the
AutoOiler. Replace cap.
5
(a)
3. Fully depress the Sureflo valve
to make sure the inlet ball is
free.
6
7
8
6. Attach the supplied
grounding wire to a
grounded object.
Start the engine (see
directions on page 4).
7. Increase the pressure to
maximum (+).
Allow pump to run until
you see spray material
flowing from the return
tube.
8. Shut the engine off. Place
return tube back into
material container and clip
return tube and suction tube
together.
PRIME
SPRAY
4
2. Push AutoOiler button 2-5 times
to lubricate the fluid section.
Press button 2-3 times before
every use. Be sure to check
reservoir level (a) and refill as
necessary.
(b)
4. Place a full container
of spraying material
underneath the suction
tube (a).
Hold the return tube into a
waste container (b).
English
5. Turn the PRIME/SPRAY
knob to PRIME.
8
2
3
4
SPRAY
SPRAY
PRIME
Start
1
PRIME
3. Getting
Material to
Flow
You will need:
• Waste bucket
• Scrap material / cardboard
• Drop cloths to protect floors and
furnishings from overspray
IMPOR´TANT: When placed on a smooth
surface, the vibration of the running engine
may cause the unit to move forward or
backward slightly. Avoid placing the unit on
an inclinded surface or near a drop-off such
as stairs. Block the wheels to prevent the
unit from moving.
5
1. Start the engine (see page
4). Point the spray gun into
a separate waste container.
Unlock the spray gun trigger.
Squeeze and hold trigger
for steps 2-3.
2. Turn the PRIME/SPRAY
knob to SPRAY.
6
3. Continue to squeeze
trigger until the material
is flowing freely through
the spray gun.
7
4. Peform the Pressure
Relief Procedure,
page 7.
8
SPRAY
OR
SPRAY
PRIME
5. Thread the spray tip guard
assembly onto the gun.
Tighten by hand.
6. Rotate spray tip forward to one of the
SPRAY positions.
Unlock the spray gun trigger.
7. Start the engine (see
directions on page 4).
Turn the PRIME/SPRAY
knob to SPRAY.
9
8. Point the spray gun at a piece of
scrap material/cardboard.
Pull the trigger and practice spraying
(see pages 10-11).
English
4. Practice
Spraying
Start
Tip:
Trigger gun after starting the
stroke. Release the trigger
before ending the stroke. The
spray gun should be moving
when the trigger is pulled and
released. Overlap each stroke
by about 50%. This will ensure
an even coating.
You will need:
• Scrap material / cardboard
Notes:
If the spray pattern becomes distorted or
stops completely while the gun is triggered,
follow any or all the procedures listed on
pages 12-14.
If you plan to be away from your spray
project for more than one hour, follow the
Short Term Storage instructions on page 15.
If you have difficulty achieving a good spray
pattern, your spray tip and gun filter may
not be ideal for the type of material you are
spraying.
Spray
Tip
Size
Filter
Color
Spray
Material
Initial
Pressure
Setting
311
Red
Thin stains,
sealers
Minimum
Yellow
Latex paints,
stains
Maximum
White
Thick latex
paints, stains Maximum
Practice on a piece of scrap material/cardboard
Hold the Spray Gun Level
correct
incorrect
313
413
415
515
517
English
10” - 12” 10” - 12”
(25 - 30 cm)
(25 - 30 cm)
10
Spray Technique
Tip:
correct
Flex your wrist as
you move in order to
keep gun parallel to
the surface
correct
inCorrect
Start
stroke
Pull
trigger
Move
steadily
Release
trigger
End
stroke
Spray Pattern
Overlap Your Strokes
GOOD SPRAY PATTERN
BAD SPRAY PATTERN: TAILING
50% Overlap
8” - 10”
(20 - 25 cm)
!
correct
See page 12-14
11
English
Spraying
Troubleshooting -
1
2
Clear the
Spray Tip
Start
You will need:
Note: If spray tip is difficult
to rotate, relieve pressure
by 1) slowly turn PRIME/
SPRAY knob to PRIME, 2)
unlock the spray gun and
3) squeeze trigger while
pointing at scrap material/
cardboard. Release
trigger, lock the spray gun,
and try rotating spray tip
again.
• Scrap material / cardboard
Do not attempt to unclog or
clean the tip with your finger.
High pressure fluid can cause
injection injury.
OR
1. Lock the spray gun.
2. Rotate spray tip 180 degrees from its
current position.
4
3
5
NARROW
SPRAY
OR
PRIME
3. Make sure the PRIME/
SPRAY knob is turned to
SPRAY.
Unlock the spray gun.
English
WIDE
4. Point at a piece of scrap material /
cardboard and squeeze trigger until
material comes out in a high pressure
stream. Release the trigger and lock the
spray gun.
12
5. Rotate spray tip forward to one
of the SPRAY positions.
Unlock the spray gun and
resume spraying.
Spraying
Troubleshooting -
1
Start
•
•
•
•
SPRAY
3
PRIME
Clean the Spray
Gun Filter
2
You will need:
Wrench
Warm, soapy water for latex material
Mineral spirits for oil based materials
Replacement spray gun filter (if necessary)
important: Never clean the filter by
poking it with a sharp object.
(a)
1. Peform the Pressure
Relief Procedure, page 7.
2. Pull trigger guard
from filter housing.
3. Tighten the wrench over the
wrench flats (a). Unscrew the
filter housing using a wrench.
Note: You DO NOT need to
remove the spray hose from the gun
to clean the filter.
4
4. Remove the filter from the
housing. Clean with appropriate
cleaning solution (warm, soapy
water for latex materials; mineral
spirits for oil-based materials).
5
6
6. Replace cleaned filter, tapered
end first, into the gun housing.
Note: It is important to place
tapered end first to ensure proper
sprayer operation.
5. Inspect the filter for
damage. Replace if any
holes or tears are found.
13
7
7. Reassemble the spray gun.
English
Spraying
Troubleshooting -
1
2
Clean the
Inlet Filter
Start
You will need:
• Warm, soapy water for latex material
• Mineral spirits for oil based materials
important: Make sure your floors and
furnishings are covered with drop cloths
to prevent accidental drips.
1. Unscrew the inlet filter from the fitting
on the end of the suction tube.
2. Clean the filter using the appropriate
cleaning solution (warm, soapy
water for latex materials, mineral
spirits for oil-based materials).
3
Note: If after completing all of the steps
in Spraying Troubleshooting you are still
experiencing problems spraying, refer to
the Troubleshooting section (page 22).
3. Replace the cleaned filter by
threading it back into the fitting on the
end of the suction tube.
English
14
Start
•
•
•
•
2
SPRAY
1
3
PRIME
Short Term
Storage
Shutdown
You will need:
OR
Water
Plastic bag or bucket
Rags
Stir stick
This procedure should be used when taking
a short term break or when ending your
project for the day. If your break is longer
than 16 hours follow Cleanup instructions,
page 16.
Instructions are for latex
materials only
Note: If using oil based material follow
instructions for Cleanup on page 16.
1. Peform the Pressure Relief
Procedure, page 7.
2. Place spray gun in plastic
bag or immerse into bucket of
water.
3. Pour 1/2 cup water slowly on
the top of the paint to prevent
the paint from drying.
Place the entire spraying
system out of the sun.
Startup
1
2
3
Page 9
1. Remove the spray gun from
the plastic bag or the water.
15
2. If water was added during
shut down, stir water into
material with the stir stick.
3. Follow Getting Material to
Flow instructions, page 9.
English
Cleanup
MINERAL
SPIRITS
Start
Cleaning notes - read before cleaning
• When using latex material, clean sprayer and components with warm, soapy water. For oil based material use
mineral spirits. Never use mineral spirits with latex materials.
• NEVER use gasoline to clean sprayer.
• Dispose of used cleaning solution properly.
• Thorough cleaning and lubrication of sprayer is important to ensure proper operation after storage.
• If you flush your sprayer with mineral spirits, repeat Cleanup instructions using warm, soapy water.
or
You will need:
Follow these steps whenever cleaning with mineral spirits:
• If spraying or cleaning with oil-based materials, the spray gun must be grounded while preparing the spray hose or
cleaning.
• Ground the gun by holding it against the edge of a metal container while purging. Failure to do so may lead to a
static electric discharge which may cause a fire.
• Always flush spray gun at least one hose length from spray pump.
• If collecting flushed solvent in one gallon metal container, place it into an empty five gallon container, then flush.
• Area must be free from vapors.
• Follow all cleanup instructions.
• A water source that can be delivered with
a garden hose (latex materials only)
• Mineral spirits if using oil-based material
• Empty waste container
• A container with warm, soapy water
Cleanup - Latex materials
STOP
Follow these steps if you used latex materials and if you have a
garden hose available. If you do not have a garden hose available,
follow the Cleanup - Oil-Based Materials instructions on page 18.
2
1. Perform Pressure Relief Procedure
(page 7).
3
4
PRIME
SPRAY
1
English
2. Remove the spray tip and
place into container filled
with warm, soapy water.
3. Place the suction tube and return tube
into an empty waste container.
16
4. Using a garden hose, rinse off the
suction tube, return tube and inlet filter.
Empty the waste container of all fluids.
6
7
8
6. Thread pump cleaning
adapter onto garden hose.
Thread suction tube fitting
over the adapter.
9
10
7. Unclip the return tube from the suction tube
and place it into the waste container. Turn
the PRIME/SPRAY knob to PRIME.
SPRAY
8. Turn the water supply to the garden hose on.
Start the engine (see page 4).
Water will go into the suction tube and out
through the return tube. Let the pump run
for a few minutes, and leave pump running
for next steps.
12
11. Continue squeezing the trigger
until fluid is coming out clear.
12. Perform Pressure Relief
Procedure, page 7.
PRIME
9. Point the spray gun at the side of
a waste container.
10. While squeezing the trigger, turn the
PRIME/SPRAY knob to SPRAY.
PRIME
11
SPRAY
5. Remove the inlet filter from
the suction tube and place
it into waste container.
PRIME
SPRAY
5
Move on the Cleaning the Spray
Gun Components, page 19.
17
English
Cleanup Oil-Based
Materials
SPRAY
2
3
PRIME
Start
1
You will need:
• Mineral spirits if using oil-based material
• Warm, soapy water if using latex material
• Waste container
4
1. Perform Pressure Relief
Procedure (page 7).
5
2. Remove the spray tip
and place into an empty
waste container.
6
3. Attach the supplied grounding wire
to a grounded object.
Submerge suction set into a
bucket with the appropriate
cleaning solution.
7
SPRAY
PRIME
SPRAY
Follow these steps if you sprayed oil-based
materials, or if you sprayed latex materials
and do not have a garden hose available.
Be sure to use the appropriate cleaning
solution for the type of material sprayed.
PRIME
4. Start the engine (see instructions
on page 4).
Point the spray gun at the side of
a waste container.
Ground the gun against the
side of a metal waste container
if flushing with mineral spirits.
English
5. While squeezing the
trigger, turn the power
ON, and turn the PRIME/
SPRAY knob to SPRAY.
6. Continue squeezing the trigger
until fluid is coming out clear.
You may need to get new
cleaning solution.
18
7. Perform Pressure Relief
Procedure, page 7.
If you flushed the sprayer with mineral
spirits repeat the steps on this page
using warm, soapy water.
Cleaning the
Spray Gun
Components
•
•
•
•
•
SPRAY
2
3
PRIME
Start
1
You will need:
Soft bristled brush
Light household oil
Warm, soapy water if using latex material
Mineral spirits for oil based material
Wrench
(a)
1. Peform the Pressure
Relief Procedure, page 7.
important: DO NOT use any siliconebased lubricants to clean or lubricate the
spray gun.
4
5
2. Pull trigger guard to separate
from filter housing and unscrew
housing using a wrench.
Note: Tighten the wrench over the
wrench flats (a).
6
3. Remove filter from spray gun.
Clean spray tip and filter with soft
bristled brush and appropriate
cleaning solution.
7
(b)
HOUSEHOLD
OIL
4. Pour a few drops of light
household oil inside gun
housing.
(c)
5. Install gun filter taperedend first. Reassemble
spray gun.
6. Line up the tabs (b) on the
spray tip with the slots in the
guard assembly.
Slide the tip into the guard.
19
7. Install spray tip and guard
assembly.
Move on to Long Term
Storage, page 20.
English
Start
OIL
2
SE
HO U
1
D
HO L
Long Term
Storage
You will need:
• Light household oil /
Piston Oil
• Rags
• Wrench
important: Store in
a well-ventilated area.
If you plan to store in
temperatures below 32ºF
(0ºC), flush with Wagner
Liquid Shield™ (sold
separately).
HOUSEHOLD
OIL
1. Remove the suction tube.
Using a wrench, remove the spray hose.
3
2. Fill a cup or other container with
two ounces of Piston Oil (light
household oil can be substituted).
Start the engine (see directions on
page 4).
4
5
4. Replace suction tube.
5. Wipe entire unit, hose,
and spray gun to remove
accumulated spray
material.
(a)
3. Cover the outlet valve with a rag.
Submerge the Sureflo™ valve (a) into
the oil.
When oil has been sucked from the
cup, press and hold the engine shutoff
button until the engine stops running.
English
20
Cleaning the
Sureflo Valve
Start
1
2
You will need:
(a)
• Wrench
Cleaning or servicing the Sureflo Valve
may be required if the unit has priming
problems. Priming problems may be
prevented by properly cleaning the sprayer
and following the long-term storage steps.
1. Remove the suction tube.
2. Unscrew the Sureflo Valve assembly (a) from the
sprayer. Visually inspect the inside and outside
of the Sureflo Valve assembly. Clean any paint
residue with the appropriate cleaning solution.
If priming problems persist, you may need
to replace the Sureflo Valve assembly. Call
Technical Service (1-800-880-0993) to order
new Sureflo valve assembly.
3
4
(b)
3. Lubricate the O-ring on the Sureflo Valve (b) with
petroleum jelly.
Replace Sureflo Valve assembly by screwing it into
the sprayer. Tighten with the wrench.
21
4. Replace suction tube and hand-tighten.
English
Troubleshooting
Before servicing, always release system
pressure by following Pressure Relief
Procedure (page 7).
Problem A: The sprayer does not start
1.
2.
Cause
Gas tank is empty
There is a problem with sprayer engine
Solution
Fill the gas tank
Call Technical Service
Problem B: The sprayer starts but does not draw material when the PRIME/SPRAY knob is set to PRIME
1.
Cause
The inlet valve is stuck
2.
3.
4.
5.
6.
7.
8.
The sprayer will not prime properly or has lost prime
The suction set is not properly installed
The material container is empty
The inlet filter is clogged
The outlet valve is stuck
The inlet valve is worn or damaged
The PRIME/SPRAY valve is plugged
Solution
Inlet may be stuck from old material. Push Sureflo Valve to release. If still stuck refer to
Clean the Inlet Filter see page 14 or Cleaning the Sureflo™ Valve see page 21 *
Refer to Getting Material to Flow section see page 9
Reinstall the suction set see page 6
Refer to Load Material and Getting Material to Flow sections see pages 8-9
Refer to Clean the Inlet Filter see page 14
Call Technical Service
Take sprayer to Wagner Authorized Service Center
Take sprayer to Wagner Authorized Service Center
Problem C: The sprayer draws up material but the pressure drops when the gun is triggered (bad spray pattern)
1.
2.
3.
4.
5.
6.
7.
Cause
Pressure too low
The spray tip is worn
The inlet filter is clogged
The spray tip is plugged
The spray gun filter is clogged
The material is too heavy or coarse
The Sureflo™ Valve assembly is damaged or worn
Solution
Increase the pressure
Replace spray tip with a new one**
Refer to Clean the Inlet Filter see page 14
Refer to Clear the Spray Tip see page 12
Refer Clean the Spray Gun Filter see page 13. Keep extra filters on hand
Thin or strain the material
Replace the Sureflo Valve see page 21*
Problem D: The PRIME/SPRAY knob is set to SPRAY and there is flow through the material return tube
1.
Cause
The PRIME/SPRAY valve is dirty or worn
Solution
Take sprayer to Wagner Authorized Service Center
Problem E: The spray gun leaks
1.
2.
Cause
Gun filter housing is loose
Internal parts of spray gun are worn or dirty
English
Solution
Tighten handle
Take sprayer to Wagner Authorized Service Center
22
Problem F: The spray tip assembly leaks
1.
2.
Cause
The spray tip was assembled incorrectly
Gun seal is worn
Solution
Check tip assembly and assemble properly see page 19, steps 6-7
Replace the seal**
Problem G: The spray gun will not spray
1.
2.
3.
4.
Cause
The spray tip plugged
The spray gun filter is clogged
The spray tip is in wrong position
PRIME/SPRAY knob not set on SPRAY
Solution
Refer to Clear the Spray Tip see page 12
Refer to Clean the Spray Gun Filter see page 13. Keep extra filters on hand
Rotate spray tip to one of the spraying positions see page 12, step 5
Turn PRIME/SPRAY knob to SPRAY see page 9 Getting Material to Flow
Problem H: The spray pattern is poor (tailing)
1.
2.
3.
4.
5.
6.
7.
Cause
Pressure too low
The spray tip is plugged
The inlet filter is clogged
The spray gun filter is clogged
The spray tip is worn
The material is too thick
Pressure loss
Solution
Increase the pressure
Refer to Clear the Spray Tip see page 12
Refer to Clean the Inlet Filter see page 14
Refer to Clean the Spray Gun Filter see page 13. Keep extra filters on hand
Replace the spray tip
Thin material using appropriate thinning solution
Refer to Causes and Solutions for Problem C
Problem I: The spray tip will not turn
1.
Cause
High pressure has locked the spray tip in place
Solution
Refer to Clear the Spray Tip see page 12
** Additional parts are available for this procedure. Refer to the Parts List (page 74) section of this manual for a list of the parts and their part numbers
Daily Maintenance
The only daily maintenance necessary is thorough cleaning. Follow the cleaning procedures in this manual.
Extended Maintenance
Some pump parts eventually wear out from use and must be replaced. The following is a list of
available repair kits. Pump performance is the only reliable indicator of when to replace wear parts.
Refer to the Troubleshooting section for more information on when to use these kits
23
Kit Part #
Description
0512178A
0501014
Fluid Section Seal Kit
Saddle seat/seal kit
English
Parts List • Liste de Pièces • Lista de Piezas
Sprayer • Pulvérisateur • Rociador
1
2
3
Item
Art.
Art.
Part No.
No de piéce
Pieza No.
English - Description
Français - Description
Español - Descripción
1
0293198A
Cart assembly
Ensemble du chariot
Ensamblaje de carrito
1
2
0523320A
Hose wrap
Support du flexible
Soporte de manguera
1
3
0516581A
AutoOiler cap
Capuchon de AutoOiler
Tapa de AutoOiler
1
4
0270118
Spray hose, 50’
Flexible de pulvérisation,
15 m
Manguera del rociador,
15 m
1
730-165
Grounding wire
Câble de mise à la terre
Cable de conexión a tierra
1
4
This unit contains no servicable parts. Do not attempt to
service yourself. Take the sprayer to a Wagner authorized
service center.
Cet appareil ne contient aucune pièce nécessitant un
entretien quelconque. Ne tentez pas d’effectuer vous-même
l’entretien. Apporter l’appareil à un centre de service
autorisé
Esta unidad no contiene piezas que se puedan reparar. No
intente repararlas personalmente. Lleve el rociador a un
Centro de servicio autorizado de Wagner.
English
Français
Español
72
Qty.
Qté.
Cant.
Parts List • Liste de Pièces • Lista de Piezas
Suction set • Dispositif d’aspiration • Juego de succión
5
6
1
2
3
Item
Art.
Art.
Part No.
No de piéce
Pieza No.
1
0516127
English - Description
Français - Description
Español - Descripción
Suction set
Dispositif d’aspiration
Juego de succión
1
2
0512389
Return tube
Tube de retour
Tubo de retorno
1
3
0512390
Clip
Agrafe
Abrazadera
1
4
0552947
Inlet filter
Filtre d’entrée
Filtro de entrada
1
5
0327226
Squeeze clip
Agrafe de compression
Abrazadera del apretón
1
6
9885553
Return tube fitting
Raccord de tube de retour
Conector del tubo de
retorno
1
7
0515146
Pump cleaning
adapter
Adaptateur de nettoyage de
pompe
Adaptador de limpieza de
bomba
1
7
4
Qty.
Qté.
Cant.
73
Español
Español Français
English
Parts List • Liste de Pièces • Lista de Piezas
GS-07 Spray Gun • Pistolet de GS-07 • Pistola de GS-07
3
4
Item
Art.
Art.
Part No.
No de piéce
Pieza No.
English - Description
Français - Description
Español - Descripción
1
0511515
VersaTip, 515
VersaTip, 515
VersaTip, 515
1
2
0154675
Filter, 100 mesh (yellow,
2 pack)
Filtre, maille 100 (jaune,
trousse de 2)
Filtro, malla 100
(amarillo, juego de 2)
1
3
0515228
Seal
Joint d’etanchéite
Sello
1
Filter housing
Logement de filtre
Alojamiento de filtro
1
Swivel
Raccord
Giratoria
1
4
------
5
0347706A
Qty.
Qté.
Cant.
2
1
5
Guard Assembly • Ensemble de déflecteur • Ensamblaje del protección
1
4
2
5
3
English
Français
Español
Item
Art.
Art.
Part No.
No de piéce
Pieza No.
1
2
Qty.
Qté.
Cant.
English - Description
Français - Description
Español - Descripción
0271441
Hook guide
Guide de crochet
Guía de gancho
1
0501011
Guard assembly
Déflecteur
Ensamblaje de
protección
1
3
0271442
Latch guide
Guide de verrou
Guía de sujetador
1
4
0501014
Tip seal / saddle seat
Joint de buse / siège
formé
Junta de boquilla /
asiento de la montura
1
5
0296641
Collar
Collier
Collar
1
0271065
Collar kit (includes items
1, 3 and 5)
Trousse de bague
(comprende les articles
1, 3 et 5)
Juego de collar (incluye
los articulos 1, 3 y 5)
74
Accessories • Accessoires • Accesorios
Part No.
No de piéce
Pieza No.
0512178A
0093896
0501011
0501014
0501411
0501413
0501415
0501417
0501419
0501515
0501517
0511313
0511515
0511517
0154839
0516913
0297055
0508071
0286024
0286025
0270192
0523044
0270118
0291004
0154919
0154675
0154842
0512132W
0512131W
0512130W
0156113
0155208
0155206
0516697A
English - Description
Piston repair kit
Hose connector kit
Tip guard
Tip seat / seal kit
411 Spray Tip
413 Spray Tip
415 Spray Tip
417 Spray Tip
419 Spray Tip
515 Spray Tip
517 Spray Tip
313 VersaTip spray tip
515 VersaTip spray tip
517 VersaTip spray tip
All Guard Protector (32 oz.)
Piston Oil™
Pump Shield™ (12 oz.)
Paint Mate™ (1 qt)
GS-07 spray gun
GS-08 spray gun
Airless hose, 25’ x 1/4”
Airless hose, 35’ x 1/4”
Airless hose, 50’ x 1/4”
Hose, whip end, 3’ x 3/16”
Green gun filter, coarse (2 pack)
Yellow gun filter, fine (2 pack)
White gun filter, medium (2 pack)
Tip extension, 36”
Tip extension, 24”
Tip extension, 12”
TR-10 telescoping roller, 3/8” nap
Roller cover, 3/4” nap
Roller cover, 3/8” nap
Inlet filter
Français - Description
Jeu de joints pour tronçon d’acheminement
Raccord de flexible
Déflecteur
Trousse de siège / rondelle
Embout de pulvérisation, 411
Embout de pulvérisation, 413
Embout de pulvérisation, 415
Embout de pulvérisation, 417
Embout de pulvérisation, 419
Embout de pulvérisation, 515
Embout de pulvérisation, 517
Buse de pulvérisation VersaTip, 313
Buse de pulvérisation VersaTip, 515
Buse de pulvérisation VersaTip, 517
All Guard Protector (950 ml)
Piston Oil™
Pump Shield™ (12 oz.)
Paint Mate™ (1 L)
Modèle du pistolet GS-07
Modèle du pistolet GS-08
Flexible sans air, 7,6 m x 0,6 cm
Flexible sans air, 10,6 m x 0,6 cm
Flexible sans air, 15 m x 0,6 cm
Flexible sans air, 1 m x 0,5 cm
Filtre de pistolet, vert, grossier (2 pièces)
Filtre de pistolet, jaune, fin (2 pièces)
Filtre de pistolet, blanc, moyen (2 pièces)
Rallonge de buse, 36 pi
Rallonge de buse, 24 pi
Rallonge de buse, 12 pi
Rouleau téléscopique de TR-10, grain de 1,0 cm
Manchon de rouleau, grain de 1,9 cm
Manchon de rouleau, grain de 1,0 cm
Filtre d’entrée
75
Español - Descripción
Juego de reparación del pistón
Conector de manguera
Ensamblaje de protección
Juego de asiento de montura / arandela
Boquilla rociadora 411
Boquilla rociadora 413
Boquilla rociadora 415
Boquilla rociadora 417
Boquilla rociadora 419
Boquilla rociadora 515
Boquilla rociadora 517
Boquilla rociadora VersaTip, 313
Boquilla rociadora VersaTip, 515
Boquilla rociadora VersaTip, 517
All Guard Protector (950 ml)
Piston Oil™
Pump Shield™ (12 oz.)
Paint Mate™ (1 L)
Modelo de pistola rociadora GS-07
Modelo de pistola rociadora GS-08
Manguera, 7.6 m x 0.6 cm
Manguera, 10.6 m x 0.6 cm
Manguera, 15 m x 0.6 cm
Manguera, 1 m x 0.5 cm
Filtro de pistola verde, grueso (2 piezas)
Filtro de pistola amarillo, fino (2 piezas)
Filtro de pistola blanco, medio (2 piezas)
Extensión de la boquilla, 36”
Extensión de la boquilla, 24”
Extensión de la boquilla, 12”
Rodillo Telescópico de TR-10, pelillo de 3/8”
Funda del rodillo, pelillo de 3/4”
Funda del rodillo, pelillo de 3/8”
Filtro de entrada
Español
Español Français
English
Limited Warranty
GARANTIE LIMITÉE
GARANTÍA LIMITADA
AIRLESS PAINT SPRAY EQUIPMENT
MATÉRIEL DE PULVÉRISATION DE PEINTURE SANS AIR
EQUIPO DE ATOMIZACIÓN DE PINTURA SIN AIRE
This product, manufactured by Wagner Spray Tech
(Wagner), is warranted to the original retail purchaser against
defects in material and workmanship for:
Ce produit, fabriqué par Wagner Spray Tech (Wagner), est
garanti, au bénéfice de l’acheteur au détail d’origine, contre
tout vice de matières et toute malfaçon pour :
Este producto, fabricado por Wagner Spray Tech (Wagner),
está garantizado ante el comprador original contra defectos
de materiales y mano de obra durante:
two years from date of purchase.
This warranty does not cover damage resulting from improper
use, accidents, user’s negligence or normal wear. This
warranty does not cover any defects or damages caused by
service or repair performed by anyone other than a Wagner
Authorized Service Center. This warranty does not apply to
accessories.
Wagner SHALL NOT IN ANY EVENT BE LIABLE FOR
ANY INCIDENTAL OR CONSEQUENTIAL DAMAGES
OF ANY KIND, WHETHER FROM BREACH OF THIS
WARRANTY OR ANY OTHER REASON.
If any product is defective in material and/or workmanship
during the applicable warranty period, please call Wagner
Technical Service at 1-800-880-0993. do not return
the product to the original retailer. Under
Wagner’s Free Tool Replacement Program, Wagner
Technical Service will either replace the defective part, or
refer you to your nearest Authorized Service Center for
repair.
SOME STATES DO NOT ALLOW LIMITATIONS ON
HOW LONG AN IMPLIED WARRANTY LASTS OR THE
EXCLUSION OF INCIDENTAL OR CONSEQUENTIAL
DAMAGES, SO THE ABOVE LIMITATION AND EXCLUSION
MAY NOT APPLY TO YOU.
THIS WARRANTY GIVES YOU SPECIFIC LEGAL RIGHTS,
AND YOU MAY ALSO HAVE OTHER RIGHTS WHICH
VARY FROM STATE TO STATE.
dos años contado a partir de la fecha de compra.
deux années à compter de la date d’achat.
La présente garantie ne s’applique pas aux dégâts entraînés
par une utilisation incorrecte, par la négligence de l’usager
ou par l’usure normale. La présente garantie ne s’applique
pas non plus aux défectuosités ou dommages résultant
de l’entretien ou de la réparation que fait une personne
quelconque qui ne soit pas membre d’un centre d’entretien
autorisé pour les produits Wagner. La présente garantie ne
s’applique pas aux accessoires.
Wagner NE pourra en aucun cas Être tenue
responsable de DOMMAGES-INTÉRÊTS INDIRECTS
OU consÉcutifs, QUE CE SOIT POUR UNE RUPTURE
DE CETTE GARANTIE OU TOUTE AUTRE RAISON.
En cas de défaut de matériau ou de fabrication du produit
durant la période de garantie applicable, appelez le Service
technique Wagner au 1-800-880-0993. Ne renvoyez pas le produit au détaillant original. Dans le cadre
du programme de remplacement gratuit d’outils Wagner, le
Service technique Wagner remplacera la pièce défectueuse
ou vous indiquera le centre de service agréé le plus proche.
CERTAINES PROVINCES INTERDISENT LES
RESTRICTIONS SUR LA DURÉE D’UNE GARANTIE
IMPLICITE OU L’EXCLUSION DES DOMMAGES
ACCESSOIRES OU INDIRECTS. IL SE PEUT DONC QUE
LA RESTRICTION ET L’EXCLUSION ÉNONCÉES CIDESSUS NE S’APPLIQUENT PAS À VOUS.
LE PRÉSENTE GARANTIE VOUS ACCORDE DES DROITS
JURIDIQUES SPÉCIFIQUES, ET VOUS AVEZ PEUTÊTRE D’AUTRES DROITS, QUI PEUVENT VARIER D’UNE
PROVINCE À L’AUTRE.
Esta garantía no cubre los daños que sean resultado de un
uso inapropiado, accidentes, negligencia del usuario o un
desgaste normal. Esta garantía no cubre ningún defecto o
daño que haya sido causado por los servicios o reparaciones
llevadas a cabo por alguien que no sea un técnico del Centro
de Servicio Autorizado de Wagner. Esta garantía no es válida
para ningún accesorio.
Wagner NO SERÁ EN NINGÚN CASO RESPONSABLE
DE NINGÚN DAÑO INCIDENTAL O DE CONSECUENCIA
DE NINGUNA CLASE, QUE RESULTE DE VIOLAR ESTA
GARANTÍA O POR CUALQUIER OTRA RAZÓN.
Si algún producto presenta fallas en los materiales y/o en
su fabricación durante el periodo de vigencia de la garantía,
llame al Servicio Técnico de Wagner al 1-800-880-0993.
No devuelva el producto a la tienda donde lo adquirió. Gracias al Programa de Reemplazo de
Herramientas Gratis de Wagner, el Servicio Técnico de
Wagner reemplazará la pieza defectuosa o lo derivará
al Centro de Servicio Autorizado más cercano para su
reparación.
ALGUNOS ESTADOS NO PERMITEN LIMITACIONES EN
CUANTO A LA DURACIÓN DE UNA GARANTÍA IMPLÍCITA
O LA EXCLUSIÓN DE DAÑOS INCIDENTALES O DE
CONSECUENCIA, DE MANERA QUE LA LIMITACIÓN Y
EXCLUSIÓN ANTERIORES PODRÍAN NO SER VÁLIDAS
PARA USTED.
ESTA GARANTÍA LE CONCEDE DERECHOS LEGALES
ESPECÍFICOS, PERO USTED PODRÍA TENER DERECHO
A OTROS, LOS CUALES VARÍAN DE UN ESTADO A
OTRO.
U.S. Patent Nos.
6,981,852 7,071,429
D553,325
7,886,876
6,933,634
D550,327
D550,329
Other patents pending
English
Français
Español
76
7,018,181
D537,839
D550,328