1
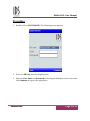
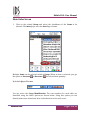
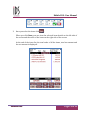
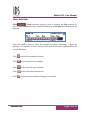
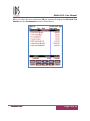
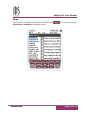
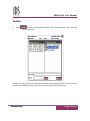
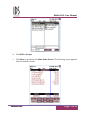
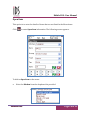
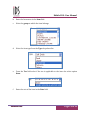
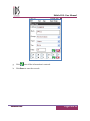
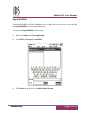
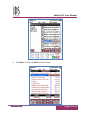
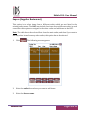
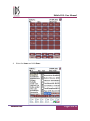
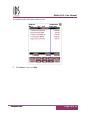
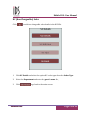
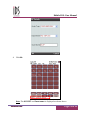
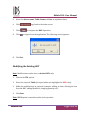
MOBILE POS
- USER MANUAL -
Document Release Date: May 12th 2011
Mobile POS –User Manual
TABLE OF CONTENTS
INTRODUCTION ........................................................................................................... 3
PROCEDURE .................................................................................................................. 5
MAIN ORDER SCREEN ...............................................................................................................11
COVER SELECTION .....................................................................................................................13
MENU .........................................................................................................................................15
MODIFIER ..................................................................................................................................16
OPEN ITEM ................................................................................................................................18
OPEN MODIFIER ........................................................................................................................21
SUPRES (SUPPLIER RESTAURANT) ..........................................................................................24
OTHERS......................................................................................................................................27
NC (NON CHARGEABLE) SALES................................................................................................31
MODIFYING THE EXISTING KOT ..............................................................................................33
Mobile POS –User Manual
MOBILE POS
Introduction
Mobile POS is a product that enables stewards in a restaurant (or any other F&B
outlet) to take an order from the guest electronically on a hand-held wireless PDA
device.
Mobile POS is targeted at F&B Outlets and would greatly reduce the hassles
associated with the traditional way of order taking on paper and then traveling to
the Kitchen to place the order. The moment order is saved on the hand held device,
it is transmitted wirelessly & printed at the kitchen(s) (which might be located at
a distance).
Mobile POS uses Wi-Fi technology and is compatible with MS windows for mobile
pocket PC platform and Microsoft Windows Terminal Services.
The new product besides enhancing image of the restaurant and increasing guest
satisfaction levels also helps the management in optimally utilizing the steward’s
time to remain more focused in serving the guests rather than mundane task as well
as reduce F&B overheads involved with auditing of manual KOT system.
Most importantly, Mobile POS by ensuring instantaneous and error free
transmission of order helps restaurants increase guest satisfaction.
M
MO
OBBIILLEE PPO
OSS
Page 3 of 33
Mobile POS –User Manual
FEATURES
The key features of the product include:
Paperless
Wireless
Handheld Order Entry
Multi-level Item Modifiers
Multi-Outlet Handling.
The product finds application in fine dining restaurants (individual or part of some
hotel), discotheques, lounge bars, resorts, roof top restaurants and any outlet where
kitchen is at a distance.
M
MO
OBBIILLEE PPO
OSS
Page 4 of 33
Mobile POS –User Manual
Procedure
1.
Double-click on PDAT100.EXE. The following screen appears.
2.
Select the DB User from the dropdown list.
3.
Enter the User Name and Password on the keypad displayed on the screen and
click Continue to login to the application.
M
MO
OBBIILLEE PPO
OSS
Page 5 of 33
Mobile POS –User Manual
Outlet selection window will display only Normal and Fast Food outlet types. On
the top right hand side of the screen you can view the Current Date and the User
Name.
M
MO
OBBIILLEE PPO
OSS
Page 6 of 33
Mobile POS –User Manual
Note:
In PDA - ROOM SERVICE, SHOP, BAKERY TYPE and BANQUET Outlet
types are restricted.
4.
Click on the Outlet name to select the required Outlet.
Once the Outlet is selected, Server Selection window appears as shown below:
On the top of the screen (Left side) you can see the name of the outlet selected along
with the current applicable session name.
M
MO
OBBIILLEE PPO
OSS
Page 7 of 33
Mobile POS –User Manual
5.
Select the Server Name.
Once the Server name is selected, Table Selection window appears as shown
below.
If you want to select a different Server click
.
Note: Table color legends:
Table highlighted in GREEN color indicates that the Table is vacant.
Table highlighted in BLUE color indicates that the table has been billed.
Table highlighted in RED color indicates that the Table is occupied.
M
MO
OBBIILLEE PPO
OSS
Page 8 of 33
Mobile POS –User Manual
6.
Click on the Table Number for which you want to place an order. Once the
Table Number is selected, Menu Group/Menu Items window appears. Menu
Groups are shown on left side. Select the menu groups to display the items.
Note: The Server Name and the table number appear at the top of the screen.
M
MO
OBBIILLEE PPO
OSS
Page 9 of 33
Mobile POS –User Manual
In Order Entry Screen, Groups will appear on the left hand side and Item Names
will appear on the right hand side.
M
MO
OBBIILLEE PPO
OSS
Page 10 of 33
Mobile POS –User Manual
Main Order Screen
1.
Click on the related Group and select the checkboxes of the Items to be
selected. Click next (>) to view the Next Page of items.
Multiple Items can be selected within a Group. When an item is selected, you get
the option to increase
or decrease
the selected item quantity.
By default Qty will be one.
You can select the Cover Identification. The seat numbers for each table are
identified using the ABCD options as shown below. Using this option you can
identify what menu items have been ordered and served to each cover.
M
MO
OBBIILLEE PPO
OSS
Page 11 of 33
Mobile POS –User Manual
2.
Once you select the items click
.
When you click Done, you can view the selected items details on the left side of
the screen and the value of the items on the right side of the screen.
At the end of the items list, the total value of all the items, total tax amount and
the net amount is displayed.
M
MO
OBBIILLEE PPO
OSS
Page 12 of 33
Mobile POS –User Manual
Cover Selection
Click
. Cover selection option is used to identify the Pax ordered for
specific item. Cover selection is optional. When you click Cover the following screen
appears:
Press the number keys to enter the number of covers. Maximum 3 digits are
allowed. The number of covers selected will show in the space highlighted in the
screen shot above.
Click
to delete the numbers selected.
Click
to increase the cover number.
Click
to decrease the cover number.
Click
to save your selection and exit.
Click
to exit the screen without saving your selection.
M
MO
OBBIILLEE PPO
OSS
Page 13 of 33
Mobile POS –User Manual
When you select the covers and press OK the system will display the Sub Total, Tax
Amount and the Net Amount screen as shown below:
M
MO
OBBIILLEE PPO
OSS
Page 14 of 33
Mobile POS –User Manual
Menu
If you want to add more menu items to the KOT click
open items or modifiers using this option.
M
MO
OBBIILLEE PPO
OSS
. You can also add any
Page 15 of 33
Mobile POS –User Manual
Modifier
a.
Click
to add any modifier items to the selected items. The following
screen appears:
On the left side of the screen all the selected items will be listed. If there are any
predefined modifiers, they will be listed on the right side of the screen.
M
MO
OBBIILLEE PPO
OSS
Page 16 of 33
Mobile POS –User Manual
b.
Click ADD to Accept.
c.
Click Done to go back to the Main Order Screen. The following screen appears
with the modifier details
M
MO
OBBIILLEE PPO
OSS
Page 17 of 33
Mobile POS –User Manual
Open Item
This option is to enter the details of items that are not listed in the Menu items.
Click
to enter Open Item information. The following screen appears:
To Add an Open Item to the menu:
a.
Select the Kitchen from the dropdown list provided.
M
MO
OBBIILLEE PPO
OSS
Page 18 of 33
Mobile POS –User Manual
b.
Enter the Item name in the Item field.
c.
Select the group to which the item belongs.
d.
Select the item type from the Type dropdown list.
e.
From the Tax field select if the tax is applicable to the item else select option
None.
f.
Enter the rate of the item in the Rate field.
M
MO
OBBIILLEE PPO
OSS
Page 19 of 33
Mobile POS –User Manual
g.
Click
h.
Click Done to save the records.
M
MO
OBBIILLEE PPO
OSS
once all the information is entered.
Page 20 of 33
Mobile POS –User Manual
Open Modifier
Predefined Modifier will be displayed on the right side of the screen. You can add
the Open Modifier for the respective item.
To enter the Open Modifier for an item:
a.
Enter the Name and Cost applicable.
b.
Click ADD to Accept the modifier.
c. Click Done to go back to the Main Order Screen.
M
MO
OBBIILLEE PPO
OSS
Page 21 of 33
Mobile POS –User Manual
d.
Click Done To View the KOT as shown below:
M
MO
OBBIILLEE PPO
OSS
Page 22 of 33
Mobile POS –User Manual
C option is used to make the Item as Complimentary.
(The Hotel has the authority to provide items as complimentary based on its
discretion. Guests are not charged for these items. Such items are known as
Complimentary Items).
Select C option again to untag the status from Complimentary to Normal as
chargeable.
+ Option is used to Increase the item Quantity.
- Option is used to Decrease the item Quantity.
1 – This option displays the Quantity and changes according to the required
Quantity. Once you enter the Quantity with + option, click Done.
X option is used the Delete the Item from KOT.
M
MO
OBBIILLEE PPO
OSS
Page 23 of 33
Mobile POS –User Manual
Supres (Supplier Restaurant)
This option is to select items from a different outlet which are not listed in the
existing outlet menu. The KOT may include few items from a different outlet, in such
cases select this option to navigate to the other outlet and add items to the KOT.
Note: The table has to be selected first from the main outlet, and then if you want to
add any other items from any other outlet, this option has to be selected.
1.
Click
2.
Select the outlet from where you want to add items.
3.
Select the Server name.
M
MO
OBBIILLEE PPO
OSS
. The following screen appears:
Page 24 of 33
Mobile POS –User Manual
4.
Select the items and click Done.
M
MO
OBBIILLEE PPO
OSS
Page 25 of 33
Mobile POS –User Manual
You will be back on the main outlet screen.
5.
Click Save to order the KOT.
M
MO
OBBIILLEE PPO
OSS
Page 26 of 33
Mobile POS –User Manual
Others
Click
for additional options as shown below:
You have two options:
Change Restaurant – This option is to change the outlet from one to another.
M
MO
OBBIILLEE PPO
OSS
Page 27 of 33
Mobile POS –User Manual
Table Transfer – This option is to transfer the KOT from one table to another
when the table is changed.
M
MO
OBBIILLEE PPO
OSS
Page 28 of 33
Mobile POS –User Manual
1.
Select the source table from the Scr Tbl dropdown list.
2.
Select the table number to which the KOT has to be transferred from the Tgt
Tbl dropdown list.
3.
Click Load. The KOT details appear on the screen.
M
MO
OBBIILLEE PPO
OSS
Page 29 of 33
Mobile POS –User Manual
4.
Click Transfer.
5.
Click Exit from the other option.
M
MO
OBBIILLEE PPO
OSS
Page 30 of 33
Mobile POS –User Manual
NC (Non Chargeable) Sales
Click
to add non chargeable sales details in the NC Bills.
1.
Click NC Details and select the option NC order types from the Order Type.
2.
Select the Department and enter the guest’s name. Or,
3.
Click
M
MO
OBBIILLEE PPO
OSS
to go back to the main screen.
Page 31 of 33
Mobile POS –User Manual
4.
Click Ok.
Note: The NC DEPT and Guest name is displayed as shown above.
M
MO
OBBIILLEE PPO
OSS
Page 32 of 33
Mobile POS –User Manual
5.
Select the Server name, Table, Items and Save as explained above.
6.
Click
7.
Click
8.
Click
to go back to the main screen.
to complete the KOT Operation.
to logout from the application. The following screen appears:
9. Click Yes.
Modifying the Existing KOT
Note: Modifications can be done on Active KOTs only.
1.
Click on the TBL option.
2.
Select the required Table (Occupied tables are highlighted in RED color).
3.
Make the modifications as required (example: adding an Item, deleting an item
from the KOT, adding Modifiers, changing quantity etc.).
4.
Click Save.
Note: SAVE option is mandatory after each operation.
M
MO
OBBIILLEE PPO
OSS
Page 33 of 33