1
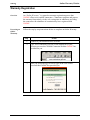
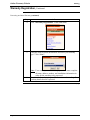
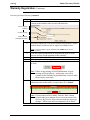
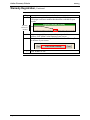
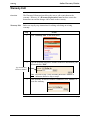
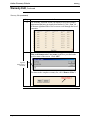
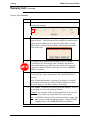
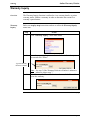
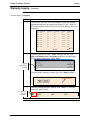
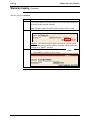
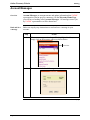
Certified Contractor Online Support System
Warranty User Manual
Information Sheet
Updated 7/11
Quality You Can Trust…From
North America’s Largest Roofing Manufacturer!™
Certified Contractor
Online Support System
GAFMC Warranty User Manual
Prepared exclusively for GAF Materials Corporation / March 2002
Online Warranty Website
warreg
Online Warranty Website
Overview
The GAFMC Certified Contractor Website allows GAFMC certified
contractors to register warranties online. As part of the features of the
website, contractors will be able to receive Account Messages and GAFMC
announcements regarding changes, updates, and special offers. The following
document will guide you through step-by-step instructions to access all of the
features offered at the website.
Contents
Online Warranty Website
Warranty Registration
Warranty Edit
Warranty Inquiry
Account Messages
Page 2
GAF Materials Corporation
2
3
7
11
14
12/20/2005
warreg
Online Warranty Website
Warranty Registration
Overview
An “Online Warranty” is a paperless warranty registration process that
GAFMC offers to its certified contractors. Contractors complete and process
the warranty form entirely via the web, saving time in addition to providing
the contractor with a database of warranties they have registered with
GAFMC.
Processing an
Online
Warranty
Follow the step-by-step instructions below to complete an Online Warranty.
Step
Action
1.
Connect to your Internet Service Provider.
2.
Type ‘www.contractors.gaf.com’ in the address bar of your
browser to access the Certified Contractor Website GAFMC has
provided for you.
3.
Once you access the Sign-In screen, type in the User Id and
password that GAFMC has provided you.
Continued on next page
12/20/2005
GAF Materials Corporation
Page 3
Online Warranty Website
warreg
Warranty Registration, Continued
Processing an Online Warranty (continued)
Step
4.
5.
6.
Action
Click “Warranty Registration” in the main menu.
Using the Form Selection down arrow and select your warranty
type. Click “Next”.
Note: Your warranty form will be displayed. You must complete
all name, address, product, and installation information in
order for the warranty to be processed.
Complete the form by typing in all information and recording all
warranty details that are requested.
Continued on next page
Page 4
GAF Materials Corporation
12/20/2005
warreg
Online Warranty Website
Warranty Registration, Continued
Processing an Online Warranty (continued)
Step
7.
Action
You will also be required to enter the payment information for this
warranty at the bottom of the screen as shown below:
List of coupons
available
Credit Card type
Credit Card No.
and Expiration Date
8.
Select the coupons you wish to use from the list provided. Coupon
numbers shown in blue are due to expire in 2 months or less.
Note: To select multiple coupons, hold down the CTRL button on your
keyboard
9.
Click the Credit Card down-arrow and select the type of credit
card you will use for the payment of this warranty.
10. Type the Credit Card Number in the text box provided.
11. Enter the credit card Expiration Date.
12. Click “Next” once you are finished entering all the information on
the form.
Note: If there is any missing or invalid information, an error
message will be displayed. At this point, you will be
returned to the Warranty Registration Entry screen to make
the necessary corrections.
13. You are now in the Warranty Review screen. Review all
information and confirm that it is correct then click “Submit”.
Note: If corrections need to be made, click the “Prev” button
located at the top or bottom of your screen to return to the
Warranty Registration Entry screen to make the necessary
changes. When corrections are completed, click “Next”.
Continued on next page
12/20/2005
GAF Materials Corporation
Page 5
Online Warranty Website
warreg
Warranty Registration, Continued
Step
Action
14. Once the warranty has been processed successfully, the system
will assign a reference number that should be recorded for your
records.
Warranty
Reference
Number
15. To print a copy of the warranty with its assigned reference
number, click “Print” at the bottom of your screen.
16. To register another warranty, click “Enter Another Warranty” at
the bottom of your screen.
17. Click “Close” to exit.
Page 6
GAF Materials Corporation
12/20/2005
warreg
Online Warranty Website
Warranty Edit
Overview
The Warranty Edit menu item allows the user to edit certain data on the
warranty. However, if a Warranty Registration Letter has been sent to the
homeowner no on-line changes can be made to the warranty.
Warranty Edit
Below are step-by-step instructions for editing or deleting an existing
warranty.
Step
1.
2.
Action
Click “Warranty Edit” in the main menu.
Type the Warranty Reference Number in the box indicated on your
screen and click “Edit”.
Type the Warranty
Reference Number
3.
Note: Proceed to step 3 if the Warranty Reference Number is
unknown otherwise skip to step 6.
If the Warranty Reference Number is unknown, click “Browse” to
locate the warranty.
Continued on next page
12/20/2005
GAF Materials Corporation
Page 7
Online Warranty Website
warreg
Warranty Edit, Continued
Warranty Edit (continued)
Step
4.
5.
Action
The Warranty Selection screen will display a list of all warranty
registrations that have previously been entered. Click “Next” on
the bottom right hand side of the screen to scroll through the list of
warranties.
To narrow your search, click “Filter” and type the Job Name
(This is the homeowner’s last name) in the box provided at the
top left corner of the screen. Click “OK”.
Type the
homeowner’s
last name
(To return to the complete warranty list, click “Remove Filter”).
Continued on next page
Page 8
GAF Materials Corporation
12/20/2005
warreg
Online Warranty Website
Warranty Edit, Continued
Warranty Edit (continued)
Step
Action
6.
When the warranty has been located, click “Select” to view, edit
or delete the warranty.
7.
Once in editing mode, you will have the editing options as
depicted below. The fields that will be available for modifications
will be open for updates to be made; you will be able to <TAB>
and/or click to navigate between fields. More details will follow
in the steps below.
8.
No changes can be made to the warranty on-line if GAFMC
Contractor Services has already sent a Warranty Registration
Letter to the homeowner. If the letter has already been sent, you
will need to contact GAFMC Contractor Services at 1-888-5325767 for assistance.
9.
Changes can be made to the warranty registration by typing
directly into the “Owner Information” and “Building Location”
sections.
In the “Product Information” section(s) you must first “deselect”
your original selections by clicking on that checkbox to remove
the check, then you can make your new selection(s).
10. Click “Delete” to remove the warranty from the database. You will
be prompted to verify your warranty deletion.
Caution: The warranty will be permanently deleted. Be sure this
is the action you want to take before proceeding.
Note: If GAFMC Contractor Services has posted the warranty into
their system, it cannot be deleted on-line. Contact GAFMC
Contractor Services at 1-888-532-5767 for assistance.
Continued on next page
12/20/2005
GAF Materials Corporation
Page 9
Online Warranty Website
warreg
Warranty Edit, Continued
Warranty Edit (continued)
Step
Action
11. Click “Save” to commit your changes. You will be prompted to
verify your changes.
12. Click “Exit” to close the Warranty Edit screen.
Note: You may return to step 2 to edit another warranty.
Page 10
GAF Materials Corporation
12/20/2005
warreg
Online Warranty Website
Warranty Inquiry
Overview
The Warranty Inquiry function is utilized to view warranty details, to print a
warranty and to validate a warranty in order to determine the reason for a
warranty’s partial status.
Warranty
Inquiry
Below are step-by-step instructions on how to utilize the Warranty Inquiry
menu item.
Step
1.
2.
Action
Click “Warranty Inquiry” in the main menu.
Enter the warranty reference number in the box indicated on your
screen and click “View”.
Type the Warranty
Reference Number
3.
Note: See step 3 if the Warranty Reference Number is unknown
otherwise skip to step 7.
If the Warranty Reference Number is unknown, click “Browse” to
locate the warranty.
Continued on next page
12/20/2005
GAF Materials Corporation
Page 11
Online Warranty Website
warreg
Warranty Inquiry, Continued
Warranty Inquiry (continued)
Step
4.
5.
Action
The Warranty Selection screen will display a list of all warranty
registrations that have previously been entered. Click “Next” on
the bottom right hand side of the screen to scroll through the list of
warranties.
To narrow your search, click “Filter” and type the Job Name
(This is the homeowner’s last name) in the box provided at the
top left corner of the screen. Click “OK”.
Type the
homeowner’s
last name
(To return to the complete warranty list, click “Remove Filter”).
6.
When the warranty has been located, click “Select” to view the
warranty as shown below.
Click here to
view the
warranty.
Continued on next page
Page 12
GAF Materials Corporation
12/20/2005
warreg
Online Warranty Website
Warranty Inquiry, Continued
Warranty Inquiry (continued)
Step
7.
8.
9.
12/20/2005
Action
You are now in the Warranty Inquiry screen where you can review
the details of the selected warranty.
Note: Changes cannot be made to the warranty in this screen.
Click “Validate” to activate the validation function.
Purpose: The validate feature allows the user to view any errors
or outstanding issues pending with the warranty which renders the
warranty as a “partial” warranty.
• Click “Print” for a hard copy of the warranty <OR>
• Click “Exit” to exit the Inquiry screen.
GAF Materials Corporation
Page 13
Online Warranty Website
warreg
Account Messages
Overview
Account Messages are announcements and update information that GAFMC
representatives send to specific contractors. On the Warranty Home Page,
you will have a heading called Account Messages. All messages sent to you
by GAFMC representatives will be shown here.
Read and Save
a message
Below are step-by-step instructions to read and save a message in your
account:
Step
1.
Action
When new messages arrive they will be highlighted in blue,
simply click on the message subject as shown below.
Click Here
2.
You are now in the Read Message screen.
Continued on next page
Page 14
GAF Materials Corporation
12/20/2005
warreg
Online Warranty Website
Account Messages, Continued
Read and Save a message (continued)
Step
3.
Deleting a
Message
12/20/2005
Action
Click “ Close” to save the message and to return to the home page.
Below are step-by-step instructions to delete a message from your account:
Step
1.
2.
Action
You must be in the Read Message screen.
Click “Delete” to discard the message.
3.
Click “Close” to return to the Home Page.
GAF Materials Corporation
Page 15