1
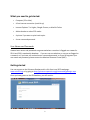
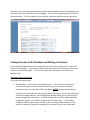
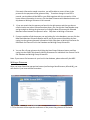
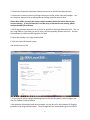
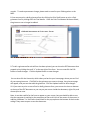
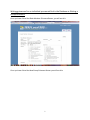
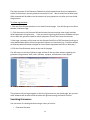
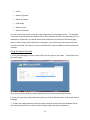
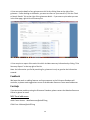
Grievance Database (GDB) User Manual Welcome to the NEW Grievance Database for Stewards. After listening to suggestions from users of the last Grievance Database, we decided to start over in order to address the most common issues. We hope that everyone finds this to be an easy and intuitive way of filling out grievance forms and storing grievance information for use by other stewards looking for guidance on how similar issues have been handled in the past. What this grievance database will allow you to do: With this Grievance Database you can: • Search for a member in your local • Review the member's contact information and correct it • Write a grievance for an individual you have found in the database • Write a grievance when you cannot find the individual in the database • Write a group grievance • Print draft and final grievance forms • Edit a grievance prior to final printing • Change the status of a grievance from unfiled to filed • Add notes to a grievance • Close a grievance • Search closed grievances • View and print a report of the search results • The grievance database will not allow you to send a grievance to management by clicking a button. You still need to both print it and turn it in to management, or save the grievance as a PDF file and email it to management (but it will not have the grievant's signature). • The grievance database will not automatically remind you of grievance timelines. You can use the notes function as a timeline reminder but you will need to calculate the date a particular action is due and check your open grievances to see when an action is required. 1 What you need to get started: • Computer (PC or Mac) • A fast internet connection (not dial-‐up) • Internet Explorer 7 or higher, Google Chrome, or Mozilla Firefox • Adobe Acrobat or other PDF reader • A printer if you want to print hard copies • A user name and password User Names and Passwords Steward user names and passwords are generated when a member is flagged as a steward in SEIU Local 503’s membership database. If you are not sure whether or not you are flagged as a steward, or if you have not received a user name and password, or if you’ve forgotten your user name and password, please contact the Member Resource Center (MRC). Getting started You can connect to the Grievance Database with a link from Local 503’s webpage: www.seiu503.org or by going to http://grievance.opeuseiu.org/grievancedb/gdbLogin.aspx. Once you have gotten to the GDB website, you will see this: 2 Enter your user name and password exactly as they appeared when sent to you (passwords are case sensitive).You will then be at your homepage. If you have active grievances, you will see them listed here. This is also where you can look up a member and start writing a grievance. Finding Someone in the Database and Writing a Grievance In the Search for Member field, start to type the first or last name of the person in your local that you are looking for. A list of names will pop up and you can scroll through this list to find the person you are looking for. Click on their name and it will appear in the Search for Member field. Starting a New Grievance From here you have choices: 1. View Member – click on the View Member button. You can see home and work contact information as well as member status (so you can ask them to become a member or join or increase their CAPE contribution AFTER you have assisted them). If home contact information is not correct, click the Edit button, correct the information and click the Update button. You will NOTget a message asking you to verify that you want to change this information. It will be changed once you click Update and those changes will appear in Local 503’s records within 2 business days. If you make a change by mistake, please email the MRC as soon as possible with the name of the person for whom you made the change and (if you have it) the correct information. 3 If the work information needs correction, you will be able to correct it later in the process for the purposes of the grievance only. To make a change in Local 503’s records, you should email the MRC or your field organizer with the correction. If the home contact information is correct, click the New Grievance with Member button and skip down to Writing a Grievance in this manual. 2. If you are certain that the person you found is the right person and that you do not need to look at any other information about them, you can skip the View Member step and go straight to writing the grievance by clicking the New Grievance with Selected Member button beneath the person’s name. Skip down to Writing a Grievance. 3. If you are unable to find the person you are looking for in the database, you can click the New Blank Member Grievance Button and fill out all the contact information by free-‐ typing into the grievant/steward information fields. Skip down to Writing Grievances for Individuals You Cannot Find in the Database and Writing Group Grievances. 4. You can file a Group grievance by clicking the New Group Grievance button and free typing into the fields. Skip down to Writing Grievances for Individuals You Cannot Find in the Database and Writing Group Grievances. Note: if you cannot find someone in your local in the database, please also notify the MRC. Writing a Grievance After you have clicked the appropriate button (see Starting a New Grievance, #3 and #4), you will see this if you have selected a member. 1. Fill in the name of the supervisor and name of the person the grievance is filed with. 4 2. Choose the Grievance Date (date incident was known or should have been known) 3. Choose the contract articles by clicking the box next to the article name and number. You can choose as many articles as appropriate by clicking the boxes next to them. Please Note: Make sure that the contract article numbers match the article titles in your current contract. If you find that this is not the case, or that articles are missing, please contact the MRC for assistance. 4. Write the grievance statement as succinctly as possible in the large Statement field. This is a very large field so if you have run out of room, you have probably written too much. Shorten the statement or talk to an MRC organizer for help. 5. Write the remedy in the large remedy field. 6. Click the Create Grievance button. You should then see this 7. If you need to add or change something you can click the Edit button, make changes, and click the Update Grievance button. If the worksite information needs to be changed, you can do so for the purposes of filing this grievance now using the Edit button. Those changes will not automatically go to Local 503’s 5 records. To make a permanent change, please send an email to your field organizer or the MRC. 8. You can now print a draft grievance form by clicking the Print Draft button or print a final grievance form by clicking the Print Final button. Once the Print Final button has been clicked, the grievance can no longer be edited. 9. To edit a grievance after a draft form has been printed, you can close the PDF document that popped up by clicking the small “x” at the top right of the form. You can now click the Edit button to make changes. Click the Update button to save changes. Or You can also click the Home tab, which takes you back to your home page, where you can find all your open grievances. Click Edit for the grievance you want to change, the grievance page will appear, and you can then edit the grievance. Click the Update button to save changes. 10. If you want to print or save a final or draft grievance form, you can use the icons or buttons at the top of the PDF document or you can put your cursor inside the document, right click, and choose print or save. Note: It can take a while for the form to appear on your screen, but you should be able to see that the computer is working by the movement of the small circle in the center of the screen; in addition, Windows 7 or Vista users should look for the pop up box at the bottom of their screen asking if they want to open or save the document. 6 Writing grievances for an individual you cannot find in the Database or Writing a Group Grievance Once you have clicked the Blank Member Grievance Button, you will see this: . Once you have clicked the New Group Grievance Button you will see this: 7 If you have not found the person you are looking for or are writing a group grievance you will need to add the name of the group or grievant, home and work contact information, job classification (if for an individual). The rest of the process is the same as for a grievance for a selected member Grievance Notes Notes are for your use only and will not be seen as part of the grievance form you print out to hand to management. You can use this field to keep notes from grievance meetings, keep track of timelines, names and contact info of witnesses, or whatever is helpful to you. These notes will also be visible to someone who has used the search function to look for closed grievances. Adding Notes To add a note from the Write or View Grievance screen, scroll to the bottom and click the Add Note button. Type you notes into the field and click the Update Note button. You are now back to the Grievance Page. Scroll down and you will see your note. You can edit this note by clicking edit, changing the note and clicking the Update Note button, or you can add a new note by clicking the Add Note button. 8 Viewing Notes You can see all notes for a grievance on the Grievance page. In addition, when a grievance has a note connected to it, there is a ‘Has Note’ indication next to the name of the group or grievance. If you hover the cursor over the Notes Indication (small dark blue circle with a white I in the middle), you will see the last note written. 9 Changing Filing Status Since you will have to hand/mail/fax/email the grievance form in to management, you will need to change the filing status manually. It is important that you keep track of the day the grievance is filed. When looking at your list of grievances on the Home Page, you can tell which grievances have been filed or not filed. To change the filing status of a grievance from your list of grievances, 1. Click the View button and then look for the Add Filing Information button at the top right of the page. You can then add the filing date. This should be the date that the grievance was actually handed to management. You will not be able to add a filing date that is in the future; it must be a current or previous date. In addition, you will not be able to add a filing date until a final version of the grievance has been printed. 2. Click the File Grievance button. You will be taken back to the View Grievance page where you can see that a filing date has been added and that the Filing Status has changed to Filed. This information will also show in your list of active grievances on your home page. Note: Print Status and Filing Status are different; once you have printed the final version of the grievance form, the Print Status will automatically change from Draft to Final. Closing Grievances 10 The major purpose of the Grievance Database is to help stewards see what has happened in similar circumstances; was the grievance successful or not? Was it settled and at what step? Other stewards will be able to see the outcome of your grievances only after you have closed the grievance. To close a grievance, !. Click the Close Grievance button on the View Grievance page. You will then go to the Close Member Grievance Page. 2. Click the arrow in the Outcome field and choose the outcome that most closely matches what happened to this grievance. If you are practicing using the Grievance Database and you do not want this grievance saved for search purposes, choose Test Case as an outcome. 3. Next type a summary of the issue into the Synopsis field (limit of 300 characters) and type a more detailed description of how the grievance came to its conclusion (e.g.: Grievance settled at third step with termination changed to a Last Chance agreement and with no back pay.) 4. Click the Close Grievance button at the end of the page. You will return to the View Grievance page and see all that you have written regarding this grievance (the grievance itself, notes, outcome, synopsis, and outcome notes) appear. This grievance will no longer appear on the list of grievances on your home page, but you and other stewards will be able to find out about this grievance using the Search Function. Searching Grievances You can search for closed grievances using a variety of criteria: • Grievance Outcome 11 • Article • Name of grievant • Name of steward • Date Range • Name of Local • Name of Coalition You can narrow your search results by using combinations of the above criteria. For example, if you want to see all grievances filed on Article 20 by stewards in ODOT that were won prior to mediation or arbitration, you would choose that combination of criteria on the Search page. Note: In order to search by Article Name or Number, you need to enter the name of the local into the Local field. The reason for this is that different locals have different article names and numbers. Using the Search function 1. From your homepage, click the Search Tab at the top right on the screen. You will then see the search page: Here you can see the different search parameters you can use to look for grievances. 2. Once you have chosen the parameters you want, click the Submit button at the button left of the page. 3. If there are closed grievances that have been entered into the Grievance Database that fit your search parameters. You will see Search Results under the search parameters. 12 4. You can see the details of any grievance on this list by clicking View at the right of the grievance. If after looking at the details, you want to return to your search list, click the “Back to Search Results” link to the right of the grievance details. If you want to print what you saw in the View page, right click and choose print. 4. You can print a report of the entire list which includes summary information by clicking “Print Summary Report” at the top right of the list. Note: the information you find by searching for grievances is only as good as the information entered. Feedback We hope that work on adding features and improvements to the Grievance Database will continue, so please send suggestions to one of the Member Resource Center email addresses. For Help If you encounter problems using the Grievance Database, please contact the Member Resource Center by phone or email. MRC Email addresses: Adult Foster Homes: [email protected] Child Care: [email protected] 13 Human Services: [email protected] Homecare: [email protected] Institutions (except OSH): [email protected] OSH: [email protected] Local Government: [email protected] Private Non Profits: [email protected] Nursing Homes: [email protected] ODOT Coalition: [email protected] OUS: [email protected] Specials Coalition: specials @seiu503.org MRC Phone numbers State employees should call 877-‐772-‐6551 Higher Education employees, Local Government and Private Non-‐Profit Employees should call 877-‐798-‐0008 Nursing home employees and Adult foster care providers should call 877-‐637-‐2611 Homecare and childcare workers should call 877-‐451-‐0002. 14