1
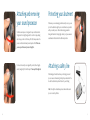
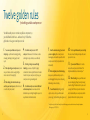
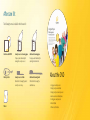
Living with your Baha System For recipients ® DVD included 1 Contents 5 How to look after your Baha® System – and yourself! 6 After surgery 6 Daily cleaning 7 Weekly cleaning 8 Attaching and removing your sound processor 9 Protecting your abutment 9 Attaching a safety line 10 Baha and children 10 What is a Baha Softband? 12 Twelve golden rules for handling your Baha sound processor 14 Using phones and other accessories 16 Sound processors - Quick Guides 21 What to expect from your batteries 22 Troubleshooting 24 Aftercare Kit 25 About the DVD 26 How to look after your Baha System – Quick Guide 2 Note: Not all products are available in all markets. Product availability is subject to regulatory approval in respective markets. 3 How to look after your Baha System – and yourself! ® Your Baha® sound processor is part of a sophisticated hearing system full of delicate microelectronic components, so you must take care of it – and yourself! This brochure shows you what to do after the surgery and how to keep your Baha sound processor and the abutment site in prime condition. The procedures outlined both here and in the accompanying DVD are so easy to follow, that they’ll soon become part of your daily routine. And the rewards will be well worth the effort! With a Baha system you’ll be able to hear and communicate with ease. 4 5 After surgery Weekly cleaning For the best result, you need to take care of the abutment to avoid any complications with the surrounding tissue. If the area has healed, the dressing and stitches will be removed 10–14 days after surgery. If not, the dressing may have to stay in place longer. Clean the inside of the abutment every week, with the abutment cleaning brush, as debris can also build up there. At home it is important to maintain good daily hygiene; for the first few weeks after the dressing has been removed, wash your hair carefully and use a strip of abutment cleaning wipe to keep the skin around the abutment clean. Daily cleaning After the first few weeks you can start cleaning the outside of the abutment with the soft abutment cleaning brush provided. Aim the bristles at the side of the abutment, and remove any debris that might have built up around the base. You can do this while taking a bath or shower, using mild soap and plenty of warm water. When you have finished bathing, use a strip of abutment cleaning wipe to make sure that all debris has been removed. 6 If you should experience soreness or inflammation, or if the abutment feels loose, contact your clinician or hearing care center. Otherwise, it’s a good idea to get regular checkups every six months. Remember: • Always rinse the abutment cleaning brush in mild soap and warm water and let it air dry. Change the brush every three months, or if you have had an infection. • If you have bilateral implants, use two separate cleaning brushes (one for each abutment), to avoid cross-contamination. • You can get new cleaning brushes from your hearing care center or by contacting your Cochlear™ office. 7 Attaching and removing your sound processor Your Baha sound processor is designed to snap onto the abutment. Simply attach it at a slight angle and tilt or rock it into place, taking care to keep your hair out of the way. The tilt technique reduces the pressure on the abutment and prevents any discomfort. Make sure you never push the sound processor straight in. To remove the sound processor again, lift your hair, slide a fingertip under it, and gently tilt it until it snaps off. Never pull it straight out. Protecting your abutment Whenever you are not wearing your Baha sound processor, you can protect the abutment using the press-on abutment cover provided with your sound processor. Wear it when sleeping, and when having hair treatments. During rough contact sports you can wear a sweatband over the abutment for additional protection. Attaching a safety line When taking part in activities where you risk losing your sound processor we recommend using the safety line provided. Insert the line into the attachment point and fasten it to your clothing. Note: The safety line should always be used when a Baha sound processor is worn by children. 8 9 Baha and children Children who use a Baha system need to observe the same routines as adults. Their parents/caregivers should teach them how to keep the abutment clean and the skin around it healthy. They should also be taught the importance of keeping their Baha sound processor safe – including using a safety line to avoid losing it. Note: In the United States and Canada, the placement of a boneanchored implant is indicated for children 5 years of age and older. What is a Baha Softband? Until children are ready for an implant they can wear their Baha sound processor on a colourful Baha Softband. This consists of an elastic headband with a plastic snap connector that holds the sound processor in place. To avoid any sore areas, this adjustable band can be turned, so the sound processor is not always in the same position. The Baha Softband enables a variety of listening opportunities. For example, in a car seat the sound processor can be worn on the forehead to maximize sound perception. 10 11 Twelve golden rules for handling your Baha sound processor Your Baha sound processor contains very delicate components, so you should handle it with care – and never drop it! Follow these golden rules to keep your sound processor safe: 1. You can wear your Baha sound processor all day long – apart from when sleeping, bathing, showering, swimming or during rough contact sports. 2. When adjusting your sound processor, make sure your hands are clean to avoid getting the inside or outside of the casing dirty. 3. When taking part in activities where you could lose your sound processor, either remove it or use the safety line provided. 4. Your Baha sound processor is NOT waterproof. Never wear it in the shower or when swimming. In rainy conditions, use an umbrella. 5. If visiting or living in an area with high humidity, you can use a Dry Aid Kit (a bag or container that contains crystals that absorb residual moisture from your sound processor) to keep your sound processor in good working order. 6. Your Baha sound processor cannot withstand extreme temperatures. So never leave it on the dashboard in your car in bright sunlight or expose it to any other kind of extreme treatment. 7. Clean the external casing of your sound processor regularly with a Sound processor cleaning wipe, and clean the snap with a small sound processor brush (both provided in the Aftercare Kit). 8. When using hair products like hairspray, always cover your Baha sound processor to avoid damaging the microphone or the casing. Alternatively, remove it entirely. 9. To avoid feedback (whistling), don’t let objects come too close to your Baha sound processor (e.g. a hat, hairbrush, phone, glasses etc.). 10. To store your Baha sound processor safely after use, remove the battery and place the sound processor in its case. 11. If you need an MRI scan, it is crucial to remove the sound processor beforehand. The implant and abutment can remain in place.* 12. When traveling, remove your Baha sound processor when going through security screening to avoid setting off metal detectors in places such as airports. An MRI/Security control instructions card is included with your sound processor, which provides information for airport personnel. *Arndt S, Kromeier J, Berlis A, Maier W, Laszig R, Aschendorff A. Imaging procedures after Bone-Anchored Hearing Aid implantation. The Laryngoscope 2007:117, 1815-8 12 13 Using phones and other accessories The best way to use telephones and cell phones with your Baha sound processor is to hold the phone receiver close to the microphone inlet of your sound processor rather than close to your ear. Don’t let your hand or the phone touch the sound processor, as this may cause it to whistle. When using Baha Cordelle II, the phone receiver should be next to the microphone on the body-worn unit. Most landline telephones are “hearing aid compatible” i.e. they have a built-in telecoil. If you are a Baha 3 System, Baha Divino or Baha Intenso user, you will need to attach the Baha Telecoil accessory to your sound processor and switch to the program for external equipment. For Baha Cordelle II, the telecoil is built into the bodyworn unit, so all you need to do is switch to the Telecoil program. Telecoils, FM receivers, and Audio adapters are available as optional accessories for your sound processor. They are easy to order from your hearing care center or your local Cochlear office. Note: FM receivers should be ordered from a hearing care center or the FM system manufacturer directly. FM Receivers An FM system makes listening easier in noisy environments, such as in classrooms. FM receivers can be specific in how they connect to your Baha sound processor; consult a hearing care specialist to determine the FM receiver that is best for you. Telecoil The Baha Telecoil accessory may help you hear better when using a phone or in buildings with loop facilities, such as churches, theaters, and airports. The Baha Cordelle II has a built-in telecoil, so no external accessory is required. Audio adapter The Audio adapter allows direct input from computers, personal stereos, TVs, MP3 players and other external equipment. Always use the audio adapter to connect your Baha sound processor to any electrical or battery-operated equipment. * * * Only Cochlear products and accessories, or products and accessories approved by Cochlear, should be used with each other to ensure the warranty is maintained. *Choice of accessories may vary depending on your Baha sound processor model 14 15 Sound processors 18 Baha 3 Sound Processor (BP100) 20 Baha 3 Power Sound Processor (BP110) 22 Baha Divino 23 Baha Intenso 24 Baha Cordelle II 16 17 Your quick guide to Baha 3 Sound Processor (BP100) u On/Off & Program Selection Button: Use the middle button to conveniently switch on and off the BP100, and to switch between the programs pre-set by your hearing care professional. v Volume down button Use this button to decrease the volume. w Volume up button u v w x Use this button to increase the volume. x P lastic snap connector y Attachment point for the safety line y U B attery compartment door. Remove the door when changing battery. V Visual status indicators Orange for processors worn on the right side of the head Blue for processors worn on the left side of the head W D irect Audio Input: For connecting audio accessories. X Microphones Consult the Baha BP100 User Manual for more details. U V W X Note: Baha BP100 not shown in actual size 18 19 Your quick guide to Baha 3 Power Sound Processor (BP110) u On/Off & Program Selection Button: Use the middle button to conveniently switch on and off the BP110, and to switch between the programs pre-set by your hearing care professional. v Volume down button Use this button to decrease the volume. w Volume up button u v w x Use this button to increase the volume. x P lastic snap connector y Attachment point for the safety line U B attery compartment door. Remove the door when changing battery. V Microphones W D irect Audio Input: For connecting audio accessories. X Visual status indicators Orange for processors worn on the right side of the head Blue for processors worn on the left side of the head y U V Consult the Baha BP110 Power User Manual for more details. W X Note: Baha BP110 not shown in actual size 20 21 Your quick guide to Your quick guide to Baha Divino Baha Intenso ™ u Volume control and On/Off button: Move the wheel up to turn your u Volume control and On/Off button: Move the wheel up to turn your sound processor on and to increase the volume. To decrease the volume and to turn your sound processor off, move the wheel down. sound processor on and to increase the volume. To decrease the volume and to turn your sound processor off, move the wheel down. v Program switch: v Program switch: Program 1 puts the microphone into omni-directional mode, where it will pick up sound from a 360° radius. Ideal for quiet surroundings. Program 2 activates the directional microphone. This will prioritise sounds coming from the front rather than from behind, which makes it easier to hear speech in noise. Note that in this program the electrical input is not activated, so any connected audio accessories will be muted. u v w Program 1 is the standard setting, suitable for most everyday situations. Program 2 is a comfort setting that may be useful in certain loud, adverse listening environments. Program E can be used when listening exclusively to input from an audio accessory, or as an instant mute, because it turns off the microphone. wD irect Audio Input: For connecting audio accessories. x Swing-out battery door: When changing the battery, remember to remove w D irect Audio Input: For connecting audio accessories. x Sliding battery door: When changing the battery, remember to remove the the plastic strip and make sure the plus-mark is facing upwards. Don’t force the door shut, as it could break. plastic strip and make sure the plus-mark is facing upwards. Don’t force the door shut, as it could break. Your sound processor will emit two beeps when the battery is low and needs to be changed. y u v w y Note: Never adjust the potentiometers y as this may void your warranty. Consult the Baha Divino User Manual for more detailed information. x Note: Never adjust the potentiometers y as this may void your warranty. Consult the Baha Intenso User Manual for more detailed information. Note: Baha Divino not shown in actual size. 22 x Note: Baha Intenso not shown in actual size. 23 Your quick guide to Baha Cordelle II u Connector cable: Connect the straight plug to the head-worn unit and the angled plug to the body-worn unit. v Volume control and On/Off button: Move the wheel to turn your sound processor on or off and to increase or decrease the volume. w Tone switch: The tone switch controls the frequency response of the sound processor. It can be set in three different positions: N=Normal. Amplifies all frequencies equally. H=High frequency emphasis. Reduces low frequency sounds which may improve speech understanding, especially in background noise. L= Low frequency emphasis. May be especially useful during the first period after fitting as it allows you to gradually get used to high frequency sounds you have not heard for a long time. x Built-in telecoil y Direct Audio Input for connecting audio accessories U P rogram switch: M= Microphone, MT=Microphone and Telecoil, T=Telecoil V Flip-up battery cover: When changing the battery, remember to use 9V batteries only. Make sure the plus-mark on the battery is facing the plusmark on your body worn unit. Don’t force the door shut, as it could break. What to expect from your batteries u v w x y U W The type of battery (size 13, 675 or 9V) depends on which Baha sound processor you are using. Just remember that for the smaller type 13 and 675 batteries, the battery will begin to drain once you remove the plastic strip – even if the sound processor is not actually in use! The batteries delivered with your sound processor reflect Cochlear’s latest battery brand recommendation. There are a number of factors that affect battery life. Brand type is one factor; low temperatures and hourly use are others. The program and volume control settings – as well as the use of accessories such as FM equipment – can also affect the life of the battery. Be sure to use only new, high quality batteries as this gives the best sound performance. Testing type 13 and 675 batteries To test the battery, place it in the tester (provided in your Aftercare Kit) with the plus-mark facing upwards, and press it onto the metal band. The display screen will then indicate how much power is left. The more bars there are, the more power is left in the battery. V Note: Never adjust the potentiometers W as this may void your warranty. Consult the Baha Cordelle II User Manual for more detailed information. Note: Baha Cordelle II not shown in actual size. 24 25 Troubleshooting If you experience physical problems or any difficulty using your Baha System, follow the guidelines listed in the chart below. If this fails to help, please contact your hearing care center for further assistance. Problem Cause Possible Solution No sound/weak sound Weak or dead battery. Replace battery. Volume too low. Turn up volume. Feedback (whistling) Hat, glasses or other object in contact with sound processor. Check that the sound processor is not touching anything. Relocate or remove the object. Battery door in wrong position. Close battery door. Too high volume. Decrease volume. Weak battery. Replace battery. Loose abutment. Contact your hearing care specialist. Sound is distorted or intermittent 26 Problem Cause Possible Solution Sound processor does not work Sound processor is not turned on. Turn on sound processor. Battery door is not completely closed. Gently close the battery door completely. Dead battery. Replace battery. Battery inserted wrong way. Make sure battery is inserted correctly. Audio accessory program active and no accessory connected. Check program setting. Programming mode enabled. Remove and insert battery. Both indicators flashing Redness or soreness around the abutment Keep the abutment site completely clean, using the soft abutment cleaning brush and/or abutment cleaning wipe. Apply a mild antimicrobial cream (provided by clinic) if necessary. Contact your clinic or hearing care center if redness and/or soreness persists. 27 Aftercare Kit The following items are included in the Aftercare Kit: Sound processor cleaning wipe Brochure with DVD Sound processor cleaning wipes 10 wipes packed individually for cleaning the sound processor. Abutment cleaning wipes 14 wipes packed individually for cleaning the abutment site. Battery tester Sound processor brush Black brush for cleaning the plastic sound processor snap. Abutment cleaning brush White brush for cleaning the abutment area. Mirror 28 Abutment cleaning wipe About the DVD • • • • • • • Using your sound processor Taking care of your abutment Taking care of your sound processor Audio accessories and telephones Testing your sound processor Baha Softband When to visit the clinic 29 How to look after your Baha System Place the sticker below on your bathroom mirror as a reminder to maintain good daily hygiene for the abutment, skin in the surrounding tissue area and sound processor. 1. After surgery, use a Abutment cleaning wipe to keep the skin around the abutment clean. 30 2. Clean the outside of the abutment with the abutment cleaning brush daily. 3. Clean the inside of the abutment with the abutment cleaning brush weekly. 4. Wipe the sound processor using a Sound processor cleaning wipe. 5. Gently clean the snap connector using the black sound processor brush. 31 93057-00 Baha, Baha Divino, Baha Intenso and Vistafix are trademarks of Cochlear Bone Anchored Solutions AB. Cochlear, Hear now And always and the elliptical logo are trademarks of Cochlear Limited. © Cochlear Bone Anchored Solutions 2011. All rights reserved. DEC11. Printed in Sweden. E81254B