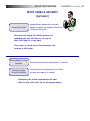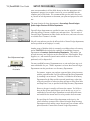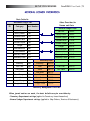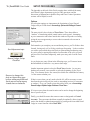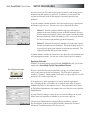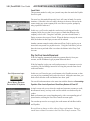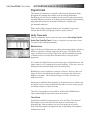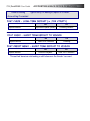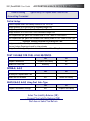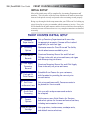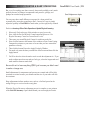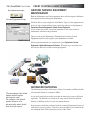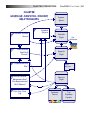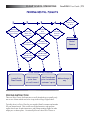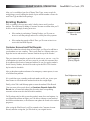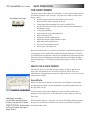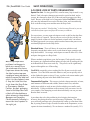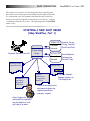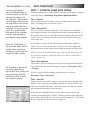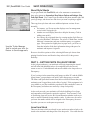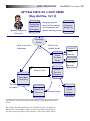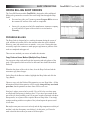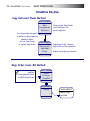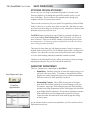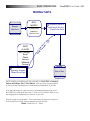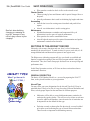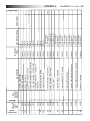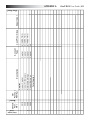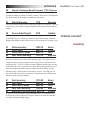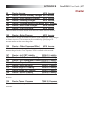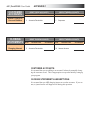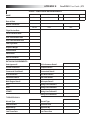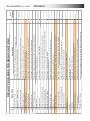
1
by
Horizon Business Concepts, Inc.
Copyright Information
Copyright © 2004 - 2008 by Horizon Business Concepts, Inc. All rights
reserved. No portion of the contents of this publication may be reproduced
or transmitted in any form or by any means without the express written
permission of Horizon Business Concepts, Inc. However, photocopies may be
made by licensed users of TotalFBO® for internal use only.
We have done our best to insure that the material found in this User Guide
is both useful and accurate. However, please be aware that errors may exist,
and that neither the authors nor Horizon Business Concepts, Inc. make any
guarantees concerning the accuracy of the information found here or the use
to which it may be put. In addition, the TotalFBO® Business Management
System software is continually growing and changing in response to customer
requests. Please check program Helpscreens or contact Tech Support for the
most current information.
Trademark Information
TotalFBO is a registered trademark of Horizon Business Concepts, Inc.
Windows products, Word, Excel, MSDE and SQL Server are trademarks of
Microsoft Corporation.
All other trademarks or registered trademarks are the property of their
respective owners.
Graphics produced using Paintshop Pro 8.0 by Jasc and SmartDraw Pro 6.0 by
SmartDraw.com. Text created using Word 2003 by Microsoft.
Text and graphics assembled using Adobe InDesign CS 3.0 by Adobe.
Printed by Webcom Limited (www.webcomlink.com)
First Printing
2004
This Guide is also available in electronic form. The PDF version is accessible
from your TotalFBO software in the Help menu, and is distributed on software
CDs and installed to your program Home Directory location.
For questions, comments or additional copies, contact:
[email protected]
918-355-3469
Horizon Business Concepts, Inc.
721 West Queens Street
Broken Arrow, OK 74012
USA
TotalFBO® User Guide | 3
INSTALLATION • 9
•
•
•
•
•
•
•
•
•
•
•
•
•
•
System Requirements .............................................................11
Network Issues .......................................................................14
Installing SQL or MSDE ........................................................18
Installing TotalFBO® ............................................................26
Creating Databases & Licensing ............................................28
Starting the Program ...............................................................32
Convert V3 Data .....................................................................30
Create Additional Databases...................................................36
Workstation Setup...................................................................34
Getting Around in TotalFBO® ..............................................37
Setting up Printers ..................................................................45
Setting up Cash Drawers ........................................................48
Making Backups .....................................................................49
Installing Program Updates ....................................................52
ENTERPRISE OPERATIONS • 55
•
•
•
•
•
Database Structure ..................................................................56
Installation & Setup ................................................................58
Location Records ....................................................................58
Inter-Location Sales ................................................................58
Location Option Overrides .....................................................60
TABLE OF CONTENTS
E
SETUP PROCEDURES • 63
•
•
•
•
•
•
Overview ................................................................................63
Controller ................................................................................64
Security ...................................................................................68
General Ledger .......................................................................70
Checking .................................................................................78
Receivables Clerk ...................................................................82
Taxes .......................................................................................82
Pricing.....................................................................................84
Customers ...............................................................................88
Credit Cards ............................................................................88
Payables Clerk ........................................................................90
Vendors ...................................................................................90
Notes & Leases .......................................................................92
Inventory.................................................................................94
Payroll Clerk .........................................................................102
Taxes & Deductions .............................................................102
Employee Records ................................................................104
The Wrap Up ........................................................................106
Verifying the General Ledger ...............................................106
Online Credit Card Processing .............................................109
International Options ............................................................112
ber
Num
10 1 0
10 1 2
13 1 0
20 0 0
30 1 0
40 1 5
50 1 5
Am o
n
rip tio
D esc
unt
sh
0 ca
10 .0
/r
.0 0 a
tory
150 0
inven
0.0 0
1735
0 a /p
.0
2
541
equity
0
les
00.0
rts sa
1000
0 pa
00.0
cost
arts
1750
.0 0 p
947 2
4 | TotalFBO® User Guide
TABLE OF CONTENTS
ACCOUNTING & BACK OFFICE
OPERATIONS • 113
Duties and Procedures for:
• Receivables Clerk .................................................................116
• Payables Clerk ......................................................................130
• Payroll Clerk .........................................................................144
• Controller ..............................................................................152
Procedure Detail Sheets ......................................................................184
Accounting Processes .........................................................................172
FRONT COUNTER & RAMP OPERATIONS • 199
• Basic Invoicing .....................................................................201
• Touchscreen Invoicing..........................................................211
• Wireless Operation ...............................................................212
• Front Counter Workflow .......................................................212
• Daily Fuel Reconciliations ...................................................216
• Receiving Fuel Loads ...........................................................222
• Recirculations, Sumps & Transfers ......................................224
• Managing Pilot Supplies.......................................................225
• Concierge Requests ..............................................................228
• Concierge Super-Screen .......................................................228
• GSE Equipment Maintenance ..............................................230
• Advanced Invoicing Procedures ...........................................230
Procedure Detail Sheets ......................................................................231
CHARTER OPERATIONS • 249
•
•
•
•
•
•
•
•
•
•
•
•
•
Quote Defaults ......................................................................250
Aircraft Setup .......................................................................252
Pilot Records ........................................................................257
Schedule Setup .....................................................................258
Dispatch Setup ......................................................................257
Preparing Quotes ..................................................................259
Scheduling Trips ...................................................................262
Dispatching Flights ...............................................................264
Check-In ...............................................................................265
Invoicing ...............................................................................266
Trip Expenses .......................................................................266
FET Taxes .............................................................................267
Staying Profitable .................................................................267
TotalFBO® User Guide | 5
TABLE OF CONTENTS
FLIGHT SCHOOL OPERATIONS • 269
•
•
•
•
•
•
•
•
•
•
•
•
•
Course Setup .........................................................................270
Aircraft Setup .......................................................................270
Schedule Setup .....................................................................277
Dispatch Setup ......................................................................276
Enrolling Students ................................................................279
Pilot Records ........................................................................279
Scheduling ............................................................................280
Dispatch ................................................................................282
Check-In ...............................................................................283
Invoicing ...............................................................................284
FAA 8710..............................................................................286
Selling Packages ...................................................................286
Staying Profitable .................................................................286
SHOP OPERATIONS • 289
•
•
•
•
•
•
•
•
•
•
•
•
•
•
•
•
•
•
•
•
What’s on a Shop Order? ......................................................292
Parts Organization ................................................................296
Shop Workflow .....................................................................298
Reworked Components ........................................................316
Core Tracking .......................................................................318
Rotable Components ............................................................322
Warranty and Progress Billing ..............................................325
Overhead Shop Orders .........................................................330
Other Internal Shop Orders ..................................................332
Work in Process ....................................................................334
Categorizing Inventory .........................................................337
Inventory Workflow ..............................................................344
Returning Stock ....................................................................348
Physical Inventory Process ...................................................350
Other Inventory Functions & Concepts ................................352
Managing Aircraft Records ..................................................354
Updating Aircraft Information ..............................................360
Aircraft Maintenance Cycle .................................................361
Scheduling ............................................................................363
Tool Calibration & GSE Maintenance..................................365
6 | TotalFBO® User Guide
TABLE OF CONTENTS
MANAGEMENT CONTROLS • 367
•
•
•
•
•
Security .................................................................................368
Monitoring Database Activity ..............................................372
Standard Reports ..................................................................374
Margins .................................................................................380
Marketing .............................................................................381
TROUBLESHOOTING & DATABASE
MAINTENANCE • 383
•
•
•
•
•
•
•
•
Making Backups ...................................................................384
Restoring a Backup...............................................................385
Sending a Backup to Tech Support.......................................385
Exporting Data & Custom Reports.......................................386
Transaction Framing .............................................................386
Troubleshooting SQL Connectivity ......................................388
Troubleshooting Online Credit Card Processing ..................396
Contacting Tech Support ......................................................399
APPENDIX A • Chart of Accounts.........................................401
APPENDIX B • Automatic Ledger List .................................427
APPENDIX C • Default Journal Entries ................................439
APPENDIX D • Overriding the Automatic
Ledger List Defaults .............................................................451
APPENDIX E • Planning your Pricing Structure ...................463
APPENDIX F • Default Privilege Requirements ...................477
APPENDIX G • Setup Questionnaire ....................................499
GLOSSARY .............................................................................517
INDEX ...........................................................................................523
TotalFBO® User Guide | 7
Getting the Most out of TotalFBO®
You’re now the proud owner of the TotalFBO® Business Management
System, which is much more than just another piece of accounting software.
TotalFBO® is a tightly integrated set of functions that are designed to support
your entire business.
You can use just a portion of the program, if you wish, and new users may feel
more comfortable easing into the program over a period of several months.
But you’ll quickly find that the more of the program you put to use, the more
efficiently your business runs. And that shows up on the bottom line!
Whether you’re a new user or a veteran, you’ll find that it’s usually best
to use a combination of the tools and training options that are available to
you. One of the best places to start is in a week-long class at Horizon’s
headquarters in Broken Arrow, OK. This class is designed for business
managers and accounting staff, and that’s where you’ll start building your
plan for implementing TotalFBO® in your organization. You’ll benefit from
interacting with other students in the class as well as from the instruction in a
focused atmosphere.
Once you’re back in the office, you’ll be reviewing your plan with other
staff members and referring to this User Guide for tips on how to design an
effective workflow throughout your organization using TotalFBO®. This
Guide will also help your IT staff install the software correctly and securely.
As you begin to customize the system and enter actual transactions, you’ll find
details on every screen, field, and button in the Helpscreens of the program
itself. You can even print out a topic or two and use it to train staff members
and develop procedure manuals.
Over time, TotalFBO® continues to grow along with your business, so you’ll
want to take advantage of opportunities to keep up to date with occasional
On-Site Training and annual User Conferences. And you can always
receive training on specific issues with personalized Focus Sessions, either at
Horizon’s Training Center or during scheduled Telephone Conferences.
Finally, at all stages of your implementation of the TotalFBO® Business
Management System, Horizon’s world-class Tech Support team is there to
support you with 365/24/7 availability.
This Guide will give you a good
idea of the WHAT, WHY, and
WHEN of typical procedures.
For more details on individual
screens and fields, refer
to the Helpscreens in the
program.
Helpful references to specific
topics are available throughout
this Guide.
See Helpscreen topics
for more details
8 | TotalFBO® User Guide
TotalFBO® User Guide | 9
INSTALLATION
Included in this section:
•
•
•
•
•
•
•
•
•
•
•
•
•
•
System Requirements
Network Issues
Installing the SQL engine
Installing TotalFBO®
Creating Databases & Licensing
Starting the Program
Convert V3 Data
Create Additional Databases
Workstation Setup
Getting Around in TotalFBO®
Setting up Printers
Setting up Cash Drawers
Making Backups
Installing Program Updates
This section will give you a
good idea of the WHAT, WHY,
and WHEN of Installation
procedures.
For more details on individual
screens and fields, refer
to the Helpscreens in the
program.
Helpful references to specific
The next section describes the actual setup and customizing of TotalFBO® for
topics are available throughout
daily use. This section is addressed to users and also to IT professionals who
this Guide.
will be supporting customer networks, assisting with or performing installation, and answering questions.
See Helpscreen topics
The actual installation of both SQL and TotalFBO® is very straightforward,
and can be done by anyone who is comfortable with basic computer and networking concepts.
However, client networks are growing more complex every day, as technology
brings us more possibilities and places more demands on the typical business. TotalFBO® itself is growing and incorporating more functions that take
advantage of network capabilities, such as Windows Terminal Server, wireless
networking, email, and online credit card processing.
Horizon Business Concepts, Inc., takes great pride in bringing you the world’s
best and most tightly integrated Accounting and Business Management system. Its stability, power, and functionality for the user depends on the security
of the Microsoft SQL engine as well as your well-designed network.
The following instructions are tested and proven to deliver a smooth installation process. We recommend that you read the entire section, understand the
implications for integrating this system into your existing network, and resolve
any issues with Tech Support before beginning the work itself.
for more details
10 | TotalFBO® User Guide
INSTALLATION
INSTALL PROGRAM
Install SQL
Must use SQL or "Mixed" Authentication
MSDE or SQL Express
available on TotalFBO® CD
Share directory for
Share directory like C:\Apps
w ith Full Access rights.
Install TotalFBO®
on server
Install from CD to C:\Apps\TFBO.
This w ill be the Program Home Directory
TotalFBO®
Setup License &
Databases
Create License record and new databases using
User Utilities. Start program and verify connectivity.
Convert V3 data
Import V3 data using Convert3.
Both old and new program must be on matching versions from
same CD or dow nload session.
Create any additional
databases
Verify workstation date
& time synchronization
Install TotalFBO®
on workstations
Setup Global Options for
WTS and Email
Setup Station settings
for cardswipes,
specialty printers,
touchscreen monitors,
cash drawers
Setup Workstations for
Online Credit Cards
Create License records and new databases for
additional companies or for training purposes.
Be sure all w orkstations are automatically synchronizing
w ith the time on the server. Can enter server name in
Global Options, Tab 1.
Map C:\Apps to the same drive letter on each w orkstation.
Setup desktop shortcuts using SETWORK or
install program locally using WSSETUP (NOT from the CD).
Customize Global Options Tabs 3 & 4
Setup Station-Specific Settings as needed to
direct printing to specific printers and for specialty
equipment.
Workstations must be running Window s 2000 or later,
the latest version of Ms XML must be dow nloaded from
www.hbcinc.com, an environment variable may be required,
and an Internet connection must be available.
TotalFBO® User Guide | 11
INSTALLATION
SYSTEM REQUIREMENTS
Any software is dependent upon the platform upon which it runs. Investing
in a well-designed computer system will pay big benefits in both reliability
and productivity. Trying to limp along with poorly-designed, aging, or
poorly-maintained hardware will result in damaged or missing data, slow
performance, and down-time. We encourage you to budget approximately a
third of your total acquisition cost for hardware each year and devote these
funds toward maintaining and upgrading your system in a coordinated manner.
As networking and operating
systems continue to evolve,
minimum requirements tend
to grow. Be sure to obtain
the services of a competent
consultant when designing
your system.
The following chart can be helpful to you and your systems consultant in this
regard.
ITEM
WORKSTATIONS:
Operating System
RAM (Memory)
Hard Drive Freespace
Display Adapter
Display Settings
BARE MINIMUMS
REASONABLE
Windows 2000 Pro
256 Megabytes
200 Megabytes
Color VGA
800 x 600 x 256
Windows XP Pro
512 Megabytes
1 Gigabyte
Color VGA
1024 x 768 x 16 bit
Windows XP Pro
1 Gigabyte
1+ Gigabytes
Fast Color VGA
1280 x 1024 x 24 bit
SERVERS:
Operating System
Microsoft SQL
RAM (Memory)
Hard Drive Freespace
Display Adapter
Display Settings
Windows XP Pro
MSDE 2000
512 Megabytes
2 Gigabytes
Color VGA
800 x 600 x 256
Windows 2000 Server
SQL Server 2000
1+ Megabytes
2 Gigabytes
Color VGA only
1024 x 768 x 16 bit
Windows 2003 Server
SQL Server 2005
2+ Gigabyte
10+ Gigabytes
Color VGA only
1024 x 768 x 24 bit
TERMINAL SERVERS:
Operating System
RAM (Memory)
Hard Drive Freespace
Display Adapter
Display Settings
Connected Sessions
Windows 2000 Server
1 Gigabyte
2 Gigabytes
Color VGA
800 x 600 x 256
30 users
Windows 2003 Server
2 Gigabytes
10 Gigabytes
Color VGA only
1024 x 768 x 16 bit
25 users
Windows 2003 Server
4+ Gigabytes
30+ Gigabytes
Color VGA only
1280 x 1024 x 24 bit
20 users
HARDWARE
Although the minimums listed above will provide you with an acceptable
environment, you will have to be aware that making hardware purchases for a
reasonable price involves selecting items which are “popular.” For instance, it
is now cheaper to purchase a 250 gigabyte hard drive than an 80 gigabyte hard
drive. Since you can always use the extra space, the larger drive is the wiser
purchase. When you speak with one of our staff, we will often recommend the
most commonly purchased items available today that our users are installing,
so that you can more accurately budget for your installation.
Note that separate servers are required for your
1. SQL and TotalFBO programs
2. Windows Terminal Server (for remote location connections)
EXCELLENT
12 | TotalFBO® User Guide
INSTALLATION
3. Domain Controller
4. Web Server
5. Exchange Server (email)
Although you may elect to use Small Business Server 2003 for one of your
servers, you may not combine these functions on one machine.
OPERATING SYSTEM
Windows operating systems which are designed for home use are NOT
supported. Although it may be possible to get the program to function using
one of these operating systems in a standalone environment, your business
network WILL encounter failures when even one workstation is using a “home
use” operating system (EVEN IF IT’S NOT ACCESSING TOTALFBO®).
Currently, Windows ME, Windows XP Home, Vista Home and Vista
Home Premium are Not Supported.
Windows operating systems which are no longer supported by Microsoft
are not supported. Therefore, Windows 95, Windows 98, Window NT 4.0
Workstation and Server are not supported.
If you need to upgrade to a more recent operating system, be sure to investigate
whether your current hardware will handle the new operating system. It may be
cheaper and less problematic to purchase a new workstation than to attempt to
upgrade. If you decide to keep your existing equipment, it is always preferable
to reformat your hard drive and install the new operating system “clean.”
You’ll also need to obtain updated drivers for the video card, printers, and
other peripheral equipment.
Operating system issues account for approximately 50% of problems
encountered in a networked software environment. Obtain the guidance of a
competent consultant in this area.
All software, including Windows and SQL products, must have all current
patches and hotfixes installed.
UPS
One recommendation on optional hardware is an Uninterruptible Power
Supply (UPS). This is a box with a battery in it that can supply power to
your computer for 30 seconds to fifteen minutes should the utility power go
completely off. It also provides protection from those momentary power
surges which just make your lights flicker. Any database application, including
TotalFBO®, is susceptible to data damage if the power is dropped at the wrong
time, and a good UPS is insurance against this possibility. It is necessary
to provide a UPS for each workstation as well as the file server to properly
protect yourself against power problems.
VIDEO DISPLAY
INSTALLATION
High-speed graphics cards are fine for user workstations, but use a lot more
power and can be the cause of intermittent failures as a result. Never use them
on a server or a workstation used as a server in a peer-to-peer environment.
Flat-screen monitors and touch-screen monitors are useful in a front-counter
environment. Buy the largest screen size you can afford. Some of the touchscreen windows in the program require resolution of 1024 x 768 or higher.
BACKUPS
Finally, you might buy a tape backup system for performing your backups.
This is a device that uses a tape cartridge similar to an audio cassette tape
to store data. The advantages of these devices are speed and convenience,
especially for customers with larger systems. Anything that makes backups
easier to perform means you’ll do backups more often; so they are a good
thing. Tapes typically store more data in a smaller space as well, making it
easier to store and transport backups of your data.
Other large capacity storage devices now on the market include the Iomega
ZIP and JAZ drives, read-writable CD-Roms, and removable hard drives,
among others. Any of these might be a practical alternative for making
backups. Note that if it is necessary to provide a copy of your backup to HBC
for review, these must be performed through TotalFBO® on an Iomega ZIP or
JAZ drive cartridge, CDs, or USB memory devices. We cannot accept tapes.
TotalFBO® User Guide | 13
While tape backups are
very convenient, they also
lull the user into a state of
complacency. It is critical
that you have and understand
procedures to check whether
or not a tape backup ran
properly!
Too many times, a user has
tried to restore from a tape
backup only to find that it has
not been working properly for
a month or more, and they
have no valid backups for a
long time, resulting in much
lost data and a lot of work to
catch up.
CASH DRAWER
One piece of hardware that is not typically sold in computer stores but may be
a part of your installation is an Electronic Cash Drawer. This unit connects
between the computer and your parallel interface printer to provide a drawer
that opens whenever an invoice is processed.
Equipment of this nature can
be purchased from a variety
An additional item you might consider is a barcode reader. Especially in
intensive inventory operations, using barcodes to speed entry can be a valuable of suppliers. We recommend
POS World as a supplier of
investment in productivity.
products which have been
tested with TotalFBO®.
MAGNETIC SWIPE EQUIPMENT
Contact them at
If you will be using the automatic credit card processing capabilities within
www.posworld.com.
TotalFBO®, you’ll want to obtain a card swipe unit or keyboard.
BARCODE READER
14 | TotalFBO® User Guide
INSTALLATION
Network Issues
See Helpscreen topic:
How to Map a Drive
Initial program installation
should be completed while
sitting at your SQL server.
Subsequent program updates
can be handled from any
workstation.
Before installing TotalFBO®, be sure that the server drive and/or directory has
been properly shared at the server and mapped at each workstation. The server
and ALL workstations must refer to the program installation directory and data
directories by the SAME drive letter. Furthermore, each workstation and user
must have FULL access rights to these directories.
Because many workstations will reserve the letters A through E for floppy
drives, hard drives, CD-Rom drives, tape drives, and/or ZIP drives, etc., it is
usually wise to select a drive letter which is higher in the alphabet (such as
T:). Then when a new drive is added to a single workstation, it will not be
necessary to redo the mapping of the program, drives, and multiple icons on
every workstation in your network.
You can install to any shared Drive and Directory you choose. The default is
C:\Program Files\TFBO.
The program must be installed to a shared network drive. While this can be
located on your SQL server, the program should never be actually run by a user
sitting at that server.
INSTALLED PROGRAM AND DATA DIRECTORY TREES
When TotalFBO® is installed using the defaults, the following subdirectories
will be created.
\TFBO (program files)
\Tools (special program reference files)
\Aspell (files for spell checking program)
You may choose to install the program to a different drive letter or to rename
the \TFBO directory to meet your needs. The current SQL Version is a
completely separate program from earlier versions of TotalFBO®, and should
NOT be installed to the same location.
It is important to insure
that all workstations and
the server are set to the
same date and time. You
can configure your network
to adjust to a time server
automatically, or simply enter
the name of your network
server in TotalFBO® at
Utilities> Customize> Global
Options.
Two databases are created initially by the program. In a default SQL server
setup, the location will typically be
C:\Program Files\Microsoft SQL Server\MSSQL\DATA.
Each database would be located in a pair of files (for data and logs). Suggested
names are:
TFBOCommon (supplemental files, i.e., airports, zipcodes, FAA
tailnumber info, winds, shop codes, aircraft models)
TFBOData (user data files)
Only one “common” database is required per installation. Additional databases
can be created and used for tracking additional companies or divisions, and
training purposes. Each data directory is completely independent of the others,
with separate login IDs and data content.
INSTALLATION
TotalFBO® User Guide | 15
NETWORK CONFIGURATIONS
We are often asked what we recommend for networking. Actually, TotalFBO®
does not require any specific network environment to function well. What is
important is that you install and configure a network which functions under
the Windows 2000/XP/2003 operating environment and performs reliably.
Typically, we find that a basic installation of your networking software,
without getting into complex configurations, works best and is easiest to
maintain over a period of time. Do be sure to utilize the services of a qualified
Network Engineer, who will insure that the latest patches and revisions to your
networking software are installed.
Network Types
The following network software packages are commonly used by our
customers:
Dedicated Server Types
Peer-to-Peer Types
Windows 2000 Server
Windows 2000 Professional
Windows 2003 Server
Windows XP Professional
Operating Systems
The following operating systems are commonly used by our customers:
Windows 2000 (Server & Professional)
Windows XP Professional
These systems should be used only when all appropriate patches & updated
drivers are installed.
Avoid mixing operating systems within a network. When using Windows
2000 for the server, using only Windows 2000 Professional or later at the
workstations will provide more reliable performance.
Communications Protocol
TCP/IP is required.
DO NOT USE NetBEUI, which has been shown to cause data corruption
and has poor error-checking capability. Check the protocol in use at
the server and EACH workstation by going to My Computer>Control
Panel>Network. You must REMOVE it completely at each location.
Hardware Options
Network cards must be matched to the type of cable that will be used to
connect the computers together. (If you use UTP or Fiber Optic cable, you
will need a hub also.) The following combination is commonly used by our
customers:
100 megabit card with UTP Cat 5 cable
You will need to know the DNS
name of your SQL server and
the names of your databases
when creating your Licensing
record.
16 | TotalFBO® User Guide
INSTALLATION
Factors Affecting Network Performance (Speed)
CPU speed in Server and in Workstations – PentiumV or better is
recommended
RAM in Workstations – 512 mg is recommended (more is better)
RAM in Server – 1 Gb or more is recommended
Network Card – 100 megabit or faster is recommended
Server hard drive and controller – SCSI is recommended
Operating System - Windows 2000/XP is recommended; all workstations
should use the SAME operating system
Network Configuration – Dedicated server is recommended
Network Size – Too many users requires adding switching hardware
Network Tuning – Sizes of caches and buffers, memory configuration, print
servers, performance boost, etc.
Age of Computers – Older machines which have been upgraded may still
be operating with slow speeds at the Motherboard level and could cause
compatibility issues
TSRs and Screen Savers - Can slow performance and waste memory, even
cause unattended shutdown or rebooting
Multiple protocols in use - too many or incorrect bindery order slows things
down
Fragmented Server Drive - Windows 2000 tends to fragment easily
Virus-Checking Software - If checking all files all the time, you’ll get a
slowdown during the day
Opportunistic File Locking – unless disabled, servers prevent access by other
users to the same file for a minimum time limit
What We’re Using...
In Horizon’s offices, we use Windows 2003 servers with Windows XP at the
workstations. The system is connected using 100 megabit cards with UTP Cat
5 cable. All our workstations are Pentium Vs or better, with 512+ megabytes of
RAM.
See Helpscreen topics:
Abnormal Terminations
Improving Performance
NETWORK STABILITY & PERFORMANCE ISSUES
Every software program is dependent on the hardware and operating system
structure upon which it runs for reliable performance. Abnormal terminations
can sometimes be the fault of the software itself, and wherever these are
identified, Horizon will immediately work to correct them. However, in most
cases, abnormal terminations are the result of the operating system,
network software, hardware, or other software failures.
If you are experiencing abnormal terminations, it is critical that the basic
cause of the abnormal termination be resolved to prevent continuing
corruption and instability of the database program. You will probably need
the services of a qualified network engineer or other computer consultant,
as this type of troubleshooting is outside the scope of Horizon’s Technical
Support service.
INSTALLATION
TotalFBO® User Guide | 17
USING TotalFBO® AT MULTIPLE SITES
TotalFBO® is designed to be used at a single location, and is easily used in
a multi-user environment under most Local Area Network programs (such as
Windows 2000 or 2003 Server). When a company desires to use the program
at multiple sites, Offsite or Enterprise licensing must be purchased. Please
contact our Sales Department for more information on licensing.
If it is necessary to integrate the information between the two sites, the
following options are available:
Remote Connection
A user at the remote site can connect to the network at the main
site and “take control” of a workstation. This type of operation
requires an internet connection at each site and a program such as
PC-Anywhere® or Remote Desktop. All data is stored on the main
site server. The speed of the connection is limited to the speed of the
internet connection.
Wide Area Network (WAN)
Both the remote and main sites can be integrated into a large network
with appropriate software and a broadband Internet connection.
Because of the large volume of data TotalFBO® must transmit
over your network connection, only a “thin-client” solution (such
as Windows Terminal Server or Citrix) will provide adequate
This means you CANNOT
performance over a remote connection. Although technically feasible, network two sites directly
VPN connections often prove difficult to administer.
through a T1 line and get
anything resembling usable
This means you CANNOT network two sites directly through a
performance!
T1 line and get anything resembling usable performance!
A Microsoft product, Windows Terminal Server®, may provide a
reasonable alternative for some situations. In larger networks, using a
Citrix Metaframe® connection may be preferable. Consult your local
networking vendor or consultant for more information on installing a
“thin-client” solution.
When using TotalFBO® in this environment, you may wish to sub-divide your
database into Locations, which will enhance security and permit more detailed
reporting. See the Enterprise Operations Section of this Guide for more
information.
It will also be necessary to change the default setting for the Machine ID in a
WAN environment and to use the Machine Name for setting the Machine ID.
This is true whether the sites
are 100 yards apart or 100
miles apart.
See Helpscreen topic:
Global Options
18 | TotalFBO® User Guide
INSTALLATION
Getting Started with SQL
TotalFBO® depends on Microsoft SQL for access to the actual database files.
This environment provides a number of benefits, most importantly stability and
security.
However, in order to achieve the most from SQL and TotalFBO®, you’ll want
to plan your network installation carefully. We recommend that you discuss
the following issues with your network consultant.
Where will you install SQL?
In a very small network (5 users or less) you may install MSDE or SQL2005
Express on your existing server in either a domain or peer-to-peer arrangement.
Keep in mind, that whenever the server is busy with other tasks besides
running SQL, performance may suffer for everyone. In a peer-to-peer
environment, try to avoid using that computer as a workstation. This is because
it affects performance, security and stability for everyone.
In a larger network, we recommend that you install SQL on a separate
computer, running Windows 2000 Server, Windows 2003 Server, or Windows
XP Professional. This leaves your primary domain controller free to handle
network authentication, file services, and web or email services. You’ll get
improved performance and additional security with this arrangement.
One option is to install Small Business Server 2003. However, this must
be installed as the FIRST server on your domain. Because of this and other
concerns, we do not recommend this product.
Wherever you install it, you’ll be able to benefit from as much RAM in that
machine as you can afford.
What form of SQL will you use?
We provide MSDE and SQL Express on your installation CD. Both
are 100% compatible with SQL Server and can be easily upgraded. It is
distributed free but comes with some limitations.
•
•
•
No administration tools are provided. However, most of the tools you
might need are incorporated into TotalFBO® itself.
The maximum database size is 2 Gigabytes for MSDE and 4 Gigabytes for
SQL Express.
Performance is reduced for more than 5 concurrent users. Although
this is a clear statement by Microsoft, our tests and those of many other
independent sources indicate that performance suffers little until you
exceed 100 users in most installations. We recommend that you install
MSDE or SQL Express and test it in your environment.
INSTALLATION
TotalFBO® User Guide | 19
SQL Server 2000/2005 requires a license for each user who will be accessing
the database and cost becomes a significant factor. However, in the medium to
large network, the additional administration tools become useful in managing
access. When you exceed 5 users, it makes sense to move into a domain
network with appropriate server installations for many reasons.
Small Business Server 2003 is an option for small-to-medium sized networks
where growth is not expected. Costs can be significantly lower than for an
installation of SQL Server 2000, but when growth occurs, you’ll pay all over
again for each of the products which were bundled into SBS, as it cannot be
upgraded. You’ll also be tempted to run other programs on the same server,
which will cause severely impaired performance. DO NOT expect to also run
Exchange (email) or IIS (web) on the same unit.
Who will be your SQL Administrator?
Several additional layers of security are implemented with a SQL installation.
You’ll need to designate someone to have access to the SQL program itself,
maintain passwords, install new Service packs and Hotfixes from Microsoft,
etc.
How will you handle backups?
You can make backups through TotalFBO® of your SQL database while other
are using the program, so anyone can handle this function easily. However,
three considerations apply:
11. Backups must be made to a drive on the SQL server computer. This means
that you cannot backup to a hard drive on another workstation. Thus, you’d
need a larger hard drive, a second hard drive, a tape device or some other
storage device on that computer. Note that TotalFBO® provides an option to
immediately ZIP the backup file and store it on another location. If you use
this option you can place the ZIP file on your own workstation or a removable
device such as a ZIP drive or a CD. Using this method, you can achieve the
important goal of not only making a backup but getting it off-site for storage.
2. If you wish to schedule an automatic backup, you may install SQL Server
2000/2005 in order to access this administration function, or schedule
automatic backups through TotalFBO®.
3. 3rd Party tools (such as tape drive software) may not be able to backup
your database files unless you make a point to stop the MSSQLServer Service
beforehand (and restart it later) and/or adjust security access to permit the
software access to SQL. This will require some administrator skill and
appropriate features within the 3rd party backup program.
See Helpscreen topics:
Backup
&
Backup Scheduled
20 | TotalFBO® User Guide
INSTALLATION
Installing SQL Properly
TotalFBO® installation cannot be completed until there is an installation of
SQL server available. If you install from our CD, most of these details are
handled for you automatically. However, you may need to install SQL in
another way, so the following information is provided for network engineers
and administrators.
There are three basic versions of SQL available from Microsoft:
1. Obtain Microsoft SQL Server 2005.
You can obtain this product from a dealer who sells Microsoft products. You
will need to purchase enough licenses to handle all the users who will be
working in the program at the same time (concurrently). Thus, you may have
10 workstations on your network, but only 8 of them are used by staff who
work in TotalFBO®, and one of them is only used at night when everyone else
is gone. In that case you would need at least 7 licenses.
In a network environment, SQL Server 2005 is best installed on a computer
which is running Windows 2003 Server (or later) as its operating system.
(Note that TotalFBO® can run on SQL Server 2000 also. Installation
instructions and considerations are essentially the same for both products.
Microsoft only sells the later version, but you may still have access to it from
some third-party vendors.)
2. Obtain Microsoft Small Business Server 2003. (NOT
RECOMMENDED)
You can obtain this product from a dealer who sells Microsoft products.
This is a bundled product which includes Windows 2003 Server, SQL Server
2000/2005, and some other products. You will need to buy enough licenses to
handle all the computers that are part of your network. Thus, if you have 10
workstations on your network, you’ll need at least 10 licenses.
One problem with this option is growth. There is no direct upgrade path for
any of the programs bundled into Small Business Server, so when you need to
add another server to your network, you must buy these programs again, with
no discount for your prior purchase.
Another issue is performance. Microsoft has made certain “compromises” to
SQL and the other products in order to enable them all to run together on one
computer (normally not possible.) Some of our customers have experienced
problems with earlier versions of SBS as a result.
INSTALLATION
TotalFBO® User Guide | 21
3. Obtain MSDE or SQL2005 Express
If you have a version of Microsoft Office 2000 that includes Access 2000,
then you already have MSDE. MSDE is not automatically installed as part of
Access or Office, but must be manually installed from the folder called \SQL\
x86\. For initial instructions, see Microsoft’s documentation Q324998.
We DO NOT RECOMMEND that you use this method to install MSDE
because vital security settings are not configured.
Note that Microsoft states that performance is reduced for more than 5
concurrent users. However, our tests and those of many other independent
sources indicate that performance suffers little until you exceed 100 users in
most installations. We recommend that you install MSDE and test it in your
environment before investing in a more expensive option.
SQL2005 Express is the successor to MSDE. Performance is no longer
limited, and the database size limit is increased. However, the number of
processors which can be used is decreased. Here is the comparison:
Feature
Maximum # of processors
Maximum RAM
Maximum database size
Workload governor
Graphical management tool
SQL Agent
Windows 98 support
MDAC Required
Supported by Vista
MSDE
2
2 GB
2 GB
Yes
No
Yes
Yes
Yes
No
SQL 2005 Express
1
1 GB
4 GB
No
Yes
No
No
No
Yes
• Note that you can restore and use a backup made on MSDE/SQL2000 to a
SQL2005 server, but not the other way around.
• You cannot run MSDE and SQL2005 on the same server.
• Limitations on RAM in SQL2005 Express may make performance poor in
larger networks.
• MSDE/SQL2000 cannot be installed on a Vista workstation, though a Vista
workstation using TotalFBO® could access MSDE/SQL2000 installed on a
network server.
If you already installed
Small Business Server 2000,
check to see if you puchased
Software Assurance for it. If
so, you can get a free upgrade
to Small Business Server 2003
for just the cost of shipping
a new set of CDs. This is
definitely worth the effort!
22 | TotalFBO® User Guide
INSTALLATION
• We DO NOT RECOMMEND that you install SQL2005 Express from a
download because vital security settings are not configured.
However, for easier installation and management, we recommend that you
install it from the TotalFBO® CD.
KEEPING CURRENT IS CRITICAL!!
If you install MSDE or SQL2005 Express from the TotalFBO® CD, a standard
Microsoft installation is performed. You get MSDE 2000 which has already
been patched with SP4, or SQL2005 Express patched with SP2. If you install
from a standard Microsoft source, be sure to install all patches promptly to
avoid some potentially serious security risks and prevent other problems.
In addition, you’ll need to regularly check Microsoft’s website for the latest
hotfixes for SQL and install them immediately.
SELECTING YOUR AUTHENTICATION METHOD
1-When you install SQL of any flavor, you must decide how authentication
will be performed. Keep in mind that there are several layers to Windows
security, and users will first authenticate on your network in some way.
• If this is a peer-to-peer network, they’ll simply log in to Windows on their
workstation and become a part of the workgroup.
• If this is a domain network, your domain controller will authenticate their
login.
2-SQL adds an extra security layer in that you must also have permission to
access the SQL server itself. When you install SQL, you must choose from
one of two options:
• Windows only authentication (Microsoft’s DEFAULT)
Because of the difficulty in setting up and administering this method of
authentication, and because we could offer you certain protections by taking
advantage of the Mixed Mode method, Windows only authentication is not
allowed. If you have already installed SQL this way, PLEASE heed the
following warning:
Horizon staff cannot assist you in obtaining access to your SQL Server if
you have chosen this method. Certain program functions will not work.
Users may be repeatedly asked for login information.
If you have already installed SQL Server and selected this method, we
recommend that you back up any databases, uninstall SQL Server, reinstall
with the correct options, and then restore or reattach any databases. Consult a
local professional for assistance with this process.
• SQL Server and Windows (Mixed Mode) authentication (REQUIRED)
Mixed authentication is recommended for all users. A default SQL
INSTALLATION
administrator is created with your installation, and whenever the username
is required, it is simply entered as the abbreviation: SA. When you install
SQL you should assign a good password to this account. DO NOT accept
the default which is to have only a blank password, as this will prevent your
installing future patches from Microsoft.
• If you install MSDE from our CD, the default password is: password
• If you install SQL2005 Express from our CD, the default password is:
password5
You will be offered the opportunity to enter any password you choose during
installation. We strongly encourage you to enter your own password here.
Otherwise, anyone can access your data!
WRITE YOUR SA PASSWORD DOWN IN A SAFE PLACE. YOU WILL
NEED IT AGAIN WHEN YOU SET UP TotalFBO® LICENSING IN A
LATER STEP. YOU WILL NEED IT ANY TIME YOU HAVE TO ACCESS
YOUR SQL SERVER FOR ADMINISTRATIVE FUNCTIONS. KEEP IT
SECURE AND DON’T LOSE IT!
3- Once you have been granted access to use SQL Server, you must then be
granted Login permission to the specific database(s) you want to work with.
When a new database is initialized in TotalFBO®, the a script must be run
which creates a user called TFBO with a password of TFBO, and assigns this
user correct access privileges to the program databases. Separate scripts are
needed for your “DATA” database and the “COMMON” database.
You can create your databases and run these scripts manually (from the \Tools
directory) through Enterprise Manager and Query Analyzer if you have a full
installation of SQL Server (not MSDE or SQL2005 Express). However, the
program can and will handle these chores automatically for you when you set
up TotalFBO® program licensing.
4- Finally, you must have a user ID and password within TotalFBO® itself.
The default ID for a new, blank database is FBO with a password of FBO.
If you are importing your Version 3 data, all established User IDs and
TotalFBO® User Guide | 23
24 | TotalFBO® User Guide
INSTALLATION
passwords will be transferred for you automatically.
STOPPING, STARTING AND RUNNING SQL
If one or both of these
services isn‛t starting
automatically for you, you
can change the setting by
going into Control Panel>
Administrative Tools>
Services.
Find each of them and
make sure they‛re set to
“Automatic” instead of
“Manual.”
A server of any kind exists to provide “services” to users. Windows 2003
Server has many Services running to handle all the chores of running your
domain. In a strict sense then, SQL is just a program that bundles several
services together to perform database chores for you. Two primary services
are exposed to you:
• MSSQLServer
This is the basic program itself. If the service isn’t running, then the
program isn’t running. That means you won’t be able to log in to SQL or
run TotalFBO® or access any other SQL databases. The default, of course,
when SQL is installed is to automatically start the service whenever the
computer is booted. If it’s not running, you can start it through Control Panel>
Administrative Tools> Services.
If they still won‛t start, begin Services cannot be run on a computer unless they, too, have
troubleshooting your operating appropriate authentication:
system itself.
•
MSDE/SQL2005 Express installation defaults these services to run in
the Local System account.
That means that whatever the administrator account is for the computer MSDE
is installed on, you’ll need to know the password to be able to handle any
troubleshooting of MSDE itself that may come along.
•
Installation of SQL 2000/2005 gives you an option to use the Local
System account or else enter a user account from your domain.
What should you use? Here’s the pros and cons of each. You’ll need to choose
what fits your network best:
Local System Account - This account may not have access rights to the
network unless you’re in a pure Windows 2000/2003 environment. In a small
peer-to-peer setup, that won’t be an issue. If you have a small domain network
that has only Windows 2000/XP machines, it’ll be okay. If you have a larger
network and want to have more than one SQL Server on your network or
integrate BackOffice services such as Exchange Server or other programs, this
won’t work.
Domain User Account If you select this option, Microsoft defaults in the account for the user who is
installing SQL. This is RARELY correct.
INSTALLATION
You should create a special user account in the domain to use for this purpose.
After you create the account, you should also make it a member of the LOCAL
administrator’s group on the SQL Server computer. Make sure that this
account also is set so that:
The password never expires
All logon hours are allowed
The entire subject of Windows Domain security is very complex, and SQL
security simply adds a few more layers of complexity. As with many things,
there are usually several ways to set up your security and authentication
structure. What we have outlined here are the basics that will enable a
relatively novice user to get installed and running quickly. If you wish to
explore the subject in greater detail, we refer you to Microsoft’s extensive
library. Another book that’s helpful for SQL administrators is SAMS Teach
Yourself Microsoft SQL Server 2000 in 21 Days, by Waymire and Sawtell.
TotalFBO® User Guide | 25
26 | TotalFBO® User Guide
INSTALLATION
Installing TotalFBO®
See Helpscreen topic:
Using the Website
Installation of TotalFBO® assumes that you have properly installed a server
on your network running Microsoft SQL Server®. Supported versions of SQL
are:
Microsoft SQL 2000
MSDE 2000
Microsoft SQL Server 2005
SQL Server 2005 Express Edition
•
•
•
•
•
The latest patches MUST be applied to each of these products before
installing TotalFBO®.
Small Business Server is NOT RECOMMENDED.
MSDE 2000 with Service Pack 4 is available on the program installation
CD.
Your professional network administrator must be involved in the initial
installation of Microsoft SQL.
Installation of MSDE/Express from the program installation CD,
database setup, and subsequent program updates can be performed by any
designated user with administrative rights to the network.
Installing on a Network
Initial program installation should be completed while sitting at your SQL
server. Subsequent program updates can be handled from any workstation.
You can install to any shared Drive and Directory you choose. The default
is C:\TFBO5. Before installing TotalFBO®, be sure that the server drive
and/or directory has been properly shared at the server and mapped at each
workstation. Furthermore, each workstation and user must have FULL access
rights to these directories.
The program must be installed to a shared network drive. While this can be
located on your SQL server, the program should never be actually run by a user
sitting at that server.
DO NOT INSTALL DIRECTLY TO EACH LOCAL WORKSTATION AT
THIS TIME. Later, The WSSETUP procedure (NOT the distribution CD)
must be used to accomplish this task at the end of your installation process
when you are ready for production work.
After all installation steps are completed, you will want to set up an icon
on each workstation’s desktop (or install the program locally on each
workstation), and synchronize the date and time for all workstations and the
server. Your network engineer can help you write a simple batch file or run a
standard network function which will set the date and time automatically for
each workstation during the network login process.
INSTALLATION
There are several steps required to install and initialize a program
using an SQL database. They are:
1. Install TotalFBO®.
2. Create licensing record and new databases.
3. Convert V3 database.
4. Install program to local workstations (if desired).
5. Create additional/training database (if desired).
Basic installation procedures are described below.
TotalFBO® User Guide | 27
The following steps require
Administrator-Level access to
your SQL server. Be sure you
also know the DNS name of
your SQL Server.
STEP 1 - INSTALL TotalFBO®
TotalFBO® is supplied on CD-ROM. You may also download a program
update from our website. However, you must have installed from the CD
before loading an update from the website.
The program installs like most other Windows applications. You will be asked
for the location (drive and directory) where you want to install the program. If
you have purchased the program or a JumpStart® evaluation copy, you will be
asked to enter your license information in Step 2 of this installation process.
To install TotalFBO® from the CD-ROM, do the following:
1. Make sure Windows is running. Close any other programs which are
running. If you have a virus-detection program, disable it.
2. Insert your TotalFBO® CD in your CD-ROM drive. Windows should
detect the CD and automatically run the installation program. If the
computer’s automatic detection feature is turned off, then click the Start button
and choose the Run option.
3. Type d:\setup.exe in the box which appears. (If your CD-ROM drive is
assigned to a different drive letter, then replace the d with the appropriate
letter.).
4. The initial window offers an opportunity to install MSDE/Express as well
as the program itself. We recommend that you install MSDE or SQL2005
Express (or complete your installation of SQL Server) before returning to
install the program. Follow the on-screen prompts to complete the installation.
We recommend that you install the program to a shared network drive on your
server which has been mapped to an appropriate drive letter such as T:\.
If you’re installing to a workstation running Vista, be sure to AVOID
installing to your “Program Files” directory.
See Helpscreen topic:
How to Map a Drive
28 | TotalFBO® User Guide
INSTALLATION
Licensing
This is the second step required to set up and begin working with TotalFBO®
Before attempting to run TotalFBO®, you must have completed all installation
steps.
If you‛re running on
Windows XP or Vista, it
may be necessary to enable
access to SQL through your
firewall before completing
the following steps. If you
are using Windows Firewall
add SQL Server to the list
of exceptions by checking
the box if it‛s listed for
you, or else add it manually:
C:\Program Files\Microsoft
SQ Server\MSSQL.1\
BINN\sqlservr.exe.
After completing this step, your first two basic databases will have been
created and populated with default information and your program license will
have been installed. First-time users will be ready to start using the program
immediately.
STEP 2 - CREATE LICENSING RECORD
1. On your Windows desktop, navigate to Start> Programs> TotalFBO
Version 5> User Utilities5.
2. The first time you start the program you’ll be asked to create a password.
Be sure you note this in a secure place, as you’ll need it when you return to the
program in the future. If you forget the password, Tech Support can assist you
with getting into the program and then you can change the password.
3. Select Update> Licensing from the menu.
4. Insert a new Licensing Record.
If for some reason you are updating licensing after initial installation you can
CANCEL out of the window that appears. However, on initial installation,
you’ll need to complete all fields properly so that your new databases can be
created.
SQL Server Name: Enter the name of your server.
• If you have installed SQL 2000 or MSDE:
This is usually the DNS name of the computer where the server is running.
(If you have multiple installations of SQL on a machine, you can give each of
them a separate instance name, though this is less common.)
• If you have installed SQL 2005 or SQL 2005 Express:
Your default server name and instance will be the computer’s DNS name\
TOTALFBO
SQL Server User ID:
Password: Enter a username and password with administrative access to the
SQL Server program. TotalFBO® needs this level of access in order to create
your two new databases and add appropriate logins for them. Usually your
‘sa’ user and password (established when you installed SQL Server or MSDE/
Express) is best for this.
Data Database Name: Enter the name you want to call the database for
your user data. Avoid using spaces or special characters in the name. The
default is TFBODATA.
INSTALLATION
TotalFBO® User Guide | 29
Common Database Name: Enter the name you want to call the database
for your common data. Avoid using spaces or special characters in the name.
The default is TFBOCOMMON. This database will hold information on
winds, airports, aircraft tail numbers, zipcodes, etc., and you’ll only need to
create it once, even if you have several databases for your user data. If it’s
already in existence, simply enter its name here. The program will not recreate
it, but will verify its existence and link it to this licensing record so you can
access it.
Upon selecting the OK button, the screen will clear and pause for a moment
while some actions are completed in memory. After that you’ll see a progress
bar indicating that your databases are being created and populated with
necessary tables and default setup information.
If you receive an error message, it is likely that you have entered incorrect
information regarding your SQL server name, User ID or Password. Contact
your Network Administrator for assistance.
When the initialization work is completed, you may enter the licensing
information.
4.
On Tab 1-General License Info, enter your licensing information as it was
provided to you by Horizon.
5.
On Tab 2-Database Access Info, your access information has already been
completed for you and should not require editing. However, you may
label this database as a “training” database and/or indicate the location of
a BMP file you wish to use as the background in place of the default.
8.
OK the new licensing record and close the User Utility program.
If you‛ll be using a ThinClient connection, copy the
file “Blank.bmp” to “Alternat.
bmp” in the program home
directory.
This will provide a plain
background image for faster
screen updates.
30 | TotalFBO® User Guide
INSTALLATION
Import Version 3 Data
This is the third step required to set up and begin working with TotalFBO®.
Before attempting to import your Version 3 data, you must have completed all
previous steps.
YOU MUST HAVE BOTH VERSION 3 AND VERSION 5 FROM
THE SAME SOURCE (whether the same distribution CD or the same
web download session) AT THE SAME TIME TO PERFORM THIS
CONVERSION. CHECK OUR WEBSITE AT www.totalfbo.com TO
OBTAIN LATEST BUILD NUMBERS AND COMPLETE THESE
UPGRADES FIRST.
If your Version 3 data is located on a network drive, it will greatly shorten your
conversion time to copy everything to the server’s local drive before beginning
the import. Be sure to preserve the directory structure, so that common files
and data files are in separate directories.
Free Space Required
On the SQL Server where your new Version 5 databases will be located, you’ll
need approximately 1 Gigabyte of free space to accommodate the Common
Files Database, and approximately 10 times the size of your current Version 3
datafiles for your User Datafiles database. This is necessary to accommodate
the temporary files created during conversion as well as the SQL transaction
logs. After conversion and your first backup are complete, your SQL Server
Administrator may be able to reduce the size of the logs.
STEP 3A - IMPORT V3 DATA TO SQL DATABASE
1. On your workstation desktop, navigate to Start> Programs> TotalFBO
Version 5> Convert3.
2. Go to Conversion> 3 to 5 Conversion.
3. Enter the locations of your databases for both Versions 3 and 5, along
with the passwords required to access your new Version 4 databases. This
information is the same as was entered in the Licensing Information for both
programs.
Note that only Passwords are Case Sensitive.
You may perform your User Datafiles conversion more than once or convert
multiple user databases from Version 3; but it is only necessary to check the
box to Convert the Common Files database the first time. However, even if
you don’t check this field, it is necessary to complete the location and access
information fields each time.
INSTALLATION
Converting Common Files is necessary if you have been using the Charter
Module in order to preserve your custom changes for airports and fees. If you
have not been using the Charter Module, it is not necessary to convert the files,
as initializing the database has already populated the database with the latest
information available.
After converting your Common Files database, you should proceed to the next
step to update your data to the latest available.
STEP 3B - IMPORT COMMON SUPPLEMENTAL DATA
The Airports, Zip Codes, FAA Tail numbers and Aircraft Types, Countries, and
Prevailing Winds databases are provided with the software. This information
is necessary for Invoicing, Concierge, and Charter operations and the Zipcode
data is used throughout the program to speed address entry.
To load Supplemental Files, go to File>Import>Import HBC
Supplemental Data.
If necessary, use the ellipses buttons to navigate to the Home directory (where
the program was installed on the server) to locate the text files which will be
used for the import.
TotalFBO® User Guide | 31
32 | TotalFBO® User Guide
INSTALLATION
Starting TotalFBO®
Your First Time
Before attempting to start the program for the first time, you must have
completed all previous steps.
While sitting at the workstation you used to install the program in Step 1, start
TotalFBO® from the desktop icon, or Run the file Totalfbo.exe from your
Home Directory, such as T:\TFBO5.
After the licensing data has been verified, the program will populate the
working data directory with your new files. After copying these files, you’re
now asked to enter a User ID and a Password. This is where you’ll start each
time from now on. The default ID is FBO, and the default password is also
FBO. Type that in and you’re into the program!
See Helpscreen topic:
Fiscal Years
If you have not imported data from Version 3, you must verify or change your
Fiscal Year Beginning Date. The default is January 1st of the current year.
While it is possible to correct the entry of an incorrect date at a later time, it’s
certainly easier if you get it right the first time.
Daily Operation
TIPS
The first time you start TotalFBO® each day, a Tip screen will appear. Tips
provide helpful hints, information on new features, and general program
guidance. These tips are contributed by our Tech Support staff when we
receive many questions on a particular item or when a shortcut can be helpful.
QUITTING TotalFBO®
When you’re ready to quit the program, close all open windows and then select
Exit from the File menu. Press <Enter> and the program terminates normally.
Be sure to exit from TotalFBO® before turning off your computer! Do not
simply turn your computer off while the program is running!
USER LICENSE
The first time you log in under a user ID and after every update, you’ll be
presented with the User License for your review. You’ll need to indicate your
acceptance of this agreement in order to proceed with the login process.
INSTALLATION
CHANGE YOUR OWN PASSWORD
To properly maintain secure audit trails, passwords for individual users should
be known only to themselves. To guarantee this, the initial login screen allows
a user to change their own password without supervision from a System
Administrator.
After providing the correct current password, the second screen appears for
you to enter a new password. You must enter the same password a second
time for confirmation.
TotalFBO® User Guide | 33
34 | TotalFBO® User Guide
INSTALLATION
Local Workstation Installation
For simplicity and ease of maintenance, some earlier versions of the program
recommended that the program be installed to the server and shared from
there to all workstation users. This meant that nothing was installed on a local
workstation except a desktop shortcut (icon) which made it easy for the user to
call the program from the server.
However, in the SQL Server environment current versions of the program
operate under, you must now also install the program to each workstation and
simply share the data from the server.
Performance
Depending on the hardware configuration of each workstation, you should
also gain some improvements in performance with this arrangement. Fewer
hardware resources are needed on the server (memory) as fewer files will be
opened for each user. Network traffic will be reduced during program startups.
Version Consistency
When the program is run from local workstations and only the data is shared,
it is critical that all workstations be updated to the same version of the program
immediately whenever an upgrade is installed. Failure to do so can result in
lost or corrupted data. To avoid this problem, a feature has been incorporated
into the program which automatically updates the local workstation whenever
necessary.
File Locations and Access
Installation of the program to local workstations begins with installing it to
the server, as usual. The entire program is loaded to the server. This directory
location is called the HOME DIRECTORY.
Most of the program files are copied from the Home Directory to the local
workstation. This directory location is called the PROGRAM DIRECTORY.
Note that the Home Directory must be shared to all users, who must all have
FULL CONTROL rights to these directories.
The Home Directory must be mapped in exactly the same way at each
workstation. For instance, one user cannot refer to the Home Directory as T:\
and another refer to it as P:\.
Before attempting the next step, you must have completed all previous steps.
INSTALLATION
TotalFBO® User Guide | 35
STEP 4 - Install program files on each workstation:
At each workstation (including the one you just installed from) complete the
following steps:
1.
Go to Start>Run on your Windows desktop.
2.
Type or browse to T:\TFBO5\WSSETUP.EXE in the box which appears.
(Substitute the location of your HOME directory for the “T:\TFBO5”.)
3.
Follow the on-screen prompts to complete the installation. The default
location for installation will be C:\TFBO5. You may change this default
to the reflect the name of the directory on your workstation which will be
your PROGRAM directory.
This process will copy necessary program files (*.dll, *.ico, *.exe) from the
HOME directory to the local workstation PROGRAM directory. Then a series
of shortcuts and a desktop icon will be created to make accessing the program
simple for the user. These icons will call the program from the PROGRAM
directory.
Program Updates
a. When a program update is installed (whether from a CD-Rom or
downloaded from the web) you will install the program files to your HOME
directory, such as T:\TFBO5. See Installing the Program.
b. Then at that same workstation only, you will follow steps 1-3 above.
c. No action is necessary at other workstations in the network. Each time the
program is started, it will compare the date on files in the HOME directory
with their counterparts in the PROGRAM directory on the workstation. If
they differ, a message will appear informing the user that it is “Upgrading
Program Files in the Local Directory.” As soon as necessary files are copied,
the program will continue to start normally.
d. As usual, the first user to access the database will see that data files which
require changes are updated automatically.
Also use this method to install
to a Terminal Server if you‛re
using a Thin-Client Connection.
36 | TotalFBO® User Guide
INSTALLATION
Creating Additional/Training Database
You may need to set up additional User Datafiles Databases in order to handle
data for other companies or divisions. It’s also a good idea to set up a separate
database which you can use to test new procedures, play with options, or train
new employees. The following procedure can help you do this.
Step 5 - Set up the New Database
Once your normal database is set up properly, it’s easy to create a training
database and copy your data into it.
1. Begin by making a backup of your normal data. For this process, the most
efficient place to work would be from your Windows desktop. Go to Start>
Programs> TotalFBO Version 5> User Utilities5> Maintenance> Backup/Restore>
Backup Database.
2. When the backup is complete, move to Updates> Licensing and insert a new
record.
Enter the Server Name, the name of your new database, and the SQL
administrator username and password. When the process is complete, finish
entering the licensing information as provided to you by Horizon.
Mark this as a Training directory by checking the option Label This Directory
as a ‘Training’ Directory (on Tab2). This will cause the word “Training” to be
appended to your company name on all printouts.
In addition, the wallpaper background for the program will be changed to make
it obvious when you’re working in the training database.
3. Now move to the restore function at Maintenance> Backup/Restore> Restore
Database.
Choose to restore the backup Over an Existing Database and select the name of
your new training database from the dropdown list. Finally, select the backup
file which was created in Step 1.
Whenever you wish you can repeat this step to update your Training directory
with more current data.
Train on New Working Procedure
When you start the program now, you must choose whether you will work in
the Data directory or in the new directory.
Other users can continue to update today’s work in the usual Data directory
without interference.
An option at Utilities>Customizing>Set Global Options allows you to change
the heading of the Main Window to reflect the data directory you’re currently
accessing.
INSTALLATION
Getting Around in TotalFBO®
You’ll see two primary types of windows as you move around the program:
Browse Boxes and Data Entry Forms. Understanding the purpose and
features of these two windows will make it simple for you to use the program,
regardless of the specific module or function you’re working in.
What’s a Browse Box?
A Browse gives you a window into the way information is stored in your data
files. The title bar of the window will usually tell you that it’s a “Browse” and
the file that’s being displayed. You’ll be using browse windows to Insert new
records, as well as to View, Print, Change, Void or Remove existing records-things like invoices, shop orders, customers, vendors, vendor invoices,
checks, recurring charges--almost everything in your database! Since all these
windows have the same features, you’ll quickly become comfortable entering
and reviewing information anywhere in your program.
On the outer area of the window, you’ll usually see these features:
Category Selection Buttons:
Most browse windows will have a dropdown list or buttons in the lower left
corner which you can use to select items for display. For instance, in the
example above, you could view All invoices, only those that are Unpaid, only
those that are Paid, or only those that are On Hold. The legend at the top of
the window will remind you of your choice.
To Close the Window:
• Click on the Close button in the lower right corner of the window or Tab
to the button and press Enter, or
• Click on the button in the top right corner of the window, or
• Press Alt+O, or
• Press the Escape key on your keyboard
For Help or More Information:
• Click on the Help button in the lower right corner of the window or Tab to
the button and press Enter, or
• Press Alt+H, or
• Press the F1 key on your keyboard
TotalFBO® User Guide | 37
38 | TotalFBO® User Guide
INSTALLATION
On the inner area of the window (or “Listbox”) you’ll usually see these
features:
Your Data:
Your data is displayed in rows and columns as in a spreadsheet. One row will
be highlighted in a different color. This will be the “active record” which you
can select for further work. Use your arrow keys or mouse to move through
the file to find specific records. You can also use the Video buttons and Scroll
bars described below.
Column Widths:
Sometimes the information you wish to see may be wider than the column
width displayed. As you move your cursor over the vertical line dividing a
column from its neighbor, the cursor changes to a double-arrow symbol that
Then hold down your left mouse button and drag the
looks like this:
column to any width you prefer. You cannot make a column so small that you
completely remove it from view.
Video Buttons:
These buttons help you move quickly through your data file. They have the
following functions:
• Top of File
• Page Up
• Move Up a Line
• Move Down a Line
• Page Down
• End of File
Scroll Bars:
Vertical and/or Horizontal scroll bars appear on list boxes where there is more
data than can be shown on the window at one time. Click on the arrows at
either end of the scroll bar to move in that direction in the file, or drag the
Thumb button to the location you prefer.
•
Depending on the size and kind of file you’re reviewing, sometimes
the Thumb button will not be located on the scroll bar in a position
proportionate to your location within a file.
•
If you move the Horizontal Thumb button all the way to the right, the last
data column will appear to stretch.
INSTALLATION
TotalFBO® User Guide | 39
Status Icons:
On some browse windows, an icon may be displayed to the left of a record.
The meaning of the icon will be shown at the top or the bottom of the window.
For instance, in the example above, a dollar sign
means this invoice
has been Paid, but a red hand
means this invoice is On Hold. In some
windows you will merely click on the record to insert an icon, for others there
is a special button or a field you must change on the individual record itself.
Action Buttons:
• If you want to add a new record, such as a new vendor or customer,
clicking on the Insert button will activate the appropriate data entry
windows for you.
•
In similar fashion, clicking on the Change button will activate the data
entry window for you to review the record in detail or make changes to
specific fields.
•
Clicking on the Delete button causes that record to be removed from your
database. You’ll be asked to confirm your choice before the deletion takes
place.
Action buttons may be “grayed” when a specific action is inappropriate at that
time or when the user’s privilege level does not permit access to that function.
Want it Your Way?
Sorting Your Data:
If you always want a particular
Click on the heading for each column to see a view of your data sorted in a
Browse Window to sort on a
different order. The data in the column you have chosen will appear in red as
column, use Shift+Right Click
a guide to the record order.
when you click on the column
heading. Your choice will be
Searching for a Record:
saved just for you every time
The Search box at the top of a Browse window allows you to search for a
you reopen the window!
specific record, using information from any column as your criteria. For
instance, if you wanted to search for a particular invoice number in the
example above, you would first click on the header of the Invoice Number
column to sort the data in that order. Then you can enter the specific invoice
number (or part of a number) you need in the Search box. After entering
the number, use your Tab key to complete your entry and display matching
records.
When searching, you can enter %word% and get a list of all records containing
those characters between the % signs anywhere within the field.
40 | TotalFBO® User Guide
INSTALLATION
Progressive Search:
You can search multiple times on the same set of records, narrowing your
selections each time, if you wish. Simply click on another column and enter
your criteria in the Search box. You can repeat this procedure as many times
as you wish. To begin a fresh search, click on the “CLR” button to the right of
the Search box.
What About Data Entry Forms?
This is where you’ll actually enter and change your data.
At the lower right edge of a Form Window, there will be three control buttons:
To Save Your Data or Changes:
• Click on the OK button or Tab to the button and press Enter, or
• Press Alt+O
On some simple forms, the OK button is the “Default” button, so pressing
the Enter key on your keyboard will accept the form and move you to the next
appropriate window. However, on more complex forms this button is not
defaulted in order to prevent premature or accidental entries.
To Quit Without Saving Your Entries:
• Click on the Cancel button or Tab to the button and press Enter, or
• Press the Escape key on your keyboard, or
• Press Alt+C
The Cancel button is used to terminate a given process, discarding any new
input. If you’re adding a new record, clicking Cancel will discard the new
record and go back to the previous screen. If you are modifying an existing
record, it will discard only the changes you have just made, with the original
record left intact.
There is one exception to this discard rule that may not be immediately
obvious. When you sidestep to add a secondary record, complete the
secondary record, return to the main record and then Cancel, the secondary
record will not be affected by the Cancel.
For Help or More Information:
• Click on the Help button in the lower right corner of the window or Tab to
the button and press Enter, or
• Press the F1 key on your keyboard, or
•
Press Alt+H
INSTALLATION
In the body of the Form will be a number of fields appropriate to the data
you’ll be entering.
Tab and Shift+Tab can be used to move forward and backward within all data
entry forms.
Backspace erases a single character within a given entry field.
your typing will
When Tabbing to a field highlights that field,
replace any existing contents of the field. Pressing either the Left or Right
Arrow keys on your keyboard will eliminate the highlight and allow you to
edit the field.
Checkbox fields
can be completed by Clicking on the field or by
pressing the Spacebar on your keyboard.
Drop-List fields require a selection from the list presented. Items on the
list are either a standard part of the program, or can be customized from an
Options and Settings function.
The Ellipses button
next to a field can be used to search for appropriate
entries. For instance, clicking the Ellipses button next to this field
brings up a Browse Window
showing all your Departments. If the Department you wanted isn’t already
in the list, you’ll be able to insert one before returning to the Form Window.
(This is a “Sidestep.”)
Entering a few characters in a field will cause the program to search for all
possible matches already in your records. A Browse Window will be presented
which allows you to refine your selection or insert a new record if necessary.
This is the most efficient method of entering data correctly.
allow you to select one option
Radio Buttons
or condition only out of several choices presented.
• Click on the option of your choice, or
• Use the Left or Right Arrow keys on your keyboard to select an option
Spin Boxes
help you enter an appropriate numerical value
in a field.
• Click the arrows at the right of the box to increase or decrease the number,
or
• Type the number you want into the field.
TotalFBO® User Guide | 41
42 | TotalFBO® User Guide
INSTALLATION
If you try to enter an amount but just get a beeping tone, you have attempted to
enter data which is not formatted correctly for the field you’re working with.
Reconsider your input or check out Options and Settings to see if you can
change the field format!
Editing Comments Fields
Comments fields provide a powerful method for storing comments and extra
information related to a given record. A very important feature of these fields
is their efficiency. A Comments field with nothing in it does not increase the
space used by that record, yet you have virtually unlimited space for text entry
on those records that do need something said.
To enter text in these Comment fields, the program must open an ‘editor’
window for that text. The amount of text you can type is not limited to just the
size of that window. If you type more than the window’s size, the text will
scroll off the top of the window, allowing you to continue almost forever.
The text will automatically word-wrap at the end of each line, so it is not
necessary (actually, not even desirable) to press Enter at the end of each line.
The exception to this rule is when you want to deliberately start a new line
or paragraph. Depending on the format of the printed document, you may
occasionally get different word-wrapping on the printout than you do in the
text entry window, so you will want to pay attention to the actual printout if
you are trying to achieve a certain look on paper.
Upper vs. Lower Case
One problem frequently encountered with many older computer programs
is being forced to enter all your data in upper case. These programs did this
because their searches were case-sensitive. In other words, if you originally
entered a name as ‘Smith’, when you go to look for it with ‘smith’ or ‘SMITH’
it wouldn’t find the original listing. You had to search for exactly what was
entered the first time, or the computer wouldn’t find it.
This program is 100 percent case insensitive. If you originally enter an
account as ‘SMITH’ and later search for it using ‘smith’ or ‘Smith’, you’ll still
find it. This allows you to enter your names in a much more natural-looking
form, and not generate any fears about finding it later because of capitalization
problems.
INSTALLATION
TotalFBO® User Guide | 43
Entering Dates
• Enter dates with or without separating slashes! Also, if you just enter the
month and day, the current year will be entered for you. For instance, if
you enter “317” you’ll get 03/17/2001.
•
The format of your dates is set by your Windows Regional Settings. We
suggest that you select a style which includes all 4 digits for the year,
to prevent any ambiguity. To change or verify your preferences, go to
Start>Settings>Control Panel>Regional Settings>Date Tab. TotalFBO®
uses the default you set for the “Short Date Style” field.
•
Save keystrokes to enter commonly used dates. When in any date field,
use the following characters you already know for fast results:
T-o-d-a-y....”T” = Today
M-o-n-t-H...”M” = First day of this month,
“H” = Last day of this month
Y-e-a-R......”Y” = First day of this year, “R” = Last day of this year
“+” = Add a day to whatever is displayed
“ - “ = Subtract a day from whatever is displayed
Calendar Pop-up
Clicking the calendar button next to any date field lets you see a month-at-atime calendar as far into the future as you wish to look. You can use the Arrow
keys to move forward and backward a month or a year at a time. Accepting
the date (click on the checkmark) will replace the date in the target field from
which the calculator was called up.
Anything Else I Should Know?
Report Previewer
Almost everything that can be viewed on your monitor can be printed, and
almost everything that can be printed can be viewed. The Toolbar at the top of
the screen allows you to zoom in on the report, page forward or backward
within the report, print a page, print or export the entire report, or cancel
and return to the previous menu. For more details, click on the blue question
mark at the center of the toolbar.
Two different Report Previewers are available, and a user can select his
favorite at File> Preferences> User-Specific Settings. See Emailing from
TotalFBO® for more details.
Some reports can be run with an option to create a comma-delimited file which
can easily be imported into other programs or used with spreadsheet programs
such as Excel. After closing the report preview window, you’ll be offered an
opportunity to specify a name and location for the file.
See Helpscreen topic:
Archiving Reports
44 | TotalFBO® User Guide
INSTALLATION
When previewing a report, fonts may not appear exactly as they will be when
printed. Some fonts may appear to be cut off or alignment may be off slightly.
Multiple Threads
When you select a menu function and begin working with your Browse Boxes
and Form Windows, you’ll be starting a “Thread.” Very simply, a Thread
is a group of related operations for which Windows sets aside memory and
resources. One of the nice features of a Windows operating system is the
ability to have several Threads open at once - so you can work in more than
one program at a time, for instance. It also means you can have multiple
operations going on within TotalFBO® if you wish.
For instance, if you’re in the middle of making timecards and realize you
forgot to add a new employee, you can leave the timecard windows open while
you go back to the menu and open the proper windows to add the employee.
Once the employee record is there, you can resume your work with timecards
in the first window. This feature can make it easier to look up related
information or even just meet the demands of a busy day full of interruptions!
However, sometimes the information you enter in one thread must be available
when the next thread STARTS. For instance, if you changed an invoicing
option in one window while you were in the middle of creating an invoice in
another window, the changed option would not apply to that invoice (though it
would take effect on the very next invoice.) Most of the time you’ll be warned
when this situation is a possibility. However, you should be aware that having
too many Threads open can lead to confusion and also consumes more of your
computer’s resources.
INSTALLATION
Setting Up Printers
Printer requirements are very minimal!
It is not necessary to install any special drivers or protocols for your printer
to operate with TotalFBO®. Simply install your printer under Windows
and TotalFBO® will find it. However, only checks, labels and invoices can
be printed on a dot-matrix printer. All other reports are designed to take
advantage of Windows capabilities in printing to a laser or ink-jet printer.
(Dot-matrix Invoice printing will be slow.)
Can I Mix Printers in the Network?
Sure! TotalFBO® can be configured so that each workstation can support
multiple printers at one time. The printers can be attached directly to the
workstation or reached through the network. Each workstation will have a
primary default printer, but can select any other printer at the time of printing
if desired. A separate default printer can be established for your check printer.
Customizing Reports
Style Sheets control how many reports look. Check them out in the Options
and Settings section of each module. You can change the wording of some
titles, include or exclude certain information, and set defaults for report
options.
Use your Word Processing program to add special touches to an important
report by exporting the report to a File. You will be prompted for a
Destination and Filename of your choosing.
Troubleshooting
1. Verify printer is plugged in, turned on, on-line, and has paper.
2. Verify network setup is correct, including Timeout settings, separator pages
and printer sharing arrangements
3. Try test-printing from another program.
4. Verify printer’s port settings are correct in Windows Printers Setup.
5. Insure trailer message is not longer than you expect with extra blank lines.
6. Insure ports are enabled in Windows Control Panel System Setup.
7. Verify printer has been set up in Windows, with correct drivers for your
operating system loaded.
8. Insure temporary directory locations for workstation and user profile have
plenty of available space.
9. Sometimes a new print driver will itself have errors that can cause a
program like TotalFBO® to fail to start properly. Usually a manufacturer will
correct these bugs fairly quickly, however, in the meantime, try running the
printer with a generic driver like HP’s Laserjet II, or try loading a driver for a
previous model from the same manufacturer.
TotalFBO® User Guide | 45
46 | TotalFBO® User Guide
INSTALLATION
Workstation Printer Setup
If you do nothing to customize your setup, the printer which has been assigned
as the default by Windows will be used for all reports and other printing
by TotalFBO®. For many companies, this is adequate. However, it can
be convenient to dedicate specific printers for specialized purposes, such
as printing checks, labels, or invoices. Identifying these printers enables
TotalFBO® to direct output to the preferred printer automatically.
To customize your setup, go to File>Preferences>Station-Specific
Settings. It is possible to have an unlimited number of station setup records.
Each workstation can select a record to be used as the Station Record for that
computer. If a workstation has not selected a Station Record, the Default
Station Setup record will be used.
Insert a new Stations record or Change an existing record and these two tabs
are visible. For any or all categories you wish to customize, simply click the
Ellipses button to the right of the field and select the appropriate printer. The
printer must already be set up in Windows to be available for selection.
The categories which are labeled with “DM” are appropriate for Dot-Matrix
printers only. If necessary, a printer setup string can be manually entered in
the area to the right of these fields. A printer setup string consists of control
codes which command the printer to adjust spacing, fonts, and other functions.
Information on how to enter these codes will be found in the manual provided
with your printer.
If you have installed a Cash Drawer for your point of sale operation, you
should also designate the type of drawer and Byte settings. The Byte settings
define the signal which commands the drawer to open. In addition, you may
designate an alternate port for your Cash Drawer, in the event you have not
connected it to the same port as your invoice printer.
Dot-Matrix Printing
In the early days of computer printing, data was sent from the computer to
the printer essentially one character at a time. This is now referred to as
“Character Mode” printing. In those days, graphics were rarely produced on
the typical printer, so this was an acceptable solution that resulted in very fast
text printing.
However, modern printouts often incorporate graphics elements such as a logo,
boxes and lines around text areas, or special fonts. These graphic elements
make reports and printouts easier to read and more personalized. However,
older dot-matrix printers can only produce these graphics very slowly by
drawing a few dots at a time. Thus, if you try to use a printer like this to
produce a typical invoice from TotalFBO®, for example, the printing process
may take a very long time or may be of poor quality.
INSTALLATION
With the introduction of laser and ink-jet printers, computers are able to send
data to the printer in large blocks. This “Graphics Mode” printing is much
faster and produces a more consistent result.
TotalFBO® produces high-quality printouts using the now standard Windows
Graphics Mode printing method. Most users will be working with Laserjet
printers. However, there may be some installations where using a dot-matrix
is necessary. Many newer dot-matrix printers can produce hi-quality graphics
rapidly in Graphics Mode and be operated through TotalFBO® as if they were
“laser” printers. However, older printers that depend on Character Mode may
need special setup attention in order to quickly produce invoices, checks, or
labels. The following areas will need to be considered:
1. Set up a separate station record for the workstation using the dot-matrix
printer. (see above) Be sure to select your printer in the appropriate fields for
DM Check Printer, DM Label Printer, and DM Invoice Printer.
2. Select appropriate style sheets for checks, labels, and invoices using the
Dot-Matrix options.
3. Insure that the “Use Copy command” option is checked in Global Options.
4. If the workstation operating system is Windows 2000/XP Professional, an
appropriate “Net Use” command must be running. (Consult your Network
Administrator before adding this command.) This command is issued from the
keyboard at the C:\ command prompt. The command only needs to be entered
once, as it will continue to operate each time the machine is rebooted. An
example of an appropriate Net Use command follows:
NET USE LPT1: \\SRVR\EPSON600 /PERSISTENT:YES
The syntax of this command is very specific, and you must know the name of
the computer the printer is hooked to, and the sharename of the printer you
wish to use. In the example above, “SRVR” is the name of the computer and
“EPSON600” is the sharename of the printer. The sharename of the printer
can usually be found on the Sharing tab of the printer properties. The name of
the computer can usually be found at My Computer>Properties>Network
Identification.
Once issued, the command cannot be changed by simply issuing another
command. It is necessary to remove the first command before issuing a new
one. To do this, enter the following:
NET USE LPT1: /DELETE
TotalFBO® User Guide | 47
48 | TotalFBO® User Guide
INSTALLATION
Cash Drawers
One piece of hardware that is not typically sold in computer stores but may be
a part of your installation is an Electronic Cash Drawer. This unit connects
between the computer and your printer to provide a drawer that opens
whenever an invoice is processed.
Many commercially available units can be used with TotalFBO®, the primary
requirement is that the drawer be opened with either a 1- or 2-digit code.
POSWorld is a well-known equipment vendor that can provide other units that
are tested to work well with TotalFBO®. Check out what they have to offer at
www.posworld.com.
To begin your setup of a cash drawer unit, connect the unit to an available
serial (COM) or parallel (LPT) port on the computer you will be using at
your front counter. Refer to the documentation that came with your unit to
determine the type of port to be used.
If you need to open the
drawer at a time other than
when you are processing
a sale, press the key
combination Alt-F2.
•
Cash Drawers can be connected to a separate port or can share a port with
a locally-connected printer if necessary. Most parallel units are shipped
with a cable that will allow you to share a printer.
•
While sitting at this workstation, start TotalFBO® and go to
File>Preferences>Station-Specific Settings. Insert a station
record for this workstation which will be used to identify printers and the
cash drawer. Once inserted and okayed, be sure to click the button titled
“Select As My Station Record.”
•
On the second tab of the Station Record, designate the type of drawer and
Byte settings. The Byte settings define the signal which commands the
drawer to open. In addition, you will select the port your Cash Drawer is
connected to.
•
If you’re connecting to a Serial port, use the third tab of the Station Record
to designate the Mode settings for the COM port you’ve selected. Refer to
your Cash Drawer manual for these settings.
•
If you’re setting up a Serial Cash Drawer, you’ll need to insure that the
“Use Copy Command” option is checked at Utilities> Customizing>
Set Global Options> Tab 4 in order to select the proper COM port.
You can use the Test button to sent the Byte characters to your drawer. When
properly set up, the drawer should open.
INSTALLATION
TotalFBO® User Guide | 49
Backing Up Your Data
A ‘backup’ is simply a copy of your data which is held in reserve in case
something goes wrong with the primary copy. Backups can come in a variety
of formats and forms, each having its own advantages and disadvantages. For
example, keeping a printed copy of every transaction is one form of backup,
but it has the primary disadvantage of being difficult to use (i.e., you have to
type in every transaction all over again).
A much better kind of backup copies the computer files from your hard disk
to floppy disks or some other kind of electronic media. These disks can then
be stored separately (perhaps even off site) from the computer, giving you the
ability to recover from a variety of problems.
But it is not enough to just make the backup and then forget about it until the
next time a backup is due. To properly protect against the full spectrum of
possible problems (including fire and theft as well as computer hardware and
software problems), you must have an integrated plan of making backups and
storing them.
How Often Should Backups Be Done?
While TotalFBO® helps make it easier to do backups, it still does not enforce
any particular backup regimen. The schedule that follows is a recommended
schedule that will provide ample protection.
1) Daily - Backups should be performed daily. Keep the daily backups for at
least a week.
2) Weekly - Backups should be performed weekly. The weekly backup
should be taken to another site for safe storage, such as a bank deposit box
or a filing cabinet in the boss’s home. Keep the weekly backups for at least
a month. Otherwise, you open a window of vulnerability during which it
would be possible to lose everything. If something catastrophic (fire is a good
example) were to happen before you left again with the new backup, all your
backups are in the same location.
3) Monthly - Backups should be performed monthly. This should be stored
off-site, again providing long-term backup safety for your previous month
archives. You should have at least two complete sets for succeeding months
(set one for April, set two for May), but the more sets you have here, the better.
This would normally be done just after the monthly close process, or if you
don’t close regularly, on the last day of a month.
Remember, one of Murphy‛s
Laws states that those who
don‛t do good backups are the
ones who will need them the
most!
50 | TotalFBO® User Guide
INSTALLATION
How to Make a Backup
You can begin the backup process from any of 4 places:
See Helpscreen topics:
Backup
&
Backup Scheduled
Inside TotalFBO®
1- File> Backup Database
2- Utilities> Program Administration> Backups> Backup Database
Windows Desktop
3- Start> Programs> TotalFBO Version 5> User Utilities5> Maintenance> Backup/
Restore> Backup Database
Batch Process
4- Create a schedule for automatic bakups to be performed.
SQL backups can be made HOT - that is, while users are actually in the
program!
The following information will be completed:
Dataset Name - This is the name of the file that will be created to hold the
backup of your data. The default name includes TFBO and the date and then a
sequence number. The file type at the end of the name will be “.bak.” You do
not need to enter this, as SQL will create it for you automatically.
Server Backup Directory - This needs to be a directory which is actually on
the SQL Server computer OR one from some other computer on your network
which is permanently mapped so that an administrator logged in locally to the
server computer could see and have full access to it. The safest place is just
to create a directory on the C:\ drive of the SQL Server computer and call it
BACKUPS.
When you complete this field, pretend you’re sitting at the SQL Server
computer!
If you accepted the defaults from above, you’d get this SQL backup file,
located on the SQL Server computer.
C:\BACKUPS\TFBO_0707171302.bak
Optional PKZIP Compression - The backup file that SQL creates is not much
smaller than the actual database. If you want to compress the file so it can
be easily taken off the server and stored off-site, you’ll want to use PKZIP to
handle it for you. After the backup file is created by SQL, this function uses
PKZIP to compress the file and save it to a new location.
When you complete this section, remember that your are actually sitting at
your local workstation computer!
INSTALLATION
You can type in the correct path to locate the backup file that was created on
the server and also the path to the target directory you want to use for the
PKZIP file. But the easiest way is simply to use the browse buttons to locate
both directories. This insures you’ll get the results you expect!
Attempting to back up directly to a CD-RW disk is not recommended. Most
often, these backups will either fail at creation or be unusable when you need
them. If you wish to use CDs as your backup medium, back up to a hard drive
directory first, then write the backup to the CD separately.
How to Restore a Database From a Backup
Restoring a SQL backup must be done while no other users are in the
program. You can use the Administrative Lockout function to keep users from
attempting to gain access while the restore function is working.
Restoring is done from your Windows Desktop at Start> Programs> TotalFBO
Version 5> User Utilities5> Maintenance> Backup/Restore> Restore Database
Caution - Do your restores carefully! If you restore from the wrong backup
set, you could damage much or all of your current data files, losing significant
amounts of data.
Where to Restore - Choose whether you are restoring over an existing database
or using your backup to create a new database, as you might if you wanted to
create a Training database. If you will restore over an existing database, you
must select the correct one from the dropdown list.
If you’re creating a new database, you’ll be asked to enter the server name,
SQL user ID, password, and the name you will give your new database.
Select Backup File - type in or browse to the correct backup file you wish
to restore. Note that if you have previously compressed your backup using
PKZIP, it must be unzipped and placed in a location accessible to the SQL
Server before you can restore it.
TotalFBO® User Guide | 51
52 | TotalFBO® User Guide
INSTALLATION
Installing Program Updates
TotalFBO® is supplied on CD-ROM. You may also download the program or
an update from our website.
Insure that no one is using TotalFBO® or will attempt to log in while you
are performing the update process. You can see a list of users currently in the
program by selecting Utilities>Reports and Listings>Who's On. You can prevent
users from trying to access the program at Utilities>Program Administration>
Administratively Lock/Unlock Program.
Although the program was initially installed at the server, you should install
updates by sitting at a workstation and installing to the shared drive on the
server.
1. Before you install the new software, be sure you have a good backup of your
data. If you have more than one data directory, be sure you have a backup of
each.
2. Make sure Windows is running. Close any other programs which are
running. If you have a virus-detection program, temporarily disable it.
3. Insert your new TotalFBO® CD in your CD-ROM drive. Windows
should detect the CD and automatically run the installation program. If the
computer’s automatic detection feature is turned off, then click the Start button
and choose the Run option.
4. Type d:\setup.exe in the box which appears. (If your CD-ROM drive is
assigned to a different drive letter, then replace the d with the appropriate
letter.) If you’re installing from a file you downloaded from the website,
browse to the location of that file in the Run box.
5. Follow the on-screen prompts to complete the installation. You will be
asked to specify the drive and directory where the program will be installed.
It is important that you install the upgrade to the same location where the
program was originally installed. The installation program will attempt to
determine this location for you. Watch the screens closely!
To get your current program location, open the Status screen at Help>Status
Window. Your program is installed in the directory marked “Home.”
6. At the conclusion of the program installation process, you must verify
that your licensing information has been entered exactly as provided on the
sheet included with your CD-ROM or as faxed to you by Horizon Business
Concepts, Inc. This is done by running the UserUtil program. See Licensing.
INSTALLATION
7. The first time you start TotalFBO® after an update, it will take a few
minutes to update your database to take advantage of the new features. (If you
have more than one data directory, you will need to log in to each one so that it
can be updated.)
Loading Supplemental Files
Several additional databases are now incorporated in every release of the
software itself.
• Airports and Prevailing Winds information is used for Charter operations.
• Zipcodes and Country information is used throughout the program to
speed and verify address entry.
• Aircraft and FAA Tailnumber information is used in Invoicing and
Concierge operations.
The first time you start the program these files will be loaded for you
automatically. You will be notified in future updates when it is necessary
to reload the file because of changes to the data. Updates can also be
downloaded from our website.
To load Supplemental Files, go to File>Import>Import HBC Supplemental Data.
If necessary, use the ellipses buttons to navigate to the Home directory (where
the program was installed on the server) to locate the text files which will be
used for the import.
TotalFBO® User Guide | 53
54 | TotalFBO® User Guide
INSTALLATION
TotalFBO® User Guide | 55
ENTERPRISE
OPERATIONS
Included in this section:
•
•
•
•
Database Structure
Installation & Setup
Location Records
Inter-Location Sales
When you have operations in more than one location but each location is still
maintained under the same company ownership structure, you’ll want to move
to Enterprise licensing for TotalFBO®.
With Enterprise, you’ll continue to maintain all your data in a single database
for instant reporting on your entire operation. But each transaction is also tied
to a specific location, so that you can monitor each area’s activities separately.
The SQL server where this single large database resides will be located in a
single location, typically your Home Office. Users in remote locations will
access the data and TotalFBO® through a “thin-client” connection, such as
Windows Terminal Server or Citrix Metaframe. It is not possible to obtain
usable network performance with a direct connection, even with T3 data lines.
Thus, in addition to the SQL server, you’ll install one or more Terminal
Servers at the same Home Office location. Be sure to consult a networking
professional who is also experienced in thin-client solutions before installing
the Terminal Server(s).
E
This section will give you a
good idea of the WHAT, WHY,
and WHEN of Enterprise
procedures.
For more details on individual
screens and fields, refer
to the Helpscreens in the
program.
Helpful references to specific
topics are available throughout
this Guide.
See Helpscreen topics
for more details
56 | TotalFBO® User Guide
ENTERPRISE OPERATIONS
DATABASE STRUCTURE
When you log in to your Enterprise database, you’ll have access only to
specific locations as defined by your User Id privileges. If you can only
access one location, you’ll never be aware that there is other data in the same
database. However, if you can access more than one location, you’ll be
presented with a selection window.
Each location operates individually as though it were an independent database.
Users enter normal daily transactions and run reports for their own location.
However, Customer and Vendor Accounts are available to all locations.
A customer is assigned to a “Home Location,” usually where his aircraft is
based, or else the first location to do business with the client. Sales can be
made and payments posted from any location. However, only the Home
Location sets pricing policy and handles collection of any receivable balances.
Depending on options and privileges, inventory in other locations can be
searched and identified when needed. However, the item must be formally
transferred to another location to be sold from there.
Home Office management staff may run reports for the entire Enterprise by
accessing them from Location Zero. This is a special section of the database
which allows no transactions. Only global functions and reports can be
performed from Location Zero.
The Master Chart of Accounts and Department settings are located in Location
Zero. When new locations are added, these Master Settings are copied to the
new location. Then the location settings can be further customized as desired.
Another location you’ll need is a Corporate Location. This section of the
database is used for posting entries which affect the enterprise as a whole, but
do not affect any single location. Entries of this nature are typically Capital
entries, such as stock issuances, partnership distributions, and the like. There
may also be certain investments or debt transactions that would be handled
here. If you have a Home Office which is strictly Administrative, the operating
expenses associated with it would be handled through the Corporate Location.
You may also find that it would be convenient to handle some transactions
for other locations from the Corporate Location, such as payroll or vendor
payments, using a single corporate checking account. You can configure
your options so that these “cross-location” transactions can be entered in the
Corporate Location and appropriate journal entries made in the other locations.
All transactions between locations are handled by using the Due To/From
Other Locations account as a clearing account. In this way, each location’s
financial statements can stand alone and be correctly balanced. TotalFBO®
ENTERPRISE OPERATIONS
TotalFBO® User Guide | 57
ENTERPRISE DATABASE STRUCTURE
LOCATION #1
Normal Transactions
LOCATION #2
Normal Transactions
LOCATION
ZERO
NO TRANSACTIONS
Global Reports
& Master Setup
Normal Transactions
LOCATION #3
Global Transactions
(Corporate or
Capital Entries)
CORPORATE
LOCATION
Users may have access to one or more locations.
Some transactions (such as payroll) may be completed in a
single location and posted to other locations.
Reports run in a location display data only for that location.
Run reports in Location Zero for Enterprise-wide data.
The Master Setup is copied and customized to create new locations.
Sales may be made and paid in any location.
Customer statements are issued from Customer's Home Location.
Each location's financial statements balance independently
as well as globally.
will make a pair of journal entries for each “cross-location” transaction so that
a clear audit trail is maintained in each location’s general ledger. Controllers
will verify that these clearing accounts reconcile as part of the monthly cycle.
58 | TotalFBO® User Guide
ENTERPRISE OPERATIONS
INSTALLATION & SETUP
See Helpscreen topic:
Installation of SQL Server and TotalFBO® does not change with Enterprise
licensing. Complete all steps as outlined in the previous section, including
conversion of your data from Version 3.
However, instead of installing TotalFBO® on individual workstations at the
remote sites, install the program on the Terminal Server, using WSSETUP.
Enterprise Basics
&
Enterprise Creating
If you have existing data, you can “promote” it to be Location #1. This is
simply a process which identifies all data as belonging to that location. In
addition, the basic general ledger setup information is used to insert your
Location Zero.
At this point you’ll want to review the Master Setup in Location Zero and be
sure it will meet the needs of any new locations which will be added. Change
or remove any items which were customized solely to meet the needs of
Location #1.
Then you can create as many additional locations as are needed. Each time
a location is added, the Master Setup information in Location Zero is copied
to the new location. Then you can customize that location’s information as
needed.
If you already have existing databases for multiple locations, contact Tech
Support for assistance in importing this information to your new locations.
After creating your locations, be sure to update the User ID records to specify
the locations each user will be able to access. Limit access to the sensitive
information in Location Zero as tightly as possible.
LOCATION RECORDS
See Helpscreen topics:
Enterprise Location
Management
Most Options and Settings in each module apply globally to all locations.
However, you can override many of these options by making changes to an
individual Location Record at Accounting> General Ledger> Update Ledger
Structure> Update Locations. In this way, each location can have customized
printouts, tax and field names, and even individual fence dates.
Although each location can be customized greatly, it’s a good idea to be as
consistent as possible to make management easier and reports more readable.
Access to global Options and Settings and Location Records should be limited
to Corporate-Level Management for best consistency.
INTER-LOCATION SALES
A big advantage of using a single database is the ability to offer a more
attractive package to your customers. Since a customer’s account appears
ENTERPRISE OPERATIONS
TotalFBO® User Guide | 59
INTER-LOCATION SALES & PAYMENTS
(When customer buys from another location)
SALES
Create Invoice
for Sale
SELLING LOCATION
HOME LOCATION
Due To/From
Due To/From
Sales Income
Accounts
Receivable
Tax Liability
Fuel Inventory
Cost of Fuel
Selling location receives income.
Home location handles receivable (if any.)
PAYMENTS
Post Payment
Invoice
Payments will usually be made to the Home Location.
However, if the customer pays the selling location
the payment may be posted there as well.
Either location may apply the payment to
outstanding charges.
HOME LOCATION
Undeposited
Receipts
Accounts
Receivable
60 | TotalFBO® User Guide
ENTERPRISE OPERATIONS
only once in the database, it’s possible to track his volume and buying habits
at the Enterprise level. You’ll be able to offer pricing which is consistent at all
locations, and which can be based on accumulated sales volume.
Even if costs vary between locations, forcing prices to differ sharply, you can
offer the customer a standard “cents-off” discount which is applied to the local
price.
When a customer makes a purchase at a location other than his Home
Location, the selling location will receive full credit for the sale, just as they
would for their local customers. However, if the customer charges the sale
to his account, TotalFBO® automatically posts the Receivable to the Home
Location. This invoice will appear on the customer’s statement which will be
sent from the Home Location at month-end.
Payments will generally be returned to the Home Location for posting. But
they may be posted from any location and applied to outstanding invoices if
necessary. Again, the cash is deposited locally but the Receivable balance at
the Home Location is reduced equally.
A location cannot change an invoice created in another location, and only the
Home Location can set price classes, tax exemptions, and certain other options.
Avoid creating duplicate accounts in each location so that you can provide the
best customer service in addition to consistent pricing and reporting. Using
Tail Numbers and Phone Numbers to select customers on transactions will help
to prevent accidental duplications.
Consistent customer service and smooth handling of client accounts at all
locations will help to build customer loyalty and your bottom line at the same
time!
See Helpscreen topics:
Enterprise Location
Option Overrides
Location Option Overrides
The following chart shows options which are set globally in each module’s
Options and Settings menu, but which may be overridden or specified
as a default for a specific location when using the Enterprise Version of the
program.
The override or default selection is found at Accounting> General Ledger>
Update Ledger Structure> Update Locations. The chart gives the tab and
field name as appropriate.
ENTERPRISE OPERATIONS
MODULE AFFECTED
OVERRIDE?
TotalFBO® User Guide | 61
SELECT DEFAULT?
RECEIVABLES
General Options> Tab 2: Default Tax
Exemptions
Tab 1: New Customer Tax Exempts
Set Sales Taxes> Tax Record> New
Customers Tax Exempt?
Tab 1: New Customer Tax Exempts
Set Sales Taxes> Tax Record> New
Inventory Items Taxable?
Tab 1: New Inventory Items Taxable
Set Sales Taxes> Tax Record
Tab 1: Tax Location Applicability
Statement Style Sheet> Customer
Statement Style
Tab 2: Statement Style Sheet
Statement Style Sheet> Compound
Statement Style
Tab 2: Compound Statement Style
Statement Style Sheet> Airline
Statement Style
Tab 2: Airline Statement Style
INVOICING
General Options> Tab 4: Fuel Tax/
Fees Taxability buttons
Tab 3: Fuel tax/Fees Taxability buttons
General Options> Tab 5: Primary
Transient Account
Tab 1: Primary Transient Customer
Account
Invoice Style Sheets
Tab 2: Invoice Style Sheet
SHOP ORDERS
General Options> Tab 1: Discrepancy Tab 5: Discrepancy Prompt-Singular
Prompt-Singular
General Options> Tab 1: Discrepancy Tab 5: Discrepancy Prompt-Plural
Prompt-Plural
General Options> Tab 1: Aircraft
Prompt-Singular
Tab 5: Aircraft Prompt-Singular
General Options> Tab 1: Aircraft
Prompt-Plural
Tab 5: Aircraft Prompt-Plural
General Options> Tab 1:
Miscellaneous Supplies Phrase
Tab 5: Miscellaneous Supplies Phrase
General Options> Tab 1: Sales Taxes Tab 5: Sales Taxes and Fees Phrase
and Fees Phrase
General Options> Tab 1: Shop Order Tab 5: Shop Order Transaction Name
Transaction Name
General Options> Tab 1: Shop Quote Tab 5: Shop Quote Transaction Name
Transaction Name
General Options> Tab 1: Quote
Discrepancy-Singular
Tab 5: Quote Discrepancy-Singular
62 | TotalFBO® User Guide
MODULE AFFECTED
ENTERPRISE OPERATIONS
OVERRIDE?
General Options> Tab 1: Quote
Discrepancy-Plural
Tab 5: Quote Discrepancy-Plural
General Options> Tab 1: Misc.
Supplies Percentage-Parts
Tab 5: Misc. Supplies Percentage-Parts
General Options> Tab 1: Misc.
Supplies Percentage-Labor
Tab 5: Misc. Supplies Percentage-Labor
Shop Order Style Sheets
SELECT DEFAULT?
Tab 2: Shop Order Style Sheet
INVENTORY
General Options>Tab 1: Fuel Price
Names
Tab 4: Fuel Price Names
General Options> Tab 2: Fuel Tax
Names
Tab 3: Fuel Tax Names
General Options> Tab 4: Price Matrix
Records
Inventory>Update Inventory
Departments> Department
Record> Tab 2: Price Matrix
General Options> Tab 3: Purchase
Order Style Sheets
Tab 2: Purchase Order Style
Sheet
PAYABLES
Set Check Formats
Tab 2: Checking Style Sheet
CHECKING
Set Check Formats
Tab 2: Checking Style Sheet
General Options> Tab 1: Default
Check Register
Tab 2: Default Check Register
PAYROLL
General Options>Tab 2: Default Tax
Payee
Tab 2: Tax Deposit Payee
GENERAL LEDGER
General Options>Tab 1: GL Fence
Start/End Dates
Tab 6: Starting/Ending Fence Dates
CHARTER
General Options>Tab 6: Style Sheets
Tab 2: Charter Quote Style Sheet
DISPATCH
Charter Dispatch Options> Tab 2:
General Declaration Style Sheet
Tab 2: General Dec. Style Sheet
CUSTOMIZING
Set Global Options>Tab 2: Repair
Station Numbers
Tab 5: Repair Station ID Numbers
TotalFBO® User Guide | 63
SETUP PROCEDURES
Included in this section:
•
•
•
•
•
•
Overview
Controller
Security
General Ledger
Checking
Receivables Clerk
Taxes
Pricing
Customers
Credit Cards
Payables Clerk
Vendors
Notes & Leases
Inventory
Payroll Clerk
Taxes & Deductions
Employee Records
The Wrap Up
Verifying the General Ledger
Online Credit Card Processing
International Options
The next sections cover the daily procedures used in each operational area
of your business. But before the daily transactions are entered by your
employees, the Accounting Department staff must customize TotalFBO® to
make it serve your company’s particular needs.
This customization process generally falls into two areas of effort:
1. Entering beginning data from your previous systems
2. Setting options and configurations for automatic behaviors
Beginning data is generally divided into two categories:
1. Information that affects Accounting activities
This includes your Chart of Accounts, Customers, Payroll
information, Vendors, etc.
2. Information that does not affect Accounting
This includes Pilot records, Charter quote rules, Aircraft maintenance
records, etc.
ber
Num
10 1 0
10 1 2
13 1 0
20 0 0
30 1 0
40 1 5
50 1 5
Am o
n
rip tio
D esc
unt
sh
0 ca
.0
0
1
/r
.0 0 a
tory
150 0
inven
0.0 0
1735
a /p
0
.0
541 2
uity
q
e
0
les
00.0
rts sa
1000
0 pa
00.0
cost
arts
1750
.0 0 p
947 2
This section will give you
a good idea of the WHAT,
WHY, and WHEN of Setup
Procedures.
For more details on individual
screens and fields, refer
to the Helpscreens in the
program.
Helpful references to specific
topics are available throughout
this Guide.
See Helpscreen topics
for more details
64 | TotalFBO® User Guide
SETUP PROCEDURES
The non-accounting data can be entered by staff in other departments, under
the coordination of the Accounting Department. Information on setting
up these areas is found in the later sections of this Guide as well as the
Helpscreens.
Much of the accounting-related data can be imported from your previous
system in most cases. This includes customers, vendors, inventory, and
outstanding payable and receivable invoices. A default chart of accounts is
included and options throughout the program are set with the most typical
settings. Thus, it’s easy for you to get started quickly if your organization
needs little additional customization.
However, most organizations will be more comfortable with keeping their
existing chart of accounts, and so we recommend taking the time to customize
the general ledger first.
In addition, TotalFBO® tightly integrates general ledger posting with entering
transactions throughout the program. You control what accounts are used for
posting these journal entries by your choices in the Setup. In this way, users
need not be familiar with your accounting requirements, yet your records are
continuously kept up to date.
The remainder of this section will help you complete the setup process in an
organized and efficient manner and help you make decisions on the options
necessary to support company policies effectively.
For convenience, we’ll organize this discussion by suggesting the Accounting
Department staffer who most typically handles that portion of the process.
However, we suggest that all staffers read this entire section thoroughly for
best coordination.
CONTROLLER
Whether your title is Controller, Bookkeeper, or “Person-in-charge-bydefault,” someone needs to make sure that the setup process gets done. Of
course, it is possible to just install the software and start entering transactions
immediately, hoping that “someday” it will all come together.
And it will—but only after several months (or more) of limping along, never
quite knowing what balances you can count on, which reports are complete,
everyone complaining, working too hard, and mounting frustration. Someday,
heads will roll, someone gets told to “fix it or else,” the setup is finally
completed, and then a lot of overtime gets used to reconcile and clean up the
mess.
SETUP PROCEDURES
TotalFBO® User Guide | 65
SETUP WORKFLOW
Install
Program
These Steps
Affect Accounting
Setup Users
Setup General
Ledger
Setup Bank
Accounts
Setup
Receivables
These Steps Affect Other Data
Setup
Aircraft
Setup GSE/
Tools
Setup
Charter
Setup Flight
School
Setup Pilots
Setup
Schedule
Setup 135
Dispatch
Setup Rental
Dispatch
Setup Payables
Setup Inventory
Setup Payroll
Verify General
Ledger Balances
Setup Credit
Card Processor
Accounting setup is best approached in order as shown.
Other data setup may be coordinated among staff
members as is convenient.
66 | TotalFBO® User Guide
SETUP PROCEDURES
This section is designed to spare you that agony and expense, thereby
delivering the benefits to your organization that you expected when you bought
TotalFBO®. Let’s take a moment to review those benefits and goals.
Aviation-Specific Features
•
If you’re using one of the many general accounting packages available
today, it’s likely that you’re also spending many hours manipulating
spreadsheets in order to obtain the information necessary to track data
by aircraft, or by flight, to analyze margins, produce FET tax reports,
Flowage Fee reports, Ramp Fee Reports, Airport Commission reports, etc.
•
Your POS package doesn’t help you track information by tail number,
doesn’t have customized fields for selling rental and instruction flights,
billing charter trips, up-charging for Prist, or automatically pricing fuel by
volume sold over time to specific customers.
These software programs themselves may be excellent packages for general
businesses – but you’re in Aviation, and you have specific needs mandated by
the FAA and by your competitive environment.
So you made the choice to upgrade to TotalFBO®, knowing that it’s designed
for YOUR needs, with all the features and fields and reports you must have
already built-in and available from Day One.
Taking advantage of these features requires only that you enter your price for
Prist, set up that volume pricing plan, add tail numbers to customer accounts,
etc. The more you tell TotalFBO® what your requirements are, the better it
can serve you!
Improved Workflow between Departments
•
Your Charter department uses software to prepare a quote, but
then the invoice has to be generated manually – entering all that
information again to another piece of software.
•
Your invoices are generated at the Front Counter, but all the airline
fuel sales must be billed in the Back Office. That means fuel
inventory can’t be reconciled to accounting or invoices in anything
like “real time.”
•
The maintenance department has to constantly work to keep up with
the current times and cycles on charter and rental aircraft, always
afraid of busting a maintenance requirement.
•
The Inventory Clerk issues a purchase order, then enters everything
again to a customer’s work order, then it gets entered a third time by
the Payables clerk.
SETUP PROCEDURES
TotalFBO
TotalFBO® User Guide | 67
®
Business Management System
INSTANT DATA ACCESS
IMPROVED WORKFLOW
AVIATION-SPECIFIC FEATURES
BRING YOUR WORLD TOGETHER
68 | TotalFBO® User Guide
SETUP PROCEDURES
•
After all the other departments have generated billing, purchases, and
payroll, the Accounting Department must post it all to the General
Ledger. It’s a constant battle to keep current and to control customer
receivables and vendor cash flow with incomplete information.
But the tight integration within your new TotalFBO® Business Management
System puts an end to all this duplicated (and wasted) effort. Enter it once
anywhere and it’s there for everyone to use. Each user can research issues
independently – just look it up from their own workstation – without waiting
for another employee to “get back to them” with the information.
And you get a bonus in improved accuracy. “Enter it once, use it everywhere”
means that you don’t have to reconcile information from two sources.
Instant Financial & Management Reports
•
When you’re dependent on each department to complete their work
and then pass it to Accounting for review, reconciliation and posting,
you also have to WAIT – wait for financial statements, wait for
management reports, wait to make those important decisions – or else
go ahead with incomplete information.
•
And when you finally get the report, you’re always wondering if it’s
really accurate. With all the actual transaction records spread among
different pieces of software throughout your company, it’s impossible
to verify the data. In fact, it’s easy for individual employees (or even
department managers!) to “shade” the information that’s passed to
Accounting, simply by including some items in a later report, whether
inadvertently or deliberately.
But now that you’re using TotalFBO®, you have truly instant record-keeping
throughout your organization – AND it’s completely date-sensitive. So go
ahead and run those financials this morning and again at the end of the day.
And run them for any date past, present, or future.
In fact, managers now have a good tool for monitoring activity company-wide.
If hangar rents seem low, has the Receivables Clerk billed recurring charges
yet? If inventories seem odd, was there a fuel load missed? If Shop Labor
Billings seem low, were all the jobs closed promptly? Run the Open Billings
Report and see what’s outstanding for yourself!
SECURITY SETUP
Now that we’re ready to start, the first step is to get into the program and also
grant secured access for employees. You’ll start the program by clicking on
the desktop icon. When the login screen comes up, enter FBO for both the
Username and Password fields.
SETUP PROCEDURES
TotalFBO® User Guide | 69
SETUP USERS & SECURITY
(Controller)
Create Users IDs
Assign default password to everyone.
Assign Privilege level, Modules Permitted,
Locations Permitted.
New users can change the default password to
something only they will know at the time of
their first login (or at any login).
Start users at lowest access level necessary and
increase as skill grows.
Review Menu Privilege
Defaults
Review Privilege
Override Defaults
Customize menu access requirements, if needed.
Customize access requirements for fields,
buttons, and reports, if needed.
Customizing the default requirements will most
likely be done after daily use of the program begins.
70 | TotalFBO® User Guide
See Helpscreen topic:
Security Setup
SETUP PROCEDURES
Once you’re in the program, go to Utilities> Security> User Setup. Click on the
Update Users button and you’ll see a browse window. Right now the only user
listed is the default user account “FBO” that you just used to login for the first
time.
By Inserting user accounts for yourself and your employees, you can grant
access and limit privileges within the program to just those that are necessary
for each employee’s position.
Refer to the Management Control section of this Guide for more details on
tailoring security settings. For now, be sure that at least one user (probably
yourself) is set up with a privilege level of 99 and access to all modules. Then,
delete or limit access under the default FBO account.
As you add users, be sure to start with low privilege levels (say 10 to 30) and
increase only as it becomes clear that additional access is necessary. Limiting
access actually makes it easier to learn the program. This is because those
functions which are restricted are usually completely hidden from view. That
means you’re not wandering around the menu tree looking for the areas you
need to work with.
If a password is forgotten,
you can easily reset it to the
default.
Also, begin by giving every user the same password, such as your company
initials. Then insist that each employee change the password to something
personal when they first login to the program. In this way, no one has access to
anyone else’s password.
Be sure to test security once in a while. For instance, after about a week,
attempt to log in with each user’s name and the default password. If you
get in, you’ll know they didn’t change the password as required. If you then
change their password to something else, they’ll have to talk to you before
being allowed to log in again. You’ll have an opportunity to remind them of
your security policy.
GENERAL LEDGER
Your General Ledger setup affects many other areas of the system, so it really
needs to be completed before you move on to entering other types of data.
The place to begin is by establishing your profit centers, or General Ledger
Departments.
General Ledger Departments
For the moment, you need only Insert a record for each department you need at
Accounting> General Ledger> Update Ledger Structure> GL/Sales Departments.
Typical departments include Shop, Flight School, Charter, Line, Marketing,
Administration, Avionics, etc.
SETUP PROCEDURES
TotalFBO® User Guide | 71
SETUP GENERAL LEDGER
(Controller)
Create General
Ledger Depts.
Create a General Ledger Department for
each profit center.
Setup Chart of
Accounts
Change default numbers to match former chart of accounts,
if desired. Then add any special accounts needed.
Delay deleting default accounts until very familiar.
Setup Automatic
Ledger List
Review list of accounts to be used for automatic journal
entries. Add or change account numbers until all categories
are complete and correct.
Add Overrides to
General Ledger
Departments
Add account numbers to customize default journal entries
for sales and payroll in specific profit centers.
Setup General
Ledger Options
Review Fiscal Year dates.
Set Fence Dates and other options.
DECIDE TIME
ZERO DATE
Select a beginning "as of" date for all accounting information.
Little else can be accomplished before the Chart of Accounts and
general accounting defaults are established.
Let all staff members who will assist with Setup know the TIME ZERO
DATE so that all balances and supporting details will be coordinated.
72 | TotalFBO® User Guide
SETUP PROCEDURES
You’ll come back to customize overrides a bit later. But with your list of
departments established, you’ll be able to select them on income, cost and
expense accounts as you work with the next task.
Chart of Accounts
If you have been working with a chart of accounts which you are comfortable
with, it’s usually a good idea to retain the same numbering when you move to
TotalFBO®.
See Helpscreen topic:
Chart of Accounts
The easiest way to approach this task is to simply CHANGE the existing
numbers on the default chart of accounts to match numbers for similar
accounts in your previous system. For instance, if your previous number for
Accounts Receivable was 1030, locate number 1210 in the default chart of
accounts and just change the number to 1030.
When that’s done, ADD any accounts from the previous system that are
necessary.
Be careful about deleting accounts from the Default Chart of Accounts. Some
items you may not be familiar with, such as Undeposited Receipts or the COD
holding account, but they are required. At this stage, when in doubt, leave it
alone.
Note that you do not need to set up accounts for income and expenses for
each aircraft tail number. Every transaction in TotalFBO® is stored with
a tail number, and you can create a profit and loss report for each aircraft
automatically. So you only need a single account for each kind of expense or
income, such as maintenance, fuel & oil, charter sales, etc. This will greatly
simplify your chart of accounts.
Be sure to select the correct department for each Income, Cost, or Expense
account. In addition, Income accounts have a number of other fields and
options you’ll want to set.
•
Those accounts which capture income from services sold to customers will
appear as options on invoice “Service Lines” only if you check the boxes
to “allow Sales” on Normal, Mobile and/or Touchscreen invoices.
•
Those accounts which represent income from rental, flight instruction,
ground instruction, or charter sales should be assigned to their proper
categories so that they will be available on these invoice lines.
•
Establish up to 20 different prices for each service sold. For instance,
ramp fees which are charged by weight or aircraft size can be setup for
fast selection on an invoice. This provides much more accurate as well
SETUP PROCEDURES
TotalFBO® User Guide | 73
as faster invoicing when compared to asking your CSR to look up prices
from a paper list.
•
If you will be processing credit card online through a Multi Service
gateway, also select the Multi Service Product Code for each service sold.
(Program defaults are already set correctly for inventory items such as
fuel and oil.)
When you’re done, check your work by printing the Chart of Accounts in both
numeric and department order.
See Helpscreen topic:
Automatic Ledger List
Most accounting systems ask you to define at least a few default accounts;
usually for such items as Current Earnings, Retained Earnings, or Accounts
Receivable.
Automatic Ledger List
TotalFBO® needs these default accounts, too, but the list is longer because so
many more journal entries will be made automatically for you.
Since you simply changed the default chart of account numbers to match your
previous numbering scheme, you should find that most of the categories in the
Automatic Ledger list are already completed correctly.
Your task now is to review the list at Accounting> General Ledger> Update
Ledger Structure> Automatic Ledger List and verify that there are no empty
categories and that the numbers displayed are correct for the category.
The appendix at the back of this Guide includes a graphic display of the
journal entries which are made automatically by TotalFBO®. If you pencil
your account numbers from the matching Automatic Ledger List categories
into the diagrams, you’ll have a customized reference to all standard entries,
and an excellent verification of your work.
Overrides
As you were reviewing the list of accounts in the Automatic Ledger List, it
probably became apparent that there were some categories where you would
like to have multiple options.
For instance, wouldn’t it be nice to split employee wages into several
accounts, depending on what department they work in? Or perhaps you have a
Maintenance Shop and an Avionics Shop, and so labor on work orders needs to
be posted to two different income accounts depending on what kind of job it is.
You can do just that by entering the accounts you want to use on each General
Ledger Department. You need only fill in those lines which are necessary
to produce the journal entry desired. However, you may find it helpful to
74 | TotalFBO® User Guide
SETUP PROCEDURES
enter account numbers in all the fields shown (on the tabs appropriate to the
department’s purpose) just to make it easier for you to remember how the
complete entry will be made. We recommend that you also add a few notes
to yourself on each department to document your plans and purposes for each
one.
The menu location for these departments is Accounting> General Ledger>
Update Ledger Structure> GL/Sales Departments.
General Ledger departments are specified in some way on a SALE – and they
affect the posting of income, related costs, and some taxes. You can select a
General Ledger Department on Shop Orders and Invoices, and even select one
as a default for a Customer’s Account.
(Payroll costs and taxes can also be affected with a General Ledger department,
and are specified on an Employee’s record.)
See Helpscreen topic:
Overriding Automatic
Accounts
Another group of defaults which is commonly overridden relates to Inventory,
and so TotalFBO® also includes the capability of establishing Inventory
Departments at Inventory> Update Inventory Departments. This enables you
to break inventory into categories such as Aircraft Parts, Pilot Supplies, Shop
Supplies, etc., and control the journal entries which are made as items are
purchased, sold, or disposed of.
You may establish Inventory Departments now or wait until a later step, as is
most comfortable for you. What’s important is to know that General Ledger
Departments can take precedence over Inventory Departments.
For instance, suppose you purchase a part and place it into inventory
with the expectation that it will be sold through the Shop Department
by installing it on an aircraft. Therefore, it is added to an Inventory
Department for the Shop and the expected journal entry at the time
of the sale would be to reduce inventory and post to Shop Parts Sales
and Shop Parts Costs, as specified in the Shop Inventory Department.
However, the part is actually sold across the counter. You’d like to
have an idea of how much business you do in this way, so you’ve
established a General Ledger Department to track this profit center,
and would like the income and cost to be posted to those accounts.
By specifying the Counter Sales department on the invoice, the
correct inventory account will be reduced (from the Shop Inventory
Department record) and the correct Income and Cost accounts will be
posted (from the Counter Sales General Ledger Department).
TotalFBO® User Guide | 75
SETUP PROCEDURES
GENERAL LEDGER OVERRIDES
Basic Defaults
Sales Overrides for
Income and Costs
Automatic Ledger List
ID
Category
Acct. Number
Flat Fee
4190
Hourly Labor
4180
Outside Labor
4170
Outside Parts
4175
Outside Repair
4185
Freight
4950
Miscellaneous
4960
Consumables
4050
General Ledger Dept.
Flat Fee
4190.60
Hourly Labor
4180.60
Outside Labor 4170.60
Outside Parts
4175.60
Outside Repair 4185.60
Freight
4950.60
Miscellaneous 4960.60
Consumables
Warranty Labor 4210
4050.60
Warranty Labor 4210.60
Warranty Parts 4215
Warranty Parts 4215.60
Inventory Dept.
Inventory
1300
Inventory
1300.10
Part Cost
5000
Cost
5000.10
Part Cost
5000.60
Part Sales
4000
Sales
4000.10
Part Sales
4000.60
Lost Items
7000
Lost Items
7000.10
Core Charges
4005
Core Charges
4005.10
Core Costs
5005
Core Costs
5005.10
Freight Charges 4950
Freight Costs
6170
Freight Charges 4950.10
Freight Costs
6170.10
Inventory Management Overrides
When journal entries are made, the basic defaults may be overridden by:
•Inventory Department settings (applied to Inventory items themselves)
• General Ledger Department settings (applied to Shop Orders, Invoices & Customers)
76 | TotalFBO® User Guide
SETUP PROCEDURES
The Appendix at the back of this Guide contains charts with both Inventory
and General Ledger departments typical to FBO operations, and the
discussions of departments in both the Shop and Front Counter Operations
sections will be helpful, as well.
Options
Several option settings are important to the functioning of your General
Ledger, and you’ll find them at Accounting> Options and Settings> General
Options.
The most critical is the selection of Fence Dates. These dates define a
“window” of time during which journal entries can be posted. Attempting
to post a transaction with a date outside this window will produce a warning,
giving the user an opportunity to correct what is assumed to be an error in
entering the date.
See Helpscreen topic:
General Ledger Setup
Checklist
Be sure to change this
date on the existing year
before adding any additional
fiscal years or entering any
transactions or balances.
Each month as you complete your reconciliation process, you’ll roll these dates
forward, leaving only a 60 to 90 day period open for posting. In the event that
you wish to post outside this period (such as when making an adjusting entry
to a prior period or posting depreciation for all months of the year) you need
only move the Fence date temporarily, make your entry, and re-set the Fence
Dates.
As you begin your entry of data in the following steps, you’ll want to insure
that information is limited to a very narrow date range.
Another important option involves the Fiscal Year selection. As your new
database was created, it was possible to select the beginning of your Fiscal
Year. If no alternate choice was entered, the default was established as January
1 of the current calendar year.
If that is correct, then you only need to decide if it will be necessary to enter
data from the previous fiscal year (such as outstanding invoices for customers
or vendors). If so, you’ll need to open this earlier fiscal year at Accounting>
General Ledger> Update Ledger Structure> Fiscal Years.
If it is not correct, then the same location can be used to change the beginning
date of your fiscal year.
Finally, you should be aware that some accounts are designated as Control
Accounts. These accounts should not normally be updated by direct journal
entries, but should be updated automatically by posting to the associated Detail
Ledger or secure function within TotalFBO®.
SETUP PROCEDURES
TotalFBO® User Guide | 77
Control Accounts include the following:
Accounts Receivable
Accounts Payable
Cash in Bank
Inventory Owned
A/R – Credit Cards
Deposit Liability
Current Earnings
Notes Liability
Accrued Net Payroll
Customer Transactions
Vendor Transactions
Check Register Transactions
Purchases, Sales, and Physical Inventory Items
Credit Card Batches & Payment Transactions
Customer Transactions
Program nets P&L accounts
Notes adjustments & payments
Payroll calculation prior to check creation
Control accounts will not appear when you are offered the opportunity to
select an account for posting. On those rare occasions when it is necessary to
adjust a Control Account manually, you can override this lockdown for a 3-day
period with a Utility function.
See Appendix A for a
complete listing of Control
Accounts.
Tech Support staff will NOT
Although you can Bypass the lockdown permanently, this setting is NOT
assist with reconciliations of
recommended because of the very strong likelihood that you will not be able to subsidiary ledgers when the
balance the detail ledgers to the Control Account.
lockout function has been
Bypassed.
Time Zero Date
That’s it – you’re now done with the basic General Ledger setup. You’ll be
able to enter budgets and continue fine-tuning your overrides, but the basics
are done. The next steps will begin to enter data that in some cases will make
actual journal entries.
These entries will be the result of setting up outstanding invoices or balances
on customer accounts, current balances and outstanding items on bank
accounts, outstanding payables, and current inventories.
And in a later step, you’ll be creating beginning balances for your General
Ledger accounts.
There is no specific requirement for when these beginning balances must be
created. In fact, it’s quite common for there to be a delay of several weeks or
even months before closing numbers are available from the old system. By
then, you’ll already be entering current transactions.
Because the beginning balances will all be entered with proper dates, just as
with your current transactions, TotalFBO® will have no problem in adjusting
your balances correctly.
78 | TotalFBO® User Guide
SETUP PROCEDURES
But you’ll need to be sure that the details which were entered for those open
amounts on customers, vendors, checking, and inventory will match the
beginning balances on the Control Accounts you’ll enter.
Guarantee this match with three steps:
1.
Set a Time Zero Date – and stick to it! Let everyone know that all
transactions and balances must be “as of” this date.
2.
Use Contra Accounts – the default chart of accounts includes Contra
Accounts for each of the Control Accounts. As you enter details, post
them to the Contra Accounts so that you’ll have a clear listing of what was
beginning data as opposed to transactions that came later.
3.
Refuse to Correct the Previous System – by resisting the temptation to
correct errors you find as you work through details on customer accounts,
etc. If you “fix” the error by entering it differently in TotalFBO® than
it was on the old system, you’ll never be able to reconcile. Always enter
the data exactly as it was on the old system. Then post the adjustment as
a “current” transaction. Be careful of this as you close out the old system
as well. You can always make adjustments in TotalFBO® using the
correct date.
Before your staff begins entering data, now is the time to finalize your
transition plan. If you cannot get closing balances from your old system,
maybe it would be better to enter details into TotalFBO® and develop balances
from there. It may not be worthwhile to burden yourself with the effort of
fixing an old system and learning a new one.
Since all information in TotalFBO® is date sensitive, you can enter current
information and ALSO “work backwards” if necessary. Entering old
transactions can have the added benefits of giving staff familiar material to
enter while they learn the new system, and of allowing you to fine-tune your
setup options early. If you have good balances from the previous system that
are a month or two back, perhaps that would make a good Time Zero Date.
It may be helpful to discuss your plans with a Tech Support Specialist before
continuing with the next steps.
CHECKING
Completing this step early can make Payroll and Payables setups easier, and it
allows you to be ready to issue checks immediately, if need be.
SETUP PROCEDURES
TotalFBO® User Guide | 79
SETUP BANK ACCOUNTS
(Controller)
Setup Check
Registers
Create a register for each account with
checking activity.
Set Checking
Options
Choose options such as the default checking account.
Setup Check
Printer
If you use a separate printer for checks, select it on
the Station Specific Settings record for users who
will be printing checks.
Define Check
Printing Formats
Create or customize one or more check printing formats
for each bank account.
Enter Beginning
Balances
Enter a check or deposit coded to the Checking Contra
Account, which represents the balance as of the
TIME ZERO DATE.
Enter Outstanding
Checks & Deposits
If you elect to enter outstanding items, be sure to code
them to the Checking Contra Account and adjust the
Beginning Balance Entry (above) so that the total of
items entered and the Beginning Balance nets to the balance
as of the TIME ZERO DATE.
Registers
Create a record for each bank account you want to track detail ledgers for at
Accounting> Checking> Update Basic Register Basic Info. That means you’ll
certainly setup a record for each checking account. It may not be necessary to
set up records for investment accounts, savings, accounts, or money-market
accounts. Most FBOs do not attempt to track Petty Cash through a bank
register, though any cash account could be tracked in this way.
There are ten account records already created for you, and each is linked to
one of the ten account numbers specified in the Automatic Ledger List. Just
change the Bank Account Name for each register you want to use. If this
will be the account you use for payroll checks, be sure to check the Allow In
Payroll? box, as well.
80 | TotalFBO® User Guide
SETUP PROCEDURES
If this account is kept in an alternate currency, create the currency type at
Accounting> Invoicing> Options and Settings> Update Currency. When you
return to the Check Register record, you’ll be able to select the currency type.
Although it is possible to enter the Current Balance on this screen, the
preferred method (described below) leaves a better audit trail.
You can enter the last check number issued on this account now, or else be sure
to enter the proper number when you create your first transaction.
Options
There are only a few options to consider at Accounting> Checking> Options and
Settings> General Options.
See Helpscreen topic:
If there might be two users creating checks at the same time, such as a payroll
being created when vendor checks are also being cut, be sure to set New
Manual Checking Entries to “Drafts” to avoid skipping check numbers.
Also select the check register you use most often as your Default register.
Checking: Initial Setup &
Options
Printer
If you keep a separate printer loaded with checks, you tell TotalFBO® to use it
automatically whenever you print a check. All other reports will be directed to
your usual printer.
To do this, go to File> Preferences> Station-Specific Settings.
• Create a new record and select the printer you want to use in the Check
Printer field.
• If you want to automatically print a duplicate check to another printer,
select it in the Check Printer (Dups) field.
• If you use multi-part checks and a Dot-Matrix printer, select it in the DM
Check Printer field.
Those users who are allowed to print checks should highlight the record
you’ve created while sitting at their workstation computer, then click the Select
As My Station Record button.
Formats
Unless your existing check stock has a stub which is pre-printed with columns
for a previous system, or is designed for hand-writing only, it’s highly likely
that TotalFBO® will be able to work with it nicely. This is because you can
customize the layout of the check – even create multiple formats – according to
your needs and preferences.
If you do feel that you want to order new checks, you’ll want to get that under
SETUP PROCEDURES
TotalFBO® User Guide | 81
way now. Take a look at the default print formats for an idea of what your
options are. Most checks with a plain stub, either above or below the check
itself, will work fine.
There are 5 default formats already created for you at Accounting> Checking>
Options and Settings> Set Check Formats.
The Blank Paper format is used to create a “report” of the check information.
This is useful when a check stub doesn’t have room for a long list of vendor
invoices, and also when you want to reprint a check for internal purposes.
There are two Laser and two Dot-Matrix formats, each providing a format
which accommodates the check or the stub on the top of the page.
The easiest way to go about this process is to Copy the default format which is
closest to the checks you have, and give it a personalized name.
Then click the Print Test Check button to create a sample printout on blank
paper. By holding the paper over your actual check stock, you should be able
to see what adjustments are needed, if any.
Then you can make changes to the check layout and choose what information
you would like included. Continue to print test checks on blank paper until
you are satisfied with the results.
Beginning Balances
If you enter a beginning balance amount when you establish the check register,
a journal entry is made which affects the general ledger account for the bank
register, but also affects the Suspense account. It is expected that this entry
will be reversed.
But a better audit trail results from entering a Deposit or Withdrawal
transaction for the beginning balance amount. This is done at Accounting>
Checking> Update Checking Entries.
Select the Bank Account you wish to use and Insert a record, being sure to
use the correct Time Zero date. Select the Checking Contra account for the
disbursement.
After all your setup is complete and verified and beginning General Ledger
Account Entries have been entered, you’ll be able to merge the Contra
Account into the Bank Account GL. Until then, the Contra account provides a
good record of beginning activities.
See Helpscreen topic:
Entering Initial Setup
Data
82 | TotalFBO® User Guide
SETUP PROCEDURES
Outstanding Items
This step is optional, but can be helpful if you intend to use the Check
Reconciliation function in TotalFBO®.
If you enter the beginning balance as of the Time Zero date, you’ll only enter
new transactions to TotalFBO®. But then you’ll have to wait a couple of
months to begin reconciling because the outstanding items won’t be available
to “check off.”
See Helpscreen topic:
If you would like to enter outstanding items, set your beginning balance as of
the previous bank statement date. Then enter outstanding register transactions
using their correct original dates. But be sure to code the disbursements for
them to the Checking Contra account.
RECEIVABLES CLERK
Accounts Receivable:
Initial Setup & Options
This section deals with establishing all the data and options that relate to
billing customers. Because this is the largest section to your setup, it may be
helpful to enlist the aid of a trusted CSR to help with data entry.
Sales Taxes
Establishing sales taxes must be done before customers can be added so that
their tax status can be created properly. These records should include not only
true sales taxes, but any fee which is based on a percentage of sales, such as an
Airport Commission. It is possible to make one tax calculate on top of another
and for taxes to stop when the sale value reaches a certain limit.
Sales taxes are created at Accounting> Invoicing> Options and Settings> Sales
Tax Setup. A single default record is already waiting for you to customize the
name and enter the Tax Rate percentage. Do this by typing it just as you say it
– don’t worry about the decimal point. So if it’s “eight and a half percent” then
type “8.5” and let the computer worry about that decimal point!
What if you have a split rate, like 8.5% up to $1,000 and then 6% after that?”
This gets set up as TWO taxes. The first is 6%. Then create a second record at
2.5% with a cap amount of $1,000.
Be sure so select the proper liability account in your GL for collecting these
amounts from sales.
SETUP PROCEDURES
TotalFBO® User Guide | 83
SETUP RECEIVABLES
(Receivables Clerk)
Setup Sales Taxes &
Fees
Create Sales Tax records for sales taxes
and any fees or commissions which are
based on a percentage of sales amount.
Setup Price Classes
Establish formulas used to
automatically calculate prices
for each class of customer.
Setup Receivables
Options
Select default price classes for new customer, default
credit terms, and other options.
Setup Credit Cards
Establish Customer Holding accounts for credit card
payments. Establish list of accepted cards. (OFFLINE)
Setup Invoice
Options
Select options for invoicing, establish invoice number format,
select line types available on invoices.
Setup Invoice Style
Sheets
Define one or more printout formats for invoices.
Setup Statement
Style Sheets
Define one or more printout formats for Customer
Statements, Airline Fuel Statements, and
Compound Statements.
Setup Shop Order
Style Sheets
Define one or more printout formats for Shop Orders.
Setup Internal
Customers
Create accounts for Internal and Non-Billing customers
for transactions between departments and inventory use.
Add Customers
Enter or import customer accounts.
Add Outstanding
Invoices or Balances
Enter or import outstanding invoices or customer balances
as of the TIME ZERO DATE.
Enter Open Shop Orders correctly.
Setup Recurring
Charges
Set up rental spaces and turn them into recurring charges,
then add other items such as club dues.
84 | TotalFBO® User Guide
SETUP PROCEDURES
Price Classes
After that, it’s a good idea to make sure Price Classes are established. You’ll
be assigning customers to Classes which determine how the final price is
calculated. For instance, you may just set a flat price when you sell fuel to
Retail customers, but give a Based customer 5% off of the Retail price. Once
your Price Classes are established, you can designate which ones will be used
as the default for new customers.
Before creating Price Class records at Accounting> Receivables> Options and
Settings> Update Price Classes, gather some information on your existing price
structure. This may not be well-documented, and may require some research
with other department managers.
A detailed discussion of the considerations involved in creating price classes is
included in this Guide
• in the Shop Operations Section, Pricing Inventory,
• in the Flight School Operations Section, Pricing Rental Flights, and
• in the Charter Operations Section, Pricing Charter Flights.
Options
Now that your Price Classes are defined for each type of sale, you’ll want
to select those that should be used as defaults when new customers are
added to your database. These will typically be those Price Classes that will
produce your highest or “Retail” price. These defaults are set at Accounting>
Receivables> Options and Settings> General Options > Tab 2.
Also consider if all new accounts should be set up as “cash only.” If so, be
sure to check the box for Payments=Charges. If you do a lot of transient
fueling, then you’ll also probably want to default new accounts to Transient
status. Transients are automatically forced to a Cash status and you can
quickly hide them when you want to concentrate on your regular customers.
Credit Cards
Setting up your accepted means of payment comes next, including the list
of credit cards that you will accept, and whether or not you will use Gift
Certificates.
Even if you intend to use Online Credit Card Processing through TotalFBO®,
you’ll begin by creating a setup for Offline processing. It may take a while
for you to get an agreement in place with an Online Processor, and so that
setup will be done when all the access information is available to you. In the
meantime, you can begin work in the Offline mode. You’ll also use Offline in
the event that your Internet connection fails for a significant period of time.
Your payment means are setup at Accounting> Receivables> Update Credit Card
Files> Update Cards Accepted List. The default list includes Cash, Check and
SETUP PROCEDURES
TotalFBO® User Guide | 85
HOW PRICE CLASSES WORK
(Get the Right Price, Every Time, Automatically)
What is the
Customer's
Price Class?
Locate Price
Class Formula
Customer Record
Tab 2
Price Classes:
Fuel - Oil - Parts - Labor
Rental - Instruction
Charter
Select correct
Reference
record
Using Price Classes
Maintains management control
over the pricing structure,
Guarantees consistent pricing to
customers,
Makes creating transactions fast.
Use Formula and
price to calculate
customer's price
Inventory Record:
Fixed, List, Cost
Employee Record:
Mechanics/Instructors
Billing Rate
Aircraft Record:
Rental/Charter
Fixed, List
Invoice
Shop Order
Quote
86 | TotalFBO® User Guide
See Helpscreen topic:
Accounts Receivable:
Initial Setup & Options
SETUP PROCEDURES
Gift Certificate. Before adding credit cards you’ll want to set up a customer as
a Holding Company at Accounting> Receivables> Update Customer List.
Review the Helpscreen topic for details on setting up this customer account
properly. Then you can enter your accepted cards and select the customer
account easily.
As customers pay invoices and shop orders using credit cards, their individual
accounts will be marked paid, and the receivable transferred to the Holding
Company account automatically.
If you only accept Bank cards (not fuel cards) AND receive the money
automatically in your bank account within 48 hours AND these deposits are for
the full amount of the charge (fees are deducted at the end of the month instead
of per-transaction) then you may skip setting up a Holding Company and
handle credit card items as cash.
Style Sheets and More Options
There are a number of options which need to be reviewed and customized for
your company in the Invoicing, Shop Orders, and Receivables modules. In
addition, you’ll be customizing the Style Sheets which control printing for
Invoices, Shop Orders, and Customer Statements. You’ll want to get your logo
on each one and set the address blocks so they’ll fit your window envelopes.
See the Options and Settings menus in each of the Invoicing, Shop Orders, and
Receivables modules.
You should also consider using a 40-column printer at your Front Counter to
produce receipts for sales to customers who prefer a smaller-format printout.
You’ll want to setup a style sheet for this format and also select the printer in
your Station-Specific Settings record for the Front Counter workstations.
See Helpscreen topic:
Internal Billing
Internal Transactions
Finally, you’ll want to setup certain Internal and Non-Billing customers to
facilitate transactions within your own organization. These special customers
can save you and your entire staff a lot of work. Once they’re in place,
work that occurs on company-owned equipment and inventory that’s used
for company purposed are handled by creating Shop Orders and Invoices
just as for any other customer. No special procedures are necessary, and the
accounting is done right every time.
See the Appendix to this Guide for a list of typical Internal and Non-Billing
customers, followed by a list of General Ledger Departments that are related.
Also see the Shop Operations Section, Other Internal Shop Orders topic for a
discussion of how these customers can be used in your company.
SETUP PROCEDURES
TotalFBO® User Guide | 87
MAGICAL ACCOUNTING!
JOURNAL ENTRIES FOR SALES TO:
NORMAL CHARGE
CUSTOMER
INTERNAL BILLING
CUSTOMER
NON-BILLING
CUSTOMER
DR Accounts Receivable
(Asset)
DR "Buying" Department's
Expense
**GL A/R OVERRIDE**
N/A
CR Income for Sales
(Income)
CR "Selling" Department's
Income for Sales
(Income)
N/A
DR Cost of Goods Sold
(Cost)
DR "Selling" Department's DR "User" Department
Cost of Goods Sold
Expense
(Cost)
**SALES DEPT. NAME**
CR Inventory Owned
(Asset)
CR Inventory Owned
(Asset)
CR Inventory Owned
(Asset)
CR Sales/Use Tax Liability
(Liability)
CR Sales/Use Tax Liability
(Liability)
CR Sales/Use Tax Liability
(Liability)
Used for:
Normal Sales to
Outside Customers
Used for:
Internal sales between
Departments
Used for:
Company use of
inventoried items
INTERNAL and NON-BILLING CUSTOMERS carry no balance and do not appear on the Accounts
Receivable Aging report, although statements and other reports can be run to detail activity on
these accounts.
INTERNAL AND NON-BILLING CUSTOMERS may be made Sales Tax Exempt if the laws of your
state permit. Otherwise an expense for Use Tax is posted.
88 | TotalFBO® User Guide
SETUP PROCEDURES
Customer Accounts
At this point it would actually be possible to start inputting live transactions
if necessary (assuming the Security and General Ledger setup steps were
also complete). This is because customers could be added as needed by
Sidestepping from a transaction entry screen.
However, if you have your customer list already in a computer in some form,
it’s likely that you can simply import all that data very quickly. If you need
guidance in determining how and what you can import, contact Tech Support.
See Helpscreen topics:
Import ASCII Data
Customer Accounts
After importing, you’ll want to review each account to customize options
which are only available in TotalFBO®. Review (or add) customer accounts
at Accounting> Receivables> Update Customer List. You may want to assign
Selection Codes, Price Classes and Taxation settings, as well as Customer
Terms, Overrides, Standing Credit Cards, Tail Numbers, and Flight School
information.
This is also an excellent opportunity to Merge duplicate customers or Purge
inactive accounts.
Because the Customer Account Record is the control point of your sales
function, the time you spend here will pay big dividends throughout the
program. Neglecting these options severely limits the functionality of the
program and slows data entry of invoices, shop orders, and other transactions.
Outstanding Invoices and/or Balances
If customers are imported you can bring their balance in along with the rest
of their information. (It’s even possible to import outstanding invoices!)
However, if you are unable to import, you’ll want to create special invoices to
set each customer’s beginning balance correctly.
These invoices are created using a Service line coded to a special account
called Contra Accounts Receivable. (Be sure this account is checked to Allow
Sales in your Chart of Accounts setup.) In this way we’ll be able to handle
the journal entries that are made without interrupting the setup of beginning
balances in the General Ledger as a whole (which is often delayed several
weeks or months after you begin working with TotalFBO®.
See Helpscreen topic:
Entering Initial Setup
Data
If the balance on an account is older than 30 days, you can split it into multiple
transactions with appropriate dates for balances aged 30, 60, or 90+ days.
If you choose, you can also enter outstanding invoices as individual items,
using their original transaction dates.
Review invoice creation in this Guide in the Front Counter & Ramp Operations
Section.
SETUP PROCEDURES
TotalFBO® User Guide | 89
If you have open jobs in the shop, you’ll need to create shop orders for them
in TotalFBO®. However, instead of selecting parts from inventory (which
would remove them from your inventory quantity totals twice) enter each part
as a Miscellaneous Part so that you can sell it without affecting inventory.
This method presumes that the cost of the parts has already been posted to
your previous accounting system.
You can also receive these items into inventory using a date prior to the Time
Zero Date, at their original cost, specifying the shop order and discrepancy
number on the Shipment Received screen. This method adds the parts to
the job and makes a complete journal entry at the time the shop order closes.
However, you’ll need to take this value into consideration when reconciling
beginning inventory balances to your prior system.
Recurring Charges
Most FBOs have some invoices which are produced repeatedly. This billing
may be hangar or tie-down rentals, office space rental, flight club dues,
package sale installment payments, or any other kind of charge to customers.
These items can be setup at Accounting> Receivables> Recurring Charges>
Update Recurring Charge Reminders.
See Helpscreen topic:
Recurring Charges
If the charge is for space rental, you can take advantage of the Update Rental
Space List function at the same location. By building your list of available
rental spaces and assigning customers to them, you’ll automatically create the
Recurring Charge Reminder you need. But in addition, you’ll be able to print
reports to help you manage the available spaces.
As you establish Recurring Charge Reminders, be sure to enter the date that
the next billing is DUE, not the date you intend to print the invoices. You’ll be
able to generate your billing at any time that’s convenient while the invoices
are dated and posted as of the due date you choose. You can change the due
Where appropriate, be sure
date, by the way, at the time billing is generated, if necessary.
to select the aircraft tail
number to help identify
multiple charges for your
customer.
90 | TotalFBO® User Guide
SETUP PROCEDURES
PAYABLES CLERK
Vendors
You may use one or a combination of three methods of getting your vendor
records setup in TotalFBO®.
1.
Import Vendors
If you have vendor information in another piece of software, even if
it’s an Excel spreadsheet, chances are you can import it easily. It’s only
necessary that the data be in a TXT or CSV file with standard formatting.
You can import basic vendor records and also outstanding payable items.
If you need guidance in determining how and what you can import,
contact Tech Support.
2.
Insert Vendors manually from a list
If you’d rather insert vendor records manually, go to Accounting>
Payables> Update Vendors. As you add each vendor’s basic contact
information, take a moment to also enter payment terms, 1099
information, and discount terms on Tab 2 of the record.
You can also enter a default Expense account for each vendor. If an
expense will be split between departments, enter the master account here
and enter the other accounts on the Auto-Distribute tabs in the GL record
for that master account. Vendors who provide inventory items need no
defaults, as the account used is tied to the item itself.
See Helpscreen topics:
Import ASCII Data
Vendor Account Records
Payable Invoices
3.
Insert Vendors manually by sidestepping as you enter invoices
If you do not import outstanding payables, you’ll be entering them as
individual transactions in a later step.
As you begin each invoice, you can insert a new vendor record as you
go. When you save the vendor, you’ll be returned to the invoice screen
to complete your entry. Many users find this to be an easy method to use,
since all of the information you need for the vendor record is usually on an
invoice, sparing you from researching your files separately.
If new vendors are added in this way, it may take some time until you have
a complete list of vendors entered. Be sure to plan to review new vendors
added through sidestepping on invoices and also purchase orders to see
that all relevant information is completed. It can be tempting to skip many
of the fields when you’re in a hurry to complete another transaction.
You’ll want to be sure to enter as many payees as you can in your Vendor
records, to save time when preparing checks and make more reporting options
available. Be sure to enter payees such as the bank you make 941 deposits
with, the airport you pay commissions or flowage fees to, state and federal
taxing authorities, and employees you regularly reimburse for expenses.
SETUP PROCEDURES
TotalFBO® User Guide | 91
SETUP PAYABLES
(Payables Clerk)
Add or Import
Vendors
Setup vendor accounts for those organizations
you will be sending payments to. Include tax
payees, airports, and employees with regular
expense accounts.
Setup Leases
Create records for recurring payables items such as
rents and leases.
Setup Loans or
Notes
Create records for recurring payables on which interest
is paid, such as mortgages, loans, and lines of credit.
Setup Payables
Options
Select options for payables, including the GL account range
for tax liabilities to be included on the Payments Due Report.
Add or Import
Outstanding
Payables
Enter outstanding items payable as of the TIME ZERO
DATE, coded back to the Payables Contra Account.
92 | TotalFBO® User Guide
See Helpscreen topic:
Leases (Recurring
Expenses)
SETUP PROCEDURES
Leases
A lease record is simply a recurring payable item. Throughout TotalFBO®
you’ll find functions such as this one, which are designed to save you from
keystrokes and repetitive effort. Set up leases at Accounting> Payables>
Update Leases.
Once a record is established, you’ll be provided with a reminder of this payable
on each Payments Due report until the expiration date you’ve set. Then you
can make the payment by simply selecting the lease and authorizing the check
or withdrawal.
Notes
Notes are another kind of recurring payable item, but they differ from leases in
that interest is involved.
See Helpscreen topic:
Notes (Loans)
As you setup the record at Accounting> Payables> Update Notes, be sure to
select the correct Note Type, which is actually the method of calculating
interest. The two most commonly used for long-term commitments are Long
Term Fixed Payment Amortized (used when the payment is exactly the same
every month) and Long Term Fixed Amount + Interest (used for variable rate
notes). Aircraft financing and Line of Credit arrangements usually fall into one
of the Balloon types.
Most accountants will also be sure that there is a separate liability account for
each note. If you do not select a specific account, the default for Long or Short
term notes will be used from your Automatic Ledger List.
Be sure the Disbursements account you select (for the debit side of the entry)
indicates “where the money went.” If you got cash, select Undeposited
Receipts. If you got an airplane title, select a fixed asset account representing
the value of the aircraft.
Since you’re setting up existing obligations, the journal entry which is created
as you save the record is unnecessary. Be sure to reverse it immediately so that
it will not duplicate the amounts you’ll enter later as you set up your beginning
balances for the entire General Ledger. Do this easily at Accounting> General
Ledger> Other Posting Operations> Reverse an Existing Entry. Using this
function reverses the entry you select and also marks it so it cannot be reversed
again accidentally.
As you make payments on Notes the proper journal entry is made which
reduces the principal and expenses the interest portion of the payment. If the
payment amount varies, you can correct it at the time of the payment.
If you increase or refinance a note, simply update the record to show the new
amount. The correct adjusting entry will automatically be made.
SETUP PROCEDURES
Options
There are very few options to set at Accounting> Payables> Options and
Settings> General Options. Be sure to enter the beginning and ending numbers
of the range of General Ledger accounts which includes your tax liabilities. In
this way, the Payments Due Report can include your entire cash requirements
for a period, exclusive of payroll itself (vendor invoices, note payments due,
lease payments due, tax payments due).
You should also verify that the check format you’ll use for vendor invoices has
been set up properly and that you have access to the designated check printer,
if any, which were setup in the Checking section above.
Outstanding Items
If you do not import outstanding payables, you’ll be entering them as
individual transactions. Be sure to use the Payables Contra account as the GL
distribution entry, and to use the original transaction and due dates.
Enter new transactions at Accounting> Payables> Update Vendor Invoices.
TotalFBO® User Guide | 93
94 | TotalFBO® User Guide
SETUP PROCEDURES
PAYABLES & INVENTORY CLERKS
This step is often coordinated between two staffers, with the Payables Clerk
taking the lead on fuels and the Inventory Clerk handling parts and oils.
The Line Department Manager will also be helpful in getting the Fuel Farm
functions setup properly.
Fuel Taxes
The first decision is on how to set your pricing option for fuels. This option is
so important that it is located in the options menus of both the Invoicing and
Inventory modules.
The default is for this option to be checked: “Fuel Taxes are added after Fuel
Sale Price?” Most FBOs today will want to UNCHECK this option. (If you
uncheck it in either location, both are affected.)
This is because most FBOs advertise a fuel price which includes all taxes
except for local sales tax. So if you advertise a price of $2.00 per gallon, the
invoice is calculated at $2.00 times the number of gallons pumped. Then sales
tax (if any) is added to the bottom of the invoice as a percentage of the total
sale.
If you leave the box checked, then your invoice is calculated as $2.00 + .45
(total of fuel taxes per gallon) times the number of gallons pumped. Then sales
tax (if any) is added to the bottom.
While you’re at Inventory> Options and Settings> General Options> Tab 2, also
enter the names of the various fuel taxes you’ll be charging. This list will
include FET, State Fuel Tax, Airport Flowage Fee, Tank Maintenance Fee,
Prepaid Sales Tax, and any other item you pay based on these two factors:
•
•
Cents per gallon rate (not a percentage)
Gallons sold to customers (not gallons delivered)
Inventory Departments
Your Controller may already have established some or all of the Inventory
Departments in an earlier step. Now these need to be reviewed and finalized at
Inventory> Update Inventory Departments.
Inventory Departments are used to separate long lists of items into manageable
groups, as when we separate Pilot Supplies into their own group so they can be
managed at the Front Counter instead of by the Inventory Clerk.
The second purpose for Inventory Departments is to direct the accounting
entries that are made when items are bought and sold.
In this Guide, both the Front Counter and Ramp Operations Section and
SETUP PROCEDURES
TotalFBO® User Guide | 95
SETUP INVENTORY
(Payables Clerk & Inventory Clerk)
Setup Invoice Options
for Fuel Taxes
Setup Inventory
Departments
Setup Price Matrix
for Parts
Review/Adjust
Price Classes
Setup Inventory
Options
Set taxing behavior for fuel taxes.
Create Inventory Departments to
separate groups of items, add GL
accounts to insure automatic journal entries
use correct accounts.
Establish one or more sliding scales for
pricing parts in various departments
based on cost or List.
Review Price Classes and adjust if necessary to use
fields updated by Matrix.
Choose options such as Inventory Costing (LIFO/FIFO/
Average), pricing, and P.O. Number formatting. Delay setting
"Force Vendor Invoice" option until new items are entered.
Setup Purchase Order
Style sheet
Create one or more printout format for purchase orders.
Setup Meters & Tanks
Create meters and attach to records for tanks and trucks.
Add Oils
Add Fuels
Receive Fuel Loads
Add or Import Parts
and Pilot Supplies
Import or Receive oils with costs and quantities
as of TIME ZERO DATE. Verify selling prices.
Create records for each fuel type you'll sell, entering
current prices, taxes, volume discount structures, and
subtypes for contracts and buybacks.
Receive fuel loads to set quantity and cost of inventory as
of TIME ZERO DATE. Transfer between tank/trucks.
Import or Receive inventory items with costs and quantities
as of TIME ZERO DATE. Verify selling prices or use
Matrix to set through Mass Update.
96 | TotalFBO® User Guide
SETUP PROCEDURES
the Shop Operations Section contain discussions and examples of typical
Inventory Department setups.
See Helpscreen topic:
Inventory Departments
You’ll likely want to create these departments:
• Each type of fuel (Avgas, JetA, etc.)
• Non-Owned fuel (airlines and larger customers who store in your tank)
• Pilot Supplies
• Aircraft Parts
• Shop Consumable Supplies (these items are expensed immediately)
• Client-Owned Parts
• Avionics Parts
By creating your list of departments now, you can select the correct department
as you enter each inventory item in a later step.
If you intend to import parts from another file, be sure to name your new
departments exactly as they were before to avoid duplicating departments.
After the import you can change the department name if desired.
Price Matrix
A matrix can be created for each department or used for one or more
departments as needed. A matrix creates a sliding scale based on either cost or
list price, which is used to calculate prices for parts (not fuels or oils).
The Shop Operations section of this Guide includes a discussion of using a
matrix in the Pricing Inventory topic.
Set up each matrix at Inventory> Options and Settings> General Options> Tab
4. If you decide to use List Price as your basis, (either up or down) you should
also consider how you will keep List current in your database. If you’re a
dealer for a manufacturer such as Cessna, you can update List automatically
through the Manufacturer’s Parts Lists function. But at best that will be only a
portion of your total inventory. Other items must be updated as you purchase
them, and this will take effort. Using cost is a more reliable method, since the
cost will always be available and current in the system, and you have several
selections as to the specific cost calculation you want to use.
See Helpscreen topic:
Pricing Inventory
Price Classes
Your Price Classes should already be established by the Receivables Clerk in a
previous step. However, if you have just created a matrix, it may be necessary
to review or alter some of your formulas in the Parts section to use the proper
fields on the Part Record without adjusting the values there any further.
For instance, a price class might have been established which based the price
on Cost and added a 30% margin. Now that you have a matrix based on cost
inserting the properly marked up value into the Fixed Price #1 field, your Price
SETUP PROCEDURES
Class should just look for that field and use the value there.
You’ll also want to review what’s been established for selling Fuels and Oils.
Your Price Classes are located at Inventory> Options and Settings> Update Price
Classes.
Options & Style Sheet
There are a number of other options that need your consideration at Inventory>
Options and Settings> General Options.
A primary concern in your selection of the Costing Method for Fuels, Parts,
and Oils. The default selection is Average, though you may also choose LIFO
or FIFO, and you need not choose the same option for all types of inventory.
Note that this selection must match your letter of election to the IRS, and
cannot be changed except once each year, with the approval of the IRS. If
you’re not sure, be sure to check your election status with your tax accountant.
Another important recommendation is to check the options to Force Vendor
Invoice when Receiving and also to Set Invoice to Hold for Review. This
guarantees that your General Ledger will be posted automatically when items
are received into inventory AND that the accounts used will be the same as
those which will be used when the item is sold or disposed of. The vendor’s
invoice is automatically created for you as a payable item, but placed on Hold
status until the Payables Clerk can review the paperwork and verify totals.
You’ll also want to customize the numbering scheme and create style sheets
for your Purchase Orders. Some FBOs insert an Alpha identifier for each
Purchasing Agent, others will maintain a separate series of numbers for each
agent, and still others will make the numbering scheme match a set of preprinted forms.
Finally, the Maximum Allowed Per-Unit Fuel Price field allows you to set a
value to be used as a warning when receiving fuel loads. The most common
mistake is to switch the cost and the number of gallons when receiving fuel,
and the second common error is to enter a decimal point incorrectly. Either of
these data entry errors can result in a cost per gallon of millions of dollars. In
short order, your general ledger will be off by billions of dollars, causing some
concern and a lot of wasted effort.
You can prevent this by setting a reasonable maximum cost per gallon, such as
$5.00. If a shipment is received with a larger cost per gallon, the user will be
warned and given an opportunity to review what they’ve entered.
TotalFBO® User Guide | 97
98 | TotalFBO® User Guide
SETUP PROCEDURES
Meters & Tanks
One of the Invoicing options asks if you want to Enable Fuel-Meter Entry on
Invoices? If you’ve enabled meters, you’ll need to set them up now and attach
them to tanks at Inventory> Other Fuel Operations> Update Fuel Meters.
Using meters enables very precise inventory control, which is simply not
possible with a manual system. If you want to know that all the fuel which has
been pumped has also been billed or accounted for, you need to use meters.
See Helpscreen topics:
The only drawback to using meters is figuring out how to get the meter
readings to the CSR creating the invoice. How you accomplish this is going to
depend on your physical location. Many FBOs simply ask the lineman to radio
the readings to the Front Counter or else drop off the hand-written fuel ticket at
the Front Counter.
However, if this isn’t possible, you may need to use one of the wireless options
available to you to capture this information electronically. You’ll be able to
create the invoice automatically and have it ready when the pilot reaches the
Contrec Fuel Truck Interface Front Counter, or even handle the entire sale out on the ramp.
Mobile Agent Processing
You’ll need to create a meter record for each meter on each tank or truck.
Some tanks may not have a meter at all. Some trucks will have two meters.
It’s a good idea to use names for the meters that will be familiar to the CSR
creating the invoice, such as “Truck 53 Front.” Don’t forget to enter your selfservice island meter.
See Helpscreen topic:
Fuel Farm Operations
When the meter records are complete, move to the Update Fuel Tanks function
to create records for each tank and truck. Don’t forget to include that old
diesel truck you use as a container, your sump tank, and the truck you use for
defueling. If you have two tanks tied together in such a way that you can’t tell
the volume in each tank separately, just enter them as one tank unit. If you can
close a valve to determine what tank is being metered or filled, then enter each
tank separately.
Be sure to indicate whether fuel is actually dispensed from each tank or truck.
This makes the meter available on an invoice. Don’t forget that you’ll be
creating invoices or records for EVERY fuel movement, including the fuel
you use for yourself from that old Autogas tank! If fuel is dispensed from a
tank or truck into a vehicle or aircraft, then it qualifies for the Allow Sales?
checkmark.
SETUP PROCEDURES
TotalFBO® User Guide | 99
Oils
Now you’re finally ready to start entering actual inventory items. If you’ll be
importing parts from another file, find out whether oils are included. If so, it
would probably be easiest just to remove them from the file.
If they can’t be removed, enter new Oil records for each item and after they’re
imported, merge the imported records into your new ones. In that way, you’ll
have moved them from the status of “Regular Part” to the status of “Oils,”
which is important for both accounting and inventory reporting purposes.
See Helpscreen topic:
Oils
If you intend to merge parts into oils in this way, be sure the new records you
create have only a number and description. After the merge you’ll need to
return to each record to verify any department selection and other details.
If you will not be importing records for oils, set them up by receiving them
into inventory at Inventory> Receive Shipments.
It’s usually best to create a special vendor for use only in this setup process.
Add a vendor called “Initial Setup” and enter a GL Liability Override which is
your Inventory Contra Account (an asset account).
Select this special vendor at the top of the Receive Shipment window. Then
enter each oil, sidestepping to create the inventory record as you go. In this
way, you’ll get correct quantities and prices entered without affecting the
General Ledger adversely, and while leaving a good audit trail so you can
track what you’ve entered. This will be important later in your reconciliation
process.
If your options were set properly when Sales Taxes were setup, you’ll be able
to see that each new oil record has the correct taxes defaulted. If this is not the
case, be sure to correct the Sales Tax setup before entering more new inventory
items, so save having to correct each one individually.
Fuels
Fuel records are created by inserting new records at Inventory> Update
Inventory.
Enter a record for each fuel type you sell, such as JetA, Avgas, Diesel, and
Mogas. If an item is often referred to by more than one term, enter one term as
the part number and the other as the description, to make invoicing easy. For
instance, Avgas can also be referred to as 100LL.
Also enter records for customer-owned fuels, such as fuel belonging to an
airline or a customer who pre-purchases a large amount. It doesn’t matter
if the fuel is co-mingled with your own fuel in a single tank or if it’s stored
separately. These records will be used to tell how much fuel belongs to each
See Helpscreen topic:
Fuels
100 | TotalFBO® User Guide
SETUP PROCEDURES
owner, while your Tank records will be used to track where the fuel is located.
Be sure to select the fuel type on the first tab and also any department which
applies to this fuel. Customer-owned fuels can all share the same Non-Owned
Fuels Inventory Department.
See Helpscreen topic:
Selling Fuel to Special
Customers
On Tab 2, enter prices in the appropriate field(s) based on what you planned
as Price Classes were created. When you have entered all the prices you think
you need, check your work by clicking the Preview Sales Pricing button. It
will show you a list of the final prices customers will pay in each Price Class.
If a price is zero or seems wrong, recheck your work.
If Prist is not pre-mixed for the JetA you sell, be sure to check the box to Allow
Prist Upcharge and enter the number of cents to add to your normal price when
Prist is requested.
Do not enter Batch/Lot records at this time. You’ll create them in the next
step.
On Tab 5, create any volume discount structure which applies to this fuel. It
may be necessary to add some additional Price Classes. You’ll be able to
create a single-sale discount and also a discount which is only given to good
customers who buy specified quantities over a period of time.
On Tab 6, enter the fuel taxes which are part of selling this fuel. The amounts
entered on the right side of the screen enable you to display on each invoice
how much of the sale price was really attributable to each tax, and also to make
individual customers exempt from a tax if necessary.
See Helpscreen topic:
Buyback Fuel Sales
The amounts entered on the left side of the screen affect how much of the sale
price is posted to your General Ledger Liability Account. You can easily have
amounts on the right side of the screen but not on the left side. For instance,
if FET is prepaid to the fuel vendor, you won’t have to pay it at the end of the
month, so it’s not necessary to post a liability account for that amount. But
flowage fees that are paid to the airport on fuel sold must be set aside so you
can report and pay them when due.
On Tab 7 you’ll be able to create Fuel Sub-Types. These will be necessary
for buyback (repurchase) sales, consolidator sales, and certain other contract
sales where special pricing or taxes are required. Avoid setting up a long list
of sub-types but remember to create a separate Fuel Subtype for each contract
accepted when using online credit cards.
Most sales can be handled by altering the options on a customer’s account to
provide tax exemptions and different price classes – even a special price class
– for a fuel type.
SETUP PROCEDURES
TotalFBO® User Guide | 101
Where the customer can’t be known in advance (such as during a buyback
sale), this information can be established on a Sub-type.
Be careful – create a Fuel Type when ownership of the fuel is different; create
a Fuel Sub-Type when only the pricing or taxes of the fuel is different.
Each week someone in the company will be reviewing and perhaps changing
the prices on the fuel type and sub-types. It’s helpful to leave some notes on
Tab 8 to remind everyone of how prices should be calculated and what fields
should be used for their entry. You can also customize the Fixed Price field
names in the Inventory Options to help remind you what figures belong in each
field.
Fuel Loads
To enter your beginning quantity and cost for each fuel type, go to Inventory>
Receive Shipments and create a new Shipment record using your special
“Initial Setup” vendor. Enter the quantity and value of the fuel you had on
hand as of your Time Zero date. You’ll also have to select a tank for this
quantity to rest in.
You may split the total quantity into several lines in order to indicate the
correct tanks, or else receive all the fuel into your primary tank and then
transfer it to the other tanks and trucks. This is done at Inventory> Other Fuel
Operations> Transfer Fuel Between Tanks.
Just as with the Oils, the Vendor Invoice and resulting journal entry will be
helpful in your reconciliation process.
Parts
If you have a list of your parts in another software program, the chances are
good that you’ll be able to import them into TotalFBO®. It’s only necessary
that the data be in a TXT or CSV file with standard formatting. If you need
guidance in determining how and what you can import, contact Tech Support.
If you cannot import parts, the easiest way to enter them is to go to Inventory>
Receive Shipments and create new Shipment records using your special “Initial
Setup” vendor. As you enter each item on the screen you can “Sidestep” to
create the part record itself. As you OK the record, you’ll be returned to the
Shipment window to finish entering the cost and quantity on hand as of your
Time Zero date.
DO NOT insert new parts records at the Update Inventory Function. Doing so
will cause an inappropriate journal entry.
Be sure to assign each part to the appropriate department as they are created.
See Helpscreen topic:
Import ASCII Data
102 | TotalFBO® User Guide
See Helpscreen topic:
Pricing Inventory
SETUP PROCEDURES
Also be careful to select Serialized Part for those items with serial numbers
and Regular Part for everything else. This is an important part of meeting FAA
requirements for tracking parts.
See the Shop Operations, Categorizing Inventory topic in this Guide for a
discussion of the various parts of the part record and how they’re used.
If you have created a Matrix and wish to apply it to standardize prices on all
your parts, use the function at Inventory> Other Parts Operations> Mass Update
Prices.
PAYROLL CLERK
Even if you expect to prepare payroll through an outside service, you’ll still
need some payroll records. This is because employee records are used when
posting labor for shop orders, when selling instructors’ time on invoices, and
when verifying employees logging in through the TimeClock function.
TotalFBO® is customized to handle aviation payrolls. Thus, you have the
ability to pay an instructor both a small salary and an hourly amount for actual
instruction hours. You can enter a separate worker’s compensation rate for
each type of time, which can result in major savings if your state permits this
kind of calculation (most do – check with your State Insurance Commissioner
for details). You can use the Profit Plus plan for tool allowances. And time
which is billed on shop orders and invoices or entered through Timeclock will
automatically build an employee’s timecard if you like.
If you’re using an outside service such as ADP or Paychex, you’ll be able to
import their output text file to create the journal entry you need (depending
on the version of their software you use). But after you’re comfortable with
TotalFBO®, you may find that the benefits of having an integrated, customized
system will justify moving this function in-house.
Payroll Taxes
If you’re preparing payroll through TotalFBO®, the first step is to load and
customize the tax tables. This is done at Accounting> Payroll> Options and
Settings> Tax Setups.
Select the Federal record and click the Reload One Default button. Then
repeat the process with each state record you’ll be working with. (Or select the
Reload All Defaults button.) In this way, you’ll be sure that the most recent
information is being used by the program, in case an update was installed after
the original program installation.
Then highlight the Federal and State records individually and use the Change
button to view them. If the tax brackets don’t seem current, it may be
SETUP PROCEDURES
TotalFBO® User Guide | 103
SETUP PAYROLL
(Payroll Clerk)
Update/Verify
Tax Tables
Setup Deductions
Add Employees
Load latest tax tables and verify
with state circulars. Also enter
Tax ID number and employer-specific rates.
Establish deductions with related GL accounts, marking
any that are pre-tax..
Create a record for each employee and contractor on
your staff, with pay rates, billing rates, deductions,
employer-matching amounts, etc. Select Pilots and Mechanics.
Update YTD
Totals
Enter YTD totals for each employee's pay since
January 1 of the current year.
Setup Payroll
Options
Choose options for payroll behavior and set the default
payee for 941 tax deposits.
necessary to download a more recent update from www.totalfbo.com. You can
also update the brackets manually at any time, based on information from your
local tax authority.
Then continue to customize the records by entering your taxpayer ID numbers
along with your company’s rates for Unemployment, Disability, or other taxes
and fees. If there are any cautions or instructions specific to your state, they’ll
be displayed on the Comments tab.
Deductions
Next, you’ll customize your list of authorized deductions at Accounting>
Payroll> Options and Settings> Employee Master Deduction List. Several
typical deductions are defaulted in for you as examples. However, you
must use your own information, especially for Pre-Tax setting on 401K,
Retirement, and “Cafeteria” plans.
104 | TotalFBO® User Guide
SETUP PROCEDURES
For each record, you’ll be able to specify the account to credit for the portion
deducted from the employee’s paycheck. In addition, you can specify the
accounts to debit and credit for the employer’s matching portion of any
deduction.
A typical example is health insurance, where the employer pays a portion and
the employee pays the rest. There are two ways to approach this entry:
Method 1: Post the credits for both the employer and employee
amounts to the same Liability account for Health Insurance Accrued.
Post the employer amount as a debit to the expense account for health
insurance premiums. When the monthly invoice is received, disburse
it to the Accrued account and then pay the bill normally.
Method 2: Post only the employee amount as a credit to the expense
account for health insurance premiums. When the monthly invoice is
received, post it to the same expense account and pay normally. The
employee credit has offset part of the expense.
In similar fashion, consider the journal entry you desire for each deduction and
select appropriate accounts. See the next section, Payroll topic for samples.
Employee Records
Whether you actually prepare payroll through TotalFBO® or not, you’ll enter
employees at Accounting> Payroll> Employee Basic Records.
See Helpscreen topic:
Employee Records
Be sure to include instructors and mechanics you pay on a contract basis as
well, so their time can be invoiced properly. You’ll be able to mark their
records as “Contract,” which separates their totals on reports and forces a 1099
instead of a W-2 at the end of the year.
If an employee is a pilot or mechanic, be sure to check the appropriate
box. Checking the box will enable you to create the basic pilot record and
automatically link it to this employee record. Then personnel in the Charter
or Flight School departments can complete the rest of the pilot record from the
Dispatch menu.
If you bill for this employee’s time, be sure to enter the billing rate for each
kind of time sold, regardless of whether or not you enter a pay rate.
You can speed Flight School invoicing by being careful how you enter
Pay Descriptions for hours to be billed as Primary Instruction, Advanced
Instruction, Ground Instruction, Pilot Services, etc.
SETUP PROCEDURES
•
•
Be consistent with naming these items for each employee.
Enter the same description on the matching GL Income Account as
the “Billing Trap Phrase.” This will guarantee that the correct income
account is selected when the instructor and his time are selected on the
invoice.
YTD Totals
Once your employee records have been created, you can use the Adjust YTD
totals button at the same location to enter balances of both dollars and hours as
of your Time Zero date.
Completing this step means that you’ll be able to produce quarterly reports,
1099s and W-2s from TotalFBO®, even if much of the payroll was originally
produced from another system.
Entering YTD totals makes no journal entry.
Options
Review options for Payroll at Accounting> Payroll> Options and Settings>
General Options.
The default settings will be appropriate for most FBOs. Be sure to select your
bank as the Default Tax Payee to save time when making 941 deposits.
TotalFBO® User Guide | 105
106 | TotalFBO® User Guide
SETUP PROCEDURES
WRAPPING IT UP - CONTROLLER
Now that all the basic setup steps are complete, it’s time to review your work.
Verifying General Ledger Balances
You’ll want to print several reports to verify that the details for each Control
Account have been entered properly. These include:
•
•
•
•
•
•
Accounts Receivable Aging (Receivables Module)
Vendor Aging Report (Payables Module)
Register-Style Listing (Checking Module)
Pay History Report (Payroll Module)
Inventory Valuation Report (Inventory Module)
Trial Balance (General Ledger Module)
The detail report totals should match the balances in the corresponding control
account as shown on the Trial Balance. If not, look for manual journal entries
to the control account which are inappropriate.
You should also print and save these reports:
• Vendor Activity Report for the “Initial Setup” vendor
• GL Account Detail for each Contra Account (Receivables, Payables,
Checking, and Inventory)
• Open SO Billings Report (Shop Orders)
Use these reports to verify the amounts which have been entered and match
them to your previous system. Save the reports so that if a beginning number
changes at some point you’ll be able to spot it quickly.
Once these beginning details are verified it’s a good idea to move your Fence
Date forward so that any new transactions cannot affect these beginning totals.
The Fence Date is set at Accounting> General Ledger> Options and Settings>
General Options.
Documenting Your Work
You’ve done a lot of customizing of your database, and made a lot of
decisions. Over time, as your business grows and changes, it may be necessary
to adjust some of your choices.
Take the time now to create a binder to store the following reports:
•
•
•
•
•
Department Listing (General Ledger)
Chart of Accounts (General Ledger)
Automatic G/L Account List (General Ledger)
Auto-Distribute Accounts Listing (General Ledger)
Department List (Inventory)
SETUP PROCEDURES
TotalFBO® User Guide | 107
VERIFY/ENTER GENERAL LEDGER BALANCES
(Controller)
Print Detail
Ledger Reports
Print and save these detail reports
as of your TIME ZERO DATE as
your record of items transferred
from your previous system.
AR Aging
GL Trial Balance
AP Aging
Check Registers
Payroll History
Inventory
Valuation
Compare to Trial
Balance
Reconcile detail ledgers to GL Control accounts. Save this
reconciliation.
Enter Beginning
Balances
When totals are available from previous system, enter beginning
balances for each GL Account as Start of Year or Monthly Totals.
Amounts for Control Accounts MUST MATCH original Trial Balance.
Review Trial
Balance
Print Trial Balance as of TIME ZERO DATE. Compare balances
for Master accounts to original Trial Balance. Reconcile
any variances.
Balance Sheet
Income Statement
Cashflow
Statement
Your General Ledger setup is now complete. You can prepare
current financial statements.
108 | TotalFBO® User Guide
SETUP PROCEDURES
•
•
•
•
•
See Helpscreen topic:
Internal/Non-Billing Summary (Receivables)
Recurring Charge Summary (Receivables)
Pricing Review (Receivables)
Notes Payable Listing (Payables)
Leases Listing (Payables)
Creating Additional/
Training Database
Now is also a good time to test your setup. Simply make a backup and restore
it to your Training Directory. Then make some sample transactions and verify
that the journal entries are as expected. Save copies of the transactions and
journal entries in your binder as a reference. If a future journal entry doesn’t
seem right, you’ll be able to quickly review your setup to see what’s changed.
See Helpscreen topic:
Beginning Ledger Balances
At some point you’ll be able to enter beginning balances for each general
ledger account. This is done at Accounting> General Ledger> Ledger Account
Balances> Update Year/Month Balances.
Setting Beginning
Balances
If you’re beginning your work in TotalFBO® at the start of your Fiscal Year,
you can enter balances for Balance Sheet accounts only by clicking the Update
Start-Of-Year Balances button.
If you’re beginning at another point in your year, you can enter beginning
balances as of the most recent month by clicking the Update One Month’s
Balances button.
You can also enter balances for the beginning of the fiscal year and each
intervening month. With this information entered, you’ll be able to produce
financial statements and comparison reports for your entire fiscal year from
TotalFBO® instead of relying on your previous system for part of the
information.
After you’ve entered your beginning balances, review a Trial Balance as of
your Time Zero Date to verify that it matches your prior system.
Then you’ll want to take some action to clean up some of the journal entries
that were made as the setup details were entered. There are two methods
available to complete this step:
1.
If you’ve not entered any new transactions (all transactions are beginning
data only not later than the Time Zero date) you can clear the general
ledger details BEFORE entering the beginning balances. (Utilities> Global
Data Updates> Clear Selected Info)
2.
If you’ve had to start some current work before all the setup steps were
complete, take the following three steps:
SETUP PROCEDURES
1.
“Pay” all items on the “Initial Setup” vendor account by using
the Cash Debit Option. Select the Inventory Contra Account.
(Accounting> Payables> Make Payments> Pay Invoices.) This
prevents these items from continuing to appear as outstanding
payables, and clears the Inventory Contra Account balance.
2.
Create a Journal Entry to close the entire balance of each remaining
Contra Account into the corresponding Control Account. (For the
Checking Contra Account, there may be several accounts to match.)
3.
Verify that all Contra accounts now have a zero balance and that the
corresponding control accounts have proper current balances. Set
a “Latest Valid Date” on each one or else raise the privilege level on
the account. This will prevent or limit further journal entries to the
account. After your next fiscal year end you may merge the Contra
accounts into their corresponding Control Accounts to remove them
from your chart of accounts.
Online Credit Card Processing
If you wish to use online credit card processing through TotalFBO®, you’ll
need to complete gateway agreements with your processor. Once you have
agreements in place and access codes, you’ll need to complete a short form
for Horizon Business Concepts, Inc., providing notice of the processor option
you’ve selected.
Horizon will provide new licensing that opens your processor option and you
can complete the processor setup.
Be sure that you meet system requirements for credit card processing, which
include access to the Internet from all workstations involved in processing
or settling charges, use of the TCP/IP protocol on your network, running at
least Windows 2000 on each workstation, installation of the latest version
of Microsoft XML on each workstation, and other environment variables
depending on the processor selected.
You may also wish to install magnetic swipe devices and a 40-column receipt
printer at your Front Counter.
TotalFBO® User Guide | 109
See Helpscreen topic:
Set Up Credit Cards
110 | TotalFBO® User Guide
SETUP PROCEDURES
SETUP ONLINE CREDIT CARD PROCESSING
(Receivables Clerk/Controller)
Setup GL Asset
account for Credit
Card Receivables
Setup NEW
Customer Account
for Holding Company
Setup Credit Card
Processor
Setup User
Security
An account separate from normal
Customer Receivables must be created
unless an account for this purpose
already exists in your Chart of Accounts.
If you've been using a customer as a holding company
for Offline transactions, it cannot be used for Online
Processing.
Using the security codes provided by your Online
Processor, setup a Processor record and select
the cards to be handled.
Select options for User IDs that will be allowed to
handle credit transactions.
Verify Internet
Connectivity
Verify that the workstations that will be authorizing and
settling transactions have an Internet connection.
Setup Workstation
Computers
Workstations processing online transactions must be
running Windows 2000 or later, must have the lastest
version of XML installed (from www.hbcinc.com) and may
need an Environment Variable setting.
Setup Cardswipe
Device
Workstations with personal customer contact should have
cardswipe devices installed. The Station-Specific
Settings for that workstation must be updated.
SETUP PROCEDURES
TotalFBO® User Guide | 111
SETTING UP A RECEIPT PRINTER
Create Invoice
Style Sheet
Copy an existing style sheet and check the box for
Dot Matrix Direct Output.
On Tab 6, select 40-Column Style and other setup options.
Style Sheet
Options
On Tab 2 at the Invoice Style Sheet browse window,
select the new style sheet as the 2nd copy and your standard
format as the 1st copy.
On Tab 2 of your default Station record, select the
correct printer for both the Invoice Standard Printer
Station-Specific (1st copy) and the Invoice 40 Column Printer (2nd copy).
Settings Record
If necessary, select 2 as the default Number of Invoices to
Print.
Use a 40-column receipt printer to provide smaller printouts to
your customers. This is especially important to charter pilots
purchasing fuel with a credit card, who have many receipts to keep
track of.
112 | TotalFBO® User Guide
SETUP PROCEDURES
International Settings
If you operate near or outside the borders of the United States, there are a
number of features and options available in TotalFBO® which can make it
easier for you to operate in multiple currencies or use metric measurements.
See Helpscreen topic:
All accounting functions are maintained in your “base” currency, but
individual transactions throughout the program can be created in an alternate
currency. Bank accounts can also be maintained in an alternate currency.
International Options
The program windows themselves can also appear in an alternate language,
and each user can choose the language he prefers. You can add or update
translations of fields or phrases as you like.
The Canadian payroll structure is also incorporated, and features for other
countries are being added as users request them.
As options and features in this area are continually expanding, be sure to check
the Helpscreens for the latest information.
TotalFBO® User Guide | 113
ACCOUNTING AND
BACK OFFICE
OPERATIONS
Included in this section:
•
•
•
•
Receivables Clerk duties and procedures
Prepare Airline Fuel billing
Invoice Recurring Charges
Post Payments Received on Account
Reconcile credit card transactions & buyback
Import Remote Invoicing
Reconcile Receivables Aging
Close Receivables and Prepare Customer Statements
Collections
Payables Clerk duties and procedures
Create C.O.D. checks
Verify invoices for inventory received
Apply C.O.D. checks and credit card payments
Verify company credit card usage
Post utility and other non-inventory payables
Monitor and clear core charges
Prepare payments for vendor invoices, notes, and leases
Reconcile travel advances
Adjust inventory records
Payroll Clerk duties and procedures
Verify timecards
Prepare payroll
Make tax deposits
Transmit deductions to appropriate payees
Clear payroll advances
Reconcile health insurance premium statement
Prepare quarterly reports
Prepare 1099s and W2s
Controller duties and procedures
Post banking transactions
Reconcile bank accounts
Post Work in Process
Reconcile detail ledgers to Control accounts
Prepare tax reports
Prepare financial statements
Prepare aircraft profit and loss reports and owners reports
This section will give you a good
idea of the WHAT, WHY, and
WHEN of Accounting and Back
Office procedures.
For more details on individual
screens and fields, refer to the
Helpscreens in the program.
Helpful references to specific topics
are available throughout this Guide.
See Helpscreen topics
for more details
114 | TotalFBO® User Guide
ACCOUNTING & BACK OFFICE OPERATIONS
Whether you have a large accounting staff or just a single super-star employee,
there are typically four major areas of work that must be addressed. In this
section we’ll deal with each of them separately for convenience, however,
there is often some overlap and quite a bit of coordination is typical among
accounting staffers.
Therefore, we encourage each member of your Accounting Department staff to
read all topics, in order to promote smooth coordination.
In addition, it’s critical to read the Setup section and have at least a general
familiarity with the other Operations sections of this Guide. TotalFBO® is
designed to eliminate entering data more than once, so as users throughout
your company enter transactions such as Invoices, Shop Orders, Shipments
Received, or Physical Inventory Adjustments, the correct accounting entries
are completed for you automatically.
Rather than posting entries manually, your focus shifts to reviewing your
records to insure accuracy. If a particular user procedure generates an entry
which is inappropriate, it’s usually easy to adjust the setup or educate the user
in a more correct procedure.
Because TotalFBO® is so complete and so tightly integrated, you’ll find that
you should only need to make one or two manual journal entries per month. If
you’re doing more than that, you’re working too hard! Contact Tech Support
for assistance in tweaking your setup to get more effective performance from
TotalFBO®.
ACCOUNTING & BACK OFFICE OPERATIONS
TotalFBO® User Guide | 115
ACCOUNTING DEPARTMENT ORGANIZATION
Receivables
Clerk
Payables
Clerk
Customer
Accounts
Customer Invoices
Payments Received
Statements
Vendor
Accounts
Vendor Invoices
Payments Made
Loans & Leases
Payroll
Clerk
Controller
Employee
Records
Timecards
Paychecks
Taxes &
Deductions
General
Ledger
Financial
Statements
Leaseback/P&L
Sales & FET Taxes
Cash &
Banking
Bank
Reconciliations
116 | TotalFBO® User Guide
ACCOUNTING & BACK OFFICE OPERATIONS
Receivables Clerk
See Helpscreen topic:
Customer Statements
This busy position is responsible for everything under the general heading of
Customer Sales. Most of the sales activity will be taking place as employees
create invoices and shop orders in other departments, but there are a few
activities that are best done in a secure environment, such as posting customer
payments and making certain adjustments to customer accounts.
The heart of your customer activity lies in the Customer Record. Take the
time to read the Helpscreens and become familiar with the fields and related
functions. You’ll find that the more complete this record is, the easier it is to
create invoices and the more accurate your accounting will be.
•
For instance, selecting a default fuel type or sub-type can help to insure
that any special price arrangements for this customer are implemented
without relying on the CSR’s memory!
•
Assigning one or more Selection codes to an account can allow you to
create custom reports for specific groups of customers.
•
Keeping credit card information on file can give you a hand when it
comes time to enforce credit terms. Simply notify customers that charges
not otherwise paid on time will be automatically billed to their credit card.
The following procedures and notes will help you accomplish the most
common tasks expected of a Receivables Clerk in an FBO.
Airline Fuel Billing
If you do fueling to airlines or other large contract fuel customers such as
consolidators, a large volume of your invoices is not handed to a customer
at the time the fuel is delivered. Instead, you’re expected to prepare a single
invoice weekly or monthly and perhaps attach individual fuel tickets as
backup.
If you do all this data entry in the Back Office, you and your Line Manager
will always be trying to catch up with the current inventory balances. In
addition, the Front Counter and Line staff must remember a special procedure
when fuel is pumped to these customers, and then you will always be
struggling to keep current with the data entry and the rest of your job.
A far better system is to let all fuel invoices be created normally as soon as the
fuel is pumped, regardless of who the customer is or what the special deal is.
If your trucks are servicing airline gates or meeting aircraft far way from
your own ramp, look into using one of the wireless options available to you.
Using either Fuel Truck Interfaces or Mobile Agent, invoices can be created
automatically and either posted immediately or made Pending for your review.
ACCOUNTING & BACK OFFICE OPERATIONS
TotalFBO® User Guide | 117
Continue to monitor these areas:
Setup Sales
Taxes
Setup
Internal
Customers
Setup
Customer
Pricing
Credit
Cards
Setup
Setup
Credit
Terms
Setup New
Customers
Receivables
Clerk
Regular duties and responsibilities:
Prepare
Airline Fuel
statements
Invoice
Recurring
Charges
Post ROA
checks
Reconcile
Credit Card
Payments
Import
Remote
Invoicing
Reconcile A/R
Close and
Mail
Statements
Collections
118 | TotalFBO® User Guide
ACCOUNTING & BACK OFFICE OPERATIONS
Even if these sales are entered manually from tickets, this work can often be
done by the normal CSR staff as quickly as possible each day. Sometimes
these fuelings are part of the task assigned to your night CSR, if that’s a slow
period for your Front Counter.
Your goal is to make it possible for your Line Manager to verify that all fuel
delivered each day was also invoiced, and that Inventory quantities are correct.
This can only be done if invoicing is entered quickly.
You’ll find that using the Touchscreen invoice format allows extremely
rapid entry of fuel tickets. When you combine this with the correct setup for
the Customer account and Fuel Record, processing very large numbers of
deliveries each day is not only feasible but painless.
When the fuel tickets have been entered to TotalFBO®, your next task is to
prepare the billing that is actually sent to the customer. Since all the deliveries
have already been posted to the Customer Account as invoices, you do not
want to create a new invoice. Instead, we’ll use a special kind of statement to
summarize these charges onto a single report.
This statement is created at Accounting> Receivables> Statements> Airline Fuel
Statement. Here you’ll be able to select the customer name and the date range
for this billing.
If the customer has pre-purchased fuel or provided their own fuel for storage in
your tanks, you’ve already established a separate Fuel Type for them. You’ll
be able to select that fuel now and include inventory information such as
beginning and ending quantities, shipments received, etc.
You can also select service lines to include, as you would have for minimum
fueling charges or hookup fees.
Finally, each customer will have specific requirements about how taxes (if
any) should be displayed, and you can choose the appropriate option.
Once you have made your choices, click the Run the Statement button to see
the entire billing. Note that the printout bears an invoice number, which your
customer will require for processing your payment. However, this is not a new
invoice number, but simply reflects the first invoice delivery which is included
on the report.
You can customize the style sheet used for this billing so that it meets your
needs and that of your customer. For instance, you will probably want to
change the title from “Statement of Account” to a more descriptive phrase,
such as “Summary Invoice.”
ACCOUNTING & BACK OFFICE OPERATIONS
TotalFBO® User Guide | 119
After you have created your first billing, the options you selected will be
defaulted for you the next time you select that customer for billing.
Most airlines and consolidators have become comfortable with the summary
invoice produced by TotalFBO®, and both you and your customer will
appreciate the accuracy and speed with which you can issue these billings. It
all finally reflects positively on your bottom line, as cash flow improves and
time spent reconciling delivery tickets goes down.
In similar fashion, the Compound Account Statement permits you to do
summary billing for multiple customers on a single document. Originally
designed to meet the needs of Flight Schools who coordinate with a college
program, the Compound Account Statement can also meet other needs. Use
your Customer Account Selection Codes to group customers for this special
summary billing.
See Procedure Details at the end of this topic.
Invoice Recurring Charges
You’ll have created your Recurring Charge Reminders either directly at
Accounting> Receivables> Recurring Charges> Update Recurring Charge
Reminders, or as a Sidestep from creating your list of available rental spaces
at Update Rental Space List. Now it’s time to actually produce these invoices,
which is done at Accounting> Invoicing> Other Invoice Operations> Bill
Recurring Charges.
Typically an FBO would like to generate and mail the invoice early, say the
15th of the previous month, in order to encourage the customer to pay on
time around the first of the month. Otherwise, a customer will wait until his
monthly statement arrives, then take another 30 days to pay – resulting in your
receiving the payment almost 60 days late.
TotalFBO® allows you to generate invoices at any time, but date and post
them to your General Ledger when the charge is actually due. You can even
add a special note to each invoice reminding the customer of the due date.
Invoices will be generated automatically for all customers and charges in your
list based on the Next Due Date field on the record. The date you specify at
the time of invoicing is the actual date that will be used for posting. This date
is used just to select the correct items to bill.
Each time an invoice is generated, the Next Due Date is rolled forward to the
next period. In this way both you and the program can tell exactly what items
have been billed. In case of a printer malfunction or network error, you’ll be
able to simply re-do the job and the system will pick up exactly where it left
off, never duplicating an invoice.
See Helpscreen topic:
Recurring Charges
120 | TotalFBO® User Guide
ACCOUNTING & BACK OFFICE OPERATIONS
You can manually roll the date forward if you want to skip a billing. Or roll
it back to generate a charge for two periods. You can even create separate
“batches” of invoices by using specific due dates for each one, such as the 1st
for hangar rents, and the 2nd for office rents. Since you specify the actual due
date at the time of invoicing, you can use any Next Due Date you wish for
selection purposes only.
This can come in handy when you need to edit some invoices manually. A
common situation occurs when you also bill for utilities on a space. Usually
this isn’t the case for all the customers you rent to, so generate most of the
billing automatically in one large group. Then generate billing for your small
group and this time choose the option that allows you to edit each invoice as
it’s generated. You can insert the correct utilities charges very quickly in this
way, without having to build the entire invoice manually.
If a customer has multiple charges, they will all appear on a single invoice. Be
sure to generate and print the Summary Report when you create invoices, as
this is your only listing of the invoice numbers created in this batch. You can
always change or delete these invoices, just as you would any other invoice.
If a customer has a credit card on file in his Customer Account Record
AND the box is checked to “Use this card for Recurring Charges,” then you
may take advantage of the function at Accounting> Invoicing> Other Invoice
Operations> Pay Recurring Charges.
Depending on whether you’re using Online or Offline credit card processing,
you’ll either automatically authorize charges or else be reminded to manually
process payments for specific customers. In this way you can still generate the
invoices early, but not process the payments until the due date.
See Procedure Details at the end of this topic.
Post Payments Received on Account from Customers
When a customer makes a payment on his account (or gives you a deposit
for Block Time) you’ll create an invoice to post to his account and serve as a
receipt for the payment. Then you’ll apply this payment to any outstanding
charges.
Create ROA Invoice
This kind of invoice is called in Creating the invoice for the payment is actually quite easy. Start an invoice
normally but don’t enter any detail lines because you’re not selling anything.
accounting jargon, an “ROA,”
which stands for “Received On Then select the Payment button and enter the amount and means of payment.
Account.”
A note line will automatically be added to the invoice indicating that it was a
payment.
ACCOUNTING & BACK OFFICE OPERATIONS
TotalFBO® User Guide | 121
When this invoice is posted, it will usually make this journal entry:
DR Undeposited Receipts (Asset Account)
CR Accounts Receivable – Customers (Asset Account)
This reduces the customer’s balance owed and puts the money in the cash
register. When the Controller prepares the bank deposit and posts it to the
Checking account, the money will be cleared from the Undeposited Receipts
account and moved into the appropriate bank account.
However, if the payment is larger than the balance owed on the customer’s
account, TotalFBO® will automatically post the resulting credit balance to
your Customer Deposits account like this:
DR Undeposited Receipts (Asset Account) - TOTAL RECEIVED
CR Accounts Receivable – Customers (Asset Account) BALANCE OWED
CR Customer Deposits (Liability Account) – REMAINING CREDIT BAL.
This magic actually happens every time an invoice is posted to a customer’s
account. The journal entry is determined by the current balance on the account
at the time the invoice is posted. In this way, outstanding balances are reduced
in your Accounts Receivable Account, and any credit balances are used up
from the Customer Deposits Account.
Applying Payments
Depending on your option settings and privilege level, you may automatically
be presented with the Apply Payments window any time you post a payment.
Normally you’ll use these settings to prevent payments from being applied at
the Front Counter, where this process would interfere with rapid invoicing.
When the Receivables Clerk posts ROA payments received in the Back Office,
it will be faster to apply each payment immediately, while referring to the
customer’s check stub for information about the items being paid.
In addition, you’ll want to run the Unapplied Payments Report in the Invoicing
module to spot any payments which could be applied but have been missed.
This list will also include invoices which could be applied against credit
balances.
Then you can apply payments at Accounting> Invoicing> Other Invoice
Operations> Apply Outstanding Credits.
Applying a charge and payment does not make any new journal entries or
change the balance on the customer’s account. It simply matches the two
items for your reference, and removes them from the “Outstanding” list on the
Customer Statement.
See Helpscreen topic:
Posting Payments
Received
122 | TotalFBO® User Guide
ACCOUNTING & BACK OFFICE OPERATIONS
However, once a payment is applied to an invoice, you should not make any
changes to either the invoice or the payment. If you do, a warning message
will appear, informing you that proceeding will cause the program to Unapply
the items to avoid possibly causing a discrepancy on the customer’s balance.
Be aware that TotalFBO® will automatically apply payments when an
outstanding invoice exists in exactly the same amount, to save you time and
keystrokes.
See Procedure Details at the end of this topic.
Reconcile Credit Card Transactions
See Helpscreen topic:
Credit Card Batches &
Settlements
The chart on the next page is helpful in understanding how credit cards are
processed. The workflow is the same, whether cards are being processed
as Online or Offline transactions, except that if you’re working with a POS
machine, you’ll have to manually reenter the information to the machine and
manually settle at the end of the day.
When an invoice is created and a Credit Card charge item appears, the details
of the invoice are saved normally in your TotalFBO® database. However,
additional information relating to the credit card payment is also saved
separately.
If you don’t accept fuel cards and your bank deposits the full amount of each
charge within 48 hours to your account, charges are handled as cash instead of
receivables. You can skip this section and just post the bank deposits as they
are made.
Closing Batches
At the end of the day, your CSR will close the cash register and prepare the
Cash Receipts report, which details all payment activity for the day (or shift).
In addition, either you or the CSR will close the Charge Batch for the day at
Accounting> Invoicing> Daily Closing Operations> Close Charge Batch.
•
If you’re doing Online processing, closing the charge batch also transmits
the settlement information to the Processor, which begins the process of
getting you the money.
•
If you’re doing Offline processing, you’ll create a batch that matches the
Settlement Report from your POS machine for the day. You’ll need to
reconcile any differences and adjust invoices in TotalFBO® or process
additional adjustments on the POS machine. When you close, it’s a good
idea to change the default batch number so it matches the control number
on the Settlement Report from the POS machine.
ACCOUNTING & BACK OFFICE OPERATIONS
TotalFBO® User Guide | 123
PROCESSING CREDIT CARDS
Customer's
Bank
Create
Invoices
Authorization
Gateway
Processor
Processing
Bank
Settlement
Close/Settle
Batch
HOLDING COMPANY
CUSTOMER ACCOUNT
Closed Batch
Payment Invoice
-$ 95
Credit for Fees
-$
5
$
0
Balance:
Post Credit &
Payment
Invoice
$100
When notice of deposit is received
Your Local
Bank
$
Settle and Close batches daily so cash flow is not interrupted.
124 | TotalFBO® User Guide
ACCOUNTING & BACK OFFICE OPERATIONS
In addition, the closed batch now appears on the Credit Card Holding
Company Customer Account as an outstanding item, just as an invoice would
on a normal customer’s account. And the statement will be easy to read, since
the batches and amounts will match the reports and payments you receive from
the Processor.
In this way, the original customer’s account has been paid off by the charge,
and the responsibility for getting us the money (the Receivable) has been
transferred to the Holding Company.
You can reprint the details of any charge batch by running the Charge Batch
report in the Receivables module.
Posting Payments Received
When you know that the money has been deposited into your account (or you
receive a check), you’ll post that payment to the Holding Company’s account.
See Helpscreen topic:
Posting Payments
Received
See Helpscreen topic:
Credit Card Chargebacks
This is done by creating an ROA invoice, just as with any other customer, and
adding a payment detail for a Cash or EFT payment type.
If you get a credit against your fuel purchases, skip this section and see the
“Move Money” function in Payables.
However, the payment will typically be short a little bit, as the Processor will
have collected a fee for handling the transactions (the “Discount Rate”). Since
you’ll never get this money, we’ll need to add another line to the invoice to
account for it.
You’ll add a Service Line, selecting the account number you specified on line
115 of the Automatic Ledger List, which is your Credit Card Fees Expense
account. As soon as you select this account, the line will be marked as a
Credit line, and you need only enter the amount of the fee and OK the line.
In this way you’ll have an invoice which will be a credit for the full amount
of the original batch (assuming you were paid for all charges). You can then
apply this credit to the outstanding batch, as you would any other payment.
See Helpscreen topic:
Buyback Fuel Sales
Buyback or Repurchase Plan Sales
When you sell fuel to a customer who has a buyback agreement with the Fuel
Supplier, the transaction is handled exactly like any other credit card sale.
You’re supplying your fuel, but with special pricing. Since you don’t know
all the customers beforehand, you’ll establish a Fuel Sub-Type so you
can set different pricing and tax structures. If you’re participating in an
Online processing program, you’ll also link this sub-type to the plan you’re
participating in.
ACCOUNTING & BACK OFFICE OPERATIONS
TotalFBO® User Guide | 125
If you’re handling the sale as an Offline item, create a payment means called
“buyback” or something your CSRs will recognize.
Set the price on the fuel to be your best estimate of what you’ll be paid under
the plan. Usually this is:
the current week’s cost + local taxes & fees + a set “intoplane” fee
You’ll want to adjust the price as each week’s costs are posted, just as you do
your retail fuel prices. Be careful not to enter just the “intoplane” amount.
As invoices are created, you’ll simply select the correct fuel Sub-Type and
then pay the invoice with the credit card.
Your Invoice Style Sheet options allow you to generate the invoice with no
dollar amount printed for the Fuel Sale on the customer’s copy, if desired.
When payment is received, post it to the Holding Company account, just as
you would any other credit card payment. If the payment is for a slightly
different amount (due to rounding or the timing of cost adjustments) add a
Service Line to the invoice, selecting the Fuel Sales Income account. Enter
the adjustment amount as either a charge (paid more) or credit (paid less).
You can see that using the credit card functions within TotalFBO® allow us
to be very flexible in transferring responsibility for payment from a group
of customers to another customer. This method is also sometimes useful in
handling sales for consolidators or in other special situations.
See Procedure Details at the end of this topic.
Import Remote or Wireless Invoicing
Remote Invoicing allows you to export a batch of new invoices from another
database, perhaps at another location, and import them to your home location
database. After processing, a backup of the home location database is restored
to the remote location and work continues.
Normally the export-import-update cycle occurs about once a week, and is
performed by the Receivables Clerk. Only new invoices and any related new
customers are imported. Changes and other transactions are ignored.
If you’re using Mobile Agent or a Fuel Truck Interface, invoices may be
imported continuously by TotalFBO® or you may import them as batches.
This import cycle is typically performed daily.
See Helpscreen topic:
Mobile Agent Processing
Fuel Truck Interfaces
126 | TotalFBO® User Guide
ACCOUNTING & BACK OFFICE OPERATIONS
Reconcile Receivables Aging
There are actually two kinds of reconciliations that must be performed.
•
The Receivables Clerk will reconcile the month’s activity to the net
change between last month’s Accounts Receivable Aging and the same
report for this month.
•
The Controller will then reconcile the total of this month’s Accounts
Receivable Aging to the Control Account balances in the General Ledger.
We’ll discuss the second reconciliation in the Controller’s Duties topic later in
this Section.
The Receivables Clerk’s reconciliation is useful to verify that account balances
have been correctly updated before Closing Receivables and generating
Customer Statements.
See Helpscreen topic:
Accounts Receivable
Change Report
TotalFBO® provides a report that does all the work for you, sifting through
account activity, matching it to the changes in customer balances over the
period, and identifying any problem accounts. It’s called the A/R Changes
report and it’s located in the Receivables module.
Run the report with a beginning date which is the END of the last month and
an ending date which is the END of the current month. (If you start with the
first of the current month, you’ll miss a day’s activity.)
There are a number of options you can select to customize the report for
specific purposes. We recommend that you include Items 1, 2, 3, 4, and 11.
Run the report first with option 8 also selected, so you’re working with just
your normal customers. Then run it again with option 9 selected to work with
your credit card holding company accounts.
By checking option 11, you’ll see only those accounts which have a problem
that needs further analysis and corrective action. The Helpscreens have an
excellent and very detailed explanation of working with this report. If you
have a problem account, read the topic and then contact Tech Support for
assistance in correcting the error.
Errors are unusual. When they occur, they may be the result of problems
which were carried over from a previous database (such as asking Tech
Support to help you “force” a balance someone thought was correct) or they
can result from hardware or networking problems.
ACCOUNTING & BACK OFFICE OPERATIONS
Close Receivables and Prepare Customer Statements
When you believe all invoicing and shop order entry is complete for the month
and your Accounts Receivable Change Reports show no errors, you’re ready to
begin the Close process.
Closing
This is NOT a close for the General Ledger as a whole, but only for
Receivables. Closing only has three effects:
1.
2.
3.
Invoices and shop orders before the Close Date can no longer be changed.
The “Balance Forward” date on the Customer Date is rolled forward.
Interest and/or late fees may be charged on delinquent accounts if desired.
These three functions prepare you to generate Customer Statements. Once
you mail a statement, you’ll want to be sure that no further changes to the
invoices included on it are possible. Updating the Balance Forward date
shortens the statement so that only Outstanding items and Current Activity are
detailed. And if you charge interest, you’ll want it to appear on the statement
immediately.
Make as few changes to an invoice as possible, and NEVER change an invoice
outside of the customer’s presence. It’s always better to create a new invoice
as an account adjustment.
You cannot close if there are any unclosed charge batches prior to the close
date. And you should check with the Controller to verify that the Undeposited
Receipts account has been cleared. This indicates that all payments have been
correctly posted to customer accounts and deposited in the bank. You’ll want
to verify that there are no Pending invoices which are inappropriate, and that
there are no Uncommitted Transactions.
Although there is no problem if you delay closing, your real pressure comes
from the need to get customer statements in the mail as quickly as possible so
that payments can begin flowing back in.
When you feel you’re ready to proceed, make a backup and make sure all
users are out of the program for a few minutes. The closing process usually
takes only a few minutes, so you can do this easily during a lunch hour or early
in the day.
The closing function is located at Accounting> Receivables> Closing
Operations> Close Statements for a Month.
All you have to do is enter the new close date. (Items dated on or before this
date will be closed.) If you wish to charge interest or fees, select the options
you prefer. Then click the Do the Close button.
TotalFBO® User Guide | 127
See Helpscreen topic:
Closing Statements
128 | TotalFBO® User Guide
ACCOUNTING & BACK OFFICE OPERATIONS
Generate Statements
When the close is complete, you’ll be ready to generate statements. These
are produced at Accounting> Receivables> Statements> Customer Statements.
From this function you can create a single statement or print them as a batch.
See Helpscreen topic:
Customer Statements
There are several options for selecting accounts which should be included, so
if you prefer not to mail statements when there is a credit or zero balance on
the account, for instance, you can exclude them quickly.
Don’t forget that you can exclude any individual customer from the batch by
simply checking the box on his Customer Account Record. There will always
be a few special accounts that you don’t mail statements to, or you may want
to exclude an account temporarily because of a dispute. Suppressing them
saves you from having to sort through the stack, removing those you don’t
want to mail.
If you are printing statements and encounter a network or printer error, you
can easily resume printing by re-generating the statements and selecting the
customer you wish to start with. Statements are generated in alphabetical
order for your convenience.
There are many choices available on the Style Sheet to enable customizing
the look and format of your customer statements. You’ll want to include your
company logo, of course, and also move the address block so that it fits neatly
into your window envelopes.
Collections Tools
You’ll primarily be working with the Accounts Receivable Aging when you
contact customers, and you should know that you can print the Aging with
customer phone numbers to make this easier.
Reconciling accounts is usually best done with the Account Detail Display, so
you can see all the activity easily.
When you call a customer, you can make notes of your conversation in the
General Comments section of the customer’s Account Record, and these are
not printed on any report.
Anything you enter in the Warning Message section is displayed whenever any
user selects the customer’s name for a transaction, quote, or report. This is a
good way to notify your co-workers that there is a problem on the account and
perhaps the customer needs to meet with you to resolve it.
You can change the customer’s credit limit restrictions at any time, so a
delinquent account could have the credit limit reduced. You could then check
ACCOUNTING & BACK OFFICE OPERATIONS
the box to Enforce Credit Limit, which prevents additional charges but allows
you to post payments when they are received. If you change the status of the
account to “Cash,” you’ll be able to make new sales for full payment, but not
post any additional payments to clear up the old balance.
A delinquent customer may also find that his Price Class has been reset to
Retail until his account is current again.
The Marketing module enables you to create collection letters and merge them
with your customer list quickly.
Other Receivables Functions
Additional procedures are available in the Helpscreens which can be useful,
including:
•
•
Credit Card Chargebacks
Charging Sales Taxes Correctly
In addition, there are a number of procedures affecting customer refunds, bad
debt charge-offs, bounced checks, etc., which are reviewed later in this section
in the Controller topic.
Finally, you’ll want to keep an eye on the customer database itself. Use the
New Accounts report to monitor new customers and be sure that correct and
complete information is entered, any selection codes you like are set, customer
terms are appropriate, and that customers are not being duplicated.
Use the Merge function at Accounting> Receivables> Other Customer
Operations> Merge Two Accounts to handle duplicates. This function will
move all information from one customer account to another, and then delete
the first account.
Use the Cross-Reference button on the Customer Account Record to prevent
duplications caused by a user’s inability to locate the correct account. If
a customer’s name changes, for instance, of course you’ll change it on the
account record. But then you can add back the old name as a separate account
and cross-reference it to the new name for a while. You can enter commonly
used acronyms and abbreviations of customer names (“Fedex”) and link
individual partners to the Partnership account.
Also be sure to keep prices and Price Classes updated as company pricing
policies change. If you find that CSRs are entering prices manually or
spending time looking up info on lists, that’s your clue that TotalFBO® needs
to be tweaked!
TotalFBO® User Guide | 129
See Helpscreen topic:
Marketing Tools
130 | TotalFBO® User Guide
ACCOUNTING & BACK OFFICE OPERATIONS
Payables Clerk
This function is responsible for verifying that purchases are properly posted
to vendor accounts and to inventory, and then that appropriate payments
are made. There will be more time spent verifying and reconciling than in
actual data entry for such things as vendor statements, credit card statements,
inventory balances, core charges, travel advances, etc.
Create C.O.D. Checks
See Helpscreen topic:
Handling C.O.D. Deliveries
When the UPS delivery person is running through your door, you don’t have
time to figure out what is being purchased and how it should be posted to your
records so you can prepare a check. Luckily, TotalFBO® makes handling
C.O.D. shipments a breeze.
Hopefully the process will start with the Inventory Clerk noting on the
Purchase Order that the shipment will be C.O.D. This not only sets things up
for good control, but can give you advance notice that a check is needed.
But whether you have time to get the check ready in advance or not, you
can get it done in a snap by Inserting a new check at Accounting> Checking>
Update Checking Entries.
After you select Check as the Entry type you can select C.O.D. check for this
entry. Doing so automatically completes the Disbursement section of the entry
for you, so all you have to do is verify the check number, select the vendor
name, and enter the amount.
C.O.D. checks are all held in a special Liability account called C.O.D.
Payments Holding. You can see them in the C.O.D. listing report, and also
track them from the Checking Browse window.
When you’ve printed the check and the UPS person has dashed back out the
door, your part of this job is over for a while.
Verify Inventory Invoices
When the shipment is received into Inventory by the Inventory Clerk, it’s not
necessary to do anything special. Assuming the option has been set to require
it, TotalFBO® will automatically create a Vendor Payable Invoice, as usual.
Also, as usual, this invoice will be placed on Hold Status so that it cannot be
paid until approved.
The Inventory Clerk will pass to you the packing slip, a copy of his Received
Shipment report, and any other documentation related to the shipment.
ACCOUNTING & BACK OFFICE OPERATIONS
TotalFBO® User Guide | 131
Continue to monitor these areas:
Setup
Vendors
Payables
Clerk
Setup
Notes/
Leases
Setup
Inventory
Regular duties and responsibilities:
Create COD
Checks
Verify
Inventory
Invoices
Apply COD and
Credit Card
Pre-payments
Verify Credit
Card
Statement
Post Other
Payables
Clear Core
Charge Credits
Pay Bills
Pay
Notes/Leases
Reconcile
Travel
Advances
Monitor
Inventory
Adjustments
132 | TotalFBO® User Guide
ACCOUNTING & BACK OFFICE OPERATIONS
This is where you pick up the thread. Go to Accounting> Payables> Update
Vendor Invoices and locate the invoice that was created when the shipment was
received. It will have a red hand by it.
Use the Change button to open the invoice and review it to be sure that it’s
accurate. Update the Invoice Number and Due Date, if necessary, and add any
discount information which applies.
DO NOT CHANGE THE INVOICE DATE, even if the vendor invoice
has a different date. Instead, change the Due Date so that you’ll
be paying it on time.
The Invoice Date is defaulted to the date the shipment was received into
inventory. Posting the payable invoice automatically posted a journal entry to
your General Ledger to keep it in sync with the Inventory Valuation records.
If you change the invoice date, the journal entry will be reversed and replaced
with a new one on the changed date. This can make it extremely difficult to
reconcile the General Ledger Control Accounts for Inventory.
You’ll also not change the Disbursement information. These accounts are
selected by the system automatically, and the same accounts will be used when
the item is sold or removed from inventory. If you change the account on the
Payable invoice, money will be “orphaned” in the wrong account.
You can change the amount ONLY if it results from changes in taxes,
freight charges, marketing promotional items, etc., and you can allocate the
disbursement for these additional amounts, as well.
If the cost of an inventory item is not what was expected at the time of the
order, you should not immediately change the Payable Invoice to match what
the vendor has billed. Instead, ask the Vendor why he’s billing an amount
different from that agreed to on your Purchase Order.
The Purchase Order is a legally binding agreement. If the Vendor accepted
your Order, he’s obligated to provide the item for the price specified, and
you’re obligated to pay that amount according to the terms.
You can do this yourself, without getting the Inventory Clerk involved, as
you can reprint the original purchase order directly from TotalFBO® at your
workstation.
If the Vendor adjusts his billing, you need not make any changes to the
Payable Invoice. However, if you are forced to pay the billed amount, you
will have to adjust the invoice, but not just yet.
Now there’s a problem in that the inventory records show this item at the
ACCOUNTING & BACK OFFICE OPERATIONS
TotalFBO® User Guide | 133
wrong cost. These records need to be corrected, too.
In addition, if the item has already been placed on an open shop order, the
journal entry for the cost of the item, and also the selling price of the item,
may be wrong, so the shop order needs to be corrected, too.
Correcting Inventory and Shop Order Records
The order in which you take these steps is important:
1.
Remove the item from the open shop order. This returns it to inventory in
stock.
2.
Use the Return Shipment Function to get the item out of inventory at the
original cost.
3.
A Credit memo for the original amount will automatically be created.
4.
Apply this credit memo to the original invoice at Accounting> Payables>
Other Invoice Operations> Apply Credit Memos on File.
5.
Now you’re ready to Receive the Shipment again. Adjust the selling
price if necessary using the Update Prices button while in the Shipment
window. Also specify the Shop Order and Discrepancy number this item
should be sold on.
6.
When you OK the Shipment, a new Payable invoice will be created for the
correct amount.
See Helpscreen topic:
Receiving Shipments
The Payables Clerk can and should take these corrective steps personally. In
most FBOs, the Inventory Clerk is too busy with new purchases to spend time
making old corrections. Consequently, these issues languish in the In-Basket,
the Shop Order gets closed with the wrong information, and the problem
becomes even more complicated.
Since the Inventory Clerk helped the Payables Clerk by automatically creating
the Payables Invoice when receiving the shipment, it’s only fair for the
Payables Clerk to return the favor by making corrections personally!
If the Shop Order has already been closed or the Invoice posted, it’s too late to
take these steps. Instead, there’ll be some research to do before you can take
appropriate action. You must determine what Cost of Sales account the item
was posted to when it was sold:
If it was a single part on an invoice, you need only find the journal entry for
that sale. Use the Selected Journal Entry Listing in the Accounting module to
find all journal entries for that invoice number.
A/P
INV
134 | TotalFBO® User Guide
ACCOUNTING & BACK OFFICE OPERATIONS
If it was sold on a shop order, you should still print the journal entry, but
now there may be several different cost accounts listed, and you need to find
the correct one. Here’s where you get to think like a computer. Look up the
following information:
Locating Cost of Parts Sold Account Used for a Closed Shop Order
What is the Automatic Ledger List
account for Part Cost of Sales, Line 59?
What Inventory Department does this
part belong to?
Avoiding this effort is easy.
Just make sure the Purchase
Order is correct BEFORE the
order is shipped!
What is the Override account (if any)
on the Inventory Department for Cost of
Sales?
What General Ledger Department was on
the Shop Order?
What is the Override account (if any) on
the General Ledger Department for Parts
Cost of Sales?
What General Ledger Department was on
the Discrepancy?
What is the Override account (if any) on
the General Ledger Department for Parts
Cost of Sales?
The account used will be the last one in the list. Verify that it is one of the
numbers in the actual journal entry you printed out.
1.
Once you know the correct Cost of Sales account for the part, adjust the
Payable Invoice to the new amount.
2.
Insert a new Disbursement Line and enter the Cost of Sales Account.
Then press the $F5 key to insert the correct amount, which may be
positive or negative.
3.
DO NOT ADJUST THE EXISTING DISBURSEMENT LINE FOR THE
INVENTORY ASSET ACCOUNT.
4.
Uncheck the Hold box and OK the invoice.
5.
It is not possible to update the inventory record itself at this point.
ACCOUNTING & BACK OFFICE OPERATIONS
TotalFBO® User Guide | 135
Apply COD and Credit Card Pre-payments
If the Purchase Order specified C.O.D. payment, you should see it as the PrePayment Type when you review the Payable Invoice. If not you can select it
now. Then you should click the Pre Payment Check ellipses button to view
currently available C.O.D. checks.
Select the check that matches this order and it will be applied as a payment on
the invoice. Now you’re ready to uncheck the Hold for Review box and OK
the invoice.
If the C.O.D. check fully paid the invoice, then your work is done. If not, you
can pay the remainder with a separate check.
In similar fashion, you can see a reference to the company credit card which
was used for pre-payment if the Inventory Clerk noted it on the Purchase
Order. If not, you can select the credit card now.
Then when you uncheck the Hold for Review box and OK the invoice, it
is automatically marked Paid in Full. But a new invoice is created for that
amount on the Credit Card account. A note in the Comments field references
the original purchase invoice for you.
Using this method is not only fast, it also provides a consistent audit trail for
purchases. You won’t have to wonder how it was paid before you look it up
in your database when a question comes up. All purchases will be listed as
Payable Invoices for the correct vendor, regardless of how it was paid for.
Post Other Payables
Although purchases of inventory items may be a large part of your payables
workload, there will be other invoices that you’ll enter manually. These will
include employee expenses for travel, charter trips, and incidentals, as well as
utility bills, insurance premiums, and all the rest of your operating expenses.
These will be entered at Accounting> Payables> Update Vendor Invoices.
Although you’ll be warned, it’s perfectly permissible to have duplicate Vendor
Invoice Numbers in your database. TotalFBO® uses the internally-generated
Invoice ID (Displayed in the top right corner of the window) to keep track of
invoices.
If you are posting something which has no invoice number, as many utilities
bill do, it’s not necessary to make something up just to get the system to
take it. When you have to look for that invoice later, it will be difficult to
remember what you made up! Instead, enter the account number or other
identifier which is actually printed on the bill, even if it duplicates previous
billings.
See Helpscreen topic:
Payable Invoices
136 | TotalFBO® User Guide
ACCOUNTING & BACK OFFICE OPERATIONS
If you find that you’re entering the due date manually often, be sure to sidestep
and update the Vendor Account with the correct payment terms. This will save
you many keystrokes later.
You can create a credit memo just by checking the Credit? box at the top of
the window, and either apply the credit to another invoice, or just list it along
with other items when you create a check. It’s not necessary to create a “zero
dollar” check in TotalFBO® just to clear an invoice and matching credit
memo.
If you own or lease aircraft, the Controller will be preparing either Aircraft
Profit and Loss statements for your own management, or else Leaseback
reports for the aircraft owners. This report can scan Payables and Checking
for expenses which relate to an aircraft and include those items in the report.
When Payables are scanned, the system is searching for any disbursement line
which references the appropriate tail number.
You’ll be inserting tail numbers for Charter Expenses, and also “overhead”
items such as insurance premiums.
You may use several disbursement lines on an invoice to split the amount
between aircraft tail numbers, even though the same General Ledger Account
number is used for each line.
Watch out! Don’t enter the tail number on parts purchased for an aircraft
which will be posted to a Shop Order. When your data is scanned, the report
will include the Shop Order AND the payable invoice, doubling the expense
on the report.
You can also enter trip numbers on the disbursement line, along with the tail
number, for charter expenses.
See Helpscreen topic:
Paying a Deposit to a
Vendor
Reconcile Travel Advances (Or make Vendor deposits)
If a charter pilot or other employee is given a travel advance, you’ll need to
be sure that expenses are posted properly and the difference either paid to the
employee or received from the employee.
The simplest way to handle this is to treat it as though it were a deposit to any
other vendor. We want to issue a check but leave a credit memo sitting on the
vendor’s account
•
For a normal vendor deposit, we’ll issue the check from the Checking
module and code it to the Pass-Thru-Transfers account.
ACCOUNTING & BACK OFFICE OPERATIONS
•
TotalFBO® User Guide | 137
Then we’ll prepare a Payables Credit Memo and disburse it to the same
Pass-Thru-Transfers account.
For a travel advance you can use the same procedure or substitute your Travel
Advance Asset account for the Pass-Thru-Transfers account.
When the expense report is submitted, post each item normally.
When you reimburse the employee for these expenses, the credit memo will
automatically be used to reduce the net amount of the check.
Verify Credit Card Statement
When a credit card is used for pre-payment or you select a credit card instead
of a check to pay an outstanding invoice, the original Payable Invoice is
marked Paid in Full.
At the same time, a new invoice is created for that amount and posted to the
Vendor Account which controls your company credit cards.
That means that when the credit card statement is received each month, you
should already have all the charges posted as Payable Invoices. Some of them
will be the result of inventory purchases, as we’ve seen, and still others will be
posted by you as you enter expenses for Charter trips, or post other employee
expense account items.
You’ll simply need to print either the Vendor Activity Report or the Vendor
Invoice Listing and compare to the statement.
If there are items on the statement which you do not have posted, you’ll need
to consider adjusting your internal procedures for those employees who are
trusted with the company credit card.
You’ll also have to obtain backup documentation of the charges and post them
as new Payable Invoices.
See Helpscreen topic:
Clear Core Charge Credits
When a mechanic removes a part from a customer’s aircraft that may be
repairable, you will typically order a replacement item on an Exchange basis
from the Vendor.
This means that you pay a lower price for the new part if you send the old part
back to the vendor and it is found to be repairable.
However, if the part isn’t returned on time or isn’t repairable, you must pay
a might higher price for the part. This added amount is referred to as a Core
Charge, and it can be quite a significant sum of money.
Cores
138 | TotalFBO® User Guide
ACCOUNTING & BACK OFFICE OPERATIONS
Therefore, it’s vital to your company that there be some control over this
process. If you have to pay a core charge, you can usually pass the cost on to
a customer:
See Helpscreen topic:
Making Payments to
Vendors
•
Sometimes you will just go ahead and bill the customer for the core
charge and then refund his money later if the core is acceptable. This is
typically the case for transient customers.
•
In other cases, you may simply provide a warning on the shop order and
bill for the additional core charge if you are billed by the vendor. This is
typically the case for your locally-based customers.
TotalFBO® provides a complete core-tracking system. Be sure to refer to the
Shop Operations section of this Guide, Core Tracking topic for an overview of
the entire core charge cycle.
When cores are returned to the vendor, it’s usually a good idea to also
select the appropriate customer’s name on the Credit Memo that’s created
automatically. That way, it’s easy to track down the customer you need to
credit or bill later, using the Invoices by Customer report in the Payables
module.
The problem is that the process of removing and returning the core is handled
in the Shop, without the knowledge and involvement of the Payables Clerk.
But one day you’ll simply see a credit amount on your vendor’s statement
perhaps with little or no explanation.
This will be your only notice that the core has been accepted for repair, but
your task is to identify it and close the core record.
You’ll have good clues by running the Cores Outstanding report from the
Inventory module. Listed here will be all those items you’re looking for
an answer about. You should be able to match the item to the credit you’ve
received.
Complete the core-tracking cycle by using the Receive Shipments function
to complete the Purchase Order which was used to send the core back to the
vendor.
If necessary, issue an invoice or credit memo to the customer, and make a note
of it on the Cores record at Inventory> Update Cores.
If you are notified that the core is not repairable, use the same method, but
manually adjust the Core Status on the record to show Discarded.
ACCOUNTING & BACK OFFICE OPERATIONS
TotalFBO® User Guide | 139
A common problem with cores is that vendors differ widely in their response
times. Unless you nag some vendors, it can be many months before you are
credited for a repairable core. Some larger FBOs have found that withholding
payment until a core status is determined can result in answers as soon as
10 days. Consider adding terms to your Purchase Order indicating your
requirements for Vendor performance in this area.
Pay Bills
Vendor invoices are paid at Accounting> Payables>Make Payments> Pay
Invoices. But the process usually begins with running the Payments Due
report from the Payables module.
This report allows you to look forward to a specified date and see all the items
that require cash between now and then. You can include not only vendor
invoices, but also Note payments due, Lease payments due, and Tax liabilities.
Typically, the Payables Clerk prepares the report and the Controller marks it
with the items that should be paid with the next check run. Then the report can
be used as an efficient guide to preparing the payments.
From the Pay Vendor Invoices window you can select one or more vendors
and display the invoices which have been approved to pay. You can even set
the Cut-Off date to match the date you used on the Payments Due report, so
that items which you do not want to pay are eliminated from view.
You need only select the items you wish to pay, either in full or partially, and
then select the payment method you wish to use.
Checks & Withdrawals
Most of your items will likely be paid with a check, and you’ll also select this
option if an automatic payment has been drafted from your account.
•
If you’re using a check, verify the starting check number and select
the date that should appear on the check. Then you can print the check
immediately, or simply add it to batch you can print later.
•
If you’re posting a draft, such as for a fuel load delivered, select
Withdrawal as the Entry type and enter the reference number of the draft.
Withdrawals are not printed as checks, but you can print a reference copy
using the “Blank-Paper” format.
Credit Card
If you select credit card, you’ll be asked to select the vendor and specific credit
card used for the payment. A new invoice for this amount will be posted to the
vendor’s account, and you may enter a reference note to help you identify the
charge.
See Helpscreen topic:
Making Payments to
Vendors
140 | TotalFBO® User Guide
ACCOUNTING & BACK OFFICE OPERATIONS
Cash Debit
This payment method is really just a journal entry that also marks the Payable
Invoice as paid.
You won’t use this method frequently, but it will come in handy for certain
situations. Often this is the case when a business is short on cash and so the
owner simply pays some company bills out of his own pocket, perhaps by
using a personal credit card.
In this case, you’ll need to mark the vendor invoice as being paid on the
company books, but you don’t have a source of funds that belongs to the
company to do it with. Using the Cash Debit, you can select the owner’s
Equity account as the source of funds. When the business can pay the owner
back, the balance in that Equity account will be reduced.
Another common example results when actual Petty Cash is used to pay an
item which was posted as a payable invoice. Using the Cash Debit, you can
show the item as paid and offset it to reduce the balance in the Petty Cash
Account.
Pay for Fuel Loads Received
If the fuel supplier automatically drafts the payment directly from your
account, use the Withdrawal type payment discussed above.
If the fuel supplier is also your credit card processor, it is common to receive
a credit for your fuel billings instead of receiving the proceeds from closed
credit card batches.
See Helpscreen topic:
In this case you’ll need to post a credit memo to the Payables account, so that
you can pay any remaining fuel loads with a check. And at the same time, you
need to show that the credit card batches have been “paid.”
Move Money Between
Receivables & Payables
You can do both transactions at the same time with the function at Accounting>
Payables> Other Invoice Operations> Move Money Between A/R and A/P.
A single screen asks you to select the vendor and customer accounts to credit,
the amount of money, and any credit card fees which were deducted by the
vendor.
Both credit memos are created simultaneously, with a corresponding pair of
journal entries, utilizing the Pass-Thru-Transfer account again.
You can then proceed to use or apply the credit memos in both Receivables
and Payables.
Be careful not to change or delete either of these credit memos. Doing so
would cause a balance to remain in the Pass-Thru-Transfer account. This
TotalFBO® User Guide | 141
ACCOUNTING & BACK OFFICE OPERATIONS
MOVE MONEY BETWEEN A/R AND A/P
(Automatic Payables Function)
Holding Company Customer Account
Closed Batches
$1000
Vendor Credit Memo
-$ 950
Credit for Fees
-$ 50
Balance:
Receivables Credit Memo
$950
$
Fuel Company Vendor Account
Fuel Loads Invoiced
$5000
-$ 950
Vendor Credit Memo
0
Balance:
Pass-Thru
Transfer Account
$ 4050
Payables Credit Memo
$950
$50 Fee
Move Money
Credit Card Fee
Expense Account
This function is commonly used when the fuel supplier
also processes credit cards for you.
Other cases occur whenever a customer performs
a service in trade.
account should always have a Zero balance, as its only purpose is to enable
posting a pair of journal entries at the same time, so that detail ledgers for two
separate Control Accounts can be maintained in sync with the General Ledger.
142 | TotalFBO® User Guide
ACCOUNTING & BACK OFFICE OPERATIONS
Pay Notes and Leases
Notes and leases are paid from functions on the menu at Accounting>
Payables>Make Payments. You’ll follow exactly the same steps as if you were
paying a vendor’s invoice. But instead of entering a new payable each month,
you’ll simply select the current payment due for the note or lease you have
established.
In the case of notes, you’ll be able to alter the payment amount and adjust
the split between principal and interest by selecting the Partial/Over Payment
button. This is especially helpful in the case of variable interest rate notes,
and certain balloon payment notes.
Monitor Inventory Adjustments
The Payables Clerk is usually responsible for working closely with the
Inventory Clerk and the Line Manager to insure that regular physical inventory
counts are being taken. When a count is made of parts or tanks are metered,
any differences between the actual count and the quantity in TotalFBO®
should be adjusted.
This is handled using the function at Inventory> Other Parts Operations>
Update Physical Inventory.
Sometimes the count is taken in the other departments and the actual
adjustment is entered by the Payables Clerk. For more details, see the Shop
Operations section of this Guide, Physical Inventory Process topic.
Other Payables Functions
You’ll want to monitor the Vendor Accounts in your database and see that all
information is noted on the account, such as 1099 information, payment terms,
and any identifying account numbers which should appear on the stub.
In addition, you can merge duplicate accounts at Accounting> Payables> Other
Vendor Operations> Merge Two Vendors. All activity on the first account is
moved to the second account, and then the first account is deleted.
Another special procedure you may need is available in the Helpscreens:
• Paying an Owner’s Personal Expenses
Though this practice is not generally recommended, in very small companies
where the owner has loaned money to the company, it is common for the
company to use its cash flow to assist the owner in return.
TotalFBO® User Guide | 143
ACCOUNTING & BACK OFFICE OPERATIONS
PHYSICAL INVENTORY
ESTABLISH A PLAN
FOR COUNTING
IN SECTIONS
ON A SCHEDULE
Following your written plan,
count small sections of your
inventory throughout the year.
Must be written
Compliance must be
documented
GENERAL LEDGER
Inventory Assets
Lost Parts Expense
JANUARY - SECTION A
Physical Inventory
Worksheet
Count items.
Initial and note
Date Counted
on each Worksheet
No need to rush entering
Updates since adjustments
are applied using the
Count Date.
Quantity in
Stock Adjusted
Update
Physical
Inventory
Adjustments Made
Qty in Stock on Count Date:
10
Qty Received since Count Date: + 5
Qty Sold since Count Date:
-2
Current Quantity Today:
13
144 | TotalFBO® User Guide
ACCOUNTING & BACK OFFICE OPERATIONS
Payroll Clerk
These duties are sometimes a cooperative effort between department heads
throughout the company and someone in the Accounting Department.
Handling payroll well involves making sure the payroll is prepared accurately,
remitting deductions and taxes to the proper payees promptly, and maintaining
appropriate information for the benefit of employees, company, and
governmental authorities.
With a single, tightly-integrated database, this coordination is generally
smooth, and the effort of preparing payrolls is greatly reduced.
Verify Timecards
Timecard information can be entered into the system at Accounting> Payroll>
Update Time Cards/Pay/Checks. However, in practice you may have to enter
very little of this information manually.
Billable Hours
Most of the hours for flight instructors, charter pilots and mechanics which was
billable to customers is already captured in the system. The Billable Hours
report, available in the Invoicing, Shop Order, and Payroll modules provides
a valuable tool for reviewing this information before you begin payroll
preparation.
It is common for Flight Schools to provide this report to Flight Instructors and
require them to verify it against their personal logbooks. In this way, errors on
both payroll and customer billing can be corrected quickly.
Billable Hours can be pulled into a timecard, if desired. However, there will
always be bits of time which must be paid to an employee but which is not
billable to customers. This includes meetings, leave time, and other nonbillable activities.
Entering these additional hours manually to the timecard can be a tedious task.
It would be easier to create an additional shop order or invoice using a special
non-billing customer to capture this time.
Then ALL of an employees time would be included in the Billable Hours
report, and building the time card becomes much faster.
Time-Clock
An alternative method of capturing time is to use the Time-Clock function.
Each employee can clock in and out from their own workstation or a
designated unit. Shop mechanics can even clock in and out of specific
Shop Order Discrepancies throughout the day so that billing can be updated
automatically as well.
ACCOUNTING & BACK OFFICE OPERATIONS
TotalFBO® User Guide | 145
Continue to monitor these areas:
Add New
Employees
Payroll
Clerk
Setup
Taxes
Setup
Deductions
Regular duties and responsibilities:
Verify Time
Clock
Verify Billable
Hours
Prepare
Payroll
Pay Tax
Deposits
Remit
Deductions
Promptly
Clear Payroll
Advances
Reconcile
Insurance
Invoices
Prepare
Quarterly
Reports
Prepare W2s
and 1099s
146 | TotalFBO® User Guide
See Helpscreen topic:
Using Time-Clock
ACCOUNTING & BACK OFFICE OPERATIONS
When you build the time card, you’ll also be offered the opportunity to include
these hours. Before getting to this step, you’ll probably want to verify the
hours using the Time-Clock Listing report or on the screen at Accounting>
Payroll> Update Time-Clock Entries. If necessary, make any corrections before
proceeding with the payroll. Although you can alter the timecard after the
hours have been pulled into it, you’ll save time by correcting any clock errors
first.
You can use either or both systems as long as you’re careful not to duplicate
hours on a single employee. Timecards can be prepared individually or
TotalFBO® can create all timecards for active employees who are paid for the
period you’re working with.
See Helpscreen topic:
Making Time Cards
See Helpscreen topic:
Prepare & Commit Pay
After you have determined the basic number of hours to be included for the
payroll, you’ll be able to split that total number of hours between Regular Pay,
Overtime Pay and Double Time pay.
Also on the timecard, you can pay special types of pay, such as bonuses and
commissions, and even reimburse an employee for a personal expense.
Prepare Payroll
Preparing the payroll is the process of calculating and posting the payroll as
well as printing the actual employee checks.
You’ll be able to adjust all of the employee and employer tax and deduction
amounts, if you’re trying to match a manually calculated check or previous
system, for instance.
You can override or change the amount of any deduction “on the fly,” so that
you don’t have to stop the process while you update an employee’s account.
The pay calculations are based on the employee’s personal information, your
deduction setup, the tax tables, and the employee’s hours from the timecard.
Once you have approved the pay calculation, you’ll take the step to Commit
Pay. This locks in the calculations and posts the journal entry for the payroll.
Since checks are not printed immediately in this step, the amount of the net
check is posted to a special Liability account called Accrued Net Payroll.
See Helpscreen topic:
Making the Paycheck
Prepare Paychecks
The next step is to print actual checks. You can also select Withdrawal as the
payment means and then provide the money to your employees through direct
deposit into their bank accounts.
Although you could print each check individually, this is usually done as a
batch operation unless a separate check printer is maintained.
ACCOUNTING & BACK OFFICE OPERATIONS
TotalFBO® User Guide | 147
Preparing checks can be done individually or as a batch also. The journal
entry is a simple one; crediting the bank account and debiting the Accrued Net
Payroll account.
Make Corrections
Preparing payroll in TotalFBO® is like walking up or down a flight of stairs.
You can walk in either direction, but you must take all steps in order.
Thus, if you have completed the payroll process and discover and error, begin
with the step you’re on and work backwards until you find the source record
you need to adjust.
For instance, you may need to change a deduction amount. To accomplish that
you’ll want to void the check and cancel the Commitment. This reverses both
journal entries. Now you can correct the deduction and follow the steps again
to produce a corrected check.
If you need to make a correction that doesn’t change the amount of the
net check, you should first Delete the check from the Checking module at
Accounting> Checking> Update Checking Entries. This not only reverses the
journal entry, but frees the check number for use again.
Now you can make your correction and recreate the paycheck, using the
original check number again.
Make Tax Deposits
Actually the fourth step to preparing payroll is to make the required tax
deposit(s). Although you could make a check for the proper amount from
either the Payables or Checking module, making it from the Payroll module
also updates your tax deposit amounts on the 941 report and enables you to
track payments on reports.
Deposits and payroll tax payments are handled through Accounting> Payroll>
Update Tax Deposits.
Enter any date range which is appropriate and the click the Perform Scan Now
button. This process builds the deposit amounts automatically from the actual
timecards stored for each employee
Then you’ll simply select the tax you’d like to pay, approve or change any
amount or date information, and OK the payment. If you’re using a check
you’ll have the option of printing the check immediately, or including it in a
batch for printing later. For 941 deposits, select Withdrawal and drop your
coupon at the bank!
See Helpscreen topic:
Making the Tax Deposit
148 | TotalFBO® User Guide
ACCOUNTING & BACK OFFICE OPERATIONS
Transmit Deductions
When money is deducted from an employee’s pay, the company assumes a
fiduciary responsibility to insure that these funds are handled promptly and
appropriately.
For instance, some states now automatically garnishee the wages of every
divorced partner who’s responsible for making child support payments. Stiff
penalties apply to the employer for late payment to the District Attorney’s
office.
Other deductions, such as those for 401K plans, must be transmitted to a
broker or other financial institution promptly. Not only will the employee lose
the benefit of the investing when deposits are late, but Federal Laws mandate
that all payroll funds be available to an employee immediately as of the time
and date of the payroll issuance.
To make this process simple for yourself, always print the Deductions Taken
report to use as a guide and prepare checks from the Checking or Payroll
modules immediately.
See Helpscreen topic:
Employee Advances
Clear Payroll Advances
Payroll advances are issued by writing a check through the Checking module
and selecting Employee Advance as the transaction type. This selection
enables you to choose an employee as the Payee, forces the distribution to the
correct Employee Advances Asset account, and updates the Advances record
which is part of the Employee’s Basic Record.
As deductions for the advance are taken from paychecks, the Advances record
is updated to show the payment history and reduced balance, and the Employee
Advances Asset account is reduced.
You’ll want to use your Deductions Taken report to monitor this flow of data
and verify that each advance is fully repaid.
Reconcile Health Insurance Premium Statement
Use your deductions taken report to verify that each employee covered by the
plan has been charged properly on the premium statement.
If you have used the Employee’s deduction to reduce the employer’s expense
account, just post the statement as a payable invoice, disbursing it to the
expense account.
If you have posted both the Employee’s and Employer’s portions to an Accrual
account, be sure the premium statement is posted as a payable and disbursed to
the Accrual account to avoid duplicating the expense.
ACCOUNTING & BACK OFFICE OPERATIONS
TotalFBO® User Guide | 149
Typical entry for payroll, whether created automatically
Understanding
Accounting Processes: by the system, entered manually, or imported. Your state
may allow deductions for additional items not shown.
COMMIT PAYROLL
DR
Gross Wages
CR
Wages Expense
FIT deducted
FIT Payable
SIT deducted
SIT Payable
FICA deducted
FICA Employer share
FICA Payable
FICA Expense
Medicare deducted
Medicare Employer share
Medicare Expense
Health Insurance deducted
Health Insurance Employer share
Workers Comp Insurance
Medicare Payable
Health Insurance Accrued
Health Insurance Expense Health Insurance Accrued
401K deducted
401K Employer share
FICA Payable
Medicare Payable
401K Payable
401K Expense
401K Payable
Workers Comp Expense
Workers Comp Accrued
Child Support Garnishments
Garnishments Payable
Uniform Expense deducted
Uniform Expense
FUTA
FUTA expense
FUTA payable
SUTA
SUTA expense
SUTA payable
Expense Reimbursement
Expense
Net Check Amount
Accrued Net Payroll
MAKE PAYCHECKS
Net Check Amount
DR
CR
Accrued Net Payroll
Checking Account
Note that in this example the Workers Comp and Health
Insurance amounts are posted as accruals, whereas a deduction
such as Uniform Expense is simply posted as a credit to the
employer‛s expense account. This is because insurance premiums
are subject to detailed audit and often have deposit or prepaid
premiums involved. The accrual process is considered a more
proper method and it provides a bit more detail.
150 | TotalFBO® User Guide
ACCOUNTING & BACK OFFICE OPERATIONS
Typical entries for checks and withdrawals used to remit
Understanding
Accounting Processes: taxes and other deductions from employee paychecks.
941 TAX DEPOSIT
DR
CR
FIT Payable
FICA Payable
Medicare Payable
Total Deposit Amount
Checking Account
STATE TAX DEPOSIT
DR
CR
SIT Payable
Total Deposit Amount
Checking Account
401K REMITTANCE
DR
CR
401K Payable
Total Deposit Amount
Checking Account
CHILD SUPPORT GARNISHMENTS REMITTED
DR
CR
Garnishments Payable
Total Payment Amount
Checking Account
FUTA PAYMENT
DR
CR
FUTA Payable
Total Payment Amount
Checking Account
SUTA PAYMENT
DR
CR
SIT Payable
Total Payment Amount
Checking Account
ACCOUNTING & BACK OFFICE OPERATIONS
TotalFBO® User Guide | 151
Prepare Quarterly Reports
The primary report you’ll produce is the IRS 941 report. TotalFBO® can
produce this report automatically for you and print it faithfully on plain paper,
saving much time in report preparation.
Prepare the report at Accounting> Payroll> Forms. Again you’ll select the
quarter you want to work with and click the Re-Scan button to build the data
for this report.
After scanning you can edit any of the information you wish. However, after
you have checked the box Has this 941 Form been Filed? no more changes to
this report will be allowed, though it can be reprinted if necessary.
For state and local reports, use one of the Earnings reports in the Payroll
module.
Prepare Annual 1099s and W2s
At the same location you can prepare 1099s, W2s, and related transmittal
forms W3 and 1096. These reports are printed on standard forms, available
form the IRS or from any office supply store.
If you are using a laser printer, you’ll need to make multiple passes for the
1099s and W2s.
Again, after scanning the information, you can edit individual forms manually.
Thus, it is possible to create a 1099 or W2 in TotalFBO® even if the payroll
data for the year is incomplete.
When you have your annual worker’s compensation audit or review, use the
Worker’s Comp Analysis and the Regular/Overtime Hours reports to support
your premium calculations.
Other Payroll Functions
These days, companies are required to maintain more and more Human
Resources information, and it must be available on a moment’s notice.
TotalFBO® provides an entire section of each Employee’s record for just
this kind of data, including personal statistics, background information,
dependents, injuries sustained, OSHA events, and even a Miscellaneous area
where you can enter additional notes.
Tracking leave time is done through the Vacation/Sick-Leave Report.
The Payroll Register and the Pay History Reports are useful in answering
requests from state and federal agencies for information.
See Helpscreen topic:
Printing Payroll Reports
and Forms
152 | TotalFBO® User Guide
ACCOUNTING & BACK OFFICE OPERATIONS
Controller
This function is responsible for monitoring cash handling within the
organization, verifying the General Ledger’s accuracy, and preparing tax and
financial reports. Not only does all this work need to get done, it needs to get
done in an orderly and repeatable cycle each and every month—thus the title of
“Controller!”
Monitor Cash
Good cash controls protect everyone within an organization, and it’s the
Controller’s job to insure that all cash is handled and accounted for properly.
You’ll be managing cash in three areas:
See Helpscreen topics:
•
•
•
Cash Register
Petty Cash
Undeposited Receipts
Each day the cash register should be closed out and only the original change
fund cash left in the drawer.
Cash a Check for Someone
Handle Petty Cash
All the cash, checks, and credit card slips which are removed should match
exactly to the Sales Receipts report in the Invoicing module.
Always establish Petty Cash custodians within the company, and do not allow
employees to take money from the till for petty cash expenses.
Most FBOs also refuse to allow check cashing at the Front Counter, but
when you find that it’s necessary, a procedure is available which will allow
the balance of both cash and checks to reflect properly on the Sales Receipts
report.
As customers make payments and deposits, these amounts are posted as Debits
to the Undeposited Receipts Asset Account. When they’re deposited into a
bank account, the Undeposited Receipts account is cleared.
Good cash control requires that this account be monitored continuously to
insure that deposits are being made and posted properly. The balance in this
account should equal actual cash in the till at ALL times.
See Helpscreen topic:
Checkbook Entries
Post Banking Transactions
Checks can be created within TotalFBO® from Payables, Payroll, and in the
Checking module. Regardless of the source, all activity can be monitored in
the Checking module bank account records at Accounting> Checking> Update
Checking Entries.
ACCOUNTING & BACK OFFICE OPERATIONS
TotalFBO® User Guide | 153
Continue to monitor these areas:
Setup
Users &
Security
Setup Chart
of Accounts
Setup
Automatic
Ledger List
Setup
Department
Overrides
Controller
Setup Bank
Accounts
Regular duties and responsibilities:
Post checks &
deposits
Prepare Sales
Tax Reports
Balance bank
accounts
Posting WIP
Reconcile
Detail Ledgers
Prepare FET
Tax reports
Leaseback
Statements
Financial
Statements
154 | TotalFBO® User Guide
ACCOUNTING & BACK OFFICE OPERATIONS
There are seven Entry Types, covering all possible methods of increasing or
reducing your bank balance:
Increasing Money
When working with the Check1. Deposit
ing Browse Screen, always be
2. Wire In
sure to select the correct
3. Interest Paid
checking account first.
Reducing Money
4. Check
5. Wire Out
6. Withdrawal
7. Service Charge
Deposits
AFTER the deposit is made at the bank, record the transaction in TotalFBO®
by inserting a new record on the Checking Browse Screen. After selecting
the Deposit Entry type, enter a description of the deposit in the “Pay To/
Description” field. You can add further notes on the Comments tab, as well.
FILING TIP:
Attach a copy of the Sales
Receipts Report to your
Deposit Receipt to detail
customers whose checks
were included in the deposit.
Attach photocopies of any
vendor refund checks.
Deposits disbursements will default to the Undeposited Receipts account,
which will usually be correct if we assume that most of your deposits are the
result of sales transactions.
However, sometimes you’ll be depositing money from other sources, such
as notes, vendor or deposit refunds, or vending machine proceeds. These
amounts much be disbursed on the deposit to the appropriate expense, liability
or income account.
A common error results when you fail to correctly disburse a deposit. The
Undeposited Receipts account, which is supposed to be cleared after each
day’s deposit, begins to build a credit balance.
On the other hand, if deposits are short because employees used money from
the cash register for other expenses, the Undeposited Receipts account will
have a debit balance.
Transfers
Moving funds from one checking account to another really requires posting
two separate transactions, if you were to post manually.
We want to have a deposit with register detail and a matching journal entry in
one account, and a withdrawal transaction with details and journal entry for the
second account.
We could simply post a check and disburse it to the second account. But while
our general ledger would be correct, there would be no supporting detail for
the deposit.
ACCOUNTING & BACK OFFICE OPERATIONS
TotalFBO® User Guide | 155
The Transfer function on the Checking Browse window smoothly handles both
transactions and both journal entries at one time, using the Pass-Thru Transfers
account to net the journal entries correctly.
You need only click the Transfer button, fill in the details of Amount, Date, and
Entry Type (check, EFT, etc.), and let TotalFBO® do the rest!
Voiding and Deleting Items
You can void or delete any item, even if it was created in the Payroll or
Payables module, from the Checking Browse window.
When you select an item and click one of these buttons, a reversing journal
entry is made. You will be asked to specify the date you want to take this
action. The default is the original date of the item, however, you may need to
choose a later date.
For instance, say you’ve closed your fiscal year and several months later you
find that a vendor lost one of y our checks. You’ll want to void and reissue the
check as of the CURRENT date, rather than changing the ending balances for
your fiscal year.
However, there is one difference in the way the checking record is handled:
•
•
Voiding a check leaves the record in your register detail so you can see
what happened.
Deleting an item removes the record completely. This is useful if you
need to re-use the same check number.
Bounced Checks and Customer Refunds
When eiher of these situations are encountered, you’ll handle them in almost
the same way with a two-step procedure:
1.
See Helpscreen topic:
Handling a Bounced Check
2.
You’ll need to create a check or withdrawal to reduce the balance in your
checking account.
In addition, you’ll need to adjust the balance on the Customer Account.
Begin by creating the check or withdrawal in the Checking module. The
account you specify on the Disbursements line will be the Pass-Thru-Transfers
account.
Then create an invoice on the Customer’s Account. In both cases, you’ll be
charging the account, either to eliminate a credit balance or to restore a balance
that didn’t get paid off because the check bounced.
You’ll use a Service line and again select the Pass-Through-Transfers account,
entering the same amount as the checking entry.
156 | TotalFBO® User Guide
ACCOUNTING & BACK OFFICE OPERATIONS
If you wish, you may add an additional Service Line, selecting your
Miscellaneous Income account, to charge the customer a fee for handling the
bounced check. Be sure to get at least as much as the bank took from you!.
Interest, Service Charges and Fees
Do not simply post journal entries for bank fees and interest when you’re
reconciling the bank statement. Although the General Ledger would be
correct, you will be missing detail in the check register. Use the Service
Charge or Interest Entry Types in the checking entry, as necessary.
The correct disbursement accounts will be selected for you automatically for
either of these Entry types. Just enter the date and amount, and you’re on your
way.
Reconcile Bank Accounts
Although it’s not absolutely necessary to handle bank account reconciliations
using the function in TotalFBO®, it can save you a lot of valuable time and
allow reprinting of your lists of both reconciled and un-reconciled items.
See Helpscreen topic:
Reconciling to the Bank
And, when the reconciliation is complete, you have the option of making
it “permanent.” Then if you need to “undo” your markings in a later
reconciliation effort, you can safely undo back to the Permanent reconciliation
point.
Make your reconciliations at Accounting> Checking> Register Reconciliation>
Reconcile to Bank Statement.
You’ll begin by entering the date of the bank statement you’re working with
and the ending balance on the statement. Then proceed to checking off items
that have cleared. You can save your work and come back to it as often as
necessary.
When there is no Out of Balance amount the option to make the reconciliation
permanent will be offered as you OK the window.
If you‛ve been using the
program for a while but not
been using this function,
contact Tech Support for
assistance in marking all old
item as reconciled quickly so
you can begin working with
current data.
Post Work in Process
Early on the first of each month you’ll want to post Work in Process for open
shop orders at Accounting> Shop Orders> Post Work in Process. See the
Shop Operations section of this Guide, Work in Process topic for a detailed
discussion of the requirements and benefits of posting Work in Process.
It’s important to close all shop orders promptly when the job closes and not
“back date them. Many FBOs struggle to close each month because so many
jobs are being finished and closed for the previous month. This practice makes
it difficult to manage cash flow and difficult to reconcile Inventory.
See Helpscreen topic:
Posting Work in Process
ACCOUNTING & BACK OFFICE OPERATIONS
TotalFBO® User Guide | 157
WORK IN PROCESS
Posting WIP posts
the current value
of the Shop Order
immediately.
LABOR
Discrepancy
Charges
LABOR INCOME
PARTS
Post
Work in
Process
Parts Lines
Core Charges
Freight
PARTS COST
MISC
INVENTORY ASSETS
PARTS INCOME
CORE INCOME
FREIGHT INCOME
CONSUMABLES
INCOME
FREIGHT INCOME
Consumables
Gen. Freight
WORK IN PROCESS
(ASSET)
This permits
"Income
Matching"
with your
current
Cash &
Expenses!
Close
Shop Order
Payroll
Accounts
Payable
Closing the job will
adjust income or
cost as needed
AND
Clear the
WIP account
LABOR COST
CASH
INVENTORY
ASSETS
ACCOUNTS
PAYABLE
WORK IN PROCESS
(ASSET)
ACCOUNTS
RECEIVABLE
(ASSET)
SALES TAX LIAB.
158 | TotalFBO® User Guide
ACCOUNTING & BACK OFFICE OPERATIONS
In addition, the Work in Process function is designed to be used immediately
at the end of the month. If you “back-date” the entry, parts will be correctly
posted based on your dates, but Labor amounts will include all totals through
the current date.
If you do not post Work in Process, be sure to print the Inventory Summary
report for Open Shop Orders. You’ll need it to reconcile the Inventory
Valuation to the General Ledger Control Account balances.
• Parts on the Summary report may NOT be in the Valuation (see option)
• Parts on the Summary report ARE still in the GL AControl Account
This is because parts on open shop orders have already been removed from
inventory counts, but the journal entry for the shop order has not been posted
yet.
Posting WIP causes the shop order journal entry to be made early, except that
sales tax liability is not posted, customer accounts are not updated, and the
total is posted to the WIP asset account instead of to Accounts Receivable.
When the Shop Order closes, final adjustments to income and cost accounts are
made, tax liabilities are posted, the customer account is updated, and the WIP
account is cleared.
The Work in Process Breakdown report always shows you the detail by shop
order number of the balance in the GL account NOW.
The Work In Process History, provides a detail of each WIP posting entry.
Avoid making any manual journal entries to the WIP account.
See Helpscreen topic:
Bad Debt Write-Offs and
Recoveries
Adjust Bad Debts
The Customer Account record contains a Bad Debt field. If you write off a
bad debt, the amount is automatically posted to this field as a protection. As
long as the field is not empty, you cannot delete or purge this account. And,
if the customer returns and attempts to do business with you again, a warning
message will appear, reminding you of the write-off.
By posting an invoice on the customer account which credits the account
balance to the Bad Dept Expense account, you’ll update the balance correctly
and also update the field on the Customer Account.
Post Depreciation
TotalFBO® is a fully date-sensitive program. This means that it is not
necessary to wait until a particular point in time to make a journal entry. For
ACCOUNTING & BACK OFFICE OPERATIONS
TotalFBO® User Guide | 159
example, if you know that you want to make a journal entry each month to
depreciate an item, you can make the entries immediately, retroactively, or in
advance by simply entering the appropriate date.
Reconcile Detail Ledgers to Control Accounts
Each of the other clerks is doing their best to insure that the detail ledger
transactions are complete. It falls to the Controller to make sure that the detail
ledgers balance to the General Ledger Control Accounts.
If you do not permit entries to the Control Accounts, a major source of
discrepancies is removed. If you are unable to reconcile completely, it may
be necessary to obtain Tech Support guidance. See Helpscreens and Monthly
Balancing Checklist for details on procedures.
Verify General Ledger
Note that the Close activity only affects Receivables, so that you’re sure that
information you send to customers on their monthly statments cannot be
changed.
No Financial Close function is necessary in TotalFBO® because the General
Ledger is entirely date-sensitive. This means that every time you post a
journal entry, the balances are updated for every period for every fiscal year
you currently have in your database.
You don’t have to force the system to roll current earnings into retained
earnings at year-end, for instance, because these balances have always been
adjusted. If you run a report prior to Fiscal Year End, you’ll see the activity
included in Current Earnings. If you open the next Fiscal Year and run a
balance sheet, those same amounts are already included in Retained Earnings!
However, you’ll still want to go through the effort to verify that your data
is correct before distributing reports that others will rely on. Refer to the
Monthly balancing checklist for a recap of the checks and reconciliations
which should be performed monthly. In addition to the Control Accounts,
several accounts should be monitored closely:
•
•
•
•
Suspense and Pass-thru-Transfers should never have a balance.
Undeposited Receipts should always match the current amount of money
in the till.
Work in Process should always balance to the Work in Process Breakdown
Report.
If you’re working in an Enterprise multi-location database, the Due To/
From accounts should net to Zero when added together globally.
The individual clerks who handle each area may assist by completing the
initial review steps, which are then quickly verified by the Controller using the
See Helpscreen topic:
Reconciliation of Detail
Ledgers
Receivables
Recurring Charge Summary
Unclosed Charge Summary
Blank Reference Lines
Uncommited Transactions
Fuel Meter Justification
Aircraft Time Justification
Billable Hours Report
Un-Posted Transactions
Un-Posted Entries Listing
Pending Invoice Summary
Un-Applied Payments Report
A/R Change Report
Discrepancy Analysis
A/R Aging Report
Verify Recurring Charges billed (or bill now)
Verify no open Credit Card Batches for month - close any open charges
Verify no Invoices are missing tail numbers on sales detail lines - correct if necessary
Verify no Invoices or Shop Orders are only partially processed
Verify all fuel sales are posted
Verify all aircraft time invoiced
Verify Instructor time invoiced properly
If Batch Posting, check for Unposted Invoices
If Batch Posting, check for Unposted Checks
Verify any pending invoices are appropriately still pending at month-end
Verify no un-applied payments on customer accounts
Reconcile changes to Receivables for Regular Customers and Holding Companies
Verify no database discrepancies remain for A/R or Invoicing (Options 3, 8, 9)
Review Aging for obvious problems
Receivables
Interest Charged Summary
Customer Statements
Airline Fuel Statements
Compound Account Statements Receivables
Verify Interest charges
Print and Mail Customer Statements
Print and Mail Airline Summary Invoices
Print and Mail College Invoicing for Flight School Students
Receivables
Receivables
Receivables
Close Statements for the Month
Receivables
Utilities
Receivables
Invoicing
Invoicing
Checking
Invoicing
Invoicing
Invoicing
Invoicing
Invoicing
Aircraft
Receivables
Shop Orders
(or) Run Inventory Summary for OPEN Shop Orders ON the LAST DAY of the MONTH Inventory Summary
Location
Shop Orders
Report
Post Shop Orders Work in Process ON the LAST DAY of the MONTH
Close Receivables
Task
Month of:
Monthly Balancing Checklist
160 | TotalFBO® User Guide
ACCOUNTING & BACK OFFICE OPERATIONS
Complete
Utilities
Payables
Checking
Payables
Discrepancy Analysis
Payments Due Report
COD Check Listing
Vendor Aging Report
Verify no database discrepancies remain for A/P (Option 1)
Verify payments for notes, leases and taxes were made
Verify all COD checks applied to vendor invoices received
Review Aging for obvious problems
Inventory
Utilities
Fuel/Oil Summary
Discrepancy Analysis
Verify Fuel and Oil quantities match current levels closely
Verify no database discrepancies remain for Inventory (Option 4)
Physical Inventory Adjustments Inventory
Verify scheduled Physical Inventory counts were taken and applied
Inventory
Inventory Change List
Verify changes occurred at reasonable cost (Change Details w/Net Change Total)
Inventory Review
Verify no database discrepancies remain for Checking (Option 5)
Utilities
General
Ledger
GL Account Detail
Compare Cash in Drawer to G/L Undeposited Receipts account
Discrepancy Analysis
Checking
Register-Style Listing
Print Register-style Listing (file with Bank Statement and Reconciliation)
Reconcile and replenish Petty Cash on Hand
Checking
Register Reconciliation Report
Verify bank statement was reconciled to database
Check Register & Cash Review
Payables
Location
Unposted Invoices
Report
If Batch Posting, check for Unposted Payables
Payables Review
Task
Month of:
Monthly Balancing Checklist
ACCOUNTING & BACK OFFICE OPERATIONS
TotalFBO® User Guide | 161
Complete
General
Ledger
Inventory
Shop Orders
Payroll
Invoicing
Receivables
Payables
Checking
GL Account Detail
Inventory Valuation
Work In Process Breakdown
Pay History Report
Sales Tax Report
A/R Aging Report
Vendor Aging Report
Register-Style Listing
(Enterprise Only) Verify Due To/From account nets to Zero (run from Location Zero)
Compare Inventory Value at Month End to G/L Control Accounts (Departments
Separate)
Compare Shop Order W.I.P. Breakdown to G/L Control Account Balance
Compare Payroll Reports to G/L Control Account Balances
Compare Sales Tax Summary Report to G/L Control Account Balances
Compare Receivables Aging Report to G/L Control Account Balance
Compare Payables Aging Report to G/L Control Account Balance
Compare Bank Account register balances to G/L. Control Account Balance
Print and file regular monthly reports from each module and financial statements
as desired
File
General
Ledger
Income Statement
Verify that Net Profit equals Current Earnings on Balance Sheet
Make monthly Backup and store off-site
General
Ledger
Balance Sheet
Verify that Assets equal the net of Liabilities and Equity
Financial Reports & Backup
General
Ledger
General
Ledger
Trial Balance
Print Trial Balance and verify it’s in balance. Use for further steps.
Verify Zero Balance on Suspense & Pass-Thru Transfer accounts (or make corrections) GL Account Detail
Utilities
General
Ledger
Location
Discrepancy Analysis
Report
Verify no database discrepancies remain for General Ledger (Options 2, 5, 6, 7)
Change Fence Dates to prevent changes to data while reports are being reconciled
General Ledger Validation & Reconciliation to Detail Ledgers
Task
Month of:
Monthly Balancing Checklist
162 | TotalFBO® User Guide
ACCOUNTING & BACK OFFICE OPERATIONS
Complete
ACCOUNTING & BACK OFFICE OPERATIONS
TotalFBO® User Guide | 163
reports listed.
The final reconciliation of detail ledgers to the General Ledger is usually
handled by the Controller. It’s a good idea to move the Fence Date forward
before beginning the reconciliation effort in order to prevent unexpected
changes to balances as new transactions are posted. If adjustments are
necessary, you can move the open access to the prior period, make the
adjustment, and then move the Beginning Fence Date forward again.
Prepare Tax Reports
Your Payments Due report from the Payables module will allow you to recap
the balances outstanding in your General Ledger Liability accounts for the
range that includes your tax items.
As you begin to prepare the actual returns, however, you’ll need to refer to
specific reports within TotalFBO®. As there are several different kinds of
taxes and fees to prepare and remit, so there are several reports available to
you.
PAYROLL TAXES
Use the Federal, State or Local Earnings Reports to detail earnings for each
agency.
You can create the quarterly 941 report from the Forms menu in the Payroll
module. Scan your payroll records, make any adjustments you like, and print
the form on blank paper, including your deposit record.
To actually make payments of payroll taxes, use the Update Tax Deposits
function in the Payroll Module instead of creating a check in either the
Payables or Checking module.
The Tax Deposits window scans your data and reconfirms the expected
payment totals for you. You can select the tax and amount you wish to pay,
and create the check or withdrawal entry as you would in the other modules.
But if you use this function, your payments will also be included on reports
such as the 941 report.
FUEL TAXES
If you prepaid FET or other taxes when you received fuel from the dealer,
these amounts will not be posted to a Liability account as part of every sale.
However, it’s possible that JetA could be delivered FET prepaid and you
would have to pay FET on Avgas sales yourself.
Be sure that a recent fuel delivery invoice for each fuel type was reviewed
when fuel taxes were established on each Fuel Type inventory record, so these
entries could be made correctly as sales are posted.
See Helpscreen topic:
Paying your Taxes
164 | TotalFBO® User Guide
ACCOUNTING & BACK OFFICE OPERATIONS
If you must remit fuel taxes, use the Fuel Sales Spreadsheet in the Invoicing
module to detail amounts you need to report. Don’t let this very large
spreadsheet-style report intimidate you! It simply has everything you could
ever want to know about fuel sales on one report, but you’ll find a nice
summary section at the end. You can also export the report for manipulation
on a spreadsheet.
You can easily see total number of gallons sold and the taxes collected.
FLOWAGE FEES
There are two ways airports collect Flowage Fees. The most common is to
charge the FBO a fee on each gallon of fuel sold. The other method is to
charge a fee on each gallon of fuel delivered to the FBO from the fuel supplier.
If you’re being charged on fuel delivered, it’s likely that your fuel dealer is
collecting and paying the fee for you. If not, use the Inventory Received report
in the Inventory module to report gallons received for each fuel type in the
period.
Flowage fees you owe based on sales of fuel are handled in the same way as
the other fuel taxes discussed above. Use the Fuel Sales Spreadsheet to detail
sales.
LANDING FEES
When you must report landing fees collected to an airport, don’t bother
creating a manual spreadsheet - just run the Service Line Breakdown report in
the Invoicing module and select your Landing Fees account. You can even sort
the report by tail number, if desired.
SALES TAXES
The Sales Tax Report, in the Invoicing Module, is designed to provide you
with flexible reporting options to make preparing most state tax returns easy.
Because some states require details on exempt sales, you can even export
information so that you can make it fit almost any format.
Sales may be Non-Taxable
if the item or service is not
marked taxable.
Sales may be Exempt if the
Customer is marked as
exempt.
The Sales Tax report divides your sales into ten basic categories. Each
category is further defined by those sales which took place at each tax rate used
and any exempt sales. (Note that a Zero tax rate is not the same as an Exempt
sale.)
If you run the report for just your Internal and Non-Billing customers, you’ll
pick up any Use Taxes which are owed for company use of taxable items you
purchased wholesale.
The Report shows calculates how much you owe and compares it to the
TotalFBO® User Guide | 165
ACCOUNTING & BACK OFFICE OPERATIONS
GROUPS ON SALES TAX REPORT
1
FUEL
2
OIL
3
PARTS
4
AIRCRAFT
From Invoices
From Shop Orders
Fuel Lines
Fuel sold on a Parts Line
Oil Lines
Oil sold on a Parts Line
Parts Lines
Parts sold on a Parts Line
Miscellaneous (Consumables)
Aircraft Lines
n/a
5
SERVICE
Service Lines
Freight
Outside Labor
Outside Parts
Outside Repair
Hourly Labor
Flat Fees
Freight
Miscellaneous Repair
6
CHARTER
Charter Lines
n/a
7
RENTAL
Rental Line
n/a
8
INSTRUCTION
9
M ISCELLANEOUS
10
DISCOUNT
Instruction Line
Miscellaneous Line
Discount Field
Discount Field
When selling a service on an invoice or a shop order discrepancy, if you
select a GL Account which is not an Income Account, the total will be shown
as a "Non-Income" service. These are often adjustments, such as writing
off a bad debt or expensing credit card fees, and not actually taxable
sales items.
166 | TotalFBO® User Guide
ACCOUNTING & BACK OFFICE OPERATIONS
amounts you actually collected. There will usually be a small difference due
to rounding on individual transactions. If there is a large difference, run the
report with the Detail Section included. All sales transactions included on the
report are detailed and any items are flagged on which the actual tax collected
varies from the tax calculated at the current rate.
Each transaction is categorized into Taxable, Non-Taxable, Exempt, and NonIncome Services columns.
When you’ve prepared your return, create a check which is disbursed to the
matching Sales Tax Liability Account. Send any difference in the amount
collected and the amount remitted to your Miscellaneous Income account.
AIRPORT COMMISSIONS
Your Sales Tax setup also includes any other fees which are based on a
percentage of sales, and many airport commissions fall into this category. You
can use the Sales Tax Report in Invoicing to detail these sales as well.
FET
Federal Excise Tax is reported on a 720 form, and it’s paid on a wide variety
of sales from many different kinds of businesses, so the form itself can be
confusing. Get good advice from your NBAA office if you need guidance!
• Charter FET
For FET owed on Charter operations, use the Charter Sales Report in the
Invoicing module to detail flights and charges.
• Fuel Sales FET
See the Fuel Taxes discussion above.
• Recapture FET on Charter Fuel
If you prepay FET on fuel deliveries, then put that fuel in your aircraft used
for Charter Operations, you may be able to recapture the FET on those gallons.
The Fuel Sales by Aircraft report in the Invoicing module, is a fast way to total
these gallons, or you can use any of the other Invoicing reports that detail fuel
sales by customer.
OTHER CHARTER TAXES & FEES
The Tax and Fee Summary report in the Charter Module will total these items
for any period. Use your Charter Sales Report for details.
STATE ROAD TAX RECAPTURE
If you don’t use aviation fuel in your ramp vehicles, you’ll probably pay
typical state and federal taxes as part of the purchase price. These taxes are
used to develop and maintain our streets and highways. However, most states
will allow you a partial credit for these taxes if you never put the vehicle on a
ACCOUNTING & BACK OFFICE OPERATIONS
TotalFBO® User Guide | 167
public road.
All you have to do is list the vehicles and their purpose, then report the number
of gallons purchased in the period which are subject to the refund.
This is easy to do, if you set up your ramp equipment with one or more
“tailnumbers” in your aircraft module. Then as fuel is dispensed to the vehicle
(either from your own Mogas supply or from an outside purchase) a fuel log is
made to record gallons consumed.
You can see these totals on the Fuel Consumption Report in the Aircraft
Module.
Prepare Financial Statements
Printing Financial Statements is something you can do whenever you want to,
all month long. There are several options available when you print the reports,
including consolidating totals, using sub-total ranges to add titles and totals to
your printout, and grouping information by department.
Of course, you’ll print the Balance Sheet and Income Statements. You can
also print a Cash Flow statement, jut as easily, and see at a glance how your
business activities are funded.
Preparing a Cash Flow Statement manually requires some effort, so you’ll
usually pay extra for one from your CPA. But once you assign your balance
sheet accounts to the proper categories, TotalFBO® will do the work at the
click of a button.
See the Appendix at the back of this Guide for a worksheet to help you setup
your Cash Flow Statement properly.
See Helpscreen topic:
Financial Statements and
Accounting Reports
If you must consolidate
financials from multiple
databases, see
Helpscreen topic:
Consolidating Financial
Information
Prepare Aircraft Owner Reports
For the Aviation Industry, an additional financial statement which is essential
to good business management is an Income and Expense Statement for each
owned or managed aircraft. In TotalFB®, this report is called the Aircraft
Leaseback/P&L report.
See Helpscreen topic:
You’ll use the same Leaseback report, from either the Aircraft or General
Ledger modules, to prepare financial statements for each aircraft and also to
prepare Owner reports of income and expenses for the period.
Leaseback/P&L Report
This report is designed to scan your entire database, looking for information
that relates to the aircraft tail number you specify. Then the data is grouped
into Income and Expense sections, along with a reconciliation of the number
of hours that elapsed on the aircraft meter (Hobbs or Tach) during the period.
168 | TotalFBO® User Guide
ACCOUNTING & BACK OFFICE OPERATIONS
AIRCRAFT LEASEBACK - PROFIT & LOSS REPORT
GENERAL LEDGER
Account Activity
CUSTOMER INVOICE
Charter Sales $ + Hrs.
Rental Sales $ + Hrs.
Service Line Sales
Off-Site Fuel Cr. $ + Gals.
Delivered Fuel/Oil
VENDOR INVOICE
Overhead Expenses
RECONCILIATION OF
HOURS FLOWN:
Income/Owner/Maintenance
INCOME
EXPENSES
Charter Fuel Purchased
NET PROFIT (LOSS)
CONSUMPTION
Fuel Logs
Oil Logs
Details of Invoices and Items
included above
SHOP ORDER
Maintenance Charges
MAINTENANCE LOG
Maintenance Charges
CHECKING ACCOUNT
Checks for Expenses
Details on Income and Expenses
are pulled by Tail Number
from your entire database
according to your definition.
ACCOUNTING & BACK OFFICE OPERATIONS
TotalFBO® User Guide | 169
In the Aircraft module options, you’ll set a basic set of defaults for how you’d
like the information to be scanned and displayed on the report.
However, because there are so many variations in Owner agreements, you can
also customize these settings on Tab 5 of each aircraft record. Once you have
established customized settings, they’ll be used automatically each time the
report is run.
Remember that a customer
account record contains a
Maintenance Account option.
You can make adjustments to options and test their effect on a report, as
needed. However, it’s important to coordinate your selections with the way
expense items are entered to Payables or Checking. Each of those transaction
disbursement screens includes a field for entering the aircraft tailnumber. But
if you’re scanning Shop Orders for maintenance expenses, you’ll only enter the
tailnumber when you’re entering two types of expenses:
Fuel purchased off-site
Overhead items, such as insurance.
Checking this box means that
Shop Orders on this account
will flow to the Leaseback
report AND any hours flown
will appear as Maintenance
Hours in the meter
reconciliation section.
If you enter the tailnumber on purchases of Parts, for instance, they’ll be
duplicated on your report as both the Shop Order and Payable totals are
scanned.
Create a separate Non-Billing
account for doing maintenance
runups and inspection flights.
Once you have the report, what do you do with it? The best answer is to post
an invoice for the bottom line of the report to the Owner’s customer account.
Then send the report along with the statement. This gives both you and the
owner a single place to look for all transactions, and helps you avoid cash flow
problems.
Some maintenance costs may be subject to your owner lease agreement, and
so should be included on the report. Other items such as unusual maintenance,
fuel, or billing for the Owner’s use of his aircraft will appear separately on his
customer account. Some FBOs have gotten into trouble when they cut a check
for the amount they owe based on the Leaseback report, then find that the
Owner is delinquent in paying his other charges.
If everything appears on the statement, you can just pay any net credit balance
remaining on the account.
Journal Entries
Although your TotalFBO® system makes most of the required journal
entries automatically, you’ll occasionally need to make your own entries for
adjustments or Fixed Asset depreciation.
As we’ve seen thus far, individual journal entries are made immediately for
each transaction as it’s posted. This makes for an excellent audit trail, which
makes it each to see if an item was changed after origination and by whom.
170 | TotalFBO® User Guide
See journal entries that were
made on one date but affect
a different date (like adjustments to a prior month) using
the Cross-Dated Journal
Entries report.
ACCOUNTING & BACK OFFICE OPERATIONS
Some accountants prefer a batch posting method, and you can choose that
option in TotalFBO® though it’s not recommended except perhaps for security
reasons when posting payroll. If you select Batch Posting, be sure to lock
down your security so that changes to transactions are not allowed EVER.
Otherwise, tracing the effect that a particular item had on the General Ledger is
very difficult.
Normally, each change to a transaction produces one or more additional entries
that reverse and adjust the original journal entry. Find all entries that relate to
a transaction, customer or vendor by using the Selected Journal Entries Listing
report in the General Ledger Module. Enter any text to scan for in journal
entry descriptions.
Making a Manual Journal Entry
You can make any journal entry at Accounting> General Ledger> Make
Standard Journal Entries.
• Normal
Enter date and a good description, including any transaction number, so you
can find it easily if needed. Then select two or more accounts to update and
the amount(s).
You’ll not be allowed to leave the screen in an out of balance condition. If you
fail to heed the warning, any discrepancy amount will be posted to Suspense.
• Post-Year
You can also make a special type of adjusting entry that helps you prepare
year-end reports in two formats.
The Post-Year entry adjusts the Year-End balances ONLY - without adjusting
any single month’s balance. When you run financial reports you can run them
with or without these entries to get two versions of your reports. A footnote is
added to the printout for clarity.
Thus you can see financials before and after adjustments or with two different
versions of depreciation calculations.
Note that these amounts ARE included in beginning balances for the next fiscal
year.
Other Posting Operations
Although you can do anything you like with a Manual Journal Entry, using
these special entry forms can save you keystrokes and improve accuracy. Find
them at Accounting> General Ledger> Other Posting Operations.
•
Reverse an Existing Entry
ACCOUNTING & BACK OFFICE OPERATIONS
TotalFBO® User Guide | 171
If you need to reverse an entry that was made, whether manually or
automatically, just select it from the list here and it’s done. In addition, the
entry is marked “Reversed” so you can see it on reports and you won’t be
allowed to reverse the same entry twice.
• Move JE to New Date
If an item was just posted with the wrong date, you’d need to reverse the entry
and then enter it again with a different date.
This screen will let you simply enter the new date and the work is done for
you!
• Make Auto-Reversing Entry
If you like to make month-end accruals which must be reversed on the first of
the following month, this one’s for you!
Make your entry and enter both the effective date and the reversing date.
You’ll get two entries for the price of one. Remember, since TotalFBO®
is totally date-sensitive, you’ll get the figures you need every time just by
running the report for the date you want to see.
Special Procedures
See Helpscreen topics for these special procedures:
Capitalizing Aircraft Maintenance
Broker an Aircraft Sale
Sell Refurbished Aircraft
Exporting Data to Other Programs
Using TotalFBO® Data with other Programs
Setting Budgets
Year-End Considerations
The following pages detail typical Accounting Processes and how they should
be handled to affect your General Ledger properly. Sometimes it’s been a long
time since Accounting 101, and it can be hard to come up with the right way
to handle something. These charts should help you get on track quickly. And
your Tech Support specialist is experienced with Accounting and can help you,
too.
See also the Appendix at the end of this Guide for a listing of the default
journal entries within TotalFBO®.
Procedure Details follow with step-by-step instructions for many of the
transactions Accounting Staff will handle. Additional Procedure Detail sheets
follow the Front Counter and Ramp Operations section also.
New to Accounting?
See Helpscreen topic:
A General Ledger Primer
172 | TotalFBO® User Guide
ACCOUNTING & BACK OFFICE OPERATIONS
Typical entry for handling Workers Compensation
Understanding
Accounting Processes:
WORKERS COMPENSATION PREMIUM DEPOSIT
Deposit Amount
DR
CR
Deposits/Prepaids (Asset)
Checking Account
ACCRUALS EACH PAY PERIOD
Payroll Totals
DR
CR
Workers Comp Expense
Workers Comp Accrued
WORKERS COMPENSATION PREMIUM STATEMENT
Monthly Payment Amount
DR
CR
Workers Comp Accrued
Accounts Payable
CLEAR PREPAID AT FINAL AUDIT, PAY FINAL PREMIUM
DR
CR
Deposit Amount
Workers Comp Expense
Deposits/Prepaids (Asset)
Premium Statement
Workers Comp Expense
Accounts Payable
If policy will continue, you may just "roll" the deposit into the next year.
You should monitor the balance of an Accrual Account - don't pay
more from it in premiums than you put in it from Payroll expenses!
ACCOUNTING & BACK OFFICE OPERATIONS
TotalFBO® User Guide | 173
Typical entry for posting Payables related to Payroll
Understanding
Accounting Processes:
HEALTH INSURANCE PREMIUM STATEMENT
Monthly Payment Amount
DR
CR
Health Insurance Accrued
Accounts Payable
WORKERS COMPENSATION PREMIUM STATEMENT
Monthly Payment Amount
DR
CR
Workers Comp Accrued
Accounts Payable
UNIFORM SERVICE STATEMENT
Monthly Payment Amount
DR
CR
Uniform Expense
Accounts Payable
Typical entry for amortizing Prepaid Expenses
Understanding
Accounting Processes:
POST THE PREPAYMENT AS A PAYABLE
Prepayment Amount
DR
CR
Deposits/Prepaids (Asset)
Accounts Payable
DR
CR
Accounts Payable
Checking Account
PAY THE INVOICE
Make the Check
MONTHLY JOURNAL ENTRY TO AMORTIZE
Monthly Payment Amount
DR
CR
Expense
Deposits/Prepaids (Asset)
Make journal entries on a regular schedule until Prepayment Amount is Zero.
Take advantage of Date-Sensitivity - post all entries at once!
174 | TotalFBO® User Guide
ACCOUNTING & BACK OFFICE OPERATIONS
Typical entry for Making a Deposit to a Vendor.
Understanding
Accounting Processes:
POST CHECK - LONG-TERM DEPOSIT (i.e., FOR UTILITY)
Deposit Amount
DR
CR
Deposits/Prepaids (Asset)
Checking Account
POST CHECK - SHORT TERM DEPOSIT TO VENDOR
Deposit Amount
DR
CR
Pass-Thru-Transfers
Checking
POST CREDIT MEMO - SHORT TERM DEPOSIT TO VENDOR
Deposit Amount
DR
CR
Accounts Payable
Pass-Thru-Transfers
This method leaves an outstanding credit balance on the Vendor's account.
ACCOUNTING & BACK OFFICE OPERATIONS
TotalFBO® User Guide | 175
Typical entry for Making a Purchase from a Vendor for
Understanding
Accounting Processes: an Inventory Item, and subsequent sale.
POST THE PURCHASE AS A PAYABLE
DR
CR
Purchase Amount
Inventory (Asset)
Accounts Payable
Freight Charges
Freight Expense
Accounts Payable
DR
CR
Accounts Payable
Checking Account
DR
CR
Cost of Sales
Inventory (Asset)
Freight Billed
Accounts Receivable
Freight Income
Sales Price Amount
Accounts Receivable
Parts Income
PAY THE INVOICE
Make the Check
SELL ON A SHOP ORDER
Purchase Amount
176 | TotalFBO® User Guide
ACCOUNTING & BACK OFFICE OPERATIONS
Typical entry for Making a Purchase from a Vendor for
Understanding
Accounting Processes: an Inventory Item, using a COD check as payment.
PAY THE DELIVERY SERVICE
Make the Check
DR
CR
COD Holding Account
Checking Account
POST THE PURCHASE AS A PAYABLE
DR
CR
Purchase Amount
Inventory (Asset)
Accounts Payable
Freight Charges
Freight Expense
Accounts Payable
MATCH CHECK TO PAYABLE INVOICE
Purchase Amount
DR
CR
Accounts Payable
COD Holding Account
In this example, freight charges are billed separately.
Typical entry for Making a Purchase from a Vendor for
Understanding
Accounting Processes: an Inventory Item, using a Credit Card as payment.
POST THE PURCHASE AS A PAYABLE
DR
CR
Purchase Amount
Inventory (Asset)
Accounts Payable
Freight Charges
Freight Expense
Accounts Payable
MATCH CREDIT CARD TO PAYABLE INVOICE
DR
CR
Invoice Amount
Accounts Payable
Pass-Thru-Transfers
Invoice Amount
Pass-Thru-Transfers
Accounts Payable
A new invoice on the Credit Card vendor account (bank) is made referencing
the original charge item.
ACCOUNTING & BACK OFFICE OPERATIONS
TotalFBO® User Guide | 177
Typical entry for paying a Vendor but then having to
Understanding
Accounting Processes: get a refund check.
POST THE PURCHASE AS A PAYABLE
DR
CR
Expense
Accounts Payable
DR
CR
Accounts Payable
Checking Account
Purchase Amount
PAY THE INVOICE
Make the Check
RETURN ITEM, CREATE CREDIT MEMO ON VENDOR ACCOUNT
Purchase Amount
DR
CR
Accounts Payable
Expense
PAY THE INVOICE BY CASH DEBIT
Refund Amount
DR
CR
Pass-Thru-Transfers
Accounts Payable
Misc. Expense
Accounts Payable
DR
CR
Checking Account
Pass-Thru-Transfers
Remaining Difference (if any)
DEPOSIT THE REFUND CHECK
Refund Amount
178 | TotalFBO® User Guide
ACCOUNTING & BACK OFFICE OPERATIONS
Typical entry for Charter Pilot Travel Advances
Understanding
Accounting Processes:
MAKE ADVANCE CHECK
Advance Amount
DR
CR
Travel Advances A/R
Checking Account
POST EXPENSE REPORT FOR FLIGHT (AS SEPARATE PAYABLES)
Hotel bill
Fuel purchased
Cash expenses for meals & tips
DR
CR
Lodging Expense
Accounts Payable (Visa)
Charter Fuel Expense
Accounts Payable (FBO)
Meals Expense
Accounts Payable
(Employee)
CLEAR ADVANCE - POST PAYMENT AS CASH DEBIT
Advance Amount
DR
CR
Accounts Payable
(Employee)
Travel Advances A/R
REIMBURSE EMPLOYEE - POST PAYMENT AS CHECK
Remaining Payable Balance
DR
CR
Accounts Payable
(Employee)
Checking Account
Pay Visa and FBO payables normally with separate checks.
ACCOUNTING & BACK OFFICE OPERATIONS
TotalFBO® User Guide | 179
Typical entry for Petty Cash management
Understanding
Accounting Processes:
ESTABLISH FUND
Fund Amount
DR
CR
Petty Cash
Checking Account
AMOUNT IN BOX
+ TOTAL OF RECEIPTS IN BOX
ORIGINAL FUND AMOUNT
REPLENISH BOX
DR
Receipt Amount
Office Supplies Expense
Receipt Amount
Refreshments Expense
Receipt Amount
Small Tools Expense
Total Receipts submitted
CR
Checking Account
When check is cashed and money placed in box, the total should
equal original fund amount.
180 | TotalFBO® User Guide
ACCOUNTING & BACK OFFICE OPERATIONS
Typical entry for Consignment Sales for Pilot Supplies
Understanding
Accounting Processes: or Rental Cars.
INVOICE TO CUSTOMER
DR
Sale Amount
CR
Accounts Receivable
Your 10% commission
Commission Income
Owner's 90% balance
Consignment Liability
Set the commission split on the GL account for Commission Income,
using the Auto-Distribute fields.
PAY OWNER FOR SALES MADE
Remaining Payable Balance
DR
CR
Consignment Liability
Checking Account
These items will be in a separate inventory department.
Use the Units Sold Report (Inventory) to detail sales for the Owner.
ACCOUNTING & BACK OFFICE OPERATIONS
TotalFBO® User Guide | 181
Typical entry for Sale to Customer with Credit Card
Understanding
Accounting Processes: Payment, Batch Settlement, and final Payment.
BOB INVOICE
$100 Sale
$100 CC payment
BOB'S ACCOUNT
$100 Sale
$100 Payment
DR
A/R - CC
CR
Sales Income
HOLDING COMPANY
ACCOUNT
no details
$ 0 Balance
$ 100 Balance
JOE INVOICE
$200 Sale
$200 CC payment
JOE'S ACCOUNT
$200 Sale
DR
A/R - CC
$200 Payment
CR
Sales Income
HOLDING COMPANY
ACCOUNT
no details
$ 0 Balance
$ 300 Balance
Close/Settle
Batch
HOLDING COMPANY
ACCOUNT
BATCH DETAILS:
$100 JOE
$200 BOB
$300 Total
CC Batch $300
$ 300 Balance
PAYMENT INVOICE
$300 EFT deposit
DR
Undeposited.
Receipts
HOLDING COMPANY
ACCOUNT
CR
A/R - CC
CC Batch $300
The Credit Card Holding Company becomes
responsible for making payment instead of
the original customer.
$300 Payment
$ 0 Balance
182 | TotalFBO® User Guide
ACCOUNTING & BACK OFFICE OPERATIONS
Typical entry for Prepaid Sales Taxes on fuel.
Understanding
Accounting Processes:
Initial Setup:
Create Prepaid Sales Tax Liability Account in GL "2210.50"
Assign Account 2210.50 Line 28 of Automatic Ledger List
Assign Prepaid Sales Tax to Fuel Tax #5 on Fuel Record
Assign Account 2210.50 to Line 120 of Automatic Ledger List
Set Prepaid Rate per gallon on Customer side of Fuel Taxes on Fuel Record
Set Prepaid Rate per gallon on Customer AND Liability sides of Fuel Taxes on Sub-Type
Preserve existing function for posting Use Tax:
Assign normal Sales Tax Expense Account to override on
General Ledger Department used for internal sales
Assign General Ledger Departments to all Internal and Non-Billing Customer accounts
POST PAYABLE FOR FUEL LOAD RECEIVED
DR
CR
Prepaid Tax Amount
Prepaid Tax Liability
A/P
Balance of Fuel Cost
Inventory
A/P
DR
CR
A/R
Sales Tax Liability
NORMAL SALE
No entry for Prepaid Sales Tax
Sales Tax on Purchase
WHOLESALE SALE Using Fuel Sub-Type
Prepaid Tax Passed Through
DR
CR
A/R
Prepaid Tax Liability
Sales Tax Liability Balance (CR)
- Prepaid Tax Liability Balance (DR)
Net due on Sales Tax Return
ACCOUNTING & BACK OFFICE OPERATIONS
TotalFBO® User Guide | 183
Typical entry for transactions between 2 Control
Understanding
Accounting Processes: Accounts, cleared through Pass-Thru-Tansfers.
Move Money
between
Vendor &
Customer
Refund
Credit Balance
to Customer
Bounced
Customer
Check
Deposit
Vendor
Refund
Transfer
Balance to
Another
Customer
DR
Checking
CR
DR
DR
A/P
CR
DR
DR
A/R
CR
DR
A/R
CR
DR
Checking
CR
DR
A/R
CR
If a balance ever appears in the
Pass-Thru-Transfers account
the transaction on one side
was altered or deleted.
PASS-THRU-TRANSFERS ACCOUNT
Transfer
Funds
$0
DR
DR
DR
DR
CR
Checking
CR
A/R
CR
Checking
CR
Checking
CR
A/P
CR
A/R
184 | TotalFBO® User Guide
ACCOUNTING & BACK OFFICE OPERATIONS
POSTING CUSTOMER PAYMENTS RECEIVED (ROA)
WHERE TO GO:
Accounting>Invoicing>Add New Invoices
Accounting>Invoicing>Update Invoices (press the Insert button)
Operations> Concierge> Concierge Super-Screen> Invoice Tab (press Insert button)
Accounting>Checking>Update Checking Entries>Insert Deposit>Add Customer Name to Disbursement
WHAT TO DO:
Select Customer - enter a Name, Tail number, or Account number
Press Cancel, as you have no Sales Detail Lines to enter
Add Payment Information Select the Payment Button
Enter Dollar Amount paid
Select Payment Means (select Cash, Check, or Credit Card/Other)
If using a Check, enter Check Number
If recording an EFT transfer, select Cash
If using an Offline Processor, select Offline Payment button
Enter Card Number and Expiration Date
OK the Line
If using an Online Processor, swipe card or
If card not available, click Online button
Enter card information manually
Click Authorize button
Close the Payment Window
Verify Invoice is complete and correct
REQUIRED SETUP OR OPTIONS:
Accepted credit cards have been established and
linked to proper paying authority.
RESULTING JOURNAL ENTRY:
DR
CR
Credit Cards Receivable
or
Undeposited Receipts (Cash & Checks)
Accounts Receivable - Customers
ACCOUNTING & BACK OFFICE OPERATIONS
TotalFBO® User Guide | 185
APPLYING PAYMENTS RECEIVED TO PRIOR CHARGES
WHERE TO GO:
Accounting>Invoicing>Other Invoice Operations>Apply Outstanding Credits
NOTE: If you have a high privilege level, the Apply Credits screen may automatically appear after you have entered
a payment invoice.
WHAT TO DO:
Select Customer
Select the Apply Credit Button
Select the Credit invoice your wish to apply from the top window
Select Charge invoices in the lower window and indicate whether to pay in full or partially
Select the Commit Button to lock in your choices
Close the Window
NOTE: If a payment exactly matches an outstanding invoice, payments will be applied automatically.
REQUIRED SETUP OR OPTIONS:
Payment invoice has been posted to customer’s
account.
Outstanding charges also exist on customer’s account.
RESULTING JOURNAL ENTRY:
186 | TotalFBO® User Guide
ACCOUNTING & BACK OFFICE OPERATIONS
POSTING PAYMENTS RECEIVED FROM CREDIT CARD HOLDING CO.
WHERE TO GO:
Accounting>Invoicing>Add New Invoices
Accounting>Invoicing>Update Invoices (press the Insert button)
Operations>Concierge>Concierge Super-Screen>Invoicing Tab (press the Insert button)
WHAT TO DO:
Select Customer - Credit Card Holding Company
Add a Sales Detail Line - Select Line Type (Service)
Select GL Account Number for Credit Card Fees
(Credit box will automatically be checked)
Enter a Sale Price equal to the credit card fee charged
Add Payment Information for the amount of money received (select Cash payment type)
OK the Invoice
NOTES:
a. Apply this payment to appropriate charge batch normally.
b. Verify the deposit for this payment was properly posted to the Bank Account and that the Undeposited
Receipts Account is properly cleared as a result.
REQUIRED SETUP OR OPTIONS:
Credit Card Merchant Fees Expense account is
setup on Line 115 of Automatic Ledger List.
Offline Credit Cards setup and linked to Holding
Company customers.
Online Processors setup and linked to Holding
Company customers and accepted credit cards.
RESULTING JOURNAL ENTRY:
CR
DR
DR
Credit Cards Receivables
Undeposited Receipts
Credit Card Fees
ACCOUNTING & BACK OFFICE OPERATIONS
TotalFBO® User Guide | 187
POSTING PAYMENTS RECEIVED FOR BUYBACK FUEL
WHERE TO GO:
Accounting>Invoicing>Add New Invoices
Accounting>Invoicing>Update Invoices (press the Insert button)
Operations>Concierge>Concierge Super-Screen>Invoicing Tab (press Insert button)
WHAT TO DO:
Select Customer - Buyback Holding Company
Add a Sales Detail Line Select Line Type (Service)
Select GL Account Number (Fuel Sales Income)
Check the Credit box
Enter a Sale Price equal to the difference between the cost the fuel supplier uses on the
date of payment and the fuel cost at the time of the sale.
Add Payment Information for the amount of money received (select Cash payment type)
OK the Invoice
NOTES:
a. The sale price on the original invoice may not be the final price paid by the fuel supplier, and this adjustment will be made when payment is received. Therefore, it is not necessary to attempt to get the sale price to
be extremely accurate at the time of the sale, although you should avoid overstating income by large amounts.
Adjusting the sale price of the Buyback Fuel Sub-type weekly should keep this variance within acceptable
limits.
b. Apply this payment to appropriate charge batch normally.
c. Verify the deposit for this payment was properly posted to the Bank Account and that the Undeposited
Receipts Account is properly cleared as a result.
REQUIRED SETUP OR OPTIONS:
Fuel supplier setup as Holding Company and linked
to Online Processor or Offiline cards accepted.
Buyback fuel Sub-type created with appropriate
price and taxes.
Sub-type linked to matching Online Card program.
RESULTING JOURNAL ENTRY:
CR
DR
DR
Credit Cards Receivable
Undeposited Receipts
Fuel Sales Income
188 | TotalFBO® User Guide
ACCOUNTING & BACK OFFICE OPERATIONS
AIRLINE CUSTOMER FUEL INVOICE
WHERE TO GO:
Accounting>Invoicing>Add New Invoices
Accounting>Invoicing>Update Invoices (press the Insert button)
Operations>Concierge>Concierge Super-Screen>Invoicing Tab
WHAT TO DO:
Select Customer - enter a Name or Account number
Add Sales Detail(s) Select Line Type (Fuel)
Select Item Sold (Customer’s own special fuel type)
Select Truck (or Tank)
Choose Prist? if offered and delivered
Select Fuel Meter Used to pump this sale
Enter Fuel Meter Readings, both beginning and ending readings
Enter Flight Number
Enter Ticket Number if requested
Verify Quantity and Sale Price are correct
OK the Line
Press Cancel when you have no more Sales Detail Lines to enter
Verify Invoice is complete and correct
OK the Invoice
NOTE: If flat rates or minimums apply, these are setup in the Airline’s Customer Account record. Once
established, an additional service line will automatically be added to the invoice when needed.
REQUIRED SETUP OR OPTIONS:
Customer has already been created in the Database,
with appropriate credit limit and terms established.
Customer’s Price Class has been specified.
Customer’s special Fuel Type and Minimum Fueling amount has been specified.
Customer’s Sales Tax rate and exemption status has
been specified.
Customer’s Flight Numbers are specified
Fuel Meters and Tanks have been set up.
Special Fuel Type established.
Fuel Price has been set as IntoPlane Fee.
Fuel is attached to Inventory Department with
proper GL overrides established.*
RESULTING JOURNAL ENTRY:
DR
CR
CR
CR
DR
CR
Accounts Receivable - Customers
IntoPlane Fee Income*
Sales Tax Liability
Fuel Tax Liability
Borrowed Fuel Liability*
Non-Owned Fuel Inventory*
ACCOUNTING & BACK OFFICE OPERATIONS
TotalFBO® User Guide | 189
AIRLINE CUSTOMER SUMMARY INVOICE
WHERE TO GO:
Accounting>Receivables>Statements>Airline Fuel Statement
WHAT TO DO:
Select Customer
Customize Statement to meet Airline’s requirements, showing sales and inventory details.
Print and mail Summary invoice, with original invoices or fuel tickets as requested by customer.
Note that the Airline Fuel Statement bears an invoice number at the top, which is actually the first invoice
made during the period to be billed.
All individual fuelings within the date range specified will be included, as well as service lines for hookup fees
and minimum charges if requested. Taxes and fees (if any) may be shown separately.
REQUIRED SETUP OR OPTIONS:
Customer has already been created in the Database,
with appropriate credit limit and terms established.
Customer’s Price Class has been specified.
Customer’s special Fuel Type and Minimum Fueling amount has been specified.
Customer’s Sales Tax rate and exemption status has
been specified.
Customer’s Flight Numbers are specified
Fuel Meters have been set up.
Special Fuel Type established.
Fuel Price has been set as IntoPlane Fee.
Fuel is attached to Inventory Department with
proper GL overrides established.*
RESULTING JOURNAL ENTRY:
190 | TotalFBO® User Guide
ACCOUNTING & BACK OFFICE OPERATIONS
BILLING RECURRING CHARGES
WHERE TO GO:
Accounting>Invoicing>Other Invoice Operations>Bill Monthly Recurring Charges
WHAT TO DO:
Select the Bill-Thru Date to tell the computer which unbilled items you wish to create invoices for
Verify on Tab 3 that the items to be billed are as expected.
Select the Effective Date to tell the computer when you want to date and post the invoices.
(This will generally be the first of the next month.)
Check the “Generate Summary” box to produce a report of all invoices generated
Select the number of invoice copies to be printed.
Be sure your printer is properly selected, turned on, and has enough paper.
Select the “Begin Processing” button.
NOTE:
You may check the “Allow Editing of Invoices” box if you need to enter charges for electricity use. You may
prefer to use a different “Bill-thru” date for these items when you set them up to allow you to run this batch
of invoices separately, which will speed up processing for the other invoices.
REQUIRED SETUP OR OPTIONS:
Customer has already been created in the Database,
with appropriate credit limit and terms established.
GL Account has been marked “Allow Sales.”
Recurring Charges have been set up for each tenant.
RESULTING JOURNAL ENTRY:
DR
Accounts Receivable - Customers
CR
Hangar Rental Income (or other appropriate income account)
ACCOUNTING & BACK OFFICE OPERATIONS
TotalFBO® User Guide | 191
REFUNDING A CUSTOMER’S CREDIT BALANCE (CHECK)
STEP 1 - CREATE REFUND CHECK
WHERETO
TOGO:
GO:
WHERE
Accounting>Checking>Update Checking Entries (select the Insert button)
WHAT TO DO:
Verify next check number to be used
Enter correct date
Enter Pay To the Order Of (Customer’s name)
Enter Amount
Add Disbursement Detail Select GL Number for Pass-Thru Transfers (using number or description)
Enter Amount of check (select the F5 button)
OK the Line
Enter Customer’s Mailing Address and any Stub Notes on Tab 2 if desired.
OK the Check and Print
STEP 2 - ADJUST CUSTOMER’S ACCOUNT BALANCE
WHERE
WHERETO
TOGO:
GO:
Accounting>Invoicing>Add New Invoices
WHAT TO DO:
Select Customer - enter a Name, Tail number, Phone Number (+8888), or Account number
Add Sales Detail Select Line Type (Service)
Select GL account for Pass-Thru Transfers (using number or description)
Enter Quantity Sold
Enter Sale Price for the amount to be refunded
Select the Notes Tab and enter the Check Number used to pay the Customer
OK the Line
Press Cancel when you have no more Sales Detail Lines to enter
Verify Invoice is complete and correct
OK the Invoice
REQUIRED SETUP OR OPTIONS:
Pass-Thru Transfers account must be marked to
Allow Sales.
RESULTING JOURNAL ENTRY:
DR
CR
Pass-Thru Transfers
Checking Account
DR
CR
Accounts Receivable - Customers
Pass-Thru Transfers
192 | TotalFBO® User Guide
ACCOUNTING & BACK OFFICE OPERATIONS
HANDLING CUSTOMER’S BOUNCED CHECK
STEP 1 - ADJUST CHECKING ACCOUNT FOR REFUSED DEPOSIT AMOUNT
WHERETO
TOGO:
GO:
WHERE
Accounting>Checking>Update Checking Entries (select the Insert button)
WHAT TO DO:
Select the correct bank account
Select Withdrawal
Enter correct date
Enter Pay To the Order Of (Customer’s name) & note “Bounced Check”
Enter Amount
Add Disbursement Detail Select GL Number for Pass-Thru Transfers (using number or description)
Enter Amount of check (select the F5 button)
OK the Line
OK the Withdrawal
OK the Check and Print
STEP 2 - ADJUST CUSTOMER’S ACCOUNT BALANCE
WHERE
WHERETO
TOGO:
GO:
Accounting>Invoicing>Add New Invoices
WHAT TO DO:
Select Customer - enter a Name, Tail number, Phone Number (+8888), or Account number
Add Sales Detail Select Line Type (Service)
Select GL account for Pass-Thru Transfers (using number or description)
Enter Quantity Sold 1
Enter Sale Price for the amount of bounced check.
Select the Notes Tab and enter the original Invoice Number and Check Number
OK the Line
(Add another Service Line to GL account for Miscellaneous Income if you wish to charge a Bounced Check Penalty Fee)
Press Cancel when you have no more Sales Detail Lines to enter
Verify Invoice is complete and correct
OK the Invoice
REQUIRED SETUP OR OPTIONS:
Pass-Thru Transfers account must be marked to
Allow Sales.
RESULTING JOURNAL ENTRY:
DR
CR
Pass-Thru Transfers
Checking Account
DR
CR
CR
Accounts Receivable - Customers
Pass-Thru Transfers
ACCOUNTING & BACK OFFICE OPERATIONS
TotalFBO® User Guide | 193
DEPOSIT CASH RECEIPTS
WHERE TO GO:
Accounting>Checking>Update Checking Entries (select the Insert button)
WHAT TO DO:
Select correct checking account
Select Entry Type “Deposit”
Enter correct date
Enter Pay To the Order Of - Daily Cash Receipts
Enter Amount of Deposit
Add Disbursement Detail Select GL Number for Undeposited Receipts (using number or description)
Enter Amount of deposit (select the F5 button)
OK the Line
OK the Deposit
NOTE: If some of the money to be deposited was from another source besides customer sales, such as vendor
refunds, OR, if the deposit is short because cash was used (improperly) for petty cash expenses, be sure to add
additional Disbursement Detail lines coded to appropriate GL Accounts, such as a cost or expense account.
After posting each day’s cash receipts from sales, the Undeposited Receipts GL Account should be cleared.
REQUIRED SETUP OR OPTIONS:
RESULTING JOURNAL ENTRY:
DR
CR
Checking Account
Undeposited Receipts
194 | TotalFBO® User Guide
ACCOUNTING & BACK OFFICE OPERATIONS
DEPOSIT CASH REFUNDS OR VENDING MACHINE PROCEEDS
WHERE TO GO:
Accounting>Checking>Update Checking Entries (select the Insert button)
WHAT TO DO:
Select correct checking account
Select Entry Type “Deposit”
Enter correct date
Enter Pay To the Order Of - Vendor Refund (or appropriate description)
Enter Amount of Deposit
Add Disbursement Detail Select GL Number for Expense Account (using number or description)
Select GL Number for Vending Machine Income (using number or description)
Enter Amount of deposit (select the F5 button)
OK the Line
OK the Deposit
NOTE: Be careful NOT to use the default disbursement to Undeposited Receipts for these funds.
REQUIRED SETUP OR OPTIONS:
RESULTING JOURNAL ENTRY:
DR
CR
CR
Checking Account
Expense Account
Income Account
ACCOUNTING & BACK OFFICE OPERATIONS
TotalFBO® User Guide | 195
TRANSFER FUNDS BETWEEN ACCOUNTS
WHERE TO GO:
Accounting>Checking>Update Checking Entries (select the Transfer button)
WHAT TO DO:
Enter Amount of Transfer
Enter correct date
Enter short description for your reference
Add any additional notes detailing this transaction
Select correct checking account the money is coming FROM
Select Entry Type (how was the money transferred?)
Enter Check number or other Identifying Transaction Number
Select correct checking account the money is going TO
Select Entry Type (how was the money transferred?)
Enter Check number or other Identifying Transaction Number
Click MAKE THE TRANSFER button.
NOTE: Detail entries are recorded in each bank register, and corresponding journal entries are made to the
General Ledger, using the Pass-Thru Transfers account as a clearing account.
REQUIRED SETUP OR OPTIONS:
RESULTING JOURNAL ENTRY:
DR
CR
Checking Account
Pass-Thru Transfers
CR
DR
Checking Account
Pass-Thru Transfers
196 | TotalFBO® User Guide
ACCOUNTING & BACK OFFICE OPERATIONS
POST DEPOSIT OF EFT PAYMENTS
WHERE TO GO:
Accounting>Checking>Update Checking Entries (select the Insert button)
WHAT TO DO:
Select correct bank account
Select Entry Type “Deposit”
Enter correct date
Enter Pay To the Order Of - EFT PAYMENT FOR _________
Enter Amount of Deposit
Add Disbursement Detail Select GL Number for Undeposited Receipts (using number or description)
Enter Amount of deposit (select the F5 button)
OK the Line
OK the Deposit
REQUIRED SETUP OR OPTIONS:
RESULTING JOURNAL ENTRY:
DR
CR
Checking Account
Undeposited Receipts
ACCOUNTING & BACK OFFICE OPERATIONS
TotalFBO® User Guide | 197
POST BANK CHARGES/INTEREST
WHERE TO GO:
Accounting>Checking>Update Checking Entries (select the Insert button)
WHAT TO DO:
Select the correct bank account
Select Entry Type “Service Charge” or “Interest”
Enter correct date
Enter Amount
Add Disbursement Detail Select GL Number using number or description (correct accounts should be defaulted)
Enter Amount (select the F5 button)
OK the Line
OK the Entry
REQUIRED SETUP OR OPTIONS:
RESULTING JOURNAL ENTRY:
DR
CR
Interest Income
Checking Account
or
DR
CR
Checking Account
Bank Charges & Fees
198 | TotalFBO® User Guide
ACCOUNTING & BACK OFFICE OPERATIONS
RECORDING DRAFTS FOR FUEL PURCHASES
Step 1:
WHERE TO GO:
Accounting>Payables>Update Vendor Invoices
WHAT TO DO:
Uncheck the Hold box to clear this invoice for payment.
Verify that the Gross Amount matches the amount of the draft.
OK the invoice.
Step 2:
WHERE TO GO:
Accounting>Payables>Make Payments>Pay Invoices
WHAT TO DO:
Highlight the appropriate Fuel Vendor account and Click the Select Vendor for Payment button.
Select the appropriate invoice to be paid and Click the Pay One in Full button.
Click the Pay by Check button.
Select the correct bank account and Withdrawal
Enter the identifying number for this draft in the Comments field
Check the “print” box to create a record of this entry.
REQUIRED SETUP OR OPTIONS:
RESULTING JOURNAL ENTRY:
DR
CR
Accounts Payable Liability
Checking Account
TotalFBO® User Guide | 199
FRONT COUNTER
AND RAMP OPERATIONS
FRONT COUNTER & RAMP OPERATIONS
Included in this section:
•
•
•
•
•
•
•
•
•
•
•
•
Basic Invoicing
Touchscreen Invoicing
Wireless Operation
Front Counter Workflow
Daily Fuel Reconciliations
Receiving Fuel Loads
Recirculations, Sumps & Transfers
Managing Pilot Supplies
Concierge Requests
Concierge Super-Screen
GSE Equipment Maintenance
Advanced Invoicing Procedures
Your Front Counter may be one of the busiest areas of your company, but it
shouldn’t be the most stressful. TotalFBO® is designed to make your POS
operation as smooth and rapid as possible.
This is largely accomplished by two basics:
1. Most of the information required for a sale should be setup
beforehand
2. All sales should be handled with identical procedures
In addition, TotalFBO® incorporates many features such as wireless
operation, touch screen, barcodes, and online credit card processing, which
reduces the amount of data entry to an absolute minimum.
This section will give you a
good idea of the WHAT, WHY,
and WHEN of Front Counter
and Ramp procedures.
For more details on individual
screens and fields, refer
to the Helpscreens in the
program.
Helpful references to specific
topics are available throughout
this Guide.
See Helpscreen topics
for more details
200 | TotalFBO® User Guide
FRONT COUNTER & RAMP OPERATIONS
INITIAL SETUP
Most of the initial setup will be completed by Accounting Department staff
members. This is because of the decisions which must be made to insure that
items are both priced correctly and posted to the accounting records properly.
Being very thorough with the setup means that your CSRs won’t be looking up
prices from a list or trying to remember which customer to invoice. Every sale
will be handled in the same manner, and the choices which have been made on
customer accounts will insure that even very complex transactions are handled
accurately.
FRONT COUNTER INITIAL SETUP
Inventory
Departments
Set up Inventory Departments with overrides
to appropriate accounts if income will be tracked
separately for each fuel type.
Inventory
Options
Customize names for Fixed Price and Tax fields,
decide when taxes are added to price.
Fuel and Oil
Records
Create an Inventory Record for each Fuel and
Oil type to be sold, set prices and taxes, sub-types
and volume pricing structures.
Pilot Supply
Inventory
Records
Create an Inventory Record for each Pilot Supply
Item to be sold, set prices and taxes.
Fuel and Oil
Price Classes
Set Prices
on Service Lines
Credit Card
Processing
Invoice
Options
Station-Specific
Settings
Establish Price Classes for your customers,
with formulas for providing the correct price
on each invoice.
Set prices and taxes on GL Income accounts to
be posted for Services sold.
Set up credit card processors and cards to
be accepted.
Define one or more Style Sheets for Invoices,
and select options for screens and invoice functions,
including invoice number format.
Set up printers, touchscreens, cardswipe units,
and default invoice selections.
FRONT COUNTER & RAMP OPERATIONS
This insures a short learning curve for new staff members, and consistent
results on your reports. In addition, you’ll look more professional to your
customers.
The charts on the next pages identify those areas which must be setup in order
to obtain full benefits of a smooth POS function and accurate fuel and oil
inventories.
We’ll be referring to each area as we work though the basics and then
complete a typical day together.
In the examples and discussion to follow, we’ll assume a medium-sized ramp
operation, with a branded fuel and some contract and airline fueling. Our
Front Counter area includes a small Pilot Shop with a wide variety of supplies
and gift items. Some of these items are sold on consignment. We also give
away some items as part of our advertising, and sell shirts to employees at a
discount.
TotalFBO® User Guide | 201
See Helpscreen topics:
Inventory Departments
Pricing Inventory
Fuels
Oils
Fuel Farm Operations
Receivables: Initial Setup &
Options
Customer Account Records
Set Up Credit Cards
Customizing Invoices
Fuel Farm Operations
Ground Equipment Setup
We also have several courtesy cars for use by pilots and customers, as well
as providing major brand’s rental cars. We have several fuel trucks and some
ramp equipment, and we sell all four types of fuel to various customers. We
use Avgas or diesel in our own ramp vehicles, which never get out on the open
road.
We have a wide variety of customers, and offer discounts based on volume to
both transients and based customers.
Since the FBO also has a Flight School and a Charter operation, our Front
Counter is expected to watch the schedule for these flights, too. We dispatch
the rental flights, and sometimes help with dispatching the Charter flights, too.
RAMP INITIAL SETUP
Fuel Meters
Fuel Tanks and
Trucks
GSE Equipment
Records
Create meter records for each truck and tank,
indicating number of digits in maximum reading.
Create records for each fuel tank and truck,
indicating if sales will be made directly from
this container.
Create records for piece of line equipment, tools,
and courtesy cars, setting reminders for
scheduled maintenance.
202 | TotalFBO® User Guide
FRONT COUNTER & RAMP OPERATIONS
THE INVOICE
Whether we’re looking at the normal invoice screen or the touch screen
display, an invoice has 3 basic areas:
IDENTIFICATION AREA
This area includes the Date, Invoice Number, and Customer Name.
Your Invoicing options can be customized so that you may not even have
access to the Date and Invoice Number. This is done to prevent errors and to
speed the creation of an invoice.
The options can also determine if each invoice will start with Today’s date, or
if the system will remember the last date entered.
Your Accounting Department staff will have also determined the default format
for the Invoice Number itself.
•
You may see Alphabetic characters at the beginning of the invoice if
there are multiple locations or special invoicing sequences necessary.
•
There can also be a section of the number which incorporates the last
two digits of the current year.
•
The final section of the number may include up to 8 more digits.
That might produce a number like this: TUC-04-99998888
It’s also possible to have the final numeric sequence be continuous for the
Touchscreen invoices are
optimized for speed, and so do entire company, or to have separate sequences running for each workstation or
user.
not allow changes to date or
invoice number.
Most of the time you’ll want to concentrate on getting the customer’s name
entered correctly and quickly. In fact, it could be argued that selecting the
right customer account is the most important task in building an invoice,
since so much is controlled by options which have been set on the customer’s
account record.
The best way to do this in for fueling invoices is to enter the aircraft
tail number instead of a name. Do this by typing the full tail number,
including the beginning letter.
1.
If the customer is already in your database, his aircraft tail numbers should
already be a part of his customer account record. Entering the tail number
will first search your own database and list any customers with that
FRONT COUNTER & RAMP OPERATIONS
TotalFBO® User Guide | 203
BASIC INVOICING
Date
Invoice Number
Select Customer
or Create New
from FAA database
Create Invoice
Verify date and invoice number
then select or create customer.
Phone Number +8888
Name or Acct. Nbr.
Rental Line
Service Line
Fuel Line
Tail Number N1234
Fuel Type/Sub-Type
GL Account Number
Rental Code
Truck
Quantity
Tail Number
Meter
Verify Price
Meter Out
Beg. Meter
Ending Meter
Oil/Parts/Supplies Line
Item Number
Prist?
Quantity
Ticket Number
Verify Price
Flight Number
Verify Price/Rounding
Meter In
Verify Price
Instruction Line
Instruction Code
Instructor
Verify Tail Number
Verify Quantity
Enter one or more lines on the invoice
detailing and pricing what was sold
Verify Price
Payments
Amount
Payment Means
Process Credit Card
Indicate payment and process credit card,
then print copies for file and customer
Credit Card
Signature Copy
Customer Invoice
Copy
204 | TotalFBO® User Guide
FRONT COUNTER & RAMP OPERATIONS
number on their account record. If the aircraft is owned by more than one
owner, you’ll be able to choose the account you want to invoice.
2.
Entering the tail number also automatically searches the FAA tail number
database, which contains over 300,000 aircraft for the US and Canada.
You’ll be able to create a new customer record in your database instantly,
with the FAA information already entered for you.
Be sure that you use this as an opportunity to talk to the customer and
verify the name, address, and phone number he wishes you to use. Try to
get an email address, if you can!
Limit invoices on the Cash
Sale customer to passenger
purchases of gift items and
other incidental purchases by
visitors to your ramp.
3.
You could also just post this sale to your Cash Sale customer. While this
is possible, it is not recommended except for very small FBOs. When a
customer gets added to the database, TotalFBO® begins automatically
tracking his buying habits, his volume, and other statistics which are
critical to your company’s marketing efforts.
When you’re not selling fuel, we recommend that the customer’s phone
number be entered. Do this by first typing either a “+” or an “=” key, then
enter the last 4 digits of the phone number.
TotalFBO® will automatically search all phone numbers on your customer
accounts, and select the correct one for you.
You can also enter a customer’s Account Number or part of the customer’s
name in order to search for an account record.
It is possible to cross-reference one customer account to another, so you may
While selecting a customer,
see a window which asks you to choose between accounts. This is helpful in
you can also add or change
many situations:
customer account records.
This is called SIDESTEPPING.
• when a customer wants you to bill his company and you can’t
When your changes are
remember the company name, or
complete, you‛ll be returned to
the invoice you were working
• when there are individuals who are members of a partnership, or
with.
•
when a company has changed its name and you can’t remember the
new name yet, or
•
when a company is well-known by a nickname (“Fedex”).
You can add a cross-reference on Tab 4 of the Customer Account Record.
FRONT COUNTER & RAMP OPERATIONS
SALES DETAILS AREA
Once you’ve selected the customer, you’re ready to list the items you’re selling
on the invoice. This is done by inserting Sales Detail Lines. Your invoice
options will most likely be set so that a new line pops up ready for you to work
with automatically after the customer’s name is selected.
There are ten kinds of detail lines that you could put on an invoice:
1. Fuel
2. Oil
3. Parts
4. Service
5. Rental
6. Instruction
7. Charter
8. Aircraft
9. Miscellaneous
10. Note
When you work with an invoice, you may not see choices for all ten lines.
Your Accounting Staff may have limited some lines because those kinds of
sales are not done by your company, or because those invoices are handled in a
different department.
For instance, many FBOs do not sell Aircraft, so this is typically removed from
the list just to avoid confusion.
Charter invoices are often prepared by the Charter Department, so this may be
limited by privilege level.
Another example is the Miscellaneous line. This line allows great flexibility
so that you can make unusual sales, such as the sale of an asset you didn’t
expect to sell (what if a customer offered you $1,000 for your chair?). But the
accounting journal entry that results from this line only hits the Miscellaneous
Income account.
The word “miscellaneous” is practically a dirty word to an Accountant,
whose job it is to classify everything that happens in the company into some
meaningful category. So if a lot of things fall into the Miscellaneous account,
it causes a lot of extra work in the Accounting Department.
Still, the Miscellaneous line can be useful in handling certain corrections,
such as when you’ve made a mistake on the sales taxes for a previous invoice.
So rather than eliminate it entirely from the list, this line may be limited by
privilege level so that only supervisors and accountants can use it.
TotalFBO® User Guide | 205
206 | TotalFBO® User Guide
FRONT COUNTER & RAMP OPERATIONS
Set default behavior and access for Line Types at Accounting> Invoicing>
Options and Settings> General Options> Tab 2.
Why Ten Different Lines?
Well, you’re probably already figuring out that each type of line is used for
specific things we sell. Thus, two things are true of these lines:
•
The fields on each line are customized for what we’re selling
•
Each line is programmed to make a certain kind of accounting journal
entry and to make adjustments to Inventory, if appropriate.
Thus, you can change the titles of the lines, if necessary, but you can’t make up
a new line or change the purpose of a line. For instance, you could change the
Parts line title to Supplies, if you never sell parts over the counter. Or if you
didn’t do Flight Instruction, you might use that line for Pilot Services.
We’re going to focus first on the lines that sell something from Inventory:
• Fuel
• Oil
• Parts
Then the general purpose line that we use for all kinds of ramp activities:
• Service
And finally, the lines that we use for Flight School and Rental flights are:
• Rental
• Instruction
See Helpscreen topic:
Keyboard Macro
Each line has a note field with it, and you can also just insert a separate Note
line. You can enter any text you like in a note, and even use Macros to pop in
paragraphs you have saved and want to re-use.
A Fuel Sale
Let’s assume our customer has purchased 50 gallons of Avgas. How will
we enter this fuel sale? After getting the customer account record selected,
we’re ready to complete a Fuel Line. (Be sure the Line Type field has FUEL
selected.)
1.
Select the Fuel Type. Either type a few letters into the field (like A for
Avgas or 100 for 100LL) or click the Ellipses button to the right of the
field to see a list of your fuels to pick from.
If we were working with JetA, you might also have to select a fuel SubType. You will also see a checkbox so that you can Include Prist.
FRONT COUNTER & RAMP OPERATIONS
2.
When the Fuel Type has been selected, your options for the Tank/Truck
which dispensed the fuel will appear.
3.
If there is more than one Meter on this Tank or Truck, you’ll see a
checkbox for Single-Point Delivery?
•
If you check the box, you’ll choose the meter used for this sale, then enter
both the START and the STOP meter readings.
•
If you do not check the box, you’ll enter the START and STOP meter
readings for both meters.
4.
The Quantity will automatically be calculated for you, from the meter
readings.
5.
The Aircraft Number will already be entered if you used it to select the
customer as you started the invoice. Otherwise, you must enter it now.
6.
The List Price and Sale Price fields should already be completed for you.
The Sale Price will have been adjusted for any discounts this customer is
entitled to because of his relationship with your company or because of
the volume of this purchase.
You may use the ellipses button to select another price class, if necessary,
or even type in a price manually. Be cautious about making changes to
the price without Supervisor approval!
If you are entering invoices to TotalFBO® after you have processed
the sale on a POS machine or some other system, you can make small
adjustments for rounding differences by selecting the Rounding Button (it
looks like a green dollar sign).
7.
Some customers, such as airlines or large contract customers, may require
you to record the Flight Number and/or Ticket Number for each sale, as
well.
That’s it – just click the OK button and your first Sales Detail line will be
saved. If another blank line pops up automatically, you can use it to continue
adding items to the invoice, or just click the Cancel button to return to the
basic invoice record.
TotalFBO® User Guide | 207
208 | TotalFBO® User Guide
FRONT COUNTER & RAMP OPERATIONS
A Ramp Service
Let’s add one more item to this invoice for a ramp fee which we charge. Select
the Line Type SERVICE.
1.
If the General Ledger
account you want to use is not
available on the Service Line,
ask your Controller to check
the “Allow Sales?” flag on the
account.
In the GL Acct # field you may enter the account number of the income
account which will be posted for this service, if you know it. But there’s
no need to memorize all those numbers or keep a list handy, because it’s
even faster just to type in part of the name of the account.
So in this case, we’ll just enter “ramp” and instantly see our choice(s) of
correct accounts.
Usually a ramp fee is charged based on the weight or size of the aircraft,
and your Accounting Department staff can enter up to 20 different prices
on this account. So, if there’s more than one price listed, you’ll get a
window allowing you to choose the price you need for this aircraft.
2.
The Quantity field will default to “1,” so you’ll only need to change it for
some services you sell. For instance, a customer may purchase 4 catered
box lunches, or need 2 lavatories pumped out. But in our example, we’ll
skip to the next field.
3.
The Aircraft Number field should still be completed for you, if you used
it to select the customer as you started the invoice. Otherwise, you must
enter it now.
4.
Since you selected the correct Price in Step 1 above, you need only verify
that the totals are what you expected.
5.
Also, enter the Flight Number, if this were a service for a scheduled
airline.
Once again, we’re done. Just click the OK button to save this Detail Line.
Since that’s all we’re going to sell in this example, if another Detail Line
appears, just click Cancel so we can return to the main invoice window.
We’ll cover more about the other line types later in this section, but you can
see from these two examples that each Detail Line offers only those fields that
you need for the sale.
Most fields already have the correct information defaulted in for you, or allow
you to quickly choose from appropriate options.
FRONT COUNTER & RAMP OPERATIONS
TotalFBO® User Guide | 209
PAYMENT AREA
Our customer invoice is almost complete. We can see the entire invoice now,
and take a moment to review our work. Each detail line is displayed, and the
total of the invoice is shown at the lower right corner of the window.
We can enter some additional information, such as a customer’s purchase order
number, tax adjustments, or alternate mailing addresses on Tabs 2, 3, and 4
of the invoice window, and also review the computer’s math. For now, we’ll
move on to entering the customer’s payment.
If the customer does not make payment for this invoice, then he must have
an available balance in his account’s credit limit. If so, you can simply OK
the invoice and hand the customer his copy. He’ll be responsible for sending
payment later.
For most fuel sales to transient customers, we’ll expect the customer to pay
now, and the most common form of payment is the credit card.
There are two ways credit cards can be used with TotalFBO®:
•
Online – when TotalFBO® is used to authorize the transaction
immediately through the Internet.
•
Offline – when you use another POS machine to authorize the
transaction through a dial-up connection, or use a paper slip and
process manually.
You’ll probably have both types of cards setup in your system. If you’re a
new TotalFBO® user, you may use Offline processing until your Gateway
Merchant Agreement is approved. Later, you may need Offline processing
when your internet connection fails for more than a short period of time and
you handle transactions with paper slips.
If you’re using Offline processing with a POS machine, be sure to swipe the
card and complete the transaction now. Then if the amount authorized is
slightly different due to tax or rounding calculations, you’ll be able to adjust
the totals on your TotalFBO® invoice immediately.
When your POS machine transaction is complete, or if you’re going to use
Online processing, click the Payment button at the bottom of your invoice
window.
Begin by entering the Amount Paid. Simply Clicking the button next to the
field or using the F5 key on your keyboard will enter the total of the invoice
for you automatically.
If your Internet connection
fails, use a paper slip to
capture the customer‛s
signature and enter the
payment as an Offline
transaction. Later you
can change the invoice to
authorize the amount Online
when your connection is
available again.
210 | TotalFBO® User Guide
FRONT COUNTER & RAMP OPERATIONS
If the customer overpays and wants change or splits his payment into two
forms of payment, you can change the amount here accordingly.
Next, we must select the form of the payment:
Using Standing Credit Cards
is helpful when the customer
is not present, but usually
costs your company a larger
processing fee. Always swipe
a card if possible.
1.
If you simply OK the line, the default assumption will be Cash.
2.
Select Check/EFT for personal or business checks. The screen will
change to allow you to enter a check number as a reference for the deposit.
3.
Select Gift Certificate when the customer presents a gift certificate issued
by your company. If there is a serial number on the certificate, the you
can enter it, too.
4.
If you select Credit Card/Other the screen will change to offer you
various fields depending on your setup.
If the customer has credit card information on file with you in his customer
account record, an additional button will appear titled Use Standing Credit
Card. You can select from any of the cards on file and automatically complete
the information up to the authorization point.
•
If you’re using Offline processing, simply OK the window to
complete this payment line.
•
If you’re using Online processing, click the Authorize button.
If you do not use the Standing Credit Card information (or if none is on file for
this customer), you’ll need to enter the information from the card or swipe it if
a device is attached to your computer.
If you have only Offline processing setup, fields for entering credit card details
will appear automatically.
If you have Online processing setup and a swipe device is attached to your
workstation, you’ll be presented with two buttons.
•
For Online processing, swipe the card now, or click the button to enter
information manually. When authorization is complete, the line will
be saved automatically.
•
For Offline processing, click the button to enter information manually.
Then OK the payment line.
After entering your payment line, the next window shows you the line(s) you
have entered and recaps the totals on this invoice and the customer’s account.
FRONT COUNTER & RAMP OPERATIONS
TotalFBO® User Guide | 211
If the customer has overpaid, you can choose to post the extra amount as a
credit on the account or else return it to the customer now as Change.
Now OK the payment window and we’re back to our main invoice screen.
When we OK the invoice, it will be saved and the number of invoice copies
indicated on the lower right corner of the screen will be printed.
You can change the number of copies to print as necessary. But to speed
things up, an Invoicing Option and also a setting on your Station-Specific
Settings record let you choose the number of copies you will usually print.
You’ll want to have a full-sized copy for your records, and you must print one
for the customer’s receipt as well. It’s also possible to print a copy at the same
time to a separate receipt printer, for those who just don’t want a big sheet of
paper to carry around.
TOUCHSCREEN OPERATION
You can speed up the process of entering invoices significantly by using
Touchscreen monitors.
After installing the monitor, just let TotalFBO® know that you wish to
enter new invoices using the Touchscreen format. Do this by going to File>
Preferences> Station-Specific Settings. Select the record you’re using (or
create a new one, if necessary). On Tab 2 of this record, select Touch-Screen
as your choice for New Invoice Data Entry Style.
Updating existing invoices (Change, View, Delete, Void) will still be done
using the standard invoice screen formats.
Since the purpose of the Touchscreen format is to speed up entry, not all
options are available. (For instance, you can’t make a Charter Invoice using
this format.) If you have a bar-code reader at your front counter, you’ll find
that swiping any barcode instantly adds that item to your invoice.
You can try it out even
without a Touchscreen
monitor!
Set the option and use the
mouse to touch the buttons.
All your choices are instantly displayed for you onscreen as large colorful
buttons, so you can speed through basic invoices.
Take care to mount your Touchscreen monitor at a comfortable angle and
with good support so that it will be easy to use in busy situations. Your Shop
Carpenter may be helpful in this regard!
See Helpscreen topic:
Touchscreen Invoicing
212 | TotalFBO® User Guide
FRONT COUNTER & RAMP OPERATIONS
WIRELESS OPERATIONS
Using Touchscreen monitors can help speed your invoicing process, but for
selling fuel, wireless operations is definitely the fastest option.
See Helpscreen topics:
Mobile Agent Processing
and
Mobile Ramp Agent
See Helpscreen topic:
Fuel Truck Interfaces
TotalFBO® offers two ways you can get started in wireless:
• Mobile Agent
• Fuel Truck Interface
With a wireless-enabled laptop or tablet PC in the hands of your Lineman,
Mobile Agent can create invoices automatically right on the ramp! If you
Velcro a small cardswipe device to the PC, even the customer’s payment can
be authorized.
Mobile Agent works even if TotalFBO® isn’t running, so it’s perfect for afterhours transactions.
If you install a metering system in your fuel trucks, invoices can be created
even faster, since meter readings will be included automatically for each
delivery. Then the Fuel Truck Interface in TotalFBO® takes over to import
the information from the fuel truck and create an invoice automatically.
Imported invoices can be completed instantly or placed in a pending status
for review and completion at the Front Counter. It’s easy to finish a pending
invoice by authorizing the payment, printing a receipt, and the pilot is on his
way.
Wireless operations not only speed the flow of invoicing, but they greatly
improve the accuracy of your inventory, as meter readings are entered correctly
right at the delivery point.
FRONT COUNTER WORKFLOW
We’ve talked about basic invoicing for fuel and ramp services, and that’s a
primary function for a typical FBO’s Front Counter. But there’s lot more going
on.
You’ll be keeping up with expected arrivals and departures and customer
requests for services, dispatching rental and charter flights, then checking those
flights in when they return, and generating invoices for those flights.
For details on each of those areas, see the Charter Operations and Flight School
Operations sections in this Guide. To help you coordinate all that activity, see
the Concierge topic later in this section.
The tight integration in TotalFBO® allows you to eliminate entering
information more than once. So if you dispatch a rental flight, for instance,
FRONT COUNTER & RAMP OPERATIONS
TotalFBO® User Guide | 213
FRONT COUNTER WORKFLOW
Flight
Dispatch &
Check-In
Process Credit Cards
manually or online
Customer
Customer
Invoices
Invoices
Fuel Meter
Justification
Report
Aircraft Time
Justification
Report
Close Shift
Verify that all Fuel sales
and Aircraft Rental sales
have been posted.
(Shifts are generally used when an
FBO uses more than one cash drawer.
You may be able to skip this step.)
Close Credit
Card Batches
Balance and submit
cash from drawer,
checks and reports to
Accounting Department.
Sales Receipts
Report
Credit Card Batch
Summary
you’ll find that the invoice is automatically created for you when the flight is
checked in. ---Because, after all, the point of all that customer service is to be
able to create an invoice that provides income for the company!
214 | TotalFBO® User Guide
FRONT COUNTER & RAMP OPERATIONS
CHECKING OUR WORK
After a busy day of creating invoices and responding to customer requests,
it’s time to take a look back at the day and make sure everything was done
correctly, then close out the Cash Drawer and submit everything to the
Accounting Department.
There are two reports you can run to spot missing invoices for either fueling
or rental operations. We’ll begin by running the Fuel Meter Justification
Report, which is located at Accounting> Invoicing> Reports and Listings>
Tab 2.
This report will show you all the fuel invoices you prepared for the day and
mark any places where the meter readings overlapped or skipped. You can also
see if the quantity sold didn’t equal the difference between meter readings.
Where there are skips, you may need to enter an invoice that was forgotten in
the rush. (It’s also possible that there was some meter movement for another
reason, such as recirculation of the fuel in a truck, or a transfer to another
truck. We’ll cover how to handle these other reasons for meter movement a
little later.)
If you have an overlap, you’ll need to verify that each invoice was billed
correctly. It’s possible that the wrong meter reading was entered on an invoice.
Another possibility is that a defueling was done (this can cause the meter to
run backwards).
Make sure that if you did a Defuel, you entered the meter readings correctly.
In some cases, there will be no meter movement at all. In others, the Starting
reading will be higher than the Ending reading.
Then you’ll run the Aircraft Time Justification Report. This report is very
similar except that it reports on invoices where there were Rental Lines and
shows the Hobbs or Tach readings.
In the same way, verify that all invoicing was done without skips or overlaps,
and make any corrections, if necessary. In some cases, it may be necessary
to simply note that an error was made because it’s not possible to re-bill a
customer at this point.
DAILY CLOSING OPERATIONS
When your verification process is complete, it will be time to start your closeout process. (If your company doesn’t use shifts, you may skip to the next
topic.)
FRONT COUNTER & RAMP OPERATIONS
TotalFBO® User Guide | 215
Shifts
If your FBO has more than one cash drawer or closes out your cash drawer
more than once a day, your Accounting Department will have established
shifts in TotalFBO®.
See Helpscreen topic:
Using shifts makes it possible to print reports for a single shift instead of for
an entire day, which makes it easier to balance your cash drawer and look at
invoicing that was done at each station.
Front Counter Shifts
If you’re the first one to log in to Invoicing each day, you’ll be starting a new
shift automatically. Each person who logs in later will either join your shift or
start a new shift, depending on whether they’re sharing your same cash drawer.
When you close out at the end of the day you’ll need to close the shift so you
can run the reports you need easily. This is done at Accounting> Invoicing>
Daily Closing Operations> Close an Invoicing Shift.
Select the current shift and OK the popup window to close it.
Charge Batches
Whether you’re using Online or Offline processing, you’ll need to close
credit card batches. This is a process that proves that the totals which have
been posted to your Accounting Records match the totals which have been
processed by your Credit Card Processor.
1.
If you’re using Offline processing, you’ll have a “batch-out” procedure
for closing the POS machine at the end of each day. When you do this
function and pull the printout that lists the charges for the day you’ll do a
matching procedure in TotalFBO®.
This is done at Accounting> Invoicing> Daily Closing Operations> Close
Charge Batch.
You’ll select the holding company you’re using and choose to see items
for the entire day or just your shift, and then click the Search for Charges
button.
On the next screen you can see the individual charges and select those
you need to include in the batch in order to match what was processed in
the POS machine batch. (If you’re not using a POS machine, select those
paper ticket items you’ll be mailing for processing.)
If you need to make any corrections to invoices, you can do that now and
come back to close the batch again.
See Helpscreen topic:
Credit Card Batches &
Settlements
216 | TotalFBO® User Guide
FRONT COUNTER & RAMP OPERATIONS
It’s a good idea to change the suggested batch number to match the
number which was on the POS machine batch printout.
When you OK the screen, you’ll get a report detailing the items in the
batch. You should attach it to the printout from the POS machine.
2.
If you’re using Online processing, when you close the batch in
TotalFBO®, it will also transmit the information necessary to settle the
batch with your Credit Card Processor.
For security reasons, you’ll not be able to select specific charges to include in
the batch. All outstanding items will be batched automatically, though they
may be split into one or more batches because of the requirements of certain
processors. If there are items remaining to be closed, you’ll be notified that it’s
necessary to close an additional batch.
As each batch closes, you’ll receive a new report of the items in the batch.
Closing the Cash Drawer
Now remove all cash, checks, gift certificates used, and any paper credit card
slips from the cash drawer and total each separately.
Print the Sales Receipts report in the Invoicing module and compare your
totals to the report.
Using good cash controls
protects everyone!
If you cannot reconcile all the totals, note any variances on the report.
Then bundle all the reports and money into an envelope, seal it, sign and
date it across the flap, and pass it to the Accounting Department for further
processing.
DAILY FUEL RECONCILIATIONS
The more often you reconcile,
the easier it is to make any
corrections.
Usually the Line Department Manager is responsible for reconciling the fuel
inventory. In larger operations, this procedure is performed at the end of each
day. Other FBOs will handle this chore weekly or monthly depending on sales
volume.
TotalFBO® makes it easy to verify fuel inventories when you enter meter
readings each time fuel is dispensed. Although it is possible to make fuel sales
without using meters, you lose your only real proof of inventory movements. If
you find it difficult to provide meter readings to the Front Counter on a timely
basis, consider using one of the Wireless options described above.
You’ll begin your reconciliation process by reviewing the Fuel Meter
Justification report, which is available in both the Inventory and Invoicing
modules.
FRONT COUNTER & RAMP OPERATIONS
TotalFBO® User Guide | 217
FUELING WORKFLOW
(Whether by Manual, Mobile Agent, or Contrec Invoicing)
Tail Number
1
Select Customer
or Create New
from FAA database
Fuel Aircraft Truck Number
Beg. Meter
Fuel
Invoice
End Meter
Process
Credit Cards
2
Fuel Inventory
Quantity
Verify all meter movements
posted each day
Fuel Truck/Tank
Quantity
Fuel Meter
Justification
Report
Adjust reported
quantity to actual
quantity on hand
Adjust
Physical
Inventory
4
3
Top-off trucks and
Dip tanks or obtain
meter tapes to
verify physical quantity
=
Tr
u
Sh c k
ee
t
0 0 0 0 0
218 | TotalFBO® User Guide
FRONT COUNTER & RAMP OPERATIONS
FUEL MOVEMENT
(Tracked for BOTH Inventory & Tank Quantities)
Accts
Payable
Invoice
ON HOLD
Quantity & Cost
adjusted on
Inventory Record
Receive Fuel
Load into
Inventory
Quantity
added to Tank
Transfer
Fuel to
Truck
Sump Fuel
Disposal
Create
Invoice
Truck
Recirculation
Fuel Tank Summary
Report
Fuel Meter
Summary Report
Fuel Meter
Justification
Fuel/Oil Summary Report
Report
Receiving Fuel Loads updates both
your Inventory totals and the Tank
quantities.
As fuel is transferred or sold, meter
readings are captured for full tracking
capability.
FRONT COUNTER & RAMP OPERATIONS
This report should be a mirror of your truck sheet, if you keep one. It will
show you all the fuel invoices you prepared for the day and mark any places
where the meter readings overlapped or skipped. You can also see if the
quantity sold didn’t equal the difference between meter readings.
Where there are skips, you may need to enter an invoice that was forgotten in
the rush. It’s also possible that there was some meter movement for another
reason, such as recirculation of the fuel in a truck, or a transfer to another
truck.
If you have an overlap, you’ll need to verify that each invoice was billed
correctly. It’s possible that the wrong meter reading was entered on an
invoice. Another possibility is that a defueling was done improperly.
The Total Gallons on the report should equal the amount of fuel that was taken
from inventory during the day.
If you top off trucks and dip tanks (or print meter tapes), then add all the
quantities for each fuel type together, you’ll arrive at the total number of
gallons you have on hand in inventory.
The Total Gallons should equal the difference in today’s inventory balance on
hand and yesterday’s balance.
Other Inventory module reports you’ll find helpful in your reconciliation will
be the Fuel Meter Summary, which indicates the expected current meter
readings for all meters, the Fuel/Oil Summary, which provides current
inventory quantities in stock, and the Fuel Tank Summary, which shows
details and total quantities for each tank and truck.
TotalFBO® User Guide | 219
220 | TotalFBO® User Guide
FRONT COUNTER & RAMP OPERATIONS
RECONCILING FUEL INVENTORIES
ENDING
Total quantity
on hand
BEGINNING
Total quantity
on hand
NET CHANGE
TOTALS:
The total activity for the day
should equal the Net Change
in Inventory for the day.
Small differences will result
from temperature and pressure
changes.
+
SUMPS
DELIVERIES
DEFUELS
SALES
REFUELS
FRONT COUNTER & RAMP OPERATIONS
But, even if everything was done correctly, these totals probably won’t match
perfectly because of changes in temperature and pressure, spillage, and
perhaps un-recorded sump operations.
You can carry these small differences on paper for a short period, but
eventually they just make reconciling a chore. Instead, it’s easy to simply
adjust the quantity in TotalFBO® to match what you have physically counted.
Do this at Inventory> Other Parts Operations> Update Physical Inventory.
1.
2.
3.
4.
5.
6.
7.
Select only Fuels at the top of this window to speed your work.
Next, click the Pre-Set Physical Counts button and choose to “Set
Physical Inventory Counts to Current Stock Levels.”
Then enter your actual Physical Counts for each item on the list.
Now click the button at the bottom of the window to Print Count Listing.
Compare the printout to your notes to be sure that you have entered the
quantities correctly.
Then click the button Proceed to Apply/UnApply Window.
You need only enter the date you made the actual count and then click the
Apply button.
You’ll be asked to select the tank or truck to take the adjustment in. If you
need to adjust more than one tank per fuel type, select the largest tank and
make transfers between tanks later.
Be careful not to leave anything ZERO just because you didn‛t need
to make a change now.
Small adjustments for temperature and pressure are normal and will be fairly
consistent over time because your climate and the size of your tanks will also
be consistent.
Huge adjustments indicate another error, such as a fuel load posted to the
wrong fuel type or received on the wrong date.
When the Physical Inventory adjustment process is complete, a new printout
of the Fuel/Oil Summary report should match your current physical totals.
TotalFBO® User Guide | 221
See Helpscreen topic:
Taking a Physical
Inventory
222 | TotalFBO® User Guide
FRONT COUNTER & RAMP OPERATIONS
INVENTORY CHANGES
We’ve looked at sales through Invoices as a major source of changes to your
inventory. In reality there are several sources, some which increase your
inventory and others which decrease or have no effect your quantity in stock:
INCREASE
Fuel Loads Delivered
Defuels
DECREASE
Sales
Refuels
Sumps
NO EFFECT
Transfers
Recirculations
Let’s see how each of these activities is handled in TotalFBO®.
DELIVERIES
Deliveries are entered at Inventory> Receive Shipments. You’ll Receive a
New Shipment and complete the next screen.
While it is important to enter fuel loads soon after delivery, it is equally
important to know the correct cost you’ll pay. Most fuel distributors will
notify you at the beginning of each week what fuel loads will cost for that
week. So even if you don’t have the invoice right away, you’ll be able to
calculate the correct cost. You may also be able to obtain a copy of the invoice
by fax or email by requesting that service.
Be sure to correctly enter the date the shipment was received. All your
inventory reports depend on these dates.
When you select a fuel to receive, the next window asks you to enter the total
quantity of fuel and the total cost of the shipment.
When that window closes you must select the tank which received the fuel.
If more than one tank received the fuel, you may split the shipment into
additional lines or complete a Tank-to-Tank transfer later.
The total cost of the shipment should include ALL charges you will be paying
the vendor, including taxes and delivery charges.
Your Accounting Department staff will probably have set an option which
forces an Accounts Payable Invoice to appear immediately after you OK the
Receive Shipment window. This is so that the Accounting Records will always
match your Inventory Records.
Simply enter the Bill of Lading number as the Vendor Invoice Number and OK
the screen. You will not be allowed to Cancel.
Be sure to print the summary report and attach it to the Bill of Lading for your
records.
FRONT COUNTER & RAMP OPERATIONS
TotalFBO® User Guide | 223
CHANGES TO FUEL INVENTORY
DELIVERIES
DEFUELS
INVENTORY
INVOICING
Receive
Shipments
Add New
Invoice
FUEL LINE
SUMPS
SALES
REFUELS
INVOICING
INVENTORY
INVOICING
Add New
Invoice
Transfer
Between
Tanks
Add New
Invoice
FUEL LINE
SUMP
FUEL LINE
RECIRCULATION
TRANSFERS
INVOICING
Add New
Invoice
FUEL LINE
OR
INVENTORY
INVENTORY
T r an s f e r
T an k s
Transfer
Between
Tanks
RECIRCULATE
Tank-To-Tank
Betw een
224 | TotalFBO® User Guide
FRONT COUNTER & RAMP OPERATIONS
DEFUELING
There are many ways that FBOs handle defueling, depending on what their
facilities are and the specific needs of the pilot.
When you create an invoice and select a Fuel line, you will change the Op
Type from Sale to DeFuel.
You’ll select the type of fuel you’re handling and then the truck or tank
receiving the fuel.
This enables you to indicate quantity independently of meter movement. In
some cases the meters will move backward, and in some cases there may be no
meter movement at all.
You can also indicate an amount to charge for the service, an amount to credit
for the value of the fuel, or no price at all.
Defueling ADDS an amount to your inventory at a cost of zero unless you
specify an amount to credit the customer for the fuel.
REFUELING
When you are able to return the fuel to the same customer’s aircraft, you can
use a Fuel Line on an invoice but select the Refuel Op Type.
Using the Refuel function allows you more flexibility in meter movement,
quantity, and price than a normal Sale. It’s also a good way to correct any
errors in Defueling.
SUMPS
When you send fuel to a sump, it is removed from your usable inventory.
Some FBOs use this fuel in their own vehicles or burn it for heating hangar
space.
You can handle this inventory change at Inventory> Other Fuel Operations>
Transfer between Tanks. Select Sump as the Transfer Type at the top of the
window.
The Sump function is the only operation which allows you to mix fuel types on
a single transaction.
TRANSFERS
At the same location you can adjust quantities between tanks or trucks by
selecting the Tank-to-Tank Transfer Type.
You’ll be able to enter meter readings for the tank the fuel is moving from.
FRONT COUNTER & RAMP OPERATIONS
TotalFBO® User Guide | 225
RECIRCULATION
When fuel is recirculated within a single truck, there is meter movement but
no actual change in inventory quantity.
This operation is entered at the same location, but by selecting the Recirculate
Transfer Type at the top of the window.
You’ll be able to enter the start and stop meter readings, but no quantity is
calculated.
All these operations (except for shipments received) will reflect on your Fuel
Meter Justification report so that you’ll have a complete picture of the fuel
movements which occurred.
MANAGING PILOT SUPPLIES
When new items are added to Inventory, you must enter them in one of the
following categories:
•
•
•
•
•
Regular Parts
Serialized Parts
Fuel
Oil
Aircraft
But you can use Inventory Departments to further divide each of these
categories to make them more manageable.
There are 2 purposes for a department in TotalFBO®:
• Separation – Breaking a long list of items into smaller groups so we can
work with it more easily. For instance, Aircraft Parts and Pilot Supplies
are usually managed by people in two different departments. Each just
wants to see those parts they care about.
•
Accounting Control – Often, different categories of inventory items need
to be tracked separately in your accounting records, too. For instance, the
income from selling those Aircraft Parts should be included in the Shop
Department, but the Pilot Supply sales should be in the Flight School
Department. The Inventory Department contains fields which allow your
Accounting staff to specify the General Ledger Accounts which should be
used when buying and selling inventory items.
As you add new items to your Inventory database, therefore, it’s important to
select the correct department for each one.
See Helpscreen topic:
Inventory Departments
226 | TotalFBO® User Guide
FRONT COUNTER & RAMP OPERATIONS
USING INVENTORY DEPARTMENTS
SEPARATE LONG LISTS INTO SMALLER GROUPS
Inventory Items
Pilot Supplies
Aircraft Parts
Jet-A
Avgas
Airline Fuel
MAINTAIN ACCOUNTING CONTROL
Aircraft Parts
Pilot Supplies
Airline Fuel
Jet-A Fuel
Avgas Fuel
Acft Parts Inventory
Shop Parts Cost of Sales
Lost Acft Parts Expense
Shop Parts Income
Pilot Supply Inventory
Pilot Supply Cost of Sales
Lost Pilot Supply Expense
Shop Parts Income
Non-Owned Inventory
Client Inventory Liability
Client Inventory Liability
Into-Plane Income
Jet-A Inventory
Jet-A Cost of Fuel Sold
Lost Fuel Expense
Jet-A Sales
Avgas Inventory
Avgas Cost of Fuel Sold
Lost Fuel Expense
Avgas Sales
FRONT COUNTER & RAMP OPERATIONS
The chart provides some examples of typical departments which would be
used in an FBO.
When the initial setup is done, your Accounting Department staff may or may
not be able to import your pilot supplies from a previous system. If not, you’ll
need to enter each item.
The easiest way to do this is by using the Receive Shipments Function. You’ll
be able to Sidestep to add new items and also enter the quantities and costs
you’ve paid.
TotalFBO® User Guide | 227
See Helpscreen topic:
Entering Initial Setup
Data
Be sure to coordinate with your Accounting Department on this process. You
may be directed to receive all these items using a special Conversion vendor.
SELLING PILOT SUPPLIES
Once all your items have been entered, you’ll sell them on an invoice using a
Parts line.
Select or enter the part number or description of the item. You can enter a just
a few letters or numbers, if you wish.
Enter the quantity and verify the price, and you’re ready to OK the line.
RETURNING OUT-DATED ITEMS
You may find it necessary to return almost any item to the vendor, but it’s a
constant effort to maintain current stocks of navigation charts.
Usually the vendor will allow you to return old items when you order the next
shipment.
A good way to keep track of these items is to print the Expired Inventory
Listing from the Inventory module. You can choose to show only those items
from your Pilot Supplies department.
Working from your report, it’s easy to pull the charts and ready them for
shipment.
Next, you’ll to go to Inventory> Return Stock. Here you’ll select the items
you’re returning. When you OK the screen, the items will be removed from
stock, you’ll be able to print a packing slip to go with the shipment, and a
credit memo equal to the value of these items is created.
In order for this report to be
dependable, you must enter a
Batch/Lot ID as you receive
each shipment. This opens
a field for you to enter the
Expiration Date.
228 | TotalFBO® User Guide
See Helpscreen topic:
Recording Customer
Preferences
FRONT COUNTER & RAMP OPERATIONS
CONCIERGE
This topic covers the very broad area of customer service. Not only does
TotalFBO® enable you to enter and track customer requests, but it provides a
coordinated way for you to manage all the complex operations that go on in a
busy front counter.
CONCIERGE REQUESTS
The Request is an organized way to enter all the information provided by the
customer. And it enables several staff members to participate in meeting the
customer’s needs and keep track of what’s been done.
Enter or update requests at Operations> Concierge> Update Requests.
When you enter information about transportation and hotels, be sure to indicate
if the reservations have already been made by the customer or if you are
expected to make arrangements on their behalf.
ur
rt yo
o
p
m
i
om
ically uests fr
t
a
m
Auto mers‛ req ication,
o
ppl
cust
eb a urn.com
w
e
h
t
hT
for
.Flas
www ct Sales ails.
a
t
Cont ption de
i
r
c
s
sub
See Helpscreen topic:
Using the Super-Screen
CONCIERGE SUPER-SCREEN
You can print any of several reports from the Concierge module to help you
track these requests. However, the best way to stay on top of things is to use
the Concierge Super-Screen.
Instead of bouncing from one menu function to another, you can access six
different functions instantly AND see your ramp schedule for any 2 week
period.
The Super-Screen is located at Operations> Concierge> Concierge SuperScreen.
Click on any day in the calendar and the activity for that date is displayed on
each of the five tabs in the lower half of the screen.
1.
From the Invoicing tab you can not only create new invoices but also
reprint or change an invoice.
2.
From the Concierge Requests tab you can instantly review details on
any customer request or add a new request when the phone rings.
3.
From the Flight Dispatch tab you can dispatch both Rental and
Charter flights.
4.
From the Flight Check-In tab you can check-in and invoice Rental
and Charter flights.
5.
From the Reservations tab you can see today’s reservations and
update the Schedule as needed.
FRONT COUNTER & RAMP OPERATIONS
TotalFBO® User Guide | 229
CONCIERGE SUPER-SCREEN
(All Front Counter Functions in ONE screen)
TWO-WEEK CALENDAR
Ramp Requests
Rental Reservations
Charter Reservations
Check In Today's Rental or 135 Flights
FAA data on Any
Tail Number
Dispatch Today's Rental or 135 Flights
Today's Concierge Requests - Insert New/See Old
Today's Reservations - Insert New/See Old
Today's Invoices - Insert New/See Old
Enter a tail number into the Info On field and instantly see both the FAA data
on this aircraft and whether the owner has an account with you. This makes
it easy to greet the pilot by name. You can even get a new customer account
setup before the wheels are chocked!
230 | TotalFBO® User Guide
See Helpscreen topic:
Ground Equipment Setup
FRONT COUNTER & RAMP OPERATIONS
GROUND SERVICE EQUIPMENT
MAINTENANCE
Both the Maintenance and Line departments have tools that require calibration
and equipment that needs regular maintenance.
You’ll be able to create categories, called Master Types, for the equipment and
tools you wish to track and then insert records for each piece of equipment at
Operations>Ground Equipment> Update Ground Equipment.
As you create each record, also create reminders for the various kinds of
maintenance which must be performed.
Then you can run the Maintenance Warning Report from the Ground
Equipment module to help organize your maintenance schedule.
When required maintenance is completed, log it at Operations> Ground
Equipment> Update Maintenance Performed. When the log is saved, the nextdue time for that item is rolled forward appropriately.
ADVANCED INVOICING
The procedures that follow
assume default option
settings are used.
For instance, the default
invoice behavior is to
automatically insert detail
lines until you cancel.
The following procedures detail steps to follow for a number of different kinds
of transactions which are common to FBOs.
As you work with each procedure, note that the same basic steps are followed
repeatedly. The difference is usually in the setup which allows for different
behavior or different results for your Accounting Records.
Some processes are better performed in the Accounting Department because of
cash control or security issues. Therefore, those procedures are included in the
Accounting & Back Office Operations section of this Guide.
FRONT COUNTER & RAMP OPERATIONS
TotalFBO® User Guide | 231
REGULAR CUSTOMER FUEL INVOICE, NO PAYMENT
WHERE TO GO:
Accounting>Invoicing>Add New Invoices
Accounting>Invoicing>Update Invoices (press the Insert button)
Operations>Concierge>Concierge Super-Screen>Invoicing Tab
WHAT TO DO:
Select Customer - enter a Tail number, Phone Number (+8888), Name or Account number
Add Sales Detail(s) Select Line Type (Fuel)
Select Item Sold (i.e., Jet A, Avgas, Diesel, Mogas, or other fuel type)
Select Sub-type if offered
Choose Prist? if offered and delivered
Select Truck (or Tank)
Select Fuel Meter Used to pump this sale
Enter Fuel Meter Readings, both beginning and ending readings
Verify Quantity and Sale Price are correct
OK the Line
Press Cancel when you have no more Sales Detail Lines to enter
Verify Invoice is complete and correct
OK the Invoice
REQUIRED SETUP OR OPTIONS:
Customer has already been created in the Database,
with appropriate credit limit and terms established.
Customer’s Price Class has been specified.
Customer’s usual Fuel Type specified.
Customer’s Sales Tax rate and exemption status has
been specified.
Invoice Style Sheet has been defined so that printing will be correct.
Default number of copies to print has been specified.
Fuel Meters have been setup.
Fuel Tanks have been setup.
Fuel Prices have been established.
RESULTING JOURNAL ENTRY:
DR
CR
CR
CR
DR
CR
Accounts Receivable - Customers
Fuel Sales Income
Sales Tax Liability
Fuel Tax Liability
Cost of Fuel Sold
Fuel Inventory
232 | TotalFBO® User Guide
FRONT COUNTER & RAMP OPERATIONS
TRANSIENT CUSTOMER FUEL INVOICE, CREDIT CARD PAYMENT
WHERE TO GO:
Accounting>Invoicing>Add New Invoices
Accounting>Invoicing>Update Invoices (press the Insert button)
Operations>Concierge>Concierge Super-Screen>Invoicing Tab
WHAT TO DO:
Select Customer - enter a Tail number, Phone Number (+8888), Name or Account number
If new customer, select Insert to add a customer
If you started with a Tail number, you
Complete Customer’s Name and Address on Tab 1
can save keystrokes with the Create
Complete Phone Number and Tail Number on Tab 5
New Account Using FAA Info button.
OK the Customer Record
Add Sales Detail(s) Select Line Type (Fuel)
Select Item Sold (i.e., Jet A, Avgas, Diesel, Mogas, or other fuel type)
Select Sub-type if offered
Choose Prist? if offered and delivered
Select Truck (or Tank)
Select Fuel Meter Used to pump this sale
Enter Fuel Meter Readings, both beginning and ending readings
Verify Quantity and Sale Price are correct
OK the Line
Press Cancel when you have no more Sales Detail Lines to enter
Verify Invoice is complete and correct
Add Payment Information Select the Payment Button
Enter Dollar Amount paid (Press F5 button if paying exact Invoice amount)
Select Payment Means (select proper Credit Card from list)
If using ONLINE credit card processing, just
Enter Card Number and Expiration Date
swipe the card.
OK the Line
Insert more payment lines if necessary for additional forms of payment used
Close the Payment Window
OK the Invoice
REQUIRED SETUP OR OPTIONS:
New Customer Defaults include Transient customer
type and correct Price Class.
Invoice Style Sheet has been defined so that printing will be correct.
Default number of copies to print has been specified.
Fuel Meters have been set up.
Fuel Tanks have been setup.
Fuel Prices have been established.
Accepted credit cards have been established and
linked to proper paying authority.
RESULTING JOURNAL ENTRY:
DR
CR
CR
CR
DR
CR
Credit Cards Receivable
Fuel Sales Income
Sales Tax Liability
Fuel Tax Liability
Cost of Fuel Sold
Fuel Inventory
FRONT COUNTER & RAMP OPERATIONS
TotalFBO® User Guide | 233
TRANSIENT CUSTOMER FUEL INVOICE, PENDING PAYMENT
WHERE TO GO:
Accounting>Invoicing>Add New Invoices
Accounting>Invoicing>Update Invoices (press the Insert button)
Operations>Concierge>Concierge Super-Screen>Invoicing Tab
WHAT TO DO:
Select Customer - enter a Tail number, Phone Number (+8888), Name or Account number
If new customer, select Insert to add a customer
If you started with a Tail number, you
Complete Customer’s Name and Address on Tab 1
can save keystrokes with the Create
Complete Phone Number and Tail Number on Tab 5
New Account Using FAA Info button.
OK the Customer Record
Add Sales Detail(s) Select Line Type (Fuel)
Select Item Sold (i.e., Jet A, Avgas, Diesel, Mogas, or other special fuel type)
Select Sub-type if offered
Choose Prist? if offered and delivered
Select Truck (or Tank)
Select Fuel Meter Used to pump this sale
Enter Fuel Meter Readings, both beginning and ending readings
Verify Quantity and Sale Price are correct
OK the Line
Press Cancel when you have no more Sales Detail Lines to enter
Verify Invoice is complete and correct
Check the Pending box
OK the Invoice
WHEN CUSTOMER IS READY TO PAY:
Go to Accounting>Invoicing>Update Invoices
Click on the Pending column to see these invoices.
Highlight the invoice and press the Change button
Make any final changes to the invoice and add the Payment information
Uncheck the Pending box
OK the Invoice
REQUIRED SETUP OR OPTIONS:
New Customer Defaults include Transient customer
type and correct Price Class.
Invoice Style Sheet has been defined so that printing will be correct.
Default number of copies to print has been specified.
Fuel Meters and Tanks have been set up.
Prices have been established.
Accepted credit cards have been established and
linked to proper paying authority.
RESULTING JOURNAL ENTRY:
DR
CR
CR
CR
DR
CR
Credit Cards Receivable
Fuel Sales Income
Sales Tax Liability
Fuel Tax Liability
Cost of Fuel Sold
Fuel Inventory
234 | TotalFBO® User Guide
FRONT COUNTER & RAMP OPERATIONS
BUYBACK FUEL INVOICE - OFFLINE PAYMENT MEANS
WHERE TO GO:
(NOT using Online credit card)
Accounting>Invoicing>Add New Invoices
Accounting>Invoicing>Update Invoices (press the Insert button)
Operations>Concierge>Concierge Super-Screen>Invoicing Tab
WHAT TO DO:
Select Customer - enter a Tail number, Phone Number (+8888), Name or Account number
Add Sales Detail(s) Select Line Type (Fuel)
Select Item Sold (i.e., Jet A)
Select Buyback Sub-type
Choose Prist? if offered and delivered
Select Truck (or Tank)
Select Fuel Meter Used to pump this sale
Enter Fuel Meter Readings, both beginning and ending readings
Verify Quantity and Sale Price are correct
OK the Line
Press Cancel when you have no more Sales Detail Lines to enter
Add Payment Information (select correct Buyback “credit card”)
Verify Invoice is complete and correct
OK the Invoice
NOTE:
The sale price on this invoice may not be the final price paid by the fuel supplier, and this adjustment will be
made when payment is received. Therefore, it is not necessary to attempt to get this sale price to be extremely
accurate at the time of the sale, although you should avoid overstating income by large amounts. Adjusting
the sale price of the Buyback Fuel Sub-type weekly should keep this variance within acceptable limits.
REQUIRED SETUP OR OPTIONS:
Customer has already been created in the Database.
Correct price specified on Fuel Sub-type, based on
weekly cost + taxes + intoplane amount.
Invoice Style Sheet has been defined so that printing will be correct.
Default number of copies to print has been specified.
Fuel Meters have been set up.
Fuel Tank has been set up.
Contract Payment Type (“credit card”) has been
established and linked to fuel supplier as Holding
Company.
RESULTING JOURNAL ENTRY:
DR
CR
CR
CR
DR
CR
Credit Cards Receivable
Fuel Sales Income
Sales Tax Liability
Fuel Tax Liability
Cost of Fuel Sold
Fuel Inventory
PAYMENT JOURNAL ENTRY:
CR
Credit Cards Receivable
DR
Undeposited Receipts
DR
Fuel Sales Income
FRONT COUNTER & RAMP OPERATIONS
TotalFBO® User Guide | 235
BUYBACK FUEL INVOICE - ONLINE CONTRACT CARD
WHERE TO GO:
Accounting>Invoicing>Add New Invoices
Accounting>Invoicing>Update Invoices (press the Insert button)
Operations>Concierge>Concierge Super-Screen>Invoicing Tab
WHAT TO DO:
Select Customer - enter a Tail number, Phone Number (+8888), Name or Account number
Add Sales Detail(s) Select Line Type (Fuel)
Select Item Sold (i.e., Jet A)
Select Buyback Sub-type for this type of card
Swiping the card will force the correct sub-type
Choose Prist? if offered and delivered
choice, if incorrect Fuel or Sub-type selected.
Select Truck (or Tank)
Select Fuel Meter Used to pump this sale
Enter Fuel Meter Readings, both beginning and ending readings
Verify Quantity and Sale Price are correct
OK the Line
Press Cancel when you have no more Sales Detail Lines to enter
Add Payment Information (swipe contract card)
Verify Invoice is complete and correct
OK the Invoice
NOTE:
The sale price on this invoice may not be the final price paid by the fuel supplier, and this adjustment will be
made when payment is received. Therefore, it is not necessary to attempt to get this sale price to be extremely
accurate at the time of the sale, although you should avoid overstating income by large amounts. Adjusting
the sale price of the Buyback Fuel Sub-type weekly should keep this variance within acceptable limits.
REQUIRED SETUP OR OPTIONS:
Correct price specified on Fuel Sub-type, based on
weekly cost + taxes + intoplane amount.
Invoice Style Sheet has been defined so that printing will be correct.
Default number of copies to print has been specified.
Fuel Meters have been set up.
Fuel Tank has been set up.
Accepted credit cards have been established and
linked to proper paying authority with contract
programs FBO is participating in selected.
Fuel Sub-type created and linked to correct contract
program.
RESULTING JOURNAL ENTRY:
DR
CR
CR
CR
DR
CR
Buybacks Receivable
Fuel Sales Income
Sales Tax Liability
Fuel Tax Liability
Cost of Fuel Sold
Fuel Inventory
PAYMENT JOURNAL ENTRY:
CR
Credit Cards Receivable
DR
Undeposited Receipts
DR
Fuel Sales Income
236 | TotalFBO® User Guide
FRONT COUNTER & RAMP OPERATIONS
GOVERNMENT CUSTOMER FUEL INVOICE (OFFLINE Payment Means)
WHERE TO GO:
Accounting>Invoicing>Add New Invoices
Accounting>Invoicing>Update Invoices (press the Insert button)
Operations>Concierge>Concierge Super-Screen>Invoicing Tab
WHAT TO DO:
Select Customer - enter a Tail number, Phone Number (+8888), Name or Account number
If new customer, select Insert to add a customer
If you started with a Tail number, you
Complete Customer’s Name and Address on Tab 1
can save keystrokes with the Create
Complete Phone Number and Tail Number on Tab 5
New Accoaunt Using FAA Info button.
Select Defense Sales Department on Tab 3
OK the Customer Record
Add Sales Detail(s) Select Line Type (Fuel)
Select Item Sold (i.e., Jet A, Avgas, Diesel, Mogas, or other special fuel type)
Select Sub-type if offered
Choose Prist? if offered and delivered
Select Truck (or Tank)
Select Fuel Meter Used to pump this sale
Enter Fuel Meter Readings, both beginning and ending readings
Verify Quantity and Sale Price are correct
OK the Line
Press Cancel when you have no more Sales Detail Lines to enter
Verify Invoice is complete and correct
Add Payment Information Select the Payment Button
Enter Dollar Amount paid (Press F5 button if paying exact Invoice amount)
Select Payment Means (select proper Government Credit Card from list)
Enter Card Number and Expiration Date
OK the Line
Close the Payment Window
OK the Invoice
REQUIRED SETUP OR OPTIONS:
New Customer Defaults include Transient customer
type and correct Price Class.
Invoice Style Sheet has been defined so that printing will be correct.
Default number of copies to print has been specified.
Fuel Meters and Tanks have been set up.
Fuel Prices have been established.
Government Credit Card established and linked to
proper payment authority.
Defense GL Department defined with proper override accounts.*
RESULTING JOURNAL ENTRY:
DR
CR
CR
CR
DR
CR
Credit Cards Receivable
Fuel Sales Income - Government*
Sales Tax Liability
Fuel Tax Liability
Cost of Fuel Sold
Fuel Inventory
FRONT COUNTER & RAMP OPERATIONS
TotalFBO® User Guide | 237
AIRLINE CUSTOMER FUEL INVOICE
WHERE TO GO:
Accounting>Invoicing>Add New Invoices
Accounting>Invoicing>Update Invoices (press the Insert button)
Operations>Concierge>Concierge Super-Screen>Invoicing Tab
WHAT TO DO:
Select Customer - enter a Name or Account number
Add Sales Detail(s) Select Line Type (Fuel)
Select Item Sold (Customer’s own special fuel type)
Select Truck (or Tank)
Choose Prist? if offered and delivered
Select Fuel Meter Used to pump this sale
Enter Fuel Meter Readings, both beginning and ending readings
Enter Flight Number
Enter Ticket Number if requested
Verify Quantity and Sale Price are correct
OK the Line
Press Cancel when you have no more Sales Detail Lines to enter
Verify Invoice is complete and correct
OK the Invoice
NOTE: If flat rates or minimums apply, these are setup in the Airline’s Customer Account record. Once
established, an additional service line will automatically be added to the invoice when needed.
REQUIRED SETUP OR OPTIONS:
Customer has already been created in the Database,
with appropriate credit limit and terms established.
Customer’s Price Class has been specified.
Customer’s special Fuel Type and Minimum Fueling amount has been specified.
Customer’s Sales Tax rate and exemption status has
been specified.
Customer’s Flight Numbers are specified
Fuel Meters and Tanks have been set up.
Special Fuel Type established.
Fuel Price has been set as IntoPlane Fee.
Fuel is attached to Inventory Department with
proper GL overrides established.*
RESULTING JOURNAL ENTRY:
DR
CR
CR
CR
DR
CR
Accounts Receivable - Customers
IntoPlane Fee Income*
Sales Tax Liability
Fuel Tax Liability
Borrowed Fuel Liability*
Non-Owned Fuel Inventory*
238 | TotalFBO® User Guide
FRONT COUNTER & RAMP OPERATIONS
REGULAR CUSTOMER INVOICE FOR SERVICES OR SUPPLIES
WHERE TO GO:
Accounting>Invoicing>Add New Invoices
Accounting>Invoicing>Update Invoices (press the Insert button)
Operations>Concierge>Concierge Super-Screen>Invoicing Tab
WHAT TO DO:
Select Customer - enter a Tail number, Phone Number (+8888), Name or Account number
Add Sales Detail(s) Select Line Type (Oil or Parts)
Select Item Sold (type of Oil or specific Pilot Supply Item, using number or description)
Enter Quantity Sold
Verify or enter Sale Price
OK the Line
Select Line Type (Service)
Select GL account for Service Income (using number or description)
Enter Quantity Sold
Verify or enter Sale Price
OK the Line
Press Cancel when you have no more Sales Detail Lines to enter
Verify Invoice is complete and correct
OK the Invoice
NOTE: If this is an invoice for Over the Counter sale of Aircraft Parts, it may also be necessary to add a
customer account. If sales of these items should be directed to another department, establish a General Ledger Department with overrides for Parts Cost and Parts Income. Then specify the Sale Department on the
Invoice, Tab 2.*
REQUIRED SETUP OR OPTIONS:
Customer has already been created in the Database,
with appropriate credit limit and terms established.
Customer’s appropriate Price Class has been specified.
Customer’s Sales Tax rate and exemption status has
been specified.
Invoice Style Sheet has been defined so that printing will be correct.
Default number of copies to print has been specified.
Parts or Oil items are in Inventory.
GL Accounts have been marked “Allow Sales.”
RESULTING JOURNAL ENTRY:
DR
CR
CR
CR
DR
CR
Accounts Receivable - Customers
Sales Income (Inventory)
Sales Income (Service)*
Sales Tax Liability
Cost of Inventory Sold*
Inventory Asset
FRONT COUNTER & RAMP OPERATIONS
TotalFBO® User Guide | 239
ADJUST ROUNDING DIFFERENCES TO POS MACHINE
WHERE TO GO:
Accounting>Invoicing>Update Invoices (press the Change button)
Operations> Concierge> Concierge Super-Screen> Invoice Tab (press Change button)
WHAT TO DO:
METHOD 1 - WHEN IT’S A FUEL SALE:
Change the Fuel Detail line
Select the “Dollar Sign” button near the Sale Price
Enter the amount of the sale from the cardswipe machine.
Mark whether the amount includes sales taxes.
OK the Line
Verify Invoice is complete and correct
OK the Invoice
METHOD 2 - WHEN IT’S ANY OTHER SALE:
Add Sales Detail Select Line Type “Service”
Select Account Miscellaneous Income
Enter Quantity of 1
Enter Sale Price for rounding difference amount. (Check Credit box if negative)
OK the Line
Verify Invoice is complete and correct
OK the Invoice
REQUIRED SETUP OR OPTIONS:
Invoice has already been created and saved.
RESULTING JOURNAL ENTRY:
Method 1:
CR
Fuel Sales Income
CR
Sales Tax Liability
DR
Credit CardS Receivable
Method 2:
DR
Credit Cards Receivable
CR
Miscellaneous Income
240 | TotalFBO® User Guide
FRONT COUNTER & RAMP OPERATIONS
POSTING CREDITS & ADJUSTMENTS
WHERE TO GO:
Accounting>Invoicing>Add New Invoices
Accounting>Invoicing>Update Invoices (press the Insert button)
Operations>Concierge>Concierge Super-Screen>Invoicing Tab
WHAT TO DO:
Select Customer - enter a Tail number, Phone Number (+8888), Name or Account number
Add Sales Detail(s) in exactly the same way as original sale was made:
If a window appears for entry of
Select Line Type Fuel, Oil, Parts or Service
cost, make NO CHANGES to
Check Credit? box
default value shown unless directed
Select Item or Service Sold
to do so by your Accounting
Enter Quantity Sold
Department staff.
Verify or enter Sale Price (use POSITIVE numbers)
OK the Line
If a replacement item is being sold, enter new Sales Detail line(s) at correct price and quantity.
Press Cancel when you have no more Sales Detail Lines to enter
Verify Invoice is complete and correct
(If a cash or credit card refund is to be made, continue with next procedure “Refunds- Cash or Credit”
Otherswise, OK the Invoice
NOTE: This procedure places a credit (or adjusted amount) on the customer’s account. If a check is to be
sent to the customer, the Accounting Department will use the Refund-Checks procedure to complete the transaction.
This method is useful for correcting errors on invoices as well as when a customer returns an item previously
sold. Inventory items are returned to stock automatically.
REQUIRED SETUP OR OPTIONS:
Customer has already been created in the Database,
with appropriate credit limit and terms established.
Customer’s appropriate Price Class has been specified.
Customer’s Sales Tax rate and exemption status has
been specified.
Invoice Style Sheet has been defined so that printing will be correct.
Default number of copies to print has been specified.
Parts or Oil items are in Inventory.
GL Accounts have been marked “Allow Sales.”
RESULTING JOURNAL ENTRY:
CR
DR
DR
DR
CR
DR
Accounts Receivable - Customers
Sales Income (Inventory)
Sales Income (Service)
Sales Tax Liability
Cost of Inventory Sold
Inventory Asset
FRONT COUNTER & RAMP OPERATIONS
TotalFBO® User Guide | 241
REFUNDING A CUSTOMER’S CREDIT BALANCE (CASH OR CREDIT)
WHERE TO GO:
Accounting>Invoicing>Add New Invoices
Accounting>Invoicing>Update Invoices (press the Insert button)
Operations>Concierge>Concierge Super-Screen>Invoicing Tab
WHAT TO DO:
(Can be done as payment section of credit memo invoice or as separate invoice)
Select Customer - enter a Tail number, Phone Number (+8888), Name or Account number
Add Payment Information Select the Payment Button
Enter Dollar Amount to refund (use NEGATIVE number)
Select Payment Means
If Cash, select Cash button
OK the Line
If Credit Card, select Credit Card/Other (requires sufficiently high privilege level)
If Online processing, select prior transaction for validation
If Offline processing, enter credit card information (process transaction n POS machine)
OK the Line
Close the Payment Window
OK the Invoice
REQUIRED SETUP OR OPTIONS:
Customer has already been created in the Database.
Invoice Style Sheet has been defined so that printing will be correct.
Default number of copies to print has been specified.
Accepted credit cards have been established and
linked to proper paying authority.
Appropriate privilege level and options set on User
ID record.
RESULTING JOURNAL ENTRY:
DR
CR
Accounts Receivable - Customers
Undeposited Receipts
or
DR
CR
Accounts Receivable - Customers
Credit Cards Receivable
242 | TotalFBO® User Guide
FRONT COUNTER & RAMP OPERATIONS
POSTING CUSTOMER PAYMENTS RECEIVED (ROA)
WHERE TO GO:
Accounting>Invoicing>Add New Invoices
Accounting>Invoicing>Update Invoices (press the Insert button)
Operations> Concierge> Concierge Super-Screen> Invoice Tab (press Insert button)
WHAT TO DO:
Select Customer - enter a Name, Tail number, or Account number
If Detail Line appears, Press Cancel, as you have no Sales Detail Lines to enter
Add Payment Information Select the Payment Button
Enter Dollar Amount paid
Select Payment Means (select Cash, Check, or Credit Card/Other)
If using a Check, enter Check Number
If recording an EFT transfer, select Cash
If using an Offline Processor, select Offline Payment button
Enter Card Number and Expiration Date
OK the Line
If using an Online Processor, swipe card or
If card not available, click Online button
Enter card information manually
Click Authorize button
Close the Payment Window
Verify Invoice is complete and correct
OK the Invoice
REQUIRED SETUP OR OPTIONS:
Accepted credit cards have been established and
linked to proper paying authority.
RESULTING JOURNAL ENTRY:
DR
CR
Credit Cards Receivable
or
Undeposited Receipts (Cash & Checks)
Accounts Receivable - Customers
FRONT COUNTER & RAMP OPERATIONS
TotalFBO® User Guide | 243
APPLYING PAYMENTS RECEIVED TO PRIOR CHARGES
WHERE TO GO:
Accounting>Invoicing>Other Invoice Operations>Apply Outstanding Credits
NOTE: If you have a high privilege level, the Apply Credits screen may automatically appear after you have entered
a payment invoice.
WHAT TO DO:
Select Customer
Select the Apply Credit Button
Select the Credit invoice your wish to apply from the top window
Select Charge invoices in the lower window and indicate whether to pay in full or partially
Select the Commit Button to lock in your choices
Close the Window
NOTE: If a payment exactly matches an outstanding invoice, payments will be applied automatically.
REQUIRED SETUP OR OPTIONS:
Payment invoice has been posted to customer’s
account.
Outstanding charges also exist on customer’s account.
RESULTING JOURNAL ENTRY:
244 | TotalFBO® User Guide
FRONT COUNTER & RAMP OPERATIONS
WORKING WITH AN EXISTING INVOICE
WHERE TO GO:
Accounting>Invoicing>Update Invoices
WHAT TO DO:
Select Invoice
To View without making changes, Select View button.
To Print an invoice, perhaps with a selection of alternate style sheets, Select Print
To Void an invoice, Select Void (retains information, reverses effect of invoice in all locations)
To Delect an invoice, Select Delete (removes information, requires higher privilege level)
To Change an invoice, Select Change
Select Detail Line or other field and make changes desired.
OK the invoice.
NOTE: Changes can only be made prior to Accounting Department’s monthly Closing of Receivables, and
within date range set by Invoicing Options.
REQUIRED SETUP OR OPTIONS:
Invoice has been created and saved.
RESULTING JOURNAL ENTRY:
Depends upon change made, if any.
In most cases, an entry will be made to reverse
the original invoice journal entry, and a new
entry will be made for value of invoice when
OK’d.
FRONT COUNTER & RAMP OPERATIONS
TotalFBO® User Guide | 245
REGULAR CUSTOMER INVOICE FOR RENTAL & INSTRUCTION
WHERE TO GO:
Accounting>Invoicing>Add New Invoices
Accounting>Invoicing>Update Invoices (press the Insert button)
Operations>Concierge>Concierge Super-Screen>Invoicing Tab
WHAT TO DO:
Select Customer - enter a Tail number, Phone Number (+8888), Name or Account number
Add Sales Detail(s) Checking in a flight from Rental
Select Line Type Rental
Dispatch automatically completes
Select Rental Code (Solo, Dual, etc.)
an invoice and displays it for your
Select Customer’s Pilot Record
approval.
Select Aircraft
Enter Beginning and Ending Hobbs and/or Tach meter readings (Quantity updates automatically)
Verify or enter Sale Price
OK the Line
Select Line Type Instruction
Select Instruction Code (using number or description)
Select Instructor
Select Billing Rate (if not linked automatically to Instruction Code in General Ledger setup)
Verify or enter Quantity (will automatically match Rental Hours from line above)
Verify or enter Sale Price
OK the Line
Press Cancel when you have no more Sales Detail Lines to enter
Verify Invoice is complete and correct
OK the Invoice
REQUIRED SETUP OR OPTIONS:
Customer has already been created in the Database,
with appropriate credit limit and terms established.
Customer’s appropriate Price Class has been specified, along with Block, Club or Package status.
Customer’s Sales Tax rate and exemption status has
been specified.
Invoice Style Sheet has been defined.
Default number of copies to print specified.
GL Accounts have been marked “Rental, Instruction” and linked to Billing Rate description.
Instructors marked as Pilots in Employee Records.
Aircraft marked as Rental in Aircraft Record.
RESULTING JOURNAL ENTRY:
DR
CR
CR
CR
Accounts Receivable - Customers
Sales Income (Rental)
Sales Income (Instruction)*
Sales Tax Liability (if any)
246 | TotalFBO® User Guide
FRONT COUNTER & RAMP OPERATIONS
INVOICING DISCOVERY (INTRO) FLIGHTS
WHERE TO GO:
Accounting>Invoicing>Add New Invoices
Accounting>Invoicing>Update Invoices (press the Insert button)
Operations>Concierge>Concierge Super-Screen>Invoicing Tab
WHAT TO DO:
Select Customer - enter a Tail number, Phone Number (+8888), Name or Account number
Add Sales Detail(s) Checking in a flight from Rental
Select Line Type Rental
Dispatch automatically completes
Complete line details normally
an invoice and displays it for your
ZERO the Sale Price
approval.
OK the Line
Select Line Type Instruction
Complete line details normally
ZERO the Sale Price
OK the Line
Select Line Type Service
Select GL Account Code Discovery Flights
Quantity 1
Verify or enter flat rate for Discovery Flight
OK the Line
Press Cancel, you have no more Sales Detail Lines to enter
Add Payment Information If using a Gift Certificate, Select that Payment means and enter certificate number
Add a second Payment Line if balance remains and complete details normally
Close the Payment Window
OK the Invoice
REQUIRED SETUP OR OPTIONS:
Customer already in database or established as a
Sidestep at the start of the Invoice.
Invoice Style Sheet has been defined.
Default number of copies to print specified.
GL Accounts have been marked “Rental, Instruction” and linked to Billing Rate description.
Instructors marked as Pilots in Employee Records.
Aircraft marked as Rental in Aircraft Record.
Gift Certificate sold on a previous invoice to another customer.
RESULTING JOURNAL ENTRY:
DR
DR
CR
CR
Undeposited Receipts
Gift Certificate Liability
Sales Income (Discovery Flights)
Sales Tax Liability (if any)
FRONT COUNTER & RAMP OPERATIONS
TotalFBO® User Guide | 247
SELL A GIFT CERTIFICATE
WHERE TO GO:
Accounting>Invoicing>Add New Invoices
Accounting>Invoicing>Update Invoices (press the Insert button)
Operations>Concierge>Concierge Super-Screen>Invoicing Tab
WHAT TO DO:
Select Customer - enter a Tail number, Phone Number (+8888), Name or Account number
Add Sales Detail(s) Select Line Type Service
Select GL account for Gift Certificate Liability (using number or description)
Enter Quantity Sold
Verify or enter Sale Price
OK the Line
Press Cancel when you have no more Sales Detail Lines to enter
Add Payment Information Select Payment Means and complete details normally
Close the Payment Window
Verify Invoice is complete and correct
OK the Invoice
NOTE: It is not necessary to attempt to match the customer who purchased the certificate and the
customer who used it. However, printing the certificate with a serial number and logging certificates used
is a part of good cash controls. Certificates given for promotional purposes must still be sold to an Internal
Customer for proper accounting.
REQUIRED SETUP OR OPTIONS:
Customer has already been created in the Database,
with appropriate credit limit and terms established.
Invoice Style Sheet has been defined.
Default number of copies to print specified.
GL Account for Gift Certificate Liability properly
established in Automatic Ledger List.
RESULTING JOURNAL ENTRY:
DR
CR
Undeposited Receipts
Gift Certificate Liability
248 | TotalFBO® User Guide
FRONT COUNTER & RAMP OPERATIONS
REIMBURSING OFFSITE FUEL PURCHASES ON RENTAL FLIGHTS
WHERE TO GO:
Accounting>Invoicing>Add New Invoices
Accounting>Invoicing>Update Invoices (press the Insert button)
Operations>Concierge>Concierge Super-Screen>Invoicing Tab
WHAT TO DO:
Select Customer - enter a Tail number, Phone Number (+8888), Name or Account number
Add Sales Detail(s) Checking in a flight from Rental
Select Line Type Rental
Dispatch automatically completes
Complete line details normally
an invoice and displays it for your
OK the Line
approval, INCLUDING offsite fuel
purchases.
Select Line Type Instruction
Complete line details normally
OK the Line
Select Line Type Service
Select GL Account Code Offsite Fuel
Enter Amount customer paid for fuel
Enter number of Gallons purchased
OK the Window
Note that Credit? has automatically been checked for this line.
OK the Line
Press Cancel when you have no more Sales Detail Lines to enter
Add Payment Information Enter Amount, select payment method, and complete details normally.
Close the Payment Window
OK the Invoice
NOTE: Credit may be reduced automatically to match your pre-defined maximum rate per gallon.
REQUIRED SETUP OR OPTIONS:
Customer already in database or established as a
Sidestep at the start of the Invoice.
Invoice Style Sheet has been defined.
Default number of copies to print specified.
GL Accounts have been marked “Rental, Instruction” and linked to Billing Rate description.
Instructors marked as Pilots in Employee Records.
Aircraft marked as Rental in Aircraft Record.
Gift Certificate sold on a previous invoice to another customer.
Maximum Offsite Fuel Credit per gallon limit set in
Invoicing Options.
RESULTING JOURNAL ENTRY:
DR
DR
CR
CR
CR
Undeposited Receipts
Offsite Fuel Credit Revenue
Sales Income (Rental)
Sales Income (Instruction)
Sales Tax Liability (if any)
TotalFBO® User Guide | 249
CHARTER OPERATIONS
CHARTER OPERATIONS
Included in this section:
•
•
•
•
•
•
•
•
•
•
•
•
•
Quote Defaults
Aircraft Setup
Pilot Records
Dispatch Setup
Schedule Setup
Preparing Quotes
Scheduling Trips
Dispatching Flights
Check-In
Invoicing
Trip Expenses
FET Taxes
Staying Profitable
Charter functions within TotalFBO® are designed to meet the needs of flights
operated under FAA Parts 91, 135, and 121. If you’re simply providing
pilot services and a rental aircraft (photo flights, etc.) see the Flight School
Operations section.
Even if you’re doing several kinds operations from the same fleet of aircraft,
the power of integration makes it easy to track maintenance, schedules,
customer billing, pilot duty time, and profitability – all on time, instantly
available, and without re-entering any data!
And don’t forget to have a chat with your Network Consultant about providing
secured access to your network through Windows Terminal Server. With
Remote Desktop Connection built-in to every Windows XP computer these
days, it’s easy to access your schedule, check-in or dispatch flights, even
update customer quotes, from anywhere. By tailoring your User ID access in
TotalFBO®, even customers can have limited access to scheduling.
This section will give you
a good idea of the WHAT,
WHY, and WHEN of Charter
procedures.
For more details on individual
screens and fields, refer
to the Helpscreens in the
program.
Helpful references to specific
topics are available throughout
this Guide.
See Helpscreen topics
for more details
250 | TotalFBO® User Guide
See Helpscreen topic:
Charter: Initial Setup &
Options
CHARTER OPERATIONS
INITIAL SETUP
In order to make the daily flow as rapid as possible, most of the information
needed for quoting and dispatching flights is entered beforehand. The chart on
the next page will give you a good idea of how all this information is used and
updated behind the scenes of daily operations.
QUOTE DEFAULTS & OPTIONS
I think we just
busted our 2%
vector margin!
LearJet 72 Alpha Golf,
take another two
turns in holding around
that barn there.
The fields shown on Tabs 1 and 3 at Operations> Charter> Options and
Settings> General Options help you save keystrokes during the actual creation
of the quote, and help customize the display and printout of the quote details.
Here you’ll also set some quote calculation rules, such as how much additional
time should be included for landings, takeoffs, and vectoring.
Note that you can select the default unit for calculating the quote (hours or
distance) separately from the unit used to display distances to the customer.
Your default Quote By unit can be overridden by the setting on an aircraft or
on an individual quote.
Tabs 2 and 4 control how taxes and fees are charged. As regulations change
from year to year, be sure to review your selections here. Note that these
settings work together with options set on the aircraft and airports records.
Set your own Flight Classes on Tab 5, and you’ll be able to see what sectors
of your Charter operations are growing or changing. Local, Interstate, and
International have been entered as defaults to get you started. How about
Contract, Government, Freight, Scheduled, Medical, Brokered….?
The look of the Charter Quote printout can say a lot about your organization,
and you’ll want to customize the Style Sheet on Tab 6 so it includes just what
you like. Note also, that you can define multiple Style Sheets to meet specific
needs. In addition to the customer’s version, you can create printouts for
internal use or that display the itinerary only, etc.
For the customer’s copy, consider adding text in the Trailer area for the
customer’s acceptance and signature. You can email the quote directly
from TotalFBO® to the customer and they can sign and fax it back to you
immediately.
AIRPORTS
TotalFBO® installs with over 25,000 airports worldwide, including private
strips and specialty landing areas. You can also add additional landing areas
for smaller international destinations or specialty locations such as golf
courses, ranches, or exhibition sites.
CHARTER OPERATIONS
TotalFBO® User Guide | 251
CHARTER INITIAL SETUP
Quote Rules
& Options
Charter Aircraft
Set up your quoting rules to match your own
policies and tax requirements, and define
one or more Style Sheets for your Quotes.
Set up each aircraft with appropriate type,
select as charter and add prices & performance,
weight & balance and CG configuration, indicate
pilot requirements, and show owner.
Charter Price
Classes
Establish Price Classes for your customers,
with formulas for providing the correct price
on each quote and invoice.
Pilot Employee
Records
Create employee records for pilots with
the correct Pay Types for Flight and
Standby hours.
Pilot Records
Dispatch Options
Invoice
Options
Schedule
Objects
Create pilot records for charter pilots with
checkouts and currency in type as well as special
type requirements.
Set defaults and Style Sheet options for checking
aircraft and pilot readiness for flight and printing
Flight Manifest and related reports.
Define one or more Style Sheets for Invoices,
including quote information and details.
Create records for pilots and aircraft,
with schedule availability.
252 | TotalFBO® User Guide
CHARTER OPERATIONS
See Helpscreen topic:
In addition to the basic airport information, TotalFBO® provides time zone
and daylight savings time fields. This information may require updating for
some destinations as usage changes.
Airports
If a note appears on the quote “Times Not Adjusted” it is likely that the time
zone information on at least one airport in the itinerary is missing. After
correcting the aircraft record the quote should print correctly.
Although you have already set a standard margin for vectoring, some airports
are so busy that you can expect additional delays as controllers get everyone
sequenced for landing. For those destinations, you’ll want to add an additional
number of minutes for the expected In-Bound Delay to keep itineraries and
prices as accurate as possible.
Tab 2 of the Airports record allows you to enter known landing fees for various
aircraft weights, as well as departure and arrival taxes and fees. On the quote
you can also add a typical amount for landing fees at unknown destinations.
Tabs 3 and 4 provide areas for you to enter information on available FBOs and
Hotels at this airport. When you prepare a quote, it will be easy to direct the
pilot to the proper place for fueling and indicate hotels for passenger and crew
lodging.
TotalFBO®
AC-U-KWIK
If you have purchased a full subscription to AC-U-KWIK data from NAVPAK
(800-600-6199) be sure to let them know you’re a TotalFBO® user. They’ll
notify Horizon you’re a customer in good standing so that we can provide you
with the password to unlock the encrypted data provided on every program
CD. Then follow the instructions provided with the password to import the
data into your airport records. As long as you continue your subscription, new
data is provided every 6 months.
AIRCRAFT SETUP
Your next step will be to set up the rental aircraft at Operations> Aircraft>
Aircraft Setup.
You may find that the aircraft records have already been created, perhaps by
others in your company who are responsible for aircraft maintenance. The
aircraft record is used in many functions throughout TotalFBO®, so be very
careful about deleting or making changes to them.
Charter users will be concerned with several areas of the aircraft record,
organized on Tabs 1, 3, 4, 5, 6 & 7.
In the General Tab, you’ll enter the Aircraft Tail Number, and select Company
as the Classification, since these aircraft will be operated and/or owned by your
own company. The most important decision you’ll make on this tab is your
CHARTER OPERATIONS
TotalFBO® User Guide | 253
selection of the Aircraft Type.
Aircraft Type
You may create your own designations for the Aircraft Type field. Keep in
mind that there’s likely to be a bit of a tug-of-war here between Mechanics and
Pilots, as both groups depend on the same data for different purposes.
•
Mechanics will be able to create default maintenance reminders for
each aircraft type they define. This will save a lot of time as each
new aircraft is added to the database, since the entire list of reminders
can be imported from the default for that type.
•
Each time a pilot flies the aircraft, a record is added to his pilot record
indicating the type of aircraft flown on that date. These records are
important in determining currency.
Most FBOs find they can meet the needs of both groups by planning how types
will be named (Cessna 172, C-172, Skyhawk).
Mechanics can often define additional “sub-types” which will be used only for
setting up default maintenance reminders.
Ratings
Now is a good time to move to Tab 7 and check off the rest of the pilot
requirements for flying this aircraft. Four of the choices are customizable
(See Utilities> Customizing> Set Customizable Field Names) so you can require
specialized checkouts if necessary.
These requirements are checked against the pilot’s qualifications as the flight
is dispatched, insuring that pilots who don’t meet your requirements won’t be
allowed to fly the aircraft.
Owners & Leaseback
Select the Customer account which represents the owner of this aircraft. There
can be any number of owners on an aircraft. Don’t forget to select an Internal
account if your company owns it.
Whether this aircraft is leased from another owner or not, you’ll want to set up
the defaults for the Leaseback P&L report when you run it for this aircraft.
•
•
If you must pay a fee or portion of the profit to the owner, be sure the
report defaults accurately reflect your contract requirements with the
owner.
If you are the owner, select special options or else make sure the
general defaults in the Aircraft Module Options will provide the Profit
& Loss report you like.
AIRCRAFT TYPES!
When I get done with
the C-172RG...!
I'm
flying the
Cutlass today...
254 | TotalFBO® User Guide
CHARTER OPERATIONS
See the Back Office Operations section for more details about preparing the
Leaseback/Profit & Loss report.
Performance/Charter
It’s a good idea to ask your chief pilot to complete this information, as it
should come straight from the Pilot Operating Handbook of the aircraft, and
his knowledge of how you typically fly it.
See Helpscreen topic:
Aircraft Pricing and
Performance
You can improve the accuracy of your quotes tremendously by entering the
speed and altitudes used in each of the 5 leg length categories. You’ll get a
more accurate calculation in situations where there is a short leg (perhaps to
position the aircraft or pick up a passenger) followed by a much longer leg.
You can also select a picture of the aircraft and enter a short description. Then
you can print this information at the top of each quote, giving your customer
a better feel for what to expect, and making your presentation much more
professional. Any BMP or JPG file can be used, however, you’ll want to
resize your graphic to about the size it will appear on the page in order to make
printing fast. The print area is about 1” tall by 1.5” wide.
Charter Pricing
Checking the Charter Aircraft box on Tab 3 allows you to dispatch and invoice
this aircraft as flights are taken.
After that, you’ll want to enter your aircraft charter rates in one or more of the
five Fixed Price Fields in the Base Price section. You may enter amounts in
either or both of the “Per Hour” or “Per Distance” columns. Your choice in the
“Billing Units for Aircraft” section at the bottom of the window will determine
which rate(s) are used normally on this aircraft. You may override this choice
on any individual quote as needed.
Also take a moment to enter your highest price in the List Price field. Invoices
and certain reports can compare the actual price paid with the List Price and
display the discount percentage.
The Second Pilot Add-On section is where you’ll enter amounts that should be
added to the base price only when a second pilot is necessary for the flight.
The fields in the Other Pricing section allow you to customize your minimums
and short leg charges. Also enter here any Fuel Surcharge rate (per hour or per
mile) you’re currently using. When fuel costs fluctuate rapidly, you’ll be able
to leave your published rates stable and automatically add the Fuel Surcharge
amount as quotes are created for customers.
How will you know what price to enter and where? This answer comes from
CHARTER OPERATIONS
how you set up Price Classes. Haven’t done that yet? Well, let’s tackle that
next!
PRICING CHARTER FLIGHTS
The central mechanism used to price charter quotes to customers is the Price
Class. These are found at Charter> Options and Settings> Update Price Classes.
A Price Class is nothing more than a formula (Pricing method) which applies
to a specific group (or “Class”) of customers. There is no limit to how many
Price Classes you can create, and so there is no limit to how many prices you
can offer to your customers.
There are at least five classes of customers which are common to Charter
Operators, and we suggest that you begin with this list:
•
•
•
•
•
Retail
Corporate
Contract (Freight)
Owner
Internal
The simplest way to set up your price classes is to set your price for the
highest charter rate (typically what you charge to your new “Retail” customer)
in a field on the Aircraft Record. You may use any of the five Fixed Price
fields and the List Price field. Let’s say you choose to use Fixed Price #1.
Then to set the formula on the Retail Price Class you would simply select
“Fixed Price #1 minus $ Amount” as your Pricing Method. The Amount 1
field we’ll leave set to 0.00.
Thus, whenever a customer who belongs to this Retail Price Class is charged
for a flight, we’ll calculate the price by finding the amount on the aircraft in
the Fixed Price #1 field and subtracting 0.00 from it.
Typically your other prices will be based on a discount off of the Retail Price,
so we can set up other Price Classes to simply use the same amount we’ve
already entered in Fixed Price #1 and subtract either a specific amount or a
percentage to arrive at the final price.
An example of this would be our Price Class for the Corporate customer. This
would be our regular customer who flies with us often. Because he does
regular business with us, we allow him a 5% discount. This is easily done
by setting the Pricing Method to “Fixed Price #1 Minus Percentage” and
setting Amount 1 to 5%.
TotalFBO® User Guide | 255
256 | TotalFBO® User Guide
CHARTER OPERATIONS
PRICING CHARTER FLIGHTS
1
2
3
What is the
Customer's
Charter
Price Class?
Is another
Price Class
selected on
the Quote?
Are special
Billing Rates on
Tab 3 of the
Quote?
Locate Price
Class Formula
Select correct
Aircraft record
Use Formula and
price to calculate
customer's price
4
Charter
Quote
Any lastminute changes?
Charter
Invoice
CHARTER OPERATIONS
In some cases, you may decide to set a price in another field for a specific class
of customer. This is common for prices to Owners or for negotiated contracts,
such as freight contracts. In these cases we have agreed to a special price
based on separate cost and profit calculations. So we’ll choose to set that
price on the Aircraft Record in another field, say Fixed Price #3, and select the
Pricing Method on the Owner or Contract Price Class accordingly.
Don’t forget to define a Price Class for those times when you use an aircraft
for company (or personal) business.
CHARTER PILOT RECORDS
Begin by making sure each pilot has an Employee Record at Accounting>
Payroll> Update Employee Basic Info, and be sure you check the box “Is a
Pilot?”
TotalFBO® User Guide | 257
If you have many individually
priced contracts, create a
price class for each customer
based on Fixed Price #5,
but leave that price on the
Aircraft at Zero. In the Price
Class show the price in the
Amount 1 field.
See Helpscreen topic:
Pilot Records
Checking the box reveals a button which will allow you to create and/or link to
a Pilot Record. (You can create pilot records directly at Operations> Dispatch>
Update Pilot Records, but you must link pilot records to their corresponding
Even Contract Pilots must have
employee records in the Payroll module.)
an Employee Record so that
you can schedule and capture
In addition to the basic qualifications, be sure you add records indicating
their time. However, Contract
checkouts and currency in each type of aircraft this pilot will fly, as well as
employees are not included in
requirements for type-specific checkouts.
Employee reports and receive
a 1099 at year-end.
DISPATCH OPTIONS
TotalFBO® provides your company with a great deal of protection through its
Dispatch function, which verifies the flight readiness of both aircraft and pilot
before permitting the dispatch to proceed.
This is especially important in light of the wide range of experience which
your dispatching staff may have. Some organizations are large enough to
employee a well-trained dispatcher, but others rely on a CSR at the Front
Counter, or even the pilot himself. And even experienced dispatchers
cannot keep up with all the individual details of a large fleet or several pilots.
Learning to depend on the Flight Dispatch capability in TotalFBO® can avoid
inadvertently putting your company at risk.
You’ll want to customize the Dispatch printout (manifest) itself. at Operations>
Dispatch> Options and Setting> Charter Dispatch Options.
Defining Flights
If you run scheduled flights where there is no quote for each trip, you can
define those flights at Operations> Dispatch> Define Flights> Assign Flight
Numbers. When you dispatch, all the leg information will be completed
automatically.
See Helpscreen topic:
Dispatching a 135 Flight
258 | TotalFBO® User Guide
See Helpscreen topic:
Accounts Receivable:
Initial Setup & Options
See Helpscreen topics:
Using Style Sheets
and
Charter: Initial Setup &
Options
CHARTER OPERATIONS
SET INVOICE OPTIONS
Most of the items at Accounting> Invoicing> Options and Settings> General
Options have probably already been considered and set by your Accounting
Department staff, however, there are a few items which are specific to Charter
invoices that you should know about.
The option to “Copy Customer Notes from Charter Quotes to Invoicing” will
copy any text in Tab 6 of the quote to a Notes line on the invoice for you.
For more customizing of your charter invoice, move now to Accounting>
Invoicing> Options and Settings> Invoice Style Sheets. You may need to set
up more than one style sheet for printing Charter invoices, to meet a variety of
customer requirements.
For example, if you’re invoicing a contact customer by the hour, it may be
necessary to display Hobbs and/or Tach times on the invoice. For more typical
charter flights, you’ll probably not want to display this information.
SCHEDULING SETUP
Keeping customers happy while watching the bottom line is largely a function
of how well you schedule. We’ll get into the details of how to do it a bit later,
but first you’ll need to think about what kinds of things and events you’ll be
scheduling.
Schedule Options
Let’s start by working with the list of Object Types you can customize at
Operations> Scheduling> Options and Settings> General Options.
The basics on the list:
• Aircraft
• Charter Pilots
How about expanding the usefulness of your schedule with these categories:
• Courtesy Cars
• Conference Room
Others in your company may have already added objects for the things they’ll
be scheduling, also.
You get the idea…! Next move to Tab 3 and add some choices to the “Other
Types” list. The first list identifies those types of things that will your
customers will be scheduling. This list identifies the reasons why something
would not be available to a customer on a short-term basis. The musts on the
list will be these:
• Aircraft Maintenance
• Sick Leave
CHARTER OPERATIONS
•
•
TotalFBO® User Guide | 259
Vacation
Dr. Appointment
Schedule Objects
Now that we know the kinds of things we’ll be scheduling, let’s set up the
individual items themselves at Operations> Scheduling> Update Objects.
This is where you’ll create a record for each aircraft, each pilot, each courtesy
car, etc.
See Helpscreen topic:
Scheduling: Initial Setup
& Options
Give each item a short name that will be used on your schedule screen, and
a full name for reports. You’ll also set up the basic schedule availability for
each item, so that employees who work part time or only in the summer can be
For Charter Aircraft, be sure
scheduled correctly.
you DO NOT check the box
“Requires a Pilot Record To
Be sure to link these items to your Aircraft and Employee records, where
Make a Reservation?”
appropriate, so that you can seamlessly Dispatch right from your Schedule
screen.
CHARTER FLIGHT WORKFLOW
That’s it for the setup. Now the phone’s ringing and it’s time to make all that
tedious work pay off.
PREPARING THE QUOTE
When the customer calls, you’ll begin the quote at Operations> Charter>
Update Charter Quotes.
1.
Get there FAST!
Make a button for any menu
function at File> Preferences>
Customize Toolbar. Charter
Quotes is Item 194!
When you select the Customer Account, their phone number and Price
Class is displayed for your reference. You can select an alternate Price
Class for this quote only, if necessary.
Copy any quote as a template for a new trip by selecting the Copy Existing
Quote button at the top of the screen.
2.
Next, you’ll enter the departure date and time, and start building the quote
itinerary.
3.
Insert each leg and select the airport destination. If this is a “round-robin”
trip, you can create the legs for the return trip by simply clicking the
Create Reversing Legs.
4.
Finally, make sure you’ll get the right aircraft for this quote. You can
select an individual tail number, if desired. But you can instantly quote on
all appropriate aircraft in your fleet by entering the number of passengers
in the Maximum Passenger Count field.
See Helpscreen topic:
See Helpscreen Topic:
Making Charter Quotes
260 | TotalFBO® User Guide
CHARTER OPERATIONS
CHARTER FLIGHT WORKFLOW
The trip can be invoiced from the Quote or through the Schedule and Dispatch process.
Prepare
Charter Quote
Schedule
Flight
Passenger
Roster
Dispatch
Flight
Flight
Manifest
International
Declarations
Pre-Authorize
Aircraft Record:
Prices &
Performance?
Maintenance Due?
Pilot Records:
Qualified?
Current?
Check-in
Flight
Pilot Duty Time Log
Payroll
Time Card
Customer
Invoice
Trip
Expenses
Payable
CHARTER OPERATIONS
TotalFBO® User Guide | 261
You can further tailor your choices by selecting Only Pressurized Aircraft?
or the distance to the home base of the aircraft (for those operators who use
aircraft based in multiple locations).
If you have selected a single aircraft by tail number, you’ll see the quote
charges instantly onscreen. If you’re quoting on multiple aircraft, or need to
see the details of any quote, click the Show Full Quote button for a preview of
the printout.
...and what
catering would
you like on board?
If the quote is within the customer’s budget, now you can enter additional
details as needed.
•
Enter passenger names on the first leg and copy them to each
succeeding leg as appropriate.
•
Select or enter Hotel and FBO information on each leg.
•
Adjust departure times for individual legs according to the customer’s
needs.
•
Review tax options on individual legs and on Tab 4.
•
Enter standby information, catering, and additional expenses on Tab
2.
•
Assign Customer Reference Number (Lead Passenger), Flight Class
on Tab 2.
•
Add Customer and Internal Notes to each leg and additional
comments on Tab 6.
Any Customer Preferences or Warnings are added to the Customer’s Account
record, so they’ll be available permanently. You’ll be able to paste Preferences
into individual leg notes for each trip. Include Warnings for your Dispatcher
about credit card or payment information which should be passed along.
Print the finalized quote for your files, if desired, and email the quote directly
to the customer for approval.
Well, the pilot will
need plenty of
Monkey Chow for
his walks with
Bonzo!
262 | TotalFBO® User Guide
CHARTER OPERATIONS
See Helpscreen topic:
SCHEDULING THE TRIP
Updating the Schedule
You can also access the Schedule from Operations> Scheduling> Update
Schedule. For Charter Operations users, you’ll want to view the screen in
Single mode, showing your aircraft fleet.
After you OK the quote, click the Schedule button to add this trip to your
schedule.
Each user will have his own favorite method of making a reservation – some
folks like to use the mouse to drag the schedule frame to fit the reservation,
others like to scroll the date and time fields, and still others just click on the big
Add to Schedule button and start completing the fields manually.
However, you like to do it, keep in mind that each reservation must have either
a Customer selection, or an Other Schedule Type choice.
You can assign a status of either Tentative or Confirmed (which affects the
color displayed for a reservation) and then add any notes you like on the
second tab. You can even use Macros to create small “forms” for standard
information you like to record.
Once recorded, your reservation will appear on the schedule screen with an
abbreviation of the customer name. Since some reservations may be difficult
to identify at high resolutions, you can always right-click on a reservation to
open a menu of options. Depending on your user privileges, you’ll be able to
identify and see any notes connected with the reservation, print a copy, change,
or even delete it.
If you must change several reservations because of weather, pilot illness or
aircraft malfunction; identify each reservation to see the customer’s phone
numbers immediately. You’ll be able to make your calls and reschedule
without leaving this window!
TotalFBO® User Guide | 263
CHARTER OPERATIONS
CHARTER
SCHEDULE-DISPATCH-INVOICE
RELATIONSHIPS
Customer Account
Record
Pilot Records:
Qualified?
Current?
Schedule
Objects
Prepare
Quote
Schedule
Flight
Dispatch
Flight
Employee Record:
Pilot?
Aircraft Record:
Maintenance Due?
Pilot Requirements?
Wt & Balance?
Pilot Duty Time
Log
PreAuthorize
Flight
Manifest
Check-in
Flight
Customer
Invoice
Trip
Expenses
Payable
264 | TotalFBO® User Guide
CHARTER OPERATIONS
DISPATCHING THE FLIGHT
See Helpscreen topic:
You can dispatch flights from the menu function at Operations> Dispatch>
Dispatch Flights.
Dispatching A 135 Flight
Unlike Rental dispatches, Charter dispatches are built up over time, perhaps by
several individuals, as information becomes available. Thus, you can begin a
Charter dispatch record early, completing it as you can, and dispatch quickly
when the flight is ready to go.
Regardless of how you create the dispatch, TotalFBO® will help you keep
track of your activity so that you are sure that all flights were completed and
billed.
Select the quote for On-demand Charter (Parts 91 or 135) or the Flight
Identifier for Contract flights or Scheduled flights under Part 121. This pulls in
the details of the flight legs and schedule for you, enabling a number of fields
on other tabs.
The critical information to verify or enter on Tab 1 is the current Hobbs and/or
Tach Times, especially if you’ve started the record before the last flight checks
in. If the prior flight has checked in, the correct times are probably displayed
for you. Otherwise, you’ll need to update them manually.
Equally important to verify is the Expected Flight Hours. Aircraft maintenance
requirements will only be reviewed through the expected return time.
Crew
Select flight crew members and verify the shift starting times on Tab 2. The
pilot’s weight flows from their Pilot record, or you can update it manually.
Passengers
Select passengers, set their seat assignments and load their baggage all on Tab
3. You can copy information to other legs for faster entry. Passenger records
are permanently stored in your database, so that contact information and
weight data can be reused for upcoming flights.
170
170
170
170
Fuel/Oil/Cargo Records
As you selected the aircraft on Tab 1, the default CG loading data from the
Aircraft Record is loaded for you, and records for each fuel and oil loading
point are defaulted. You should adjust them now for actual fuel loaded for this
trip.
Then add any records for cargo carried (in addition to passenger’s baggage),
selecting the loading point and legs the cargo will be aboard.
CHARTER OPERATIONS
International and Billing Information
If you’re traveling internationally, this is where you can enter notes for the
declaration page.
You can pre-authorize a credit card deposit now, and return to this screen after
the flight is checked in to invoice. If you’re billing by the seat, you can choose
the seat price. Note that you can invoice a different customer than the account
you used for the quote, in case this information changes. You must select a
customer before creating the invoice, however.
Flight Legs
If you’ve selected a quote or pre-defined flight, the legs will be displayed for
you automatically. You can update times and select FBO and Hotels on each
leg at this point, if necessary.
Test for Exceptions
When you’re ready to go, return to Tab 1 and click the Test for Exceptions
button. This allows the computer do the work of inspecting Aircraft
maintenance records and Pilot records for both the student and instructor. Any
exceptions found will be listed for you on the next screen. Depending on your
user privilege level, you may select another aircraft or pilot, possibly update
the record to show recent changes (such as a new medical), or else ignore the
exceptions and continue anyway.
Flight Manifest and Reports
You can print the manifest and other reports from Tab 7 just before you check
out or from the Dispatch Reports and Listings menu.
Dispatch the Flight
To finalize this flight, select the Dispatch button at the bottom of Tab 1.
If necessary, you’ll be able to “un-dispatch” , but the usual next step is the
Check-In.
CHECK-IN
The check-in process is handled from Operations> Dispatch> Dispatch Flights
browse window. The check-in basics are designed to be completed by the pilot
as the trip is completed.
Simply select the flight and click the Update/Check In button. Complete the
following items:
Tab 1 :
Actual Return Date
Time
Tab 2 :
Cycles In
Shift Stop Time
TotalFBO® User Guide | 265
266 | TotalFBO® User Guide
CHARTER OPERATIONS
Hobbs In
Tach In
Provide 6 x 9 envelopes for
pilots to keep logs and
receipts in during the trip.
You can even pre-print an
expense form or log right on
the front of the envelope,
which makes it easy for the
pilot to use and easy for you
to file.
Flight Hours
Now click the Check-in button at the bottom of Tab 1. This updates the aircraft
record with the current times and cycles data and also updates the schedule to
show this flight as “Returned.”
The pilot can now drop his trip envelope with all logs and receipts in a secure
location and get some much-needed rest.
INVOICING THE FLIGHT
After the check-in is complete, you’ll want to review the trip envelope and
prepare the customer’s invoice.
Be sure you have selected the Customer Account and Invoicing Method on Tab
5, then click the Invoice button at the bottom of Tab 1 to generate the invoice.
You’ll be able to make any changes necessary on the invoice itself, including
adjusting or removing Extra Charges. If you have major changes to make, we
suggest that you update the Charter Quote itself and reselect it on the invoice
to update the totals. This method avoids having to make the complex tax
calculations manually.
If you pre-authorized a credit card for this trip, that information will appear
automatically on the invoice. You’ll be able to capture it and authorize
the final charges, or else delete it and continue with an alternate method of
payment.
Credit card processors vary in their handling of pre-authorizations. Deleting
the record from TotalFBO® may or may not actually release the hold on the
customer’s credit card.
TRIP EXPENSES
When a pilot has received an
advance, enter the payable
and then use the Pay by Cash
Debit function to clear the
advance account. Then issue
a check to the pilot for any
balance remaining.
You may use the Trip Expenses button in the dispatch record to open an
Accounts Payable Invoice window for entry of expenses. You may also enter
this information at Accounting> Payables> Update Vendor Invoices.
Be sure to enter the tail number on each disbursement line and the trip number.
For fuel and oil expenses, also enter the quantity purchased on the Fuel/Oil log
window.
FET TAXES
Taxes and fees charges on invoices are posted as liabilities in your accounting
records. When your Accounting Department staff prepares the IRS 720 form,
they’ll refer to the Charter Sales Report, in the Invoicing module, for details
of these amounts.
CHARTER OPERATIONS
TotalFBO® User Guide | 267
The Tax and Fee Summary, in the Charter module will also provide a quick
recap of these totals for any period.
STAYING PROFITABLE
Whether or not you lease aircraft from other owners, you’ll need a good
handle on costs and income from your Charter Operations. Your Accounting
Department will certainly prepare Profit and Loss statements for the Charter
Department, but you’ll also want to get this information on a per aircraft basis.
Be sure to review the information on the Leaseback/Profit & Loss Statement
in the Back Office Operations section of this guide.
In addition, you should regularly prepare the Aircraft Activity Report, from
the Reports and Listings section of the Aircraft module. This spreadsheetstyle report recaps income from both rental and instruction, displays hours in
all categories, lists fuel and oil usage and burn per hour, plus maintenance and
overhead expenses. All this information is summarized and an overall cost and
profit per hour calculation is provided.
This information is invaluable in planning pricing decisions and in determining
the size and composition of your training fleet.
The Trip Summary report, in the Charter module, provides a listing of income
and expense items for each flight. This report can give you early warning
of rising costs for fuel or overnight expenses that can be used to adjust your
prices.
The Charter Sales Report, in the Invoicing module, can also be run to
summarize sales by the Flight Classes you have defined. You’ll see sales
trends by business segment or customer group.
Finally, the Billable Hours report, available in the Invoicing module, can
help you review instructor productivity and catch billing errors before they
also become payroll errors. Many managers ask Pilots who are hourly paid to
review this report and compare it to their own logbooks before each payroll is
prepared.
Your NATA membership
entitles you to excellent
materials and advice on what
taxes and fees are applicable
to your operations.
268 | TotalFBO® User Guide
CHARTER OPERATIONS
TotalFBO® User Guide | 269
FLIGHT SCHOOL
OPERATIONS
Included in this section:
•
•
•
•
•
•
•
•
•
•
•
•
•
•
Course Setup
Aircraft Setup
Schedule Setup
Dispatch Setup
Enrolling Students
Pilot Records
Scheduling
Dispatch
Check-In
Invoicing
Squawks & Maintenance
FAA 8710
Selling Packages
Staying Profitable
Whether you’re operating under Part 61 or Part 141 FAA regulations, there is
a common need to reference information about courses and students’ progress.
The Flight School module provides simple access to this information and
makes it easy to prepare the FAA 8710 when it’s time to go for that big test!
This section will give you
a good idea of the WHAT,
WHY, and WHEN of Flight
School and Aircraft Rental
procedures.
For more details on individual
screens and fields, refer
to the Helpscreens in the
program.
Helpful references to specific
topics are available throughout
this Guide.
These areas are of primary interest to the instructor, but your company as a
whole will benefit from the tight integration with Flight Dispatch, Invoicing,
Aircraft Maintenance, and Scheduling modules functions.
See Helpscreen topics
This section will show you how to combine all this activity into a seamless
flow that makes it possible for you to keep your customers happy and keep an
eye on the bottom line at the same time.
for more details
And don’t forget to have a chat with your Network Consultant about providing
secured access to your network through Windows Terminal Server. With
Remote Desktop Connection built-in to every Windows XP computer these
days, it’s easy for instructors and staff to access your schedule, check-in or
dispatch flights, even update student records, from anywhere. By tailoring
your User ID access in TotalFBO®, even customers can have limited access to
scheduling.
270 | TotalFBO® User Guide
See Helpscreen topic:
Flight School:
Initial Setup & Options
The number of hours you
expect a student to complete
in your course may exceed
FAA requirements.
FLIGHT SCHOOL OPERATIONS
INITIAL SETUP
In order to make the daily flow as rapid as possible, most of the information
needed for tracking student flights is entered beforehand. The chart on the next
page will give you a good idea of how all this information is used and updated
behind the scenes of daily operations.
COURSE SETUP
Before your first student walks in the door, you’ll want to set up the courses
he’ll be taking from you, at Operations> Flight School> Update Courses.
See Helpscreen topic:
Begin by creating a course for each of the certificates you train for, such as
Pinch-Hitter, Private, Instrument, Commercial, Aerobatic, or specialty type
ratings.
Flight School Courses
Within each course you’ll define individual lessons, both flights and ground
school time, and any simulator hours you require. This is easily completed by
simply pulling out your approved syllabus and entering the information.
If you’re approved for VA reimbursement, be sure to check the box on the
course record. Student records will be available for special reporting in order
to meet VA requirements.
AIRCRAFT SETUP
Your next step will be to set up the rental aircraft at Operations> Aircraft>
Aircraft Setup.
You may find that the aircraft records have already been created, perhaps by
others in your company who are responsible for aircraft maintenance. The
aircraft record is used in many functions throughout TotalFBO®, so be very
careful about deleting or making changes to them.
Flight School users will be concerned with several areas of the aircraft record,
organized on Tabs 1, 2, 5, 6 & 7.
In the General Tab, you’ll enter the Aircraft Tail Number, and select Company
as the Classification, since these aircraft will be operated and/or owned by your
own company. The most important decision you’ll make on this tab is your
selection of the Aircraft Type.
FLIGHT SCHOOL OPERATIONS
TotalFBO® User Guide | 271
FLIGHT SCHOOL INITIAL SETUP
Courses
Rental
Aircraft
Rental &
Instruction
Price Classes
Instructor
Employee
Records
Instructor
Pilot Records
Dispatch Rules
Invoice
Options
Schedule
Objects
Training
Package
Working from your Syllabus, enter courses with
lessons and number of ground or flight hours.
Set up each aircraft with appropriate type,
select as rental and add prices, indicate
pilot requirements, and show owner.
Establish Price Classes for your customers,
with formulas for providing the correct price
on each invoice.
Create employee records for instructors with
the correct Billing Rates for instruction hours.
Create pilot records for instructors with
checkouts and currency in type.
Determine rules program will follow in checking
aircraft and pilot readiness for flight.
Set minimums for Block and Club credits
and select options relating to aircraft meters.
Create records for instructors and aircraft,
with schedule availability.
Create packages with number of hours for each
type of time included (flight or instruction)
NOTE: Requires GL account for each time type.
272 | TotalFBO® User Guide
AIRCRAFT TYPES!
When I get done with
the C-172RG...!
I'm
flying the
Cutlass today...
FLIGHT SCHOOL OPERATIONS
Aircraft Type
You may create your own designations for the Aircraft Type field. Keep in
mind that there’s likely to be a bit of a tug-of-war here between Mechanics and
Pilots, as both groups depend on the same data for different purposes.
•
Mechanics will be able to create default maintenance reminders for
each aircraft type they define. This will save a lot of time as each new
aircraft is added to the database, since the entire list of reminders can
be imported from the default for that type.
•
Each time a rental or charter pilot flies the aircraft, a record is added
to his pilot record indicating the type of aircraft flown on that date.
These records are important in determining currency.
Most FBOs find they can meet the needs of both groups by planning how types
will be named (Cessna 172, C-172, Skyhawk).
Mechanics can often define additional “sub-types” which will be used only for
setting up default maintenance reminders.
Ratings
Now is a good time to move to Tab 7 and check off the rest of the pilot
requirements for flying this aircraft. Four of the choices are customizable
(See Utilities> Customizing> Set Customizable Field Names) so you can require
specialized checkouts for training you offer.
These requirements are checked against the pilot’s qualifications as the flight
is dispatched, insuring that pilots who don’t meet your requirements won’t be
allowed to fly the aircraft.
Owners & Leaseback
Select the Customer account which represents the owner of this aircraft. There
can be any number of owners on an aircraft. Don’t forget to select an Internal
account if your company owns it.
Selecting an owner helps us in pricing the flight when the owner flies, as well
as in certain reports.
Whether this aircraft is leased from another owner or not, you’ll want to set up
the defaults for the Leaseback P&L report when you run it for this aircraft.
•
If you must pay a fee or portion of the profit to the owner, be sure the
report defaults accurately reflect your contract requirements with the
owner.
FLIGHT SCHOOL OPERATIONS
•
TotalFBO® User Guide | 273
If you are the owner, select special options or else make sure the
general defaults in the Aircraft Module Options will provide the Profit
& Loss report you like.
See the Back Office Operations section for more details about preparing the
Leaseback/Profit & Loss report.
Rental
Checking the Rental Aircraft box on Tab 2 allows you to dispatch and invoice
this aircraft as customers rent it from you.
The Minimum Time to Fly field allows you to set a minimum number of pilot
hours required for flight. This is especially helpful when you have a nicer
aircraft available for rental. You’d like it to be available for qualified pilots,
but limit the wear and tear that results from use by students and low-time
pilots.
Also enter any Fuel Surcharge rate per hour you’re currently using. When
fuel costs fluctuate rapidly, you’ll be able to leave your hourly rates stable
and automatically add the Fuel Surcharge amount as flights are invoiced to
customers.
After that, you’ll want to enter your hourly rental prices in one or more of the
5 Fixed Price Fields. Also take a moment to enter your highest price in the
List Price field. Invoices and certain reports can compare the actual price paid
with the List Price and display the discount percentage.
How will you know what price to enter and where? This answer comes from
how you set up Price Classes. Haven’t done that yet? Well, let’s tackle that
next!
PRICING RENTAL FLIGHTS
The central mechanism used to price rental and instruction to customers is the
Price Class. These are found at Inventory> Options and Settings> Update Price
Classes.
A Price Class is nothing more than a formula (Pricing method) which applies
to a specific group (or “Class”) of customers. There is no limit to how many
Price Classes you can create, and so there is no limit to how many prices you
can offer to your customers.
Don‛t forget to establish an
Aircraft Record for each
Simulator you‛ll be renting by
the hour.
274 | TotalFBO® User Guide
FLIGHT SCHOOL OPERATIONS
Because there are at least four classes of customers which are common to
Flight Schools, specialized programming has been included in TotalFBO® for
these required Price Classes:
•
•
•
•
Retail (or Default)
Block
Club
Owner
In addition, we suggest that you consider adding two more for:
•
•
Employees
Maintenance Runups
The simplest way to set up your price classes is to set your price for the highest
rental rate (typically what you charge to your “Retail” customer) in a field on
the Aircraft Record. You may use any of the 5 Fixed Price fields and the List
Price field. Let’s say you choose to use Fixed Price #1.
Then to set the formula on the Retail Price Class you would simply select
“Fixed Price #1 minus $ Amount” as your Pricing Method. The Amount 1
field we’ll leave set to 0.00.
Thus, whenever a customer who belongs to this Retail Price Class is charged
for rental, we’ll calculate the price by finding the amount on the aircraft in the
Fixed Price #1 field and subtracting 0.00 from it.
Typically your other prices will be based on a discount off of the Retail Price,
so we can set up other Price Classes to simply use the same amount we’ve
already entered in Fixed Price #1 and subtract either a specific amount or a
percentage to arrive at the final price.
An example of this would be our Price Class for Maintenance Runups. We’ll
need to create an invoice to record the meter readings only. That’s done by
selecting a Non-Billing customer which is marked as a “Maintenance Account”
and creating a normal invoice. Obviously, we don’t want to bill ourselves any
money for this, so the price we come up with has to be Zero. This is easily
done by setting the Pricing Method to “Fixed Price #1 Minus Percentage”
and setting Amount 1 to 100%.
In some cases, you may decide to set a price in another field for a specific
class of customer. This is common for prices to Owners, since this is often a
calculation of what we think the cost for fuel and oil might be per hour, rather
than a price we expect to make a profit from. In that case, we might choose
to set a price on the Aircraft Record in another field, say Fixed Price #3, and
select the Pricing Method on the Owner’s Price Class accordingly.
TotalFBO® User Guide | 275
FLIGHT SCHOOL OPERATIONS
PRICING RENTAL FLIGHTS
1
What is the
Customer's Rental
Price Class?
2
3
Is this a
Club
Customer?
Is this a
Block Time
Customer?
Is there a
Credit Balance?
Is it more
than Minimum
Requirement?
Select
Lowest Price
of the 4
4
Is this the
Aircraft
Owner?
Is there a
Credit Balance?
Rental
Invoice
Is it more
than Minimum
Requirement?
Price Calculation Process
Locate Price
Class Formula
Select correct
price from
aircraft record
Use Formula and
price to calculate
customer's price
Add surcharge, if
any
PRICING INSTRUCTION
There are Price Classes for Instruction, as well, though there are usually only
one or two of them which need to be set up in the average Flight School.
Typically, there is a Price Class for your outside (Retail) customer and another
for your internal needs. This would cover flight instructors who perform
regular check-outs for other instructors, and perhaps training flights for other
employees or charter pilots. Occasionally there are other Price Classes to
276 | TotalFBO® User Guide
Even Contract Instructors
must have an Employee Record
so that you can bill for their
Instruction Time. However,
Contract employees are not
included in Employee reports
and receive a 1099 at yearend.
FLIGHT SCHOOL OPERATIONS
handle discounts given to the military, club members, or formal ground school
classes.
Note: If your instructors sometimes provide pilot services, such as for photo
flights, you’ll need a billing rate for these hours, as well.
The prices themselves are set up on each instructor’s Employee Record in the
Billing Rate fields. Again, there is no limit to the number of rates you may
establish, and the typical Flight School will have a rate for Primary, another for
Advanced, and perhaps another for Multi instruction.
INSTRUCTOR PILOT RECORDS
While you’re working with each instructor’s Employee Record at Accounting>
Payroll> Update Employee Basic Info, be sure you check the box “Is a Pilot?”
See Helpscreen topic:
Pilot Records
Checking the box reveals a button which will allow you to create and/or
link to a Pilot Record. (You can create pilot records directly at Operations>
Dispatch> Update Pilot Records, but you must link instructor records to their
corresponding employee records in the Payroll module.)
DISPATCH RULES
TotalFBO® provides your company with a great deal of protection through its
Dispatch function, which verifies the flight readiness of aircraft, instructor, and
pilot before permitting the dispatch to proceed.
See Helpscreen topic:
Flight School: Initial
Setup & Options
This is especially important in light of the wide range of experience which
your Front Counter staff may have. For much of the day, you may have
experienced instructors available who can make good judgment calls based on
their knowledge of your equipment, FAA regulations, and the weather. But
there are likely to be periods when employees without this level of knowledge
are doing their best to meet customer requests, and can inadvertently put your
company at risk.
The considerations necessary to determine pilot readiness can vary by
company policy, the type of instruction you do, and insurance regulation.
Therefore, you’ll want to customize them at Operations> Dispatch> Options
and Setting> Rental Dispatch Options.
Here you’ll also be able to select the defaults used to speed billing when a
flight is checked in, and customize the Dispatch printout itself.
SET INVOICE OPTIONS
Most of the items at Accounting> Invoicing> Options and Settings> General
Options have probably already been considered and set by your Accounting
Department staff, however, there are a few items which are specific to Flight
School invoices that you should know about.
FLIGHT SCHOOL OPERATIONS
The most critical is the minimum account balance required to be eligible for
Block or Club Rates. If a customer has the Block or Club box checked in
their Account Record AND their account balance meets the minimum you set
here, they’ll receive your special prices for those programs.
If your aircraft have Tachs in them, it’s always a good idea to record both the
Tach and Hobbs meter readings at the beginning and ending of each flight.
Although TotalFBO® can update the Tach by a ratio of the Hobbs readings,
the more accurate you are, the better your maintenance warning will be. If you
will be entering the Tach times, then, be sure the option is set to enable those
fields on the invoice.
TotalFBO® User Guide | 277
See Helpscreen topic:
Accounts Receivable:
Initial Setup & Options
Also, you’ll need to decide whether you will be invoicing customers for the
exact difference on the Hobbs meter, or if you’ll be rounding that up or down
a little bit. If you don’t want to round, then be sure you check the box to
Enforce Quantity-to-Hobbs Link.
SCHEDULING SETUP
Keeping customers happy while watching the bottom line is largely a function
of how well you schedule. We’ll get into the details of how to do it a bit later,
but first you’ll need to think about what kinds of things and events you’ll be
scheduling.
Schedule Options
Let’s start by working with the list of Object Types you can customize at
Operations> Scheduling> Options and Settings> General Options.
The basics on the list:
• Aircraft
• Instructors
How about expanding the usefulness of your schedule with these categories?
• Student Condos
• Courtesy Cars
• Mechanics
• Hangar Bays
• Conference Room
• Simulators
You get the idea…! Next move to Tab 3 and add some choices to the “Other
Types” list. The first list identifies those types of things that your customers
will be scheduling. This list identifies the reasons why something would not
be available to a customer on a short-term basis. The musts on the list will be
See Helpscreen topic:
Scheduling: Initial Setup
& Options
278 | TotalFBO® User Guide
FLIGHT SCHOOL OPERATIONS
these:
•
•
•
•
Be sure to link these items to
your Aircraft and Employee
records, where appropriate,
so that you can seamlessly
Dispatch right from your
Schedule screen!
See Helpscreen topic:
Flight Training Packages
Aircraft Maintenance
Sick Leave
Vacation
Dr. Appointment
Schedule Objects
Now that we know the kinds of things we’ll be scheduling, let’s set up the
individual items themselves at Operations> Scheduling> Update
Objects.
This is where you’ll create a record for each aircraft, each simulator, each
instructor, etc.
Give each item a short name that will be used on your schedule screen, and
a full name for reports. You’ll also set up the basic schedule availability for
each item, so that employees who work part time or only in the summer can be
scheduled correctly.
TRAINING PACKAGES
If you offer package prices for flight training, TotalFBO® offers an automatic
way to track hours used in the package independently of how you set up billing
and payment arrangements for the customer.
You’ll need to work with your Accounting Department staff here, because each
kind of time included in each package needs a General Ledger account number
for proper tracking.
You’ll begin by setting up Master Time Types at Operations> Flight School>
Update Packages.
Master Time Types include Single Engine Solo Time, Single Engine Dual
Time, Primary Instruction, Advanced Instruction, etc. Some Flight Schools
will break these categories further by identifying C-150 time separately from
C-172 time, etc.
For each Master Time Type, up to 5 General Ledger accounts can be used as
triggers. There must be at least one trigger on each record, and you cannot use
the same account as a trigger on multiple records.
Once a package has been sold to a student, his “bank” of hours for each Time
Type in that package is established. As flights are completed you’ll create
normal invoices, selecting these GL accounts for the rental and instruction
hours. TotalFBO® will use these accounts as “triggers” to set the price on the
invoice to zero and reduce the hours used from the appropriate Time Type in
the student’s “bank.”
FLIGHT SCHOOL OPERATIONS
TotalFBO® User Guide | 279
After you’ve established your list of Master Time Types, create records for
each package you sell, adding the details of price and the number of hours for
each Time Type included in the package.
Enrolling Students
Well, everything’s all set up now, and it’s finally time to enroll your first
student. You could start by adding a Customer Account record but often you’ll
be able to start by simply creating an invoice.
•
If the student is purchasing a Training Package, you’ll create an
invoice to sell that package and receive at least part of the payment.
•
If the student has agreed to Block Time, you’ll create an invoice to
receive his first Block Deposit.
Customer Account and Pilot Records
See Helpscreen topic:
Customer Account
Records
Unless the student has already taken an Intro Flight, you’ll need to add him to
your database as a new customer. This is easily done as a Sidestep when you
begin the invoice and enter the Customer Name at the top of the window.
See Helpscreen topic:
Take your time and complete as much of the record now as you can – every bit
of information you enter now will save stress for you and your customer later.
So in addition to the basics of name and address, be sure you get the student’s
Social Security Number, which will be used to print his FAA 8710 form the
day he takes his checkride.
Sell Doscpvery
(Intro) Flights
Also get the phone number and name of an emergency contact person, in case
of an unforeseen problem.
See Helpscreen topic:
It’s a good idea to get a standing credit card number on file, too, in case your
front counter is closed when the student checks in after a night flight.
Finally, select Tab 6 and Sidestep again to create the student’s Pilot Record.
(You can create pilot records directly at Operations> Dispatch> Update Pilot
Records, but you must link student pilot records to their corresponding
customer account records in the Receivables module.)
You’ll perhaps only be able to enter the student’s name for a true beginner. As
you dispatch the student on flights, you’ll be able to sidestep to enter medical
and checkout information, or the instructor can update the record as the student
progresses.
After saving the Pilot Record, you’ll be returned to the Customer Account
Record, and after saving that, you’ll be back in your original invoice.
Pilot Records
280 | TotalFBO® User Guide
See Helpscreen topic:
Enrolling Students
FLIGHT SCHOOL OPERATIONS
If you sell a Training Package or receive a Block Deposit, TotalFBO® will
automatically check those options in the Customer Account Record, so that
future flights will be billed correctly.
If you charge for Club Dues, you’ll need to update the Customer Account
option manually, and may want to ask your Accounting Staff to set up a
Recurring Charge Reminder in the Receivables module so that dues are billed
automatically each period.
Course Enrollment
If this student is enrolling in a Course (as opposed to taking some recurrency
training or local checkouts, etc.) you’ll want to set up his student record at
Operations> Flight School> Update Student Enrollments.
STUDENT FLIGHT WORKFLOW
See Helpscreen topic:
Updating the Schedule
Finally, the paperwork’s all done and you’ll want to take advantage of the
student’s enthusiasm by scheduling one or more flights. Here’s where the
power of integration within TotalFBO® starts to pay off in a seamless
workflow that means you’ll never enter the same information twice (unless you
just want to!)
Schedule the First Flight
Scheduling is done at Operations> Scheduling> Update Schedule. For Flight
School users, it’s usually most comfortable to put the screen in Dual mode,
so that you can split the window and view the schedule for both Aircraft and
Instructors at the same time.
Viewing in Dual mode also means you can quickly make the reservation for
both objects at the same time.
Each user will have his own favorite method of making a reservation – some
folks like to use the mouse to drag the schedule frame to fit the reservation,
others like to scroll the date and time fields, and still others just click on the big
Add to Schedule button and start completing the fields manually.
However, you like to do it, keep in mind that each reservation must have either
a Customer selection, or an Other Schedule Type choice.
You can assign a status of either Tentative or Confirmed (which affects the
color displayed for a reservation) and then add any notes you like on the
second tab. You can even use Macros to create small “forms” for standard
information.
In Flight Schools, there’s often a need to reschedule some students to make
TotalFBO® User Guide | 281
FLIGHT SCHOOL OPERATIONS
STUDENT FLIGHT WORKFLOW
Schedule
Flight
Pilot Records:
Qualified?
Current?
Dispatch
Flight
Dispatch
Aircraft Record:
Maintenance
Due?
Student Takes Flight
Check-in
Flight
Student Activity:
Hours
Lessons
Grades
Customer
Invoice
room for special checkrides or cross-country flights that need to be completed
immediately. So take advantage of the Notes tab to indicate the purpose of
special flights such as these, and perhaps the destination of any cross-country
flight to make such coordination easier.
Once recorded, your reservation will appear on the schedule screen with an
abbreviation of the customer name. Since some reservations may be difficult
282 | TotalFBO® User Guide
FLIGHT SCHOOL OPERATIONS
to identify at high resolutions, you can always right-click on a reservation to
open a menu of options. Depending on your user privileges, you’ll be able to
identify and see any notes connected with the reservation, print a copy, change,
or even delete it.
If you must change several reservations because of instructor illness or aircraft
malfunction, identify each reservation to see the customer’s phone numbers
immediately. You’ll be able to make your calls and reschedule without leaving
this window!
Making Multiple Reservations
Your students may wish to schedule multiple flights in advance. Take
advantage of the Multiple Reservations to quickly create those reservations
based on criteria you determine. Click the option for Multiple Reservation
when creating reservations on the schedule for this ability.
See Helpscreen topic:
Dispatching Rental
Flights
Dispatch the Flight
You can dispatch flights from the menu function at Operations> Dispatch>
Dispatch Flights. But you’ll save keystrokes if you begin with the Schedule
screen. Simply right-click on the reservation and select Dispatch from the
menu.
Not only will you be presented with a completed Dispatch Record, but the
reservation will be updated to Dispatched status and the color changed on the
Schedule Display.
One of the options you set in the Dispatch module allows you to control
whether aircraft can be dispatched before a prior flight has checked in. And
you may be stopped or warned at this point.
Obviously, there’s greater control if you force check-ins first. However, the
layout of some Flight Schools can mean that students do not return to the
Front Counter immediately after completing the flight, but continue with other
training or Ground School for some time before returning to close out their
billing for the day.
If that’s your situation, you can either change the option to allow dispatches
early, or else create a procedure so that all flights are checked in immediately,
but you delay creating the invoice.
You can even create new dispatches that you place on hold by checking the
Pending box, so that your counter crew can keep pace at those busiest times of
day.
FLIGHT SCHOOL OPERATIONS
Either way, TotalFBO® will help you keep track of your activity so that you
are sure that all flights were completed and billed.
The critical information to verify or enter on the Dispatch screen is the current
Hobbs and/or Tach Times. If the prior flight has checked in, the correct
times are probably displayed for you. Otherwise, you’ll need to enter them
manually.
Equally important to enter correctly is the Expected Flight Hours. Aircraft
maintenance requirements will only be reviewed through the expected return
time.
Be sure to check off options such as Headset Rental and Damage Waiver now
so that they’ll appear on the invoice automatically after the flight is checked in.
When you’re ready, Ok the screen and let the computer do the work of
inspecting Aircraft maintenance records and Pilot records for both the student
and instructor. Any exceptions found will be listed for you on the next screen.
Depending on your user privilege level, you may select another aircraft or
pilot, possibly update the record to show recent changes (such as a new
medical), or else ignore the exceptions and dispatch the flight anyway.
If you elect to ignore exceptions, you’ll be required to login again so that a log
can be recorded for management review.
It’s also possible that you’ll be alerted to a credit or balance problem on the
student’s Customer Account. For instance, you may want to be sure the
student has enough credit to cover the expected flight charges, or to require a
new Block Deposit when the balance is too low. These requirements and alerts
are also part of your Rental Dispatch Options.
As the flight is dispatched you’ll want to print the Rental Checkout sheet. This
form provides places to record the aircraft meter readings upon return, as well
as an area for noting squawks. The instructor may also use the page for lesson
notes.
This is an important opportunity to communicate with your customer, and
there’s plenty of room to include a paragraph of “legalese,” instructions and a
phone number in case of emergency, or even reminders such as the VFR and
IFR flight rules. You can customize the layout and content of the printout on
Tab 6 of your Rental Dispatch Options.
At any point throughout the day, you’ll be able to print the Open Flights report
to see where your planes and instructors are.
TotalFBO® User Guide | 283
284 | TotalFBO® User Guide
FLIGHT SCHOOL OPERATIONS
Checking In
When the flight returns, you’ll go to Operations> Dispatch> Dispatch Flights to
check it in. Simply select the dispatch record and click the Check-in button at
the bottom of the screen.
See Helpscreen topic:
Recording Offsite
Fuel Consumed
Begin by entering the returning Hobbs and/or Tach numbers, and the number
of landings completed. Most of the rest of the first tab will already be
completed for you from the dispatch itself and from the defaults you set up.
Simply verify that no changes are needed.
If the student purchased offsite fuel, note the number of gallons and amount.
Your options will control the maximum amount per gallon that will be credited
on the student’s invoice.
If the pilot or instructor reported any problems with the aircraft, be sure to
enter them on Tab 2. These will be immediately available to your shop crew
for review. Many Flight Schools set every squawk so that the default is to
ground the aircraft until a qualified staffer reviews the severity of the problem
and the upcoming schedule and determines the appropriate action.
If the student is enrolled in a Course, enter the units worked on, grades, flight
details, and lesson notes on Tabs 3 and 4. This information will be used to
create a Student Activity record. Instructors can create or edit Student Activity
records at Operations> Flight School> Update Student Activity. However, with
the busy workload of the typical instructor, catching up on the recordkeeping
can be difficult. Entering this information from the instructor’s notes on the
dispatch form keeps student records current continuously.
Invoicing
After saving the Dispatch Check-in, the fully completed invoice will be
displayed. Simply add the form of payment, if any, and OK the invoice to
complete the customer’s bill.
If necessary, you can cancel the invoice and later create it by selecting an
Unbilled Dispatch and clicking the Update/Check In button from the Dispatch
browse.
Note the form of this invoice carefully. If you were to create it manually
(without using the Dispatch function) you’d have to select the customer, enter
a rental line for the correct aircraft and type of flight, and enter an instruction
line for the correct instructor and type of instruction time.
Certainly there will be situations where this effort is necessary, but the power
of integration can save you this work most of the time by completing the
screens you need automatically from the Schedule to the Dispatch to the
FLIGHT SCHOOL OPERATIONS
TotalFBO® User Guide | 285
SCHEDULE-DISPATCH-INVOICE RELATIONSHIPS
Customer Account
Record
Price Class?
Block? Club?
Pilot Records:
Qualified?
Current?
Schedule
Objects
Schedule
Flight
Dispatch
Flight
Employee Record:
Pilot?
Dispatch
Course Record:
Student Enrolled?
Aircraft Record:
Maintenance Due?
Pilot
Requirements?
Student Activity:
Hours
Lessons
Grades
Check-in
Flight
Customer
Invoice
286 | TotalFBO® User Guide
See Helpscreen topic:
Updating Package Times
FLIGHT SCHOOL OPERATIONS
Invoice to the Student record!
In addition, TotalFBO® will update the pilot records to show currency in the
correct aircraft type, and will update the aircraft record with current meter
readings and cycles, as well as fuel and oil consumption. Any squawks are
also added to the Aircraft record for the mechanic’s review.
Updating Package Times
When you created the invoice to sell a Training Package, this was done by
inserting a Service Line which referenced your Package Sales account. This
account is specially tagged in TotalFBO® so that the student’s “bank” of hours
is established and the student’s Customer Account is marked to indicate that
this is a Package student.
After that, each invoice automatically adjusts the student’s remaining number
of hours for each Time Type in his package. As long as there is a balance of
hours, new flights are invoiced at no charge. But when there are no more hours
in a Time Type, a flight is invoiced at your normal rates.
See Helpscreen topic:
Printing Flight School
Reports
If a student takes a flight which is not part of his training curriculum, simply
select a rental account which is not one of the GL trigger accounts to create a
normal invoice.
Because of individual learning differences, it’s rare that a student uses exactly
the combination of hours you have provided in the package. If your policy
permits, you may manually adjust an individual student’s package as needed.
You might, for instance, provide a few more solo hours and reduce their
available dual hours.
Checkride Day
If the student sticks with it, eventually the BIG DAY will come. But before
you get to stick his picture on your wall, the instructor must help the student
complete the paperwork for the Examiner.
Unfortunately, there’s a lot of information on the FAA 8710, it’s difficult to
type neatly, and students make a lot of errors by entering information that may
be accurate but not acceptable.
Your instructor can make it easy for everyone by preparing the form in
TotalFBO® and printing it perfectly on blank paper. This is quickly done at
Operations> Flight School> Forms> 8710s.
Each field is easily completed from information already in your records or by
selecting from among pre-approved options, checkboxes, or simple numeric
entries. You can even re-print a saved form, if necessary.
FLIGHT SCHOOL OPERATIONS
STAYING PROFITABLE
Whether or not you lease aircraft from other owners, you’ll need a good
handle on costs and income from your Flight School Operations. Your
Accounting Department will doubtless prepare Profit and Loss statements for
the Flight School Department, but you’ll also want to get this information on a
per aircraft basis.
Be sure to review the information on the Leaseback/Profit & Loss Statement
in the Back Office Operations section of this guide.
In addition, you should regularly prepare the Aircraft Activity Report, from
the Reports and Listings section of the Aircraft module. This spreadsheetstyle report recaps income from both rental and instruction, displays hours in
all categories, lists fuel and oil usage and burn per hour, plus maintenance and
overhead expenses. All this information is summarized and an overall cost and
profit per hour calculation is provided.
This information is invaluable in planning pricing decisions and in determining
the size and composition of your training fleet.
You’ll also find the Student Course Activity report in the Flight School
module helpful in monitoring overall student progress. Students who aren’t
progressing are likely to drop out, and there goes your revenue stream or your
reputation or both. You can often encourage those students or assist them in
resolving issues that are holding them back, to the immediate benefit of your
bottom line. The Flight/Instruction Summary Report in the Receivables
module is also helpful in this regard.
Finally, the Billable Hours report, available in the Invoicing module, can help
you review instructor productivity and catch billing errors before they also
become payroll errors. Many Flight Schools ask Instructors to review this
report and compare it to their own logbooks before each payroll is prepared.
If you coordinate with a local college that provides ground instruction,
produce specialized billing for student activity with the Compound-Account
Statement.
TotalFBO® User Guide | 287
288 | TotalFBO® User Guide
FLIGHT SCHOOL OPERATIONS
TotalFBO® User Guide | 289
SHOP OPERATIONS
Included in this section:
• What’s on a Shop Order?
• Parts Organization
• Shop Workflow
• Reworked Components
• Core Tracking
• Rotable Components
• Overhead Shop Orders
• Other Internal Shop Orders
• Work in Process
• Categorizing Inventory
• Inventory Workflow
• Returning Stock
• Physical Inventory Process
• Other Inventory Functions & Concepts
• Managing Aircraft Records
• Updating Aircraft Information
• Aircraft Maintenance Cycle
• Scheduling
• Tool Calibration & GSE Maintenance
Shops and Shop Operations in the aviation industry are as varied as ice cream
flavors, but all of them can be served well by TotalFBO®. This is made
possible by the high degree of customization possible in the program with the
many options and style sheets available.
In the examples and discussion to follow, we’ll assume a mid-level shop with
two departments, handling general aircraft maintenance as well as avionics
repair. Our example shop services the public and also performs maintenance
on aircraft used by the FBO for Flight School and Charter operations. As
needed, shop personnel also service ramp equipment for the Line Department.
Your own operation will probably vary in many ways from our example, but
the procedures and workflow pattern described can easily be tailored to your
local requirements.
Inventory procedures and Aircraft Management functions are also included
in this section because they are so tightly integrated with shop operations, both
in your organization and in TotalFBO®.
This section will give you a
good idea of the WHAT,
WHY, and WHEN of shop
procedures.
For more details on individual
screens and fields, refer
to the Helpscreens in the
program.
Helpful references to specific
topics are available throughout
this Guide.
See Helpscreen topics
for more details
290 | TotalFBO® User Guide
SHOP OPERATIONS
INITIAL SETUP
The chart on the next page provides a list of the areas that need to be addressed
in setting up your shop operation.
See Helpscreen topics:
In this section, each area is discussed as it appears in the workflow, so that you
can fully understand the purpose of each option and record you’ll be working
with.
Inventory Departments
Therefore, we suggest that you read this section completely before beginning
any setup activities.
Customizing Shop Orders
Inventory: Initial Setup
and Options
Aircraft: Initial Setup
and Options
Note that the Credit Card Processing setup is completed by your Accounting
Department staff, as is the setup of Sales Taxes (not included in the chart).
Details on those processes are included in theSetup Procedures section of this
Guide.
If you have two shop departments, such as Aircraft Maintenance and Avionics
or a Paint Shop, your Account Department will have established General
Ledger Departments for each profit center. You’ll be selecting the correct
department on each shop order or discrepancy item as appropriate. Be sure to
coordinate with your Accounting Department staff to insure proper posting.
Your Accounting Department staff will also establish the Internal and NonBilling accounts which are discussed later in this section.
If your operation includes parts sales “over the counter,” you’ll also need to
read the Front Counter and Ramp Operations section for information on selling
inventory on invoices.
SHOP OPERATIONS
TotalFBO® User Guide | 291
SHOP OPERATIONS INITIAL SETUP
Inventory
Departments
Inventory Options
Set up Inventory Departments with overrides
to appropriate accounts.
Set up Style Sheets for Purchase Orders,
set up Price Matrices, select markups for
outside repairs, and other options.
Parts and Oils
Records
Create an Inventory Record for each Part and Oil
type to be sold, set prices and taxes.
Parts & Labor
Price Classes
Establish Price Classes for your customers,
with formulas for providing the correct price
on each shop order.
Mechanic's
Employee Records
Create employee records for each mechanic,
selecting Mechanic option and setting billing rates.
Company Aircraft
Records
Create aircraft records with configuration,
serial numbers,components, maintenance reminders,
Wt & Balance.
Aircraft Options
Set up logbook compliance statements, authorized
personnel, aircraft types, Wt & Balance message.
Credit Card
Processing
Set up credit card processors and cards to
be accepted.
Shop Order
Options
Define one or more Style Sheets for Shop Orders,
and select options for screens and invoice functions,
including Shop Order number format.
Station-Specific
Settings
Kits
and Macros
Set up Zebra logbook label printer.
Create records for parts and labor sold on
commonly performed tasks.
292 | TotalFBO® User Guide
SHOP OPERATIONS
THE SHOP ORDER
See Helpscreen topic:
Shop Orders
The Shop Order is more than just a document. It is the central collection point
for all data relating to a job or project. From this set of data we can do many
things, such as:
• generate progress bills and a final bill for the customer,
• direct the work of the mechanic on the job,
• create internal documentation for ourselves and the FAA,
• post Work in Process as well as Income and Expense information to
accounting records,
• verify job profitability,
• track inventory usage and installations,
• bill for warranty work,
• update the aircraft component list,
• update the aircraft weight & balance report,
• make the aircraft logbook entry,
• run a ton of management reports,
• and even pay our employees!
Because the Shop Order is so central, it could also be a potential bottleneck for
your operation if each staffer had to update information manually. Therefore,
you’ll find that most employees will be able to handle their individual job tasks
from other places in the program, and that information will update the Shop
Order automatically. Let’s begin by identifying the major sections of a Shop
Order.
WHAT’S ON A SHOP ORDER?
On a typical job we’ll select the customer’s name, of course, and then we
need to see information on the Aircraft itself, plus the Labor, Parts, and
Miscellaneous charges that are required to complete the job. Let’s look at each
of these areas in detail.
Aircraft Info
When you enter the tail number of an aircraft, serial numbers, current times,
and comments text from your aircraft database are pulled automatically into
the shop order for you.
If the aircraft is used by your company for rental or charter, each invoice
updates the times and cycles, so they should be accurate when you start the
shop order.
Updating a secondary
If this aircraft belongs to a customer, you can use the ellipses button to update
record while working with a
the times on the aircraft (even add a new aircraft record) before pulling the
primary transaction is called
SIDESTEPPING. (Like adding data into the shop order.
an Aircraft while starting a
Shop Order.)
TotalFBO® User Guide | 293
SHOP OPERATIONS
WHAT'S ON A SHOP ORDER?
AIRCRAFT
AIRCRAFT INFO TAB
TAIL NUMBER
Current Times
Serial Numbers
DISCREPANCY TAB
MECHANIC'S
TIME
REWORKED
PARTS
Hourly Labor
Flat Fee Labor
Outside Parts
Outside Labor
Outside Repairs
Freight
LABOR
SPECIAL CHARGES
Miscellaneous
TEXT
Problem
Resolution
PARTS
PARTS TAB
ORDERED ON
P.0.
CREATED
(Miscellaneous) PARTS
ISSUED FROM
STOCK
Quantity
Sale Price
Core Charge
Freight
Cost
Quantity
Sale Price
Core Charge
Cost
Quantity
Sale Price
Core Charge
GENERAL & AUX INFO TABS
GENERAL
Consumable Supplies Fee
Added Discounts
AUX INFO
General Freight
Tax Adjustments
MISCELLANEOUS
294 | TotalFBO® User Guide
SHOP OPERATIONS
Building the Aircraft Record first, and keeping it current, will save you many
keystrokes later.
NOTE: Data flows FROM the Aircraft Record TO the Shop Order. It NEVER
flows backward!
Labor
Labor generally falls into two big categories:
Mechanic’s Time (work performed by our own employees)
Reworked Parts (outside work performed by vendors)
All of this is entered in the Discrepancy Tab of the Shop Order, along with
text to explain what the Problem or task was, what Resolution or action was
taken, and any private Mechanic’s Instructions.
Mechanic’s Time - You can enter just the number of Hours Billed and a
Billing Rate per hour directly in the discrepancy if you wish. But although
that achieves the goal of billing a certain amount to your customer, it does not
allow you to track the names of employees who worked on the job or compare
the cost of paying those employees with the amount billed. To achieve those
additional goals, you may enter the hours worked each day through the Batch
Mode Labor screen. For even greater accuracy, employees can capture their
own time by using the Time Clock function throughout the day.
Macros can help you insert
In addition to, or instead of, billing a rate per hour for work performed, a Flat
projected labor hours and flat
Fee can be specified on the Discrepancy.
fees for standard tasks.
When unusual expenses or activities must be charged for (such as when
ferrying an aircraft or working away from the home base) they can be entered
as a Miscellaneous item on the Discrepancy.
Reworked Parts – When a component must be sent to an outside vendor
for repair, the entire charge for the work is entered to the Discrepancy.
Depending on how you are billed from the vendor and what your local sales
tax requirements are, you may enter these amounts to any or all of the Outside
Labor, Outside Parts, Outside Repairs, or Freight fields.
If you select Outside Repair on the Purchase Order to the vendor, the
appropriate fields will be updated for you when the shipment is received, using
the markup percentage you specify, and the vendor name and description of the
component will be added to the text in the Resolution field.
SHOP OPERATIONS
Parts
Parts that are special-ordered for the job will automatically appear on the Shop
Order after they are received into inventory, if the correct Shop Order Number
and Discrepancy Number fields have been entered. Not only does the price for
the part appear, but so do charges for freight and any core charges that applies.
The cost for the part is also tracked so that you can determine profitability on
the job.
Parts which are kept in stock are added to the Shop Order either by directly
inserting Parts lines or else through the Batch Mode Parts function. The
charge for the part and any core charge will appear, and the cost will be
tracked. However, because accounting regulations do not permit including
freight on inventoried items, you’ll need to be sure that your selling price is
high enough to include your freight expense.
From time to time you may be able to sell an item which you have salvaged
from a previous project, or which you have on hand but do not have in
your inventory records. You can insert a part record on the Shop Order as a
Miscellaneous Part item, assigning a part number, description, and price as
needed.
Miscellaneous Charges
Several other general items may appear on a Shop Order as necessary:
Consumable Supplies – These items are best charged for by applying
a standard rate to each Shop Order, rather than attempting to track them as
individual parts.
Discounts – Regular customers are usually given discount pricing on parts or
labor through the price classes assigned to their account. Using the Discount
field helps handle special situations.
General Freight – There are freight fields in the Discrepancy for Outside
Repairs, and on each Part line for items ordered for the job. And an additional
freight field is available for unusual charges and crating fees.
Sales Taxes – The Aux Info tab provides fields for making this job exempt
from typical sales taxes and for changing the rate of any tax. These changes
apply only to a single job. You can also verify what taxes are being charged
by reviewing these fields.
TotalFBO® User Guide | 295
296 | TotalFBO® User Guide
SHOP OPERATIONS
A CLOSER LOOK AT PARTS ORGANIZATION
Special for Job - For the typical FBO, actual inventory kept in stock is very
limited. Each job requires that most parts must be special-ordered, and on
average, this amounts to about 80% of the total parts that appear on a Shop
Order. Because of the high level of integration within TotalFBO®, you need
only enter the information once on the Purchase Order, and it automatically
flows to the Receiving screen and then onto the Shop Order.
These parts are marked “Non-Stocking” in the Inventory Record so you can
exclude them from reports and physical inventory worksheets.
For convenience, you may want to designate a rack or shelf on the shop floor
for each job as it is opened. Then as parts are received for the job, they can
simply be placed on that rack for the mechanic to install at his convenience.
No further paperwork is necessary, and this method insures that parts are not
accidentally duplicated on the Shop Order.
Standard Items – There will always be some items which are used
frequently enough that it makes sense to order them in larger quantities and
keep them on hand. On average, stocked parts account for about 10% of the
total parts that appear on a Shop Order.
Most shops experience
problems tracking parts
which are removed from
the stockroom after hours.
Experience shows that using
the label system improves
compliance among mechanics,
who will remove the label and
stick it to the clipboard, even
if they don‛t take the time
to jot down the Shop Order
or Discrepancy Number.
Further, any part packaging
found on the shop floor with
a label still attached bears
silent witness to the problem!
Managers and Inventory
Clerks can easily follow up to
insure the item is posted to
the right job.
When a mechanic requisitions a part, the Inventory Clerk typically records
the issuance on a clipboard and then updates all open jobs by entering this list
to the Batch Mode Parts screen each day. This process can be significantly
improved through the use of Bar-coding.
TotalFBO® can quickly print a stocking label for all parts received in each
shipment. Use a label with removable adhesive, and you can quickly stick it
on the clipboard as parts are issued. Later, your bar-code scanner makes quick
work of entering the parts in the Batch Mode Parts screen.
Consumable Supplies - This category includes cleanup materials, solvents,
small amounts of lubricants and sealants, fasteners and rivets, and other
similar items which are used on most jobs but which are too small to track
individually. Failing to add them to the customer’s bill can create a loss for
your company. But attempting to track them individually can cost you more
than the items are worth.
A procedure that solves this problem involves bringing the items into
inventory, but placing them in a special Inventory Department. This allows
us to track total purchases each year and quickly reorder on a Purchase Order.
But, by setting General Ledger Override accounts on the Department, we can
expense the items immediately. We can then set a standard fee (usually 3-5%
SHOP OPERATIONS
TotalFBO® User Guide | 297
ALL PARTS IN ORDER
80%
10%
9%
SPECIAL FOR
JOB
Ordered from
Vendor
STANDARD
ITEMS
Already in Stock
CONSUMABLE
SUPPLIES
Rags
Sealants
Fasteners
Create
Purchase
Order
Receive into
Inventory
Batch Mode or
Parts
Set Up
Standard
Rate
Direct Entry
to Shop
Order
Automatically flows
to Shop Order.
Issue to Mechanic
from Secured Area
as needed.
Use percentage of Total Parts,
Total Discrepancies, or Both.
3-5% of Discrepancies is Typical.
Can be adjusted on each Shop Order.
CREATED
ITEMS
1%
Salvaged
Stocked but not
in inventory
Manufactured in
the shop
Direct Entry
to Shop
Order
Enter as
"Miscellaneous Part"
of the total Discrepancy [labor] charges) which will be added automatically to
each Shop Order. The resulting total can be changed if appropriate for a single
job.
Consumable supplies are usually purchased in bulk and are issued to
mechanics as needed. Typically, open bags are located in roll-around units
throughout the shop floor for easy accessibility. Periodically, the Physical
Inventory function should be used to adjust the inventory quantity on hand, or
bag quantities can be posted to an Internal or Non-Billing Shop Order when
issued.
298 | TotalFBO® User Guide
SHOP OPERATIONS
Created Items – Most FBOs have an area “up there” or “out back” where
salvaged assemblies are piled, side by side with obsolete parts, items left over
Why not enter from previous jobs, even an entire inventory from a previous ownership…
all these ugly you get the picture! Once in a while an opportunity comes along to actually
ducklings to
sell one of these items. The problem is that it’s not in your inventory, and you
your inventory don’t have a clue what the cost was, if there ever was one.
but place them
in a special
The answer is to enter it directly to the Shop Order on a Parts Line as a
Inventory
Miscellaneous Part. No accounting entry is made for the cost, but you can
Department. Then
enter a description, part number, and selling price.
it‛s easy to list them for
Outside Sale or even hire an
This is also a great way to handle selling assemblies that you manufacture in
Auctioneer!
your own organization, where the cost is tracked in other ways.
S
NOTE: You can also use the Miscellaneous Parts line to charge for disposal
fees and similar items.
SHOP WORKFLOW
The flow of work through the shop always starts with the customer.
See Helpscreen topic:
Internal Billing
Sometimes that customer will be another department in your company, if
you’re maintaining an aircraft used to produce income for rental or charter. In
that case, we’ll add a customer account to the database which is classified as
“Internal,” and your accounting staff will set it up so that income for jobs on
this account is posted to the Shop Department as always, but the charges are
posted to the other department as an aircraft maintenance expense. Decisions
will be made about how parts and labor will be priced on this Internal
Customer account, as well.
Sometimes that customer will be your own department, such as when you
pull a quart of oil out of inventory to lubricate a shop tool. For this type of
transaction we need another special customer which is called “Non-Billing.”
Transactions on this account are only used to reduce inventory and charge the
cost of the item to your expenses.
Everyone else is classified as a “Regular” customer, though we can customize
each account to accommodate special pricing, taxation, and accounting
requirements.
The great thing about TotalFBO® is that once the account is set up by you or
by your Accounting Department, all these special requirements are handled
automatically each time you bill the customer. That means that you can train
your staff to handle every job in exactly the same way – no special procedures
to learn!
TotalFBO® User Guide | 299
SHOP OPERATIONS
This section covers the flow of work through the shop, beginning with
the creation of a new Shop Order and ending when the paperwork’s done!
It’s essential that every staff member understand their part in this flow,
because your cash flow depends on being able to close the job – correctly
– immediately when the job is done. The tight integration of TotalFBO®
makes it easy!
STARTING A NEW SHOP ORDER
(Shop Workflow, Part 1)
SIDESTEP
Customer Delivers Aircraft
Create Shop
Order
Customer
Records
SIDESTEP
Aircraft
Records
Inventory Control
copy w/Barcodes
Mechanic's
Discrepancy
Worksheets
w/Barcodes
After Inspection,
additional Discrepancies
may be added for each
job task to be done.
Payment Terms,
Pricing, Taxation
Credit Card Info
Serial Numbers,
Configuration
Current Times
Customer Copy
Customer
Authorization
w/Signature to
Master File
Create Discrepancies for
each general inspection,
reported problem or
customer request.
Customer Deposit
Payment Limited to
This Shop Order
300 | TotalFBO® User Guide
SHOP OPERATIONS
Save time and improve
your professional image by
creating a quote for the job
when you first hear from
the customer. Quotes work
just like shop orders and you
can copy them to the actual
shop order when the job is
accepted. By setting up the
quote first, you‛ll already
have much of the customer,
aircraft, and discrepancy
information in your system!
PART 1 – STARTING A NEW SHOP ORDER
Enter the Tail Number in
the Customer Name field to
quickly select an existing
account or create a new one
using FAA registry data.
If you charter or rent the aircraft, times and cycles information should be
current. If this is an outside customer’s aircraft, you’ll want to update this
information on the aircraft record before pulling the data into the Shop Order.
For standard or frequently
recurring tasks, set up
macros with text, billing rate,
projected hours, and flat
fee and use them to build
Discrepancies quickly.
When the customer delivers the aircraft to your ramp, you’ll begin by inserting
a new Shop Order at Accounting> Shop Orders> Update Shop Orders.
Tab 1 - General
All you really must have in order to create a new shop order is a customer
name. Everything else you can add as you go.
Tab 4 – Aircraft Info
Next you’ll want to enter the aircraft data. If it’s already in your database,
serial numbers and times will be pulled into the Shop Order automatically. If
the aircraft is new to you, use the ellipses button to quickly add a new aircraft
record. The more you can get into this record now, the greater will be your
time savings later.
NOTE: The Aircraft Comments field is a good place to note any damage you
see on the aircraft when it’s delivered, so there’s no chance it could later be
called “hangar rash.”
Tab 3 – Discrepancies
This is where you’ll start entering the list of tasks to be performed on this job.
As you insert each one, enter the customer’s requests on Discrepancy Tab 3
– Problem.
If there’s a special note the mechanic should be alert to, enter it on
Discrepancy Tab 4 - Instructions.
Tab 5 – Aux Info
Finally, enter the name of the customer’s representative and/or purchase order
number. If for some reason, the billing for this job will be non-standard, you
can also set a Default Labor Rate. (This will override any labor rates entered
later through the Batch-Mode Labor function.)
In the General Comments field here, use the Macro button to insert your
customer release paragraph of “legalese,” defining customer rights and giving
your company permission to fly or taxi the aircraft as needed, etc. This should
include a signature line for the customer’s approval.
SHOP OPERATIONS
TotalFBO® User Guide | 301
Finishing Up
At this point you’ll want to verify the address which should be used for this
billing. If it’s not the normal address on the customer account record, you can
select or add an alternate address on Tab 6 – Addresses.
If you’re doing business internationally, you’ll also want to select the currency
to be used for billing on Tab 7 – Currency. (This tab will be hidden unless
your accounting staff has defined an additional currency.)
Depending on your relationship with the customer, you’ll probably also want
to get a deposit payment. Select the Deposits button on Tab 1 – General, and
enter the amount and method of payment.
NOTE: Be careful not to use the Payments button until the end of the job. You
want deposits to be posted to your accounting records immediately, and they
wouldn’t be if you used the Payments button.
Deposit amounts are always visible in the job totals, whether viewing them
on-screen, or in a printout. Deposits entered in this way are tracked in a
separate general ledger account and are not available as general credits on the
customer’s account, so they can’t be used for paying other invoices. When
the job closes, these deposits are subtracted from the total of the job, and the
customer will pay the remaining balance.
If you’re processing credit cards online through TotalFBO®, you can enter
the credit card information from any workstation and have it authorized
automatically in seconds.
Now you’ll want to print out two copies of the shop order. At the bottom of
the Shop Order window, you’ll see a choice for the number of Copies to Print.
Select 2 and OK the screen. Depending on your options settings, you’ll see
a window offering you a selection of style sheets. Choose the one you have
designed for Customer Billing.
The customer will want to keep a copy, of course, and you’ll need a copy
which he has signed in the Comments area and also in the Credit Card
signature band. Now you can wave goodbye to your customer and get back to
your desk. Once there, you’ll probably print off additional copies of the shop
order for the mechanic and the inventory clerk, using appropriate style sheets
for each.
It‛s a good idea to install
a magnetic card swipe
reader in your shop for this
purpose, because swiped card
transactions cost you less
to process than those you
manually enter.
302 | TotalFBO® User Guide
SHOP OPERATIONS
About Style Sheets
As you get started with TotalFBO®, take a few moments to customize the
shop order printout at Accounting> Shop Orders> Options and Settings> Shop
Order Style Sheets. You’ll want to get the address and phone number right, add
your logo image, and choose how and where you want everything to appear.
Use the Trailer Message
field to include your text for
Return to Service approvals.
Then copy that style sheet and create additional printout versions for use
internally.
• For instance, you’ll want one that displays costs for management
review before closing the job.
• Another one could display barcodes to help the Inventory Clerk in
adding parts quickly.
• Save money on pre-printed forms by creating another Style Sheet to
use as the Mechanic’s Worksheet. Set at least 15 blank lines, include
Mechanic’s instructions, and start each discrepancy on a separate
page. When printed on slightly heavier paper stock, you’ll have a
form that includes all the basic information along with spaces for
mechanic and inspector’s signoffs.
Be sure to check the options to allow selecting different style sheets when
printing from the browse and from the shop order itself, for the greatest
flexibility.
PART 2 – GETTING PARTS ON A SHOP ORDER
As the job gets underway, your mechanic will begin inspecting the aircraft
and will often find additional tasks to be completed before the aircraft
returns to service. Each additional task must be added to the shop order as a
Discrepancy.
If you’re using wireless networking with laptops or tablet PCs and the Mobile
Agent feature, your mechanics can quickly add a discrepancy as needed.
The Macro and Spell-check buttons near each text field will insure that your
mechanics aren’t bogged down in the effort of typing! If this equipment isn’t
yet available to you, then establish a procedure so that a mechanic’s notes on
the Discrepancy worksheets are entered by a shop clerk quickly.
As the work proceeds, your mechanics will also be building a list of parts
and components which must be repaired or replaced. Your Inventory Clerk
or Purchasing Agent will review this list and determine whether items are in
stock or must be obtained from an outside vendor. In either case, the earlier
you know the number which will be assigned to the Discrepancy, the more
keystokes you can save as the parts are processed.
Issue from Stock
These are the items which are already in your stockroom, and need only to be
issued to the mechanic and charged out to the shop order. You could enter the
SHOP OPERATIONS
TotalFBO® User Guide | 303
GETTING PARTS ON A SHOP ORDER
(Shop Workflow, Part 2)
Mechanic Inspection
of Aircraft
Create New
Shop Order
Discrepancy
Assigning required
parts to Discrepancies
verifies purpose and
speeds ordering process
Inventory
Requisition
Purchasing
Review
Issue from Stock
to Mechanic
OR
Obtain from
outside Vendor
Create
Purchase
Order
Parts in Stock
SIDESTEP
Vendor
Records
SIDESTEP
Inventory
Records
Receive
Part into
Inventory
Batch Mode
Parts Entry
Barcode
for Speed!
Shop Order
Parts Line
Includes Freight
part directly to the job by using the Change button on the Shop Order browse
screen.
But in larger shops this method presents a problem because a fundamental
limitation of your computer network prevents two people from working in
the same record (shop order) at the same time. Since some staffers will be
Accts
Payable
Invoice
ON HOLD
304 | TotalFBO® User Guide
SHOP OPERATIONS
See Helpscreen topic:
wanting to enter parts, others update labor, and still others reviewing costs
and updating the discrepancy text, there are bound to be delays for someone.
You can’t afford to let collisions jam up your workflow and possibly prevent
closing the job on time.
Batch Updating
Shop Orders
So the answer is to use the Batch Mode Parts entry function to enter the parts.
Although you’ll still need exclusive access to the shop order at the time the
batch is posted, you can work on a batch all day and post it each morning,
quickly updating all open jobs at once.
Most shops have a stockroom with a counter or dutch-door where mechanics
can sign out for the parts they need. You only need to know the part number,
shop order number, discrepancy number and quantity, and you can speed
through a long list of parts in no time. If you’re attaching bar-coded labels
to each part when stocked, you’ll be able to use the Batch Mode Parts entry
screen in Barcode Mode for even greater efficiency in moving through the
fields.
After hours, leave the clipboard with the sign-out sheet on the counter and
mechanics can simply peel the part label off the part they’re taking and jot
down the shop order and discrepancy number that applies.
Order from Vendor
See Helpscreen topic:
Purchase Orders
Approximately 80% of the parts that are used on the typical job must be
ordered from an outside vendor. Once you enter the information on a Purchase
Order, TotalFBO® will automatically update the job and all other necessary
records when the part is received. This is a big advantage in saving time and
improving accuracy. But correcting incomplete information in several places
can be a chore you’ll not want to do often. Thus, it’s important to build the
Purchase Order properly, including getting an accurate cost from the very
beginning.
Ordering
Begin a new Purchase Order by Inserting a record at Inventory> Update
Purchase Orders. As you build a Purchase Order, you can sidestep to add a
vendor as well as new parts whenever you need to.
1.
You’ll enter detail records for each part you’re ordering,
including the appropriate Shop Order Number and Discrepancy
Number. Once the list is built, the typical Inventory Clerk will
phone the vendor to verify the price and delivery. Be sure to
get an accurate cost now, even if it means asking the Customer
Service Rep for the vendor to look up your final price at the end
of the phone call.
SHOP OPERATIONS
2.
You’ll also want to estimate the freight charges as closely as you
can, and enter the value of the core, if this is an exchange item.
3.
If you’re sending a component for rework, be sure to select
the Outside Repair Line Type. More details on reworked
components are available later in this chapter.
4.
If you’re ordering a service only, such as testing or interior work,
select Outside Service.
5.
Be sure to note the Payment Type you’re using for this order.
Your choices are On Account, COD, and Credit Card. If you
select Credit Card, you’ll be allowed to choose the card that’s
being used. Entering this information correctly prevents errors
in duplicate payments, and aids in verifying your credit card
statement.
TotalFBO® User Guide | 305
Once the details of the Purchase Order are complete, OK the record and select
“Finalize” from the option screen. This prevents further changes to detail
items or quantities, and prepares you to receive the shipment when it arrives.
Because the purpose of using a purchase order system is to control the
ordering process of an organization, TotalFBO® does not allow “blanket”
purchase orders which remain open indefinitely.
Receiving Shipments
When the materials you’ve ordered arrive and are inspected, you’ll want to be
sure to mark the date received on the packing slip immediately.
In a perfect world, there would always be an inventory clerk standing at the
door ready to post the shipment to your records. But the realities of staff
vacations, illnesses, and Saturday deliveries from Fedex, often leave us in the
position of receiving shipments after the fact.
With TotalFBO®, this needn’t be a problem. As long as you’re careful to
receive each shipment with the correct date, all your inventory records will be
accurate.
Begin the process by inserting a new record at Inventory> Receive Shipments.
Enter the correct date at the top of the screen, and then enter or select the
Purchase Order.
The entire order is automatically pulled into the Receiving Screen for you. If
you received everything exactly as ordered, simply OK the screen. However,
we suggest that you take a moment to refine or update your estimate on freight
charges and insert any batch or lot numbers that apply.
See Helpscreen topic:
Receiving Shipments
306 | TotalFBO® User Guide
SHOP OPERATIONS
If you have ordered any serialized parts, you’ll not be allowed to OK the
screen until the serial numbers have been entered.
Because you know your cost,
this is an excellent time to
update your selling price! Use
the Update Pricing button for
immediate access to the fields
you need. You‛ll be able to
apply your matrix or manually
enter a price.
ALL SHIPMENTS NEED A
VENDOR INVOICE even if
the shipment is pre-paid.
Your accounting staff can
easily apply COD checks or
credit card payments to close
the invoice, completing a good
audit trail. And you‛ll benefit
by having only one procedure
for all types of orders.
If an item is not included in this shipment, you can delete it from the screen
and receive it in a separate shipment.
If items are backordered, you can adjust the quantity received and enter a date
you expect to receive the final shipment. The On Order/Back Order Report
will help you monitor the status of your orders.
What Happens Next
After you OK the Receive Shipment screen, several things can happen
automatically.
1.
Summary Report – You’ll want to print a recap of your work to attach
with the Packing Slip and forward to your Accounting Department.
This report is also helpful in stocking those parts you’ll keep on hand,
as it lists the correct Bin or Location for each item.
2.
Print Labels – For any items to be carried in stock, you’ll save a lot
of time by allowing TotalFBO® to produce labels for each item in
this shipment. If you choose not to print labels at this time, you can
produce labels later for individual part numbers.
3.
Vendor Invoice – In order to insure that the accounting records are
updated in sync with your inventory records, a vendor invoice must
be recorded for Accounts Payable. This is so important that an option
is available to force the creation of an invoice for every shipment.
Your accounting staff will probably also set an Inventory Option so
that the resulting invoice is placed On Hold, so that it cannot be paid
prematurely. If the option is set, you will not be able to exit from the
invoice screen unless you select OK.
Typically, all the information is already completed on the invoice
screen, with the occasional exception of the Due Date. All you need
do is enter the letter “T” (shortcut for Today’s date). If you wish, you
may also enter the packing slip number in the Vendor Invoice number
field before you OK the screen.
4.
Inventory Update – Your inventory records are automatically updated
to show the items received, and the Purchase Order is marked
Completed.
5.
Shop Order Update – The Shop Order is updated as well. Outside
repairs and services appear automatically on the Discrepancy, and
SHOP OPERATIONS
inventory items are added as Parts Lines. Appropriate Freight and
Core Charges are included, and the correct price for the Customer is
used.
PART 3 – GETTING LABOR ON A SHOP ORDER
As with posting parts, you can simply update the Shop Order directly by
adding a number of hours and a labor rate to the individual Discrepancy.
However, the preferred method is to use the Batch Mode Labor function at
Accounting> Shop Orders> Batch Mode Labor to update all open jobs at once.
Many shops use an automatic time clock to update daily timecards for each
employee. Others require mechanics to keep a tally of their hours on another
form or on the Discrepancy Worksheets. If these time records are collected
each day, a clerk can quickly enter them as a Batch. The Batch is then posted
once a day at a time when other employees are not also working with Shop
Orders.
1.
When a time record is entered to the batch, you’ll be allowed
to select the employee from a list. This list contains only those
employees who have been identified as a “Mechanic” in their
payroll record.
2.
After selecting the employee, you’ll also select the correct billing
rate. This is not the employee’s pay rate, but the standard rate for
shop work billed to customers when performed by this employee.
For instance, you may charge a higher rate for Turbine work than
for Prop work. And a manager or specialist’s time may be billed
at a premium rate. All these standard rates should be entered to
each mechanic’s payroll record so they can be used for customer
billing. If a customer’s price class entitles him to a discount for
labor, the billing rate will be adjusted automatically on the Shop
Order.
3.
You’ll be asked to select the Shop Order and Discrepancy for this
time.
4.
Finally, you may enter just the number of hours (as hours and
minutes or tenths) or even enter the actual clock times, depending
upon what’s most convenient and the records you’re working
from.
5.
Be sure not to check the box to “Post labor When OK’ed?” until
you have completed the batch and have exclusive access to all
the shop orders. If others are working in a shop order when you
TotalFBO® User Guide | 307
308 | TotalFBO® User Guide
SHOP OPERATIONS
GETTING LABOR ON A SHOP ORDER
(Shop Workflow, Part 3)
Barcode
for Speed!
Time Clock
Real-Time
Logging
Recorded by Mechanic
as workday progresses
Batch Mode
Labor Entry
PAYROLL
Employee
Records
Can be reviewed and corrected
or Entered from Daily timecards
Includes correct Billing Rate
as well as Employee Cost
Shop Order
Discrepancy
Either or Both
can be Included in
Payroll Timecard
Labor Write-Off
Analysis Report
Number of hours billed to Customer
or Flat Rate Fees can be adjusted
by Shop Manager
Compares actual hours worked to
hours billed
try to post, you’ll receive a “busy” message. The system will try
to post the batch continuously until it succeeds.
SHOP OPERATIONS
Time Clock
Manual logging of time is usually not as accurate as using the computer to
capture time spent throughout the workday. TotalFBO® includes a fullfeatured Time Clock at File>Time Clock. All employees can use it to log
attendance, but it’s especially helpful for Shop employees.
TotalFBO® User Guide | 309
See Helpscreen topic:
Time-Clock
In addition to logging general attendance, mechanics can select the Shop Order
Effective use of the Time
and Discrepancy they’re working on. When clocking out, they’re offered a
Clock requires easy and
choice to clock in immediately on another item or to close out for the day.
immediate access to a
computer on the shop floor.
Security options and setting in the user’s ID record prevent employees from
clocking in for each other, but allow a supervisor to review logs and make
corrections where necessary.
Once logs are verified, they can easily be turned into a labor Batch and
processed normally.
On the Shop Order
Once time has been posted to the job, a manager can adjust the number of
hours to be billed, adjust the dollar amount to be billed, or remove the hours
and substitute a flat fee.
The Labor Write-Off Analysis report compares actual hours worked to the
number of hours billed to help in developing shop standards.
Details of time worked can be included on Shop Order printouts through Style
Sheet settings.
PART 4 – CLOSING A SHOP ORDER
As mechanics complete work on a discrepancy and the work is inspected, the
worksheets are usually submitted to the Shop Clerk. Then the text describing
the work performed is entered to the shop order on Discrepancy Tab 5
– Resolution.
Here’s another place where using Macros can make an often tedious task
go quickly. Simply click the Macro button to select the paragraphs you’ve
previously saved.
Don’t have any macros yet?
New users can build the macro file easily by following these steps:
1. Type the text you need into the shop order.
2. Highlight the entire paragraph (Ctrl-A or click and drag to highlight)
3. Copy the text (Ctrl-C or Edit>Copy)
4. Click the Macro button to bring up the Macros Browse
5. Insert a new Macro in the appropriate Group
6. Paste the text into the body of the macro (Ctrl-V or Edit>Paste)
See Helpscreen topic:
Keyboard Macros
310 | TotalFBO® User Guide
SHOP OPERATIONS
CLOSING A SHOP ORDER
(Shop Workflow, Part 4)
Update Shop
Order
Close Shop
Order
Complete entry of Response information on Discrepancies.
Use Macros to speed repetitive typing and Spell-check for
readability.
Manager reviews job for profitability.
Internal Cost
Inventory costs and margin are displayed.
Review
Labor costs and billing rates are compared.
Charge for consumables is evaluated.
Defer any discrepancies not to be completed.
Enter Close Date and attempt to close.
If necessary, stop and resolve any issues with open P.O.s.
Customer Billing
Copy
Change Shop
Order
Make any necessary adjustments and enter
customer's payment, if not on account.
Customer Final
Billing Copy
Cross-Bill
Shop Order
Generate Customer Billing Copy and email or fax
to customer for review.
Customer Picks Up Aircraft
Generate billing for any warranty parts or labor on the job.
(May be done at any time during or after job.)
Warranty Invoice
Now your shop order is done AND you’ve saved the text for re-use many times
on future jobs.
You can also quickly insert text that will change each time (like cylinder
pressures, or the number of problems found) by using Variables.
SHOP OPERATIONS
TotalFBO® User Guide | 311
Create a Variable by inserting two percent symbols around a phrase that
reminds you what you need to insert like this:
%%cylinder #1 top pressure%%
As the text is being inserted into your discrepancy, you’ll be reminded to enter
the missing text.
Manager’s Review
Now it’s time to print the entire shop order using your Internal Review style
sheet. You’ll want to display costs, employees who worked on the job, and the
source of parts.
•
If you also display the List Price, an additional column will appear
that compares the List to the Unit Price. Now it’s easy to run your
finger down the column and spot any parts where the markup is
inadequate or the cost is missing.
•
If you also print a summary section at the bottom, you’ll be able to
quickly compare costs to the selling price for each of the major areas
of the job.
•
A final review of the shop order should also verify that sales taxes are
appropriate.
•
Also see that all necessary departments are selected on the shop order
and/or individual discrepancies. The department controls how the
income and costs for the job are posted to your accounting records.
•
Verify that the default charge which has been calculated for
Consumable Supplies is appropriate for this job.
•
Defer any discrepancies which are not to be completed now.
•
Mark any discrepancies and/or parts as Warranty which should be
billed to a 3rd party (or your own company).
Attempt to Close
All that’s needed to close this job is a date in the Close Date field on Tab 1 of
the Shop Order. When the review and any corrections are complete, go ahead
and insert today’s date and OK the shop order.
-Any Outstanding Orders for this Job?
If there are any Purchase Orders which show parts for this job that have not yet
been received, you’ll receive a warning message. After you OK the message
screen, a list of the items involved will appear so you can decide what to do.
Why would a cost be zero?
When the correct vendor
price was not inserted on the
Purchase Order or Receive
Shipment screen.
312 | TotalFBO® User Guide
SHOP OPERATIONS
If you have a sufficiently high privilege level, you will be allowed to close the
job anyway.
However, we suggest that you investigate the items displayed to be sure that
you’re not closing the job without billing for all the items you intended to.
Sometimes in a rush job the project gets ahead of the Inventory Clerk’s ability
to get all the orders received into inventory.
In other cases, you may have ordered a part but the vendor can’t deliver on
time, so you re-order from another source. Now you’ll want to change the
original purchase order so that the item no longer shows the Shop Order
number. Then it can be received into stock or else returned to the vendor when
it arrives.
Any Parts Added After Close Date?
The system will also check the Action Dates on each part which has been
included in this shop order. If the Close Date you’ve set falls before any
Action Date, you’ll be prevented from closing.
Back-Dating jobs when you
close them is inappropriate.
Keeping the Shop Order up to
date each day will allow you to
This is necessary in order to prevent discrepancies between your inventory
close promptly at the end of
records and your accounting records where it appears that you sold the part
the job, making this practice
before you removed it from inventory.
unnecessary.
See Helpscreen topic:
Emailing from
TotalFBO
Issue Customer Bill and Get the Money!
With the Shop Order complete and properly closed, you’re ready to print it out,
using your Customer Billing style sheet format.
When you call the customer to notify him that the aircraft can be picked up,
add a professional touch by emailing or faxing the shop order to him for his
review.
When the customer arrives, you can make any requested adjustments or add
final payment to the Shop Order by using the Change Button on the Shop
Order Browse window. It is not necessary to “Open” the shop order to
make these changes. (You can have access to a closed shop order until your
Accounting Department closes for the month.)
If the customer will not be making full payment at this time, the remaining
total of the Shop Order will be added to his account balance. When he makes
payment, your Accounting Department staff will record it using an Invoice and
then applying it to the Shop Order on this account.
DO NOT continue to add payments to the original Shop Order after the close
date. This practice causes your accounting records to appear as though the
money was received before it actually was, preventing you from balancing
your checking account properly.
SHOP OPERATIONS
TotalFBO® User Guide | 313
Create Warranty Invoices
At any time during the life cycle of the Shop Order you can issue invoices
for Warranty labor and/or parts. The Discrepancy or part must be marked
“Warranty” in the Shop Order, which makes it available for separate invoicing
and shows it as “No Charge” to the customer.
PART 5 – LOGGING THE JOB
Depending on the aircraft and your relationship with the customer, you may
handle the final paperwork either before or after the Shop Order closes.
LOGGING THE JOB
(Shop Workflow, Part 5)
SHOP ORDER
Discrepancy
Resolutions
Updates Aircraft
Maintenance Items
Next Due Times
SHOP ORDER
Discrepancy
Resolutions
Update
Maintenance
Logs
Logbook Label
Easily import text from Discrepancies
individually or by Job Classes you define
to produce logs and FAA 337s.
Update
FAA 337
Form
FAA 337
See Helpscreen topic:
Cross-Billing
Shop Orders
314 | TotalFBO® User Guide
SHOP OPERATIONS
It’s often tempting to put this chore off when the aircraft is one of your own.
But keep in mind that when this aircraft is dispatched for the next charter or
rental flight, your aircraft maintenance logs will be checked automatically. If
you’ve performed the required maintenance, but not updated the records yet, it
will slow down the dispatch process at your front counter.
See Helpscreen topic:
Logging Maintenance
Performed
Even worse, your Customer Service Reps may get into the habit of ignoring
maintenance warnings, which can be dangerous.
Logbook Entries
TotalFBO® makes logging fast and easy because very little typing is
necessary. You’ll begin at Operations> Aircraft> Update Maintenance Logs.
1.
Immediately you’ll see the list of aircraft in your database, and you’ll
select the tail number you need to update.
2.
Insert a new log record and select the Maintenance Type and
Maintenance Item.
3.
Complete the times, dates, and cycles on the aircraft when the work
was performed.
If you OK the record at this point, the Next Due times for that Maintenance
Item will automatically roll forward. However, you’ll want to proceed to Tab
2 – Notes, and enter the text describing the work done.
You can again use any Macros you have defined, enter text manually, and
check it with the Spell-Checker. But if most of this information has already
been entered on the Shop Order, you can import it easily.
Click on the SO button to bring up the Scan window. Here you can select a
shop order and tag one or more discrepancies to import. If you have assigned
a Job Class to your discrepancies, you can bring them in by those groups,
making fast work of separating a long job into separate logs for Airframe,
Engine, or Prop work.
Typically, the Resolution text on the Discrepancy is imported here, however,
an option is available to select the Problem text also.
After saving the log record, you’ll want to print one or more copies for your
files and the aircraft logbook itself.
You can define several printout formats, allowing you to print logs on any size
label or plain paper. If you have a Zebra label printer, you can even include
your logo on the printout.
SHOP OPERATIONS
TotalFBO® User Guide | 315
You can also enter up to 5 standard paragraphs for compliance statements,
and any number of names of authorized personnel for the signature line. This
information is set up at Operations> Aircraft> Options and Settings> General
Options.
The FAA 337
Creating the FAA 337 is done in exactly the same way as the logbook entry.
You can access the 337 function from Shop Orders, Inventory, or Aircraft
menus. Look for the Forms menu.
1.
After you insert a new 337 record you’ll select the Aircraft Tail
Number. Much of the standard information on the aircraft and
your own company will appear automatically at this point.
2.
Continue moving through each of the tabs until you have
completed all the required fields.
3.
On Tab 5 – Description of Work, you’ll enter the text or import
it from a Shop Order.
After saving your work, you’ll be ready to print the form on plain paper from
your laser printer. You can print each page separately, turning the printout
over so you can print on the back if you like. The system will automatically
generate as many continuation sheets as are necessary to accommodate the text
you’ve entered.
TRACKING REPAIRS & CORES
In the previous section, we covered the basics of getting parts and labor posted
to a Shop Order. In this section, we’ll adjust our focus to look at those items
which have been removed from an aircraft and need to be repaired or replaced.
It’s easy to lose track of a component in the daily hustle of a typical shop. And
as you know, that can be an expensive error. In fact, many Shop Managers and
Inventory Clerks have created elaborate and stringent procedures to help avoid
the problem. The difficulty is that these procedures usually depend on a single
employee for completion, often a person who’s already overworked!
TotalFBO® relieves the pressure by breaking the job down into small steps
in which everyone cooperates. And the status of an item is always readily
available to all users, so you’re not waiting for a single staff member to look it
up in a log.
See Helpscreen topic:
Preparing the
FAA 337
316 | TotalFBO® User Guide
SHOP OPERATIONS
We’ll cover three types of transactions in this section:
• Reworked Components
• Cores
• Rotable Components
REWORKED COMPONENTS
See Helpscreen topic:
Sending parts for
Rework
We’ll use this term when we take an item off an aircraft, send it out to a
vendor for repair, and then reinstall it on the aircraft. We expect to charge the
customer for the freight both ways, the vendor’s charges for labor and any
parts that were used, and any sales tax which applies.
Remove Component from Aircraft
1. Add a Parts Line to your Shop Order.
2.
Before completing any of the usual fields, check the “Send Out for
Repair?” box. This lets the program know that you’ll be working
with a Serialized Part that is also a Client Unit.
3.
Complete the Part Number. Appropriate screens will appear that
allow you to either select an existing inventory record (must be Client
Unit or Sold status) or add this item as a new Client Unit. Be sure to
enter the correct unit serial number in the Unit record window.
NOTE: This special Parts line will be used to help you track the component
but will not print on the Shop Order unless you specifically check an option on
the Style Sheet.
Send it to the Vendor
1. Create a Purchase Order and select the Vendor.
2.
Insert a Detail record and select Outside Repair as the Line Type.
3.
Enter the Part Number and select the unit with the correct serial
number.
4.
The Unit Cost field will contain your estimate (if any) of repair
charges.
5.
Add your expense for shipping the component in the Outgoing Freight
field.
6.
Also complete the Shop Order Number and Discrepancy Number
fields.
7.
After completing any other appropriate information on the Purchase
Order, OK and Finalize it.
SHOP OPERATIONS
TotalFBO® User Guide | 317
REWORKED COMPONENTS
(Item will be reinstalled on same aircraft after repair)
Shop Order
Parts Line
Select "Send Out for Repair"
Remove Component
from Aircraft
Creates new
Serialized
Part Record
as Client Unit
Purchase Order
Packing Slip
Accts
Payable
Invoice
ON HOLD
Create
Purchase
Order
Receive
Component
into Inventory
Send to Vendor for Rework using
Purchase Order and selecting
component on Outside Repair
The charge for repair and freight
will be billed to your customer
at your default markup or you
can set a price manually.
Rework Info and Price
automatically added to
Shop Order Discrepancy
& Resolution Text Area
318 | TotalFBO® User Guide
SHOP OPERATIONS
8.
Finally, print the purchase order and packing slip from the Purchase
Order Browse screen and ship the component.
Receive the Shipment from the Vendor
When the vendor has returned the repaired item, you’ll be ready for the final
step in the cycle.
1.
Receive the new shipment and select the Purchase Order Number at
the top of the window to complete the details for you.
2.
Be sure to adjust the detail line so that it shows the correct cost and
incoming freight.
3.
Also consider the Customer Price. Your Inventory Options allow
you to set a default markup for Outside Repair items and Freight.
(Many FBOs set the markups to 25% for the Repair and 10% for the
Freight.) If the default calculation doesn’t match your agreement with
the customer, you can check the box “Do not mark up price?” or else
manually enter a total in the Customer Price field. This amount will
appear on the Shop Order Discrepancy.
When you next review the Shop Order, you’ll see the charges in the Outside
Repair field of the Discrepancy. In addition, a notation will appear on
the Resolution tab which identifies the component and vendor, per FAA
regulations.
CORE TRACKING
See Helpscreen topic:
Tracking Cores
We’ll use the term “Core” when we purchase a part to replace an item on a
customer’s aircraft, but the vendor expects us to supply a repairable item in
exchange within a set period of time. If we are unable to supply a repairable
part, then an additional charge must be paid.
TotalFBO® provides a list of core records which is maintained separately from
your normal Inventory items.
If you wish, you can create a core record immediately when the component
is removed from the aircraft at Inventory> Update Cores. However, often the
component is not removed until the new part is ready to be installed, so we’ll
begin our discussion with ordering the new part.
Order the New Part
We’ll begin by creating a Purchase Order at Inventory> Update Purchase
Orders.
Be sure to include not only the cost you actually expect to pay in the Unit Cost
SHOP OPERATIONS
TotalFBO® User Guide | 319
CORE TRACKING
(If it's good, you'll get a vendor credit)
Remove Part
from Aircraft
Total Liability
with Cost of
Part and Core
Accts
Payable
Invoice
ON HOLD
Create
Purchase
Order
Order Replacement Part
Show Total Cost Including
Core Charge if No Exchange
Receive Part
into
Inventory
Create Core
Purchase
Order
Shop Order
Parts Line
Core
Record
Purchase Order
Packing Slip
Adjusted
Core
Charge
Accts
Payable
Credit Memo
ON HOLD
Payables Clerk Reviews & Pays Net
Receive to
Close
Purchase Order
OK to remove
customer core
charge from
Shop Order.
Cores Outstanding
Report
Ship Core
to Vendor
Vendor
Inspection
320 | TotalFBO® User Guide
SHOP OPERATIONS
field, but also the Core Charge which you are obligated for in the event that the
exchange item is not accepted.
OK and Finalize the Purchase Order normally.
Receive the Shipment
When the shipment arrives, Receive the New Shipment into inventory
normally. The data will automatically update two other records:
•
Accounts Payable Invoice
The Vendor Invoice will be created as usual, but this time the total will
include the full amount of the part and the possible Core Charge. This is
because your company actually has a liability for this amount, even though
we don’t expect to have to pay it all.
Note: The Core Charge amount is separated into a special account so it’s
easy to track.
•
Shop Order
The new part will appear on a Parts Line in the Shop Order as usual, but
it will also show the amount of the Core Charge which you may bill to the
customer.
Review the Shop Order
The next time you work with the Shop Order, you’ll be reminded that a part
with a Core Charge has been added to the job. This will be your opportunity
to create a Core Record automatically, if you have not already done so earlier.
You may remove the core charge amount if you do not intend to charge the
customer unless the core is not accepted. However, be sure to add a note
reminding the customer that core charges may be billed after the job closes.
Send Core Back to Vendor
Although a core item isn’t really a part of your inventory, it’s convenient to use
the same Purchase Order and Receiving functions you’re comfortable with to
track the movement of these components.
Create a Purchase Order and select Core as the Line Type on the Detail Line.
This allows you to select the correct component from your Core records.
Be sure to enter the amount of the core charge in the Unit Cost field, as well as
your freight expense for shipping the item.
After you OK and Finalize the Purchase Order, print a Packing Slip to include
in the shipment.
SHOP OPERATIONS
The Core record will be updated automatically to indicate the status and date
sent back. You may add additional information to the record manually, such as
a freight Tracking Number and the date you expect to have a determination.
If It’s Good, Complete the Purchase Order
At some point you’ll become aware of the Vendor’s decision on the exchange
unit. Often your Payables Clerk will simply find an unexplained credit on
your statement. Sometimes you’ll be able to obtain a determination by phone
or fax.
At that point, you’ll use the Receive New Shipment function to complete the
Purchase Order. Again, there will be two results:
•
Core Record
The Core Record status will be updated.
•
Accounts Payable Invoice
A Credit Memo for the amount of the core charge will be posted. You
may adjust this amount if the actual credit is different from the original
core charge. Your Payables Clerk can apply the credit to the original
invoice so that only the charge for the replacement part is paid.
If you owe the customer a refund, create an Invoice selecting a Service Line to
Core Charges Billed. Be sure to mark the line “Credit.”
If It’s Bad, Force It!
If the exchange unit is not repairable, you’ll have to pay the full amount of
the original vendor invoice. You may also need to charge the customer for the
core charge.
To keep the Purchase Order from remaining open forever, you’ll need to go to
Inventory> Update Purchase Orders and highlight the correct Purchase Order.
Then click the Force Complete button and OK the message window.
Then you’ll need to review the Core Record at Inventory> Update Cores.
Select the appropriate status if the unit was not discarded.
Also make note of the Customer so you can create an Invoice, if necessary.
When building that invoice, you’ll select a Service Line to Core Charges
Billed.
TotalFBO® User Guide | 321
322 | TotalFBO® User Guide
SHOP OPERATIONS
ROTABLE COMPONENTS
We’ll use this term to mean those parts you have someone repair but which are
held in stock until they’re needed. The source for these parts can vary widely.
Add Client-owned inventory
to a different Inventory
Department so that it can be
tracked separately in both
the inventory and accounting
records.
Sometimes you’ll remove an item from an aircraft but there isn’t time to repair
it before the aircraft must be returned to service, so your customer agrees to
purchase a new item. Then the repaired item will be available as a spare.
In the same way, sometimes a client will purchase spare parts and ask you
to store them until needed. Repairable parts will be returned to this separate
stock grouping.
In other cases, you’ll decide to keep a reworked component in stock for use on
any customer’s job. These will be carried in your Inventory normally.
Receive the Component
Whatever the source, it must appear in your inventory records as a Serialized
Part.
Items which are Purchased from a Vendor or Provided by the
Client
You’ll begin by receiving these into your inventory as you would any other
new shipment. It may be necessary to create a new Vendor (such as “Client”)
to indicate the correct source of these parts.
Items which are Removed from an Aircraft
You may receive it by simply adding it to a Parts Line on the Shop order.
• If you will take ownership of the item, check the Credit? box and
enter a cost equivalent to any credit you will give the customer for
this item.
•
If the unit will remain the property of the client, check the Send Out
for Repair? box.
Send it to the Vendor
1. Create a Purchase Order and select the Vendor.
2.
Insert a Detail record and select Outside Repair as the Line Type.
3.
Enter the Part Number and select the unit with the correct serial
number.
4.
The Unit Cost field will contain your estimate (if any) of repair
charges.
SHOP OPERATIONS
TotalFBO® User Guide | 323
ROTABLE COMPONENTS
(Item will remain in stock after rework)
Purchase
from
Vendor
Provided
by Client
Remove Component
from Aircraft
If removed or supplied by client,
Receive
item is entered at Zero Cost
Component
into Inventory Must be added as Serialized Part
Purchase Order
Packing Slip
Accts
Payable
Invoice
ON HOLD
Create
Purchase
Order
Send to Vendor for Rework using
Purchase Order and selecting
component on Outside Repair
Item Cost is now the charge for
Receive
repair.
Component
Set the Selling Price high enough to
into Inventory
include cost plus freight both ways
plus standard profit margin.
324 | TotalFBO® User Guide
SHOP OPERATIONS
5.
Add your expense for shipping the component as Outgoing Freight.
6.
After completing any other appropriate information on the Purchase
Order, OK and Finalize it.
7.
Finally, print the purchase order and packing slip from the Purchase
Order Browse screen and ship the component.
Receive the Shipment from the Vendor
1. When the vendor has returned the repaired item, receive the new
shipment and select the Purchase Order Number at the top of the
window to complete the details for you.
2.
Be sure to adjust the detail line so that it shows the correct cost and
incoming freight.
An Accounts Payable invoice will automatically be generated to enable you to
pay the Vendor for the work done.
FOR CLIENT-OWNED ITEMS, BILL FOR THE WORK DONE
Since this item may sit in stock for some time before it’s used on an aircraft,
you’ll want to collect from the client as soon as possible. You can either be
sure to enter an open Shop Order Number on the Receive Shipment screen to
transfer the charge to a job, or else create an invoice to bill for the repair work
done.
FOR YOUR OWN ITEMS, NOTE THE COST
Note that the cost of the repair has been added to the original cost of the item
when you obtained it. Now you should review it and set your selling price
accordingly.
Manually update the price at Inventory> Update Inventory. Select the part and
locate the appropriate Unit record from Tab 3. The price fields are located on
Tab 2 – Pricing.
SHOP OPERATIONS
CROSS BILLING SHOP ORDERS
The Cross-Bill function within TotalFBO® is designed to allow additional
billing to be generated as a result of the work being done through the Shop
Order.
• For some long jobs, you’ll want to generate Progress Bill invoices to
the customer as sections of the work are completed.
•
On any job, you may need to bill a manufacturer, insurance company,
or even yourself, for parts or labor which is covered under a
Warranty.
PROGRESS BILLING
The Shop Order is designed to be a working document during the course of
a job, and then to become a bill to the customer when the work is finished.
However, some jobs stretch out over months – even years. During this time,
we usually expect the customer to make progress payments as portions of the
work are completed and approved.
There are two methods you can use to handle this situation.
Copy Deferred Items Method (Multiple Shop Orders)
You can open a shop order and begin the inspection and early phases of the
work. Discrepancies which are not to be done until later should be marked
Deferred.
When the first phase of the work is done, close the Shop Order and ask the
customer to pay those charges.
On the Shop Order Browse window, highlight the Shop Order and click the
Copy Button.
Choose to copy only the Deferred Discrepancies to a new Shop Order. All the
information on those discrepancies will be copied, along with any associated
parts lines, but the quantities on those lines will be set to zero.
Now here’s where you need to be careful. First of all, why were there parts
on a Deferred Discrepancy in the first place? If you never got started on this
part of the job, there probably won’t be any parts records associated with these
discrepancies, so no parts will be copied to the new Shop Order. You simply
continue working with the next phase of the job and repeat the process until
it’s all done.
But maybe some parts were received early and the big component was delayed
and that’s why the discrepancy was deferred. At this point, you’ll need to
make a decision about when you want to bill those parts.
TotalFBO® User Guide | 325
326 | TotalFBO® User Guide
SHOP OPERATIONS
PROGRESS BILLING
Copy Deferred Items Method:
SHOP ORDER
Mark
Discrepancies
Deferred
Decide whether any parts
on Deferred Discrepancies
should be billed
on first Shop Order
or copied Shop Order.
SHOP ORDER
Continue with
New Shop
Order
Close original Shop Order
to bill Customer for
work completed.
Copy Shop Order, choosing
only Deferred Discrepancies.
Adjust Parts Qtys. as needed
Shop Order Cross-Bill Method:
Unbilled
Discrepancies/Parts
on OPEN Shop Order
SHOP ORDER
Select
Items to
Cross-Bill
RECEIVABLES
Invoice
SHOP ORDER
Marks Item
as Billed
SHOP OPERATIONS
•
If you want to bill for the parts now, then simply delete the parts
lines off the new (copied) Shop Order. These parts will have already
been billed for in the first Shop Order, so you just want to avoid
duplicating them.
•
If you want to wait to bill for them until you can bill the entire
discrepancy, then delete them from the original Shop Order (which
returns them to your stock) and re-enter the quantities on the new
(copied) Shop Order. In the case of Serialized Parts, you’ll have to
re-select the correct unit.
The Multiple Shop Orders method is perhaps most useful when there are
distinct phases to the work or when the aircraft will be in service for periods of
time between phases.
Cross Bill Method (Progress Bill Invoices)
When you create a new Shop Order, it’s easy to get the customer to make an
initial deposit for the work. But if you go back to him for additional payments
before the job is done, he’ll likely ask you to provide some evidence of what
he’s paying for. The Cross-Bill function enables you to provide this evidence
easily and make the appropriate accounting entries for Progress Bill Invoices.
As a project progresses, your mechanics and inspectors will sign off on
individual discrepancies when they are completed. After management review,
the Discrepancy Status should be changed to Completed. Any further attempts
to change the Discrepancy will trigger a warning message.
1.
To generate the bill, highlight the Shop Order on the Shop Order
Browse window and click the Cross-Bill button.
•
•
Select Progressive – By Parts Line to bill only for parts.
Select Progressive – By Discrepancy to bill for labor and/or
parts. You can limit the list of discrepancies to display only those
with a Completed status or else see all unbilled discrepancies.
2.
Tag the items you wish to bill and then click the Bill Marked Charges
button.
3.
An invoice will be presented to you with these charges included.
Parts and Labor will be detailed as notes on separate Service Lines.
You may add any additional notes or changes as you wish and OK the
invoice.
4.
The Discrepancy and/or Parts on the Shop Order will be marked as
“Billed” and the charges subtracted from the net due on the job.
TotalFBO® User Guide | 327
328 | TotalFBO® User Guide
SHOP OPERATIONS
NOTE: If you delete a Service Line from the Invoice, or Void or Delete the
Invoice itself, these items become “unbilled” on the Shop Order.
No tax is charged on this invoice, as the accounting treatment is the same as
when receiving any other Customer Deposit. If you issued Progress Bills for
all the parts and labor on a Shop Order, there would still be a balance due on
the Shop order for taxes and Miscellaneous charges.
WARRANTY BILLING
To bill a Third Party for parts or labor, use the Cross-Bill function to generate
the invoice as follows:
1.
Highlight the Shop Order on the Shop Order Browse window and
click the Cross-Bill button.
Select Warranty – By Parts Line to bill only for parts. You’ll
see only those parts which have been marked as “Warranty” in
the Shop Order.
• Select Warrancy – By Discrepancy to bill for labor and/or
parts. You’ll see only those Discrepancies which have been
marked as “Warranty” in the Shop Order AND on which a
Customer account was selected to bill.
You may need to add a vendor or manufacturer to your
Customer records in order to bill for Warranty work.
•
If you delete a Service Line
from the Invoice, or
Void or Delete the Invoice
itself, these items become
“unbilled” on the Shop Order.
2.
Tag the items you wish to bill and then click the Bill Marked Charges
button.
3.
An invoice will be presented to you with these charges included.
Parts and Labor will be detailed as notes on separate Service Lines.
You may add any additional notes or changes as you wish and OK the
invoice. Note that Warranty billings are non-taxable sales.
4.
The Discrepancy and/or Parts on the Shop Order will be marked as
“Billed” and the charges subtracted from the net due on the job.
When payment is received in the form of a check, your accounting staff will
post the payment to the account normally.
When payment is received as a credit memo on your account with the vendor,
your accounting staff will use the Payables function, Move Money Between
A/R and A/P, to generate twin credit memos. Each credit memo will be
applied to the appropriate account.
SHOP OPERATIONS
TotalFBO® User Guide | 329
WARRANTY BILLING
(Shop Order Cross-Bill)
SHOP ORDER
Mark Items
as Warranty
SIDESTEP
Add Mfg or
Vendor as
Customer
SHOP ORDER
Select Items
to Cross-Bill
RECEIVABLES
Invoice
IF CHECK RECEIVED:
OR
RECEIVABLES
CHECKING
Post Check
as Deposit
SHOP ORDER
Marks Item
as Billed
IF CREDIT RECEIVED:
Apply Credit
to Invoice
Apply Payment
to Invoice
Create
Invoice to
Post Payment
Select Warranty Parts and/or
Discrepancies from ANY
Shop Order.
PAYABLES
Move Money
between
Receivables
& Payables
RECEIVABLES
Credit Memo
PAYABLES
Credit Memo
330 | TotalFBO® User Guide
SHOP OPERATIONS
OVERHEAD SHOP ORDERS
No matter how conscientious and hard-working your mechanics are, there will
always be a percentage of the time you pay them for which is not billable to
customers. This non-billable time includes shop cleanup, tool repair, meetings,
approved leave, chasing parts, aircraft repositioning, and “coffee-break time.”
Develop a simple numbering
scheme for this special shop
order, such as OVR-04-01 for
a job opened in January, 2004,
etc. Always include the same
group of 3 or 4 discrepancies
for common activities.
Billable time is captured through Batch-Mode Labor (or Invoices) and can be
used to build the employee’s Timecard automatically in the Payroll module.
However, if the non-billable time is not captured in some way, this leaves the
Payroll clerk manually reconciling timecards and adding the missing time.
Happily, a simple solution exists: Create a single “Overhead” Shop Order each
month and post non-billable time to it.
•
Mechanics can consistently charge all their time to a Shop Order,
whether keeping a manual timesheet or using the Timeclock function.
•
Payroll is consistent and fast.
•
Supervisors can track and begin to manage this “lost” time. For
instance, if you learn that a large amount of time is being spent in
shop cleanup or aircraft repositioning, perhaps it’s time to hire a
staffer who’s more appropriately paid for these duties. If meetings are
a problem, consider redesigning your communications habits.
NON-BILLING CUSTOMER ACCOUNT
There will never be any “payment” required for this special Shop Order, so we
need to be sure the Customer we use is set up in a special way.
Your Account Department will create a customer using your own company
name, such as “Your Company Name – Overhead Shop Orders.” This is done
at Accounting> Receivables> Update Customer List.
On Tab 3 of the Customer account record, they’ll select a Billing Type of NonBilling. This insures that special accounting procedures will be in effect for
this customer.
If you put Parts on the
Overhead Shop Order, set a
General Ledger Department
on the Non-Billing Customer
account which uses an
override for Cost of Parts
to a Shop Supplies Expense
account.
•
•
•
•
No balance will be carried on this account.
No payment can be made to this account.
No journal entry for labor or miscellaneous charges will be made.
Only the Asset-Cost journal entry for parts will be made.
Thus, if you only show non-billable labor on the Overhead Shop Order, no
accounting journal entry at all will be made.
If you add parts to this Shop Order, a journal entry will be made that withdraws
SHOP OPERATIONS
TotalFBO® User Guide | 331
MECHANIC'S TIME FULLY IDENTIFIED
Aircraft
Maintenance
Vacations
Meetings
Just
One
Cup...
Tool Repair
Time Clock
Capture
All Paid Time
is entered to
Time Clock and/or
Batch Mode Labor
PAYROLL
Batch Mode
Labor Entry
SHOP ORDER
SHOP ORDER
Billable
Customer
Overhead
Customer
the items from inventory and charges it to a cost account. You might use this
feature to help you track cleaning supplies or similar items.
NOTE: Depending on the legal structure and the laws of your state, you may
need to charge yourself a Use (Sales) Tax on parts used internally.
Employee
Timecards
332 | TotalFBO® User Guide
SHOP OPERATIONS
OTHER INTERNAL SHOP ORDERS
The preceding section described a situation where we set ourselves up as a
customer and created a Shop Order on that account. There are other situations
in the typical FBO which require a special customer account.
By setting up these accounts we greatly simplify our daily procedures, because
all transactions can be handled the same way. Once we properly establish and
then select the proper Customer Account for a Shop Order, TotalFBO® will
handle the specialized accounting.
We used a Non-Billing Customer for the Overhead Shop Order, because we
didn’t want to see any income from this transaction.
The other Customer Billing Type available to you is called Internal. This
account is used when one department within a company performs services for
another department.
In this situation, the billing department needs to post normal income and costs
for the work performed, and the department being serviced needs to post
an expense. This special accounting task is accomplished by selecting the
expense account as an override on Tab 3 of the Customer record.
Your Accounting Department staff will establish several customers for your
use. Here are some examples for you to adapt to your own situation:
Shop Expenses – Non-Billing
This would be used for posting parts used in tool repair, cleaning supplies, and
the like. These items should reduce inventory and increase shop expense.
Charter Aircraft Maintenance – Internal Billing
This customer is selected on shop orders for maintenance of aircraft used in
Charter Operations. The Accounts Receivable account override is Charter
Aircraft Maintenance Expense.
Flight School Aircraft Maintenance – Internal Billing
This customer is selected on shop orders for maintenance of aircraft used in
Flight School Operations. The Accounts Receivable account override is Flight
School Aircraft Maintenance Expense.
Ramp Equipment Maintenance – Internal Billing
This customer is selected on shop orders for maintenance of ground service
equipment used in Ramp Operations. The Accounts Receivable account
override is Line Equipment Maintenance Expense.
SHOP OPERATIONS
TotalFBO® User Guide | 333
MAGICAL ACCOUNTING!
JOURNAL ENTRIES FOR SALES TO:
NORMAL CHARGE
CUSTOMER
INTERNAL BILLING
CUSTOMER
NON-BILLING
CUSTOMER
DR Accounts Receivable
(Asset)
DR "Buying" Department's
Expense
**GL A/R OVERRIDE**
N/A
CR Income for Sales
(Income)
CR "Selling" Department's
Income for Sales
(Income)
N/A
DR Cost of Goods Sold
(Cost)
DR "Selling" Department's DR "User" Department
Cost of Goods Sold
Expense
(Cost)
**SALES DEPT. NAME**
CR Inventory Owned
(Asset)
CR Inventory Owned
(Asset)
CR Inventory Owned
(Asset)
CR Sales/Use Tax Liability
(Liability)
CR Sales/Use Tax Liability
(Liability)
CR Sales/Use Tax Liability
(Liability)
Used for:
Normal Sales to
Outside Customers
Used for:
Internal sales between
Departments
Used for:
Company use of
inventoried items
INTERNAL and NON-BILLING CUSTOMERS carry no balance and do not appear on the Accounts
Receivable Aging report, although statements and other reports can be run to detail acvitity on
these accounts.
INTERNAL and NON-BILLING CUSTOMERS may be made Sales Tax Exempt if the laws of your
state permit.
334 | TotalFBO® User Guide
SHOP OPERATIONS
Leaseback Aircraft Maintenance – Internal Billing
This customer is selected on shop orders for maintenance of aircraft used in
Charter or Flight School Operations. In this situation, the owners of these
aircraft do not pay for maintenance directly, but are billed a single invoice each
month which results from the net of the Leaseback report (flight income less
expenses). The Accounts Receivable account override is Leaseback Costs.
Parts Sold Between Locations – Non-Billing
This customer is used on invoices to transfer a part from one shop location
to another. The Sales Department should override cost to the Due To/From
Other Locations account. NOTE: The receiving location will Receive using a
Vendor account that overrides the Payables Liability account to the same Due
To/From Other Locations account.
POSTING WORK IN PROCESS
Whereas the entire Customer Invoice transaction takes place immediately, the
Shop Order transaction occurs over a period of time – sometimes a loooong
time! During that period, parts that are added to the job from inventory
will correctly adjust the inventory quantity records. But other areas of your
database are not updated, such as the customer’s account and your general
ledger. These adjustments are only made when the job closes and the final
totals are known.
If most of your jobs open and close within about 30 days, this delay in
updating your records poses no problems. But if a job is open for longer, your
business will be incurring costs for labor and parts each week, but no income
will be received until the Shop Order finally closes.
From an accounting standpoint, it looks like your business is losing money for
several months and then suddenly has a windfall, only to cycle back to a loss
again.
Accountants have developed a concept called the Income Matching Principle,
which states that you should try to post income to your records at about the
same pace you earn it, rather than waiting until you actually bill it to the
customer. This helps to offset the costs you’re posting, providing a more
accurate picture of the health and profitability of the company all year-round.
Posting the Entry
TotalFBO® makes this easy with the function at Accounting> Shop Orders>
Post Work In Process. Here you’ll be able to select all shop orders or just a
single job to post, and set the date you want for the entry.
Based on the activity dates when parts and labor batches were added to the
job, the correct balance on the shop order as of your effective date will be
SHOP OPERATIONS
TotalFBO® User Guide | 335
WORK IN PROCESS
Posting WIP posts
the current value
of the Shop Order
immediately.
LABOR
Discrepancy
Charges
LABOR INCOME
PARTS
Post
Work in
Process
Parts Lines
Core Charges
Freight
PARTS COST
MISC
INVENTORY ASSETS
PARTS INCOME
CORE INCOME
FREIGHT INCOME
CONSUMABLES
INCOME
FREIGHT INCOME
Consumables
Gen. Freight
WORK IN PROCESS
(ASSET)
This permits
"Income
Matching"
with your
current
Cash &
Expenses!
Close
Shop Order
Payroll
Accounts
Payable
Closing the job will
adjust income or
cost as needed
AND
Clear the
WIP account
LABOR COST
CASH
INVENTORY
ASSETS
ACCOUNTS
PAYABLE
WORK IN PROCESS
(ASSET)
ACCOUNTS
RECEIVABLE
(ASSET)
SALES TAX LIAB.
336 | TotalFBO® User Guide
SHOP OPERATIONS
calculated. Then the journal entry is made to post your income accounts,
but instead of updating the Customer’s Account and posting the balance to
Accounts Receivable, the total is posted to another asset account called Work
in Process.
Because the bill is not yet issued to the customer, no sales tax is posted at this
time.
Typically, this function is utilized by an Accounting Department manager once
a month, after all jobs that are completed have been closed.
If a job continues for several months, each new Work in Process Entry posts
any additional income adjustments which are appropriate because of changes
to the Shop Order since the previous entry was made.
Closing the Shop Order
At the end of the job, you’ll have nothing extra to do; simply close the job
normally and TotalFBO® will make the correct entry for you.
Any remaining adjustments to income which are appropriate will be made,
sales tax liability will be posted, and the total for this job which has been
posted to the Work In Process account will be cleared. Now that the
Customer’s account is being updated, any unpaid balance on the Shop Order
will be posted to Accounts Receivable.
Verifying Work in Process
There are two reports in the Shop Order module which will help you reconcile
and verify that the Work in Process postings are correct.
•
Work in Process Breakdown Report
At any moment in time, this will break down the total in the Work
in Process asset account to show the amount that was posted from
each Shop Order. You can easily verify that no jobs appear on the list
which have actually been closed.
•
Work in Process History Report
This report will detail each Work in Process journal entry to identify
the specific income accounts and amounts which made up the other
side of the entry, listed by Shop Order Number as well.
SHOP OPERATIONS
TotalFBO® User Guide | 337
CATEGORIZING INVENTORY
In the preceding sections we explored the flow of work through the shop and
focused on the need to get information onto the Shop Order. A major source of
this information is your Inventory records, and so we turn our attention now to
that section of your database.
For details on all the fields in
inventory records for each
Your Inventory data is used in many ways throughout the program. These
Inventory Type, see the
include selling aircraft parts on Shop Orders, returning expired charts at
Helpscreen topic for each
the Front Counter, tracking an airline’s fuel for into-plane deliveries across
type.
the Ramp, detailing the value of assets in the Accounting Department, and
providing special pricing to your competitor, just to name a few!
In order to properly handle all these tasks, you’ll be able to categorize your
inventory items in many ways. Although it would be possible to use the
Inventory module of the program without using all the fields available to you,
many of the special features of TotalFBO® would be lost.
INVENTORY TYPES
INVENTORY TYPES
When you attempt to add a new item to your Inventory, you are asked to select
from one of the following 5 Inventory Types:
1. Inventoried Aircraft – For most owners, an aircraft is always for
sale if the right price comes along! So it’s pretty common for an
FBO that owns and uses aircraft to produce rental or charter income
to occasionally sell an aircraft. But unless you’re an aircraft dealer
or broker, you probably won’t be keeping aircraft in stock. If you do,
this is where you’ll set up the information.
2. Fuel – Selling fuel has its own special requirements, such as
the ability to record meter readings. And, in today’s competitive
environment, a great deal of flexibility when it comes to prices
and taxes is required. So the items in the Fuel Type have many
specialized fields to make this work smoothly for you.
3. Oil – Lubricants can be purchased in bulk and dispensed in small
units, and the pricing must allow for this range of options.
4. Serialized Part – Although thousands of widgets may be
manufactured, when a serial number is attached each item becomes
unique. FAA regulations require that these items be tracked
individually, too, and TotalFBO® maintains a complete history of
each one automatically.
5. Regular Part – Probably the greatest number of items in your
Inventory database will fall into this Inventory Type, as it includes all
the items not already mentioned above. Although a history of each
part is not maintained, a history of each Batch or Lot you purchase is
maintained, for full traceability.
Aircraft
Fuel
Oil
Serialized Part
Regular Part
338 | TotalFBO® User Guide
SHOP OPERATIONS
STOCKING OR NON-STOCKING?
It won’t take you very long to accumulate thousands of records in your
Inventory database, even though the typical FBO actually stocks very few
items in the Shop. This is because every item that passes through your
company will have its own inventory record.
These records are necessary for you to meet FAA regulations, reprint old Shop
Orders or Invoices, or re-order some items at a later date. But when you want
to print a list of those things you do keep in stock, it shouldn’t be cluttered with
thousands of parts you only saw once.
TotalFBO® helps you keep these reports short by providing a checkbox on
every record labeled Non-Stocking Item? Most of the time, you’ll want to
have it checked. Then you can decide whether to include this group of parts
on a report or not. An inventory option can default the check for you on new
items, saving you many keystrokes.
There may be times when you will change the status of a part in response to
demand, such as when an AD or Service Bulletin requires that a certain part be
replaced. For a short time you may elect to keep that item in stock, and then
re-set it to Non-Stocking when the demand has returned to normal.
Checking or un-checking the box only affects your reports; it does not change
anything else about the way you’ll work with the item itself.
INVENTORY DEPARTMENT
See Helpscreen topic:
There are 2 purposes for a department in TotalFBO®:
• Separation – Breaking a long list of items into smaller groups so we
can work with it more easily. For instance, Aircraft Parts and Pilot
Supplies are usually managed by people in two different departments.
Each just wants to see those parts they care about.
•
Inventory
Departments
Accounting Control – Often, different categories of inventory
items need to be tracked separately in your accounting records, too.
For instance, the income from selling those Aircraft Parts should be
included in the Shop Department, but the Pilot Supply sales should be
in the Flight School Department. The Inventory Department contains
fields which allow your Accounting staff to specify the General
Ledger Accounts which should be used when buying and selling
inventory items.
As you add new items to your Inventory database, you’ll be careful to select a
Department on each one.
SHOP OPERATIONS
TotalFBO® User Guide | 339
USING INVENTORY DEPARTMENTS
SEPARATE LONG LISTS INTO SMALLER GROUPS
Inventory Items
Pilot Supplies
Aircraft Parts
Customer-Owned
Avionics Parts
Obsolete Items
Consumable
Supplies
MAINTAIN ACCOUNTING CONTROL
Aircraft Parts &
Obsolete Items
Pilot Supplies
Customer-Owned
Avionics Parts
Consumable
Supplies
Acft Parts Inventory
Shop Parts Cost of Sales
Lost Acft Parts Expense
Shop Parts Income
Pilot Supply Inventory
Pilot Supply Cost of Sales
Lost Pilot Supply Expense
Shop Parts Income
Non-Owned Inventory
Client Inventory Liability
Client Inventory Liability
Shop Parts Income
Avionics Parts Inventory
Avionics Parts Cost
Lost Avionics Parts Exp.
Avionics Parts Income
Shop Supplies Expense
Shop Supplies Expense
Shop Supplies Expense
Shop Supplies Income
340 | TotalFBO® User Guide
SHOP OPERATIONS
A part may be moved from one department to another, if necessary. For
instance, you may create a special department for Obsolete Items that you
would like to sell at auction. By changing the department selected on a part,
you’ll move it into the new category. Then it’s easy to print a list of those
items for the auctioneer.
When can you have duplicate
items in inventory?
When the Part Number,
Description, Department, or
Bin Location is different
BIN LOCATION
This field has little meaning for Non-Stocking parts, but it’s critical for those
items you do keep on hand.
The typical FBO will have a stockroom with shelf units which have been
numbered or lettered to designate each shelf unit, shelf, and bin. There’ll also
be stock stored in the Line Shack, Front Counter, Avionics Locker, or Security
Cage. Whatever you call it, you can enter it in this field.
When you take a Physical Inventory, it will be more convenient for you to print
your worksheets and enter changes in Bin Location order.
USING CATEGORIES
These 4 major divisions of your Inventory (Type, Non-Stocking,
Department, and Bin Location) are used to help you organize and select
the information you see on reports. In addition, you can often limit the records
you work with to a specific date range.
Limiting the information you have to work with can make it easier to find what
you’re looking for, so you can often use these categories on program screens as
well.
For instance, the Browse Inventory window at Inventory> Update Inventory can
be limited to display only a certain Type and/or Department. By clicking on
the top of any column (such as Bin Location) you can then sort the data in that
order.
Similar options are available to help you organize the window at Inventory>
Other Parts Operations> Update Physical Inventory, so that the screen can match
the count worksheet you printed.
SHOP OPERATIONS
TotalFBO® User Guide | 341
PRICING INVENTORY
While it would be possible to simply enter a price each time we sell an item on
a Shop Order or Invoice, we would be doing a lot of unnecessary work that a
computer could do for us.
Even more importantly, we want to have some control over our prices. We’d
like to be sure we’re going to make a consistent profit on the items we sell.
We need to be sure certain customers get their promised prices. We’d like to
attract repeat business with price programs. We’d like to be sure we don’t
make mistakes in typing or math that would embarrass the company. And we
want to make that sale as fast as possible!
See Helpscreen topic:
Pricing Inventory
So TotalFBO® offers you some very flexible and powerful options to help you
achieve these goals. Your company will probably use a combination of tools
depending on your own needs. Let’s explore the available options by starting
at the very beginning…
PRICE CLASSES
If we were free to start a new business, how would we price our inventory?
That question cannot be answered until this one is answered: Who will be
buying our inventory?
To answer that question, let’s make a list of the kinds (or CLASSES) of
customers we’ll have:
• Retail Customers – those buyers that will pay our highest price
• Based Customers – those with whom we have a relationship, and
to whom we’ve promised a discount
• Contract Customers – buyers who have negotiated a price with us
• Wholesale Customers – other businesses that have to make a
profit, too.
• Employees – our own staff who will take advantage of our buying
power
• Internal – sometimes we’ll use inventory for our own purposes
Now to get back to the first question… How will we set our inventory price?
Now that we know who we’re selling to, let’s take each one in order. (By the
way, we’ll use aviation parts in our example here, but each type of inventory
will have a slightly different group of customers and profit goal.)
A typical profit margin goal for aviation parts is 30%. So we might look at
the cost of an item and add enough to give us that level of profit. An item
that costs us $100, then, would be priced at $143. If we wrote that down as a
Remember that a Margin
yields a larger number than
a Markup Percentage. The
standard pricing formula is
RETAIL PRICE = Cost ÷
(1 – Markup Percentage)
342 | TotalFBO® User Guide
SHOP OPERATIONS
formula, it would look like this:
Retail: Cost + 30% Margin = $Price
For the next class of customers, we’d like to give a slightly cheaper price. If
we decided on a 5% discount, our formula would look like this:
Based: Cost + 28% Margin = $Price
When we negotiate a firm price with our next class of customer, we’ll be doing
the math ourselves. When the contract is signed, we’re locked in to a price for
the term of the agreement. So our formula this time looks like this:
Contract: Fixed Price = $Price
If we’re an aviation parts dealer, the manufacturer will require us to sell to
other FBOs, and usually dictate the formula we have to use. We’ll get to buy
at a good discount from the List Price, and then we have to split the discount
with the other FBO. If we’re allowed an even split, the formula is this:
Wholesale: [(List –Cost) x 50%] +Cost = $Price
Commonly, employees are allowed to purchase items through the company for
about 10% over the cost. So this formula looks like this:
Employees: Cost + 10% = $Price
Finally, when we use items for our own purposes, such as using a quart of oil
in a ramp vehicle, we’re just going to pull the item from Inventory at cost:
Internal: Cost = $Price
Now all we have to do is set these formulas up in our computer, and
TotalFBO® can automatically calculate correct prices for us. You can do this
yourself at Inventory> Options and Settings> Update Price Classes. There’s
a section for everything you might sell, whether that’s inventory, labor, or
aircraft usage.
PRICE MATRIX
But before we do that, let’s refine our process a bit more. Look again at our
Retail formula. We’d sure like to get a 30% profit on every part, but will we be
able to do it by simply marking everything up that amount?
•
•
You could easily sell a $1.00 bolt for $1.43.
Could you sell a $100,000 engine for $143,000?
Wouldn’t it be nice to be able to use a sliding scale? That way we could mark
up the cheaper items even more (that bolt could sell for $2.00), and the more
expensive items would be marked up less (the engine would sell for $110,000).
Then on average over the year, we’ll expect to make our 30% profit.
TotalFBO® User Guide | 343
SHOP OPERATIONS
PRICING PARTS
APPLY
MATRIX
Receive
New Part
Inventory Record
with Cost & Price in
Fixed Price Field
1
-
5%
Sliding scale
based on
Cost or List
Customer Account:
*Based Price Class
e
Pr
ic
d
xe
Fi
Set Formulas:
Retail
*Based
Contract
Wholesale
Internal
#
PRICE
CLASSES
Invoice
Sale of Part
Shop Order
You’ll establish your sliding scale (for parts only) in TotalFBO® at Inventory>
Options and Settings> Tab 4 – Price Matrices. You can set up as many matrices
as you need, and even attach one to each Inventory Department, if you like.
If we apply the matrix to a part, the price is calculated and inserted in one of
the Fixed Price fields on the part record. There are 5 Fixed Price fields, so you
can design quite an elaborate price structure, if you wish.
Now let’s return to our formulas. If we set the matrix to insert our retail price
in the Fixed Price #1 field, then our formula can look like this:
Retail: Fixed Price #1 = $Price
344 | TotalFBO® User Guide
SHOP OPERATIONS
And since we now know that whatever is in the Fixed Price #1 field is our
Retail price, then our next formula gets easier, too:
Based: Fixed Price #1 – 5% = $Price
Basing prices on List means
you‛ll have to make an effort
to keep List updated in your
system. If you‛re a dealer,
see Helpscreen topic: Using
Manufacturer‛s Price Lists. If
not, better use Cost, which is
always current.
If you want to set up a new matrix, you can apply it to many parts at once at
Inventory> Other Parts Operations> Mass Update Prices. After that, just click
the Apply Matrix button on each part as you receive it into inventory. When
you handle a special part, you can manually set the price in Fixed Price #1 as
you receive it.
PUTTING IT ALL TOGETHER
1.
2.
3.
First we create our matrix and use it to set prices in one or more of the
Fixed Price fields on the part.
Then we create Price Classes and set formulas on each one. Formulas
can be based on any of the Fixed Price Fields, or List, or Cost.
Then we select the correct Price Class on each Customer Account
record.
Presto! Every sale is priced perfectly for every customer every time – and
we’ll never do any of the math!
INVENTORY WORKFLOW
There are only three primary tasks involved in the Inventory Workflow:
• Create Purchase Orders
• Receive New Shipments
• Make Physical Inventory Adjustments
While there are other functions you will perform from time to time, these
three tasks are part of a repetitive cycle that supports the Sales function of an
organization.
SHOULD YOU USE PURCHASE ORDERS?
Although it’s not mandatory that you use Purchase Orders, they offer many
benefits that make it worthwhile. Their primary purpose is to control the
authority to purchase items for the company.
Before computers were commonplace, employees who needed something sent
a Requisition form up through the chain of command. After all the approvals
had been made, the form passed to the Purchasing Agent, who shopped for the
item. Before placing the order, however, he prepared a Purchase Order, which
was again approved by the chain of command.
Both the vendor and the company understood that the Purchase Order is a
legally binding contract. The vendor is obligated to supply the item as ordered,
and the company is obligated to pay the amount stated. The Purchase Order
SHOP OPERATIONS
TotalFBO® User Guide | 345
PURCHASE ORDER BENEFITS
TO CASH FLOW
P.O.
Correct Cost
+ Freight
Vendor
Vendor bills
as expected
Receive
Shipment
Correct Cost
& Price Flow
to Shop Order
and Payables
Accts
Payable
Invoice
Pay Vendor
On Time
Close Shop
Order
On Time
Collect Customer's
Payment
When the Customer receives
his bill promptly at the end of the
job, you receive his payment faster!
Checking
Account
also includes agreements regarding the type of delivery method, and the
location where the buyer will take delivery.
Unfortunately, many companies and employees today have gotten rushed into
bad habits. Orders are made verbally, with no firm understanding of the price
or freight charges. Sometimes employees even “make up” a Purchase Order
Number just to have something to tell the vendor, and getting an approval just
doesn’t happen.
346 | TotalFBO® User Guide
If several managers must
authorize a purchase order,
save it as a PDF file and
email it.
See Helpscreen topic:
Emailing from
TotalFBO®
Purchase Order
Life-Cycle
SHOP OPERATIONS
As a result, management has no control over costs. Employees can easily
purchase the wrong item, or even make personal purchases. Because the price
is not set, it’s difficult to establish the correct price for the customer – so the
shop order can’t be closed on time. And the Payables Clerk and Inventory
Clerk are tied up in endless paperwork battles. With costs out of control and
cash flow slowed up, the business is in for a tough time.
In some FBOs managers have attempted to apply some controls to the situation
by requiring that nothing can be paid without a Purchase Order that perfectly
matches the vendor’s invoice. But this can backfire, as employees learn that
they need only continue their current practices, but create a Purchase Order
“after the fact.” Actually, the only way that every Purchase Order will match
to the penny is to fake them in later, since there will often be slight variances in
freight, taxes, discounts, and the like. The situation only worsens, as vendors
see that payments are slow in coming, and so the costs continue to rise and the
service declines.
If your FBO is small, so that the chain of command is very short, requiring
Purchase Orders may be of little benefit. In that case, simply begin your
Inventory Workflow at the Receive New Shipment screen. As long as you
correctly enter the costs at this point, there will be no problems posed by this
procedure.
If you have a larger organization, using the Purchase Order function in
TotalFBO® can provide many benefits, while still being flexible enough to
enable you to respond quickly.
Open
THE PURCHASE ORDER LIFE-CYCLE
There are 3 stages in the life of any Purchase Order:
1. Open
2. Finalized
3. Completed
When you Insert a new Purchase Order at Inventory> Update Purchase Orders,
the status of the P.O. is “Open.” At this stage, you may save and change your
work as often as you like until the order is complete.
Finalized
Complete
As items are added, you’ll be able to SIDESTEP to create new inventory
records as needed. Each record will be marked “On Order.” If you attempt to
order the same item before it’s been received, you’ll be warned (unless you’ve
disabled this option), and your On Order/Backorder report will help you track
the process.
Each time you OK the Purchase Order window, you’ll be asked if you’re ready
to “Finalize.” You must Finalize at some point in order to begin Receiving
against the Purchase Order. However, after Finalizing, changes to the Purchase
SHOP OPERATIONS
TotalFBO® User Guide | 347
Order are very limited.
Many Inventory Clerks have found that it works best to create the Purchase
Order with everything except for final costs and print it out before calling the
vendor to place the order. At the conclusion of the call it’s easy to jot down
the final costs on the printout. After hanging up, they can quickly enter these
figures to the Purchase Order and Finalize it.
As you receive the items you ordered and enter them on the Receive New
Shipments screen, TotalFBO® checks each item off against the Purchase
Order and changes the notation on each part record from “On Order” to
“Received.” When all items on a Purchase Order have been received, the
Purchase order is changed to a “Completed” status.
If an item is discontinued so that it will never be received, it will be necessary
to “Force-Complete” the Purchase Order after everything else has been
received. Do this by clicking the button on the Purchase Order Browse
window.
RECEIVING NEW SHIPMENTS
Once a Purchase Order has been Finalized, you’re ready to proceed to the next
step as soon as the order arrives. This is done at Inventory> Receive Shipments.
Simply click the Receive New Shipments button, enter the correct date, and
select the Purchase Order number. Instantly the entire window is completed
for you.
At this point you should review each detail line and verify or update the
following information:
• Cost
• Quantity Received – If short or back-ordered, enter expected date
• Update Freight Costs – Enter estimate, if necessary
• Unit Identifiers:
Regular Parts – Enter Batch or Lot ID from packaging
Serialized Parts – Enter Serial Number
• Update Inventory Pricing – apply Matrix or enter Retail price
See Helpscreen topic:
When you’re ready to OK the window, decide what actions the program
should take for you automatically:
Print Summary? – Checking this box produces a report of what you
have received. This printout is usually matched with the packing slips and
forwarded to the Payables Clerk.
Print Labels? – This will print a label for each item in the shipment. You’ll
be able to select the format and print location, if some labels have already been
removed from the sheet.
Receiving Shipments
348 | TotalFBO® User Guide
SHOP OPERATIONS
Vendor Invoice? – Your Accounting Department staff may set an
Inventory Option which forces the creation of the Accounts Payable Invoice
automatically, but places it on Hold status. This guarantees that the accounting
records will always match your inventory records, and is highly recommended.
Although the actual vendor invoice may not be in hand at this point, the
information should be accurate if you’ve correctly entered the costs in the
receiving window.
When the vendor’s invoice is received, the Payables Clerk can easily match it
to the Packing Slip and Shipments Received Summary report. Then it’s quick
work to take the Invoice off of Hold status, update the Invoice Number if
necessary, and verify the dollar amounts.
Note: Minor adjustments for freight charges can be made to the invoice, but
changes to the cost of the part, must also be made to the inventory records and
Shop Order.
When Returning Stock, do not
change the Unit Cost which is
displayed, unless directed to
do so by Tech Support.
Returning Stock
The Return Stock function at Inventory> Return Stock is used to actually send
an item back to the vendor, such as when the wrong part was ordered. You’ll
be able to select the item to return and generate both a Packing Slip and a
Credit Memo.
But it’s also the best way to correct any errors which were made in Receiving
New Shipments (wrong cost, wrong quantity, wrong Shop Order, etc.).
When you must correct the cost for a part which was received and posted to an
open Shop Order automatically, the sequence you use to accomplish making
the adjustments, is important:
1.
2.
3.
4.
5.
6.
First delete the item from the Shop Order.
Then use the Return Stock Function to remove it from your Inventory
at the old (incorrect) cost.
This should generate a Payable Credit Memo, reversing the incorrect
amount from your accounting records.
Now Receive the item again at the correct cost.
This should generate a corrected Payables Invoice.
The Payables Clerk can apply the Credit Memo and new Invoice to
the original Invoice (or delete the two adjustments and correct the
original).
SHOP OPERATIONS
TotalFBO® User Guide | 349
INVENTORY WORKFLOW
Create
Purchase
Order
Receiving new items updates
Inventory. Accounting Records
are updated through the Accounts
Payable Invoice, which may be
generated automatically.
Accts
Payable
Invoice
Receive New
Shipment
Items
in Stock
Return
Stock
Removing items is
done by Returning Stock
or through Sales.
Customer
Invoice or
Shop Order
Unexplained
Loss
Regular Physical
Inventories
Physical
keep counts
Inventory
accurate and Adjustments
minimize
adjustments.
GENERAL
LEDGER
ACCOUNTING
RECORDS
Inventory Owned
Sales Income
Cost of Sales
Core Charges
Freight
Lost Parts
350 | TotalFBO® User Guide
See Helpscreen topic:
Taking a Physical
Inventory
SHOP OPERATIONS
PHYSICAL INVENTORY
Physically counting each item in stock can be a major headache. It always has
to be done each year – and usually that means your most trusted employees
work long hours between Christmas and New Year to make the count and get it
entered into the computer before too many sales occur. When sales do occur,
someone always has to adjust the count again. Everyone’s grumbling, and
management is never really sure if the counts are accurate.
Fortunately, TotalFBO® uses the Perpetual Inventory method of tracking
inventory. That’s an accounting term that simply means everything is updated
continually and the counts are keyed off of a date.
What that means to you is that you’re now free to take a physical count any
time – no more waiting until the end of the year and losing your holidays!
See Helpscreen topic:
Using Barcodes
And you no longer have to rush to enter the counts before the next sale because
TotalFBO® applies updates using the date counted and considering any
activity since that time.
As organizations and their inventories grow, at some point it becomes
impossible to take a count of every item all at one time. So accepted
accounting guidelines allow you to count inventories in smaller sections
throughout the year. The requirement is that you must establish a written plan
that shows when each sectopm will be counted so that the entire inventory will
be counted at least once a year. Then you must follow your plan and document
that you followed it.
If you’re using Bin Locations in your Inventory records in TotalFBO®, you
Got a Wireless Network? Use can easily design a schedule that shows what bins will be counted and when.
Mobile Agent and a Bar-Code The schedule is up to you – monthly, weekly, or even daily. The more the task
Scanner to take counts fast!
becomes a standard part of someone’s job, the easier it is to do!
See Helpscreen topic:
Mobile Agent
Processing
As counts are updated, the Adjustments Made report and the resulting
accounting Journal Entry will provide the documentation you need to show
that you followed the plan.
At audit time, your accountant will be happy to review your documentation
and make just a few sample tests to verify accuracy. You’ll save money on the
cost of the audit.
In addition, you’ll know that your Inventory counts and values are more
accurate all year-long. When adjustments are made, they’ll be in smaller
amounts and will be applied throughout the year instead of all at once at yearend.
TotalFBO® User Guide | 351
SHOP OPERATIONS
PHYSICAL INVENTORY
ESTABLISH A PLAN
FOR COUNTING
IN SECTIONS
ON A SCHEDULE
Following your written plan,
count small sections of your
inventory throughout the year.
Must be written
Compliance must be
documented
GENERAL LEDGER
Inventory Assets
Lost Parts Expense
JANUARY - SECTION A
Physical Inventory
Worksheet
Count items.
Initial and note
Date Counted
on each Worksheet
No need to rush entering
Updates since adjustments
are applied using the
Count Date.
Update
Physical
Inventory
Adjustments Made
Qty in Stock on Count Date:
10
Qty Received since Count Date: + 5
Qty Sold since Count Date:
-2
Current Quantity Today:
Quantity in
Stock Adjusted
And, almost magically, as employees throughout the company see the accuracy
of the Inventory improve, attitudes and efforts will improve, too. You’ll find
fewer corrections will need to be made as transactions are posted accurately
every day.
13
352 | TotalFBO® User Guide
SHOP OPERATIONS
OTHER INVENTORY FUNCTIONS & CONCEPTS
While we’ve covered the basics of your daily workflow, there are a number of
other areas we’d like to mention.
Lot Tracing
If you’re servicing Part 121 carriers, FAA regulations are more stringent
regarding traceability of parts. Not only do you have to be able to prove the
history of serialized parts, but regular parts, too.
While the major airlines have spent millions meeting this requirement, you’ll
be able to handle it automatically with TotalFBO®. All you have to do is
check the box that says “Enforce Batch Tracking Logic for this Part?”
Note: You can turn check the box automatically for all new parts with an
Inventory Option.
As you receive each shipment, be sure to enter the vendor’s batch or lot
identifiers. If a large order includes more than one lot for the same part, simply
split the receiving details into two or more lines so that each lot can be added
separately.
Now the magic happens when you sell an item. If there’s only one lot with
remaining quantity in stock, you’ll notice no difference. But if there is more
than one lot, you’ll be asked to select the lot you’re issuing the part from.
Merge Two Parts
There will be times when you create two part records for the same item, such
as when you stock cases of oil in the shop and also in the line shack. If the
time comes when you decide to store all that oil in a single location, you’ll
want to reflect that change in your Inventory records by merging.
See Helpscreen topic:
The merge function at Inventory> Other Parts Operations> Merge Two Parts
Records allows you to select the two records and merge one into the other. At
the conclusion of the process, the empty record is deleted.
Purge Inactive Parts
Regular Parts
This function helps you delete old inventory records which are no longer
needed. That means there’s no quantity in stock, it’s not on order, it’s not a
Client Unit, it hasn’t had any activity in a long period of time, and we wouldn’t
need to have access to it for printing an old Shop Order.
In practical terms, this is best done after your Accounting Department staff
has completed an archive, which is done no more often than once a year.
Archiving removes closed Purchase Orders, Shop Orders, Invoices, etc., so that
Purging can be effective.
SHOP OPERATIONS
Kits
Kits offer a fast way to manage groups of parts you use repeatedly for common
tasks. You’ll be able to define a kit and select parts from your inventory to
make it up.
For instance, if you do a lot of maintenance for a Flight School, you’ll be
using the same set of parts every time you perform a 100-hour inspection.
When you’re building the Shop Order simply select the kit instead of entering
individual parts. The items in the kit can be printed or not, and the price for
the kit can be any amount, even if it doesn’t total what you’d charge for the
individual items.
TotalFBO® User Guide | 353
See Helpscreen topic:
Kits
More about Serialized Parts
Whereas a Regular Part can have any number as a quantity, Serialized Parts
will always have a quantity of +1, 0, or -1. Thus, it makes more sense to
identify the current status of a Serialized Part – who owns it and where is it
now? The status options available in TotalFBO® are:
Equivalent to Zero:
• Just Entered – the record has been entered, but not yet received or
sold. This is the status assigned when a part record is added while
creating a Purchase Order for stock items.
• Client Unit – we don’t own the part, but the record is in our
Inventory database for tracking purposes (selected manually, added
as a Rework Part from a Shop Order, or from the Aircraft Equipment
List).
• Sold – the part has been received and sold on a shop order or
invoice.
• Sold-Installed – the part has been received and sold on a shop order
on which an aircraft has been selected.
Equivalent to -1:
• Pre-Sold – the part has been sold on a shop order or invoice, but has
not yet been received.
• Pre-Sold-Installed – the part has been sold on a shop order on
which an aircraft has been selected, but has not yet been received.
Equivalent to 1:
• In Stock – the part is in stock and available.
• Out for Rework – the part has been sent to a vendor for repair using
a Purchase Order.
• Loan – the part is counted in our inventory, but is temporarily on
loan to another company or individual (requires manual selection)
• Loan-Installed – the part is counted in our inventory, but is
temporarily installed on an aircraft as a loaner unit. (requires manual
selection)
See Helpscreen topic:
Serialized Parts
354 | TotalFBO® User Guide
SHOP OPERATIONS
Loaning or Renting Parts
When you loan or rent an item to someone you retain ownership, though
temporarily it is not in your possession. But as long as you own it, the part
shows as “in stock” in your inventory. Because it would be easy to lose track
of these items, TotalFBO® enables you to change their status so you can
monitor them more easily.
When an item is loaned or rented to another company, you’ll take two steps:
1.
2.
Change the status of the part to Loan, making a note of the
arrangement in the part record.
Create an invoice for the rental, using a Service Line to your Rental
Fees Income account.
When an item is loaned to a customer and you install it on their aircraft, you’ll
take these two steps:
1.
Change the status of the part to Loan-Installed, noting the
arrangement along with the tail number and Shop Order number on
the part record.
2. Create Miscellaneous Parts line on the Shop Order detailing the item
and your charge for rental (if any).
When the part is returned, simply change the status back to In Stock.
See Helpscreen topic:
MANAGING AIRCRAFT RECORDS
In the discussion of Shop Orders, we briefly mentioned adding or selecting
an aircraft record. Now we want to take a closer look at this section of your
database.
Aircraft Records
Information from the Aircraft Record is used throughout the program for much
more than aircraft maintenance considerations:
Shop Orders
• Serial number and configuration data flow to the Shop Order.
Customer Accounts
• Selecting the tail number identifies the Owner and helps select the
correct customer when creating new Shop Orders or Invoices.
Rental & Charter Invoices
• Current Hobbs and Tach times are provided to the Invoice and
updated times are returned to the Aircraft Record
• The aircraft record supplies the price information for rental flights.
TotalFBO® User Guide | 355
SHOP OPERATIONS
AIRCRAFT RECORDS SERVE MANY NEEDS
Invoices
Current Meters
Rental Pricing
Fuel Logging
Accounting
Owner Billing &
Aircraft
Profitability
Flight Dispatch
Maintenance Needed
Pilot Requirements
Wt & Balance Config.
Customer
Aircraft
Ownership
Required
Maintenance
Warnings
Shop Order
Charter Quote
Serial Numbers
& Configuration
Pilot Record
Flight Currency
in Type
Fuel & Oil Invoices
• When fuel or oil is dispensed into an aircraft in your database, a
Consumption Record is made.
Flight Dispatch
• The Dispatch process looks at required maintenance items and
component life-cycles to determine whether maintenance is required
before the flight is expected to return.
• The aircraft record also determines what pilot qualifications will be
required.
• Weight and Balance information as well as the C/G Loading
Configuration is used to prepare a Weight & Balance report for
charter flights.
Performance
& Pricing
356 | TotalFBO® User Guide
Be alert when deleting,
changing or renaming an
aircraft, because it may
affect many others in your
company!
SHOP OPERATIONS
• Pilot squawks recorded at check-in flow to the aircraft record.
Charter Quotes
• Charter pricing by hour and distance and for special charges flows to
the quote.
• Aircraft performance data is used in calculating leg lengths and times.
Accounting
• Aircraft data is used in creating owner leaseback and profit & loss
reports.
• Aircraft cost information is used in setting prices
Maintenance
• Scheduled maintenance reminders and component life-cycle
information is used to warn of required maintenance.
• Pilot squawks alert staff to unscheduled items.
• Aircraft logbook entries provide required documentation and update
maintenance reminder next-due times.
SECTIONS OF THE AIRCRAFT RECORD
Obviously, with so many functions and uses, there’s a lot of information
attached to the aircraft record. To make it easier for you to work with, it’s all
arranged behind tabs and buttons that separate it into logical areas.
The Helpscreens within the program will give you details on each field and
function, organized according to the area of the program which is using the
information. Thus, the Charter Setup topic discusses how to enter pricing and
performance data.
AIRCRAFT TYPES!
When I get done with
the C-172RG...!
In this Shop Operations section, we’ll focus on those sections that relate to
maintenance functions.
GENERAL DESCRIPTION
The basics of Tail Number, Model, etc., are used in preparing the FAA 337
form, so they should conform to your registration.
Aircraft Type
You may create your own designations for the Aircraft Type field. Keep in
mind that there’s likely to be a bit of a tug-of-war here between Mechanics and
Pilots, as both groups depend on the same data for different purposes.
I'm
flying the
Cutlass today...
•
Mechanics will be able to create default maintenance reminders for
each aircraft type they define. This will save a lot of time as each new
aircraft is added to the database, since the entire list of reminders can
be imported from the default for that type.
•
Each time a rental or charter pilot flies the aircraft, a record is added
to his pilot record indicating the type of aircraft flown on that date.
These records are important in determining currency.
SHOP OPERATIONS
TotalFBO® User Guide | 357
SECTIONS OF THE AIRCRAFT RECORD
Weight & Balance
Details
C/G Loading
Configuration
Pilot Ratings
Requirements
Engine/Prop/Time
Data
Rental Aircraft
Pricing
Components Installed
& Life Cycles
Charter Aircraft
Pricing
Scheduled
Maintenance
Requirements
Charter Aircraft
Flight Performance
Pilot Squawks
Owner(s)
Leaseback Report
Configuration
Fuel & Oil
Consumption
Logs
Most FBOs find they can meet the needs of both groups by planning how types
will be named (Cessna 172, C-172, Skyhawk).
Mechanics can often define additional “sub-types” which will be used only
for setting up default maintenance reminders. When you’re importing from
defaults, the information can replace or add to any that is already established
on the aircraft record. Thus you can define a basic set of defaults and add
additional information to handle minor differences in models and years of
manufacture.
358 | TotalFBO® User Guide
SHOP OPERATIONS
Classification
Aircraft are assigned to one of 4 basic classifications:
• Company
• Based
• Transient
• Military
Over time, you’ll likely accumulate quite a few aircraft records, many of them
the result of a single shop order for a customer who never returned. These
classifications help you limit screens and reports to your own aircraft or those
belonging to good customers.
When you check the appropriate fields on Tabs 2, 3 & 5, company aircraft are
further defined as:
• Charter
• Rental
• Leaseback
Maintenance Phases
You may choose whether maintenance must be performed on a 100-hr.
schedule, or according to manufacturer-defined phases. You can define up to
99 phases and name them appropriately.
When you set up your list of maintenance reminders, you’ll set up one for each
phase and assign it to the appropriate time or date cycle. Then the individual
tasks you define can be attached to one or more phases.
See Helpscreen topic:
Engine/Prop/Time
Data
Base Maintenance Reminders
on Total Time rather than
an instrument for long-term
consistency.
Engine/Prop/Time Data
After entering the basic identifying info on an aircraft, the next set of
information you’ll enter will be the configuration and serial numbers. Notice
that as you make certain choices (such as the number of engines), the screens
will configure themselves automatically, opening and closing fields as
necessary.
This information is not only used for scheduled maintenance warnings, but it
flows to the Shop Order when a tail number is selected. Entering these details
first will save many keystrokes later.
Be careful to enter the Total Time Offset and Tach readings correctly, so that
TotalFBO® can continue to track the Total Time on the aircraft indefinitely,
even if a Tach is replaced. When an instrument is replaced, enter an amount
to the Total Time Offset field so that amount plus the current Tach reading will
equal the Total Time on the aircraft.
SHOP OPERATIONS
TotalFBO® User Guide | 359
TotalFBO® will calculate the next due time for each reminder, so avoid doing
all or part of this calculation yourself when entering engine, prop and hot
section times. See the chart for an easy form to follow.
ENTERING MAINTENANCE TIMES
ENGINE
Time on
engine when
last overhauled
PROP
Time on
prop when
last overhauled
HOT SECTION
Time on
HS when
last overhauled
CYCLES
Number of cycles
when last
overhauled
ENGINE
PROP
HOT SECTION
CYCLES
Time between
required overhauls
Time between
required overhauls
Time between
required overhauls
Cycles between
required overhauls
TotalFBO
TotalFBO
TotalFBO
TotalFBO
Next
Overhaul
Due Time
Next
Overhaul
Due Time
Next
Overhaul
Due Time
Next
Overhaul
Due Time
CALCULATES
CALCULATES
CALCULATES
CALCULATES
PROP
HOT SECTION
CYCLES
ENGINE
Total time on
the engine now
Total time on
the pop now
Total time on
the HS now
Total cycles now
TotalFBO
TotalFBO
TotalFBO
TotalFBO
Time Until
Next
Overhaul
Time Until
Next
Overhaul
Time Until
Next
Overhaul
Time Until
Next
Overhaul
CALCULATES
CALCULATES
CALCULATES
CALCULATES
360 | TotalFBO® User Guide
See Helpscreen topics:
Maintenance Reminders
and
Components
SHOP OPERATIONS
Maintenance Reminders & Components
These two data areas are similar in that you will be creating a list of those
things that need to be regularly inspected and serviced, based on a variety of
triggers. These include the full list of dates, times, cycles, and just because the
FAA said to!
You can set up a list of defaults when you create an Aircraft Type designation.
Then you can import that list for each new aircraft, adding to or replacing any
information already on the aircraft.
Components can also be entered from Inventory> Avionics> Update Aircraft
Equipment List. When you put a serialized part on a Shop Order (assuming
you have selected an aircraft in your database) the item is also added as a
component. Any life-cycle information already on the part record is passed
along as well.
Components can be added to the list which were not sold through your
Inventory. These will be added as Client Units.
Maintaining the Aircraft Equipment List enables you to track required
maintenance in greater detail.
See Helpscreen topic:
In addition, the Parts Needing Work report alerts you to those items in your
database (including installed components and Client Units) which need work
pursuant to a newly issued Service Bulletin.
UPDATING AIRCRAFT INFORMATION
Service Bulletins
Once you’ve entered all the required information, you’ll have little need to
make changes to your maintenance reminders except when new ones are
required.
Instead, you’ll find that normal transactions keep most information updated
automatically in TotalFBO®.
•
As Rental and Charter flights occur and are Dispatched or Invoiced,
the Hobbs, Tach, and Cycles are updated immediately. Note that the
Tach is updated by a ratio to the Hobbs if a specific Tach entry is not
made, as is Canadian Air Time.
•
Components are added through the Shop Order.
•
Fuel and Oil Consumption Logs are added through Invoices, Shop
Orders, Off-site Fuel Credits, and Vendor Invoices for Charter fuel
purchases.
SHOP OPERATIONS
•
Weight and Balance entries are added for new components sold
through the Shop Order.
•
Maintenance Reminder Times are updated through Maintenance Log
entries.
You can manually correct information such as instrument times and cycles
either directly within the aircraft record itself, or from separate menu functions
which provide access to needed fields without exposing the entire aircraft
record to every employee.
THE MAINTENANCE CYCLE
The Aircraft Record has little value in and of itself. Its purpose and power
is in its ability to help you avoid violations of FAA regulations, both in
dispatching flights and in performing required maintenance.
Determine Required Maintenance
When a new customer arrives for an annual inspection, it’s usually quite a
chore to determine what is required. Typically someone must search through
the logbook in an effort to learn what has been done in the past, compare
that to known requirements from the manufacturer, research Airworthiness
Directives and Service Bulletins, and finally put together a list of inspections
and maintenance tasks.
Depending on your competitive environment, you may be able to charge for
this effort and you may not. One way to approach the task is to use the power
of the computer to help you.
Begin by creating the aircraft record and importing the list of required
maintenance items from your default lists. Enter any applicable ADs to
TotalFBO® and make sure there is a related maintenance item. Finally, enter
current times and cycles and general configuration information.
Now you can turn your attention to the aircraft logbooks. Instead of hunting
for individual items, simply begin entering the log items to TotalFBO® as
Maintenance Logs. Along the way you’ll probably have to spend a little time
with the calculator, deciphering the time notations previous mechanics have
used.
When you’re done, it will probably have taken you the same or less time than
it would have taken you to search the logs and develop a manual list. But now
you have several big advantages.
It’s easy now to generate a complete list of required maintenance items using
the Maintenance Warning Report.
TotalFBO® User Guide | 361
362 | TotalFBO® User Guide
SHOP OPERATIONS
AIRCRAFT MAINTENANCE CYCLE
Create New
Aircraft Record
Customer Delivers Aircraft
Aircraft
Applicable
ADs
Required
Maintenance
Items
Review logbooks &
enter selected
Maintenance Logs
Print report of
what remains to
be done now
Complete needed
maintenance
Prepare
FAA 337
FAA 337
Maintenance
Warning Report
As Times and Cycles
are Updated, (manually
or from Invoices) the
Maintenance Cycle
repeats itself.
Create Shop
Order
Prepare
Wt & Bal
Report
Prepare
Maintenance
Logs
Weight &
Balance Report
Labels
Labels
SHOP OPERATIONS
TotalFBO® User Guide | 363
And at the conclusion of the job, producing logbook entries on labels will be a
snap.
The most important advantage is that YOU’LL NEVER HAVE TO DO IT
AGAIN FOR THIS AIRCRAFT. The next time the customer brings you
his plane, you need only update the current times and cycles, check for new
requirements, and generate the Warning Report.
You might have an easier time of convincing the customer to pay you for the
effort, too, since his logbook is now completely backed up on the computer
– and can be regenerated at any time if necessary.
This is a good way to get
- and keep repeat business.
Do the Work
The mechanics can now get to work, and they’ll begin by creating new
Discrepancies on the Shop Order. As inspections are completed, additional
Discrepancies will be added to handle problems identified. When all the items
have been inspected and approved, the job is ready to close.
Finish the Paperwork
When the work is done, you’ll use the information in the Shop Order to
quickly generate both the FAA 337 and the Maintenance Logs.
As the logs are created, appropriately-sized labels are printed and the
information updates the next-due times for the maintenance items which were
completed.
You’ll also be able to print a new Weight and Balance report, if needed,
complete with logbook-style signoff area.
Restart the Cycle
Let your customer know that you’ll be sending him copies of the Maintenance
Warning Report from time to time. In fact, if he’ll agree to keep you updated
on times and cycles, you’ll be happy to remind him of upcoming maintenance
monthly or more often, depending on the kind of flying the aircraft does.
The Maintenance Warning Report can be printed with the Customer’s
information at the top for easy mailing – and it can even be emailed directly
from TotalFBO®. It’s a good way to build repeat business for little additional
effort.
Schedule Upcoming Maintenance
There’s a complete Scheduling module built in to TotalFBO® at Operations>
Scheduling. You’ll probably find that all your own aircraft have already been
set up on the schedule so that Flight School Rentals and Charter Flights can be
managed.
See Helpscreen topics:
Preparing the FAA 337,
Maintenance Logs,
and Weight and Balance
364 | TotalFBO® User Guide
SHOP OPERATIONS
When the Maintenance Warning Report or Due-Time Summary alerts you to
upcoming required maintenance, why not access the Schedule module and
mark the aircraft off for maintenance?
Sharing the schedule in this manner can go a long way toward reducing
overtime and improving your relationship with the Flight School and Charter
Department staff. These folks are, after all, charged with the responsibility
for making money by keeping those planes in the air as much as possible.
But the Maintenance Department is charged with the responsibility of insuring
there are no maintenance infractions – then nobody flies!
These two seemingly opposite goals must be brought into harmony for the
health of the company. If not, we often see either angry customers (lost
business) or maintenance performed on overtime (increased costs).
Using the schedule together alerts everyone to the need for maintenance in
time to adjust flight schedules smoothly.
Reports
An ever-growing array of reports awaits you at Operations> Aircraft> Reports
and Listings. You’ll want to check them out at your leisure, and here’s a few to
get you started…
PTT ?
Squawk
Squawk
Squawk
• Aircraft Squawks Report
If your company flies aircraft for charter or rental, pilots will be able to report
maintenance items during the Flight Dispatch check-in process. Depending
upon option settings, EVERY squawk can ground the aircraft, or the employee
can make that decision.
At least daily you’ll want to run this report to see what squawks have been
reported. Within the aircraft record you can change the “Bad Enough To
Ground?” setting and enter notes in response to the report.
• Due-Times Summary
Many local FSDOs have approved posting the Due-Times Summary report in
lieu of manually updating a large whiteboard with maintenance alerts for each
aircraft.
The layout of the report is similar to the typical whiteboard, with rows for
aircraft tail numbers and columns for the next-due times on major maintenance
items. There are even columns for Squawks and ANY maintenance item.
• Maintenance Warning Report
This report recaps all the current times and cycles information on the aircraft
and details the required maintenance items. Although you can include all
SHOP OPERATIONS
TotalFBO® User Guide | 365
items, this report is most often limited to the upcoming month or quarter. You
may include a single aircraft or various groupings.
• Aircraft Detailed Listing
Quite simply, this is everything related to an aircraft, including all maintenance
logs.
TOOL CALIBRATION & GROUND SERVICE
EQUIPMENT MAINTENANCE
See Helpscreen topic:
Both the Maintenance and Line departments have tools that require calibration
and equipment that needs regular maintenance.
You’ll be able to create categories, called Master Types, for the equipment and
tools you wish to track and then insert records for each piece of equipment at
Operations>Ground Equipment> Update Ground Equipment.
As you create each record, also create reminders for the various kinds of
maintenance which must be performed.
Then you can run the Maintenance Warning Report from the Ground
Equipment module to help organize your maintenance schedule.
When required maintenance is completed, log it at Operations> Ground
Equipment> Update Maintenance Performed. When the log is saved, the nextdue time for that item is rolled forward appropriately.
Ground Equipment Setup
366 | TotalFBO® User Guide
SHOP OPERATIONS
TotalFBO® User Guide | 367
MANAGEMENT
CONTROLS
Included in this section:
•
•
•
•
•
Security
Monitoring Database Activity
Standard Reports
Margins
Marketing
This section will give you a
good idea of the WHAT, WHY,
and WHEN of Management
and Security procedures.
This User Guide provides a great deal of useful information and TotalFBO®
itself offers a tremendous array of features and capabilities. But these are only
For more details on individual
tools which YOU can use to support the every day tasks of your business.
screens and fields, refer
to the Helpscreens in the
The modern manager is more like an orchestra conductor than a monarch. You
program.
cannot possibly complete all the work yourself, and so your job becomes one
of organizing, coaching, and coaxing the best possible performance from your
Helpful references to specific
staff members.
topics are available throughout
this Guide.
TotalFBO® uses the power of integration to help you bring all the various
departments and processes within your company into one focused unit. When
See Helpscreen topics
data developed in one department is instantly available to users in another
department, you’ll stop spending time re-entering information and proceed
directly to the next task.
When each department is using its own software and a collection of
spreadsheets to manage information, you’ll find that staffers spend a lot of
time reconciling data from multiple sources. And you’ll always be waiting for
someone to finish catching up with data entry before you can run a financial
statement or needed management report.
With TotalFBO® in place you have a strong audit trail. You can trust the
numbers you see on reports and statements. And you can manage the business
instead of the system.
This section will help you know what reports to run to answer specific
questions and to monitor activity. We’ll spend some time covering security
and think about marketing efforts, as well.
for more details
368 | TotalFBO® User Guide
MANAGEMENT CONTROLS
Security
Because your data is so vital to the health of your business, protecting it from
deliberate or inadvertent damage is critical. The best security comes in layers,
beginning with physical access to your computers.
Physical Access
The first consideration is often the one we’re most blind to. Larger
organizations routinely place their network servers in locked rooms. But small
and mid-sized companies may not have a separate room for the server at all. If
you have a small peer-to-peer network, the server may even be a workstation at
someone’s desk.
Any computer with a connection to your network is a potential avenue of
access to your data. Be sure that you’re following good physical security
procedures with basic locks on office doors. Train your employees to avoid
allowing customers or delivery personnel into office areas where computers are
available.
When a staff member is away from their usual station temporarily, it’s easy
for anyone to use their computer – and receive the same level of access as
the employee. While 3rd party screen savers are not a good idea, using the
screensaver within Windows with the password function is a good choice.
After a few minutes of inactivity, the screen is covered and access to the
computer can only be regained by entering a password.
Don’t set up computers in customer lounges, testing areas, or training centers
that also have access to your network. Your network consultant can show
you how to allow these machines to use your internet connection without
permitting access to your internal network.
If you have a computer in your Line Shack, be sure it is continuously
monitored, has extremely limited access, and is secure after hours.
Network Connection
Be sure that each user is required to log in to a computer workstation, and
don’t allow passwords to be blank or common among groups of employees.
If you have a network with a server that’s running Windows Server 2000 or
2003, or Small Business Server, be sure to set up a domain instead of creating a
workgroup. There are many security improvements in a domain environment,
and you’ll be able to manage user accounts centrally.
If you leave ANY of your computers running at night, be sure you have
installed a firewall, even if you think you’re too small and you only have an
old modem as a connection.
MANAGEMENT CONTROLS
TotalFBO® User Guide | 369
SECURING YOUR DATA
Avoid tears by insuring
that each layer is intact.
Physical Access
Network Connection
SQL Security
TotalFBO® User Id
Privilege Level/Modules
Menu Access
Field/Button Access
Most companies these days have access to the Internet continuously, and if
you do, hopefully you already have a firewall installed at the point where the
network connects to the outside world.
You can spend a lot of money on a firewall appliance, or re-use an old
computer with an inexpensive software firewall installation. Both options will
work equally well on the average network. Expect to spend up to $1,000 per
year for the subscription update service that keeps your firewall able to combat
the latest worms and intrusion methods.
370 | TotalFBO® User Guide
MANAGEMENT CONTROLS
If you’re using a Wireless Access Point on your network, be sure to change the
default passwords and require encryption. Anyone with a mobile phone can
gain access to your network if they try hard enough, so don’t make it easy.
SQL Security
Your data is under the control of the Microsoft SQL program, which handles
ALL direct access to the data and related files. This is so whether the access is
from a backup tape drive, TotalFBO®, or another program such as Excel.
Because SQL is a universal standard, you will be able to have more versatile
use of your data than ever before, but within the control limitation imposed by
SQL itself.
A master password for the SQL system administrator (“sa”) was established
when SQL was installed, and is required for certain database maintenance
operations your IT staff may undertake. However, it should not be easily
available to staff members, and it’s not needed for access to your TotalFBO®
databases after initial installation.
When your databases were created, an additional password was created for
daily access by the program.
The User Utilities program, which is used to perform some SQL operations
such as creating or restoring databases, has its own separate password to
further limit access to these functions. Be sure you set a secure password and
avoid sharing it with users within your organization.
User ID
When TotalFBO® was first installed, the default User ID and password were
both set to FBO. Be sure that you immediately establish your own User ID
and password, with master-level privileges. Then remove or severely limit the
default FBO user.
This is done at Utilities> Security> User Setup> Update Users.
See Helpscreen topic:
Security Setup
When you set up new users, be sure to create a default password for your
company and then set this as the password for each user account. Insist that
each user change the password to something only she will know immediately
upon accessing the program for the first time.
If a user forgets a password, simply reset it to the default and they’ll be able
to establish a private password again. In this way, ONLY the individual
employee will know the password, and you are protected from possible
allegations against you in the event of a problem down the road. In addition,
there won’t be any list of users and passwords for you to store or someone else
to find.
MANAGEMENT CONTROLS
TotalFBO® User Guide | 371
Once the Employee Records are set up in the Payroll module, be sure to return
to the User ID setup and link each User ID to the corresponding Employee
Record.
Also on the User ID record, you’ll be able to set options regarding whether and
how this employee can process credits for credit card charges.
If you are operating the Enterprise version (multiple locations), you should
also choose the location(s) this employee will be able to access.
If a disaster occurs and you need access to TotalFBO® but don’t have an
appropriate User ID, contact Tech Support. They can give you a temporary
password which is date-limited, however, the Support Specialist will only
provide this access to users whom you have registered with Horizon Business
Concepts in writing. As staff and management changes, be sure to keep this
list up to date.
Privilege Levels & Modules
As you establish each User ID, you’ll also assign a number from 1 to 99 as
a Privilege Level. The higher the number, the greater the access to program
functions.
However, this access is limited to those modules and major program sections
that you select by checking them off. In this way, you can have Master level
access to Shop Orders, say, but no access at all to Payroll.
Menu Access
It’s best to start with low privileges and add access as employees grow both
as a security consideration and as a training aid. When a user is blocked from
a menu function, it simply doesn’t appear on the program menu. Thus, a new
user is able to focus on locating and learning those functions he needs most,
and is less likely to be confused by functions he has no need of.
Field/Button Access
Each menu function, report, user account, general ledger account, plus many
additional fields and buttons have specific required privilege level defaults.
It’s a good idea to spend a little time getting to know these defaults before you
assign Privilege Levels to your users.
Appendix B of this User Guide provides a chart of this information, and you
can also print the report at Utilities> Reports and Listings> Menu Structure to
see what’s been setup for your own database.
See Appendix F for details
372 | TotalFBO® User Guide
MANAGEMENT CONTROLS
Adjusting Requirements for Access
TotalFBO® installs with a security structure of defaults already established for
you, so that you can begin using the program immediately. However, as you
begin to assign various functions to your own staff members, some “tweaking”
is usually necessary.
•
You can change a required privilege level for any menu function at
Utilities> Security> Menu Privileges.
•
Change requirements for individual fields, buttons, and reports at
Utilities> Security> Privilege Overrides.
Although the installed security structure uses “round number” levels of 10, 20,
30, and so on, actually ANY number from 1 through 99 is appropriate. This
gives you a lot of room to fine-tune your security structure.
For instance, let’s assume that you have assigned a level 10 to most of your
Front Counter staff, which is enough to create new invoices but not enough to
change invoices. During the day, you have a supervisor available to handle
corrections and changes, so everything works well for a while. But then you
begin to extend your hours during the summer, and your night CSR needs to be
able to change invoices because he’s working alone.
You could lower the requirement for changing an invoice to 10, but then all
your CSRs would have this ability.
You could raise the night CSR to a level 20, but that would also grant access to
other functions, such as closing a charge batch, that would be inappropriate.
The solution is to raise the night CSR to an intermediate level, such as 23. At
the same time, lower the requirement for changing invoices to 23.
This provides the access that’s needed without going too far.
MONITORING DATABASE ACTIVITY
Even when staff uses appropriate access to TotalFBO®, you’ll need to monitor
what’s being added to your database and insure that your policies are being
followed.
It’s easy for a busy CSR to decide to “take a shortcut” and just use the default
Cash Sale customer for transient sales, for example. But that will cost
your company the ability to market to that customer and perhaps develop a
profitable relationship.
Another common issue is creating duplicate customer accounts. TotalFBO®
makes it easy to avoid this problem by allowing you to search for customers
MANAGEMENT CONTROLS
TotalFBO® User Guide | 373
by several fields, and the best choice is the aircraft tail number (for fuel and
maintenance customers). For Charter and Flight School customers, you can
set their phone number as an account number, and achieve almost the same
level of reliable access.
By entering a tail number or phone number when beginning an invoice, your
CSR will be less likely to be affected by misspellings or the order the data is
displayed on her screen. You’ll also be able to benefit by the instantaneous
searching of the FAA database as well as your own customer records. Creating
a new account based on the FAA data is just a click for the CSR.
We also encourage you to make full use of the Cross Reference feature on
Customer Accounts:
•
When partners share ownership, enter each partner and the
partnership account, then cross-reference them together.
•
When a company is well-known by its initials or nickname (such as
Fedex for Federal Express Corporation) set up both accounts and
cross-reference the nickname to the correct name.
See Helpscreen topic:
•
When a company changes its name, make the change to the existing
account and then add the old name back as a new account with a
cross-reference. This will help employees locate the right account
while they’re learning the new name.
Company Policies for Good
Data
By simply looking at the Customer Browse screen at Accounting>
Receivables> Update Customers, you can learn a lot about how your front
counter is operating.
Use the New Customer Summary report in the Receivables module to review
new customer activity, and monitor the activity in the Cash account to see that
you’re making the most of your marketing opportunities.
In similar fashion, you’ll want to review the browse screens available in the
other modules of the program to see what new information is being entered
and whether it meets company standards.
374 | TotalFBO® User Guide
MANAGEMENT CONTROLS
Standard Reports
The busy manager needs to keep an eye on everything at once, and the Sales
Activity Report found in the Invoicing module helps keep you up to date. This
report is designed to be a daily recap of sales activity on a single page.
The other reports in the Invoicing module will give you the details to support
the summarized totals.
But there are hundreds of reports available to you. Which ones will you need?
The answer will depend, of course, on your business and your management
style. But the charts on the next pages will help you get started.
Being able to run your own reports at any time, rather than depending on a
staffer to provide you with figures, is a big advantage to having an integrated
system like TotalFBO®. Everything stays current at all times, unless an
employee fails to use the program, so there’s no delay in receiving the
information you need to make good decisions.
MANAGEMENT CONTROLS
REPORT FREQUENCY
TFBO MODULE
REPORT NAME
RECEIVABLES
Account Detail Display
As Needed
RECEIVABLES
Internal/Non-billing Summary
As Needed
GENERAL LEDGER
GL Account Detail
As Needed
INVOICING
Fuel Meter Justification
Daily
INVOICING
Sales Activity
Daily
INVOICING
Sales Receipts
Daily
INVOICING
Invoice/Shop Order Summary
Daily
INVOICING
Charge Batches
Daily
INVOICING
Un-Closed Charge Summary
Daily
INVOICING
Invoice Change History
Weekly
INVOICING
Pending Invoice Summary
Weekly
SHOP ORDERS
Billable Hours Report
Weekly
SHOP ORDERS
Labor Write-Off Analysis
Weekly
SHOP ORDERS
Open SO Summary
Weekly
INVENTORY
Inventory Received
Weekly
INVENTORY
Shipments-Received
Weekly
INVENTORY
Inventory Change List
Weekly
INVENTORY
Fuel/Oil Summary
Weekly
CONCIERGE
Pending - Summary
Weekly
RECEIVABLES
A/R Aging
Monthly
INVOICING
Fuel Discounts/Margins
Monthly
INVOICING
Fuel Sales by Price Class
Monthly
INVOICING
Fuel Sales
Monthly
INVOICING
Sales Unit-Totals
Monthly
INVOICING
Service Line Breakdown
Monthly
INVOICING
Sales Tax
Monthly
INVOICING
Fuel Sales Spreadsheet
Monthly
RECEIVABLES
Customer Statement
Monthly
RECEIVABLES
New Account Summary
Monthly
RECEIVABLES
Recurring Charge Summary
Monthly
TotalFBO® User Guide | 375
376 | TotalFBO® User Guide
MANAGEMENT CONTROLS
REPORT FREQUENCY
TFBO MODULE
REPORT NAME
GENERAL LEDGER
Balance Sheet
Monthly
GENERAL LEDGER
Standard Income Report
Monthly
GENERAL LEDGER
12-Month Income Report
Monthly
GENERAL LEDGER
Two-Year Income Report
Monthly
GENERAL LEDGER
One-Year Budget Performance
Monthly
GENERAL LEDGER
Two-Year Budget Performance
Monthly
SHOP ORDERS
Work-in-Process Breakdown
Monthly
SHOP ORDERS
Open SO Billings Report
Monthly
SHOP ORDERS
Open Inventory Summary
Monthly
SHOP ORDERS
Job Cost Analysis
Monthly
RECEIVABLES
Sales Profile
Quarterly
RECEIVABLES
Sales History
Quarterly
RECEIVABLES
Available Spaces Summary
Quarterly
RECEIVABLES
Rental Space Expirations
Quarterly
RECEIVABLES
Pricing Review
Annually
GENERAL LEDGER
One-Year Annual Budget
Annually
GENERAL LEDGER
One-Year Monthly Budget
Annually
MANAGEMENT CONTROLS
TotalFBO® User Guide | 377
MANAGEMENT DECISION-MAKING
CONCERNS:
MODULE
How should we negotiate a contract renewal?
REPORT NAME
RECEIVABLES
Sales Profile
RECEIVABLES
Sales History
RECEIVABLES
A/R Aging
What’s the margin on fuel sales?
INVOICING
Fuel Discounts/Margins
How many sales are being made at discount prices?
INVOICING
Fuel Sales by Price Class
Are we invoicing for all the fuel we pump?
INVOICING
Fuel Meter Justification
In general, what business did we do during the period?
INVOICING
Sales Activity
What were the details on fuel sales?
INVOICING
Fuel Sales
What were the details of services and other items?
INVOICING
Sales Unit-Totals
How much money did we take in yesterday?
INVOICING
Sales Receipts
INVOICING
Invoice/Shop Order Summary
INVOICING
Charge Batches
INVOICING
Un-Closed Charge Summary
Who paid their bills yesterday?
INVOICING
Invoice Change History
How was their check applied?
INVOICING
Invoice Change History
What invoices are pending customer information?
INVOICING
Pending Invoice Summary
How can I report Landing Fees owed to the airport?
INVOICING
Service Line Breakdown
How can I report on Sales Taxes owed?
INVOICING
Sales Tax
How can I report on Fuel Taxes owed?
INVOICING
Fuel Sales Spreadsheet
What services do customers use most from us?
What’s a customer’s buying pattern?
What’s our annual cash-flow cycle?
Who owes us money?
How long have they owed it?
Are the Chevron credit card payments being posted?
Did credit card items match the POS machine batch?
When was an invoice paid and how?
378 | TotalFBO® User Guide
MANAGEMENT CONTROLS
MANAGEMENT DECISION-MAKING
CONCERNS:
MODULE
REPORT NAME
What sales, payments, and adjustments are on a
customer’s account?
RECEIVABLES
Account Detail Display
What’s outstanding on a customer’s account?
RECEIVABLES
Customer Statement
What internal accounts have been set up for us?
RECEIVABLES
Internal/Non-billing Summary
What price classes have been assigned to customers?
RECEIVABLES
Pricing Review
What new customers were added recently?
RECEIVABLES
New Account Summary
What rental spaces are available and rented?
RECEIVABLES
Available Spaces Summary
RECEIVABLES
Rental Space Expirations
RECEIVABLES
Recurring Charge Summary
What recurring charges are being billed?
What’s our financial position?
What’s our profit and loss so far this year?
How does that break down for each of last 12 months?
How do we compare to last year?
GENERAL
LEDGER
GENERAL
LEDGER
GENERAL
LEDGER
GENERAL
LEDGER
Balance Sheet
Standard Income Report
12-Month Income Report
Two-Year Income Report
What makes up an account balance?
GENERAL
LEDGER
GENERAL
LEDGER
GENERAL
LEDGER
GENERAL
LEDGER
GENERAL
LEDGER
Are we billing for most of our mechanics’ time each
day?
SHOP ORDERS
Billable Hours Report
Are our mechanics productive?
SHOP ORDERS
Labor Write-Off Analysis
What’s our annual budget?
What’s our monthly budget?
How are we doing compared to the budget this year?
How are we doing compared to the budget for 2 years?
One-Year Annual Budget
One-Year Monthly Budget
One-Year Budget Performance
Two-Year Budget Performance
GL Account Detail
MANAGEMENT CONTROLS
TotalFBO® User Guide | 379
MANAGEMENT DECISION-MAKING
CONCERNS:
MODULE
How much shop work is yet unbilled?
REPORT NAME
SHOP ORDERS
Work-in-Process Breakdown
SHOP ORDERS
Open SO Billings Report
How much inventory is on unbilled jobs?
SHOP ORDERS
Open Inventory Summary
How’s the workflow in the shop?
SHOP ORDERS
Open Shop Order Summary
Did we make a profit on our shop jobs this period?
SHOP ORDERS
Job Cost Analysis
What shipments were received for an item this month?
INVENTORY
Inventory Received
What shipments were received this month, with costs?
INVENTORY
Shipments-Received
What happened to our inventory this month?
INVENTORY
Inventory Change List
What’s our fuel and oil inventory?
INVENTORY
Fuel/Oil Summary
Who do we owe money to?
PAYABLES
Vendor Aging Report
What are our cash flow needs for the next 30 days?
PAYABLES
Payments Due Report
What are our cash balances today?
CHECKING
Register Balances Report
Has our checking account been reconciled to the bank?
CHECKING
Register Reconciliation Report
What customer ramp service requests are unworked?
CONCIERGE
Pending - Summary
380 | TotalFBO® User Guide
MANAGEMENT CONTROLS
MARGINS
Knowing that you’re making profit before you send the invoice is critical to
company stability and growth.
Be sure you review the pricing setup information in this User Guide so that
you can control customer pricing by policy instead of by accident. An FBO
manager is often targeted by customers who will beg for special pricing
arrangements based on friendship rather than on business activity.
You may be able to avoid some of this pressure by simply saying, “I’d love to,
but this new computer system structures everything for us and I have to stay
with our policies.”
Be sure that any special price arrangements you do make are written and expire
at least once each year. You need the ability to renegotiate when the business
climate changes.
It’s also a good idea to tie all special fuel prices to your Retail price, and
limit yourself to just a few discount levels. This makes changing prices for
everyone a matter of adjusting a single price each week. And it prevents
revealing your cost to outsiders.
Stay on top of customers with the Top Sales Customers report. Then check out
their buying patterns with the Sales History report and the Sales Profile Report.
Use a matrix to price inventory. That way you’ll get the benefit of a structured
margin level but based on a sliding scale to make it workable.
Watch your Fuel Sales by Price-Class and Fuel Discounts/Margins reports in
the Invoicing module closely. They’ll help you identify what percentage of
your business is retail and how much is discounted. It’s easy to get “upsidedown” when almost every sale is discounted.
In the Shop, watch the Job Cost Analysis report and the Labor Write-Off
Analysis report. They’ll tell you where you’re making and losing money.
For Charter, insist that every trip be assigned to one of your defined Flight
Classes. You’ll be able to use the Charter Billing Summary and Charter Sales
report to see what segment of your business is growing.
The Leaseback/Profit and Loss report and Aircraft Activity Summary will
help you determine profitability by aircraft. Running these reports both
monthly and quarterly will help you spot trends in expenses, fuel consumption,
maintenance costs, and aircraft utilization. That’s invaluable when you’re
making decisions about pricing for Rental or Charter, as well as the
composition of your fleet.
MANAGEMENT CONTROLS
MARKETING
The marketing module provides a fast way for you to produce mass mailings
to customers.
TotalFBO® User Guide | 381
See Helpscreen topic:
Marketing Tools
Although an obvious use is to send collection letters to overdue accounts, you
can also send mailings to transients, those in specific zip codes, etc.
You’ll be able to create a letter or form, save it, and then merge the letter with
a list of customers you’ve selected based on the information in certain fields of
your database.
See Helpscreen topic:
In addition to the Marketing functions, keep in mind that you can also produce
mailing labels for customers, vendors, and employees from the Receivables,
Payables, and Payroll modules.
Label Formatting
382 | TotalFBO® User Guide
MANAGEMENT CONTROLS
TotalFBO® User Guide | 383
TROUBLESHOOTING &
DATABASE MAINTENANCE
Included in this section:
•
•
•
•
•
•
•
•
Making Backups
Restoring a Backup
Sending a Backup to Tech Support
Exporting Data & Custom Reports
Transaction Framing
Troubleshooting SQL Connectivity
Troubleshooting Online Credit Card Processing
Contacting Tech Support
TotalFBO® and your computer system are very powerful tools that enable
us to handle very complex tasks and large amounts of information with ease.
We’ve come to depend on them and when something doesn’t work properly,
it’s very frustrating.
But, like any other tool, they take a little maintenance and occasionally some
actual repairs to keep them functioning smoothly.
This section will give you the basics of what you can expect in the way of
typical maintenance and minor repairs. There’s also a good checklist for
verifying that all your connections are working properly.
We also encourage you to develop a close working relationship with a local
Network Consultant, who will be able to support you while keeping your
security concerns in mind.
This section will give you
a good idea of the WHAT,
WHY, and WHEN of Database
Maintenance procedures.
For more details on individual
screens and fields, refer
to the Helpscreens in the
program.
Helpful references to specific
topics are available throughout
this Guide.
See Helpscreen topics
for more details
384 | TotalFBO® User Guide
TROUBLESHOOTING & DATA MAINTENANCE
BACKUPS
A major advantage of using SQL to control access to your database is that
backups are easier – and they can be performed while users are still working
with the program, if necessary.
This is great news, because most of us don’t make backups often enough,
putting our data and our businesses in danger. It’s not a matter of whether or
not you’ll need your backup; that’s a guarantee. It’s just a matter of when!
Don’t assume that because your server has a “Mirror” you don’t need backups.
A mirror is simply a second drive where the data is written a second time
simultaneously. That means any errors that are written to one drive can be
written to both drives! You’ll have no recourse if you don’t have a backup
from a prior point in time to work from.
Tape Backups
Your Network Consultant may have installed a tape backup unit on your
network or server, configuring it to backup automatically late at night.
This is great, IF someone is carefully verifying the backup, switching tapes,
checking for error messages, reviewing the list of directories getting backed
up, and occasionally restoring to be sure everything works. Too many tape
backups just weren’t there or weren’t usable when the crunch came.
Even if the tape is good and has everything you need on it, what good is it if
YOU don’t know how to use it? Make an appointment right now for your
Network Consultant to teach you how to restore. Then write the instructions
down step by step and tape them on the back of the door in the server room.
Finally, most tape backups programs will need to be set up so they have access
to your SQL database. SQL doesn’t give ANYONE or ANYTHING access to
your data without proper credentials, and that includes your tape device. Your
tape drive manufacturer should have simple instructions for this procedure
easily available.
See Helpscreen topics:
Backup
&
Backup Scheduled
Database Backups
Getting a network backup each night is a good idea, and it’s even better if you
can supplement that process by getting a backup of just your TotalFBO® data
separately. Once the backup file is made, you can easily compress it quite a
bit using PKZIP or WINZIP and then move it off to a disk or CD that you can
store off-site for security.
From within TotalFBO® you can make a fast backup at File> Backup
Database. The options available allow you to also Zip and copy the backup to
a local drive for offsite storage.
TROUBLESHOOTING & DATA MAINTENANCE
TotalFBO® User Guide | 385
It’s a good idea to get a backup before making major changes to your database
or computer system in any way.
RESTORING FROM A BACKUP
Although we all think of hard drive failure as the reason for having to restore a
backup, actually there may be many occasions when you can use a backup.
•
•
•
It may be necessary to restore your database when a new or upgraded
server is brought online.
You may decide to pass a copy of the database to an outside
consultant such as your CPA, or even do a little analysis on your
home computer.
You may want to create a second database for a new company or for
training purposes.
For security reasons, restoring cannot be done from within the program,
but must be accomplished from the User Utilities4 program. You’ll need to
know the password for the User Utility program which was established by the
Administrator when TotalFBO® was installed.
From your workstation desktop, navigate to Start> Programs> TotalFBO > User
Utilities> Maintenance> Backup/Restore> Restore Database.
From this function you’ll be able to restore over your existing database, if
necessary, or else create an entirely new database and load the backup into it.
SENDING DATA TO TECH SUPPORT
In order to assist you more quickly when you have a problem or to complete
requested custom programming, you may be asked to submit a copy of your
database to Tech Support. In fact, if we cannot reproduce your problem in our
test databases, the only way to resolve it may be to test using your data.
Bear in mind that when you purchased the software, Horizon agreed in writing
to keep your data secure and confidential if we receive your database for any
reason. Even reports and test results we produce are shredded, and your data
itself is purged at 90 days.
When requested to do so by Tech Support, you can send us a disk or even
upload your database to a special website from which we can download it.
Please ZIP the backup to compress it as much as possible before uploading.
See Helpscreen topic:
Sending Data to
Tech Support
386 | TotalFBO® User Guide
TROUBLESHOOTING & DATA MAINTENANCE
If you decide to upload the data through the web, please follow these steps:
1. Navigate to the website: ftp://ftp.totalfbo.org
2. The user name is: HBCNET\tfboftp
3. The password is: _(contact HBC)_
4. Right-click and paste to upload your backup to this directory.
6. Leave the website and send an email to [email protected] telling us that:
your database is ready for download,
where it is,
the name of the file,
and YOUR COMPANY NAME!
We cannot check for the database without possibly interrupting your upload,
so sending the email when you’re done is critical. Unidentified files may be
deleted for security reasons.
EXPORTING DATA & CUSTOM REPORTS
Because SQL is a worldwide standard in database management, it’s not only
very secure, but also easily accessible. Many other programs exist which can
access your database through ODBC connectivity, as long as you provide the
proper security credentials. These include well-known favorites such as Excel,
Access, and Crystal Reports.
Tables can be exported using several popular formats, including Excel. Your
local bookstore can supply you with a wide variety of materials explaining
how to access the data using various tools.
TRANSACTION FRAMING
Although SQL maintains excellent control over your data, there are still
hardware failures, network problems, and power interruptions which can
potentially cause a loss of data.
If one of these occurs during the processing of a transaction, such as an invoice
or shop order, TotalFBO® has a built-in detection and correction function to
get you going again quickly.
The X-Files
Your data is stored in tables, and complex transactions are stored in several
tables at once. In the event of an unexpected interruption, it is theoretically
possible for part of the data to be stored and part lost, leaving behind an
incomplete transaction.
Therefore, as data is being written to the tables, the last previous state of the
transaction is stored in a special set of temporary tables called The X-Files.
When a transaction is successfully stored, the temporary data is erased.
TROUBLESHOOTING & DATA MAINTENANCE
Thus, any data found in the X-Files either indicates a transaction currently in
progress, or a transaction which needs to be repaired.
You can see what’s in your X-Files at any time by running the report at
Accounting> Invoicing> Reports and Listings> Uncommitted Transactions.
If the report is not empty, first verify that any items are not just transactions in
process at another workstation.
For any remaining items, simply locate the Invoice or Shop Order from the
appropriate Browse Window and open it with the Change button. Then OK
the window and allow TotalFBO® and SQL to complete their work.
Discrepancy Analysis Reports
If you’ve used earlier versions of TotalFBO®, you’ll remember that the
software has always incorporated a special set of reports designed to help you
verify the accuracy of your data.
With the control and security of SQL, database corruption is no longer
possible. But hardware problems could still result in a loss of data, and so
these reports are still available to you.
Run the reports at Utilities> Reports and Listings> Discrepancy Analysis
whenever you have experienced system errors or hardware failures. In
addition, it’s a good idea to verify the database monthly during your
Accounting Close cycle.
Much of your data is stored in redundant tables for your protection and
to improve access speed. The Discrepancy Analysis Reports use this
arrangement to compare the data against itself, looking for inconsistencies.
Be sure that you do not attempt corrective action for items found on a
Discrepancy Analysis Report without first resolving any Uncommitted
Transactions, as described above.
If Discrepancies remain, contact Tech Support for guidance.
TotalFBO® User Guide | 387
388 | TotalFBO® User Guide
TROUBLESHOOTING & DATA MAINTENANCE
TROUBLESHOOTING SQL CONNECTIVITY
The miracle of modern computers is that so much goes on behind the scenes
at close to the speed of light while we sit casually at our keyboards. Ask
your grandmother…it truly is amazing that we have come to depend on this
technology for so much so quickly.
But even in the horse-and-buggy days, if the team wasn’t hitched up properly,
the wagon didn’t go anywhere. Later on, we all learned that if we didn’t dial
all the numbers correctly AND in the right order, we didn’t get grandma on the
phone. And today, if all the ports aren’t open to the right protocols, the data
packets don’t get through.
Grandma forgot to
open my port again!
The first section of this book detailed the steps for installing not only the
TotalFBO® software, but also the engine which controls access to the database
itself, Microsoft SQL.
This section will provide some guidelines and suggestions for resolving issues
that you may encounter during or after the installation process. These are
only guidelines and suggestions because only your local network engineer can
support your computer system safely.
Break it Down
When you’re unable to start TotalFBO® successfully, it’s best to look at each
part of the network chain sequentially. Unless you’ve only got one computer,
there will be at least 6 links to check out:
1.
2.
3.
4.
5.
6.
Server (where SQL and TotalFBO® are installed)
SQL
Database
TotalFBO®
Switch or Hub (the box all the cables go into)
Workstation (where you’re sitting for actual work)
Server
SERVER
Is the server’s basic network connection using the TCP/IP protocol?
You can find out by right-clicking on My Network Places and selecting
Properties (if it’s a Windows 2003 Server, then double-click on Network
Connections). Then right-click on Local Area Connection and select
Properties. You should see a list which includes at least the following:
Client for Microsoft networks
File and Printer Sharing for Microsoft Networks
Internet Protocol (TCP/IP)
TROUBLESHOOTING & DATA MAINTENANCE
TotalFBO® User Guide | 389
ACCESSING YOUR TOTALFBO® DATABASE
TCP/IP Protocol Enabled?
Listening on Port 1433?
SQL Service Running?
SQL Installed using
Full Administrator Rights?
SQL Authentication?
\TFBO4 \ shared properly?
Correct SA password?
SQL/MSDE
SERVER
Using TCP/IP Protocol?
Port 1433 Blocked by Firewall?
MDAC in good shape?
Basic network connectivity OK?
Can you PING the server?
SWITCH/HUB
Using TCP/IP Protocol?
Port 1433 Blocked by Firewall?
MDAC in good shape?
TotalFBO®
WORKSTATION
390 | TotalFBO® User Guide
TROUBLESHOOTING & DATA MAINTENANCE
•
•
•
If you do not see this list, stop and call your Network Consultant. These
items must be installed.
If you see NetBeui on this list, stop and call your Network Consultant. It
must be removed.
If there are other items on the list, they may be unnecessary. Talk to your
networking consultant to see if they could be removed, thereby improving
your network performance.
Is the MDAC in good shape?
This little bit of alphabet soup stands for Microsoft Data Access Components,
and without them you can’t use things like SQL or Access that work with
databases. The MDAC is installed automatically as a part of Windows but it
can become corrupted or out of date.
You can download the latest MDAC from www.microsoft.com/downloads and
enter MDAC in the Keywords box. Once downloaded, just click on the file to
install it. Be sure to reboot afterwards.
From the same location you can also download the MDAC Utility, which
checks the individual components of the MDAC and identifies what version
you have installed.
Where is SQL/MSDE
installed?
C:\Program Files\
Microsoft SQL Server
Is Port 1433 Open?
This is the port that SQL uses, by default. If there’s a firewall or some other
security software installed on your network, you’ll have to enable this port.
You can test to see if it’s open by going to a workstation and opening up a
Command Prompt. Type the following (substitute the name of your own
server and press Enter at the end):
TELNET servername 1433
• If you get an error message, the port isn’t open. Call your Network
Consultant.
• If you just get a black screen, the port is open. Click the X in the top
corner of the window to close it.
SQL
Was it installed with full Administrator privileges?
If not, then the easiest fix is to uninstall, delete the remaining directory tree,
and reinstall properly. If necessary, also verify that someone has not altered
the Administrator’s privileges on this server.
Did you reboot after installation?
Sometimes the installation is done at a time when it’s inconvenient to reboot,
so that step gets skipped. But if it’s not done immediately after installation,
certain information isn’t written to the registry properly, or the SQL service
may not start.
TROUBLESHOOTING & DATA MAINTENANCE
Is the MSSQLSERVER service running?
One way to tell is to look down on your Taskbar in the Notification Area (all
the way to the right side). Is there a small gray server with a green or red
arrow on it? If you right-click on it a menu will open and you’ll get to see the
name of the server, too.
If the service is running, the arrow will be green. If it’s not, you can try to
start it from the menu. If it starts but doesn’t start automatically again after a
reboot, call your Network Consultant.
Uninstalling, rebooting, reinstalling, and rebooting again, may solve it for you,
as well.
Was it installed to use SQL Server (or Mixed) Authentication?
If you installed MSDE or SQL Express from one of our CDs, this option was
set for you automatically. If you installed SQL from another source it would
have been necessary to choose this option, as the default installation sets up
Windows Authentication. THAT WON’T WORK, NO WAY, NO HOW,
SORRY, DON’T PASS GO, NICE TRY, but we did try to tell you that in the
installation instructions, didn’t we?
The solution is to uninstall, reboot, reinstall with the correct option, reboot.
Is SQL/MSDE actually listening on Port 1433 using TCP/IP?
Open Windows Explorer and navigate to:
C:\Program Files\Microsoft SQL Server\80\Tools\Binn\SVRNETCN.exe
TotalFBO® User Guide | 391
392 | TotalFBO® User Guide
TROUBLESHOOTING & DATA MAINTENANCE
Double-click the file and make sure the windows look like this (if you have to
make any changes, be sure you reboot afterwards):
Is SQL having trouble getting access to the port or encountering some other
error?
You can read the error logs by opening Windows Explorer and navigating to:
C:\Program Files\Microsoft SQL Server\MSSQL\LOG. Double-click on
ERRORLOG (no extension), and choose to open the file with Notepad.
You’ll also be able to print the log from Notepad and send it to your Network
Consultant.
Database
Is there anything to connect to?
If TotalFBO® was able to connect to SQL correctly during installation, two
databases were created. The default names for them are TFBOCOMMON and
DATA, though you may have changed these names during installation.
Each SQL database consists of two files. Both have the same name, but one
has a file type MDF and the other has file type LDF. You can check for the
existence of database files by opening Windows Explorer and navigating to:
C:\Program Files\Microsoft SQL Server\MSSQL\Data.
Do you know the correct password?
Be sure you know the correct SA password and password for the databases,
especially if you’ve changed them from their defaults.
TotalFBO®
Is the program Home Directory on the Server shared?
Open Windows Explorer and navigate to C:\Apps\TFBO (or whatever location
you used, if different). Right-click and select Sharing. If it’s shared, make
sure the Permissions allow Everyone Full Control.
TotalFBO®
Is TotalFBO® using the right information?
Open Windows Explorer and navigate to the program home directory. Doubleclick on the file Userutil.exe. From the menu select Update> Licensing.
Select the licensing record and inspect Tab 2 closely. Be sure the server name,
database names, and passwords are correctly entered.
If there is no licensing record, you’ll need to Insert one. Review the
Installation procedures for details.
Switch or Hub
SWITCH/HUB
Actually this category includes any and all network connection hardware, such
as cables, network cards, switches, routers, firewalls and hubs. Your Network
consultant can help you test these pieces of hardware. You can also sometimes
TROUBLESHOOTING & DATA MAINTENANCE
TotalFBO® User Guide | 393
eliminate an element temporarily and see if the problem gets better or goes
away.
To test basic network connectivity, open a Command Prompt and type this (be
sure you substitute the name of your own server and press Enter at the end):
PING servername
You should also repeat the test using the following:
PING IPaddress
The IP address is a number that looks similar to this: 192.168.2.10. Your
Network Consultant can help you locate the address. (For security reasons, we
won’t cover that information here.)
There should be a short wait after entering the command.
•
•
If the connection is reached, you’ll get 4 lines that start with “Reply
from…”
If the connection is not reached, you’ll get an error message. Let your
Network Consultant know immediately, as there could be problems with
hardware, DNS, WINS, or some other configuration issue.
Workstation
Is the workstation’s basic network connection using the TCP/IP protocol?
You can find out by right-clicking on My Network Places and selecting
Properties. Then right-click on Local Area Connection and select Properties.
You should see a list which includes at least the following:
Client for Microsoft networks
File and Printer Sharing for Microsoft Networks
Internet Protocol (TCP/IP)
•
•
•
If you do not see this list, stop and call your Network Consultant. These
items must be installed.
If you see NetBeui on this list, stop and call your Network Consultant. It
must be removed.
If there are other items on the list, they may be unnecessary. Talk to your
networking consultant to see if they could be removed, thereby improving
your network performance.
Is the MDAC in good shape?
This little bit of alphabet soup stands for Microsoft Data Access Components,
and without them you can’t use things like SQL or Access that work with
databases. The MDAC is installed automatically as a part of Windows but it
can become corrupted or out of date.
You can download the latest MDAC from www.microsoft.com/downloads and
enter MDAC in the Keywords box. Once downloaded, just click on the file to
install it. Be sure to reboot afterwards.
WORKSTATION
394 | TotalFBO® User Guide
TROUBLESHOOTING & DATA MAINTENANCE
From the same location you can also download the MDAC Utility, which
checks the individual components of the MDAC and identifies what version
you have installed.
Running a firewall here?
Check to see if you have Norton Personal Firewall (or a similar product)
installed, which could be blocking Port 1433. If so, try disabling it and
see if the problem is resolved. If so, contact Symantec (or the software
manufacturer) for assistance in configuring the product to permit access to
SQL.
In addition, Windows XP or Vista can have Internet Connection Firewall
enabled on the network connection. You can find out by right-clicking on
My Network Places and selecting Properties. Then right-click on Local Area
Connection and select Properties. Select the Advanced tab and look for the
Internet Connection Firewall checkbox. If it’s checked, either uncheck it
and test or contact your Network Consultant for assistance in configuring the
Firewall.
Is Windows listening with TCP/IP and Port 1433?
Open Windows Explorer and navigate to:
C:\WINDOWS\system32\CLICONFG.EXE
(Some versions of Windows use: C:\WINNT\system32\CLICONFG.EXE)
TROUBLESHOOTING & DATA MAINTENANCE
Double-click on the file name and make sure that your windows look like this
(if you have to make any changes, be sure you reboot afterwards):
Is the Program Home Directory mapped properly?
To map the directory, be sure you are logged in with Administrative rights on
this workstation, then open Windows Explorer. Navigate through Network
Places (or Network Neighborhood) until you locate the server and the
directory where TotalFBO® is installed. Right-click and select Map Network
Drive. Choose a drive letter and be sure the Reconnect at Logon? box is
checked.
Is TotalFBO® installed on the workstation properly?
You should NOT install to the workstation using a CD. Instead, follow the
Installation Procedures to install first to the server, then use the
WSSETUP.EXE program to copy the files you need to the workstation.
When this is done properly, the desktop shortcut properties will look similar to
this, but will be correct for your network locations:
TotalFBO® User Guide | 395
396 | TotalFBO® User Guide
TROUBLESHOOTING & DATA MAINTENANCE
Notice that the Target and Start In directories are NOT the same.
If you installed to the workstation improperly, open Windows Explorer and
navigate to the program home directory on the server. Double-click on the file
WSSETUP.EXE.
Still Not Working?
If you still can’t connect, contact your Network Engineer and suggest that he
obtain Microsoft’s Knowledge Base Article 827422, “How to troubleshoot
connectivity issues in SQL Server 2000.”
This article covers some of the topics listed above as well as others in greater
depth, and provides links to helpful utilities and reference materials.
TROUBLESHOOTING ONLINE CREDIT CARD
PROCESSING
If you’re experiencing difficulty with online processing, please work through
this checklist to be sure you’ve set up everything properly and that your
Internet connection is available FROM THE WORKSTATIONS YOU’RE
AUTHORIZING OR SETTLING ON. If you can do things fine from
one workstation but not another, it’s likely to be your firewall or Internet
connection settings! Always test from more than one workstation.
1.
2.
3.
4.
5.
6.
7.
8.
Be sure you have installed the LATEST update from www.totalfbo.com.
Processors change their internal requirements frequently, and they are
incorporated into new releases of TotalFBO® rapidly.
Obtain gateway agreement and access information from your Processor.
Submit signed TotalFBO® Credit Card Processing Setup agreement to
Horizon, receiving new license in response.
Install updated program licensing to enable your processor(s).
Follow Helpscreen instructions to customize environment as needed. For
instance, Verisign requires adding an environment variable for a path to
the security certificate. This must be done at each workstation that will be
processing or settling transactions.
Install latest version of Microsoft’s XML at each workstation. This can be
downloaded from www.totalfbo.com.
Insure that each workstation that will be processing or settling transactions
has access to the Internet and that security settings will not prevent
connections to the URLs specified on the Processor record.
Set up Processor(s) in the Receivables module. Enter your user access
information, select Holding Company customer records, select cards
you will accept, select contract programs you participate in. BE SURE
YOU’VE SELECTED THE RIGHT PROCESSOR - Although Multi
Service handles gateway functions for Chevron, Avfuel and others, you
won’t select it for these programs.
TROUBLESHOOTING & DATA MAINTENANCE
9.
10.
11.
12.
13.
Set up a fuel sub-type for each contract program and link it to the
program you selected on the Processor record.
Install any keyboard or cardswipe devices and install drivers or custom
programming scripts as needed.
Select or create Station record in TotalFBO® and indicate that cardswipe
device is to be used. Test the device using the button provided.
If your Internet connection is slow (modem, wireless, satellite, etc.)
increase the HTTP timeout setting.
Go to each workstation where a cardswipe device is located and select the
Station record you customized as the default for that workstation.
If you’ve verified that everything was installed properly, consider these issues:
Do you get an error message? If so, copy ALL OF IT down EXACTLY
and send it to Tech Support.
Can you authorize a charge by entering the information manually?
If so, it’s likely that your cardswipe device needs to be reprogrammed.
Cardswipe devices can read many different kinds of cards, such as ID badges,
Hotel keys, etc., and need to be set up to read and transmit information on
credit card correctly. Typical programming information is available in the
Helpscreens.
Can you authorize but not settle? If so, verify that the information on
the Settlement tab(s) of your Processor record is correct. Also recheck that
you have the latest version of TotalFBO® and Microsoft XML installed on the
workstation where you’re having the problem. Check that you’ve set up the
correct Processor for the program (“brand”) you’re working with (see step 8).
When you swipe a card, do you get “garbage” characters in the
fields on the Payment Line Window? If so, the cardswipe device is not
set up in this workstation’s Station record. When you have properly set up
your cardswipe device, the Payment Line Window will not initially display
fields for you to enter the data. Instead, you’ll see two big buttons. The first
says “Swipe the card now,” and the second says “OFFLINE PAYMENT.”
If you can’t settle, how long has it been since you authorized the
charge? Each processor has different security limits on the period of time
before an authorization expires. Generally, you should settle every day. If a
problem prevents settling immediately, be sure you settle within 7 days. Do
not let a problem ride - you’ll lose money!
If you’re still unable to resolve your problem, you’ll need to send a special set
of files to Tech Support so we can analyze exactly how the failure is occurring.
The following instructions detail how to send us these files. Also send a copy
of your latest database backup.
TotalFBO® User Guide | 397
398 | TotalFBO® User Guide
TROUBLESHOOTING & DATA MAINTENANCE
SENDING CREDIT CARD TRANSACTION LOGS
1- Be sure you know the location of your program home directory. To verify
the location, go to Help> Status Window. Note this information below:
Path: __________________________________________________________
2- To automatically create a zipped file of your logs, go to Utilities> Special
Operations and select the button titled “Send C/C Logs.”
3- The logs are automatically zipped into a file with a name such as
“CC070717.zip” and the file is placed in your program home directory. The
file name contains the date in YYMMDD order.
4a – If you DO NOT have TotalFBO® set up to handle direct emailing, you’ll
need to open your usual email program and attach this file. Then send it to
[email protected]. Include in the body of the email your company name
and your name.
4b - If you DO have TotalFBO® set up to handle direct email, a window will
open automatically for you with the file already attached. Simply add your
company name to the body of the email (and your own name as sender, if
necessary) and send the email.
4c – If you do not have access to email, or if your logs are too large to email,
you may upload them to a special website.
1.
2.
3.
4.
6.
Navigate to the website: ftp://ftp.totalfbo.org
The user name is: HBCNET\tfboftp
The password is: _(contact HBC)_
Right-click and paste to upload your log files to this directory.
Leave the website and send an email to [email protected] telling us that:
your log files are ready for download,
where it is,
the name of the file,
and YOUR COMPANY NAME!
This last step is critical and cannot be done until your file is completely
uploaded.
TROUBLESHOOTING & DATA MAINTENANCE
CONTACTING TECH SUPPORT
Horizon’s Tech Support Team is known worldwide for its expertise and
commitment to customer satisfaction. We urge you to subscribe to or renew
your CustomerCare™ Plan, which provides access to support on a 365/24/7
basis.
Here’s how to reach us:
Horizon Business Concepts, Inc.
721 West Queens Street
Broken Arrow, OK 74012
Phone: 918-355-3469
Fax:
918-355-3487
Email: [email protected]
We appreciate your business and your support of TotalFBO®, and encourage
you to let us know if there are program enhancements which would make your
business run smoother. Every request is important to us, and even though
there are many more items on the list than we have time to complete each day,
each item is cataloged and scheduled as quickly as possible.
Custom programming is available if you need an enhancement quickly, and
is often a more cost-effective choice for your business than attempting to use
another piece of software for a small portion of your operations. The power of
TotalFBO® to build your business lies in its unique combination of features
and tight integration.
We look forward to serving you.
TotalFBO® User Guide | 399
400 | TotalFBO® User Guide
TROUBLESHOOTING & DATA MAINTENANCE
TotalFBO® User Guide | 401
CHART OF ACCOUNTS
The Default Chart of Accounts which is created as a new database is installed
is detailed here for your reference.
You can use this worksheet to insert your own corresponding numbers from a
previous system to make customizing the chart of accounts more manageable.
Remember to change the default numbers to match your own, then add any
additional accounts you need.
Be cautious about deleting any accounts from the default list, as some of those
that are unfamiliar to you are required for automatic processing.
Also included is a sample setup for the Cash Flow Statement. Once you’ve
assigned your balance sheet accounts to the appropriate categories, this complicated statement is just a click away.
APPENDIX A
Auto Ledger
List #
Petty Cash
1050
1060
1070
1080
1090
1100
1110
13
14
15
16
17
18
Accounts Receivable - Transients
Accounts Receivable Setup (Contra)
A/R Credit Cards
Fuel Supplier Receivable
American Express Receivable
Discover Receivable
Multiserve Receivable
Contract Fueling Receivable
1210
1211
1215M
1215
1215
1215
1215
1217
129
Accounts Receivable - Customers
1210
Treasury Bonds
1150
Asset
Asset
Asset
Asset
Asset
Asset
Asset
Asset
Asset
Asset
Undeposited Receipts/Cash On Hand Asset
Asset
Asset
Asset
Asset
Asset
Asset
Asset
Asset
Asset
Asset
Asset
Asset
Account
Type
1120
Bank 9
Bank 8
Bank 7
Bank 6
Bank 5
Bank 4
3
8
Bank 10
1040
12
Bank 3
1030
11
Payroll Checking Account
1020
Checking Account Setup (Contra)
1011
Current Assets
Description
Operations Checking Account
Our
Account
Number
1010
Master?
10
9
Default
Acct.
Nbr.
4 A/R
4 A/R
4 A/R
4 A/R
4 A/R
4 A/R
4 A/R
4 A/R
4 A/R
1 CASH
1 CASH
1 CASH
1 CASH
1 CASH
1 CASH
1 CASH
1 CASH
1 CASH
1 CASH
1 CASH
1 CASH
1 CASH
1 CASH
Cash Flow Group
Department
402 | TotalFBO® User Guide
APPENDIX A
Allow Sales?
Auto Ledger
List #
Aircraft Inventory
Inventory Contra
1330
1351
Airline Fuel Inventories
1313
78
Fuel Inventory - Auto Gas
1310
Oil Inventory
Fuel Inventory - JetA
1310
1320
Fuel Inventory - 100LL
Parts Inventory - Misc.
1301
1310
Pilot Supplies - Flight School
1301
Fuel Inventory
Parts Inventory - Avionics
1300
1310 M
Parts Inventory - Shop
1300
Parts Inventory
1300M
74
61
57
Notes Receivable
Description
1250
Our
Account
Number
Employee Advances
Master?
1220
Default
Acct.
Nbr.
Asset
Asset
Asset
Asset
Asset
Asset
Asset
Asset
Asset
Asset
Asset
Asset
Asset
Asset
Asset
Account
Type
NON-CASH
3 DEBITS
NON-CASH
3 DEBITS
NON-CASH
3 DEBITS
NON-CASH
3 DEBITS
NON-CASH
3 DEBITS
NON-CASH
3 DEBITS
NON-CASH
3 DEBITS
NON-CASH
3 DEBITS
NON-CASH
3 DEBITS
NON-CASH
3 DEBITS
NON-CASH
3 DEBITS
NON-CASH
3 DEBITS
NON-CASH
3 DEBITS
4 A/R
4 A/R
Cash Flow Group
Department
APPENDIX A
TotalFBO® User Guide | 403
Allow Sales?
Deposits/Prepaid Expenses
1450
Land
Building
Equipment
Furniture And Fixtures
Trucks
Automobiles
Computer System
Computer Software Costs
Aircraft Owned
Aircraft Owned - N11111
Aircraft Owned - N22222
1500
1510
1520
1530
1540
1550
1560
1565
1570M
1570
1570
Fixed Assets
Total Current Assets
School Credits Outstanding
Work In Process
Description
1430
Our
Account
Number
22
Auto Ledger
List #
1410
Master?
23
Default
Acct.
Nbr.
Asset
Asset
Asset
Asset
Asset
Asset
Asset
Asset
Asset
Asset
Asset
Asset
Asset
Asset
Account
Type
NON-CASH
3 DEBITS
NON-CASH
3 DEBITS
NON-CASH
3 DEBITS
NON-CASH
3 DEBITS
NON-CASH
3 DEBITS
NON-CASH
3 DEBITS
NON-CASH
3 DEBITS
NON-CASH
3 DEBITS
NON-CASH
3 DEBITS
NON-CASH
3 DEBITS
NON-CASH
3 DEBITS
NON-CASH
3 DEBITS
4 A/R
4 A/R
Cash Flow Group
Department
404 | TotalFBO® User Guide
APPENDIX A
Allow Sales?
NON-CASH
3 DEBITS
NON-CASH
3 DEBITS
NON-CASH
3 DEBITS
NON-CASH
3 DEBITS
NON-CASH
3 DEBITS
NON-CASH
3 DEBITS
NON-CASH
3 DEBITS
Asset
Asset
Asset
Asset
Asset
Asset
Asset
Asset
Accum. Deprec. - Building
Accum. Deprec. - Equipment
Accum. Deprec. - Furn. & Fix.
Accum. Deprec. - Trucks
Accum. Deprec. - Automobiles
Accum. Deprec. - Computer System
Accum. Deprec. - Aircraft
Accum. Deprec. - Leasehold
Improvements
1600
1600
1600
1600
1600
1600
1600
1600
NON-CASH
3 DEBITS
NON-CASH
3 DEBITS
Asset
Asset
Organization Costs
Patents
1900
1910
Other Assets
Total Fixed Assets
NON-CASH
3 DEBITS
Asset
Less Accumulated Depreciation
1600M
NON-CASH
3 DEBITS
NON-CASH
3 DEBITS
Asset
Leasehold Improvements
Cash Flow Group
1580
Account
Type
NON-CASH
3 DEBITS
Description
Asset
Our
Account
Number
Aircraft Owned - N33333
Master?
1570
Default
Acct.
Nbr.
Department
APPENDIX A
TotalFBO® User Guide | 405
Allow Sales?
Auto Ledger
List #
Less Amortization of Intangible Assets Asset
1960
Total Other Assets
Copyrights
1940
Asset
Asset
Asset
Account
Type
Goodwill
Description
1930
Our
Account
Number
Trademarks
Master?
1920
Default
Acct.
Nbr.
NON-CASH
3 DEBITS
NON-CASH
3 DEBITS
NON-CASH
3 DEBITS
NON-CASH
3 DEBITS
Cash Flow Group
Department
406 | TotalFBO® User Guide
APPENDIX A
Allow Sales?
Auto Ledger
List #
5 A/P
5 A/P
5 A/P
4 A/R
4 A/R
4 A/R
NON-CASH
2 CREDITS
7 FINANCING
7 FINANCING
NON-CASH
2 CREDITS
NON-CASH
2 CREDITS
NON-CASH
2 CREDITS
NON-CASH
2 CREDITS
NON-CASH
2 CREDITS
NON-CASH
2 CREDITS
Liability
Liability
Liability
Liability
Liability
Liability
Liability
Liability
Liability
Liability
Liability
Liability
Liability
Liability
Liability
Inventory Purchase Setup
Accounts Payable Setup (Contra)
Accounts Payable - Credit Cards
Unearned Revenue (Customer
Deposits)
Shop Progressive Billing
Shop Work Deposits
Gift Certificates Outstanding
Notes Payable - Short-term
Line of Credit
Salaries/Wages Payable
Employee Benefits Payable
Employee Purchases
Pension Plan Benefits Payable
Payroll Taxes/Premiums Payable
Medicare Payable
2011
2011
2015
2020
2021
2025
2030
2040M
2040
2110
2120
2120
2120
2130M
2130
4
21
119
35
33
56
47
42
5 A/P
Liability
C.O.D. Payments
2011
Cash Flow Group
118
Account
Type
5 A/P
Current Liabilities
Description
Liability
Our
Account
Number
Accounts Payable
Auto Ledger
List #
2010
Master?
5
Default
Acct.
Nbr.
Department
Allow Sales?
Yes
APPENDIX A
TotalFBO® User Guide | 407
NON-CASH
2 CREDITS
NON-CASH
2 CREDITS
NON-CASH
2 CREDITS
NON-CASH
2 CREDITS
NON-CASH
2 CREDITS
NON-CASH
2 CREDITS
NON-CASH
2 CREDITS
NON-CASH
2 CREDITS
NON-CASH
2 CREDITS
NON-CASH
2 CREDITS
NON-CASH
2 CREDITS
NON-CASH
2 CREDITS
NON-CASH
2 CREDITS
Liability
Liability
Liability
Liability
Liability
Liability
Liability
Liability
Liability
Liability
Liability
Liability
Liability
FIT Withholdings Payable
EIC Advances Payable
SIT Withholdings Payable
LIT Withholdings Payable
SUTA Payable
FUTA Payable
Accrued Worker’s Compensation
Disability Payable
Sales Tax Liability
Sales Tax 1 Liability
Sales Tax 2 Liability
Sales Tax 3 Liability
Sales Tax 4 Liability
2130
2130
2130
2130
2130
2130
2130
2130
2210M
2210
2210
2210
2210
38
39
40
44
43
45
46
24
25
26
27
Cash Flow Group
37
Account
Type
NON-CASH
2 CREDITS
Description
Liability
Our
Account
Number
FICA Payable
Auto Ledger
List #
2130
Master?
41
Default
Acct.
Nbr.
Department
408 | TotalFBO® User Guide
APPENDIX A
Allow Sales?
NON-CASH
2 CREDITS
NON-CASH
2 CREDITS
NON-CASH
2 CREDITS
NON-CASH
2 CREDITS
NON-CASH
2 CREDITS
NON-CASH
2 CREDITS
NON-CASH
2 CREDITS
NON-CASH
2 CREDITS
NON-CASH
2 CREDITS
NON-CASH
2 CREDITS
NON-CASH
2 CREDITS
NON-CASH
2 CREDITS
NON-CASH
2 CREDITS
Liability
Liability
Liability
Liability
Liability
Liability
Liability
Liability
Liability
Liability
Liability
Liability
Liability
State Fuel Tax Payable
Local Fuel Tax Payable
Fuel Flowage Fee Payable
Charter Taxes/Fees Payable
Charter Cargo FET Payable
Charter Passenger FET Payable
International FET Payable
International Customs Payable
International Immigration Fees
Payable
Charter Departure Tax Liability
Charter Per Segment Tax Liability
Charter APHIS Liability
2220
2220
2220
2230M
2230
2230
2230
2230
2230
2230
2230
2230
67
68
69
113
112
107
108
109
110
111
128
NON-CASH
2 CREDITS
Cash Flow Group
FET Fuel Tax Payable
Account
Type
2220
Description
66
Our
Account
Number
Liability
Auto Ledger
List #
Fuel Taxes/Fees Payable
Master?
2220M
Default
Acct.
Nbr.
Department
APPENDIX A
TotalFBO® User Guide | 409
Allow Sales?
Auto Ledger
List #
2920
2930
1
124
N/P - Aircraft N33333
2520
Total Long-Term Liabilities
Intercompany Due To/Due From
Suspense
Pass-Through Transfers
N/P - Aircraft N22222
2520
2910
N/P - Aircraft N11111
Mortgage Payable
Long-Term Liabilities
Total Current Liabilities
Local Landing Fees Payable
Description
2520
Our
Account
Number
N/P - Long-term
Master?
2520M
2510
2240
2
32
97
Default
Acct.
Nbr.
Liability
Liability
Liability
Liability
Liability
Liability
Liability
Liability
Liability
Account
Type
2 A/P
xx
xx
7 FINANCING
7 FINANCING
7 FINANCING
7 FINANCING
7 FINANCING
NON-CASH
2 CREDITS
Cash Flow Group
Department
Allow Sales?
Yes
410 | TotalFBO® User Guide
APPENDIX A
3600
3900
7
Auto Ledger
List #
6
Total Capital
Current Earnings
Retained Earnings
Owner Withdrawals
Capital
Description
3020
Our
Account
Number
Owner Capital
Master?
3010
Default
Acct.
Nbr.
Capital
Capital
Capital
Capital
Account
Type
xx
6 INVESTING
6 INVESTING
6 INVESTING
Cash Flow Group
Department
APPENDIX A
TotalFBO® User Guide | 411
Allow Sales?
Auto Ledger
List #
84
83
82
88
86
87
58
Master?
Sublet Work Revenue - Avionics
4050
Sublet Work Revenue
4050M
Sublet Work Revenue - Shop
Flat Fee Revenue - Avionics
4040
4050
Flat Fee Revenue-Shop
Flat Fee Revenue
4040M
4040
Shop Labor Revenue - Avionics
4030
Shop Labor Revenue
4030M
Shop Labor Revenue-Shop
Freight Revenue - Counter Sales
4020
4030
Freight Revenue - Avionics
4020
Freight Revenue
4020M
Freight Revenue-Shop
Miscellaneous Supplies - Avionics
4010
4020
Miscellaneous Shop Supplies Sales
Miscellaneous Shop Supplies Sales
4010M
4010
Core Charges Billed - Avionics
4005
Core Charges Billed
4005M
Core Charges Billed - Shop
Parts Sales - Counter Sales
4000
4005
Parts Sales - Avionics
4000
Parts Sales
Income
Description
Parts Sales - Shop
Our
Account
Number
4000
4000M
Default
Acct.
Nbr.
Income
Income
Income
Income
Income
Income
Income
Income
Income
Income
Income
Income
Income
Income
income
Income
Income
Income
Income
Income
Income
Income
Income
Account
Type
Cash Flow Group
Avionics
Shop
Administration
Avionics
Shop
Administration
Avionics
Shop
Administration
Counter Sales
Avionics
Shop
Administration
Avionics
Shop
Administration
Avionics
Shop
Administration
Counter Sales
Avionics
Shop
Administration
Department
Allow Sales?
Yes
Yes
Yes
Yes
Yes
Yes
Yes
Yes
Yes
Yes
Yes
Yes
Yes
Yes
Yes
Yes
Yes
Yes
Yes
Yes
Yes
Yes
Yes
412 | TotalFBO® User Guide
APPENDIX A
Auto Ledger
List #
Tie Down Revenue
Lavatory Service - Line
Cabin Service/Ice - Line
Deicing Service - Line
Solo Aircraft Rental Revenue
PKG: Solo Rental Revenue: SE
PKG: Solo Rental Revenue: Complex Income
PKG: Solo Rental Revenue: Twin
Dual Aircraft Rental Revenue
PKG: Dual Rental Revenue: SE
PKG: Dual Rental Revenue: Complex Income
4081
4091
4092
4093
4110
4110
4110
4110
4115
4115
4115
Income
Income
Income
Income
Income
Income
Income
Income
Income
Income
Hangar Revenue
Income
Income
4080
Oil Sales - Shop
4070
Income
Income
Oil Sales - Line
Oil Sales
4070M
Income
Income
Income
Income
Income
Income
Income
Account
Type
4071
Into-Plane Fees
4062
75
Minimum Fueling Surcharge
4061
Fuel Sales - Shop
4060
92
Fuel Sales
4060M
Fuel Sales - Line
Outside Parts - Avionics
4055
4061
Outside Parts Revenue-Shop
Outside Parts Revenue
Description
4055
Our
Account
Number
62
85
Master?
4055M
Default
Acct.
Nbr.
Cash Flow Group
Flight School
Flight School
Flight School
Flight School
Flight School
Flight School
Flight School
Line
Line
Line
Line
Line
Line
Shop
Administration
Line
Line
Line
Shop
Administration
Avionics
Shop
Administration
Department
Allow Sales?
Yes
Yes
Yes
Yes
Yes
Yes
Yes
Yes
Yes
Yes
Yes
Yes
Yes
Yes
Yes
Yes
Yes
Yes
Yes
Yes
Yes
Yes
Yes
APPENDIX A
TotalFBO® User Guide | 413
Yes
Yes
Yes
Yes
Yes
Yes
Yes
Yes
Yes
Yes
Yes
Yes
Yes
Yes
Yes
Yes
Yes
Yes
Flight School
Flight School
Flight School
Flight School
Flight School
Flight School
Flight School
Flight School
Shop
Shop
Flight School
Flight School
Charter
Charter
Charter
Charter
Charter
Charter
Income
Income
Income
Income
Income
Income
Income
Income
Income
Income
Income
Income
Income
Income
Income
Income
Income
Income
Income
Discovery Flights
Simulator Rental Revenue
Flight Store Revenue
Headset Rental Revenue
Damage Waiver Revenue
Flight Instruction Revenue
Instruction - Primary Revenue
Instruction - Advanced Revenue
Shop Warranty Labor Billed
Shop Warranty Parts Billed
Ground School Revenue
Flight Package Sales
Charter Revenue - Aircraft Charges
Charter Revenue - Aircraft Standby
Charter Revenue - Pilot Standby
Charter Revenue - Extra Charges
Charter Revenue - Additional Crew
Charges
Charter Revenue - Catering
Charter Revenue - Other Expenses
Charged
4130
4140
4150
4155
4160
4170M
4170
4170
4176
4177
4180
4190
4210
4211
4212
4213
4214
4215
4216
95
98
137
138
93
14
100
101
105
104
102
106
Yes
Yes
Flight School
Income
Fuel Surcharge Revenue
4125
65
Charter
Yes
Flight School
Income
Off-Site Fuel Credit Revenue
Department
4120
Cash Flow Group
96
Account
Type
Yes
Description
Flight School
Auto Ledger
List #
Income
Master?
PKG: Dual Rental Revenue: Twin
Our
Account
Number
Allow Sales?
4115
Default
Acct.
Nbr.
414 | TotalFBO® User Guide
APPENDIX A
Auto Ledger
List #
90
79
103
4910
Total Income
Sales Discounts
Income
Broker Commissions on Aircraft Sales Income
Income
Income
4520
Scheduled Flight Seat Revenue
4310
Income
Aircraft Sales
Leased Aircraft Revenue
4230
Income
Income
Account
Type
4510
Brokered Charter Flight Revenue
Description
4220
Our
Account
Number
Charter Revenue - Landing/Airport
Fees
Master?
4217
Default
Acct.
Nbr.
Cash Flow Group
Administration
Administration
Yes
Yes
Yes
Yes
Scheduled
Flights
Administration
Yes
Yes
Yes
Allow Sales?
Charter
Charter
Charter
Department
APPENDIX A
TotalFBO® User Guide | 415
Auto Ledger
List #
63
89
59
Master?
Costs
Costs
Oil Cost Of Goods Sold - Shop
Oil Cost of Goods Sold - Counter
Sales
5070
5070
Costs
Oil Cost Of Goods Sold
5070M
Costs
Costs
Fuel Cost Of Goods Sold - Line
Fuel Cost Of Goods Sold - Shop
5060
Costs
Expense
Expense
Expense
Expense
Expense
Expense
Expense
Expense
Costs
Costs
Costs
Costs
5061
Fuel Cost Of Goods Sold
5060M
Freight Expense
5020M
Freight Expense - Flight School
Shop Supplies - Avionics
5010
5021
Shop Supplies - Shop
5010
Freight Expense - Counter Sales
Shop Supplies
5010
5020
Core Charge Expense - Counter Sales Costs
5005
Freight Expense - Avionics
Core Charge Expense - Avionics
5005
5020
Core Charge Expense - Shop
5005
Freight Expense - Shop
Core Charge Expense
5005M
5020
Parts Cost - Counter Sales
5000
Costs
Parts Cost - Avionics
Costs
Costs
Account
Type
5000
Parts Cost Of Goods Sold
Cost of Sales
Description
Parts Cost - Shop
Our
Account
Number
5000
5000M
Default
Acct.
Nbr.
Cash Flow Group
Counter Sales
Shop
Administration
Line
Shop
Administration
Flight School
Counter Sales
Avionics
Shop
Administration
Avionics
Shop
Administration
Counter Sales
Avionics
Shop
Administration
Counter Sales
Avionics
Shop
Administration
Department
416 | TotalFBO® User Guide
APPENDIX A
Allow Sales?
Flight School
Charter
Charter
Charter
Charter
Charter
Charter
Scheduled
Flights
Scheduled
Flights
Scheduled
Flights
Scheduled
Flights
Scheduled
Flights
Scheduled
Flights
Administration
Administration
Costs
Costs
Costs
Costs
Costs
Costs
Costs
Costs
Costs
Costs
Costs
Costs
Costs
Charter Costs
Charter Fuel & Oil Costs
Charter Pilot Expenses
Charter Miscellaneous Expenses
Charter Catering Expenses
Charter Landing/Airport Fees
Scheduled Flight Costs
Scheduled Flight Fuel & Oil Costs
Scheduled Flight Pilot Expenses
Scheduled Flight Misc. Expenses
Scheduled Flight Catering Expenses
Scheduled Flight Landing/Airport Fees Costs
Costs
Flight School Instruction Supplies
Aircraft Cost Of Goods Sold
Purchases Discounts
5170
5210M
5210
5210
5210
5210
5210
5310M
5310
5310
5310
5310
5310
5510
5910
80
36
Total Costs of Sales
Flight School
76
Costs
Line
Department
Cost Of Pilot Supplies Sold
Cash Flow Group
5150
Costs
Account
Type
Flight School
Description
Fuel & Oil Expense - Flight School AcftCosts
Our
Account
Number
5110
Auto Ledger
List #
Oil Cost Of Goods Sold - Line
Master?
5071
Default
Acct.
Nbr.
APPENDIX A
TotalFBO® User Guide | 417
Allow Sales?
Default
Acct.
Nbr.
Our
Account
Number
Description
Account
Type
Cash Flow Group
Department
418 | TotalFBO® User Guide
APPENDIX A
Allow Sales?
Master?
Auto Ledger
List #
Administration
Flight School
Administration
Administration
Administration
Shop
Avionics
Counter Sales
Charter
Line
Flight School
Scheduled
Flights
Administration
Administration
Administration
Administration
Administration
Administration
Administration
Administration
Expense
Expense
Expense
Expense
Expense
Expense
Expense
Expense
Expense
Expense
Expense
Expense
Expense
Expense
Expense
Expense
Expense
Expense
Expense
Expense
Contract Labor
Contract Labor - Flight Instructors
Accounting & Professional Fees
Administrative Salaries Expense
Salaries/Wages Expense
Salaries & Wages - Shop
Salaries & Wages- Avionics
Salaries & Wages - Counter Sales
Salaries & Wages - Charter
Salaries & Wages - Line
Salaries & Wages - Flight School
Salaries & Wages - Scheduled Flight
Payroll/Employee Benefit Expenses
Employee Benefits
Pension Benefits
Health Insurance Benefits
Auto allowance
Payroll Taxes/Premiums Expense
Taxes-Medicare
Taxes-FICA
7080
7081
7085
7100
7110M
7110
7110
7110
7110
7111
7111
7111
7120M
7120
7120
7120
7120
7130M
7130
7130
49
48
54
55
Administration
Department
Expense
Cash Flow Group
Advertising Expense
Account
Type
6160
Expenses
Description
Administration
Our
Account
Number
Expense
Auto Ledger
List #
Sales Commission Expense
Master?
6110
Default
Acct.
Nbr.
APPENDIX A
TotalFBO® User Guide | 419
Allow Sales?
Taxes-Disability
Taxes-Sales
7130
7130
7210M
53
Sales Tax 4 Expense
Taxes-Fuel
7210
7210
7220M
30
31
Taxes-Charter
Lost Parts Inventory
7220
7230
7310M
73
Aircraft Inventory Adjustments
Maintenance - Building
Maintenance - Auto
7340
7400
7410
81
Lost Oil Inventory
7330
77
Lost Parts Inventory - Pilot Supplies
7311
Lost Fuel Inventory
Lost Parts Inventory - Avionics
7310
7320
Lost Parts Inventory - Shop
7310
Local Fuel Tax Expense/Recapture
64
60
Flowage Fee Expense/Recapture
7220
72
State Fuel Tax Expense/Recapture
7220
71
FET Expense/Recapture
7220
70
Sales Tax 3 Expense
Sales Tax 2 Expense
7210
29
Sales Tax 1 Expense
7210
28
Worker’s Compensation Premiums
Taxes-FUTA
52
Taxes-SUTA
Description
7130
Our
Account
Number
50
Auto Ledger
List #
7130
Master?
51
Default
Acct.
Nbr.
Expense
Expense
Expense
Expense
Expense
Expense
Expense
Expense
Expense
Expense
Expense
Expense
Expense
Expense
Expense
Expense
Expense
Expense
Expense
Expense
Expense
Expense
Expense
Expense
Account
Type
Cash Flow Group
Administration
Administration
Administration
Line
Line
Flight School
Avionics
Shop
Administration
Administration
Administration
Administration
Administration
Administration
Administration
Administration
Administration
Administration
Administration
Administration
Administration
Administration
Administration
Administration
Department
420 | TotalFBO® User Guide
APPENDIX A
Allow Sales?
Yes
Yes
Charter
Scheduled
Flights
Flight School
Administration
Shop
Avionics
Line
Administration
Administration
Administration
Administration
Administration
Administration
Administration
Administration
Administration
Administration
Administration
Administration
Administration
Administration
Administration
Expense
Expense
Expense
Expense
Expense
Expense
Expense
Expense
Expense
Expense
Expense
Expense
Expense
Expense
Expense
Expense
Expense
Expense
Expense
Expense
Expense
Aircraft Maintenance - Sched. Flight
Aircraft Maintenance - Flight School
Maintenance - Equipment
Maintenance - Shop Equipment
Maintenance - Avionics Equipment
Maintenance - Line Equipment
Maintenance - Office Equipment
Building/Office Rent Expense
Utilities
Telephone Expense
Postage & Office Freight
Office Supplies Expense
Dues & Subscriptions
Bank Service Charge Expense
Credit Card Fees Expense
Cash Over/Short
Entertainment
Travel
Meals
Insurance-General
Insurance-Auto
7421
7421
7440M
7440
7440
7441
7441
7500
7510
7520
7530
7540
7550
7560
7570
7580
7600
7610
7620
7710
7720
19
115
Department
Expense
Cash Flow Group
Aircraft Maintenance - Charter
Account
Type
7420
Description
Administration
Auto Ledger
List #
Expense
Master?
Maintenance - Aircraft
Our
Account
Number
Allow Sales?
7420M
Default
Acct.
Nbr.
APPENDIX A
TotalFBO® User Guide | 421
Scheduled
Flights
Flight School
Expense
Expense
Insurance - Scheduled Flight Aircraft
Insurance - Flight School Aircraft
7731
7731
Yes
Yes
Yes
Administration
Administration
Administration
Administration
Bank Interest & Investments Revenue Other Income
Other Income
Other Income
Other Income
Returned Check Charge Revenue
Miscellaneous Revenue
Currency Exchange Gain/Loss
8040
8050
8210
8510
116
139
Administration
Administration
Administration
Other
Expense
Other
Expense
Other
Expense
Depreciation Expense
Interest Expense
Miscellaneous Expense
9020
9030
34
117
Other Expense
9010
20
Yes
Yes
Administration
Other Income
Bad Debts Recovered
8030
Administration
Yes
Administration
Other Income
Finance Charge Reversal
8025
Total Other Income
Yes
Administration
Other Income
Finance Charge Revenue
8020
91
Yes
Administration
Other Income
Auto Ledger
List #
Gain/Loss On Sale Of Assets
Allow Sales?
8010
Other Income
Total Expenses
Charter
Expense
Department
Insurance - Charter Aircraft
Cash Flow Group
7730
Account
Type
Administration
Description
Expense
Our
Account
Number
Insurance-Aircraft
Master?
7730M
Default
Acct.
Nbr.
422 | TotalFBO® User Guide
APPENDIX A
Auto Ledger
List #
114
State Income Tax Expense
9810
Total Other Expenses
Federal Income Tax Expense
Description
9800
Our
Account
Number
Bad Debt Expense
Master?
9500
Default
Acct.
Nbr.
Administration
Administration
Other
Expense
Other
Expense
Department
Administration
Cash Flow Group
Other
Expense
Account
Type
Allow Sales?
Yes
APPENDIX A
TotalFBO® User Guide | 423
424 | TotalFBO® User Guide
APPENDIX A
SAMPLE CASH FLOW SETUP
1 - NON-CASH INCOME
Sub-Group Title:
GL Account Clusters:
Unearned Revenue (Customer Deposits) 2020.00 - 2030.99
Payroll & Taxes Payable
2110.00 - 2130.99
Sales/Fuel/Charter Taxes Payable
2210.00 - 2240.99
2 - A/P
Sub-Group Title:
GL Account Clusters:
Accounts Payable
2010.00 - 2015.99
Inter-Company Due To/Due From
2930
3 - NON-CASH EXPENSE
Sub-Group Title:
GL Account Clusters:
Changes to Inventories
1300.00 - 1350.99
Deposits and Prepaid Expenses
1450.00 - 1499.99
Depreciation of Fixed Assets
1600.00 - 1600.08
Changes to Intangible Assets
1900.00 - 1940.99
Amortization of Intangible Assets
1960.00
4 - A/R
Sub-Group Title:
GL Account Clusters:
Accounts Receivable
1210.00 - 1250.99
Work In Process
1410.00 - 1420.99
APPENDIX A
SAMPLE CASH FLOW SETUP
5 - INVESTING
Sub-Group Title:
GL Account Clusters:
Treasury Bonds
1150.00 - 1150.99
Purchase (Sale) of Fixed Assets
1500.00 - 1580.99
Owner Investments
3010.00 - 3020.99
Prior Year Adjustments
3600.00
6 - FINANCING
Sub-Group Title:
GL Account Clusters:
Short-Term Financing
2040.00 - 2040.99
Long-Term Notes
2510.00 - 2520.99
7 - CASH
Sub-Group Title:
GL Account Clusters:
Cash on Hand
1010.00 - 1120.99
TotalFBO® User Guide | 425
426 | TotalFBO® User Guide
APPENDIX A
TotalFBO® User Guide | 427
AUTOMATIC LEDGER LIST
The Automatic Ledger List is detailed here, along with a description of the
purpose for each category.
Also shown is the default account number from the Chart of Accounts
supplied with TotalFBO® and the type of account normally expected for this
position. Items noted as Control Accounts indicate accounts that can only
be used for automatic journal entries. Manual journal entries will not be
allowed, and under normal operation, these accounts cannot be selected for
disbursements on checks or payable invoices or from invoice service lines.
Accounts are grouped by Function:
• Master Required Accounts
• Banking
• Unerned Income
• Sales Taxes
• Notes and Other Payables
• Payroll
• Inventory
• Shop & Other Sales
• Flight School
• Charter
• Miscellaneous
When you assign one of your account numbers to this list it becomes the
default that is used when a journal entry is made automatically by the system.
If you leave a category with no assigned number, any journal entry
which is made will be posted to the Suspense account.
We recommend that you are cautious about deleting numbers from the default
chart of accounts until you are very familiar with TotalFBO® in order to avoid
items being posted to Suspense.
Avoid making manual journal entries to the Suspense account. This account
should only be used by the system so that any balance will alert you to a
problem. Create another account for use in making journal entries you’re not
ready to classify.
APPENDIX B
428 | TotalFBO® User Guide
APPENDIX B
Master Required Accounts
1
Suspense
2920 Liability
2
Pass-Through Transfers
2910 Liability
*CONTROL ACCOUNT* 3
Default Accounts Receivable
1210 Asset
*CONTROL ACCOUNT* 129
Transient Accounts Receivable 1210.10 Asset
*CONTROL ACCOUNT* 136
Default Credit Card A/R
1210.30 Asset
*CONTROL ACCOUNT* 4
Default Customer Deposits
2020 Liability
*CONTROL ACCOUNT* 5
Default Accounts Payable
2010 Liability
Perhaps the most important of all the required accounts, and the only one
you cannot delete, this account is where an unbalanced journal entry is made
into a balanced one. Some parts of the program deliberately use this account
(such as manually modifying a customer’s balance), while normal usage
of the program will only make journal entries to this account if the normal
account for that operation can’t be found. Renaming this account or specifying
a different account number is acceptable, but you cannot set this line item to
zero.
Though you are free to use it for many purposes, this account is the common
account used in the Checking Transfer function and the Payables/Receivables
Transfer function.
When a change is made to the balance on a customer’s account, this is the
ledger account which records the change. If the Receivables Override Account
field on the customer record is not blank, that account number will be used
instead of this default number. If the customer has a credit balance, however,
the change is recorded against the Customer Deposits account (#4).
This is used for customers having a Paid On Purchase (Cash Only) status if the
invoice date and the payment date are not the same. This would be the case
when a pending fuel invoice or C.O.D. parts invoice is created on one day and
closed with payment on a subsequent day.
This is used for transactions on a customer set up as a credit card Holding
Company.
When a customer’s account goes into a credit balance (they have money on
account), the amount of that credit will be posted to this account as a credit
balance. When sales are then made to this account, the credit balance is
reduced.
This account is used to record the changes on vendor account balances. There
is an override account on the vendor record that will be used instead of this
default if the override is not blank.
APPENDIX B
6
Retained Earnings
3600 Equity
7
Current Earnings
3900 Equity
TotalFBO® User Guide | 429
The current year’s net income is automatically and continuously carried into
future years through this account. Renaming this account or specifying a
different account number is acceptable, but you cannot set this line item to
zero.
This account is not used to record any actual transactions. It serves as a trigger
to add up the net income when running the Balance Sheet report. Renaming
this account or specifying a different account number is acceptable, but you
cannot set this line item to zero.
8
Undeposited Receipts
1120 Asset
124
InterCompany Due To/Due From
2930.00 Liability
*CONTROL ACCOUNT*
All cash-type payments received on invoices and shop orders are debited to
this account. It thus serves as a ‘cash on hand’ account, holding this money
until you make a bank deposit.
When running TotalFBO® Enterprise Edition, transactions may be posted
between locations within the organization, such as when a customer makes a
purchase from a location other than his “home” location. This account is used
to make pairs of balanced journal entries for each location.
Banking
9
10
11
12
13
14
15
16
17
18
Bank Register 1
Bank Register 2
Bank Register 3
Bank Register 4
Bank Register 5
Bank Register 6
Bank Register 7
Bank Register 8
Bank Register 9
Bank Register 10
1010
1020
1030
1040
1050
1060
1070
1080
1090
1100
Asset
Asset
Asset
Asset
Asset
Asset
Asset
Asset
Asset
Asset
19
Bank Service Charge Expense 7560 Expense
These ten accounts record changes made to the corresponding check registers.
When a ‘Service Charge’ entry into a bank register is made, this account is
used as the default disbursement account. You can override this each time you
make an entry.
*CONTROL ACCOUNT*
*CONTROL ACCOUNT*
*CONTROL ACCOUNT*
*CONTROL ACCOUNT*
*CONTROL ACCOUNT*
*CONTROL ACCOUNT*
*CONTROL ACCOUNT*
*CONTROL ACCOUNT*
430 | TotalFBO® User Guide
APPENDIX B
20
Bank/Investment Interest Income 8040
Income
139
Currency Gain/Loss
Income
21
Shop Progressive Billings 2020
22
Compound-Statement School Credit 1430 Asset
23
Shop Orders Work in Process 1410 Asset
24
25
26
27
Sales Tax 1 Liability
(Reserved)
(Reserved)
(Reserved)
2210.01
28
29
30
31
Sales Tax 1 Expense
(Reserved)
(Reserved)
(Reserved)
7210.01
When you make an Interest-type transaction in checking, this account is the
default disbursement account. You can override this each time you make an
interest entry.
4960.10
As the exchange rate for the currencies you work with varies, this account will
be posted to show your net gain or loss in the value of cash in the bank.
Unearned Income
Liability
The Cross-Bill function creates a Progress Bill invoice on open shop orders
which credits this account. Closing the shop order then debits this account and
posts normal income.
This account number is used in the Compound-Account Statement.
If you use the Post Open Shop Orders functions, the total of the posted workin-process is debited to this account. When the shop order actually closes,
amounts posted to this account are automatically credited.
Sales Taxes
Liability
Liability
Liability
Liability
When sales taxe is charged on an invoice or shop order, the amount of the tax
is recorded against its liability account. When you write the check to the tax
commission, the amount should be coded to (thereby debiting) this account.
Expense
Expense
Expense
Expense
These accounts are used by the inventory module as a defaulted payment code
on payables assignments.
APPENDIX B
32
33
Long-Term Notes Payable 2520 Liability
Short-Term Notes Payable 2040 Liability
34
Interest Paid (Expense)
35
Gift Certificates Outstanding
2030 Liability
36
Earned Discounts (Payables)
5910 Cost
118
C.O.D. Holding Account 2010.88
Liability
119
Shop Deposits Account 2025
Liability
These accounts are used to record the value of outstanding long-term and
short-term notes entered through the payables module.
9020
Expense
When loan payments and interest are paid during payment sequences, the
amount of the interest will be debited to this account
When you select ‘Gift Cert’ as a payment means, the program makes the Debit
to this account. If you use service lines coded to this account to record sales of
gift certificates, you’ll properly account for all outstanding gift certificates.
When a discount is taken advantage of on an accounts payable item, that
discount amount is credited to this account.
This account is the default when a manual C.O.D. account is made. It is
cleared when that check is applied to a Payables invoice item.
Similar to the Customer Deposit Liability account (#4), this account
hold amounts posted to Shop Orders as Deposit Payments until the job is
completed.
TotalFBO® User Guide | 431
Notes and Other
Payables
*CONTROL ACCOUNT*
*CONTROL ACCOUNT*
432 | TotalFBO® User Guide
Payroll
APPENDIX B
37
38
39
40
Federal Withholding Liability
Payroll - Advance EIC Payments
State Withholding Liability
Local Withholding Liability
41
42
43
44
45
46
FICA Liability
Medicare Liability
FUTA Liability
SUTA Liability
Worker Comp Liability
Disability Liability
2130.02
2130.10
2130.08
2130.07
2130.09
2130.10
Liability
Liability
Liability
Liability
Liability
Liability
47
Default Payroll Deductions 2120
Liability
131
Employee Advances
1210.20
Asset
48
49
50
51
FICA Expense
Medicare Expense
FUTA Expense
SUTA Expense
7130.02
7130.01
7130.08
7130.07
Expense
Expense
Expense
Expense
52
Worker Comp Expense
7130.09
Expense
53
Disability Expense
7130.10
Expense
2130.03
2030.04
2130.05
2130.06
Liability
Liability
Liability
Liability
These accounts hold the tax withheld from employee’s payroll for the federal,
state, or local taxes. These, of course, will not have any employer contribution.
These liability accounts hold the employee and employer payroll taxes (if any)
until the tax payments are made. When the payments are made, the account is
either returned to zero or to the remaining tax for the current tax period.
When you set up new deductions in the payroll module, this account is used
as the default holding account. You may change this account as you edit the
deduction names.
Deductions to repay a payroll advance are posted as credits to this account.
These accounts are where the employer-paid FICA, FUTA, and SUTA taxes
are logged. These are expenses, not liabilities, and will not be decreased by tax
deposit payments.
As with the other payroll taxes, this account records the accrued expense for
any worker’s compensation premiums you have set up. The corresponding
liability is recorded by ID# 45.
This account records the employer tax expense for any state disability taxes
you have set up.
APPENDIX B
54
Payroll - Employee Benefit Expense 7120 Expense
55
Payroll Expense
7110
Expense
56
Accrued Net Payroll
2110
Liability
TotalFBO® User Guide | 433
If you are using the option for Employer Contributions, this is the expense
account the employer portion is initially coded to. This can be overridden on a
line-by-line basis in the employee deduction setup screen.
This is the default account for recording gross wages as an expense. There are
several layers of overrides on this posting which are discussed in the payroll
module.
This account receives the net pay from employee pay records in the process
of the Make Pay step. When pay checks are made, this account is debited,
bringing the balance on this account back to zero at the end of each pay cycle.
57
58
59
60
Parts Inventory
Parts Sales
Parts Cost of Sales
Lost Parts Inventory
1300.10
4000.10
5000.10
7310.10
61
62
63
64
92
Fuel Inventory
1310.00
Fuel Sales
4060.50
Fuel Cost of Sales
5060.50
Lost Fuel Inventory
7320.00
Minimum Fuel Surcharge 4061.00
Asset
Income
Cost
Expense
This set of four accounts is repeated for each inventory area. The Inventory
account records the asset value of that inventory type. The Sales account
records the gross revenue (customer sales) when parts are sold on invoices
and shop orders. The Cost of Sales account is debited (and the asset account
credited) for the cost of a part when it is sold. When parts quantities or unit
costs are changed, the asset account is adjusted for your change, and the
offsetting entry is made to the Lost Inventory account. Note that you can
provide overrides for all these accounts by using the Inventory Department
structures in the Inventory module.
Asset
Income
Cost
Expense
Income
If you have set up an Airline Fueling Minimum, this G/L account is used
to charge the extra fee required if a single sale does not meet the customer
account’s minimum fueling charge.
*CONTROL ACCOUNT*
Inventory
434 | TotalFBO® User Guide
APPENDIX B
66
67
68
69
120
121
122
123
Fuel - FET Liability
Fuel - State Liability
Fuel - Local Liability
Fuel - Other Liability
Fuel Tax 5 Liability
Fuel Tax 6 Liability
Fuel Tax 7 Liability
Fuel Tax 8 Liability
2220.01
2220.02
2220.03
2220.04
2220.04
2220.04
2220.04
2220.04
Liability
Liability
Liability
Liability
Liability
Liability
Liability
Liability
70
71
72
73
132
133
134
135
Fuel - FET Paid
Fuel - State Paid
Fuel - Local Paid
Fuel - Other Paid
Fuel Tax 5 Paid
Fuel Tax 6 Paid
Fuel Tax 7 Paid
Fuel Tax 8 Paid
7220.01
7220.02
7220.03
7220.04
7220.05
7220.06
7220.07
7220.08
Expense
Expense
Expense
Expense
Expense
Expense
Expense
Expense
74
75
76
77
Oil Inventory
Oil Sales
Oil Cost of Sales
Lost Oil Inventory
1320.00
4070.50
5070.50
7330.00
Asset
Income
Cost
Expense
78
79
80
81
Aircraft Inventory
Aircraft Sales
Aircraft Cost of Sales
Lost Aircraft
1330.00
4510.00
5510.00
7340.00
Asset
Income
Cost
Expense
89
Freight Paid (Expense)
5020.10
Expense
These tax liabilities are recorded the same as with the sales taxes. When any
of these taxes are charged on fuel sales to customers, that amount will be
recorded in the proper account.
These expense accounts are used when a fuel sale is made to a non-billing
customer.
This account is used by the inventory module as a defaulted payment code on
payables assignments.
APPENDIX B
82
Shop Billing - Hourly
4030.10 Income
83
Shop Billing - Flat Rate
4040.10 Income
84
Shop Billing - Outside Labor
4050.10 Income
85
Shop Billing - Outside Parts
4055.10 Income
86
Miscellaneous Shop Supplies 4010.10 Income
87
Core Charge Billing/Rebate
4005.10 Income
88
Freight Billed (Income)
4020.10 Income
90
Discounts Given to Clients
4910.00 Income
125
Shop Billing - Outside Repair
4055.10 Income
126
Shop Billing - Misc Repair
8210.00 Income
This account is used to record employee time billed out on shop orders. It can
be overridden while entering a given shop order.
This account is used to record income billed as ‘Flat Fees’ on shop orders. It
can be overridden while entering a given shop order
This account is used to record income billed as ‘Outside Work’ on shop orders.
It can be overridden while entering a given shop order
This is used as the default income code on the Outside Repair line of shop
order discrepancies.
Amounts entered in the Miscellaneous Supplies field on shop orders will be
credited to this account when the shop order is closed or posted.
This is used as the default revenue account for core charges billed on shop
orders. It is also used as the default account for core charges billed to you (by
the vendor) when you receive an item with a core charge.
This account is used to record freight income from the freight field on shop
orders. It is also the default code (it can be changed) on the per-discrepancy
freight field.
Whenever a discount is given on an invoice or shop order, that amount is
recorded against this account. The amounts recorded will be debits, and this
account will probably show up as a net debit (negative income) on the general
ledger.
This account is used to record income billed as ‘Outside Repair’ on shop
orders. It can be overridden while entering a given shop order.
This account is used to record income billed as ‘Miscellaneous Repair’ on
shop orders. It can be overridden while entering a given shop order.
TotalFBO® User Guide | 435
Shop & Other Sales
436 | TotalFBO® User Guide
APPENDIX B
137
138
Shop Warranty Labor Sales
Shop Warranty Parts Sales
4176.00 Income
4177.00 Income
65
Automatic Fuel Surcharge
4125 Income
93
Package Sales Trigger Account 4190 Income
95
Headset Rentals (Dispatch Ops) 4155 Income
96
Off-Site Fuel Credit
4120 Income
97
Landing Fees (Dispatch Ops)
2240 Income
98
Dispatch - Damage Waiver
4160 Income
These accounts are used to record amounts billed to Warranty vendors using
the Shop Order Cross-Bill invoice function.
Flight School
The Automatic Fuel Surcharge account is used on invoices when the rental
aircraft has an automatic fuel surcharge specified.
This account is used on an invoice service line to trigger the Package Sales
code into action. When this code is seen on a service line, the program gives
you a list of Packages (as set up in the Flight School module) to select from,
and updates the package time totals for that customer.
If you enable headset rentals or landing fees in the dispatch module, these
accounts are used to record the income.
If you record a service line on an invoice to this account, two things happen.
The credit flag is automatically set to Yes, and the Quantity field is posted to
the aircraft on that line in a fuel consumption record.
This account is used to credit the revenue for local Landing Fees charged to
Rental customers on Dispatches.
This account is used to credit the revenue for Damage Waiver sales on
Dispatches.
APPENDIX B
99
100
101
102
103
104
127
Charter Income
4210 Income
Charter - Aircraft Standby Charges 4211 Income
Charter - Pilot Standby Charges
4212 Income
Charter - Catering Charges
4215 Income
Charter - Landing/Airport Fees Billed 4217 Income
Charter - Add’l Crew Charges
4214 Income
Charter - Fuel Surcharge
4210 Income
105
Charter - Extra Charges
4213 Income
106
Charter - Other Expenses Billed
4216 Income
107
108
109
110
111
112
113
128
Charter - Int’l FET Liability
2230.03
Charter - Int’l Customs Liability
2230.04
Charter - Int’l Immigration Liability 2230.05
Charter - Departure Taxes
2230.06
Charter - Per-Leg Taxes
2230.07
Charter Psgr FET Liability
2230.02
Charter Cargo FET Liability
2230.01
Charter - APHIS Liability
2230.08
130
Charter Taxes - Expense
These accounts record the income from sales on Charter lines on invoices.
This account is used as the default account to credit charges for ‘extra’ charges
on charter invoices. This account can be overridden by specifying a GL
account number on the extra charge line.
Often used for other crew expenses, when you make a charter invoice, the
amount charged in the ‘Crew Expenses’ field is credited to this account.
Liability
Liability
Liability
Liability
Liability
Liability
Liability
Liability
These accounts record the tax liabilities from sales on Charter lines on
invoices.
7260.10 Expense
This account records the expense when taxes are not collected from an outside
customer.
TotalFBO® User Guide | 437
Charter
438 | TotalFBO® User Guide
Miscellaneous
APPENDIX B
91
Interest Charged to Clients
8020 Income
94
Electric Meter Sales Revenue
(none) Income
114
Bad Debt Expense
9500 Expense
115
Credit Card Merchant Fee Expense 7570 Expense
116
Miscellaneous Income
8210 Income
117
Miscellaneous Expense
9030 Expense
Once per month, during the closing operation, interest is charged to all
accounts that have an outstanding balance due of more than 30 days. This is
shown as income and logged against this account.
Obsolete Function
This account is used to automatically credit revenue from electric meters, if
you’re using that capability on the rental space functions.
If you record a credit to an account using a service line on an invoice, and
use the ‘Bad Debt’ service code as specified here, the amount credited will be
added to the account’s bad-debt field.
This account is used as the default ‘Additional Credit’ account in the Transfer
Money Between A/R and A/P function.
When you sell an item on an invoice, and use the line type ‘Misc’, this account
will record that income amount.
When receiving inventory, if you specified the Misc line type on a purchase
order, this account is used when building a vendor invoice from the Receive
function.
TotalFBO® User Guide | 439
DEFAULT JOURNAL
ENTRIES
APPENDIX C
The following pages document the basic journal entries made by the program during various operations. Some assumptions exist for each type of operation. If the
assumptions are reversed from your actual operation, debits will become credits and
vice versa.
INVOICING ASSUMPTIONS:
It is assumed you are selling inventory or services and taking in money. Checking
the Credit? box on a sales detail line will reverse these actions.
CLOSING STATEMENTS ASSUMPTIONS:
It is assumed that you ARE charging interest on overdue accounts. If you are not, no
journal entries will happen at all during this operation.
CUSTOMER ACCOUNTS:
It is assumed that you are adding to an account’s balance by manually changing the
customer record. This is inappropriate except when initially setting up your program.
PAYABLES ASSUMPTIONS:
When adding a Purchase Bill, it is assumed that this is not a credit memo. Checking
the Credit? box will reverse the sense of the journal entries.
UPDATE INVENTORY ASSUMPTIONS:
When adding inventory, you have to have both a non-zero quantity and a non-zero
cost to make any journal entries from these functions. This is inappropriate except
when correcting as the result of a physical inventory count.
RECEIVE INVENTORY ASSUMPTIONS:
Usually no entries will be made from this function. However, you will get the Negative Oversale Adjustment entry only if the inventory has been sold negative, and the
new stock comes in at a different cost than the old. This chart assumes that the new
cost has increased.
WORK IN PROCESS ASSUMPTIONS:
When you post Work in Process, essentially the same journal entry is made as for
Closing a Shop Order. However, since the customer’s account is not being updated,
the Work in Process asset account is used and no entries are made for tax liabilities.
When the Shop Order later closes, any adjustments to income are made and the Work
in Process asset account is cleared.
440 | TotalFBO® User Guide
APPENDIX C
DEBIT THESE ACCOUNTS
INVOICES
ALL#
Money Received
8
Undeposited Receipts
Gift Certificate Sale
35
Gift Certificates Liability
3
Accounts Receivable
Account Title
GL Number
CREDIT THESE ACCOUNTS
ALL#
Account Title
GL Number
Total Charges, Including
Credit Card Receivables 136 A/R - Credit Cards
3
Accounts Receivable
Payment on Account
4
Customer Deposits
Sales Taxes
24
Sales Tax 1 Liability
Discounts Given to
Customers
90
Sales Discounts
61
Fuel Inventory
62
Fuel Sales Income
66-69
Fuel Sales
Oil Sales
Parts Sales
Aircraft Sales
63
76
59
80
Cost of Fuel Sold
Cost of Oil Sold
Cost of Parts Sold
Cost of Aircraft Sold
Fuel Tax Liability 1-4
120-123 Fuel Tax Liability 5-8
74
Oil Inventory
75
Oil Sales Income
57
Parts Inventory
58
Parts Sales Income
78
Aircraft Inventory
79
Aircraft Sales Income
INVOICING ASSUMPTIONS:
It is assumed you are selling inventory or services and taking in money.
Checking the Credit? box on a sales detail line will reverse these actions.
APPENDIX C
INVOICES
(Cont’d.)
DEBIT THESE ACCOUNTS
ALL#
Account Title
GL Number
TotalFBO® User Guide | 441
CREDIT THESE ACCOUNTS
ALL#
Account Title
99
Charter Income
100
Aircraft Standby
Income
101
Crew Standby Income
102
Catering Income
103
Landing Fee Income
104
Add’l Crew Income
105
Extra Charges Income
106
Other Exp. Income
107
Int’l FET Liability
108
Int’l Customs Liability
109
Int’l Immigration Liab.
110
Departure Taxes Liab.
111
Per-Leg (Segment)
FET
112
Passenger FET Liab.
113
Cargo FET Liability
127
Charter Fuel
Surcharge
128
Charter APHIS Liability
Miscellaneous Sale
116
Miscellaneous Income
Services Sold
==
Any selected account
Gift Certificate Sale
35
Gift Certificates
Liability
Charter Sales
130 Charter Taxes Expense
GL Number
442 | TotalFBO® User Guide
CUSTOMER
ACCOUNTS
ALL#
Manual Change to
Account Balance
3
APPENDIX C
DEBIT THESE ACCOUNTS
CLOSING
STATEMENTS
ALL#
Charging Interest
3
Account Title
CREDIT THESE ACCOUNTS
GL Number ALL#
Accounts Receivable
1
DEBIT THESE ACCOUNTS
Account Title
GL Number
Suspense
CREDIT THESE ACCOUNTS
GL Number ALL#
Accounts Receivable
Account Title
Account Title
GL Number
91 Interest Income
CUSTOMER ACCOUNTS:
It is assumed that you are adding to an account’s balance by manually changing the customer record. This is inappropriate except when initially setting up
your program.
CLOSING STATEMENTS ASSUMPTIONS:
It is assumed that you ARE charging interest on overdue accounts. If you are
not, no journal entries will happen at all during this operation.
APPENDIX C
SHOP
DEPOSIT
Money Received or
Credit Card
Receivable
DEBIT THESE ACCOUNTS
ALL#
Account Title
8
Undeposited Receipts
TotalFBO® User Guide | 443
CREDIT THESE ACCOUNTS
GL Number ALL#
Account Title
GL Number
136 A/R - Credit Cards
3
Accounts Receivable
119 Shop Deposits Liability
PROGRESS BILL
INVOICE
PROGRESS BILL
INVOICE
Money Received or
Credit Card
Receivable
DEBIT THESE ACCOUNTS
ALL#
Account Title
8
Undeposited Receipts
CREDIT THESE ACCOUNTS
GL Number ALL#
GL Number
136 A/R - Credit Cards
3
Accounts Receivable
21 Shop Progressive Billing
DEBIT THESE ACCOUNTS
WARRANTY INVOICE ALL#
Money Received or
Credit Card
Receivable
Account Title
8
Account Title
Account Title
Undeposited Receipts
136 A/R - Credit Cards
3
CREDIT THESE ACCOUNTS
GL Number ALL#
Accounts Receivable
137 Warranty Labor Billed
138 Warranty Parts Billed
GL Number
444 | TotalFBO® User Guide
DEBIT THESE ACCOUNTS
SHOP ORDER
ALL#
Money Received
8
Release Deposit
Total Charges, Including
Credit Card Receivables
APPENDIX C
Account Title
CREDIT THESE ACCOUNTS
GL Number ALL#
Account Title
Undeposited Receipts
119 Shop Deposits Liability
136 A/R Credit Cards
3
Accounts Receivable
Payment on Account
Sales Taxes
3
Accounts Receivable
4
Customer Deposits
24 Sales Tax Liability
Discounts Given to
Customers
90 Sales Discounts
61 Fuel Inventory
62 Fuel Sales Income
66 Fuel-FET Liability
67 Fuel-State Liability
68 Fuel-Local Liability
Fuel Sales
63 Cost of Fuel Sold
69 Fuel-Other Liability
74 Oil Inventory
Oil Sales
76 Cost of Oil Sold
75 Oil Sales Income
57 Parts Inventory
58 Parts Sales Income
Parts Sales
Freight Charges
Misc. Shop Supplies
OutsideLabor Charges
59 Cost of Parts Sold
87 Core Charge Inc./Exp.
88 Freight Income
86 Misc. Shop Supplies
84 Outside Labor Income
85 Outside Parts Income
125 Outside Repair
Outside Parts Charges
126 Misc. Repair
GL Number
APPENDIX C
SHOP ORDER
(Cont’d.)
Hourly Labor Charges
Flat Rate Charges
Adjust Work in
Process
DEBIT THESE ACCOUNTS
ALL#
Account Title
TotalFBO® User Guide | 445
CREDIT THESE ACCOUNTS
GL Number ALL#
Account Title
82 Shop Labor Income
Shop Flat Rate
83 Income
23 Shop Work in Process
GL Number
446 | TotalFBO® User Guide
WORK IN
PROCESS
Total Charges
APPENDIX C
DEBIT THESE ACCOUNTS
ALL#
Account Title
CREDIT THESE ACCOUNTS
GL Number ALL#
Account Title
GL Number
23 Shop Work in Process
61 Fuel Inventory
Fuel Sales
63 Cost of Fuel Sold
62 Fuel Sales Income
74 Oil Inventory
Oil Sales
76 Cost of Oil Sold
75 Oil Sales Income
57 Parts Inventory
58 Parts Sales Income
Parts Sales
Freight Charges
Misc. Shop Supplies
Outside Labor
Charges
59 Cost of Parts Sold
87 Core Charge Inc./Exp.
88 Freight Income
86 Misc. Shop Supplies
84 Outside Labor Income
85 Outside Parts Income
125 Outside Repair
Outside Parts Charges
Hourly Labor Charges
Flat Rate Charges
126 Misc. Repair
82 Shop Labor Income
83 Shop Flat Rate Income
WORK IN PROCESS ASSUMPTIONS:
When you post Work in Process, essentially the same journal entry is made as
for Closing a Shop Order. However, since the customer’s account is not being
updated, the Work in Process asset account is used and no entries are made for
tax liabilities. When the Shop Order later closes, any adjustments to income
are made and the Work in Process asset account is cleared.
TotalFBO® User Guide | 447
APPENDIX C
UPDATE
INVENTORY
DEBIT THESE ACCOUNTS
ALL#
Account Title
CREDIT THESE ACCOUNTS
GL Number ALL#
Account Title
Add or Adjust a Part
57 Parts Inventory
60 Lost Parts Expense
Add or Adjust a Fuel
61 Fuel Inventory
64 Lost Fuel Expense
Add or Adjust an Oil
74 Oil Inventory
77 Lost Oil Expense
78 Aircraft Inventory
81 Lost Aircraft Expense
Add or Adjust an
Aircraft
GL Number
UPDATE INVENTORY ASSUMPTIONS:
When adding inventory, you have to have both a non-zero quantity and a nonzero cost to make any journal entries from these functions. This is inappropriate
except when correcting as the result of a physical inventory count.
RECEIVE
INVENTORY
DEBIT THESE ACCOUNTS
ALL#
Account Title
CREDIT THESE ACCOUNTS
GL Number ALL#
Account Title
Negative Oversale of
Parts
59 Cost of Parts Sold
57 Parts Inventory
Negative Oversale of
Fuel
63 Cost of Fuel Sold
61 Fuel Inventory
Negative Oversale of
Oil
76 Cost of Oil Sold
74 Oil Inventory
RECEIVE INVENTORY ASSUMPTIONS:
Usually no entries will be made from this function. However, you will get the
Negative Oversale Adjustment entry only if the inventory has been sold negative,
and the new stock comes in at a different cost than the old. This chart assumes
that the new cost has increased.
GL Number
448 | TotalFBO® User Guide
PAYABLES
Add Purchase Bill
Pay by Check/
Withdrawal
Mark Paid by Manual
C.O.D. Check
APPENDIX C
DEBIT THESE ACCOUNTS
ALL#
Account Title
== Any selected account
CREDIT THESE ACCOUNTS
GL Number ALL#
5
Account Title
GL Number
Accounts Payable
36 Earned Discounts
5
Accounts Payable
9-18 Bank Register
36 Earned Discounts
5
Accounts Payable
118 COD Holding Account
36 Earned Discounts
Pay by Credit Card
5
Accounts Payable
5
Accounts Payable
36 Earned Discounts
Pay by Cash
Add Note
5
Accounts Payable
== Any selected account
== Any selected account
Long-Term or Short32-33 Term Notes Payable
Long-Term or Short32-33 Term Notes Payable
Make Note Payment
34 Interest Paid Expense
9-18 Bank Register
Make Lease Payment
== Any selected account
9-18 Bank Register
PAYABLES ASSUMPTIONS:
When adding a Purchase Bill, it is assumed that this is not a credit memo.
Checking the Credit? box will reverse the sense of the journal entries.
APPENDIX C
MANUAL
CHECKING
Add Checks or
Withdrawals, Wires
Out, & Drafts
Pay by Manual C.O.D.
Check
Add Service Charge
DEBIT THESE ACCOUNTS
ALL#
Account Title
==
Any selected account
118 COD Holding
19
Service Chg. Exp.
TotalFBO® User Guide | 449
CREDIT THESE ACCOUNTS
GL Number ALL#
Account Title
9-18 Bank Register
9-18 Bank Register
9-18 Bank Register
Add Deposits of Daily
Receipts
9-18 Bank Register
Add Other Deposits &
Wires In
9-18 Bank Register
== Any selected account
Add Interest Received
9-18 Bank Register
20 Bank/Investment Inst.
Update Exchange Rate
9-18 Bank Register
139 Currency Gain/Loss
6
Undeposited Receipts
GL Number
450 | TotalFBO® User Guide
PAYROLL
APPENDIX C
DEBIT THESE ACCOUNTS
ALL#
Account Title
CREDIT THESE ACCOUNTS
GL Number ALL#
Account Title
55 Payroll Wage Expense
56 Accrued Net Payroll
38 Advance EIC Payments
37 Federal W/H Liability
39 State W/H Liability
40 Local W/H Liability
Commit Pay
Make Paycheck
48 FICA Expense
41 FICA Liability
49 Medicare Expense
42 Medicare Liability
50 FUTA Expense
43 FUTA Liability
51 SUTA Expense
44 SUTA Liability
52 Worker’s Comp Expense
45 Worker’s Comp. Liability
53 Disability Expense
46 Disability Liability
54 Employee Benefits Exp.
47 Employee Benefits Liab.
56 Accrued Net Payroll
9-18 Bank Register
37 Federal W/H Liability
9-18 Bank Register
39 State W/H Liability
40 Local W/H Liability
41 FICA Liability
42 Medicare Liability
43 FUTA Liability
44 SUTA Liability
45 Worker’s Comp. Liab.
Make Tax Deposit
46 Disability Liability
38 Advance EIC Payments
GL Number
TotalFBO® User Guide | 451
OVERRIDING THE
AUTOMATIC LEDGER LIST
DEFAULTS
Although the list of categories contained within the Automatic Ledger List is
very complete, the system of Overrides provided in TotalFBO® enables you to
have unlimited flexibility in directing journal entries to specific profit centers
within your organization.
The two most basic tools you’ll use are the Inventory Department and the
General Ledger Department. The diagram on the next page shows the relationship of these two typs of Departments to the Automatic Ledger List. Note
that each is designed to override specific categories of the Automatic Ledger
List, and that there is some overlap between the two departments themselves.
This overlap allows you to make a basic decision about how journal entries
will be made for most inventory sales, but use the General Ledger
Department to make an alternate decision for some items at the time of the sale
itself, depending on the customer or method of sale.
Another tool you’ll use is the type of customer account which will be used for
the sale. Although most sales will be made to Normal customers, there will be
items removed from inventory for company use that are handled with a NonBilling customer, and transactions between departments that are handled with
an Internal customer.
The worksheets that follow provide examples of typical setups for Internal and
Non-Billing Customers as well as Inventory and General Ledger Departments.
APPENDIX D
452 | TotalFBO® User Guide
APPENDIX D
GENERAL LEDGER OVERRIDES
Basic Defaults
Sales Overrides for
Income and Costs
Automatic Ledger List
ID
Category
Acct. Number
Flat Fee
4190
Hourly Labor
4180
Outside Labor
4170
Outside Parts
4175
Outside Repair
4185
Freight
4950
Miscellaneous
4960
Consumables
4050
General Ledger Dept.
Flat Fee
4190.60
Hourly Labor
4180.60
Outside Labor 4170.60
Outside Parts
4175.60
Outside Repair 4185.60
Freight
4950.60
Miscellaneous 4960.60
Consumables
Warranty Labor 4210
4050.60
Warranty Labor 4210.60
Warranty Parts 4215
Warranty Parts 4215.60
Inventory Dept.
Inventory
1300
Inventory
1300.10
Part Cost
5000
Cost
5000.10
Part Cost
5000.60
Part Sales
4000
Sales
4000.10
Part Sales
4000.60
Lost Items
7000
Lost Items
7000.10
Core Charges
4005
Core Charges
4005.10
Core Costs
5005
Core Costs
5005.10
Freight Charges 4950
Freight Costs
6170
Freight Charges 4950.10
Freight Costs
6170.10
Inventory Management Overrides
When journal entries are made, the basic defaults may be overridden by:
•Inventory Department settings (applied to Inventory items themselves)
• General Ledger Department settings (applied to Shop Orders, Invoices & Customers)
APPENDIX D
TotalFBO® User Guide | 453
MAGICAL ACCOUNTING!
JOURNAL ENTRIES FOR SALES TO:
NORMAL CHARGE
CUSTOMER
INTERNAL BILLING
CUSTOMER
NON-BILLING
CUSTOMER
DR Accounts Receivable
(Asset)
DR "Buying" Department's
Expense
**GL A/R OVERRIDE**
N/A
CR Income for Sales
(Income)
CR "Selling" Department's
Income for Sales
(Income)
N/A
DR Cost of Goods Sold
(Cost)
DR "Selling" Department's DR "User" Department
Cost of Goods Sold
Expense
(Cost)
**SALES DEPT. NAME**
CR Inventory Owned
(Asset)
CR Inventory Owned
(Asset)
CR Inventory Owned
(Asset)
CR Sales/Use Tax Liability
(Liability)
CR Sales/Use Tax Liability
(Liability)
CR Sales/Use Tax Liability
(Liability)
Used for:
Normal Sales to
Outside Customers
Used for:
Internal sales between
Departments
Used for:
Company use of
inventoried items
Sales Dept Name
Shop Overhead
General Tab
AIRLINE
General Tab
MOGAS
Asset
Asset
Asset
General Tab
DIESEL
Asset
General Tab
AVGAS
Asset
Lost Inv.
Core Sale
Core Exp
Lost Inv.
Core Sale
Core Exp
Lost Inv.
Core Sale
Core Exp
Cost
Lost Inv.
Core Sale
Core Exp
Used to separate Mogas sales from other fuel sales.
Cost
Used to separate Diesel sales from other fuel sales.
Cost
Used to separate Avgas sales from other fuel sales.
Cost
Freight Inc.
Freight Inc.
Freight Inc.
Freight Inc.
Revenue
Cost
Lost Inv.
Core Sale
Core Exp
Freight Inc.
Used to separate non-owned fuel sales from other fuel sales (for Into-Plane fees)
Revenue
Revenue
Revenue
Revenue
Used to separate JetA sales from other fuel sales.
Freight Exp
Freight Exp
Freight Exp
Freight Exp
Freight Exp
Marketing (for taxes only)
Ramp Vehicle Mtce (for taxes only)
Ramp Vehicle Fuel/Oil
Flight School
Flight School Mtce (for taxes only)
Flight School Fuel/Oil (for taxes only)
Charter Aircraft Mtce (for taxes only)
Charter Fuel/Oil (for taxes only)
(Purpose for override accounts indicated. If none used, department is for separation of inventory only.)
General Tab
JETA
Marketing Giveaway Expense
Line Vehicle Mtce Expense
TYPICAL INVENTORY DEPARTMENTS
NON-BILLING
INTERNAL
Advertising Gifts
Shop Overhead
INTERNAL
Line Ramp Vehicle Maintenance
NON-BILLING
NON-BILLING
Flight School Mtce Expense
Flight School Aircraft Maintenance INTERNAL
Flight School Supplies Used
Charter Mtce Expense
Flight School Fuel Expense
INTERNAL
INTERNAL
Charter Aircraft Maintenance
Flight School Aircraft Fuel & Oil
Line Ramp Vehicle Fuel/Oil
Charter Fuel Expense
INTERNAL
Charter Aircraft Fuel & Oil
GL A/R & CD Override
Type
TYPICAL INTERNAL AND NON-BILLING ACCOUNTS
Customer Name
454 | TotalFBO® User Guide
APPENDIX D
TYPICAL INVENTORY DEPARTMENTS
General Tab
CONSIGNMENT
General Tab
FLITESTORE
General Tab
CONSUMABLES
General Tab
PAINTSHOP
General Tab
CLIENT OWNED
General Tab
AVIONICS
General Tab
AIRCRAFT
Asset
Asset
Asset
Asset
Asset
Asset
Asset
Lost Inv.
Core Sale
Core Exp
Lost Inv.
Core Sale
Core Exp
Lost Inv.
Core Sale
Core Exp
Cost
Lost Inv.
Core Sale
Core Exp
Used to separate paintshop materials from other inventories.
Cost
Used to separate client-owned inventories of parts.
Cost
Used to separate avionics parts sales from other parts sales.
Cost
Freight Inc.
Freight Inc.
Freight Inc.
Freight Inc.
Lost Inv.
Core Sale
Core Exp
Cost
Lost Inv.
Core Sale
Core Exp
Used to separate Pilot Supply sales from other parts sales.
Cost
Freight Inc.
Freight Inc.
Revenue
Cost
Lost Inv.
Core Sale
Core Exp
Freight Inc.
Used to separate non-owned pilot supplies sold on consignment.
Revenue
Revenue
Separates & expenses consumable shop supplies immediately - billing is by flat fee.
Revenue
Revenue
Revenue
Revenue
Used to separate aircraft parts sales & from other parts sales.
(Purpose for override accounts indicated. If none used, department is for separation of inventory only.)
Freight Exp
Freight Exp
Freight Exp
Freight Exp
Freight Exp
Freight Exp
Freight Exp
APPENDIX D
TotalFBO® User Guide | 455
Flat Fee
Shop Tab
Flat Fee
Shop Tab
General Tab
LINE
General Tab
Parts Sales
Parts Sales
Warr Labor
Parts Sales
General Tab
PARTS COUNTER
Freight
Payroll Tax Payroll Exp.
Misc Sales Consumable
Oil Cost
Warr Parts
Hourly Labor Out Labor Out Parts Out Repair
Core Sales Parts Cost Fuel Sales Fuel Cost
Freight
Oil Sales
Payroll Tax Payroll Exp.
Misc Sales Consumable
Oil Cost
Freight
Oil Sales
Payroll Tax Payroll Exp.
Misc Sales Consumable
Oil Cost
Oil Sales
Core Sales Parts Cost Fuel Sales Fuel Cost
Oil Sales
Used for employee payroll.
Core Sales Parts Cost Fuel Sales Fuel Cost
Oil Cost
Oil Cost
Payroll Tax Payroll Exp.
Payroll Tax Payroll Exp.
Sales of parts over the counter separate from items installed on aircraft & for employee payroll.
Warr Parts
Hourly Labor Out Labor Out Parts Out Repair
Core Sales Parts Cost Fuel Sales Fuel Cost
Painting and aircraft refurbishing activities. Override A.L.L. defaults on Shop Orders and for employee payroll.
Warr Labor
Parts Sales
PAINT SHOP
Warr Parts
Hourly Labor Out Labor Out Parts Out Repair
Oil Sales
Avionics Maintenance activities. Override A.L.L. defaults on Shop Orders and for employee payroll.
General Tab
AVIONICS
Warr Labor
Flat Fee
Shop Tab
Core Sales Parts Cost Fuel Sales Fuel Cost
Aircraft Maint. activities separate from other shops, may post fuel & oil to Shop instead of Line, & for payroll.
Parts Sales
General Tab
SHOP
(With purpose for override accounts indicated. If no override used, department is used on GL accounts as profit center only)
TYPICAL GENERAL LEDGER DEPARTMENTS
Sales Tax
Tax Expense Tab
General Tab
Extra Chg
Payroll Tax Payroll Exp.
Oil Cost
Catering Landing Fee
Oil Sales
Extra Chg
Payroll Tax Payroll Exp.
Core Sales Parts Cost Fuel Sales Fuel Cost
Oil Sales
Oil Cost
Payroll Tax Payroll Exp.
Fuel Tax 1
Fuel Tax 8
Fuel Tax 2 Fuel Tax 3 Fuel Tax 4 Fuel Tax 5 Fuel Tax 6
Fuel Tax 7
Payroll Tax Payroll Exp.
Oil Sales
Oil Cost
Core Sales Parts Cost Fuel Sales Fuel Cost
Parts Sales
Core Sales Parts Cost Fuel Sales Fuel Cost
Oil Sales
Oil Cost
Payroll Tax Payroll Exp.
Used to record parts taken from inventory for maintenance of shop equipment on Non-Billing Account.
Parts Sales
SHOP OVERHEAD
Oil Cost
Catering Landing Fee
Oil Sales
Transfers giveaway items on Internal Account Invoice from Flight Store inventory & for employee payroll.
Parts Sales
General Tab
MARKETING
General Tab
Payroll Tax Payroll Exp.
Transfers pilot supplies for instruction from Flight Store inventory on Non-Billing invoice & for employee payroll.
Acft Charges Acft Standby Add Crew Crew Stnd Crew Exp
Charter Tab
Core Sales Parts Cost Fuel Sales Fuel Cost
Parts Sales
General Tab
FLIGHT SCHOOL
Oil Cost
Scheduled flights under Part 121, separate from On-Demand charter & for employee payroll.
Acft Charges Acft Standby Add Crew Crew Stnd Crew Exp
Charter Tab
Core Sales Parts Cost Fuel Sales Fuel Cost
Parts Sales
SCHEDULED SVC.
Oil Sales
Charter Flight activities. A.L.L. defaults may be enough unless you have more than one department.
Core Sales Parts Cost Fuel Sales Fuel Cost
Sales of pilot supplies. Used to track these sales separately from parts installed on aircraft & for employee payroll.
Parts Sales
General Tab
CHARTER
General Tab
FLIGHT STORE
(With purpose for override accounts indicated. If no override used, department is used on GL accounts as profit center only)
TYPICAL GENERAL LEDGER DEPARTMENTS
TYPICAL GENERAL LEDGER DEPARTMENTS
Parts Sales
Sales Tax
Tax Expense Tab
Sales Tax
Tax Expense Tab
Sales Tax
Tax Expense Tab
Parts Sales
Sales Tax
General Tab
Tax Expense Tab
RAMP EQUIP MTCE
Parts Sales
General Tab
FLT SCHOOL FUEL/
OIL
Parts Sales
General Tab
CHARTER FUEL/OIL
Core Sales Parts Cost Fuel Sales Fuel Cost
Oil Sales
Used for employee payroll.
Oil Cost
Payroll Tax Payroll Exp.
Fuel Tax 8
Fuel Tax 7
Fuel Tax 2 Fuel Tax 3 Fuel Tax 4 Fuel Tax 5 Fuel Tax 6
Fuel Tax 8
Fuel Tax 7
Fuel Tax 2 Fuel Tax 3 Fuel Tax 4 Fuel Tax 5 Fuel Tax 6
Fuel Tax 8
Fuel Tax 1
Fuel Tax 8
Fuel Tax 2 Fuel Tax 3 Fuel Tax 4 Fuel Tax 5 Fuel Tax 6
Fuel Tax 7
Payroll Tax Payroll Exp.
Oil Sales
Oil Cost
Only needed to departmentalize use tax paid on parts.
Fuel Tax 7
Fuel Tax 2 Fuel Tax 3 Fuel Tax 4 Fuel Tax 5 Fuel Tax 6
Core Sales Parts Cost Fuel Sales Fuel Cost
Fuel Tax 1
Oil Sales
Payroll Tax Payroll Exp.
Core Sales Parts Cost Fuel Sales Fuel Cost
Oil Cost
Used to record fuel and oil sold from Line Dept to Flight School Dept on Internal Account.
Fuel Tax 1
Oil Sales
Payroll Tax Payroll Exp.
Core Sales Parts Cost Fuel Sales Fuel Cost
Oil Cost
Used to record fuel and oil sold from Line Dept to Charter Dept on Internal Account.
Fuel Tax 1
Oil Sales
Payroll Tax Payroll Exp.
Core Sales Parts Cost Fuel Sales Fuel Cost
Oil Cost
Used to record fuel and oil taken from Inventory for use in ramp vehicles on Non-Billing Account.
Parts Sales
General Tab
RAMP EQUIP FUEL/
OIL
General Tab
ADMINISTRATION
(With purpose for override accounts indicated. If no override used, department is used on GL accounts as profit center only)
TYPICAL GENERAL LEDGER DEPARTMENTS
Sales Tax
Tax Expense Tab
Parts Sales
Sales Tax
General Tab
Tax Expense Tab
FLT SCH ACFT MTCE
Parts Sales
General Tab
CHARTER ACFT
MTCE
Fuel Tax 1
Oil Sales
Oil Cost
Oil Cost
Fuel Tax 2 Fuel Tax 3 Fuel Tax 4 Fuel Tax 5 Fuel Tax 6
Oil Sales
Only needed to departmentalize use tax paid on parts.
Fuel Tax 2 Fuel Tax 3 Fuel Tax 4 Fuel Tax 5 Fuel Tax 6
Core Sales Parts Cost Fuel Sales Fuel Cost
Fuel Tax 1
Core Sales Parts Cost Fuel Sales Fuel Cost
Only needed to departmentalize use tax paid on parts.
Fuel Tax 8
Fuel Tax 7
Fuel Tax 8
Payroll Tax Payroll Exp.
Fuel Tax 7
Payroll Tax Payroll Exp.
(With purpose for override accounts indicated. If no override used, department is used on GL accounts as profit center only)
TotalFBO® User Guide | 459
INVOICE
105Other Expenses Billed
128Charter APHIS Liabiity
Unlimited Other Expenses may be posted to specific accounts individually.
Specify Department on invoice, or specify specific account to override ID 99 only.
Review defaults from Automatic Ledger List. If needed, create GL Departments to overide income charges.
4Default Customer Deposits Liability
3Default Accounts Receivable
130Charter Taxes Expense
105Other Expenses Billed
105Other Expenses Billed
113Charter Cargo FET Liability
99G/L Acct Nbr Selection
112Charter Psgr FET Liability
111Charter - Per-Leg Taxes
110Charter - Departure Taxes
109Charter - Int’l Immigration Liability
108Charter - Int’l Customs Liability
G/L DEPT
G/L Department Name
105Extra Charges
106Charter - Other Expenses Billed
107Charter - Int’l FET Liability
102Catering
103Landing Fees
106Crew Expenses
103Charter - Landing/Airport Fees
105Charter - Extra Charges
101Crew Standby
102Charter - Catering Charges
104Charter - Add’l Crew Charges
100Aircraft Standby
104Additional Crew
101Charter - Crew Standby Charges
99Aircraft Charges
100Charter - Aircraft Standby Charges
99Charter Income
AUTOMATIC LEDGER LIST
USING OVERRIDES ON CHARTER INVOICES
460 | TotalFBO® User Guide
APPENDIX D
32/33
GL Liability Override Account
NOTE RECORD
5GL Liability Account
VENDOR ACCOUNT RECORD
Override the Automatic Ledger List by selecting accounts directly on the Vendor or Note record.
5 Default Accounts Payable
32 Long-Term Notes Payable
33 Short-Term Notes Payable
AUTOMATIC LEDGER LIST
USING OVERRIDES ON PAYABLES
APPENDIX D
TotalFBO® User Guide | 461
54Employee Benefit Expense
50FUTA Expense
44SUTA Liability
38Advance EIC Payments
54Employee Benefit Expenses
G/L DEPT
55Pay RateG/L Expense Acct
55Wage Expense GL Override
55G/L Department Name:
EMPLOYEE RECORD
48-54Payroll Employer Tax Expense
55Payroll Wage Expense
46Disability Liability
Each deduction and tax type can be posted to individual accounts.
Wage Expense for Individual pay types can be posted to specific accounts along with Worker’s Comp Accruals.
Select a Department on the Employee Record to quickly override Wage Expense and all tax expenses
46Disability Liability
45Worker Comp Liability
44SUTA Liability
40Local Withholding Liability
39State Withholding Liability
47Default Payroll Deductions
55Payroll Wage Expense
40Local Withholding Liability
53Disability Expense
45Worker Comp Liability
39State Withholding Liability
52Worker Comp Expense
55Payroll Expense
STATE/LOCAL TAX TABLE SETUP
47Default Payroll Ded.-Employer
49Medicare Expense
51SUTA Expense
47Default Payroll Ded.-Employee
EMPLOYEE MASTER DEDUCTIONS SETUP
48FICA Expense
AUTOMATIC LEDGER LIST
USING OVERRIDES ON PAYROLL
462 | TotalFBO® User Guide
APPENDIX D
TotalFBO® User Guide | 463
PLANNING YOUR
PRICING STRUCTURE
Use these worksheets to develop your price classes and to plan how you’ll
enter prices on the items and services you sell.
Also included are worksheets to help you develop and enter pricing and
performance data on aircraft used in rental and charter operations.
You can distribute these worksheets internally to the managers and pilots who
are most familiar with the data, then collect them to use in entering the data to
the system.
APPENDIX E
Wholesale
Internal
Contract
Discount
FIXED PRICE #1
FIXED PRICE #2
FIXED PRICE #3
FIXED PRICE #3
FIXED PRICE #4
Check your work by pressing the Preview Sale Pricing
button when in any fuel type record.
FIXED PRICE #5
FIXED PRICE #2
pressing the Update Inventory Pricing button.
COST
LIST
FIELDS USED*
FIELD*
FIXED PRICE #1
FORMULA
PRICE CLASSES
NOTES: When Receiving, update individual fuels by
Fuel Price Class:
CUSTOMER RECORD
FIXED PRICE #5
FIXED PRICE #4
Retail
CLASS
LIST
VALUE
INVOICE
Fuel Sales Line
COST
FIELD
FUEL RECORD
F
USING PRICE CLASSES FOR FUEL
+ $ AMT
+ % AMT AMOUNT
464 | TotalFBO® User Guide
APPENDIX E
Internal
Based
Discount
FIXED PRICE #1
FIXED PRICE #2
FIXED PRICE #3
FIXED PRICE #3
FIXED PRICE #4
Check your work by pressing the Preview Sale Pricing
button when in any fuel type record.
FIXED PRICE #5
FIXED PRICE #2
pressing the Update Inventory Pricing button.
COST
LIST
FIELDS USED*
FIELD*
PRICE CLASSES
FIXED PRICE #1
FORMULA
INVOICE
NOTES: When Receiving, update individual oils by
Oil Price Class:
CUSTOMER RECORD
FIXED PRICE #5
FIXED PRICE #4
Wholesale
LIST
CLASS
Retail
VALUE
Oil Sales Line
COST
FIELD
OIL RECORD
O
USING PRICE CLASSES FOR OIL
+ $ AMT
+ % AMT AMOUNT
APPENDIX E
TotalFBO® User Guide | 465
P
CLASS
Wholesale
Internal
Based
Discount
FIXED PRICE #1*
FIXED PRICE #2*
FIXED PRICE #3*
Parts Price Class:
CUSTOMER RECORD
FIXED PRICE #5*
FIXED PRICE #4*
Retail
LIST
VALUE
COST
FIELD
PART RECORD
FORMULA
FIXED PRICE #4
Parts Sales Line
FIELD*
PRICE CLASSES
FIXED PRICE #5
FIXED PRICE #3
FIXED PRICE #2
FIXED PRICE #1
COST
LIST
SHOP ORDER
Parts Sales Line
INVOICE
USING PRICE CLASSES FOR PARTS
+ $ AMT
+ % AMT AMOUNT
466 | TotalFBO® User Guide
APPENDIX E
MATRIX BASED ON: (Circle One)
LAST ORDER COST
COST
LIST
Check your work by pressing the Preview Sale Pricing button when in any part record
button, then the Apply Manual-Pricing Matrix button.
When Receiving, Apply Matrix to update individual part records by pressing the Update Inventory Pricing
Apply the Matrix to parts to insert correct numbers into Fixed Price fields
Link a matrix to an inventory department at Inventory>Update Inventory Departments>Department More Tab
Set Up the Matrix at Inventory>Options and Settings>General Options>Price Matrices Tab
FIXED PRICE #5*
FIXED PRICE #4*
FIXED PRICE #3*
FIXED PRICE #2*
FIXED PRICE #1*
BRACKET
RANGES:
*Regular Parts and Serialized Parts can use a Matrix to insert values into these fields:
APPENDIX E
TotalFBO® User Guide | 467
Employee Billing Rate
Employee Billing Rate
Employee Billing Rate
Employee Billing Rate
Employee Billing Rate
+ $ AMT
NOTES: Don’t forget to mark each shop employee as a Mechanic at Accounting>Payroll>Update Employee Basic Info
Shop Price Class:
CUSTOMER RECORD
Employee Billing Rate
PAY TYPE BILLING RATE
Employee Billing Rate
Employee Billing Rate
PAY TYPE BILLING RATE
Employee Billing Rate
Internal
PAY TYPE BILLING RATE
Employee Billing Rate
Employee Billing Rate
Owner
PAY TYPE BILLING RATE
Employee Billing Rate
Based
PAY TYPE BILLING RATE
FIELD*
PRICE CLASSES
PAY TYPE BILLING RATE
FORMULA
Employee Billing Rate
CLASS
Retail
VALUE
PAY TYPE BILLING RATE
FIELD
EMPLOYEE RECORD
Discrepancy Rates
SHOP ORDER
USING PRICE CLASSES FOR BILLING SHOP LABOR
+ % AMT AMOUNT
468 | TotalFBO® User Guide
APPENDIX E
VALUE
Retail
CLASS
Accounting> Payroll> Update Employee Basic Info
NOTES: Don’t forget to mark each instructor as a Pilot at
Instruction Price Class:
CUSTOMER RECORD
PAY TYPE BILLING RATE
PAY TYPE BILLING RATE
PAY TYPE BILLING RATE
PAY TYPE BILLING RATE
PAY TYPE BILLING RATE
PAY TYPE BILLING RATE
PAY TYPE BILLING RATE
FIELD
EMPLOYEE RECORD
Instruction Sales
I Line:
FORMULA
INVOICE
FIELDS USED*
+ $ AMT
+ % AMT AMOUNT
EMPLOYEE BILLING RATE
G/L INCOME ACCT SALES PRICE
G/L INCOME ACCT LIST PRICE
FIELD*
PRICE CLASSES
USING PRICE CLASSES FOR BILLING INSTRUCTOR TIME
APPENDIX E
TotalFBO® User Guide | 469
Club
Owner
FIXED PRICE #2
FIXED PRICE #3
FIXED PRICE #3
FIXED PRICE #4
FIXED PRICE #5
Leave the Rental Price Class set to Retail, however,
Set the minimum allowable credit balance to qualify for the rate
at Accounting> Receivabales> Options and Settings> General Options
Block/Club rate will be charged, otherwise the Retail rate is charged.
If the customer’s balance is eligible at the timeof the sale, the
FIXED PRICE #2
Customer Record as allowing the rate.
LIST
FIELDS USED*
FIELD*
FIXED PRICE #1
FORMULA
PRICE CLASSES
NOTES: Set up a Block/Club price class and then mark the
Package Customer?
Club Rates Allowed?
Block Rates Allowed?
Rental Price Class:
CUSTOMER RECORD
FIXED PRICE #5
FIXED PRICE #4
Block
FIXED PRICE #1
CLASS
Retail
VALUE
Rental Sales Line:
LIST PRICE
FIELD
AIRCRAFT RECORD
R
INVOICE
+ $ AMT
USING PRICE CLASSES FOR BILLING AIRCRAFT RENTAL TIME
+ % AMT
AMOUNT
470 | TotalFBO® User Guide
APPENDIX E
Brokered
FIXED PRICE #2
Charter Price Class:
CUSTOMER RECORD
FIXED PRICE #5
FIXED PRICE #4
FIXED PRICE #3
Retail
Corporate
CLASS
LIST PRICE
VALUE
Charter Sales Line:
FIXED PRICE #1
FIELD
CHARTER AIRCRAFT RECORD
C
FORMULA
FIXED PRICE #5
FIXED PRICE #4
FIXED PRICE #3
FIXED PRICE #2
FIXED PRICE #1
LIST
FIELDS USED*
FIELD*
PRICE CLASSES
USING PRICE CLASSES FOR BILLING CHARTERS
+ $ AMT
+ % AMT
AMOUNT
APPENDIX E
TotalFBO® User Guide | 471
472 | TotalFBO® User Guide
APPENDIX E
AIRCRAFT PRICING WORKSHEET
RENTAL AIRCRAFT PRICING
List Price
Reference Price 1
Reference Price 2
Reference Price 3
Reference Price 4
Reference Price 5
Fuel Surcharge:
(all prices per hour)
TAIL NUMBER
TotalFBO® User Guide | 473
APPENDIX E
AIRCRAFT PRICING WORKSHEET
CHARTER AIRCRAFT PRICING
TAIL NUMBER
2nd Pilot Required?
Optional
Always
Never
Aircraft & Pilot Base Price
Per Hour
2nd Pilot Add-on Price
Per Distance Unit
Per Hour
List Price
Reference Price 1
Reference Price 2
Reference Price 3
Reference Price 4
Reference Price 5
Positioning Leg Rate
Crew Standby Per Hour
Crew Standby Daily
Crew Standby Overnight
Billing Units for Aircraft:
Global Default
Hour
Statute Mile
Stat. Mile or Hour
Nautical Mile
Naut. Mile or Hour
Kilometer
Kilometer or Hour
Minimum Charter Amount
Min. Per-Leg Amount
Fuel Surcharge
Aircraft Standby Per Hour
Aircraft Standby Daily
Aircraft Standby Overnight
Hours Free Standby
Per ? Miles
Short Leg Distance
Short Leg Rate
Per Distance Unit
474 | TotalFBO® User Guide
APPENDIX E
AIRCRAFT PERFORMANCE WORKSHEET
TAIL NUMBER
Climb/Cruise Speed Units
Knots
MPH
KPH
Rate
Speed
FPM or MPM
Minimum
Short
Medium
Climb Data
Speeds & Altitudes for
Typical Leg Lengths
Leg Length
Long
Extended
29,999
Speed
Altitude
Max Takeoff Weight
Max Passenger Load
Aircraft Based at ID
Fuel Stop After ? Hours
Aircraft Subject to FET?
Fuel Type
Jet A
AvGas
APPENDIX E
TotalFBO® User Guide | 475
PILOT RECORD WORKSHEET
NAME
Title
First
Number
Class
MI
Last
Date of Birth
Medical Certificate
Flight Review Date
Local Checkride Date
Solo Endorsement Date
One Time Checkout Date
Last Flight Date
Dispatch Weight
Current Hours
VA Student?
Part 141 Student?
RATINGS & ENDORSEMENTS:
Solo Approved?
Hi-Performance Rated?
Private Certificate?
Complex Rated?
Commercial Certificate?
Pressurized Rated?
ATP Certificate?
Tail Wheel Rated?
Instrument Rated?
Sea-Plane Rated?
Multi-Engine Rated?
Helicopter Rated?
CFI?
Rating User Defined 1?
CFII?
Rating User Defined 2?
CFIME?
Rating User Defined 3?
Rating User Defined 4?
TYPE APPROVALS:
Aircraft Type
Aircraft Type
Checkout Date
Checkout Date
Approved By
Approved By
Last Flown Date
Last Flown Date
Date
Suffix
476 | TotalFBO® User Guide
APPENDIX E
TotalFBO® User Guide | 477
DEFAULT PRIVILEGE
REQUIREMENTS
Each user is assigned a Privilege Level number that defines his activities in
those major sections of the program to which he’s been given access.
However, although default privilege level requirements have been assigned
to menus, buttons, fields, and reports throughout the program, each FBO will
want to make some changes to accommodate staffing assignments.
The following charts detail the default requirements and provide space for
you to note your own changes.
APPENDIX F
478 | TotalFBO® User Guide
APPENDIX F
PRIVILEGE OVERRIDES FOR BUTTONS, AND FIELDS
Our
Changes
Default
General Area
Description
Read Write Read Write
Aircraft
Change An Aircraft
20
Aircraft
Delete An Aircraft
70
Aircraft
Insert New Aircraft
10
Dispatch
Edit Account to Correct Exceptions
20
Dispatch
Edit Aircraft to Correct Exceptions
20
Dispatch
Edit Pilot to Correct Exceptions
20
Dispatch
Hobbs Out on Check-In Screen
10
10
Dispatch
Hobbs Out on Check-Out Screen
10
10
Dispatch
Ignore Exceptions
Dispatch
Override Max Fuel Credit
Dispatch
Tach Out on Check-In Screen
20
20
Dispatch
Tach Out on Check-Out Screen
10
10
Enterprise
Cross-Location Accounts
General Ledger
Make Cross-Location Journal Entries
80
Inventory
Add New Fuels
50
Inventory
Add New Items
30
Inventory
Add New Oils
50
Inventory
Change Items
50
Inventory
Delete Items
80
Inventory
Force-Complete Purchase Order Button
50
Inventory
Fuel Tax Tab
70
Inventory
Lot Cost Fields
80
80
Inventory
Lot Quantity Fields
70
70
Inventory
Manually Add New Lots
70
Inventory
Manually Change Lots
70
Inventory
Manually Delete Lots
10
Inventory
Modify Fuel-Tank Quantity
Inventory
View Other Location’s Inventory
80
Invoice Update
‘Grant Block Time’ Question
10
Invoice Update
Apply Credits When Updating
70
1
40
1
30
50
APPENDIX F
TotalFBO® User Guide | 479
PRIVILEGE OVERRIDES FOR BUTTONS, AND FIELDS
Our
Changes
Default
General Area
Description
Read Write Read Write
Invoice Update
C/C Credit/Void
30
Invoice Update
C/C Number View
70
Invoice Update
Change An Invoice
20
Invoice Update
Copy Button
30
Invoice Update
Date Field
Invoice Update
Delete An Invoice
30
Invoice Update
Insert New Invoices
10
Invoice Update
Invoice Number Field
Invoice Update
Void Invoices
30
Invoicing
Enable Cost-Print Option
70
Invoicing
Override Return Cost
70
70
Invoicing
View Costs
80
80
Payables Payments
Make Cross-Location Payments
80
Payroll
Make Cross-Location Payments
80
Pilot-Update
Add New Pilots
10
Pilot-Update
Add Other Checkouts
50
Pilot-Update
Add Type-Approvals
50
Pilot-Update
Change Other Checkouts
50
Pilot-Update
Change Pilot Record
30
Pilot-Update
Change Type-Approvals
50
Pilot-Update
Delete Other Checkouts
50
Pilot-Update
Delete Pilot Record
50
Pilot-Update
Delete Type-Approvals
50
Scheduling
Add New Reservation
10
Scheduling
Change Reservation
10
Scheduling
Delete Reservation
10
Scheduling
Dispatch Reservation
10
Scheduling
Edit Reservation
10
Scheduling
Work Outside Current Date
Shop Orders
Change A Shop Order
10
10
10
10
1
20
480 | TotalFBO® User Guide
APPENDIX F
PRIVILEGE OVERRIDES FOR BUTTONS, AND FIELDS
Our
Changes
Default
General Area
Description
Read Write Read Write
Shop Orders
Change Closed Shop Order
60
Shop Orders
Change Discrepancy Status
60
Shop Orders
Close Date
Shop Orders
Cross-Billing
60
Shop Orders
Delete A Shop Order
30
Shop Orders
Department Fields
50
50
Shop Orders
Discrepancy GL/Tax Fields
50
50
Shop Orders
Enable Copy Button
70
Shop Orders
Enable Cost-Print Option
70
Shop Orders
Enable Open-PO ByPass
70
Shop Orders
Insert New Shop Order
10
Shop Orders
Misc Parts Button
30
Shop Orders
Update Closed Discrepancies
50
Time Clock
Time Fields
Receivables Update
Access-Privilege Field
Receivables Update
Add Selection Code
30
Receivables Update
Balance/Activity Button
50
Receivables Update
Change A Customer From Menu
20
Receivables Update
Change A Customer From SideStep
20
Receivables Update
Change Selection Code
50
Receivables Update
Credit Limit Fields
10
50
Receivables Update
Customer Balance Field
50
80
Receivables Update
Delete A Customer From Menu
40
Receivables Update
Delete A Customer From SideStep
70
Receivables Update
Insert New Customer From Menu
10
Receivables Update
Insert New Customer From SideStep
10
Receivables Update
Price and Taxes Tab
30
Receivables Update
Transient Check-Box
30
30
1
80
10
10
40
40
APPENDIX F
TotalFBO® User Guide | 481
PRIVILEGE OVERRIDES FOR REPORTS
Default
General Area
Description
Read
Our Changes
Write
Read
Reports-Aircraft
Activity Report
20
Reports-Aircraft
Aircraft Detailed Listing
20
Reports-Aircraft
Aircraft Revenue Report
20
Reports-Aircraft
Aircraft Squawks Listing
20
Reports-Aircraft
Blank-Reference-Lines
1
Reports-Aircraft
Default Maintenance Listing
Reports-Aircraft
Due-Times Summary
1
Reports-Aircraft
Flight-Time Summary
20
Reports-Aircraft
Fuel Consumption Report
20
Reports-Aircraft
Leaseback/P&L Report
20
Reports-Aircraft
Maintenance Warning Report
20
Reports-Aircraft
Master Aircraft Summary
20
Reports-Aircraft
Time Justification Report
1
Reports-Aircraft
Weight & Balance Report
20
Reports-Charter
Selected Quotes
1
Reports-Charter
Two-Point Flight Leg
1
Reports-Checking
Check Entry Listing
1
Reports-Checking
Checking Disbursements Report
1
Reports-Checking
Register Balances Report
1
Reports-Checking
Register Reconciliation Report
1
Reports-Checking
Register-Style Listing
1
Reports-Checking
Un-Posted Entries Listing
1
Reports-Checking
Un-Reconciled Entries Listing
1
Reports-Concierge
Daily Schedule Listing
1
Reports-Concierge
Pending - Detailed
1
Reports-Concierge
Pending - Summary
1
Reports-Concierge
Requests by Customer
1
Reports-Concierge
Requests by Date
1
Reports-Dispatch
Checkout Sheet
1
Reports-Dispatch
Dispatch Exceptions
Reports-Dispatch
Flight Manifests
20
30
1
Write
482 | TotalFBO® User Guide
APPENDIX F
PRIVILEGE OVERRIDES FOR REPORTS
Default
General Area
Description
Read
Our Changes
Write
Read
Reports-Dispatch
Open Flights
1
Reports-Flight Schoo
Course Listing
1
Reports-Flight Schoo
Enrollments Listing
1
Reports-Flight Schoo
Package Listing
1
Reports-Flight Schoo
Student Activity
1
Reports-Flight Schoo
Student Course Activity
1
Reports-Flight Schoo
Student Package Details
1
Reports-Flight Schoo
Student-Instructor Listing
1
Reports-Flight Schoo
VA Activity Report
1
Reports-General Ledg
12-Month Income Report
1
Reports-General Ledg
Aircraft Leaseback/P&L
1
Reports-General Ledg
Auto-Distribute Accounts Listing
1
Reports-General Ledg
Automatic G/L Account List
1
Reports-General Ledg
Balance Sheet
1
Reports-General Ledg
Cash-Flow Report
1
Reports-General Ledg
Chart of Accounts
1
Reports-General Ledg
Cross-Dated Journal Entries
1
Reports-General Ledg
Department Listing
1
Reports-General Ledg
full JEs - One Account
1
Reports-General Ledg
GL Account Detail
1
Reports-General Ledg
GL Changes Report
1
Reports-General Ledg
Historical/Projected Budget
1
Reports-General Ledg
Monthly Balances
1
Reports-General Ledg
Multiservice Codes Listing
1
Reports-General Ledg
One-Year Annual Budget
1
Reports-General Ledg
One-Year Budget Performance
1
Reports-General Ledg
One-Year Monthly Budget
1
Reports-General Ledg
Pie-Chart Graphs
1
Reports-General Ledg
Selected Journal Entry Listings
1
Reports-General Ledg
Single Journal Entry Listing
1
Reports-General Ledg
Standard Income Report
1
Write
APPENDIX F
TotalFBO® User Guide | 483
PRIVILEGE OVERRIDES FOR REPORTS
Default
General Area
Description
Read
Our Changes
Write
Read
Reports-General Ledg
Start-Of-Year Balances
1
Reports-General Ledg
Subtotal Ranges
1
Reports-General Ledg
Trial Balance
1
Reports-General Ledg
Twelve-Month Bar-Charts
1
Reports-General Ledg
Two-Year Budget Performance
1
Reports-General Ledg
Two-Year Income Report
1
Reports-Inventory
ASCII Text Export
50
Reports-Inventory
Cores Outstanding
1
Reports-Inventory
Department List
Reports-Inventory
Expired Inventory Listing
1
Reports-Inventory
Fuel Meter Justification Report
1
Reports-Inventory
Fuel Meter Summary
1
Reports-Inventory
Fuel/Oil Summary
Reports-Inventory
Inventory Change List
Reports-Inventory
Inventory Received
30
Reports-Inventory
Inventory Valuation Report
30
Reports-Inventory
Master Parts List
1
Reports-Inventory
On Order/Back Order Report
1
Reports-Inventory
Outside Sales Offering
1
Reports-Inventory
Parts Labels
1
Reports-Inventory
Parts Needing Work
1
Reports-Inventory
Physical Inventory Adjustments
1
Reports-Inventory
Physical Inventory Worksheet
1
Reports-Inventory
Purchase Order Summary
1
Reports-Inventory
Recommended Order Worksheet
1
Reports-Inventory
Reorder Threshold/Quantity
1
Reports-Inventory
Sales History Report
1
Reports-Inventory
Serialized Models Summary
1
Reports-Inventory
Serialized Parts Listing
1
Reports-Inventory
Shipments-Received
Reports-Inventory
Units Sold Report
30
30
1
30
1
Write
484 | TotalFBO® User Guide
APPENDIX F
PRIVILEGE OVERRIDES FOR REPORTS
Default
General Area
Description
Read
Our Changes
Write
Read
Reports-Invoicing
Billable Hours Report
1
Reports-Invoicing
Charter Sales Report
50
Reports-Invoicing
Closed Charge Batches
1
Reports-Invoicing
Fuel Discounts/Margins
50
Reports-Invoicing
Fuel Meter Justification
1
Reports-Invoicing
Fuel Sales by Price-Class
Reports-Invoicing
Fuel Sales Report
Reports-Invoicing
Fuel Sales Spreadsheet
50
Reports-Invoicing
Invoice/Shop Order GL Breakdown
50
Reports-Invoicing
Invoice/Shop Order Summary
50
Reports-Invoicing
Invoice/SO Change History
1
Reports-Invoicing
Invoicing Shift Log
1
Reports-Invoicing
Pending Invoice Summary
1
Reports-Invoicing
Reprint Selected Invoices
1
Reports-Invoicing
Sales Activity Report
Reports-Invoicing
Sales Receipts Report
Reports-Invoicing
Sales Tax Report
50
Reports-Invoicing
Sales Unit-Totals Report
50
Reports-Invoicing
SalesPerson Totals Report
1
Reports-Invoicing
Service Line Breakdown
1
Reports-Invoicing
Transient Customer Report
1
Reports-Invoicing
Un-Applied Payments Report
1
Reports-Invoicing
Un-Posted Transactions
1
Reports-Marketing
Aircraft Owners by Zipcode
1
Reports-Marketing
Letter Template Listing
1
Reports-Payables
Invoice Disbursement Report
1
Reports-Payables
Invoices by Customer
1
Reports-Payables
Leases Listing
1
Reports-Payables
Notes-Payable Listing
1
Reports-Payables
Payments Due Report
1
Reports-Payables
Unposted Invoices
1
50
1
50
1
Write
APPENDIX F
TotalFBO® User Guide | 485
PRIVILEGE OVERRIDES FOR REPORTS
Default
General Area
Description
Read
Our Changes
Write
Read
Reports-Payables
Vendor Activity Report
1
Reports-Payables
Vendor Aging Report
1
Reports-Payables
Vendor Invoice Listing
1
Reports-Payables
Vendor Labels
1
Reports-Payables
Vendor Listing
1
Reports-Payroll
Billable Hours Report
1
Reports-Payroll
Deductions-Taken Report
50
Reports-Payroll
Employee Barcode Labels
1
Reports-Payroll
Employee Listing
1
Reports-Payroll
Employee Roster
1
Reports-Payroll
Federal 941
1
Reports-Payroll
Federal Earnings Report
Reports-Payroll
Local Earnings Report
1
Reports-Payroll
Overtime Hours Report
50
Reports-Payroll
Pay History Report
50
Reports-Payroll
Paycheck Summary
50
Reports-Payroll
Payroll Register
50
Reports-Payroll
Profit-Plus Listing
50
Reports-Payroll
State Earnings Report
50
Reports-Payroll
Tax Deposits Summary
50
Reports-Payroll
Tax Setup Listing
50
Reports-Payroll
Time Card Listing
50
Reports-Payroll
Time Card/Pay/Check Summary
50
Reports-Payroll
Time-Clock Listing
50
Reports-Payroll
Trial Pay Summary
50
Reports-Payroll
Vacation/Sick-Leave Report
Reports-Payroll
Who’s Clocked-In
50
Reports-Payroll
Workers Comp Analysis
50
Reports-Receivables
A/R Aging
1
Reports-Receivables
A/R Change Report
1
Reports-Receivables
A/R Justification Report
1
50
1
Write
486 | TotalFBO® User Guide
APPENDIX F
PRIVILEGE OVERRIDES FOR REPORTS
Default
Read
Our Changes
General Area
Description
Write
Read
Reports-Receivables
Account Activity Summary
1
Reports-Receivables
Account Detail Listing
1
Reports-Receivables
Account/Pilot Summary
1
Reports-Receivables
Address Labels
1
Reports-Receivables
Available Spaces Summary
1
Reports-Receivables
Block/Club Summary
1
Reports-Receivables
Charge Batches
1
Reports-Receivables
Closes Performed
1
Reports-Receivables
Current Balances
1
Reports-Receivables
Customer Bar Code Labels
1
Reports-Receivables
Customer Sales Tax Overrides
1
Reports-Receivables
Customers by Selection Code
1
Reports-Receivables
Flight/Instruction Summary
1
Reports-Receivables
Interest-Charged Summary
1
Reports-Receivables
Internal/Non-Billing Listing
1
Reports-Receivables
Last Activity Listing
1
Reports-Receivables
Names and Addresses
1
Reports-Receivables
New Account Summary
1
Reports-Receivables
Pilot Dates Review
1
Reports-Receivables
Pricing Review
1
Reports-Receivables
Recurring Charge Expirations
1
Reports-Receivables
Recurring Charge Summary
1
Reports-Receivables
Rental Space Expirations
1
Reports-Receivables
Rolodex-Style Labels
1
Reports-Receivables
Sales History
1
Reports-Receivables
Sales Profile
1
Reports-Receivables
Tax-Exempt Customers
1
Reports-Receivables
Top N Sales Customers Report
1
Reports-Receivables
Un-Closed Charge Summary
1
Reports-Receivables
Warning Message Summary
1
Reports-Scheduling
Box-Format Schedule
1
Write
APPENDIX F
TotalFBO® User Guide | 487
PRIVILEGE OVERRIDES FOR REPORTS
Default
General Area
Description
Read
Our Changes
Write
Read
Reports-Scheduling
Change History
1
Reports-Scheduling
Combined Schedule
1
Reports-Scheduling
Object Listing
1
Reports-Scheduling
Schedule by Client
1
Reports-Scheduling
Schedule by Object
1
Reports-Shop Orders
Batch Labor Listing
10
Reports-Shop Orders
Batch Parts Listing
10
Reports-Shop Orders
Billable Hours Report
Reports-Shop Orders
Closed Shop Order Summary
50
Reports-Shop Orders
Cross-Location Transactions
20
Reports-Shop Orders
Invoice/SO Change History
Reports-Shop Orders
Job Cost Analysis
Reports-Shop Orders
Labor Write-Off Analysis
Reports-Shop Orders
Open Inventory Summary
50
Reports-Shop Orders
Open Shop Order Billings
50
Reports-Shop Orders
Open Shop Order Summary
50
Reports-Shop Orders
Reprint Selected SOs
1
Reports-Shop Orders
Sales Receipts Report
1
Reports-Shop Orders
Sales Tax Report
50
Reports-Shop Orders
Shop Order Billings
50
Reports-Shop Orders
Shop Orders Inventory Summary
50
Reports-Shop Orders
Transient Customer Report
1
Reports-Shop Orders
Warranty Billing Summary
1
Reports-Shop Orders
Work-In-Process Breakdown
50
Reports-Shop Orders
Work-In-Process History
50
Reports-Utilities
Discrepancy Analysis
1
Reports-Utilities
Text Macro Listing
1
Reports-Utilities
Transaction Tie-Out
1
Reports-Utilities
What’s Locked
1
Reports-Utilities
Who’s On
1
1
1
50
1
Write
Change User ID without leaving the program
2Log In Under New User ID
Change your default printer selection
5Print Setup
This menu leads to all Accounting operations
This menu leads to all Invoicing setup and operation functions.
Adds new invoices in a continuous loop
Add, Change, Remove, or Reprint Invoices from a browse.
Operations to close shifts, cash-out, etc.
Mark an invoicing shift as closed, so a new one can be started.
Combine credit card receipts into a daily ‘batch’ record.
23Add New Invoices
24Update Invoices
25Daily Closing Operations
26Close An Invoicing Shift
27Close Charge Batch
Open the cash drawer (if one is configured for your system)
281Open Cash Drawer
22Invoicing Menu
Make a backup of the database and control files
272Backup Data Files
21Accounting Menu
Allow employees to clock in and out, including optional shop order info.
Set options and controls specific to this computer
14Station-Specific Settings
265Time Clock
Mark specific menu items to place on a ‘toolbar’ at the top of the main screen.
13Customize Toolbar
Update settings related to the currently logged-in user.
Change program settings to suit your tastes
12Preferences
263User-Specific Settings
Save data from selected TotalFBO files in other formats
11Export
Load airport, zipcode, and wind data supplied by Horizon Business Concepts
9Import HBC Supplemental Data
Load airport data licensed from ACUKWIK (NavPak)
Import data in ASCII text files into selected TotalFBO database files
8Import ASCII Data
10Import ACUKWIK Airport Data
Operations for loading data from other sources into TotalFBO files
6Import
Capture the current screen image to a file that can then be printed
Select a prior year’s archive database for reporting from.
4Switch To An Archive
267Print Screen
Switch between active database files.
3Select A New Database
Switch to a different Location within the current database.
Basic program operations menu
Description
1File
Menu Name
288Switch Location
ID
DEFAULT PRIVILEGES FOR MENU FUNCTIONS
Default
20
10
10
10
10
1
1
0
90
10
1
60
1
1
70
80
30
99
20
1
1
80
1
0
1
1
Our
Changes
488 | TotalFBO® User Guide
APPENDIX F
Operations for exporting and importing invoices generated at remote sites.
31Remote Invoice Operations
Basic Invoicing options.
Update sales tax rates and names.
Enter currency types and exchange rates
34General Options
35Set Sales Taxes
36Update Currency
Enter parts in daily batches to multiple shop orders.
Enter labor on a daily basis to multiple shop orders.
Make an entry to the G/L for currently open shop orders.
Shop order reports and listings.
Enter and print forms of various types.
Update and print FAA 337 forms
Options and controls for running shop orders
General options for running shop order operations.
Update sales tax rates and names.
39Batch-Mode Parts Entry
40Batch-Mode Labor
41Post Work-In-Process
42Reports And Listings
43Forms
44337s
45Options And Settings
46General Options
47Sales Tax Setup
48Receivables
Functions for updating customers and reporting on their activity.
Update style sheets used for formatting shop order printouts.
Add, change, close, and print shop orders.
38Update Shop Orders
291Shop Order Style Sheets
Functions for updating, printing, and reporting on shop orders.
37Shop Orders
Update the style sheets used to control invoice printouts.
Controls and settings used to run Invoicing.
33Options And Settings
290Invoice Style Sheets
Invoicing reports and listings.
32Reports And Listings
Import transaction data from a variety of outside sources
Generate monthly invoices for the recurring charge notations.
30Bill Monthly Recurring Charges
294Import Invoices
Mark invoices as paid/unpaid.
29Apply Outstanding Credits
Browse invoices with a list showing change records for each invoice
Miscellaneous invoicing operations
Description
28Other Invoice Operations
Menu Name
273Browse Invoices With History
ID
DEFAULT PRIVILEGES FOR MENU FUNCTIONS
Default
1
70
50
50
50
10
10
1
50
10
10
10
1
70
50
50
50
50
1
50
10
40
40
40
20
Our
Changes
APPENDIX F
TotalFBO® User Guide | 489
90
90
90
40
40
40
40
50
50
80
80
20
50
50
90
10
10
10
10
50
50
Miscellaneous other customer operations
Delete old customers with no recent activity or transactions on file.
Combine two customer accounts and their records into one account.
Functions to enter and maintain recurring charge reminders.
Add, change, or remove recurring charge reminders.
Make mass changes to selected recurring charge reminders.
Change the Next-Due date on all recurring charge reminders
Add, change, or remove rental space information.
Make mass changes to specified rental space records.
Update payment methods for use in invoicing and shop orders.
Add, change, or remove payment method types
Update control files for online credit card processing
Combine un-collected charges into a daily ‘batch’.
Display a listing of all charges that have not been closed into a charge batch.
Operations for cycling statements forward to next month.
Perform automatic interest calculations for running statements.
Reverse the action of a previous close.
Reports and listings for the receivables module
Functions for printing customer statements in various formats.
Run standard statements for one or more customers.
Run a compound pseudo-statement designed for flight school billings.
Run a pseudo-statement designed for Airline Fuel Billing.
Options and controls for running Receivables
General receivables options.
50Other Customer Operations
51Purge Inactive Accounts
52Merge Two Accounts
53Recurring Charges
54Update Recurring Charge Reminders
55Globally Change Reminders
56Globally Change Due Dates
57Update Rental Space List
58Globally Change Rental Spaces
59Update Credit-Card Files
60Update Cards-Accepted List
61Close Charge Batch
62Display Un-Closed Charges
63Closing Operations
64Close Statements For A Month
66Unclose A Previous Close
67Reports And Listings
68Statements
69Customer Statements
70Compound-Account Statements
71Airline Fuel Statements
72Options And Settings
73General Options
1
1
1
10
Add, change, remove, and print customer information.
Description
Default
49Update Customer List
Menu Name
296Update CC Processors
ID
DEFAULT PRIVILEGES FOR MENU FUNCTIONS
Our
Changes
490 | TotalFBO® User Guide
APPENDIX F
Set pricing mechanisms for customer-based dynamic pricing.
75Set Price Classes
Functions for entering and processing bills payable to other companies.
Add, change, remove, or print vendor invoices.
Miscellaneous operations on vendors and invoices.
Apply money available on one invoice to others on that same vendor.
Transfer outstanding amounts between A/R and A/P.
Add, change, or remove Notes Payable.
Add, change, or remove Leases Payable.
Make payments on invoices, notes, and leases.
Make payments on outstanding vendor invoices.
Make payments on outstanding Notes Payable.
Make payments on outstanding Leases Payable.
Update basic vendor information.
Miscellaneous other operations on vendors.
Delete vendors with no activity on file.
Combine records from two vendors into a single file.
Reports and listing for the Payables module.
Update and print various forms.
Update and print Federal 1099 forms.
Options and controls for running Payables module.
General options and controls for running payables operations.
Update style-sheets used to print checks.
Operations for updating and mainting bank accounts.
76Payables
77Update Vendor Invoices
78Other Invoice Operations
79Apply Credit Memos On File
80Move Money Between A/R And A/P
81Update Notes
82Update Leases
83Make Payments
84Pay Invoices
85Pay Notes
86Pay Leases
87Update Vendors
88Other Vendor Operations
89Purge Inactive Vendors
90Merge Two Vendors
91Reports And Listings
92Forms
931099s
94Options And Settings
95General Options
96Set Check Formats
97Checking
Update style sheets used to control statement printouts
Set sales tax names and rates.
Description
74Set Sales Taxes
Menu Name
292Statement Style Sheets
ID
DEFAULT PRIVILEGES FOR MENU FUNCTIONS
Default
1
40
50
40
60
10
1
70
99
60
10
40
40
40
40
10
10
40
10
10
10
1
70
70
50
Our
Changes
APPENDIX F
TotalFBO® User Guide | 491
Reconcile computer records to a given bank statement.
Reverse a permanent reconciliation to re-do it.
Reports and listings for the checking module.
Options and controls governing the operation of the checking module.
General options for the checking module.
Set style-sheets used to format check printouts.
Functions to set up, control, enter and report general ledger data.
Make manual adjustment to the general ledger.
Other operations in the general ledger.
Select an existing Journal Entry and reverse (cancel) it.
Select an existing JE, cancel it, and repost it on another date.
Make a special journal entry that automatically cancels itself on another date.
Process invoices that have not yet been posted to the general ledger.
Process vendor invoices that have not yet been posted to the general ledger.
Process checks that have not yet been posted to the general ledger.
Make changes to the chart of accounts, depts, etc in the General Ledger.
Add, change, or remove accounts to the General Ledger.
Combine two GL account records and their sub-files.
Update the list of GL accounts used automatically by the program.
Update the list of general ledger departments and their overrides.
Add, modify, or delete fiscal years for the General Ledger.
Update the codes used for multiple location management
101Reconcile To Bank Statement
102UnReconcile
103Reports And Listings
104Options And Settings
105General Options
106Set Check Formats
107General Ledger
108Make Standard Journal Entries
109Other Posting Operations
110Reverse An Existing Entry
111Move JE To New Date
112Make Auto-Reversing Entry
114Post Invoice Batch To G/L
115Post Payables Batch To G/L
116Post Check Batch To G/L
117Update Ledger Structure
118Chart Of Accounts
119Merge Two GL Accounts
120Automatic Ledger List
121Departments
122Fiscal Years
286Update Locations
Update basic register info, including last check number used.
99Update Register Basic Info.
Operations for reconciling computer records to the bank statements.
Add, change, remove, and print ‘manual’ checking entries.
Description
98Update Checking Entries
Menu Name
100Register Reconciliation
ID
DEFAULT PRIVILEGES FOR MENU FUNCTIONS
Default
99
10
50
90
90
10
10
20
20
20
50
50
50
50
10
1
10
50
10
1
10
10
10
40
10
Our
Changes
492 | TotalFBO® User Guide
APPENDIX F
Scan through balances on GL accounts.
Update balances on GL accounts en masse.
Update general ledger budget figures by month or by year.
Scan through and maybe print the journal entries on file.
Reports and listings for the general ledger.
Options and controls that govern operation of the general ledger module.
General options controlling the general ledger module.
Set the account ranges used for subtotals on GL reports.
Functions and operations for generation and tracking of payroll.
Manually edit the time clock entries.
Update time cards, make pay, make pay checks.
Make and/or void payroll tax deposits.
Edit the employee information file.
Reports and listings for the payroll module.
Payroll Forms
Options and control that govern operation of the payroll module.
General options and controls for the payroll module.
Update the Employee Master Deduction list.
Update the tax setups that drive income tax and other tax calculations.
Operations for updating, ordering, receiving, and reporting inventory.
Add, change, and remove fuel, oils, and parts.
Other operations to support basic inventory.
Add, change, or remove model information used for serialized parts.
Functions to load and process certain manufacturer’s parts lists.
125Browse Balances
126Update Year/Month Balances
127Update Budget
113Browse Journal Entries
128Reports, Listings, And Graphs
129Options And Settings
130General Options
123Set User-Defined SubTotals
131Payroll
132Update Time-Clock Entries
133Update Times-Cards/Pay/Checks
135Update Tax Deposits
137Update Employee Basic Info
138Reports And Listings
140Forms
144Options And Settings
145General Options
146Employee Master Deduction List
147Tax Setups
148Inventory
149Update Inventory
150Other Parts Operations
151Update Serialized Parts Models
152Manufacturer Parts Lists
Description
Update directly month-end and budget balances.
Menu Name
124Ledger Account Balances
ID
DEFAULT PRIVILEGES FOR MENU FUNCTIONS
Default
50
10
10
10
1
50
80
50
50
10
1
10
50
50
90
1
40
50
50
1
50
50
90
10
10
Our
Changes
APPENDIX F
TotalFBO® User Guide | 493
Combine two parts records and their sub-files.
Enter, review, apply, and report physical inventory adjustments.
Update prices on parts by either price matrix or ratio.
Other functions to support fuel operations.
Add, change, or remove fuel meters and current meter readings.
Add, change, or remove fuel tanks and their associated data.
Record fuel transfers between tanks that are not sales transactions.
Add, change, or remove parts kits.
Update status of cores being sent out and returned
Add, change, or remove Inventory Departments and their overrides.
Add, change, or remove basic vendor (supplier/manufacturer) information.
Add, change, or remove Purchase Orders
Receive inventory into stock with or without a purchase order.
Return inventory in stock to the vendor.
Operations for updating, servicing, and reporting Avionic equipment.
Add, change, or remove basic information about service bulletins.
Update list of equipment on company or customer aircraft.
Reports and listings for the inventory module.
Update and print inventory-related forms.
Update and print FAA 337 forms.
Update and print FAA 8130-3 forms.
Options and controls to run Inventory operations.
General options and controls for running Inventory operations.
Update the price classes used to automatically calculate sale-time prices.
154Merge Two Parts Records
155Update Physical Inventory
283Mass Update Pricing
156Other Fuel Operations
157Update Fuel Meters
158Update Fuel Tanks
159Transfer Between Tanks
160Update Kits
287Update Cores
161Update Inventory Departments
162Update Vendors/Suppliers
163Update Purchase Orders
164Receive Shipments
165Return Stock
166Avionics Operations
167Update Service Bulletins
168Update Aircraft Equipment List
169Reports And Listings
170Forms
171337s
1728130-3s
173Options And Settings
174General Options
175Update Price Classes
Description
Delete parts inactive for a specified period with no activity on file.
Menu Name
153Purge Inactive Parts
ID
DEFAULT PRIVILEGES FOR MENU FUNCTIONS
Default
50
50
50
10
10
10
1
20
10
10
30
30
10
10
30
40
70
30
50
50
30
70
20
50
90
Our
Changes
494 | TotalFBO® User Guide
APPENDIX F
Specialized functions for operating the front desk efficiently.
Add, change, remove, and print scheduled service requests.
Combination screen for scheduling, dispatching, billing, etc from front desk.
Reports and listings for the Concierge module.
Functions for updating and reporting aircraft and maintenance information.
Update aircraft maintenance logs.
Quickly update aircraft times on one or more aircraft.
Update fuel and oil consumption records for each aircraft.
Add, modify, & delete weight & balance info for all aircraft.
Basic aircraft information.
Update airworthiness directives and service bulletins on file.
Reports and listings for the aircraft module.
Update and prints forms for aircraft operations.
Update and print FAA 337 forms.
Options and controls that govern operations of the aircraft module
General options and settings for the aircraft module.
Operations for quoting new charter flights.
Add, change, remove, and print charter quotes.
Update information on aircraft for charter quoting.
Update basic customer information.
Edit airport information on file, or add your own.
Reports and listings from the Charter Quotes module.
Options and controls for the charter quotes module.
General options and controls for the charter quotes module.
178Concierge
179Update Requests
180Concierge Super-Screen
181Reports And Listings
182Aircraft
183Update Maintenance Logs
184Update Aircraft Times
185Update Fuel/ Oil Consumption
264Update Weight/Balance
186Aircraft Setup
187Update ADs And SBs
188Reports And Listings
189Forms
190337s
191Options And Settings
192General Options
193Charter
194Update Charter Quotes
195Update Charter Aircraft
196Update Customer Accounts
197Update Airports
198Reports And Listings
199Options And Settings
200General Options
Description
All operations for quoting, dispatching and checking in aircraft flights.
Menu Name
177Operations
ID
DEFAULT PRIVILEGES FOR MENU FUNCTIONS
Default
50
50
1
50
10
20
10
1
50
50
10
10
1
20
20
20
20
20
20
1
1
10
10
1
1
Our
Changes
APPENDIX F
TotalFBO® User Guide | 495
1
10
20
20
20
1
50
70
70
1
10
30
1
50
50
20
75
10
50
80
Operations for checking out and returning flights.
Check out flights for renters and/or company flights.
Update control information regarding scheduled flights.
Create basic records regarding regular flights.
Update the seating charts used for passenger assignment and C/G calculations.
Update pilot information for any given pilot.
Reports and listings for the Dispatch module.
Options and controls for the Dispatch module.
General options and controls for the dispatch module.
Set options pertaining to Charter (Flight) Dispatch operations
Functions for scheduling rental & charter flights, pilots, etc.
Add, change, or remove reservations on file.
Update ‘objects’ that can be reserved in reservations.
Reports and listings for the reservations module.
Options and controls for the reservations module.
General options and controls for the scheduling module.
Functions for maintaining flight school records on students.
Update the records recording flight school activity
Manually edit the time remaining on a given customer’s package.
Update information about students and their enrollments.
Update basic information about courses and the syllabus for each.
Add, change, or remove basic definitions of flight-school packages.
Reports and listings about the Flight School module.
Update and prints forms related to flight school operations.
202Dispatch
203Dispatch Flights
206Define Flights
207Assign Flight Numbers
266Update Seating Charts
209Update Pilot Records
210Reports And Listings
211Options And Settings
212Rental Dispatch Options
284Charter Dispatch Options
213Scheduling
214Update Scheduling
215Update Objects
216Reports And Listings
217Options And Settings
218General Options
219Flt School
271Update Student Activity
298Update Student Package Times
220Update Student Enrollments
221Update Courses
222Update Packages
223Reports And Listings
224Forms
10
1
1
900
70
Description
Update info for charging different price structures.
Menu Name
Default
201Update Price Classes
ID
DEFAULT PRIVILEGES FOR MENU FUNCTIONS
Our
Changes
496 | TotalFBO® User Guide
APPENDIX F
50
50
10
50
30
10
80
80
1
1
1
50
50
1
1
50
70
90
99
99
99
Options and controls for the Flight School module.
General options and controls for the flight school module.
Update and report on ground equipment and maintenance required
Add, change, or delete ground equipment setup information
Update maintenance performed on ground equipment
Reports on ground equipment
Options for controlling ground equipment module
General options for controlling operation of ground equipment module
Functions for using your customer databse for sales and marketing.
Select a list of customers, and merge that with a prepared letter template.
Add, change, or remove templates used with the merge process.
Reports and listings for the Marketing module.
Options and controls for the Marketing module.
General options and controls for the Marketing module.
General maintenance functions for the whole program.
Functions to customize a few general settings for the whole program.
Change the text that is used for selected field names.
Add, change, or remove text macros.
Set a few global options for the whole program.
Update the price classes used to perform sale-time price calculations.
Let the user add and/or modify report layouts used in List & Label operations
Functions used to manage program security features
Add, Change, and Delete User IDs and their security ratings.
View and optionally set override privilege levels for menu functions
226Options And Settings
227General Options
299Ground Equipment
300Update Ground Equipment
301Update Maintenance Performed
302Ground Equipment Reports
303Ground Equipment Options
304General Options
228Marketing
229Create Merge List
230Update Letter Templates
231Reports And Listings
232Options And Settings
233General Options
234Utilities
235Customizing
236Set Customizable Field Names
237Update Keyboard Macros
238Set Global Options
279Update Price Classes
280List & Label Report Layout Manager
268Security
239User Setup
269Menu Privileges
1
50
20
10
Description
Update and print FAA form 8710 for students.
Menu Name
Default
2258710s
ID
DEFAULT PRIVILEGES FOR MENU FUNCTIONS
Our
Changes
APPENDIX F
TotalFBO® User Guide | 497
50
1
80
60
90
99
80
Retrieve and display or print archived reports
General functions for maintaining the program.
Update licensing info, or add new working directories.
Release any record locks currently placed.
Functions to back up and restore user data files.
Back up the user data files to another disk.
Lock the program against all users for installing new updates, db maint, etc.
Make copies of old data so the current database can be purged more easily.
289Archived Reports
240Program Administration
241Update Licensing And Directories
242Force-Clear Locks
243Backups
244Backup A Database
285Administratively Lock Program
246Archiving
1
99
Description
Set privilege levels required for a variety of specific operations
Menu Name
Default
274Update Privilege Overrides
ID
DEFAULT PRIVILEGES FOR MENU FUNCTIONS
Our
Changes
498 | TotalFBO® User Guide
APPENDIX F
APPENDIX G
SETUP QUESTIONNAIRE
TotalFBO® can be customized to meet the needs of most aviation-industry
businesses. In fact, there are so many options that it’s possible to miss using a
feature that would be helpful to your business.
Sometimes that’s because your business is growing and changing over
time, sometimes the staffers doing the setup are not aware of the details of
operations in other departments, and sometimes it’s because TotalFBO® is
continuing to grow and add requested features.
The following questionnaire has been developed to help you gather and
organize your information. Sometimes just knowing the right question to ask
can make a big difference!
Once you’ve gathered your answers, feel free to discuss your needs with
a Tech Support Specialist to be sure you’re getting the most from your
investment in TotalFBO® .
TotalFBO® User Guide | 499
APPENDIX G
500 | TotalFBO® User Guide
APPENDIX G
Setup Questionnaire
Area
Answer Definition/Glossary
Why
Fuel Sales
Do you have a prepaid sales
tax on fuel?
Prepaid Sales Tax is usually
a cents-per-gallon tax that is
charged by the fuel distributor for
each delivery. When customers
pay the normal sales tax rate, the Affects ALL setup, receiving
FBO is reimbursed for the Prepaid procedure, ap procedure,
sales tax procedure
Sales Tax.
Do you have sales to a
consolidator?
A Consolidator is a company
that resells fuel to others. Often
an FBO will deliver the fuel
directly to the aircraft, but bill the
consolidator, who then bills the
aircraft owner.
Affects fuel setup, billing, and
payment structure
Do you have sales to an
airline?
Affects inventory setup,
Inventory departments,
General Ledger setup,
invoicing procedure, billing
procedure, inventory
reconciliation procedure.
Do you deliver into-plane for
a customer who supplies their
own fuel?
Affects fuel setup,general
ledger setup, and inventory
department setup
Do you have any minimum
charges for airline or other
into-plane fuel?
Minimum charges can be in
the form of a hookup fee, or a
minimum number of gallons or
dollars to be charged for each
delivery.
Do you charge extra for Prist?
Prist is a fuel additive that can be
pre-mixed into JetA fuel by the
refinery, injected at the time of the
sale by your fuel truck, or not used
at all.
Affects fuel price setup
Affects customer setup.
Do you sell JetA?
Affects fuel type setup
Do you sell Avgas?
Affects fuel type setup
Do you sell Autogas?
Affects fuel type setup
APPENDIX G
TotalFBO® User Guide | 501
Setup Questionnaire
Area
Answer Definition/Glossary
Why
Do you sell Diesel?
Affects fuel type setup
Do you have your own storage
tanks?
Affects tank setup
Are any of these tanks
underground?
Underground storage tanks may
leak fuel into the ground, so
owners must keep meticulous
records to prove tank quantities
are correct, and the EPA or the
airport may require payment of
UST fees.
Do you sell fuel from a
consortium?
A Consortium is a fuel farm,
usually at a larger airport, which is
owned by one or more companies.
An FBO may “borrow” fuel from
the consortium and then either pay Affects fuel type setup,
for it later or replace it with some inventory department setup,
of their own fuel.
fuel tax setup
Affects fuel type setup, fuel
taxes setup
Do you have delivery trucks?
Affects tank and meter setup
Do you sell directly from any
tanks?
Affects tank setup
Do you have a self-serve
pump?
Affects credit card setup
Is pricing from the self-serve
pump different from normal
Avgas?
Affects fuel sub-type setup
Is FET prepaid to the Fuel
Distibutor for JetA?
FET is Federal Excise Tax. Often
this is prepaid to the fuel distributor
for JetA.
Affects fuel tax setup.
Is FET prepaid to the Fuel
Distibutor for Avgas?
FET is Federal Excise Tax. Your
fuel supplier may or may not
prepay it for you on Avgas.
Do you pay a fuel flowage
fee?
Flowage fees are paid to the
airport and may be paid to the
fuel supplier at the time of delivery
OR to the airport after sale to the
customer.
Affects fuel tax setup
Affects fuel tax setup.
502 | TotalFBO® User Guide
APPENDIX G
Setup Questionnaire
Area
Answer Definition/Glossary
Why
What other taxes and fees are
prepaid to the fuel distributor?
There may be state excise taxes,
local fuel taxes, or other airport
fees.
Affects fuel tax setup
Does your fuel supplier have a
buyback program?
Buyback is also called
Repurchase. Fuel companies
make deals with large customers
and force you to sell to them at a
Zero price. Then the fuel supplier
reimburses you for the cost of the
fuel plus taxes plus an additional Affects fuel sub-type setup,
profit amount.
and credit card setup.
Do you have a volume
discount price structure?
Volume discounts mean that
the more a customer buys, the
cheaper his price will be.
Do you have any large
customers who have a special
volume price structure?
Do you have any customers
who receive a cumulative
volume discount?
Affects fuel type setup.
Affects fuel sub-type setup.
Cumulative volume discounts
enable a customer to purchase a
quantity of fuel during a set time
period and receive a discount
for any purchases beyond that
minimum.
Affects fuel type setup and
customer record setup.
Does your fuel price include
all taxes except sales tax?
Affects inventory price option
and fuel tax setup.
Is Sales Tax charged on all
fuels?
Affects fuel type setup.
Do you need to recapture
state fuel tax for auto gas
used in ramp vehicles?
Who changes the fuel prices
weekly?
Ramp vehicles may use auto gas
on which state road taxes have
been paid, but since they do not
use public roads, may be eligible Affects Fuel Tax Setup, Nonfor a refund of those taxes.
Billing Customer setup.
Affects security level required
for that user.
APPENDIX G
TotalFBO® User Guide | 503
Setup Questionnaire
Area
Do any of your customers
receive pricing based on OPIS
or another national reference
price?
Answer Definition/Glossary
Why
Various organizations publish fuel
price averages for each part of
the country. Some contracts with
large customers are based on
Affects fuel sub-type setup
these reference prices.
and price class definitions.
Are fuel selling prices based
strictly on cost?
Affects fuel price setup and
price class definitions.
Do you do defueling?
Defueling is the removal of
fuel from an aircraft in order to
accommodate a pilot’s weight
requirements or to permit
maintenance operations.
Do you have a structured
price program in place?
Structured pricing means that all
discounts are based on an amount Affects customer setup, fuel
off of the retail price or an amount sub-type setup, and Price
added to cost.
class definitions.
Affects invoicing procedure
and invoicing option.
Do you process a credit card
separately before entering
data to TFBO?
Affects rounding and invoice
procedures, as well as
credit card reconciliation
procedures.
Do you sell fuel to charter
companies or use your
own fuel in your charter
operations?
Affects FET tax setup and
recapture procedures.
Do you use metric
measurements for fuel and
oil?
Affects Inventory setup.
Receivables
Are most sales to transient
customers?
Transients are clients that you see
rarely and who are required to pay Affects default settings for
in full at the time of the sale.
new customer accounts
504 | TotalFBO® User Guide
APPENDIX G
Setup Questionnaire
Area
Are you a branded fuel
dealer?
Answer Definition/Glossary
Why
Branded means that you have a
sign for a big fuel company like
Chevron-Texaco, Phillips, Exxon,
etc.
Affects credit card setup.
Do you use your own fuel
in your ramp and courtesy
vehicles?
Affects GL setup, GL
department setup, and NonBilling customer setup, fuel
tax recapture procedures.
When you use inventory for
yourself, do you price it at
cost?
Affects Price Class definitions,
Non-Billing and Internal
customer setup.
Does one department provide
services for another?
Common examples include
Maintenance repairing Charter
or Flight School aircraft or Line
service equipment.
Affects Internal Customer
Setup.
Do you intend to use TFBO
for online processing of credit
cards?
Online processing means that
credit cards are swiped through
your computer keyboard or an
attached device and authorized
instantly through the Internet.
Affects Credit Card setup,
and Invoicing procedure,
and Customer Accounts for
Holding Companies, and GL
chart of accounts.
If you do online credit card
processing, will you handle
fuel company cards?
Affects Credit Card setup,
and Invoicing procedure,
Fuel company cards are setup
and Customer Accounts for
through the Multiservice gateway, Holding Companies, and GL
which supplies access codes.
chart of accounts.
If you handle fuel company
card online, will you
participate in a buyback
program?
These are buyback programs
that use a credit card, such as
Chevron’s Alliance program.
Your participation agreement
must be reflected properly
in the credit card processor
setup and in the fuel sub-type
setup.
Do you need to group your
customers by categories?
Examples may be hangar
customers, flight students
attending a local college for
ground school, etc.
Affects selection code setup,
customer setup, A/R options
APPENDIX G
TotalFBO® User Guide | 505
Setup Questionnaire
Area
Answer Definition/Glossary
Why
What is your default credit
limit for a new customer?
Most new customers will be setup
as “Cash Only.” When allowed to
charge, what will be your starting
limit?
Affects A/R options
Will transients be added as
individual customers?
If all transient sales are lumped
together under the “Cash”
customer, no marketing reports
can be generated.
Do you wish to continue
using account numbers for
customers?
Account numbers are an obsolete
method of accessing customer
accounts, but may be continued
to provide continuity to a previous A/R options, customer
system.
procedures.
Do you have standard
customer payment terms?
Affects customer setup and
Terms are often stated as “Net 30” a/r options
Affects Invoicing options,
Mobile Agent options,
Contrec options, and invoice
procedure.
Do you charge interest and/or
a late fee for late customer
payments?
Affects customer setup and
a/r options
Is the majority of new
customer accounts
individuals?
Affects customer setup and
a/r options
Do you rent hangar or other
space to customers?
Affects space and recurring
charge setup.
Do you keep customer credit
card info on file?
Affects customer setup and
invoicing procedure.
Invoicing
Do you have a State sales
tax?
Affects sales tax setup
Do you have a county sales
tax?
Affects sales tax setup
Do you have a local sales tax?
Affects sales tax setup
Do you have an airport
commission?
Affects sales tax setup
506 | TotalFBO® User Guide
APPENDIX G
Setup Questionnaire
Area
Answer Definition/Glossary
Why
Do you have any other
taxes or fees which are
a percentage of the sale
amount?
Affects sales tax setup,
invoicing options, shop order
options
Do any of these taxes/fees
have a cap?
Affects sales tax setup
Are any taxes/fees charged
on top of another tax?
Affects sales tax setup
Are you located in Florida?
Affects invoicing option.
Do you have more than one
cash drawer?
Affects setup of shifts, and
Invoicing procedure
Do you use more than one
currency?
Affects invoicing setup and
procedure.
Do you have company-owned
or leased aircraft?
Affects invoicing procedure.
Do you use pending invoices
Affects invoicing procedure
and options.
Do you usually enter invoices
the following day?
Affects invoicing options.
Do you sell aircraft?
Affects invoicing options.
Do you need to number
invoices with multiple series?
Affects invoicing options.
Do you have a maximum
offsite fuel credit?
This credit is given when a
customer fuels a plane at another
FBO after renting it “wet.”
Affects invoicing options.
Will you be using Touchscreen
equipment?
Allows fast entry of invoices
without a keyboard.
Affects invoicing procedure,
station setup options.
Payables
Do you have any company
credit cards?
Affects vendor setup
Must any vendors be tracked
separately in the General
Ledger?
Affects GL setup and vendor
setup.
APPENDIX G
TotalFBO® User Guide | 507
Setup Questionnaire
Area
Will you be paying vendor
invoices through TFBO?
Answer Definition/Glossary
If checks will be issued from
another computer program,
adjustments must be made.
Why
Affects GL setup and
Checking setup.
Do you have any notes or
other loan payments?
Special setup required.
Do you have any leases,
rental agreements or other
recurring payables?
Special setup required.
Do you ever have a customer
that performs a service for you
as a vendor?
Examples include flight school
customers who provide services or
fuel dealers who supply fuel and
apply credit card charges against
your fuel account as payment.
Affects Payables procedure
Are most vendors exempt
from receiving a 1099?
Affects vendor setup
Does the owner or manager
ever pay company bills from
personal funds?
Affects vendor payment
procedure, GL setup
Shop Orders
Do you charge multiple hourly
rates?
Examples are prop rate, turbine
rate, jet rate
Affects shop order setup,
procedure, emloyee setup
Do you intend to use the time
clock function within TFBO?
Affects shop order procedure,
terminal location
Do you charge a flat rate for
consumable supplies?
Affects shop order options
and procedures
Do you have unclosed
shop orders at the time of
conversion to TFBO?
Affects data entry procedures
for setup
Do you have outstanding
Work In Process posted at the
time of conversion to TFBO?
Affects data entry procedures
for setup
Do you have multiple shop
departments?
Examples are airframe, engine,
paintshop, avionics
Affects GL setup, GL
departments, Shop order
procedures
508 | TotalFBO® User Guide
APPENDIX G
Setup Questionnaire
Area
Answer Definition/Glossary
Why
Do you have more than 2
mechanics?
Affects Batch-mode
procedures
Do you wish to customize
the shop order numbering
system?
Affects shop order options
Are you an engine or
component rebuilder?
Component rebuilders do not work
directly on aircraft.
Affects shop order options
Will you use a TFBO printout
for the mechanic’s working
document?
Affects shop order style sheet
setup, shop order procedures
Inventory
Do you need to separate
inventory into categories?
Examples are separating pilot
supplies from aircraft parts
Affects Inventory departments
and inventory setup
Does any inventory need
to be tracked separately in
either inventory or sales GL
accounts?
For instance, will JetA fuel and
Avgas are often tracked in
accounting records separately.
Affects GL setup, inventory
departments, and inventory
setup
Do you have structured pricing
based on cost or list?
Affects inventory setup, price
class definitions, matrix setup,
inventory department setup
Do you store parts in labelled
bins?
Affects Inventory setup.
Do you have some shop
supplies you need to order
and sell but not track in detail?
Are parts taxable in your
area?
Are you located in Florida?
Have you elected a LIFO or
FIFO costing method with the
IRS?
Often items such as lubricants,
gasket material, cleaning solvents Affects Inventory setup,
and rags, etc. are expensed when inventory departments, GL
puchased.
setup, shop procedure
Affects inventory setup,
new customer options, new
inventory options
Some Florida locations have
unusual tax requirements for parts
and labor.
Affects invoicing options
Affects Inventory options and
pricing setup
APPENDIX G
TotalFBO® User Guide | 509
Setup Questionnaire
Area
Answer Definition/Glossary
Why
Affects inventory setup,
aircraft options
Do you prepare 8130-3’s?
Do you wish to customize PO
numbering?
Numbering can match existing
pre-printed forms, or be setup in
separate series for departments or
purchasing agents.
Affects Inventory options.
Do you have any outstanding
cores you need to track?
Cores are parts which have been
returned to the vendor for credit
against the price of a replacement
part.
Affects cores setup.
Do you routinely sell the same
group of parts for similar
repair orders?
Affects kits setup.
Will you be using barcodes for
input?
Affects inventory procedure,
option setup
Payroll
Do you have an outside
service preparing your
payroll?
Outside services include ADP,
Paychex, and others.
Affects payroll procedures,
general ledger procedures,
employee setup
Will you be using the
TimeClock module?
The Timeclock module allows
efficient entry of data for shop
orders and payroll use.
Affects payroll options and
user ID setup.
Do you have any pre-tax
deductions?
Certain “cafeteria plans”, 401K
and other retirement plans, and
specific benefits may be pre-tax.
Affects payroll deduction
setup
Do you allow employee
advances?
Affects employee setup
Do you have any outstanding
employee advance balances?
Affects GL and employee
setup.
Are you beginning TFBO in
the middle of a calendar year?
Affects beginning balances for
generation of payroll reports
and tax calculation.
510 | TotalFBO® User Guide
APPENDIX G
Setup Questionnaire
Area
Answer Definition/Glossary
Why
Do you have contract
employees?
Affects employee setup.
Do you wish to break
employee payroll into
departments?
Affects Employee and GL
setup
Do any employees split
their pay between multiple
departments?
Affects Employee and GL
setup
Are any employees both
salaried and hourly paid?
Affects employee setup
Do you bill for any employee’s
time?
Examples are mechanics and
flight instructors.
If you bill for employee labor,
do you have multiple prices?
Examples are mechanics who are
billed at one rate for prop repair
Affects employee setup, shop
and another rate for jet repair
order procedures
Affects employee setup
Do you have any mechanics
or pilots on staff?
Affects employee setup and
pilot and mechanic currency
records
Do you have preprinted
checks for payroll?
Affects check format setup
Checking
Do you have more than one
checking account?
Requires individual setup,
affects GL setup
Are checks cut or deposits
received directly at a home
office?
Affects checking setup and GL
setup, checking and payables
procedures.
Can multiple users be printing
checks at the same time?
Affects checking options
Do you have preprinted
checks?
Affects check layout setup
General Ledger
Do you expect to use only
TFBO for your accounting
records?
Affects GL setup, procedures
APPENDIX G
TotalFBO® User Guide | 511
Setup Questionnaire
Area
Answer Definition/Glossary
Why
Do you have an existing chart
of accounts?
A chart of accounts is a numbered
list of accounts that gather your
accounting information and totals.
Retaining numbers you’re familiar
with can be helpful.
Affects GL setup.
Is you existing chart of
accounts serving your needs
well.
Conversion can be a good time to
improve your chart of accounts if
there are problems.
Affects GL setup
Do you have multiple
departments or profit centers?
Affects GL setup, GL
Examples are Line, Shop, Charter, Department setup, customer
Flight School.
setup
Do your detail or subsidiary
ledgers support your balance
sheet account totals?
Examples are a listing of customer
accounts receivable or an
inventory valuation listing.
Affects GL setup procedures
Does your fiscal year coincide
with the calendar year?
Affects GL setup
Do you use fiscal months?
Affects GL setup
Do you have a good list
of standard charges for
services?
Examples would include ramp
services.
Affects GL setup
Affects Financial Statement
options
Are you incorporated?
Do you sell on consignment?
Examples are pilot shops or rental
cars, where part of the sale price
must to to another company.
Affects GL setup
Do you split expenses
between departments on a
standard schedule?
Examples are utility bills
Are credit cards processed
through Multi Service?
Affects GL setup, Payables
procedure
Affects GL setup, Holding
Company setup, Credit Card
setup, Processing Company
Setup
512 | TotalFBO® User Guide
APPENDIX G
Setup Questionnaire
Area
Answer Definition/Glossary
Will you be entering beginning
balances for your general
ledger as of the beginning of
the fiscal year?
Affects GL setup procedures
Do you have a budget?
Do you have multiple
locations?
Why
Affects GL setup
Affects database and GL
setup, licensing structure,
Multiple locations are usually (but invoicing procedure, station
not always) in different cities
setup
Affects database and GL
setup, licensing structure,
invoicing procedure, station
setup
Do you have multiple divisions
or companies?
Aircraft/Ground Equipment
Do you use leased or
managed aircraft?
Affects aircraft setup
and aircraft options, data
procedures
Do you print labels for logbook
entries?
Affects aircraft options setup
Do you use or repair the same
type of aircraft repeatedly?
Affects aircraft type setup,
macro setup
Do you track required
maintenance on ground
equipment or instruments?
Affects GSE setup
Do you prepare 337’s?
Affects Aircraft setup and shop
orde procedures
Flight School/Dispatch
Do you offer training
packages?
A training package is sold at a
Affects package setup, GL
unit price which includes flight and setup, invoicing procedure,
instruction hours.
customer setup.
Do you offer 141 training?
Training under FAR Part 141
requires record-keeping by the
company instead of only by the
instructor.
Affects course setup, student
enrollment setup.
APPENDIX G
TotalFBO® User Guide | 513
Setup Questionnaire
Area
Answer Definition/Glossary
Why
Do you dispatch aircraft by
type?
Large schools prefer to
schedule aircraft by type so that
maintenance downtime is spread
evenly throughout the fleet.
Affects dispatch setup.
Do you require damage
waivers from students?
Damage waivers are fees charged
students to insure the student
against the cost of the deductible if Affects dispatch options,
there is damage to the aircraft.
invoicing procedure
Do you rent headsets to
students?
Affects dispatch setup, GL
setup
Do you obtain both hobbs and
tach information from rental
customers?
Affects dispatch options,
invoicing options.
Do you ground flights when
squawks are reported?
Grounding policy depends upon
VFR/IFR operations and staffing
availability.
Affects dispatch options.
Charter/Dispatch
Do you use helicopters in your
charter operations?
Helicopters often land on buildings
or other private areas.
Affects airports setup.
Do you land at private
airports?
Affects airports setup.
Do you charge all aircraft on
the same basis? (by the mile
or by the hour)
Affects aircraft setup, charter
options
Do you conduct passenger
operations?
Affects aircraft setup, charter
options
Do you conduct cargo
operations?
Affects aircraft setup, charter
options
Do you have standard
discounts for good
customers?
Affects price class definitions,
customer setup, charter
procedure
Do you have jets in your fleet?
Affects charter options, aircraft
setup.
514 | TotalFBO® User Guide
APPENDIX G
Setup Questionnaire
Area
Answer Definition/Glossary
Why
Do you pay sales
commissions to your quote
staff?
Affects charter setup.
Do you use aircraft not based
at your home field?
Affects aircraft setup, charter
options, charter procedure
Do you charge a cheaper rate
for positioning legs?
Positioning legs are flights taken
to move the aircraft to a location
convenient for either the customer Affects aircraft setup, charter
or the company.
options, charter procedure
Do you do international
flights?
Affects aircraft setup, charter
options, charter procedure
Are flights conducted entirely
with your state borders
considered sales taxable?
Affects charter options,
charter procedure.
Do you grant any free standby
time to customers?
Affects charter options,
charter procedure.
Do you track flights by
category?
Example categories include
Affects charter options,
local, interstate & international or charter procedure, and GL
scheduled, on-demand, cargo, etc. setup
Do you charge by the seat?
Affects charter dispatch,
charter invoicing
Do you track customer
preferences?
Affects customer setup
Scheduling
Do you schedule for aircraft?
Affects scheduling setup
Do you schedule for condos
or rental property?
Affects scheduling setup
Do you schedule for staff
members?
Affects scheduling setup
Do you allow customers
to make changes to the
schedule?
Affects security setup
APPENDIX G
TotalFBO® User Guide | 515
Setup Questionnaire
Area
Answer Definition/Glossary
Why
Environment
Do you have a cash drawer
connected to your computer?
Affects station setup
Do you use bar-code
scanners?
Affects station setup
Do you use magnetic swipe
equipment for credit cards?
Affects station setup
Do you use Windows Terminal
Server/Citrix for a remote
connection?
Affects station setup
Do you use dot matrix
printers?
Affects station setup
Do you have a mixed
operating system
environment?
Mixed operating systems include
a variety of operating systems
withing one network.
Affects network stability
Do you have a Zebra printer
for labels?
Affects station setup
Do you use touch screen
monitors?
Affects station setup
Do you use a 40-column
invoice/receipt printer?
Affects station setup
Are you located outside of the
USA?
Affects international options
and paper sizes
Can you export ascii text file
data from your prior system?
Affects setup of inventory,
vendors and customers
Are you a Navpak/Ac-u-kwik
customer?
Affects setup of airports
516 | TotalFBO® User Guide
APPENDIX G
TotalFBO® User Guide | 517
GLOSSARY
100LL
61
91
121
135
141
145
337
8710
AD
ALL
AP
AR
ASCII
Avionics
Buyback
Charter Flight
C.O.D.
Consolidator
Contrec Connection
Computer
Fuel used in aircraft which has an octane rating of 100. Also often called
AVGAS.
FAR section governing flight training by individual instructors.
FAR section governing commercial flight operations.
FAR section governing scheduled flight operations.
FAR section governing charter flight operations.
FAR section governing flight training in approved facilities.
FAR section governing aircraft maintenance.
FAA form used to report maintenance on aircraft.
FAA application form used to obtain and update pilot licensing.
Airworthiness Directive. Issued by the FAA requiring maintenance or inspection
of specific components.
Automatic Ledger List. Account numbers used as defaults for automatic journal
entries.
Accounts Payable. Money owed to vendors by the company.
Accounts Receivable. Money owed to the company by customers.
Standard describing plain-text information format for computer files.
The instrumentation installed in an aircraft which provides the pilot with
information on the current attitude, location and functionality of the aircraft.
Sale to customer who has made separate contract directly with fuel distributor.
FBO is not paid by customer, but is reimbursed by the fuel distributor.
Flight in which both aircraft and pilot are provided to the customer for a
combined price. May also include other services.
Collect on Delivery. Shipping an item where payment must be made to the carrier
at the time of delivery.
Company that resells fuels to other customers.
Function within TotalFBO® which uses information received from a Contrec
metering system-equipped fuel truck over a wireless connection to create fuel sale
invoices automatically.
Mechanical device that promised us all less work, but actually raised the bar on
what’s expected. Somewhat more complicated than a microwave oven, but not
as complicated as an aircraft. Maintenance and upgrade costs must be budgeted
regularly as for an aircraft.
518 | TotalFBO® User Guide
Core
Cross Country
CSR
Damage Waiver
Defuel
Departure Fee
Diesel
Dry
EPA
FAR
FBO
FET
FIFO
Firewall
Fiscal Year
Fuel Farm
GAAP
GL
GSE
Headset
Holding Account
Hookup Fee
International Trash
JE
GLOSSARY
Used part returned to a vendor when its replacement is sold on Exchange basis.
Also, the fee that’s charged if the used part isn’t returned or isn’t repairable.
Flight in which the aircraft makes an approach to minimums or actually lands at
an airport away from the originating airport.
Customer Service Representative. Usually an employee who works in or near a
Front Counter, meeting the needs of customers.
Fee paid by a rental pilot in lieu of paying the owner’s deductible amount in the
event of damage to the aircraft.
Removing fuel from an aircraft before repairs or in order to reduce the aircraft
weight. Sometimes an FBO can use the fuel, so the customer is given a credit.
When the fuel cannot be re-used the customer is charged a fee for the service.
The process of defueling can make the meters on a fuel truck run backwards.
Flat fee charged by an airport to a departing aircraft to cover the added burden of
servicing the customer.
Fuel used in heavy-duty vehicles and ground equipment.
Renting an aircraft for a price which does not include fuel.
Environmental Protection Agency
Federal Aviation Regulations
Fixed Base Operator - now, any aviation business, especially fuel sellers.
Federal Excise Tax
First-In-First-Out. A method of costing inventory where the oldest items are
presumed to be sold first.
Software or specialized device which serves to prevent unauthorized traffic from
passing through to a computer or network of computers.
One year’s accounting cycle. May not coincide with calendar year.
Collection of tanks in which fuel is stored.
Generally Accepted Accounting Principles. Universal standards and methods
which govern accounting activities to insure that reported figures are generally
understood.
General Ledger. The collection of accounts which contains the financial
information describing the activities and condition of the company.
Ground Service Equipment, the vehicles and equipment used in ramp service.
Communications equipment provided to a rental pilot for a fee.
Customer account set up to track money owed to you by a credit card processor.
Flat charge for meeting airline flights to determine fueling needs.
Waste materials removed from aircraft which have arrived in the US from a
foreign location. Subject to specialized disposal regulations.
Journal Entry. Record of a transaction affecting the financial information for a
company.
GLOSSARY
JetA
LAN
Landing Fee
Leaseback
LIFO
Macro
Map
Margin
Mobile Agent
Mogas
MSDE
Network
Night Flight
ODBC
Offsite Fuel
Online
Override
Package
Physical Inventory
Pilot Service
Price Class
Prist
TotalFBO® User Guide | 519
Fuel used in high-performance aircraft, especially those with jet engines, and
some race vehicles.
Computer network in which all computers are physically located in the same
building.
Flat fee charged by an airport to a visiting aircraft to cover the added burden of
servicing the customer. Usually charged based on the size of the aircraft.
Arrangement where an FBO sells an aircraft and leases it back from the owner
for use in charter or rental operations. The owner is paid a portion of the income
from those operations. Also, the report within TotalFBO® which summarizes the
income and expenses related to those operations for the FBO and the owner.
Last-In-First-Out. A method of costing inventory where the most recently
purchased items are presumed to be sold first.
Text saved and available for repeated use.
The process of creating a shortcut on your computer to a specific directory on
another computer. The shortcut ends up looking like a drive letter on your own
computer.
The portion of a sales price which represents the profit on the sale.
Functions within TotalFBO® which provide direct access to your database from a
wireless device.
Motor Gas. Fuel used in vehicles, usually with an octane rating between 85 and
97.
A limited version of SQL supplied by Microsoft.
Collection of computers linked together for the transfer of information in a
controlled manner.
Flight which is conducted within the period of time between sunset and sunrise as
defined by FAA regulations.
Open Data Base Connectivity. A standard permitting access to a database from a
program which was not used to create the database.
Fuel purchased by a pilot while the aircraft was away from the FBO.
Accessing or sending information over the Internet. Used in providing credit card
authorizations and settlements through TotalFBO®. A computer which cannot
access the Internet cannot participate in Online processing.
Using an alternate account number instead of the default specified on the
Automatic Ledger List for a particular category.
Bundle of aircraft rental hours, flight instruction, ground instruction, and other
services sold as a unit to flight school students.
Counting the quantity of an item in inventory by visual inspection.
Flight in which a commercial pilot provides his services to the customer for a fee.
Does not include rental of the aircraft.
Grouping of customers who are eligible for a specific price structure.
Fuel additive to JetA, premixed or injected or sold in cans.
520 | TotalFBO® User Guide
Query
Ramp
Ramp Fee
Recirculation
Reconciliation
Refuel
ROA
Service Bulletin
SMTP
Solo
SQL
Squawk
Standby
Sump
Tailnumber
TCP/IP
Tech Support
Thin-Client
Thread
GLOSSARY
Format for requesting information from a SQL database.
The portion of an airport property which is owned or leased by an FBO for
business purposes. Usually this area is paved and accessible to aircraft.
Flat fee charged by an FBO to a visiting aircraft to cover the added burden of
servicing the customer. Usually charged based on the size of the aircraft. Often
waived or reduced if the customer actually purchases something.
Cycling fuel within a truck. The meter is moved but the quantity of fuel in the
truck does not change.
Report or process comparing two data sources, noting or eliminating any
differences.
Returning fuel to an aircraft which was previously removed from that aircraft.
Can only be done with specific equipment under strict regulations.
Received on Account. Payment received from a customer to be applied to
outstanding charges.
Information issued by a manufacturer suggesting inspection, upgrade or repair of
a component.
Simple Mail Transport Protocol. Most common standard for sending email.
A flight by a student pilot which is taken without the instructor (or any other
passengers).
Structured Query Language. A set of standards defining standardized, controlled
access to databases.
Mechanical problem with an aircraft which is reported by a pilot.
Fee charged to a charter customer for the time an aircraft and/or crew is kept
available and waiting.
Removing fuel from a tank or truck which may be contaminated. Also the tank in
which sumped fuel is placed.
The letters and numbers which are painted on an aircraft as an identifier. The
tailnumber is assigned by the registering agency for the country where the aircraft
is based.
Computer protocol (set of universal standards for formatting packets of
information) which is used to send data between computers over a network.
Required for TotalFBO®.
Collection of caring, intelligent, patient people who will give up their free time to
help you have a nice day. Often provide free information and assistance on other
areas of computing and life in general beyond TotalFBO® just to get you out of a
jam.
Software which enables remote access to a software program over a slow network
connection because only the data necessary to update the screen or entered from
the keyboard is tranmitted over the connection. All processing is conducted at the
server location. See WTS.
Computer memory set aside for a specific process.
GLOSSARY
Touchscreen
UST
Vector
WAN
WLAN
WAP
Wet
WIP
Wireless
WTS
TotalFBO® User Guide | 521
A computer monitor which has a surface sensitive to human touch. Also, the
invoicing interface within TotalFBO® which takes advantage of this type of
monitor to provide a faster method of creating invoices.
Underground Storage Tank. Underground fuel tank installations are subject to
tighter regulations and additional fees.
Instruction from a tower controller telling a pilot where to go.
Computer network in which the computers are located in two or more buildings.
Requires Thin-Client software to obtain enough speed to run TotalFBO®.
A local computer network in which some or all of the connections use wireless
transmission equipment. Significantly slower than wired networks.
Wireless Access Point. An antenna on a network which is transmitting
information.
Renting an aircraft for a price which includes all fuel.
Work in Process. The value of goods and services which have been delivered but
not yet billed to a customer. An Asset to the company.
Network connection in which information is transmitted from an antenna on the
network to an antenna on the computer or other mobile device.
Windows Terminal Services. A group of functions which enables desktop
operation of programs from remote workstations. The most common Thin-Client
solution.
522 | TotalFBO® User Guide
GLOSSARY
INDEX
TotalFBO® User Guide | 523
GENERAL INDEX
#
1099: 90, 104, 142, 151, 257, 276
337: 315, 356, 363
40-column receipt printer: 109
401K: 103, 148
8710s: 286
941: 90, 105, 147, 151, 163
A
A/P: 140, 328
A/R: 126, 140, 328
Abnormal Terminations: 16-17
AC-U-KWIK: 252
Accounting & Back Office Operations: 230
Accounting Processes: 171
Accounting Reports: 167
Accounts Payable: 198, 222, 266, 306, 320-321, 324, 348
Accounts Receivable (Customers): 121, 184, 188, 190-192, 231,
237-238, 240-242, 245
Accounts Receivable: Initial Setup & Options: 82, 86, 258, 277
Accounts Receivable Change Report: 126
Accrual account: 148
Accrued Net Payroll account: 147
Action Dates: 312
AD: 338
Additional Databases: 9, 14, 53
Adjusting journal entry: 324
Administrative Lockout: 51
ADP: 102
Advanced Invoicing Procedures: 199
Aircraft Activity Report: 267, 287
Aircraft Activity Summary: 380
Aircraft dealer: 337
Aircraft logbook entries: 292, 356
Aircraft Maintenance: 17, 63, 171, 252, 258, 264-265, 269-270,
278, 283, 289-290, 298, 314, 332, 334, 354
524 | TotalFBO® User Guide
INDEX
Aircraft Maintenance Cycle: 289
Aircraft maintenance logs: 314
Aircraft maintenance requirements: 264, 283
Aircraft malfunction: 262, 282
Aircraft Management: 289
Aircraft meter: 167, 283
Aircraft Number: 207-208
Aircraft owners: 136, 253, 272
Aircraft performance data: 356
Aircraft Pricing: 254
Aircraft Records: 245-246, 248, 252, 270, 289, 354, 358
Aircraft Rental procedures: 269
Aircraft Setup: 249, 252, 269-270
Aircraft Tail Numbers: 72, 89, 136, 167, 202, 252, 270, 315,
364, 373
Aircraft tailnumber: 169
Aircraft Time Justification Report: 214
Aircraft Type designation: 360
Aircraft Types: 31
Aircraft weight & balance: 292
Aircraft: Initial Setup & Options: 290
AIRLINE CUSTOMER FUEL INVOICE: 188, 237
AIRLINE CUSTOMER SUMMARY INVOICE: 189
Airline fuel sales: 66
Airline Fuel Statement: 118, 189
Airline fueling: 201
Airline’s Customer Account record: 188, 237
Airline’s fuel: 337
Airlines: 66, 96, 99, 113, 116, 118-119, 188-189, 201, 207-208,
237, 337, 352
Airport Commission: 66, 82
Airports: 14, 29, 31, 53, 66, 82, 90, 94, 100, 164, 166, 250,
252, 259
Airworthiness Directives: 361
Alternat.bmp: 29
Applying Outstanding Credits: 121
Archiving: 353
Archiving Reports: 43
Auctioneer: 298, 340
INDEX
Authentication: 18, 22-23, 25, 391
Auto-Distribute: 90, 106
Automatic Ledger List: 73, 79, 92, 124, 186, 247
Avgas, JetA, etc.: 96
Avgas sales: 163
Aviation-Specific Features: 66
Aviation fuel: 166
Aviation industry: 167, 289
Aviation payrolls: 102
Aviation-Specific Features: 66
Avionics Shop,: 73
B
Back-date: 158
Back-Dating: 312
Back-ordered: 347
Backups: 9, 12, 19, 49-51, 383-384
Bad Debt Write-Offs: 158
Balance sheet accounts: 108, 167
Balloon types: 92
Bank Account GL: 81
Bank Account Name: 79
Bank cards: 86
Bank Charges & Fees: 197
Barcode reader: 13
Barcodes: 13, 199, 211, 302, 304, 350
Batch-Mode Labor: 300, 330
Batch/Lot records: 100
Batch Mode Labor: 294, 307
Batch Mode Parts: 295-296, 304
Batch Posting: 169-170
Batch Tracking Logic: 352
Batch Updating Shop Orders: 304
Beginning Balances: 77-78, 81, 88, 92, 108, 170
Beginning inventory balances: 89
Bill Recurring Charges: 119
Billable time: 330
Billing customers: 82
TotalFBO® User Guide | 525
526 | TotalFBO® User Guide
INDEX
Billing errors: 267, 287
Billing Trap Phrase: 105
Bin Locations: 340, 350
Blank.bmp: 29
Bounced Check: 155-156, 192
Broker an Aircraft Sale: 171
Budgets: 77, 171
Buyback Fuel Sales: 100, 124
C
C/G Loading Configuration: 355
C.O.D. Deliveries: 130
Cafeteria: 103
Canada: 204
Canadian Air Time: 360
Canadian payroll structure: 112
Capitalizing Aircraft Maintenance: 171
Cardswipe devices: 212, 397
Cash a Check for Someone: 152
Cash Drawers: 9, 48
Cash Flow Statement: 167
Categorizing Inventory: 102, 289, 337
Cessna: 96, 253, 272, 357
Change Your Own Password: 32
Changing Invoices: 372
Chargebacks: 124, 129
Charging Sales Taxes Correctly: 129
Chart of Accounts: 56, 63-64, 72-73, 78, 88, 106, 109
Charter: Initial Setup & Options: 250, 258
Charter Aircraft: 254, 258-259, 332
Charter Aircraft Maintenance Expense: 332
Charter Billing Summary: 380
Charter Dispatch Options: 257
Charter Expenses,: 136
Charter fuel purchases: 360
Charter income: 337
Charter Operations: 31, 53, 84, 166, 212, 249-250, 262, 267,
289, 332
INDEX
TotalFBO® User Guide | 527
Charter Operators: 255
Charter pilots: 136, 144, 257-258, 272, 275, 356
Charter pricing: 84, 254-255, 356
Charter Quotes: 255, 258-259, 356
Charter Reservation,: 262
Charter Sales Report: 166, 267, 380
Charter Taxes: 166
Charter: Initial Setup & Options: 250, 258
Check-In: 228, 249, 265-266, 269, 283-284, 356, 364
Check cashing: 152
Check Formats: 81
Check Reconciliation function: 82
Check Register: 80-81, 156
Checkbook Entries: 152
Checking Contra Account,: 81-82, 109
Checking In a Flight: 245-246, 248
Checking: Initial Setup & Options: 80
Checklist: 76, 159, 383, 396
Checkride: 279, 286
Chevron: 396
Cleaning supplies,: 331-332
Clear Selected Info: 108
Client-owned inventory: 322
Close Charge Batch: 122, 215
Close process: 50, 127
Close Receivables: 113, 127
Close regularly,: 50
Closing: 43, 77-78, 122, 126-127, 214-216, 244, 302, 304,
309, 312, 336, 358, 372
Closing a Shop Order: 309
Closing Statements: 127
Club: 89, 245, 274, 276-277, 280
COD: 72, 135, 305-306
Collection letters: 129, 381
Commit Pay: 146
Communications Protocol TCP/IP: 15
Company Credit Card: 113, 135, 137
Company Policies: 64, 373
Company Policies for Good Data: 373
528 | TotalFBO® User Guide
INDEX
Company’s particular: 63
Component life-cycle: 356
Components: 289, 302, 305, 316, 320, 322, 360-361, 390,
393-394
Compound Account Statement: 119
Computer workstation: 51, 80, 368
Concierge: 31, 53, 184, 199, 212, 228, 239, 242
Concierge Requests: 199, 228
Concierge Super-Screen: 199, 228
Conference Room: 258, 277
Consolidating Financial Information: 167
Consolidators: 116, 119, 125
Contacting Tech Support: 383, 399
CONTACTING TECH SUPPORT: 399
Contra Accounts: 78, 81-82, 88, 93, 99, 106, 109
Contract employees: 257, 276
Contract flights: 264
Contract Payment Type: 234
Contract Price Class: 257
Contrec: 98, 116, 125, 212
Contrec Fuel Truck Interface: 98, 125, 212
Control Account: 77, 106, 109, 126, 158
Controller: 16, 18, 22, 63-64, 94, 106, 113, 121, 126-127,
129, 136, 139, 152, 159, 163, 208
Controller duties: 113
Conversion time: 30
Convert V3 Data: 9
Converting Common Files: 31
Copy Deferred Items Method: 325
Copy Existing Quote button: 259
Core Tracking: 138, 289, 318
Cores: 137-139, 315-316, 318, 321
Cores record: 138
Corporate Location: 56
Counter sale of Aircraft Parts: 238
Counter Sales department: 74
Courses: 250, 269-270
Courtesy Cars •: 201, 258, 277
Create Additional Databases: 9
INDEX
TotalFBO® User Guide | 529
Creating Databases & Licensing: 9
Credit Card Batches: 122, 140, 215
Credit Card Chargebacks: 124, 129
Credit Card Holding Company: 124, 126, 186
Credit Card Processor: 140, 215-216
Credit Cards: 63, 84, 86, 88, 109, 122, 137, 184, 186-187,
201, 209-210, 232-236, 239, 241-242, 262, 301
Credit memos: 133, 136-138, 140, 227, 241, 321, 328, 348, 350
Credit terms: 116
Crew lodging: 252
Cross-Billing: 313
Cross-country flights: 281
Cross-location: 56-57
Crystal Reports: 386
Currencies: 112
Currency type: 80
Custom programming: 385, 397, 399
Customer Account Records: 201, 204, 279
Customer balances: 126
Customer Deposits: 121, 279, 328
Customer Payments: 116, 184, 242
Customer Preferences: 228, 261
Customer refunds: 129, 155
Customer’s check stub: 121
Customer’s copy: 125, 250
Customer Statements: 86, 113, 116, 121, 126-128
Customer-owned fuels: 99-100
Customizable Field Names: 253, 272
Customize Toolbar: 259
Customizing: 9, 45, 86, 106, 128, 201, 258, 290
Customizing Invoices: 201
Customizing Shop Orders: 290
D
Daily Fuel Reconciliations: 199, 216
Damage Waiver: 283
Data corruption: 15
Database Management: 386
530 | TotalFBO® User Guide
INDEX
Database Structure: 55-56
Date-sensitive: 68, 158-159, 171
Deductions: 63, 103, 113, 144, 148
Default Cash Sale customer: 372
Default chart of accounts: 64, 72, 78
Default Expense account: 90
Default Journal Entries: 171
Default Labor Rate: 300
Default Tax Payee: 105
Deferred Discrepancies: 325
Defining Flights: 257
Defueling: 98, 214, 219, 224
Delinquent accounts: 127-128
Deliveries: 118-119, 130, 163, 166, 207, 212, 222, 304-305,
337, 345, 368
Departments: 41, 64, 66, 68, 70, 72, 74, 76, 86, 90, 94, 96,
104, 116, 142, 201, 225, 227, 230, 289-290, 311, 338,
365, 367
DEPOSIT OF EFT PAYMENTS: 196
Deposit payment: 301
Deposit Receipt: 154
Deposit to a Vendor: 136
Deposits: 49, 81, 86, 90, 105, 113, 120-122, 136, 146-149,
152, 154-155, 163, 186-187, 192-194, 196, 210, 265,
279-280, 283, 301, 327-328
Depreciation: 158
Desktop shortcut: 34, 395
Dial-up connection,: 209
Discount percentage: 254, 273
Discovery (Intro) Flights: 246
Discrepancy Analysis Reports: 387
Dispatch: 104, 201, 212, 228, 245-246, 248-249, 254, 257,
259, 264-266, 269, 273, 276, 278-279, 282-284, 314,
355, 364
Dispatch Setup: 249, 269
Dispatching a 135 Flight: 257, 264
Dispatching Flights: 249-250, 361
Dispatching Rental Flights: 282
Dot-matrix printers: 45-47, 80
INDEX
TotalFBO® User Guide | 531
Due To/From accounts: 159
Due To/From Other Locations account: 56, 334
E
EFT payment type: 124
EFT transfer,: 184, 242
Ellipses buttons: 31, 41, 46, 53, 135, 206-207, 292, 300
Emailing from TotalFBO®: 312
Employee Advances: 148
Employee expenses: 135, 137
Employee Master Deduction List: 103
Employee Records: 63, 102, 104-105, 245-246, 248, 257,
259, 276, 278, 371
Encrypted data: 252
Enforce Credit Limit,: 129
Enforce Quantity-to-Hobbs Link: 277
Engine/Prop/Time Data: 358
Enrolling Students: 269, 279-280
Entering Initial Setup Data: 81, 88, 227
Enterprise licensing: 55, 58
Enterprise Operations: 18, 55
Equipment Maintenance: 199, 230, 332, 365
Equity account: 140
Error messages: 34, 384, 29, 34, 384, 390, 393, 397
Examples of typical departments: 227
Examples of typical Inventory Department setups: 96
Exchange Server: 25
Expense Statement: 167
Exporting Data & Custom Reports: 383, 386
Exporting Data to Other Programs: 171
F
FAA 337: 315, 356, 363
FAA 8710: 269, 279, 286
FAA Parts 91, 135,: 249
FAA registry data: 300
532 | TotalFBO® User Guide
INDEX
FAA tail number database,: 204
FAA Tailnumber: 14, 53
Fence dates: 58, 76, 106, 163
FET Taxes: 249, 267
FIFO: 97
Financial Close function: 159
Financial Statements: 56, 68, 108, 113, 167
Fiscal Years: 32, 76, 108-109, 155, 159, 170
Fixed Asset depreciation: 169
Flat-screen monitors: 12
Flight/Instruction Summary Report: 287
Flight Classes: 250, 267, 380
Flight Dispatch: 228, 257, 269, 355, 364
Flight Identifier: 264
Flight Manifest: 265
Flight Number: 188, 207-208, 237
Flight School: Initial Setup & Options: 270, 276
Flight School Aircraft Maintenance Expense: 332
Flight School Courses: 270
Flight School Departments: 104, 225, 286, 338
Flight School Operations: 84, 212, 249, 269, 286, 332, 334
Flight School Reports: 286
Flight School: Initial Setup & Options: 270, 276
Flight Training Packages: 278
Flights browse window: 265
Flowage Fees: 90, 100, 164
Front Counter & Ramp Operations: 88, 199
Front Counter Shifts: 215
Front Counter staff: 276, 372
Front Counter Workflow: 199, 212
Fuel and Oil Consumption: 284, 360
Fuel Consumption Report: 167
Fuel costs: 187, 254, 273
Fuel Farm: 94, 98, 201
Fuel Farm functions setup: 94
Fuel Farm Operations: 98, 201
Fuel inventories: 66, 188, 216, 231-237
Fuel Meters: 98, 188-189, 231-237
Fuel Prices: 94, 97, 125, 188-189, 231-232, 236-237, 380
INDEX
TotalFBO® User Guide | 533
Fuel Sales: 66, 94, 100, 124-125, 164, 166, 187, 206, 209, 216,
231-236, 239, 380
Fuel Surcharge: 254, 273
Fuel Tanks: 98, 219, 231-232, 234-235
Fuel Taxes: 94, 100, 163-164, 166
Fuel types: 99-101, 116, 118, 163-164, 188-189, 206-207, 219,
221, 224, 231-237, 240, 337
Fuels: 94, 96-97, 99-100, 201, 206, 221
G
Gateway Merchant Agreement: 209
General Ledger Accounts: 77, 93, 106, 225, 278, 338
General ledger accounts: 77, 81, 93, 106, 108, 136, 208, 225,
278, 301, 338, 371
General Ledger Control Accounts: 132, 159
General Ledger Department: 73-74, 106, 238, 330
General Ledger Departments: 70, 73-74, 76, 86, 106, 238,
290, 330
General Ledger Primer: 171
General Ledger Setup Checklist: 76
Genesis POS: 13, 48
Getting Around in TotalFBO®: 9, 37
Getting Started: 18
Getting Started with SQL: 18
Gift Certificates: 84, 216
Global Options: 14, 18, 36, 47, 58
Ground Equipment Setup: 201, 230, 365
Ground School: 270, 276, 282
GSE: 199, 289
GSE Equipment Maintenance: 199
H
Handle Petty Cash: 152
Handling a Bounced Check: 155
Hangar rents: 68, 120
HBC: 12, 31, 53
Headset Rental: 283
534 | TotalFBO® User Guide
INDEX
Helpscreen topic: A General Ledger Primer: 171
Helpscreen topic: Aircraft Records: 354
Helpscreen topic: Consolidating Financial Information: 167
Helpscreen topic: Cross-Billing Shop Orders: 313
Helpscreen topic: Emailing: 312, 346
Helpscreen topic: Engine/Prop/Time Data: 358
Helpscreen topic: Inventory Departments: 96, 225, 338
Helpscreen topic: Kits: 353
Helpscreen topic: Logging Maintenance Performed: 314
Helpscreen topic: Making Charter Quotes: 259
Helpscreen topic: Mobile Agent Processing: 350
Helpscreen topic: Preparing: 315
Helpscreen topic: Pricing Inventory: 96, 102, 341
Helpscreen topic: Receiving Shipments: 133, 305, 347
Helpscreen topic: Regular Parts: 352
Helpscreen topic: Sending parts: 316
Helpscreen topic: Serialized Parts: 353
Helpscreen topic: Service Bulletins: 360
Helpscreen topic: Taking: 221, 350
Helpscreen topic: Tracking Cores: 318
Helpscreen topic: Using Barcodes: 350
Helpscreen topic: Using Manufacturer’s Price Lists: 344
Helpscreen topic: Inventory Departments 0
Helpscreen topic: Maintenance Reminders
Helpscreen topic: Customizing Shop Orders
Helpscreen topic: Inventory: Initial Setup: 29
Hookup fees: 118, 189
Horizon Business Concepts: 9, 52, 109, 371, 399
Hot section times: 359
Hotel: 261, 397
How to Map a Drive: 14, 26
Human Resources information,: 151
I
Icons: 14, 35
Import: 30-31, 53, 88, 90, 93, 96, 101-102, 113, 125, 212,
227, 252, 314-315, 360
Import Ascii Data: 88, 90, 101
INDEX
TotalFBO® User Guide | 535
Import Common Supplemental Data: 31
Import Version 3 Data: 30
Improved Workflow Between Departments: 66
Improving Performance: 16
Income Matching Principle: 334
Income Statements: 167
Ink-jet printer: 45
Inspection flights: 169
Inspector’s signoffs: 302
Installation & Setup: 55, 58
Installing Program Updates: 9, 52
Installing SQL or MSDE: 9
Instant Financial & Management Reports: 68
Instructor illness: 282
Instructor’s Employee Record: 276
Integrated: 9, 17, 49, 102, 114, 289, 374
Integrated system: 374
INTER-LOCATION SALES: 55, 58
Internal Customer: 247, 298
International Options: 63, 112
Intro Flights: 246, 279
Inventoried Aircraft: 337
Inventory Contra Account balance: 109
Inventory counts: 142, 158, 221, 350
Inventory Departments: 74, 94, 96, 100, 188-189, 201, 225,
237, 290, 296, 298, 322, 338, 343
Inventory Reports: 222
Inventory Workflow: 289, 344, 346
Invoice Recurring Charges: 113, 119
Invoice Style Sheets: 125, 231-236, 238, 240-241, 245-248,
258
IRS 941: 151
J
Journal Entries: 56-57, 64, 73-74, 76-77, 88, 106, 108-109,
114, 121, 133, 140-141, 147, 155-156, 158, 169-171, 195
JPG file: 254
JumpStart® evaluation: 27
536 | TotalFBO® User Guide
INDEX
K
Keyboard Macros: 206, 309
Kits: 353
L
Label Formatting: 381
Landing Fees: 164, 252
Landings, takeoffs: 250
Laptops: 302
Lead Passenger: 261
Leaseback Report: 167, 169, 334
Leases (Recurring Expenses): 92
Licensing: 9, 15, 17, 23, 27-30, 32, 36, 52, 55, 58, 109, 392, 396
LIFO: 97
Line Equipment Maintenance Expense: 332
Line Manager: 116, 118, 142
Line of Credit arrangements: 92
Loading Supplemental Files: 53
Loan: 354
Loan-Installed: 354
Loans: 92
Local Workstation Installation: 34
Location Management: 58
Location Option Overrides: 60
Location Records: 55, 58
LOCATION RECORDS: 58
Location Zero: 56, 58
Locations: 18, 30, 34, 45, 55-56, 58, 60, 202, 244, 250, 261,
334, 350, 371
Lock/Unlock Program: 52
Lockdown: 77
Lockout: 51
Locks: 146, 368
Logbook-style signoff area: 363
Logbook Entries: 314, 356, 363
INDEX
TotalFBO® User Guide | 537
Logbook entries: 292, 314-315, 356, 363
Logging Maintenance Performed: 314
Logs: 14, 30, 215, 266, 309, 314, 360-361, 363, 365, 392, 398
Lot ID: 347
M
Machine ID: 18
Machine Name: 18
Macros: 206, 262, 280, 294, 300, 309, 314
Mailing labels: 381
Maintenance alerts: 364
Maintenance Logs: 314, 361, 363, 365
Maintenance of aircraft: 332, 334
Maintenance of ground service equipment: 332
Maintenance Reminders: 253, 272, 356-358, 360
Making Backups: 9, 12, 49, 383
Making Charter Quotes: 259
Making Payments to Vendors: 138-139
Making the Paycheck: 146
Making the Tax Deposit: 147
Making Time Cards: 146
Management Controls: 367
Managing Aircraft Records: 289, 354
Managing Pilot Supplies: 199, 225
Manufacturer’s Parts Lists: 96
Margins: 66, 367, 380
Marketing: 70, 129, 132, 204, 367, 373, 381
Marketing Tools: 129, 381
Markup Percentage: 294, 341
Markups: 294, 311, 318, 341
Mass Update Prices: 102, 344
Master account: 90
Master Chart of Accounts: 56
Matrix: 96, 102, 306, 342-344, 347, 380
Maximum Allowed Per-Unit Fuel Price field: 97
Maximum database size: 18
Maximum Offsite Fuel Credit: 248
Maximum Passenger Count: 259
538 | TotalFBO® User Guide
INDEX
Mechanic’s instructions,: 294, 302
Mechanic’s Time: 294
Mechanic’s Worksheet: 302
Menu Privileges: 372
Merge: 81, 88, 99, 109, 129, 142, 352, 381
Merge Two Parts Records: 352
Meters: 98, 188-189, 207, 216, 219, 224, 231-237
Metric measurements: 112
Microsoft’s Windows Terminal Server®: 17
Microsoft Small Business Server 2000: 21
Microsoft XML: 109, 397
Minimum Fueling: 118, 188-189, 237
Minimum number of pilot hours: 273
Minimum requirements: 11
Minimum Time: 273
Mirror: 219, 384
Mobile Agent Processing: 98, 125, 212, 350
Mobile Ramp Agent: 212
Money-market accounts: 79
Monitoring Database Activity: 367, 372
Monthly Balancing Checklist: 159
Move Money Between Receivables & Payables: 140
MS-Cash Drawer® unit: 48
MSSQLServer Service: 20, 390
Multi-user environment: 17
Multi Service: 73, 396
Multi Service Product Code: 73
Multiple aircraft,: 261
Multiple currencies: 112
Multiple databases,: 167
Multiple installations of SQL: 28
N
Names of the various fuel: 94
NATA membership: 267
NAVPAK: 252
NBAA: 166
Network authentication,: 18
INDEX
TotalFBO® User Guide | 539
Network Configurations: 15
Network Issues: 9, 14
Networking concepts: 9
New accounts: 84, 129, 232-233, 373
New Customer Summary: 373
New Customers: 17, 84, 125, 129
New location: 51, 56, 58
New Shipments •: 344, 347-348
Next-due times: 230, 356, 363-365
Night flight: 279
Non-billable labor: 330
Non-Billing Customer: 144, 274, 330, 332
Non-Billing Shop Order: 297
Non-Income Services columns: 166
Non-Stocking: 296, 338, 340
Non-taxable sales: 328
Norton Personal Firewall: 394
Notes & Leases: 63, 142
Notes (Loans): 92
Number of invoice copies: 190, 211
O
Obsolete Items: 340
ODBC connectivity,: 386
Offline Processor,: 184, 242
Offline transaction: 209
Offsite Fuel: 248, 284
Offsite Fuel Credit: 248
Oils: 94, 96-97, 99, 101, 201
Online Credit Card Processing: 9, 15, 63, 73, 84, 109, 199,
232, 383, 396
Online Processor: 84, 184, 187, 242
Operating Systems: 11, 15
Other Internal Shop Orders: 86, 289, 332
Other Inventory Functions & Concepts: 289
Outgoing Freight: 316, 324
Output text file: 102
Outside Service: 102, 305
540 | TotalFBO® User Guide
INDEX
Overhead Shop Orders: 289, 330
Overriding Automatic Accounts: 74
Overview: 63, 138
Owner’s Personal Expenses: 142
Owner’s Price Class: 274
P
Package Sales account: 286
Package student: 286
Package Times: 284, 286
Packages: 15, 66, 269, 278
Packing Slip: 130, 227, 305-306, 318, 320, 324, 348
Part 141 FAA regulations: 269
Part 61: 269
Part Record: 96, 101-102, 295, 343, 347, 353-354, 360
Partial/Over Payment button: 142
Partial credit: 166
Partnership account: 129, 373
Parts Needing Work: 360
Parts Organization: 289, 296
Parts section: 96
Parts Sold Between Locations: 334
Pass-Thru-Transfers: 136-137, 155, 159
Passenger records: 264
Passenger’s baggage: 265
Password: 23-25, 28-29, 32-33, 36, 51, 68, 70, 252, 368,
370-371, 385-386, 392, 398
Pay calculations: 146
Pay Descriptions: 104
Pay History Reports: 151
Pay Vendor Invoices: 139
Payables Clerk: 63, 66, 90, 94, 97, 113, 130, 133, 138-139,
142, 321, 346-348, 350
Payables Credit Memo: 137
Payables function, Move Money Between A/R: 328
Paying a Deposit to a Vendor: 136
Paying an Owner’s Personal Expenses: 142
Paying Your Taxes: 163
INDEX
TotalFBO® User Guide | 541
Payments of payroll taxes,: 163
Payments Received: 113, 120-121, 124, 184-187, 242-243
Payments to Vendors: 138-139
Payroll Clerk: 63, 102, 113, 144, 330
Payroll errors: 267, 287
Payroll preparation: 144
Payroll Register: 151
Payroll Reports: 151
Payroll Taxes: 102, 163
PDF file: 43, 346
Peer-to-peer: 12, 15, 18, 22, 25, 368
Pending invoices: 127, 212, 233
Performance: 11, 15-19, 21-22, 34, 55, 114, 139, 254, 356,
367, 390, 393
Perpetual Inventory method of tracking inventory: 350
Personal credit card: 140
Personal expense: 146
Personal logbooks: 144
Personal purchases: 346
Personal statistics: 151
Photo flights, etc.: 249
Physical Inventory: 221, 350
Physical inventory worksheets: 296
Picture of the aircraft: 254
Pilot Operating Handbook of the aircraft,: 254
Pilot qualifications: 355
Pilot readiness: 276
Pilot Records: 63, 249, 257, 265, 269, 276, 279, 283-284
Pilot’s weight: 264
Plain background image: 29
Planning pricing decisions: 267, 287
Post-Year entry: 170
Posting depreciation: 76
Posting Payments Received: 121, 124, 186-187
POSTING PAYMENTS RECEIVED FOR BUYBACK FUEL:
187
POSTING PAYMENTS RECEIVED FROM CREDIT CARD
HOLDING CO.: 186
Posting WIP: 158
542 | TotalFBO® User Guide
INDEX
Posting Work In Process: 156, 334
Prepare & Commit Pay: 146
Preparing Quotes: 249
Preparing the FAA 337: 315, 356, 363
Preparing the Payroll: 146
Previous accounting system: 89
Price inventory: 341, 380
Pricing: 56, 60, 63, 66, 84, 94, 96, 100-102, 108, 124, 129,
201, 254-255, 257, 267, 272-275, 287, 295, 298, 306,
324, 337, 341, 347, 356, 380
Pricing fuel: 66
Pricing Inventory: 84, 96, 102, 201, 341, 347
Pricing policies: 56, 129
PRICING RENTAL FLIGHTS: 273
Pricing setup information: 380
Printers: 9, 11, 45-48
Printing: 45-47, 73, 86, 128, 146-147, 151, 167, 212, 231-236,
238, 240-241, 247, 254, 258, 286, 302, 352
Printing Flight School Reports: 286
Printing Payroll Reports: 151
Privilege levels: 39, 70, 109, 121, 185, 205, 241, 243-244,
265, 283, 312, 371-372
Privilege Overrides: 372
Progress Billing: 325
Promotional: 132, 247
Protocol: 15, 109, 388, 393
Purchase Orders: 90, 97, 304-305, 311, 318, 321, 344, 346, 353
Purchasing Agent: 97, 302, 344
Purge Inactive Parts: 352
Purging: 353
Q
Quote Defaults: 249-250
Quotes: 249, 254-255, 258-259, 300, 356
R
INDEX
TotalFBO® User Guide | 543
Ramp fee: 66, 208
Ratio of the Hobbs readings,: 277
Recapture FET: 166
Receivables Clerk: 63, 68, 82, 96, 113, 116, 121, 125-126
Received Shipment: 89, 130
Receiving Fuel Loads: 97, 199
Receiving Shipments: 133, 305, 347
Recirculation: 214, 219, 225
Reconciliation of Detail Ledgers: 163
Reconciling to the Bank: 156
Recording Customer Preferences: 228
RECORDING DRAFTS FOR FUEL PURCHASES: 198
Recording Offsite Fuel Consumed: 284
Recurring Charges: 68, 89, 113, 119-120, 190
Recurring payable item: 92
Red hand: 39, 132
Refuel function: 224
Refueling: 224
Refund-Checks procedure: 240
Refunding a Customer’s Credit Balance: 191, 241
Regular Parts: 225, 347, 352
Regular Pay, Overtime Pay: 146
Remote Invoice Batches: 125
Rental cars: 201
Rental Fees Income account: 354
Rental flights: 206
Rental lines: 214, 284
Rental Space List: 89, 119
Repairable core: 139
Report Previewer: 43
Repurchase: 100, 124
Requisition: 344
Reservations: 228, 262, 281-282
Restore a Database From a Backup: 51
Restoring a Backup: 51, 383
Return Stock: 227, 348
RETURNING OUT-DATED ITEMS: 227
Returning Stock: 289, 348
Reverse An Existing Entry: 92, 170
544 | TotalFBO® User Guide
INDEX
Reversing journal entry: 155
Reworked Components: 289, 305, 316
Rivets: 296
Roll-around units: 297
Rotable Components: 289, 316, 322
Rounding: 125, 166, 207, 209, 239, 277
Rounding Button: 207
Rounding Differences: 207, 239
Rounding differences: 207, 239
S
Sale Department: 238
Sale of an asset: 205
Sale price of the Buyback Fuel Sub-type: 187, 234-235
Sales Activity Report: 374
Sales Detail Lines: 184, 186-188, 191-192, 205, 207,
231-238, 240, 242, 245-248
Sales History: 380
Sales of fuel: 164
Sales Profile Report: 380
Sales Taxes: 82, 99, 129, 164, 205, 239, 290, 295, 311
SAMS Teach Yourself Microsoft SQL Server 2000: 25
Schedule: 19, 49, 201, 228, 230, 249, 257-259, 262, 264,
266, 269, 277-278, 280-282, 284, 350, 358, 363-365
Schedule Setup: 249, 269
Scheduled flights: 257, 264
Scheduling: 249, 258-259, 262, 269, 277-278, 280, 289, 363
Scheduling: Initial Setup & Options: 259, 277
Scheduling Trips: 249
Scheduling: Initial Setup & Options: 259, 277
Screensaver: 368
Scroll bars: 38
Seat price: 265
Security of the Microsoft SQL 2000 engine: 9
Security Setup: 68, 70, 370
Select Billing Rate: 245
Self-service: 98
SELL A GIFT CERTIFICATE: 247
INDEX
TotalFBO® User Guide | 545
Selling fuel, wireless operations: 212
Selling Packages: 269
Selling rental: 66
Sending a Backup to Tech Support: 383
Sending Data to Tech Support: 385
Sending Parts for Rework: 316
Serial numbers: 102, 210, 247, 292, 300, 306, 316, 322,
337, 347, 354, 358
Serialized Parts: 225, 306, 327, 347, 352-353
Server name: 28-29, 36, 51, 392
Service Bulletin: 338, 360
Service Charges: 154, 156, 197
Service lines: 72, 88, 118, 124-125, 155-156, 164, 188-189,
192, 208, 237, 286, 321, 327-328, 354
Service Pack 3a: 26
Servicing airline gates: 116
Servicing Part 121 carriers, FAA regulations: 352
Set Up Credit Cards: 109, 201
Setting Beginning Balances: 108
Setting Budgets: 171
Setting up Cash Drawers: 9
Setting Up Printers: 9, 45
Settlement Report: 122
Settling charges: 109
Settling transactions: 396
Setup Checklist: 76
Setup Credit Cards: 186
Setup Procedures: 63
Shared network drive: 14, 26-27
Sharename of the printer: 47
Shifts: 114, 214-215
Shop cleanup: 330
Shop clerk: 302, 309
Shop Consumable Supplies: 96
Shop Department: 74, 225, 298, 338
Shop expense: 332
Shop Labor Billings: 68
Shop mechanics: 144
Shop Operations: 84, 86, 96, 102, 138, 142, 156, 289, 356
546 | TotalFBO® User Guide
INDEX
Shop Order Discrepancy: 318
Shop Order module: 336
Shop Order Style Sheets: 302
Shop Supplies Expense account: 330
SHOP WORKFLOW: 289, 298
Short leg: 254
Sick Leave: 258, 278
Sliding scale: 96, 342-343, 380
Spell-Checker: 314
SQL Administrators: 19, 23, 25, 36
SQL backups: 50-51, 385
SQL databases: 19, 24, 27, 30, 384, 387, 392
SQL installation: 19, 26
SQL products, must: 12
SQL Security: 25, 370
Squawks: 269, 283-284, 356, 364
Standard Reports: 367, 374
Starting the Program: 9
State Insurance Commissioner: 102
Statement: 19, 60, 82, 113, 118-119, 121, 124, 127-128,
137-138, 148, 156, 167, 169, 189, 267, 286-287,
305, 321, 367
Statement of Account: 118
Staying Profitable: 249, 267, 269, 286
Student Activity: 284, 287
Student records: 269-270, 280, 284
Student’s Customer Account: 283, 286
Student’s Pilot Record: 279
Students: 269, 273, 279-280, 282, 286-287
Style sheets: 45, 47, 86, 97, 118, 125, 128, 231-236, 238,
240-241, 244-248, 250, 258, 289, 301-302, 309,
311-312, 316
Sub-types: 100-101, 116, 124-125, 187, 206, 231-236,
253, 272, 357, 397
Sump: 98, 221, 224
Super-Screen: 199, 228
Supplemental Files: 14, 31, 53
Support of TotalFBO®,: 399
Suspense account: 81
INDEX
TotalFBO® User Guide | 547
Swipe device: 210
System Requirements: 9, 11, 109
T
T1 line: 17
Tail Number: 14, 53, 66, 72, 89, 136, 164, 167, 169, 184,
191-192, 202, 204, 229, 231-236, 238, 240-242,
245-248, 252, 259, 261, 266, 270, 292, 300, 314-315,
354, 356, 358, 373
Taking a Physical Inventory: 221, 350
Tax Deposits: 113, 147, 163
Tax exemptions: 60, 100
Tax liabilities: 93, 139, 158
Tax Rate percentage: 82
Tax Setups: 102
Tax tables: 102, 146
Taxable, Non-Taxable, Exempt: 166
Taxes: 63, 74, 82, 94, 99-103, 118, 125, 129, 132, 144,
163-164, 166, 187, 189, 205, 222, 234-235, 239,
249-250, 252, 267, 290, 295, 311, 328, 337, 346
Taxpayer ID numbers: 103
Threads: 44
Tie-down rentals: 89
Time-Clock: 144, 146, 309
Time card: 144, 146
Time Cards: 146
Time server: 14
Time Zero: 77-78, 81-82, 89, 101, 105, 108
Timeclock: 102, 330
Tool allowances: 102
Tool Calibration & GSE Maintenance: 289
Toolbar: 43, 259, 386, 398
Top Sales Customers: 380
Total Time Offset: 358
Touchscreen Invoicing: 199, 211
Traceability of parts: 352
Tracking Cores: 318
Trailer message: 45, 302
548 | TotalFBO® User Guide
INDEX
Training Database: 29, 36, 51
Transaction Framing: 383, 386
Transfer: 101, 155, 184, 195, 214, 219, 222, 224-225,
242, 324, 334
Transfer Fuel Between Tanks: 101
TRANSFER FUNDS BETWEEN ACCOUNTS: 195
TRANSIENT CUSTOMER FUEL INVOICE, CREDIT CARD
PAYMENT: 232
TRANSIENT CUSTOMER FUEL INVOICE, PENDING PAYMENT: 233
Transient customers: 138, 209, 232-233, 236
Transition plan: 78
Travel Advance: 136-137
Trip envelope: 266
Trip Expenses: 249, 266
Troubleshoot connectivity issues: 396
Troubleshooting & Database Maintenance: 383
TROUBLESHOOTING & DATABASE MAINTENANCE: 383
Troubleshooting of MSDE: 24
Troubleshooting Online Credit Card Processing: 396
Troubleshooting SQL Connectivity: 388
U
Un-dispatch: 265
Unapplied Payments Report: 121
Unbilled Dispatch: 284
Uncommitted Transactions: 127, 387
Undeposited Receipts: 72, 92, 121, 127, 152, 154, 159, 184,
186-187, 193-194, 196, 234-235, 241-242, 246-248
Uniform Expense: 149
Uninterruptible Power Supply: 12
Unusual charges: 295
Unusual expenses: 294
Unusual maintenance: 169
Update/Check In button: 266, 284
Update Aircraft Equipment List: 360
Update all open jobs: 307
Update Basic Register Basic Info: 79
INDEX
TotalFBO® User Guide | 549
Update Cards Accepted List: 84
Update Charter Quotes: 259
Update Checking Entries: 81, 130, 147, 152
Update Cores: 138, 318, 321
Update Courses: 270
Update Currency: 80
Update Customer List: 86, 88, 330
Update customer quotes,: 249
Update daily timecards: 307
Update Employee Basic Info,: 257, 276
Update Fuel Meters: 98
Update Fuel Tanks: 98
Update Ground Equipment: 230, 365
Update information: 292
Update Inventory Departments: 74, 94
Update Inventory Function: 101
Update Inventory Pricing –: 347
Update labor: 304
Update Leases: 92
Update List: 96, 292
Update Locations: 58, 60
Update Maintenance Logs: 314
Update Maintenance Performed: 230, 365
Update maintenance reminder next-due times: 356
Update Notes: 92
Update Objects: 259, 278
Update One Month’s Balances: 108
Update Packages: 278
Update Physical Inventory: 142, 221, 340
Update Pilot Records: 257, 276, 279
Update Price Classes: 84, 97, 255, 273, 342
Update Pricing button: 306
Update Purchase Orders: 304, 318, 321, 346
Update Recurring Charge Reminders: 89, 119
Update Rental Space List: 89, 119
Update Schedule: 262, 280
Update Shop Orders: 300
Update Start-Of-Year Balances button: 108
Update Student Activity: 284
550 | TotalFBO® User Guide
INDEX
Update Student Enrollments: 280
Update student records,: 269
Update Time-Clock Entries: 146
Update Time Cards/Pay/Checks: 144
Update Vendor Invoices: 93, 132, 135, 266
Update Vendors: 90
Update Year/Month Balances: 108
Updates: 9, 14, 26, 29, 34, 52-53, 147-148, 245, 266, 292,
296, 350, 363
Updating Aircraft Information: 289, 360
Updating licensing: 28
Updating Package Times: 284, 286
Updating the Schedule: 262, 280
Upgrading Program Files: 35
Upload: 385-386, 398
Use Gift Certificates: 84
User ID records: 23, 58, 241, 371
Using Barcodes: 13, 350
Using Style Sheets: 258
Using the Timeclock Function: 330
Using the Website: 26
Utilities: 120, 135, 370, 396
V
VA reimbursement: 270
Vacation: 259, 278
Vending Machine Income: 194
Vendor Account Records: 90
Vendor Activity Report: 106, 137
Vendor Invoice Number: 222, 306
Vendor Refund: 154, 194
Vendors: 37, 63-64, 76, 78, 90, 138-139, 142, 294, 346, 381
Verifying the General Ledger: 63, 152
Verisign: 396
VFR: 283
View, Delete, Void Checking Transactions: 211
View, Print, Change, Void Invoices: 37
Virus-Checking Software: 16
INDEX
TotalFBO® User Guide | 551
Volume: 17, 60, 66, 98, 100, 116, 201, 204, 207, 216
Volume Pricing: 66
W
W2: 151
W3: 151
Wallpaper: 36
Wallpaper background: 36
WAN: 17-18
Warranty billing: 328
Warranty labor and/or parts: 313
Weight and Balance: 355, 361, 363
Wholesale Customers: 341
Wide Area Network: 17
Window envelopes: 86, 128
Windows Authentication: 391
Windows Control Panel System Setup: 45
Windows Printers Setup: 45
Windows Regional Settings: 43
Windows Terminal Server: 9, 21, 55, 249, 269
Windows XP Home: 11
Winds: 14, 29, 31, 53
WIP account: 158
Wireless Access Point: 370
Wireless Invoicing: 125, 199, 211
Wireless Networking: 9, 302
Wireless Operation: 199
Withdrawals: 81, 92, 139-140, 146-147, 154-155, 163, 192, 198
Work in Process: 113, 156, 158-159, 289, 292, 334, 336
Worker’s Comp Analysis: 149, 151
Workflow: 66, 122, 199, 212, 259, 280, 289-290, 298,
304, 344, 346, 352
Working with Locations: 58
Workstation’s Station record: 397
Workstation Setup: 9
Write-Offs: 158
www.hbcinc.com: 30, 103, 396
552 | TotalFBO® User Guide
INDEX
Y
Year-End Considerations: 171
Your Chart of Accounts: 63, 72, 88, 109
Z
Zipcodes: 14, 29, 53
Zipped file: 398
INDEX
TotalFBO® User Guide | 553
INDEX OF PROCEDURE DETAIL SHEETS
POSTING CUSTOMER PAYMENTS RECEIVED (ROA) ..........................................184
APPLYING PAYMENTS RECEIVED TO PRIOR CHARGES .....................................185
POSTING PAYMENTS RECEIVED FROM CREDIT CARD HOLDING CO. ..........186
POSTING PAYMENTS RECEIVED FOR BUYBACK FUEL ....................................187
AIRLINE CUSTOMER FUEL INVOICE.......................................................................188
AIRLINE CUSTOMER SUMMARY INVOICE ............................................................189
BILLING RECURRING CHARGES ..............................................................................190
REFUNDING A CUSTOMER’S CREDIT BALANCE (CHECK) ................................191
HANDLING CUSTOMER’S BOUNCED CHECK .......................................................192
DEPOSIT CASH RECEIPTS ..........................................................................................193
DEPOSIT CASH REFUNDS OR VENDING MACHINE PROCEEDS .......................194
TRANSFER FUNDS BETWEEN ACCOUNTSPOST ..................................................195
DEPOSIT OF EFT PAYMENTS .....................................................................................196
POST BANK CHARGES/INTEREST ............................................................................197
RECORDING DRAFTS FOR FUEL PURCHASES ......................................................198
REGULAR CUSTOMER FUEL INVOICE, NO PAYMENT ........................................231
TRANSIENT CUSTOMER FUEL INVOICE, CREDIT CARD PAYMENT ................232
TRANSIENT CUSTOMER FUEL INVOICE, PENDING PAYMENT .........................233
BUYBACK FUEL INVOICE - OFFLINE PAYMENT MEANS ................................234
BUYBACK FUEL INVOICE - ONLINE CONTRACT CARD ..................................235
GOVERNMENT CUSTOMER FUEL INVOICE (OFFLINE Payment Means) ............236
AIRLINE CUSTOMER FUEL INVOICE.......................................................................237
REGULAR CUSTOMER INVOICE FOR SERVICES OR SUPPLIES.........................238
ADJUST ROUNDING DIFFERENCES TO POS MACHINE .......................................239
POSTING CREDITS & ADJUSTMENTS......................................................................240
REFUNDING A CUSTOMER’S CREDIT BALANCE (CASH OR CREDIT) .............241
POSTING CUSTOMER PAYMENTS RECEIVED (ROA) ..........................................242
APPLYING PAYMENTS RECEIVED TO PRIOR CHARGES .....................................243
WORKING WITH AN EXISTING INVOICE ...............................................................244
REGULAR CUSTOMER INVOICE FOR RENTAL & INSTRUCTION......................245
INVOICING DISCOVERY (INTRO) FLIGHTS............................................................246
SELL A GIFT CERTIFICATE .........................................................................................247
REIMBURSING OFFSITE FUEL PURCHASES ON RENTAL FLIGHTS ..................248
554 | TotalFBO® User Guide
INDEX
INDEX OF ACCOUNTING PROCESSES
Payroll Journal Entries ......................................................................................................149
Payroll Liability Payments Journal Entries.......................................................................150
Workers Compensation .....................................................................................................172
Payables Related to Payroll ..............................................................................................173
Amortizing Prepaid Expenses ...........................................................................................174
Making a Vendor Deposit .................................................................................................175
Purchase & Sell Inventory ................................................................................................176
C.O.D. Inventory Purchase ...............................................................................................177
Credit Card Inventory Purchase ........................................................................................178
Vendor Refunds.................................................................................................................179
Charter Pilot Travel Advance ............................................................................................180
Petty Cash Management ...................................................................................................181
Consignment Sales (Pilot Supplies or Rental Cars, etc.) ..................................................182
Credit Card Processes .......................................................................................................183
Prepaid Sales Taxes on Fuel..............................................................................................184
Pass-Thru-Transfers Account (Transactions between Control Accounts) ........................185
INDEX
TotalFBO® User Guide | 555
INDEX OF FIGURES AND CHARTS
Install Program ..............................�
................................................................................................................. 10
Enterprise Database Structure ........................................................................................................................ 57
Location Option Overrides ............................................................................................................................ 61
Setup Workflow..............�
65
Bring Your World Together ............................................................................................................................ 67
Setup Users & Security ..�
69
Setup General Ledger ....�
71
General Ledger Overrides .............................................................................................................................. 75
Setup Bank Accounts .....�
79
Setup Receivables ..........�
83
How Price Classes Work �
85
Magical Accounting (Customer Journal Entries, Normal, Internal, Non-Billing .......................................... 87
Setup Payables ...............�
91
Setup Inventory ..............�
95
Setup Payroll ................�
103
Verify/Enter General Ledger Balances ........................................................................................................ 107
Setup Online Credit Card Processing .......................................................................................................... 110
Setting Up a Receipt Printer .........................................................................................................................111
Accounting Department Organization ......................................................................................................... 115
Receivables Clerk Duties ............................................................................................................................. 117
Processing Credit Cards ............................................................................................................................... 123
Payablaes Clerk Duties �
131
Locating Cost of Parts Sold Account Used for a Closed Shop Order .......................................................... 134
Move Money Between A/R and A/P............................................................................................................ 141
Physical Inventory .......�
143
Payroll Clerk Duties.....�
145
Controller Duties..........�
153
Work in Process Posting .............................................................................................................................. 157
Monthly Balancing Checklist ...................................................................................................................... 160
Groups on Sales Tax Report......................................................................................................................... 165
Aircraft Leaseback - Profit & Loss Report .................................................................................................. 168
Front Counter Initial Setup .......................................................................................................................... 200
Ramp Initial Setup .......�
201
Basic Invoicing ............�
203
Front Counter Workflow .............................................................................................................................. 213
Fueling Workflow ........�
217
Fuel Movement ............�
218
Reconciling Fuel Inventories ....................................................................................................................... 220
Changes to Fuel Inventory ........................................................................................................................... 223
Using Inventory Departments (Line) .......................................................................................................... 226
Concierge Super-Screen ............................................................................................................................... 229
556 | TotalFBO® User Guide
INDEX
Charter Initial Setup .....�
.................................................................................................................................251
Pricing Charter Flights .�
.................................................................................................................................256
Charter Flight Workflow .............................................................................................................................. 260
Charter Schedule-Dispatch-Invoice Relationships ...................................................................................... 263
Flight School Initial Setup ........................................................................................................................... 271
Pricing Rental Flights ..�
.................................................................................................................................275
Student Flight Workflow .............................................................................................................................. 281
Schedule-Dispatach Invoice Relationships .................................................................................................. 285
Shop Operations Initial Setup ...................................................................................................................... 291
What’s On a Shop Order? ............................................................................................................................ 293
All Parts in Order .........�
297
Starting a New Shop Order (Shop Workflow, Part 1) ................................................................................. 299
Getting Parts on a Shop Order (Shop Workflow, Part 2.............................................................................. 303
Getting Labor on a Shop Order (Shop Workflow, Part 3) ........................................................................... 308
Closing a Shop Order (Shop Workflow, Part 4) .......................................................................................... 310
Logging the Job (Shop Workflow, Part 5).................................................................................................... 313
Reworked Components �
317
Core Tracking...............�
319
Rotable Components ....�
323
Progress Billing (Two Methods) .................................................................................................................. 326
Warranty Billing...........�
329
Mechanic’s Time Fully Identified ................................................................................................................ 331
Magical Accounting (Internal and Non-Billing Customers) ........................................................................ 333
Work in Process ...........�
335
Using Inventory Departments (Shop) ......................................................................................................... 339
Pricing Parts .................�
343
Purchase Order Benefits to Cash Flow ........................................................................................................ 345
Inventory Workflow .....�
349
Physical Inventory .......�
351
Aircraft Records Serve Many Needs ........................................................................................................... 355
Sections of the Aircraft Record .................................................................................................................... 357
Entering Maintenance Times ....................................................................................................................... 359
Aircraft Maintenance Cycle ......................................................................................................................... 362
Securing Your Data ......�
.................................................................................................................................369
Report Frequency ..........................................................................................................................................375
Reports for Management Decision-Making................................................................................................. 377
Default Chart of Accounts ........................................................................................................................... 402
Sample Cash Flow Setup ............................................................................................................................. 424
Automatic Ledger List .�
.................................................................................................................................428
Default Journal Entries ............................................................................................................................... 439
General Ledger Overrides ............................................................................................................................ 452
INDEX
TotalFBO® User Guide | 557
Magical Journal Entries ............................................................................................................................... 453
Typical Internal and Non-Billing Accounts ................................................................................................. 454
Typical Inventory Departments.................................................................................................................... 454
Typical General Ledger Departments .......................................................................................................... 456
Using Overrides on Charter Invoices ........................................................................................................... 460
Using Overrides on Payables ....................................................................................................................... 461
Using Overrides on Payroll.......................................................................................................................... 462
Using Price Classes for Fuel ........................................................................................................................ 464
Using Price Classes for Oil .......................................................................................................................... 465
Using Price Classes for Parts ....................................................................................................................... 466
Using Price Classes for Billing Shop Labor ................................................................................................ 468
Using Price Classes for Billing Instructor Time .......................................................................................... 469
Using Price Classes for Billing Aircraft Rental Time .................................................................................. 470
Using Price Classes for Billing Charters ..................................................................................................... 471
Aircraft Pricing Worksheet (Rental) ........................................................................................................... 472
Aircraft Pricing Worksheet (Charter) .......................................................................................................... 473
Aircraft Performance Worksheet (Charter) ................................................................................................. 474
Pilot Record Worksheet ............................................................................................................................... 475
Privilege Overrides for Buttons and Fields.................................................................................................. 478
Privilege Overrides for Reports ................................................................................................................... 484
Default Privileges for Menu Functions ........................................................................................................ 488
Setup Questionnaire .....�
499
558 | TotalFBO® User Guide
INDEX
TotalFBO® is constantly growing and changing to meet the needs
of its users, And though most of the installations of TotalFBO®
are in an aviation-related organization, there is a wide diversity of
businessses, company sizes, and organization styles represented
within that group.
One of the strengths of TotalFBO® is its flexibiity, with so many
features and options which can be customized to meet the needs
of most businesses. But it would be impossible to cover all those
options in a single document.
So, this Guide is only the beginning. We encourage you to take
advantage of the Helpscreens, Tech Support, and your
opportunities for training in order to maximize your investment
and the benefits TotalFBO® can bring to your company.
In addition, we recommend that each department manager in your
organizaton be on our email list. As each new release is posted to
the website, you‛ll receive an email listing the new features which
have been added. Subscribe to the list by sending your email
address to [email protected].