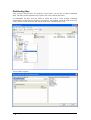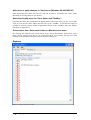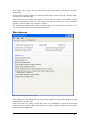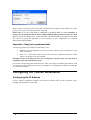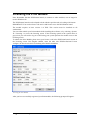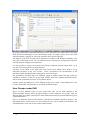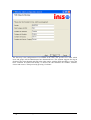
1
Manual INiS 5 RDT-Global Version 5.0 Classroom Management & Multimedia eLearning Suite (release date: 27.05.2005) The information contained in this document may change without notice and represents no obligation on the part of the Ramcke DatenTechnik GmbH. The software, which is described in this document, is made available under the accompanying license agreement and may be only used in accordance with the conditions contained in such agreement. It is unlawful to copy the software onto another medium unless this is expressly permitted by the license agreement. This manual in whole or in parts may not be reproduced, copied or transmitted for any purpose, in any form or with any means whatsoever, electronically or mechanically without the expressed written permission of Ramcke DatenTechnik GmbH. Program copyright 1989-2004 by Ramcke DatenTechnik GmbH. All rights reserved. Manual copyright 2004 by Ramcke DatenTechnik GmbH. All rights reserved. First Print - August 2004 The company and product names contained in this Manual are registered trademarks. All other trademarks are the property of the respective companies. Printed in the United Kingdom. Contens Introduction Welcome to INiS Version 5 User registration Classroom Overview Screen transfer File browser Explorer expansion (only with the UserAdmin module) Exam mode (only with the UserAdmin module) Protection Policies HDGUARD Add-on modules INiS as a Trial Version Limitations of INiS.UserAdmin in the Trial Version: Limitation of HDGUARD in the INiS Trial Version: How to use this manual Overview Terminology Screenshots Using INiS Start INiS User Interface Function bars Symbols in the function bar Userlist Workstation Icons in User Names List View Selecting users Room Overview Room Overview Workstation Icons in Room Overview Desktop Overview Desktop Overview Viewing all screens File browser File operations with individual students File operations with several student’s Print Overview (Printer Control is required) Process overview and navigation Terminate Application Shut down student workstations Run at Student’s PC Online Activity Log (Internet-Control is required) Screen demonstration End Screen Demonstration Remote control Screen Transfer Locking screens Clipboard exchange Manual INiS 5 1 2 2 2 2 3 3 3 3 4 4 4 4 5 5 5 5 5 7 8 8 9 9 10 11 11 12 12 13 14 14 15 16 16 19 23 25 26 27 27 29 30 30 30 30 31 31 Contens • iii Send message Opening the chat window Multichat Speech Transmission Prerequisites Announcement Phone Call Setting the Volume Problem Solving Video Transmission Video presentation Video conference Video monitor Problems with the video source Paint Box Printing Call for assistance function Internet unlock / lock (optional) Lock Internet Filter through Positive list Access to URL Filter through Negative list Content filter Unlock Internet Application, Restrictions and Compatibility System Tray Status Indicator (Un-)Lock Applications (opional) (Un-)Lock Applications Using the ‘Unlock Application’ Icon Unlocking Applications from the Applications List Copy Protection DOS-Lock Start at Student’s PC Desktop Control on the student workstation Status Refresh on Student workstations (Un-)Lock Printer (optional) Lock & Unlock Printers Configuring the Page Header Limit Page Outputs Working with the INiS.UserAdmin Module Starting the lesson Lesson options Create students Automatic new user creation New student Resetting the password User properties User properties Home directory Collecting students for a course Printing class and/or course lists Selecting Students for a Class Explorer expansion (Namespaces) Copying Files to all Students Collecting files Distributing files Collecting and distributing files in INiS Exam mode Installation Guide iv • Contens 32 33 33 36 36 37 37 38 38 39 39 40 41 41 41 42 43 44 44 44 45 45 46 47 47 47 48 48 49 50 50 50 51 53 54 54 54 55 56 56 57 57 57 61 61 62 62 62 62 63 63 64 65 66 68 69 69 71 Manual INiS 5 General Requirements Recommended System Requirements INiS Usage Restrictions Managing Multiple Rooms with INiS INiS Installation Uninstalling INiS Updating INiS Licensing your software Licensing INiS.professional Adding new licenses Licensing HDGUARD Integrated in INiS Configuring Basics General Notes on the System Settings Room Overview Designing the room Positioning workstations Deleting Workstations Editing Policies General Notes Settings Start menu Working-principle Explorer Miscellaneous Distribute policies Activate/de-activate INiS Autostart Enable/ disable INiS User Log-on Changing the System Password Important - Keep your password safe Configuring the Teacher workstation Configuring the IP Address Configuring the Screen Transfer Workstation environment Room Configuration General Settings File Locations Configuring the Student Workstation Settings Network Configuration Check for Updates Updating Students Internet-Modul configuration Licensing the Internet Module Activating/Deactivating the INiS.Internet Module (Students) Configuring Internet Filtering Configuring the Content Filter Analysing an URL Configuring the Positive list Standard Settings for the INiS.Internet Module for Students DesktopControl Module configuration Licensing the DesktopControl Module DesktopControl Module Overview How does DesktopControl work? Manual INiS 5 72 72 72 73 73 74 80 80 81 81 83 83 85 86 86 87 87 87 87 87 87 88 89 89 90 91 93 93 93 93 94 94 94 96 97 97 98 98 100 101 102 102 102 103 104 105 105 106 107 108 109 111 112 113 113 Contens • v Configuring application access Manage Applications The Meaning of the Icons Configuring Dynamic Access Adding new applications User-defined Applications Defining rules Editing the extension list Setting the default configuration for student PCs Copy Protection DOS-Lock Saving and transferring the default settings Print Module configuration Licensing the Print Module Registering the Module on Student Workstations Configuring the Print Module Manage Printers Restrict Print Jobs Configure Header Send Default UserAdmin Modul configuration User Administration Processing Modes Creating Objects with the INiS UserAdmin Module User Groups under INiS Extended User Properties The INiS Admin The INiS UserAdmin The INiS Teacher General Information on Operation Processing Modes UserAdmin User Interface Navigation within UserAdmin Objects Changing Objects Deleting Objects Printing Objects Extras Transferring Classes Quick Creation of Objects Importing Objects Exporting Objects Importing from INiS.classic General Information Setup of the Data Structure User Groups Filter for Identifiers within UserAdmin Customizing UserAdmin Important UserAdmin Files Setting up the UserAdmin Module Prerequisites Preparations on the server Setting up Set up the first room Setting up additional rooms Activating UserAdmin for students Presettings of UserAdmin vi • Contens 114 114 116 118 120 120 121 124 125 127 127 128 129 130 131 131 131 132 133 133 135 136 136 137 140 143 144 144 144 144 144 145 147 147 149 149 150 150 151 151 152 153 153 154 154 155 155 155 155 156 156 157 157 159 162 163 163 Manual INiS 5 Profiles Login script Password Default groups Update for existing users 164 165 165 165 165 HDGUARD 167 What is HDGUARD? Software Prerequisites General Windows 2000 / XP Swap-File or HDGUARD Partition HDGUARD Area on Windows 2000/XP Systems HDGAURD Area on Legacy Windows Protected Partitions Configuring HDGUARD form INiS Welcome Licensing Password HDGUARD Area Visibility Miscellaneous Activating HDGUARD Basic Functions Activate or Deactivate HDGUARD Apply Changes Configuring Config Wizard Advanced Configuration Advanced Functions Imaging/Cloning an HDGUARD PC Changing or setting the password Resizing or moving the HDGUARD Swap-File Submitting a bug report 168 168 168 168 169 169 169 169 169 170 170 171 172 172 172 173 174 174 174 174 174 174 175 175 175 175 175 Appendix 177 Introduction to User Administration using INiS.UserAdmin What is the ADS? Which users are administrated by UserAdmin? User and Group Structure of the UserAdmin UserAdmin objects and their attributes Directory Structure of the UserAdmin Users and Profiles Reset/relax password specifications under Windows 2000 and Windows 2003 server Working with Multiple NICs Problems with the Screentransfer The Screen remains grey: Some Computers are Skipped During Transmission Stripes at the Recipient’s Screen Stripes on Teacher Screen Loss of data-packages HDGUARD problems The partition table is not displayed on the HDGUARD monitor. Problems with standard Windows Domain users Index Manual INiS 5 178 178 178 179 180 182 189 194 194 195 195 195 195 196 196 197 197 197 199 Contens • vii Introduction INiS 5 RDT - Global Version 5.0 Classroom Management & Multimedia eLearning Suite Manual INiS 5 Introduction • 1 Welcome to INiS Version 5 There has been a major increase in the use of networked PCs in education and vocational training in the recent years. Whether in School, Universities, for the workplace or adult training and lessons, with the aid of PC networking the Internet services are brought directly to every workstation. At the same time a well-configured network provides a multitude of possibilities to change the way learning and teaching with new media is perceived, making it more efficient and interesting. INiS has been designed for small and medium-sized networks in schools, companies and training facilities. With the aid of INiS you can support other users from your workstation and communicate with them in a simple manner. To keep the installation and maintenance expense at a minimum, INiS is equipped with a twostage safety concept, which ensures that users at the workstations cannot make any uncontrolled permanent changes. The following diagram explains the individual function blocks of INiS: Administration User registration Graphical support overview User Amin: automatical usermanagment Support functions Realtime screen transfer Internet filter DesktopControl Safety functions PrinterControl PolicyProtection Integrated HDGUARD User registration INiS administers the students who will logon during the session with either their Windows login name or an assigned ‘Smile’ name. Usually a login name consists of the students’ first name and surname. For networks where individual user identification is not required or wanted, INiS will use the PC name or the IP number for display. Classroom Overview The INiS classroom overview can be started from the teacher workstation. It is possible to choose to either display the overview as a graphical representation of the room itself or to simply reduce this view to a list of the active users. The teacher can now perform all support and safety functions of INiS through the support overview. The support overview also provides a viewing mode with which the teacher can look at the active programs on the students’ desktops. It is also possible to end applications directly from the teacher’s workstation. Screen transfer This includes the visual support functions. INiS uses a new way of high-speed transmission, which can be used for almost real-time broadcast of video streams. 2 • Introduction Manual INiS 5 Thus the teacher can send his screen contents to all students to demonstrate an exercise, or retrieve one or several students’ screens onto his desktop allowing the teacher to see whether a student is following the lesson or is occupied with other things. It is possible to temporarily lock student workstations from the teacher's desktop by a mouse click, to attract attention and focus the students on a particular issue. In a special overview, the teacher can see the screens of all of the students at one glance, in order to directly monitor their progress and give specific support if necessary. File browser The teacher can access the local drives (i.e. hard disk drive, CD ROM or mapped network drives) on the PCs of the participating students directly from his workstation. This way it is very easy to distribute files or coursework, which has been prepared for the lesson to the students, or collect the material again at the end. It also provides for a convenient method of remotely exchanging files between students. Explorer expansion (only with the UserAdmin module) You can directly access the student directories in Windows Explorer and in Open/Save dialogs. For example, you can open student documents in Office without having to search for them. In addition, you can distribute files by simply storing them in the classes. These files are then automatically distributed to all students. Exam mode (only with the UserAdmin module) During an exam, it may not be desirable for the students to access their data. To prevent this, just activate exam mode, and the students will be assigned an empty home directory. After the exam, use the IniS function “Collect work“ to copy the work to a memory stick or a CD. With the “Distribute work” function, INiS automatically copies the collected files into the student directory. Protection Policies During a lesson it is often essential to lock certain functions of the student PC. This reduces the possibilities of being diverted and helps to quickly reach the actual subject of the lesson. Certain system settings or printer configurations can be concealed from student access. For this purpose INiS uses the Windows Registry, in which these key values are changed to reflect such access restrictions. This is the first safety stage. As there are always options under Windows for ‘Insiders’ to manipulate the Registry, it is still possible to circumvent certain settings. For this reason INiS provides a second safety stage, HDGUARD. Manual INiS 5 Introduction • 3 HDGUARD HDGUARD protects the PC reliably against permanent changes. A predefined boot condition is restored automatically after a restart of the PC. Even if the users have performed deletions or file changes, these are automatically reverted to their previous state. This guarantees a high level of system security and simplifies care and maintenance. Add-on modules INiS incorporates an interface through which further educational modules are integrated. INiS.Internet provides several convenient features in connection with Internet access. Access to the Internet can be centrally locked or released from the teachers’ workstation. Additionally, fully configurable content & keyword filter and protocol functions are part of this module. With the INiS.DesktopControl module all student applications can be dynamically locked or released by the teacher simply via mouse click. The INiS.PrintControl module can be used for controlling the use of the printer. It is an effective way to prevent several students repeating the same print job and therefore blocking network printers or lots of paper being used. In addition, single printers can be locked or dynamically released. The INiS.UserAdmin module allows you to easily administer users in a domain on a Windows, NovellNetware or Linux server. Please visit our Internet site for more information about available modules and new expansions at http://www.rdt-global.com. If you have any suggestions for future expansion modules or would like to see a particular feature integrated please contact us on [email protected] INiS as a Trial Version You may test INiS as a trial version for a period of 45 days. You should note that only a maximum of four PCs can be displayed. Any additional PCs will not show in the overview. To display different PCs you have to delete one of the three PCs displayed first (click with right mouse button) before selecting the next so that the maximum number of for PCs is not exceeded. In the trial version the password needed to access the system menu is ‘demo’. This password cannot be changed unless you obtain a full license. Before you can access all ‘System’ menu items or position stations in the classroom overview, you have to select ‘Login to system’ once from the ‘System’ menu. After opening HDGUARD monitor for the first time, a splash-screen will appear every time Windows starts. This splash screen will have an eleven-second delay until you configure a hidden partition in HDGUARD monitor. To do this from the teacher-workplace please go to the ‘System’ menu | HDGUARD | Configure HDGUARD (for all). After defining the hidden partition the splash screen will only appear for two seconds and fades out afterwards. Limitations of INiS.UserAdmin in the Trial Version: The INiS.UserAdmin module is limited to managing a maximum 5 teachers and 5 classes in the trial version but is fully functional in all other respects. 4 • Introduction Manual INiS 5 Limitation of HDGUARD in the INiS Trial Version: In the trail version any user can configure, activate or deactivate HDGUARD without being prompted for a password. You need a licensed copy of INiS to ensure that HDGUARD can only be started or configured by entering the system password. How to use this manual Overview This manual has been compiled to make it easier for either target audience, may it be teacher or system administrator to quickly retrieve the information required. Terminology The term teacher is used whenever an action is carried out from the main controlling desktop, as this is usually the teachers desktop; we assume the same for the purpose of this manual. Student is used in the context of the connecting users. Although in many cases, where a system administrator is also a teacher or vice versa, we have used the term system administrator to highlight the difference between configuration and dayto-day operation. Screenshots The screenshots supplied in this manual show the INiS on-screen dialogs with all additional module licenses registered. If you have not licensed any further modules, the corresponding menu items and taskbar icons will be missing. Manual INiS 5 Introduction • 5 Using INiS INiS 5 RDT - Global Version 5.0 Classroom Management & Multimedia eLearning Suite Manual INiS 5 Using INiS • 7 Start At this stage, we assume that INiS is completely installed and the initial configuration has been performed. Firstly, we will describe the teacher’s workstation. We will discuss the individual function blocks and provide information on their use. INiS User Interface After INiS starts, the user interface shown in the following figure appears on the teacher workstation. The INiS user interface is divided into three areas: The INiS toolbar, the user list and the support area. Generally speaking, the support functions provided by INiS are displayed in this support area. After INiS starts, the room overview automatically appears in the support area. 8 • Using INiS Manual INiS 5 Function bars The educational functions are performed via function bars, which can in part be taken out of the overview. Switching from room overview into desktop overview provides a comfortable way to work with other applications in parallel with INiS. In the desktop overview only the toolbars remain active and stay permanently in the foreground. The space gained by hiding the room overview can now be used for other programs. Symbols in the function bar Change between Application list User- and Redirect screen Start lesson Lock screen Lesson options Exchange clipboard View room Send message View desktop Chat mode View all screens Multi-chat Filebrowser Speech transmission View print jobs Video transmission Process overview and navigation Internet (un)-lock View online log file Desktop (un)-lock Demo Printer (un)-lock Remote control Manual INiS 5 Using INiS • 9 Userlist During use, the labeling of the student list can be switched between the following modes: Computernames Usernames INiS-Names IP-Addresses The ‘INiS’-name is usually chosen by the student and is entered in a log-on window accordingly. To enable this, user registration has to be activated during INiS configuration. If no ‘INiS’-name is defined, the User name will be the Windows log-on name. Please note: If various students log-on to Windows using an identical name (e.g. the ‘Guest ‘account), the User name will have no particular meaning. In this case the user registration via the ‘Smile’-name is strongly recommended. Please Note: If the user registration has not been activated during the installation process, the user name will be the ‘Smile’-name regardless. 10 • Using INiS Manual INiS 5 Workstation Icons in User Names List View The icons displayed next to the user name in User Name List View are meant to inform the teacher that a student has e.g. inserted a CD-ROM or plugged in a USB-Stick at their workstation. The following incons are displayed in addition to the user names in User Name List View: Standard symbol for logged-on users This is the standard symbol when no user is logged onto the student computer, or INiS was not started. This icon shows you that a student has either inserted a CD-ROM or plugged in a USBStick or has opened a network connection. If a student has plugged in a USB device, this icon will be displayed additionally next to the student’s name. This icon informs you that a student has inserted a CD-ROM. Selecting users You can use your mouse to highlight the user you whish to select. The following rules apply to the general use of the educational functions: • If users are highlighted, selected functions only apply to these users • If no user is highlighted, the selected functions apply to all users Some educational functions like the Remote control, Screen Transfer and Chat are an exception to these rules, as they always require a highlighted user. There are different ways of highlighting a user: You can either highlight individual users by simply clicking on the user in the room overview or by highlighting them in the user list. If you want to select several users at once you can highlight them all by pressing and holding down the ‘CTRL’ key on your keyboard when selecting. You can achieve the same by drawing a frame around the group of users you wish to select in the room overview with the mouse button pressed. The users stay highlighted (blue) when the mouse button is released. Manual INiS 5 Using INiS • 11 Room Overview The workstations installed with INiS and the logged-on users are displayed in the room overview. In general, the support functions provided by INiS are activated via this overview. The room layout and the arrangement of the elements in the room overview can be adapted by the user as desired as explained in the chapter on configuration. 12 • Using INiS Manual INiS 5 Workstation Icons in Room Overview A number of slightly differing Workstation Icons represent different states of students’ workstations in Room Overview thus providing the teacher with a quick means to gather information on the status of the students’ PCs. It is displayed for example whether or not HDGUARD is active on the respective student’s PC. A workstation icon with a black monitor is displayed in any of the following three cases: the respective workstation is not powered up at all or INiS is not started on a workstation running already or no student has logged in to INiS on that workstation. This icon shows you that the corresponding workstation is up and running and a student is logged in to INiS on that workstation. The student’s PC is now available for all educational functions you may want to perform. This icon is displayed if on the student’s workstation HDGUARD is installed and activated. This icon is meant to inform you that one or more INiS Add-On Modules are not activated on the student’s PC. To get detailed information on which modules are inactive move the mouse pointer to the icon and let it hover above it for approximately three seconds. A pop-up text similar to the one below will appear: This computer is in class exercise mode Manual INiS 5 Using INiS • 13 Desktop Overview By switching from room overview to desktop overview, it is possible to very conveniently work with other programs in addition to INiS. In the desktop overview, only the function bars remain active and permanently present in the foreground. The space where the room overview was, which has now been freed up, can be used for other programs. 14 • Using INiS Manual INiS 5 Viewing all screens Initially the room overview is replaced by the reduced – size display of the students' screens. Similar to the workstations in the room overview, the screens are evenly laid out by name. The screen areas contain the current screen content of the students and are frequently updated. Viewing all screens Number of screens selection You can use the button in the bottom right hand corner below the scrollbar defining the number of screens to be displayed simultaneously. The viewing window is adjusted automatically to the number of screens selected. Manual INiS 5 Using INiS • 15 File browser As well as providing features for transferring screen contents and communicating with students, INiS also offers a function for exchanging files with students. For this purpose INiS has a special File Manager, which can be selected from the toolbar. You can access the local disk drives of your students directly with the INiS file browser (except floppy disk drives). You can copy individual files from the students’ drives to your teacher's PC, copy files from the teacher's PC to the students' PCs, delete files on the student's PC and create folders. You can also use it to clean the D: file partition from files no longer needed. INiS also offers the possibility to distribute files to several students at the same time with just one command function. This function is called ‘Distribute Files’. For transferring similar files from several students to the teacher’s workstation you can use the so-called ‘Collecting Files’ function. The file browser is embedded in the surface of INiS. You get a two-window-display that enables you to copy files to individual students using drag and drop. This is closely related to the Windows Explorer functionality. File operations with individual students When you start the INiS file browser using the button in the toolbar, the following screen appears. File browser The student’s file system will be displayed within the left-hand window for the highlighted student. The right pane displays the teacher’s workstation as an Explorer window. These windows can be sized individually. 16 • Using INiS Manual INiS 5 Firstly you have to select an active student from the left-hand list to get access to the respective files. If a workstation is not present in the network – for example if it is turned off – this will be indicated in the following form File browser with attachment to a PC that is not in the network In case of an active, highlighted student it will always be changed to the so-called exchange folder (see chapter Folder for exchanging files ‘Exchange folder’). The window of the teacher’s workstation acts like the Windows Explorer. The following rules are for the student’s file window: Double clicking a directory causes a change to this directory. A double click on a single file displays a dialog from which you can specify the path where this file should be saved on your workstation. The context menus for a selected file or directory can be reached by clicking the right mouse button. The respective context menu appears. In the student’s file window the following functions are available: Save File As..., Send File, Delete File, Insert and Create Directory. Manual INiS 5 Using INiS • 17 Click to file with right mouse button The function ‘Save File As...’ is for saving a file in a selected directory on the teacher’s PC. ‘Send File’ is for the other way round, files can be sent from the teacher to the student selected. ‘Delete File’ is for deleting a selected file of the student’s workstation. The menu item ‘Insert’ in the context menu is for copying files directly from the Windows Explorer to the student’s workstation. This menu item is only available if you have highlighted a selection of files in the Windows Explorer and selected the command ‘Copy’ beforehand. The context menu of the teacher’s workstation contains all context menu standard functions of Windows Explorer. Copying Files via Drag & Drop The simplest and most illustrative way of copying files is ‘Drag & Drop’. This can be done in both directions: from the teacher’s workstation to a student and vice versa. Copying via Drag & Drop We assume that you are familiar with Drag & Drop , but just in case; to copy files using this method you have to highlight these in the source directory and drag it over the target directory (here the teacher’s) whilst holding down the left mouse button. It is possible to copy several files at a time as well. 18 • Using INiS Manual INiS 5 The shape of the mouse pointer will tell you when to ‘let go’ of the files, to ‘drop’ these at the desired position. A confirmation window will appear confirming where the selected files are listed. c Copy confirmation Toolbar Functions Teacher’s toolbar The buttons Save and Delete appear after highlighting a file. You can either transfer the highlighted files to your teacher’s PC or delete a file on the student’s PC. Above the directory list you will find a dropdown list box where you can change to the current disk drive on the student’s PC. Please notice that you always have to change to the exchange folder by accessing a student’s PC for the first time. If you access a disk drive when no disk is inserted the directory list will stay empty. If you access a directory, which is not logically available, then the root folder C:\ will be used. The button on the left-hand side is used to switch to the student’s root directory. The button is the next higher directory level. The button is used to switch to the exchange folder. The button is for creating a new directory on the student’s PC. These buttons are located on the right side of the teacher’s window. File operations with several student’s Folder for exchanging files ‘Exchange Folder’ In the settings of the teacher’s workstation, the system administrator defines the folder for the exchange of files. This folder is called the Exchange Folder. The exchange folder is the starting point for all file operations involving several students. Multiple copy functions are only possible in this exchange folder. In this folder you can create your own directory structure (e.g. categorised in classes, programs or topics). Please ensure that the path for the exchange folder is the same for all users in an INiS room. This also requires that the created path for the exchange folder is available to all users. Manual INiS 5 Using INiS • 19 After the installation, the default exchange folder is set C:\incoming. You should customise this folder depending on your requirements and your network structure. The following settings are possible: • Exchange folder on HDGUARD – protected drive (e.g. C:\incoming) On an HDGUARD – protected drive distributed files can only be saved until next restart. Please note: It is not possible to save your files permanently when using this option. • Exchange folder on the non – HDGUARD – protected data drive (e.g. D:\incoming) The files can be saved permanently on the local data drive. You should consider this option if you don’t have a network server where all files are saved. • Exchange folder on an user directory of the file server (e.g. H:\) Every user gets a home directory on the server. Distributing files The exchange folder is located on the local hard disks of the non – HDGUARD – protected drive D: (for example D:\exchange.) You need to highlight the files you would like to distribute to the students at the right side of your file browser (in this example the files excercise1.xls and excercise2.xls). Drag the files via drag&drop to the button ‘Distribute’ on the bottom left. Please Note: A mouse click to the button ‘Distribute’ opens a file selection window. In this window only one file can be selected. Distributing files After releasing the mouse button you can select the students, which should receive the selected files. Simply highlight the requested students using your mouse and the CTRL or the Shift key. 20 • Using INiS Manual INiS 5 You can also do this by dragging a frame with your mouse. Opening the context menu with the right mouse button and selecting the command ‘Select All’ will select all students. Select student The following window displays the status of the copy processes using a progress bar. Copy status display When all processes have been completed the ‘Cancel’ button changes into ’Finalize’. When a copy process has completed, ‘Done’ appears in the third column of a line. If an error occurs during the transmission, a corresponding error message will be displayed in the third line. Clicking the button ‘Finalize’ closes the status window. Manual INiS 5 Using INiS • 21 Copy process successfully completed Collecting files To collect the files you have distributed to the students earlier, you have to click the button ‘Collect’ on the toolbar. The same window for selecting the students as in ‘Distribute Files’ appears. The contents of the student’s PC will be displayed in the status window. Please Note: This process may take some time depending on the number of files in the student’s directories, so please be patient. When all files have been located on the student’s workstations the following dialogue appears: Collect files Every single file on the selected student PCs is displayed in the list of all files. In the example shown above you can see that file “excercise1.xls” is currently saved on one student PC. The files to be collected can be selected from this list. Clicking ‘OK’ starts the copy process. Please note: The existing files in the teacher’s exchange folder will be overwritten without warning. A subdirectory for every student will be created in the teacher’s exchange folder. The 22 • Using INiS Manual INiS 5 names of those subdirectories are made up from <currently displayed INiS name > + ‘@-sign’ + <PC name>, for example Cathy Smith @ (S07). The files will be copied to these directories. Collected files Print Overview (Printer Control is required) The print overview is an additional control function. In the print overview, you can see the student’s print entries. Like the screen overview, you can adapt the number of students per line to your own needs using the switch at the bottom right. Manual INiS 5 Using INiS • 23 All of the students’ print jobs are listed here. They can be viewed or deleted using the context menu. Deleted print jobs are shown with a line through them. Note: The name of the student and the date are not shown in the print overview. The header is only on the printout. 24 • Using INiS Manual INiS 5 Process overview and navigation With the help of the process overview the teacher can get a review of the applications and processes currently running on the student workstations. You can use the ‘View Processes’ button to retrieve an overview of the processes on these workstations. Active processes and applications at student PCs Manual INiS 5 Using INiS • 25 Terminate Application This overview can also be used to shut down selected applications or processes on student PCs from the teacher’s workstation. To do this you highlight the relevant student and click the right mouse button to display the context menu. Shut down student’s application To immediately close any processes at the student’s PC select ‘Terminate Application’. This function is useful, if you want to, for example, shut down unauthorised processes or if the student is unable to shut down a particular process himself. Warning: Under certain circumstances ending a process or application can lead to loss of working results or data for the affected student. You should therefore use this feature with caution! Unlike the screen overview, which only shows the active screen, the process overview provides you with information about processes or applications running in the background. This way you be aware of other, probably illegal processes such as a student downloading files from the Internet through an FTP-client. 26 • Using INiS Manual INiS 5 Shut down student workstations The context menu allows you to remotely shut down student workstations. Shut down student’s PC It will depend on the PC as well as its power management configuration whether the PC shuts down and turns off completely or automatically carries out a restart. Warning: The shutdown of a student’s workstation may result in loss of working data if not saved beforehand. You should therefore use this feature with extreme caution! Please Note: If no particular student is highlighted, all active PCs will be shut down. Run at Student’s PC From the context menu of any one student’s workstation icon the item ‘Run at Student’s PC’ is available. This allows you to comfortably execute arbitrary files at that student’s PC. The ‘look and feel’ of this dialog is equivalent to the ‘Run…’ feature available in the Windows Start Menu. Manual INiS 5 Using INiS • 27 ‘Run at Student’s PC’ dialog If you are using the IniS.DesktopControl add-on module this dialog will be expanded to display all executable available at the teacher’s PC. The extended dialog shown below will be displayed only after the teacher’s PC has been scanned for executables using System Æ DesktopControl Æ Manage Applications. ‘Run at Student’s PC’ dialog with registered DesktopControl module Note: In contrast to the ‘Lock Application’ feature applications that need a full path to be executable and are located in a different directory at the student’s PC cannot be called upon by this function! 28 • Using INiS Manual INiS 5 Online Activity Log (Internet-Control is required) You can get a complete overview of all sites visited by the students by selecting ‘Online log-file from the ‘View’ menu. All site visits with denied access, either through the Positive list or the Content Filter, are displayed in red. Sites with access permission are marked in green. Internet-Online Activity Log You can open any site on the list by selecting ‘Open URL’ from the context menu (right click). If your access policy is set by the Positive list, you can also add a barred site through the context menu using the ‘Grant Access to URL’ menu item. If you would like more information about why a particular site was barred you can select the ‘Analyse URL’ option to drill down to the reason why the Content filter has denied access to this site. Manual INiS 5 Using INiS • 29 Screen demonstration Pressing the button starts the demonstration of the teacher’s workstation for the highlighted users. The teacher’s desktop (without the INiS window) will be transferred as default. The arrow leads to a selection of active programs, which can be alternatively selected. In this case only the selected program will be transferred. This is useful for teaching using a targeted approach, such as sending an MS Word window in half screen size to the students. This allows the student to work on his document with the assistance of the teacher. If this is not required, the application can be switched to full screen mode. If no students are highlighted, the demonstration is started for all active users. The paint tools of INiS are also activated when starting the demonstration and the Paint box toolbar appears. The functions of this toolbar are explained in the ‘Paint Box’ section. End Screen Demonstration Once the demonstration starts, the button changes to “End demonstration”. As is the case with “Start screen transfer”, the demonstration mode can also be ended for individual programs. Remote control The ’Remote Control’ button is used to grab the screen content of a highlighted student and to operate the student PC remotely. This function is available only for individual students, since the simultaneous remote control of several students would naturally be rather problematic. Pressing the ESC key ends remote control. Therefore, during remote control the ESC key cannot be used with programs that are running on a student’s workstation. During remote control the mouse and keyboard of both the student and the teacher remain active. To prevent interference from the student, higher priority is given to the teacher. Student commands only become effective if the teacher has not been using his mouse or keyboard for at least 5 seconds. Screen Transfer This function is used to combine Demonstration and Remote control into one function. The teacher controls the workstation of the selected student and its screen is at the same time transferred to the workstations of the other students. As with remote control, the ESC key ends this function. 30 • Using INiS Manual INiS 5 Locking screens With this function, INiS offers the possibility of temporarily locking the screens and keyboards of either single or multiple students to attract their attention. Once locked, the students will see a black screen with a message. The button image changes for the teacher, and the same button can be used to release the student screens. As is the case with the video function, individual students or groups can be addressed here. Clipboard exchange Sending the clipboard to all or to selected students is another new educational function of INIS. This function can be useful in many different situations: • Working on an exercise could lead to the situation where some students become ‘stuck’ on one particular part. With ‘Clipboard Exchange’ the solution for this part can be sent to the students. The information can be delivered bit by bit. This allows the students to work out next steps of the solution on their own. • A scanner is connected to the teacher’s PC. The teacher can scan a picture and send it via clipboard to the students. This picture can be inserted directly into any image editing software to be used by the students. This allows the students to use devices of which there is only one available per classroom. The students have the option to continue working with their own clipboard content. A student can select between the clipboard of the teacher and his own clipboard using the Smile-Icon in the system tray. The following menu appears after a right mouse click: Selection clipboard student The student can paste the teacher clipboard at a later stage even if the student has pasted a different object or text on his own clipboard in the meantime. Manual INiS 5 Using INiS • 31 You as the teacher on the other hand are able to obtain the students’ clipboards by simply selecting a student. Control clipboard teacher You can always later on access the last clipboard obtained from a student again. Send message You can send a message to be displayed on screen by using the button. This message forces itself into the foreground of the selected students’ screen and must be confirmed before the recipient can carry on working. Sending messages 32 • Using INiS Manual INiS 5 Opening the chat window INiS has a built-in Chat window, which can be opened with the button. With this the students and the teacher can communicate directly with one another in a dialog. A two-part window with split input for the teacher and student appears. All entries in the window are transferred directly to the relevant chat partner. The student cannot end the chat mode himself, but must wait until the teacher does this. Multichat The multi-chat function of INiS allows a chat involving several users at the same time. You can create several chat rooms to allow students in different workgroups to communicate with each other. This function is started by pressing the button. To create Chat rooms the teacher selects ‘New’. Pressing ‘OK’ starts the multi chat. Chat room selection teacher PC Manual INiS 5 Using INiS • 33 These virtual rooms can be entered by selecting the chat tool from the Smile icon in the system tray of the taskbar and choosing a chat room. Chat room selection student PC Messages can be entered in the input line. After pressing the ENTER key all users of the chat room see the created message. ChatClient 34 • Using INiS Manual INiS 5 All events regarding the chat are listed in the bottom line of the chat window. The configuration window is displayed by pressing the very similar. button. The windows of the students and teacher look The option Deactivate Chat does not appear in the student version. The button Manage Chatrooms is called Select Chatroom in the student’s version. Both buttons open the windows described above (Select Chatroom teacher or Select Chatroom student). A part of the window can be displayed or removed by the button Configuration. This function contains settings such as font size and split screen line. Save Chat text allows you to save an input in a file. Only the teacher has the possibility to deactivate the chat in every chat room. Clicking the INiSChat symbol in the toolbar with the right mouse button ends the chat. When the chat server is running on the teacher’s workstation this icon is displayed. Hint: Pressing the F2 key shows the timestamp of every input. Hint: The whole text of a chat input can be copied to the clipboard by clicking on a chat entry with the right mouse button. Hint: If a chat input contains an Internet address (e.g. http://www.rdt-global.com) a menu item appears when the right mouse button is clicked. This opens the corresponding web site directly in your Internet browser. Manual INiS 5 Using INiS • 35 Speech Transmission With INiS the functions for Speech Transmission are seprarated into two modes: Announcement The teacher can transmit a spoken ‘message’ to either all students or to previously selected students. The students may only listen in this mode. Phone Call In this mode the teacher can talk (and listen) to one student. This connection is bidirectional just as a phone line. To be able to use Phone Call the teacher has to select an active student from the Classroom Management Console. Prerequisites If you want to use INiS’ Speech Transmission feature the following hardware has to be available at every workstation: • A sound card capable of Full Duplex mode (these days Full Duplex is standard with sound cards) • A microphone for the teacher (if you want to use ‘Announcement’ only) • Microphones for each student (if you want to use ‘Phone Call’) We strongly recommend using headsets to avoid interference and/or high noise levels resulting from speakers. 36 • Using INiS Manual INiS 5 Announcement When the teacher starts an announcement the following window will be displayed: Announcement at teacher PC With these controls you may change the volume settings for your local PC. Be careful though because this will result in a system-wide change of volume, i.e. it will change the volume for the playback of a music CD as well. Here the teacher may only change the settings for Recording, the stundent only for Playback. Phone Call Starting a Phone Call on the teacher’s PC will bring up the following window (identical for both the teacher and the selected stundent): Phone Call With Phone Call the settings for Recording and Playback can be manipulated by both participants for their own workstation. Manual INiS 5 Using INiS • 37 Setting the Volume Please note that the various audio components (Microphone, Aux, Line-in, etc. …) listed in the drop-down list boxes depend on what audio drivers are installed on your system and thus may vary from those displayed here. Playback Settings You can pick any one of the audio components installed on your PC from the drop-down list box under Playback. Please make sure that the first entry (here: volume) is not disabled by having checked the Mute/Select check box. Push the slider to its topmost position. Should the playback be to loud lower the slider gradually until a convenient volume level is reached. Now select Wave from the list box and proceed in the same way. All other entries in the list box are ignored for Playback. We recommend to check the Mute/Select check box for all entries you do not use to minimize possible interference. This is explicitly true for the Microphone entry during Playback since this does not deactivate the microphone’s recording ability but sets the microphone’s own playback volume to zero, i.e. the volume you’ll hear your own voice with when speaking. Caution: There are some PC where Mute/Select must not be selected. Therefore you should give checking this box a try. If it doesn’t work please simply uncheck it again. Recording Settings Select Microphone from the drop-down list box under Record, Push the volume silder to its topmost position and then check the Mute/Select check box. Note: You may transmit a currently played-back audio file using the Speech Transmission feature. Simply select the Record Mixer list entry, check the Mute/Select check box and your Wave or MP3 file is transmitted to your students. Problem Solving Please take the following steps in case you should experience difficulties using INiS’ audio features: Simple microphone test (is the d*** thingy plugged in allright?) Go to Start Æ Programs Æ Accessories Æ Entertainment Æ Sound Recorder. In the Sound Recorder’s window press the ‘record’ button (the one with the red circle) and talk into your microphone for about five seconds. Then stop the recording and press the playback button. If you do not hear what you have said just before there is something wrong with your audio cofiguration that has nothing to do with INiS. Please make sure everything is plugged in properly (some microphones and headsets have a separate ‘ON’ switch. Make sure the most current sound card driver is installed. Check the settings in the Device Manager (Start Æ Settings Æ Control Panel Æ System Æ ‘Hardware’-Tab Æ Device Manager Æ Sound, video and game controllers). In case the settings for your sound card reads something like Legacy Device or Emulation Mode please deactivate these. With some sound cards the Duplex Mode has to be activated separately. Please check this using the Device Manager (see item 4.) . Check whether your sound card is listed as the Preferred Device in Start Æ Settings Æ Control Panel Æ Sounds and Multimedia Æ’Audio’-Tab Æ Sound Playback and under … Æ Sound Playback on the same tab. Make absolutely sure that the device listed here does not have anything like Legacy or Emulation somewhere in its name. 38 • Using INiS Manual INiS 5 Video Transmission You can use the video transmission function to transmit video images, for example from a webcam or PC microscope, from the teacher PC to the student PC. Video presentation In the video presentation, the video source connected to the teacher’s computer is simultaneously transmitted to the selected student. The video presentation window opens for the teacher and students. You can select the source for the video signal under the menu item, “Settings”. All of the installed video sources that can be used are displayed. The active source is checked in front of the entry. The participants can save individual images before transmission. These can be saved directly as a file, or copied to the Windows clipboard. The presently displayed image is saved in the folder “My documents\Video presentation” by navigating to “Settings Æ Save still”, or by pressing the F8 key. By selecting the menu item “Copy still” or pressing the F9 key, the image is copied to the clipboard and can be processed with any desired graphics program such as Microsoft Paint. Manual INiS 5 Using INiS • 39 Video conference With the video conference function, the teacher and a student selected by the teacher can establish a video connection. On both stations, images are recorded by a video source and sent to the other participant. This window is opened on both PCs when a conference is started by the teacher. The received video images are visible in the larger section. The images taken by the local video source are shown in the small section. This makes it easier to adjust the video source. If there is no source, this area automatically disappears. The status of the most important video conference functions is shown in the status bar at the bottom edge of the window. The status bar is divided into four areas: 1st Area Status of the network connection. If a connection has been established, the IP address of the other party is shown. 2nd Area Status of the local video source. If a source was found, the number of images per second sent by the source is displayed. 3rd Area The number of images sent per second via the network connection is shown. 4th Area The number of images received per second via the network connection is shown. Video source driver windows are opened under the options “Camera” and “Format”. Settings can be adapted there for most of the drivers such as sharpness, brightness, contrast, resolution, etc. 40 • Using INiS Manual INiS 5 Video monitor The video monitor is identical with the video presentation. However with the video monitor, a video source connected to the student computer is transmitted to the teacher computer. Problems with the video source If your video source is not found or cannot be started, check if the video source is properly connected, if the drivers are installed, or if the error occurs with other programs that use such a video source. Paint Box A number of additional symbols appear in the task bar of Windows during the screen transfer. Additionally you get a further toolbar in INiS. This is the INiS paint box. It can also be opened in the view menu separately from the screen transfer. INiS paint box tool bar You can use the Paint Box features to draw in your current application, for instance, to annotate particular elements or to illustrate certain steps of the application. The drawing function is not just useful for illustrating an on-screen demonstration, but also to guide through a demonstration using a projector or large-scale data-display. The drawing function is easily accessible. As with other drawing programs, you choose at first the type of function or tool you wish to use by selecting it from the toolbar. Then, if you have an active application running in the window that you want to draw in, you need to hold the SHIFT+CTRL key in order for the application not to interpret your drawings as an instruction to itself. This tells the INiS Paint Box to use such actions and tells the running application to ignore these. The drawings are inserted into the active window and not just overlaid, so even if the active window is moved, the drawings will move accordingly and if the window is minimised the drawings are also minimised. The simple drawing functions available are: Simple Pen Numbering Yellow Textmarker Left Pointer Red Textmarker Right Pointer Error symbol Yellow Block Question symbol Red Block Information symbol Eraser Tool, used to delete all drawings Manual INiS 5 Using INiS • 41 Printing The following information can be printed via the menu ‘File’ – ‘Print’: Print Menu View of room This provides a quick overview of all users that are currently logged on to this room. View print jobs Is used to print a list of all current print jobs started by the users. Application log-file Used to print a list of all active applications started by each users. Internet log-file Prints a list of all websites visited by each user. Student lists Use this function to print a list of all the students logged on at a given moment. Please note: Depending on your settings the printout will give the names of the current workspace. (computer names, user names, ‘INiS’ - Names or IP-Address) 42 • Using INiS Manual INiS 5 Call for assistance function A student can draw attention by selecting the INiS symbol in the Windows toolbar (calling function). The following dialog appears: In this dialog the student is able to define the priority of his message. There are three priority levels available. You will receive the information that an alert has been raised via a symbol in the user list. In order to read the content of this message you need to move the mouse over the relevant student and rest it for a little while for the message text to appear in a note window. Activating the chat mode with this student will reset this message automatically. Manual INiS 5 Using INiS • 43 Internet unlock / lock (optional) The INiS Internet Module allows you to restrict visits to certain websites or block Internet access completely. You can also select whether to apply the access rules to everyone connected to the current INiS room or to a group or single student. Internet drop-down menus in INiS You can change your Internet settings from the drop-down lists in the ‘Internet’ menu or the Internet symbol on your toolbar. You have 5 options to modify the Internet access settings of the connecting computers. The 5 options have the following functionality: Lock Internet The ‘Lock Internet’ option prohibits all Internet access. If a student tries to access any site an alert message will be displayed, either that “The site could not be found” or that the “Search Page could not be opened” (Internet Explorer). Browser alert when the Internet is blocked Filter through Positive list The Positive List is designed for use in lessons where access to a certain (small) number of sites is desired. You can for instance allow dedicated research from specific library sites only, whilst at the same time prohibiting access to other sites that may due to their content provide an unfair advantage. Please Note: If an unlocked website contains links to other sites on a different domain, you will only be able to access these sites if they are also included in the Positive List. 44 • Using INiS Manual INiS 5 Access to URL Every teacher is able to add more sites to the Positive List as required during a lesson. After the Internet access through Positive List has been activated, you can add new sites via the menu item “Grant Access to URL” in the Internet Module drop-down lists. Add websites The students can immediately access the recently added site. Address dialog This function can also be used to directly add the address of a website a teacher is currently visiting to the Positive List. To do this select ‘Grant Access to URL”, whilst the desired site is open in the active browser window and the address entry will be automatically entered in the dialog box. Please note: Any addresses that are subsequently added manually will only be valid for the current session only. When the Internet access status is changed from access through PositiveLists to a different policy, the manually added sites become locked again. If the policy is later set to Positive List again, the access rights will default to the pre-configured list (see Configuring the Positive-List). Filter through Negative list The Negative list filter prohibits access to Internet sites, which are specified in this list. The student will not be able to access any content on these sites, but will be able to browse other URLs, which are not listed. Using negative lists allows you to block specific pages. Note that this option is only active in Internet Explorer. Warning: When you use the negative list to (re)filter, all your students’ opened Internet Explorer windows will be closed. Manual INiS 5 Using INiS • 45 Content filter The Content Filter provides Internet security at the next level, instead of looking at the address entry only; it will evaluate the site content for entries in the filter list. In principle all websites will be accessible unless an entry is found. When access is denied, the browser will display the following screen: Browser: Access denied The web page evaluation is firstly carried out by checking the address of the page for any banned words. The next step is a check of the page title and the included Meta Tags. As a lot of ‘dirty’ sites contain pictures rather than copious amounts of text, all picture tags and alternative descriptions are scanned. The last stage is the check of the actual page text content for banned words or phrases. In order to maintain an adequate system performance, only the first few lines of text are checked. As with the Negative list this may have unwanted consequences: On one hand, it may be perfectly acceptable to have certain words appearing in a particular context (e.g. “sex“: likely to appear on biology education or aids awareness sites). Or, on the other hand you may have certain words appearing as part of a completely different word or phrase. (e.g. “University of Essex”). It may also be that the banned subject only appears at the very end or bottom of the page, where the filter does not scan for performance reasons. Therefore it must be noted that the Content Filter can never be a complete protection against Internet abuse, although a high proportion of unwanted sites are blocked. The principle behind the INiS filtering is fairly conservative, it will rather block too many than too few sites. Please note: The Content Filter works only with Internet Explorer. Warning: Every time the teacher activates or de-activates Content Filtering, all open Explorer and Internet Explorer windows on the student PCs will be closed. 46 • Using INiS Manual INiS 5 Unlock Internet This restores the unrestricted access to the Internet. All filters will be set to inactive. Application, Restrictions and Compatibility The function ‘Lock Internet’ and ‘Filter through Positive list’ can be applied immediately and are browser independent, regardless of whether you use Internet Explorer, Netscape, Opera etc. More so, the functionality is not limited to the browser but also extends to controlling the access in FTP and Email clients. The function ‘Filter through Negative list’ and ‘Content Filter’ is currently only available for Microsoft Internet Explorer. As soon as you select the ‘Content Filter‘, all open Internet Explorer windows on the student PC will be closed to allow the Content Filter to become active. The online activity log provides a quick status overview of all connected PCs. For technical reasons, it is not possible to restrict Internet access during file exchange via the File Browser or during Video/Screen broadcast. This is a temporary requirement of the Windows Explorer during which unrestricted access to the Internet is granted. The student PC will return to its restricted settings as soon as the file exchange or the Screen-transfer is finished. System Tray Status Indicator After the successful activation of the Internet Module on a student PC you will see a small ‘globe’ symbol in its system tray. The student will receive a pop-up notification detailing the change to the relevant Internet settings. This notification will disappear after a short time. If you hover your mouse pointer over the globe the current status will be displayed. After starting INiS the Internet access is locked by default. If the Internet is now subsequently unlocked, the status icon will reflect this change when the mouse pointer is placed over the globe icon. If Internet access is granted using the Positive list, the applied filter is displayed in brackets after the status. If Internet access is restricted by ‘Content Filter‘an additional filter icon is displayed in the system tray If Internet access is restricted by ‘Negative list ‘an additional filter icon is displayed in the system tray. Manual INiS 5 Using INiS • 47 (Un-)Lock Applications (opional) The DesktopControl Module allows the teacher to lock or unlock applications dynamically and to define which applications will be available for each student at the start of a lesson. This prevents any interruption or delay from the beginning, and enables the lesson to commence immediately. There are two different ways of locking or unlocking applications from the Teacher’s workstation. (Un-)Lock Applications Using the ‘Unlock Application’ Icon The second way to lock or unlock application is, the symbol in the menuebar. Unlock applications The ‘Unlock Application’ function will display all applications that have been set for dynamic access by the system administrator. Depending on the default settings, you may have certain applications locked or unlocked as standard. You can recognise locked applications by the RED icon and unlocked applications by the GREEN icon. This pre-configured setting can be changed as required, after INiS has been started on the teacher PC. 48 • Using INiS Manual INiS 5 Select the application to be unlocked In our example if you want to unlock Microsoft Word you can change the lock status by either: • Clicking the right mouse button • Selecting an option from the top toolbar After you have selected ‘Unlock’, the application will be marked with a green icon Please Note: The Explorer style display is designed to make the navigation of your applications easier. The more applications you set for dynamic access the more cluttered the view can become. You can also sort the entries in the right windowpane alphabetically by application or executable by clicking on the appropriate listing header. If you double-click on an entry in either windowpane, it will be located and highlighted in the other pane. Simply click ‘Apply’ to change the settings for Microsoft Office on the connected workstations. Unlocking Applications from the Applications List If you click the button in the INiS Toolbar the following Pop-up menu will apear, allowing you to switch between a Users List and an Applications List. Pop-up menu to switch between Users List and Applications List Manual INiS 5 Using INiS • 49 Applications List Now you can select one or more application(s) from the list and either lock them by clicking the respective icon. or unlock After you have changed the lock status of an application you have to transmit the changed lock status information to your Students’ PCs by clicking . Only then the changed status will become valid for your Students’ workstations! Copy Protection Clicking the icon activates or deactivates the Copy Protection. If you need to copy or rename files during a lesson you may need to de-activate copy protection. This is an important default setting as it is, when activated, designed to prevent the copying or renaming of executables for the purpose of circumventing the access rights settings. You can change the copy protection status simply by clicking the corresponding button. If you are working with programming-tool such as ‘Borland Delphi’, it´s recommend to deactivating the copy protection. DOS-Lock Clicking the icon activates or deactivates the MS-DOS lock. The DOS lock prevents older, MSDOS based applications and the ‘Command.com’ from being executed. Start at Student’s PC When clicking the icon (Run at Student’s PC) you may start an application remotely on the selected Students’ PCs. Before you can use this feature the list entries have to be configured by the INiS System Administrator. Using this feature lets you remotely mount a CD-image on your Students’ PCs for example. Clicking the icon brings up a dialog that lets you select the application(s) you’d like to start on your Students’ PCs. 50 • Using INiS Manual INiS 5 Configuring ‘Start at Student’s PC’ To add items to the ‘Start at Student’s PC’ list you’ll have to create a simple text file within INiS program folder and rename it ‘shortcuts.lst’. Entries within this text file have to have the following format: Display name = executable file Example: Windows Explorer = c:\windows\system32\explorer.exe Mount English Coach 2000 CD-ROM = c:\scripts\coach.vbs Warning: The program path must be accessible to the students exactly as indicated. Desktop Control on the student workstation A locked application will appear on the student workstation with a red cross above the application icon, the cross will disappear as soon as the application is unlocked again.. Start menu and desktop on Student PC The student cannot start the locked application. If a student attempts to start a locked application, the following warning message will appear: Manual INiS 5 Using INiS • 51 Application specifc warning If an application is unlocked by default and a student has already started this application, then the student will be able to continue working, even if the teacher locks that application in the meantime. The application will not be forced to shutdown, which could result in data loss; instead the student can save and close the open files. However, once the application is locked and has been closed, the student will not be able to start the application until the teacher unlocks it again. Please note: Many applications under Windows act as OLE-Servers, which for instance enables Word to embed an Excel graph in a document. It is important to remember that if Excel is locked, that an Excel - OLE-Object will be locked too and the embedding of (in our example) the graph will fail: OLE embedding If a student tries to embed an OLE object when the corresponding application is locked a warning message indicating the relevant source application will appear: OLE warning 52 • Using INiS Manual INiS 5 The student will usually receive an error message generated by the program he is working with, e.g. Word may produce the following error. Please note: As the error messages are created by the application that is running, it is not possible to exhaustively list all the potential messages. You can assume, if a program produces an unusual or cryptic error message after an attempt has been made to access a locked application through this program, that the access denied response of INiS is misinterpreted by this program and subsequently that error can be ignored. Status Refresh on Student workstations If a teacher changes the application status on the connecting PCs, INiS will refresh the desktop and Start-menu on the student workstation to reflect the changes made. This occurs automatically and does not require any user intervention. It is however, due to network speed possible, that for a short period of time the desktop icons disappear from view. This is quite normal and the icons will reappear soon after reflecting the updated application status. Please note: Due to technical reasons all desktop icons are automatically adjusted to their closest Windows standard size (16x16, 32x32 or 64x64) over time the screen is refreshed after a status change. If a student attempts to rename an application or to copy it to a different location, the following warning will appear: Warning: Access denied Depending on the operating system a separate system generated message may appear. This message may vary in its content and is not controlled by INiS. Manual INiS 5 Using INiS • 53 (Un-)Lock Printer (optional) The INiS Print Module enables you to control the print operations of your students. A toolbar is used to set the printer access rights for all connected students, limit print outputs and to configure document header settings for print jobs. Lock & Unlock Printers The menu item ‘Unlock Printer’ is used to set the access rights for the printers installed within the INiS classroom. The dialog box displays the printers found and the ‘ticked’ printer(s) can either be locked or unlocked, depending on your requirement. Printer availability If a student tries to print to a locked printer the following error prompt will appear: Warning message Configuring the Page Header This option enables you to include the students’ details with every print job. The header area of a document can be set to include basic information such as date, student name or classroom, to quickly match up a printed document with its creator. The ‘Configure Page header’ option will prompt you with the following dialog to define your settings. Tick the box alongside the required header detail and press OK to confirm your choice. 54 • Using INiS Manual INiS 5 Page Header Limit Page Outputs The ‘Limit Page Outputs’ function provides direct control over a printer and how it will react to print commands submitted by the students. Print Outs Limits The first option allows you to limit the total amount of print jobs per session. The amount defined is the maximum permissible per user and contributes to a more economical use of your printer The option to ‘Restrict size of Print-outs’ is also designed to improve economic, but with a slightly different approach. This setting will limit the maximum page count per print job to prevent unauthorised printing of large documents such as user manuals. The last option tackles a problem frequently encountered in lessons, the issue of accidental or deliberate multi-prints. This may be because the printer is still in the process of warming up or the delay before printing starts is perceived as too long and the command is sent again. The “Prevent multiple Print-out“ stops multi-prints for a certain time, during which the print button is blocked. The student can keep pressing the button, but the command is ignored until the specified time has elapsed. Manual INiS 5 Using INiS • 55 Working with the INiS.UserAdmin Module In the UserAdmin module, you can easily maintain users on a server. You can set up new users, reset passwords, or access student data. Users created with the UserAdmin module are given a home directory on the server. In addition, the folder “My documents” is automatically routed to the home directory. This chapter will describe working with the UserAdmin module for normal lessons. Other important functions for the system administrator such as creating classes, courses and teachers will be described in the next chapter. Starting the lesson To use the functions of the UserAdmin module, you first need to start the lesson. In the INiS “Start lesson”. The following window appears: toolbar, click on the button In this window, select the classes you want to work with, and then click the button “Start lesson”. Exchange directories for the corresponding classes are activated on the student computers. In addition, you can create new users, delete the passwords of existing users, or access the home directories of the students. If you have defined your own classes and courses, they will be displayed under "Own classes/courses". This option is then automatically activated. When you switch to “All classes/courses”, all the classes and courses will be displayed that are set up on the server. This option is recommendable for example when you are substituting for a colleague and want to administer a “foreign” class or course. 56 • Using INiS Manual INiS 5 Lesson options The following administrative functions are called up under the lesson options: • Print class and/or course lists • Set up new students • Reset student passwords • View student home directories • Start “Automatic new user creation” • Collect students for courses • Renew “Exam ticket” Note: The lesson option functions are only available after you have started the lesson or an exam. Create students There are several ways to create students. You can manually set up a student at the teacher’s station, or activate “Automatic new user creation”, and the students will set themselves up. We recommend that you create students via the “Automatic new user creation” function when you work with a class the first time, and no users have been set up in the class. If you want to subsequently set up individual users in the class (for example, the user was sick during automatic new user creation), use the “New student” function. Automatic new user creation Manual INiS 5 Using INiS • 57 To automatically create a new user, go to the INiS toolbar and click ”Lesson options”. Select the previously activated class in which the student is to be created. The new user can only be automatically created for one class, and not for courses. Click on the “New user creation” button. The window “Overview of new students" then opens in the teacher’s station. Automatic new user creation for students To create new users, it is necessary for the Clients to be located in the Windows logon screen. The word “new” must be entered as the user name. The password field remains empty. Note: If users have already confirmed the New User Creation dialog before New User Creation has been released by the teacher, they receive the following message: Cancel leads the user back to the Windows logon screen, and any additional information can only be entered after release by the teacher. After the release of New User Creation, the users are led through various screens, which serve to collect the required data for adding as users in the domain structure. The data entered by the user must always be confirmed by pressing the “Continue” button. The start screen for New User Creation informs the users being added about the further progression of the menu-driven dialog. If the Assistant has been started inadvertently, the process can be canceled again at this point. On the second screen, the user must enter his first name and last name. 58 • Using INiS Manual INiS 5 After confirming the entries, another screen appears, which lists in the top field the logon names in the domain assigned by the system. At this point, the user must assign a password of his choice. If the entered passwords are not identical, the “Next” button will not be active. The user can log on to the domain using the combination of logon name and password once New User Creation is completed. Manual INiS 5 Using INiS • 59 In the summary that follows, the user can check his information. No changes can be made here; they can only be made by going back to previous input screens. New User Creation is completed when the user presses the “Finish” button. Automatic new user creation at the teacher’s station At the teacher’s station, the student data are displayed in the window “Overview of new students”. The teacher can detect the progress of the creation of a new user by the change in font color on his support overview. As soon as the necessary entries have been made by the user and the student has confirmed his or her data in the last dialog by clicking “Finish”, the color of the font changes from red to black. You can now check the student data and change it if necessary. After you have checked all the user data, click on the “Accept student” button. 60 • Using INiS Manual INiS 5 New student Individual students in a class are also created in the dialog “Lesson options”. As was the case with “Automatic new user creation”, select the class in which the user is to be created. Click on the “New student” button. A window is displayed in which you can enter the data of the new student. After confirming with “Ok”, the user is created on the server. Resetting the password You can reset the password for individual students with the “Password” button in the lesson options. The user is then able to log on without a password. Windows then asks him or her to enter a new password. To reset a password, select the class in which the user is located. Then mark the corresponding user, and click “Password”. After a security question that you must confirm with “Yes”, the user’s password is reset. Manual INiS 5 Using INiS • 61 User properties You can also display the user’s properties in “Lesson options". The user properties can also be retrieved via the user context menu in the room overview. Among other things, you can see which courses the user is in this dialog. The corresponding course is displayed under “Member of”. You can also reset the password here. You can also open the personal directory of the user by clicking the “…” button. Home directory The teacher gains direct access to the content of the respective home directory via the “Home directory” (Lesson options) button of a marked user. In this view, you can look at the content and make changes, e.g. delete, copy or create content. Collecting students for a course In addition to the classes, you can collect logged-on students from one or more classes for a course. First, the course in which the students are to be collected must be activated with the function “Start lesson“. Then open “Lesson options“. Select the course in which the participants are to be collected. And click the “Collect” button. A dialog window then opens offering two options. At this point, there is a selection option to collect either all of the registered (active) students into a course, or to collect only those who have been previously selected by the teacher on the support overview. 62 • Using INiS Manual INiS 5 Collecting students for a course is done using the Collect into Course button. Printing class and/or course lists Under Lesson Options, you can also print out the information stored in the system on students from individual classes or courses. After selecting a class or course in the combination box, the members of this object are listed in the lower part of the screen. Printing is activated by pressing the “Print” button. The class name, the object names, the complete names, the first names and last names of the students are printed out in table form. Selecting Students for a Class Click the overview. button in the user list to select all users of a class or course in the room If you click on the symbol with the mouse, the following menu opens: Here you can select which users in the room overview are to be marked. If you select the class TG15, for example, all students who belong in the TG15 class are selected in the room overview, and additional support functions, such as switching the screen to non-display, become available. Manual INiS 5 Using INiS • 63 Explorer expansion (Namespaces) Using the Namespaces, you have the option to access the home directories of the students from the teacher’s computer and to distribute files to all students with a simple mouse click. In addition, you have the option to access a common exchange directory of classes. You can carry out these functions comfortably from Windows Explorer or via the Desktop. Explorer with a view of the Namespaces In this figure, you will see a folder called “Exchange Directories” in which the “Informatics” and “TG15” classes can be found. All students who have registered for the respective class can access the exchange folder. In addition, the “Student directories” folder, in which all registered students are listed, is located there. Within these folders you can, as usual, send files to the students using the Windows functions “copy” and “paste”, or you can collect files from the students. 64 • Using INiS Manual INiS 5 Copying Files to all Students Simply drag the file that you want to copy to all registered students to the student directory and then change over to the INiS window. The following dialog will then be displayed in INiS: In this window, click on the “Distribute” button. The file will then be copied into all student directories. If not all the students are present or if additional files are to be distributed, you can interrupt the distribution by clicking the “Later” button. Manual INiS 5 Using INiS • 65 If you select “Cancel”, the file is not distributed. Students normally find the distributed files in their home directory in the “Incoming“ folder. Since the location of the incoming folder is configurable, students may also find it under “My documents”. You can find additional information about your configuration from your system administrator. Collecting files With the “Collect files” function, you can copy work results (files) from all the students into a local folder. This can for example be a folder on the server, or a memory stick. INiS creates a subfolder for each student in which the respective files are copied. To collect the files, go to Windows Explorer and click your right mouse key on a folder. In the popup menu, select the entry “Collect work here”. Alternately, you can retrieve the menu item “Collect work from here” in the context menu of the named room, "Student directories”. Another window opens: 66 • Using INiS Manual INiS 5 This is the main window for collecting files. It is divided into several areas: Collect data from In this area, you identify the folders where files are to be searched. You have the following options: - Student folder (active): The files are searched in the “My documents” folder of all the logged-on students. - Student folder (all): The “My documents” folders of all the students of the activated classes and courses are searched. - Exam folder: Files are searched only in the “My documents” folders of exam users. Select this option when you want to collect files after an exam. Some filters are also available when collecting files. For example, you can look just for files with the current date, or for specific files types. The following files can be collected This area displays all the files that were found in the above-cited folders. The “Number” column shows how frequently the file was found in the student folders. The "Size” column indicates the overall size of the files with this name. Mark the files here that you want to collect. A summary of the files to be collected is displayed below the list. Collect work in this directory This is the target directory into which the collected files can be copied. Select a folder of your choice (such as a memory stick). If you activated the function via the context menu of a folder, this folder has already been entered here. Information on this work Enter a name for the collected files. This name is used to create a folder under which the user directories are generated with the collected files. Warning: If collected files to be taken with you are subsequently copied to another medium, copy the entire folder with the name indicated under “Info”. In addition to the actual student files, you can also find additional information here required for later distribution of the work. Manual INiS 5 Using INiS • 67 Distributing files After you have collected files, for example to correct them, you can also use INiS to distribute them. The files are then automatically copied to the correct student directories. To redistribute the files, open the folder in which the work is saved. Folders containing collected files are displayed in Explorer as briefcases with students. Click the right mouse key on the collected work, and select the context menu entry “Distribute this work”. A new window appears: 68 • Using INiS Manual INiS 5 It is much easier to distribute work than to collect it. To distribute work, just click “Distribute”. When distributing work, no additional setting options are available. After work has been distributed, however, you are asked if your copy of the work should be deleted. This is particularly recommendable when the work was originally collected in your home directory on a computer not protected by HDGUARD since these files unnecessarily eat up memory over time. Collecting and distributing files in INiS The file collection and distribution functions are also found in the INiS tool bar under the “File administration” menu. Exam mode When writing an exam, it is frequently undesirable for students to have access to their files in the home directory. To prevent this, INiS has an “Exam mode”. In exam mode, a temporary exam user is created for each student on the server. Each of the exam users is given an empty home directory and is assigned a jointly-used, binding profile. In addition, the exam user cannot load data from his normal student directory. Starting an exam To activate the exam mode, go to the INiS toolbar and click the symbol “Start lesson”. Then select the class or course in which you want to write an exam. Then click “Start exam”. You are then asked if files in the exam folders (old exams) should be deleted. If you answer “Yes”, all the files in the exam folders are deleted. The students first log on with their normal account names in the Windows logon screen. The users are then automatically logged on as exam users. If a student has already logged on before the exam mode was activated, the student is automatically logged off and then logged on again as an exam user. When an exam user logs on, the PC symbol in the room overview changes to: you to see if an exam user is actually logged onto the computers. . This allows Renewing an exam ticket Each student in an exam is given an “Exam ticket” at the beginning of the exam. Each student participating in an exam needs a valid exam ticket. When the student logs on to a computer for the first time, the ticket is redeemed and hence looses its value. The student is unable to log on to a second computer. Manual INiS 5 Using INiS • 69 Example: Thomas is taking an exam. He has a friend on another computer in a different room who wants to help him. When Thomas logs on, he redeems his exam ticket. His friend cannot log onto a different computer for the exam since Thomas’ ticket is no longer valid. The exam ticket also keeps students from getting undesired help from the outside. Students are prevented from logging on outside of the control of INiS (for example on a notebook or WLAN) because the exam users are given a randomly generated password not known to anyone, especially the helpers, when the exam ticket is assigned. Sometimes a computer may crash, or an exam user may accidentally log off. In this case, the student’s exam ticket will need to be renewed. To do this, click , “Lesson options”. In the window, select the student that needs a new ticket, and click the button “Renew exam ticket”. The student can then log on as an exam user. Ending exam mode To keep the students from being logged on each time as exam users, you need to end the exam. There are several ways to end the exam mode. Click “Start lesson”, select the class in which you wrote the exam, and then click “Start lesson”. Alternately when leaving the INiS teacher interface, you are asked if you want to end the exam mode. 70 • Using INiS Manual INiS 5 Installation Guide INiS 5 RDT - Global Version 5.0 Classroom Management & Multimedia eLearning Suite Manual INiS 5 Installation Guide • 71 General This part of the manual is intended for the system administrator who sets up the network and installs INiS.. Requirements Before starting the installation of INiS you should make sure that you meet the following installation prerequisites: Please make absolutely sure that you have made a back up of all your important data and files of the computer you intend to install INiS on. • Although unlikely, it is possible that, due to user error or an interrupted installation, you may lose or corrupt your existing data. RDT and its partner organisation cannot accept any liability for data loss or consequential loss of income due to any reason whatsoever. • The minimum computer configuration is quite undemanding; a workstation from basic Pentium CPU upward with sufficient memory (RAM) will be all that is required. • The memory configuration depends on the operating system installed, whilst with Windows 98 or ME 64 MB will be enough, we recommend for 128 MB for Windows 2000 and Windows XP. Windows 95 and Windows NT 4 support has since INiS Version 2.2 been discontinued. • Whilst not strictly required, it is advisable to apply the latest Service Packs (SP) for the appropriate release to ensure full compatibility with all drivers. • For network use you will need a network adapter configured for IP networking under Windows 98, ME, Windows 2000 – Workstation and Windows XP. Ethernet standard with installed WinSock 2. You can find an example of setting up an IP network in the Appendix. • HDGUARD does not support dynamic hard disks under Windows 2000/XP. • You will need to set your graphics card resolution and colour depth for all PCs, which are to be connected by INiS, to the same settings to enable screen transfer. The current maximum resolution supported is 1280x1024 pixels. • Minimum colour-depth for each workstation should be set to 16 Bit corresponding to 65536 colours. • You must have Internet Explorer 4.0 or higher installed on your system. If this is not installed the teacher’s workstation won’t display any tool-bar icons, also content-filtering at the participants’ workstations will not be functional. • For UserAdmin modul: Network server under Windows 2000/2003 Server, Linux or Novell NetWare 5.1 with ZenWorks 4 and later. Recommended System Requirements For high-quality screen-transfer we recommend a homogeneous network and system configuration. We also recommend that all computers (including the teacher-workstation) are equipped with comparable hardware as far as processor-speed and graphics-adapter performance are concerned. 72 • Installation Guide Manual INiS 5 Workstations with 400 MHz or higher and sufficient memory (RAM) depending on the operating system as outlined earlier. INiS Usage Restrictions It is not recommended to install INiS on a central server under Windows 2000 or Windows 2003 or on a workstation that provides Internet access for other PCs in the network, such as a proxy server. This may severely restrict functionality and impair the performance of INiS. Managing Multiple Rooms with INiS You must select during installation one of the eight (virtual) rooms provided, in which the computer you are installing on should be placed, or specify a customised room . Please note that in order for all computers within one physical room to appear in the same virtual room after the installation is finished, you have to enter all of them in the same room (e.g. ‘Room 1’) during set-up. Only the students’ workstations, which are in the same room, will be displayed on the teacher’s workstation. Should you have accidentally chosen the wrong room number for the teacher’s workstation during set-up you can subsequently change this from the menu-item ‘System’ Æ ‘Settings’ You must remember that you need a separate Base-License (Teacher Desktop) for each physical room in order to install INiS in more than one room. Dies gilt nicht wenn Sie INiS-Professional einsetzten. Furthermore you should make sure that ONLY ONE TEACHER -WORKSTATION is set up in each physical room. Most networks utilise Ethernet technology. One aspect of Ethernet transfer is that all workstations share the same medium, in this case the network cable. There is no check on bandwidth availability and data packets spread across the whole network regardless whether the 2 connected PCs are standing right next to each other or are far apart. This creates packet collisions and when detected these packets are discarded and have to be resent. This principle is called CSMA/CD (Carrier Sense Multiple Access / Collision Detection). CSMA/CD results in increased network traffic and a decrease in performance for all connected workstations. This disadvantage of the Ethernet can be minimised by segmenting your network into smaller subnets, although with this method, some resources on the network may not be accessible, such as Internet access or shared printers and file depositories. If multiple segments / subnets are bundled on one central server you can achieve the same result either by binding the IP-Stack to the network adapter the required number of times (i.e. assigned multiple IP-addresses to the network adapter, one for each segment / subnet) or by using multiple network adapters. If a central switch is used setting up multiple VLANs (Virtual LANs) is recommended as well. This has to be supported by the server’s network adapter as well as the switch. Note: If you use this kind of segmenting you may, under certain circumstances, have to use routing between your subnets to make sure that all (physical) rooms use the shared Internet access. The consequences for an INiS installation in multiple rooms may be large data packets impacting on the rest of the network, especially given that the screen transfer functions of INiS Manual INiS 5 Installation Guide • 73 transmit large amounts of data. We therefore recommend segmenting your network on a per room basis. INiS Installation Before you start with the actual installation of INiS, it is necessary that your IP network is set up completely. You should also ensure that you have completely removed any previous installation of HDGUARD or INiS from your system before installing the current version. Important note for Windows 2000 or Windows XP users: workstation as Administrator to install INiS! You must log on at the Please note: Make sure that you complete all installation and configuration steps using administrator rights, this also includes HDGUARD set-up and policy configuration Please note: Make sure that you familiarise yourself with the rights required to run INiS (see ‘Notes on Windows NT User-Accounts’) To install INiS start the set-up program through the corresponding link from the Program CD This set-up must be performed for all workstations working with INiS. A dialog for selecting the installation language appears. Apart from the appearance of the set-up program this also determines the language in which INiS will be installed. After the set-up program has initialised, please select ‘Next’ from the Welcome screen to start the installation . 74 • Installation Guide Manual INiS 5 Please note: In order to install the software you must agree to the license agreement. Please read the agreement carefully before installing the software, as with installing this software, the license agreement becomes legally binding. The next step is the installation of the INiS program files. Either select the required installation folder for this or confirm the folder suggested by the set-up program. Manual INiS 5 Installation Guide • 75 You will now be prompted to select the set-up type of the workstation, as teacher and student workstations require a different set of INiS files to be installed. Next you need to define the room in which this workstation is located. You can select from the predefined simple range ‘Room 1-8’ or define your own, custom named room. 76 • Installation Guide Manual INiS 5 You will need to define custom rooms when installing more than the predefined 8 rooms, but even if you only install a single room it is good practise to determine how future rooms should appear in your installation. This will make additions at a later stage more logical and easier to install. Please make sure that you specify the same room name for all PCs in the same physical room (for instance ‘Room 101’). Only the students’ workstations, which are in the same room, will be displayed on the teacher’s workstation. Should you have accidentally chosen the wrong room Manual INiS 5 Installation Guide • 77 number for the teacher’s workstation during set-up you can subsequently change this from the menu-item ‘System’ Æ ‘Settings’. Also you should make sure that ONLY ONE TEACHER -WORKSTATION is set up in each physical room. Please note: For each physical room with a teacher workstation that is to run under INiS a separate Base-License is required. Please note: If you wish to incorporate isolated workstations (i.e. a single PC in a library), you should group these in to a ‘virtual classroom’ to be assigned to one of the 9 INiS classrooms available. Please note: In a large(r) scale network with several rooms it is advisable to separate these rooms by segmenting your network. In this scenario you may assign an individual subnet to each room. In case a common server is used for all rooms this segmenting may be implemented by using mutiple network adapters in this server or applying the VLAN (virtual LAN) technique. To be able to use a common Internet access IP-Routing may have to be configured on the server. To have the functions of INiS always available, you can set INiS to start automatically when someone logs on to the workstation. This option is activated in the following dialog. Please deactivate this option if you only want INiS to be started manually using the ‘Programs’ menu. You can choose to display student workstations by their computer names, Windows user names, IP addresses or Smile user names on the teacher's workstation. Since the Smile user name cannot be retrieved from system data, there is a setting to display a dialog at each start of INiS to query the designated user-name. This can be activated or deactivated using the next installation option. 78 • Installation Guide Manual INiS 5 Next you can decide whether you wish to install HDGUARD. IMPORTANT: If you decide not to install HDGUARD at this point of INiS setup it is NOT possible to do so separatly afterwards. You will have to reinstall INiS completey in order to make use of HDGUARD at a later stage! If you are absolutely sure that you do not wish to use HDGUARD you may uncheck the installation check box in the above window nevertheless. With leaving the box checked you will only copy the necessary files to your PC. This does NOT automatically include configuration Manual INiS 5 Installation Guide • 79 and activation of HDGUARD though. This will be done in another step after the PC has been restarted. If your operating system is Windows 2000 or later the INiS setup is complete at this point. To ensure a secure HDGUARD start-up on Windows 9x systems two additional measures are to be taken here. For one you will have to prevent the PC from being able to boot from Diskette or CD-ROM by making the appropriate changes to the PC’s BIOS settings. Second the interruption of the boot process through various Hotkeys or key combinations has to be prevented. The later will be done automatically by the setup program when you leave the box ‘Secure Windows 9x Startup’ checked. Now the Installation of INiS is complete. It is advisable to restart the PC at this point in time and - having set up all workstations - move to licensing a full version of INiS and/or making the basic configurations. Note: If you have purchased licenses for INiS Add-On Modules these should be registered on the students workstations at this point of the installation process as well. Uninstalling INiS To uninstall INiS, start the INiS setup program from the CD. The setup automatically checks if another version of INiS has already been installed. If the setup program finds INiS on the computer, the existing INiS files are removed. Updating INiS To update the teacher computer, start the setup from the INiS CD or from your download folder. First, the previously installed INiS version is uninstalled. After this version of INiS is uninstalled, setup restarts. The current version of INiS is then installed. Make sure that INiS is installed in the same directory from which it was just uninstalled. All the INiS settings are kept such as the license or the UserAdmin setup. When the teacher is updated, an update package to centrally update student computers is also installed. To subsequently update the student computers, you need to be logged onto all computers (teacher and student computers) as a user with administrative rights. Perform the following steps on the teacher computer. • Deactivate HDGUARD on all student computers. Make sure that INiS is started on all the computers. • Start INiS on the teacher computer. If it is already running, shut it down and restart it. • Log on from the INiS system menu, and select "SystemÆUpdateÆUpdate students" The student computers are then updated. As soon as the computers are finished updating, they are automatically restarted. Then reactivate HDGUARD on the student computers. 80 • Installation Guide Manual INiS 5 Warning: These instructions only describe the general procedure for updating. Additional steps can be necessary depending on the version. Make sure to follow the update instructions accompanying the new versions. Licensing your software After the initial installation, INiS is only installed as a 4 user trial version valid for 45 days. In order to unlock the full version you will need to enter your license code in the dialog box which appears the first time you start INiS. You can also access this option later on using the menu ‘System Æ Licensing’. Enter License information in this dialog Make sure to enter your license code exactly as printed in your license documentation. If you enter a wrong code you will have to enter it again, otherwise you will only have the functionality of the demo version. Please note: You can license your Add-on modules using this dialog box; you will notice that the first three fields of the module keys will be automatically filled in for you. You will need to complete the last two fields with the codes supplied to you. Licensing INiS.professional The license dialog of INiS.professional is initially the same as the dialog for INiS. Enter the school name and license key into the fields of the basic license, and confirm the license dialog by clicking OK. Make sure to precisely reproduce upper and lower case! Manual INiS 5 Installation Guide • 81 The INiS.professional license dialog then appears. Licensing INiS.professional Note: To license INiS.professional, the INiS UserAdmin module must be set up since the license data cannot otherwise be saved. The module can be set up under the non-licensed demo version, or after licensing. Once the INiS.UserAdmin module is set up and additional rooms are connected to the installation, these rooms are automatically licensed. 82 • Installation Guide Manual INiS 5 Adding new licenses After entering the license key, you can add additional licenses by clicking the “Add” button to retrieve the menu item “Licensing”. Adding a license Licensing HDGUARD Integrated in INiS If you have selected to install HDGUARD during INiS setup, at first only a 30 day trial version of the software will be installed. To fully license your version of HDGUARD please proceed as follows: • Change your INiS System Password from its initial default ‘demo’ to a password of your choice. This new password must not be ‘demo’! • Start INiS on all Student PCs and log in to INiS if necessary. • Open the HDGUARD Configuration dialog through ‘System Æ HDGUARD Æ Configure HDGUARD (all)’ and assign a ‘hidden Partition’ or an HDGUARD Swap File as described in the paragraph ‘Configuring HDGUARD’ below. Now your HDGUARD is fully licensed. Please note: If prompted for a license key in the course of the HDGUARD Configuration Wizard DO NOT enter any information in the respective input boxes! Manual INiS 5 Installation Guide • 83 Configuring INiS 5 RDT - Global Version 5.0 Classroom Management & Multimedia eLearning Suite Manual INiS 5 Configuring • 85 Basics The configuration steps described here generally represent a once only process which is performed directly after the installation of INiS. You can always change the configuration settings later on. This is usually required if further computers are added to the network or if hardware components have changed. General Notes on the System Settings You can access the system settings of INiS through the ‘System’ menu. Since these settings should not be available to every user, a password is requested when this menu item is selected. If you are running the demo version or running INiS for the first time this password is set to ‘demo’. Please Note: If you are using INiS in combination with HDGUARD you must change this password from its default value to a password of your choice. Otherwise HDGUARD will remain in trial-mode on your students’ PCs, (i.e. limited to 30 days) and as it is not password protected, anybody will be able to change HDGUARD settings. After entering the password the system setting menu items will be available to you: INiS System menu items Important Note: In order to perform any set-up tasks the system administrator must identify himself via the menu ‘System – System log-on’. Selecting this menu will prompt you for the password. You can only move workstations to their appropriate position in Room Overview using drag & drop, during the first set-up after you have logged on as system administrator. To deactivate the System-settings functions again, select ‘System log off’ from the ‘System’ menu. 86 • Configuring Manual INiS 5 Room Overview There is no special menu item for designing the room overview and positioning the workstations. After you have enabled the system settings by entering the system password, you can work directly on the room overview. You can design the background of your overview window to ressemble your classroom layout. In addition, a grid is displayed in the room overview that makes it easier for you to align the workstation symbols. Designing the room When you start designing the room you will notice that the program used is the default program on your system linked with the file extension BMP. Usually this will be the PAINT.EXE program from the Windows accessories group. But other programs can also be registered for BMP (e.g. Paintshop or Corel etc). Simply double-click in the room overview. Changes in the picture become effective at the next start. The room picture is stored in your Smile directory under ROOM.BMP. By default the Room Overview background is set to display the INiS default texture. Positioning workstations Newly recognized workstations are initially displayed as icons in the left upper corner of the room overview. When you display the room overview for the first time you will notice that all icons are stacked ontop of each other. You can now position these by simply dragging the icons one by one to the position on your screen corresponding to the location in the room. Again you have to be logged on as administrator to do this. You can determine the alignment (left, right, above, below) of the workstation label under ‘Settings’ using the context menu of the workstation. Deleting Workstations Workstations that are no longer required in the Room Overview can easily be deleted. Simply highlight the required station and select the ‘Delete station’ option in the context menu. Please Note: When selecting ‘fetch all screens’ during installation you may receive a rare ‘List index out of range’ error. This happens when new students appear on the teacher-screen, which have not previously been registered on this workstation. To correct this, close the INiS teacherworkplace and restart it to refresh the view. Editing Policies General Notes If you work with a domain structure under Windows NT or Windows 2000, policies are provided by copying user profiles from the Windows NT/2000 server. If you now try to set policies with INiS, these are most likely to be invalidated or overridden by the system guidelines of a server-located profile each time. An in-depth documentation on Windows NT guidelines can be found in the Knowledge Base (www.microsoft.com) under the keyword ‘Guidelines for Windows NT 4.0 - profiles and – guidelines’. Manual INiS 5 Configuring • 87 INiS.policies give you the possibility of restricting the actions of your students to a minimum or to adapt it to your own requirements. INiS.policies works on System Registry level. All values which refer to the Start menu or other Windows settings are adjusted here. The various settings, which can be implemented with INiS.policies, are described in greater detail later on in this document. The IniS.policies cannot be considered as absolutely safe. The Windows system makes it possible to partially circumvent them with corresponding devices (i.e. hacker tools from the Internet). This is why these policies represent only the first stage of the INiS safety concept. However they still have a significant importance. Policies help you to switch off certain system functions that are then not visible or accessible to the student. This provides fewer possibilities for distraction, thereby increasing concentration and learning potential. There will still be options open to interfere with the system, maybe to make changes on a computer causing it to crash or even to fail completely. This is when the second safety stage (HDGUARD) comes into play. Settings When you start the INiS.policies the current configuration of your computer will be automatically displayed. You will find the menu-item ‘Save Export-File’ in the main ‘File’ menu. Clicking on this item will save the current configuration of your Registry key set in INiS.policies to a file. You can use this file to reset the current configuration to previously saved settings by selecting ‘Load Export-File’ in the ‘File’ menu. It also allows you to distribute this configuration to the students of your Smile-group. With the menu-item ‘Apply to this computer’ in the ‘Edit’ menu you can apply the current configuration to the computer you are working on. You should choose the settings for your Registry keys carefully, to ensure full functionality of your machine after these settings have been applied. In the ‘Help’ menu you will find a link to the Online-Help-System of INiS as well as a ‘Note’ entry. Clicking on this entry will display a PopUp window reminding you that you will need all necessary user privileges to the local Registry for the current user to successfully edit the configuration and apply your changes. You can easily navigate through INiS.policies with the tabs in the upper left hand corner and modify the configuration-settings according to your personal needs. 88 • Configuring Manual INiS 5 Start menu Start-menu’ tab of the Smile Policy editor Working-principle By clicking on a menu-item, holding the mouse-button down and dragging the mouse to the desired position, you can move the selected entry either from the left to the right part of the window (remove) or vice versa (add). When you let go of the mouse-button this entry will either be moved to the respective position or you will be prompted that the selected entry can not be moved for technical reasons. Within the ‘Additional Keys’ box in the lower part of the window you will find four additional keys that have the following use: Add new entries to ‘Documents’ folder: By deselecting this check box you will prevent new entries in the ‘Recent Documents’ folder of your ‘Start’ menu, e.g. if you open a Word document, a text file or a picture. Manual INiS 5 Configuring • 89 Allow user to apply changes to 'Start'-menu (Windows 98,2000,ME,XP) After deselecting this check box the user will not be able to personalise the ‘Start’ menu. Renaming or moving entries is now denied. Deactivate PopUp-menu for 'Start'-button and 'TaskBar'’: Selecting this check box will disable the PopUp menus (the menus that ‘pop up’ if you rightclick an icon) for the ‘Start’ button and all icons in the ‘TaskBar’. It will then no longer be possible to access the PopUp menus of applications shown in the ‘TaskBar’ and to for instance shut down an application. Erase entries from 'Documents'-folder on Windows shut-down By selecting this check box all current entries in the ‘Recent Documents’ folder of the ‘Start’ menu will be deleted from this list on system shut-down, this prevents the next user from tracking which documents the previous user has been working on. Explorer Explorer tab of the Smile Policy editor 90 • Configuring Manual INiS 5 In the upper part of this view you will find two items that enable or disable the ‘Autorun’ functionality. If selected the respective function is enabled and data CDs or audio CDs with ‘Autorun’ ability will start or play automatically. In the lower part all available drive-letters are listed with the respective accessibility symbol. Setting a check-mark in front of a drive-letter will remove it from view in the ‘Windows Explorer’ window and the ‘My Computer’ window. The information behind the drive letter can either display the network path of the drive or in case of removable media, the current status of the drive. Miscellaneous Miscalleneous tab of the Smile Policy editor In the upper part you will find four keys that are only applicable to NT-based operating systems (Windows NT 4.0, 2000, XP). Each entry relates to a setting or menu-item of the ‘NT-TaskManager’, which can be activated or deactivated to customise and restricted the user’s option to interfere with the system control functions of the TaskManager. Manual INiS 5 Configuring • 91 Deactivate 'Lock Workstation’ If selected, the workstation can no longer be locked. Deactivate '[User] Logoff’ If selected, the logging off function for the current user is disabled. This will prevent users to log off and on under a different name. Deactivate 'Change Password' If selected, the user can not change his personal password using the TaskManager any more. Deactivate 'TaskManager' If selected, the user will not have access to the TaskManager at all and consequently the easiest way to shut down an application will be blocked. Within the ‘Additional Keys’ box you may select a couple of additional keys that can restrict the user’s range of actions even more, to provide effective protection against abuse. Deactivate Registry-Editor This option allows you to control whether or not a user should have access to the Registry using the ‘Regedit’-tool. It is strongly recommended to always select this option to prevent editing and meddling with the Registry by experienced users. Hide desktop-icons Select this item to prevent quick access to files or other objects on the desktop. Consequently all desktop icons are removed from view. Deactivate 'BeepOnError' If selected, the system-speaker is deactivated and the typical ‘beep’ on every error is suppressed. Do not allow changes to 'Display Properties' Select this item to keep the user from changing the ‘Display properties’ settings. Settings such as resolution or color-depth are vital for several screen-transfer features, and will cause malfunction of these features when set incorrectly. Hide 'Network Neighborhood'-icon’ If selected, the user can not access the Network Neighborhood via the related desktop icon preventing the exchange of files with other users through file & print sharing. Hide 'Identification'-tab in 'Network Neighborhood ->Properties' When selected, the editing of Computer name and Workgroup parameters is not longer possible as the corresponding tab will be hidden. Deactivate PopUp-menus for desktop icons and in 'Explorer' window If selected, PopUp menus for desktop icons and in the right window of the Windows Explorer are disabled. Right-clicking desktop icons and accessing various editing functions of the Windows Explorer will no longer be available. Do not allow changes to 'Active desktop' Select this item to keep the user from changing Active desktop settings. The display settings for the contents of the Active desktop can not be altered or deleted any more. 92 • Configuring Manual INiS 5 Deactivate 'Command Prompt' If selected, the user will no longer have access to the DOS Command Prompt. Please note that you must restart your system for the applied changes to take effect! Distribute policies The Registry settings defined with INiS.Policies are initially stored on the teacher's workstation in the SMILEPOL.INI file. To transfer and apply these to the student workstations, you must select the ‘Distribute policies’ menu item. The current settings are transferred to all student workstations on which INiS is currently running. You can include subsequently added workstations by repeating this action when required. Please note that in order for the transferred settings to become effective you must disable HDGUARD and ensure that no other system policies (i.e. Mandatory Profiles for instance) are active at this time. It is therefore recommended that the policies transfer is carried out before HDGUARD is enabled or that HDGUARD is disabled temporarily when changes to the policies are to be transferred. Since Windows Explorer evaluates the new policy settings only on its initialisation, the workstations must be restarted in any event to enable the new settings. You should have by now made the necessary precautions in the computer BIOS to prevent bootup from removable media such as floppy disks or bootable CD-ROMs. Also please ensure that you have selected boot up protection for Win9x/ME during installation. Activate/de-activate INiS Autostart During the INiS installation you have already defined whether INiS should be started every time the PC is started or not. If you have decided not to, you will be able to later activate this from the Start menu in the INiS program folder. Provided HDGUARD is disabled on the student workstations, you can modify the autostart feature of INiS on all connected student workstations. Enable/ disable INiS User Log-on You have also decided whether a user name must be entered at the start. If this setting is disabled, then INiS uses the Windows user name as a Smile name. Similar to the autostart feature above you can use the Start menu in the INiS program folder to modify the INiS log-on settings on all connected student workstations.. Changing the System Password We recommend for security reasons to change the system password after installing the software. To do this please select the menu ‚System’, after which you will be prompted to enter the current password ’demo’; and choose the option ‘system password’. The following dialog appears: Manual INiS 5 Configuring • 93 Change system password Please enter a password of your choice and confirm this by retyping it in the field below. After pressing ‚OK’ your new password will be activated. Please note: If you are using INiS in combination with HDGUARD you must remember to change your system password to ensure complete HDGUARD protection on all your client PCs. If you do not change INiS’ system password all HDGUARDs will remain in trial mode and cannot be password protected to avoid changes to the configuration or complete deactivation of HDGUARD Important - Keep your password safe As with any password, two things are absolutely vital: 1. Make sure you do remember it. It is best to write it down so you will be able to look it up, if required. 2. Keep it at a safe place locked away from access by unauthorised persons. Don’t forget, it is the key to all your settings. Warning: In the event that you have lost or forgotten your password, you will need to completely wipe and reinstall the system. For security reasons the password will stay the same, even after re-installing the software. This is to prevent anyone without the necessary credentials to re-installing the software in an attempt to overide any settings. Configuring the Teacher workstation Configuring the IP Address If your teacher workstation contains more than one network card, use the ’Network’ tab to configure the preferred card for INiS. 94 • Configuring Manual INiS 5 Change the IP settings The ‚Base-Port’ box allows you to change the standard port settings of INiS. In some rare circumstances it may be necessary to change the port settings to use a different range. INiS will use the selected number as the starting port number for its range of a further 60 ports, i.e. in the default setting 40000 - 40060. If the BasisPort is changed, it must be done the same way on all workstations in a room. Please note that a specific sequence must therefore be maintained when these settings are changed: 1. Make sure that all workstations in the room are logged on and have started INiS. 2. Then load the settings of a student workstation in the room overview (context menu of the workstation). Then change the BasisPort and transfer this setting to all the workstations. 3. Change the BasisPort in the settings of the teacher computer (see above). Close INiS on all workstations and restart. Another setting that can be made on this flag is the type of communication between the teacher and student workplaces. The variations single cast, multicast and broadcast are available. Single cast should be used in radio networks to circumvent existing problems with access points when processing multicast and broadcast. Each student is sent commands directly to his or her IP address. Multicast should be used in switched networks to prevent command packages from being routed throughout the entire network and triggering problems, especially on Windows 9x computers, and unnecessarily increasing the network load in other rooms. In order to use multicast, the utilized switch must be compatible with the protocol IGMP (Internet group message protocol). With multicast, only one package per room is sent to the multicast address transmitted to the switch from all workstations in the room. Multicast is the standard for communication within INiS. Manual INiS 5 Configuring • 95 Broadcast should be used as an alternative to multicast when switches or hubs are not IGMPcompatible. These different types of communication ensure that packages reach all the workstations of the current IP segments. In larger networks, virtual LANs or subnetting should therefore be used. Configuring the Screen Transfer INiS uses a non fixed connection between transmitter and receiver via UDP Broadcast or Multicast, to transfer screen information. As with any dynamic connection, the performance of the system will dictate the quality of the reception. The screen transfer tab is used to customise the transfer settings for your system to achieve the best possible configuration. Screen Transfer Configuration Tab Transfer Complete Desktop INiS Screen Transfer allows you to choose between either transmitting the complete desktop of the teacher’s PC or transmitting the windows of selected applications only. The default setting leaves this check box unticked thus enabling transmission of selected applications. Since the options below are relevant only when transferring the complete Desktop they are not available unless you choose to transfer the complete desktop of the teacher’s PC. Adapting the color depth when starting INiS When INiS student computers are started, the screen resolution and the color depth of the teacher computer are automatically used. Use Multicast This option selects the method by which the screens are relayed to the students. ‘Use Multicast’ is the default setting. If this option is deselected, Broadcast is used for the transfer. In case you use switches in your network ‘Use Multicast’ should be selected. Additionally ‘Use Multicast’ prevents performance-loss on workstations currently not taking part in Screen-Transfer. 96 • Configuring Manual INiS 5 Optimise Screen Transfer This setting is activated by default, it causes INiS to treat the active windows in the foreground as higher priority, thus resulting in faster display and better refresh rates for windows in the foreground. This is particularly useful for transmitting animated content or video as part of your desktop. This will also reduce the traffic and therefore the impact of screen transfer to your network. You may notice sometimes a lag in transmitting the background images, which may be interpreted as bad signal broadcast but is a side-effect of the improved foreground transmission . If you experience lag and poor background performance you may want to uncheck the box to improve the overall quality perception, but be aware that this may also increase your network traffic significantly. Workstation environment Screen Transfer works best if all workstations in the network have a similar graphics- and processing power. If these parameters vary within your network you can modify the Screen Transfer environment to suit your individual conditions. Identical: All workstations are identical as far as graphics-adapter capabilities and CPU processing power are concerned. Mixed: The workstations differ slightly from one another (e.g. Pentium II 300 to Pentium III 700) Very mixed: The workstations differ considerably (e.g. Pentium I 200 to Pentium IV 1800) You can find additional information for trouble-shooting screen transfer problems in the Appendix. Room Configuration The Room tab enables you to set in which (virtual / logical) room the teacher workstation should be placed. As per the initial settings during installation, only students in the same virtual room will appear in the teacher’s room overview. Change room Manual INiS 5 Configuring • 97 If you wish to select a custom name or a name which you have pre-defined as part of your installation strategy, please check the ‘Custom Room’ radio button and type in the name in the field below. General Settings Here you can set the start-up options of the teacher worstation Set logon options As with the student workstations settings, you can also set the autostart and logon options for the teacher workstation. Tick the relevant check box to enable this option. If you have both options selected you will be able select the default name with which the teacher workstation is to be logged on. Type in the user name you wish to use in the corresponding field. The drop-down list below defines which list to use for selecting the log-on user name. File Locations This tab allows you to define the default folder to be displayed when starting Windows Explorer. This setting will be used for the teacher workstation as well as for all connected student PCs. The pre-configured setting is ‘C:\incoming’ 98 • Configuring Manual INiS 5 File exchange default folder settings You can also browse for a location by clicking the [...] button. A browser window will be displayed from which you can select the appropriate location. Frequently, it is rather awkward to access H:\Incoming. In such cases, the directory can also be located under “My documents”. Enter H:\My documents\Incoming. Please note that the setting should be the same in all rooms of a large installation with INiS.UserAdmin. Displaying exchange and student directories in open and save dialogs This function adds the Open and Save dialogs of, for example, Microsoft Word. The exchange and student directories are also shown in the dialogs. Manual INiS 5 Configuring • 99 Configuring the Student Workstation Similar to configuring the teacher’s workstation with INiS you can change the basic settings for any one stundent PC from the teacher’s PC. To bring up the student’s configuration dialog select the ‘Settings’ menu item form the student workstation’s context menu in the Classroom Management Console. Context Menu of Student Workstation in Classroom Management Console Please note: The ‘Settings’ menu item will by available only if you have logged in through ‘System Æ Login to System’ at the teacher’s workstation beforhand. If the student PC in question is running and INiS is started the Configuration Dialog will appear for that student PC. If the PC isn’t powered up yet or INiS is not being executed on that PC the ConfigurationDialog will not be displayed. 100 • Configuring Manual INiS 5 Settings Here you may modify INiS’ startup behaviour. Configuration Dialog for Student Workstation Please note: Configuration of the INiS Autostart feature - i.e. setting INiS to be started automatically on Windows Startup - can be set through ‘System’ Æ ‘INiS Autostart’ menu item. The button ‘Apply to all’ causes the currently made settings for the student PC selected to become valid for all student PCs logged in to INiS at that time. This function is available only if the ‘Use INiS login’ option is activated., Use INiS login: If this checkbox is ticked, students are prompted for entering their Smile-name on INiS startup. Please note: The ‘Login Student’s PC automatically with the following name:’ option is available only if ‘Use INiS login’ is deactivated (i.e. the check box is not ticked). Show active user on desktop: Activating this option causes a small identification window to be displayed in the upper left corner of the student’s desktop. Manual INiS 5 Configuring • 101 Network Configuration The ‚Base-Port’ box allows you to change the standard port settings of INiS. In some rare circumstances it may be necessary to change the port settings to use a different range. INiS will use the selected number as the starting port number for its range of a further 60 ports, i.e. in the default setting 40000 - 40060. It is highly recommendet that if you wish to change the Base-Port settings of your INiS room to do so first for the student PCs and then for the teacher workstation since the student workstations may become inaccessible from the teacher’s PC when applying Base-Port changes in reverse order! Should a student workstation be equipped with two or more network adapters please see the ‘Multiple Network Adapters in a Workstation’ paragraph for additional information. Check for Updates To check whether an update to your current version of INiS is available please select this function. Check for updates This will check on the RDT-Global websites for relevant files and suggest the appropriate action. If you are using a proxy server to access the Internet please tick the check box and type in the IP address and port in the corresponding fields. Updating Students This function is used to automatically update active student computers. To do this, an update package must be run on the respective teacher computer. New updates to the teacher computer generally contain the update package for the student computers. Before updating students, HDGUARD must be deactivated on the student computers by navigating the menu steps: “System->HDGUARD->Deactivate“, and then reactivated. 102 • Configuring Manual INiS 5 Internet-Modul configuration INiS 5 RDT - Global Version 5.0 Classroom Management & Multimedia eLearning Suite Manual INiS 5 Internet-Modul configuration • 103 Licensing the Internet Module Important: You will need an unlock code and a valid license in order to use the Internet module! You can unlock your Internet module either when installing the software, or by selecting ‘System’ Æ ‘Licensing’ to access the licensing screen. If the licensing option in the system menu is greyed out you will need to log in to INiS using your system password to access the licensing screen. To unlock the Internet Module please enter your license code in the INiS.Internet section of the licensing screen. The entry is unnecessary when you have an INiS.Professional license since it already includes the release of all modules. Licensing the Internet Module After you have successfully registered your Internet module, the following prompt will appear: Register you module on connected PCs 104 • Internet-Modul configuration Manual INiS 5 WARNING: You will only be able to use the Internet module after you have activated the license on the teacher workstation. This will trigger the activation on all student workstations that are currently connected to INiS. Please Note: You will need to de-activate HDGUARD before registering the Internet Module. For Windows NT or Windows 2000/XP you also need to be logged on locally using administrator rights to succeed with the registration. Activating/Deactivating the INiS.Internet Module (Students) For the INiS.Internet module to be used in student workstations, it first needs to be activated from the teacher workstation. INiS must first be started on the corresponding student workstation. In addition, HDGUARD must be deactivated. If you use Windows NT, Windows 2000 or Windows XP, make sure that you are logged on as a user with ADMINISTRATOR rights. After the INiS.Internet module is activated or deactivated on the student workstation from the teacher computer, the student computer must be restarted for the changes to be effective. If you activate several modules in a session, one subsequent restart is sufficient. After restarting, the globe icon in the systray (next to the clock) will indicate that the INiS.Internet module has been activated at the student workstation. The INiS.Internet module can also be activated or deactivated at any time by navigating the menu as follows: System Æ Internet module Æ activate/deactivate (students). Configuring Internet Filtering The configuration of the Internet filter should be done in 2 stages: First, define the keywords and phrases that should be included in your Content filter list and thendecide on the domains and web addresses that you wish to enable access to by default (Positive list). Then begin with the actual filter configuration. To start the configuration, select ‘Configure Internet Filtering’ from the ‘System’ Æ ‘Internet Module’ context menu. Manual INiS 5 Internet-Modul configuration • 105 Configuring the Content Filter The Content Filter tab lists all words and phrases that, if detected on a website, will cause this site to be blocked. Simply add new keywords by selecting ‘Add’ from the command bar. Unlike the Positive list, it is not possible to add session-based keywords to change the filter configuration temporarily in a lesson. The filter list can only be modified through the ‘System’ menu using administrator privileges. Configuring the Content Filter 106 • Internet-Modul configuration Manual INiS 5 Analysing an URL To simplify the maintenance of the Content Filter and Positive List, INiS provides a tool to test the behaviour of the filter settings on a certain website. Select the ‘Test Website’ tab. Enter the address of the website to be analysed, in our example “www.pass4u.net”. Analysing an URL The list in the left hand pane lists the sites “Explorer-style” by their classification. If the site is in the ‘Restricted sites’ branch you will see a further breakdown of which element has failed the test. Each entry has a context sensitive menu, which you can open with a right-click on the entry. Select the option you require from the pop-up menu. The right hand pane displays the offending HTML-Element. You can add one or more of the keywords listed to your list of restricted words by right-clicking the word and selecting ‘Add to restricted keywords’. Another possibility to analyse websites is to start the Configuration of the Internet Filter and then open a website in Internet Explore. Any page you open in the Internet Explorer will subsequently be analysed. As the list of tested sites may grow rapidly, you can always purge this list by selecting the ‘Delete’ option. Please note that this will delete all entries in the list. Manual INiS 5 Internet-Modul configuration • 107 Configuring the Positive list The Positive List tab configuration enables a system administrator to define domain entries or IP addresses which will be enabled by default and are therefore always accessible. Configure the Positive list You can add new entries by selecting ‘Add’ from the command bar. The following prompt appears: Add a Positive List entry You should enter all domain names that you wish to grant access to by default (e.g.. your school homepage or www.curriculum-online.gov.uk) but also IP addresses (such as the IP of your proxy server) that may be required for your Internet connectivity. Please note: Enter only the domain or IP-address without the protocol prefix (e.g. http://). A useful feature is the option to work with wild cards. If for instance you want to give access to a website of a big organisation, for instance “www.bigcompany.com”, you may wish to grant 108 • Internet-Modul configuration Manual INiS 5 access to the subsidiary sites such as “www.bigcompany.co.uk” as well. This is particularly practical in cases when the local domain redirects automatically to a global domain. In our example the appropriate wild card would be “www.bigcompany.*”; the asterisk will now include all suffixes for this domain in the Positive List. Use the ‘Delete’ button to remove an entry. The ‘Save’ options allows you to export your settings to a text file that you can import again at any time using the ‘Load’ option. Standard Settings for the INiS.Internet Module for Students When a student logs on to INiS without the teacher having started INiS, Internet access is generally blocked. This presetting setting can be adapted as needed via the configuration dialog (right mouse click on an active student computer, then select the setting). Configuring the default Internet setting Select the first radio button Internet is accessible so that the students have full access to the Internet after INiS is started. This setting applies until the teacher computer starts INiS and selects a type of Internet access for students differing from this setting. You can also configure a positive list here that is based on the student computers. You can adopt the centrally configured positive list (see Configuring the positive list) by selecting the radio button Import default positive list for the student computer(s). PLEASE NOTE: You cannot start with an activated negative list or content filtering. PLEASE NOTE: When students work without the teacher, the displayed status of the globe icon in the taskbar is Internet is blocked by default. Manual INiS 5 Internet-Modul configuration • 109 DesktopControl Module configuration INiS 5 RDT - Global Version 5.0 Classroom Management & Multimedia eLearning Suite Manual INiS 5 DesktopControl Module configuration • 111 Licensing the DesktopControl Module Important: You will need a license code and a valid license in order to use the DesktopControl module! Before you can use this module you must either unlock it when installing the software, or by selecting ‘System’ Æ ‘Licensing’ to access the licensing screen. Enter the license code in the ‘INiS.DesktopControl’ section of the licensing screen. Licensing is not necessary with INiS.Professional since this version already has licenses for all modules. Licensing the Desktop module You will only be able to use the INiS.DesktopControl module on the student PCs if you register or ‘activate’ it on the connected workstations. Hence, after you have successfully registered your DesktopControl module, the following prompt will appear: Register your module on connected PCs 112 • DesktopControl Module configuration Manual INiS 5 Important: Please ensure that you have activated the DesktopControl module on the student workstation; otherwise you will not be able to control or block applications. Please Note: You will need to de-activate HDGUARD before registering the DesktopControl Module. For Windows NT or Windows 2000/XP you also need to be logged on locally using administrator rights to succeed with the registration. The activation status of the DesktopControl module on student workstations can be modified at any time. To do this, simply go to the menu item ‘System’ Æ ‘Activate/de-activate’ DesktopControl Module (Student) to toggle the status. You will need to restart each workstation to activate the changes to the system. DesktopControl Module Overview The INiS DesktopControl Module provides the teacher with extensive control over which applications a student is able to start or which are blocked during a lesson. Most modern PCs have by default a range of software pre-installed, but not all are necessary in each lesson. As this software is available to anyone logged on to the computer, it is more than possible and sometimes just a matter of time before it provides a welcome distraction from the lesson at hand. The effort needed to get every student to focus again on the core subject, combined with the ensuing delay, usually means that valuable time is lost before a lesson can commence. The DesktopControl Module allows the teacher to lock or unlock applications dynamically and to define which applications will be available for each student at the start of a lesson. This prevents any interruption or delay from the beginning, and enables the lesson to commence immediately. INiS DesktopControl works dynamically, unlike conventional methods (for example Group Policies) to control applications. This means you can use your mouse to lock applications, which were accessible a moment ago and vice versa. The student does not have to restart the PC or even log out and in again. Similarly the initial DesktopControl configuration, carried out by the system administrator, is done with a few simple mouse clicks. How does DesktopControl work? The DesktopControl application access is controlled through the filename of the relevant application executable (e.g. notepad.exe or calc.exe). Therefore files, which are linked to an application, will not open as long as the source application is blocked. If for instance the Text editor (notepad.exe) is locked, then you will not be able to open any file with the extension “.txt”, unless this extension is linked to another application. Manual INiS 5 DesktopControl Module configuration • 113 Or, if you block “Set-up files“ (setup.exe), all program installations, which are started with a setup.exe file, are prevented regardless of the drive or folder from which the executable is triggered. In order to prevent students from simply renaming the blocked executables (e.g. setup.exe into setup1.exe), INiS DesktopControl write-protects the files, so that a renaming attempt is prohibited. See also: Configuring default settings Any attempt to overcome or to interfere with the teacher’s accessibility settings will return a certain error message. This error message is system or application defined and its content depends on how the application interprets the ‘Access denied’ message from INiS. In some cases it is possible that an application does not understand this error and will produce an error message that seems strange in the context of the events. The system administrator should explain this side–effect to the teachers to make them aware that some error messages are not real problems, but connected to INiS’ access policy settings. Configuring application access We assume that all the applications used in lessons will be installed on the teacher workstation as well as on the student workstation. To select an application for setting its access rights, simply choose one from the list of installed applications on the teacher’s workstation. There will certainly be some applications that should never be used by students during a lesson. INiS enables the system administrator to set these applications to ‘Always locked’ status. Please note: Applications, which are ‘Always locked’ cannot be unlocked by a teacher without administrator access and will not appear in the teacher’s list of applications with dynamic access. The system administrator must initially define which programs should be: • Always locked, • Dynamically accessible or • Always unlocked for the user. This one-off default configuration is set from the system menu item “Manage Applications”. Manage Applications When you select this option you will see a preview window of the teacher’s view. The left window pane will later display the application status. As there are no applications yet defined, this pane will be empty. 114 • DesktopControl Module configuration Manual INiS 5 Manage Applications If you click on ‘Edit’ for the first time, the INiS DesktopControl will scan all installed applications on the teacher’s PC. This will result in a list of all Start-menu and Desktop entries. For operating systems that are based on Windows NT technology the scanner will, as well as listing the programs available to all users, include the programs available to the current user. It furthermore scans for all OLEServers (ActiveX – components) and the files in the Windows folder. Depending on the complexity of your software installation, this process may take a few minutes. Manual INiS 5 DesktopControl Module configuration • 115 Application(s) found All applications found are displayed in an Explorer style dialog. Detailed view From here the system administrator can set the default configuration with ease. All applications are marked with green icons as a default after the scanning process. This is to indicate that all applications are currently unlocked. The Meaning of the Icons The following overview explains the meaning of the icons. To display this window simply select the question mark icon 116 • DesktopControl Module configuration from the bottom toolbar. Manual INiS 5 Meaning of the icons The RED icon signifies an ‘Always locked’ application. When set, the relevant application will not be accessible from student PCs and the teacher will not be able to unlock it. For this reason this application will not appear in the teacher’s application status dialog. The GREEN icon indicates that the application can be started on the student PC by default. The teacher cannot lock these applications and again these will not appear in the status display. If the icon of an entry is greyed out, the entry cannot be locked. This may be for one or more of the following reasons: • A folder does not contain any further entries • The linked application is connected to Explorer.exe • The link is ‘dead’ IMPORTANT: Windows Explorer (explorer.exe) is part of the system and must not be locked, as DesktopControl and its security aspects require Windows Explorer functionality, for instance, to start applications or prevent renaming files. If you would like to restrict the Explorer, you should better use INiS policies to make changes to the student settings. The ‘Dynamic access’ option allows teachers to change the access rights for the relevant application dynamically without interruption, i.e. whilst students are working on their computers. Please note: A locked application is only locked after INiS has been started. You should activate the INiS - Autostart function if you need the lock to be active directly after the system has started. Manual INiS 5 DesktopControl Module configuration • 117 Configuring Dynamic Access Set the status to ‘Dynamic access’ The following example demonstrates how you can set the access rights for Games and enable dynamic access for its programs by the teacher. Highlight the 'Games’ folder with your mouse or keyboard. You can now change the status by either: • Clicking the right mouse button • Selecting an option from the top toolbar After you have set the ‘Games’ folder to dynamic access, you will notice that all dependent entries in the same folder have also changed their status. 118 • DesktopControl Module configuration Manual INiS 5 Lock an application permanently Other entries that may link to the same executable will be marked with a greyed out dynamic access icon. These will not appear in the teacher’s status window but will also depend on the access rights setting for that executable. In our example we want to have ‘Hearts’ locked for students and we also want to deny the teacher the option for unlocking it. Hence we need to lock Hearts permanently. Status change Manual INiS 5 DesktopControl Module configuration • 119 Adding new applications You can search the system for newly added links from the dropdown menu of the switch “Enter new”. The new links are then added to the existing user list. Blocks or releases that have already been set are not affected. User-defined Applications User-defined applications can also be manually added via the dropdown menu of the switch “Enter new”. This may be necessary when the program in question has not been detected automatically during the scanning process. This happens if it is neither present in the Start-menu nor on the desktop or Windows folder. This is also necessary when the application is only present on the student but not on the teacher’s workstation. After you have clicked ‘Add’ the following prompt appears: Add application Please enter a name in the description field. If the application is installed on the teacher’s PC then you can select ‘Browse’ to locate the appropriate executable yourself. If the application is installed on the student PCs only, just enter the name of the executable (you do not need to include any path information the name of the executable will suffice). 120 • DesktopControl Module configuration Manual INiS 5 Specify application In some cases, executable components for an application may not appear as such in the Startmenu. For example: The shortcut bar of Microsoft Office ‘MSOFFICE.EXE’ is included as a shortcut in the Start-menu. The shortcut bar includes links to other applications (e.g. Word: “WINWORD.EXE“). As this could be started form Windows Explorer itself, you will need to define both executables for dynamic access in order to lock and unlock either later on. To complete the configuration for your application access simply select the ‘Finish’ option from the top toolbar. You will then return to the Preview window. Defining rules Rules can be used to create dependencies between specific applications. The “Application links” affect the other applications governed by the rule when the rule-defined application is released (the first use of a rule). Note: Rules are only inherited when the application is released so that applications that are not released can be blocked in a rule. Example: Borland Delphi is added as “rule-defined” to a rule, and Microsoft MSDN is added as another application to the rule. When Borland Delphi is released, then MSDN is also simultaneously released. In addition to linking applications, you can use rules to define the status of the DOS block and copy protection. Example: Copy protection is deactivated in the existing rule for Borland Delphi. If a teacher releases Borland Delphi for the lesson, copy protection is also deactivated so that applications can also be created when Borland Delphi is compiling. To define a rule, click the button “Rules” in the configuration dialog. The following window opens: Manual INiS 5 DesktopControl Module configuration • 121 To add applications to a rule, they need to be dragged and dropped from the configuration window to the rules form. The first application of a rule determines the name of the rule. To save a rule, click the save button above the applications in the rule. 122 • DesktopControl Module configuration Manual INiS 5 Existing rules are shown in the bottom area of the rules form and can be selected for processing by double-clicking them. Note: An application can only appear once in a rule. The folders and applications identified with a gray icon cannot be added to a rule. Note: To drag and drop, press and hold down the left mouse key on an application in the configuration window. Then, while holding down the mouse key, drag the application over the gray area of the rules form. To complete the action, release the left mouse key, and the application will be added to the rule. Note: Rules that have yet to be processed (shown in the top window) are not inherited during the release. Only save a rule when it is going to be used. Manual INiS 5 DesktopControl Module configuration • 123 Editing the extension list The DesktopControl configuration allows you to edit the extensions to be displayed for the INiS shell expansion “Collect/distribute files“ (see picture). To edit the extensions to be displayed, click the “Extensions“ button window opens: 124 • DesktopControl Module configuration . The following Manual INiS 5 In the list on the left, all of the previously found programs are cited, and their extensions can be displayed in the right view window with a left click. By removing the check before the corresponding entries, they are no longer shown in the INiS shell expansion “Collect/distribute files”. Setting the default configuration for student PCs After you have defined, which applications are locked and which have dynamic access, you will see a preview of the application access screen as it will appear to the teacher during a lesson. Set defaults At this point you will be able to set the default options for each of the applications when INiS is started on a student PC. The following example illustrates how to set the configuration so that the Microsoft Office applications are locked as standard, i.e. the teacher must unlock these before the students can use the applications. But we also want to independently give students access to Excel, with the option for the teacher to block this later on, if required. Manual INiS 5 DesktopControl Module configuration • 125 Select multiple applications Change to the “explorer-mode” and highlight the application you wish to lock by default, right click with your mouse and select ‘Lock’ from the context menu. The Explorer style display is designed to make the navigation of your applications easier. The more applications you set for dynamic access the more cluttered the view can become. You can also sort the entries in the right windowpane alphabetically by application or executable by clicking on the appropriate listing header or selecting multiple entries simultaneously. Status changed 126 • DesktopControl Module configuration Manual INiS 5 In our example, all entries for Microsoft Office have been marked and locked, only the entry for Excel is set to ‘Unlocked’. Copy Protection The system administrator needs to consider copy protection as part of the default settings. This is an important setting as it is designed, when activated, to prevent the copying or renaming of executables for the purpose of circumventing the access rights settings. To set copy protection simply activate it by clicking the corresponding button: Copy protection The standard copy protection settings on each student PC will be set to activated if the system administrator has activated copy protection in the default settings. A teacher can temporarily de-activate this setting during a lesson, if required. As a ground rule, copy protection should only be de-activated in cases where a lesson requires the creation of executables, such as in development and programming environments. If you need this functionality or if you want to create self-extracting archives (which are also based on executables), then you should de-activate the copy protection. Please note: If you are a system administrator you may want to point this fact out to your teachers when implementing your INiS policies. DOS-Lock Another standard setting as part of the base configuration is the so called “DOS Lock”. This lock is used to prevent the execution of batch files (with the extension .BAT), or shortcuts to linked DOS files (.PIF) and general programs (with .COM extensions). The DOS Lock is set via the following button: DOS Lock PIF files are not always easy to detect, as they may be hidden in program folders rather than being in the Start-menu, but they will still need to be treated by the DesktopControl module in the same way as Windows executables. To simplify the access settings, the DOS lock provides an easy function to lock or unlock all .PIF files with one click. The DOS lock should only be de-activated by default in cases where the students work predominantly with DOS files during a lesson and need access to files with extensions as detailed above. Manual INiS 5 DesktopControl Module configuration • 127 WARNING: If you de-activate the DOS Lock you will not be able to prevent the copying of files from a DOS-prompt, as the Copy protection will not work for command.com. The DOS Lock will be activated as standard on each student PC, if the system administrator has activated DOS Lock in the default settings. Although a teacher can temporarily de-activate this setting during a lesson, if required. Saving and transferring the default settings After you have completed your default settings press the ‘Set Standard’ button to save the new settings and to transfer the defaults to all student workstations currently connected to INiS. Please Note: You will not be able to keep these settings permanently if HDGUARD is active, please remember to de-activate HDGUARD before transferring your settings. You can transfer your settings at any time by selecting ‘Send Defaults’ from the ‘System’ Æ ‘DesktopControl’ menu. Once the defaults have been set the ‘Unlock Application’ dialog will be displayed when the teacher starts a lesson. 128 • DesktopControl Module configuration Manual INiS 5 Print Module configuration INiS 5 RDT - Global Version 5.0 Classroom Management & Multimedia eLearning Suite Manual INiS 5 Print Module configuration • 129 Licensing the Print Module Note: Remember that the INiS.PrinterControl (in contrast to other modules) can no longer be used in Windows 98. The INiS.PrinterControl was developed to deal with the special needs of working with lessons. IMPORTANT: You need a release code and a valid license to use the INiS.PrinterControl. The module requires at least version 3 of INiS. This version must be installed on all workstations. You can either unlock your Print module whilst installing the software, or by selecting ‘System’ Æ ‘Licensing’ to access the licensing screen. If the licensing option in the system menu is greyed out you will need to log in to INiS using your system password to enable access to the licensing screen. To unlock the Print Module please enter your license code in the INiS.PrintControl section of the licensing screen. Die Eingabe entfällt, wenn Sie über eine INiS.Professional Lizenz verfügen, da diese bereits die Freischaltung aller Module beinhaltet. Licensing the Print Module After you have successfully registered your Print module, the following prompt will appear: 130 • Print Module configuration Manual INiS 5 Register you module on connected PCs Registering the Module on Student Workstations WARNING: You will only be able to use the Print module after you have activated the license on the teacher workstation. This will trigger the activation on all student workstations that are currently connected to INiS. Please Note: You will need to de-activate HDGUARD before registering the Print Module. For Windows NT or Windows 2000/XP you also need to be logged on locally using administrator rights to succeed with the registration. The activation status of the Print module on student workstations can be modified at any time. To do this, simply go to the menu item ‘System’ Æ ‘Activate/de-activate’ Print Module (Student) to toggle the status. Configuring the Print Module A teacher can influence students’ use of printers through INiS.PrinterControl. In addition to releasing and blocking printers, printing restrictions and individual headers can be defined. Warning: To use the printer control, both the teacher and students must have the same printer setup. The printer control deals with individually set-up printers and not printer types. For the printer control to work, the printers must be set up at every workstation with precisely the same name. By default, the settings specified by the system administrator are used when the teacher starts INiS, and these settings can be changed during the lesson. It is recommendable to use restrictive settings by default to prevent expensive resources (such as color printers) from being used without authorization since students can print faster than the teacher can block printers. Set up the INiS.PrinterControl under ”System Æ Printer module“. You first need to log on to the system for the system menu to be activated. Under “Administer printers”, “Restrict print jobs” and “Configure header”, you can create default settings that take effect when INiS is started. Select “Send default” to save the settings as defaults and send them to all the students. Manage Printers Under the menu item “System Æ PrinterControl Æ Manage printers”, select the printers that are blocked or released by default. This is the setting that is automatically used when the teacher starts INiS, and it initially applies to administered students as well. Manual INiS 5 Print Module configuration • 131 In the printer list, check the printers to be released, and confirm with “OK”. If this setting is to be used automatically for all working students, it must be sent to the student workstations via ”System Æ PrinterControl Æ Send default“. Restrict Print Jobs Define the default restrictions for released printers by navigating to ”System Æ PrinterControl Æ Restrict print jobs“. This is the setting that is automatically used when the teacher starts INiS, and it initially applies to administered students as well. You can restrict the number of printouts per student. This forces the students to use resources economically. The same holds true for the option “Limit size of printout”. This prevents students from printing large jobs (such as manuals) without authorization. During lessons, print jobs are often unintentionally sent several times because the students do not see the printer immediately responding. This can occur when the printer is in a warm-up phase, or when the server to which the printer is assigned is doing something else. The option “Prevent multiple printouts of documents” prevents print jobs from being unintentionally sent several times. You can set the time that must pass before the print job is resent. If this setting is to be used automatically for all working students, it must be sent to the student workstations via ”System Æ PrinterControl Æ Send default“. 132 • Print Module configuration Manual INiS 5 Configure Header To clearly associate a student with printed pages from a jointly used printer, especially during exams, INiS allows you to print a header on each page. The header content can be set under the menu item ”System Æ PrinterControl Æ Configure header“. These settings are used as defaults by the teacher when INiS is started. The appearance of a header depends on the activated options. The following figure illustrates the precise dependences: If this setting is to be used automatically for all working students, it must be sent to the student workstations via ”System Æ PrinterControl Æ Send default“. Send Default After the default settings are selected, they can be sent to the student workstations via ”System Æ PrinterControl Æ Send default“. For these defaults to take effect, the student workstations must be in INiS when the defaults are sent, and HDGUARD must be deactivated. The sent settings immediately take effect after a student logs on. The settings only apply when no teacher is working in the classroom. When a teacher is present, the settings made during the lesson take priority. Manual INiS 5 Print Module configuration • 133 UserAdmin Modul configuration INiS 5 RDT - Global Version 5.0 Classroom Management & Multimedia eLearning Suite Manual INiS 5 UserAdmin Modul configuration • 135 User Administration The User administration area of the INiS User Admin module is very important for the creation and maintenance of user objects under INiS in Windows domains. After setting up the UserAdmin module, the user administration can be called up via “System/User Admin/User administration” and Processing Modes There are two different processing modes are identified and defined in the user administration under INiS. They are the View mode and the Processing mode. View mode: No UserAdmin data can be changed in this mode. It is only possible to observe the datasets. This is the standard setting after starting the UserAdmin module. The button with the magnifying glass is highlighted light blue in this mode. Processing mode: In the editing mode, the data of respective INiS objects can be changed. When in active status, the icon is highlighted in color. The following objects may be edited: • Classes • Courses • Teachers 136 • UserAdmin Modul configuration Manual INiS 5 • Student Creating Objects with the INiS UserAdmin Module New datasets are created according to a uniform procedure for all administrative INiS users. Within UserAdmin, the objects are added to the system by activating the “Create new dataset” button. You must be in the processing mode to do this. The button that is first deactivated changes color to green in this mode. It is also possible to call up this function via “Processing/Processing modes/New User Creation” from the menu bar. Definition of the available objects under INiS.UserAdmin Classes The following properties can be defined for a class: Name of class: A unique designation for the class is entered here. The “Object name” field is a mandatory field. The created class can only be saved if a designation has been assigned. Description of class: A description of the class can be entered here additionally. This is not a mandatory field. A created class can also be saved without this explanatory description. Transferring to a class: The next class to which the students should be transferred during a change of school term is determined here. This field is not a mandatory field either. The Members and Home directory flags cannot be edited during the initial set-up of a class. Changes can only be made after saving the object. The UserAdmin module automatically stores the information regarding the Home directory. It is not possible to enter a user here. Courses: As is the case for classes, the object name and an optional description can be entered for a course that is still to be set up. The Home directory is generated by the UserAdmin module. Members of courses cannot be transferred to successive courses. Students: Student objects cannot be created until class objects have been System/UserAdmin/User administration you arrive at the following screen: Manual INiS 5 entered. Via UserAdmin Modul configuration • 137 To add students to the system manually in this view, please change over to the “Student” branch and extend the view by double clicking or by using the + sign. The students already assigned to the class, whose properties can be processed here, are listed on the right side of this view (see below). After changing over to the processing mode by activating the “Recreate dataset” button, the view of the screen changes and the properties of the students to be added can be entered on the right side. 138 • UserAdmin Modul configuration Manual INiS 5 Once the first name and last name of the student have been entered, the INiS.UserAdmin module automatically completes the fields Complete Name and Object Name. Entering the first name and last name is mandatory; the Profile and Connect To fields cannot be edited. After saving the object, these entries are completed by the UserAdmin module and can no longer be changed here. All other input fields can be individually edited. Manual INiS 5 UserAdmin Modul configuration • 139 In the Description field, additional information can be entered for this student object. The input fields E-mail and Homepage are of a documentary nature. If a logon script is to be carried out when the student is logging on, it must be entered in the Logon Script field. The features of the User Account can be changed in accordance with Windows standards in the lower part of this input screen. You can enable the user to interactively change the password he selected using the Change Password button. It is also possible to assign a new password to the user using the Password input field, e.g. in case the user has forgotten his system password. 4 buttons can be found on the right side of the input screen, which can be used to set up individual properties of the user account. These correspond to the specifications of the operating system and should only be changed by experienced users. The possibilities described above for manually typing in student objects into the system are available to members of the user groups INiS Admins, INiS User Admins and INiS Teacher, and are used to maintain previously set up student objects. Another option for adding users of the Student Group to the system is the Student New User Creation under INiS. The procedure is described in another chapter. User Groups under INiS There are three different types of users under INiS, who can all make changes in the INiS.UserAdmin module and are grouped together in their respective user groups. They are different from one another with respect to their authorizations and can perform different types of system maintenance. There is a difference between INiS Admins, and INiS UserAdmins and INiS Teachers. The information below will describe how these different users can be added to the domains and which differences exist with respect to their authorizations. 140 • UserAdmin Modul configuration Manual INiS 5 Note: Before system-authorized users can be entered using the UserAdmin module, in the current delivery version of the INiS software the Domain Administrator must be added (manually) to the group of INiS Admins at operating system level.This is carried out using the administrative tool “Active Directory Users and Computers”. After logging on to the system as administrator or equivalent user on an INiS Teacher PC and starting up INiS, additional users can be set up. Creating ‘Teachers’ under INiS Users in the “Teachers” group under INiS are created according to a uniform principle. Once the UserAdmin module has been started, change over to the “Teachers” list and into the processing mode via the main node “INiS”. Once the function “Create New Dataset” has been activated, you will arrive at the following input screen: Manual INiS 5 UserAdmin Modul configuration • 141 The first name and last name of the new user being added must be entered on the right side of this input field. These two fields are mandatory fields. After the first name and last name have been entered, the UserAdmin module automatically completes the fields “Complete Name” and “Object Name”, once updated by left clicking in an empty input field. The entry displayed in the Object Name field is the valid user name which when used in conjunction with a password will allow the user to logon to the domain later. At this point the Object Name can be changed and the suggested syntax altered as necessary 142 • UserAdmin Modul configuration Manual INiS 5 Note: It is possible to add several users with the same name. The UserAdmin module creates a revised Object Name (see below). The following restrictions apply: • It is not possible to create 2 or more users with the same name within an organizational unit • This also applies to students in classes. • It is only possible to create users with the same name in different classes. Extended User Properties The UserAdmin module allows system-authorized users to define the additional properties of created users, which are of significance for later work under INiS. When creating users via the UserAdmin module, a distinction is made between the system administrator and user administrator. If none of these properties are defined for the user, the user is considered a default teacher by INiS, for whom only limited rights are available. Manual INiS 5 UserAdmin Modul configuration • 143 The differences regarding the authorizations of individual user groups is explained in more detail below. The INiS Admin Members of the INiS Admin group have higher-ranking authorizations within the user maintenance under INiS. As the only system-authorized users, they may change the status of other users of the “Teachers” group as they desire, as well as being allowed to create additional users of the INiS Admins group. It is also possible for them to create, change or delete all of the objects being managed in the UserAdmin module. The INiS UserAdmin Members of the INiS User Admin group are to be seen as equal to members of the INiS Admin group with the following restrictions: • No changes can be made to the properties of members of the “INiS Admin” group. There are viewing rights only. • Data import from INiS.classic and the “Delete all data” function are deactivated. The INiS Teacher Members of the INiS Teacher group only have access to the “Course” and “Student” objects via the UserAdmin module. You can view all of the courses that have been set up and the assigned students by double clicking on the course list in the Tree View. It is also possible to access their Home Directory. INiS Teachers do not have the authority to recreate or delete courses. By expanding the student class list and the course list, INiS Teachers have the following possibilities for maintaining objects: • Existing courses and classes as well as the members of each can be viewed. • Students can be added manually to or deleted from classes. • Students can be transferred within classes using the drag and drop method. • Students can be assigned to courses or removed from these courses again. General Information on Operation Mouse operation Move the mouse indicator onto a button. This can be an icon or a menu item. Click the left mouse button and a new screen opens or the menu “pops up”. Keyboard operation Keyboard commands in the menu items are identifiable as one of the letters is underlined. Processing Modes UserAdmin provides a defined set of work modes. Only certain actions can be performed in different work modes. In this way, working with the UserAdmin can be done in a controlled manner. 144 • UserAdmin Modul configuration Manual INiS 5 View No UserAdmin data can be changed in this mode. It is only possible to observe the datasets. After starting up, UserAdmin is in the view mode. New User Creation By selecting the “New User Creation” button, an empty screen for the corresponding INiS object is displayed. This function is only active for the following objects: • Teacher-object: A new teacher is created. • Teacher lists-object: A new teacher is created. • Class-object: A new class is created. • Class lists-object: A new class is created • Course-object: A new course is created • Course lists-object: A new course is created • Student-object: A new student is created in the class of the current student. • Student lists-object: A student is created in the selected class Editing In the editing mode, the data of the respective INiS object can be changed. This includes both the object information and the file information. This function is only active for the following objects: • Class-object • Course-object • Teacher-object • Student-object Quick creation New objects can be created in Quick Creation (available through ‘Extra Æ Quick Creation’ in UserAdmin menu) in table form. This function is only active for the following objects: • Class-object • Course-object • Teacher-object • Student-object Student objects can be very conveniently created using the functions of the main module. They can also be created using Import. UserAdmin User Interface The UserAdmin interface is set up in the following manner: On the left side is a Tree Structure that contains all of the relevant objects of UserAdmin. On the right is a List View that can be used for navigating. In addition, the UserAdmin objects are displayed on the right side. The main menu can be found in the uppermost section of the Manual INiS 5 UserAdmin Modul configuration • 145 UserAdmin window, underneath which is the toolbar. The status bar can be found in the lower section of the window. Object View The Object View is available for the following objects: • Class-object • Course-object • Teacher-object • Student-object The properties of the respective object are displayed on a number of tabs in this view: The ‘General’ tab in the upper part of the right hand pane contains the basic data of the given UserAdmin object (e.g. the object’s name). The second tab - either labeled ‘Member of’ or ‘Members’ - shows the relations of the given UserAdmin object within the system’s organizational structure. The given UserAdmin object’s home directory and its subdirectories can be viewed and browsed through via the ‘Home Directory’ tab. When switching to editing mode within the Object View, an additional status bar appears at the lower end of the right hand panethat provides you with information on the editing status of the UserAdmin object currently selected. (‘not changed’ or ‘changed’) Tree View The Tree can be used for navigating within UserAdmin. To do so click on the corresponding node in the Tree. You can also navigate using the cursor buttons on the keyboard. List View The lists can be used for navigating within UserAdmin. By double clicking on the respective symbol in the list, you arrive at the element. It is also possible to start group actions by selecting multiple elements. Forms of Display for Lists: Various forms of display are stored for lists: Icon: The list items are displayed as icons on the right hand pane.This is the default setting for UserAdmin. Small icons: In case of large numbers of list items this form of display is intended to account for all list items (if possible) to be displayed on the right hand pane.. List: An ordered list is displayed on the right hand pane. Report: The display of objects on the right hand pane is in the form of a report. This display improves the overview of the objects added. It has a negative effect on the display speed, however. Selection options in List View In list view, you can mark objects, e.g. with the mouse. a) to mark an object: Select the object in the List View using the mouse button. b) To mark several related objects: Click the mouse button next to an object in the List View. Keep the mouse button pressed down. Now move the cursor over the respective objects. 146 • UserAdmin Modul configuration Manual INiS 5 These are now displayed with a dark background. Release the mouse button. You can now perform a group action. c) To mark several non-related objects: Press the CTRL key. Keep the CTRL key pressed down. Now mark each object individually in the List View. The respective objects are highlighted with a dark background. Release the CTRL key. You can now perform a group action. Additionally, UserAdmin provides the following standard methods for selection: a) select all objects b) deselect all objects c) invert the current selection for all objects. Main Menu All functions of UserAdmin are available in the Main Menu. Toolbar Frequently used functions can be found on the toolbar. Status bar General status information can be found in the status bar in the bottom-most part of the UserAdmin main window. Navigation within UserAdmin The following actions can be used to navigate within the data: see Tree View Clicking on objects within the Tree Structure: Changes over to the respective element that has been clicked. Double-clicking on objects within the list elements: The respective element is opened. Note: • Student-object: Any particular Student object can be accessed only if you have previously selected the corresponding class object or course object from the object tree on the left hand pane. Then you may either expand the class- or course node and select the student directly from the tree view or highlight the class- or course node in the tree view and the double click the student on the right hand pane. Objects Creating Objects Within UserAdmin, the objects are added to the system by pressing the “New User Creation” button. When doing so the following must be considered: The objects and directories for the new UserAdmin object are created only after the new object has been saved. Objects that are not saved are not created. Manual INiS 5 UserAdmin Modul configuration • 147 Class-object The following information can be maintained for a class: 1. Name: Name of class 2. Description: Description of class 3. Subsequent class: Into which class the students should be transferred in the case of an automatic transfer. The information for the Home Directory is automatically stored in the system by UserAdmin and may not be altered by the user here. Course-object The following information can be maintained for a course: 1. Name: Name of course 2. Description: Description of course The course information for the Home Directory is automatically stored in the system by UserAdmin and may not be altered by the user here. Student-object 1. First name 2. Last name 3. Complete name 4. Profile 5. Object name 6. Description 7. Log-on script 8. E-mail 9. Connect to 10. Home page 11. Password Special Features: • Prior to creating the first Student (object) at least one Class (object) must have been created to which the Student can be assigned.. Teacher-object See creating students. In contrast to Students no Class (object) is required to create a Teacher (object). Moreover, some additional information can also be noted, which determines the membership in the group: • System Administrator • User Administrator Log-on behavior on the server can also be determined. There are so-called user flags for this. 148 • UserAdmin Modul configuration Manual INiS 5 Creating Course-Student Allocations Course-students can only be allocated in UserAdmin if the respective courses and students are available. You must also be in the editing mode. To assign students to a course, select the respective students in the List View and then drag them to the respective course in the Tree View. Or you can select the respective courses in the List View and then drag them to the respective students in the Tree View. It is also possible to make course-student allocations by dragging the respective objects within the Tree View. Changing Objects Objects can only be changed in editing mode. When doing so the following must be considered: Student If the object name of a Student-object is changed, the Share for the respective student is re-set. In addition, if the complete name is changed, the Home Directory of the student must be renamed. The directory must not be being accessed at the time. Teachers See Students Transferring Students You also have the additional possibility of transferring a Student-object to another class. To do so select the respective Student-object in the Tree View and drag it onto the desired Class node of the Tree View . It doesn’t matter whether you drag it onto the desired Class node below the Classes node or below the Student node. The student is transferred. It is important to note here as well, that the Shares must be re-set and the Home Directory must not be being accessed. You can also transfer several students at once into the same class. To do so, select the respective students in the List View and drag them to the respective class in the Tree View. Courses If the course name is changed, the Share must be re-set. In addition, the Home Directory of the course is adjusted. The directory must not be being accessed at the time. Classes When the name of a Class-object is changed, the Home Directory for the object must be renamed. The student directories can also be found in the class directory. Neither the associated student directory nor the class directory may be being accessed. Deleting Objects The following must be kept in mind when deleting objects: Since when deleting objects the associated directories of the objects are also removed, they must not be being accessed. Furthermore: Classes may only be deleted when they no longer contain any students. Thus, in order to delete a class, the respective students of the class must either be transferred to another class or deleted. Objects can only be deleted in editing mode or in the New User Creation mode. Manual INiS 5 UserAdmin Modul configuration • 149 The following objects can be deleted in UserAdmin: • Teacher-object • Class-object • Course-object • Student-object A Student’s membership in a Class or Course (i.e. the respective Class-Student-Object or Course-Student-Object) can be viewed and annuled from the respective Student’s “Member of” tab. This is done by marking the respective Class(es)/Course(s) and then selecting “Delete”. In addition, CourseStudent-objects can be deleted in the respective Course. This is done by marking and deleting the Student-objects from the “Member” tab of the Course. Note: If one of the above-mentioned objects is selected in editing mode, the delete function depends on the tab position of the object. If “General” is selected and Delete is pressed, the entire object is deleted. If “Members” or “Member of” is selected, only the respective object’s membership is deleted. Printing Objects To print objects, the respective objects must be selected in the List View. The “Print” button must then be pressed. All information regarding the specified object(s) is printed. The following objects can be printed: Teacher-object: The respective Teacher is printed. Teacher lists-object: One or more teachers can be selected. The teachers are printed. Class-object: The respective class is printed. Class lists-object: One or more classes can be selected. The classes are printed. Course-object: The respective course is printed and students belonging to the course. Course lists-object: One or more courses can be selected. The courses are printed. Student-object: The respective student is printed and the courses which the student is attending. Student lists-object: One or more students can be selected. All of the selected students are printed. StudentClasslists-object: One or more Student lists-objects can be selected. All of the students of all selected Student lists-objects are printed. Extras The “Extras” menu item of the UserAdmin module is available to members of the Teachers group after logging on to the system and starting up the user administration. In this menu it is possible to transfer classes, carry out a fast creation of certain objects and carry out extensive importing and exporting of data. These functions are explained below. 150 • UserAdmin Modul configuration Manual INiS 5 Transferring Classes UserAdmin provides an automatic Class change function to promote Students at the end of a school year. If this function is activated, all students of a respective class are transferred into their respective next class. The merging of subsequent classes as well as the ring transfer (see glossary) of classes is possible here. If a subsequent class has not already been specified in the ‘Follow-up object’ box when first setting up the classes, this must first be updated in the respective Classes ‘General’ tab in UserAdmin. To carry out the transfer, activate the “Promote Class” button in the ‘Extra’ menu. You will be asked to confirm whether the transfer should be carried. Select “Yes” and the transfer of students to the subsequent classes is initialized. Notes When calling up the “Promote Class” function from the ‘Extra’ menu, UserAdmin moves the Home Directories of the students. This function should therefore only be carried out whilst no student Home Directory is being accessed (i.e. no Students are logged in on their workstations). All of the students of a class are transferred in each case. You do have the option, however, of transferring individual students back or transferring them ahead of time. Quick Creation of Objects Quick Creation enables the user to enter objects within UserAdmin in table form. Quick Creation can be carried out for Classes, Courses, Students and Teachers objects. Navigate within this menu using the mouse and the tab key. Firstly the object group for which the fast creation is to be carried out must be marked in the left field of the input screen. After pressing the “Quick Creation” button (‘Extra’ menu), the required entries can be made in table form on the right side of the input field. The table can be extended using the Tab key in order to record more data. After all of the data to be recorded has been entered, it can be transferred to the system immediately by saving. If any errors have occurred, the user receives a warning and report so that the entered data can be corrected. Manual INiS 5 UserAdmin Modul configuration • 151 • Specifying the class name is a mandatory field for the Quick Creation of classes, while the description is optional. The same applies for the Quick Creation of courses. • For the Quick Creation of students, the respective class must first be selected. • Teachers’ users properties can be changed in the editing mode of the UserAdmin module. Importing Objects General Information UserAdmin provides function to import data from different source files.. These files must have a certain structure. When importing, the import files are analyzed from top to bottom. This means that Class objects must be placed before the Student objects of the respective class. In addition, the Course-Student allocations can only be carried out if the Course objects and Student objects are placed before the CourseStudent-objects. Every single line of the import file is analyzed and should therefore have valid import data and descriptions. An object description is always one single line. An object is always one single line. Structure of the Import File Import files are always structured in the following manner: Object description: The object description first indicates the type of successive objects. Which object fields are to be imported is also stored. A semicolon separates the individual entries from one another. Objects: The objects always refer to the preceding object description. Content must be stored for each field in the object description. The content can also be zero. If so, only a comma is entered. Every single line of the import file has a semicolon at the end. The following objects can be defined within the import file: • Student-object • Class-object • Course-object • Teacher-object • CourseStudent-object 152 • UserAdmin Modul configuration Manual INiS 5 Special Features when Importing: If no object name is indicated when importing students and teachers, the object name will be generated automatically. The following procedure is then applied: The object name is by default the first letter of the first name, followed by the last name. If the object name that is formed in this case is already assigned, the second letter of the first name will be placed in front of the last name. This process continues until a unique object name is formed. If it is not possible to generate a unique object name, an entry will be made in the warning and report. If an incomplete name is indicated when importing students and teachers, the complete name will be generated automatically. The complete name is : First name + space + last name Importing from a Text File 1. Carrying out the Import action (Extra| Data | Import from text file), leads you to a file browser. 2. Here you select the file to be imported and confirm with OK. The UserAdmin objects are now imported. 3. If errors occur after importing, a warning report appears, which can then be saved. Importing from an Excel File 1. Carrying out the Import action (Extra| Data | Import from Excel file), leads you to a file browser. 2. Here you select the file to be imported and confirm with OK. The UserAdmin objects are now imported. 3. If errors occur after importing, a warning report appears, which can then be saved. Exporting Objects You can carry out the following exports: Text export: All UserAdmin objects are exported into a text file. The structure of an export file is the same as that of an import file. The export file can therefore also be used for another import. Excel export: All UserAdmin objects are exported into an Excel file. An extra worksheet is available for each object group. Importing from INiS.classic Importing from INiS.classic can only be carried out by a System-Admin! Manual INiS 5 UserAdmin Modul configuration • 153 Start the import function from the menu “ExtraÆDataÆImport from INiS.classic” in UserAdmin and then follow the instructions on the screen. General Information Setup of the Data Structure Sequence of Data Setup The various objects of UserAdmin should be set up in the following form: 1) Setting up the teachers and classes. 2) Setting up the students: The students can only be created if the associated classes are available. 3) Setting up the courses: 4) Allocating the students to courses The UserAdmin Objects Various objects are defined within the UserAdmin. Specific actions are possible for each individual object. • The Class-object • The Classlists-object: Contains the Class-objects • The Teacher-object • The Teacher lists-object: Contains the Teacher-objects • The Student-object • The Studentlists-object: contains the Student-objects • The Studentclasses-object: contains the Studentlists-objects • The Course-object • The Courselists-object: contains the Course-objects • The System-object: contains all system groups stored in INiS • The Systemlists-object: contains the System-objects 154 • UserAdmin Modul configuration Manual INiS 5 User Groups Three user groups exist in UserAdmin. They are: • Teachers • UserAdmin • SystemAdmin The functions for use of UserAdmin are limited depending on a user’s membership of one of these groups: Teacher permissions: A teacher can edit students and student-course allocations. He can also print out students and courses. SystemAdmin permissions: All functions of the UserAdmin are available to the SystemAdmin. UserAdmin permissions: The UserAdmin has all of the rights of the SystemAdmin except for: • The UserAdmin cannot carry out INiS.classic import • The UserAdmin cannot maintain any Exchange e-mail accounts. • The UserAdmin cannot create a SystemAdmin. • The UserAdmin cannot change a SystemAdmin. Filter for Identifiers within UserAdmin UserAdmin is equipped with several filters. These ensure that invalid symbols for UserAdmin objects are replaced by valid ones. Under normal circumstances, invalid symbols are replaced by an “X”. Using the warning report, you can retrace possible changes, whilst exporting, for example. When directly entering UserAdmin objects in the Object View, the filters are activated immediately after leaving the respective field. Customizing UserAdmin The toolbar and the main menu can be adapted to one’s own needs. This is done using the “Customize” menu item. (Tools | Customize) The custom settings made are reset after leaving UserAdmin. Note: If a system administrator makes custom settings, they will be saved and are subsequently active for all users of UserAdmin. Thus the SystemAdmin can hide functions or regroup functions for himself and for all other users. Important UserAdmin Files Various configuration files are available for UserAdmin: DefaultConfig.txt The “DefaultConfig.txt” is a configuration file for printing and exporting. DefaultGroups.txt The groups for all UserAdmin objects, which are automatically allocated when creating a new object, are stored in the “DefaultGroups.txt”. Groups can be stored for the following objects: Teachers Manual INiS 5 UserAdmin Modul configuration • 155 UserAdmin (special teacher with additional rights) SystemAdmin (special teacher with additional rights) Student Class Course Import.txt The “Import.txt” is an example of an import file for the TextImport of UserAdmin. This can serve as a template and be customized to one’s own needs. Import.xls The “Import.xls” is an example of an import file for UserAdmin ExcelImport. This can serve as a template and be customized to one’s own needs. SmartExcel.txt The fields for all UserAdmin objects which are supposed to appear when exporting to Excel are stored in “SmartExcel.txt”. SmartFile.txt The fields for all UserAdmin objects which are supposed to appear when exporting to a file are stored in “SmartFile.txt”. SmartInsert.txt The fields for all UserAdmin objects that appear in Fast Creation are stored in the “SmartInsert.txt”. SmartPrint.txt The fields for all UserAdmin objects that are supposed to appear during a printout are stored in “SmartPrint.txt”. Setting up the UserAdmin Module To use the INiS UserAdmin module, it first needs to be set up on the server. The following chapter describes setting up the module on a Windows server. To use the UserAdmin module on a Novell or Linux server, follow the instructions in the separately obtainable setup documentation. Prerequisites The current version of UserAdmin supports Windows 2000 and 2003 servers as the network operating system and Windows 2000, XP as the client operating system. To set up the UserAdmin, you need a Windows domain with ADS installed. The DNS server must be set up on the PDC according to Microsoft specifications in order for the server name to be correctly released from all workstations of the domain. In addition, all workstations must be included in the domain, and DNS must be configured on the workstations. In general, enter the IP address of the Windows server as the DNS server. We also recommend deactivating “Offline files” in the options of Windows Explorer since they can cause problems when rerouting folders. 156 • UserAdmin Modul configuration Manual INiS 5 Preparations on the server In order to set up the UserAdmin module, several preparations must first be made on the server. You only need to carry out the following steps one time, even if you wish to set up several rooms using the UserAdmin module. • First log on as an “Administrator“ for the Windows server. • Then start the administration program “Active Directory Users and Computers“. You can find this program under ”Programs Æ Administration“. • Create a new “Organizational unit” (OU) there via the menu item “Procedure Æ New”, and name it “Lesson”. • Open Windows Explorer and create a new folder called “INiS” on the data drive. In general, this is the drive on which the greatest amount of free memory is available. • Right-click on the “INiS” folder, and then select “Sharing and Security”. Share the folder with the name “INiS”. • Click on the “Permissions” button. In the windows which follow, the group “Everyone” and the fields ”Full access”, “Change”, and “Read” should be selected. • Change to the “Security” tab and remove all of the listed users except for the “Administrator”. Give the administrator “Full Access” to this folder. Setting up In every room in which you wish to use the UserAdmin module, it must first be set up in INiS. To do so, log onto your domain as Administrator on the teacher workstation, and start INiS. Open the menu item “UserAdmin Æ Set-up” in the INiS “System Menu”. An Assistant will appear, and will ask for all of the required information for configuring the ADS and the file system in sequential order. Manual INiS 5 UserAdmin Modul configuration • 157 Then a brief explanation is given regarding the purpose of the set-up. Simply select “Continue” at this point. 158 • UserAdmin Modul configuration Manual INiS 5 Set up the first room When you set up the UserAdmin module for the first time, select the entry “The UserAdmin module is being set up for the first time in this domain.” Select Windows (ADS) as the operating system. Confirm your selection by pressing “Continue”. Manual INiS 5 UserAdmin Modul configuration • 159 The first step is the configuration of UserAdmin in the ADS. The specific OU’s under which users and groups will be administrated are determined here. The assistant suggests the log-on domain as the target domain and fills in the other entries with the INiS presettings. Correct the basic container if needed and modify, if desired, the sub-containers for teachers, students, classes and courses. Then proceed by pressing “Continue”. 160 • UserAdmin Modul configuration Manual INiS 5 UserAdmin adds users to different default groups depending on the type of user. The designations for these groups can be changed on the next page of the assistant. The groups and the “New” user are created in the “INiS System” OU under the previously selected basic container. The “New” user serves as the log-on name for the creation of new users and is created without a password. Proceed by pressing “Continue”. Manual INiS 5 UserAdmin Modul configuration • 161 The next task is the configuration of the file system. First select the UNC path on your “INiS” release as the basic path. This basic path will also be adopted as the basic directory for teachers and students. You can also change this if desired (on releases on other hard drives or servers as necessary). When your configuration is complete, you can conclude the set up process by pressing “Finish”. Setting up additional rooms If the UserAdmin module has already been set up, select the entry “Connect to existing installation.” In the field “Installation path” enter the folder in which the UserAdmin is installed and attach the “\INiS” folder. (Example: Server\INiS\INiS). 162 • UserAdmin Modul configuration Manual INiS 5 You cannot make any changes in the following dialogs; they only provide information as to how the UserAdmin was set up. The UserAdmin module is now completely configured and is available with full scope of function. Please also follow the instructions in the next chapter on activating the UserAdmin module for students. Activating UserAdmin for students In order for the UserAdmin module and the associated expansions in Explorer (exchange directories) to be available to students, the selected settings must be transferred to the student computers when setting up the UserAdmin module. In the menu, select “Activate system UserAdmin (students)“. As is the case with other modules, all the student computers in the room must be in INiS, and HDGUARD must have been deactivated beforehand. Presettings of UserAdmin Creating users in INiS, depending on the type of user, follows a fixed principle. Nevertheless, presetting can still be defined for several different pieces of information. This definition is made using menu item “System UserAdmin Presettings”. When calling up this menu item, the following screen will appear: Manual INiS 5 UserAdmin Modul configuration • 163 Profiles Presettings for profiles, logon scripts, password handling and default groups can be defined here for the five types of users. You need to be logged on as an administrator to create profiles. In addition, make sure that no users are logged on to the server while updating. For profiles, the type of profile can be determined first. Temporary profiles are not stored on the server, but diverted to a workstation from the default user´s profile at the time of the first user logon. Non-mandatory profiles are stored on the server. When a user logs on to a workstation, this is transferred from the server to the workstation and updated on the server when the user logs off as necessary. Mandatory profiles are likewise stored on the server. When a user logs on, the profile is copied from the server to the workstation. However changes are not transferred back to the server! When selecting mandatory profiles, the joint use of the profile template for all users of a user group can be activated. In this case, not every user receives a copy of the profile template, but instead, the INiS template directory is entered directly as the profile path in his user information. Folder rerouting ensures that the directories “My documents”, “Cookies”, etc. are created and used in his Home directory. 164 • UserAdmin Modul configuration Manual INiS 5 The template for the profile template is not used directly for newly created users! Rather, a snapshot of the profile is copied into the template directory of INiS and this copy is then used for the profiles of new users. With this copying procedure authorizations in particular are adapted to the user registry and settings, e.g. for “My documents”. Profile templates are stored in the INiS basic directory on the server and in the \ProfileTemplates\Students, \ProfileTemplates\Teachers \ProfileTemplates\UserAdmins and \ProfileTemplates\SystemAdmins directories. Both local profiles and any server-based profiles can be used as templates for the profile templates. One requirement, however, is that the selected profile must not be in use at the time of being selected, i.e., its owner is not logged on. It is a good idea, therefore, to create special users for maintenance of the profiles and to use their profiles as a template. Before selecting a template as a profile template, all of the applications installed should be started and any necessary configurations should be completed. This is necessary so that users to whom the profile template is assigned do not make the configuration themselves. This would turn out to be difficult, particularly in the case of mandatory profiles, since the configuration would not enter the user profile permanently and thus the configuration would be demanded again each time the user logs on. Login script If desired, users can automatically be assigned a login script whilst it is being created. Password The password specifications define the standard values of the respective password flags when creating a new user. Default groups Under certain circumstances rights extending beyond those automatically assigned by IniS are required in order to be able to work with specific resources (programs, printers, CD’s, databases, etc.). To allow for this situation, users can be automatically added to additional groups, through which the required rights are assigned, during New User Creation. Update for existing users If you have defined a new profile template and you want to use it for existing users, you can do this by clicking the button “Update for existing users”. This overwrites the user profiles with the profile template. The button “Update for existing users” overwrites the user profiles with the profile template. For users with non-mandatory profiles, the user’s personal settings may be overwritten. When profiles are shared, the function “Update for existing users” is not available. Manual INiS 5 UserAdmin Modul configuration • 165 HDGUARD INiS 5 RDT-Deutschland Version 5.0 Classroom Management & Multimedia eLearning Suite Manual INiS 5 HDGUARD • 167 If you have chosen to install HDGUARD during INiS setup only the files necessary for HDGUARD to function have been copied to your PC. In order to protect your PC against unauthorisied changes of any kind you will have to configure and activate HDGUARD explicitly after INiS setup is finished and you have restarted your PC. If you are familiar with HDGUARD already you may skip next next paragraphs and continue with ‘Configuring HDGUARD form INiS’. If HDGUARD is entirely new for you, please do read the following carefully: What is HDGUARD? HDGUARD is security software that restores a system to its original state simply by rebooting. HDGUARD works by preventing permanent changes on your hard disk drives. HDGUARD does this by automatically restoring the original state of the computer, after every reboot. Even if the current user has removed or changed the contents of files, these changes are not permanent. In this way HDGUARD provides long term stability of IT equipment reducing both maintenance time and total cost of ownership. The working principle is intentionally kept very simple, since simplicity results in robustness; HDGUARD redirects any access from the protected drives to its hidden HDGUARD area. While the computer is up and running, not even the operating system itself is aware of HDGUARD. Therefore HDGUARD protects Windows from itself and on the other hand is completely non-restrictive. All the features of Windows and your applications work as if there is protection – but there is! As soon as the computer is restarted, HDGUARD forgets all changes that were made to the protected hard disk partitions. That happens in a fraction of a second and does not delay the computer’s boot process. HDGUARD is purely a software solution. Neither hardware nor a dongle is needed. Forget the screwdriver when talking about hard disk protection! Software Prerequisites General Make backup copies of all important data. Data can be damaged or lost by incorrect operation or an incorrect installation. Ramcke DatenTechnik GmbH is not liable for any loss of data. Make sure that the system is running free of faults. Viruses, corrupt files, faulty hard disk drive sectors and similar problems can lead to issues when HDGUARD is activated. By nature of the software, any faults will occur again at every restart. Windows 2000 / XP HDGUARD does not support dynamic hard disks, which are available only for Windows 2000/XP. This will not affect most users, as basic disks are the most common. If dynamic disks have been set up on your computer, you will have to change them to the basic type manually. To do this, first backup all data on your dynamic hard disks. Remove all of them using the Windows built in Disk Administrator in Computer Management. When this is done set them up again as basic hard disks. 168 • HDGUARD Manual INiS 5 Swap-File or HDGUARD Partition In the case where a previous installation of HDGUARD was installed on the PC, an HDGUARD partition may already exist on it. Such HDGUARD partitions will work fine with HDGUARD 3. For new installations it is not necessary to have such a partition; instead it is recommended to use a Swap File. The Swap File is usually located on the protected partition, i.e. the partition which will forget permanent changes. The allocated size can be somewhat smaller than the protected partitions, as only the recent changes and not all the protected data will be stored in it. The maximum file size can be set from inside the HDGUARD Config Wizard or from the advanced configuration dialog. HDGUARD can assign an automatic value based on the size of the protected partitions. HDGUARD Area on Windows 2000/XP Systems HDGUARD for Windows 2000 / XP uses a Swap File to record changes. The size of that file may vary from a minimum of 200MB up to a user specified maximum; normally 2GB to 3GB. It may be placed on a hard disk partition of your choice, however for optimal performance, it is recommended to be placed on the same partition as the one set to be protected. Make sure there is enough free space on the hard disk and run a defragmentation before activating HDGUARD. Alternatively a hidden partition as opposed to a Swap File (mandatory for legacy Windows systems) of similar size can be used. HDGAURD Area on Legacy Windows HDGUARD for Windows 95, 98, ME, or NT requires a separate partition used for redirection purposes. See chapter below. Protected Partitions Each hard disk partition accessible from the Windows File System can be protected by HDGUARD. As long as HDGUARD is active, no changes made to those partitions will be permanent and will be restored upon a reboot. HDGUARD can protect up to a maximum of 5 partitions when installed on Windows 2000 or Windows XP. When installed on Windows 95, 98, ME or NT4, HDGUARD can protect a single partition only. Configuring HDGUARD form INiS To configure HDGUARD from the INiS Classroom Management Console you have to log in to the system through ‘System Æ Login to system’ Please make sure to change INiS’ system passowrd from its default value (‘demo’) to a customised password (see: ‘General Notes on System Settings’ and ‘Changing the System Password’). Now select ‘System Æ HDGUARD Æ Configure HDGUARD (All) to call up to following dialog: Manual INiS 5 HDGUARD • 169 HDGUARD Main Window For first time users we highly recommend using the Configuration Wizard. Clicking on the equally labeled button you will be propmted for a password. Please enter your INiS System Password here since it will be the only one valid for HDGUARD itself as well as the Configuration Wizard. Welcome This will bring up the following Welcome window Cofiguration Wizard Welcome Dialog On the left f the above dialog you see a list of steps that you may either go through chronologically by clicking the ‘Next’ button in the lower right corner or directly jump to by clicking on the appropriate entry directly in the list. Licensing Please Note: The two steps immediately following this Welcome dialog - ‘Licensing’ and ‘Password’ - are relevant only when using HDGUARD as a ‘stand-alone’ application and 170 • HDGUARD Manual INiS 5 are listed here for technical reasons. We highly recommend you skip these two steps by clicking ‘Next’. Please DO NOT try to enter a license key here! If you have licensed your INiS version, the dialog below will explicitly state that a valid license key has been provided already but WILL NOT display any characters in the related input boxes. HDGUARD Licensing Dialog Password The next step allows you to set a password for HDGUARD’s Configuration Dialog as well as for activating/deactivating HDGUARD. HDGUARD Password Dialog Please note: When using HDGUARD in combination with INiS any password set here will be valid only temporarily! This new password will work ONLY if you DO NOT start the HDGUARD Configuration Dialog from within INiS and will be VALID ONLY UNTIL you start the HDGUARD Configuration Dialog from within INiS. After having started the HDGUARD Configuration Dialog from within INiS the HDGUARD password will be set back to the INiS System Password! Manual INiS 5 HDGUARD • 171 HDGUARD Area The HDGUARD Area may be a Swap-File or an HDGUARD Partition. In terms of security, both equally protect your computer.HDGUARD Partitions are mandatory for a Windows 95, 98, ME or NT installation, whereas either may be used for Windows 2000 or XP. Choose either “automatic assignment” or manually select a partition to be used for redirection of all changes. Check the box to manually define the size of a Swap-File. Setting the HDGUARD Area Visibility Often it is more secure to hide your security measures. This makes HDGUARD and your computer less attractive to compromise. You may customise the visibility of HDGUARD by either selecting a template (Visible or Invisible), or by checking the appropriate options. HDGUARD ‘Visibility’ Miscellaneous These are some advanced options regarding the Windows user logon and HDGUARD.master; in most configurations these options should be left as default. HDGUARD Configuration ‘Miscellaneous’ Tab 172 • HDGUARD Manual INiS 5 When your done making your adjustments to HDGUARD’s configuration please click the ‘Finish’ button to apply your changes immediately. Activating HDGUARD Activating or deactivating HDGUARD from your INiS Classroom Management Console depends on whose HDGUARD is to be delt with - the students’ or the teacher’s. For the student PCs’ HDGUARD you’ll find a corresponding menu item in the INiS System menu: ‘System Æ HDGUARD Æ Activate HDGUARD (Students)’ or ‘System Æ HDGUARD Æ Deactivate HDGUARD’. Activating / Deactivating HDGUARD on Student PCs For the teacher’s PC this can only be done through HDGUARD’s main configuration dialog: When HDGUARD is configured, it may be activated by a single click. Run HDGUARD – you’ll find it (depending on the visibility you’ve chosen) on the Desktop, inside the Start-Menu, or (even when completely invisible) in the program folder selected during installation. Press the Activate button to activate HDGUARD. The system will then reboot and HDGUARD will be active upon restart. In the same view HDGUARD may be deactivated. Manual INiS 5 HDGUARD • 173 Activating / Deactivating HDGUARD on Teacher PC Basic Functions Basic Functions are accessible directly from the HDGUARD application. Activate or Deactivate HDGUARD Choose “Activate” or “Deactivate” from the main window. Apply Changes This function allows you to deactivate HDGUARD instantly and without a reboot. All changes made to the system since the computer was last restarted will be written to the protected partitions permanently. Use this function only if you’re aware of all changes made to the computer since the last restart. Configuring Config Wizard The Config Wizard is recommended for usual configuration tasks like changing the password, resizing a Swap-File or changing Visibility. However, protecting more than one partition requires you to open the Advanced Configuration dialog described in the following section. Advanced Configuration The appearance of the Advanced Configuration dialog is very much like the configuration dialog of previous HDGUARD versions. Hard disks, including their partitions, are displayed with essential information and options. Click the plus sign located next to the Information and Status headers to select the view you would like to see. Set the appropriate checkboxes. If you set a Swap-File while another has already been set, the original one will disappear. You may set up to 5 protected partitions. 174 • HDGUARD Manual INiS 5 Use the menu bar for configuring additional options such as setting the password, reporting bugs and viewing the online manual. HDGUARD Advanced Configuration Dialog Click the + and – symbols to tell HDGUARD which partitions to protect and where to place its Swap-File Advanced Functions Imaging/Cloning an HDGUARD PC Be sure to deactivate HDGUARD before cloning. A PC actively protected by HDGUARD should not be cloned, since it will result in data-loss on the target system. After the cloned machine has been started, HDGUARD may be activated manually or by using HDGUARD.master. Changing or setting the password Use the HDGUARD Config Wizard or the advanced configuration dialog described earlier in this document to change or set the HDGUARD password. Resizing or moving the HDGUARD Swap-File HDGUARD must be deactivated to perform any of these operations. Be sure to deactivate it, and restart your system before continuing. Open the advanced configuration dialog and uncheck the Swap-File checkbox. Check the Swap-File checkbox for the new location (If you intend to resize the file, this will be the same partition!). A size selection dialog will pop up. Set the size and press ok. Close the advanced configuration dialog and activate HDGUARD. Submitting a bug report In the case where your HDGUARD installation or usage doesn’t behave as expected, we would greatly appreciate any feedback you may have. You can report this feedback online or by printing a bug report form. Manual INiS 5 HDGUARD • 175 Go to the Advanced Configuration dialog and select Help Æ Feedback Æ Bug Report to fill in the bug report form. It’s also available online at http://www.pcprotection.net:8080/feedback/bugreport.php 176 • HDGUARD Manual INiS 5 Appendix INiS 5 RDT - Global Version 5.0 Classroom Management & Multimedia eLearning Suite Manual INiS 5 Appendix • 177 Introduction to User Administration using INiS.UserAdmin The method in which the INiS.UserAdmin module handles the administration of users and groups in the ADS is described below. In addition to the actual administration of objects in the ADS, this also applies to the administration of directories, the assigning of access rights, and the relationships between the items of ADS and the file system of the server. What is the ADS? The ADS (Active Directory Service) is a shared database, in which the files and their hierarchical relationships to one another are stored. In the case of a Windows 2000 domain, users, groups, servers, computers and other objects of the network are administered there. The primary advantage compared to older procedures of user administration is the protection against breakdown provided by replication and shared administration of the ADS. This means that the ADS need not be installed on one particular server, but can be distributed redundantly over several servers. Another advantage of the ADS is that the administration of objects – comparable to a file system – is hierarchical. This means that within the ADS, in addition to the actual objects, there is a folder structure in which the objects are grouped according to certain aspects. These folders within the ADS are called organizational units, or OU’s for short. The operating system (Windows 2000 Server/Advanced Server, Windows 2003 Server) provides different programs for the administration of the ADS. The most important one for the administration of users can be found in the program menu under “Administration” and is called “Active Directory Users and Computers” Which users are administrated by UserAdmin? The UserAdmin uses the ADS to perform user administration designed for schools. Although this ultimately involves the creation of users, groups and OU’s in the ADS, typical schoolrelated terms such as student, teacher, classes and courses are used in the UserAdmin and in INiS. Precise knowledge of how these terms are implemented “from the inside” within the ADS is not necessary for daily operation or for the normal end user. Despite this, the implementation is described below. This knowledge is very important for the system administrator involved or for supporting specialized companies, particularly in the event of a fault. If in addition to INiS another user administration is being used, for instance for users of the administration of the adult education centre / nightschool etc., then this knowledge is particularly important so as to separate and identify the different “types” of users and structures. INiS generally recognizes four types of users. They can first be roughly divided into students and teachers. Teachers are further sub-divided depending on their responsibilities into INiS teacher, INiS UserAdmins and INiS SystemAdmins and hold different access rights respectively. The subdivision of these user types is carried out by means of the different position within the ADS, as well as by different group memberships and access rights. Although in principle it is possible to create UserAdmin-compliant users directly using Microsoft programs, it is recommended that you create them using the INiS-ADSIBrowser, since it assigns to groups, grants access rights, etc. automatically. 178 • Appendix Manual INiS 5 User and Group Structure of the UserAdmin Upon installation of the UserAdmin module, it is possible to determine the position of the users and groups administered by INiS within the ADS. The default suggested by the set-up is the OU Lesson. The following description assumes that this suggestion has been followed. Under the selected basic OU, INiS creates five new OU’s, also called Containers: Teachers, students, classes, courses and INiS system. These designations can also be freely selected when setting up and therefore merely represent a suggestion, around which this description is oriented. After setting up the UserAdmin, the structure in the ADS is as shown in the following figure: The Containers that are set up there have the following relevance: Classes TC12 TC13 TC14 Courses Informatics Music Workshop Teacher Theodor Black Cathy Smith Michael Fly Student TC12 TC13 Sophie White Peter Black INiS-Syste, New INiS-Teacher INiS-Students INiS-Admins INiS-UserAdmins User groups for the created classes are created here. Additionally, information on possible transfers and subsequent classes are created. The class groups serve as distributors of the rights required in connection with work conducted as a class (shared directory). User groups for the created courses are created here. The course groups serve as distributors of the rights required in connection with course work (exchange directory). A prerequisite for membership in a course is that a student has been added to a class. The teachers are created here. Their status is determined by their membership in one of the system groups (Teacher, User Admin or System Admin). Under this OU, additional OU’s are created for the created classes. The students of the class can be found under this. The class OU’s merely aid in structuring within the ADS. Students receive the necessary rights both individually and from their class group. There is a special nextClass OU in every class-OU. This contains information relevant to class transfers. In this OU, the basic groups of INiS (INiS Teacher, INiS Student, INiS Admins and INiS UserAdmins) as well as the Creation of new users (New) are created. At first, only general and account-related information such as user name, first name and last name, display name, password and password options are set for the users created via INiS. Additionally, depending on presettings, the profile entries for the users are also set. In this way, a connection is created between network users and their files (Homedirectory and Profile). Manual INiS 5 Appendix • 179 UserAdmin objects and their attributes When adding users, classes, and courses in the UserAdmin module, all the required data are requested. However, the UserAdmin module still has extensive import options. For this reason, required and optional attributes of the various types of objects will now be described. The following types of objects affect the importation of users and groups: Student, class, course, teacher, coursestudent The following objects can be imported for these objects: Teacher-object Import name: #teacher# The following information belongs to a teacher object: Field Name Field Property Import Variable First name Required field #firstname# Last name Required field #lastname# Complete name Optional #fullname# Object name Optional #objectname# Description Optional #description# Log-on script Optional #loginscript# E-mail Optional #emailaddress# Home page Optional #homepage# Password Optional #password# Change password Optional #changepassword# Account disabled Optional #accountDisabled# Account property Optional #flag# User Administrator Optional #useradmin# System Administrator Optional #systemadmin# Picture of the object Optional #picturepath# My documents Optional #mydocuments# Password does not Optional expire 180 • Appendix #dontexpirepasswd# Manual INiS 5 Class object Import name: #class# The following information belongs to a class object: Field Name Field Property Import Variable Object name Required field #objectname# Description Optional #description# Transferring to a class Optional #nextClass# Picture of the object Optional #picturepath# Course object Import name: #course# The following information belongs to a course object: Field name Field property Import Variable Object name Required field #objectname# Description Optional #description# Picture of the object Optional #picturepath# CourseStudent object Import name: #courseStudent# The following information belongs to a coursestudent object: Field name Field property Import Variable Name of class Required field #classname# Student name Required field #studentname# Name of course Required field #coursename# Manual INiS 5 Appendix • 181 Student object Import name: #student# The following information belongs to a student object: Field Name Field Property Import Variable Class name Required field #classname# First name Required field #firstname# Last name Required field #lastname# Complete name Optional #fullname# Object name Optional #objectname# Description Optional #description# Logon script Optional #loginscript# E-mail Optional #emailaddress# Home page Optional #homepage# Password Optional #password# Change password Optional #changepassword# Account disabled Optional #accountDisabled# Account property Optional #flag# Picture of the object Optional #picturepath# My documents Optional #mydocuments# Password does not Optional expire #dontexpirepasswd# Directory Structure of the UserAdmin Apart from the administration of users and groups, INiS also assumes organization of user files with UserAdmin. Users have access to different types of files in a Windows system. The individual files mainly represent results of their work. Under certain circumstances, system files determine the appearance and configuration of applications and Windows itself. Common files are used by several users of a group (in extreme cases, all users). With the exception of common files, this information can generally be found at the workstation where the user is working. Since HDGUARD, as a component of INiS, prevents permanent storage of files on the local computer and since users in schools (students and teachers) perform their work at workstations that are constantly changing, it makes sense that permanent storage in the latter case is on the central server. The directory in which Windows users store their files centrally is generally referred to as a Homedirectory. For the purpose of easy handling, this is assigned a drive name (letter). Typically the drive name H (for Home) is used for this purpose and therefore also in the case of INiS. 182 • Appendix Manual INiS 5 When creating users, INiS also automatically creates these Home directories. They are always released under the user names and the UNC path to this directory in the ADS at the user’s location is entered as the Home directory. As with the set-up of the ADS, INiS also follows a prescribed structure when creating user directories: The five directories INiS, Classes, Examen, Teachers and New are created under the basic directory of the UserAdmin installation. Manual INiS 5 Appendix • 183 The creation of users, classes and courses, constantly develops this structure: INiS ProfileTemplates Students SystemAdmins Teachers UserAdmins Exam In addition to a number of configuration files, the INiS directory above all contains templates for the user profiles of the various user groups (students, teachers, etc.) Classes TC12 Cathy Smith Cookies Favorietes Incoming INiS My Documents Recent Templates Within the Classes directory, a sub-directory is created for each class and each course, with the respective names of each. The directories INiS and Exchange can be found here, as well as a directory for each student of the class with each student’s name. The student directories are released under the user names of the students and entered for them as Home directories in the ADS. Teacher Sophie Hope Cookies Favorietes Incoming INiS My Documents Recent Templates Within the Teacher directory, a sub-directory with the respective teacher’s name is created for each teacher The Teacher directories are released under the user names of the teachers and entered for them as Home directories in the ADS. New Located in the New directory is the mandatory profile of the New User Creation user “New”. Changes to this profile are no longer necessary once the UserAdmin has been installed. The exam directory is basically structured just like the student directory. In contrast to the student directories, an exam user only has access to the directories My documents, Incoming and Log. The directory log is only used by INiS to store the exam log. Profile Exam TC12 Jon Miller Jane Kirk Tom Black 184 • Appendix Manual INiS 5 Set-up of the User Directories Various directories are created for each user under his Home directory. The content of these directories is explained in the following list: While surfing the Internet, Internet Explorer gathers logon information, presettings, etc. for different pages for the respective user. These are saved in the “Cookies” directory, in order to make repeated access to these pages easier and more user-friendly. The work results of users are saved in the “My Documents” directory. Depending on the operating system, this directory is structured with additional folders such as “My pictures”, “My music”, etc. Contains the Favorites list of Internet Explorer and other programs, if needed. This directory contains files handed out by the teacher via INiS. Reserved for INiS-specific configuration files. Profile directory of user. Depending on the selected type of profile, the name of this directory is “Profile.man” or simply “Profile” Contains links to the most recently opened files. This directory typically contains user-specific templates for applications such as Microsoft Office. Now that the directory structure has been explained, the directories can be sorted according to the subdivision into individual files, system files and common files implemented at the very beginning: Individual files are stored directly in the “My Documents” directory by the user, indirectly as a side effect of using applications, and also in the “Cookies”, “Favorites”, “Recent” and “Templates” directories. System files, which help in the configuration of Windows and the application environment of a user, are saved in the “Profile” directory or “Profile.man” directory, depending on the presettings of UserAdmin. Common files are saved in the exchange directories of classes and courses. Rights in the Directory Structure In addition to the depiction of actual directories, documentation of access rights is also a factor in considering the INiS directory structure. The access rights to the described directory structures are automatically assigned by INiS when creating users, classes and courses. The following lists describe the authorizations granted by INiS to the above directory structure for INiS system groups, class/course groups and individual users. Only groups/users who actually have authorizations are included in these lists. The authorizations are specified for the highest directory in each case, from where they are handed down to the sub-directories. Subdirectories excluded from the handing down process are listed in addition. The description applies to Windows domains and accordingly to installations on Novell file servers. The cited releases only apply to Windows domains. Manual INiS 5 Appendix • 185 Authorizations to access the INiS Directory: Groups: INiS Admins Full access INiS UserAdmins Revise Read, execute List folder contents Read Write Released as: “Inis” Group: INiS Teacher Full access Revise Read, execute List folder contents Read Write Groups: INiS Admins Full access INiS UserAdmins Revise Read, execute List folder contents Read Write Shared as: “StudentsProfile”, “TeachersProfile”, “UserAdminsProfile”, “SystemAdminsProfile” Group: INiS Teacher INiS Student To the profile directory of the respective group Full access Revise Read, execute List folder contents Read Write Authorizations to access the Central Profile Directories: Authorizations to Class/Course Directories Full access Groups: INiS Admins INiS UserAdmins Revise INiS Teacher Read, execute List folder contents Read Write Shared as: “Classes” Groups: INiS Admins INiS UserAdmins INiS Teacher Class group Full access Revise Read, execute List folder contents Read Write Shared as: _Class name 186 • Appendix Manual INiS 5 Authorizations to Access Teacher Directories Full access Groups: INiS Admins INiS UserAdmins Revise Read, execute List folder contents Read Write Shared as: “Teacher” Groups: INiS Admins Full access INiS UserAdmins Revise Read, execute User: Teachers List folder contents Read Write Shared as: User name Manual INiS 5 Appendix • 187 Authorizations to Access Student Directories Groups: INiS Teacher User: Student Shared as: User name Groups: INiS Teacher User: Student Groups: INiS Teacher User: Student • Full access Revise Read, execute List folder contents Read Write Full access* Revise Read, execute List folder contents Read Write Full access Revise Read, execute List folder contents Read Write Full access Revise Read, execute List folder contents Read Write Full access Revise Read, execute List folder contents Read Write Full access Revise Read, execute List folder contents Read Write The Home directory of a student has a special feature. He has almost full access there, but is not authorized to change authorizations. This prevents a student from granting rights to his directory to another user! 188 • Appendix Manual INiS 5 Authorizations to access the Exam Directory: Shared as: (username) Group: INiS-Teacher Full access Revise Read, execute List folder contents Read Write User: Examuser Full access Revise Read, execute List folder contents Read Write Users and Profiles In addition to the organization of individual and common files, there is one more significant feature of the UserAdmin regarding the administration of system files and directories needed for a user. These determine the set-up and appearance of the desktop and start menu as well as the individual configuration of applications for each user. The amount of information is referred to in its entirety as User profile or for short, Profile. Profiles are of particular relevance locally to Windows and in the network once a user logs on. Windows checks whether a profile exists for a user at the time of the user’s first logon to a Windows workstation. If this is not the case, a new profile will be created for the user based on a local standard profile (p.p. unconfigured). Special attention must be paid to the user profiles, since their existence and concrete configuration can determine whether logon is successful or unsuccessful, either during the initial logon or the first start-up of an application. The reason for this is that many applications (e.g. Microsoft Office) check to see whether an individual configuration has already been completed for the logged on user. In certain instances, if this is not the case, the application will first display a message with a more or less extensive dialog for configuration. This can cause inexperienced users, in particular, to become very confused, resulting in the start of the first lesson being significantly delayed. To ease this situation, new users in IniS are assigned standard profiles specified by the System Administrator. Essential items of application configuration have already been covered in these standard profiles, enabling a new user to start the applications unimpeded. Before we go into more detail regarding setting up and dealing with standard profiles, some basic information about profiles should first be presented. This includes in particular using Windows with the profiles. Overview of User Profiles Windows is familiar with three different types of user profiles. Since several of them are suitable in principle for use in schools and all of them are supported by INiS.UserAdmin, we would like to briefly describe these variants. We will use both the English and the German designation for this: Local Profiles (local or temporary profiles) Local profiles are created based on a default user during the initial logon of a user to a workstation, unless the user already has a server-based profile. If a server-based profile for the user is noted in the ADS, but it is not yet available, the local profile will be transferred to the server when the user logs off and therefore to the Roaming Manual INiS 5 Appendix • 189 Profile of the user. If the profile entry is missing in the ADS, this type of profile is also called a temporary profile, since – apart from caching mechanisms of the operating system – it is basically recreated each time. Since local profiles are based on the profile of the default user, applications contained herein are not yet correctly configured. This causes the system to respond like a newly installed Windows computer after the logon. The Windows Tour appears; when Office starts up, the Installer appears, Internet Explorer asks for connection information, etc. Roaming Profiles (server-based profiles) In order to make this possible they are made centrally available on a server. This means that roaming profiles accompany their user as he changes from workstation to workstation. In order to make this possible they are made centrally available on a server. The location of the profile is noted in the user information in the ADS. Roaming profiles are transferred to the local workstation when the owner of the profile logs on and then updated on the server when the user logs off. This type of profile is therefore best suited for use in schools, since students and teachers work on different computers from one class to the next during lesson time. Unless a user receives a functioning profile from the system support person before the initial logon, the profile will be initialized – with the respective side effects – as described under Local Profiles. Mandatory Profiles These profiles are very similar to the roaming profiles. They, too, wander (roam) with the user from workstation to workstation. The only actual serious difference is that changes to the profile when logging off are not transferred back to the server! These profiles are therefore to a large extent static. They therefore appear to be best suited for students, since they are most likely to ensure logon and start-up procedures run smoothly. The only problematical aspect in this regard is that without special configuration of the profile, individual user files are unfortunately also static, so that no files can be saved permanently. Fortunately, this problem can be solved by configuring so-called folder rerouting (see below). The Set-up of User Profiles The easiest way to obtain a quick overview of the setup of a profile is to take a look in your own local profile directory. For Windows 2000 and Windows XP, this can be found under the name of the registered user under the directory “Documents and Settings”. In addition to the directories and files visible in the figure, a user profile also contains the userspecific part of the registry. This is located directly in the profile directory as a NTUSER.DAT file. The directories available in the profile depend on the operating system being used and in certain cases on the software installed. The most important default directories are briefly described below: 190 • Appendix Manual INiS 5 Application-specific files. Manufacturers of applications decide in individual cases which files should be saved here. Cookies from Internet Explorer Links and files that are located on the Desktop Standard directory for storing files and documents that a user creates. In some instances, the directory may include other sub-directories for images, music, etc. Internet Explorer Favorites Application settings and files. Among other things, this directory contains the Internet Explorer temporary files Links and files of the start menu User templates for MS Office, for example Links to documents most recently used User-specific part of the registry (HKEY_CURRENT_USER) saved as a file, as NTUSER.DAT or NTUSER.MAN, depending on the type of profile. Older applications may save application settings in the WIN.INI file or other INI files. In such cases, the profile includes an additional “Windows” directory, which includes the user-specific versions of these files. In principle, this type of local profile is identical to the server-saved profiles. After all, serversaved profiles are also copied to the local computer when a user logs on, and updated on the server when the user logs off. This particular circumstance poses potential problems, however. If the complete profile were to actually roam with the user, then in time large even volume temporary data (local settings) and work results (my documents) would be copied back and forth. As a result logging on and off would become slower and slower and network traffic would increase immensely. To avoid this problem, the server-supported profiles offer two special features: Temporary files are not updated in server-supported profiles. Folders with user-specific files remain on the server (folder rerouting) Some of these measures are not offered automatically by Windows. Folder rerouting in particular must be activated and configured via GPO’s (GroupPolicy Objects). Folder rerouting means that the affected Windows directories are not in any way expected directly in the profile directory, but the directory specified directly as rerouting will be used on the server. The Set-up of INiS Profile Templates INiS profile templates serve as a model for the profiles of newly created users. When preparing the respective profile, new users are thus spared the trouble of configuring applications and deactivating annoying bits of information. In order to allow for the different requirements of the four user groups of INiS, different profile templates can be created for each group. In the INiS directory of its server under the “ProfileTemplates” directory are sub-directories for the profile templates of students, teachers, UserAdmins and System Admins. The following graphic shows an example of setting up a profile template for students: Manual INiS 5 Appendix • 191 As can be seen from this graphic, an INiS profile template merely contains the directories, which contain the user-specific Windows and application configuration. Temporary files (local settings), which are not taken into account during synchronization of profiles between server and workstation, are initially not included in the profile at all. The folders that contain user-specific files (my documents, cookies, favorites, etc.) are likewise not included in the profile. You will be rerouted by automatic folder rerouting to the respective directories in the Home directory of newly created users. It is thus also possible to configure the settings of the Desktop, Start menu, etc. as mandatory (without the possibility to make changes) and simultaneously allow permanent storage of work results via “My documents”. Folder rerouting is already anchored in the registry of the profile template by INiS. This enables all users of a user group to enjoy direct, joint use of this profile when working with mandatory profiles. This also makes making central changes easier and saves storage space for the storage of the profiles. When working with non-mandatory profiles, joint usage is not possible, since any updating of the profile by several users would of course cause total chaos (in certain circumstances even contradictory changes) in the profile. User Profiles of INiS Users Assuming that profile templates have been defined in the presettings of the INiS.UserAdmin, the available profile template for the respective user group is automatically copied into the profile directory of the user when creating a new user. The name of the profile directory is based on the presettings. In the case of non-mandatory profiles, the name of the directory is “Profile”, and for mandatory ones, “Profile.man”. Also, for mandatory profiles NTUSER.DAT is renamed to NTUSER.MAN. This is the point at which Windows first detects that it is a mandatory profile. The following graphic illustrates the origin and set-up of an INiS user profile. 192 • Appendix Manual INiS 5 These directories are rerouted from the profile directory of the user to the Home directory by folder rerouting. They are initially empty! The templates directory is an exception. This is initialized by a copy of the files in the profile template. In addition to the described directories, the user registry is copied from the profile template as NTUSER.DAT or NTUSER.MAN directly into the profile directory of the user. Manual INiS 5 Appendix • 193 Reset/relax password specifications under Windows 2000 and Windows 2003 server To relax the password guidelines under the Windows 2000/2003 server, it is necessaryto make the following presettings in the safety guidelines for domains. Start the Safety Guidelines for Domains tool via Start/Programs/Administration on the server and change over in the structure to the password guidelines field. Here, the maximum password age, the minimum password length and the minimal password age must all be set to “0”. These settings are made in the processing mode on the right side. After double clicking on the respective guideline, you can either deactivate the checkbox “Define this guideline setting” or enter a “0” as the value for the active guideline. Below is an example for the “Minimum password length” guideline. To activate the changes, change back over to the higher-ranking node “Safety settings”. The changes are effected in the context menu using “Reload” (see below). This function only applies to the Windows 2000 server. For the Windows 2003 server, safety settings must be updated using the command line command “gpupdate”. Note: The above screenshots were created on a Windows 2000 server. The setup should be carried out in the same manner on Windows 2003 systems. Working with Multiple NICs In the event that you have more than one network card installed in a computer (usually the teacher’s desktop) you have to specify, which card INiS should use to communicate with the classroom. This also applies if you have Dial-up & AOL adapters or ISDN-cards installed. To set the correct IP address, select ‘Settings’ from the ‘System‘ menu and select the address from the drop down list-box on the Network Configuration tab. If a student desktop uses multiple NICs you need to modify the WIN.INI file (located in your Windows folder, e.g. C:\windows or c:\winnt) Enter the following lines: [INiS .Smile] PrimaryIP=xxxx.xxxx.xxxx.xxxx For xxxx.xxxx.xxxx.xxxx please use the IP number of the network adapter that is going to be used to connect to the INiS classroom. If you do not include this entry, INiS will always select the first available from the list of installed network cards. Please note: After you have changed the IP settings you need to restart the teacher’s workstation. You will notice that the PC icon in the overview still displays the old IP address. To change this, you need to firstly remove the icon of the teacher PC from the room overview. Log on to the system by entering your password and right click the icon. The icon will not be highlighted although the context menu is still available. 194 • Appendix Manual INiS 5 Select ‘Delete workstation’ from the context menu and exit INiS. The next time you start INiS the PC icon will display the correct IP address, as long as the IP is valid for the network card and it has been entered into the WIN.INI file Problems with the Screentransfer The Screen remains grey: Please check that all computers are set to the same colour-depth resolution. We suggest trying to reduce the colour-depth to 16bit at 800x600 pixels screen resolution to check functionality and then gradually increasing it to the desired settings. Check your IP-Configuration. It is possible that an IP-Number is assigned to a specific ClassNet (A. B or C) but has been provided the wrong Subnet mask. Make sure that the selected IP-Number is from a ‘non-public’ Class-C IP range. For example 192.168.0.x (where ‘x’ is a number between 1 and 254) with a Subnet mask 255.255.255.0. Use the latest drivers for your graphics-card. Check your user manual or manufacturer website for information how to obtain and install these. Some Computers are Skipped During Transmission First you will have to check which transfer method was chosen for INiS: Multicast or Broadcast. If this problem occurs in Multicast-mode, then this indicates a problem with the Switch or Hub used. In Broadcast-mode the use of Switches may lead to such problems. These disturbances may become apparent when the teacher’s screen is transmitted (broadcast) to all of the others. A Switch has to register these Broadcast-Packages and relay to the other ports (Computers). There are Switches that are technically unable to handle this amount of Broadcast-traffic. Please check with your hardware-dealer what steps can be taken as far as the Switch is concerned to ensure that Broadcast-Packages are transmitted quickly and undisturbed to all stations within your subnet. Normally you should set INiS transfer mode to Multicast. If for any reason you need to use the ‘Broadcast’ setting, you may need to exchange the relevant Switch or replace it with a Hub. Stripes at the Recipient’s Screen Usually this has two possible reasons: The transmitting computer is much faster then the receiving computers, so other PCs in your working environment cannot ‘keep up’. This will result in not all screen-packages being evaluated and displayed at the receiving PC. Missing packages show up as fault-spots during image-build-up. Remedy Under ‘System’ -> ‘Settings’ -> ‘INiS Configuration’ set the slider for ‘Composition of Workstations in the Network’ to suit your environment. Manual INiS 5 Appendix • 195 Change the slider step by step from ‘identical’ to ‘mixed’ or ‘very mixed’ until the screen transfer becomes consistent. The ‘Very mixed’ option will only affect the so-called ‘Screen demonstration’. The further to the left the slider is set, the more the transmitting computer will be slowed down. Stripes on Teacher Screen If you get stripes when fetching the screen because the student’s computer is faster than the teachers, you can do the following: Edit the SMILE.INI configuration file (in the program directory of INiS on the teacher’s workplace) Add the following lines: ‘Look32’ LookGetDef=/P01/W01/R00/C00 If the result still isn’t acceptable, you can now increase the value of the second parameter step by step until it becomes acceptable. LookGetDef=/P01/W03/R00/C00 or LookGetDef=/P01/W10/R00/C00 Loss of data-packages Due to network disruption data-packages can get lost. These may cause image corruption during screen transfer. Disruption can be caused by the malfunction of network interface cards (NICs), faulty or not correctly configured Switches/Hubs, defective cabling, weathered cable connectors, defective shielding, non-suitable network-sockets, etc. Remedy Check the physical components of your network systematically. A sensible first step would be a visual check (Is every cable plugged into the correct socket?). Especially with older BNC connectors, corrosion, oxidation or slack contact may cause connection problems. If this is unsuccessful, you should next test whether your network settings are correct and compare to the recommended settings. These tests are especially important with CAT 5 cabling on a 100Mbit basis. If this still leads to no success, it is sensible to set up a network with a very basic configuration (two workstations connected with either a Cross-over-patch-cable or a BNC cable). If the image-build-up problem does not occur in this minimal configuration the network should be expanded step by step by connecting the remaining workstations subsequently until the defective component is identified. 196 • Appendix Manual INiS 5 HDGUARD problems The partition table is not displayed on the HDGUARD monitor. An Ultra ATA or RAID controller is being used This can occur when Ultra ATA hard disks are connected to a separate controller, or when Raid controllers are used. To troubleshoot, reinstall the appropriate controller driver that is usually included with the delivered hardware. When reinstalling the driver, HDGUARD must be installed but not activated. Cloning with the Microsoft Image Server When you use the Microsoft Image Server for cloning under Windows 2000, the partitions are not displayed under HDGUARD. To solve this issue, use a different cloning program (Ghost or Image Cast, etc.). Problems with standard Windows Domain users If you have problems with INiS that do not occur when you are logged on with administrator privileges. Unable to register status monitor! Mode remains unchanged.’ This message appears when trying to activate HDGUARD. HDGUARD can only be activated or deactivated by users with administrative privileges. The students’ workstations are not reported as active (the red X at the workstation’s icon is visible) The student and the group the student belongs to (as well as the teacher) need full access rights to the following registry key: HKEY_LOCAL_MACHINE\SOFTWARE\VBS\SMILE The teacher’s workstation does not save the configuration of workstationicons in Room Overview The teacher and the group the teacher belongs to (as well as the students) need full access rights to the following registry key and all subsequent sub keys: HKEY_LOCAL_MACHINE\SOFTWARE\VBS\SMILE Smile Autostart can’t be activated / deactivated Autostart functionality for INiS is provided by settings in the Registry. The user currently logged on under Windows NT / 2000 / XP needs full access rights to the following registry key: HKEY_LOCAL_MACHINE\SOFTWARE\MICROSOFT\WINDOWS\CURRENT VERSION\RUN The policies I’m distributing do not become valid INiS manipulates the following Registry entries, hence it is compulsory to have full access rights to these keys and their subsequent sub keys: HKEY_CURRENT_USER\Software\Microsoft\Windows\CurrentVersion\Explorer Manual INiS 5 Appendix • 197 HKEY_CURRENT_USER\Software\Microsoft\Windows\CurrentVersion\Policies HKEY_CURRENT_USER\Control Panel If you are using server-based profiles within your Windows NT Domain, the local policy settings configured in INiS will be overwritten by the server-side restrictions. 198 • Appendix Manual INiS 5 G General Notes on the System Settings 88 Index A Activate/de-activate INiS Autostart 95 Activating/Deactivating the INiS.Internet Module (Students) 109 Announcement 37 Applications 48 C Call for assistance function 43 Changing the System Password 95 Clipboard exchange 31 Collecting files 22 Collecting students for a course 62 Configuring 87 Configuring application access 118 Configuring the Page Header 54 Configuring the Screen Transfer 98 Configuring the Student Workstation 102 Configuring the Teacher workstation 96 Content filter 46 Copy Protection 131 Copying Files via Drag & Drop 18 D Deleting Workstations 89 Desktop Overview 14 DesktopControl Module configuration 115 Distribute policies 95 Distributing files 20 DOS-Lock 131 E Editing Policies 89 Enable/ disable INiS User Log-on 95 Ending exam mode 70 Explorer expansion 64 F File browser 16 File operations with individual students 16 File operations with several student’s 19 Filter through Negative list 45 Filter through Positive list 44 Function bars 9 Manual INiS 5 H Home directory 62 How to use this manual 5 I INiS User Interface 8 Installation Guide 73 Introduction 1 L Lesson options 57 Licensing 174 Licensing your software 83 Limit Page Outputs 55 Limitation of HDGUARD in the INiS Trial Version 5 Limitations of INiS.UserAdmin in the Trial Version 4 Lock & Unlock Printers 54 Lock Internet 44 Locking screens 31 M Manage Applications 118 O Opening the chat window 33 P Phone Call 37 Playback Settings 38 Positioning workstations 89 Preparations on the server 161 Prerequisites 36 Presettings of UserAdmin 167 Print Module configuration 133 Printer 54 Printing 42 Printing class and/or course lists 63 Problems with the video source 41 Process overview and navigation 9, 25 Profiles 168 R Remote control 30 Renewing an exam ticket 69 Resetting the password 61 Room Configuration 99 Room Overview 12 Run at Student’s PC 27 Index • 199 S Screen demonstration 30 Screen Transfer 30 Selecting Students for a Class 63 Send message 32 Set up the first room 163 Setting the Volume 38 Setting up additional rooms 166 Setting up the UserAdmin Module 160 Settings 90 Shut down student workstations 27 Speech Transmission 36 Standard Settings for the INiS.Internet Module for Students 113 Symbols in the function bar 9 T Terminology 5 Trial Version 4 U Unlock Internet 47 User properties 62 UserAdmin Modul configuration 139 V Video conference 40 Video monitor 41 Video presentation 39 Video Transmission 39 Viewing all screens 15 W Workstation environment 99 Workstation Icons in Room Overview 13 Workstation Icons in User Names List View 11 200 • Index Manual INiS 5