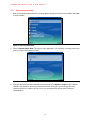
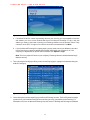
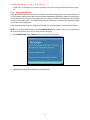
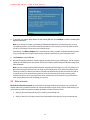
1
Vodafone Email Plus
User Guide for Nokia Series 60
V O D A F O N E
E M A I L
P L U S
U S E R
G U I D E
Table of Contents
1
INTRODUCTION................................
INTRODUCTION ................................................................
................................................................................................
................................................................................................
................................................................................................
................................................................................................
.................................................................
................................. 4
2
INSTALLING VODAFONE EMAIL PLUS ................................................................
................................................................................................
................................................................................................
...................................................................................
...................................................4
................... 4
2.1
SETUP BY USING VODAFONE EMAIL PLUS ICON ............................................................................................................................................. 5
2.2
SETUP BY DOWNLOADING THE VODAFONE EMAIL PLUS SOFTWARE FROM THE WEB.......................................................................... 8
2.3
UPGRADING FROM VODAFONE BUSINESS EMAIL TO VODAFONE EMAIL PLUS ................................................................................. 11
2.3.1
Upgrade procedure for enterprise customers ...................................................................................................................... 11
2.3.2
Upgrade procedure ................................................................................................................................................................................ 11
2.4
USING VODAFONE EMAIL PLUS ON TWO MOBILE PHONES ...................................................................................................................... 12
3
SETTING UP YOUR EMAIL
EMAIL ACCOUNTS ................................................................
................................................................................................
................................................................................................
...............................................................................
............................................... 12
3.1
MICROSOFT EXCHANGE ACCOUNT ................................................................................................................................................................... 12
3.1.1
How to set up a mailbox...................................................................................................................................................................... 13
3.1.2
How to add PIM Data............................................................................................................................................................................. 15
3.2
OTHER ACCOUNTS ................................................................................................................................................................................................. 16
3.2.1
How to activate a mailbox.................................................................................................................................................................. 17
3.3
WELCOME EMAIL ..................................................................................................................................................................................................... 19
4
USING VODAFONE EMAIL PLUS................................
PLUS................................................................
................................................................................................
................................................................................................
.............................................................................................
............................................................. 20
4.1
STATUS SCREEN ...................................................................................................................................................................................................... 20
4.1.1
Status menu................................................................................................................................................................................................ 21
4.2
ACCESSING YOUR EMAIL ACCOUNTS................................................................................................................................................................ 21
4.2.1
Inbox................................................................................................................................................................................................................. 22
4.2.2
Home screen .............................................................................................................................................................................................. 22
4.3
WORKING WITH EMAILS......................................................................................................................................................................................... 23
4.3.1
Reading an email...................................................................................................................................................................................... 23
4.3.2
Viewing an HTML email........................................................................................................................................................................ 24
4.3.3
Replying to/forwarding an email................................................................................................................................................... 25
4.3.4
Composing new emails........................................................................................................................................................................ 27
4.3.5
Working with attachments................................................................................................................................................................. 27
4.3.6
Sending an email with an attachment........................................................................................................................................ 28
4.3.7
Adding an email signature ................................................................................................................................................................. 29
4.3.8
Restoring Vodafone Email Plus services to a new mobile phone............................................................................. 29
5
WORKING WITH EXCHANGE
EXCHANGE AND PIM DATA................................
DATA ................................................................
................................................................................................
................................................................................................
...................................................................
................................... 30
5.1
GLOBAL ADDRESS LIST ......................................................................................................................................................................................... 30
5.2
CALENDAR ................................................................................................................................................................................................................ 32
5.2.1
Viewing your calendar.......................................................................................................................................................................... 32
5.2.2
Accepting a meeting request........................................................................................................................................................... 32
5.2.3
Adding an appointment to your calendar................................................................................................................................ 33
5.3
TASK LIST ................................................................................................................................................................................................................... 33
6
VODAFONE EMAIL PLUS ONLINE................................
ONLINE................................................................
................................................................................................
................................................................................................
..........................................................................................
.......................................................... 35
6.1
MY CONTACTS ......................................................................................................................................................................................................... 37
6.1.1
Managing contacts.................................................................................................................................................................................. 37
6.1.2
Importing a contact................................................................................................................................................................................ 38
6.1.3
Adding a contact ...................................................................................................................................................................................... 38
2
V O D A F O N E
E M A I L
P L U S
U S E R
G U I D E
6.1.4
Deleting a contact................................................................................................................................................................................... 38
6.1.5
Exporting contacts .................................................................................................................................................................................. 38
6.1.6
Editing contacts ........................................................................................................................................................................................ 38
6.1.7
Merging Contacts..................................................................................................................................................................................... 39
6.2
MY CALENDAR......................................................................................................................................................................................................... 42
6.3
MY SETTINGS ........................................................................................................................................................................................................... 43
6.3.1
Timezone ...................................................................................................................................................................................................... 43
6.3.2
Password ....................................................................................................................................................................................................... 43
7
SPECIAL SETTINGS................................
SETTINGS................................................................
................................................................................................
................................................................................................
................................................................................................
........................................................................................
........................................................ 44
7.1
UPGRADE................................................................................................................................................................................................................... 44
7.2
CONNECT AND DISCONNECT .............................................................................................................................................................................. 44
7.3
MANAGING MAILBOXES ......................................................................................................................................................................................... 44
7.4
SETTINGS ................................................................................................................................................................................................................... 44
7.4.1
Connection schedule............................................................................................................................................................................ 45
7.4.2
Message Limit............................................................................................................................................................................................. 45
8
TIPS FOR USING VODAFONE EMAIL PLUS................................
PLUS................................................................
................................................................................................
................................................................................................
........................................................................
........................................ 46
9
TROUBLESHOOTING................................
TROUBLESHOOTING ................................................................
................................................................................................
................................................................................................
................................................................................................
....................................................................................
.................................................... 47
10
FREQUENTLY ASKED QUESTIONS
QUESTIONS................................
STIONS ................................................................
................................................................................................
................................................................................................
........................................................................................
........................................................ 49
11
INDEX ................................................................
................................................................................................
................................................................................................
................................................................................................
................................................................................................
...................................................................................
................................................... 52
3
V O D A F O N E
E M A I L
P L U S
U S E R
G U I D E
1 Introduction
Vodafone Email Plus™ gives you real-time access to your favourite email accounts on your mobile phone. It
works with a large number of free or paid for email accounts, including Microsoft Exchange, Gmail, Hotmail,
and standard IMAP/POP3-enabled mailboxes.
Vodafone Email Plus can also access and synchronise PIM (Personal Information Management) data such as
contact lists, calendar entries, and task lists from your Microsoft Exchange account. Any updates to your PIM
data are automatically delivered to your mobile phone, keeping you connected to your important information
wherever you are.
Vodafone Email Plus Online is a secure website that backs up and stores your PIM data. Your mobile phone
and Vodafone Email Plus Online are always synchronised. With Vodafone Email Plus Online, you can update
your address book and calendar from any web browser. Even if you switch mobile phones or lose your mobile
phone, your information from Vodafone Email Plus Online is easily transferred to a new mobile phone.
NOTE: To use Vodafone Email Plus, you must have a subscription. If you do not yet have a subscription, please
contact your local Vodafone Retail Store or call Vodafone Customer Service on 1907.
2 Installing Vodafone Email Plus
Vodafone Email Plus icon may be located in the Menu screen. Click the icon or the setup prompt to activate
the service and add your email accounts as described in this user guide.
Figure 1: Vodafone Email Plus Icon
There are currently three ways of installing Vodafone Email Plus on your mobile phone:
•
Vodafone Email Plus Icon: The Smart Icon (as shown in Figure 1) assists with installing the software.
See Section 2.1: Setup by using Vodafone Email Plus icon on page 5 for the installation procedure.
•
Web browser: If you do not have the preinstalled software, use the mobile web browser to download
the correct software. See Section 2.2: Setup by downloading the Vodafone email plus software from
the web on page 8 for more information.
•
Upgrading: If you are Upgrading from Vodafone Business Email to Vodafone Email Plus, see Section
2.3: Upgrading from Vodafone Business Email to Vodafone Email Plus on page 11.
4
V O D A F O N E
E M A I L
P L U S
U S E R
G U I D E
2.1 Setup by using Vodafone Email Plus icon
Follow the procedure below if the Vodafone Email Plus icon is on your mobile phone.
1. From the main menu on your mobile phone, click the Vodafone Email Plus icon.
Figure 2: Welcome to Vodafone Email Plus
2. Click Setup now to begin installation.
Figure 3: Download Vodafone Software
3. Click OK to download the software. Download details displays the progress of the software download.
5
V O D A F O N E
E M A I L
P L U S
U S E R
G U I D E
Figure 4: Install Vodafone Email Plus
4. Click Yes to install Vodafone Email Plus.
Figure 5: Continue Installation
5. Click Continue. An installation progress bar displays. When the installation is complete, the Terms and
Conditions screen appears.
6
V O D A F O N E
E M A I L
P L U S
U S E R
G U I D E
Figure 6: Terms and Conditions
6. Read the End User License Agreement, Terms of Use, Vodafone Customer Note, and License Agreement. When
you have finished reading all of the Terms and Conditions, click Accept to continue.
You are now connected to the Vodafone Email Plus service.
Figure 7: Select Email Account
7. Select the email account(s) to set up. For more information about setting up your email, see Section 3: Setting
up your email accounts on page 12.
NOTE: If you have any problems with the installation process, text Vodafone Customer Service at 1907.
Vodafone Email Plus is installed to your Installations folder by default.
7
V O D A F O N E
E M A I L
P L U S
U S E R
G U I D E
2.2 Setup by downloading the Vodafone email plus software from the web
When you signed up for Vodafone Email Plus, you may have received an SMS with a link you can use to
download the Vodafone Email Plus software. Please check your SMS Inbox for this message. Select the link in
the SMS to open the mobile web browser to the download site. If you cannot find the message, please follow
the procedure described below to install Vodafone Email Plus.
1. Select the link provided in the SMS. If you did not receive an SMS with the link, open the mobile web browser.
Enter the following URL in the browser
emailplus.vodafone.ie/ota
2. Click Yes to open the secure connection. The Vodafone Email Plus download landing page appears.
Figure 8: Downloading Vodafone Email Plus
3. Click OK to download the selected file. Note: If the download does not automatically start, select the
Download Software link.
8
V O D A F O N E
E M A I L
P L U S
U S E R
G U I D E
Figure 9: Install Vodafone Email Plus
4. Click Yes to install Vodafone Email Plus.
Figure 10: Continue Installation
5. Click Continue. An installation progress bar displays.
9
V O D A F O N E
E M A I L
P L U S
U S E R
G U I D E
Figure 11: Welcome to Vodafone Email Plus
8. Click Setup Now or click Learn More for more details about Vodafone Email Plus.
Figure 12: Terms and Conditions
9. Read the End User License Agreement, Terms of Use, Vodafone Customer Note, and License Agreement. When
you have finished reading all of the Terms and Conditions, click Accept to continue.
You are connected to the service.
10
V O D A F O N E
E M A I L
P L U S
U S E R
G U I D E
Figure 13: Select Email Account
10. Select the email account(s) to set up. For more information about setting up your email, see Section 3: Setting
up your email accounts on page 12.
NOTE: If you have any problems with the installation process, text Vodafone Customer Service at 1907.
Vodafone Email Plus is installed to your Installations folder by default.
2.3 Upgrading from Vodafone Business Email to Vodafone Email Plus
Before attempting to upgrade, you must verify that your Vodafone Business Email account is still active and
you must be using a mobile phone supported by Vodafone Email Plus.
2.3.1
Upgrade procedure for enterprise customers
If you are an enterprise customer and want to upgrade from Vodafone Business Email to Vodafone Email Plus,
you must first sign up for the service. If you use Microsoft Exchange at your company, you may be offered an
equivalent service that is able to access your Microsoft Exchange account through Outlook Web Access. Ask
your VES administrator for assistance with uninstalling the Vodafone Business Email software on your mobile
phone. Then contact Vodafone Customer Service to sign up for the Vodafone Email Plus service.
2.3.2
Upgrade procedure
Please follow the procedure described below to upgrade your software and activate Vodafone Email Plus.
1. Launch the Vodafone email software.
2. Select Options > Upgrade to request an upgrade of the software.
3. The new Vodafone Email Plus software downloads and is then installed on your mobile phone.
4. Complete the steps described in Section 2.2: Setup by downloading the Vodafone email plus software
from the web on page 8.
11
V O D A F O N E
E M A I L
P L U S
U S E R
G U I D E
2.4 Using Vodafone Email Plus on two mobile phones
You can activate Vodafone Email Plus on two mobile phones.
1. Install Vodafone Email Plus and set up the mailboxes as described in the procedures below.
2. Transfer your SIM card from the first mobile phone to your other mobile phone.
3. Click on the Vodafone Email Plus icon and enter your password for your predefined mailboxes. As soon as you
enter your password, your mailboxes appear on the second mobile phone and Vodafone Email Plus connects to
deliver updates to that mailbox and associated PIM data.
NOTE: You can switch back and forth between two phones, e.g. one business phone during the week and one
personal phone during the weekend.
3 Setting up your email accounts
Once Vodafone Email Plus is connected, you are prompted to set up mailboxes for your email accounts. You
must have at least one account set up in order to be able to use Vodafone Email Plus. Using Vodafone Email
Plus, you can activate up to 5 separate mailboxes at the same time. Vodafone Email Plus will continuously
update these mailboxes. If you have PIM data associated with a Microsoft Exchange account, your PIM data.
also continuously updates. PIM data from email service providers is not included.
Choose your first mailbox from the selection offered. The selection includes the most popular Internet Email
services in your country along with a Corporate Email option for access to Microsoft Exchange accounts. If you
do not see your Internet email provider listed, select Internet Email and complete the fields with the
required information.
When you set up your mailboxes, your address book, calendar, and task list are backed up in Vodafone Email
Plus Online. For more information about using Vodafone Email Plus Online, see Section 6: Vodafone Email
Plus Online on page 35.
For information on how to set up your Microsoft Exchange account, see Section 3.1: Microsoft Exchange
account on page 12.
For information on how to set up an Email Service Provider account (Hotmail or Gmail) or an Internet email
account, see Section 3.2: Other accounts on page 16.
3.1 Microsoft Exchange account
By using Vodafone Email Plus to access Microsoft Exchange, you can synchronise email, contacts, calendar
entries, and task list with your mobile phone. You can receive your Microsoft Exchange information on your
mobile phone without worrying about servers or synchronising with your PC.
12
V O D A F O N E
3.1.1
E M A I L
P L U S
U S E R
G U I D E
How to set up a mailbox
1. When you first install Vodafone Email Plus, a prompt appears, asking if you want to set up a mailbox. Select Yes
to set up a mailbox.
Figure 14 : Select Corporate Email
2. Select Corporate Email. (Note: This option is only applicable if your company or hosting provider has
given you a Microsoft Exchange account.)
Figure 15 : Enter Login Information
3. Enter your Microsoft Exchange email address and password. Select Options > Login to login. Vodafone
Email Plus will attempt to discover your domain information and log in to your exchange account. If
Vodafone Email Plus is unable to find your server, you are prompted to enter technical settings as
indicated below:
13
V O D A F O N E
E M A I L
P L U S
U S E R
G U I D E
Figure 16 : Server Address
a. If Vodafone Email Plus cannot automatically discover your account, you are prompted to enter the
web address you use to access Outlook Web Access for Microsoft Exchange (i.e. this is the web
address you need to enter when accessing your Exchange mailbox over the internet). Select “Only
connect if secure (SSL)” to login in over a secure connection (recommended). Click Next.
b. If you use Microsoft Exchange for company email, you may need to enter your Windows user name
(use to login to your computer) and Windows Domain (the domain your computer is on). Your
company’s IT Department can provide this information. Click Options > Login.
Note: This is only required if access to your company’s Exchange domain is authenticated through
Windows security.
4. The Login progress bar displays. When you are successfully logged in, a progress bar indicates that your
mailbox is setting up.
Figure 17 : Exchange Inbox
5. Your mobile phone receives email from your Microsoft Exchange account. The first fifty email messages
synchronise to your Vodafone Email Plus account after you set up your mailbox for the first time. For
information on how to use Microsoft Exchange data, see Section 5: Working with Exchange and PIM data
14
V O D A F O N E
E M A I L
P L U S
U S E R
G U I D E
on page 30. For information on how to use your inbox, see Section 4: Using Vodafone Email Plus on page
20.
3.1.2
How to add PIM Data
If new appointments, task lists, and contacts are available in your Microsoft Exchange account, a message at the top
of your Exchange mailbox indicates that Personal Information Management (PIM) data is available for synchronising
to your mobile phone. This allows you to synchronise your Contacts, Calendar and Task data from your Exchange
account to your mobile phone. The PIM Data prompt appears if PIM data is present in your Microsoft Exchange
account and on your mobile phone.
If your mobile phone has no contacts, appointments, or tasks, you are not prompted to synchronise your PIM data.
NOTE: You can always add PIM later by selecting PIM Available from the Status screen. For more information
about the Status Screen, see Section 4.1: Status screen on page 20.
1. Select PIM Available from the Status screen or from in your Exchange inbox.
Figure 18: PIM Available
2. Click Yes to synchronize your PIM data to your mobile phone.
15
V O D A F O N E
E M A I L
P L U S
U S E R
G U I D E
Figure 19: PIM Data Preparation
3. To proceed, you need to decide what to do with existing PIM data. Click Combine to confirm combining PIM
data (recommended).
Note: If you decide to combine your Exchange PIM data with PIM data on your mobile phone, you may
see duplicate entries in your contacts, calendar, and task lists. This occurs if you have the same contacts
in both your Exchange account and on your mobile phone.
Alternatively, click Menu > Replace if you want delete all contact, calendar, and task information present
on your mobile phone and replace with contacts, calendar, and tasks from your Exchange account.
4. Click Continue to confirm PIM data.
5. Microsoft Exchange synchronises contacts, calendar, and task entries to your mobile phone. You can view and
update your calendar, task list, and contacts. See Section 5: Working with Exchange and PIM data on page 30 for
more information.
Note: You can manage duplicate PIM information using Microsoft Exchange on your PC. Any edits in your
Microsoft Exchange account are sent over the air to your mobile phone. If you have many entries in your
Exchange contact list, calendar, and task list, PIM data synchronisation may take several minutes and up
to several hours. If the synchronisation process is slow, disconnecting from and reconnecting to the
Vodafone Email Plus service may help. Please allow a few minutes to several hours for your PIM data to
reach your mobile phone when activating your account.
3.2 Other accounts
Email Service Provider accounts are connections to the large email service providers, such as Gmail and
Hotmail. When using Vodafone Email Plus in conjunction with an account on any of these email domains, you
get two primary benefits beyond the standard capabilities of Internet Email accounts:
•
Ability to get near instant delivery of new email to your mobile phone.
•
Ability to search for or lookup contacts in the email address book directly from your mobile phone.
16
V O D A F O N E
E M A I L
P L U S
U S E R
G U I D E
Internet Email accounts are connections to regular POP or IMAP enabled ISP mailboxes. When using
Vodafone Email Plus in conjunction with any of these standard accounts, you will receive new email on
average every 15 minutes.
NOTE: Before adding your Internet Email account, please make sure you have POP enabled in your account. If
you do not know how to enable POP, contact your ISP provider for more information. If POP is not enabled,
you will not be able to login and retrieve email using Vodafone Email Plus.
NOTE: If you want to add a Yahoo mailbox, add your Yahoo email account using the Internet Email option.
3.2.1
How to activate a mailbox
This section describes how to set up a mailbox from your Email Service Provider or Internet Provider.
1. When you first install Vodafone Email Plus, you are prompted to select an email account from a list.
Figure 20: Email Accounts
2. Select one of the email service accounts (Hotmail or Gmail) from the list of email providers. Or select Internet
Email if you want to set up a standard mailbox using an ISP that is not explicitly mentioned on the list.
Figure 21: Login Information (Gmail Account)
17
V O D A F O N E
E M A I L
P L U S
U S E R
G U I D E
3. Enter your email address in the Email Address field. NOTE: For certain named email service providers the
domain name may be pre-filled by default, but you can edit this text to login to a specific domain hosted by this
email service provider.
4. Enter your login password in the Password field.
5. Click Login.
6. If your login fails, the email setup screen indicates that you need to enter in additional information such as your
login name and mail server. If this occurs:
a.
Click OK.
b. Verify that you have entered the correct email and password. Click Login.
c.
Enter your Login name and the Mail Server. Click Login.
7. Accept any Terms of Condition that may appear.
8. A progress bar displays the Login, Set up, and email retrieval progress.
Figure 22: Email Inbox
9. If your attempt to login is successful, the inbox appears on the screen. The first fifty email messages
synchronise to your Vodafone Email Plus account after you set up your mailbox for the first time. For
more information about using your email, see Section 4.3: Working with emails on page 23.
18
V O D A F O N E
E M A I L
P L U S
U S E R
G U I D E
3.3 Welcome email
When you have activated your first mailbox using Vodafone Email Plus, you will receive a welcome email in
your email account. This welcome email introduces the Vodafone Email Plus service and explains how to find
and login on the Vodafone Email Plus Online website. For more information, see Section 6: Vodafone Email
Plus Online on page 35.
Figure 23: Welcome Email
19
V O D A F O N E
E M A I L
P L U S
U S E R
G U I D E
4 Using Vodafone Email Plus
4.1 Status screen
Once you have created your first mailbox, your mobile phone will display the Vodafone Email Plus Status screen.
This screen shows the connection status of your email service with the date and time of the most recent network
activity and each mailbox account you have set up. Your mailbox account will indicate the number of unread
messages, if any. You can access this Status screen any time by clicking the Vodafone Email Plus icon from your
mobile phone’s main menu.
You can opt to keep the Status screen closed. Closing the Status screen does not disconnect you from the
Vodafone Email Plus service. When the Status screen is closed, Vodafone Email Plus continues to run in the
background. You can set up your home screen to list your email accounts, as described in Section 4.2.2: Home
screen on page 22.
Figure 24: Status Screen
By default, each account is labelled according to the domain name of the email address on that account. For
example, if your Exchange account receives email at the address, [email protected], the name of the
Mailbox account will be “Bigcompany”.
•
Change the mailbox alias through Options > Edit Mailbox > Mailbox
Mailbox Details and specify a new label (you will
need to provide your mailbox password to update the label).
•
To add another mailbox, select Options > Add Mailbox and you will be shown the list of email providers.
•
Click Lookup to search for a contact in any of your email address books (either Microsoft Exchange,
Gmail, or Hotmail depending on which mailboxes you have activated in Vodafone Email Plus).
•
Click Contacts to view your contact list.
•
Click Calendar to view your appointments. For more information about your calendar, see Section 5.2:
Calendar on page 32.
•
Click Tasks to view your task list. For more information about your task list, see Section 5.3: Task list on
page 33.
20
V O D A F O N E
4.1.1
E M A I L
P L U S
U S E R
G U I D E
Status menu
The Status menu provides you with various options for your mailboxes.
Figure 25: Status Screen Menu
Disconnect or Connect allows you to disconnect from or connect to the Vodafone Email Plus service.
Status Info allows you to see if you are connected or disconnected from the Vodafone Email Plus service.
Open allows you to view the inbox of the selected mailbox.
Settings allows you to set a connection schedule and message limit. The connection schedule provides an option
to manage the day/time when Vodafone Email Plus should connect to receive email and PIM updates, while the
message limit can be used to configure the number of messages to store in your mailbox on the mobile phone. See
Section 7.4: Settings on page 44 for more information.
Add Mailbox allows you to select and add a new email account.
Upgrade allows you to manually check if there is an upgrade to the Vodafone Email Plus software for your mobile
phone. However, you are automatically notified of any new software upgrades so this function is rarely used.
Edit Mailbox allows you to change the password for a selected email account. Use this option if you have recently
changed the password to your email account.
Delete Mailbox allows you to delete the selected mailbox.
About provides the version number and specific information about the Vodafone Email Plus service.
4.2 Accessing your email accounts
This section describes how to access your email account and use the features. For information about features
available only for a Microsoft Exchange Account, see Section 5: Working with Exchange and PIM data on page
30.
You can use your mobile phone’s settings function to set an alert for when you receive a new email message.
See the user manual for your mobile phone for more information about setting alerts for your mobile phone.
Select your email account from the Status screen. If you have unread messages, the inbox will open to the
first unread messages. If there is no new email, your inbox will appear.
21
V O D A F O N E
4.2.1
E M A I L
P L U S
U S E R
G U I D E
Inbox
Incoming messages are displayed in the Inbox. By default, messages are sorted by date, with the most recent
message listed first.
Select Options > Create Message > E-mail to compose a new email message. See Section 4.3.4: Composing
new emails on page 27.
To sort your inbox, select Options > Sort by. You can select to sort your emails by Date, Sender, or Subject.
To read an email, scroll to the email, and use the OK key to select the email. The email message appears.
Viewing the email also provides you with several options for working with email.
4.2.2
Home screen
When your mobile phone is in idle mode, you can still view information about your email accounts. When you
receive new email, the envelope icon displays the number of new, unread email messages in your email account.
You can manually customise the idle screen to display email information from one of your mailboxes. The Home
Screen display options are found in the Personalisation folder.
To set up the display for the Nokia E71:
1. Navigate to Menu > Tools > Settings > General > Personalisation > Home screen.
2. Change the Home Screen setting to Active.
3. Return to the Home screen set up and open Mode Settings > Home Screen Applications > Enabled
Applications.
4. Ensure that ‘Email 1 Notification’ and ‘E-mail 2 notification’ are ticked. Click OK.
5. Select Email 1 Notification.
6. Set the Mailbox value to the name of the mailbox you would like to see on the home screen. You can also select
preview options.
7. To view a second mailbox on the home screen, you can repeat the same procedure with Email 2 Notification.
8. Return to the home screen where the mailbox is displayed.
22
V O D A F O N E
E M A I L
P L U S
U S E R
G U I D E
Figure 26: Mailbox Display
4.3 Working with emails
This section describes how to read, reply to, forward, and create new email messages.
4.3.1
Reading an email
To read an email, use your navigation keys to scroll down to the email. Click the OK key to open a selected
email.
To save space and allow for quick message retrieval, your messages will initially be displayed with header,
subject and part of the text. The rest of the text is often truncated if the size of the email goes beyond 2Kb.
Figure 27: Truncated Message
To retrieve the full email from the server, select Options > Retrieve. You can also scroll down and select the
“Get entire message” link.
If the email message is in HTML format, you are able to view the HTML version of the message. See Section
4.3.2: Viewing an HTML email on page 24 for more information.
23
V O D A F O N E
E M A I L
P L U S
U S E R
G U I D E
To delete the email, select Options > Delete.
To reply to the email you are reading, click Options > Reply. You can reply to the sender or to all email
recipients. See Section 4.3.3: Replying to/forwarding an email on page 25 for more information.
To forward the email, select Options > Forward.
If you want to add the email address to your contact list, select the email address in the header. Click Options
> Add to Contacts. If the body of the text contains an email address or phone number, you can select it to
add to your contacts. You can either create a new contact or update an existing contact.
•
When you create a new contact, the email field is populated with the email address. Enter contact
details such as name and phone number and click Done.
•
To update an existing contact, select the contact from the list. The email field is populated with the
email address. Click Done.
To return to the email inbox, click Back.
Back
To return to the Status screen select Options > Exit.
Exit
An email message can contain hotlinks such as a phone number, an email address, or a web address. You can
click on the hotlink provided in an email message. Clicking on the phone number calls the number. Clicking on
an email address creates a new email with the email address. Clicking on a web address opens the mobile phone
browser to the web address.
4.3.2
Viewing an HTML email
Vodafone Email Plus now supports display of HTML email with fonts, colours, rich formatting, and embedded or
external images. HTML email is more visual than basic text and offers a richer email viewing experience.
To read an HTML email:
Figure 28: HTML Email with Image Security
1. Open the email message in your inbox. The email appears as a truncated, plain text email.
24
V O D A F O N E
E M A I L
P L U S
U S E R
G U I D E
Figure 29: Get External Content
2. Select Options > Get External Content.
3. The Privacy Risk message appears. Click Continue. If you do not want to see the privacy risk warning in the
future, click No. If you want to see the warning message, click Yes.
Figure 30: HTML Email
4. The full message downloads and displays as HTML. Use your navigation keys to scroll left and right.
Note: If HTML is not available, the body text is displayed in plain text format.
Note: Hotmail accounts do not currently support this feature.
4.3.3
Replying to/forwarding an email
When you reply to or forward an email from your mobile phone, Vodafone Email Plus offers the convenience
of a smart reply/smart forward. This means that text you enter on your mobile phone is added to a full copy of
the email from your mailbox before the reply/forward is sent to the recipients. If you are viewing a truncated
message, you do not need to download the full message to your phone and then reply or forward everything
from your phone over the air back to the server.
25
V O D A F O N E
E M A I L
P L U S
U S E R
G U I D E
Instead you can send a quick reply or forward from your phone and Vodafone Email Plus will automatically
create the outbound message by appending the equivalent server copy of the email message direct from
your mailbox with all attachments and full HTML or plain text format. This means your recipients will receive
the full message with all its parts even if you only sent a minor part of this message from your mobile phone.
To forward or reply to an email you are reading:
1. Select Options > Reply or Options > Forward.
2. Choose whether you want to reply to the sender, to all email recipients, or forward the message.
Figure 31: Replying to an email
3. A new email message, which includes the original message, appears. Use the keyboard to type your message.
You can also edit the original message by scrolling below the –Original Message-- indicator and editing the
message.
4. To add an email address to the email, scroll up to the To: field to place the cursor in the To: field.
5. Select Options > Add recipient.
6. Select a recipient from your contact list or enter the name in the search field to find the contact. The contact is
added to the To: field. If a contact has more than one email address, scroll through the list and select the email
you want to use. The email address is added to the To: field.
•
To add a Cc, position the cursor so that it is in the Cc: field. Use the same procedure to add an email
address.
•
If you want to include Bcc, select Options > Show Bcc. Position the cursor in the Bcc: field and use the
same procedure to add an email address.
7. To set the importance of the email, select Options > Importance. You can set the importance to Low, Normal
(default), or High.
8. If you need to save the message, select Close > Save to Drafts.
9. Select Options > Send to send the email.
26
V O D A F O N E
E M A I L
P L U S
U S E R
G U I D E
To retrieve a draft, use the navigation key (right or left) to scroll to the Drafts folder. Select the draft from the list to
open the message and continue writing.
4.3.4
Composing new emails
To compose a new email:
1. From your inbox, select Options > Create message > E-mail. Select the email account you wish to use from
the list. A blank email message appears.
Figure 32: Composing an Email
2. Add a recipient in the To: field by selecting Options > Add Recipient. Select a recipient’s email from your
contact list. The email field is populated. You can also add Cc. If you want to add Bcc, select Options > Show
Bcc.
3. Enter the Subject and the body of the email. If you need to save the email, select Close > Save to Drafts. To
delete the message, select Close > Delete.
4. To send the email, select Options > Send.
Note: You can use Vodafone Email Plus to append a signature to each of your outgoing messages. See Section 4.3.7:
Adding an email signature on page 29.
4.3.5
Working with attachments
Using Vodafone Email Plus, you can selectively download attachments to your mobile phone one by one.
Downloaded attachments can be saved on your mobile phone. To view an attachment, your phone must be
able to display the attachment type, either through a native phone capability such as the Picture Viewer or
through bundled software applications such as Microsoft Word or Adobe Acrobat Reader.
NOTE: Some file types require installation of 3rd party add-on software before the attachment can be viewed
on your mobile phone. If the software is installed on the mobile phone, the attachment will display. If not, a
question mark appears to the left of the attachment name and the attachment will not open. You need to
download the appropriate software onto your mobile phone in order to view the attachment. Alternatively,
you can also transfer the file from your mobile phone to your PC and view it there instead. Refer to the manual
that came with your mobile phone for further information about downloading 3rd party add-on software or
transferring information to your PC.
27
V O D A F O N E
E M A I L
P L U S
U S E R
G U I D E
When you receive a message that contains attachments, the attachment icon (an envelope with a paper clip)
appears next to the message.
To download an attachment:
1. Open the message that contains the attachment.
Figure 33: Attachments Link
2. Click View Attachments at the top of the email. The Attachments screen appears.
3. Select Options > Retrieve to download the attachment.
4. A red arrow appears on the attachment icon. When the red arrow disappears, the file is downloaded to the
mobile phone and appears as the file type.
5. Select the attachment name again to view the contents.
4.3.6
Sending an email with an attachment
1. Open the email and reply, or open a new email.
2. Select Options > Attachments. The Attachments screen appears.
Figure 34: Insert Attachment
28
V O D A F O N E
E M A I L
P L U S
U S E R
G U I D E
3. Select Options > Insert. You can insert a picture, sound, video, note, or file.
4. A list of files available on the mobile phone appears. Scroll through the list and select the file you want to
attach. The Adding attachment progress bar displays.
5. The attachment appears in the Attachment screen. You can add more attachments using the above
procedure.
6. Click Back. Compose the email and click Send.
4.3.7
Adding an email signature
You can create an email signature to add to the end of the email you send. To add a signature:
1. From the Status screen, highlight the mailbox you want to use the signature.
2. Select Options > Edit Mailbox > Mailbox Signature.
Figure 35: Signature Options
3. Ensure that Signature is set to Enabled.
4. Select Signature Text.
5. Enter your new signature in the text box.
6. Click OK.
7. Click Back, Back, to return to the Status screen.
4.3.8
Restoring Vodafone Email Plus services to a new mobile phone
If you are using Vodafone Email Plus and want to transfer the service to your new mobile phone, you can easily
transfer your mailbox information to your new mobile phone.
1. Install Vodafone Email Plus and set up the mailboxes.
2. Transfer your SIM card from the first mobile phone to your other mobile phone.
3. Click on the Vodafone Email Plus icon.
29
V O D A F O N E
E M A I L
P L U S
U S E R
G U I D E
4. When you connect to the service, you are prompted to enter your password for each of the mailboxes you have
set up. As soon as you enter your password for each mailbox, a mailbox is created and activated.
5. Vodafone Email Plus automatically connects to deliver email messages and PIM updates.
5 Working with Exchange and PIM data
The following sections describe features available in your Microsoft Exchange account powered by Vodafone
Email Plus.
5.1 Global Address List
You can look up an Exchange contact in the Global Address List (GAL) at any time to view a contact’s name,
phone number, and email address. Note that the address books of your other email accounts also appear in
the Contact Lookup list. Only the Global Address List accesses the company contact list in your Microsoft
Exchange account.
Before you can access the GAL, you need to activate a Microsoft Exchange mailbox and enable PIM data
synchronisation between Microsoft Exchange and your mobile phone. For information about adding Microsoft
Exchange PIM data to your mobile phone, see Section 3.1.2: How to add PIM Data on page 15.
1. Select Lookup from the status screen.
2. Ensure that the Global Address List box contains a tick mark.
Figure 36: Contact Lookup
3. Enter the contact information in the Search for field and select Search. A list of contacts with matching
names appears.
30
V O D A F O N E
E M A I L
P L U S
U S E R
G U I D E
Figure 37: Contact Lookup in Global Address List
4. Highlight the desired contact and select Open to view more information about the contact. This usually
includes email and phone number.
Figure 38: Contact Details in Global Address List
5. You can opt to use the contact’s information (email address), add the contact to your contact list on the
mobile phone, and use the contact’s information and then add to your contact list. Select Options to
access these options.
You can access the GAL when composing an email. To access the GAL from an email message:
1. Open a new email or reply to an email in your Exchange mailbox.
2. Place the cursor in the To: field.
3. Select Options > Lookup.
4. Enter the name into the search field and ensure the Global Address List is selected. Click Search
5. Select the matching name and click Open.
31
V O D A F O N E
E M A I L
P L U S
U S E R
G U I D E
6. Click the email address to add the email to the To: field.
7. Follow the above procedure to add more email addresses. Click Send to send the email.
5.2 Calendar
When using Vodafone Email Plus, you can access your Microsoft Exchange calendar on your mobile phone.
When you receive a meeting notification in your Exchange account, you can view meeting details and accept
the meeting. The mobile phone calendar synchronises with your Exchange account to ensure that the
calendar on your mobile phone is always up to date. Calendar entries for 90 days in the future and 14 days in
the past are included.
Figure 39: Calendar
5.2.1
Viewing your calendar
When you open your calendar, you can view your meeting schedule. The current viewing mode is indicated in the
lower left corner. The view options are Month, Week, Day, or To-do. Select Options > Change view to change your
calendar view.
You can use the settings feature of your mobile phone to set a tone alert to notify you when a meeting is about to
take place.
Click an appointment in the calendar to view more details.
5.2.2
Accepting a meeting request
1. Open the meeting request email in your Exchange Account email account. The meeting icon looks like a small
calendar.
2. In the meeting invite, select Options > Meeting > Accept. Alternatively, you can select Tentative or Decline.
3. When you accept a meeting, you can choose to send a response, edit a response, or not send a response.
4. The meeting appears in your calendar.
32
V O D A F O N E
E M A I L
P L U S
U S E R
G U I D E
Figure 40: Meeting
5.2.3
Adding an appointment to your calendar
To add a new appointment to your calendar:
1. Select Calendar from the Status screen.
2. In the Calendar, select Options > New Entry > Meeting.
3. Enter the subject, time date, and location into the appropriate fields. You can also select to set a timer alert for
the appointment.
4. Click Done when complete. The new appointment appears in your calendar.
5.3 Task list
You can use Vodafone Email Plus to access your Exchange task list. To work with your tasks, select Tasks
from the Status screen.
Figure 41: Task List
33
V O D A F O N E
E M A I L
P L U S
U S E R
G U I D E
If you have combined your task list with your Exchange Account with your personal account, the tasks from
both accounts appear.
To add a new task, select Options > New Entry > To do. Enter the details into the various fields, including
priority, due dates, and reminders. When complete, click Done. The new task appears in the Tasks screen.
To view details about a task, select the task. You can view due dates, priority and other information. Select
Options > Edit to enter more details about the task.
To mark a task as complete, highlight the task by scrolling to the selected task. Select Options > Mark as
done. A green check mark appears in the check box.
To change the view, select Options > Change view. You can select month, week, day, or agenda view.
To delete a task, select Options > Delete Task. Click Yes to verify that you want to delete the task.
34
V O D A F O N E
E M A I L
P L U S
U S E R
G U I D E
6 Vodafone Email Plus Online
Vodafone Email Plus Online is a web-based repository for storing data, such as your calendar and address
book. Your mobile phone and Vodafone Email Plus Online are always synchronised. You can update your
address book and calendar from any web browser. Changes to Vodafone Email Plus Online will automatically
appear on your mobile phone. If you switch mobile phones or lose your mobile phone, your information from
Vodafone Email Plus Online is easily transferred to a new mobile phone.
You can access Vodafone Email Plus Online from this web address (which is sent to you in the Welcome
Email):
https://emailplus.vodafone.ie
Figure 42: Login Screen
When the Login Screen loads, you are prompted for your mobile number and your system password (the
default password is always set to the password of the first mailbox you activated on Vodafone Email Plus).
35
V O D A F O N E
E M A I L
P L U S
U S E R
G U I D E
Figure 43: Welcome Screen
The Welcome screen displays the navigation links to access your contacts and calendar. You can also access
your Vodafone Email Plus account settings.
36
V O D A F O N E
E M A I L
P L U S
U S E R
G U I D E
6.1 My Contacts
Use Vodafone Email Plus Online to easily manage your contacts.
Figure 44: Contacts Screen
6.1.1
Managing contacts
You can add contacts from a selected email account. Your mobile phone synchronises with Vodafone Email Plus
Online and adds the contacts to your mobile phone. This section describes how to add a contact using Vodafone
Email Plus Online.
Icon
Purpose
My Contacts – returns you to your contact list.
Import Contacts – imports contacts from an email service provider account to your mobile phone.
See Section 6.1.2: Importing a contact on page 38 for more information.
37
V O D A F O N E
E M A I L
P L U S
U S E R
G U I D E
Add Contact – adds a new contact to Vodafone Email Plus Online and your mobile phone. See
6.1.3: Adding a contact on page 38 for more information.
Delete Contact – deletes the selected contact(s) from Vodafone Email Plus Online and your
mobile phone. See 6.1.4: Deleting a contact on page 38 for more information.
Export Contacts – exports a contact from your contact list to an email service provider (Gmail or
Hotmail) mailbox. See Section 6.1.5: Exporting contacts on page 38.
Merge Contact – allows you to combine contacts that are duplicates. See Section 6.1.7: Merging
Contacts on page 39.
Table 1: Contact Icons
6.1.2
Importing a contact
1. Select the email service provider mailbox you want to import contacts from.
2. Enter the password for the selected email service provider account, and select the contacts to import.
3. The imported contacts are added to your contacts list and are synchronised to your mobile phone.
6.1.3
Adding a contact
1. Select My Contacts from the Welcome Screen.
2. To add a contact, click the
icon.
3. Enter the contact details. The various tabs organize the information into Personal Information, Phone Numbers,
Internet Address, and Postal Addresses
4.
Click Save when finished. The contact is added to your contact list.
6.1.4
Deleting a contact
Select the contact(s) in the list by placing a tick mark in the checkbox. Click the Delete Contacts icon.
6.1.5
Exporting contacts
Use the Export Contacts feature to export a contact from one email account to another selected email
account. When you log into your email account, the exported contact appears in your contact list
1. Select contact(s) from your contact list by placing a tick in the checkbox.
2. Click the Export Contacts icon.
3. Select the email account you want to export the contact to.
4. Enter your login information.
5. When the contact is exported, click OK to close the pop up box.
6.1.6
Editing contacts
To edit a contact, select the contact from the list. Use the fields to edit contact details and click Save.
38
V O D A F O N E
6.1.7
E M A I L
P L U S
U S E R
G U I D E
Merging Contacts
Duplicate contacts may be created when you combine PIM data with contacts on your mobile phone. Use
Merge Contacts to combine selected contacts together.
To merge a contact:
Figure 45: Select a Contact to Merge
1. Select a contact from your contact list by placing a tick mark in the box. (In the example above, there are two
Jane Does that can be merged together.)
2. Click
in the toolbar. The “Select a contact to merge” pop up box appears.
39
V O D A F O N E
E M A I L
P L U S
U S E R
G U I D E
Figure 46: Select a Contact to Merge
3. Select a contact to merge from the pop up list and click OK.
40
V O D A F O N E
E M A I L
P L U S
U S E R
G U I D E
Figure 47: Address Book Cleaner
4. In the Address Book Cleaner, use the radio buttons to select the information you want to combine into one
contact.
5. Click Save. The duplicate contacts are merged into one contact. The contact entry is updated in Vodafone Email
Plus Online and the contact data is updated on your mobile phone.
41
V O D A F O N E
E M A I L
P L U S
U S E R
G U I D E
6.2 My Calendar
The calendar allows you to manage your appointments. You can add, edit, or delete an event.
Figure 48: Calendar Screen
The calendar displays events for the current week. To view more details about an event, click the link. Clicking
the event link also allows you to edit event details.
To view past events, click the left arrow. To view future events, click the right arrow and the top of the week view.
Click the + icon add an event. Enter event details into the Add Event screen and click Add Event.
Event
Click Today to view current calendar events.
The calendar in the upper right corner allows you to navigate to a selected month. Use the arrows to navigate to
the desired month. Select a day to view events for that day.
42
V O D A F O N E
E M A I L
P L U S
U S E R
G U I D E
6.3 My Settings
Figure 49: My Settings
The Settings panel allows you to change your time zone and set a new password.
6.3.1
Timezone
To select a new timezone, use the pull down tab to select the correct time zone and click Save. Your calendar is
updated to the set timezone.
When viewing the calendar information via Vodafone Email Plus Online, you can update the timezone to match the
current timezone you are travelling in. For example, if you are travelling abroad to a different time zone, this will allow
you to adapt the calendar view on Vodafone Email Plus Online to your current time.
NOTE: Any calendar information viewed on your mobile phone will always be adapted to the time settings on your
phone.
6.3.2
Password
To change your Vodafone Email Plus Online password, type your current password and the new password in the
appropriate fields. Click Save.
43
V O D A F O N E
E M A I L
P L U S
U S E R
G U I D E
7 Special Settings
The Vodafone Email Plus Options, found on the Status screen, enables you to connect and disconnect the
Vodafone Email Plus application as well as configure various settings and mailboxes in Vodafone Email Plus.
7.1 Upgrade
Periodically, new version of the Vodafone Email Plus application for your mobile phone is released. When this
occurs, upgrading is easy.
As soon as a new software upgrade is available for your phone, Vodafone Email Plus presents a service
message at the top of your Inbox or Status Screen called Upgrade Available or Upgrade Required. You can
decide to accept or delay the upgrade until later.
NOTE: If you delay the upgrade more than 3 times, the Service Message may disappear and you may have to
manually request the upgrade by selecting Options > Upgrade from the Status screen.
You do not need to backup your email or PIM data before upgrading. Just follow the upgrade instructions to
install the latest version of Vodafone Email Plus. To perform a manual check if an upgrade is available, select
Upgrade from the Options menu.
7.2 Connect and disconnect
The Connect and Disconnect menu options control your connection status. This is a toggle switch with the
active menu option appearing greyed out. To disconnect, click Connected at the top of the Status screen.
Click Disconnect.
To reconnect to Vodafone Email Plus, click Disconnected at the top of the Status screen. Click Connect.
7.3 Managing mailboxes
If you need to change the password for a particular mailbox, highlight the mailbox in the Status screen. Select
Options > Edit Mailbox. Enter the account name (optional) and the new password in the Password field. Click
Login when complete.
If you need to delete a mailbox, highlight the mailbox in the Status screen. Select Options > Delete Mailbox.
Confirm that you want to delete the selected mailbox.
7.4 Settings
The Settings menu options set your connection schedule and set the message limits for each of your
Inboxes.
44
V O D A F O N E
7.4.1
E M A I L
P L U S
U S E R
G U I D E
Connection schedule
Figure 50: Connection Schedule
When you enable the Connection Schedule, you can specify when Vodafone Email Plus is pushing email and
PIM data to and from your mobile phone.
1. Select Options > Settings > Connection Schedule to activate the function.
2. Select Schedule to change the status to Enabled.
3. Set the start and end times for when you want Vodafone Email Plus to operate. You have the option to set
Vodafone Email Plus to run Monday through Friday, everyday, or on a custom set of days.
4. Once you have set your preferred schedule, click Back to activate the Connection Schedule.
7.4.2
Message Limit
In order to preserve memory, you can set the limit for the number of emails in each of your mailboxes. This
limit applies to all of your mailboxes. When the limit is reached, the oldest messages will drop off as new
messages come in. The maximum number of Inbox messages you can have in each mailbox is 200.
To change your message limit:
1. Go to the Status screen and select Options > Settings.
2. Select Message Limit.
3. Select Msgs per mailbox.
4. Enter the numerical value between 10 and 200.
5. Click Done.
6. Click Back and Back to return to the Status screen.
45
V O D A F O N E
E M A I L
P L U S
U S E R
G U I D E
8 Tips for Using Vodafone Email Plus
The following are a few tips to help you get the best experience out of Vodafone Email Plus on your mobile
phone.
•
You can opt to receive alerts when new emails arrive or when a task list is due or when a meeting occurs.
To select how you want to be notified when a new email message arrives, create a customised profile
from the Profiles application. You can have a ring tone play or set your mobile phone to vibrate when a
new email arrives.
•
If you switch to a new mobile phone or lose your mobile phone, use Vodafone Email Plus Online to
transfer your information to your new mobile phone.
•
Important! – Your monthly fee for the Vodafone Email Plus service does not include roaming. If you do
not wish to be charged for your email whilst roaming, you can turn off the service. Open Vodafone Email
Plus by clicking the icon. Select Options or Tools > Disconnect. Remember to reconnect the service
when you return home.
•
Use Vodafone Email Plus to view, create, and send email. Your mobile phone may have a separate email
application that may not use the features described in this user guide.
•
To uninstall the Vodafone Email Plus application from your mobile, close the application and select the
Email Plus icon from where you’ve installed it, click Options > Remove. Confirm that you want to
remove Vodafone Email Plus by clicking Yes.
Note: You may still be charged for the service. To cancel the subscription, contact Vodafone Customer
Service.
46
V O D A F O N E
E M A I L
P L U S
U S E R
G U I D E
9 Troubleshooting
There are times when you may need some more help to understand temporary failures. Please keep in mind
that many problems can be resolved by soft resetting your mobile phone. To reset your mobile phone, turn it
off, remove and reinsert the battery, and turn the mobile phone back on. If this does not resolve your problem,
please use the following table to determine how to diagnose your problem and determine whom to contact
to resolve your problem.
Problem
Solutions
Activation Issues
I can’t download the application or
activate the service
•
•
•
I can’t activate a mailbox using the
application
•
•
•
I forgot my password
•
•
Usage Issues
I cannot receive email using the
service
•
•
•
•
Check your APN settings. Only the Vodafone Live APN can be
used to access and connect to Vodafone Email Plus.
Network connectivity: Try again, since it may be a temporary
problem due to intermittent network coverage.
If this does not work, please contact your Vodafone Retail Store
or call Vodafone Customer Care to verify your ability to use
mobile data and check the status of your Vodafone Email Plus
subscription.
This could be caused by bad connectivity in your local area: Try
again, since it may be a temporary problem due to intermittent
network coverage.
This may be due to wrong email credentials. Verify that the
username and password credentials entered on the handset are
the same as when you access your email account via the web.
Check with your Email Provider: If this does not work, please
contact your Email Provider to verify the exact settings required
to access your email account via POP or IMAP.
If you forgot your Vodafone Email Plus password, contact
Vodafone Customer Support.
If you have forgotten your email password, contact your ISP or
Email Provider for assistance.
The application may have lost connectivity: Verify the status of
the Vodafone Email Plus application. Ensure that the Vodafone
Email Plus application is connected by opening the Status
Screen and then select the menu option “Connect”. Please
ensure that you have mobile network coverage and allow a few
minutes to connect again.
You may need to enable POP/IMAP access for your email
account: Verify if your mailbox is enabled for POP/IMAP access
by logging in to your email account via Webmail.
You may need to wait up to 15 minutes for new email to arrive:
Your email delivery may be delayed if there is a need to poll your
email account. Please wait 15 minutes and check if the email
arrives.
You do not receive any Hotmail email if you are marked as
“Online” in the PC version of MSN Messenger: Reconfigure your
47
V O D A F O N E
E M A I L
P L U S
Problem
I cannot send email using the
service
I have sent a message but it is not
received
U S E R
G U I D E
Solutions
Messenger status to be different than “Online” and send yourself
an email to trigger delivery of new messages.
• The application may have lost connectivity: Verify the status of
the Vodafone Email Plus application. Ensure that the Vodafone
Email Plus application is connected by opening the Status
Screen and then select the menu option “Connect”. Please
ensure that you have mobile network coverage and allow a few
minutes to connect again.
• Your email message may be temporarily stuck in the Outbox:
Check if your email message is stuck in the Outbox folder on the
handset. If you can see the message in the Outbox you may want
to “Disconnect” and “Connect” again. This will force the device to
try sending the email message again.
• Your Email Provider may have temporarily blocked your account:
Check if you can still login to your email account via Webmail.
Certain Email Providers may from time to time issue challenges
that could affect outbound email delivery. In this case you will
need to accept/solve the challenge in your webmail account
before retrying to send email from your mobile handset.
• Check that the message is not stuck in your local Outbox folder
on the mobile phone. If this is the case, you may want to
disconnect from Vodafone Email Plus and connect again. This
should submit your message from the Outbox.
•
I have requested an attachment, but
it does not download
•
I can’t synchronise updates to my
contacts or calendar
•
•
The message may have been caught in the spam folder of your
recipient’s email account. Ask the person you sent the email to
check the spam folder. For more information on how this
situation can be avoided, please see Question 8 in the FAQ
section.
This may occur if your mobile phone is low on memory. Free up
some memory by decreasing your inbox message limit (refer to
Section 7.4.2: Message Limit on page 45 or by deleting files on
your mobile phone, and try to download the attachment again.
The application may have lost connectivity: Verify the status of
the Vodafone Email Plus application. Ensure that the Vodafone
Email Plus application is connected by opening the Status
Screen and then select the menu option “Connect”. Please
ensure that you have mobile network coverage and allow a few
minutes to connect again.
You may need to wait up to 30 minutes for new PIM items to
arrive: Your PIM updates may be delayed if there are many new
items to synchronize. Please wait 30 minutes and check if the
PIM data has arrived. If you still have a problem, you may want to
“Disconnect” and “Connect” again since this will force another
attempt to synchronize your PIM data.
Table 2: Troubleshooting
48
V O D A F O N E
E M A I L
P L U S
U S E R
G U I D E
10 Frequently Asked Questions
This section lists answers to some of the most frequently asked questions.
Question 1: How many email accounts can I activate using Vodafone Email Plus?
• You can activate and use up to 5 email accounts at the same time.
Question 2: Do I have to configure my ISP mailbox to receive email via Vodafone Email Plus (e.g. switch on POP
access)?
• Microsoft Exchange: Vodafone Email Plus will automatically detect your account using the same settings as
you normally enter via Outlook Web Access to access Exchange. Check with your Administrator if you have
any issues to activate or connect.
• Hotmail: Vodafone Email Plus will automatically detect your account. No need to worry about settings.
• Gmail: Vodafone Email Plus will automatically detect your account. If you have not yet enabled POP/IMAP
access, this will be automatically turned on for your Gmail accounts. No need to worry about settings.
• Most ISP Email Providers allow free access POP/IMAP access by default, but there are some exceptions. If
access to your mailbox does not work, please contact your Email Provider to verify if your email account can
be accessed via POP or IMAP.
Question 3: Is Vodafone Email Plus easy to use?
• Vodafone Email Plus is designed to offer maximum convenience and provide information at your fingertips.
Your mobile phone will receive updates as soon as these are available from your email account.
• Vodafone Email Plus updates your mobile phone automatically in the background and makes information
instantly available the next time you look at your mobile phone.
• You can turn off the mobile phone knowing that the Vodafone Email Plus will resume automatically when
your mobile phone is turned on again.
Question 4: How do I know
know if Vodafone Email Plus is working properly?
• Vodafone Email Plus offers a simple user experience even under difficult conditions, e.g. during low or
intermittent connectivity.
• When using Vodafone Email Plus, you will be able to view the reason for any service interruptions at the top
of your inbox. For example, if you drop out of connectivity for a while Vodafone Email Plus is going to display
a status message with the text “Disconnected” in your inbox. This message will go away automatically when
the problem is corrected.
Question 5: Can I trust that my user credentials (email address and password) are securely stored and shared in
Vodafone Email Plus?
• Your user credentials are stored in encrypted format on your mobile phone. To login and access your email
account, the user credentials are shared with your Email Provider over a secure connection (if your Email
Provider supports secure connections). If in doubt, please check with your Email Provider.
Question 6: If I change my email password, can I still
still receive email via Vodafone Email Plus?
• If you change your email password, your Vodafone Email Plus inbox is going to display an authentication
error the next time you try to connect. If you select and click on this authentication error, you will be
prompted to enter your new email password for this account before reconnecting to receive email again.
49
V O D A F O N E
E M A I L
P L U S
U S E R
G U I D E
Question 7: If my corporate network password changes, can I still access my Microsoft Exchange account via
Vodafone Email Plus?
• You will continue to receive updates to your Microsoft Exchange account via Vodafone Email Plus, except if
login to your Microsoft Exchange account is authenticated via the password to your Windows Domain. In this
is the case, please refer to Question 4 for information on how to update Vodafone Email Plus after a change
of email password.
Question 8: If I have activated multiple email accounts on Vodafone Email Plus, how do I know which inbox will
display on the home screen?
• The home screen is automatically going to display all of your email accounts, including the name of your
inbox, the number of unread email messages, and the connection status of your Vodafone Email Plus
service.
Question 9: Which folders can I synchronise with Vodafone Email Plus?
• The Inbox is the only folder that is synchronised with your ISP, Gmail, Hotmail or Microsoft Exchange mailbox.
• You can use other folders locally on your device, Sent Items, Outbox, etc.
Question 10: Does Vodafone Email Plus keep my email in sync with my email account?
account?
• Vodafone Email Plus synchronizes read, unread, replied, and forwarded status flags with Hotmail, Gmail and
other IMAP-enabled email accounts. This means that email actions you take using Vodafone Email Plus on
your mobile phone will be visible when you login to your email account.
Question 11:
11: Do messages I send from Vodafone Email Plus get copied into the Sent Items folder on my email
account?
• By default, Vodafone Email Plus sends your outbound email messages via your email provider’s SMTP server.
In this case you will find copies of messages you send from Vodafone Email Plus in the Sent Items folder on
your email account.
• Some Email Providers may impose restrictions that do not allow 3rd party access to the SMTP server and this
may block Vodafone Email Plus from sending your messages via your home domain. In this case, your
messages will be sent from Vodafone Email Plus and there is a risk they may be marked as spam by the
recipient’s Email Provider. Please contact your Email Provider to confirm if 3rd party access to the SMTP
server is allowed and reconfirm the exact settings, then contact Vodafone to have these settings
automatically configured in Vodafone Email Plus for your email domain.
Question 12:
12: What should I do if my mobile phone with Vodafone Email Plus is lost or stolen?
• Contact Vodafone immediately to bar your SIM card which will prevent further use of your mobile phone.
• On your request, Vodafone can also remove all user data from Vodafone Email Plus, including email,
contacts, calendar and tasks stored on the mobile phone.
• Please note: Vodafone Email Plus has made a backup of your email, contacts, calendar and tasks. This will
enable you to restore your service quickly and easily onto a new mobile phone as long as it is supported by
Vodafone Email Plus.
Question 13
13: How do I restore Vodafone Email Plus onto a new mobile phone?
• Ensure that your new mobile phone is supported by Vodafone Email Plus.
• When you activate the Vodafone Email Plus service on your new phone, you will be prompted to confirm the
passwords of any email accounts you had activated on your old phone.
• As soon as all the passwords are confirmed, your new mobile phone will synchronise to receive and update
your email, contacts, calendar and task information.
50
V O D A F O N E
E M A I L
P L U S
U S E R
G U I D E
Question 14:
14: What
What is the impact of Vodafone Email Plus on my mobile phone’s battery life?
life
• Vodafone Email Plus has been specifically optimized to send/receive as little data as possible and this
minimizes your mobile phone’s battery consumption. Therefore, you should not need to recharge your
phone more than once a day under normal conditions.
Question 15: Can I continue to use Vodafone Email Plus when roaming?
• You decide if and when you want to use Vodafone Email Plus if you are roaming. However, you risk incurring
additional data roaming charges according to the operator you use when roaming. If you should wish to
switch off Vodafone Email Plus to limit usage when roaming then you can manually disconnect the
application for as long as you want (but please note that you will not receive any updates when the
application is disconnected).
51
V O D A F O N E
E M A I L
P L U S
U S E R
G U I D E
11 Index
Add Contacts, 24
Add Mailbox, 20
Calendar, 20
Connect, 45
Connection Schedule, 46
Delete Mailbox, 45
Disconnect, 45
Edit Mailbox, 20, 21, 45
Email, 22, 23
Attachment, 27
Delete, 24
Download Messagel, 23
Forward, 24
HTML, 24
New Email, 27
Reply, 25
Save Address, 24
Sending Attachments, 28
Smart Forward, 25
Smart Reply, 25
Sorting, 22
Truncated, 25
Email Service Provider Accounts, 16
Email Set Up, 12
Email Signature, 29
Folders, 51
Frequently Asked Questions, 50
Global Address List, 30
Home Screen, 22
Inbox, 22
Internet Email Accounts, 17
Lookup, 20
Mailbox Settings, 21
Message Limit, 46
Microsoft Exchange
Calendar, 32
Calendar View, 33
Meeting Request, 33
New Appointment, 34
Search Contacts, 30
Task List, 34
Microsoft Exchange Account, 30
Set Up, 13
Setting Alerts, 47
Settings Menu, 46
Status Screen, 20
Menu, 21
Task List, 34
Transfer Service, 30
Troubleshooting, 48
Two Mobile Phones
Activation, 12
Uninstalll, 47
Upgrade from Business Email, 11
Upgrading Vodafone Email Plus, 45
Vodafone Email Plus Icon, 5
Installation, 5
Vodafone Email Plus Online, 36
Adding Contacts, 39
Address Book Cleaner, 42
Calendar, 43
Contacts, 38
Deleting Contacts, 39
Editing Contacts, 39
Exporting Contacts, 39
Importing Contacts, 39
Managing Contacts, 38
Merging Contacts, 40
Password, 44
Settings, 44
Timezone, 44
Welcome Email, 19
Vodafone SMS, 8
52
V O D A F O N E
E M A I L
P L U S
U S E R
G U I D E
Notice
This document, as well as all accompanying documents for this product, is published by Visto Corporation. Visto
may have patents or pending patent applications, trademarks, copyrights, or other intellectual property rights
covering the subject matter in these documents. The furnishing of this, or any other document, does not in any
way imply any license to these or other intellectual properties, except as expressly provided in written license
agreements with Visto Corporation. This document is for the use of licensed users only. No part of this document
may be used, sold, reproduced, stored in a database or retrieval system or transmitted in any form or by any
means, electronic or physical, for any purpose, other than the purchaser’s authorized use without the express
written permission of Visto Corporation. Any unauthorized copying, distribution or disclosure of information is a
violation of copyright laws.
While every effort has been made to ensure technical accuracy, information in this document is subject to
change without notice and does not represent a commitment on the part of Visto Corporation. The software
described in this document is furnished under a license agreement or nondisclosure agreement. The software
may be used or copied only in accordance with the terms of those agreements.
The documentation provided is subject to change at Visto's sole discretion without notice. It is your responsibility
to utilize the most current documentation available. Visto assumes no duty to update you, and therefore Visto
recommends that you check frequently for new versions. This documentation is provided "as is" and Visto
assumes no liability for the accuracy or completeness of the content. The content of this document may contain
information regarding Visto's future plans, including roadmaps and feature sets not yet available. It is stressed
that this information is non-binding and Visto creates no contractual obligation to deliver the features and
functionality described herein, and expressly disclaims all theories of contract, detrimental reliance and/or
promissory estoppel or similar theories.
Patents, Legal Information & Trademarks
©Copyright 2009. Visto Corporation, Visto, the Visto logo, Constant Sync and worklife.freedom are either
trademarks or registered trademarks of Visto Corporation. All third-party trademarks, trade names, or service
marks are the property of their respective owners and are used only to refer to the goods or services identified
by those third-party marks. Visto’s technology is protected by U.S. Patents 6,085,192; 5,968,131; 6,023,708;
5,961,590; 6,131,116; 6,151,606; 6,233,341; 6,131,096, 6,708,221 and 6,766,454 and the following NTP U.S.
Patents: 5,436,960, 5,438,611, 5,479,472, 5,625,670, 5,631,946, 5,819,172, 6,067,451, 6,317,592 and various
other foreign patents. Other patents pending.
Third Party Marks
All third-party trademarks, trade names, or service marks used herein are the property of their respective owners
and are used only to refer to the goods or services identified by those third-party marks.
Visto Corporation
101 Redwood Shores Pkwy, Suite 400
Redwood City, CA 94065, USA
www.visto.com
tel +1 [650] 486.6000
fax +1 [650] 622.9590
53