Transcript
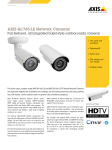
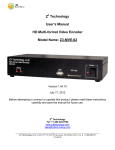
2.Connect device
1.Product structure diagram
Status Light STA1
Status Light STA2
POWER LED
STA1
Decoration
STA2
PWR
Photosensitive
sensor
OUT
ETHERNET
DS DV 1.5A
Lens
HD Cloud Camera
RESET
FN
router
IR LED
power
outlet
Microphone
Quick Install Manual
4
3
2
1
link cable
link network
Audio
Headset/
audio jack
DC5V power
interface
Reset
FN composite
button
Connect power, Ethernet cable and the wireless antenna as above.
Wait for 50 seconds, STA2 will flash green 3 times every 3 seconds.
It means the camera has connected normally.
Ethernet interface
OUT
ETHERNET
DS DV 1.5A
Micro SD Card slot
3.Software downloading
Phone system
Download address
IOS(iphone,ipad) System
App store
Software name
mipc
Android System
Play store,Android
market、Gomarket、
91 helper etc.
mipc
RESET
FN
Thanks for your purchasing Cloud Camera,
please follow the correct steps in this manual.
Camera base
4.Logging
Cloud cam has two ways to log in :
A.Single device to log in
1
B.Multiple devices to log in
1
QR code for logging
2
Click 'Sign up'
QR code to add device
9:17
Sign up
Sign up
3
Click 'Add device'
9:17
9:17
9:17
Exit
Exit
Set video size
Add device
Auto
Input device ID
Smal l[160X90]
Input password
Half [320X180]
Add
Cancel
Normal[640X360]
HD [1280X720]
1JFIEGBPV4XBA
Device List
Device list is empty
Set password
Add device
Remember password
Remember password
Sign in
Sign in
5、Connect WIFI
1 Press
the camera,Click'Settings'
2 Select'Network'
Select'Wi-Fi',choose ' Client'
Done
Product info
Settings
4
Select'Network list',input
'password',click'Apply'
9:17
9:17
9:17
Exit
3
Settings
9:17
Network
Settings
Network interface
Nickname
Ethemet
Network
Select network
Wi-Fi
RDWIFI(Quality:100%)
Password
Status
Password
Enabled
IP
OSD
Network
MAC address
7c:dd:90:0e:5b:39
Use DHCP
SDCard
Network status
Alert device
Alarm action
Wi-Fi Mode
Time/ Date
Client
System
AP
Normal
IP address
Gateway
Network mase
192.168.20.102
192.168.20.1
255.255.255.0
DNS
Note:Browser viewing and user manual downloading : http://www.mipcm.com