1
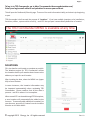
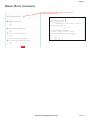
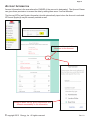
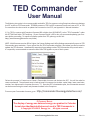
Page 1
TED Commander
User Manual
The following instruction is the recommended method for TED Pro customers using Footprints software to Activate
the ECC to post to TED Commander. TED5000 customers, TED Pro MTU customers that do not have an ECC, or TED
Pro customers who do not wish to update the firmware on their ECC, see Appendix A: Manual Activation.
1) For TED Pro systems with Footprints firmware 660 or higher (see HELP-ABOUT), select “TED Commander” under
the SETTINGS tab within TED Footprints. (If your firmware version is 659 or less, we recommend updating your firmware before proceeding. To request a firmware update from TED, please go to this link:
http://www.theenergydetective.com/ticket)
NOTE: With firmware version 660 or higher, the System Settings and Utility Settings automatically export to TED
Commander upon activation. If your system has the TED Commander selection, (see below) you do not need to
update the TED firmware. Automatically exporting these settings makes TED Commander setup much easier –
it is especially recommended to customers who have TED Spyders as part of their system.
Follow the prompts in Footprints to Create a Commander Account and Activate the ECC. You will be asked to
create a password. The password must include at least 8 characters that include: capital letter, lower case letter,
number, non-alphanumeric character (but not a “?”). Once the ECC is Activated to post, the Commander account
can be accessed using the email and password created in the Footprints.
To access your Commander Account, go to
http://commander.theenergydetective.com/
© Copyright Notice:
The display of energy-use data and energy-use gradient in Calendar
format described/depicted below and used in TED Commander is
© Copyright 2014-2015 Energy, Inc.
All rights reserved
www.theenergydetective.com
Rev 1.8
Page 3
2
To log in to TED Commander, go to http://commander.theenergydetective.com/
Enter your login email address and password to access your account.
This will open the Dashboard (Calendar) page. There won’t be much information initially, as the data is just beginning
to post.
TED Commander is built around the concept of “Locations.” If you have multiple Locations, solar installations,
franchises, offices, systems within a facility, - each ECC that you post is automatically defined as a ‘location.’
The TED Commander MENU is available at any time
Locations
Fill in the data for each location as complete as possible.
The Weather-engine for TED Commander utilizes
the location-data to pull weather-data closest to the
address you input for each location.
After inputting the data, select the MENU icon (upper
left) to store the data.
In some instances, the Location information may
be imported automatically when activating TED
Commander. Please confirm that all the data is
present - and fill in where it is incomplete.
When a new ECC is activated through TED Footprints,
a new Location will automatically be added to the
Account. To manually add additional Location(s) to
your Account, press the (+) button from the Locations
selection on the Main Menu.
© copyright 2015
Energy, Inc All rights reserved
Rev 1.8
Page 3
Navigating the Dashboard
Move Calendar forward or backward
by WEEK or MONTH
Choose Details for the Calendar (kWh,
Cost, Temp, Demand, Voltage, etc.)
Choose LOCATIONS to display
From the Globe in the upper right, you can toggle between different Locations on the Dashboard.
From the Display Options (Gear-looking icon), you can change the data on the Calendar (Dashboard)
to kWh, Costs, Voltage, Demand as well as Weather parameters. If the system is measuring solar, you
can also choose Solar Production, NET, and Load Consumed.
The optional Gradient shows as green, yellow, red based on the highest recorded parameter of the
data you are displaying within the month. (Green is good, Yellow not-so-good, RED is high).
With the Gradient ON, it is quite easy to get a quick glimpse of the month - or to readily see when things
seem to be higher than normal.
Calendar with Gradient OFF
Calendar with Gradient ON
www.theenergydetective.com
Rev 1.8
Page 5
4
Daily Detail
Click on any day in the Calendar, and you will be presented with specific details of that particular day.
Shown below is an image of the data-detail (from a solar-installed site). You can easily navigate to
the Next/Previous day by pressing the navigation arrows in the upper right of the screen.
Immediately above the data are Graphing options for a quick glimpse of a day.
To view Daily Detail in a Line Graph, click “Line”
© copyright 2015
Energy, Inc All rights reserved
Move the cursor along the timeline at the base of the graph
to display detailed data of a particular time of the day.
Rev 1.8
Page 5
To view Daily Detail in a Bar Graph, click “Bar”
Move the cursor along the timeline at the base of the graph
to display detailed data of a particular time of the day.
Move the cursor over any segment of the Pie Chart to
reveal Cost and kWh of that particular circuit.
To view Daily Detail in a Pie Chart, click “Pie”
www.theenergydetective.com
Rev 1.8
Page 7
6
Data shown in the Calendar can be changed any time
the user desires. Only two fields may be displayed
at any given time.
If the user has solar or wind, several other options to
choose will appear (cloud coverage, kWh generated,
net usage, and avg wind speed).
Graphing
Select a date range and the points you wish to see graphed. You can choose to show the NET or
Weather parameters as a line graph against which other loads can be compared.
© copyright 2015
Energy, Inc All rights reserved
Rev 1.8
Page 7
Note the load increases as the
temperature increases...
Circuit-level graphing of Spyder-data via Pie Chart or Line Graph
www.theenergydetective.com
Rev 1.8
Page 9
8
Graphing Solar
- Graph any period of time.
- See your CONSUMPTION compared with your GENERATION.
- Compare your GENERATION with the weather (cloud coverage).
- Confirm your NET USAGE - or the power you are sending back to the grid!
© copyright 2015
Energy, Inc All rights reserved
Rev 1.8
Page 9
Comparison
The Comparison feature lets you compare different LOCATIONS with each other, for any period of time.
Ideal for solar integrators to compare installations, franchise owners to compare stores, industrial facilities
to compare systems, etc.
Choose locations to Compare
simply by clicking the (+).
xxxxxxxxxxxxxxxxxxxxx
xxxxxxxxxxxxxxxxxxxxx
Site 2
xxxxxxxxxxxxxxxxxxxxx
xxxxxxxxxxxxxxxxxxxxx
Site 2
Site 3
www.theenergydetective.com
Rev 1.8
Page 11
10
Data Export
Export data from any Location for any time period. Spyder sub-loads can be analyzed. Weather can
be exported to compare with Solar or Wind Generation.
Export Spyder Data
Export Weather Data
for Solar/Wind analysis
© copyright 2015
Energy, Inc All rights reserved
Rev 1.8
Page 11
www.theenergydetective.com
Rev 1.8
Page 13
12
Energy Plan
The energy plan should auto-populate when you initially upload your data from TED Footprints. Please
go through the fields below and make any corrections that you would like to make. Energy plans can
be made for any Location, Monitoring Point, or TED System. Multiple energy plans are acceptable (but
in most cases, a location will only have one energy plan.)
Select Dropdown to select
different Account Location
Account Name
Location Name
Dropdown for
International
Currencies
Location Name
Utility will auto-populate
Use scroll-bar to change Meter Read Date
Bill cycle is generally 30 days, however some utilities have
60-day cycles.
Use scroll-bar to change number of Tiers (max 5)
Input Tier ‘to’ figure - the
‘from’ will auto-populate
Input the rate per kWh.
The Currency selected
above will be reflected
throughout Commander.
© copyright 2015
Energy, Inc All rights reserved
Rev 1.8
Page 13
Energy Rates (continued)
Selecting Demand Charges will bring up the Demand
Charge window shown here:
SAVE
www.theenergydetective.com
Rev 1.8
Page 15
14
Account Information
Account Information is the area where the OWNER of the account is designated. The Account Owner
can give others permission to access the data by adding them as an ‘Account Member.’
The Account MTUs (and Spyder information) should automatically import when the Account is activated.
MTUs and Spyder(s) may be manually entered as well.
Select to add an additional
Member to the Account
Members added can be given permissions with
different accessability to the information
© copyright 2015
Energy, Inc All rights reserved
Rev 1.8
Page 15
The TED Commander portal can be set up to be viewed/accessed in a variety of ways. For example,
TED Commander can be setup for:
- an individual User/Location
- a group of people to view an individual Location;
- a franchise owner/manager to view his 27 locations;
- The individual 27 Locations can be setup for access to ONLY their Location, or set to access ALL
27 Locations
To give Users access to ALL Locations on a Commander Account:
1. Create a Commander Account either by going to http://commander.theenergydetective.com/ or simply Activating
an ECC from the ‘TED Commander’ drop-down under SETTINGS in TED Footprints.
2. Log into Commander. Then, under Account Settings, add the email address of the new member on the Account.
Set the appropriate privilege level: Administrator, Editing, or Read Only.
3. The new member will have access to all Locations on the Account.
To give Users access to ONLY their Location on a Commander Account:
To set up an account so that an individual/client/tenant can view and edit only his/her individual Commander
Location, but you as a business/TED distributor/property owner can view and edit all of your similar clients’
Locations:
1. Create a Commander Account for your business
2. Have your client Activate their ECC from the TED Commander drop-down in TED Footprints (using their email
and creating a password).
3. Have the customer log into Commander and then, under Account Settings, add the email address associated
with your business. Set the appropriate privilege level: Administrator, Editing, or Read Only.
4. When you then log in under the business email, all of your clients’ Locations will be accessible from the each
Commander page.
www.theenergydetective.com
Rev 1.8
Page 17
16
User Profile
The User Profile allows the Owner of the account to change his/her credentials to log in to TED Commander.
© copyright 2015
Energy, Inc All rights reserved
Rev 1.8
Page 17
Appedix A
To post to TED Commander without using the most recent version of TED Footprints software (v660 or
higher) follow these steps:
1) Create a TED Commander account by following this link: http://commander.theenergydetective.com/
2) Enter your email address and password. Password must be at least 8 characters, include upper
and lower case letters, at least one number, and include a non-alphanumeric character.
Once the registration process is completed, you will find the ACTIVATION URL and ACTIVATION KEY
under the “Activation” selection in the top left menu dropdown.
Activate your TED device by entering the Account URL and Activation Key in the following locations:
a) TED Pro ECC with Footprints rev. 559 or lower: Footprints > Settings > 3rd Party Posting Settings
b) TED Pro MTU : MTU UI page > 3rd Party Posting Settings
c) TED 5000 Footprints > EDIT > Activate Energy Posting
www.theenergydetective.com
Rev 1.8