1
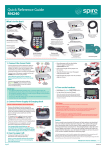
Quick Reference Guide
M4230
What’s in the box*:
Document pack
D4200 Charging Dock
(supplied as standard with some
product configurations only; for
charging the handset)
M4230 Handset
(New terminals include a
pre-fitted battery and SIM card)
Power Supply
*Box contents may vary for replacement/swaps
3. Turn on the handset:
1. Connect Power Supply & Charging Dock
DO NOT TURN ON HANDSET
UNTIL INSTRUCTED
• Remove the battery from the terminal by
pressing in the release clip and pulling out
the battery. Remove and discard the
protection film across the contacts. Replace
the battery ensuring that it is firmly in
place and flush with the terminal body.
• If Charging Dock supplied, connect a
power supply to the red POWER port
under the Charging Dock and to a mains
wall socket.
• Place the handset carefully on
the Charging Dock.
• If Charging Dock is not supplied, connect
the power supply direct to the terminal.
The charging light should light up red
to indicate that the battery is charging.
Please allow the battery to fully charge
before taking it off the dock/supply (this
may take 2 to 4 hours).
2. Insert a paper roll:
• Using your fingers, pinch the sides of
the Printer Cover and pull up firmly.
If this is a new terminal, remove the roll
from the holder and remove an outer
packaging that may be present.
• Drop the paper roll into the holder with the
paper feeding from underneath the roll.
• Pull a short length of the paper over
the screen.
• Shut the Printer Cover over the paper
until you hear it ‘click’.
• Pull and tear the paper over the serrated
edge as shown.
Page 1
POWER port
SERIAL port
• Hold down the blue FUNCTION button.
• Let go when the terminal ‘beeps’.
After a few seconds the screen will show the desktop
with icons and then the SALE / REFUND (Idle) Screen.
The terminal will automatically connect to bank systems
to logon as required.
RED = charging
GREEN = Fully charged
MID Entry:
Your terminal may prompt for you to enter your MID as a security check.
DHCP:
Drop
paper
roll
Pull
paper
roll
Your terminal will be pre-configured for use on standard networks featuring DHCP (automatic
allocation of IP addresses). In the unlikely event that your network does not have this feature,
please call the helpdesk for assistance.
Updates
Once a month, your terminal will connect to Spire systems to download
any new software and/or important changes. This update will typically
occur during the night. For this reason, Spire suggests you leave your
terminal powered on and placed on the Charging Dock or directly to the
Power Supply at all times. In the event of it being switched off when the
update tried to take place, your terminal will notify you to leave its power
on for another update attempt the following night.
Please turn over to continue...
22097-05
Quick Reference Guide
M4230
Sale (Inserting a Chip Card)
Refund (Inserting a Chip Card)
Step 1. You can start a Chip and PIN sale transaction in one of two ways:
• Select SALE from the Idle Screen and insert a Chip Card into the
terminal’s Chip Card reader.
• Insert the Chip Card straight into the terminal’s Chip Card reader.
Step 1. Relect REFUND from the Idle Screen and swipe the Supervisor Card
when prompted.
Step 2. Type in the SALE AMOUNT in pence or cents (in Republic of Ireland
/ ROI) and press Enter.
Example: Typing in 1000 would equate
to a value of £10.00 (€10.00 in ROI).
Step 3. Insert the customer’s Chip Card into the terminal’s
Chip Card reader.
Step 3. The customer must type in their Personal Identification Number
(PIN) on the terminal keypad. After the PIN has been typed in, the
customer should press Enter.
The terminal will now attempt to connect to the Acquirer. The
terminal will then display a response. If the transaction is
APPROVED, the Approval Code will then be displayed and the
terminal will print the Merchant Copy of the receipt.
Step 4. Remove the card and tear off the Merchant Copy of the receipt
and press OK/Enter. The terminal will then print the Customer Copy
of the receipt and display the response again.
Step 5. Tear off the Customer Copy and hand it to the customer along
with their card. Then press Enter to return to the idle screen.
Sale Keyed (Keyed Entry, for Customer Not Present)
Step 1. Select SALE from the Idle Screen
Step 2. N.B. On some software versions and configurations, amount
entry is after Step 5.
Type in the SALE AMOUNT in pence or cents, and press Enter.
Example: Typing in 1000 would equate
to a value of £10.00 (€10.00 in ROI).
Step 3. Carefully enter in the card number on the front of the card. As you
type, you will notice that the message at the top of the screen
changes to ENTER CARD NUMBER and the number begins to appear
in the box on the screen. Once the number has been typed in
correctly, press Enter.
Step 4. Type in the EXPIRATION DATE and press Enter.
Step 5. You will then be asked if the card is present. Press NO/Clear to
continue or Cancel to cancel the transaction.
Step 6. Type in the 3 digit security code on the back of the card (4 digits
on the front of the card for American Express) and press Enter.
Step 7. Type in the numbers from the Post Code of the card’s registered
address and press Enter.
Example: GU21 5SB In this case you would enter the Post Code as 215.
Type in the house/building number of the card’s registered address
and press Enter.
The terminal will now attempt to connect to the Acquirer.
Step 8. Now you must decide if you are willing to continue with the
transaction based upon the Acquirer response displayed.
If you press NO/Clear, the terminal will print out the
Reversal Copy of the receipt and connect to the Acquirer
to reverse the transaction. If successful, the terminal will
display REVERSAL ACCEPTED.
Press Enter to return to the idle screen.
If you press YES/Enter, the Approval Code will be displayed and
the terminal will print the Merchant Copy of the receipt.
Step 9. Tear off the Merchant Copy of the receipt and press OK/ Enter.
Step 10. Tear off the Customer Copy and press Enter to return
to the idle screen.
Page 2
Step 2. Press OK/Enter to acknowledge that the terminal has accepted the
Supervisor Card.
Step 4. Type in the REFUND AMOUNT in pence or cents, and press Enter.
Example: Typing in 1000 would equate
to a value of £10.00 (€10.00 in ROI).
The terminal will now attempt to connect to the Acquirer. The
terminal will then display a response. If the transaction is
APPROVED the terminal will display REFUND ACCEPTED and the
terminal will print the Merchant Copy of the receipt.
Step 5. Remove the card and the Merchant Copy of the receipt.
Step 6. The Merchant Copy of the receipt must be signed, and the
terminal will ask if the signature is correct.
If you press YES/Enter to confirm, the terminal will print the Customer
Copy of the receipt and display REFUND ACCEPTED.
Press Enter to return to the Idle Screen.
Settlement, X and Z Reports
Settlement
Step 1. Ensure the Idle Screen is displayed. Then press the SETTLE button
on the keypad.
Step 2. Swipe the Supervisor Card when prompted.
Step 3. If your terminal is configured with multiple Acquirers, select the
Acquirer you want to settle (ALL HOSTS is recommended).
The terminal will connect to the selected Acquirer(s) and print
out the Settlement report(s). The Settlement totals will then be
reset to zero.
Responses from host will be: Totals Agree, Totals Disagree, Totals
Unconfirmed or Cannot Confirm (Refer to manual for explanations)
X and Z Reports
PLEASE NOTE: The Supervisor Card and/or the local password (default
is 0000) are required to access these reports.
To access the reports menu, ensure the Idle Screen is displayed. Then press
the REPORTS button on the keypad.
X Totals. This is a running report that can be printed off at any point
during the day. It displays the total number and total value of
transactions performed for each Acquirer since the last Z report was
done, but does not reset the totals.
Z Totals. This report can be done at the end of each business day or
working week. It performs the same function as an X Totals Report but
then resets the reports totals in the terminal back to zero.
Please refer to User Manual on User Documents
CDROM for instructions including all screen prompts.
© Copyright 2011 – 2013 Spire Payments Holdings S.a.r.l. All rights reserved.
Spire Payments is a registered trademark of Spire Payments Holdings S.a.r.l.
Spire Payments and the Spire Payments logo are trademarks, service marks
or registered trademarks or service marks of Spire Payments Holdings S.a.r.l..
All other trademarks are the property of their respective owners.
All information is subject to change without notice and Spire Payments
Holdings S.a.r.l. does not warrant the information’s accuracy or correctness.
Any Spire Payments software described in this document is subject to a
Software Licence Agreement. Please refer to the Software Licence Agreement
for information regarding the terms of use.
22097-05