1
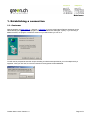
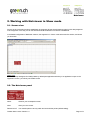
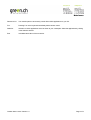
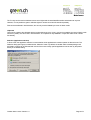
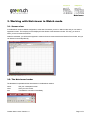
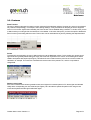
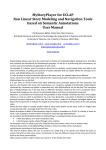
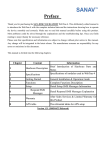
Netviewer
User Manual
Netviewer one2one
INDEX
_______________________________________________________________________________________________
1. Establishing a connection.................................................2
1.1. Customer................................................................................................................. 2
2. Working with Netviewer in Show mode............................3
2.1. Screen view ............................................................................................................ 3
2.2. The Netviewer panel .............................................................................................. 3
2.3. Features .................................................................................................................. 5
3. Working with Netviewer in Watch mode ..........................7
3.1. Screen view ............................................................................................................ 7
3.2. The Netviewer border ............................................................................................ 7
3.3. Features .................................................................................................................. 8
Creation date 7.19.05
Version 1.0
Netviewer
1. Establishing a connection
1.1. Customer
Start the program via www.green.ch -> Support -> Netviewer. If you are using Internet Explorer, Netviewer can be
started directly (see Figure: "Start the program from here". IE Version 6.0 and higher: "Open"). If you are using a
different browser, the program must first be saved to any location before you can run it.
You will now be prompted to enter the unique consulting number that was provided to you on the telephone by a
supporter. After you click "OK", the visual connection to the supporter will be established.
Creation date 7.19.05 / Version 1.0
Page 2 of 9
Netviewer
2. Working with Netviewer in Show mode
2.1. Screen view
As soon as the connection has been established, the supporter will see the red Netviewer panel, which always appears
in the foreground. In this way, he can see at all times whether Netviewer connection is established.
In the default configuration of Netviewer one2one, the supporter is in “Show“ mode at the start of a session, and shows
you his screen.
Please note:
Since the desktop background is initially hidden by default (see Application selection), if no application is open on the
supporter’s monitor, you will only see a black screen.
2.2. The Netviewer panel
watch:
Observe your counterpart’s screen.
show:
Show your own screen.
Remote ctrl off:
Your session partner can only watch and work with the pointer (default setting).
Creation date 7.19.05 / Version 1.0
Page 3 of 9
Netviewer
Remote ctrl on:
Your session partner can remotely control all the visible applications on your PC.
F12:
Pressing F12 on the keyboard immediately blocks remote control.
Selection:
Selection of which applications are to be shown to your counterpart. Select the applications by clicking
in the Selection window.
End:
Immediate termination of the connection.
Creation date 7.19.05 / Version 1.0
Page 4 of 9
Netviewer
2.3. Features
Remote control rights
In Show mode, Netviewer one2one provides you the capability to grant the supporter (Watch mode) remote control rights to
the applications you have released. If remote control is granted with the “On” button in “Remote control”, both users are able
to make entries with the mouse and keyboard. The user in Show mode can withdraw the remote control rights granted to his
partner at any time by pressing F12. The user in Watch mode is then only able to work with the pointer. Thus, the user in
Show always has control over his own PC.
Quality Corner
In the top left-hand corner of the Netviewer panel, beside the word “Netviewer“, you will see a small square field – the “Quality
Corner”. In this field, you can see how far your partner’s screen setup has progressed from the colours grey, yellow and
green.
The colours have the following meanings:
Gray:
Your partner cannot yet see all of the screen content you have released.
Yellow: Your partner can see all of the screen content you have released, but with limited colour reproduction (256 colours).
Green: Your partner can see all of the screen content you have released, with the correct colour reproduction.
File Transfer
With the correct configuration and when remote control is activated, the file transfer functionality can be used. Files can
be transferred using “drag&drop”. The transfer is always initiated by the user in Watch mode. Before the transfer, the
user in Show mode must signal his agreement explicitly with a corresponding confirmation. The confirmation dialog
allows the user the option to deny the transfer, to allow it once, or to permit future transfers without the need for
confirmation.
Creation date 7.19.05 / Version 1.0
Page 5 of 9
Netviewer
The F12 key can be used to withdraw remote control rights and the associated file transfer authorisation at any time.
However, it is not possible to grant or withdraw rights to remote control and file transfer separately.
Files can be transferred in both directions, but can only ever be initiated by the user in Watch mode.
Clipboard
Texts can be copied to the clipboard with the keyboard shortcut Ctrl+C (Copy), and can be pasted by the user in Watch mode
with Ctrl+V (Paste). This too works in both directions. The clipboard is only available in conjunction with the File Transfer
functionality.
Selection (application selection)
In Show mode, the application selection is used to define which applications the session partner is allowed to see. The
Selection dialog (see Figure) is called with the “Selection” button. By default, the toolbar and the desktop background
are hidden, but both can be activated with a click of the mouse. Newly opened applications can be seen by the partner
directly in the default setting.
Creation date 7.19.05 / Version 1.0
Page 6 of 9
Netviewer
3. Working with Netviewer in Watch mode
3.1. Screen view
In the Netviewer one2one default configuration, at the start of a session you are in “Watch mode, and you can see the
supporter’s screen. The company name is displayed in the title bar of the Netviewer window. This way, you know to
whom you are connected at all times.
Inside the red border, you will see the supporter’s screen and mouse movements live and sized to fit to window, and you
can follows his work steps directly.
3.2. The Netviewer border
The Netviewer is operated with the three buttons in the Netviewer window.
watch:
show:
end:
See your counterpart’s screen.
Show your own screen.
Terminate the connection immediately.
Creation date 7.19.05 / Version 1.0
Page 7 of 9
Netviewer
3.3. Features
Zoom Function
The user in Watch mode sees his partner’s screen, resized to fit the Netviewer window. However the screen is not enlarged,
only reduced correspondingly. For example, when viewing drawings, it may sometimes be disrupting to see the supporter
zoom in on his screen. Against this eventuality, the Zoom function can be disabled during a session. To do this, when you are
in Watch mode you must right-click the “Netviewer” in the taskbar. In the menu that opens, you have the option to disable the
Zoom function by left-clicking with the mouse. This function can be reactivated at any time by following the steps described.
Pointer
To assist with communication, the user in Watch mode can use the Netviewer pointer. For this, before any remote control
rights have been granted (default setting) he simply has to left-click anywhere on the screen, and a flashing arrow will be
visible to both parties at that point (see Figure). This allows the user in Watch mode to point out an incorrect number in a
calculation, for example. This cannot be combined with remote control of the partner’s PC, and it is not possible to
change data.
Remote control rights
If the user in Watch mode has been granted remote control rights for his session partner’s PC, these rights are indicated
visibly with a corresponding icon in the title bar (see Figure). He is thus able to operate his partner’s PC using his own
mouse and keyboard until this right is withdrawn again.
Creation date 7.19.05 / Version 1.0
Page 8 of 9
Netviewer
File Transfer
With the correct configuration and when remote control is activated, the file transfer functionality can be used. This is
also indicated by a corresponding icon in the title bar (see Figure). This enables files to be transferred via “drag&drop”.
The transfer is always initiated by the user in Watch mode.
Before the transfer, the user in Show mode must signal his agreement explicitly with a corresponding confirmation. The
confirmation dialog allows the user the option to deny the transfer, to allow it once, or to permit future transfers without
the need for confirmation. Despite having been granted remote control rights, the user in Watch mode is not able to
issue the confirmation of the transfer on the partner system. Each user must do that individually on his own system.
Files can be transferred in both directions, but the transfer can only ever be initiated by the user in Watch mode.
Example of a file transfer to the partner:
The user in Watch mode left-clicks a file on his PC, and with the mouse button depressed drags the file into the Netviewer
window where he drops it again, for example on the Desktop to which he has remote access. When the user in Show mode
has confirmed initiation of the file transfer, the file is transferred and saved to the desired location.
Example of a file transfer from the partner:
The user in Watch mode left-clicks a file on his session partner’s PC. Keeping the mouse button depressed, he drags the file
out of the Netviewer window and drops it for example on his own Desktop. When the user in Show mode has confirmed
initiation of the file transfer, the file is transferred and saved to the desired location.
Clipboard
Texts can be copied to the clipboard with the keyboard shortcut Ctrl+C (Copy), and pasted by the user in Watch mode with
Ctrl+V (Paste). This too works in both directions. The clipboard is only available in conjunction with the File Transfer
functionality.
In this case too, your session partner has the option to withdraw previously granted remote control and file transfer rights by
pressing the F12 key. If the Netviewer programs are equipped with file transfer functionality, it is not possible to grant rights to
remote control and file transfer separately.
Creation date 7.19.05 / Version 1.0
Page 9 of 9