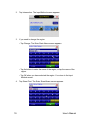
1
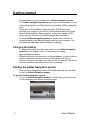
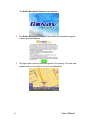
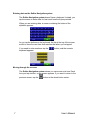
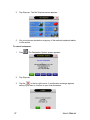
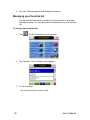
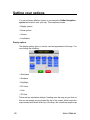
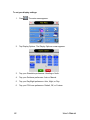
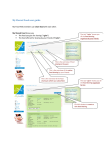
Navigation System
User’s Manual
Contents
Getting started-------------------------------------------------------------------------------------- 3
Charging the battery----------------------------------------------------------------------------- 3
Starting the GoNav Navigation system ----------------------------------------------------- 3
Using the GoNav Navigation system buttons --------------------------------------------- 5
Getting a GPS signal ---------------------------------------------------------------------------- 5
Entering data on the GoNav Navigation system ----------------------------------------- 7
Moving through the screens ------------------------------------------------------------------- 7
Working with the map---------------------------------------------------------------------------- 8
Map view ------------------------------------------------------------------------------------------- 8
Maneuver detail----------------------------------------------------------------------------------- 8
Panning the map --------------------------------------------------------------------------------- 9
Route list ------------------------------------------------------------------------------------------- 9
Location and POI information ----------------------------------------------------------------- 11
Planning your route------------------------------------------------------------------------------- 13
Setting a single destination -------------------------------------------------------------------- 13
Using an address as a destination----------------------------------------------------------- 13
Using an intersection as a destination ------------------------------------------------------ 18
Using a Point of Interest (POI) as a destination ------------------------------------------ 24
Using a Favorite destination as a destination--------------------------------------------- 30
Using a Recent destination as a destination ---------------------------------------------- 30
Using a City Center as a destination -------------------------------------------------------- 31
Adding detours and stopovers ---------------------------------------------------------------- 35
Detours --------------------------------------------------------------------------------------------- 35
Stopovers ------------------------------------------------------------------------------------------ 36
Managing your favorites list ------------------------------------------------------------------- 38
Setting your options------------------------------------------------------------------------------ 40
Display options ---------------------------------------------------------------------------Route options ----------------------------------------------------------------------------Volume ------------------------------------------------------------------------------------Localization --------------------------------------------------------------------------------
40
43
45
47
Getting started
Congratulations on your purchase of the GoNav Navigation system.
Your GoNav Navigation system can guide you to the destination of your
choice using signals from Global Positioning Satellites (GPS) orbiting the
earth.
There are 24 GPS satellites orbiting the earth. A GPS device can
calculate your position on the earth if it can receive signals from at least
three of these satellites. When it receives at least four signals, a GPS
device can also calculate your altitude (height above sea level).
To use the GoNav Navigation system for the first time you need to
charge the battery, and install the map loader onto your computer. You
can install the map loader while the battery is charging.
Charging the battery
To charge the battery, plug the power cable into the GoNav Navigation
system and into a power outlet. Let the battery fully charge
(approximately four hours).
When the device is not connected to a charger/adaptor, in order to reduce
power consumption, the device turns off its backlight after 3min of
inactivity, and goes into sleep mode after five min of inactivity. The device
resumes operation mode after power button is pressed.
Starting the GoNav Navigation system
Once you have charged the battery and loaded map data, you are ready
to start the GoNav Navigation system.
To start the GoNav Navigation system:
1. To use the GoNav Navigation system for the first time you need to turn
on the hardware power switch on device bottom.
3
User’s Manual
The GoNav Navigation System screen appears.
4
2.
The GoNav Navigation system will auto starts the Navigation program.
A warning screen appears.
3.
Tap Agree after you have read and agreed to the warning. The map view
appears and you are ready to set your first destination!
User’s Manual
Using the GoNav Navigation system buttons
The buttons on the GoNav Navigation system have been set up to
quickly show you key information.
Zoom In
and Zoom Out
buttons
Wheel button:
Up: toggles 3D display on/off
Right: displays the Route List
Left: displays the GPS Info
Down: toggles the mute on/off
Center: tap for OK
Main Menu button
Set destination button
System On/Off button
Getting a GPS signal
To use the GoNav Navigation system to guide you to a destination, the
system’s GPS antenna must be receiving signals. GPS signals can be
obstructed by ceilings, trees, and nearby tall buildings. The roof of your
vehicle can also obstruct signals. For best results, position your GoNav
Navigation system where it has a clear view of the sky.
Receiving initial GPS signal may take several minutes. Also, the further
away the unit is from the last location of use, the longer time it will take to
obtain current location GPS signal.
You can quickly view the GPS Info screen by pressing the right side of the
wheel button.
The GPS info screen appears
If you continue to tap the right button, the following screens appear by
turns: map screen →GPS Info → Almanac → Location Information →
Route list → map screen.
5
User’s Manual
Tap the left button, they appear reversely. Whatever current screen it is,
tap the OK button it changes to map screen.
6
User’s Manual
Entering data on the GoNav Navigation system
The GoNav Navigation system doesn’t have a keyboard. Instead, you
tap the screen to enter data, for best result use the stylus provided.
When you are entering data, a screen containing the letters of the
alphabet appears:
As you tap the buttons on the keyboard, the list at the top of the screen
scrolls to show the next item that matches the letters you’ve tapped.
If you need to enter numbers, tap the
keyboard appears:
button, and the numeric
Moving through the screens
The GoNav Navigation system shows you one screen at a time. Each
time you tap a button, a new screen appears. If you want to return to the
previous screen, tap the
7
button in the wheel button center.
User’s Manual
Working with the map
The GoNav Navigation system gives you many ways of looking at the
map. You can see your current position, you can view any of the
maneuvers on a route, and you can pan the map to view other areas. You
can zoom in and out, and you can find information about specific
locations.
Map view
If you have a GPS signal, the map view on the GoNav Navigation
system shows you your current location, indicated by a green arrow. If
the arrow is red, you do not have a GPS signal, and if the arrow is yellow
the GPS signal is weak.
At the bottom of the map is a scale indicating your current zoom level.
Maneuver detail
If you have set a destination, the map displays additional information. As
you navigate to a destination, the top of the map displays the name of the
next street, the direction of your next turn and the distance to that turn.
8
User’s Manual
At the bottom of the map you see the time, an estimate of how much time
before you arrive at your destination, the remaining distance to your
destination, and your current speed.
Panning the map
You can pan the map by tapping and dragging the map.
To return to the regular map view, press the center of the wheel button.
Route list
If you have set a destination, you can view a list of the maneuvers that
make up your route by pressing the left side of the wheel button. Tapping
an item on the list and then tapping Map will display the maneuver detail
screen for that maneuver.
9
User’s Manual
Main menu and set destination button
Every time, you press
a Main Menu screen appears.
Press
, if you have set a destination, a Destination Options screen
appears.
If not, a Set Destination screen appears, and then you can set a
destination using any of the methods explained as follows.
10
User’s Manual
Location and POI information
You can find location information about any point on the map by pressing
firmly on the map. A screen appears giving you the opportunity to set the
location as the Start or the Destination, save the location to your Favorites
list, or view information.
From the Information screen you have several options:
• Set start location
• Set destination
• Save this location
• Information
Setting the location as a starting point is useful if you are trying to find the
distance between two locations. Setting the location as your destination is
a quick way to set a destination. Saving the location adds the location to
your Favorites list (you’ll learn more about Favorites later in this manual).
To view location information:
1.
11
To view information about a location on the map, press firmly on the map.
The address information screen appears.
User’s Manual
2.
Tap Information. The Information screen appears, giving you block
information about the location, including latitude and longitude.
To view POI information:
1.
12
To view information about POI on the map, press firmly on the icon on the
map. The POI(S) screen appears.
User’s Manual
Planning your route
You can set a destination with the GoNav Navigation system many
different ways. Once you have set a destination, you can add a detour or
a stopover.
The GoNav Navigation system also offers an Itinerary feature, where
you can enter up to 50 destinations and use the Itinerary screen to move
the addresses into any order you like.
Setting a single destination
You can set your destination the following ways:
• Address
• Intersection
• Point of Interest (POI)
• Favorites
• Recent
• City Center
When you have found your destination, you have several options:
• Nav
• Fav
• Map
Calculate the route from your current location (or the location you
set as a starting point) to the destination.
Add the destination to your Favorites list. Your Favorites list is a
list of locations that you can add destinations to. You can also enter a
name for a destination and delete destinations from the list.
Display the location on the panning map without calculating a
route.
Using an address as a destination
When you use an address for a destination, you must know at least the
name of the street and the city. Guidance directions will be more accurate
if you also know the street number of the destination.
Note: If you already have a destination, you can tap New to set a new
destination.
13
User’s Manual
There are two ways to enter the address: by selecting the street first, or
be selecting the city first. If you use Street First and too many records
match, you will be asked to use City First.
To enter an address as a destination using Street First:
1.
Press
. The Set Destination appears.
2.
Tap Address. The Input Method screen appears.
3.
If you need to change the region:
• Tap Change. The Enter State Name screen appears.
14
User’s Manual
• Tap the letters to enter the name of the region, or tap the name of the
region.
• Tap OK when you have selected the region. You return to the Input
Method screen.
4.
Tap Street First. The Enter Street Name screen appears.
5.
Tap the letters to enter the name of the street. Tap OK when you have
selected the street. The Enter House Number screen appears.
6.
Select the address that matches the location you want to go to and
tap
15
. The map appears, and the guidance directions begin.
User’s Manual
To enter an address as a destination using City First:
1.
Press
. The Set Destination screen appears.
2.
Tap Address. The Input Method screen appears.
3.
If you need to change the region:
• Tap Change. The Enter State Name screen appears.
• Tap the letters to enter the name of the region, or tap the name of the
region.
• Tap OK when you have selected the region. You return to the Input
Method screen.
16
User’s Manual
4.
Tap City First. The Enter City Name screen appears.
5.
Tap the letters to enter the name of the city. Tap OK when you have
selected the city. The Enter Street screen appears.
6.
Tap the letters to enter the name of the street. Tap OK when you have
selected the street. The Enter House Number screen appears.
17
User’s Manual
7.
Tap the numbers to enter the house number. Tap OK when you have
finished. The Select Address screen appears.
8.
Select the address that matches the location you want to go to and
tap
. The map appears, and the guidance directions begin.
Using an intersection as a destination
When you use an intersection for a destination you must know the names
of both streets. If there are many cities that have streets with the first
name you enter you might be asked to select the city first.
There are two ways to enter the intersection: by selecting the street first,
or be selecting the city first. If you use Street First and too many records
match, you will be asked to use City First.
To enter an intersection as a destination using Street First:
1.
18
Press
. The Set Destination screen appears.
User’s Manual
2.
Tap Intersection. The Input Method screen appears.
3.
If you need to change the region:
• Tap Change. The Enter State Name screen appears.
• Tap the letters to enter the name of the region, or tap the name of the
region.
• Tap OK when you have selected the region. You return to the Input
Method screen.
4.
19
Tap Street First. The Enter Street Name screen appears.
User’s Manual
5.
Tap the letters to enter the name of the street. Tap OK when you have
selected the street. The Enter 2nd Street Name screen appears.
6.
Tap the letters to enter the name of the second street. Tap OK when you
have selected the street. The Select Address screen appears.
7.
Select the intersection that matches the location you want to go to and
tap
20
. The map appears, and the guidance directions begin.
User’s Manual
To enter an intersection as a destination using City First:
1.
Press
. The Set Destination screen appears.
2.
Tap Intersection. The Input Method screen appears.
3.
If you need to change the region:
• Tap Change. The Enter State Name screen appears.
• Tap the letters to enter the name of the region, or tap the name of the
region.
• Tap OK when you have selected the region. You return to the Input
Method screen.
21
User’s Manual
4.
Tap City First. The Enter City Name screen appears.
5.
Tap the letters to enter the name of the city. Tap OK when you have
selected the city. The Enter Street screen appears.
6.
Tap the letters to enter the name of the street. Tap OK when you have
selected the street. The Enter 2nd Street Name screen appears.
22
User’s Manual
7.
Tap the letters to enter the name of the second street. Tap OK when you
have selected the street. The Select Address screen appears.
8.
Select the intersection that matches the location you want to go to and
tap
23
. The map appears, and the guidance directions begin.
User’s Manual
Using a Point of Interest (POI) as a destination
There are many points of interest that you can select as a destination.
Generally, you choose a category and then choose one of four methods
of selecting the specific point of interest. Sometimes you must first select
a subcategory (such as Museum within the category of Attractions) before
you can choose a selection method.
Because there are so many different types of restaurants, choosing a
subcategory of restaurant is more like selecting a street.
The four methods of selecting a specific point of interest include two for
nearby POIs and two for all POIs in a region.
To select a nearby POI as a destination:
1.
Press
2.
Tap Points of Interest. The Points of Interest screen appears.
24
. The Set Destination screen appears.
User’s Manual
3.
Tap a category. Usually a subcategory screen appears.
Note: If you choose Restaurant, tap the letters to enter a type of
restaurant. If you choose Hotel, there is no subcategory screen. Go to the
next step.
4.
Tap a subcategory. The POI Options screen appears.
5.
To select a nearby POI from an alphabetical list:
• Tap Alphabetical. The Enter POI Name screen appears.
25
User’s Manual
• Tap the letters to enter the name of the POI. Tap OK when you have
selected the POI. The POI Select screen appears, displaying the
address of the POI.
• Tap
6.
. The map appears, and the guidance directions begin.
To select a nearby POI by distance:
• Tap By Distance. The POI List screen appears, listing the closest POIs
first.
• Tap the POI that you want to go to and tap
. You may need to
scroll down the list by tapping the scroll bar. The map appears, and the
guidance directions begin.
26
User’s Manual
To select from all POI in a region:
1.
Press
. The Set Destination screen appears
2.
Tap POI. The Points of Interest screen appears.
3.
Tap a category. Usually a subcategory screen appears.
Note: If you choose Restaurant, tap the letters to enter a type of
restaurant. If you choose Hotel, there is no subcategory screen. Go to the
next step.
27
User’s Manual
4.
Tap a subcategory. The POI Options screen appears.
5.
To select a POI from an alphabetical list:
• Tap List All. The Enter POI Name screen appears.
• Tap the letters to enter the name of the POI. Tap OK when you have
selected the POI. The POI Select screen appears.
• Tap
6.
. The map appears, and the guidance directions begin.
To select a POI by city:
• Tap By City. The Enter City Name screen appears.
28
User’s Manual
• Tap the letters to enter the name of the city and tap OK. The Enter POI
Name screen appears.
• Tap the letters to enter the name of the POI and tap OK. The POI Select
screen appears.
• Tap
29
. The map appears, and the guidance directions begin.
User’s Manual
Using a Favorite destination as a destination
Favorite destinations are locations you add to a list on the GoNav
Navigation system. You can add locations to your Favorites list as you
set a destination, from the POI(S) screen, and from the Location
Information screen. You can then easily select one of these locations as a
destination.
To select a favorite as a destination:
1.
Press
. The Set Destination screen appears.
2.
Tap Favorites. The Favorites screen appears.
3.
Tap on the favorite you want to use as a destination and tap
map appears, and the guidance directions begin.
. The
Using a Recent destination as a destination
Recent destinations are locations you have navigated to recently. You
can easily select one of these locations as a destination.
Managing your recent destinations list is covered later in this section.
30
User’s Manual
To select a destination from your list of recent destinations:
1.
Press
. The Set Destination screen appears
2.
Tap Recent. The Recent screen appears.
3.
Tap on the recent destination you want to go to and tap
appears, and the guidance directions begin.
. The map
Using a City Center as a destination
Sometimes you may want to use the GoNav Navigation system to get to
a city, but not to a specific location within the city. To do this you select a
City Center as a destination.
As with selecting a Point of Interest, there are several methods of
selecting a city center: two for nearby city centers and one for all city
centers in a region.
31
User’s Manual
To select a nearby City Center as a destination:
1.
Press
. The Set Destination screen appears
2.
Tap City Center. The City Center screen appears.
3.
To select a nearby city center from an alphabetical list:
• Tap Alphabetical. The Enter City Name screen appears.
32
User’s Manual
• Tap the letters to enter the name of the city. Tap OK when you have
selected the city. The City Center screen appears.
• Tap
4.
. The map appears, and the guidance directions begin.
To select a nearby city center by distance:
• Tap By Distance. The City List screen appears, listing the closest city
centers first.
• Tap the city that you want to go to and tap
. You may need to scroll
down the list by tapping the scroll bar. The map appears, and the
guidance directions begin.
33
User’s Manual
To select from all City Centers in a region:
1.
Press
. The Set Destination screen appears
2.
Tap City Center. The City Center screen appears.
3.
To select a city center from all available in a region:
• Tap List All. The Enter City Name screen appears.
34
User’s Manual
• Tap the letters to enter the name of the city. Tap OK when you have
selected the city. The City Center screen appears.
• Tap
. The map appears, and the guidance directions begin.
Adding detours and stopovers
The detour feature lets you tell the GoNav Navigation system about
roads on a route that you do not want to use. Stopovers are stops you add
to a trip to make prior to reaching your destination.
Detours
Once you have set a destination you can look at the list of streets and
determine if you need to mark one or more as unavailable. If you mark a
section as unavailable the GoNav Navigation system will calculate a
new route that avoids the section you marked.
Note: You cannot create a detour if you do not have a current destination.
To create a detour:
1.
35
Press
. The Destination Options screen appears.
User’s Manual
2.
Tap Detour. The Detour screen appears.
3.
Mark any segments that you do not want included:
• Tap on a route instruction to highlight it.
• Tap Avoid. A do not enter symbol appears.
4.
When you have finished marking segments, tap
. Your route is
recalculated, the map appears and the guidance directions begin.
Stopovers
Once you have set a destination you can add a stopover. Adding a
stopover does not cancel your original destination.
To create a stopover:
1.
36
Press
. The Destination Options screen appears.
User’s Manual
2.
Tap Stopover. The Set Stopover screen appears.
3.
Set your stopover destination using any of the methods explained earlier
in this section.
To cancel a stopover:
1.
Press
2.
Tap Stopover.
3.
Tap the
in the top right corner. A confirmation message appears
asking if you want to continue to your final destination.
37
. The Destination Options screen appears.
User’s Manual
4.
Tap Yes. The map appears and navigation continues.
Managing your favorites list
You can edit the destinations you add to your favorites list to give them
descriptive names. You can also remove destinations from your favorites
list.
To manage your favorites list:
1.
Press
2.
Tap Favorites. The Favorites screen appears
3.
To edit a favorite:
. The Set Destination screen appears
• Tap on the favorite you want to edit.
38
User’s Manual
• Tap Edit. The Edit Favorites screen appears.
• Enter a descriptive name for this favorite.
• Tap OK when you are done.
4.
To delete a destination from your favorites list:
• Tap on the favorite you want to delete.
• Tap Del. The favorite is removed from the list.
5.
39
Tap X to close the Favorites screen.
User’s Manual
Setting your options
You can set many different options to customize the GoNav Navigation
system and make it work your way. These options include:
• Display options
• Route options
• Volume
• Localization
Display options
The display options give you control over the appearance of the map. You
can change the following:
• Orientation
• Guidance
• Day/Night
• POI Icons
• Color
• 3D View
There are two orientation settings. Heading turns the map as you drive so
that you are always moving toward the top of the screen. North keeps the
map oriented with North at the top of the map, like a traditional paper map.
40
User’s Manual
There are two guidance settings, which control whether or not the
maneuver detail screen appears when you near your next maneuver. If
you use the auto setting, the maneuver detail screen appears.
The day/night setting controls the background of the screen. If you choose
auto, the GoNav Navigation system will automatically switch to a darker
version of your color scheme soon after sunset, to reduce the glare in the
vehicle. You can instead choose to use either the day or night setting at
all times.
There are three options for displaying POI icons. If you choose default,
the most commonly displayed categories of POI icons will appear on the
map at zoom levels of 1000 ft and closer. If you choose off, no POI icons
are displayed. If you choose custom, you can choose which categories of
POI icons you want displayed.
The color settings control the background color of the map. You can
choose from four different colors.
The 3D view settings control your view of the map. Off shows you the map
in traditional 2D mode. 1, 2, and 3 show you a 3D version of the map, with
a different angle for each value. If you use any of the 3D settings you will
not be able to tap on a location to view location information. You can
toggle the 3D view on and off using the up button on the wheel button.
41
User’s Manual
To set your display settings:
1.
Press
2.
Tap Display Options. The Display Options screen appears.
3.
Tap your Orientation preference: Heading or North.
4.
Tap your Guidance preference: Auto or Manual.
5.
Tap your Day/Night preference: Auto, Night, or Day.
6.
Tap your POI Icons preference: Default, Off, or Custom.
42
. The main menu appears.
User’s Manual
• When you tap Custom the POI Options screen appears.
• Tap on the categories you want displayed. The categories to be
displayed are highlighted. You can use Select All and Clear All to
quickly highlight or clear categories.
• When you have highlighted the categories you want displayed, tap OK.
You return to the Display Options screen.
7.
Tap your Color preference: Yellow, Grey, White, or Fuchsia.
8.
Tap your 3D View preference: Off, 1, 2, or 3.
9.
When you have finished choosing your options, tap OK.
Route options
The route options give you control over the appearance of the map. You
can change the following:
• Method
• Ferries
• Toll roads
• Carpool
• Turns
43
User’s Manual
There are four method settings. Quickest calculates the route that should
take the least amount of time. Major calculates a route that uses major
roads whenever possible. Shortest calculates the route that is shortest in
distance. Local calculates a route that uses local roads whenever
possible.
The ferries setting indicate whether ferries should be included when your
route is calculated. If you include ferries, the route will take you to the ferry
terminal, but the total time for the route does not take into account the
ferry schedule or time spent on the ferry.
The toll roads setting indicates whether you want to include or exclude toll
roads when your route is calculated. If you include toll roads, those roads
will be used if appropriate for the method you selected.
The carpool setting indicates whether or not you want to include carpool
or high occupancy vehicle (HOV) restrictions in the calculation of your
route.
The turns setting indicates whether or not you want to make more or less
turns.
To set your route settings:
1.
Press
2.
Tap Route Options. The Display Options screen appears.
44
. The main menu appears.
User’s Manual
3.
Tap your Method preference: Quickest, Major, Shortest, or Local.
4.
Tap your Ferries preference: Include or Exclude.
5.
Tap your Toll Roads preference: Include or Exclude.
6.
Tap your Carpool preference: Include or Exclude.
7.
Tap your Turns preference: Less or More.
8.
When you have finished choosing your options, tap OK.
Volume
You can set the volume used by your GoNav Navigation system to the
level most comfortable for you.
You can also mute the sound. You can toggle the mute on and off by
pressing the down side of the wheel button. There is also a Mute button
on the Volume screen.
To change the volume:
1.
45
Press
. The main menu appears.
User’s Manual
2.
Tap Volume. The Volume screen appears.
3.
Tap on the volume setting you want, or tap on the Vol ↓ or Vol ↑ buttons.
4.
To test the volume, tap Test.
5.
To save your changes, tap OK. The Volume screen closes.
46
User’s Manual
Localization
The localization options give you control over the settings affected by your
location, including:
• Language
• Time zone
• Units
There are four language settings. When you change the language, all of
the screen names and controls will be in the selected language.
There are six time zone settings, for all areas of United States.
There are three settings for units, which determine how the distance to
your location is expressed. You can choose between Mi/Ft (miles and
feet), Mi/Yd (miles and yards), or KM (kilometers).
To set your localization settings:
. The main menu appears.
1.
Press
2.
Tap Localization. The Localization screen appears.
47
User’s Manual
3.
Tap your Language preference: English, Français, Español, or Chinese.
4.
Tap your Time Zone preference: Eastern, Central, Mountain, Pacific,
Alaska or Hawaii.
5.
Tap your Units preference: Mi/Ft, Mi/Yd, or KM.
6.
When you have finished choosing your options, tap OK.
For all other inquiries, please contact your local dealer.
48
User’s Manual