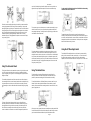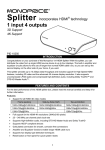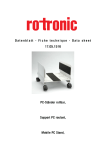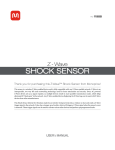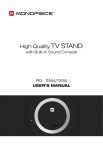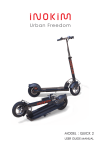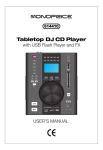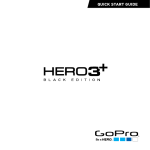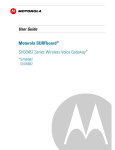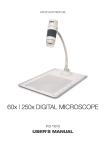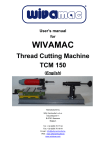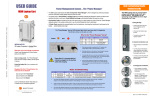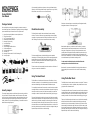
1
Rollbar/Vehicle Mount
If your mounting location does not have an anchor point for attaching the
lanyard you can affix the provided Security Lanyard Anchor to your vehicle,
board, helmet, etc. to which you can secure the lanyard.
Product ID 10641
User Manual
Push down on the two wings to ensure that they are flat against the table,
then tighten the nuts to lock the wings in place.
Package Contents
After receiving this product, please inventory the contents to ensure you
have all the proper parts, as listed below. If anything is missing or damaged,
please contact Monoprice Customer Service for a replacement.
1
2
3
4
5
6
7
8
9
10
11
12
13
Mount Base Assembly with two screws and plastic nuts
Tilting Camera Mount
2x 15" Universal Strap with Clip
Helmet Base with 3M Adhesive
Mounting Clip Screw Key
2x Universal Wings
2x Rollbar Wings
2x Board Wings with 3M Adhesive
90° Mounting Bracket
Security Lanyard Anchor
2x Rollbar Tie
Mounting Clip Base and 1/4"-20 UNC Mounting Clip
Security Lanyard
Mount Base Assembly
The Mount Base Assembly is the central element for most mounting
solutions. The Action Camera can be mounted directly to the mount base
assembly or it can be mounted to the Tilting Camera Mount or the 1/4"-20
UNC Mounting Clip, which in turn is mounted on the base assembly.
The base assembly features a knurled locking ring and a retractable
orientation pin. The knurled locking ring on the base assembly matches the
knurled locking rings on the Tilting Camera Mount and the 1/4"-20 UNC
Mounting Clip, and ensures that the camera mount will not yaw off to one
side or the other during extreme use.
The two screws on the base assembly are used to attach one of the sets of
wings or to secure it to the Helmet Base.
Next determine where on your board (or other flat surface) you want to
attach the mount. Ensure that the mounting location is cleaned of all dirt,
dust, grease, fingerprints, etc. When you are ready to attach the mount
assembly remove the protective film from the adhesive pads on the wings.
Place the mount assembly in the desired location, paying attention to the
location of the orientation pin. Press down on the two wings to ensure a good
connection between the pads and the mounting surface.
For best results the 3M adhesive pads should be affixed to the
mounting surface at least 24 hours before use.
Note that this is a permanent installation for the wings, but that the mount
base assembly can be removed so it can be used for another mounting
solution.
Using The Board Mount
The Board Mount is used to attach the camera to a flat surface, such as a
surfboard, snowboard, etc. It is assembled using the mount base assembly
and the two Board Wings, which feature attached 3M adhesive pads.
Security Lanyard
The security lanyard provides an added level of assurance that you will not
lose your camera if it should somehow come off the mount or if the mount
comes loose. One end of the lanyard loops through the lanyard ring on the
camera and the other end loops through an anchor point on your vehicle,
board, or helmet. The clip on the lanyard allows you to remove the camera
without first removing the lanyard.
To assemble the board mount, first remove the screws from the mount base
assembly. With the screws removed note that there are knurled locking rings
around the screw holes on one side of the base assembly. Place the base
assembly on a table or flat surface with the knurled locking rings facing you.
Take one of the board wings and orient it on one side of the base assembly,
with the adhesive pad down and so that the knurled locking ring on the wing
matches the ring on the base assembly. Push the wing over the side of the
base assembly so that the holes align, then insert one of the screws so that
the screw head recesses into the hexagonal shaped hole on one side of the
board wing. Attach the plastic nut to the screw, but do not tighten it down yet.
Repeat the steps above for the second board wing.
Page 1
Using The Rollbar Mount
The Rollbar Mount is used to attach the camera to a round pole. The mount
can work with poles as small as a handlebar, but provides the most secure
grip to poles with a diameter about 2".
To assemble the rollbar mount, first remove the screws from the mount base
assembly. With the screws removed note that there are knurled locking rings
around the screw holes on one side of the base assembly. Place the base
assembly on a table or flat surface with the knurled locking rings facing you.
Take one of the rollbar wings and orient it on one side of the base assembly,
with the foam side down and so that the knurled locking ring on the wing
matches the ring on the base assembly. Push the wing over the side of the
base assembly so that the holes align, then insert one of the screws so that
the screw head recesses into the hexagonal shaped hole on one side of the
board wing. Attach the plastic nut to the screw, but do not tighten it down yet.
Repeat the steps above for the second rollbar wing.
User Manual
one side of the board wing. Attach the plastic nut to the screw, but do not
tighten it down yet. Repeat the steps above for the second rollbar wing.
Place the mount assembly against the pole on which you want to attach the
mount, paying attention to the location of the orientation pin. Squeeze the
two wings together to grip the pole. Thread the free end of one of the Helmet
Straps through the slot in one of the wings then through the slot in the other
wing. Thread the free end through the locking clip on the strap and cinch
down the strap while squeezing the wings until the mount is securely
attached to the pole. Finally tighten the two plastic nuts to ensure the wings
stay securely in place.
There are two ways to use the straps to secure the mount assembly to your
desired location. One way is to squeeze the wings together and thread a
strap through both wings, cinching it down for a squeeze grip, similar to that
used with the rollbar mount above.
The other method is to spread the wings and strap each side to a secure
anchor point. To do this, thread one of the straps through the slot on one
wing then around an anchor point (such as one of the bars on a bike helmet).
Loop the strap back and thread it through the clip. Repeat the process with
the other strap and other side. Finally cinch down the straps and lock them in
place with the strap clips. Finally, tighten the two plastic nuts to ensure the
wings stay securely in place.
Using The Universal Mount
The Universal Mount is used to attach the camera to a bicycle helmet, round
pole. The mount can work with poles as small as a handlebar, backpack
strap, or anywhere you can get a secure mounting point using the Universal
Wings and Straps.
To assemble the universal mount, first remove the screws from the mount
base assembly. With the screws removed note that there are knurled locking
rings around the screw holes on one side of the base assembly. Place the
base assembly on a table or flat surface with the knurled locking rings facing
you.
Take one of the universal wings and orient it on one side of the base
assembly, with the foam side down and so that the knurled locking ring on
the wing matches the ring on the base assembly. Push the wing over the
side of the base assembly so that the holes align, then insert one of the
screws so that the screw head recesses into the hexagonal shaped hole on
Using The Helmet Base
The Helmet Base is curved to fit flat against the curved surface of a
motorcycle helmet. It has a 3M adhesive pad on the underside, which
provides a permanent mounting point for the mount base assembly.
To install the helmet base, first identify where you want to attach it to your
helmet. Place the base against the helmet to ensure that the curvature
matches. Next, ensure that the mounting location is cleaned of all dirt, dust,
grease, fingerprints, etc.
When you are ready to attach the mount assembly remove the protective film
from the adhesive pad. Position the base then press down firmly to ensure a
good connection between the adhesive pad and the helmet surface.
Page 2
For best results the 3M adhesive pad should be affixed to the mounting
surface at least 24 hours before use.
To attach the camera, first remove the screws from the mount base
assembly. Position the mount base assembly into the helmet base, align the
screw holes, and then insert the screws so that the screw heads seat into the
hexagonal shaped holes in the helmet base. Add the plastic nuts and tighten
them until the entire assembly is secure.
Using the 90° Mounting Bracket
The included 90° Mounting Bracket is used to orient the camera vertically
when it is side mounted to a helmet, vertical pole, etc. To use the bracket,
first affix it to the mount base assembly or one of the other mounting
adapters, then insert the camera and secure it using the 1/4"-20 UNC screw.