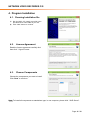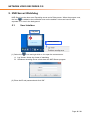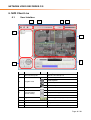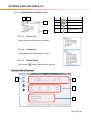
1
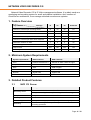
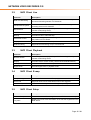
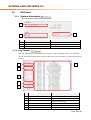
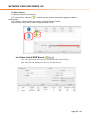
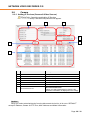
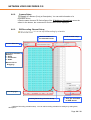
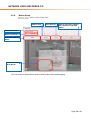
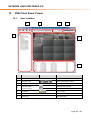
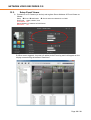
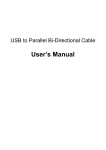
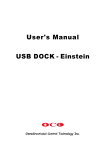
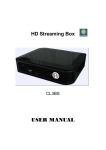
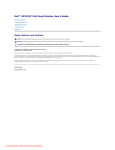
NETWORK VIDEO RECORDER C/S
USER MANUAL
Released on the 19th of Sep., 2014
NETWORK VIDEO RECORDER C/S
INDEX
1.
Feature Overview ................................................................................................................................................. 4
2.
Minimum System Requirements ................................................................................................................. 4
3.
Detailed Product Features .............................................................................................................................. 4
4.
5.
3.1.
NVR CS Server .................................................................................................................................... 4
3.2.
NVR Client Live ................................................................................................................................... 5
3.3.
NVR Client Playback ........................................................................................................................ 5
3.4.
NVR Client E-map .............................................................................................................................. 5
3.5.
NVR Client Setup ............................................................................................................................... 5
Program Installation ........................................................................................................................................... 6
4.1.
Running Installation file ................................................................................................................. 6
4.2.
License Agreement........................................................................................................................... 6
4.3.
Choose Components ....................................................................................................................... 6
4.4.
Registering NVR Server in the Windows Startup program................................................. 7
4.5.
Installation Completion .................................................................................................................. 7
NVR Server/ Watchdog ..................................................................................................................................... 8
5.1.
6.
NVR Client Live ..................................................................................................................................................... 9
6.1.
6.2.
7.
User Interface ....................................................................................................................................... 9
6.1.1.
Status Window and Server List ..................................................................................... 10
6.1.2.
Program Icons ......................................................................................................................... 12
6.1.3.
Display Mode ............................................................................................................................ 12
6.1.4.
Display Screen ........................................................................................................................ 13
6.1.5.
PTZ Control ............................................................................................................................... 13
6.1.6.
Time Line & PTZ Panorama ............................................................................................. 14
6.1.7.
Login Information .................................................................................................................. 16
Server/Group List and Display Menu .................................................................................. 17
6.2.1.
Server List Menu .................................................................................................................... 17
6.2.2.
Group List Menu..................................................................................................................... 17
6.2.3.
Display Screen Menu........................................................................................................... 17
6.2.4.
Group Main Menu .................................................................................................................. 18
NVR Client Playback ....................................................................................................................................... 19
7.1.
8.
User Interface ....................................................................................................................................... 8
User Interface .................................................................................................................................... 19
NVR Client E-Map ............................................................................................................................................. 20
Page: 2 / 32
NETWORK VIDEO RECORDER C/S
8.1.
User Interface .................................................................................................................................... 20
8.2.
E-map Group ..................................................................................................................................... 21
8.2.1.
To add E-map Group ........................................................................................................... 21
8.2.2.
To edit E-map Group ........................................................................................................... 21
8.2.3.
To lock or unlock E-map Group .................................................................................... 21
8.2.4.
To open/ delete E-map ........................................................................................................ 21
E-map Items ....................................................................................................................................... 22
8.3.
9.
8.3.1.
To add items to E-map........................................................................................................ 22
8.3.2.
To edit/delete items on the E-map ............................................................................... 22
8.3.3.
To save items to E-map ..................................................................................................... 22
NVR Client/Server Setup............................................................................................................................... 23
9.1.
User Interface .................................................................................................................................... 23
9.2.
NVR Information (
9.3.
User List (
9.4.
Server List (
9.5.
NVR Sever ........................................................................................................................................... 25
) ................................................................................................................ 24
)............................................................................................................ 24
)................................................................................. 25
9.5.1.
System Information (
9.5.2.
Log Viewer(
9.5.3.
DB Drive Setting (
9.5.4.
User List of NVR Server (
) .................................................................................................. 25
) ............................................................................... 26
) ......................................................................... 27
Camera .................................................................................................................................................. 28
9.6.
10.
)....................................................................................................... 23
9.6.1.
Adding IP Devices (Camera & Video Servers) ...................................................... 28
9.6.2.
Camera Setup .......................................................................................................................... 29
9.6.3.
DB Recording Channel Setup ........................................................................................ 29
9.6.4.
Motion Setup ............................................................................................................................ 30
NVR Client Event Viewer ..................................................................................................................... 31
10.1.
User Interface .................................................................................................................................... 31
10.2.
Setup Event Viewer ....................................................................................................................... 32
Page: 3 / 32
NETWORK VIDEO RECORDER C/S
Network Video Recorder C/S is IP Video management software. It is widely used as a
monitoring and recording system for small and midsize installation. And, because of
Client/Server architecture, it can manage unlimited record server systems.
1. Feature Overview
Key features
Package
16
36
64
Unlimited
Number of cameras per recording server
16
36
64
64
Multi server solution
No
No
No
Yes
Number of servers
1
1
1
Unlimited
Number of cameras per NVR Client Live
16
36
64
128
Number of cameras per NVR Client Playback
16
36
64
64
Maximum numbers of users
1
5
5
32
Alarm Manager
Yes
Yes
Yes
Yes
Map function
Yes
Yes
Yes
Yes
Watchdog
Yes
Yes
Yes
Yes
2. Minimum System Requirements
System requirements
NVR CS Server
NVR CS Client
CPU
Pentium Core2 duo 2.4
Pentium i3-3220 3.3GHz or higher
Graphic Card
128MB
128MB
Ram
2GB
2GB or higher
O/S
Windows 7
Windows 7
Network
Gigabit LAN
Gigabit LAN
HDD
Minimum 1GB Free
Minimum 1GB Free
3. Detailed Product Features
3.1.
NVR CS Server
Function
Recording Server
Description
Saves transmitted video stream from IP cameras
Intelligent recording functions ( Scheduling, Event Recording)
Relay Server
Relays video streams or events from IP cameras to the Client
Two way Audio Server
Transmits client’s audio data to Camera
User Management
Manages the user group and the privilege of the user group
Watchdog
Monitors Recording Servers periodically and maintains stable
recording operations.
Page: 4 / 32
NETWORK VIDEO RECORDER C/S
3.2.
NVR Client Live
Function
Description
Real-time Monitoring
Performs real-time monitoring of Max. 128 channels by remote
access to Recording servers or IP Cameras.
Unlimited Server System
Provides unlimited server system by remote management of
recording servers of IP Cameras
Quick Search
Provides up to x16 playback speed of recording data by each
camera of Recording Server.
P/T/Z Control
Controls Pan/Tilt/Zoom of IP Camera.
Backup
Provides AVI file of Video Backup.
Panorama Control
Creates 360 degree panorama image of PTZ Camera and Controls
the position of PTZ camera.
Display
Provides various screen modes (1/4/6/9/10/13/16/25/36/49/64ch)
Dual Monitoring
Supports Dual monitoring of up to 128 channels.
3.3.
NVR Client Playback
Function
Description
Remote Search
Provides up to x16 playback speed of recording data by each
camera of Recording Server.
Display
Provides various screen modes (1/4/6/9/10/13/16/25/36/49/64ch)
Backup
Provides AVI file of Video Backup.
Digital Zoom
Provides digital zoom in playback mode
3.4.
NVR Client E-map
Function
Description
E-map management
Provides unlimited number of E-map pages
Event Link
Supports various event notifications when event triggered.
User-friendly Interface
Provides User-friendly interface of Drag&Drop setting
3.5.
NVR Client Setup
Function
Description
Remote Setup
Sets the functions of Recording Servers and IP Cameras remotely.
Log View
Displays the list of Event information of IP Cameras registered on the
NVR Server.
Page: 5 / 32
NETWORK VIDEO RECORDER C/S
4. Program Installation
4.1. Running Installation file
1)
2)
Run the NVR_CS_Install_xx.exe file in the
provided CD or in the folder of your PC.
Click “Next” button to continue.
4.2.
License Agreement
Read the license agreement carefully And
then click “ I Agree” button.
4.3.
Choose Components
Choose the components you want to install.
Click “Next” to continue.
Note. To install all components as standalone type, in one computer, please click “ NVR Server”.
Page: 6 / 32
NETWORK VIDEO RECORDER C/S
Choose Install Location
Define the destination folder and click
“Install” button.
(Default folder is C:\Program Files\NVR CS)
4.4. Registering NVR Server in the
Windows Startup program.
If you choose the NVR Server of
components, the popup window for Startup
registry will appear. Then Click “Yes” Button
to register it to Startup program.
4.5.
Installation Completion
Upon completion, you can run NVR
Recording Server by clicking “Finish” button
with checked on the check box of Run NVR
Recording Server.
After installation completion, 6(six) shortcut icons will be created on Desktop as follows;
Uninstalling NVR CS,
To uninstall NVR CS, you can run uninst.exe on the below location/ way.
Start-up MenuèAll ProgramsèNVR CSèUninstall (uninst.exe)
In the control panelà open uninstall a program à Network Video Recorder à Uninstall
Page: 7 / 32
NETWORK VIDEO RECORDER C/S
5. NVR Server/ Watchdog
NVR Server’s main roles are a Recording server and a Relay server. When the program runs,
the icon [
] is added to the notification area on the taskbar. It does not have its own
separate UI. It runs in the background.
5.1.
User Interface
Tray Icon
Customize…
(1) Select the [
Context Menu
] icon and right click on it to open the context menu.
A. Log Viewer: shows log viewer of watchdog
B. Shutdown recording server: shuts down the NVR Server program.
(2) Enter the ID and password and click “OK”.
Page: 8 / 32
NETWORK VIDEO RECORDER C/S
6. NVR Client Live
6.1.
User Interface
2
4
3
5
1
6
7
8
No.
Item
1
Server & Group List
Icon
Description
Server List & Group List
Select components to switch.
2
Program Icons
NVR Playback
NVR Setup
NVR E-map
3
Display mode
4
Function Button
(Screen mode)
Selects the desired screen channel
Dual Screen mode
Snapshot Saving & Print
Full Screen mode
5
Login info
Shows Login Info ( Log in/out)
6
Display screen
Shows all desired
7
Timeline
Playback the recorded data
8
PTZ Control
Can control PTZ cameras remotely
Page: 9 / 32
NETWORK VIDEO RECORDER C/S
6.1.1. Status Window and Server List
1
2
No.
3
Icon
Item
1
Server List
2
Group List
3
Option Setup
4
Status Window
4
6.1.1.1.
Server List
Shows registered servers and their status
6.1.1.2.
Group List
Shows Registered Groups and their status.
6.1.1.3.
Option Setup
Click Option [
] button. Setup Window appears.
Display Setup Window
1
2
3
4
Page: 10 / 32
NETWORK VIDEO RECORDER C/S
No.
Item
Description
Display
1
Option List
Dual Screen
2
Information Language
Changes Language
3
Display Caption
Sets up the captions
4
Video Display
Log Viewer Window
1
2
3
4
5
6
7
No.
Item
Icon
Description
1
Option List
Log Viewer
2
Log List
Shows the log list
3
Log Search
Searches list of
4
Page Selection
Turns to the selected page
5
Date, Type, Query
Choose Search types
6
Print Log List
Print the searched list
7
Keyboard
On-Screen Key Board
Page: 11 / 32
NETWORK VIDEO RECORDER C/S
Etc. Window
Option List
Save path
(Backup & Snapshot)
Two Way Audio use
6.1.2. Program Icons
NVR Live
:
shows real-time live video for monitoring
NVR Playback
NVR Setup
:
:
you can set up / configure Network Video Sever
NVR Event viewer
NVR E-Map
you can search and play back recorded data
:
:
Shows live video when events triggered
Displays live video and Alarms on user’s defined
map when events triggered.
6.1.3. Display Mode
You can set the modes: 1/4/6/9/10/11/16/25/36/49/64 channel mode
Page: 12 / 32
NETWORK VIDEO RECORDER C/S
6.1.4. Display Screen
1
No.
Item/ Icon
Description
1
Camera
Name
Shows the name of
camera
Recording in progress
2
The status of Audio
output
The status of
Microphone
When Motion event is
detected
Alarm In/Out
2
6.1.5. PTZ Control
3
2
1
4
5
6
7
8
9
No.
Item
Icon
Description
1
PTZ Jog
Adjusts the selected position and Controls PTZ operation/menu.
2
Zoom out
Zooms out to smaller image
3
Zoom in
Zooms in to bigger image
4
Focus in
Adjust the focus range to closer distance
5
Focus out
Adjusts the focus range to further distance
6
Iris Open
Sets to Smaller F number for more light exposure
7
Iris Close
Sets to higher F number of Iris for less light exposure
Select Preset Number
8
Preset set-up
Go to Preset Number
Saves a Preset
Clears Preset
9
PTZ Speed
Controls PTZ Speed (Slow or Fast)
Page: 13 / 32
NETWORK VIDEO RECORDER C/S
6.1.6. Time Line & PTZ Panorama
1
2
4
3
5
6
8
7
No.
Item
1
Sync all
2
Stop all
Icon
Description
Synchronizes all on-screen playback to the time of
a searching camera
Stop all playback
Shows the payback point of time in the time line
Pause / Stop playback
3
Playback time
& Control
Backward Playback/ Forward Playback
Backward one frame / Forward one frame
Moves to the first frame/ Moves to the last frame
4
Playback
Speed
5
Backup
6
Panorama
7
Timeline
Use the time line of Searching Data Grid
8
Research
Shows the name of camera
6.1.6.1.
Sets the speed to 0.5x, 1x, 2x, 4x, 8x, 16x.
Opens Backup set-up Window ( The final backup
file format is “*.avi” format.)
Use scanned 360 Panoramic image for easy PTZ
control
How to backup Search Dada
1) Select Cameras from the list
2) Specify the desired time from the Setting section.
Start/stop time, File Path & Contents types (continuous, Event, Audio)
3) Click “Backup size” button for checking the backup size.
4) Click “Start” button.
Page: 14 / 32
NETWORK VIDEO RECORDER C/S
2
1
3
4
6.1.6.2.
How to Search Data Grid
Displays the recorded data of the desired camera in the search grid. Drag
the black line to a desired point of time to playback.
1
2
3
1) Search Time Scale
You can choose Calendar, timeline scale for Search Grid
Calendar, Scale
Calendar, Scale:
(1 hour, 30 minutes, 10 minutes, 5 minutes, 1 minute)
2) Recording status
Color
Description
Blank with no colored bar:
Continuous recording with
blue bar
Audio recording with Green
bar
Event recording with Red bar
No recorded data
shows the recorded data of continuous
recording.
shows Audio recorded data
shows the recorded data point when event
triggered
3) In the search data grid, the black vertical line is the current playback point of
time
Page: 15 / 32
NETWORK VIDEO RECORDER C/S
6.1.6.3.
PTZ Panorama
(limited to the PTZ panorama supporting PTZ cameras)
On the PTZ Panorama 360 degree image, you can click at the desired
position to move a PTZ camera.
PTZ panorama
button
To create the PTZ panorama 360-degree image, right click on the image to open the context
menu. There are three speed steps (low, middle, high) to scan 360-degree. Lower speed is
higher image quality.
6.1.7. Login Information
You can click the [
window:
After login [
Log off ] button and enter the User ID and password in the login
] , the ID will be displayed
Page: 16 / 32
NETWORK VIDEO RECORDER C/S
6.2. Server/Group List and Display Menu
6.2.1. Server List Menu
Context
Description
Display
Display videos on the screen
Close
Close videos on the screen
http://
Open the web page of the cameras
Stream
Auto control of delayed frames
Or Fixed channel setup
6.2.2. Group List Menu
Context
Description
Open
Display groups on the screen
Save
Saves groups on the screen
Delete
Dual
screen
Deletes groups
Display groups on the dual screen
6.2.3. Display Screen Menu
Context
Description
Digital zoom
Provides enlarging the video
image by drag (returns to its
original size, click on display)
PTZ Control
Controls PTZ on display (supports
for only PTZ Cameras)
PTZ on Display
Moves to the “Mouse click”
position (supported model only)
Audio On/Off
Turns on or off Audio
Mic. On/Off
Turns on or Off Mic.
Alarm Out On/Off
Turns on or off Alarm Out
Save Image
Saves or prints Snapshot Image
Close
Closes the display screen
Close All
Closes all the display screens
http:// ~ /
Moves to the webpage of the
camera
Reset
Moves to the previous display.
Page: 17 / 32
NETWORK VIDEO RECORDER C/S
6.2.4. Group Main Menu
Context
Description
Add
Adds a group
Preview
Displays groups to a preview icon
Controls Dual screen options
Open
Close
Maximize
Full Screen
Duplicate Screen
Dual Screen
< Group Setup Window>
<Icon of group preview>
Page: 18 / 32
NETWORK VIDEO RECORDER C/S
7. NVR Client Playback
7.1.
User Interface
2
4
3
5
1
6
7
8
No.
Item
Icon
Description
1
Server & Group List
Server List & Group List
2
Program Icons
Select Components to switch.
3
Display modes
Selects the desired screen channel
4
Function Button
(Screen modes)
Snapshot Saving & Print/ Full Screen
mode
5
Login info
Shows Login Info ( Log in/out)
6
Display
Shows all desired
7
Timeline
Playback the recorded data
8
Calendar
Playback the recorded data
All the features of NVR Client playback are almost the same of NVR Client Live.
The differences are;
Display/ Close screens are available only on the [
] stop playback .
On the search grid, all the timeline of display cameras are listed.
Playback all the cameras simultaneously. (Independently in NVR Client Live)
After screens being configured, select the date from the calendar.
Page: 19 / 32
NETWORK VIDEO RECORDER C/S
8. NVR Client E-Map
8.1.
User Interface
1
2
3
4
5
8
6
7
No.
Item
1
Program Icons
Icon
Description
Selects Components to switch.
Creates new E-map Group
2
E-map Manager
Opening /Editing E-map Group
Locks E-map Group (Monitoring mode)
Unlocks E-map Group (Editing mode)
3
Function Button
Full Screen mode
4
Login info
Shows Login Info ( Log in/out)
5
Server List
Server List & E-map Item
6
PTZ Control
Can control PTZ cameras remotely
7
E-map Group List
Shows the saved E-map group.
8
E-map Screen
E-map Screen
Page: 20 / 32
NETWORK VIDEO RECORDER C/S
8.2.
E-map Group
8.2.1. To add E-map Group
1. Click [
] button to create new E-map.
2. In the Group Setup window, enter Name &
Description and define Image path by clicking [
button.
3. Click [OK] button and then the new E-map will
appear on the E-map Group List
]
8.2.2. To edit E-map Group
1. Click [
] button to edit Description or Image of
E-map Group. (Enter Description or click [
button to change Image Path)
2. Click [OK] button
]
8.2.3. To lock or unlock E-map Group
You can click Lock [
] button or Unlock [
button to switch the E-map mode.
Note. In the Editing mode, [
] button and [
]
Monitoring mode
Editing mode
] button are deactivated.
8.2.4. To open/ delete E-map
1. Double click to open an E-map in the E-map Group list.
2. Or, click right mouse button on it to open context menu.
3. You can open or delete the E-map.
Page: 21 / 32
NETWORK VIDEO RECORDER C/S
8.3.
E-map Items
To add/ edit/ delete items (Camera, Stream1, Stream2, Alarm In, Alarm Out) is
only available in the Editing [
] mode.
8.3.1. To add items to E-map
1) Click an item and drag it to the E-Map.
2) Drop onto the desired position.
No.
1
2
3
4
5
1
2
3
Icon
Item
Camera
Stream1 (Display)
Stream2 (Display)
Alarm In 1
Alarm Out 2
4
5
8.3.2. To edit/delete items on the E-map
You can move an item on the E-map by drag-n-drop.
And you can delete it by context menu (right mouse
button)
No.
1
Icon
Item
Camera
2
Stream1 (Display)
3
Stream2 (Display)
4
Alarm In 1
5
Alarm Out 2
For Display items, Stream1, Stream2, or Pop-up display, you can move/resize a display. Click
right mouse button to open context menu to Delete item or set up Event link or Dwell time setting.
Context menu
Delete item
Event link
Dwell time
Description
Motion, Alarm In, Alarm Out
Continuous, 5sec, 10sec, 30sec,
60sec
8.3.3. To save items to E-map
1) To save E-map, click [
] button and it will be switched to [
2) In a confirmation pop-up window, click [OK] button.
] button.
Page: 22 / 32
NETWORK VIDEO RECORDER C/S
9. NVR Client/Server Setup
9.1.
User Interface
1
2
4
3
No.
Items
Icons
Description
1
Program Icons
Selects Components to switch.
2
Login info
Login buttons
3
Setup Window
Setup Window for detailed setup
NVR information & Display Language
Register users of NVR Server & Permission
Registers/ Adds NVR Servers
4
Shows NVR Sever System
Server List
and Setup Menu
Adds/Edits/Deletes IP Devices
Views Log information of NVR Server
9.2.
NVR Information (
)
: NVR information & Language setup
1). Click [
] and it displays NVR information &
Current display language.
2) You can set the language for NVR.
Available languages: English/ Korean/ Russian/
Spanish/ Portuguese/ Czech/ Japanese/ Italian
3) After the language is checked, click [Save] button to save it to the NVR Client.
Page: 23 / 32
NETWORK VIDEO RECORDER C/S
9.3.
User List (
)
You can register users to the user list of NVR.
1
2
4
3
9.4.
No.
Items
Description
1
Information
2
Permission
(management)
3
Add/ Edit/ Delete
Name, User ID, Password, Confirmation Password
Administrator: has all permissions
Operator: its permission can be specified;
Live/ Playback, Backup/ Setup/ Shutdown recording
Adds/ Edits/ Deletes the selected users
4
Save
Saves User’s list to NVR client
Server List (
)
It is used to register NVR Sever/Client Server (IP Address, User ID & Password)
2
1
3
No.
Items
Description
1
IP Address/ Port
Connection
setting
Add Server
Set IP Address, Port & Description of NVR Server
Server connection information
(User ID, Password, Connection Time, Reconnection Time)
Adds/ Edits/ Deletes the desired sever from Server list
2
3
Page: 24 / 32
NETWORK VIDEO RECORDER C/S
9.5.
NVR Sever
9.5.1. System Information (
)
You can see the NVR system information.
1
2
3
No.
Items
Description
1
System Information Name
You can set a name for NVR Server
2
Network Server network adapter setup
Sets up when using dual network adapters.
3
Port Setup
NVR Server port setup
9.5.2. Log Viewer(
)
You can view all the log information (System, User, Network, Event) on the NVR
Server and search them with various ways. And you can save or print the searched
log list.
1
6
2
3
4
5
No.
Items
Description
1
Log Search
Search button
2
Page Search
3
Select Date/ Log type/ Query
4
Save Log List
Turns to the selected page
Choose Search types ( Date, Log types,
Query, Log # per page.
Saves log list
5
Print Log List
Print log list
6
Log List
Displays the log list
Page: 25 / 32
NETWORK VIDEO RECORDER C/S
9.5.3. DB Drive Setting (
)
You can set up DB Drive of NVR Server.
1
2
3
4
No.
Items
Description
1
Volume List
Shows Volume list
2
Drive List
3
Drive information & Size Setting
4
Volume Add button
Show DB Drive list
Show the Volume information of
Selected Drive and sets up the size of
DB drive
Add the volume.
Volume: a unit of recording database (DB) of NVR server. It is a bunch of Drives.
It is recommended to configure (set up) one physical Hard Drive into one Volume.
An O/S installed drive is excluded in the Volume
configuration.
You can select a desired volume for recording by each
camera/device individually. It is for stable distributed
recording of several cameras by volume.
To add a volume
1) Click “Add” button.
2) The Volume Add window appears.
3) Select a desired Drive and click “OK” button.
Page: 26 / 32
NETWORK VIDEO RECORDER C/S
To Edit a Volume,
1) Select a volume of Volume list.
2) To add a drive, click the [
] button and the Volume add window appears. Select a
desired drive.
3) To delete a volume, select the volume. And click “Delete” button.
4) When done, click “Save” button to apply to NVR server.
9.5.4. User List of NVR Server (
)
You can register the User group of Selected NVR Server/Client .
(the same-format window of User list of NVR Server)
Page: 27 / 32
NETWORK VIDEO RECORDER C/S
9.6.
Camera
9.6.1. Adding IP Devices (Camera & Video Servers)
: Searching and Adding IP Devices
Click “IP Device Setup” and then Setup window will appear.
1
3
2
4
6
5
7
No.
Items
Description
1
IP Address & Port
Sets up IP address and Port of IP Cameras
2
Camera Description & MAC address
Edit Description & MAC address
3
Camera ID & Password
Edit Camera ID & Password
4
Camera channel Setup
Sets up Streaming types of Channels
5
Camera Add Button
Add Camera
6
Scan Button
Displays Camera list
7
Scanned Device List
Discovered device list
(When you select desired device from the list,
the device information is displayed on the setup)
Caution:
When you select a desired device from the discovered device list, all is set to “DEFAULT”
except IP Address, Stream & HTTP Port, MAC Address and Model information.
Page: 28 / 32
NETWORK VIDEO RECORDER C/S
9.6.2.
Camera Setup
(IP address (Port)) or Description): You can edit information of a
registered device
It has the same format of IP Device Setup. But, IP Address, Stream Port cannot be
edited. In the bottom, the connected IP device video will be displayed.
9.6.3.
DB Recording Channel Setup
: It is to set up DB Recording by schedule.
Camera numbers in
the selected volume
Pre/Post time setup
Volume Selection
Recording Schedule
(Weekly)
E : Event
C : Continuous
A : Audio
(Mouse click or
Dragging)
Recording type
*Holiday Recording schedule Setup
Save the schedule
to NVR server
* Holidays Recording schedule setup : You can add recording schedule for holidays by setting date,
description
Page: 29 / 32
NETWORK VIDEO RECORDER C/S
9.6.4.
Motion Setup
: Motion Area Setup Pane
Motion Area
Clear All area
Save to the motion setup to
the Camera through NVR
Server
Motion detection
Motion sensitivity
Motion Area Block
Setup
Selected motion
Area (Block)
You can select or delete Motion area by clicking the mouse and dragging.
Page: 30 / 32
NETWORK VIDEO RECORDER C/S
10.
NVR Client Event Viewer
10.1.
User Interface
2
3
4
5
1
6
7
No.
Item
Icon
Description
1
Server List
Server List
2
Program Icons
Select Components to switch
3
Display modes
Selects the desired screen channel
4
Function Button
(Screen modes)
Snapshot Saving & Print
5
Login info
Login / Logout
6
Display
Displays Event Triggered Video
7
Event Log
Show Event logs
Full Screen mode
Page: 31 / 32
NETWORK VIDEO RECORDER C/S
10.2.
Setup Event Viewer
A. Connect to an IP Camera (or device) and register Server Address of Event Viewer as
follows;
Setup è Even t è Notification è Check and enter related info on CMS
Event type: Alarm, Motion, User
Interval time: sec
Server Address: IP address of NVR Server
Dwell time: sec
B. When event triggered, its event info added to the Event log and it will appear on the
display screen during the defined “Dwell time”.
Page: 32 / 32