1
Agent Based Simulator
User’s Manual
9, 2000
Kozo Keikaku Engineering Inc.
Innovative Information Technology Dept.
Contents
Introduction
1. What Is an Agent Based Simulator? ........................................................... 0-2
2. Operating Environment ............................................................................. 0-2
3. Installing and Uninstalling ......................................................................... 0-2
4. Basic Concepts ......................................................................................... 0-2
5. How This Manual Is Organized .................................................................. 0-3
6. Typographical Conventions Used in This Manual ....................................... 0-4
An Introduction to Agent Based Simulator
1.1 Running the Samples ............................................................................... 1-2
1.1.1 Segregation Model ................................................................................................ 1-2
1.1.2 Sugarscape Model ................................................................................................ 1-4
1.2 Making Changes ...................................................................................... 1-6
1.2.1 Segregation Model ... A Simulation of Segregated Living Among Turtles ........... 1-6
1.2.2 Sugarscape Model ... A Simulation of an Anthill .................................................. 1-7
1.3 Constructing a Simple Model .................................................................. 1-8
1.3.1 The ABS Programming Environment ................................................................. 1-10
1.3.2 Adding a Component (Space) ............................................................................. 1-12
1.3.3 Adding a Component (Agent) ............................................................................. 1-12
1.3.4 Adding Output Settings ....................................................................................... 1-12
1.3.5 Running It (A Turtle that Does Nothing) ............................................................ 1-14
1.3.6 Opening the Rule Editor ...................................................................................... 1-15
1.3.7 Writing the First Rule .......................................................................................... 1-15
1.3.8 Running It (A Bullet Turtle that Disappears from the Map) .............................. 1-16
1.3.9 Making an Agent that Moves Back and Forth Over the Map ........................... 1-16
1.3.10 Adding More Turtle Agents ............................................................................... 1-18
1.3.11 If the Simulations Doesn't Run Correctly ......................................................... 1-19
1.3.12 Conclusion ......................................................................................................... 1-21
1.3.13 Terms and Techniques ...................................................................................... 1-21
1.3.14 Let's Review ..................................................................................................... 1-21
1.4 Making Modifications for a Slightly More Complex Model ................. 1-22
1.4.1 Resetting the X and Y Variables to Their Original State .................................... 1-22
1.4.2 Using World ........................................................................................................ 1-22
1.4.3 For Variables Used Only in Rules, First Define the Type .................................. 1-23
1.4.4 Loop Control ....................................................................................................... 1-23
1.4.5 Determining the Number of Created Agents ...................................................... 1-23
1.4.6 How to Specify Components .............................................................................. 1-24
1.4.7 Accessing an Individual Agent ............................................................................ 1-24
1.4.8 Running It (A Large Number of Regular Turtles) .............................................. 1-24
1.5 Adding Random Factors to Agents ......................................................... 1-25
1.5.1 Placing Agents Randomly in a Space ................................................................. 1-25
1.5.2 Adding Random Factors to Variable Values ....................................................... 1-25
1.5.3 Changing Execution Rules for Agents ................................................................ 1-26
1.6 Creating a Space That Wraps Around ..................................................... 1-26
1.6.1 Space Component Settings ................................................................................. 1-27
1.6.2 Creating a Function to Adjust the Coordinate Position ....................................... 1-27
1.7 Conclusion ............................................................................................ 1-28
1.7.1 Terms and Techniques ........................................................................................ 1-29
1.7.2 Let's Review ....................................................................................................... 1-29
1.7.3 Differences in Notation between Visual Basic and Agent Based Simulator .... 1-29
Reference
2.1 Making Settings for Models .................................................................... 2-2
2.1.1 Job File Input and Output ...................................................................................... 2-2
2.1.2 Creating a New Job File ....................................................................................... 2-3
2.1.3 Creating a New Space .......................................................................................... 2-5
2.1.4 Creating a New Agent .......................................................................................... 2-6
2.1.5 Writing the Agent Rules ........................................................................................ 2-7
2.1.6 Deleting an Agent ............................................................................................... 2-10
2.1.7 Creating a New Variable .................................................................................... 2-10
2.2 Simulation Setting Feature .................................................................... 2-13
2.2.1 Initialize Dialog Box ............................................................................................ 2-13
2.2.2 Set Default Dialog Box ....................................................................................... 2-16
2.2.3 Output Settings Dialog Box ................................................................................. 2-16
2.2.4 Execution Environment Settings Dialog Box ...................................................... 2-24
2.2.5 Control Panel Settings ......................................................................................... 2-29
2.3 Simulation Execution Features .............................................................. 2-31
2.4 Log Playback Feature ............................................................................ 2-32
2.5 Analytic File Output Feature.................................................................. 2-34
2.6 Help Feature.......................................................................................... 2-40
2.7 Debug Screen Feature ........................................................................... 2-40
Agent Rule Syntax
3.1 Overall Structure of Agent Rules ............................................................. 3-2
3.2 Special Functions .................................................................................... 3-2
3.3 User-defined Functions ........................................................................... 3-3
3.4 Rules for Names ..................................................................................... 3-4
3.5 Variable Declaration Block ..................................................................... 3-5
3.5.1 Declaration of Variables ....................................................................................... 3-5
3.5.2 Variable Type Declaration .................................................................................... 3-6
3.6 Execution Block...................................................................................... 3-6
3.6.1 Dummy Statements ............................................................................................... 3-6
3.6.2 Assignment Statements ......................................................................................... 3-7
3.6.3 Expressions ........................................................................................................... 3-8
3.6.4 Function Calls ........................................................................................................ 3-9
3.6.5 Conditional Statements .......................................................................................... 3-9
3.6.6 Loop Statements ................................................................................................. 3-10
3.6.7 Jump Statements ................................................................................................. 3-11
3.6.8 Other Statements ................................................................................................ 3-12
3.7 Internal Functions ................................................................................. 3-12
3.7.1 Numerical-calculation Functions ......................................................................... 3-13
3.7.2 String-manipulation Functions ............................................................................. 3-13
3.7.3 Data-manipulation Functions .............................................................................. 3-13
3.7.4 Agent Functions .................................................................................................. 3-14
3.7.5 Collection Functions ............................................................................................ 3-14
3.7.6 Space Functions .................................................................................................. 3-15
3.7.7 File Input-Output Functions ................................................................................ 3-15
3.7.8 Other Functions ................................................................................................... 3-15
3.8 Reserved Words .................................................................................... 3-15
3.9 Comments............................................................................................. 3-17
3.10 Error Correction ................................................................................. 3-18
Creating More Advanced Models
A.1 A Model Using Internal Functions (Simple Segregation Model) ............ A-2
A.1.1 Preparing the Simulation Components ................................................................ A-2
A.1.2 Writing the Rules ................................................................................................. A-6
A.2 Making It Easier to Use
(Segregation model Using the Control Panel Window) .................. A-8
A.2.1 Making It Possible to Change the Threshold Value ............................................ A-8
A.2.2 Making It Possible to Change the Starting Number of Turtles ........................ A-10
A.2.3 Quitting the Simulation When the Turtles Stop Moving .................................... A-12
A.2.4 Adding a Time-series Graph and Step View ..................................................... A-14
A.3 A Fairly Complex Model Using Collections (Forest-fire Model) ........ A-18
A.3.1 Creating a Simple Model (But Something Is a Little Strange!) ........................ A-19
A.3.2 Synchronizing the States Using a Backup ........................................................ A-23
A.3.3 Adding Display of Required Numerical Values to Simulation Execution ......... A-26
A.3.4 Changing the Pattern of How the Forest Fire Spreads .................................... A-29
Index and Infomation
Introduction
1. What Is an Agent Based Simulator?
An active entity that pursues its own benefit based on its own plan of action and decisionmaking mechanism associated with individual internal attributes is termed an "agent", and the
term "multi-agent" is used to refer to an aggregate of correlated agents.
As an example, in a simulation of how stock prices are determined, the persons who wish to
buy and sell stocks are called agents. In this case, individual examination of the buyers and
sellers (agents) does not reveal the whole picture. This is because stock prices are determined
according to supply and demand (the mutual relationships between sellers and buyers) by
invisible mechanisms acting within the group that differ from the rules of the individual active
entities (agents).
In this way, Agent Based Simulator (ABS) simulates systems (complex systems) in which
the rules for the behavior of the elements that make up the system change dynamically according
to the overall context.
2. Operating Environment
A personal computer running Windows 95/98, Windows NT 4.0, or Windows 2000
3. Installing and Uninstalling
Installation and Setup
1. Run abs.exe to create a folder called disk1.
2. In the disk1 folder, run Setup.exe.
Uninstalling
1. In Control Panel, double-click Add / Remove Programs.
2. At the Install / Uninstall tab, select Agent Based Simulator from the list of programs,
then click Uninstall.
4. Basic Concepts
Agent
The dictionary defines agent as "one who acts (on behalf of another)", but here it is a construct
that is substituted for an actual entity in a simulation and behaves as if it were that entity. It
exerts effects on itself and others according to certain rules. In specific terms, an agent
performs actions such as referencing and changing the values of its variables, creating new
agents, and deleting old ones. To speak figuratively, it can see items that other people are
carrying (variables), and can give and receive such items, but it doesn't know what other
people are thinking (rules).
World agent
This is a special agent at the highest level and forms the frame of reference for this simulation.
Other components are defined within it, producing the simulation model.
0 - 2 Agent Based Simulator User’s Manual
Space
This is a two-dimensional space to which an agent or variable belongs.
Variable
This is like a carton for string and numerical value, text, or other data that an agent has. It
corresponds to terms such as x and y in mathematics. Computers cannot process vague
definitions such as "friendly" or "short-tempered", and so all aspects of an agent's "personality"
are maintained as numerical and text data in these variables.
Local variable
This refers to a variable used temporarily only within an agent rule. Other agents do not have
access to it.
Agent rule
This is a rule that governs how an agent acts. In a simulation, an agent acts according to such
rules. The values of variables may change, but agent rules remain unchanged unless modified
by the user. There are three kinds of agent rules; initial rules ( Agt_Init) which are executed
once when an agent is created, execution rules ( Agt_Step) which are executed at each step
through a simulation, and user-defined functions which are defined by the user.
Model
This refers to the set of components that the user constructs. The state when components
have been placed, rules have been formulated, and settings for output and the like have been
completed is called the model.
ABS file
This is a file in which the data for a created model is saved. It is made up of component
information and information on simulation settings, and if a log has been made, it also includes
the log data.
5. How This Manual Is Organized
This manual is made up of three chapters, an appendix, and an index.
The contents of each are as follows.
Chapter 1 An Introduction to Agent Based Simulator
This chapter is arranged in two parts that take a staged approach to learning. The introductory
section describes how to perform actual simulations using two tutorial files, and the main text
gradually builds on the knowledge acquired to create models. Start with this chapter to actually
use Agent Based Simulator and familiarize yourself with the flow of simulations.
Chapter 2 Reference
This chapter is organized by function, and describes all of the setting screens where the user
can make various settings. Use this chapter as a reference, using the index and table of
contents to locate the information you need.
Chapter 3 Agent Rule Syntax
This chapter describes the syntax of the agent rules that define agents. Use this chapter as a
Agent Based Simulator User’s Manual 0 - 3
reference, using the index and table of contents to locate the information you need.
Appendix
This is an advanced course in Agent Based Simulator that will take you beyond the introductory
material in chapter 1. It deepens your understanding of Agent Based Simulator through a
hands-on approach that covers the segregation model, the forest-fire model, and other topics.
Index
This is an index to frequently used terms in Agent Based Simulator. The format "chapter
number – page number" is used to indicate the locations where entries appear in the text.
6. Typographical Conventions Used in This Manual
The typography of this manual follows the conventions described below.
Usage of Italic type
Italic type (sometimes Bold italic type) is used to explain step-by-step procedures. Italic and
normal type are used to differentiate between descriptions of procedures, and its results and
supplementary explanations. For example,
1. Select Agent Based Simulator.
Agent Based Simulator starts.
> Description of procedure
> Operation result
Explanations after "Important : "
This provides additional explanations or special attentions.
This manual also assumes a basic understanding of the operations and terms of Windows. If
you are unfamiliar with how to use Windows, refer to the documentation that comes with
Windows.
0 - 4 Agent Based Simulator User’s Manual
Chapter 1
An Introduction to
Agent Based
Simulator
1.1 Running the Samples
Agent Based Simulator (ABS) includes two types of sample simulations that enable you to
see for yourself how the program works. You can start a simulation right away simply by
opening the corresponding job file (*.abs) and making a minimum of settings.
Now you're ready to start learning how to use this multi-agent simulator as you try it out for
yourself.
Getting Ready
To start a simulation, the first thing you need to do is to start the multi-agent simulator and
select the job file for the corresponding model.
From the Start menu, choose Programs, go to Agent Based Simulator, then to Tutorial,
and select either Sugarscape Model or Segregation Model. This automatically starts
Agent Based Simulator.
1.1.1 Segregation Model
A Simulation of Segregated Living Among Turtles
(1) About This Simulation
This is a model that simulates the process by which two types (red and blue) of turtles move
according to certain rules, resulting in segregated living. There are no differences in the
personalities or other traits of the two types of turtles.
When a turtle is surrounded by certain number of other turtles, it moves to an unoccupied
space to seek more comfortable surroundings. This is the only rule established for the turtles,
but it results in segregated living among all the turtles.
Of course, you can change these settings any way you like, but first, try running it with the
original settings.
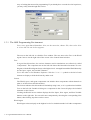
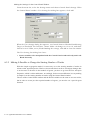
(2) Settings
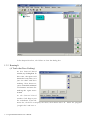
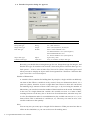
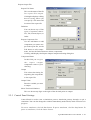
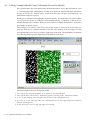
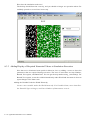
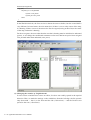
Going into the Tutorial folder and opening the Segregation.abs file makes a window like the
one in the following figure appear.
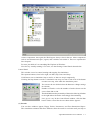
Tree
This is the most basic screen for this simulator. It displays the hierarchical structure of the
1 - 2 Agent Based Simulator User’s Manual
various components. One agent, the World agent, always exists in the tree. Other components
such as two-dimensional space, agents, and variables exist under it. These are explained in
later chapters.
For now, just think of it as something like Explorer in Windows.
Now let's try actually running it. To run it, use the floating Control Panel shown below.
Control Panel
This window is used to control starting and stopping for simulations.
The topmost buttons, from left to right, are Run, Step, Pause and Stop.
Click Run to start a simulation, Stop to end it, or Pause to stop it temporarily.
Clicking the Step button executes a simulation one step at a time. Each click of the button
executes one step, after while the simulation pause.
You can use the two sliders below the buttons to change settings
in real time.
Number of Turtles varies the number of turtles shown on the
screen from 400 to 600.
Threshold indicates the personality of the turtles. Moving it farther
to the right makes the turtles increasingly discriminating.
Let's give it a try. In the Control Panel window, click the Run
button. Did a screen like the one shown below appear?
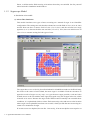
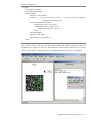
(3) Results
You see three windows appear; Happy Turtles, Parameters, and Two-dimensional Space.
The simulation continues and these windows show the results in real time until you Stop or
Agent Based Simulator User’s Manual 1 - 3
Pause, or all the turtles finish moving to locations where they are satisfied. See for yourself
what results this simulation model leads to.
1.1.2 Sugarscape Model
A Simulation of an Anthill
(1) About This Simulation
This model simulates two types of ants swarming on a mound of sugar in an islandlike
configuration. The settings are such that the red ants have a wide field of view (10 to 11 sites)
and the blue ants have a narrow field of view (2 to 3 sites), and the red ants have large
appetites (2 to 3) whereas the blue ants eat little (1.5 to 2.5). Also, there are initial assets of
10 to 13 as a common setting for both types of ants.
The sugar that serves as food is placed beforehand in islandlike mounds on the World map;
the closer to the center of each island, the more sugar is available. Each ant consumes its
appetite's worth of sugar at every step, so to get the most sugar possible, each one looks
around, moves to the site with the most sugar, then grabs every bit of sugar in the site, which
it hoards as its assets. Because the sugar in the World would eventually run out under these
conditions, it is replenished a little at a time. Each ant merely seeks and moves to the location
where sugar is most plentiful, but when seen overall, it looks just like the ants are moving in a
swarm over mountains of sugar.
If an ant's assets are depleted, the ant dies. Conversely, if an ant stockpiles assets equal to at
1 - 4 Agent Based Simulator User’s Manual
least ten times its appetite, it reproduces.
You can also change these settings however you like, of course, but first try running the
simulation with the original settings.
(2) Settings
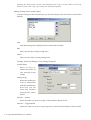
Go into the Tutorial folder and open the Sugarscape.abs file. This makes a window like the
one in the following figure appear.
Now let's try actually running it. To run it, use the Control Panel window. From the View
menu, choose Control Panel.
This Control Panel has different buttons and sliders than the segregation model. Let's take a
look at these, working from top to bottom.
Food Replenishment
When the slider is all the way to the left, food is replenished at the rate of one per step. When
it is all the way to the right, food is replenished at the rate of one per every four steps.
Naturally, the farther to the right the slider is, the harsher is the environment for the ants.
Seasonal Change
When you select this button, the space is divided into an upper part and a lower part, and food
is replenished only in one part. This simulates a lack of food in winter. Every 60 steps, the
seasons in the upper and lower areas are reversed.
Number of Red Ants and Number of Blue Ants
You can use these sliders to set the starting number of each type of ant from 50 to 200. The
Agent Based Simulator User’s Manual 1 - 5
settings for these sliders must be made before you start the simulation.
Let's give it a try. In the Control Panel window, click the Run button. Did the following screen
appear?
See for yourself how the settings on the Control Panel affect the simulation.
1.2 Making Changes
In the previous section you tried running some models yourself, but that was only able to run
prepared simulations. Now let's try getting some different results by changing the settings.
1.2.1 Segregation Model ... A Simulation of Segregated Living Among Turtles
Making the Component Settings Again
Changing the Type of Space
In the initial stage, the turtles moved around on a square grid measuring 35 squares on a side.
Let's try changing this to a hexagonal model. The procedure is as follows.
In the Tree window, right-click on twoDimensionalSpace. From the menu, select
Properties.
Click Type of Space, then change Grid Model to Hexagon Model.
In the grid model, the turtles could only move in four directions; forward, backward, left, or
right. But in the hexagon model, they move in six directions.
1 - 6 Agent Based Simulator User’s Manual
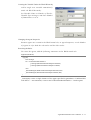
Making the Output Settings Again
Next, let's try modifying the output in various ways.
From the Settings menu, choose Output.
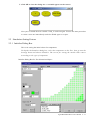
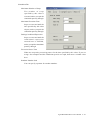
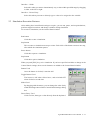
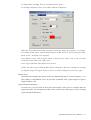
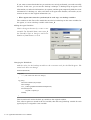
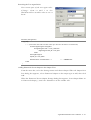
(1) Making the time-series graph lines bold and adding markers
Let's add markers to the apices of the bends
in the lines of the time-series graph and make
the lines thicker, making the graph easier to
view. The procedure is as follows.
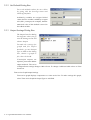
1. From the list, choose Number of Turtles, then
click Edit. This displays the Time-Series
Graph Settings dialog box.
2. In the Graph Component List, select Happy
Turtles, then click Edit.
3. Change the Line Width setting from "1pt" to
"3pt", select the Show Markers check box,
then click OK. You can make the settings in
the same way for Unhappy Turtles as well.
Now you're ready again. Try clicking the Run
button on the Control Panel.
1.2.2 Sugarscape Model ... A Simulation of an
Anthill
Making the Component Settings Again
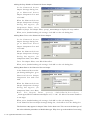
Making the Control Panel Settings
You've already seen how you can use the buttons in the Control Panel window to change the
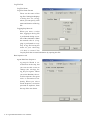
settings for simulations in real time. Now let's try changing Number of Red Ants.
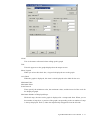
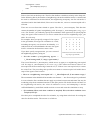
1. From the Settings menu,
select Control Panel
Settings.
2. F ro m t h e l i s t , c h o o s e
Number of Red Ants, then
click Edit. A User Settings
dialog box appears.
3. Change the range of "50
to 200" to "50 to 500",
change Scale Interval to
"50", then click OK.
Agent Based Simulator User’s Manual 1 - 7
Now let's try running it. Try displaying the Control Panel window. Notice how the range has
changed to "from 50 to 500" for just the number of red ants. So how does this change affect
the simulation? Try running it yourself and see.
1.3 Constructing a Simple Model
In this section, you'll learn about the basic elements and procedures for constructing an agent
model from a completely blank state. Construction of a model usually follows a sequence like
the one described following.
1 - 8 Agent Based Simulator User’s Manual
1.
2.
3.
4.
Component placement and settings
Output settings
Describing agent rules
Running and debugging
This list comes up many times during the creation process, so use it to get a general idea of
what operation you're performing at the time.
This section also deals with the important programming concepts of conditional branches (If
statements), methods of setting initial values, and debugging. Rules are still at an undeveloped
stage, but beginners should familiarize themselves with the unique modes of expression and
Agent Based Simulator User’s Manual 1 - 9
ways of writing that are used in programming. If you already have a certain level of experience,
you may safely skim through this section.
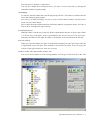
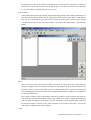
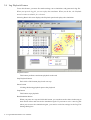
1.3.1 The ABS Programming Environment
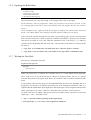
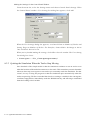
First, start Agent Based Simulator. Next, on the menu bar, choose File, then select New.
A screen like the one below appears.
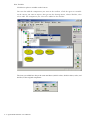
The area on the left side is called the Tree window. The area next to the Tree is the World
Agent Canvas. On the right side of the screen is the Control Panel window.
Tree
In Agent Based Simulator, the various elements used in simulations are collectively called
"components". The component tree on the left side shows this hierarchical structure as a tree
diagram, with the World agent always at the highest level. Arranged beneath the World hierarchy
are the space, agent, and variable elements.
Use is the same as for Windows Explorer. Click the "+" or "−" symbol to the left of each
element to display or hide the hierarchy under each.
Canvas
The World, space, and agent components can include other components within themselves
(that is, in their lower their hierarchies).
The Canvas indicates this hierarchical relationship using icons, so it is synchronized with the
Tree on the left side. Double-clicking on a component in the Canvas displays the included
elements on the Canvas.
Clicking the World Canvas window displays the New Space, New Agent, and New Variable
buttons on the right side. You can add a new component by choosing the corresponding New
button, then clicking anywhere on the canvas.
World Agent
World agent exists uniquely at the highest level of a simulation model. All other components
1 - 10 Agent Based Simulator User’s Manual
are placed in the hierarchy under the World agent to make up the simulation. Its name is
"World", but it doesn't necessarily have to take up space, as in the real world. It's also possible
to construct abstract models that take up no space.
Control Panel
Control Panel has buttons for running, stepping through, pausing, and stopping simulations. If
you click the Run button when only an empty agent rule has been made (that is, immediately
after you go to the menu bar, pull down the File menu, and select New), then not only nothing
is displayed, but the Tree and Canvas are hidden. To return to the original state, click the Stop
button.
Space
This is the space where agents and variables are placed. The present version of Agent Based
Simulator supports only two-dimensional spaces, but support for three dimensions may be
possible in future versions. Normally you use the Grid Model with its regular horizontal and
vertical arrangement, but you can also use the Hexagon Model which is employed for simulations
of strategy and the like.
The setting for Edge of Space determines whether coordinates wrap around to the opposite
side when they exceed the boundaries of the space. When set to Loop, an agent that disappears
from the right side appears again on the left side, like with a LOGO graphic turtle. Note that
because this feature is effective only in the functions of Agent Based Simulator, processing
code must be implemented in the program.
Agent
Agent Based Simulator User’s Manual 1 - 11
A component that acts and interacts in a simulation according to certain rules is called an
agent. An agent acts on and is affected by other components. Agent Based Simulator makes
it simple to place multiple agents and carry out simulations.
Variable
This is something like a container for storing the information and state of a component in the
form of numerical values or text. It may be useful to consider it more or less synonymous with
variables in mathematics, such as x and y.
What is unique about computer variables is that they are always typed. Before you use a
variable, you must declare what type it is. Types include Integer, Double, and Text data types.
It's necessary to use variables of the appropriate types, matched to the kind of information .
1.3.2 Adding a Component (Space)
1.
2.
3.
4.
Component placement and settings
Output settings
Describing agent rules
Running and debugging
In the component tree, right-click on World to display the context menu. Then select Add
Space.
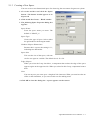
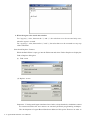
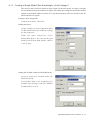
Selecting Add Space displays a Space Properties window. Set Space Name to "space",
set Space Type to "Grid Model", leave the Space Size settings at 50 for both X and Y,
and set Edge of Space to "Do Not Loop". When you have finished making the settings,
click OK to close the window.
Now you're done creating a two-dimensional space using the grid model for the World agent.
Make sure that "space" appeared under World in the tree, and on the World canvas.
1.3.3 Adding a Component (Agent)
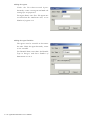
In the Tree window, right-click "space". From the context menu choose Add Agent. The
Agent Properties window appears. Change Agent Name to "turtle" and set Number of
Agents to 1. When you have finished making the settings, click OK to close the window.
This creates a turtle agent in the hierarchy under the space.
When you click the + of the turtle agent on the tree, you see that the variables included in the
agent have been added automatically. X and Y indicate the coordinates of the agent's location
in the two dimensions, with the upper-left point taken to be (0,0). Direction shows the agent's
orientation in radians, so one revolution (360-degree) is 2π. Because the calculations are a bit
troublesome, we will not use this variable here.
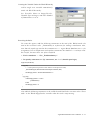
1.3.4 Adding Output Settings
1. Component placement and settings
2. Output settings
1 - 12 Agent Based Simulator User’s Manual
3. Describing agent rules
4. Running and debugging
You're now finished making the settings for a simple agent, but clicking the Run button in the
Control Panel window still will not display anything (Click the Stop button to go back to the
original state). To display something while running, you need to add output settings.
> Output settings are required to run a simulation
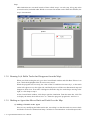
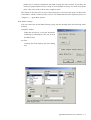
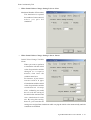
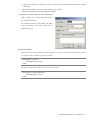
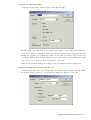
From the menu bar, select the Settings menu and choose Output. The types of output
items include Time-series Graph, Bar Graph, 2D Map, Numerical Output, and File Output.
From the drop-down combo box, choose 2D Map, then click Add.
The Two-dimensional Map Settings dialog box appears. Leave Map Name unchanged
as "2Dmap_1" and Map Title unchanged as "space", and in the Map Component List
click Add.
The Two-dimensional Map Component
Settings dialog box appears. Change
Component Name to "turtle", leave
everything else unchanged, then click OK
to close the dialog box. This adds "turtle"
to the Map Component List.
In the Two-dimensional Map Settings
dialog box, click OK to close the dialog
box. When you go back to the Output Item
List, you see that "2Dmap_1" has been
added.
Agent Based Simulator User’s Manual 1 - 13
In the Output Item List, click Close to close the dialog box.
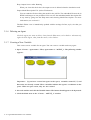
1.3.5 Running It
(A Turtle that Does Nothing)
At the Control Panel
window, try clicking Run. In
this state, the agent still
doesn't have any rules, so it
just sits there and does
nothing. Now, however,
you've created the minimum
of elements and state for
making the agent move
around.
At the Control Panel
window, click Stop to quit
the simulation. From the
menu bar, click File to display the menu, then choose Save As. Name the program
"prog01.abs" and save it.
1 - 14 Agent Based Simulator User’s Manual
1.3.6 Opening the Rule Editor
1.
2.
3.
4.
Component placement and settings
Output settings
Describing agent rules
Running and debugging
The present state isn't very interesting, so let's apply some rules to the agent.
We'll add these rules to prog01.abs, which you created in the previous section. If you
are starting again from this section, then double-click the prog01.abs file you saved to
open it.
In the component tree, right-click the Turtle agent to display the context menu. From the
menu, select Rule Editor. This displays the Rule Editor window for the agent.
You see that the window already has two items, Agt_Init and Agt_Step. Agt_Init is an initial rule
that is executed only once, when an agent is created in a simulation. Agt_Step is an execution
rule that is executed at every step when the simulation runs. The braces ("{}") indicate
respectively the beginning and end of the rule. The necessary statements are written inside
the braces.
> "Agt_Init" is an initial rule executed only once, when an agent is created.
> "Agt_Step" is an execution rule, executed at every step when a simulation runs.
1.3.7 Writing the First Rule
Now let's try writing the first rule.
Prog02.abs (Turtle agent rule)
Agt_Step{
my.X = my.X + 1
}
When you entered my., a window for variables such as X, Y, and DIRECTION appeared.
Here, we'll use X, so use the arrow keys to choose X, then press Enter. The my. is a special
notation that points to the agent itself. Here, my.X indicates the X variable included within
itself.
At first glance, this rule may appear to be mathematically incorrect, but remember that in a
program, it is used not as an equality statement, but as an assignment statement. That is, it
signifies that the information on the right side of the equal sign is to be assigned to the left side
of the equal sign. If my.X has a value of 1, then after rule execution, my.X becomes 2.
To make code more readable, add spaces between variable names, operators such as the
equal sign, +, and −, and other words.
> "my." is special notation pointing to the agent itself.
> The equal sign "=" in a rule is an assignment statement.
Agent Based Simulator User’s Manual 1 - 15
Steps
ABS simulations are executed in units of time called "steps". At each step, all Agt_Step rules
(execution rules) included under World are executed in random order. When this finishes, the
step is incremented.
1.3.8 Running It (A Bullet Turtle that Disappears from the Map)
When you finish writing the rule, go to the Control Panel window and click Run. If there is an
error, check the highlighted line for an incorrect word.
When the program runs correctly, the value of the X coordinate increases by 1, so the turtle
on the left edge moves to the right side, and finally moves off the two-dimensional map and
disappears from view. Even after it disappears from the map, the turtle keeps moving to the
right, so click Stop to stop it.
At the Control Panel window, click Stop to quit the simulation. From the menu bar, click File
to display the menu, then choose Save As. Name the program "prog02.abs" and save it.
1.3.9 Making an Agent that Moves Back and Forth Over the Map
(1) Adding a Variable to the Agent
Now let's try modifying the bullet-turtle rule, reworking it so that the turtle now moves back
and forth over the two-dimensional map. Consider for a moment how we should express this
1 - 16 Agent Based Simulator User’s Manual
rule. It should be able to change direction when it reaches the edge of the screen, but the
orientation cannot be determined from just the agent's X and Y coordinates. In this example,
we are not using DIRECTION, which controls the orientation.
We'll add a new variable to the turtle agent that indicates the direction of advancing along the
X axis as a positive or negative value.
In the component tree, right-click the Turtle agent to display the context menu. From the
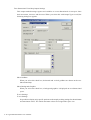
menu, select Add Variable. The Variable Properties dialog box appears. Enter DIRX for
Variable Name, and Integer for Variable Type. Leave Number of Dimensions set to 0.
Then click OK.
(2) Adding a Conditional Branch Rule
Before we write the code, let's write out the rule in text form.
• Initial rule : Assign 1 to DIRX.
• Execution rules : If the X coordinate is 0 or less than 0, then assign 1 to DIRX (changing
the orientation to the front).
• If the X coordinate is 49 or greater than 49, then assign −1 to DIRX (changing the orientation
to the back).
• Add the value of DIRX to the X coordinate.
When we write the code for this, it looks like the following.
Prog03.abs (Turtle agent rule)
Agt_Init{
my.DIRX = 1
}
Agt_Step{
If my.X <= 0 Then
my.DIRX = 1
End If
If my.X >= 49 Then
my.DIRX=-1
End If
my.X = my.X + my.DIRX
}
To review what you learned earlier, Agt_Init{} is a rule that is executed only once, when an
agent is created. The new variable is given a value of 0 in its initial state, so unless the initial
rule assigns a value "1" or "−1" to DIRX, the turtle won't move.
Something newly added here is a conditional-branch rule. This is written with this syntax; If
(condition) Then (rule carried out if the condition is fulfilled) End If. The portion from Then
to End If may be any number of lines. It is usual to use tabs to indent this portion so that the
branched structure of the conditional expression is apparent. Also, rule statements are not
case-sensitive (upper case and lower case are not differentiated). This means that my.X and
My.X are actually processed in the same way.
> "If (condition) Then (rule carried out if the condition is fulfilled) End If"
> Rule statements are not case-sensitive.
Agent Based Simulator User’s Manual 1 - 17
(3) Running It (A Turtle That Moves Back and Forth)
When you finish writing the rule, go to the Control Panel window and click Run. If it runs
correctly, the turtle continues moving back and forth, changing direction at the edges of the
map. As an exercise to apply this, try adding DIRY to indicate the direction of the Y coordinate
as well, creating an agent that moves diagonally. The agent rule of the answer may look like
the following.
Prog04.abs (Turtle agent rule)
Agt_Init{
my.DIRX = 1
my.DIRY=1
}
Agt_Step{
If my.X <= 0 Then
my.DIRX = 1
End If
If my.X >= 49 Then
my.DIRX=-1
End If
my.X = my.X + my.DIRX
If my.Y <= 0 Then
my.DIRY=1
End If
If my.Y >= 49 Then
my.DIRY=-1
End If
my.Y=my.Y+my.DIRY
}
1.3.10 Adding More Turtle Agents
(1) Creating Multiple Agents
Now that you've made an agent that moves diagonally, let's try creating multiple agents.
However, no matter how large we increase the number, if we place all the agents at the same
location at the start, they will all move the same way. That isn't very interesting, so let's try
changing where each one is placed at the start.
In the component tree, right-click the Turtle agent to display the context menu. From the
menu, select Properties. The Agent Properties dialog box appears. Here, set Number of
Agents to 3, then click OK.
> Use Agent Properties to make the setting for the number of agents.
1 - 18 Agent Based Simulator User’s Manual
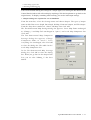
(2) How to Place Individual Agents at Different Initial Locations
We want to start each agent at a different location. To do this, we need to assign different
initial values to the X and Y variables that indicate the space positions of the agents. How do
we do this?
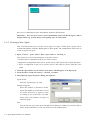
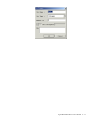
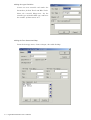
There is a feature that lets you assign individual initial values to variables. In the
component tree, right-click the X variable for the Turtle agent to display the context
menu. From the menu, select Initialize. The Initialize dialog box appears.
There are three Turtle agents, numbers 0, 1, and 2. Assign these values of 5, 10, and 15,
respectively. If the numerical values are obscured, drag the right edge of the X item
name to adjust the horizontal width. When you have finished making the settings, click
OK to close the window.
Now when you run it, you see interesting movement, even with these simple rules.
> Individual initial values are assigned to agents with Initialize.
(3) How to Assign a Nonzero Value to Agent Variables in a Batch
Now let's say we want the Y coordinates for all the agents to start at 5. What should we do
in this case? There are two possible answers. One way is to add my.Y = 5 to Agt_Init{} for the
Turtle agents, as we described in the section on the DIRX setting.
Another method is to use Set Default. This is different from Initialize, which we saw earlier
— instead, it is a feature for assigning initial values to variables in a batch.
In the component tree, click the Y variable to select it. Then, from the menu bar, go into
the Settings menu and choose Set Default. The default value should be set to 5 (• ¨
Prog05.abs).
> Set Default assigns initial values to agents in a batch.
1.3.11 If the Simulations Doesn't Run Correctly
1.
2.
3.
4.
Component placement and settings
Output settings
Describing agent rules
Running and debugging
The process of identifying the causes of program errors and correcting them so that the
program runs properly is called "debugging". No matter how much care and planning you put
into crafting a program, it rarely runs flawlessly the very first time. Something almost always
occurs; for example, the program may stop because of a syntax error, or it may not run as
expected. Mistakes and errors are an unavoidable part of programming, even for seasoned
programmers. However, being able to perform appropriate troubleshooting when problems
occur, seems to lead to proficiency in programming faster than trying to prevent errors before
they occur.
Computers Operate Through Logic
People are ambiguous, but computers operate entirely through logic. Unless some very special
steps are taken, there are never any exceptions where a computer will depart from logic. This
Agent Based Simulator User’s Manual 1 - 19
means that any computer error always has a clear-cut cause. If results are not as expected,
it is never a case of the machine being in a bad mood or not liking the operator.
To eradicate errors, it is important first of all to isolate and identify the problematic area
according to computer logic. The examples below are some errors that beginners are particular
likely to make.
(1) Syntax Errors in Rules
If operation is different from what you expected or if a warning message appears, the first to
look for is a syntax error in one or more of the rules. These errors are not limited to beginners.
Even skillful programmers frequently experience syntax errors caused by carelessness.
Remedy1
If Agent Based Simulator discovers an error before execution, it displays a warning message
indicating the line where the problem occurred. In almost all cases, the error is caused by a
mistake in how the line is written, so check the points like the following.
• Spelling mistakes in variable and function names
• Missing spaces around commands, variables, and operators
(Tip) The spaces between words in the program list have an important meaning. If the
words are connected, then may not be recognized correctly.
Remedy2
Include the DebugStr() function in the rules to verify the values of variables. For example,
DebugStr(World.NumberOfTurles)
// The value of the World.NumberOfTurtles variable appears
// on the Debug Screen.
(2) Incorrect Output Settings
With Agent Based Simulator, nothing is displayed during execution unless output settings are
made. Also, if only one type is displayed even though two types are supposed to appear, or if
the behavior of graphs or numerical values is different from what it expected, it often means
that there is a mistake in the output settings. Often no warning is displayed for such errors, so
it can be difficult at first to discover where the problem is.
Remedy
Output settings are essential for obtaining any kind of result during execution. Check the
output settings to make sure the Item Name and Component Name settings for the elements
are correct. If there are not enough output elements, in almost cases a Component Name
setting is incorrect.
(3) Incorrect Component Properties
If there's nothing wrong with the rules but operation is nonetheless incorrect, it's necessary to
look for an error in the properties of the components, such as the number of agents created
and their initial values.
1 - 20 Agent Based Simulator User’s Manual
Remedy1
Make sure the value of each property is set correctly.
Remedy2
Remember that there are a number of methods for determining the initial values of components.
• Batch settings of numerical values for all components are made with Set Default.
• Numerical values of individual components are set separately with Initialize.
• Numerical values can also be assigned by assignment statements in the component rules.
When initial values are set using all the preceding methods, the settings take priority in this
sequence; 1) component rules, 2) Initialize, and 3) Set Default. Make sure that the values of
the settings are not being changed somewhere.
1.3.12 Conclusion
Here is what you've learned in this section.
1.3.13 Terms and Techniques
•
Component tree
•
•
Canvas
World agent
•
•
Control Panel
Space
•
•
Agent
Variable
•
•
Adding space to World
Adding agent
•
•
Adding output settings
Displaying Rule Editor
•
•
Two types of rules (Agt_Init{} and Agt_Step{})
How a component references itself (my.)
•
•
Conditional branch statements ( If...Then...End If)
Adding variables to agents
•
•
Creating multiple agents
Assigning initial values to variables individually (Initialize)
•
•
Assigning initial values to variables in a batch (Set Default)
Debugging
1.3.14 Let's Review
•
•
Have you mastered the basic structural elements in the ABS programming environment?
Do you understand the flow of the basic steps for creating an ABS program; Component
locations and settings ... Output settings ... Describing agent rules ... Running and
debugging?
•
Did you try making Agent Based Simulator settings yourself while referring to the
text? Did the programs run as expected?
Agent Based Simulator User’s Manual 1 - 21
1.4 Making Modifications for a Slightly More Complex Model
In this section, you'll add increasingly complex elements while modifying the rule for the turtle
that moves back and forth. The programming concepts covered include declaration of variables,
loop control, random numbers, functions, and arrays. So far the examples we've seen have
been somewhat mechanical, but incorporating random numbers in the rules makes it possible
to make agents move separately. This makes the examples more like actual agent models.
This section also contains numerous techniques and tricks for using Agent Based Simulator,
so be sure not to overlook them.
1.4.1 Resetting the X and Y Variables to Their Original State
In Prog05.abs, we set the initial values and default values for the X and Y variables, so let's
return these to their initial state.
In the tree, right-click the X variable to display the context menu. Next, from the context
menu, choose Initialize to return the values of 5, 10, and 15 for the respective X variables
to 0. In the tree, click the Y variable to select it, then from the menu bar, go into the
Settings menu and choose Set Default to return the setting to the default value of 0.
1.4.2 Using World
When there is a large number of agent (for example, 100 or 200), how can we assign initial
values to them efficiently?
If they are arranged regularly, then it should be enough simply to write a rule somewhere.
However, in the rules for an agent, although local information for the agent itself and its
surroundings are determined, this isn't practical for manipulating multiple agents as a group
(More accurately, this is structurally unsound). What we use at such times is World, at the
highest level. World is also an agent, so you can also write rules for it. However, what is
special is that World rules are often used in cases of batch processing that affects all agents
in the hierarchy.
> World agent rules are often used to perform batch processing that affects agents in
the hierarchy.
There is also common rules although we are not using them here. To display the Common
Rule Editor, go into the View menu and select Common Rule Editor. Because these rules can
be referenced either from agents or from World, it is sufficient to write a computational
expression (function) used by both agent rules and World rules; for instance, a function
generating a random number in a certain range.
> Common rules can be referenced both from agents and from World.
Let's consider how to place Turtle agents with their X coordinates spaced three sites apart.
World need to know the number of agents created, and to assign the values to the X variables
for each turtle agent. Write this into the Agt_Init{} rule for World.
1 - 22 Agent Based Simulator User’s Manual
Prog06.abs (World agent)
Agt_Init{
Dim i as integer
for i = 0 to _CountAgent(World.space.turtle) - 1
World.space.turtle.X(i) = i * 3
next i
}
1.4.3 For Variables Used Only in Rules, First Define the Type
What appears first is a Dim statement. This is called a declaration statement. It's used to
define a type for a temporary variable used only within a rule. When execution of the rule
ends, the variable is deleted. Such variable is called "local variable". Local variables are used
differently from variables in the component tree, which continue to maintain their value. Here,
we'll define a variable of Integer data type called "i" for accessing an individual agent.
> Temporary variables (local variables) used only within rules are declared with a
"Dim" statement.
1.4.4 Loop Control
The next topic is the For...Next statement. This is called a loop-control statement. It's used to
repeat the enclosed commands the specified number of times. The number of times is specified
as follows.
For variable name = starting number to ending number Step increment per iteration
looped operation
Next variable name
The loop-statement variable "i" is ordinarily increased by one with each iteration, so you can
usually omit Step. When Step -1 is used, the value is decreased by one with each iteration.
When you write the looped operation, indent with a single tab to make it easier to understand
the structure.
1.4.5 Determining the Number of Created Agents
In Agent Based Simulator, the special function _CountAgent() is used to determine the number
of agents created. When certain data is given to a function, the function returns a value as
result. Some functions are built in. You can also define your own original functions. With
_CountAgent(), when you specify an agent in the parentheses, the function returns the number
of agents as an integer.
> When certain data is given to a function, the function yields a specific return value.
Agent Based Simulator User’s Manual 1 - 23
1.4.6 How to Specify Components
In specifying an agent in the parentheses, the hierarchical relationship with World is expressed
by separating the names with periods ".". This means the Turtle agent is specified as
"World.space.turtle". This method of expression is used in many places, so you should remember
it.
> When specifying a component, state the hierarchical relationship, beginning with
World.
> Periods (".") are used to indicate the hierarchical relationship.
1.4.7 Accessing an Individual Agent
Obtaining the information that an individual agent holds requires a bit of extra work. This
method of expression is also frequently used, so you should remember how to use it.
To start with, created agents are assigned sequential IDs, beginning with 0. The variables in
an agent are stored in an array, and are called in the form of the variable name (agent ID).
For instance, The X coordinate of a Turtle agent having an ID of 4 is expressed as
"World.space.turtle.X(4)".
Take a look at Prog06.abs. The variable "i" starts at 0, is looped to the number of agents −1,
and the value of i × 3 is assigned to each X coordinate.
> Agents are assigned sequential IDs, starting at 0.
Array variables
When a large amount of data must be handled at one time, naming each variable individually
would be an onerous task. When assigning the test scores in five subjects for ten people, for
example, creating individual variables for each person and each subject, such as Ja1, En1,
Ma1, So1, Sc1, Ja2, En2, Ma2, So2, Sc2,..., would be too inefficient. Moreover, if the number
of persons were to change, it would become impossible to cope with the change.
Array variables are used in cases like this. An array variable uses the form of variable name
(ID), and can be referenced simply by supplying the ID number in the parentheses. Applying
to the test scores for five subjects as an example, the array variables might be Ja(1), En(1),
Ma(1), So(1), Sc(1), Ja(2), En(2), Ma(2), So(2), Sc(2),... . With this method, all we have to do
is specify Ja(i), En(i), Ma(i), So(i), and Sc(i) and use the value of "i" with a For...Next loop.
With Agent Based Simulator, the variables that agents have are automatically made array
variables. Also, when you add a variable to a space, a two-dimensional array in the form of a
grid matched to the size of the space is created. The two-dimensional array is specified as
variable name (X coordinate, Y coordinate).
1.4.8 Running It (A Large Number of Regular Turtles)
Now let's set the number of agents at six and try running the simulation. You see that the
turtle agents are arranged at regular intervals, as specified by Agt_Init{}.
1 - 24 Agent Based Simulator User’s Manual
1.5 Adding Random Factors to Agents
So far we've covered how to assign regular initial values. However, the results still seem a bit
mechanical, and not much like multi-agents. Now let's try adding a random element to the
initial rule.
1.5.1 Placing Agents Randomly in a Space
Placing agents randomly in a space is fairly simple. In Agent Based Simulator we use the
built-in agent function _RandomPutAgent(). The first item in the parentheses specifies the agent
to place. The second item specifies whether placement of multiple agents in a single cell is
permitted (True or False). Because all functions return a value, the correct use is along the
lines of i=RandomPutAgent(), but in this case the important thing is the random-placement feature,
and the return value is not needed. In cases where the return value is not used, the assignment
statement is frequently omitted, as in the following rule.
> "_RandomPutAgent()" places agents randomly.
Prog07.abs (World agent)
Agt_Init{
_RandomPutAgent(World.space.turtle, False)
}
1.5.2 Adding Random Factors to Variable Values
The Rnd() function is used to assign random values to variables. Rnd() generates a random
number greater than or equal to 0 and less than 1. In many cases, however, a random integer
is required. This can be obtained by using Rnd() in combination with Int() to truncate the portion
to the right of the decimal point, as in the following example.
i = Int(Rnd() * 5 )
In this case, the variable "i" is assigned an integer value of from 0 to 4. If you want a value
from 1 to a, you can use i=Int(Rnd()*a)+1.
_RandomPutAgent() which we saw can be replaced as following code.
Prog08.abs (World agent)
Agt_Init{
Dim i as integer
For i = 0 to _CountAgent(World.space.turtle) - 1
World.space.turtle.X(i) = Int(Rnd()*50)
World.space.turtle.Y(i) = Int(Rnd()*50)
Nexti
}
Now let's also try making the direction random. The variables DIRX and DIRY must be added to
the agent in advance. Also, let's remove the remaining initial rule for the Turtle agent. You'll
notice that the complicated expression "-1+(Int(Rnd()*2)*2)" appears in this program. This is a
programming technique for obtaining a result that is only either −1 or 1.
> "i = Int(Rnd()*a+1)" obtains a random integer from 0 to a.
Agent Based Simulator User’s Manual 1 - 25
Prog09.abs (World agent)
Agt_Init{
Dim i as integer
For i = 0 to _CountAgent(World.space.turtle) - 1
World.space.turtle.X(i) = Int(Rnd()*50)
World.space.turtle.Y(i) = Int(Rnd()*50)
World.space.turtle.DIRX(i) = -1 + (Int(Rnd()*2) * 2)
World.space.turtle.DirY(i) = -1 + (Int(Rnd()*2) * 2)
Nexti
}
Prog09.abs (turtle agent)
Agt_Init{
}
1.5.3 Changing Execution Rules for Agents
Now you've assigned the agent's location and orientation randomly. Next, as a practical
application of this, let's try adding a random factor to the agent's execution rules (Agt_Step). In
our programs so far, the direction changed only when Turtle agents reach to edge of space.
Now let's make the orientation change randomly.
In the execution rules for the Turtle agents (Agt_Step), write a rule to change the direction at
random before the determination of whether a border has been reached.
Prog10.abs (turtle agent)
Agt_Step{
if Int(Rnd()*10) == 0 then
my.DIRX = -1 + Int(Rnd()*3)
my.DIRY = -1 + Int(Rnd()*3)
end if
if my.X <= 0 then
(The rest is the same)
The direction changed each iteration, the agents would zigzag all over the place, so we added
an If statement to make the direction change only one time out of ten on average. Unlike the
earlier example, the If statement obtains a value of either −1, 0, or 1. This makes the agents
occasionally appear to stand still.
> "If Int(Rnd()*A) == 0 Then...End if" causes a branch with a probability of 1/A.
1.6 Creating a Space That Wraps Around
Space that is looped (wraps around) is a coordinate system used by LOGO graphic turtles
and the like. The top and bottom of the screen are connected, and so are the left and right
sides. For example, when an agent disappears off the right side of the screen, it reappears on
the left edge. This coordinate system is useful when simulating a space like a ball. However,
it takes a little extra work to handle it with Agent Based Simulator. Let's take a look at the
steps and rules that are involved.
1 - 26 Agent Based Simulator User’s Manual
So far, in Prog××.abs, we used If statements to make an agent change direction when it
reached the edge of the map. Now we'll make the space wrap around and eliminate the mapedge processing code.
1.6.1 Space Component Settings
First, in the ABS Space Properties dialog box there is an option for selecting either Loop or
Do Not Loop. To make the space wrap around, you must first select the Loop option. However,
because this is valid only for built-in functions related to space, selecting Loop is not enough
to establish the conditions for actually looping.
> The Loop setting in the Space Properties dialog box is not enough by itself.
1.6.2 Creating a Function to Adjust the Coordinate Position
What we need to do now is to prepare another rule to adjust the coordinate position of the
agents. However, because the rules themselves are starting to get lengthy, and because we'll
be able to find other uses for this adjustment rule, let's try using a user-defined function.
A user-defined function is a function that you can define any way you like. You use Function()
or Sub() for this. Function() and Sub() are differentiated in use as follows.
• When a return value is required .................. Function()
• When a return value is not required .......... Sub()
User-defined statement format for Function
Function function name (argument name as argument type) As return-value type {
variable type declaration block
execution block
Return(variable name)
}
User-defined statement format for Sub
Sub function name (argument name as argument type) {
variable type declaration block
execution block
}
Important : You can give a function any name you like, except reserved words, alreadydeclared variable names, and already-declared name definitions. Using such illegal
names can cause Agent Based Simulator to become confused.
Because the adjustment rule requires a return value, we have to use Function statement. You
can write it at any location in the Rule Editor except inside Agt_Init{} or Agt_Step{}. Add the
following user-defined function after Agt_Step{} for the Turtle agent. When you then eliminate
the map-edge processing portion from the execution rule (Agt_Step), you end up with Prog11.abs.
> User-defined function — "Function function name (argument name As argument
type) As return-value type {}"
Agent Based Simulator User’s Manual 1 - 27
Prog11.abs (turtle agent)
Agt_Init{
}
Agt_Step{
if Int(Rnd()*5) == 0 then
my.DIRX = -1 + Int(Rnd()*3)
my.DirY = -1 + Int(Rnd()*3)
end if
my.X=FixX(my.X+my.DirX)
my.Y=FixY(my.Y+my.DirY)
}
Function FixX(iX as double) as double{
Dim LimX as double
LimX = _GetWidthSpace(World.space)
If iX > LimX - 1 then
iX = iX - LimX
ElseIf iX < 0 then
iX = iX + LimX
End If
Return(iX)
}
Function FixY(iY as double) as double{
Dim LimY as double
LimY = _GetHeightSpace(World.space)
If iY > LimY - 1 then
iY=iY-LimY
ElseIf iY < 0 then
iY=iY+LimY
End If
Return(iY)
}
Some unfamiliar functions appear in FixX() and FixY(). _GetWidthSpace() and _GetHeightSpace() are
functions that obtain the width and height, respectively, of the target space. Using these
makes it unnecessary to revise the rule when changing the size of the space.
In order to reduce errors and increase the general utility of rules, you should use function to
define constant values, if this value can be changed in its properties dialog box.
> "_GetWidthSpace()" returns the width of a space.
> "_GetHeightSpace()" returns the height of a space.
To apply what you've learned here, rewrite the random placement of agents covered in section
1.5.1, using _GetWidthSpace() and _GetHeightSpace().
1.7 Conclusion
Here is what you've learned in this section.
1 - 28 Agent Based Simulator User’s Manual
1.7.1 Terms and Techniques
•
How to use World agent rule
•
•
Dim statements
Loop control (For...Next statement)
•
•
Function
_CountAgent()
•
•
How to specify hierarchical components
Agent ID
•
•
Array variable
_RandomPutAgent()
•
•
Obtaining random integers from 0 to a
Branching with a probability of 1/A
•
•
Spaces that wrap around (loop)
User-defined function, Function()
•
•
_GetWidthSpace()
_GetHeightSpace()
1.7.2 Let's Review
•
Is it clear what processing is performed in the sample programs?
•
Try changing the ranges of the variables in the sample programs, and consider other
applications.
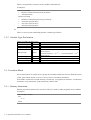
1.7.3 Differences in Notation between Visual Basic and Agent Based Simulator
The rule format in Agent Based Simulator is basically the same as in Microsoft Visual Basic,
but there are some difference. These differences are shown below.
Item
Function definition
Function return value
Variable type declaration
Comparison operator
For … Next
Agent Based Simulator
Visual Basic
Function … EndFunction
Sub … EndSub
Function {…}
Sub {…}
Return(return value)
Function name = Return value
※ Specified as argument of Return function
※ Input in function name
Required
Variant data type when not specified
If A==B Then … EndIf
If A=B Then … EndIf
※ Two "="
※ One "="
For i=0 To 10
……
Next i
For i=0 To 10
……
Next
※ Variable "i" required at end.
Comments
Special functions
’…
// …
/* … */
Agt_Init : Executed once when created
Agt_Step : Executed at every step
’…
Agent Based Simulator User’s Manual 1 - 29
Chapter 2
Reference
2.1 Making Settings for Models
This section describes the features for making model settings, including agents, variables, and
other components.
2.1.1 Job File Input and Output
Select one of the commands from the File menu in the
following figure to create a new simulation, import an existing
job file, or save the settings for a simulation you have created.
The setting data for a simulation is saved as a job file (*.abs).
Creating a New Job
To make settings for a new simulation, from the File menu,
select New, or click the New button on the tool bar.
Saving a Job File
To save a job file for which you have made settings, from
the File menu, select Save or Save As, or click the Save button on the tool bar.
2 - 2 Agent Based Simulator User’s Manual
2.1.2 Creating a New Job File
When you start Agent Based Simulator and create a new job file, the following screen appears.
Tree
This is the most basic screen for this simulator. It displays the hierarchical structure of the
various components. One agent, the "World agent", always exists in the tree. Create other
components such as two-Dimensional space, agents, and variables under it, and make up the
settings for the simulation.
Canvas
This is a window that only agents can have. To display it, first select an agent in the Tree
window, then go into the View menu and select Canvas, or double-click the agent. You can
use this window to place child agents and variables.
Toolbox
You use this when placing child agents, variables, spaces, and the like on the Canvas. Spaces
can be placed only on the World agent.
Select
Click this to select or move a component on the Canvas.
New Space
Click this to place a space on the World Canvas.
New Agent
Click this to place an agent on the Canvas.
Agent Based Simulator User’s Manual 2 - 3
New Variable
Click this to place a variable on the Canvas.
You can also add the components you want to the toolbox. Click the agent or variable
on the canvas you want to import, then go into the Settings menu, choose Toolbox, then
select Add. The component you selected is added to the toolbox.
The item you added here keeps the same attributes (initial values, default values, rules, and
the like) as the original component.
2 - 4 Agent Based Simulator User’s Manual
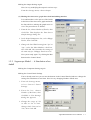
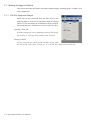
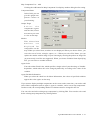
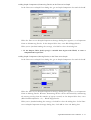
2.1.3 Creating a New Space
You can create a two-dimensional space for observing the movement of agents on a plane.
1. Go to the toolbox and click the Space
button. The button should appear to be
depressed.
2. Click inside the Canvas – World window.
3. The following Space Properties dialog box
appears.
Space Name
Enter the space name you want. The
default is "SPACE_1".
Space Type
Choose the type of space. Select either
the grid model or the hexagon model.
Number of Space Dimensions
Because this is a space, the setting is "2",
indicating two dimensions.
Space Size
This sets the size of the space, with one
site for one agent or variable. The default size is 50 × 50.
Edge of Space
When you select the Loop check box, a component that reaches the edge of the space
appears again on the opposite side. When you select Do Not Loop, components bounce
back.
Note
You can any text you want, up to a length of 256 characters. What you enter here has no
effect on the simulation, so you can use this area for making notes.
4. Click OK to close the dialog box. A space appears on the canvas.
Agent Based Simulator User’s Manual 2 - 5
Now you've established a space immediately under the World agent.
Important : You can only create a space immediately under the World agent. ABS is
designed that way to keep things conceptually easy to understand.
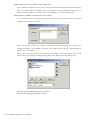
2.1.4 Creating a New Agent
This section describes how to create a new agent in a space. Unlike space, agents can be
created immediately under the World agent or other agents. The example here shows how to
create an agent in a space.
1. Open "Canvas – space name". Here, space name is "SPACE_1".
You can use any of several techniques to open the canvas.
• Double-click a component in the tree or on the canvas.
• Right-click a component in the tree or on the canvas, then select Canvas from the menu.
• Select a component in the tree or on the canvas, then choose Canvas from the View
menu.
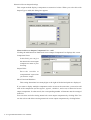
2. Click the Agent button in the toolbox. The button should appear to be depressed.
3. Click anywhere inside the Canvas – SPACE_1 window.
4. The following Agent Properties dialog box appears.
Agent Name
Enter the agent name you want.
Number of Agents
Enter the number of instances of this
agent. The number you enter here is used
to create instances of agents acting
according to the same rules. In other
words, this is the number of copies of
identical agents.
Note
You can any text you want, up to a length of 256 characters. What you enter here has no
effect on the simulation, so you can use this area for making notes.
2 - 6 Agent Based Simulator User’s Manual
5. Click OK to close the dialog box. The agent appear on the canvas.
Now you have created a new agent immediately under the space. You use the same procedure
to create a new agent immediately under the World agent or another agent.
Important : When you put an agent in a space, the three variables X, Y, and Direction
are automatically placed under the agent. These variables contain the coordinate
information for the agent.
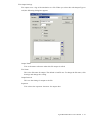
2.1.5 Writing the Agent Rules
After you create an agent, it doesn't do anything without rules for it. You need to write agent
rules for each agent.
1. Choose an agent and open the Rule window.
There are three types of Rule windows; the World Rule Editor for writing rules for the World
agent, the Agent Rule Editor for writing rules for other agents, and the Common Rule Editor
which can be referenced from anywhere.
To open the Rule Editor, select an agent, then go into the View menu and choose Rule Editor
or Common Rule Editor. Alternatively, right-click the agent, then select Rule Editor.
When you do this, the following window appears.
Agent Based Simulator User’s Manual 2 - 7
2. Write the agent rules inside this window.
For " Agt_Init{}", write, between the "{" and " }", the rules that are to be executed only once,
when the agent is created.
For "Agt_Step{}", write, between the "{" and "}", the rules that are to be executed at every step
of the simulation.
Search and Replace Features
While the Rule Editor is open, go into the Edit menu and select Find or Replace to display the
Find or Replace dialog box.
(1) Find screen
(2) Replace screen
Important : Existing multi-agent simulators have had a serious drawback; simulations cannot
be constructed unless the user masters an extremely difficult programming technique.
The development of Agent Based Simulator addressed this point. However in order to
2 - 8 Agent Based Simulator User’s Manual
enable you to construct simulations and make settings for rules as freely as possible, the
writing of programmatical rules is kept to the minimum necessary. To learn more about
rules, study rules such as those in the sample models.
The format of the rules used in Agent Based Simulator is based on the syntax of Microsoft
Visual Basic, which is relatively easy to learn. For information about the required syntax, see
"Chapter 3 — Agent Rule Syntax".
Rule Editor Settings
You can set the font for the Rule Editor by going into the Settings menu and selecting Other
Settings.
Automatic Indent
When this check box is selected, automatic
indenting is performed for rules you write in
the Rule Editor.
Set Font
Clicking Set Font displays the Font dialog
box.
Agent Based Simulator User’s Manual 2 - 9
Keep Output Screen After Running
When you clear this check box, the output screen is deleted when the simulation ends.
Import Model Description File (Select File button)
You can embed a file describing the model in the job file. The embedded file must be in
HTML and images are not permitted. You can view the embedded model-description file
at any time by going into the Help menu and selecting Model Description. For more
information, see section 2.5.
The Rule Editor view is immediately updated with the settings for font, style, size that you
make here.
2.1.6 Deleting an Agent
Click the agent you want to delete, then from the Edit menu, select Delete. Alternatively,
right-click the agent, then from the menu, select Delete.
2.1.7 Creating a New Variable
This creates a new variable for an agent. You can create a variable under any agent.
1. Open "Canvas – agent name". Here, agent name is "AGENT_1. The following window
appears.
Important : If you have created an agent in the space, variables named X, Y, and
Direction are already created. These variables indicate the agent's coordinates in the
space. When no space exists, they are not created.
2. Go to the toolbox and click the Variable button. The button should appear to be depressed.
3. Click the blank area in the "Canvas – AGENT_1" window.
2 - 10 Agent Based Simulator User’s Manual
Agent Based Simulator User’s Manual 2 - 11
4. A Variable Properties dialog box appears.
Type
Name
Value range
Boolean data type
Boolean
True or False.
String data type
String
0 to 1,000 characters
Integer data type
Integer
from −2,147,483,648 to 2,147,483,647
Real data type
Double
from -1.79769313486232×10308
to 4.94065645841247× 10324 (when negative)
from 4.94065645841247×10324
to 1.79769313486232 × 10308 (when positive)
Object data type
Object
Agent entity value
Collection data type
Collection
Array of variables of Object data type
Basically, you should choose String data type for text, Integer data type for integers, and
Double data type for numbers that include a fractional portion. Boolean data type is a
little special — it has a value of either Yes (True) or No (False). Object data type is used
when you want to employ an object itself in an argument for a function. Collection data
type is used for a set of such objects.
Number of Dimensions
A variable is like a container for holding data. In principle, a single variable can hold only
one item of data. When a variable is newly created, it has zero dimensions (that is, it's a
point on a plane), therefore it stores a single data item. However, that's not convenient
for handling large amounts of data of the same type, so by increasing the number of
dimensions, you can also increase the number of data items that can be stored. Incidentally,
in the case of a single-dimension variable, the variable can store n +1 items of data,
counting from zero to the array size n. In the case of two dimensions, when the array size
is m for first dimension and n for second dimension, the variable can store (m +1) × (n +1)
items of data. This is indicated as "variable (m, n)". The array size starts at zero, so be
careful to add one to the quantity.
Note
You can any text you want, up to a length of 256 characters. What you enter here has no
effect on the simulation, so you can use this area for making notes.
2 - 12 Agent Based Simulator User’s Manual
5. Click OK to close the dialog box. A variable appear on the canvas.
Now you've created the new variable "VAR_1" under an agent. You use the same procedure
to create a new one immediately under the World agent or a space.
2.2 Simulation Setting Feature
2.2.1 Initialize Dialog Box
This is for setting the initial values for components.
To display the Initialize dialog box, select the components in the Tree, then go into the
Settings menu and choose Initialize. The screen for setting the initial values varies
according to the type of component.
Initialize Dialog Box for Two-dimensional Space
Agent Based Simulator User’s Manual 2 - 13
This dialog box appears when you go to the Tree window, select Two-dimensional Space,
then go into the Settings menu and choose Initialize. You place agents and variables by clicking any coordinates in "Space: Two-dimensional Space".
important : When you display this dialog box, in the initial state all the agents may be
bunched together in the upper-left corner. If this happens, click the Clear Screen button
to reset the screen. Doing this eliminates the placed agents.
Make sure the agents are gone from the space, then click where you want to place the
agents. In order to place multiple agents at one location, enter the numerical value in Range
of Change.
Setting Target
Select the agent or variable to be placed on the two-dimensional space.
Number of Agents
This sets the number of agents to be placed at the point you select by clicking with the
mouse. If you have chosen Select with Mouse (described later), then the numerical value
set for Range of Change is automatically entered.
If you have chosen a variable for Setting Target, this field changes to Initial Value.
Total Number of Agents
Maximum Number
The value set for Number of Agents in Properties automatically appears in the Maximum
Number field, and the present number of placed agents automatically appears in the Total
Number of Agents field.
If you have chosen a variable for Setting Target, these do not appear.
Marker
Color
These set the type and color of the markers indicating agents and variables in the twodimensional space.
Select with Mouse
When you select this check box, then each time you click the coordinate, the number of
components increases or decreases by the amount set for Range of Change.
File Input
File Output
You can import the initial values from an existing file or save them in a file by clicking
these buttons.
Display List
Selected components appears on "Space: Two-dimensional Space".
Initialize Dialog Box for Agents and Variables
You can set the initial values of agents and variables that are used when the simulation starts.
To display this dialog box, select an agent or a variable in Tree window, then go into the
Settings menu and choose Initialize.
2 - 14 Agent Based Simulator User’s Manual
Target Agent: Red Ant
This indicates that current setting target is the initial value of the agent named Red Ant.
When you have selected a variable, this field changes to "Agent Variable Initialize: variable
name". Enter the numerical values you want to set in the table under this.
Individually Set Agents
When setting for multiple agents, you can set the values individually for each by selecting
the corresponding check boxes.
File Input
File Output
You can import the initial values from an existing file or save them in a file by clicking
these buttons.
Agent Based Simulator User’s Manual 2 - 15
2.2.2 Set Default Dialog Box
To set the default values for vari ables
by going into the Settings menu and
choosing Defaults.
Ordinarily variables are assigned initial
values, but if a variable is added by an agent
rule (with _CreateAgent, for example), then the
numerical value of this default is stored in
the added variable.
2.2.3 Output Settings Dialog Box
The Output Item List dialog
box appears when you go
into the Settings menu and
choose Output.
To make the settings for
graph and file output
methods, go into Output
Type to Add in this dialog
box, choose a graph or
file, then click Add.
If multiple outputs are
required, you need to add the
output methods. The series
of Output Items settings change to Move Icons. To change visible/unvisible selects to View
check box.
Time-series Graph Output Settings
Time-series graph displays components as a time-series line. To make settings this graph,
select Time-series Graph in Output Type to Add field.
2 - 16 Agent Based Simulator User’s Manual
Name
This is the name referenced when calling up this graph.
Title
This title appears on the graph displayed on the output screen.
Show Legend
When you select this check box, a legend is displayed next to the graph.
Axis Label
When the graph is displayed, this item is also displayed as the label for the axis.
Minimum Value
Maximum Value
Scale Interval
These specify the minimum value, the maximum value, and the interval of the scale for
the displayed graph.
Maximum Number of Displayed Steps
With each step, the time-series graph is displayed in a compressed form. When you set
the number of steps here, a portion of the graph corresponding to the set number of steps
is always displayed. That is, older data sequentially disappears from the left side.
Agent Based Simulator User’s Manual 2 - 17
Graph Component List
Clicking Add displays another dialog box for setting.
Component Name
In this field, you can give
this graph component a
name of your choosing.
Output Value
Enter the names of the
graph components (such as
variables) whose histories
you want to view.
Line Width
Line Color
These set the width and color of the lines in the graph.
Marker
When you select this check box, markers are displayed on the graph.
If you want to display multiple graphs on the screen at the same time, you need to add each of
their components (such as agent 1, agent 2, variable 1, and so on) as graph components. In
other words, the corresponding number of elements must be arranged in the list.
You can select and edit existing graph components by clicking Edit. You can also select and
delete existing graph components by clicking Delete. At Output Value in Graph Component
List, a numeric to surrounded by "@" is unfolded.
example:
"World.Val(@3,5@)" writes
World.Val(3)
World.Val(4)
World.Val(5)
2 - 18 Agent Based Simulator User’s Manual
Bar Graph Output Settings
This output method displays components as a bar graph. When you select this with Output
Type to Add, the following dialog box appears.
Almost all the setting items are the same as for time-series graphs.
Agent Based Simulator User’s Manual 2 - 19
Two-dimensional View Map Output Settings
This output method arranges agents and variables on a two-dimensional view map to show
their movement, increase, and decrease. When you select this with Output Type to Add, the
following dialog box appears.
Show Gridlines
When you select this check box, horizontal and vertical gridlines are drawn on the twodimensional map.
Show Backgroud Graphics
When you select this check box, a backgroud graphics is displayed on two-dimensional
space.
X-axis Settings
Y-axis Settings
It's possible to display only specific portions on the map by making settings for the minimum
and maximum values. The initial maximum values are assigned the space size.
2 - 20 Agent Based Simulator User’s Manual
Map Component List – Add
Clicking the Add button for Map Component List displays another dialog box for setting.
Component Name
In this field, you can
give this graph component a name of
your choosing.
Output Target
S e l e c t
t h e
components (agents
and the like) whose
movement you want
to view on the map.
Marker
This selects how
markers
are
displayed for
components on the
map. When you select None, markers are not displayed. When you choose Select, you
can select out of circle, triangle, square, or ×. When you select File Name, you can
replace the marker with an image of your choosing by entering the path to an image file
(at present only icon files are supported). When you choose Variable Name Specifying
File, you can select a variable in World.
Agent Color
You select either Fixed Color, which specifies a single color of your choosing, or Variabledependent, which makes the color change dynamically according to the value of the
variable.
Agent Variable Information
When you select the check box for Show Information, the values of specified variables
appear above the agents on the map.
If you want to display multiple components on the screen at the same time, you need to add
each of their components (such as agent 1, agent 2, variable 1, and so on) as map components.
In other words, the corresponding number of elements must be arranged in the list.
You can select and edit existing map components by clicking Edit. You can also select and
delete existing map components by clicking Delete.
Agent Based Simulator User’s Manual 2 - 21
Numerical Screen Output Settings
This output method displays components as numerical values. When you select this with
Output Type to Add, this dialog box appears.
Numerical Screen Output Component List – Add
Clicking the Add button for Numerical Screen Output Component List displays this screen.
Component Name
In this field, you can give
the numerical screen output
component a name of your
choosing.
Output Value
Enter the variable or
computational expression
you want to output.
Show Fractional Numbers
This setting determines how many digits to the right of the decimal point are displayed.
If you want to display multiple components on the screen at the same time, you need to add
each of the components (such as agent 1, agent 2, variable 1, and so on) as numerical screen
output components. In other words, the corresponding number of elements must be arranged
in the list.
You can select and edit existing numerical screen output components by clicking Edit. You
can also select and delete existing numerical screen output components by clicking Delete.
2 - 22 Agent Based Simulator User’s Manual
File Output Settings
File output saves a log of the simulation to a file. When you select this with Output Type to
Add, the following dialog box appears.
Output Name
This is the name references when this file output is called.
File Name
This is the file name for output. The default is OutFile.out. To change the file name, click
Settings and change the setting.
Output Interval
This sets the timing for output to the file.
Separator
This selects the separator character for output data.
Agent Based Simulator User’s Manual 2 - 23
File Output Component List – Add
Clicking the Add button for File Output Component List displays this screen.
Component Name
In this field you can give
the file output component a
name of your choosing.
Output Value
Enter the variable you want
to output.
Show Fractional Numbers
This setting determines how many digits to the right of the decimal point are displayed.
If you want to output multiple data items to the output file at the same time, you need to add
each of the components (such as agent 1, agent 2, variable 1, and so on) as file output
components. In other words, the corresponding number of elements must be arranged in the
list.
You can select and edit existing file output components by clicking Edit. You can also select
and delete existing file output components by clicking Delete.
2.2.4 Execution Environment Settings Dialog Box
Here is where you make various settings for running simulations.
From the Settings menu, choose Execution Environment Settings. The Execution
Environment Settings dialog box appears. This dialog box has five tabs; Simulation,
Log File, Run Sequence, Run Continuously, and Report Output. You can move among
these tabs to make the settings.
2 - 24 Agent Based Simulator User’s Manual
Simulation Tab
Maximum Number of Steps
The number of steps
specified by this value is
executed, unless you quit the
simulation partway through.
Maximum Execution Time
Steps are executed until the
time specified by this value
elapses, unless you quit the
simulation partway through.
Ending Conditional Expression
Steps are executed until the
conditional expression
entered here is fulfilled,
unless you quit the simulation
partway through.
Execution Pause Time
When one step ends, processing pauses for the time specified by this value. If you are
using a fast computer and the simulation speed is too rapid, then enter a suitable value
here.
Random Number Seed
You can specify a pattern for random numbers.
Agent Based Simulator User’s Manual 2 - 25
Log File Tab
Log File Name
Log File Name Format
These set the name of the
log-file. Clicking Set displays
a dialog box for saving,
where you can specify a file
name and location of the log
file.
Logging Step Interval
When you enter a value
here, logging to the log file
is performed during execution of the simulation. When
the entered value is 1, logging is performed at every
step. A log file having the
name of your choosing
(***.abs) is created. You
can play back the executed simulation by opening this file.
Run Sequence tab
Agent Rule Run Sequence
Agt_Step for World is ex-
ecuted first in the step, but
you can use this screen to
change the settings for
Agt_Step for agents. When
you select Random, the execution sequence for agent
rules is determined randomly. When you select
Fixed Sequence, execution
proceeds in sequence, from
the top of the tree down.
2 - 26 Agent Based Simulator User’s Manual
Run Continuously Tab
•
When Initial Values Change Setting Is Set to None
Maximum Number of Executions
The simulation is repeated
the number of times entered,
unless you quit the
simulation.
•
When Initial Values Change Setting is Set to Linear
Initial Value Change Variable
Name
When you want to perform
a simulation with the initial
value of a particular variable
changed in a stepwise
m a n n e r, t h e n e n t e r t h e
variable name here.
For instance, if you want to
execute a total of 11 types
of simulations with the initial
value of a particular variable
varied from 0 to 1 in steps
of 0.1, ordinarily you would
have to redo the setting of
the initial value ten times and
run a simulation for each
one. By using this setting,
however, you can make the
setting once and perform simulations while varying the initial value automatically until the
conditions are fulfilled.
Agent Based Simulator User’s Manual 2 - 27
Start Value
End Value
Range of Change
These set the start value, end value, and range of change for the variable to be changed.
Number of Executions with Same Initial Value
This sets the number of times to execute the same simulation before changing the initial
value.
• When Initial Values Change Setting Is Set to Random
Initial Value Change Variable
Name
When you want to perform
a simulation with the initial
value of a particular variable
changed randomly, then
enter the variable name here.
For instance, if you want to
execute a total of 10 types
of simulations with random
numbers in the range of 0 to
1 used as the initial value of
a particular variable,
ordinarily you would have to
redo the setting of the initial
value ten times and run a
simulation for each one. By
using this setting, however,
you can make the setting
once and perform simulations while varying the initial value automatically until the conditions
are fulfilled.
Minimum Value
Maximum Value
These set the minimum and maximum values of the range of random numbers for the
variable to be changed.
Number of Executions with Same Initial Value
This sets the number of times to execute the same simulation before changing the initial
value.
Number of Executions with Different Initial Value
This sets the number of times to execute the simulation with the initial value varied randomly.
Set Different Values for Same level Variables
Select this check box when you want to apply the different random number to identical
variables of the same agent (for example, turtle(0), turtle(1), turtle(2),...).
2 - 28 Agent Based Simulator User’s Manual
Report Output Tab
Report File Name
This sets the name of the file
for report-file output.
Clicking Set displays a dialog
box for saving, where you
can specify a file name and
location of the report-file.
Delimiter
You can choose any of four
types of separator characters; Tab, Comma, Space, or
Other.
Report Component List
Use the Add button to add
components you want to output in the report file, use the
Edit button to edit components, and use the Delete button to delete components.
Clicking Add displays the Report Output Component Setting dialog box.
Component Name
In this field you can give
the report output
component a name of your
choosing.
Output
This selects the timing for
outputting the components
to the report file.
Output Value
Enter the variable you want
to output.
Show Fractional Numbers
This sets how many digits to the right of the decimal point are output.
2.2.5 Control Panel Settings
Control Panel is used to start a simulation, pause a simulation partway through, or quit a
simulation. You can also change the variables immediately under World, while execution is in
progress.
To start a simulation, click the Run button. To quit a simulation, click the Stop button. To
pause a simulation, click the Pause button.
Agent Based Simulator User’s Manual 2 - 29
Clicking the Step button executes the simulation one step at a time. Each click of the
button executes one step, after which the simulation pauses.
Making Settings for the Control Panel
To make settings for the Control Panel, go into the Settings menu and select Control Panel
Settings.
Add
This adds setting items displayed in the Control Panel window.
Edit
This is used to edit existing setting items.
Delete
This is used to delete existing setting items.
Clicking Add or Edit displays a User Settings dialog box.
Control Name
Enter an easy-tounderstand name of
your choosing in this
setting.
Setting Target
Select the variable you
want to manipulate
with the Control Panel.
Note that you can
select only variables
immediately under
World.
Interface – Button
Select this when you want to assign a value when the button is ON.
Interface – Toggle Button
Select this when you want to assign respective values when the button is ON and OFF.
2 - 30 Agent Based Simulator User’s Manual
Interface – Slider
Select this when you want to intermittently vary a value within specified range by dragging
a slider to the left or right.
Interface – Direct Entry
Select this when you want to directly type a value to be assigned to the variable.
2.3 Simulation Execution Features
After making the Control Panel settings as require, you can run, pause, and stop simulations,
perform stepped execution, and change variables during simulation.
To execute a simulation, use the Control Panel window.
Run button
Click this to start a simulation.
Step button
This executes a simulation one step at a time. Each click of the button executes one step,
after which the simulation pauses.
Pause button
Click this to pause a simulation.
Stop button
Click this to quit a simulation.
When you push [ESC] key, exit a simulation. If you have specified variables to change in the
Control Panel settings, then several elements are added to the Control Panel window.
Button Used
Once the button is clicked, it remains ON.
Toggle Button Used
The button is ON when clicked once, and switched OFF
when clicked a second time.
Slider Used
By dragging with the mouse, you can change the value freely
within the Range entered in the Control Panel Settings dialog
box.
Direct Entry Used
Click to select, then type a value directly from the keyboard.
Agent Based Simulator User’s Manual 2 - 31
2.4 Log Playback Feature
To use this feature, you must first make settings, run a simulation, and generated a log file.
When you open the log file, you can replay the simulation. When you do this, the Playback
menu becomes available for selection.
Selecting Run in this state displays the Playback panel and replays the simulation.
Playback button
This button performs continuous playback to the end.
Step Playback button
Each click of this button plays back one step.
Pause button
Clicking this during playback pauses the playback.
Stop button
This button stops playback.
Run Simulation button
When you pause at a step and click this button, you can then set the values in that step to
their initial values and execute the simulation again. If you want to save a new log file
when you execute the simulation again, you need to redo the settings in the Log File
Settings dialog box.
2 - 32 Agent Based Simulator User’s Manual
Playback List Panel
The step numbers, together with the date and time of simulation execution, are listed in
ascending order on the time axis. When you pause at a step and click the location you
want on this list, you can display the step's actual output. You can also display their
images by using the arrow keys instead of clicking.
Agent Based Simulator User’s Manual 2 - 33
2.5 Analytic File Output Feature
To use this feature, you must first make settings, run a simulation, and generated a log file.
When you open the log file, you can get analitic file. When you do this, the Analytic file
menu becomes available for selection.
Selecting Analytic file in this state displays the Analytic file output dialog(1/6) and sets output
formats.
Output Simulation Setting
When a logfile contains multiple simulations, sets simulations for output data.
2 - 34 Agent Based Simulator User’s Manual
Output Step Setting
Enter the step count you want to output data.
Agent Based Simulator User’s Manual 2 - 35
Output Values Setting
Set values for output data. Select an Agent, show values series, click Add button for
ouput values displays this screen. You can select many values. Clicking Delete button to
except entries. Click More button, you can set for details
2 - 36 Agent Based Simulator User’s Manual
Side Format Setting
Set side format for output data.
Agent Based Simulator User’s Manual 2 - 37
Header Format Setting
Set header format for output data.
2 - 38 Agent Based Simulator User’s Manual
Output file
Set file name for output data.
Header Output
Set Header format for output data.
Side Output
Set Side format for output data.
Separator
This selects the separator character for output data.
Deficit Data
This selects the deficit data for output data.
Agent Based Simulator User’s Manual 2 - 39
2.6 Help Feature
Descriptions of Models
If a model description file is already embedded in the job file (see Rule Editor Settings), you
can view the embedded model description file by going into the Help menu and selecting
Model Description.
Viewing the Help File
Going into the Help menu and selecting Show Help displays the standard help file. This is
mainly a reference for agent-rule syntax. Use it together with this manual.
About Agent Based Simulator
Going into the Help menu and selecting About displays the following window that provides
information about the version of Agent Based Simulator.
2.7 Debug Screen Feature
Debug Screen Output
You can output a debugging screen by including the _DebugStr function in rules. _DebugStr is an
internal function to display debugging information.
Format: _DebugStr(argument)
If the argument is a text string, it must be enclosed in quotation marks ("").
For example,
Agt_Init{
Dim X as Integer
X=0
_DebugStr ("Initial value = " & X )
X=X+1
_DebugStr ("After adding 1 = " & X )
}
2 - 40 Agent Based Simulator User’s Manual
Execution Result :
Agent Based Simulator User’s Manual 2 - 41
Chapter 3
Agent Rule Syntax
This section is the specification for the language used in agent rules for the Agent Based Simulator.
The content may be somewhat advanced for persons with no programming experience. Please study it
along with a commercially available syntax guide. The language used in rules is basically in line with
that of Microsoft Visual Basic.
3.1 Overall Structure of Agent Rules
An agent rule is written with the following structure for each agent. A rule is a collection of
functions.
Agt_Init{
Local declaration block
Execution block
}
Agt_Step{
Local declaration block
Execution block
}
User-defined function{
(User-defined functions are not necessarily required)
}
3.2 Special Functions
Agt_Init
This is a function that is executed only once, when agents are created while running a simulation.
The name Agt_Init has a special meaning, and Agt_Init is a reserved word that cannot be used
for any other purpose. The format is as follows.
Agt_Init{
Variable-type declaration block
Execution block
}
Agt_Step
This is a function that is executed repeatedly until the simulation ends. The name Agt_Step has
a special meaning, and Agt_Step is a reserved word that cannot be used for any other purpose.
The format is as follows.
Agt_Step{
Variable-type declaration block
Execution block
}
3 - 2 Agent Based Simulator User’s Manual
3.3 User-defined Functions
You can freely define user-defined functions. Like name constants declared in the variabletype declaration block, functions defined here can be called from the Agt_Init function, Agt_Step
function, or user-defined functions in the relevant agent rule. However, that cannot be called
from agent rules for other agents.
The format is as follows.
Function statement
Function function name (parameter declaration) As function return-value type
{
Variable-type declaration block
Execution block
Return (expression)
}
Function
This declares that a user-defined function is defined starting here.
Function name
You can name this any way you like. However, reserved words or already-declared variable
names and name constants cannot be used, because these may confuse Agent Based Simulator.
As function return-value type
This is stated when the function must return a value. When this is omitted, the function cannot
return a value. For the function return-value type, specify the type of the value that the
function returns. The method of specifying this is the same as for the variable type.
Sub statement
Sub function name (parameter declaration)
{
Variable-type declaration block
Execution block
}
Sub
This declares that a user-defined function is defined starting here.
Function name
You can name this any way you like. However, reserved words or already-declared variable
names and name constants cannot be used, because these may confuse Agent Based Simulator.
Agent Based Simulator User’s Manual 3 - 3
Parameter Declaration
When a parameter is passed to the function, the following format is used to declare it.
Variable name 1 As variable type, ... , Variable name n As variable type
(Examples)
Function Function2(a as Integer, b As Integer, c As Double) As Integer{
}
Sub Function2(a as Integer, b As Integer, c As Double){
}
Differences between Function and Sub
When a user-defined function is executed, if you want to use the value of the result (the
return value) directly in an execution statement, use Function. In other cases, use Sub. For
example,
Agt_Step{
Dim a As Integer
a = Function1(5,3)
}
Function Function1(b As Integer, c As Integer) As Integer{
Dim answer1 As Integer
Answer1 = b + c
Return (answer1)
}
In line 2, we declare variable a of Integer data type. Next, we pass the values 5 and 3 to the
user-defined function Function1, and assign its calculation result to a.
In the user-defined function (starting at line 5), we declare the variable answer1 of Integer data
type (line 6), assign the calculation result of b + c (in this case, 5+3) to answer1 (line 7), then
return the value of answer1 to the Function1 location in Agt_Step.
That is, this example says to assign the answer of the calculation of 5+3 to the variable a.
However, if it's not necessary to assign the calculation result to the a variable, then there is no
need for the user-defined function to return a value. In such cases, use Sub instead of Function.
3.4 Rules for Names
The names of variables and functions used in agent rules must follow the convention below.
The first character of a name must be a letter.
• Each of the second and subsequent characters must be a letter, numeral, or underscore "_".
• A name must be 100 characters or fewer.
• Reserved words (see section 3.8) cannot be used as names.
Important : Letters are not case-sensitive.
3 - 4 Agent Based Simulator User’s Manual
For examples, Sum, sum_x, and sum100 are correct names. SUM, Sum, and sum are all considered
to be identical. The following names are incorrect;
• 1x
A numeral cannot be used as the first character.
• x$
• next
A special symbol cannot be used.
Reserved words cannot be used.
3.5 Variable Declaration Block
This is a section that declares variables to be used only within the relevant function. Variables
must be declared before they are used. If a variable is used without defining it first, an
"undefined" error occurs during compiling.
Variables declared here are called "local variables". They can be referenced or changed only
within the function where they are declared. Local variables are initialized when execution of
the function starts, and are destroyed when execution of the function ends.
When initialized, variables of String data type are reset to a null string (""), and other variables
are reset to 0 (zero).
3.5.1 Declaration of Variables
The format is as follows. This may be omitted if local variables are not used.
Dim variable name 1 As variable type [, ... , variable name n As variable type]
(Examples)
Dim x As Integer
Dim x1 As Double, x2(10) As Double, x3(10,20,30) As Double
Dim
This is a reserved word that indicates the start of variable declaration.
Variable name
This is written using the following format.
(1) For a simple variable
Variable name
(2) For an array variable
This is declared using the following format.
Dim variable name 1 (m1, ... , mn) As variable type, ...
variable name2 (m1, ... , mn) As variable type
m1: Number of array elements in the first dimension −1
mn: Number of array elements in the nth dimension −1
Agent Based Simulator User’s Manual 3 - 5
There is no particular restriction on the number of dimensions.
(Examples)
Dim dx(10) As Integer
// Declares a one-dimensional array having 11 elements
//
from dx(0) to dx(10).
Dim ds(2,3) As String
// Declares a two-dimensional array having 3*4 elements;
//
ds(0,0), ds(0,1), ds(0,2), ds(0,3)
//
ds(1,0), ds(1,1), ds(1,2), ds(1,3)
//
ds(2,0), ds(2,1), ds(2,2), ds(2,3)
As
This is a reserved word indicating that the variable type follows.
3.5.2 Variable Type Declaration
There are eight variable types;
Type
Boolean data type
String data type
Integer data type
Name
Boolean
String
Integer
Real data type
Double
Agent data type
Object data type
Collection data type
Space data type
Agent
Object
Collection
Space
Value range
True or False
0 to 1,000 characters
−2,147,483,648 ∼ 2,147,483,647
−1.79769313486232 × 10308 ∼ 4.94065645841247 × 10-324
(when negative)
4.94065645841247 × 10-324 ∼ 1.79769313486232 × 10308
(when positive)
Agent name defined in Tree
Agent entity value
Array of variables of Object data type
Space name defined in Tree
3.6 Execution Block
An execution block is composed of a group of executable statements and sets forth the action
of the agent. Block means a series of zero or more executable statements.
Executable statements include dummy statements, assignment statements, conditional
statements, loop statements, jump statements, and the like.
3.6.1 Dummy Statements
Dummy statements perform no execution. They are used to make programs more readable.
(Example)
If x == 1 And y == 1 Then
Else
Z=0
End If
3 - 6 Agent Based Simulator User’s Manual
The above example is equivalent to the following one.
If x <> 1 Or y <> 1 Then
z=0
End If
3.6.2 Assignment Statements
Assignment statements assign values to variables. The format is as follows.
Variable name = Expression
Variable name
This is either a variable declared in an agent rule, or an agent variable established using the
GUI (graphical user interface). The format is as follows.
(1) For a variable declared within the agent rule
• For a simple variable (zero dimensions)
Variable name
(Example)
x
• For an array variable
Variable name (Expression indicating the element number of the first dimension, ... ,
expression indicating the element number of the nth dimension)
(Examples)
x(0) // For a one-dimensional array
y(i) // For a one-dimensional array
z(i,j) // For a two-dimensional array
(2) For an agent variable
agent name.variable name
Agent name
This states the path name of the agent.
(Examples)
// (Example 1) When specified with the relevant agent as the origin
Up.Up.agent_b
// Up: Up one level in the hierarchy
// (Example 2) When the agent is an array
World.agent_a(i).Agent_b
// (Example 3) When specified with the World agent as the origin
world.Agent_a.agent_b(i)
// (Example 4) When specifying the relevant agent
My.
Agent Based Simulator User’s Manual 3 - 7
Variable name
The format is the same as for variables declared within an agent rule.
(Examples of assignment statements)
a=0
a=b;c
a = b + Function_a(c)
a(i) = b
World.a = 0
World.a(i) = b + c(i)
World.Agent_a(i).b = c
My.a = 1
3.6.3 Expressions
An expression is a linear expression, or linear expressions joined by operators, including the
following types.
• Arithmetic expression ............. x * y + Rnd() / 10
• Relational expression .............. If x > y Then
• Logical expression .................. If x > y And x > z Then
• Character expression ............... multi_agent = "multi" & "agent"
A linear expression may be any of the following.
• Numeric constant
• Character-string constant
• Variable name (the same as a variable name in an assignment statement)
• Function call
• − linear expression
• Not plus linear expression (Not is a bitwise operator)
• (Expression)
(Examples of linear expressions)
0
x
x(i)
Function_a(a,b)
-x
-Function_a(a,b)
Not a
(a + b)
-(-a + b)
Constant
Variable name
Variable name
Function call
− linear expression
− linear expression
Not plus linear expression
(expression)
− linear expression
The following summarizes the operators that can be use in expressions, and their precedence.
3 - 8 Agent Based Simulator User’s Manual
String operators
Type
Others
Arithmetic
operators used
in arithmetic
expressions
String operator
Relational
operators used
in relational
expressions
Logical
operators used
in logical
expressions
Assignment
operator
()
Function
^
*
Precedence
1
2
3
4
5
/
5
Mod
+
&
= =
< >
! =
<
< =
>
> =
Not
And
Or
Xor
6
7
8
8
9
10
10
10
10
10
10
10
10
11
12
13
=
14
Operator
Meaning
Expression enclosed in "()"
Function call
Exponentiation, xn
Negation, −x
Multiplication, x × y
Floating-point division (result is floating-point number),
x/y
Integer division (result is integer, x y
Modulo (result is remainder of integer division)
Addition, x + y
Subtraction, x − y
String concatenation ("ab" & "cde" → "abcde")
equal (note difference from "=")
Not equal (identical to !=)
Not equal (identical to <>)
Less than
Less than or equal
Greater than
Greater than or equal
Logical negation
Logical conjunction
Logical disjunction
Logical exclusion
Assignment (assign result of expression), variable name
= expression
3.6.4 Function Calls
In terms of syntax, a function call is a linear expression. A function call may be used in an
arithmetic, relational, or logical expression, or may be used as an independent statement.
Note that a function with no return value can be used only as an independent statement.
Function name (argument 1, argument 2, ... )
Argument
The number of arguments and their types must match what has been defined. Only variable
names can be specified as arguments.
3.6.5 Conditional Statements
Conditional statements cause processing to branch according to certain conditions.
(1) When the expression evaluates to true, the block is executed.
If expression Then
Block statement
End If
Agent Based Simulator User’s Manual 3 - 9
(2) When the expression evaluates to true, block 1 is executed. When it evaluates to false, block
2 is executed.
If expression Then
Block statement 1
Else
Block statement 2
End If
(3) When the value of the expression is true, the corresponding block is executed.
When all expressions evaluate to false, block n is executed.
If expression 1 Then
Block statement 1
ElseIf expression 2 Then
Block statement 2
ElseIf expression 3 Then
Block statement 3
•••
Else
Block statement ‚•
End If
3.6.6 Loop Statements
Loop statements perform repetitive processing.
For statement
This is used to repeat processing a specific number of times. The format is as follows.
For loop variable = start value To end value (Step step value)
// When Step value is omitted, step defaults to 1
Block statement
Next loop variable
(Example)
total = 0
For i=1 To 10 Step 1
total = total + i
Nexti
Do While statement
This is used to repeat processing while an expression evaluates to true. The format is as
follows.
Do While expression
Block statement
Loop
3 - 10 Agent Based Simulator User’s Manual
Do Until statement
This is used to repeat processing while an expression evaluates to false, that is, until it evaluates
to true.
Do Until expression
Block statement
Loop
3.6.7 Jump Statements
Jump statements change the flow of control.
Goto statement
This is used to jump to a specified location. The format is as follows.
Goto jump-destination label name
•••
Jump-destination label name:
•••
(Example)
Do While x > 0
Do while y > 0
If err_flag == True Then
Goto error_handling
End If
Loop
Loop
// Jump to specified label
Goto normal_processing
error_handling:
Break statement
This is used to break out of a loop.
(Example) To escape from a While loop
Do While conditional expression
Do While conditional expression
•••
If conditional expression for escape Then
Break
End If
•••
// Escape one level
Loop
•••
Loop
Agent Based Simulator User’s Manual 3 - 11
(Example) To escape from a For loop
For i=0 To 10 Step 1
For j=0 To 10 Step 1
•••
If conditional expression for escape Then
Break
End If
•••
// Escape one level
Nextj
•••
Nexti
3.6.8 Other Statements
Return statement
When function execution ends, this statement returns control of execution to the location
where called from. The function with a return value can return a value at this time. The
format is as follows.
Return (expression)
Important : There is not limit on the number of Return statements that can appear
within a function.
Important : The following cases result in a compile error.
• When the function is defined as returning a value and an expression is omitted.
• When the function is defined as returning a value and the data type of the return
value differs from the data type of the expression.
• When the function is defined as not returning a value and an expression appears.
3.7 Internal Functions
Agent based simulator has predefined functions, called internal functions. These functions
can all be called from within functions.
The internal functions are listed below.
3 - 12 Agent Based Simulator User’s Manual
3.7.1 Numerical-calculation Functions
Number
Function
name
1
2
3
4
Abs
Atn
Cos
Exp
5
Int
6
7
8
9
10
11
Log
Rnd
Round
Sin
Sqr
Tan
Action
Calculates the absolute value
Calculates the arctangent (trigonometric function)
Calculates the cosine (trigonometric function)
Calculates ex
Truncates the fractional part of a real number and returns the first
integer less than or equal to the real number
Calculates the natural logarithm log e x
Returns a random number greater than or equal to 0.0 but less than 1.0
Rounds off the portion of a number to the right of the decimal point
Calculates the sine (trigonometric function)
Calculates the square root
Calculates the tangent (trigonometric function)
3.7.2 String-manipulation Functions
Number
Function
name
1
2
3
4
5
Left
Len
Mid
Right
Strcomp
Action
Extracts a string from the left side
Returns the number of characters of a string
Extracts a string from a specified position
Extracts a string from the right side
Compares two strings
3.7.3 Data-manipulation Functions
Number
Function
name
1
2
3
CDbl
4
CBool
CInt
CStr
Action
Converts the value of an expression to Double data type
Converts the value of an expression to Integer data type
Converts the value of an expression to String data type
Converts to False when an expression evaluates to 0, and
converts to True otherwise
Agent Based Simulator User’s Manual 3 - 13
3.7.4 Agent Functions
Number
Function name
_CountAgent
1
2
3
4
5
6
7
8
9
10
11
12
13
14
Action
Returns the number of instances of a specified agent
Returns the number of instances of surrounding agents in
_ViewCountAgent
two-dimensional space (grid model or hexagon model),
centered at specified coordinates
Returns the number of instances of surrounding agents in
_ViewCountAgent2
two-dimensional space (grid model or hexagon model),
centered at specified coordinates (All-mode available)
_RandomPutAgent
Randomly places a specified agent
Seeks and moves to a surrounding unoccupied site, centered
_MoveToSpace
on specified coordinates
Seeks and moves to a surrounding unoccupied site, centered
_MoveToCollectionSpace on specified coordinates, not overlapping with agents
belonging to a specified collection
Seeks and moves to a surrounding site in two-dimensional
_MoveToRichValue
space, centered at specified coordinates, where the value of a
specified variable is largest
Advances forward (direction of advance is determined by the
_Forward
Direction variable)
_Turn
Changes the orientation (the Direction variable is modified)
_CreateAgent
Creates an agent
_LinkAgent
Changes the linking of an agent
_KillAgent
Destroys an agent
_SpecifyKillAgent
Returns the value of the Kill flag
_SpecifyAgent
Returns the agent type of a specified object
3.7.5 Collection Functions
Number
Function name
_CountCollection
1
_GetObject
2
3
4
5
6
7
8
9
10
11
12
13
14
15
Action
Returns the number of objects in a collection
Returns the object at a specified position in a collection
Returns the collection of agents around specified location
_CollectAround
coordinates
_AddCollection
Adds an object to a collection
_RemoveCollection
Removes a specified object from a collection
_CopyCollection
Copies a collection
_CollectAgent
Creates a collection of a specified agent name
_InitCollection
Initializes a collection
_CloseCollection
Releases a collection
Returns a new collection formed by merging two collections
_MakeMergeCollection()
(with no redundant elements)
Returns a new collection formed by joining two collections
_MakeJoinCollection()
(redundant elements are permitted)
Returns a new collection formed of elements (objects) which
_MakeCommonCollection()
are common to two collections
Returns a new collection formed of elements (objects) which
_MakeDiffCollection()
are included in only one or the other, but not both, of two
collections
Returns a new collection formed by excluding elements in
_MakeDelCollection()
collection 2 from collection 1
Examines whether a specified object exists in the elements of a
collection, and returns an integer greater than or equal to zero
_GetCollectionEntry()
representing a sequential number (element number) from the
starting element of the collection, or –1 if the object does not
exist in the collection
3 - 14 Agent Based Simulator User’s Manual
3.7.6 Space Functions
Number
1
2
3
4
Function name
_SpecifySpace
_GetWidthSpace
_GetHeightSpace
_GetRideSpace
Action
Returns the type of a specified space
Returns the horizontal width of a specified space
Returns the vertical height of a specified space
Returns the space on which a specified object rides
3.7.7 File Input-Output Functions
Number
1
2
3
4
Function name
_OpenFileCSV
_ReadFileCSV
_WriteFileCSV
_CloseFileCSV
Action
Open CSV file
Read one row from CSV file
Write one row to CSV file
Close CSV file
3.7.8 Other Functions
Number
1
2
3
4
5
6
7
Function name
_SpecifyLoop
_GetCountStep
_GetCountSimulationNumber
_ExitSimulation
_ExitSimulationMsg
_DebugStr
_Shell
Action
Returns the loop setting of a specified space
Returns the present step count
Returns the present simulation execution count
Exits a simulation
Outputs a string to a message and exits a simulation
Displays a string on the Debug Screen
Execute a runnable program
3.8 Reserved Words
When you write an agent rule, you cannot use reserved words for variable names, userdefined function names, or the like. The names of internal functions also cannot be used.
Reserved words are listed below.
Constants
True
False
Color_Red
Color_Green
Color_Blue
Color_Yellow
Color_Cyan
Color_Mazenta
Color_Black
Color_White
Indicates a true value (Boolean data type).
Indicates a false value (Boolean data type).
Indicates the color red.
Indicates the color green.
Indicates the color blue.
Indicates the color yellow.
Indicates the color cyan.
Indicates the color magenta.
Indicates the color black.
Indicates the color white.
Agent Based Simulator User’s Manual 3 - 15
Type names
Void
No valid data type
Boolean
(used as the type for the return value of a function)
Boolean data type
Double
Integer
String
Agent
Real data type
Integer data type
String data type
Agent data type
Collection
Object data type
Collection data type
Space
Space data type
Object
Operators
And
Mod
Logical conjunction
Modulo
Or
Logical negation
Logical disjunction
Xor
Logical exclusion
Not
Execution control
Do
Used in Do While and Do Until statements
While
Used in Do While statements
Used in Do Until statements
Until
Loop
If
Then
Else
ElseIf
End
For
To
Step
Next
Break
Goto
Used in Do While and Do Until statements
Used in If statements
Used in If statements
Used in If statements
Used in If statements
Used in If statements
Used in For statements
Used in For statements
Used in For statements
Used in For statements
Used in jump statements
Used in Goto statements
Identifier declarations and references
Dim
Used in declarations
As
Used in declarations
Used in declarations
By
Val
Function
Sub
Agt_Init
Used in declarations
Used in function definitions
Used in function definitions
The name of a function executed only once,
at the start of a simulation
3 - 16 Agent Based Simulator User’s Manual
Agt_Step
The name of a function executed repeatedly in a simulation
Up
Indicates the agent one hierarchical level higher
Indicates the relevant agent
My
World
All
Indicates the World agent
Indicates all agents (used in the _CollectAround function)
Others
X
Reserved for future use
Indicates the spatial coordinate of an agent
Y
Indicates the spatial coordinate of an agent
Static
3.9 Comments
You can write comments in agent rules. Because Agent Based Simulator ignores text in
comments, you can write anything in comments. Because rules can easily become long
processions of hard-to-understand text, we recommend commenting your programs liberally
to make them easier to understand when inspected later. You can add comments at any place
where a blank can be written.
The methods that can be used to write comments are given below.
(1) '
Everything from the ' to the end of the line is a comment.
(Example) In this case, sum = 0 is interpreted as a rule.
sum = 0
' Initialize the total value
(2) //
Similar to (1).
(Example)
// Determine direction of advance, then move
direction = Rnd(360)
(3) /* ... */
Everything from the /* to the */ is a comment. This may span more than one line.
(Example)
/*
************************************************
* Turtle rule
*
* Examination of Schelling's segregation model *
************************************************
*/
Agent Based Simulator User’s Manual 3 - 17
3.10 Error Correction
When a rule with a incorrect syntax is written in the Rule Editor, an error is displayed. Typical
error messages and their remedies are given here.
1. A type name (Boolean, Integer, Double, String, Agent, Space, Object, or Collection) is
required after "As".
Remedy: Check the type declarations for the function's return value and variables.
2. "××.++" is undefined.
Remedy: Do ×× and ++ exist? Also, check to make sure there are no typing errors.
3. _×××: The number of function arguments does not match the function specification (Call:
x arguments, Function specification: y arguments).
Remedy: Check for an error in the format of the arguments.
4. "××" is required after "++".
Remedy: Make sure that ×× exists after ++.
3 - 18 Agent Based Simulator User’s Manual
Appendix
Creating
More Advanced
Models
The interesting thing about multi-agent models is that they affect each other based on local information.
Local information could also be termed "limited information around the agents themselves". For instance,
even in our real lives, we depend on limited information around ourselves to act and make decisions on
a day to day basis. We also learn about events occurring elsewhere through the media and from other
people. In simulations using earlier programming languages, however, it was rather difficult to produce
such local interactions.
Agent Based Simulator was designed for manipulating agents, so you can program local interaction
fairly easily. However, you still need to know some procedures and methods. This chapter describes
some expressions that are unique to Agent Based Simulator. Give them a try, even if you already have
experience with Visual Basic or the like. Because this chapter uses simple explanations that omit the
descriptions of on-screen procedures in earlier chapters, if you're not sure about a procedure, go back
to the previous chapters to check it.
A.1 A Model Using Internal Functions (Simple Segregation Model)
Let's try constructing a segregation model. This is a classic topic in the field of multi-agent
simulators, put forth by Thomas Schelling.
This is based on a rule discovered by Schelling in his studies of the living patterns of residents
in urban areas. It says that ethnic groups (or races) that initially live in an ethnically mixed
state become clearly segregated over time. Various features have been added to the model
included with the tutorial to make it easier to use, so we'll start by implementing a simple
segregation model having only a minimum of elements.
The rules that define the segregation model are as follows.
1. There exist equal numbers of two types of turtles (red turtles and blue turtles).
2. The maximum occupancy of a single cell is one turtle. Two or more turtle cannot exist in
a cell at a same time.
3. A turtle receives information from turtles in the eight cells surrounding it, and knows what
percentage of the turtles are the same type as itself (this is the degree of happiness).
4. When a turtle's happiness is lower than a threshold value, the turtle moves to a nearby
vacant cell.
5. When a turtle's happiness is higher than the threshold value, the turtle does not move.
The required parameters for the simple segregation model are as follows.
1. The numbers of red turtle and blue turtle agents are 500 each.
2. The threshold is 0.6 (60%).
A.1.1 Preparing the Simulation Components
The segregation model is a classic model using a two-dimensional space. In a space-using
model, you ordinarily prepare the simulation components in the sequence of space, agents,
and agent variables. Then, to obtain screen output during execution, you go into Output Settings
and select Two-dimensional Map.
A - 2 Agent Based Simulator User’s Manual
Creating a New Setting File
From the File menu, select New.
Adding the Space
Create a single new space component under
the World hierarchy, then make the settings
for the properties.
N a m e t h e s p a c e c o m p o n e n t " Tw o dimensional Space". Select Grid Model, set
35 each for both X and Y, and set it to loop
(wrap around).
Adding the Agents
Under the Two-dimensional Space hierarchy, create two new agents and make the
settings for their properties.
Name the agents Red Turtle and Blue Turtle,
respectively. Set the number of agents to
500 for each agent.
Agent Based Simulator User’s Manual A - 3
Adding the Agent Variables
Create one new variable each under the
hierarchies for Red Turtle and Blue Turtle.
Name the variable Happiness. Set the
variable type to Double data type, and leave
the number of dimensions at 0.
Adding the Two-dimensional Map
From the Settings menu, choose Output, then add 2D Map.
A - 4 Agent Based Simulator User’s Manual
Set Map Name and Map Title to Two-dimensional Space.
At the Map Component List, click Add to add the component.
When the Two-dimensional Map Component Settings dialog box appears, set Component Name to Red Turtle, and set Output Target to Red Turtle as well (clicking the dropdown arrow • ¥ displays the options).
Leave Marker none, and set Agent Color to Fixed Color. If the color is not red, then
click Select and choose the right color.
Leave Agent Variable Information un-selected.
Follow the same steps to add the Blue Turtle component. Be sure to modify the settings
for Output Target and Agent Color correctly, or what's displayed will not be right.
Marker View
The feature that displays the agents on the two-dimensional map as circles, triangles, × s, or
other shapes is called Marker View. If you don't use Marker View, agents appear as squares
aligned with the cells.
Agent Variable Information
In some cases, you may want to have direct knowledge of the state of variables under an
agent's hierarchy. You can display variable values in the center of the agent view by selecting
Agent Variable Information.
Agent Based Simulator User’s Manual A - 5
When you've finished making the settings, close the Output Item List dialog box.
Now you're done preparing the simulation components.
A.1.2 Writing the Rules
After you've structured the components for the simulation, the next step is to write out the
rules. In a simple rule, the World rule is also simple; the initial rule just places each agent
randomly. Notice that "false" appears at the end of _RandomPutAgent(). This indicates whether
it is permitted to place multiple agents in a single cell. The rule for this model place no more
than one agent per cell, so this is set to false.
Seg01.abs (World rule)
Agt_Init{
_RandomPutAgent(World.twoDimensionalSpace.blueTurtle, false)
_RandomPutAgent(World.twoDimensionalSpace.redTurtle, false)
}
Agt_Step{
}
Next let's look at the Red Turtle agent rule. The rule for red turtles is as follows.
Seg01.abs (Red turtle agent rule)
Agt_Init{
}
Agt_Step{
Dim redTurtleNumber as integer, blueTurtleNumber as integer,
turtleTotal as double
redTurtleNumber = _ViewCountAgent(my.X, my.Y, 1,
World.twoDimensionalSpace.redTurtle)-1
blueTurtleNumber = _ViewCountAgent(my.X, my.Y, 1,
World.twoDimensionalSpace.blueTurtle)
turtleTotal = redTurtleNumber + blueTurtleNumber
If redTurtleNumber > 0 Then
my.happiness = redTurtleNumber / turtleTotal
Else
my.happiness = 0
End If
A - 6 Agent Based Simulator User’s Manual
if my.happiness < 0.6 then
_MoveToSpace(my.X, my.Y, 3)
end if
}
Take a close look at the Step rule. The first line defines variables used only in the Step rule.
In the following block, the number of neighboring red turtles and blue turtles is counted and
the total is calculated. In the third block, the neighboring-occupancy rate for red turtles is
calculated, and in the fourth block, if the rate is less than 0.6, a move to an unoccupied cell is
effected.
There are two new functions related to agents. The first is _ViewCountAgent(). This function
returns the number of agents in neighboring cells. Its usage is _ViewCountAgent(X, Y, range, agent
name). For X and Y, you ordinarily specify the coordinates of the agent itself. In specifying the
range, the agent's own location is 0; to move outward in successive neighboring steps, you
add 1 for each step.
For example, when you specify a range of 1 for a space
in the grid model, the target for calculation is 9 cells,
2
2
2
1
2
1
2
1
2
2
including the agent's own location. Incidentally, 1 is
subtracted from redTurtleNumber because the agent
2
2
1
1
0
1
1
1
2
2
itself is counted in the function's return value.
If you don't specify an agent name, you can a count of
2
2
2
2
2
all neighboring agents by using All.
Relation between own location and
step ranges (grid model)
> Get the number of neighboring agents —
"_ViewCountAgent(X, Y, range, agent name)"
The second function is _MoveToSpace(), which moves an agent to a neighboring unoccupied
cell. Its usage is _MoveToSpace(X, Y, movement range). This effects movement if there is an
unoccupied in the movement range centered at X, Y. If there is no unoccupied cell, it returns
the value True. The preceding rule specifies movement to an unoccupied cell within three
steps of the agent's own location.
> Move to a neighboring unoccupied cell — "_MoveToSpace(X, Y, movement range)"
The If statement in the third block has another new element — Else. Processing to be performed
in cases when the first condition doesn't apply are written between Else and EndIf. You may be
wondering why the If statement branches to this Else portion. We do this because if there are
no neighboring red turtles, the value of redTurtle is zero, and attempting to divide
redTurtleNumber by turtleTotal would result in an error and cause the simulation to stop.
> "If (condition) Then (rule when condition is satisfied) Else (rule when condition is not
satisfied) End If"
Now that you've completed the rules for red turtles, try using them as the basis for writing the
rules for the blue turtles. The answer is as follows.
Agent Based Simulator User’s Manual A - 7
Seg01.abs (Blue turtle agent rule)
Agt_Init{
}
Agt_Step{
Dim redTurtleNumber as integer, blueTurtleNumber as integer,
turtleTotal as double
redTurtleNumber = _ViewCountAgent(my.X, my.Y, 1,
World.twoDimensionalSpace.redTurtle)
blueTurtleNumber = _ViewCountAgent(my.X, my.Y, 1,
World.twoDimensionalSpace.blueTurtle)-1
turtleTotal = redTurtleNumber + blueTurtleNumber
If blueTurtleNumber > 0 Then
my.happiness = blueTurtleNumber / turtleTotal
Else
my.happiness = 0
End If
if my.happiness < 0.6 Then
_MoveToSpace(my.X, my.Y, 3)
end if
}
A.2 Making It Easier to Use
(Segregation model Using the Control Panel Window)
When you try running the simple segregation model covered earlier, you see that it shows
exactly the same operation as the segregation model included in the tutorial. With the simple
model, however, you can't change user parameters unless you start the Rule Editor. Accordingly,
as the next step we'll try using the Control Panel window and the World variable to improve it
to a user-friendly segregation model. Here, we'll add the following features.
• Ability to change the threshold value
• Ability to change the starting number of turtles
• Ability to quit the simulation when the turtles stop moving
• Addition of a time-series graph and the number of steps view
A.2.1 Making It Possible to Change the Threshold Value
The first thing we want to experiment with in this segregation model simulation is to see how
segregation patterns change when we vary the setting (threshold value). The threshold value
affects the value of neighboring-occupancy rate the turtles can stand without moving. For the
first modification, let's try making it easy to set the threshold value with the Control Panel
window.
The Control Panel window is used mainly to directly manipulate the threshold values of agent
rules. However, you should note that these cannot be implemented in the rules using only the
Control Panel settings. We'll use the following method, which is a bit complicated.
A - 8 Agent Based Simulator User’s Manual
• Create the variable to store the value you want to control directly under the World
hierarchy.
• Rewrite the rules to reference the variable you created.
• Make the settings in the Control Panel window.
Creating the Variable Under the World Hierarchy
Add a single new variable directly under
the World hierarchy.
Set Variable Name to Threshold, Variable
Type to Double, and leave Number of
Dimensions at 0.
Rewriting the Rules
Rewrite the necessary portions of the respective rules for the red turtles and blue turtles
to reference the variable you just created.
If my.happiness < 0.6 Then
_MoveToSpace(my.X, my.Y, 3)
End If
Change the portions with this constant as follows:
If my.happiness < World.threshold Then
_MoveToSpace(my.X, my.Y, 3)
End If
Agent Based Simulator User’s Manual A - 9
Making the Settings for the Control Panel Window
From the menu bar, select the Settings menu and choose Control Panel Settings. When
the Control Panel window's User Setting List dialog box appears, click Add.
When the User Settings dialog box appears, set Control Name to Threshold and Setting
Target to Threshold. For Interface, choose Slider. Set Range to 0.2 to 0.8, and Scale
Interval to 0.05. When you've finished making the settings, click OK to close the window.
The User Setting List dialog box closes.
> Create variables to be manipulated with the Control Panel window directly under the
World hierarchy.
A.2.2 Making It Possible to Change the Starting Number of Turtles
With the simple segregation model, it's necessary to set the starting number of turtles in
advance with Agent Properties. However, this means that in order to investigate changes due
to an increase or decrease in the number of agents, you have to go into the Tree and open
Properties, which is a bit troublesome. Accordingly, for the next modification, let's try making
it simple to set the starting number of turtles using the Control Panel window.
The use of the Control Panel window and the World variable are the same as we saw earlier,
but in order to create just the required number of agents, you need to use a special agent
function.
A - 10 Agent Based Simulator User’s Manual
Creating the Variable Under the World Hierarchy
Add a single new variable immediately
under the World hierarchy.
Set Variable Name to Number of Turtles,
Variable Type to Integer, and leave Number
of Dimensions set to 0.
Changing the Agent Properties
Because agents are created in the World initial rule, in Agent Properties, set the Number
of Agents to 0 for both the red turtles and the blue turtles.
Rewriting the Rules
To create the agents, add the following statements to the World initial rule.
Seg02.abs (World rule)
Agt_Init{
Dim i as integer
for i = 0 to World.numberOfTurtles - 1
_CreateAgent(World.twoDimensionalSpace.blueTurtle)
_CreateAgent(World.twoDimensionalSpace.redTurtle)
next i
_RandomPutAgent(World.twoDimensionalSpace.blueTurtle, false)
_RandomPutAgent(World.twoDimensionalSpace.redTurtle, false)
}
_CreateAgent() creates a single instance of the agent specified in parentheses. Combined this
with the For ... Next statement, create a total of World.numberOfTurtles × 2 turtle agents.
Agent Based Simulator User’s Manual A - 11
Making the Settings for the Control Panel Window
From the menu bar, select the Settings menu and choose Control Panel Settings. When
the Control Panel window's User Setting List dialog box appears, click Add.
When the User Settings dialog box appears, set Control Name to Number of Turtles and
Setting Target to Number of Turtles. For Interface, choose Slider. Set Range to 200 to
700, and Scale Interval to 50.
When you've finished making the settings, click OK to close the window. The User Setting
List dialog box closes.
> Create agents — "Use _CreateAgent(agent name)"
A.2.3 Quitting the Simulation When the Turtles Stop Moving
One drawback of the simple model is that the simulation continues to run on and on even
when the locations of the turtles become more or less static. This means that you can't determine
when (at what step) convergence occurs unless you constantly watch the simulation. For that
reason, let's try revising the program so that the simulation quits automatically when the
turtles stop moving. We'll use a method that involves creating a variable for the convergence
condition, happyTurtles, immediately under the World hierarchy, and effecting a conditional
branch according to this variable.
A - 12 Agent Based Simulator User’s Manual
Creating the Variable Under the World Hierarchy
Add a single new variable immediately
under the World hierarchy.
S e t Va r i a b l e N a m e t o h a p p y Tu r t l e s ,
Variable Type to Integer, and leave Number
of Dimensions set to 0.
Rewriting the Rules
To create the agents, add the following statements to the end of the World initial rule
and in the execution rules. _ExitSimulation() is a function for ending a simulation. Also,
note that the equal sign used in the If statement is ==. Agent Based Simulator uses = for
assignment, but in comparison and equality statements the doubled == is always used.
Be careful, because these are often confused.
> End a simulation — "Use _ExitSimulation()"
> In equality statements in "If" statements, use "==" (double equal sign).
Seg03.abs (World rule)
Agt_Init{
• • • (The portion up to here is the same as in the previous rule)
_RandomPutAgent(World.twoDimensionalSpace.redTurtle, false)
World.happyTurtles = World.numberOfTurtles * 2
}
Agt_Step{
if World.happyTurtles == 0 then
_ExitSimulation()
End if
World.happyTurtles = 0
}
Also add the following statements to the redTurtle and blueTurtle execution rules. These
add 1 to the World.happyTurtles variable when the turtles stop moving.
Agent Based Simulator User’s Manual A - 13
Seg03.abs (Red turtle and blue turtle agent rules)
Agt_Step{
• • • (The portion up to here is the same as in the previous rule)
if my.happiness < World.threshold then
_MoveToSpace(my.X, my.Y, 3)
Else
World.happyTurtles = World.happyTurtles + 1
end if
}
The usage of the World.happyTurtles variable in the World agent is a bit tricky. That's because
this variable is set to zero, right after the conditional statement that ends the simulation if the
value of the variable is zero. It seems that a simulation should stop immediately, but in reality
it works well. Why is that?
It's because rules are always execute in the sequence of first the World agent, and then the
various other agents. This means that even though the variable is set to zero at each step, the
movement numbers are added according to the agent rules, and are carried over to the next
step. If the value of the variable remains zero in a particular step, the conditional branch at
the beginning of the next step ends the simulation.
A.2.4 Adding a Time-series Graph and Step View
In the previous step we added the happyTurtles variable to World. If we could graph this
numerically, we would be able to know how many turtles move in different steps. Accordingly,
now let's try adding a time-series graph and display of numerical values to the output view
(see Seg04.abs file).
Adding a Time-series Graph to the Output View
From the menu bar, select the Settings menu and choose Output.
When the Output Item List dialog box appears, select Time-series Graph as the output
type to add, then click Add.
When the Time-Series Graph Settings dialog box appears, set Name and Title to Turtle
Graph, and select the Show Legend check box.
A - 14 Agent Based Simulator User’s Manual
Adding Graph Components (Nonmoving Turtles) to the Time-series Graph
In the Time-series Graph View dialog box, go to Graph Component List and click Add.
When the Time-series Graph Component Settings dialog box appears, set Component
Name to Nonmoving Turtles. In the Output Value box, enter World.happyTurtles.
When you've finished making the settings, click OK to close the dialog box.
> In the Output Value field, specify a variable that begins with World, or enter a
computational expression.
Adding Graph Components (Moving Turtles) to the Time-series Graph
In the Time-series Graph View dialog box, go to Graph Component List and click Add.
When the Time-series Graph Component Settings dialog box appears, set Component
Name to Moving Turtles. Because Nonmoving Turtles can be determined by subtracting
the moving turtles from the number of agents created, in the Output Value box, enter
(World.numberOfTurtles × 2) − World.happyTurtles.
When you've finished making the settings, click OK to close the dialog box. In the Timeseries Graph Component Settings dialog box, click OK to close the dialog box.
Agent Based Simulator User’s Manual A - 15
Adding Numerical Screen Output to the Output View
Select Numerical Output as the type of output to add to the Output Item List dialog box,
then click Add. When the Numerical Screen Output Settings dialog box appears, set
Output Name to Numerical Output, and enter Parameters as the window title.
Adding the Step Number to Numerical Screen Output
In the Numerical Screen Output Settings dialog box, go to Numerical Screen Output
Component List and click Add.
When the Numerical Screen Output Component Settings dialog box appear, for
Component Name, enter Number of Steps. For Output Value, specify _GetCountStep() to
display the step number.
When you've finished making the settings, click OK to close the dialog box. In the
Numerical Screen Output Settings dialog box, click OK to close the dialog box.
Does the screen look like what you see above?
Now let's try running it. Execution result is,
A - 16 Agent Based Simulator User’s Manual
Agent Based Simulator User’s Manual A - 17
A.3 A Fairly Complex Model Using Collections (Forest-fire Model)
We constructed the previous model using internal functions in Agent Based Simulator, such
as _ViewCountAgent() and _MoveToSpace(). In some cases, however, internal functions may not be
enough to do the job. At such times, Collection data type variables and functions can
demonstrate impressive power.
Briefly put, a collection is an aggregate of objects (agents). It is used when you want to obtain
a set of specific agents or conditions surrounding specific coordinates. Collections are
manipulated like array variables. However, their notation is slightly idiosyncratic, so examine
the example programs closely.
The example covered here is the Forest-fire model, which is based on the Forest Fire program for StarLogo. It simulates whether a fire that starts burning at the left edge of a map
will spread from tree to tree to reach the right edge of the map. The probability of reaching
the right edge differs greatly depending on the density of the trees.
The following describes the Forest-fire model.
1. Tree agents are placed randomly on a map at a specified density.
2. Tree agents have three states; unburned (green), burning (red), and burnt (black).
3. A tree in the burning state becomes burnt state in the subsequent step.
4. If a tree is in the burning state, any unburned trees in the eight adjacent locations
become burning state.
5. In the first step, trees on the left edge are burning.
A - 18 Agent Based Simulator User’s Manual
A.3.1 Creating a Simple Model (But Something Is a Little Strange!)
The rules for the Forest-fire model are truly simple. In the first model, we start by creating
the two-dimensional space and the tree agents, then make the settings for the World variable
and the Control Panel window to allow us to vary the tree density. Then we write the rules for
World and the tree agents.
Creating a New Setting File
From the File menu, select New.
Adding the Space
Create a single new space component under
the World hierarchy, then make the settings
for the properties.
N a m e t h e s p a c e c o m p o n e n t " Tw o dimensional Space". Set a size for the grid
model of 50 each for both X and Y, and set
it not to loop.
Adding the Variable Under the World Hierarchy
Create a single new variable under the
World hierarchy.
For Variable Name, enter treeDensity. Set
Variable Type to Integer, and leave Number
of Dimensions set at 0.
Agent Based Simulator User’s Manual A - 19
Adding the Agents
U n d e r t h e Tw o - d i m e n s i o n a l S p a c e
hierarchy, create a new agent and make the
settings for its properties.
For Agent Name, enter Tree. The agents are
created when the simulation runs, so set
Number of Agents to 0.
Adding the Agent Variables
The agents need a variable to determine
the state. Under the agent hierarchy, create
a new variable.
For Variable Name, enter State. Set Variable
Type to Integer, and leave Number of
Dimensions set at 0.
A - 20 Agent Based Simulator User’s Manual
Adding the Two-dimensional Map
From the Settings menu, choose Output, then add 2D Map.
Set Map Name and Map Title to Two-dimensional Space. At the Map Component List,
click Add to add the component. When the Two-dimensional Map Component Settings
dialog box appears, set Component Name to Tree and set Output Target to Tree as
well.Leave Marker View blank (unselected), set Agent Color to Set by Variable, and
select State. Leave Agent Variable Information unselected.
When you've finished making the settings, close the Output Item List dialog box.
Making the Settings for the Control Panel Window
From the menu bar, select the Settings menu and choose Control Panel Settings. When
the Control Panel window's User Setting List dialog box appears, click Add.
Agent Based Simulator User’s Manual A - 21
When the User Settings dialog box appears, set Control Name to treeDensity and Setting
Target to treeDensity as well. For Interface, choose Slider. Set Range to 20 to 100, and
Scale Interval to 1. When you've finished making the settings, click OK to close the
window.
The User Setting List dialog box closes.
Writing the World Rule
Write the following rule for the World agent. This is not used here as the initial rule. The
rule first obtains the size of the space, then calculates the number of agents according
to the tree density set at the Control Panel window and randomly places the required
number of agents using _CreateAgent().
Fire01.abs (World rule)
Agt_Init{
Dim LimX as Integer, LimY as Integer
Dim i as Integer, Maxi as Integer
LimX = _GetWidthSpace(World.twoDimensionalSpace)
LimY = _GetHeightSpace(World.twoDimensionalSpace)
Maxi = Int(LimX * LimY * World.treeDensity * 0.01)
For i = 1 to Maxi
_CreateAgent(World.twoDimensionalSpace.tree)
Nexti
_RandomPutAgent(World.twoDimensionalSpace.tree, False)
}
Agt_Step{
}
Writing the Tree Agent Rules
Next we write the rules for the agents. In the Initial rule, first we set the agent's own
State to unburned (green). Color_Green is a special method used to specify the displayed
color on the map. Because the displayed color takes the state variable, we make such
an assignment.
In the subsequent If statement, if the agent is at the left edge, then State becomes burning
(red).
Fire01.abs (Tree agent rule)
Agt_Init{
my.state = Color_Green
if My.X == 0 then my.state = Color_Red End If
}
Agt_Step{
Dim neighbors as Collection
Dim neighboringTree as Object
Dim Stp as Integer
If My.state == Color_Red then
neighbors = _CollectAround(My.X, My.Y, 1 , World.twoDimensionalSpace,
World.twoDimensionalSpace.tree)
For Each neighboringTree In neighbors
A - 22 Agent Based Simulator User’s Manual
If neighboringTree.state == Color_Green then
neighboringTree.state = Color_Red
End If
Next neighboringTree
My.state = Color_Black
End If
}
The collection makes its appearance in the Step rule. The rule in this example says that if a
tree's own state is burning (red), any neighboring trees in the eight adjacent locations also
become burning (red). The collection is used for this neighboring portion.
The first section has Dim statements that define the variables. In addition to the collection
variable, an object variable (as Object) also makes an appearance. An object variable is used to
call objects from among a collection. In most cases, however, an object is an agent.
The _CollectAround() function appears in the subsequent block. This function groups agents
(objects) in a range centered on specific coordinates into a collection. You may have noticed
that the method used to specify it resembles that for _ViewCountAgent(), which we saw in an
earlier section. However, whereas _ViewCountAgent() can only return the number of agents, a
collection can perform processing that is more complex.
> Group the neighboring agents into a collection — "_CollectAround(X, Y, range, space
name, agent name)"
Notice the For ... Each in the next line. This is a special way of accessing each individual
element of a collection. That is to say, For Each neighboringTree In neighbors indicates that the
elements in the neighbors collection are to be sequentially read one by one as neighboringTree
objects.
> Sequentially access the elements in the collection — "For Each A(Object) in
B(Collection) ... Next A"
The state variable of the neighboringTree object is read, and if the state is unburned (green),
then it is changed to burning (red). As with My, it can be accessed simply by using
"neighboringTree.state".
A.3.2 Synchronizing the States Using a Backup
Now the preparations are complete, let's try executing it. After you've run it a few times,
you'll probably notice that the results are different from those of simulations made with
StarLogo. If the spread of fire from the left edge per unit time is taken to be equal, then when
100% of the ground is covered by trees, the fire should spread to the right linearly and uniformly.
But that's not what happens in this simulation.
Why not? The reason has to do with the specifications of Agent Based Simulator, which
prevent it. Agent Based Simulator is a simulator for multi-agent models, but when the computer
performs the processing, internal processing for each individual agent must be carried out
singly and sequentially, even for multiple simultaneous events. This processing order is allocated
randomly for agents other than the World agent. This means that depending on the sequence
of agent processing, it's possible that a state to be read in the next step (in this rule, "burning
(red)") may be read by another agent in the selfsame step, resulting in chained processing.
Agent Based Simulator User’s Manual A - 23
If you want to ensure that behaviors per unit time are strictly performed, you need to modify
the rules. In this case, you can use the "backup" technique. A backup keeps an agent's read
information (A) and write information (A) separate, and the agent temporarily holds the write
information in a backup (A). After execution of all agent rules finishes, the results (A) are
written en masse to the original information (A).
> When agent states must be synchronized in each step, use backup variables.
The variables in this Forest-fire model that need to be backed up are the state variables for
the agents, so create a backup variable called state_B.
Adding the Agent Variables
Under the agent hierarchy, create a new
variable. For Variable Name, enter state_B.
Set Variable Type to Integer, and leave
Number of Dimensions set at 0.
Changing the World Rule
Add the rules for the backup variable to the execution rule for the World agent. The
initial rule does not change.
Fire02.abs (World rule)
Agt_Init{
• • • (The initial rule does not change)
}
Agt_Step{
Dim Col as Collection, Obj as Object
Dim i as Integer
Col = _CollectAgent(World.twoDimensionalSpace.tree)
For Each Obj in Col
Obj.state = Obj.state_B
NextObj
}
This execution rule writes the back up variable to the original variable.
First, all tree agents are stored in the Col variable, then the state_B backup variable for each
agent (object) is assigned to state variable.
A - 24 Agent Based Simulator User’s Manual
Changing the Tree Agent Rules
Add the rules for backup variables to the tree agent rules. What you need to do is to
change the portions that write to the state variable to write to the state_B variable.
Fire02.abs (Tree agent rule)
Agt_Init{
my.state = Color_Green
my.state_B = Color_Green
if My.X == 0 then
my.state_B = Color_Red
End If
}
Agt_Step{
Dim neighbors as Collection
Dim neighboringTree as Object
Dim Stp as Integer
If My.state == Color_Red then
neighbors = _CollectAround(My.X, My.Y, 1 , World.twoDimensionalSpace,
World.twoDimensionalSpace.tree)
For Each neighboringTree In neighbors
If neighboringTree.state == Color_Green then
neighboringTree.state_B = Color_Red
End If
Next neighboringTree
My.state_B = Color_Black
End If
}
Agent Based Simulator User’s Manual A - 25
How does the simulation work now?
The backup should function correctly, and you should no longer see operation where fire
suddenly spreads to several sites in one step.
A.3.3 Adding Display of Required Numerical Values to Simulation Execution
Now that we've eliminated some quirks in behavior, let's try adding a screen to show the
parameters that are required during execution. The ones we need here are Step Number,
Burned Tree Agents, and Burnt Rate. You can get the step number using _GetCountStep(). For
Burned Tree Agents, create the variable immediately under World and increment it when an
agent changes to the burnt state.
Adding the Variable Under the World Hierarchy
Create a new variable under the World hierarchy. For Variable Name, enter burntTree.
Set Variable Type to Integer, and leave Number of Dimensions set at 0.
A - 26 Agent Based Simulator User’s Manual
Rewriting the Tree Agent Rules
Now rewrite part of the tree agent rules.
Change them to add 1 to the
World.burntTree variable when a tree is
burnt.
Fire03.abs (Tree agent rule)
Agt_Step{
• • • (The initial rules and execution rules up to here are the same as in Fire02.abs)
For Each neighboringTree In neighbors
If neighboringTree.state == Color_Green then
neighboringTree.state_B = Color_Red
End If
Next neighboringTree
My.state_B = Color_Black
World.burntTree = World.burntTree + 1
• • • Add this line.
End If
}
Adding Numerical Screen Output to the Output View
From the menu bar, select the Settings menu and choose Output. When the Output Item
List dialog box appears, select Numerical Output as the output type to add, then click
Add.
When the Numerical Screen Output Settings dialog box appears, leave Output Name set
to Numerical Output_1, and enter Parameters as the window title.
Agent Based Simulator User’s Manual A - 27
Adding the Step Number to Numerical Screen Output
I n t h e N u m e r i c a l S c re e n
Output Settings dialog box,
g o t o N u m e r i c a l S c re e n
Output Component List and
click Add.
When the Numerical Screen
Output Component Settings
d i a l o g b o x a p p e a r, f o r
Component Name, enter
Number of Steps. For Output Value, specify _GetCountStep() to display the step number.
When you've finished making the settings, click OK to close the dialog box.
Adding Burnt Trees to the Numerical Screen Output
I n t h e N u m e r i c a l S c re e n
Output Settings dialog box,
g o t o N u m e r i c a l S c re e n
Output Component List and
click Add.
When the Numerical Screen
Output Component Settings
d i a l o g b o x a p p e a r, f o r
Component Name, enter Burnt
Trees. For Output Value, enter World.burntTree.
When you've finished making the settings, click OK to close the dialog box.
Adding Burnt Rate to the Numerical Screen Output
In the Numerical Screen Output Settings dialog box, go to
N u m e r i c a l S c re e n O u t p u t
Component List and click
Add.
When the Numerical Screen
Output Component Settings
d i a l o g b o x a p p e a r, f o r
Component Name, enter Burnt
R a t e . F o r O u t p u t Va l u e ,
specify
" C d b l ( Wo r l d . b u r n t Tr e e )
/
_CountAgent(World.twoDimensionalSpace.tree) * 100". Set Show Fractional Numbers
to one digit.
When you've finished making the settings, click OK to close the dialog box.
In the Numerical Screen Output Settings dialog box, click OK to close the dialog box.
The function Cdbl() appears in Output Value for the burnt rate. This converts the data type of
the value within the parentheses to Double data type. Why do we go to the trouble of converting
A - 28 Agent Based Simulator User’s Manual
to floating-point numbers when World.burntTree can hold only integers? The reason is because
the results of division are affected. If you try eliminating Cdbl(), the calculation results are
always zero. Because of the way internal processing performed in Agent Based Simulator,
the result of an "Integer data type − operator − Integer data type" operation is always Integer
data type, so the portion to the right of the decimal point in the result of the division operation
is truncated. In order make the result a real number, we must make one or the other of the
numerical values the Double data type.
Type-conversion Functions
To use a variable in Agent Based Simulator, you must declare the type of the data the variable
handles. These types include Integer data type, Double data type, and String data type, but
there are times when you want a value of a different type from the original one. The foregoing
case, where you want to get a floating-point number by dividing two integers is a typical
example. At such times, you use type-conversion functions. Cdbl() converts to Double data
type, Cint() to Integer data type, Cstr() to String data type, and Cbool() to Boolean data type (True
or False).
A.3.4 Changing the Pattern of How the Forest Fire Spreads
In the Forest fire model, the fire starts spreading all at once from the left edge. Now let's add
different kinds of variations to this.
(1) Rules for Starting the Spread of Fire from One Location at the Center of the Map
A wildfire usually starts at one location, so this makes the fire start to spread from the center
of the map. You need to change the initial rules for World and the tree agents.
Fire04.abs (World rule)
Agt_Init{
Dim LimX as Integer, LimY as Integer
Dim i as Integer, Maxi as Integer
Dim Col as Collection, Obj as Object
LimX = _GetWidthSpace(World.twoDimensionalSpace)
LimY = _GetHeightSpace(World.twoDimensionalSpace)
Maxi = Int(LimX * LimY * World.treeDensity * 0.01)
For i = 1 to Maxi
_CreateAgent(World.twoDimensionalSpace.tree)
Nexti
_RandomPutAgent(World.twoDimensionalSpace.tree, False)
Col = _CollectAround(int(LimX/2), int(LimY/2), 0,
World.twoDimensionalSpace, All)
if _CountCollection(Col) > 0 then
Obj = _GetObject(Col,0)
Obj.state_B = Color_Red
else
World.twoDimensionalSpace.tree.X(0) = int(LimX/2)
World.twoDimensionalSpace.tree.Y(0) = int(LimY/2)
World.twoDimensionalSpace.tree.state_B(0) = Color_Red
end if
}
Agent Based Simulator User’s Manual A - 29
Fire04.abs (Tree agent rule)
Agt_Init{
if my.state_B <> Color_Red then
my.state = Color_Green
my.state_B = Color_Green
end if
}
In the World initial rule, the first section is almost the same as before, but the second half is
very different. In broad terms, the rule means this; If there is a tree at the center of the map,
it is burning. If there is no tree, then move the first tree agent (having an ID of 0) to the center
of the map, and make it burning.
For the tree agents, the trees other than the one that is burning must be initialized to unburned
(green), so we change the conditional statement to take trees that haven't prior been assigned
Color_Red and make them unburned (Color_Green).
(2) Changing the number of Neighborhoods
In cases where wind direction exerts an effect, fire does not readily spread in the upwind
direction. Here, we make the settings so the wind blows from the left edge, the fire spreads
only downwind — that is, to the front and the side (5 directions) — and the fire does not
spread to the rear (3 directions).
A - 30 Agent Based Simulator User’s Manual
Fire05.abs (Tree agent rule)
Agt_Step{
Dim neighbors as Collection
Dim neighboringTree as Object
Dim Stp as Integer
If My.state == Color_Red then
neighbors = _CollectAround(My.X, My.Y, 1 , World.twoDimensionalSpace,
World.twoDimensionalSpace.tree)
For Each neighboringTree In neighbors
If neighboringTree.state == Color_Green
AND neighboringTree.X <> My.X - 1 then
neighboringTree.state_B = Color_Red
End If
Next neighboringTree
My.state_B = Color_Black
World.burntTree = World.burntTree + 1
End If
}
This is fairly simple. You are just required the conditional statement that detect the five
neighboring tree agents. In this case, the condition is satisfied only when the state is green
and the X coordinate is not the agent's own coordinate minus one (that is, not upwind).
Agent Based Simulator User’s Manual A - 31
You can also rewrite the rule to change the number of neghborhoods from eight to four. In this
case, add the conditional statement that detects agents with the same X or Y coordinate as
the agent.
If neighboringTree.state == Color_Green AND ((neighboringTree.X == My.X) OR (neighboringTree.Y == My.Y)) then
(3) Rules for Jumping Sparks
You can also make fire spread between trees that are not directly touching. Jumping sparks
usually occur only when the wind is strong, so let's add this to the rule we created in (2).
Fire06.abs (Tree agent rule)
Agt_Step{
Dim neighbors as Collection
Dim neighboringTree as Object
Dim Stp as Integer
If My.state == Color_Red then
neighbors = _CollectAround(My.X, My.Y, 1 ,
World.twoDimensionalSpace, World.twoDimensionalSpace.tree)
For Each neighboringTree In neighbors
If neighboringTree.state == Color_Green
AND neighboringTree.X <> My.X - 1 then
neighboringTree.state_B = Color_Red
End If
Next neighboringTree
neighbors = _CollectAround(My.X, My.Y, 4 ,
World.twoDimensionalSpace, World.twoDimensionalSpace.tree)
For Each neighboringTree In neighbors
If neighboringTree.state == Color_Green
AND neighboringTree.X > My.X + 1 then
If Int(Rnd()*100) == 0 then
neighboringTree.state_B = Color_Red
End if
End If
Next neighboringTree
My.state_B = Color_Black
World.burntTree = World.burntTree + 1
End If
}
This rule uses the neighbors collection twice. In the second use, neighbors are collected with
a scope of 4, and sparks jump from a burning tree to a distant agent with a probability of 1 in
100.
A - 32 Agent Based Simulator User’s Manual
Agent Based Simulator User’s Manual A - 33
Index
and
Infomation
Index
E
A
Agent
0-2, 1-11
-- properties
2-6
adding -1-12, 2-6
-- function
3-14
-- rule
0-3
destroying --2-10
individually set -2-15
initialize dialog
2-14
new -2-3
variable information
A-5
Agt_Init
3-2
Agt_Step
3-2
Argument
3-9
Assignment statement
3-7
Automatic indent
2-9
Edge of space
2-5
Else statement
A-7
_ExitSimulation()
A-13
Expression
3-8
F
File
output settings
2-23
Find future
2-8
Font settings
2-9
For statement
1-23, 3-10
For...Each statement
A-23
Forest fire model
A-18
Function
user-defined -3-3
Function statement
3-3
important note on naming
user-defined -1-27
B
Backup variable
A-24
Bar graph
output settings
2-19
Break statement
3-11
C
1-27
G
_GetCountStep()
Goto statement
A-26
3-11
H
Canvas
1-10, 2-3
Cdbl()
A-28
_CollectAround()
A-23
Collection
-- function
3-14
how to use -- type variable
A-18
Comments
3-17
Common rule editor
1-22
Conditional statement
3-9
Control panel
1-3, 1-5, 1-11
setting
2-29, A-8
_CountAgent()
1-23
_CreateAgent()
A-11
Help
I
If statement
1-17
Initialize
two-dimensional space
2 Index & Information
2-13
J
Job file
creating new -saving -2-2
2-2
L
Log
-- file tab
2-26
playing back -2-32
D
Data manipulation function
3-13
Debug screen feature
2-40
Dim statement
1-23
Dimensions
number of -2-12
Disk1
0-2
Do Until statement
3-11
Do While statement
3-10
Dummy statement
3-6
2-40
M
Marker view
A-5
Model
0-3
description
2-40
importing -- description file
_MoveToSpace()
A-7
Multi-agent
0-2
My.variable name
1-15
2-10
N
T
Naming method
3-4
Numerical calculation function
Numerical screen
adding -- output
A-16
output settings
2-22
Time-series graph
adding -A-14
output setting
2-16
Tool box
2-3
adding item to -2-4
Tree
1-2, 1-10, 2-3
Two-dimensional view map
output setting
2-20
Type conversion functions
3-13
O
Output item list
2-16
Output screen
keep -- after running
Output setting
adding -1-12
setting output value
2-10
A-29
V
Variable
0-3, 1-12
creating new -2-10
declaration
3-5
declaration block
3-5
initial value setting
2-14
local -0-3
new -2-4
-- name
3-5
-- properties
2-12
-- type
3-6
-- type declaration
3-4
Version information
2-40
_ViewCountAgent()
A-7
VisualBasic and ABS
difference in notation
1-29
A-15
R
_RandomPutAgent()
1-25
Replace feature
2-8
Report output tab
2-29
Reserved word
3-15
Return statement
1-27, 3-12
Return value
-- type
3-3
Rnd()
1-25
Rule
-- editor setting
2-9
displaying -- window
2-7
Run continuously tab
2-27
Run sequence tab
2-26
W
World agent
S
0-2, 1-10
Segregation model
1-2, A-2
Set default
2-16
Simulation
-- tab
2-25
when -- doesn't run correctly
1-19
Space
0-3, 1-11
creating -1-12, 2-5
new -2-3
number of dimensions
2-5
-- function
3-15
-- name
2-5
-- properties
2-5
-- size
2-5
-- type
2-5
Step
1-16
Sub statement
3-3
user-defined statement
1-27
Sugar model
1-4
Index & Information 3
For more information ...
Kozo Keikaku Engineering Inc.
Innovative Information Technology Dept.
Phone: +81–3–5342–1125
Fax: +81–3–5342–1225
http://www2.kke.co.jp/abs/
e-mail: [email protected]
4 Index & Information