1
Technical report
Report on the extension of iDesk
Internship 13-11-2006 - 16-02-2007
Andrès Koetsier
Jasper Laagland
Table of Contents
1.Problem definition............................................................................... .........................5
Introduction................................................................................................................ .5
Document detection............................................................................................. .......5
User interaction.......................................................................................................... .5
Deliverables.............................................................................................. ..................5
2.Requirements.................................................................................................. .............6
Functional requirements..................................................................................... .........6
1.Input........................................................................................... .........................6
2.Output.............................................................................. ...................................6
3.Storage......................................................................................... .......................7
4.Computation............................................................................. ...........................7
Non-Functional requirements....................................................................................... 7
5.Response time.....................................................................................................7
6.Throughput.............................................................................. ............................7
7.Resource usage......................................................................................... ...........7
8.Reliability...................................................................................... .......................7
9.Allowance........................................................................................................... ..7
10.Platform................................................................................... ..........................7
11.Technology to be used................................................................................. .......7
12.Development...................................................................................................... 8
13.Date of delivery............................................................................................... ...8
3.Problem analysis................................................................................ ..........................9
Environment................................................................................................................ 9
Users......................................................................................................................... ..9
Current system...........................................................................................................9
iDesk................................................................................................................... ....9
Camcap................................................................................................................. ..9
Known problems...................................................................................................... ..10
4.Previous work................................................................................................ .............11
Hand detection....................................................................................................... ...11
Fingertip detection....................................................................................................12
Document detection......................................................................................... .........12
Document rectification..............................................................................................12
5.Design................................................................................................................. .......13
Introduction............................................................................................................ ...13
Background detection...............................................................................................13
Shadow detection.................................................................................................... ..15
Skin detection.................................................................................... .......................17
Hand detection....................................................................................................... ...19
Locating the finger ............................................................................. ......................20
Document Detector...................................................................................... .............21
Document Detection.................................................................................................21
Document Rectification.............................................................................................22
6.Implementation............................................................................................. .............24
CamCap............................................................................................ ........................24
7.Evaluation.............................................................................................. ....................28
Background detection...............................................................................................28
Shadow detection.................................................................................................... ..30
Skin detection.................................................................................... .......................31
Background detection combined with skin detection.................................................33
Hand detection....................................................................................................... ...34
Locating the finger ............................................................................. ......................34
Document detection......................................................................................... .........36
Document Rectification.............................................................................................37
8.Prototypes..................................................................................................... .............38
First Prototype............................................................................................. ..............38
9.Usability study I...................................................................................................... ....40
Setup.............................................................................................. ..........................40
Tasks........................................................................................................ .................41
Results................................................................................................. .....................41
Questionnaire.................................................................................................... ....41
Observations.............................................................................................. ...........41
Discussion.................................................................................................. ...........42
Conclusions................................................................................................... ............42
10.Prototypes (2)......................................................................................................... ..43
Second Prototype................................................................................... ...................43
11.Usability study II.............................................................................................. .........45
Setup.............................................................................................. ..........................45
Results................................................................................................. .....................45
Questionnaire.................................................................................................... ....45
Observations.............................................................................................. ...........45
Conclusions................................................................................................... ............46
12.Future work........................................................................................ ......................47
Hand detection....................................................................................................... ...47
Document detection......................................................................................... .........47
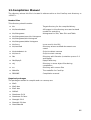
13.Compilation Manual........................................................................................... .......48
14.User manual................................................................................................. ............50
Document detection......................................................................................... .........50
Fingertip detection....................................................................................................50
Captured documents................................................................................... ..............50
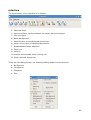
Interface.................................................................................. .................................51
Introduction
This report describes the design, implementation and evaluations of the document
detection and pointing recognition in the iDesk application. Research on pointing
devices has already been done in great extent [refs] however most of them are only
usable in a controlled static environment. Dynamic lighting which occurs in any normal
environment troubles the accuracy and performance in most of the papers. For the
iDesk the need for a robust pointing detection was of great importance. From various
possible methods the following are selected: background subtraction, skin color
detection and for matching the actual hand fast normalized cross correlation is used.
Also a method for detecting and rectification of documents is developed. This method
makes use of the Hough transform on the subtracted foreground gradients. Iterating
over the detected lines detects documents structures, which are rectangles. The pinhole
model and a projection matrix are used to rectify captured documents. All the separate
parts are evaluated whether they are applicable to the presented problem.
Also an interaction is designed to select a point in a document. To test the usability of
the interaction a number of tests are done. During these tests the usability of the iDesk
system was also measured.
This report also includes the implementation, a compilation manual and a user manual.
1.Problem definition
Introduction
The Image Understanding and Pattern Recognition group (IUPR) of the DFKI has
developed an interactive desktop environment called the iDesk demonstrator. The iDesk
demonstrator is designed to be a real desk in order to show how to bridge the gap from
the offline to the online desktop. A standard digital photo camera is mounted on top of
the iDesk to observe the user's desktop. The low-resolution image of the viewfinder is
processed in real-time to detect documents in the field of view. As soon as a document
is detected, a high-resolution image is acquired and the document image is extracted.
The product is designed for a large group of users (from administrative staff to
researchers and consumers). Also the overall cost of the product should be low,
therefore it is preferred that one should be able to create the product from consumer
products. It is important that the system can be used in different settings under different
conditions (eg. lighting).
Document detection
The current method of document detection is not reliable enough. The possible
methods to detect and rectify the document are to be explored.
User interaction
A more natural user interaction is desired, the first step is providing the possibility for
users to point in documents. Therefore the hand must be segmented and the fingertip
must be located. The various methods available to detect the hand and fingertip are to
be explored.
Deliverables
A working prototype is to be implemented and tested. An application called CamCap is
already available, which is to be extended with the functionality described above.
5
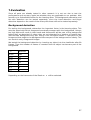
2.Requirements
In this chapter the main requirements of the system are described. The system should
comply with all the given requirements given below. The requirements are subdivided
into functional and non-functional requirements.
Functional requirements
These section defines the functional requirements. The requirements are split up in
several subsections.
1. Input
The user can interact with the system by putting documents in the viewfinder image
and providing pointing gestures to the system.
1.
Document
Documents placed in the viewfinder of the camera should be
detected.
2.
Document
All detected documents should be captured.
3.
Document
Multiple detected documents on the desk at once should all be
captured.
4.
Pointing
Hands in the viewfinder image should be recognized.
5.
Pointing
The position of the fingertip should be detected.
6.
Pointing
A pointing action should be detected.
2. Output
After the user has provided some input to the system there should be some output to
the user. The next section describes the requirements of this ouput.
2.
Feedback
When a document is detected this should be corresponded with
the user using audio-visual feedback.
3.
Feedback
The user should be informed of a detected fingertip using audiovisual feedback.
4.
Feedback
When a pointing action is detected the user should be informed
using audio-visual feedback.
5.
Document
The captured document should be rectified, eliminating
transformations caused by the perspective view.
6.
Document
There should be a minimum of edges around the rectified
document (1 or 2 pixels).
7.
Document
The rectified documents should be displayed in the captureddocuments-browser.
6
3. Storage
The system has to store some data so it can be used later by others programs or for
further processing by the system.
3.
Document
Each rectified document should be saved as an image (png) file.
4.
Document
Pointing locations found in documents should be saved in a data
file.
4. Computation
Computation of the system should be done in near real-time. Minimal framerate of the
application should be 2 to 3 frames a second.
Non-Functional requirements
5. Response time
The system should response in real-time to input provided by the user. Document
rectification however is done in the background and should complete in a timely
manner.
6. Throughput
The throughput of the camera should be realtime so delay is kept to a minimum.
7. Resource usage
Document detection, rectification and finger tracking require a huge amount of
resources. The program however should be able to run real-time on an average
consumer personal computer. Also it must be possible to create the system with
consumer products.
8. Reliability
The system should not crash unexpectedly due to uncaught exceptions. Memory leaks
or invalid memory access should not occur.
9. Allowance
The system should be programmed and documented in such a way that allows future
additions to the program.
10.Platform
Linux.
11.Technology to be used
●
Canon A620 or Canon S50 digital camera
●
Personal computer with an USB port, running Linux with wxwidgets libraries and
7
usb-tools installed.
●
All technology used should consist of consumer products.
12.Development
The system has to be developed on the last stable version of the CamCap application.
The program should improve on document detection and rectification precision. It should
also contain finger tracking and must be compilable on both unicode and non-unicode
systems.
13.Date of delivery
The system should be delivered on the 16th of February 2007.
8
3.Problem analysis
Environment
The prototype should work in different environments under different conditions. The
main influence in different environments is lighting. Different lighting conditions
influence the images that are acquired from the camera. These vary from natural
lighting to various artificial light sources. The system should be able to adapt to changes
in lighting as well. For example sunlight is blocked for a short period should not change
the performance of the system. This requires either an adaptation of the system to the
change in lighting or a method that is independent of these lighting changes.
The system should work on different desks and with different cameras. The chosen
methods need to be very flexible and independent of properties of both the desk and
the camera. Therefore it is important that no static data about the environment is used
by the system. It is very likely that desks which have a light color have a low contrast
with documents which are most likely white. It is to be researched whether there are
methods available or that can be developed which solve this problem. Also skin colorlike desks can be a problem when skin segmentation is used.
Users
Everybody who uses a computer and has to deal with documents is considered as a
possible user for this system. Therefore we aim at experienced computer users. The only
requirement is that they have a desk, a camera, and a computer. This means that the
target user group is very large. The most important factor is different hand sizes and
skin colors. Since this is the only input that is not mouse and keyboard.
Current system
iDesk
The current iDesk consists of a wooden desk with a Canon A-260 camera mounted on
top. The camera is directed down to provide a top down view of the desk. A difficulty is
that the brown color of the desk is very skin color like. Skin color detection is very useful
for hand segmentation, if this is to be used a suitable solution needs to be found for this
problem.
Camcap
Camcap is an application which is developed at the IUPR research group. Camcap can
acquire images from the viewfinder of several camera's. It also can load images from
disk, this is mainly used for testing purposes. From the user's view Camcap has three
states:
●
Stopped, the camera is turned off.
●
Running, images from the viewfinder are captured and document detecion is
enabled.
●
Paused, images from the viewfinder are captured. Document detection is turned
off.
Camcap provides the following functionality:
9
●
Background resetting: Resets the background, the next image is taken as the
new background.
●
Contour drawing: Draws a contour around the detected documents.
●
Cluster drawing: Draws circles on the cornerpoints of detected documents.
●
Zooming: Zooms in/out, this requires that a camera is used for providing the
images.
●
Captured documents viewer: Shows the captured documents, these are rectified
by the application.
●
Debug information: Allows users to select the log level, which indicates which
messages are displayed. Also the user can choose to output the log information
to a file or the console.
Known problems
Whenever the camera (Canon A260) is turned on and there is no document in the
viewfinder the colors in the images that are acquired from the camera have a very
distorted color spectrum. The images appear to have high values of blue. Putting in a
document or another white object resolves this problem. Since the gesture recognition
is only used in combination with document detection this will not be dealt with.
What does form a problem is the radical changes in the colors whenever a new object is
put in or removed from the viewfinder. The R B and G values can change about 15%
each.
10
4.Previous work
Many possible methods have been researched and developed in the field of gesture
recognition. In this chapter we will focus on hand and finger detection. There is a wide
range of possibilities when one wants to detect hands and fingertips. In almost all cases
first an attempt is made to segment the hand and then detect the fingertip. In most
cases these methods are tested in controlled environments. This means constant
lighting and static backgrounds are used. In a different setting these methods tend to
fail. For example if there is an object in the background with a high skin color likelihood
using only skin color detection will not be sufficient.
Hand detection
The simplest method is to make use of an infra red camera as in [OKA03] and [WIL05].
The human body has a constant temperature and the hands can be detected by
thresholding between 30 and 34 degrees Celsius. This method is very robust because it
is independent of dynamic lighting and changing backgrounds. But this does require the
use of an infra red camera.
A very popular method is background subtraction (for example, see [ZHA01] [HAR01]
[NOK98] ). There are various methods available to subtract the background from a
scene. A basic method is to take the first N frames of a sequence and calculate the
average value of each pixel, then each next frame is thresholded with the background.
Whatever is not deleted becomes foreground. More complicated methods use
algorithms to update the background continuously. For an review of different
background subtraction techniques see [PIC04].
Another popular and commenly used method is skin color detection [WU02] [WAC05] .
Skin color detection uses information about human skin color which has very specific
characteristics. Using this information hands can be segmented from any other object in
the scene. Also for this method there are various approaches. [VEZ03] provides an
overview of available skin color detection methods. The disadvantage of using skin color
detection is that either a model or a classifier need to be trained, this requires lots of
skin and non-skin colored data.
Other less commenly used methods are:
●
Motion detection [CUI97].
●
Line matching [ATH03].
●
Adaboost [KOL04].
●
Blob and ridge searching [LAP01].
11
Fingertip detection
After the hand has been segmented the exact location of the fingertip (of the index
finger). Again there is more than one approach that can be applied. Matching seems to
be a logical solution to this problem and is often used. For example [CRO95] uses SSD
with a template to calculate the most probable location of the fingertip. There are
various matching algorithms available, the most important difference is the complexity
of these algorithms.
Also different classification methods are used for finding a fingertip location such as
neural nets [NOL98] to detect features that are extracted through some preprocessing
method. The advantage of feature detection is that it tends to be very accurate, also in
some methods the hand detection can be skipped. But often these methods are slow,
barely reaching one or two frames per second on a workstation.
Whenever a hand is found another possibilty is to fill the hand and try to detect the
fingers (see [HAR01] or [MOE04]). Using the knowledge that the width finger is only a
couple of pixels depending on the distance of the camera fingers can be detected when
the hand is floodfilled.
Document detection
Detection of documents or other quadrangles in images has already been done in
[WUY00],[ZHA03] and [ZHA03b]. First the gradients in the images are detected, after
which lines are searched in those gradients using Hough transform. In [ZHA03] a
quadrangle is found if four lines match the following conditions:
●
Opposite lines should have quite opposite orientations (180° within 30°)
●
Opposite lines should be quite far from each other (bigger than one fifth of the
image height or width)
●
Angle between neighboring lines should be close to 90° (within 30°)
●
Orientation of the lines should be consistent (either clockwise or counter-clockwise)
●
Quadrangle should be big enough (circumference should be larger than (W+H)/4)
The difference in the implementations in the mentioned papers is that only a single
quadrangle is found, whereas in the CamCap application it should be possible to have
multiple documents in the viewfinder image.
Document rectification
The papers used for document detection also address the problem of perspective
transformation of the input image. In all three papers the images are rectified using the
pinhole model [FAU93]. In [ZHA03] an elaborate explanation is given how to intrinsic
matrix, rotation matrix and translation vector are calculated. In the CamCap application
the solution for detecting the focal point and determining the aspect ratio is used from
these papers.
Rectification however is by determining the projection matrix using common 3D
computer vision techniques described in [HOR86]. This is done because of an unknown
scaling factor the first three papers.
12
5.Design
Introduction
This chapter describes the used methods to create a robust and flexible system. To
design such a system a number of methods will be combined. As described in Chapter 4
there are various methods that can be used for detecting hands and fingers. Most
methods used in previous work are not robust, they are either unable to adapt to
changes in lighting or in changing background (for example an new inserted object in
the scene). But a combination of these methods will enable us to create a system that is
independent of it's environment and does not perform less when the environment
changes.
Background detection
Having the requiments in mind background subtraction seems to be a proper solution.
Using this technique we can both segment the documents and the hand from the rest of
the scene. To avoid that new objects in the scene and dynamic lighting will not distupt
the system we can consider a number of strategies (for details and comparison see
[PIC04]):
●
Kernel density estimation
●
Mixture of Gaussians
●
Sequential density approximation
●
Temporal median filter
Taking speed and accuracy in lesser importance memery usage into account a mixture
of Gaussians is the best choice for robust background subtraction. This method is
described in [STA99] and is used for real-time tracking, in the paper it is used for
tracking traffic. The method models each pixel as a mixture of Gaussians. A pixel is
defined in the RGB color space, therefore pixel X ={R , G , B} . The history of pixel
{ X 1,.. , X t } is modeled by K Gaussian distributions. The probability of observing pixel
X t is:
K
P X t =∑ i ,t∗ X t , i ,t , i ,t
i=1
where K is the number of Gaussian distributions, i ,t is the weight of the i-th
distribution at time t, i ,t is the mean of the i-th distribution at time t, i ,t is the
covariance matrix of the i-th distribution at time t and is the Gaussian probability
density function:
X t , , =
1
n
2
e
1
1
T −1
− X t −t X t −t
2
2 ∣∣2
The avoid matrix inversion the covariance matrix is simplified to the form:
k , t = 2 I
13
The K Gaussian distributions are sorted according to their weights in descending order.
We used the first N of K Gaussian to define background, which is suggested in [STA00].
This means that the N Gaussian with the highest weights are considered background.
Whenever a new pixel is presented to the model the model is updated as follows:
1. Iterate through the K Gaussians.
2. Whenever the pixel value is within 2 of a distribution that distribution is
updated according to the update functions.
3. Update weights of all distributions
Whenever is not considered to be part of any of the K distributions a the distribution
with the lowest weight (i.e. the K-th distribution ) is replaced by a new distribution with
k ,t = X k ,t and a low k ,t and k , t .
The weights are updated as follows:
k ,t =1− k , t −1 Mk ,t
where is the learning rate and M k ,t is 1 for the distribution that matched X t and
0 for the other distributions.
The update functions are modeled according to K-means, this is a good estimation of the
new values of the distributions without having to use a window of recent pixels. The
update functions are as follows:
t=1−t −1 X t
2=1− 2t −1 X t −t T X t −t
where is the second learning rate:
= X t∣k , k
The advantage of using the mixture of Gaussians is that objects that are new in the
scene can quickly be merged with the background and changes in light intensity can
quickly be resolved depending on the value of . One disadvantage is that whenever
a hand or a document is at the same position long enough it will dissolve in the
background. To avoid this problem we allowed to add masks to the background model.
In the mask a value of 0 indicates that the corresponding pixel is to be processed and a
1 indicates that the pixel is not to be processed. This does require fast detection of
hands and documents because otherwise they will be dissolved before they are
detected.
14
Shadow detection
One aspect that the chosen background model does not take into account is shadow. As
will be described in Chapter 7 drop shadows are a problem for proper hand detection.
Whenever a user points the arm and hand create a drop shadow. To eliminate this
problem we modeled shadow and excluded detected shadow from the foreground.
Detected shadows are not included in the mask. From experiments was learned that
excluding shadow from the background performed worse than including shadows.
We use a method similar to the one presented in [KAE01], each new pixel which is
presented to the background model is first checked to the current background
Gaussians. If the pixel is considered as shadow of one of the foreground Gaussians (i.e.
the N first Gaussian) the pixel is labeled as shadow it is only removed from the
foreground and still fed to the background detection. The method used for detecting
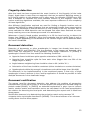
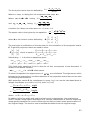
shadows is described in [HOR99].
Figure 1: Model for detecting shadow proposed by
Horprasert et al.
Figure 1 illustrates the method proposed by Horpasert et al. The background pixel E i in
the RGB color space. The line 0 E i is the expected chromaticity line, each pixel on this
line is considered to have similar chromaticity and therefore is shadow. For a new pixel,
say I i , the chromaticity distance CD i (the orthogonal distance between the
chromaticity line and the color value of pixel I i ) and the brightness distortion i (the
strength in brightness of pixel I i with respect to E i ).
i and CDi can be calculated as follows:
[ ] [ ] [ ]
Ir ,i r ,i
i=
r ,i2
Ig , i g , i
g ,i2
Ib,i b,i
b ,i2
r ,i 2 g,i 2 b ,i
r ,i
g,i
b, i
2
15
CDi=
Ir ,i−i r ,i
r ,i
2
Ig ,i −i g,i
g ,i
2
I b ,i −i b ,i
b ,i
2
where Ir ,i Ig , i Ib, i are the R,G and B values of pixel Ii respectively, r , i , g, i , b , i are
the means of the R,B and B values respectively, r ,i , g ,i , b , i are the standard
deviations of pixel Ii respectively.
To reduce the number of operations that need to be performed at run-time i can be
computed according to some precomputed values:
[ ] [ ] [ ]
r ,i 2 g , i 2 b , i
Ai =
r ,i
g ,i
b,i
Bi =
C i=
D i=
2
r ,i
Ai
2
r ,i
g ,i
Ai 2g ,i
b , i
Ai
2
b,i
Then, at run-time i can be computed by using:
i=Bi Ir ,i C i Ig ,iDi Ib ,i
By using a threshold on CDi one can decide whether pixel I i has similar chromaticity
to the background pixel E i , whenever i0 pixel I i can be classified as shadow.
16
Skin detection
Whenever a new object appears in the scene the region in which it is inserted will be
considered background after a number of frames. But until that moment we would like
to seperate hand from non-hand candidate regions. This is done by detecting skin.
Again, there are several methods to detect skin [VEZ03]:
●
Explicitly defined skin regions
●
Nonparametric skin distribution modeling
●
Normalized Lookup table
●
Bayes classifier
●
Self organizing map
●
Parametric skin distribution modeling
●
Single Gaussian
●
Mixture of Gaussians
●
Multiple Gaussian clusters
●
Elliptic boundry model
●
Dynamic skin distribution models
Of all these methods a Bayes classifier using a skin probability map (SPM) has the
highest performance, meaning that it has a high rate (90%) of true positives and a low
rate (14.2%) of false positives. Therefore we have chosen to implement this method.
This method is proposed by Jones et al. [JON02], a large dataset was created of 18,696
images which contained nearly 2 billion pixels. From these images 13,640 were used as
training set. A subset of skin and a subset of non-skin pixel have been manually labeled.
A histogram was used for classifying the two sets of pixels. The distributed probability
distance is calculated as follows:
P rgb=
c [rgb]
Tc
where c is the count in the histogram bin rgb and T c is the total number of entries in
the histogram. Using this formula skin and non-skin probabilities are calculated as
follows:
P rgb∣skin=
s[rgb]
Ts
P rgb∣¬skin=
n [rgb]
Tn
where s[rgb] is the number of counts in bin rgb of the skin histogram and c[rgb] is the
numer of counts in bin rgb of the non-skin histogram. T s and T n are the total counts
contained in the skin and non-skin histograms, respectively.
17
A pixel is then classified according to the following formula:
P rgb∣skin
≥
P rgb∣¬skin
where 0≤≤1 is used as a threshold. A low threshold leads to a high rate of true
positives but also a high rate of false positives. Using a high threshold will lead to less
false positives but also less true positives.
Also bin size is an important factor in performance, using a bin for each RGB value, that
is 2563 bins, leads to overfitting. According to [JON02] using 32 bins (a bin size of 8)
leads to the best performance.
The dataset used for the histogram we used is the Compaq Cambridge Research Lab
image-database, which is the same as in [JON02].
18
Hand detection
After segmenting the foreground from the background and detecting skin, the system
still suffered from noise (see Chapter 7 for more details). To be certain that a hand is
detected a matching algorithm is selected to verify whether there is a hand in the
segmented foreground. A fast template matching method is used called fast normalized
cross correlation. Fast normalized cross correlation is equivalent to normalized cross
correlation except that it has a much lower computational cost. Fast normalized cross
correlation is introduced by [LEW95].
If cross correlation is used one gets high correlations at locations where the intensity of
the image is high. These correlations can be higher than at the actual location where the
feature is located. Normalizing the image and feature can overcome this problem. Using
normalized cross correlation the correlation coefficient is calculated as follows:
u , v=
x , y [f x , y −f u ,v ][t x−u , y −v−t ]
0.5
{ x ,y [f x , y−f u ,v ]2 x , y [t x−u , y−v −t ]2 }
The numerator in (?) can be substituted by convolution in the frequency domain.
Assuming that the mean of f and t have already been removed the numerator becomes:
num u , v=∑ f ' x , y t ' x−u , y−v
x, y
where f' substitutes f x , y−f u , v and t' substitutes t x , y −t .
This is equal to a convolution where t' (-x,-y) is used instead of t', which can be
computed by:
This reduces the complexity by a large factor . Using a search win the complexity of
num is approximately N 2 M−N12 additions/multiplications, for the convolution
the complexity is approximately N 2 M 2 additions/multiplications.
2
The intensity part - ∑ x , y [f x , y−f u,v ]
(i.e. the normalizing part) can be computed
by using the integral image (also known as running sum) of the image and the image
square.
The image energy is then computed as follows:
s u , v =f u , v s u−1, vs u , v −1−s u−1,v−1
ef u ,v=s uN−1,vN−1−s u−1,v N −1−s uN−1,v−1s u−1,v−1
Similarly the energy of the image square can be computed by substituting f u , v with
2
f u , v . This requires only approximately 3M2 operations.
19
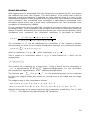
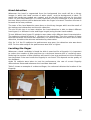
Locating the finger
Once the hand is located, the exact location of the pointing finger needs to be extracted.
The user is positioned at the bottom of the desk, the assumption is made that the user
will always point upwards. Then the tip of the finger will always be at the highest y-value
in the acquired frame.
Since the image is floodfilled to create a mask for the background subtraction locating
the finger tip is done in the same iteration. When the highest y-value is found a check is
made whether the point found is part of the finger tip. From the last 8 rows the width of
the filled area is checked. Whenever the width is higher than 8 pixels the found location
will not be considered a finger tip. Normally the width of a fingertip is between 3 and 6
pixels.
From the x-coordinates of this strip the middle of the finger is calculated by summing
the x-values and dividing the total by the number of x-values.
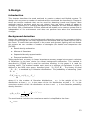
The advantage of this approach that the finger with which one is pointing does not
necessarily needs to be the index finger. Figure 2 shows an example of a located finger.
Figure 2: Located fingertip, the
red area indicates the 8
highest rows in the filled blob
20
Document Detector
The document detection part is one of the main components in the system. Its task is to
detect documents in the viewfinder image. After a document is detected in the
viewfinder image the document detector should capture the document from a high
resolution image and then rectify these documents. After the documents are rectified,
they should be saved to disk and added to a database of documents together with a
possible pointing location. Each of these steps will be discussed in this section.
Document Detection
The first step in capturing a document is knowing that a document actually is present in
the viewfinder image. To detect a document a number of methods are available. These
methods include, background color differencing and background gradient differencing.
Background color differencing is a method which is very intuitive. Each pixel color in the
viewfinder image is compared to the same pixel in a background image. This
comparison is done in the RGB space. The color difference is the Euclidean distance
between the to pixel colors. When the color distance between to pixel is larger than a
certain threshold the pixel is considered foreground. Although the approach is intuitive
and easy to implement it has a few drawbacks. The first drawback is the sensitivity to
noise. If a shadow or a highlight appears in the viewfinder image the pixels inside this
shadow or highlight are falsely classified as foreground pixels. Another problem is the
fact that when a document is places in the viewfinder image of the camera the lighting
will change, causing the camera to adjust its white balance and exposure settings. This
will cause a global color change in the viewfinder image which could result in the entire
image appearing as foreground.
Because of these problems another approach was used for detecting possible
foreground objects in a viewfinder image. This second approach also uses differencing of
the current image and the background image. However this approach does not use color
information directly to classify a pixel as foreground or background. Instead it first
creates a gradient image of both the background and the viewfinder image using a
simple Sobel kernel [-1 0 1] in both horizontal and vertical direction. The next step is
subtracting each gradient pixel of the background from the gradient pixels in the
viewfinder image. The result is an image with gradients which only appear in the
viewfinder image and not in the background image. Gradients which exist in the
background and not in the viewfinder, which may be caused by objects being removed
from the desk, become negative gradients in the difference image. The difference image
is then thresholded so only strong gradients are kept. The advantage to color
differencing is that global color changes do not influence the gradient images and thus
will not cause the entire image to be classified as foreground. Also shadows and
highlights are removed because they rarely contain any sharp edges.
The gradient image now contains all the lines of the foreground objects in the viewfinder
image. These objects do not always have to be documents but can also be other items
places on the desk. To detect what lines could be that of documents straight lines need
to be found that could make up a document. The lines are detected by doing a
Probabilistic Hough transform. The result is a set of straight lines in the document, each
represented by a start and end point. These lines are then clustered so double lines and
close lines are removed. If a document exists in the set of lines it can be assumed that a
document is surrounded by four lines. To technique used for finding enclosed areas is by
iterating through the set of lines matching end points of one line with the start point of
another line. When an end point of a certain line reaches the start point of the first line
the algorithm return the area enclosed by these lines as a document.
21
Document Rectification
For each document detected in the viewfinder image the set of cornerpoints are saved
according to [ZHA03]. Next the document detector acquires a high resolution image
from the camera. On this high resolution image the actual document rectification is
performed. The coordinates of the cornerpoints of a document are scaled to match the
same points in the high resolution image. By scaling these points precision can be lost
due to rounding errors or viewfinder deviation with respect to the high resolution image.
In order to (re)gain accuracy the document detector will try to detect the position of the
document corner in the high resolution image. This is done by extracting a patch from
the high resolution image for each cornerpoint. The center of each patch is the scaled
location of the cornerpoint from the original viewfinder image. In this patch edges and
lines are detected by using the same methods as with document detection stage. The
crossings of all the lines are calculated. The point with the most crossings is considered
to be the exact cornerpoint of the document. Doing this results in less noise and parts of
the background at the borders of the document.
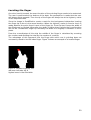
After the detection of the cornerpoints the algorithm rectifies the image to eliminate
distortion caused by projection. For rectification of the document the method in [ZHA03]
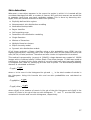
where used. The method uses the standard pinhole model to model the projection from
a space point M to an image point m as show in Figure 3.
Figure 3: Conversion from image to space
points
Let the width and the height of the rectangular shape be w=1 and h=w/aspect_ratio. Let
the coordinates of the four corners, Mi (i = 1..4), be (0,0), (w,0), (0,h), (w,h) in the plane
coordinate system (z = 0). The rectangle is projected in the image as a quadrangle with
is the vector x with an augmented 1.
the corners mi (i = 1..4) respectively. A vector x
T
T
For example x =[ x 1,... , x n ,1] if x =[ x 1,.. , x n ] .
The first step in rectification of the document is calculating the focal distance of the
camera. This is needed to get the aspect ratio of the original document. When assumed
that all pixels are square (s = 0), and the principal point is at the image center (u0 = 0
and v0 = 0 with image positions in the range from x = [-width/2 ... width/2] and y =
[-height/2 ... height]).
22
2
The focal point can be then be defined by: f =
−n21 n31n22 n32
n23 n33
Where n2i (resp. n3i) being the i-th component of n2 (resp. n3).
Where
and
n2=k 2 m 2−m 1 having k 2=
n3=k 3 m 3−m 1 having k 3=
m 1×m 4⋅m 3
m 2×m 4⋅m 3
,
m 1×m 4⋅m 2
.
m 3×m 4⋅m 2
A solution for f does not exists when n23 = 0 or n33 = 0.
T
The aspect ratio is then given by the equation:
where A is the intrinsic matrix defined by:
−T
−1
2
n 2 A A n2
w
= T −T −1
,
h
n 3 A A n3
[
f 0
A= 0 sf
0 0
uo
v0
1
]
.
The next step in rectification of the document is the calculation of the projection matrix
P. To get this projection matrix we need to solve:
[] []
x
u
P y = v
1
1
P 0,0 x P 0,1 yP 0,2= u
which is equal to P 1,0 x P 1,1 yP 1,2= v
P 2,0 x P 2,1 yP 2,2=
Substituting in the first to equations gives:
−xP 0,0−yP 0,1−P 0,2xuP 2,0yuP 2,1uP2,2
−xP 1,0−yP 1,1−P 1,2xvP 2,0yvP 2,1vP 2,2
This yields eight equations if this is done for all four cornerpoints of the document. If
written in the matrix notation:
M [P 0,0 , .., P 2,2 ]=0 with M a 8x9 matrix.
To solve this equation the eigenvectors of M T M are calculated. The eigenvector which
belongs to the eigenvalue 0 contains elements of the projection matrix that can be used
for rectifying the document.
With projection matrix P the coordinates in space (x,y) can now be calculated back to
images coordinates (u,v) with u in [0..h] and v in [0..w].
P0,0 xP1,0 y P 2,0 width
z
2
P
xP1,1 y P 2,1 height
v= 0,1
z
2
u=
where
z =P 0,2 xP1,2 yP2,2
By adding half of the width and height to both u and v respectively, the locations are
now in 'normal' image space starting at (0,0). Bilinear interpolation is used for improving
image quality because the u and v values are not likely to match exact pixel locations in
the original image. The result is now a rectified document from the original image.
23
6.Implementation
The CamCap application, which is described in this paper, is build on the previous
version of the CamCap software. Because of this, only newly implemented parts of the
system will be described in detail. Common parts will only be referenced to, or, if
needed for clarity, briefly described.
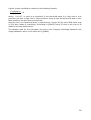
CamCap
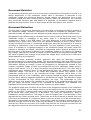
The central part of the application is the class CamCap as shown in Figure 4.
Figure 4: Simplified class diagram of the CamCap application
This class is responsible for the dataflow of the system. In each iteration of the system,
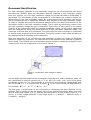
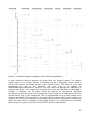
the class CamCap executes a set of operations as shown in Figure 5.
24
Figure 5: Simplified sequence diagram of the CamCap application
In each iteration CamCap requests an image from the current camera. The camera
object, which in the current version of CamCap can be a FileLoader, Canon A620 or
Canon S50, returns an Image pointer of the current frame. This frame is now used
throughout the rest of the iteration. The next step is to update the
AdaptiveBackgroundSubtractor instance. This will cause the background subtracter to
analyze each pixel in the image and compare them with its Gaussians as described in
Chapter 5. However not all pixels should be learned as background. Detected
documents and hands, which can be stationary in the image for a longer period of time,
should always stay in the foreground. This is implemented using a mask image as an
optional parameter. Each red pixel in the mask which is larger than 0 (each pixel has a
range of 0 to 255) is not learned in the update call but simply classified as a foreground
pixel. The mask which is supplied to the update function is a combination of the masks
returned by the getMask function in both FNCC2 and DocumentFinder.
25
After the background has been updated the application requests the foreground image
for further processing. This foreground image is updated on each update call since each
pixel is already classified as background or foreground. The function
getForegroundImage returns an Image pointer without the need to do any extra
computations. The foreground image is a color image that is equal to the camera frame,
however all pixels classified as background are made black.
The foreground image is now used to detect skin colored pixels. This is done with the
use of three different histograms. One histogram contains pixel colors of human skin
samples and the second histogram contains non-skin colored pixel colors. The third
histogram should only be used on backgrounds with a color that is close to skin color, for
example red wooden tables like the one used with the development of this application.
The result is a binary picture, with all skin colored pixels displayed as white pixels, and
all non-skin colored pixels black like the figures shown in Table 3.
This binary skin image is than passed to the FNCC2 class which will try to match some
hand models to it. This is done using fast Fourier transforms and normalized cross
correlation as described in Chapter 5. If a hand is found in the image the function will
return a pixel location in the image which can be used to locate the fingertip in the same
binary image. The fingertracker will locate the fingertip using a floodfill algorithm by
calling the detectFinger function. The mean x-value of last few top rows of filled pixels
is considered to be the fingertip. The location is then updated in the finger tracker.
Whenever a fingertip is found to be stationary at a position for a period of time the
finger tracker will not only return the position of the fingertip but also a boolean telling
the system that a 'pointing-event' has occurred.
The last series of steps in each iteration take care of detecting a document and
rectification of this document if one is found. The first step in detecting documents is
creating a gradient difference image by calling gradientDiff from the background
subtracter class. This function creates two gradients images, one from the current
strongest background, and one from a gray scale camera frame. The gradients of the
background are then subtracted from the gradients of the camera frame. The result is
an image will gradients values in the range of -255, if a very strong gradient was present
in the background and no gradient was present in the camera frame, to 255, if a
gradient is only visible in the camera frame. A thresholded image is returned to the
CamCap instance for further processing.
The processing of the gradient difference image is done in DocumentFinder by calling
the findDocumentPB function. This will find straight lines in the gradient image by using
a Hough transform, and processing all the found lines as described in Chapter 5. If a
document is found the DocumentFinder queries the camera for a high resolution image
on which further processing can be done. This processing is done in a different thread to
allow the program to continue while rectifying the document, which can be a time
consuming job. When the thread finishes processing it will wait for a mutex in CamCap
after which it will call a function in the CamCap class, which sets a pointer to the
rectified image. Each time an iteration of the application restarts it will check if the
pointer is set. If so, it will save the image to disk and clean up the pointer. This last step
is done by the main thread because disk access in any child process tends to be very
slow. Using the mutex ensures only thread is allowed to set the pointer to the rectified
image without any other thread overwriting any unsaved data.
26
7.Evaluation
Since all parts are already tested in other research it is not our aim to test the
performance and accuracy again but whether they are applicable to our problem. Also
we will try to find suitable values for the learning rates. The background subtraction and
the skin detection can be tested separately, since the hand detection and finger
detection depend on the result of the other parts these will not be tested separately.
Background detection
For testing the background subtraction the important factor is the learning alpha. This
sets the speed with which foreground eventually emerges with the background. Using a
too high alpha will result in that hands and documents will be part of the background
before they are detected. Or when they are not detected for a number of frames they
also become background very fast. Using a too low alpha results in new parts of the
foreground that ought to be background become part of the background too slowly. This
can result in noisy foreground images.
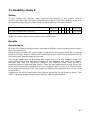
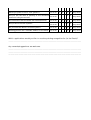
We tested the background detection by inserting an object into the viewfinder after 80
frames. Then the number of frames is counted until the object has become part of the
background.
#frames
0.005
140
0.01
50
0.05
20
0.1
11
0.2
6
0.3
4
0.5
2
Depending on the framerate of the iDesk an will be selected.
27
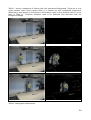
Table 1 shows a sequence of frames with the subtracted foreground. There are is only
some random noise. Area's where there is a shadow are also considered foreground.
Whenever a user points on the iDesk he will always create a drop shadow (which can be
seen in Table 3). Therefore shadows need to be detected and removed from the
foreground image.
Table 1: Background subtraction
28
Shadow detection
Next we added the shadow detection to the background subtraction. As can be seen in
Table 1 there is noise in the shadow area in the background subtraction without shadow
removal. Table 2 shows the result of shadow removal added to the background
subtraction. This reduces the noise created by shadows to a minimum.
Table 2: Background subtraction with shadow removal
29
Skin detection
The skin detection uses a thresholded function to decide whether a pixel value is skin
color. Whenever the threshold is too high the performance will be poor but the number
of false positives will be low. Whenever the threshold is set too low there will be a high
rate of false positives.
From the first tests we learned that the colors of the iDesk has too much overlap with
skin color. Therefore we created an extra histogram of the iDesk by manually selecting
pixels under different lighting conditions. A histogram of 32x32x32 bins (RBG) was
trained on this data. The iDesk histogram can be seen as an addition to the non-skin
color histogram.
The optimal performance of the skin color histogram is reached when a threshold of
0.4 is used [JON02]. The skin detection is tested on different lighting
conditions:
●
Artificial light, high intensity
●
Artificial light, low intensity
●
Day light
●
Both artificial light and daylight
From these test we learned that the performance did not differ much under the different
lighting
conditions.
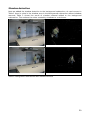
As can be seen in the examples of table 3 the skin detection the performance of the skin
detection has a high rate of true positives. But there is also a moderate rate of false
positives. This supports our conclusions based on previous work.
30
Table 3: Skin detection under different lighting conditions
31
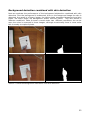
Background detection combined with skin detection
Next we evaluate the performance of the background subtraction combined with skin
detection. First the background is subtracted, then on the foreground image the skin is
detected, the result is a binary image. the white pixels represent foreground and skin
pixels, the black pixels are background and/or non-skin pixels. This also tested in
different conditions. Table 4 shows a result under two different conditions. As can be
seen the noise is removed in these images, although occasionally there is some noise
this is mostly a couple of pixels.
Table 4: Combined background subtraction and skin detection
32
Hand detection
Whenever the hand is segmented from the background the result will be a binary
images in which the hand consists of white pixels and the background is black. To
match the hands two models are created, one for the left hand and one for the right
hand. For the hand detection it is more important to find a maximum of true positives
because false positives will be detected when the finger is located. Therefore the test is
focused at the true positives.
The tests of the hand detection were done on the binary images which are the result of
the background subtraction and the skin detection.
The aim of this test is to learn whether the hand detection is able to detect different
hand types (i.e. different in size and finger length) using the two hand models.
To test different hand types 10 subjects were taken with different hand characteristics.
The subjects pointed for about 2 minutes in the viewfinder. Then the number of times
that the hand was not found was measured. It is hard to measure the exact rate of false
detection, therefore the rate was estimated by observation.
Only for 1 of the 10 subjects the performance was poor, the detection rate was about
60%. For the other subject the performance was 90% or higher.
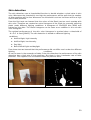
Locating the finger
Whenever a hand candidate is found the blob is searched for a fingertip. It is important
to reduce the number of false positives to a minimum because this is confusing users.
Reducing the number of false positives will result in less true positives but this should be
less important if the user knows the fingertip is not found. This depends on the quality of
the feedback.
Again 10 subjects were taken to test the performance, the rate of correct fingertip
detected was measured whenever the hand was detected.
Table 5 shows an example of a detected finger, the red area indicates the location of the
fingertip.
Table 5: Finger detection results
33
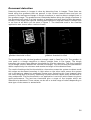
Document detection
Detecting documents in images is done by detecting lines in images. These lines are
found using the gradients that are present in the current camera frame and are not
present in the background image. A Hough transform is used to detect straight lines in
the gradient image. The gradients are thresholded before doing the Hough transform. A
low threshold will result in a high number of gradients and may lead to false document
borders in the image see Figure 8. Setting the threshold to high will result in broken lines
or no lines at all which can be seen in Figure 7. The threshold used in the CamCap
application was chosen after a series of tests.
Figure 6: Gradient image when a low
gradient threshold is used
Figure 7: Gradient image when a high
gradient threshold is used
The threshold for the minimal gradient strength used in CamCap is 50. The gradient is
now used in a Hough transform to detect straight lines in the image. The Hough
transform also uses three different thresholds for the line detection. The first threshold
in the Hough function defines the minimal line weight. The second and third parameters
define respectively the minimum and maximum length of the detected lines.
The result of settings the first threshold to a low value causes the system to detect small
thin edges as document boundary. A high value on the other hand causes the system
not to except any edges but extremely strong ones. Detecting thin lines however does
not cause a big drop in accuracy. Detecting no lines however causes many documents to
stay undetected. The first threshold in our application is set to 40 which seems to give a
good performance. The last two thresholds give a range of line lengths which are
allowed to be detected. These values can be set to a wide range of values depending on
what type of documents is worked with.
34
Document Rectification
The goal of the document rectification is to eliminate projection transformation and
rotation of the document in the captured image. Because intrinsic parameters of the
camera where unknown the exact mathematical solutions where not checked. Instead
the checks where done by visually inspecting the rectified documents for errors or
incorrectness. By letting the system capture a document with a raster printed on it, the
correctness of the document can be checked by checking if all the lines of the corrected
raster are exactly horizontal and vertical. The test case setup can be seen in Figure 6,
the result can be seen in Figure 9.
Figure 8: Test setup document rectification
Figure 9: Rectified test
document
35
8.Prototypes
During the project two prototypes were developed. The first version was the primary
version based on the last version of CamCap, but with the added functionality described
in this report. This version was used to do the first series of user tests on. The second
prototype was developed based on the first prototype but with the added knowledge
gained from the user tests. This second prototype was then used for the second series
of user tests. Both prototypes were also tested using two different settings with respect
to the user input. The first subversion of each prototype used a ten second time limit for
the program to wait for a pointing event in a document. If a hand is found and the
fingertip is located in a document the application will wait until the fingertip is out of the
document for a period of two seconds before initiating the capture. The second
subversion of each prototype waited an unspecified period of time for a pointing event
to occur in a document before capturing it. Like in the first subversion the capture will
only be initialized after a fingertip is not found in a document for a period of two
seconds.
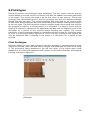
First Prototype
Although visibly not much had changed in the first prototype if compared with the last
version of CamCap, there still were some changes that influenced the users while using
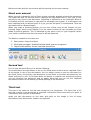
it. The processing frame displayed in the left top corner of the screen gave visual
feedback to the user what happened with respect to document detection and fingertip
tracking as shown in Figure 10.
Figure 10: Graphical User Interface of the first
prototype
36
The visual feedback of the document detector consisted of drawing a rectangle around
every detected document. The rectangles changed in colors whenever a document
changed state internally in the application. The meaning of each color was:
●
Red
Document probably detected
●
Orange
Document detected and its location is stable
●
Blue
Capturing and processing the document
●
Green
Document captured and processed success
A user could start pointing at a document when it turned orange, meaning a document
was detected at a stable location for at least 10 frames. The feedback during the
pointing action consisted of a circle around the fingertip. The circle changed color
representing the internal state of the fingertip in the system. The color around the
fingertip meant:
●
Red
Fingertip detected
●
Orange
Fingertip stable at a location for 1.5 seconds
●
Green
Pointing event occurred, fingertip stable at a location for 3 seconds
When the user pointed at a location for three seconds the circle would turn green,
representing that the user can retract its finger. After the user would retract its finger
from the document the system captures the document and starts processing, showing a
blue rectangle around the document. After rectification on the document the rectangle
would turn green.
37
9.Usability study I
Setup
To test the usability of the first prototype a study is conducted. The goal was to learn
whether users were comfortable using the pointing gesture and how well they were able
to use the prototype. The study was qualitative usability study which consisted of three
smaller tests followed by a questionnaire and a short discussion. Although we used only
5 subjects the questionnaire still can give an indication about the strengths and
weaknesses of the system.
The first test was to measure the learning curve of the subject, without the subjects
knowing how the system works. We asked them to put a document in the viewfinder and
wait until the rectangle around the document turned orange and then try to point in the
document. The result should be that the document is captured. Also this test is to learn
which 'click gesture' the subject would expect.
The second test was to test the usability of the first of the two interactions: when a
document is detected by the iDesk it waits for 10 seconds after the document is colored
orange after which the application captures the document.
The third test was to test the usability of the second interaction: when a document is
detected the system waits until a user has pointed or the finger detection is turned off.
During the test an observation was made according to these criteria
1. Switching of attention between computer screen and desk.
Switching attention very often is very likely to confuse the subject. This also
indicates that the provided feedback is not sufficient.
2. Learning curve.
A short learning curve indicates that the interface is very intuitive.
3. Position of hand(s) while not pointing.
If the subject leaves his hand in the viewfinder the hand will become part of the
background. This results in that pointing gestures will not be detected in that area.
4. 'Clicking gestures'
If subjects use a different gesture to indicate a mouse click than the one provided
that gesture should be considered as the new 'click gesture'. This mainly depends
of the feasibility to implement that gesture. For example implementing a tap is very
hard if not impossible for the iDesk.
5. Unintentional moving of documents on the desk.
A document might stick to the hand of the user, then the document will be moved
for a few centimeters. The result is that the document is detected again.
6. Errors
All information that the subjects needs to perform the tests was put in a document
together with the questionnaire. By using a document all users have the same
knowledge when the perform the tests. The document (including the questionnaire) can
be found in Appendix A.
38
Tasks
For the first test we asked the subject to put one document in the viewfinder and point
at the image in the document. The document should be captured.
For the second and the third test we asked the user to put two documents in any order
in the viewfinder and point in one of them. Both documents should be captured.
Results
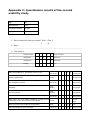
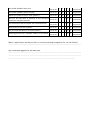
Questionnaire
All subjects noticed the different colors on the document and the finger except for one.
He only noticed the colors on the fingertip. Most subjects were able to guess the
representations of the used colors in the interface. Only the blue color around the
document was missed by most users. All users pointed and waited for feedback.
Subjects who had a good understanding of the system and were able to interact quickly
with it preferred the first of the two types of interaction. Subjects who did not
understand how the system worked or did were not very fast with the interaction (slow
reaction to the feedback) preferred the second type of interaction.
Most users liked the system and thought it was useful. The colors and their
representations were clear to the subjects. The weak point was the quickness of the
feedback, all subjects indicated that it was too slow. Even though they liked to use the
system and though the interaction was natural. The combined results of the
questionnaires can be found in Appendix B.
Suggestions for which applications the subjects would like to use iDesk for were:
capturing documents, capturing images (in documents), games (e.g. chess) and
capturing references.
Observations
The results of the observations are discussed according to the criteria.
1. The subjects mostly switched their attention whenever they put a document in the
viewfinder. When the user pointed at a point in the document at first he looks at the
document on the desk then points and switches to the computer screen. Also
whenever the iDesk did not detect the finger the subjects switched frequently
between the the desk and the computer screen.
2. In the first test it took about 5 minutes before a subject figured out how to use the
system. The most difficult was to learn that whenever the rectangle around the
document was red they were not allowed to point in the document. Most users tried
to point right after the document is detected. Also the difference between the red
and orange of the rectangle was not very clear.
3. All users put their hand (with which they pointed) at the bottom of the desk. This
was outside the range of the viewfinder.
4. Most subjects pointed in the document and waited until something happened.
Although most subjects eventually realized that the document could not be
captured when they were pointing in it, it took quite some time before they figured
this out. Most users did notice that the circle turned green on the detected finger
but did not react by retracting their hand.
5. This did not happen very often, but when a subject did move the document he felt
'bad' about it. They thought they did something wrong.
39
6. The most common error was that the subjects pointed in the document when the
rectangle around the document was still red. Even when they knew that they should
wait until the rectangle turned orange they still made this error.
Another problem that often occurred is that in the green circle int the document
(which represents the selected point) was confusing to the user.
Discussion
Most subjects found that the size of the window with the camera view was too small.
They had move towards the screen to see the feedback clearly. Also they did understand
the representations of the different colors but found it hard to use these correctly. Also
users had to wait very long until they could point in the document and the document
was detected.
Conclusions
To improve the iDesk there are a number of changes can be made.
●
The feedback that the pointing gesture is finished should be improved.
●
The number of colors used to indicate the state of the system should be reduced.
●
The time-span before the user can point in the document should be removed.
●
The pointing gesture should be detected faster.
●
The window which shows the camera view should be larger.
●
The indication where the user pointed and the indication where the finger is
detected should be different.
●
Unintentional moving of the document should be detected.
40
10.Prototypes (2)
Second Prototype
After the first usability study (see Chapter 9) a number of changes were made to the
application to simplify the user interaction with the application. Not all recommended
changes are implemented. This because of the limited time available. Changes to the
user interface (see Figure 11) included:
●
Larger display area for the processing frame
●
Filled circles on the fingertip
●
Audio feedback when a pointing event occurred in a document
●
Drawing a cross when a pointing location occurred in a document
●
Less colors on the fingertip and documents
●
Reduced time-span for finger point gesture.
Because of the larger display area of the processing frame the user could more easily
see what the system was doing. Also the filled circles around the fingertip were used to
improve visibility in the interface.
Figure 11: Interface of the second prototype
Also two new feedback elements were added. The first and most noticeable
the audio feedback. Whenever the user points in a document the system
synthesized voice to tell the user to remove his hand from the document.
feedback added to the systems consists of a drawing a blue cross in the
where the user pointed.
one being
will use a
The other
document
41
The colors around the document and fingertip also changed because users did not
understand all the different colors in the first prototype. The meaning of the new colors
around the document:
●
Blue
Document detected
●
Red
Capturing and processing the document
●
Green
Document captured and processed success
The new colors around the fingertip have the meaning:
●
Blue
Finger detected
●
Green
Pointing event occurred (after 2 seconds)
Not only the colors in the interface changed but also the internal document states
changed. A user is now allowed point inside a document as soon as it is detected
(colored blue), instead of having to wait for the document to turn orange. Another
feature added to the application is the ability to point somewhere in a document that
has already been captured. After this post-capture pointing event, the application will
recapture the document.
The pointing mechanism also changed. By dropping a state were it would turn orange in
the first prototype. Instead in now turn green after a finger has been stationary at a
location for at least two seconds.
The results of these changes are discussed in the second user test (see Chapter 11).
42
11.Usability study II
Setup
To test whether the changes made improved the usability of the system another
usability test was held. The same methods were used as in the first usability study only
two questions regarding the audio feedback were added to the questionnaire:
The audio feedback was clear.
not at all
very much
The audio feedback was annoying.
not at all
very much
Again five (new) subjects were used for this usability test.
Results
Questionnaire
As in the first usability study all users noticed the different colors and were able to guess
their representations.
Subjects tend to prefer the second type of interaction (the system waits for a pointing
gesture infinitely), the one subject who preferred the first interaction mentioned that he
only works with one document at the time.
The overall appreciation of the iDesk was higher than in the first usability study. The
most striking result was that the quickness of the feedback was rated much higher,
although this was not improved. However the response time (how quickly a
finger/document is detected) was shorter. There are two explanations for this: either the
users misinterpreted the question or the second group did not notice the delay because
of the improved response time. The combined results of the questionnaire can be found
in Appendix C.
Suggestions for which applications the subjects would like to use iDesk for were: Text
editor, capturing images, image edit programs, capturing paragraphs.
43
Observations
1. The subjects switched their attention less than in the first usability test. If they did
switch it mostly was because they were looking were they put the document. A
possible explanation for the lower rate of switching between screen and desk is that
the screen size has been increased. Now it is more clear to the users what they are
doing. Although some subjects experienced difficulty understanding what the voice
was actually saying.
2. The average learning curve was about 1 minute. Whenever the voice said to
remove the hand from the document the subject responded accordingly. Also the
subject did not need to wait until the rectangle around document turned orange.
Which caused much confusion in the first usability test.
3. The subject rested their hand at the bottom of the desk or on their lap. This was
outside the range of the viewfinder.
4. All but one subjects pointed and waited for feedback. This time the feedback was
clear enough for the subjects to identify that the pointing gesture was finished.
5. This did not change for this usability study.
6. An error which also occurred in the first usability study was that subject tried to put
the document back in the rectangle when the document was moved. Whenever a
document is moved the rectangle indicating its position stays for a few frames.
Conclusions
From this usability test we can conclude that the second prototype improved the
usability of the system. The overall appreciation of the iDesk was higher and the
learning curve is reduced by a factor of 5. But there still are some improvements that
can be made:
●
Unintentional moving of the document should be detected.
●
Improve the quality of the audio feedback (quality of the voice is poor)
●
Delay of the rectangle around the document should be removed.
Further we can conclude that users very much like to use the system. Whether they also
like to use it in practice is still to be learned. But the interaction using pointing gestures
was very much appreciated.
44
12.Future work
Hand detection
Scale and rotation
The current hand detection uses multiple hand models to match possible hand blobs in
the viewfinder. Implement a rotation and scale invariant matcher so they are not
restricted to the size and orientation of the hand models.
Multiple hands and fingertips
Allow the matcher to find two hands in the viewfinder and detect multiple fingertips on
each hand. This will allow advanced region selection and the use of gestures.
Document detection
Line detection
Improve the line detection algorithm by using RAST instead of Hough? The Hough
transform seems to get somewhat unstable when multiple documents appear in the
viewfinder.
Rectangle detection
The documents are found be finding any path over lines. Implement the algorithm used
in [ZHA03] for more robust document detection.
Lines are sometimes broken into multiple smaller lines. Detect small lines that could
form a single long line.
Region selection
Create region selecting in combination with multiple hand and fingertip detection. Or
improve current one. Current region selection is that a second point is selected if there
is at least a two second period between to pointing events. Just two crosses are drawn,
maybe draw a rectangle in the correct perspective view of the document.
Multiple point events in a single document
This can be desirable if for example someone needs multiple images from a single
document. By being able to first select all the images in the document before it is
captured saves a lot of time because then the document does not need to be captured
for every image.
45
13.Compilation Manual
The directory where this file is located is referenced to as the CamCap root directory or
<ROOT>.
Needed files
This directory should contain:
●
bin
Target directory for the compiled binary
●
bin/handmodels
All images in this directory are used as hand
models for matching
●
bin/histograms
Histograms for Skin, Non-Skin and Table
●
bin/histograms/non-skin-histogram
●
bin/histograms/skin-histogram
●
bin/histograms/table-histogram
●
bin/icons
Icons used in the GUI
●
bin/rectified
Directory where rectified documents are
saved
●
bin/autodetect.sh
Script to detect camera
●
bin/run.sh
Script to start camcap
●
libs
Directory with libraries (containts opencv-1.0
and libptp)
●
libs/libptp2
libptp2 directory
●
obj
Directory to store object files during
compilation
●
src
Directory with source files
●
Makefile
The makefile for CamCap
●
README
Compilation manual
Required packages
The packages needed to compile and run camcap are:
●
fftw3
●
fftw3-dev
●
flite1-dev
●
libflite1
●
libwxbase-2.6-0
●
libwxbase-2.6-dev
●
libwxgtk-2.6-0
●
libwxgtk-2.6-dev
●
libavcodec0d
46
●
libformat0d
●
libusb-0.1-4
Running CamCap
Run 'make' in the root directory of the camcap program. The source files (.cc and .h)
should be in <ROOT>/src.
The compiled binary will end up in the <ROOT>/bin directory. CamCap can be started by
executing run.sh in the bin-directory.
Run ./run.sh --help for all the camcap options.
47
14.User manual
This chapter presents the user manual on the additional functionality of the iDesk. The
use of the document detection and pointing recognition is described. Also the additional
functionality of the debug frames is described.
Document detection
Document detection is always turned on. Only when the pause button is pressed the
iDesk does not process any frames, it just shows what the camera is capturing. A
captured document is indicated in two ways:
●
Rectangles around the documents
●
Circles on the corner points of the documents
The different states of the the document detection is indicated by different colors:
●
Blue:
Document detected, you can point in the document.
●
Red:
Capturing document, please do not move or occlude the document.
●
Green: Document captured.
You can put as many documents on the iDesk as long as they do not overlap. Whenever
documents are detected badly or not at all reset the background using the background
reset button.
Fingertip detection
Finger tip detection can be turned on and off by pressing the 'finger detection button'.
When fingertip detection is turned on the iDesk captures documents after you pointed in
it. When fingertip detection is turned of a document is captured immediately when it is
detected.
A detected fingertip is represented by a circle. different colors indicate a different status:
●
Blue:
Location of the finger tip.
●
Green: Pointing gesture recognized.
Whenever a pointing gesture is recognized a blue cross appears on that point. This
indicates your pointed position. Also a voice will tell you that you should remove your
hand. When you have removed your hand from the document it will be captured.
Captured documents
Captured documents are automatically rectified by the iDesk. Using the 'view captured
documents' button you can see the documents that are captured and rectified. If you
have pointed in the document a blue circle marks the area where you pointed.
48
Interface
The functionality of the interface is as follows:
1. Start the iDesk
2. Pause the iDesk, captured frames are shown but not analyzed
3. Stop the iDesk
4. Reset background
5. Show borders around detected documents
6. Show corner points of detected documents.
7. Enable/disable finger detection.
8. Zoom out
9. Zoom in
10.Analyze documented (does nothing yet)
11.Show captured documents
There are two debug frames, the following debug modes can be selected .
●
Background
●
Foreground
●
Gradients
●
Skin
49
References
[ATH03]
V. Athitos and S. Sclaroff. Estimating 3D hand pose from a cluttered image.
In 2003 IEEE Computer Society Conference on Computer Vision and Pattern
Recognition (CVPR 2003), pages 432 – 442, Madison, WI, USA, June 2003.
[BRE92]
T.M. Breuel. Fast Recognition using Adaptive Subdivisions of Transformation
Space. In Proceedings IEEE Computer Society Conference on Computer
Vision and Pattern Recognition (CVPR 1992), pages 445 – 451, Champaign,
IL, USA, June 1992.
[CRO95]
J. Crowley, F. Berard and J. Coutaz. Finger Tracking as an Input Device for
Augmented Reality. In Proceedings of the International Workshop on Gesture
and Face Recognition (IWAGFR '95). Zurich, June 1995.
[CUI96]
Y. Cui and J. J. Weng. View-Based hand Segmentation and Hand-Sequence
Recognition with Complex Backgrounds. In Proceedings of the International
Conference on Pattern Recognition (ICPR '96), vol. 3, page 617, Washington,
DC, USA, 1996.
[FAU93]
O. Faugeras. Three-Dimensional Computer Vision: a Geometric Viewpoint.
MIT Press, 1993.
[HAR01]
C. Hardenberg and F. Bérard. Bare-hand human-computer interaction. In
Proceedings of the 2001 workshop on Perceptive user interfaces (PUI '01),
pages 1 – 8, Orlando, Florida, USA, 2001.
[HOR86]
B.K.P. Horn. Robot Vision. MIT Press, 1986.
[HOR99]
T. Horprasert, D. Harwood and L.S. Davis. A Statistical Approach for Realtime Robust Background Subtraction and Shadow Detection. In Proceedings
IEEE ICCV '99 FRAME-RATE Workshop, 1999.
[JAV02]
O. Javed, K. Shafique and M. Shah. A Hierarchical Approach to Robust
Background Subtraction using Color and Gradient Information. In
Proceedings of the Workshop on Motion and Video Computing (MOTION '02),
page 22, Washington, DC, USA, 2002.
[JON02]
M.J. Jones and J.M. Rehg. Statistical color models with application to skin
detection. In International Journal of Computer Vision, vol. 46, pages 81 – 96,
2002.
[KAE01]
P. KaewTraKulPong and R. Bowden. An Improved Adaptive Background
Mixture Model for Real-time Tracking with Shadow Detection. In Proceedings
2nd European Workshop on Advanced Video-based Surveillance Systems
(AVBS01), Kingston upon Thames, September 2001.
[KOL04]
M. Kolsch and M. Turk. Robust Hand Detection. In Proceedings Sixth IEEE
International Conference on Automatic Face and Gesture Recognition (FGR
2004), page 614, Seoul, Korea, May 2004.
[LAP01]
I. Laptev and T. Lindeberg. Tracking of Multi-state Hand Models Using Particle
Filtering and a Hierarchy of Multi-scale Image Features. In Proceedings of the
Third International Conference on Scale-Space and Morphology in Computer
Vision (Scale-Space '01), pages 63 – 74, London, UK, 2001.
[LEW95]
J.P. Lewis. Fast normalized cross-correlation. In Vision Interface, pages 120123, 1995.
[MOE04]
T.B. Moeslund, M. Störring and E. Granum. Pointing and Command Gestures
for Augmented Reality. In ICPR workshop on Visual Observation of Diectic
Gestures (Pointing'04), Cambridge, UK, August 2004.
[NOL98]
C. Nölker and H. Ritter. Detection of Fingertips in Human Hand Movement
Sequences. In Proceedings of the International Gesture Workshop on
Gesture and Sign Language in Human-Computer Interaction, pages 209 –
218, London, UK, 1998.
[OKA03]
K. Oka, Y. Sato, and H. Koike. Real-Time Fingertip Tracking and Gesture
Recognition. In IEEE Computer Graphics and Applications, vol. 22, pages 64 –
71, 2002.
[PIC04]
M. Piccardi. Background subtraction techniques: a review. In Proceedings of
the IEEE International Conference on Systems, Man and Cybernetics (SMC
2004), pages 3099 – 3104, The Hague, Netherlands, October 2004.
[STA99]
C. Stauffer and W.E.L. Grimson. Adaptive background mixture models for
real-time tracking. In Proceedings of IEEE International Conference on
Computer Vision and Pattern Recognition (CVPR 1999), vol. 2, pages 244 –
252, 1999.
[STA00]
C. Stauffer and W.E.L. Grimson. Learning Patterns of Activity Using Real-Time
Tracking. In IEEE Transactions on Pattern Analysis and Machine Intelligence
(TPAMI '00), vol. 8, pages 747 – 757, Washington, DC, USA, 2000.
[VEZ03]
V. Vezhnevets, V. Sazonov and V. Andreeva. A Survey on Pixel-Based Skin
Color Detection Techniques. In Proceedings of the Graphicon, pages 85 – 92,
2003.
[WAC05]
J. Wachs, H. Stern, Y. Edan, M. Gillam, C. Feied, M. Smith and J. Handler. A
Real-Time Hand Gesture System Based on Evolutionary Search. In
Proceedings of Genetic and Evolutionary Computation Conference (GECCO
2005), Washington, DC, USA, June 2005.
[WIL05]
A.D. Wilson. PlayAnywhere: a compact interactive tabletop projection-vision
system. In Proceedings of the 18th annual ACM symposium on User
interface software and technology (UIST '05), pages 83 – 92, Seattle, WA,
USA, 2005.
[WU02]
Y. Wu and T. Huang. View-Independent Recognition of Hand Postures. In
Proceedings of IEEE International Conference on Computer Vision and
Pattern Recognition (CVPR 2000), vol. 2, pages 88 – 94, Hilton Head Island,
SC, USA, 2000.
[WUY00]
Y. Wu, Y. Shan, Z. Zhang, S. Shafer. Visual Panel: From an ordinary paper to a
wireless and mobile input device. Technical Report MSR-TR-2000-112.
October 2000.
[ZHA01]
Z. Zhang, Y. Wu, Y. Sang and S. Shafer. Visual panel: virtual mouse, keyboard
and 3D controller with an ordinary piece of paper. In Proceedings of the
2001 workshop on Perceptive user interfaces (PUI '01), pages 1 – 8, Orlando,
Florida, USA, 2001.
[ZHA03]
Z. Zhang, L. He. Whiteboard Scanning and Image Enhancement. Technical
Report MSR-TR-2003-39. June 2003.
[ZHA03b] Z.Zhang. Vision-based Interaction with Fingers and Papers. In Proc.
International Symposium on the CREST Digital Archiving Project. Pages 83106, Tokyo, Japan, May 2003.
Appendix A: Usability test iDesk
Introduction
The iDesk allows users to capture documents to their computer. When a document is
placed on the desk it is detected and the document is captured. A new feature is gesture
recognition, a user can point at a location in the document. These can be images that
should be captured or an email address to which an email should be sent. This test
consists of three parts with a questionnaire.
First test
For the first test we would like you to put a document on the desk and point at the
image. The system should capture the document containing the image.
1. Press the play button in camcap:
2. Put the document on the iDesk
3. Wait until a rectangle appears around the document.
4. Point at the image in the document, make sure that the document is captured.
Please do this test before reading further.
Which pointing gesture did you make?
1. Point and retract.
2. Point and wait for feedback.
3. Point and tap.
4. Other: ..............................................................
Did you see the different colors around the document and/or on the finger tip?
1. Yes
2. No
If you answered no in the last question, you can continue with the second test.
What do you think these colors mean?
Blue
around the rectangle
:
...........................................................................................................
on the fingertip
:
...........................................................................................................
Red
around
the
rectangle
...........................................................................................................
:
Green
around
the
rectangle
...........................................................................................................
on the fingertip
:
...........................................................................................................
Did you understand what the voice said?
1. Yes
2. No
:
Before we start with the second test we first provide a short user manual.
Short user manual
When you put a document on the iDesk a blue rectangle appears around the document.
The iDesk will wait 10 seconds until it captures the document when it lays still, in this
period you can point in the document. Capturing is defined by a red rectangle. When it
is finished and the document is captured the rectangle turns green. If a document has
been captured and you did not point in it yet you can still point in it afterwards. Then the
document will be captured again.
When you make a pointing gesture you can see a blue circle at the location of your
pointing finger. When your fingertip is at the same location for two seconds you have
made a pointing gesture. This is indicated by the green circle on your fingertip. When
your hand is removed from the document it will be captured.
The buttons needed for the tests are:
1. Start button: Starts the iDesk
2. Hand gesture toggle: Enables/Disables hand gesture recognition
3. Captured documents: Shows captured documents
Second test
For this test we would like you to do the following:
You should place two documents in the on the iDesk which both must be captured. Point
at the image in one of the documents. You can either choose to put one document on
the iDesk, point, and put the next document on the iDesk or put both documents on the
iDesk and point in one. If the iDesk does not detect or capture the document properly
you can (re)move the document and try again. Note that you can use the 'captured
documents' button to see where you were pointing in the document.
Third test
This test is the same as the last test except for the interaction. The time limit of 10
seconds to point in the document is removed. Instead the iDesk waits until you point at
a document and captures it afterwards.
Again put two documents on the desk and point at the image in one of these
documents. Both documents need to be captured.
Questionaire
Age
Male/Female
Left/right handed
Are you colorblind?
1. Which interaction did you prefer? Test 2 / Test 3
2. Why?
..................................................................................................................................
3. The iDesk is:
hard to learn
easy to learn
inefficient
efficient
ineffective
effective
boring
fun
Was the feedback of the iDesk clear to you?
not at all
very much
Did you try to alter the position of the green circle
never
when it appeared?
every time
Did you have any problems identifying the colors on
not at all
the computer screen?
very much
How good could you identify the circle on your very
fingertip.
poorly
very good
How good could you identify the rectangles around very
the documents
poorly
very good
Were the representations of the colors clear to you?
very much
not at all
How often did you switch between looking at the
never
computer screen and looking at the iDesk
all the
time
How quick was the feedback of the iDesk.
slow
fast
Was the feedback quick enough?
not at all
very much
The audio feedback was clear.
not at all
very much
The audio feedback was annoying.
not at all
very much
Would you prefer to use a 'click gesture'?
not at all
very much
Did you like the idea of pointing in the document
not at all
instead of using the mouse?
very much
The interaction with the iDesk felt natural/intuitive.
not at all
very much
Did you like to use the system?
not at all
very much
Do you think the iDesk is a useful system?
not at all
very much
Pointing gesures are a valuable addition to the iDesk. not at all
very much
Which applications would you like to use the pointing recognition for (in the iDesk)?
............................................................................................................................................
Any remarks/suggestions are welcome.
............................................................................................................................................
............................................................................................................................................
Appendix B: Questionnaire results of the first
usability study
Age
28
Male/Female
5M
Left/right handed
5 right
Are you colorblind?
5 no
1. Which interaction did you prefer? Test 2 / Test 3
2
/3
2. Why?
..................................................................................................................................
3. The iDesk is:
hard to learn
1
2
2
easy to learn
inefficient
2
3
efficient
ineffective
4
1
effective
boring
Was the feedback of the iDesk clear to you?
5
fun
2
3
1
1
1
2
1
2
not at all
Did you try to alter the position of the green circle
never
when it appeared?
2
Did you have any problems identifying the colors on
not at all
the computer screen?
very much
every time
very much
How good could you identify the circle on your very
fingertip.
poorly
3
2
How good could you identify the rectangles around very
the documents
poorly
1
4
Were the representations of the colors clear to you?
not at all
1
How often did you switch between looking at the
never
computer screen and looking at the iDesk
1
3
How quick was the feedback of the iDesk.
slow
1
3
1
Was the feedback quick enough?
not at all
1
2
1
very good
very good
3
very much
2
all the
time
fast
1
very much
Would you prefer to use a 'click gesture'?
not at all
1
1
Did you like the idea of pointing in the document
not at all
instead of using the mouse?
The interaction with the iDesk felt natural/intuitive.
not at all
Did you like to use the system?
Do you think the iDesk is a useful system?
2
1
4
very much
very much
2
2
not at all
1
1
3
very much
not at all
2
2
1
very much
3
2
very much
Pointing gesures are a valuable addition to the iDesk. not at all
1
1
very much
Which applications would you like to use the pointing recognition for (in the iDesk)?
............................................................................................................................................
Any remarks/suggestions are welcome.
............................................................................................................................................
............................................................................................................................................
................................................................................................................................
Appendix C: Questionaire results of the second
usability study
Age
27
Male/Female
5M
Left/right handed
5 right
Are you colorblind?
5 No
1. Which interaction did you prefer? Test 2 / Test 3
1
/4
2. Why?
..................................................................................................................................
3. The iDesk is:
hard to learn
inefficient
ineffective
3
1
2
4
3
boring
Was the feedback of the iDesk clear to you?
easy to learn
efficient
2
effective
5
fun
1
not at all
Did you try to alter the position of the green circle
never
when it appeared?
2
Did you have any problems identifying the colors on
not at all
the computer screen?
5
1
1
2
every time
1
How good could you identify the rectangles around very
the documents
poorly
4
5
1
not at all
How often did you switch between looking at the
never
computer screen and looking at the iDesk
very much
very much
How good could you identify the circle on your very
fingertip.
poorly
Were the representations of the colors clear to you?
3
3
4
1
1
very good
very good
very much
all the
time
How quick was the feedback of the iDesk.
slow
2
2
1
fast
Was the feedback quick enough?
not at all
2
2
1
very much
The audio feedback was clear.
not at all
2
1
1
The audio feedback was annoying.
not at all
2
2
1
Would you prefer to use a 'click gesture'?
not at all
1
2
1
very much
very much
1
1
very much
Did you like the idea of pointing in the document
not at all
instead of using the mouse?
2
1
2
The interaction with the iDesk felt natural/intuitive.
not at all
1
1
3
very much
Did you like to use the system?
not at all
1
3
very much
Do you think the iDesk is a useful system?
not at all
2
2
very much
4
1
very much
Pointing gesures are a valuable addition to the iDesk. not at all
1
very much
Which applications would you like to use the pointing recognition for (in the iDesk)?
............................................................................................................................................
Any remarks/suggestions are welcome.
............................................................................................................................................
............................................................................................................................................
................................................................................................................................