1
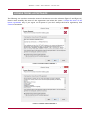
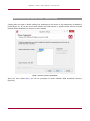
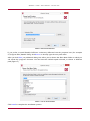
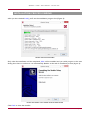
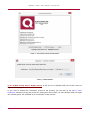
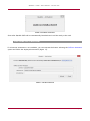
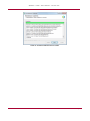
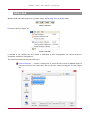
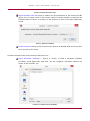
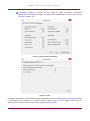
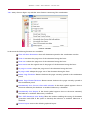
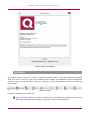
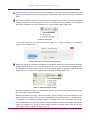
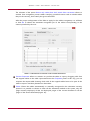
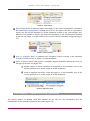
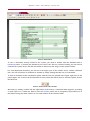
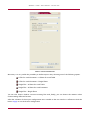
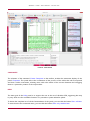
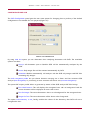
Quablo™ OCR USER MANUAL – Version 2.0 Quablo™ OCR - User Manual - Version 2.0 Java®, Oracle®, Microsoft®, Microsoft Excel®, Microsoft® Excel, Windows®, Windows 7®, Windows 8®, Windows Vista® e Windows® XP are trademarks owned and/or registered in the United States and other countries, or both, by third parties other than Exeura s.r.l. All uses of the aforesaid trademarks herein are strictly for purposes of identifying the respective products and/or their owners. Exeura s.r.l. makes no claim to any trademark rights in or to any such trademarks and nothing herein impacts the ownership thereof by the rightful third parties to such trademarks. The use of the aforementioned trademarks should not be interpreted as any form of express or implied sponsorship or endorsement of Exeura, s.r.l. or its product(s) herein by such third party owners. Java® is a registered trademark or trademark of Oracle, or its subsidiaries, in the United States and other countries, or both. Microsoft®, Microsoft Excel®, Microsoft® Excel, Windows®, Windows 7®, Windows® 8, Windows Vista® e Windows® XP are registered trademarks or trademarks of Microsoft corporation, or its subsidiaries, in the United States and other countries, or both. On information and belief, JExpress is the trademark of DeNova, or its assignees or subsidiaries, in the United States and other countries, or both. The application contains recognition technologies of ABBYY® FineReader® Engine 10 for Windows®© 2010. ABBYY, FINEREADER and ABBYY FineReader are registered trademarks of ABBYY Software Ltd. Adobe PDF Library is used for opening and processing PDF files: © 1984-2008 Adobe Systems Incorporated and its licensors. All rights reserved. Protected by U.S. Patents 5,929,866; 5,943,063; 6,289,364; 6,563,502; 6,185,684; 6,205,549; 6,639,593; 7,213,269; 7,246,748; 7,272,628; 7,278,168; 7,343,551; 7,395,503; 7,389,200; 7,406,599; 6,754,382; Patents Pending. Adobe®, the Adobe logo, Acrobat®, the Adobe PDF logo are either registered trademarks or trademarks of Adobe Systems Incorporated in the United States and/or other countries. All other trademarks are the property of their respective owners. Using Type 1 fonts for exporting to PDF format: © 2001 ParaType Inc. © 2003 ParaType Inc. Opening DjVu image format: Portions of this computer program are copyright © 1996-2007 LizardTech, Inc. All rights reserved. DjVu is protected by U.S. Patent No. 6,058,214. Foreign Patents Pending. Working with JPEG image format: This software is based in part on the work of the Independent JPEG Group. Unicode support: 1991-2009 Unicode, Inc. All rights reserved. Intel® Performance Primitives: Copyright© 2002-2008 Intel Corporation. Font support: Portions of this software are copyright© 1996-2002, 2006 The FreeType Project (www.freetype.org). All rights reserved. © 2014 Exeura s.r.l. All rights reserved. No reproduction of all or any part of this manual without prior written approval. 2/47 Quablo™ OCR - User Manual - Version 2.0 TABLE OF CONTENTS TABLE OF CONTENTS ..................................................................................................... 3 INTRODUCTION .............................................................................................................. 4 About Quablo™ OCR............................................................................................................................. 4 Main features ............................................................................................................................................ 4 INSTALLING QUABLO OCR ............................................................................................. 5 Software requirements ............................................................................................................................ 5 Hardware requirements .......................................................................................................................... 5 Installation process startup ..................................................................................................................... 5 License Terms acceptance ....................................................................................................................... 7 Installation directory selection ............................................................................................................... 8 Installation process ending ...................................................................................................................10 RUNNING QUABLO ......................................................................................................11 License activation ...................................................................................................................................14 On-line activation ...................................................................................................................................14 Off-line activation..................................................................................................................................15 UNINSTALLING QUABLO ..............................................................................................16 USER INSTRUCTIONS ....................................................................................................18 General description of the user interface .........................................................................................19 Menu bar .................................................................................................................................................21 Toolbar .....................................................................................................................................................28 Documents visualization window .........................................................................................................31 Tools for the visualization and navigation of PDF documents ....................................................33 Tools for the manual composition of a table .................................................................................34 Utilities panels .........................................................................................................................................36 Documents .............................................................................................................................................36 Pages .....................................................................................................................................................38 Export configuration ...........................................................................................................................39 Console ..................................................................................................................................................41 Report ....................................................................................................................................................41 Preview..................................................................................................................................................42 Composite .............................................................................................................................................43 Help .......................................................................................................................................................43 Configurazione OCR ..........................................................................................................................44 FIGURES INDEX ............................................................................................................45 3/47 Quablo™ OCR - User Manual - Version 2.0 INTRODUCTION ABOUT QUABLO™ OCR It is a powerful and effective tool for the extraction of data and tables from PDF documents (also scanned ones) and images; It is able to elaborate in a totally automatic way both bordered tables and non bordered tables having a regular structure; It provides an easy and intuitive GUI allowing to extract data also from tables with very irregular structure and without grid; It allows to define selection and extraction filters to increase results precision; It allows to export tables and data from PDF to other editable formats (XLS, CSV and XML). Allows to acquire a selection of the computer’s video screen (Capture Screen), chosen by the user, and analyze the content using tools made available by the same Quablo. MAIN FEATURES Availability of both interactive and automatic tables extraction mechanisms; Ability to suggest non bordered tables structure; User friendly graphical interface; Management of templates for the extraction of data from tables, according to a format defined by the user; Real time preview of recognized tables and of their content; Conversion to several output formats; Wide choice of how to export extracted data. 4/47 Quablo™ OCR - User Manual - Version 2.0 INSTALLING QUABLO OCR SOFTWARE REQUIREMENTS Quablo OCR can be installed on Windows 8 (32-bit and 64-bit), Windows 7 (32-bit and 64-bit), Windows Vista (32-bit and 64-bit) or Windows XP (32-bit and 64-bit) platforms. Quablo™ OCR Software Requirements Windows 8 (32-bit and 64-bit), Windows 7 (32-bit and 64-bit), Windows Vista (32-bit and 64-bit), Windows XP (32-bit and 64-bit) OS HARDWARE REQUIREMENTS Minimum hardware requirements for Quablo installation are summarized in the following table: Quablo™ OCR Hardware Requirements RAM 2GB CPU Dual Core (Intel Core 2 Duo or equivalente) Installer 230MB Occupied space on disk after installation 494MB INSTALLATION PROCESS STARTUP To start Quablo OCR installation process, double click the installer icon (Figure 1) and then, click Next in the Welcome window that will be displayed (Figure 2). 5/47 Quablo™ OCR - User Manual - Version 2.0 FIGURE 1. QUABLO INSTALLER ICON FIGURE 2. INSTALLATION STARTUP 6/47 Quablo™ OCR - User Manual - Version 2.0 LICENSE TERMS ACCEPTANCE The following two windows contain the terms of the license to use the software (Figure 3 and Figure 4). Please read carefully the terms of this agreement and select the option I accept the terms of the license agreement only if you agree on all points. If you don’t accept the license agreement, click Cancel to terminate. FIGURE 3. SOFTWARE LICENSE AGREEMENT – 1 FIGURA 4. SOFTWARE LICENSE AGREEMENT - 2 7/47 Quablo™ OCR - User Manual - Version 2.0 INSTALLATION DIRECTORY SELECTION Clicking Next will open a further dialog box dedicated to the choice of the components of Quablo to install (Figure 5). To use the version that includes the OCR requires a specific license. Please read the manual section dedicated to licenses for more details. FIGURA 5. CHOICE OF QUABLO’S COMPONENTS Once you have clicked Next, you will be prompted to choose Quablo OCR installation directory (Figure 6). 8/47 Quablo™ OCR - User Manual - Version 2.0 FIGURA 6. INSTALLATION DIRECTORY If you prefer to install Quablo OCR into a directory different from the proposed one (for example C:\Program Files\Quablo OCR), click Browse or directly type the new path name. After you click Next, an additional dialog box allow you to choose the Start Menu folder in which you will create the program's shortcuts. You can leave the default option inserted, or choose a different path (Figure 7). FIGURA 7. PATH OF THE START MENU Click Install to complete the installation process. 9/47 Quablo™ OCR - User Manual - Version 2.0 INSTALLATION PROCESS ENDING After you have clicked Install, you’ll see the installation progress bar (Figure 8). FIGURE 8. INSTALLATION PROGRESS Only when the installation will be completed, Next will be enabled and you could progress to the next dialog box where to confirm to run automatically Quablo at the end of installation process (Figure 9) FIGURE 9. RUN QUABLO OCR AT THE END OF INSTALLATION PROCESS Click Finish to close the installer. 10/47 Quablo™ OCR - User Manual - Version 2.0 RUNNING QUABLO After having successfully installed Quablo OCR, a shortcut to run Quablo OCR will appear on your desktop (Figure 10). Double click Quablo OCR icon on your desktop to run the software. FIGURA 10. QUABLO OCR SHORTCUT As an alternative, you can run Quablo OCR directly from the installation directory or from the Windows menu, following the path Start Programs Quablo Quablo. If you already have a Quablo license, previously activated on your computer, Quablo OCR can be launched without further operations. All the features already included in Quablo will be available for Quablo OCR users. Moreover they will be able to use OCR to load scanned PDF documents and image files, free for 7 days. After this period, the OCR feature will be disabled, while all the other features will continue to be available to the user. To continue to use the OCR you’ll need to buy the OCR Upgrade, following the online purchase procedure available on the web site www.quablo.eu. At the end of the purchase process you will receive an e-mail from [email protected] with the subject "Getting Started with Quablo - License Key" containing Quablo - OCR Upgrade license in attachment (this is a file extension. lic that can be saved in any file system folder). At this point you must click on the menu Help and then on the submenu Licenses. In the window Licensing Information (Figure 11) you must, finally, click the Load OCR Upgrade License button. In this way you will access the dialog box for entering the license file (Figure 12). 11/47 Quablo™ OCR - User Manual - Version 2.0 FIGURE 11. OCR UPGRADE LICENSE LOADING WINDOW FIGURE 12. LICENSE ENTERING If you do NOT already have a Quablo license, at the first run of Quablo OCR, the windows shown in Figure 13 will appear. If you want to activate the evaluation version of the product, you can click on the Start 7 Days Evaluation command. During this period, the dialog box shown when you start Quablo OCR will report the remaining time still available for the evaluation of the product. 12/47 Quablo™ OCR - User Manual - Version 2.0 FIGURE 13. QUABLO FIRST RUN Once the evaluation period has expired the same dialog box will allow to choose between the remaining two options Buy now Quablo or Load a License (Figure 14). FIGURE 14. EVALUATION PERIOD EXPIRED To buy a commercial license of Quablo OCR, click Buy now Quablo OCR and follow the online purchase procedure available on the website www.quablo.eu. 13/47 Quablo™ OCR - User Manual - Version 2.0 At the end of the purchase procedure, check if you have received an e-mail with subject "Getting Started with Quablo - License Key" from [email protected], containing Quablo OCR license in attachment (this is a .lic file that you could save wherever you prefer in your file system. Click Load a License in Quablo OCR start-up window and a dialog box will be displayed for entering license path in the file system (Figure 12). LICENSE ACTIVATION Only after having entered the license, the Ok button will be enabled. At this point the dialog box which allows to activate Quablo OCR will be displayed (Figure 15). FIGURE 15. LICENSE ACTIVATION ON-LINE ACTIVATION Ensure to be connected to the Internet and click Ok to proceed with the on-line license activation. You will be advised of the successful activation with the message shown in Figure 16. 14/47 Quablo™ OCR - User Manual - Version 2.0 FIGURE 16. SUCCESSFUL ACTIVATION Soon after Quablo OCR will be automatically launched and it will be ready to be used. OFF-LINE ACTIVATION If an Internet connection is not available, you can activate the license selecting the Off-Line Activation option and follow the displayed instructions (Figure 17). FIGURE 17. OFF-LINE ACTIVATION 15/47 Quablo™ OCR - User Manual - Version 2.0 UNINSTALLING QUABLO To uninstall Quablo you can click the Uninstall.exe program included in Quablo installation directory. Click Disinstalla to confirm that you want to remove Quablo (Figure 18). At the end of the uninstall process (Figure 19), in the last window, click Fine (Figure 20). FIGURA 18. CONFIRM QUABLO INSTALLATION FIGURE 19. UNINSTALLATION IN PROGRESS 16/47 Quablo™ OCR - User Manual - Version 2.0 FIGURE 20. SUCCESSFUL UNINSTALLATION OF QUABLO 17/47 Quablo™ OCR - User Manual - Version 2.0 USER INSTRUCTIONS Quablo OCR can be easily used both by new and experienced users thanks to a graphical interface that is simple and intuitive to use and at the same time rich of suitable tools to support all the operational needs that can occur during the table extraction process from PDF documents (also scanned ones) and images (Figure 22) FIGURE 21. QUABLO GRAPHICAL INTERFACE At Quablo OCR start-up, a welcome screen allows a simply and quickly access to the main resources needed to support users in the system use. In fact, this windows make available a link to the user manual, to the tutorials and to other resources as Quablo web site and Facebook page. The welcome screen contains also the option Click here to Start! that enables the user to a direct exploitation of the core tools to start to work with Quablo OCR (Figure 22). 18/47 Quablo™ OCR - User Manual - Version 2.0 FIGURE 22. CORE TOOLS TO START USING QUABLO The online guide, appearing in the right panel of the main window is particularly useful for Quablo OCR new users. This guide suggests which are the functionalities available for the user contextually to a given system use phase. To access to all the arguments of the guide, regardless of a particular system use context, it is sufficient to click on the button Show all Hints. GENERAL DESCRIPTION OF THE USER INTERFACE The main window of the user interface contains a menu bar providing access to the main functions of interaction with the system. Just under the menu bar it is placed a toolbar containing the icons to access to the functions most frequently used by the user. In the central region of the main window, the user can find a panel for documents visualization. This panel has its own toolbar providing access to all the functions that can be applied to the file currently visualized. 19/47 Quablo™ OCR - User Manual - Version 2.0 In the left and the lower borders of the main window some floating panels are available for the visualization and management of information associated to a particular phase of interaction with the system. Some buttons are available on the main window borders. Each one of them allow the opening of a panel intended to the display and management of the information related to a particular phase of interaction with the system. Each user interface component will be more extensively described in the next sections. FIGURE 23. QUABLO GRAPHICAL INTERFACE 20/47 Quablo™ OCR - User Manual - Version 2.0 MENU BAR Quablo OCR menu bar (Figure 24) provides access to File, Edit, View and Help menu. FIGURE 24. MENU BAR File menu, shown in Figure 25, FIGURE 25. FILE MENU is divided in two sections: the first section is dedicated to files management, the second section to documents collections management. The functions included in the first section are: Open Documents …: Opens a dialog box to select the file to load in Quablo OCR. To select more files at the same time, click on the files while pressing the Crtl key (Figure 26). 21/47 Quablo™ OCR - User Manual - Version 2.0 FIGURE 26. MULTIPLE SELECTION OF FILES Open document from URL: Open a window for the specification of the remote file URL (Figure 27). An option shown in this window allows to decide whether to eliminate the document after its closure or to keep it in the directory in which it has been temporarily saved. FIGURE 27. REMOTE FILE OPENING Recent Documents: Keeps track of the last files opened in Quablo OCR and shows their list to provide a fast access. Functions included in the second section of File menu are: Open Documents Collection…: Opens a window to load a document collection previously saved (Figure 28). Note that you can recognize a document collection by means of the extension .cps. FIGURE 28. DOCUMENT COLLECTION OPENING 22/47 Quablo™ OCR - User Manual - Version 2.0 Save Documents Collection as…: Opens a window to choose the name and the path in which to save a document collection (Figure 29). FIGURE 29. DOCUMENTS COLLECTION SAVING Recent Documents Collection: Lists the most recently opened document collections. The last function of the File menu is: Exit: Closes Quablo. Edit menu, shown in Figure 30, FIGURE 30. EDIT MENU contains the following functions: Undo last action: Restores last table or line update; Redo last action: Redoes last table or line update; Export configuration: Opens a window for the configuration of the export options for the recognized tables; 23/47 Quablo™ OCR - User Manual - Version 2.0 Preferences: Opens a window for the tuning of table recognition parameters (Recognition Parameters in Figure 31) and for the modification of some other options (Options in Figure 32). FIGURE 31. TABLE RECOGNITION PARAMETERS FIGURE 32. OPTIONS A detailed explanation of the meaning of the parameters shown in the Recognition Parameters window is given below. We suggest not to modify default values if there is not a specific need to do so. Anyway, default values can be restored by clicking Restore Defaults. 24/47 Quablo™ OCR - User Manual - Version 2.0 Blank char %: estimated percentage of blank chars occurring in a text line. Between 0 and 1. White space tolerance: tolerance value used for the classification of a line as belonging to a non border table. The greater this value is, the greater it will be the number of blank chars occurring into a text row, needed to classify the row as belonging to a table. Cells inter-token distance: tolerance value used to guess the belonging of two tokens to the same cell of a non bordered table. The greater this value is, the greater it will be the likelihood of two tokens to belong to the same cell. Between 0 and 1. Min path width: minimum width of a line to consider it in the recognition of a border table. Expressed in points. Min path height: minimum height of a line to consider it in the recognition of a border table. Expressed in points. Min rows count: minimum number of rows for a table to be considered as table. Min column count: minimum number of columns for a table to be considered as table. Inter-token distance: minimum distance to consider two tokens as distinct tokens into a text line. Expressed in points. Vertical tokens overlapping: tolerance value used to evaluate the belonging of two tokens to the same line, considering their vertical overlapping degree. The greater this value is, the greater it will be the likelihood of two tokens to belong to the same line. Between 0 and 1. Inter-line tolerance: maximum distance to consider a line as belonging to a region of the document where presumably is placed a table. Expressed in points. Table row interline tolerance: tolerance value used to recognize two distinct lines into a table. The greater this value is, the greater it will be the likelihood of two rows to be separated. Expressed in points. Tokens out of grid tolerance: tolerance value used to evaluate the belonging of a token to a cell. The greater this value is, the greater it will be the likelihood of a token to belong to a cell. Expressed in points. 25/47 Quablo™ OCR - User Manual - Version 2.0 View menu, shown in Figure 33, includes some features concerning files visualization. FIGURE 33. VIEW MENU In this menu the following functions are available: Close all shown Documents: closes all documents opened in the visualization window. Zoom in: increases the page size of the document having the focus. Zoom out: reduces the page size of the document having the focus. Reset zoom: sets the original size of the pages of the document having the focus. Fit page to screen: adapts the page size of the document having the focus. Fit page width: adapts the page size of the document having the focus. Rotate Page Clockwise: Rotate clockwise the page currently opened in the visualization panel. Rotate Page CounterClockwise: Rotate counter clockwise the page currently opened in the visualization panel. Automatically show Preview after table selection: if the check symbol appears close to the menu command, this behavior is enabled. Otherwise, is disabled. Automatically show Report: if the check symbol appears close to the menu command, this behavior is enabled. Otherwise, is disabled. Show OCR documents save dialog: Show the window enabling the saving of documents generated with OCR. If the option is checked, this behavior is enabled. Otherwise is disabled. Restore layout: restores the default graphical layout. 26/47 Quablo™ OCR - User Manual - Version 2.0 Help menu, shown in Figure 34, FIGURE 34. HELP MENU contains the following functions: Guide: Opens Quablo user manual. Open documentation folder: Open the folder containing the documentation supplied together with Quablo. Licenses: Opens a window showing license information concerning Quablo (Figure 35); About: Opens a window showing some general information concerning Quablo (Figure 36). FIGURE 35. LICENSE INFORMATION WINDOW 27/47 Quablo™ OCR - User Manual - Version 2.0 FIGURE 36. QUABLO ABOUT WINDOW TOOLBAR The toolbar, shown in Figure 37, allows a quick and intuitive access to the main features of Quablo OCR. You need to click one of the icons included in the toolbar to immediately use the represented function or the arrow on the right of the icon, if present, to access the advanced options available for that function. FIGURE 37. TOOLBAR Features available in the toolbar are: Open Document: Opens a window to select files to be loaded in Quablo. To select more files at the same time click the files pressing the Crtl key on the keyboard. 28/47 Quablo™ OCR - User Manual - Version 2.0 Capture Screen: Capture a portion of the computer’s video screen, freely selectable by the user, processable in an image format by the OCR functionality already present in Quablo OCR. Run OCR: Run OCR analysis on the document currently opened in the visualization panel. Clicking on the arrow to the right of the icon, it is possible to choose whether to run OCR on the current document, on all the documents or only on some pages (Figure 38). FIGURE 38. OCR OPTIONS In the latter case, you can select the current page or a range of pages in a separate window shown in Figure 40. FIGURE 39. SELECTION OF THE PAGES TO ANALYZE WITH OCR Recognize: Starts the automatic recognition of the tables occurring in the document currently opened. Clicking on the arrow on the right of the icon, you can extend the recognition to all the documents currently loaded into the system, limit the tables recognition to the displayed page only or use a filter to recognize only some kind of tables (Figure 40). FIGURE 40. TABLES RECOGNITION OPTIONS Note that recognized tables are marked by a green grid tracing the external border and the cells of the recognized tables. Selecting the option Applying a Filter the window shown in Figure 42 will be displayed. This window allows to specify which are the characteristics of the table the user is interested on. In particular, it is possible to specify if tables recognition has to be performed only on the current document or on all the documents loaded in Quablo OCR, which pages contain the tables to recognize, how many are the columns and rows of these tables and, at the end, which values have to appear in some given cell. 29/47 Quablo™ OCR - User Manual - Version 2.0 The selection of the option Return only tables that don’t match filter constraints allows to exclude from recognition process tables satisfying specified criteria and to include tables that, on the contrary, don’t satisfy the given constraints. After the proper configuration of the filter to apply for the tables recognition, it is sufficient to click Ok to obtain the automatic recognition just of the tables corresponding to the criteria specified by the user. FIGURE 41. CONFIGURATION OF THE FILTER TO USE FOR TABLES RECOGNITION Create Composite: Allows to structure as you like the table to export, dragging cells from the original tables to the table represented into the Composite panel. In this way, you can compose the output table choosing which cells of the original tables have to be part of the table to export and their placement in that table. Clean: Cleans the tables automatically or manually recognized in the document currently opened. It is possible to choose to clean all the documents loaded in the system, only the page currently displayed, all the not displayed pages of the current document or all the pages of the current document (Figure 42). 30/47 Quablo™ OCR - User Manual - Version 2.0 FIGURE 42. CLEAN OPTIONS Export: Exports the recognized tables accordingly to the export configuration selected in the panel Export Configuration. Clicking the arrow on the right of the icon, it is possible to export only the current document or all the documents loaded in the system (Figure 44). Moreover it is possible to export only tables corresponding to the characteristics specified by the user by means of a filter similar to the one used for the automatic recognition (Figure 41). FIGURE 43. EXPORT OPTIONS Save as Template: Saves as template the recognition layout occurring in the document currently opened in order to apply it to other documents. Select Template: Selects and applies a template. Options available clicking the arrow on the right of the icon are (Figure 45): Applies tables of current document as template to all documents, only to the current document or to all the pages of all the documents; Loads a template previously saved and apply it to all documents, only to the current document or to all the pages of all the documents. FIGURE 44. TEMPLATE OPTIONS DOCUMENTS VISUALIZATION WINDOW The central window of Quablo OCR GUI includes all the tools for the visualization and the management of the documents loaded in the system (Figure 45). 31/47 Quablo™ OCR - User Manual - Version 2.0 FIGURE 45. MAIN WINDOW To view a document already loaded in the system, you need to double click the document title in Documents panel. If, instead, the document you want to view has not yet been loaded, you can select it from the file system, click it with the left button of the mouse and drag it in the central window. For each displayed document, you will see in the upper part of the window a bar with the document title. You can switch from a document to another by simply clicking the title bar of a document. To close a document in the visualization panel, click the first icon placed in the upper right part of the panel (Figure 46). To close all the documents at once, select the central icon. To resize the panel, choose the third icon. FIGURE 46. VISUALIZATION PANEL CONTROLS Moreover, by clicking a table with the right button of the mouse, a contextual menu appears, providing a quick export of a table into Excel or into the Console panel and a recognition/exportation just of the tables having the same number of rows and columns of the selected table. 32/47 Quablo™ OCR - User Manual - Version 2.0 TOOLS FOR THE VISUALIZATION AND NAVIGATION OF PDF DOCUMENTS After having opened a file in the central window of Quablo OCR, you can explore document pages by means of the navigation controls shown in Figure 47. The downwards arrow allows to view the next page, the upwards one the previous one. FIGURE 47. PAGE NAVIGATION CONTROLS The second group of controls available in the toolbar is in charge of document visualization and allows to adjust the size of the document image as follows: zooms in the page visualization; zooms out the page visualization; adjusts the visualization to the size of the original document image; adapts the visualization according to the window dimension; adapts the visualization according to the window width. Document size can be changed also pressing Ctrl key on the keyboard and scrolling mouse wheel or using Ctrl+ e Ctrl- keys combinations. To rotate the pages of the document currently visualized, clockwise and counterclockwise controls are available (Figure 48). FIGURE 48. CLOCKWISE AND COUNTERCLOCKWISE CONTROLS Moreover, clicking the arrow to the right of each rotation icon is possible to select one of the following options: Rotate CounterClockwise/Clockwise Current Page Rotate CounterClockwise/Clockwise All Pages Note that the rotation of a single page is permitted only for PDF documents not analyzed with OCR. In all the other cases it is allowed only the rotation of all the document pages. To explore the document content focusing the attention on the recognized tables, you can use tables navigation controls (Figure 49). The rightwards arrow allows to view the next table recognized in the document, the leftwards one, the previous. 33/47 Quablo™ OCR - User Manual - Version 2.0 FIGURE 49. TABLE NAVIGATION CONTROLS TOOLS FOR THE MANUAL COMPOSITION OF A TABLE Quablo OCR GUI allows the user to modify the layout of the tables recognized automatically, to identify tables in a semi-automatic way or to trace a table from scratch. These interactions are supported by the tools included in the last group of the toolbar (Figure 50) and can be accessed in mutual exclusion. In other words, functions of this group can be used one at a time and only after explicit selection. FIGURE 50. TABLE MANUAL COMPOSITION CONTROLS In the default configuration, the active control is Select and Modify ( whole grid traced on a table can be selected and moved or deleted. ). In this modality, a line or a To move a grid or a line you need to press the left button of the mouse and move it towards the final position. To perform micro- displacements you can use also arrow keys of the keyboard. To delete a grid or a line, you can select the element to delete and push Canc on the keyboard. Note that on the selected table it appears a red border. In the same way, a selected line is highlighted in red. If the active command is Select and Modify you can modify the recognition grid, also increasing o decreasing its dimensions. To obtain this modification it is sufficient to place the cursor of the mouse on one of the table borders and to move right or left (if the selected border is vertical) or up or down (if the selected border is horizontal). To select a single cell, press Select Cells ( ) and click on the cell. Cell selection is highlighted by a pink coloring of the cell. To select a set of cells, instead, click on the cells, pressing Ctrl on the keyboard. The cell selection enables other two functionalities: is the icon representing Merge Cells feature and consists in merging more cells in a single one. This operation is enabled only if selected cells are adjacent. If this condition is not respected, an error message will be shown. is the icon representing Create rows feature and consists in the partition of one or more cells in rows, following system automatic recognition heuristics. 34/47 Quablo™ OCR - User Manual - Version 2.0 For the semi-automatic recognition of a table, it is necessary to select Draw Table ( ) and, then, while pressing the left button of the mouse, to trace page region in which the table you want recognize is placed. After the release of the mouse button, a green grid will be traced on the selected table. The obtained recognition could be improved selecting proper controls for table updating. To manually draw a table, select Draw Empty Table ( ) to draw only the table border and then Draw Line ( ) to split the table in rows and columns. By positioning the mouse cursor on the table border, the preview of the line to draw will be shown in blue. Click and the proposed line will be really drawn. If you want to draw lines only for some cells, start pressing left mouse button on the line starting point, move the mouse until the line ending position and only at this point release the button. If you need to repeat a draw line operation only for some cells, it could be useful to select the cells group using Select Cells and then Draw Line: in this way, placing the mouse cursor on the border of the group of cells, only the lines interesting the table region covered by the selected cells automatically will be proposed in blue. In the tail end of the toolbar there are placed the functions to cancel a table or a line ( cancel ( ) or restore ( ) and to ) last update made. Finally, note that a contextual menu will be shown if you select a group of cells and click with the right button of the mouse (Figure 51). This menu enables a rapid access to Merge Cells and Create Rows functionalities, to the quick export of the selected cells into Excel or the Console panel and to the Clear Selection and Select all Cells functionalities. 35/47 Quablo™ OCR - User Manual - Version 2.0 FIGURE 51. CONTEXTUAL MENU ON THE VISUALIZATION WINDOW UTILITIES PANELS The default configuration of Quablo OCR GUI presents a central window and some panels along the borders of the central window. The panel content is displayed if you click on the title bar of the panel and it is hidden if you click on the symbol in the title bar. The proposed graphical layout can be widely customized and adapted to the user preferences both in relation to the panels position and dimension and to the interaction modality. To change the position of a panel and to bring it to the same visualization level of the main window, left click on the panel title bar, drag the panel and release the mouse button only after having chosen the preferred position. To resize a panel, click on its border and drag it left clicking until you have obtained the preferred size. Each panel can be moved in the foreground, occupying all the available area pressing the button . The resize of the same panel can be obtained pressing the button closed pressing the button . Finally a panel can be The default layout can be always restored selecting Restore Layout in View menu. DOCUMENTS The list of PDF documents currently loaded in Quablo OCR is visible in Documents panel (Figure 52). 36/47 Quablo™ OCR - User Manual - Version 2.0 FIGURE 52. DOCUMENT PANEL This panel is automatically opened after the loading of new files or, on user request, clicking on the panel title bar. In the upper region of the panel there is a toolbar to quickly access to the following features: loads PDF documents; removes selected PDF documents; removes all loaded PDF documents; lexicographic ordering of loaded documents.. To find a given document in the displayed list, you can use the search utility based on the document title. Insert chars sequence in the text field search… placed under the Documents panel toolbar: as soon as you start typing new chars, only documents containing in their title the typed text are shown in the list. Finally, note that in the lower part of the panel the number of documents currently loaded is shown. Selecting one or more documents in this panel and right clicking with the mouse, a contextual menu will appear (Figure 53), offering a quick access to the following functionalities: Show selected documents: Opens all selected documents in the visualization window; Start automatic recognition on selected documents: Runs automatic recognition on selected documents; Run OCR: Run OCR on selected documents. This option is enabled only for Quablo™ OCR. Clean selected documents: Cleans all the recognized tables in the selected documents; 37/47 Quablo™ OCR - User Manual - Version 2.0 Remove selected Documents: Closes selected documents; Open Parent Folder: Open the folder containing the selected file. FIGURE 53. CONTEXTUAL MENU ON DOCUMENTS PANEL PAGES If you need to work with documents made by many pages, it could be useful to have at your disposal a tool to quickly recognize and access a single page. Clicking on the title bar Pages on the left border of the main window, you can open a vertical panel hosting document pages thumbnails (Figure 54). To go directly to a selected page, you can simply click on the page thumbnail. The page currently displayed in the main window is highlighted in the thumbnails with a red border. 38/47 Quablo™ OCR - User Manual - Version 2.0 FIGURE 54. THUMBNAILS EXPORT CONFIGURATION To export tables into an editable format, you have to click on the proper icon placed into the main toolbar of Quablo OCR GUI ( ). Default modalities used to export tables are shown in the Export Configuration panel. As you can see in Figure 55, according to the default configuration, recognized tables are exported into Excel. In the same directory of the original files, Quablo OCR will create an XLS file for each exported document, and, for each XLS file, a sheet for each recognized table. You can change this export configuration choosing XML, CSV or textual output format instead of Excel format. You can also decide whether to activate or not the option Open output file(s) to automatically open output files at the end of export process. 39/47 Quablo™ OCR - User Manual - Version 2.0 FIGURE 55. EXPORT CONFIGURATION Moreover, it is very useful the possibility to define export rules, choosing one of the following option: A File for each Document – A Sheet for each Table A File for each Document – Single Sheet Single File – A Sheet for each Table Single File – A Sheet for each Document Single File – Single Sheet You can also choose whether overwrite existing files and, finally, you can choose the numeric values format among different formats. After the selection of the export configuration more suitable to the user need it is sufficient to click the button Apply to use the chosen configuration. 40/47 Quablo™ OCR - User Manual - Version 2.0 A particular export configuration could be saved and reused later: you need to click Save Configuration and to type the configuration name in the dialog box that will appear. Finally click OK (Figure 56). FIGURE 56. EXPORT CONFIGURATION CREATION At this point, the saved configuration will appear among the available configurations and it will be possible to load it or to delete it if no more useful (Figure 57). FIGURE 57. EXPORT CONFIGURATION SAVING Similarly, you can restore the default configuration clicking Restore defaults. CONSOLE Console panel is used to trace advanced information, useful for system processes monitoring, and to visualize exported tables into textual format. For this panel two options are available: one to copy and paste its content and the other one to clear it. REPORT After the execution of a tables automatic recognition process into a collection of documents, it could be useful to have a general view of the obtained results. For this purpose, Quablo OCR includes the Report panel that is automatically shown after each automatic recognition process and that contains some useful information for the user as the number of tables found in each processed document (Figure 59). 41/47 Quablo™ OCR - User Manual - Version 2.0 FIGURE 58. REPORT PANEL The automatic display of the Report panel can be disabled clicking the menu View Automatically show Report. PREVIEW To verify the correspondence between the table recognition result, obtained both automatically or manually, and the one expected by the user, Quablo OCR GUI contains a panel that, given a PDF table with its recognition grid, provides a preview of the recognition done on the table (Figure 59). The preview of a table is shown automatically each time you select a table in a PDF file and any updates to the recognized grid is immediately shown in the preview. In the Preview panel you can modify the columns width and to open a contextual menu right clicking with the mouse. This menu allows to: Copy the content of the cells selected in the preview; Quickly export the content of the selected cells into Excel or console; Configure the decimal and thousands separators to use for numeric values export. 42/47 Quablo™ OCR - User Manual - Version 2.0 FIGURE 59. TABLE PREVIEW COMPOSITE The selection of the command Create Composite in the toolbar, enables the automatic display of the panel Composite. This panel allows the visualization of the preview of the table that will be exported and that is under construction, selecting some cells in the tables of the current document and dragging them in a particular position of the output table. HELP The main goal of the Help panel is to support the user in the use of Quablo OCR, suggesting him step by step which are the available features in a particular system utilization phase. To obtain the complete list of all the functionalities of the guide, you can click the button Show all Hints. To came back to the contextual menu, you can click the button Show only suitable hints. 43/47 Quablo™ OCR - User Manual - Version 2.0 CONFIGURAZIONE OCR The OCR Configuration panel gives the user some options for changing how to perform, if the default configuration is not suitable for user purpose (Figure 61). FIGURE 60. OCR CONFIGURATION By using OCR Use option you can determine when analyzing documents with OCR. The available options are three: Always: All documents open in Quablo OCR will be automatically analyzed by the OCR. Never: Only image files will be scanned automatically by OCR. Automatic: Quablo automatically will analyze with the OCR only images and PDF files containing only images. The OCR recognition profile lets you choose between carrying out a faster and less accurate OCR analysis (Fast Recognition) or, conversely, a more accurate and slower one (Accurate Recognition). The option PDF export profile allows to generate by means of the OCR analysis PDF files having: Text With Pictures: This will display the recognized text with no background and the source document will be displayed in areas with no text. Text On Image: The source document is shown as a background for the recognized text. Image On Text: The source document will be shown in the foreground. The option OCR dictionary to use, finally, enables the choice of the dictionary that OCR will use to recognize the text.. 44/47 Quablo™ OCR - User Manual - Version 2.0 FIGURES INDEX Figure 1. Quablo installer icon ........................................................................................................................................ 6 Figure 2. Installation startup ............................................................................................................................................ 6 Figure 3. Software license agreement – 1 ................................................................................................................... 7 Figura 4. Software license agreement - 2 .................................................................................................................... 7 Figura 5. Choice of Quablo’s components .................................................................................................................... 8 Figura 6. Installation directory ........................................................................................................................................ 9 Figura 7. Path of the Start Menu .................................................................................................................................... 9 Figure 8. Installation progress ....................................................................................................................................... 10 Figure 9. Run Quablo OCR at the end of installation process ................................................................................ 10 Figura 10. Quablo OCR shortcut .................................................................................................................................. 11 Figure 11. OCR upgrade License loading window ................................................................................................... 12 Figure 12. License entering ............................................................................................................................................ 12 Figure 13. Quablo first run ............................................................................................................................................ 13 Figure 14. Evaluation period expired ......................................................................................................................... 13 Figure 15. License activation ......................................................................................................................................... 14 Figure 16. Successful activation .................................................................................................................................... 15 Figure 17. Off-line activation........................................................................................................................................ 15 Figura 18. Confirm Quablo installation ....................................................................................................................... 16 Figure 19. Uninstallation in progress............................................................................................................................ 16 Figure 20. Successful uninstallation of Quablo .......................................................................................................... 17 Figure 21. Quablo graphical interface ....................................................................................................................... 18 Figure 22. Core tools to start using Quablo ............................................................................................................... 19 Figure 23. Quablo graphical interface ....................................................................................................................... 20 Figure 24. Menu bar ....................................................................................................................................................... 21 Figure 25. File menu ........................................................................................................................................................ 21 Figure 26. Multiple selection of files ............................................................................................................................ 22 Figure 27. Remote file opening .................................................................................................................................... 22 Figure 28. Document collection opening ...................................................................................................................... 22 Figure 29. Documents collection saving ....................................................................................................................... 23 45/47 Quablo™ OCR - User Manual - Version 2.0 Figure 30. Edit menu ....................................................................................................................................................... 23 Figure 31. Table recognition parameters ................................................................................................................... 24 Figure 32. Options ........................................................................................................................................................... 24 Figure 33. View menu ..................................................................................................................................................... 26 Figure 34. Help menu ...................................................................................................................................................... 27 Figure 35. License Information window ....................................................................................................................... 27 Figure 36. Quablo about window ................................................................................................................................ 28 Figure 37. Toolbar ........................................................................................................................................................... 28 Figure 38. OCR options .................................................................................................................................................. 29 FigurE 39. Selection of the pages to analyze with OCR ......................................................................................... 29 Figure 40. Tables recognition options .......................................................................................................................... 29 Figure 41. Configuration of the filter to use for tables recognition....................................................................... 30 Figure 42. Clean options ................................................................................................................................................ 31 Figure 43. Export options ............................................................................................................................................... 31 FigurE 44. Template options .......................................................................................................................................... 31 Figure 45. Main Window ............................................................................................................................................... 32 Figure 46. Visualization panel controls........................................................................................................................ 32 Figure 47. Page navigation controls ............................................................................................................................ 33 Figure 48. clockwise and counterclockwise controls .................................................................................................. 33 Figure 49. Table navigation controls ........................................................................................................................... 34 Figure 50. Table manual composition controls ........................................................................................................... 34 Figure 51. Contextual menu on the visualization window ........................................................................................ 36 Figure 52. Document panel ............................................................................................................................................ 37 Figure 53. Contextual menu on documents panel...................................................................................................... 38 Figure 54. Thumbnails ..................................................................................................................................................... 39 Figure 55. Export configuration .................................................................................................................................... 40 Figure 56. Export configuration creation .................................................................................................................... 41 Figure 57. Export configuration saving ....................................................................................................................... 41 Figure 58. Report panel ................................................................................................................................................. 42 Figure 59. Table preview............................................................................................................................................... 43 Figure 60. OCR configuration ....................................................................................................................................... 44 46/47 Quablo™ OCR - User Manual - Version 2.0 47/47


![[Scan] button on the ScanSnap.](http://vs1.manualzilla.com/store/data/005658366_1-513fc66afaf683e0c3b25d8948918383-150x150.png)