1
PeopleTools 8.4:
Data Management
PeopleTools 8.4: Data Management
SKU Tr84DAM-B 0302
PeopleBooks Contributors: Teams from PeopleSoft Product Documentation and
Development.
Copyright © 2002 PeopleSoft, Inc. All rights reserved.
Printed in the United States.
All material contained in this documentation is proprietary and confidential to PeopleSoft,
Inc. ("PeopleSoft"), protected by copyright laws and subject to the nondisclosure provisions
of the applicable PeopleSoft agreement. No part of this documentation may be reproduced,
stored in a retrieval system, or transmitted in any form or by any means, including, but not
limited to, electronic, graphic, mechanical, photocopying, recording, or otherwise without the
prior written permission of PeopleSoft.
This documentation is subject to change without notice, and PeopleSoft does not warrant that
the material contained in this documentation is free of errors. Any errors found in this
document should be reported to PeopleSoft in writing.
The copyrighted software that accompanies this document is licensed for use only in strict
accordance with the applicable license agreement which should be read carefully as it
governs the terms of use of the software and this document, including the disclosure thereof.
PeopleSoft, the PeopleSoft logo, PeopleTools, PS/nVision, PeopleCode, PeopleBooks,
PeopleTalk, and Vantive are registered trademarks, and "People power the internet." and Pure
Internet Architecture are trademarks of PeopleSoft, Inc. All other company and product
names may be trademarks of their respective owners. The information contained herein is
subject to change without notice.
Contents
Data Management Preface
About This PeopleBook................................................................................................... xiii
Before You Begin............................................................................................................ xiii
PeopleSoft Application Fundamentals ............................................................................ xiv
Related Documentation ................................................................................................... xiv
Hard-copy Documentation........................................................................................ xiv
PeopleBooks Standard Field Definitions...........................................................................xv
Typographical Conventions and Visual Cues.................................................................. xvi
Page and Panel Introductory Table................................................................................ xviii
Comments and Suggestions........................................................................................... xviii
Chapter 1
Data Integrity Tools
Understanding Data Integrity Tools ................................................................................ 1-1
SQL Alter ........................................................................................................................ 1-1
Understanding Table and Column Audits................................................................. 1-2
DDDAUDIT .................................................................................................................... 1-3
DDDAUDIT Queries ................................................................................................ 1-4
SYSAUDIT ..................................................................................................................... 1-5
Understanding SYSAUDIT Output .......................................................................... 1-7
Chapter 2
Data Mover
Understanding Data Mover ............................................................................................. 2-1
Understanding the Data Mover Interface ........................................................................ 2-2
Starting Data Mover.................................................................................................. 2-2
Operating Modes....................................................................................................... 2-2
Signing on to the Development Environment ........................................................... 2-2
Understanding the Data Mover Window .................................................................. 2-3
Understanding the Menu Options ............................................................................. 2-4
Understanding the Toolbar Options.......................................................................... 2-4
Understanding Data Mover Scripts ................................................................................. 2-4
Command Types ....................................................................................................... 2-5
Syntax Rules ............................................................................................................. 2-5
PEOPLESOFT PROPRIETARY
AND
CONFIDENTIAL
CONTENTS
iii
DATA MANAGEMENT
Creating and Editing Scripts ..................................................................................... 2-7
Preparing to Run Export Scripts................................................................................ 2-8
Running Scripts......................................................................................................... 2-9
Using Database Setup .................................................................................................... 2-10
Accessing Database Setup....................................................................................... 2-10
Using the Database Setup Screen............................................................................ 2-11
Using the Select PeopleSoft Application Screen .................................................... 2-11
Using the Database Parameters Screen ................................................................... 2-12
Checking the Generated Script................................................................................ 2-12
Using the Data Mover Command Line Interface........................................................... 2-13
Overview ................................................................................................................. 2-13
Getting Started (on UNIX)...................................................................................... 2-14
Running a Data Mover Script from the Command Line ......................................... 2-15
Understanding the Command Line Parameters....................................................... 2-15
Using a Parameter File ............................................................................................ 2-16
Understanding Data Mover Commands ........................................................................ 2-17
Data Mover Commands .......................................................................................... 2-17
SQL Commands ...................................................................................................... 2-18
Standard SQL Commands with DMS Scripts ......................................................... 2-18
Standard SQL Commands with SQL Files.............................................................. 2-19
Non-Standard SQL Commands............................................................................... 2-19
Command Matrix .................................................................................................... 2-20
Data Mover Command Reference ................................................................................. 2-21
CHANGE_ACCESS_PASSWORD ....................................................................... 2-22
CREATE_TEMP_TABLE...................................................................................... 2-22
CREATE_TRIGGER .............................................................................................. 2-23
ENCRYPT_PASSWORD....................................................................................... 2-23
EXPORT ................................................................................................................. 2-24
IMPORT.................................................................................................................. 2-25
REM, REMARK, - - ............................................................................................... 2-27
RENAME................................................................................................................ 2-27
REPLACE_ALL ..................................................................................................... 2-30
REPLACE_DATA .................................................................................................. 2-30
REPLACE_VIEW................................................................................................... 2-31
RUN ........................................................................................................................ 2-31
SET.......................................................................................................................... 2-32
SWAP_BASE_LANGUAGE ................................................................................. 2-33
SET IGNORE_ERRORS ........................................................................................ 2-33
SET BASE_LANGUAGE ...................................................................................... 2-34
Data Mover Command Modifiers.................................................................................. 2-35
CONTENTS
iv
PEOPLESOFT PROPRIETARY
AND
CONFIDENTIAL
DATA MANAGEMENT
AS ........................................................................................................................... 2-35
IGNORE_DUPS ..................................................................................................... 2-36
WHERE .................................................................................................................. 2-37
When Data Mover Issues COMMITs............................................................................ 2-38
SET Parameter Reference.............................................................................................. 2-38
COMMIT ................................................................................................................ 2-38
CREATE_INDEX_BEFORE_DATA .................................................................... 2-39
DBSPACE............................................................................................................... 2-39
DDL ........................................................................................................................ 2-41
EXECUTE_SQL..................................................................................................... 2-41
EXTRACT .............................................................................................................. 2-42
IGNORE_DUPS ..................................................................................................... 2-42
INPUT..................................................................................................................... 2-43
INSERT_DATA_ONCE......................................................................................... 2-44
LOG ........................................................................................................................ 2-44
NO DATA............................................................................................................... 2-45
NO INDEX ............................................................................................................. 2-46
NO RECORD.......................................................................................................... 2-46
NO SPACE ............................................................................................................. 2-46
NO TRACE............................................................................................................. 2-47
NO VIEW ............................................................................................................... 2-47
OUTPUT................................................................................................................. 2-48
SIZING_SET .......................................................................................................... 2-48
SPACE .................................................................................................................... 2-49
START.................................................................................................................... 2-49
STATISTICS .......................................................................................................... 2-50
VERSION ............................................................................................................... 2-50
Script Examples............................................................................................................. 2-51
Exporting a Database .............................................................................................. 2-51
Building a Microsoft SQL Server Database............................................................ 2-51
Recreating All Views .............................................................................................. 2-51
Importing with REPLACE_ALL with a Commit Level ......................................... 2-51
Combining SQL Commands and IMPORT ............................................................ 2-52
Chapter 3
PeopleTools Utilities
Understanding the PeopleTools Utilities......................................................................... 3-1
Administration Utilities ................................................................................................... 3-2
PeopleTools Options................................................................................................. 3-2
Message Catalog ....................................................................................................... 3-8
PEOPLESOFT PROPRIETARY
AND
CONFIDENTIAL
CONTENTS
v
DATA MANAGEMENT
Translate Values...................................................................................................... 3-10
Load Application Server Cache .............................................................................. 3-11
Table Space Utilities ............................................................................................... 3-14
Table Space Management ....................................................................................... 3-15
DDL Model Defaults............................................................................................... 3-16
Strings Table ........................................................................................................... 3-18
XML Link Function Registry.................................................................................. 3-19
Merchant Integration Utilities ................................................................................. 3-19
TableSet IDs............................................................................................................ 3-19
Record Group Table ................................................................................................ 3-20
TableSet Control ..................................................................................................... 3-21
Convert Panels to Pages .......................................................................................... 3-22
Update Utilities ....................................................................................................... 3-26
URL Maintenance ................................................................................................... 3-26
Copy File Attachments............................................................................................ 3-27
Query Monitor......................................................................................................... 3-29
Sync ID Utilities...................................................................................................... 3-29
Audit Utilities ................................................................................................................ 3-29
Record Cross Reference .......................................................................................... 3-29
Perform System Audit (SYSAUDIT) ..................................................................... 3-31
Database Level Auditing Utilities ........................................................................... 3-31
Debug Utilities............................................................................................................... 3-32
PeopleTools Test Utilities ....................................................................................... 3-32
Replay Appserver Crash (Application Server Crash) ............................................. 3-33
Trace PeopleCode ................................................................................................... 3-33
Trace SQL ............................................................................................................... 3-35
Trace Page............................................................................................................... 3-36
International Utilities ..................................................................................................... 3-36
Preferences .............................................................................................................. 3-36
Process Field Size.................................................................................................... 3-37
Time Zones.............................................................................................................. 3-37
Manage Languages.................................................................................................. 3-37
Optimization Utilities .................................................................................................... 3-38
Chapter 4
Understanding Configuration Manager
Configuration Manager.................................................................................................... 4-1
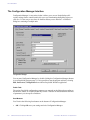
The Configuration Manager Interface ............................................................................. 4-2
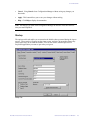
Startup.............................................................................................................................. 4-3
Signon Defaults ......................................................................................................... 4-4
CONTENTS
vi
PEOPLESOFT PROPRIETARY
AND
CONFIDENTIAL
DATA MANAGEMENT
Numeric keypad — Enter Key tabs to next field ...................................................... 4-6
Operator Can Override.............................................................................................. 4-6
Cache Files................................................................................................................ 4-6
Display............................................................................................................................. 4-7
Language................................................................................................................... 4-8
Page Display ............................................................................................................. 4-8
Font ......................................................................................................................... 4-10
Business Process Display........................................................................................ 4-11
Crystal/Business Interlink.............................................................................................. 4-11
Crystal Options ....................................................................................................... 4-12
Business Interlink Driver Options........................................................................... 4-12
Trace.............................................................................................................................. 4-12
Workflow....................................................................................................................... 4-14
Detach Directory..................................................................................................... 4-14
Maximum Worklist Instances ................................................................................. 4-15
Mail Protocol .......................................................................................................... 4-15
Mail DLL Path ........................................................................................................ 4-15
Remote Call ................................................................................................................... 4-15
Client Setup ................................................................................................................... 4-17
Shortcut Links......................................................................................................... 4-18
ODBC Setup ........................................................................................................... 4-18
Install Workstation.................................................................................................. 4-19
Import/Export ................................................................................................................ 4-19
Export to a File........................................................................................................ 4-19
Import from a File................................................................................................... 4-20
Profile ............................................................................................................................ 4-20
Database/Application Server................................................................................... 4-22
Process Scheduler ................................................................................................... 4-25
nVision.................................................................................................................... 4-28
Common Tab .......................................................................................................... 4-30
Command Line Options................................................................................................. 4-31
Import File .............................................................................................................. 4-32
Export File .............................................................................................................. 4-32
Run Client Setup ..................................................................................................... 4-32
Run Client Setup “Quietly”..................................................................................... 4-32
Install ActiveX controls .......................................................................................... 4-32
Install Crystal runtime files..................................................................................... 4-32
Install MMS DSN ................................................................................................... 4-33
Disable ODBC Driver Manager Installation........................................................... 4-33
Disable PeopleSoft ODBC Driver Installation ....................................................... 4-33
PEOPLESOFT PROPRIETARY
AND
CONFIDENTIAL
CONTENTS
vii
DATA MANAGEMENT
Uninstall Workstation ............................................................................................. 4-33
Help ......................................................................................................................... 4-33
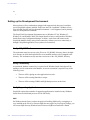
Setting up the Development Environment..................................................................... 4-34
Verify <PS_HOME> Access .................................................................................. 4-34
Verify Connectivity................................................................................................. 4-34
Verify Supporting Applications .............................................................................. 4-34
Understanding the User Settings ............................................................................. 4-35
Running Client Setup .............................................................................................. 4-36
Chapter 5
Data Archiving
Understanding Data Archiving ........................................................................................ 5-1
Determining an Archive Strategy.............................................................................. 5-2
Archiving to Tables................................................................................................... 5-2
Archiving to Flat Files............................................................................................... 5-4
Using Archive Designer................................................................................................... 5-4
Record Criteria Page ................................................................................................. 5-4
Join Record Criteria Page.......................................................................................... 5-6
SQL Designer Page ................................................................................................... 5-7
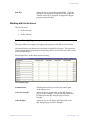
Working with the Archives.............................................................................................. 5-9
Archive Security Page............................................................................................... 5-9
Archive Utilities Page ............................................................................................. 5-10
Working with Data ........................................................................................................ 5-10
Data Finder Page ..................................................................................................... 5-11
Data Transfer Input Page......................................................................................... 5-12
Data Transfer Output Page...................................................................................... 5-13
Running Data Archival Processes.................................................................................. 5-14
Archive Data Page................................................................................................... 5-14
Archive Online to Flat Files Page ........................................................................... 5-15
Export History to Flat Files Page ............................................................................ 5-17
Import From Flat Files Page.................................................................................... 5-17
Running Data Archival Reports and Audits .................................................................. 5-18
Archive Report Page ............................................................................................... 5-18
Audit Report Page ................................................................................................... 5-19
Audit Inquire Page .................................................................................................. 5-20
Archiving Tips and Techniques..................................................................................... 5-21
Understanding Business Requirements ................................................................... 5-21
Creating History Tables .......................................................................................... 5-22
Archiving to Flat File .............................................................................................. 5-22
Archiving from Online to History Table Process.................................................... 5-23
CONTENTS
viii
PEOPLESOFT PROPRIETARY
AND
CONFIDENTIAL
DATA MANAGEMENT
Rolling Back History Table Data............................................................................ 5-23
Archiving from History Table to a Flat File ........................................................... 5-24
Restoring Archived Data from Flat Files ................................................................ 5-24
Understanding Commits ......................................................................................... 5-24
Gaining Increased Performance .............................................................................. 5-24
Modifying Indexes .................................................................................................. 5-25
Chapter 6
PeopleSoft CTI
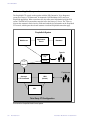
Understanding PeopleSoft CTI........................................................................................ 6-1
Understanding the Components ................................................................................ 6-2
Understanding the PeopleSoft CTI Console ............................................................. 6-3
Required Genesys Components ................................................................................ 6-3
Required Java Runtime Environment ....................................................................... 6-4
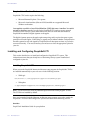
Installing and Configuring PeopleSoft CTI..................................................................... 6-4
Installing PeopleSoft CTI.......................................................................................... 6-4
Enabling PeopleSoft CTI .......................................................................................... 6-5
CTI Configuration Page ............................................................................................ 6-6
Shared Phone Book................................................................................................... 6-8
CTI Agent Configuration Page ................................................................................. 6-9
Phone Book Page .................................................................................................... 6-10
Personalization Page ............................................................................................... 6-11
Queue Configuration Page ...................................................................................... 6-12
Miscellaneous Page................................................................................................. 6-13
Demo: Outbound Call Page .................................................................................... 6-13
Setting up Genesys for Popup Windows................................................................. 6-13
Supporting Single Signon ....................................................................................... 6-15
Implementing "Free Seating".................................................................................. 6-15
Troubleshooting ...................................................................................................... 6-15
Using PeopleSoft CTI.................................................................................................... 6-16
Overview................................................................................................................. 6-16
Understanding the Interface .................................................................................... 6-17
Getting Started ........................................................................................................ 6-18
Using the CTI Console with the Portal ................................................................... 6-19
Understanding Call Actions .................................................................................... 6-22
Answering a Call..................................................................................................... 6-23
Transferring a Caller ............................................................................................... 6-23
Initiating Conference Calls ..................................................................................... 6-24
Working with the Hold Status................................................................................. 6-25
Disconnecting a Caller ............................................................................................ 6-26
PEOPLESOFT PROPRIETARY
AND
CONFIDENTIAL
CONTENTS
ix
DATA MANAGEMENT
Switching "Agent Ready" Status............................................................................. 6-26
Dialing an Outbound Call ....................................................................................... 6-27
Completing a Call.................................................................................................... 6-28
Using Hotkeys ......................................................................................................... 6-28
Viewing Your Information on the Agent Info Page................................................ 6-29
Chapter 7
Transaction Set Editor
Understanding Transaction Set Editor ............................................................................. 7-1
TSE Record Edits ............................................................................................................ 7-2
TSE Record Edit Types............................................................................................. 7-3
TSE Process Modes................................................................................................... 7-4
TSE Environmental Requirements............................................................................ 7-6
Log Tables ....................................................................................................................... 7-9
Set-Level Log............................................................................................................ 7-9
Edit-Level Log ........................................................................................................ 7-10
Field-Level Log....................................................................................................... 7-11
TSE API Services .......................................................................................................... 7-12
Services Provided.................................................................................................... 7-12
String Field Conversions......................................................................................... 7-12
Logging Application Errors .................................................................................... 7-13
Building a WHERE Clause ..................................................................................... 7-17
UseEdit Flag Translation......................................................................................... 7-17
Internal Documentation ................................................................................................. 7-18
Program Module Flow ............................................................................................ 7-18
Narrative.................................................................................................................. 7-19
General Ledger Example......................................................................................... 7-20
TSE Messages ......................................................................................................... 7-22
Chapter 8
Database Level Auditing
Creating Audit Record Definitions .................................................................................. 8-2
Working with Auditing Triggers ..................................................................................... 8-4
Defining Auditing Triggers....................................................................................... 8-4
Creating and Running the Auditing Triggers Script.................................................. 8-5
Deleting Auditing Triggers ....................................................................................... 8-6
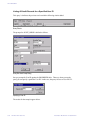
Viewing Audit Information ............................................................................................. 8-7
Creating Queries to View Audit Records Details ............................................................ 8-8
Creating an Access Group......................................................................................... 8-8
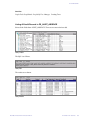
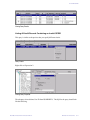
Listing All Audit Records in PS_AUDIT_ABSENCE ............................................. 8-9
CONTENTS
x
PEOPLESOFT PROPRIETARY
AND
CONFIDENTIAL
DATA MANAGEMENT
Listing All Audit Records for a Specified User ID................................................. 8-10
Listing All Audit Records Containing an Invalid OPRID ...................................... 8-11
Listing All Audit Records For a Specified Time Period......................................... 8-12
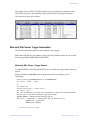
Microsoft SQL Server Trigger Information .................................................................. 8-13
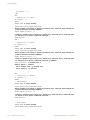
Microsoft SQL Server: Trigger Syntax................................................................... 8-13
Microsoft SQL Server: Capturing Text/Image Columns ........................................ 8-15
Microsoft SQL Server Trigger Maintenance .......................................................... 8-17
Sybase Trigger Information........................................................................................... 8-18
Sybase Trigger Syntax ............................................................................................ 8-18
Sybase Trigger Maintenance................................................................................... 8-19
Oracle ............................................................................................................................ 8-20
Oracle Trigger Syntax............................................................................................. 8-20
Oracle Trigger Maintenance ................................................................................... 8-23
DB2 for OS/390 Trigger Information............................................................................ 8-25
Assembler Program AUDIT01 for DB2 for OS390 ............................................... 8-25
User Defined Function (External Scalar) requirements .......................................... 8-30
Sample DB2 Syntax to Create UDF Function AUDIT01 ....................................... 8-30
Verifying Status of UDF Function.......................................................................... 8-30
DB2 OS390 Trigger Syntax.................................................................................... 8-31
DB2 OS390 Trigger Maintenance .......................................................................... 8-32
Glossary
Index
PEOPLESOFT PROPRIETARY
AND
CONFIDENTIAL
CONTENTS
xi
Data Management Preface
In this book we'll show you how to use various administration PeopleTools, such as Data
Mover, the PeopleTools Utilities, Configuration Manager, Archive Data, and so on.
In previous releases, this book contained the Mass Change documentation. However, Mass
Change is no longer recommended for new development, and because of that we no longer
distribute the documentation.
The “About This PeopleBook” section contains general product line information, such as
related documentation, common page elements, and typographical conventions. This book
also contains a glossary with useful terms that are used in PeopleBooks.
See PeopleSoft Glossary.
About This PeopleBook
This book provides you with the information that you need for implementing and using
PeopleTools 8.4 applications. Complete documentation for this release is provided on the CDROM PT84PBR0.
Note. Your access to PeopleSoft PeopleBooks depends on which PeopleSoft applications
you've licensed. You may not have access to all of the PeopleBooks.
This section contains information that you should know before you begin working with
PeopleSoft products and documentation, including PeopleSoft-specific documentation
conventions, information specific to each PeopleSoft product line, and information on
ordering additional copies of our documentation.
Before You Begin
To benefit fully from the information covered in this book, you should have a basic
understanding of how to use PeopleSoft applications. We recommend that you complete at
least one PeopleSoft introductory training course.
You should be familiar with navigating the system and adding, updating, and deleting
information by using PeopleSoft windows, menus, and pages. You should also be
comfortable using the World Wide Web and the Microsoft® Windows or Windows NT
graphical user interface.
Because we assume that you already know how to navigate the PeopleSoft system, much of
the information in these books is not procedural. That is, these books do not typically provide
step-by-step instructions on using tables, pages, and menus. Instead, we provide you with the
information that you need to use the system most effectively and to implement your
PEOPLESOFT PROPRIETARY
AND
CONFIDENTIAL
PREFACE
xiii
DATA MANAGEMENT
PeopleSoft application according to your organizational or departmental needs. PeopleBooks
expand on the material covered in PeopleSoft training classes.
PeopleSoft Application Fundamentals
Each PeopleSoft application PeopleBook provides implementation and processing information
for your PeopleSoft database. However, there is additional, essential information describing
the setup and design of your database contained in a companion volume of documentation
called PeopleSoft Application Fundamentals.
PeopleSoft Application Fundamentals contains important topics that apply to many or all
PeopleSoft applications across each product line. Whether you are implementing only one
PeopleSoft application, some combination of products within a product line, or an entire
PeopleSoft system, you should be familiar with the contents of this central PeopleBook. It
contains fundamental information such as setting up control tables and administering security.
The PeopleSoft Applications Fundamentals PeopleBook contains common information
pertinent to all applications in each product line, such as defining general options. If you're
upgrading from a previous PeopleSoft release, you may notice that we've removed some
topics or topic headings from the individual application PeopleBooks and consolidated them
in this single reference book. You’ll now find only application-specific information in your
individual application PeopleBooks. This makes the documentation as a whole less
redundant. Throughout each PeopleBook, we provide cross-references to PeopleSoft
Application Fundamentals and other PeopleBooks.
Related Documentation
You can order printed, bound versions of the complete PeopleSoft documentation delivered on
your PeopleBooks CD-ROM and additional copies of the PeopleBooks CDs through the
Documentation section of the PeopleSoft Customer Connection website:
http://www.peoplesoft.com/corp/en/login.asp
You can find updates and additional documentation for this release, as well as previous
releases, on PeopleSoft Customer Connection (http://www.peoplesoft.com/corp/en/login.asp ).
Through the Documentation section of Customer Connection, you can download files to add
to your PeopleBook library. You'll find a variety of useful and timely materials, including
updates to the full PeopleSoft documentation delivered on your PeopleBooks CD.
Important! Before you upgrade, it is imperative that you check PeopleSoft Customer
Connection for updates to the upgrade instructions. We continually post updates as we refine
the upgrade process.
Hard-copy Documentation
To order printed, bound volumes of the complete PeopleSoft documentation delivered on your
PeopleBooks CD-ROM, visit the PeopleSoft Press website from the Documentation section of
PREFACE
xiv
PEOPLESOFT PROPRIETARY
AND
CONFIDENTIAL
DATA MANAGEMENT
PeopleSoft Customer Connection. The PeopleSoft Press website is a joint venture between
PeopleSoft and Consolidated Publications Incorporated (CPI), our book print vendor.
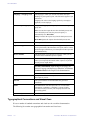
We make printed documentation available for each major release shortly after the software is
shipped. Customers and partners can order printed PeopleSoft documentation by using any of
the following methods:
From the main PeopleSoft Internet site, go to the
Documentation section of Customer Connection. You can
find order information under the Ordering PeopleBooks
topic. Use a Customer Connection ID, credit card, or
purchase order to place your order.
Internet
PeopleSoft Internet site: http://www.peoplesoft.com/.
Telephone
Contact Consolidated Publishing Incorporated (CPI) at
800 888 3559.
Email
Send email to CPI at [email protected].
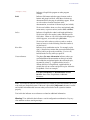
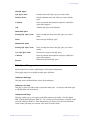
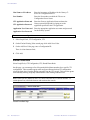
PeopleBooks Standard Field Definitions
Throughout our product documentation, you will encounter fields and buttons that are used on
many application pages or panels. This section lists the most common fields and buttons and
provides standard definitions.
Field
Definition
As of Date
The last date for which a report or process includes data.
Business Unit
An identification code that represents a high-level organization
of business information. You can use a business unit to define
regional or departmental units within a larger organization.
Description
Freeflow text up to 30 characters.
Effective Date
Date on which a table row becomes effective; the date that an
action begins. For example, if you want to close out a ledger on
June 30, the effective date for the ledger closing would be July
1. This date also determines when you can view and change the
information. Pages or panels and batch processes that use the
information use the current row.
For more information about effective dates, see
Understanding Effective Dates in Using PeopleSoft
Applications.
EmplID (employee ID)
PEOPLESOFT PROPRIETARY
AND
CONFIDENTIAL
Unique identification code for an individual associated with
your organization.
PREFACE
xv
DATA MANAGEMENT
Field
Definition
Language or Language Code
The language in which you want the field labels and report
headings of your reports to print. The field values appear as you
enter them.
Language also refers to the language spoken by an employee,
applicant, or non-employee.
Process Frequency group box
Designates the appropriate frequency in the Process Frequency
group box:
Once executes the request the next time the batch process runs.
After the batch process runs, the process frequency is
automatically set to Don't Run.
Always executes the request every time the batch process runs.
Don't Run ignores the request when the batch process runs.
Report ID
The report identifier.
Report Manager
This button takes you to the Report List page, where you can
view report content, check the status of a report, and see content
detail messages (which show you a description of the report and
the distribution list).
Process Monitor
This button takes you to the Process List page, where you can
view the status of submitted process requests.
Run
This button takes you to the Process Scheduler request page,
where you can specify the location where a process or job runs
and the process output format.
For more information about the Report List page, the
Process List page, and the Process Scheduler, see Process
Scheduler Basics in the PeopleTools documentation.
Request ID
A request identification that represents a set of selection criteria
for a report or process.
User ID
The system identifier for the individual who generates a
transaction.
SetID
An identification code that represents a set of control table
information or TableSets. A TableSet is a group of tables
(records) necessary to define your company’s structure and
processing options.
Short Description
Freeflow text up to 15 characters.
Typographical Conventions and Visual Cues
We use a number of standard conventions and visual cues in our online documentation.
The following list contains our typographical conventions and visual cues:
PREFACE
xvi
PEOPLESOFT PROPRIETARY
AND
CONFIDENTIAL
DATA MANAGEMENT
(monospace font)
Indicates a PeopleCode program or other program
example.
Bold
Indicates field names and other page elements, such as
buttons and group box labels, when these elements are
documented below the page on which they appear. When
we refer to these elements elsewhere in the
documentation, we set them in Normal style (not in bold).
We also use boldface when we refer to navigational paths,
menu names, or process actions (such as Save and Run).
Italics
Indicates a PeopleSoft or other book-length publication.
We also use italics for emphasis and to indicate specific
field values. When we cite a field value under the page on
which it appears, we use this style: field value.
We also use italics when we refer to words as words or
letters as letters, as in the following: Enter the number 0,
not the letter O.
KEY+KEY
Indicates a key combination action. For example, a plus
sign (+) between keys means that you must hold down the
first key while you press the second key. For ALT+W,
hold down the ALT key while you press W.
Cross-references
The phrase For more information indicates where you
can find additional documentation on the topic at hand.
We include the navigational path to the referenced topic,
separated by colons (:). Capitalized titles in italics
indicate the title of a PeopleBook; capitalized titles in
normal font refer to sections and specific topics within the
PeopleBook. Here's an example:
For more information, see Documentation on CDROM in About These PeopleBooks: Additional
Resources.
Note. Text in this bar indicates information that you should pay particular attention to as you
work with your PeopleSoft system. If the note is preceded by Important!, the note is crucial
and includes information that concerns what you need to do for the system to function
properly.
Text in this bar indicates cross-references to related or additional information.
Warning! Text within this bar indicates a crucial configuration consideration. Pay very
close attention to these warning messages.
PEOPLESOFT PROPRIETARY
AND
CONFIDENTIAL
PREFACE
xvii
DATA MANAGEMENT
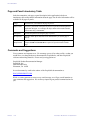
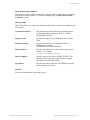
Page and Panel Introductory Table
In the documentation, each page or panel description in the application includes an
introductory table with pertinent information about the page. Not all of the information will be
available for all pages or panels.
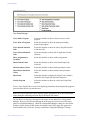
Usage
Describes how you would use the page or process.
Object Name
Gives the system name of the panel or process as specified in the PeopleTools
Application Designer. For example, the Object Name of the Detail Calendar
panel is DETAIL_CALENDAR1.
Navigation
Provides the path for accessing the page or process.
Prerequisites
Specifies which objects must have been defined before you use the page or
process.
Access
Requirements
Specifies the keys and other information necessary to access the page. For
example, SetID and Calendar ID are required to open the Detail Calendar
page.
Comments and Suggestions
Your comments are important to us. We encourage you to tell us what you like, or what you
would like to see changed about our documentation, PeopleBooks, and other PeopleSoft
reference and training materials. Please send your suggestions to:
PeopleSoft Product Documentation Manager
PeopleSoft, Inc.
4460 Hacienda Drive
Pleasanton, CA 94588
Or send comments by email to the authors of the PeopleSoft documentation at:
[email protected]
While we cannot guarantee to answer every email message, we will pay careful attention to
your comments and suggestions. We are always improving our product communications for
you.
PREFACE
xviii
PEOPLESOFT PROPRIETARY
AND
CONFIDENTIAL
CHAPTER 1
Data Integrity Tools
This chapter provides an overview and covers how to:
•
Run SQL Alter.
•
Run DDD Audit.
•
Run SYSAUDIT.
Understanding Data Integrity Tools
PeopleSoft provides several data integrity tools to ensure the health of the information stored
in your PeopleSoft system. These tools are SQL Alter, SYSAUDIT, and DDDAUDIT.
You’ll typically want to use these tools during certain activities, such as upgrades and system
customizations, to verify the integrity of your PeopleSoft system and check how it compares
to your actual SQL objects.
The tools described in this chapter help maintain consistency between the knowledge stored in
PeopleTools and the actual information stored in your corresponding database(s). In addition
to these tools provided by PeopleSoft, most database platform vendors provide data integrity
tools specific to their system. Check the documentation for your particular database platform
for further information.
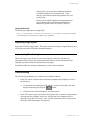
SQL Alter
The primary purpose of the Application Designer’s “SQL Alter” function is to bring SQL
tables into accordance with PeopleTools record definitions. You can run SQL Alter in an
“audit-only” mode that alerts you to discrepancies between your record definitions and SQL
tables, but that doesn’t actually perform an alter.
To audit tables or views:
1. In Application Designer, choose the record(s) you want to audit.
You have the option of auditing the active object definition (must be a record), selected
records in the project workspace, or all the records in the current project.
2. Select the Build menu and select the appropriate option for the records you want to audit.
PEOPLESOFT PROPRIETARY
AND
CONFIDENTIAL
DATA INTEGRITY TOOLS
1-1
DATA MANAGEMENT
If you’re auditing an open record definition, choose Build, Current Object. If you have
one or more records selected in the project workspace, you can select Build, Selected
Objects. If you want to audit all records in the current project, select Build, Project.
The Build Scope reveals a list of all the records that will be affected, or audited in the
case.
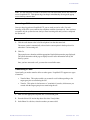
3. Select Alter tables as your Build Option and select Build script file as your Build
Execute option.
4. Click Settings and choose the Alter tab in the Build Settings dialog.
5. In the Alter Any group box, select the situations for which you want an Alter performed.
6. Select the Scripts tab.
You use the Scripts tab to specify your output for the build scripts—in one file, in two
files, where the file will be generated, and so on.
7. Select Write Alter comments to script.
Performing Alters with this option enabled will add comments to the SQL script about
what fields are being manipulated.
8. Choose your other script file options.
9. Click OK, to close the Build Settings dialog and return to the Build dialog.
10. Press Build, on the Build dialog.
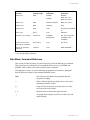
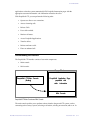
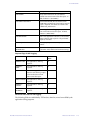
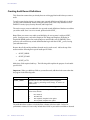
Understanding Table and Column Audits
The SELECT statements produced by auditing with SQL Alter deal with inconsistencies
between PeopleTools tables and SQL in the definition of tables or columns. A SQL table is
equivalent to a record in the Application Designer, and a column is equivalent to a field.
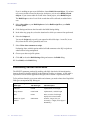
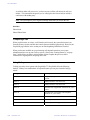
To fix problems found in your system tables and columns, you need to know how PeopleSoft
field types correspond to SQL data types:
1-2
Application Designer
Field Type
SQL Data Type
SQL Description
Character
CHAR
Alphanumeric; fixed length
Long character
LONGVAR
Alphanumeric; variable length
Date
DATE
Dates; stored as fixed length;
displayed in various formats
Number or signed
number
SMALLINT
Numeric; integers only (no
decimals); 1-4 digits (and 5 digits if
RawBinary)
DATA INTEGRITY TOOLS
PEOPLESOFT PROPRIETARY
AND
CONFIDENTIAL
DATA MANAGEMENT
Application Designer
Field Type
SQL Data Type
SQL Description
Number or signed
number
INTEGER
Numeric; integers only (no
decimals); 5-9 digits(and 10 digits if
RawBinary)
Number or signed
number
DECIMAL
Numeric; either (1) 10 or more
digits or (2) contains decimal
positions
Note. In Application Designer, if a field is specified as “required,” or if a field is numeric and
does not have a format of Phone, SSN, or SIN, you need to initialize the starting value of the
column and specify the NOT NULL attribute in SQL.
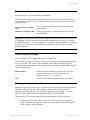
DDDAUDIT
The Data Designer/Database Audit Report (DDDAUDIT) finds inconsistencies between
PeopleTools record and index definitions and the database objects. This Audit consists of
nine queries: four on tables, two on views, and three on indexes.
Note. This SQR refers to the Data Designer, the PeopleTool that allowed you to create record
definitions in the PeopleTools releases prior to release 7. Now, all of the development tools
are incorporated into one integrated development environment called the Application
Designer. But you can still think of this audit as auditing the “data designing” component of
the Application Designer.
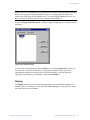
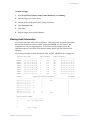
To run DDDAUDIT:
1. Using Windows Explorer navigate to PS_HOME\sqr and locate DDDAUDIT.SQR.
2. Double-click it.
3. Type in the Database name, Username, and Password.
You’ll probably need to use the database Access ID and password to execute the
DDDAUDIT properly.
4. Verify the Report arguments and click OK.
The –f argument indicates where the system writes the .LIS file.
5. At the Command Prompt, press ENTER.
At the end of a successful run, you’ll be prompted to press Enter again.
PEOPLESOFT PROPRIETARY
AND
CONFIDENTIAL
DATA INTEGRITY TOOLS
1-3
DATA MANAGEMENT
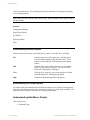
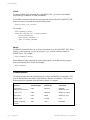
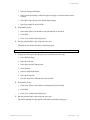
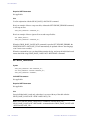
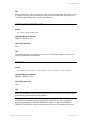
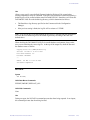
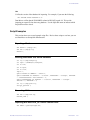
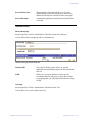
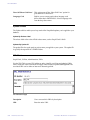
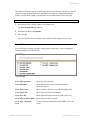
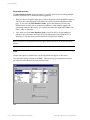
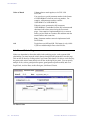
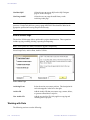
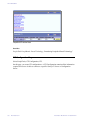
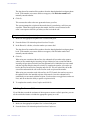
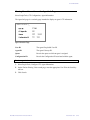
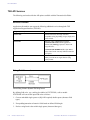
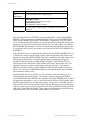
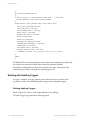
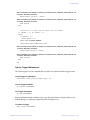
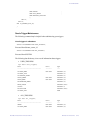
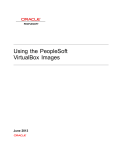
When you run DDDAUDIT.SQR, its results are written to a file called DDDAUDIT.LIS in
your \TEMP folder. After running DDDAUDIT, view the .LIS file using any text editor.
Here’s a sample excerpt of this file:
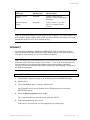
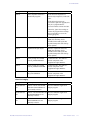
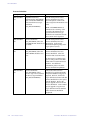
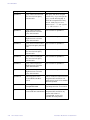
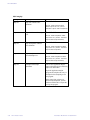
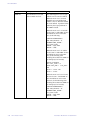
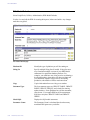
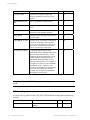
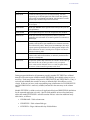
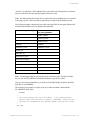
DDDAUDIT Queries
The following table lists the names of each query that DDDAUDIT performs on your
PeopleSoft system, what it means if rows are returned, and how to resolve the inconsistency.
Note. The query names in this table are arranged alphabetically, and are not necessarily in
they order in which they appear in DDDAUDIT.LIS.
Query
If Rows are Returned…
Resolution
INDEX-1
Indexes are defined in the
Application Designer and not
found in the Database.
Use Application Designer to
create the index.
INDEX-2
Indexes are defined in the
Database and not found in the
Application Designer.
If the index is valid, use
Application Designer to define the
index.
Otherwise, DROP the index.
INDEX-3
Uniqueness or the number of keys
in the Index Definition do not
match between the Application
Designer and the Database.
See INDEX-1.
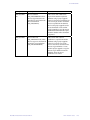
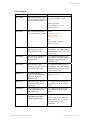
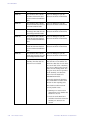
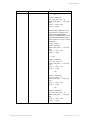
TABLE-1
SQL table names are defined in
the Data Designer that are not
blank and not the same as the
Record Name.
Use Application Designer to enter
the record name as the NonStandard SQL Table Name.
TABLE-2
SQL tables are defined in the Data
Designer and not found in the
Database.
If you want to delete the record
definition, use Application
Designer (select File, Delete).
Otherwise, to create the SQL
table, use Application Designer.
This command also creates the
appropriate indexes for keys,
duplicate order keys, alternate
keys, and list items.
TABLE-3
SQL tables are defined in the
database and not found in the Data
Designer.
If the table is not valid, DROP it.
Otherwise, define a new record in
Application Designer.
SYSINDEXES and SYSTABLES
can be ignored in these results.
For Informix: PSALTERLONG
can also be ignored.
1-4
DATA INTEGRITY TOOLS
PEOPLESOFT PROPRIETARY
AND
CONFIDENTIAL
DATA MANAGEMENT
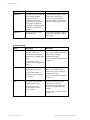
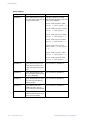
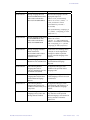
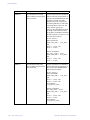
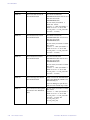
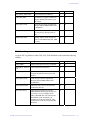
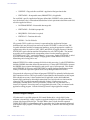
Query
If Rows are Returned…
Resolution
TABLE-4
Tablespace not defined for the
SQL Table in the Application
Designer.
If you’re using—or migrating to—
an RDBMS that uses tablespaces,
you should use Application
Designer to assign tablespaces to
these tables.
TABLE-5
Table contains more than 250
fields.
Use Application Designer to
adjust the number of fields on the
table, as needed.
VIEWS-1
Views are defined in the Data
Designer and not found in the
Database.
If you want to delete the view
definition, use
Application Designer (select File,
Delete).
Otherwise, to create the SQL
view, use Application Designer.
VIEWS-2
TRIGGER-1
Views are defined in the Database
and not found in the Data
Designer.
If the view is not valid, DROP it.
Trigger defined in the Application
Designer and not found in the
Database.
Delete the definition if it is not
needed.
Otherwise, define a new view in
Application Designer.
Otherwise, use Application
Designer to create the trigger in
the database..
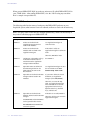
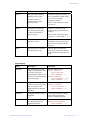
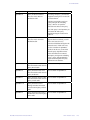
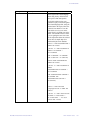
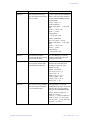
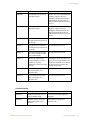
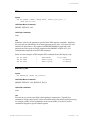
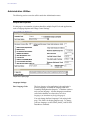
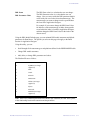
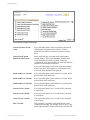
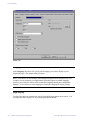
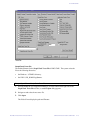
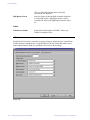
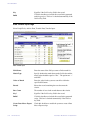
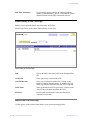
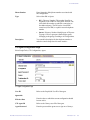
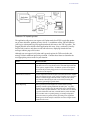
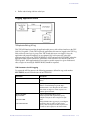
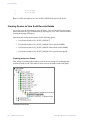
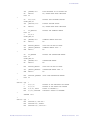
SYSAUDIT
The System Audit (SYSAUDIT) identifies “orphaned” PeopleSoft objects and other
inconsistencies within your system. An example of an orphaned object would be a module of
PeopleCode that exists, but which does not relate to any other objects in the system.
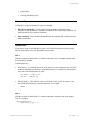
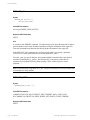
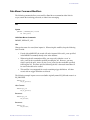
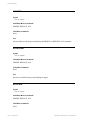
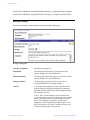
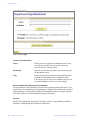
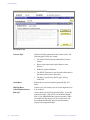
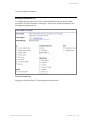
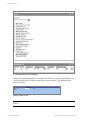
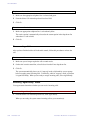
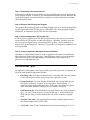
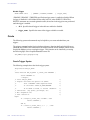
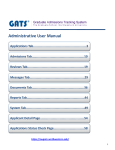
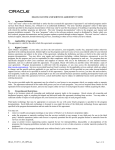
Select PeopleTools, Utilities, Audit, Perform System Audit.
PEOPLESOFT PROPRIETARY
AND
CONFIDENTIAL
DATA INTEGRITY TOOLS
1-5
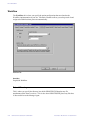
DATA MANAGEMENT
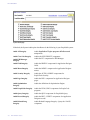
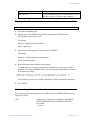
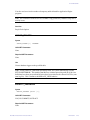
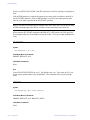
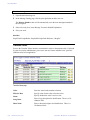
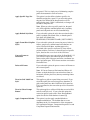
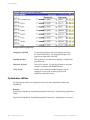
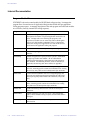
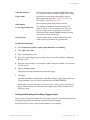
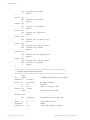
System Audit page
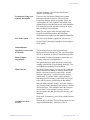
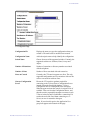
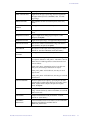
If checked, the System Audit option checkboxes do the following in your PeopleSoft system:
1-6
Audit AE Integrity
Audits Application Engine program definitions and
components.
Audit Clear List Integrity
Audites the SYSCLRLIST* component.
Audit EDI Manager
Integrity
Audits the EC* component for EDI Manager.
Audit Field Integrity
Audits the DBFLD* component for Application Designer
fields.
Audit Menu Integrity
Audits the MENU* component for Application Designer
menus.
Audit Security Integrity
Audits the AUTH*, OPRDF* components for
PeopleTools Security.
Audit Page Integrity
Audits the PNL* component for Application Designer
pages.
Audit Optimization
Integrity
Audits the definitions for Optimization Engine.
Audit PeopleCode Integrity
Audits the PCM*, PRG* components for PeopleCode
programs.
Audit Query Integrity
Audits the QRY* component for PeopleSoft Query.
Audit Record Integrity
Audits the REC*, VIEWT* components for Application
Designer records.
Audit Related Lang
Integrity
Audits Related Language Integrity—Query the *LANG
component.
DATA INTEGRITY TOOLS
PEOPLESOFT PROPRIETARY
AND
CONFIDENTIAL
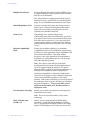
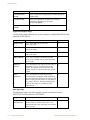
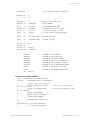
DATA MANAGEMENT
Audit SQL Integrity
Audits the referential integrity of the tables supporting
SQL objects in the db component.
Audit Tree Integrity
Audits the TREE* component.
Audit Translates Integrity
Audits the XLAT* component.
Audit PSLOCKS Version
Integrity
Audits the VERSN* component.
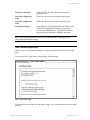
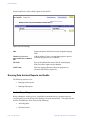
To run SYSAUDIT:
1. Select PeopleTools, Utilities, Audit, Perform System Audit.
When prompted, enter a new Run Control ID and click OK.
2. Select the desired Integrity Audit options.
3. Click Run.
4. Select the appropriate settings on the Process Scheduler Request page, and click OK..
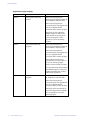
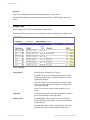
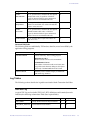
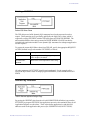
Understanding SYSAUDIT Output
When you run SYSAUDIT, the results are written to the Data Mover output file. For best
viewing, PeopleSoft recommends opening the output file in a text editor.
The following table lists the names of each of the audit queries that SYSAUDIT performs on
your PeopleSoft system, what it means if rows are returned, and how to resolve the
discrepancies uncovered by the audit report.
Note. The query names in this table are arranged alphabetically, and are not necessarily in
they order in which they appear in the output.
PEOPLESOFT PROPRIETARY
AND
CONFIDENTIAL
DATA INTEGRITY TOOLS
1-7
DATA MANAGEMENT
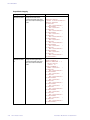
Application Engine Integrity
Query
Description
Resolution
AE-01
AE programs without any
sections
If the affected program was
delivered by PeopleSoft and has not
been modified, contact the GSC.
If the affected program was
converted as part of an upgrade, this
may be a symptom that the
conversion failed. Contact the GSC.
Otherwise, use the Application
Engine designer to either create
valid sections for the program or
remove the program. It is not
possible to recover the missing
sections.
AE-02
AE sections without AE
programs
If the affected program was
delivered by PeopleSoft and has not
been modified, contact the GSC.
If the affected program was
converted as part of an upgrade, this
may be a symptom that the
conversion failed. Contact the GSC.
If the affected program was a
customization, it is not possible to
recover the missing program.
Restore it from a backup if needed.
Use SysAECleanUp.dms (located in
PS_HOME\scripts.) to remove any
orphans remaining after you have
followed the steps above.
AE-03
AE state records without AE
programs
If the affected record was delivered
by PeopleSoft, contact the GSC.
If the affected program was
converted as part of an upgrade, this
may be a symptom that the
conversion failed. Contact the GSC.
Otherwise, ignore the warnings or
restore the program from a backup.
It is not possible to recover the
missing program.
1-8
DATA INTEGRITY TOOLS
PEOPLESOFT PROPRIETARY
AND
CONFIDENTIAL
DATA MANAGEMENT
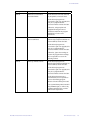
Query
Description
Resolution
AE-04
AE state records without
record definitions
If the affected record was delivered
by PeopleSoft, contact the GSC.
If the affected program was
converted as part of an upgrade, this
may be a symptom that the
conversion failed. Contact the GSC.
Otherwise, using PeopleTools
Application Designer remove
invalid records from the program
definition or create record
definitions.
AE-05
AE section details without base
section definitions
If the affected program was
delivered by PeopleSoft and has not
been modified, contact the GSC.
If the affected program was
converted as part of an upgrade, this
may be a symptom that the
conversion failed. Contact the GSC.
Otherwise, ignore the warnings or
restore the program from a backup.
It is not possible to recover the
missing sections.
AE-06
AE steps without sections
If the affected program was
delivered by PeopleSoft and has not
been modified, contact the GSC.
If the affected program was
converted as part of an upgrade, this
may be a symptom that the
conversion failed. Contact the GSC.
If the affected program was a
customization, it is not possible to
recover the missing program.
Restore it from a backup if needed.
Use SysAECleanUp.dms (located in
PS_HOME\scripts.) to remove any
orphans remaining after you have
followed the steps above.
PEOPLESOFT PROPRIETARY
AND
CONFIDENTIAL
DATA INTEGRITY TOOLS
1-9
DATA MANAGEMENT
Query
Description
Resolution
AE-07
AE Call Section actions
referring to non-existent
sections
If the affected program was
delivered by PeopleSoft and has not
been modified, contact the GSC.
If the affected program was
converted as part of an upgrade, this
may be a symptom that the
conversion failed. Contact the GSC.
Otherwise, use the Application
Engine either to open the program
containing the Call Section and
change it to call the correct section,
or create the required section.
AE-08
AE Log Message actions
without an AE step
If the affected record was delivered
by PeopleSoft, contact the GSC.
If the affected program was
converted as part of an upgrade, this
may be a symptom that the
conversion failed. Contact the GSC.
If the affected program was a
customization, it is not possible to
recover the missing program,
restore it from a backup if needed.
Use SysAECleanUp.dms (located in
PS_HOME\scripts.) to remove any
orphans remaining after you have
followed the steps above.
AE-09
AE actions without an AE step
If the affected record was delivered
by PeopleSoft, contact the GSC.
If the affected program was
converted as part of an upgrade, this
may be a symptom that the
conversion failed. Contact the GSC.
If the affected program was a
customization, it is not possible to
recover the missing program,
restore it from a backup if needed.
Use SysAECleanUp.dms (located in
PS_HOME\scripts.) to remove any
orphans remaining after you have
followed the steps above.
1-10
DATA INTEGRITY TOOLS
PEOPLESOFT PROPRIETARY
AND
CONFIDENTIAL
DATA MANAGEMENT
Query
Description
Resolution
AE-10
AE TempTables attached to
Invalid AE programs
If the affected temp table was
delivered by PeopleSoft, contact the
GSC.
If the affected program was
converted as part of an upgrade, this
may be a symptom that the
conversion failed. Contact the GSC.
Otherwise, ignore the warnings or
restore the program from a backup.
It is not possible to recover the
missing programs.
AE-11
Orphaned AE PeopleCode
Because of platform issues and
SQR, this check may not be
included in the audit report. But
SysAECleanUp.dms will clean up
these orphans.
AE-12
Orphaned AE SQL objects
Because of platform issues and
SQR, this check may not be
included in the audit report. But
SysAECleanUp.dms will clean up
these orphans.
AE-13
Verify enough rows loaded
into PS_AEONLINEINST
Contact the GSC. This table is a
critical component of the
Application Engine Runtime
AE-14
Verify enough rows loaded
into PS_AEINSTANCENBR
Contact the GSC. This table is a
critical component of the
Application Engine Runtime
AE-15
Verify a row is loaded into
PS_AELOCKMGR.
Contact the GSC. This table is a
critical component of the
Application Engine Runtime
Clear List Integrity
Query
Description
Resolution
SYSCLRLIST01
Entries in PSACTIVITYDEL
and PSACTIVITYDEFN are
not mutually exclusive
Run the VERSION Application
Engine program.
SYSCLRLIST02
Entries in PSAEAPPLDEL and
PSAEAPPLDEFN are not
mutually exclusive
Run the VERSION Application
Engine program.
SYSCLRLIST05
Entries in PSCOLORDEL and
PSCOLORDEFN are not
mutually exclusive
Run the VERSION Application
Engine program.
PEOPLESOFT PROPRIETARY
AND
CONFIDENTIAL
DATA INTEGRITY TOOLS
1-11
DATA MANAGEMENT
1-12
Query
Description
Resolution
SYSCLRLIST06
Entries in PSFMTDEL and
PSFMTDEFN are not mutually
exclusive
Run the VERSION Application
Engine program.
SYSCLRLIST07
Entries in PSHOLIDAYDEL
and PSHOLIDAYDEFN are
not mutually exclusive
Run the VERSION Application
Engine program.
SYSCLRLIST09
Entries in PSIMPDEL and
PSIMPDEFN are not mutually
exclusive
Run the VERSION Application
Engine program.
SYSCLRLIST10
Entries in PSMENUDEL and
PSMENUDEFN are not
mutually exclusive
Run the VERSION Application
Engine program.
SYSCLRLIST11
Entries in PSPCMPROGDEL
and PSPCMPROG are not
mutually exclusive
Run the VERSION Application
Engine program.
SYSCLRLIST12
Entries in PSPNLDEL and
PSPNLDEFN are not mutually
exclusive
Run the VERSION Application
Engine program.
SYSCLRLIST13
Entries in PSPNLGRPDEL
and PSPNLGRPDEFN are not
mutually exclusive
Run the VERSION Application
Engine program.
SYSCLRLIST14
Entries in PSPRCSRUNCDEL
and PSPRCSRUNCNTL are
not mutually exclusive
Run the VERSION Application
Engine program.
SYSCLRLIST15
Entries in PSPROJECTDEL
and PSPROJECTDEFN are not
mutually exclusive
Run the VERSION Application
Engine program.
SYSCLRLIST16
Entries in PSQRYDEL and
PSQRYDEFN are not mutually
exclusive
Run the VERSION Application
Engine program.
SYSCLRLIST17
Entries in PSRECDEL and
PSRECDEFN are not mutually
exclusive
Run the VERSION Application
Engine program.
SYSCLRLIST18
Entries in PSRECURDEL and
PS_PRCSRECUR are not
mutually exclusive
Run the VERSION Application
Engine program.
SYSCLRLIST19
Entries in PSSTYLEDEL and
PSSTYLEDEFN are not
mutually exclusive
Run the VERSION Application
Engine program.
SYSCLRLIST20
Entries in PSTOOLBARDEL
and PSTOOLBARDEFN are
not mutually exclusive
Run the VERSION Application
Engine program.
DATA INTEGRITY TOOLS
PEOPLESOFT PROPRIETARY
AND
CONFIDENTIAL
DATA MANAGEMENT
Query
Description
Resolution
SYSCLRLIST21
Entries in PSTREEBRADEL
and PSTREEBRANCH are not
mutually exclusive
Run the VERSION Application
Engine program.
SYSCLRLIST22
Entries in PSTREEDEL and
PSTREEDEFN are not
mutually exclusive
Run the VERSION Application
Engine program.
SYSCLRLIST23
Entries in PSTREESTRDEL
and PSTREESTRCT are not
mutually exclusive
Run the VERSION Application
Engine program.
SYSCLRLIST24
Entries in XLATTABLEDEL
and XLATTABLE are not
mutually exclusive
Run the VERSION Application
Engine program.
EDI Manager Integrity
Query
Description
Resolution
ECINMPFL-1
Inbound work records not
found in the PSRECDEFN
table
Either modify the inbound map
definition to not use the Inbound
Row ID Work Record
(ECINMAPFILE), or create the
Work Record Definition.
ECINMPFL-2
Inbound work record EC Map
ID not found in the
PS_ECMAPDEFN table
Create an entry in the map
definition table (ECMAPDEFN).
ECINMPFD-1
Inbound work record fields not
found with valid EC Map ID
and EC File Row ID
combination from the
PS_ECINMAPFILE table
Either remove the invalid map id
from the Inbound Work Record
(ECINMAPFLD), or create an
Inbound Row ID Work Record
(ECINMAPFILE) entry.
ECINMPFD-2
Inbound work record fields
from PS_ECINMAPFLD not
found in PSRECFIELD
Either remove the invalid entry in
the inbound work record
(ECINMAPFLD) or create the
record/field definition.
ECINMPRC-1
Target inbound records not
found in the PSRECDEFN
table
Either modify the inbound map
definition to not use the Inbound
Row ID Target Record
(ECINMAPREC), or create the
Work Record Definition.
ECINMPRC-2
Target inbound EC Map ID not
found the PS_ECMAPDEFN
table
Either remove the invalid map ID
from the Inbound Row ID Target
Record (ECINMAPREC) or create
an entry in the Map Definition table
(ECMAPDEFN).
PEOPLESOFT PROPRIETARY
AND
CONFIDENTIAL
DATA INTEGRITY TOOLS
1-13
DATA MANAGEMENT
1-14
Query
Description
Resolution
ECINMPRF-1
EC Map ID/EC File Row ID
combination not found in
PS_ECINMAPREC for the
target inbound record field in
PS_ECINMAPRECFLD
Remove the invalid map ID from
the Inbound Target Record
(ECINMAPRECFLD).
ECINMPRF-2
A Field for a Record in
PS_ECINMAPRECFLD was
not found in PSRECFIELD
Create the appropriate definitions in
PSRECFIELD or remove the
invalid map ID from the Inbound
Target Record
(ECINMAPRECFLD).
ECINMPRF-4
A related record in
PS_ECINMAPRECFLD was
not found in PSRECDEFN
Either create the record definition or
remove the reference to the related
record in the Inbound Target Record
(ECINMAPRECFLD).
ECINMPRF-5
An EC Related Record in
PS_ECINMAPRECFLD does
not have a valid EC Related
Row ID from
PS_ECINMAPREC
Either remove the reference to the
related record from the Inbound
Target Record
(ECINMAPRECFLD) or create an
appropriate entry in the Inbound
Row ID Target Record
(ECINMAPREC).
ECINMPRF-6
A related field in
PS_ECINMAPRECFLD was
not found in PSRECFIELD
Either remove or correct the
reference to the related field record
from the Inbound Target Record
(ECINMAPRECFLD) or create the
correct definition in PSRECFIELD
ECOTMPRC-1
Target outbound records not
found in the PSRECDEFN
table
Either modify the outbound map
definition to not use the Outbound
Target Record (ECOUTMAPREC),
or create the record definition.
ECOTMPRC-2
Outbound work record EC
Map ID was not found in the
PS_ECMAPDEFN table
Create an entry in the map
definition table (ECMAPDEFN).
ECOTMPRC-3
Parent records from the
outbound work record not
found in the PSRECDEFN
table
Remove the reference to the parent
record or create a record definition
for the parent.
ECOTMPRC-4
File records from the outbound
work record not found in the
PSRECDEFN table
Create a record definition for the
file record.
ECOTMPFD-1
Outbound work record fields
not found with valid EC Map
ID and EC File Row ID
combination from the
PS_ECOUTMAPREC table
Either remove the entry from the
Outbound Work Record
(ECOUTMAPFLD) or create an
entry in the Outbound Target
Record (ECOUTMAPREC).
DATA INTEGRITY TOOLS
PEOPLESOFT PROPRIETARY
AND
CONFIDENTIAL
DATA MANAGEMENT
Query
Description
Resolution
ECOTMPFD-2
Outbound work record fields
from PS_ECOUTMAPFLD
not found in PSRECFIELD
Create the appropriate definitions in
PSRECFIELD or remove the
invalid map ID from the Outbound
Work Record (ECOUTMAPFLD).
SYSECMGR-1
Inbound work record field does
not exist in type definitions in
PSDBFIELD
Call PeopleSoft GSC for resolution.
Query
Description
Resolution
FIELD-3
The Following Default Fields
are Invalid
Modify the Default Value in Record
Field Properties.
FIELD-4
Fields being used in Record
Definitions that do not exist in
PSDBFIELD
Define the Field in Application
Designer.
FIELD-5
Fields have multiple default
field labels in
PSDBFLDLABL.
Open the field, select default label,
and resave.
FIELD-06
Deleted Fields have orphaned
field labels in
PSDBFLDLABL.
DELETE FROM PSDBFLDLABL
Field Integrity
WHERE FIELDNAME NOT IN (SELECT
FIELDNAME FROM PSDBFIELD)
Menu Integrity
Query
MENU-01
Description
Resolution
A row in the MenuItem table
has no corresponding row in
the MenuDefinition table.
Issue the following SQL:
DELETE FROM PSMENUITEM
WHERE MENUNAME = 'x';
MENU-02
A component-type menu item
specified no component.
Use the Menu Designer to change
each of these menu items to
reference an existing component.
MENU-03
A menu item has a specified
component, but that
component has no
corresponding row in the
ComponentDefinition table.
Use the Menu Designer to change
each of these menu items to
reference an existing component.
PEOPLESOFT PROPRIETARY
AND
CONFIDENTIAL
DATA INTEGRITY TOOLS
1-15
DATA MANAGEMENT
Query
Description
Resolution
MENU-04
A PeopleCode-type menu item
has a specified enabling
component, but that
component has not been
specified for any componenttype menu item within the
same menu. (Such menu items
would never get enabled at
runtime.)
Use the Menu Designer to change
each of these menu items to
reference a component that is
associated with a component-type
menu item within the same menu.
MENU-05
A menu has no rows in the
MenuItem table.
Use the Menu Designer to add any
appropriate menu items to each of
these menus.
Query
Description
Resolution
SEC-01
Authorized Signon Operator
does not exist in Class
Definition table.Incomplete
permission list: Orphan signon
times:
Delete the extra signon times. If
this is a permission list that should
exist, recreate it through
PeopleTools Security.
Security Integrity
(Verifies the existence of
permission lists owning signon
times)
SEC-2
:Incomplete permission list:
Orphan page permissions:
(Verifies the existence of
permission lists owning page
permissions)
SEC-3
:Incomplete permission list:
Orphan process groups:
(Verifies existence of
permission lists owning
process groups)
DELETE FROM PSAUTHSIGNON WHERE
CLASSID='x'
Delete the extra page permissions.
If this is a permission list that
should exist, recreate it through
PeopleTools Security.
DELETE FROM PSAUTHITEM WHERE
CLASSID='x'
Delete the extra process group
authorizations. If this is a
permission list that should exist,
recreate it through PeopleTools
Security
DELETE FROM PSAUTHPRCS WHERE
CLASSID='x'
1-16
DATA INTEGRITY TOOLS
PEOPLESOFT PROPRIETARY
AND
CONFIDENTIAL
DATA MANAGEMENT
Query
Description
Resolution
SEC-4
Incomplete permission list:
Orphan process profiles:
Delete the extra process profiles. If
this is a permission list that should
exist, recreate it through
PeopleTools Security
(Verifies existence of
permission lists owning
process profiles)
SEC-5
Permission list references a
non-existent process group:
(Verifies the existence of
process groups)
DELETE FROM PSPRCSPRFL WHERE
CLASSID='x'
Delete the extraneous process
groups. If this group should exist,
recreate it
DELETE FROM PSAUTHPRCS WHERE
CLASSID='x' AND PRCSGRP = 'y'
SEC-6
User Profile references a Role
that does not exist:
Open the User Profile in
PeopleTools Security and remove
the reference to the Role that does
not exist.
SEC-7
Role references a Permission
List that does not exist:
Open the Role in PeopleTools
Security and remove the reference
to the Permission List that does not
exist.
Query
Description
Resolution
PAGE-01
Page definition’s page field
count is not equal to the count
of its page fields in the
PageField table, and there is at
least one row in the PageField
table for that page.
Page Integrity
PAGE-02
Page definition’s page field
count is not equal to zero, but
there are no rows in the
PageField table for that page
definition.
PAGE-03
A subpage contains itself as a
page field.
PAGE-04
A row in the PageField has no
corresponding row in the
PageDefinition table.
PEOPLESOFT PROPRIETARY
AND
CONFIDENTIAL
Enter the following SQL:
SELECT COUNT(*)
FROM PSPNLFIELD
WHERE PNLNAME = 'x';
UPDATE PSPNLDEFN
SET FIELDCOUNT = count
WHERE PNLNAME = 'x';
Enter the following SQL:
UPDATE PSPNLDEFN
SET FIELDCOUNT = 0
WHERE PNLNAME = 'x';
Use the Page Designer to change
each of these page fields to
reference a different subpage.
Issue the following SQL:
DELETE FROM PSPNLFIELD
WHERE PNLNAME = 'x';
DATA INTEGRITY TOOLS
1-17
DATA MANAGEMENT
Query
Description
Resolution
PAGE-05
A subpage-type page field has
no corresponding row in the
Page Definition table for its
specified subpage.
Use the Page Designer to change
each of these page fields to
reference an existing subpage.
PAGE-06
A page field’s specified
record/field has no
corresponding row in the
RecordField table.
Use the Page Designer to change
each of these page fields to
reference an existing record/field.
PAGE-07
A row in the ComponentItem
table has no corresponding row
in the ComponentDefinition
table.
Issue the following SQL:
DELETE FROM PSPNLGROUP
WHERE PNLGRPNAME = 'x';
PAGE-08
A component item’s specified
page has no corresponding row
in the PageDefinition table.
Use the Component Designer to
replace each of these component
items with one that references an
existing page.
PAGE-09
A component’s specified
access detail page has no
corresponding row in the
PageDefinition table.
Use the Component Designer to
change each of these components to
reference an access detail page that
exists.
PAGE -10
A component’s specified
search record has no
corresponding row in the
RecordDefinition table.
Use the Component Designer to
change each of these components to
reference a search record that exists.
PAGE-11
A component’s specified add
search record has no
corresponding row in the
RecordDefinition table.
Use the Component Designer to
change each of these components to
reference an add search record that
exists.
Optimization Integrity
Query
Description
Resolution
OPTZN-01
Problem Type Records that do
not have matching record
definitions.
Execute SQL:
DELETE FROM PSOPTREC WHERE
RECNAME = ‘<RECORD NAME>’;
DELETE FROM PSOPTFIELD WHERE
RECNAME = ‘<RECORD NAME>’;
OPTZN-02
1-18
DATA INTEGRITY TOOLS
Optimization delete records
that do not have matching
definitions.
Go to Record Designer, open base
record definition properties and clear
the optimization delete record name and
perform an Alter.
PEOPLESOFT PROPRIETARY
AND
CONFIDENTIAL
DATA MANAGEMENT
Query
Description
Resolution
OPTZN-03
Optimization base record has
fields that delete record does
not.
Using Record Designer, delete the
optimization delete record definition,
drop the table and recreate it by cloning
the base record. Run Build. You may
need to recreate triggers on the base
record on some platforms where
deferred processing is not done.
OPTZN-04
Optimization delete record has
fields that base record does
not.
Using Record Designer, delete the
optimization delete record
definition, drop the table and
recreate it by cloning the base
record. Run Build. You may need to
recreate triggers on the base record
on some platforms where deferred
processing is not done.
OPTZN-05
Optimization base record field
definitions that do not match
with delete record fields.
Using Record Designer, delete the
optimization delete record
definition, drop the table and
recreate it by cloning the base
record. Run Build. You may need to
recreate triggers on the base record
on some platforms where deferred
processing is not done.
OPTZN-06
Optimization base record defn
has trigger flag set but has no
delete record name or vice
versa.
Using Record Designer, open the
record definition properties, make
sure the optimization delete record
name is set and save. Build the
record with ‘create triggers’
checkbox set to create optimization
triggers.
OPTZN-07
Optimization records that need
to have trigger flag set and do
not.
Using Record Designer, open the
record definition properties, make
sure the optimization delete record
name is set and save. Build the
record with ‘create triggers’
checkbox set to create optimization
triggers.
OPTZN-08
Optimization records that have
trigger flag set but are not
marked readable in any
problem type.
Using Record Designer, open the
record definition properties, clear
the optimization delete record name
and alter the record to drop
optimization triggers as they are no
longer needed but impact
performance.
PEOPLESOFT PROPRIETARY
AND
CONFIDENTIAL
DATA INTEGRITY TOOLS
1-19
DATA MANAGEMENT
PeopleCode Integrity
1-20
Query
Description
Resolution
PEOPLECODE1
PeopleCode Name table
contains Program name that
does not exist in PcmProgram
table
DELETE FROM PSPCMNAME A
PEOPLECODE2
PeopleCode Program table
contains Program name that
does not exist in PcmName
table
DELETE
FROM PSPCMPROG A
WHERE A.NAMECOUNT <> 0
AND NOT EXISTS
(SELECT 'X'
FROM PSPCMNAME B
WHERE A.OBJECTID1
B.OBJECTID1
AND A.OBJECTVALUE1
B.OBJECTVALUE1
AND A.OBJECTID2
B.OBJECTID2
AND A.OBJECTVALUE2
B.OBJECTVALUE2
AND A.OBJECTID3
B.OBJECTID3
AND A.OBJECTVALUE3
B.OBJECTVALUE3
AND A.OBJECTID4
B.OBJECTID4
AND A.OBJECTVALUE4
B.OBJECTVALUE4
AND A.OBJECTID5
B.OBJECTID5
AND A.OBJECTVALUE5
B.OBJECTVALUE5
AND A.OBJECTID6
B.OBJECTID6
AND A.OBJECTVALUE6
B.OBJECTVALUE6)
DATA INTEGRITY TOOLS
WHERE NOT EXISTS
(SELECT 'X'FROM PSPCMPROG B
WHERE B.OBJECTID1
=
A.OBJECTID1
AND B.OBJECTVALUE1 =
A.OBJECTVALUE1
AND B.OBJECTID2
=
A.OBJECTID2
AND B.OBJECTVALUE2 =
A.OBJECTVALUE2
AND B.OBJECTID3
=
A.OBJECTID3
AND B.OBJECTVALUE3 =
A.OBJECTVALUE3
AND B.OBJECTID4
=
A.OBJECTID4
AND B.OBJECTVALUE4 =
A.OBJECTVALUE4
AND B.OBJECTID5
=
A.OBJECTID5
AND B.OBJECTVALUE5 =
A.OBJECTVALUE5
AND B.OBJECTID6
=
A.OBJECTID6
AND B.OBJECTVALUE6 =
A.OBJECTVALUE6)
=
=
=
=
=
=
=
=
=
=
=
=
PEOPLESOFT PROPRIETARY
AND
CONFIDENTIAL
DATA MANAGEMENT
Query
Description
Resolution
PEOPLECODE3
PeopleCode Program table
Name count does not match
record count in PcmName
table
UPDATE PSPCMPROG A SET
A.NAMECOUNT =
(SELECT COUNT(*)
FROM PSPCMNAME C
WHERE C.OBJECTID1
A.OBJECTID1
AND C.OBJECTVALUE1
A.OBJECTVALUE1
AND C.OBJECTID2
A.OBJECTID2
AND C.OBJECTVALUE2
A.OBJECTVALUE2
AND C.OBJECTID3
A.OBJECTID3
AND C.OBJECTVALUE3
A.OBJECTVALUE3
AND C.OBJECTID4
A.OBJECTID4
AND C.OBJECTVALUE4
A.OBJECTVALUE4
AND C.OBJECTID5
A.OBJECTID5
AND C.OBJECTVALUE5
A.OBJECTVALUE5
AND C.OBJECTID6
A.OBJECTID6
AND C.OBJECTVALUE6
A.OBJECTVALUE6)
=
=
=
=
=
=
=
=
=
=
=
=
PEOPLECODE4
PeopleCode contains Invalid
FILELAYOUT References:
Open PeopleCode program in
Application Designer and correct
invalid reference.
PEOPLECODE5
PeopleCode Reference to
Invalid Record or Field
Open PeopleCode program in
Application Designer and correct
invalid reference.
PEOPLECODE6
PeopleCode Reference to
Invalid Field
Open PeopleCode program in
Application Designer and correct
invalid Field Name
PEOPLESOFT PROPRIETARY
AND
CONFIDENTIAL
DATA INTEGRITY TOOLS
1-21
DATA MANAGEMENT
Process Scheduler
Query
Description
Resolution
PRCSSCHED01
SQR-Related Process
Definitions (PS_PRCSDEFN)
that override the PARMLIST
field from the Process Type
Definition
(PS_PRCSTYPEDEFN)
For the listed processes select
Process Scheduler, Processes,
Override Options. Remove the
value assigned to the Parameter List
field.
PRCSSCHED03
Process Definitions
(PS_PRCSDEFN) where the
OUTDESTTYPE should be set
to NONE
For the listed processes select
Process Scheduler, Processes
Destination. In the Output
Destination Options group, set the
Type option to (None).
PRCSSCHED04
Process Definitions
(PS_PRCSDEFN) where the
API AWARE should be set to
true.
For the listed processes select
Process Scheduler, Processes,
Process Definition. Select the
checkbox that reads API Aware.
Note: This PRRSCHED-01 is
intended to be a warning. If the
override of the Parameter List
specified in the Process Type
definition was intentional, then the
above action can be bypassed.
If API Aware is not marked, this
process will get an incorrect Run
Status when viewed from Process
Monitor. For additional
information, please refer to the
Process Scheduler PeopleBook.
PRCSSCHED05
1-22
DATA INTEGRITY TOOLS
Process Definitions
(PS_PRCSDEFN) where
Process Type was not found in
the Process Type Definition
(PS_PRCSTYPEDEFN)
This occurs when a Process
Definition is copied from another
PeopleSoft database using project
upgrade. However, the Process
Type definition associated with this
Process Definition was not copied
into the database. Review the
project upgrade used to create the
Process Definition. Create another
project upgrade to copy Process
Type definition from the database
where the Process Definition
originated.
PEOPLESOFT PROPRIETARY
AND
CONFIDENTIAL
DATA MANAGEMENT
Query
Description
Resolution
PRCSSCHED06
Process Job Item
(PS_PRCSJOBITEM) where
Process Type listed as a Job
Item but was not found in the
Process Definition
(PS_PRCSDEFN).
This occurs when a PSJob was
copied from another PeopleSoft
database using a project upgrade.
However, the Process Definition for
one or more job items in the PSJob
was not copied from the database.
Review the project upgrade used to
create the PSJob. Create another
project upgrade to copy the Process
Definitions identified in this report
from the database where the PSJob
originated.
PRCSSCHED07
Server Class List
(PS_SERVERCLASS) where
Process Type was not found in
the Process Type Definition
(PS_PRCSTYPEDEFN)
This occurs when a Server
Definition is copied from another
database using a project upgrade.
However, a process type in the
Server Class list is not found in the
Process Type Definition. Create
another project upgrade to copy the
Process Type definition from the
database where the Server
Definition was created.
PEOPLESOFT PROPRIETARY
AND
CONFIDENTIAL
DATA INTEGRITY TOOLS
1-23
DATA MANAGEMENT
Query Integrity
Query
Description
Resolution
QUERY-01
Query Definition Select count
does not match record count in
the Query Select table
The query definition is corrupt.
Run the following SQL to delete the
entire query definition:
DELETE FROM psqrydefn WHERE
oprid = ‘x’ AND q ryname = ‘y’
DELETE FROM psqryselect WHERE
oprid = ‘x’ AND qryname = ‘y’
DELETE FROM psqryrecord WHERE
oprid = ‘x’ AND qryname = ‘y’
DELETE FROM psqryfield WHERE
oprid = ‘x’ AND qryname = ‘y’
DELETE FROM psqrycriteria
WHERE oprid = ‘x’ AND qryname
= ‘y’
DELETE FROM psqryexpr WHERE
oprid = ‘x’ AND qryname = ‘y’
DELETE FROM psqrybind WHERE
oprid = ‘x’ AND qryname = ‘y’
1-24
QUERY-02
Query Definition Expression
count does not match record
count in the Query Expression
table
See resolution for QUERY-01.
QUERY-03
Query Definition Bind count
does not match record count in
the Query Bind table
See resolution for QUERY-01.
QUERY-04
Query Definition Record name
does not exist in the Record
Definition table.
See resolution for QUERY-07.
QUERY-05
Query Definition Record
JoinRecord name does not
exist in the Query Record table
See resolution for QUERY-01.
QUERY-06
Query Definition Record
JoinField name does not exist
in the Query Field table
See resolution for QUERY-01.
DATA INTEGRITY TOOLS
PEOPLESOFT PROPRIETARY
AND
CONFIDENTIAL
DATA MANAGEMENT
Query
Description
Resolution
QUERY-07
Query Field Record Name
does not exist in Record
Definition Table
To salvage the query, you must use
Application Designer to recreate the
record definition.
Having recreated the record, run
Query and open the offending
query. Remove or repair the
affected areas and save the query.
Or, if the query is not important you
can delete the entire query
definition using the resolution for
QRY-01.
QUERY-08
Query Definition Field name
does not exist in the Field
Definition table
If the record on which this field
appears has been deleted, you will
have seen errors for every
referenced field that belonged to the
deleted record. If this is the case,
see the resolution for QUERY-1.
If this is not the case, some fields
that the query depended on have
either been deleted or renamed.
Run Query and open the offending
query. Query will automatically
repair itself and update the query
definition in the database.
QUERY-09
Query Selection Record count
does not match record count in
Query Record table
See resolution for QUERY-01.
QUERY-10
Query Selection Field count
does not match record count in
Query Field table
See resolution for QUERY-01.
QUERY-11
Query Selection Criteria count
does not match record count in
Query Criteria table
See resolution for QUERY-01.
QUERY-11A
Query Selection Criteria
having count does not match
record count in Query Criteria
table
See resolution for QUERY-01.
QUERY-12
Query Selection Parent select
number does not exist in Query
Select table
See resolution for QUERY-01.
PEOPLESOFT PROPRIETARY
AND
CONFIDENTIAL
DATA INTEGRITY TOOLS
1-25
DATA MANAGEMENT
Query
Description
Resolution
QUERY-13
Query Criteria Selection-Left
does not exist in the Query
Selection table
Run Query and delete corrupted
criteria entry. If you can't open the
query, run the following SQL to
delete the corrupted criteria entry:
DELETE FROM psqrycriteria
WHERE oprid = ‘x’ AND qryname
= ‘y’ AND crtnum = ‘z’
1-26
QUERY-14
Query Criteria SelectionRight1 does not exist in the
Query Selection table
See resolution for QUERY-13.
QUERY-15
Query Criteria SelectionRight2 does not exist in the
Query Selection table
See resolution for QUERY-13.
QUERY-16
Query Criteria Field-Left does
not exist in the Query Selection
table
See resolution for QUERY-13.
QUERY-17
Query Criteria Field-Right1
does not exist in the Query
Selection table
See resolution for QUERY-13.
QUERY-18
Query Criteria Field-Right2
does not exist in the Query
Selection table
See resolution for QUERY-13.
QUERY-19
Query Criteria ExpressionRight1 does not exist in the
Query Selection table
See resolution for QUERY-13.
QUERY-20
Query Criteria ExpressionRight2 does not exist in the
Query Selection table
See resolution for QUERY-13.
QUERY-22
Following Queries Were
Created Without PUBLIC
Access
This is normal; the audit insures that
PeopleSoft does not deliver nonpublic queries as part of its standard
delivered products.
QUERY-23
Following Queries do not exist
in PSQRYRECORD
This is an internal PeopleSoft audit.
Call PeopleSoft GSC for resolution.
QUERY-24
Following Queries were
created with name UNTITLED
This is normal; the audit insures that
PeopleSoft does not deliver any
queries with a name of
“UNTITLED’ as part of its
standard delivered products.
DATA INTEGRITY TOOLS
PEOPLESOFT PROPRIETARY
AND
CONFIDENTIAL
DATA MANAGEMENT
Record Integrity
Query
Description
Resolution
RECORD-1
Record Definition Field count
does not match the number of
records in Record Field table
SELECT COUNT(*) FROM
psrecfield WHERE recname =
‘x’;
UPDATE psrecdefn
SET fieldcount = count
WHERE recname = ‘x’;
RECORD-2
Record Definition Fields do
not exist in Record Field table
Either
UPDATE psrecdefn
SET fieldcount = 0
WHERE recname = ‘x’;
Or
DELETE FROM psrecdefn
WHERE recname = ‘x’;
RECORD-3
Record Definition Parent
Record does not exist in
Record Definition table
Use Application Designer to open
the definition. Select File, Object
Properties, Use and specify a valid
parent record.
RECORD-4
Record Definition SubRecord
does not exist in Record
Definition table
Use Application Designer to open
the definition. Select File, Object
Properties, Type and specify a
valid subrecord.
RECORD-5
Record Definition Query
Security Record does not exist
in Record Definition table
Use Application Designer to open
the definition. Select File, Object
Properties, Use and specify a valid
query security record.
RECORD-6
Record Field definitions
contain Record names that do
not exist in the Record
Definition table
DELETE FROM psrecfield
WHERE recname = ‘x’;
RECORD-7
DBField records do not exist
for the following RecField
table Fields
Use Application Designer to open
the definition and fix the invalid
fields.
RECORD-8
Record definitions do not exist
for the following RecField
table SubRecords
Use Application Designer to open
the definition and fix the invalid
fields.
RECORD-9
IDENTIFY INVALID
RECORDS IN RECORD
GROUP DEFINITIONS
Can be fixed with:
PEOPLESOFT PROPRIETARY
AND
CONFIDENTIAL
DELETE FROM PS_REC_GROUP_REC
WHERE RECNAME NOT IN (SELECT
DISTINCT RECNAME FROM
PSRECDEFN)
DATA INTEGRITY TOOLS
1-27
DATA MANAGEMENT
Query
Description
Resolution
RECORD-11
Records with more than two
Longs defined
This depends on whether your
database platform supports it or not.
If it does not, then those records
must be modified.
RECORD-12
Records with a Blank/Null
RECNAME
Can be fixed with:
DELETE FROM PSRECDEFN WHERE
RECNAME = ''
Related Language Integrity
Query
Description
Resolution
SYSLANG-01
Base Language Records found
in the PSRECDEFNLANG
table
Run the following SQL from the
your SQL tool.
Delete from psrecdefnlang
where
Language_cd = (select
b.language_cd from psoptions)
SYSLANG-02
Base Language Fields found in
the PSDBFIELDLANG table
Check the value of
LANGUAGE_CD on PSOPTIONSthis is your base language. Entries
with this language code were found
in PSDBFIELDLANG. Base
language entries should only be in
PSDBFIELD.
Once you've established that the
base language entries in
PSDBFIELD are correct, you
should delete them from
PSDBFIELDLANG as follows:
DELETE FROM psdbfieldlang
WHERE language_cd =(SELECT
language_cd FROM psoptions)
1-28
DATA INTEGRITY TOOLS
PEOPLESOFT PROPRIETARY
AND
CONFIDENTIAL
DATA MANAGEMENT
Query
Description
Resolution
SYSLANG-03
Foreign Language Records
found in PSRECDEFNLANG
table without related Base
Records from PSRECDEFN
Run the following SQL from the
appropriate SQL tool.
Delete from psrecdefnlang
where not exists (select ‘x’
from psrecdefn b where
psrecdefnlang.recname =
b.recname)
And psrecdefnlang.language_cd
<> (select c.language_cd from
psoptions c)
SYSLANG-04
Foreign Language Fields found
in the PSDBFIELDLANG
table without related Base
Fields from PSDBFIELD
DELETE FROM psdbfieldlang A
WHERE NOT EXISTS
(SELECT 'X' FROM psdbfield B
WHERE A.fieldname=B.fieldname)
AND A.language_cd <> (SELECT
language_cd FROM psoptions)
SYSLANG-05
Foreign Language Translate
Fields found in the
XLATTABLE table without
related Base Language
Translate Fields
Either delete the offending entries
via SQL, or use the Application
Designer to add the equivalent
entries in the base language of the
database.
SYSLANG-07
Related Language Records
Which Are Not Valid Records
In Application Designer, delete the
specified Related Language
Records.
SYSLANG-08
The Following Related
Language Records are
effective dated but do not have
an EFFDT field defined
In Application Designer, add
EFFDT to the specified related
language table.
SYSLANG-09
The Following Related
Language Record(s) Point to
another Related Language
Record
In Application Designer, delete the
related language reference for each
record listed.
SYSLANG-10
The Following Related
Language Record(s) do not
contain a LANGUAGE_CD as
a key field.
In Application Designer, make
LANGUAGE_CD field a Key on
the specified Related Language
Tables.
SYSLANG-11
The Following Related
Language View(s) Have The
Wrong Structure Defined
In Application Designer, make the
key structures on the specified
Related Language view identical to
the key structure on the Base
Table/view.
PEOPLESOFT PROPRIETARY
AND
CONFIDENTIAL
DATA INTEGRITY TOOLS
1-29
DATA MANAGEMENT
1-30
Query
Description
Resolution
SYSLANG-12
The Following Related
Language Record(s) Have The
Wrong Key Structure Defined
In Application Designer, make the
key structures on the specified
Related Language Tables identical
to the key structure on the Base
Table.
SYSLANG-13
Identify related language
records that have more than
one base record defined
In Application Designer, remove the
related language table link to one of
the base records.
SYSLANG-14
Identify related language
RECORDS that have the
wrong structure defined
In Application Designer, make the
key structures on the specified
Related Language Tables identical
to the key structure on the Base
Table. Also remove any fields,
except language_cd, on the related
language record that do not exist on
the base record.
SYSLANG-15
The Following Related
Language field(s) are orphaned
For each row on the related
language record there must be a
single row on the base table with
matching keys. An orphan row is a
row of data on the related language
record that does not have a
corresponding parent row on the
base table. Orphan rows must be
deleted.
DATA INTEGRITY TOOLS
PEOPLESOFT PROPRIETARY
AND
CONFIDENTIAL
DATA MANAGEMENT
Query
Description
Resolution
Select against the related language
table using the key fields listed in
the report to find discrepancies.
To fix this problem, using your
platform’s query tools select against
the related language table, using the
fields listed in the report, where the
values do not match a row on the
base table. For every row on the
report there is an orphan row on the
table. Do a SELECT first to ensure
you are getting the same row count
as the report then delete the selected
rows. Here is sample SQL for a
Microsoft SQL Server database.
SELECT * FROM PSCONTDEFNLANG A
WHERE NOT EXISTS
(SELECT 'X' FROM PSCONTDEFN B
WHERE A.ALTCONTNUM =
B.ALTCONTNUM
AND A.CONTNAME = B.CONTNAME
AND A.CONTTYPE = B.CONTTYPE)
DELETE FROM PSCONTDEFNLANG
WHERE NOT EXISTS
(SELECT 'X' FROM PSCONTDEFN B
WHERE
PSCONTDEFNLANG.ALTCONTNUM =
B.ALTCONTNUM
AND PSCONTDEFNLANG.CONTNAME =
B.CONTNAME AND
PSCONTDEFNLANG.CONTTYPE =
B.CONTTYPE)
SELECT * FROM <Related
Language Record> A WHERE NOT
EXISTS
(SELECT 'X' FROM <Base Record>
B WHERE A.<Field Name> =
B.<Field Name> ...for each
field name listed)
PEOPLESOFT PROPRIETARY
AND
CONFIDENTIAL
DATA INTEGRITY TOOLS
1-31
DATA MANAGEMENT
SQL Integrity
Query
Description
Resolution
SQL-01
SQL text without a base
definition
Can be fixed with:
SQL definitions without SQL
text
Can be fixed with:
SQL descriptions without a
base definition
Can be fixed with:
SQL descriptions without
associated SQL text
Can be fixed with:
AE SQL without SQL
definitions
This reveals Application Engine
SQL Actions that do not contain any
SQL code within them.
SQL-02
SQL-03
SQL-04
SQL-05
DELETE FROM PSSQLTEXTDEFN
WHERE SQLID NOT IN (SELECT
DISTINCT SQLID FROM PSSQLDEFN)
DELETE FROM PSSQLDEFN WHERE
SQLID NOT IN (SELECT DISTINCT
SQLID FROM PSSQLTEXTDEFN)
DELETE FROM PSSQLDESCR WHERE
SQLID NOT IN (SELECT DISTINCT
SQLID FROM PSSQLDEFN)
DELETE FROM PSSQLDESCR WHERE
SQLID NOT IN (SELECT DISTINCT
SQLID FROM PSSQLTEXTDEFN)
Open the Application Engine
program and complete the entry of
the SQL before attempting to run
the program.
If the empty SQL actions were
delivered by PeopleSoft, open an
incident with the GSC to report the
corrupt AE program.
1-32
DATA INTEGRITY TOOLS
PEOPLESOFT PROPRIETARY
AND
CONFIDENTIAL
DATA MANAGEMENT
Query
Description
Resolution
SQL-06
AE SQL that's not referenced
This reveals an Application Engine
SQL object that is not being
referenced by an AE program. This
indicates that the AE program was
deleted but the associated SQL was
not. The orphaned SQL will not
cause issues other than consuming
disk space.
If the orphaned SQL was delivered
by PeopleSoft, open an incident
with GSC to make sure that it is not
a symptom of a larger problem such
as a corrupted AE application.
SQL-07
Record Views/Dynamic Views
without SQL definitions
Complete the entry of the record
view/dynamic view before
attempting to build/create the view.
Each record should be opened, and
the SQL should be entered as
required.
SQL-08
View SQL that's not referenced
by record or dynamic views
Enter the following SQL:
DELETE FROM PSSQLDEFN WHERE
SQLTYPE = 2 AND SQLID NOT IN
(SELECT DISTINCT RECNAME FROM
PSRECDEFN WHERE RECTYPE = 5 OR
RECTYPE = 1)
DELETE FROM PSSQLDESCR WHERE
SQLTYPE = 2 AND SQLID NOT IN
(SELECT DISTINCT RECNAME FROM
PSRECDEFN WHERE RECTYPE = 5 OR
RECTYPE = 1)
DELETE FROM PSSQLTEXTDEFN
WHERE SQLTYPE = 2 AND SQLID
NOT IN (SELECT DISTINCT
RECNAME FROM PSRECDEFN WHERE
RECTYPE = 5 OR RECTYPE = 1)
Tree Integrity
Query
Description
Resolution
TREE-01
Tree Structure table contains
Level Record name that does
not exist in Record Definition
table
Use Tree Manager to open the
structure and fix the invalid fields.
TREE-02
Tree Structure table contains
Level Page name that does not
exist in Page Definition table
Use Tree Manager to open the
structure and fix the invalid fields.
PEOPLESOFT PROPRIETARY
AND
CONFIDENTIAL
DATA INTEGRITY TOOLS
1-33
DATA MANAGEMENT
Query
Description
Resolution
TREE-03
Tree Structure table contains
Node Record name that does
not exist in Record Definition
table
Use Tree Manager to open the
structure and fix the invalid fields
TREE-04
Tree Structure table contains
Node Field name that does not
exist in RecordField table
Use Tree Manager to open the
structure and fix the invalid fields
TREE-05
Tree Structure table contains
Node Page name that does not
exist in Page Definition table
Use Tree Manager to open the
structure and fix the invalid fields
TREE-06
Tree Structure table contains
Detail Record name that does
not exist in Record Definition
table
Use Tree Manager to open the
structure and fix the invalid fields
TREE-07
Tree Structure table contains
Detail Record name that does
not exist in Record Definition
table
Use Tree Manager to open the
structure and fix the invalid fields
TREE-08
Tree Structure table contains
Detail Page name that does not
exist in Page Definition table
Use Tree Manager to open the
structure and fix the invalid fields
TREE-09
Tree Structure table contains
Summary Tree that does not
exist in Tree Level table
Lists any Summary Tree Structures
that reference a level number on a
Detail Tree that does not exist in the
Tree Level table. Since a Summary
Tree is a tree that is built off of the
nodes from an existing Detail Tree
at a given level, the level specified
on the Summary Tree Structure
must exist in the detail tree's
PSTREELEVEL table.
Given this situation the Summary
Tree would NOT be useable from
nVision or other reporting tools.
The situation could occur from
several possible causes :
• Summary Tree was moved or
imported into a new database but
Detail Tree was not
• The levels on the Detail Tree
could have been deleted since the
summary tree structure was
created
1-34
DATA INTEGRITY TOOLS
PEOPLESOFT PROPRIETARY
AND
CONFIDENTIAL
DATA MANAGEMENT
Query
Description
Resolution
Corrective Action :
1. First need to determine if Detail
Tree exists and is in a valid state.
This can be done by checking the
name of the Detail Tree on the
Summary Tree's Structure record -check the Summary Tree tab on the
Tree Structure record for the
Summary Tree. Note the Tree
Name, SetId, and Level #
2. If Detail Tree exists, check and
see if the level # defined on the
Summary Tree Structure (step 1
above) exists.
3. To correct the situation, either
add missing level to detail tree or
update Summary Tree Structure to
refer to a valid detail tree and level
number.
TREE-10
Tree Structure table contains
Level Menu-Menu Bar
combination that does not exist
Use Tree Manager to open the
structure and fix the invalid fields.
TREE-11
Tree Structure table contains
Node Menu-Menu Bar
combination that does not exist
Use Tree Manager to open the
structure and fix the invalid fields.
TREE-12
Tree Structure table contains
Detail Menu-Menu Bar
combination that does not exist
Use Tree Manager to open the
structure and fix the invalid fields.
TREE-13
Tree Structure table contains
Level Menu-Page combination
that does not exist
Use Tree Manager to open the
structure and fix the invalid fields.
TREE-14
Tree Structure table contains
Node Menu-Page combination
that does not exist
Use Tree Manager to open the
structure and fix the invalid fields.
TREE-15
Tree Structure table contains
Detail Menu-Page combination
that does not exist
Use Tree Manager to open the
structure and fix the invalid fields.
PEOPLESOFT PROPRIETARY
AND
CONFIDENTIAL
DATA INTEGRITY TOOLS
1-35
DATA MANAGEMENT
Query
Description
Resolution
TREE-16
Tree Definition Level count
does not match record count in
Tree Level table
Set the Count in the Tree Definition
table to reflect the actual number of
records in the PSTREELEVEL table
for this tree branch. Note that a
problem may occur if some levels
are missing and there are still nodes
referencing them. In this case, the
nodes will not open the tree
correctly. The third SELECT checks
for the previous situation. If this is
the problem, run PSTED, and define
the missing levels, save the tree, and
then close and re-open it.
SELECT COUNT(*)
FROM PSTREELEVEL
WHERE TREE_NAME = ‘tree_name’
AND
SETID = ‘setid’ AND
EFFDT = ‘effdt’;
UPDATE PSTREEDEFN
SET LEVEL_COUNT = $count
WHERE TREE_NAME = ‘tree_name’
AND
SETID = ‘setid’ AND
EFFDT = ‘effdt’;
TREE-17
Tree Definition Node count
does not match record count in
Tree Node table
Set the count in the Tree Definition
table to reflect the actual number of
the records in the PSTREENODE
table for this tree branch.
SELECT COUNT(*)
FROM PSTREENODE
WHERE TREE_NAME = ‘tree_name’
AND
SETID = ‘setid’ AND
EFFDT = ‘effdt’ AND
TREE_BRANCH =
‘tree_branch_name’;
UPDATE PSTREEDEFN
SET NODE_COUNT = $count
WHERE TREE_NAME = ‘tree_name’
AND
SETID = ‘setid’ AND
EFFDT = ‘effdt’
TREE_BRANCH =
‘tree_branch_name’;
1-36
DATA INTEGRITY TOOLS
PEOPLESOFT PROPRIETARY
AND
CONFIDENTIAL
DATA MANAGEMENT
Query
Description
Resolution
TREE-18
Tree Definition Leaf count
does not match record count in
Tree Leaf table
Set the Count in the Tree Definition
table to reflect the actual number of
records in the PSTREELEAF table
for this branch.
SELECT COUNT (*)
FROM PSTREELEAF
WHERE TREE_NAME = ‘tree_name’
AND
SETID = ‘setid’ AND
EFFDT = ‘effdt’
TREE_BRANCH =
‘tree_branch_name’;
UPDATE PSTREEDEFN
SET LEAF_COUNT = $count
WHERE TREE_NAME = ‘tree_name’
AND
SETID = ‘setid’ AND
EFFDT = ‘effdt’
TREE_BRANCH =
‘tree_branch_name’;
TREE-19
Tree Definition contains
Structure ID that does not exist
in Tree Structure table
Use Tree Manager to create the
structure desired using the name
reported in this audit.
TREE-20
Tree Definition contains Query
Access Group structure with
undefined levels and leaves
Query trees should have no leaves
and no levels. This audit finds
exceptions to that case in the
definition counts.
UPDATE pstreedefn
SET level_count = 0,
leaf_count = 0
WHERE tree_strct_id =
'ACCESS_GROUP' AND
(level_count <> 0 OR
leaf_count <> 0);
TREE-21
Tree Selector Control contains
Tree name 'that is not defined
in Tree Definition table
This audit flags records in the
PSTREESELCTL tables for records
that don’t have a corresponding
record in the PSTREEDEFN table.
DELETE FROM pstreeselctl A
WHERE NOT EXISTS
(SELECT 'x' FROM pstreedefn B
WHERE B.setid = A.setid AND
B.tree_name = A.tree_name AND
B.effdt = A.effdt)
PEOPLESOFT PROPRIETARY
AND
CONFIDENTIAL
DATA INTEGRITY TOOLS
1-37
DATA MANAGEMENT
Query
Description
Resolution
TREE-22
Tree Definition Level count
does not match level use
This audit flags the Level Use type
with the Level Count for conflicts.
When the Level Use is "N" there
should be no Levels defined and
when it is not "N" then there should
be levels defined. A problem in this
audit may also report problems in
the TREE-16 audit.
When the Level Use is ‘N” and the
Level Count !=0 and TREE-16 does
not indicate an error on the same
tree, do the following:
UPDATE PSTREEDEFN
SET USE_LEVELS = ‘S’
WHERE TREE_NAME =
‘tree_name’ AND
SETID = ‘setid’ AND
EFFDT = ‘effdt’
When the Level Use is ‘S’ and the
Level Count !=0 and TREE-16 does
not indicate an error on the same
tree, do the following (after
checking the resolution on TREE-16
to cleanup any level records):
UPDATE PSTREEDEFN
SET LEVEL_COUNT = 0
WHERE TREE_NAME = ‘tree_name’
AND
SETID = ‘setid’ AND
EFFDT = ‘effdt’
When the Level Use is not ‘N’ and
the Level Count = 0 and TREE-16
does not indicate an error on the
same tree, do the following (after
checking the resolution on TREE-16
to cleanup any level records):
UPDATE PSTREEDEFN
SET USE_LEVELS = ‘N’
WHERE TREE_NAME =
‘tree_name’ AND
SETID = ‘setid’ AND
EFFDT = ‘effdt’
1-38
DATA INTEGRITY TOOLS
PEOPLESOFT PROPRIETARY
AND
CONFIDENTIAL
DATA MANAGEMENT
Query
Description
Resolution
and
UPDATE PSTREENODE
SET TREE_LEVEL_NUM = 0
WHERE TREE_NAME = ‘tree_name’
AND
SETID = ‘setid’ AND
EFFDT = ‘effdt’
When TREE-23 indicates an error
on the same Tree with the Level
Count on the PSTREEDEFN =
number of PSTREELEVEL records
(when the PSTREELEVEL has no
levels for this tree, count = 0 for the
following:
SELECT COUNT(*)
FROM PSTREELEVEL
WHERE TREE_NAME = ‘tree_name’
AND
SETID = ‘setid’ AND
EFFDT = ‘effdt’
\\ Then…
UPDATE PSTREEDEFN
SET LEVEL_COUNT = 0
WHERE TREE_NAME = ‘tree_name’
AND
SETID = ‘setid’ AND
EFFDT = ‘effdt’
and
UPDATE PSTREEDEFN
SET USE_LEVELS = ‘N’
WHERE TREE_NAME = ‘tree_name’
AND
SETID = ‘setid’ AND
EFFDT = ‘effdt’
and
UPDATE PSTREENODE
SET TREE_LEVEL_NUM = 0
WHERE TREE_NAME = ‘tree_name’
AND
SETID = ‘setid’ AND
EFFDT = ‘effdt’
PEOPLESOFT PROPRIETARY
AND
CONFIDENTIAL
DATA INTEGRITY TOOLS
1-39
DATA MANAGEMENT
Query
Description
Resolution
TREE-23
Tree Level does not exist in
Tree Definition table
Tree Level records in the
PSTREELEVEL table exist for trees
that don’t exist in the
PSTREEDEFN table.
DELETE FROM pstreelevel A
WHERE NOT EXISTS
(SELECT 'x' FROM pstreedefn B
WHERE B.setid = A.setid AND
B.tree_name = A.tree_name AND
B.effdt = A.effdt)
TREE-24
Tree Node does not exist in
Tree Definition table
Tree Node records in the
PSTREENODE table exist for trees
that don’t exist in the
PSTREEDEFN table.
DELETE FROM pstreenode A WHERE
NOT EXISTS
(SELECT 'x' FROM pstreedefn B
WHERE B.setid = A.setid AND
B.tree_name = A.tree_name AND
B.effdt = A.effdt)
TREE-25
Tree Leaf does not exist in
Tree Definition table
Tree Leaf records in the
PSTREELEAF table exist for trees
that don’t exist in the
PSTREEDEFN table.
DELETE FROM pstreeleaf A WHERE
NOT EXISTS
(SELECT 'x' FROM pstreedefn B
WHERE B.setid = A.setid AND
B.tree_name = A.tree_name AND
B.effdt = A.effdt)
TREE-26
Tree Leaf ranges not valid in
Tree Definition table
Finds records in the PSTREELEAF
table where RANGE_FROM is less
than RANGE_TO.
Use Tree Manager to open the tree
and correct the invalid range values
TREE-27
1-40
DATA INTEGRITY TOOLS
Tree Leaf does not have parent
Tree Node in Tree Definition
table.
DELETE FROM pstreeleaf A WHERE
NOT EXISTS
(SELECT 'x' FROM pstreenode B
WHERE B.setid = A.setid AND
B.tree_name = A.tree_name AND
B.effdt = A.effdt AND
B.tree_node_num =
A.tree_node_num)
PEOPLESOFT PROPRIETARY
AND
CONFIDENTIAL
DATA MANAGEMENT
Query
Description
Resolution
TREE-28
Tree Branch does not exist in
Tree Branch table.
Refer to the "Tree Audit and Repair
Utilities" chapter in the Tree
Manager PeopleBook and run the
Unbranch Tree Repair Utility so
that all branches are removed from
the tree.
TREE-29
Tree Branch does not exist in
Tree Branch table
Refer to the "Tree Audit and Repair
Utilities" chapter in the Tree
Manager PeopleBook and run the
Unbranch Tree Repair Utility so
that all branches are removed from
the tree.
TREE-30
Tree Branch Node count does
not match record count in Tree
Node table
See Resolution for Tree-29
TREE-31
Tree Branch Leaf count does
not match record count in Tree
Leaf table
See Resolution for Tree-29
TREE-32
Tree Node Num, Node Num
End, or Level Num is invalid
in Tree Branch table
See Resolution for Tree-29
TREE-33
Identify all orphan access
group definitions as well as
invalid access group
definitions in the access group
security
Open Query Access Group Tree in
Query Access Group Manager and
update the identified Access Group
so that a record is created in the
Access Group Table
TREE-34
Tree Definition Node Count
Does Not Equal 0 for a
Branched Tree.
See Resolution for Tree-29
TREE-35
Tree Definition Leaf Count
Does Not Equal 0 for a
Branched Tree.
See Resolution for Tree-29
Translate Integrity
Query
Description
Resolution
XLATT-1
Translate table Field does not
exist in database Field.
Create the field using Application
Designer.
XLATT-3
Translate field(s) do not have
associated translate values
defined.
Edit translate field and enter
translate value.
PEOPLESOFT PROPRIETARY
AND
CONFIDENTIAL
DATA INTEGRITY TOOLS
1-41
DATA MANAGEMENT
PSLOCK Integrity
Query
Description
Resolution
Manager-< XXX
>
Version Check of listed table
against PSVERSION.
Run the Version Application Engine
program.
Where XXX is
the associated
three-letter code
of the object
type.
1-42
DATA INTEGRITY TOOLS
PEOPLESOFT PROPRIETARY
AND
CONFIDENTIAL
CHAPTER 2
Data Mover
This document provides an overview of Data Mover and covers the following topics:
•
Data Mover interface
•
Using Data Mover
•
Data Mover Scripts
•
Database Setup functionality
•
Data Mover Command Line Interface
•
Data Mover Commands
•
Data Mover Set Parameters
•
Sample Data Mover Scripts
Understanding Data Mover
Data Mover enables you to perform the following tasks:
•
Transfer application data between PeopleSoft databases.
•
Move PeopleSoft databases across operating systems and database platforms.
•
Execute SQL statements against any PeopleSoft database, regardless of the underlying
operating system or database platform.
•
Control database security and access.
•
Create, edit, and run scripts. These scripts may include any combination of SQL
commands and Data Mover commands for exporting and importing data.
The Data Mover development interface, or GUI, only runs on Windows. However, the Data
Mover command line interface, which is mainly intended for UNIX servers, runs on Windows
and UNIX operating systems.
Important! Data Mover runs in two-tier mode only. You must sign on to the database
directly, not through an application server.
PEOPLESOFT PROPRIETARY
AND
CONFIDENTIAL
DATA MOVER
2-1
DATA MANAGEMENT
Understanding the Data Mover Interface
Before you begin using Data Mover to create and run your database scripts, you’ll want to
become familiar with the Data Mover interface.
Starting Data Mover
There are two ways to start Data Mover:
•
Using the Data Mover short cut in your PeopleSoft program group, as in Start,
Programs, <PeopleSoft Group>, Data Mover. This access method only applies to the
Windows Development Environment.
•
Using the command line interface. This executes Data Mover in a console for
Windows and a telnet session for UNIX. The command line interface is discussed in
more detail later in this document.
Operating Modes
Operating modes refer to how you are connected to the database. You use Data Mover in one
of the following modes: regular or bootstrap.
Regular Mode
Most of the time you will sign onto Data Mover in regular
mode. To do this, you simply enter your PeopleSoft user
ID and password at the signon screen. In regular mode,
all commands are valid.
Bootstrap Mode
At times, you need to signon on to Data Mover in
bootstrap mode, which means using the database access
ID and password at the signon screen. Typically, using
bootstrap mode is necessary for database loading because
there are no PeopleSoft security tables established yet.
Bootstrap mode is also used for running some security
commands, such as, ENCRYPT_PASSWORD.
Note. In bootstrap mode, the following commands are not valid: EXPORT, RENAME, and
REPLACE_VIEW.
Signing on to the Development Environment
To start Data Mover in the Development Environment:
1. Select Start, Programs, <PeopleSoft Group>, Data Mover.
2-2
DATA MOVER
PEOPLESOFT PROPRIETARY
AND
CONFIDENTIAL
DATA MANAGEMENT
Where <PeopleSoft Group> refers to the program group containing your PeopleSoft
programs. If you don’t have a Data Mover short cut, you can add one to the desktop. The
executable to launch is as follows: %PS_HOME%\bin\client\winx86\PSDMT.EXE.
2. Sign on using the appropriate ID and password.
In regular mode, these would be your User ID and password. In bootstrap mode, you use
the system access ID and access password, such as SYSADM.
Understanding the Data Mover Window
The Data Mover interface is split horizontally into two panes: an input pane and an output
pane.
The input pane is on the top of the screen and the output pane is on the bottom.
The status bar at the bottom of the screen reveals the following:
•
Database Name. QEDMO, PT840HR, and so on.
•
Database Type. Oracle, Sybase, and so on.
•
Operating Mode. Regular or Bootstrap mode.
•
Trace Status. On or off.
The input pane (window) is where the script you’ve opened appears. This is where you view
and edit Data Mover scripts.
The output window displays the results after running a script. If you encounter any errors, the
output window shows where the script failed. In a multi-database environment, always check
the information at the top of the output to ensure that you've run the script against the
appropriate database. Specifically, refer to the "Database:" line.
Note. The results shown in the output window are saved to the file DATAMOVE.LOG by
default, which is written to the default log directory as specified in the Configuration Manager
(Profile, Common tab). You can also specify your own file name.
SQL Trace status appears in the far right portion of the status bar. PeopleSoft recommends
using Data Mover with tracing turned off. You can disable SQL Trace (for the Windows
environment) before starting Data Mover in a number of places:
•
Configuration Manager
•
PeopleTools Options
•
Data Mover Command (NO TRACE)
The operating mode display on the status bar lets you know if you’re in regular mode or in
bootstrap mode. If you are connected to the database in regular mode, the status shows a
PEOPLESOFT PROPRIETARY
AND
CONFIDENTIAL
DATA MOVER
2-3
DATA MANAGEMENT
“blank” operating mode. The operating mode displays BootStrap if you signed on using the
access ID and password.
Note. Make sure you know the mode you are using. Most commands require regular mode to
run successfully.
See Also
Configuration Manager
PeopleTools Options
NO TRACE
Operating Modes
LOG
Understanding the Menu Options
There are four menu bar items in the Data Mover window: File, Edit, View, and Help.
File
Contains options to Create, Open, Save, and Run scripts.
You also launch Database Setup from this menu. These
options are discussed later in this document in the proper
context.
Edit
Contains menu items similar to those of most text editors:
Undo, Cut, Copy, Paste, and Clear. Also, you will find
Select All, Find, Replace, and Repeat.
View
Using the View menu list, you can opt to hide the Toolbar
and/or the Status Bar. Both appear by default.
Help
Contains the Standard PeopleSoft help options.
Understanding the Toolbar Options
The toolbar offers the standard Microsoft Windows buttons to use in place of selecting menu
options for the following actions: New, Open, Save, Cancel, Cut, Copy, Paste, and Help. The
only button that is specific to Data Mover is the Run Script button.
Understanding Data Mover Scripts
This section covers:
•
2-4
DATA MOVER
Command Types
PEOPLESOFT PROPRIETARY
AND
CONFIDENTIAL
DATA MANAGEMENT
•
Syntax Rules
•
Creating and editing scripts
Command Types
A Data Mover script can contain two types of commands:
•
Data Mover commands. Used to export and import database information and to
otherwise modify the database. Data Mover commands also control script execution, call
other Data Mover files, and enter comments.
•
SQL commands. These include both standard and non-standard SQL commands used to
modify the database.
Syntax Rules
If you plan to create or edit Data Mover scripts, you will need to keep the following syntax
rules in mind to make sure your commands run successfully.
Rule 1
With the exception of double-dash (--) comment statements, every command statement must
be followed by a delimiter.
Valid delimiters are:
•
Semicolon (;). A semicolon can reside on the same line as the command itself, or by itself
on the line immediately following a command statement. For example, the following two
uses of the semicolon delimiter are valid:
SET OUTPUT c:\temp\abc.dat;
SET LOG c:\temp\new.log
;
•
Forward slash (/). This delimiter can be used only on a line by itself, in column 1, on a
line immediately following a command statement. For example:
IMPORT *
/
Rule 2
With the exception of double-dash (--) comment statements, statements may span multiple
lines. For example:
EXPORT absence_hist
WHERE absence_type = ‘A’;
PEOPLESOFT PROPRIETARY
AND
CONFIDENTIAL
DATA MOVER
2-5
DATA MANAGEMENT
Rule 3
A double-dash (--) comment statement does not require a delimiter termination. However,
each statement can’t span more than one line. Also, make sure you add a space after the (--)
before you start your comment. For example:
Correct:
-- This script imports the information stored in
-- the ABC.DAT file.
Incorrect:
--This script imports the information stored in
the ABC.DAT file.
Rule 4
Command statements may contain any amount of white space between items.
Rule 5
Statement text is case insensitive. For example,
IMPORT *
is equivalent to
import *
Note. In this chapter, we show commands in UPPERCASE to help set them apart from other
statement text.
Rule 6
String constants are case sensitive and must be surrounded by single quotes. For example,
‘ABC’ is treated differently than ‘Abc’ or ‘abc’.
Rule 7
In Data Mover, when a record name needs to be specified as one of the elements in the
command statement syntax, as in an IMPORT statement, you can specify either the record
name or the corresponding table name. For example, the following IMPORT statements are
equivalent:
Correct:
IMPORT job;
Correct:
IMPORT ps_job;
2-6
DATA MOVER
PEOPLESOFT PROPRIETARY
AND
CONFIDENTIAL
DATA MANAGEMENT
However, when a table name is required for one of the elements in the command statement
syntax, you must use the table name—not the record name. For example:
Correct:
IMPORT job
AS
ps_process;
AS
process;
Incorrect:
IMPORT job
Creating and Editing Scripts
When you want to use Data Mover to manipulate the information in your database, you can
either write a new script, or open and edit an existing script that is similar to the one you want
to create.
The default file extension for scripts is DMS, which stands for Data Mover Script.
To create a new script:
1. Select File, New.
When you first launch Data Mover, this is the default mode; you don’t need to select File,
New.
2. Enter the script text (code) in the input (top) pane.
Using proper Data Mover syntax, enter the command statements you want the script to
execute.
3. Save the script.
Select File, Save. On the Save As dialog box select the Save as Unicode checkbox (if
appropriate) and click Save.
To edit an existing Data Mover script
1. Select File, Open.
2. Choose the file you want and click OK.
By default, you view only .DMS files. You can also choose All Files from the Files of
type drop-down list and view all file types. After you open a script, it appears in the Data
Mover input pane.
3. Make the desired changes to the script.
If the file you opened was not a .DMS type, be sure to check that it conforms to the
required syntax rules and that it doesn’t contain any unsupported SQL commands.
PEOPLESOFT PROPRIETARY
AND
CONFIDENTIAL
DATA MOVER
2-7
DATA MANAGEMENT
4. Save the script with a new name, if desired.
Select File, Save As.
On the Save As dialog, enter a File name, select the Save as Unicode checkbox if
appropriate and click Save.
If the script is edited in Unicode format, then the default save is Unicode. However, if the
file is opened in ASCII format then the default will be ASCII.
See Also
Understanding Data Mover Scripts
Understanding Data Mover Commands
Data Mover Command Reference
SET Parameter Reference
Running Scripts
Preparing to Run Export Scripts
Before running a Data Mover export script, you must first prepare your database, by
completing the following steps:
To prepare for an export
1. Load DDL model information by running all DDL*.DMS files through Data Mover.
2. If you need to change your DDL model information, use the DDL Model Defaults utility
in PeopleTools Utilities.
3. Run the DDDAUDIT.SQR and fix any errors it finds.
4. Run the SYSAUDIT.SQR and fix any errors it finds.
5. Use Application Designer to SQL Alter all tables.
Either let the files alter in place or run the script that it generates to alter any tables it finds
out of sync.
6. Use Application Designer to SQL Create all records, using the If table exists... Never
recreate option.
See Also
PeopleTools Utilities
2-8
DATA MOVER
PEOPLESOFT PROPRIETARY
AND
CONFIDENTIAL
DATA MANAGEMENT
Running Scripts
This section discusses running scripts with Data Mover. Through Data Mover, you can run
DDL, DML, and SQL scripts created with the following tools:
•
Data Mover (DMS scripts).
•
Application Designer's Build SQL functionality (SQL scripts).
•
Platform-specific SQL utility (SQL scripts).
When running scripts through Data Mover, keep the following items in mind:
•
PeopleSoft strongly recommends running Data Mover scripts when SQL Trace is set
to Off. If SQL Trace is enabled, turn it off on the Trace tab in the Configuration
Manager before you run the script. You can also enter the SET NO TRACE statement
within your scripts whenever possible. This disables SQL Trace for the DMS script
even if it is enabled in the Configuration Manager.
•
Records defined using Data Mover EXPORT and IMPORT commands can have a
maximum of 250 total columns and no more than two long columns.
•
On DB2 platforms, locks can occur on system catalogs. In that case, you should not
let Data Mover sessions run unattended, and be sure to close your session as soon as
all scripts complete.
•
If you want to run a .SQL script, you must open it using File, Open so that the SQL
executes properly. Do not copy and paste SQL from another source into Data Mover.
See Also
SET Parameter Reference
Configuration Manager
To run a script:
1. Select File, Open.
2. Choose the type of script to run.
You have the following options:
•
Data Mover Files (.DMS). These are the files created using Data Mover.
•
Query Files (.SQL). These are the files created using the Build SQL functionality
menu in Application Designer or using an RDBMS-specific query tool, such as
PL/SQL on Oracle.
•
All Files. Enables you to view all available files in a directory. Only .DMS and .SQL
files are valid file types for Data Mover.
PEOPLESOFT PROPRIETARY
AND
CONFIDENTIAL
DATA MOVER
2-9
DATA MANAGEMENT
Note. SELECT commands are not supported. When performing upgrades, use the
SQL utility for your platforms to run .SQL scripts, not Data Mover.
3. Select File, Run.
You can monitor the script's progress in Data Mover’s output pane, which reveals any
error messages and a message saying “Script Completed” when processing has ended.
Using Database Setup
Typically, Database Setup is used during PeopleSoft installations and upgrades, not
necessarily on a daily basis. You use Database Setup to create Data Mover import scripts that
load data into your PeopleSoft database.
This section covers:
•
Accessing Database Setup
•
Using the Database Setup Wizard
Note. If you are performing an installation, you need to use the documentation included in
your PeopleSoft Installation guide, which provide specific details regarding your applications,
languages, and RDBMS. This section provides a general overview, not specific to the
installation procedure.
Accessing Database Setup
To Access the Database Setup Utility:
1. Signon on to Data Mover in bootstrap mode.
Use the access ID and password rather than your PeopleSoft user ID and password.
2. Select File, Database Setup.
Note. If you sign on to Data Move using the regular mode, not bootstrap mode, the
Database Setup menu option is disabled.
2-10
DATA MOVER
PEOPLESOFT PROPRIETARY
AND
CONFIDENTIAL
DATA MANAGEMENT
Using the Database Setup Screen
Select Target Database
From the drop-down list, select the RDBMS you intend to
run the database setup script against. For instance, if the
database you are creating is to run on an Oracle server,
select Oracle.
Database Type
PeopleSoft supports Non-Unicode (ANSI) and Unicode
database types. Make sure you select the appropriate type
for your system. For some RDBMS types, Unicode is not
an option.
Select Character Set
Depending on what RDBMS you selected previously, the
valid character sets appear in this drop-down list. Select
the appropriate option for your system.
Using the Select PeopleSoft Application Screen
PeopleSoft Application
Only the applications that you have licensed appear.
Select the applications for which you want to create Data
Mover scripts. To add applications selectively, use the
Add button. To add all applications available, use the Add
All button. The Add All button is enabled when multiple
applications appear. You add the applications to the Data
Mover Scripts to Create edit box.
Data Mover Scripts to
Create
Contains the applications you added from the PeopleSoft
Application list box. Use the Remove button to remove a
single application, and use the Remove All button to clear
the list box if multiple applications appear. The Remove
All button resets the PeopleSoft Application list.
Database Type
Specify what the result of running the script should be.
There are two database codes: PT for PeopleTools and EP
for PeopleSoft applications.
PEOPLESOFT PROPRIETARY
AND
CONFIDENTIAL
•
Demo. For creating a demonstration database.
•
System. For creating a system database.
•
Add New Language. For adding support of new
languages to and existing database.
•
Add New Product. To add an new PeopleSoft product
to the current system. With this option selected only
non-PT Database Codes appear.
DATA MOVER
2-11
DATA MANAGEMENT
Using the Database Parameters Screen
Database Name
Enter the name of the database against which you intend
to run the script. Note that the database name that appears
is the database for which you are currently signed on. If
the script you are creating will be run against another
database, make sure to specify the appropriate name here.
If elect to generate a script for a database other than the
current database, the system uses a default database using
the following convention, XXDMO for demonstration
databases, and XXSYS for system databases. The 'XX'
represents the product code, such as HR.
Symbolic ID
This is used as the key to retrieve Access ID and access
password. For initial installation set it equal to the
Database Name.
Access ID
The PeopleSoft Access ID is the RDBMS ID with which
PeopleSoft application(s) are ultimately connected to your
database once the PeopleSoft System validates the User or
Connect ID. It typically has all the RDBMS privileges
necessary to access and manipulate data for an entire
PeopleSoft application.
Access Password
The password associated with the access ID.
Connect ID
The ID used for the initial connection to the database.
Any two-tier connection requires a Connect ID. A
Connect ID is a valid user ID that, when used during
login, takes the place of PeopleSoft User IDs for the logon
process.
Table Owner
(DB2 for OS390) Populates the CREATOR field in the
system catalog table SYSIBM.SYSTABLES. You
determined the name of the table owner ID during the
initial installation using your PeopleSoft installation
guide.
Index Storage Group
(DB2 for OS390) The storage group where the index
spaces will be created.
Table Space Storage Group
(DB2 for OS390) The storage group for tablespaces. This
value must be the same as that used in the XXDDL.SQL
script when you created tablespaces during your
installation.
Checking the Generated Script
After running Database Setup, check the output directory for the generated script if you are
interested in viewing it. Notice that some commands are added that call other scripts and
2-12
DATA MOVER
PEOPLESOFT PROPRIETARY
AND
CONFIDENTIAL
DATA MANAGEMENT
perform various functions. These commands are added to reduce the number of scripts and
commands you need to run manually. For example, notice that the following commands
appear at the end of the script:
•
REPLACE_VIEW. Creates views for the new database.
•
CREATE_TEMP_TABLE. Creates any necessary temporary table images. The
number of temporary tables to create is determined by the value Temp Table Instances
setting in PeopleTools Options (Utilities, Administration, PeopleTools Options) plus
the number of Application Engine temporary table(s).
•
SWAP_BASE_LANGUAGE. If you selected a base language other than English, this
command modifies your system to recognize that language as the base language. The
default PeopleTools language is English if PSSTATUS table is not available.
•
RUN. This command executes the CURRXXX.DMS script, to load your system with
the appropriate currency information, and this command executes MSGTLXXX.DMS
to load your system with the appropriate PeopleTools messages (error and
informational messages). Where 'XXX' represents the language code, such as FRA
for French. The system runs these scripts only if you have selected a base language
other than English.
Note. After each DDL create table, import data, and DDL create indexes, Data Mover issues
an UPDATE STATISTICS command (except on OS/390), which improves the performance
of subsequent commands, such as the REPLACE_VIEW command.
See Also
CREATE_TEMP_TABLE
SWAP_BASE_LANGUAGE
Using the Data Mover Command Line Interface
The following section gives an overview of the command line feature and discusses:
•
Running scripts from the command line.
•
Command line parameters.
•
Using a parameter file ("parm file").
Overview
The Data Mover command line interface enables you to run Data Mover scripts from the
command line in UNIX and Windows environments. Keep in mind that the command line
interface is designed only for running scripts, not creating and editing scripts. You create and
PEOPLESOFT PROPRIETARY
AND
CONFIDENTIAL
DATA MOVER
2-13
DATA MANAGEMENT
edit scripts using the Data Mover Development Environment, which is supported on Windows
only.
When using the command line interface the results of the script run appear in the command
line window much like the contents of the output pane in the Windows GUI. The system also
writes this information to the LOG file.
Data Mover supports $PS_HOME, for UNIX, and %PS_HOME, for Windows NT.
Note. The command line interface also runs on Windows machines, however, in most cases
you would use the Data Mover Windows GUI to run scripts on Windows machines. This
documentation is geared towards UNIX.
Note. The Data Mover command line on UNIX is intended to increase the performance with
large database loads during installation. It is recommend that you use the Data Mover
Windows interface for other types of scripts.
Getting Started (on UNIX)
Before running the Data Mover command line on UNIX, be aware of the following items:
•
BEA Tuxedo is required for Data Mover to run on UNIX, and it must be installed
before you use the UNIX Data Mover interface.
•
Run PSCONFIG.SH first to set the UNIX and PeopleTools environment variables
before running PSDMTX.
•
PeopleSoft supplies default UNIX environment variables for Data Mover in the
PSCONFIG.SH shell program. If you need to modify the default environment
variables, you need to edit the PSCONFIG.SH or manually change the environment.
For example, to change the Data Mover environment variables modify the following:
export PS_DM_DATA=<new data path>
export PS_DM_SCRIPT=<new script path>
export PS_DM_LOG=<new log path>
2-14
Configuration Setting
Description
$PS_DM_DATA
Use this environment variable to specify the directory where
Data Mover should search for its input data files (.DAT).
When running a Data Mover script, if no explicit path is
specified for the file named in the set input lines, then Data
Mover searches directories for the .DAT file in the following
order. The default is $PS_HOME/data.
$PS_DM_SCRIPT
Use this environment variable to specify the location of your
Data Mover scripts files. The default is $PS_HOME/scripts.
DATA MOVER
PEOPLESOFT PROPRIETARY
AND
CONFIDENTIAL
DATA MANAGEMENT
Configuration Setting
Description
$PS_DM_LOG
Use this environment variable to specify the location of your
Data Mover log files. The default is $PS_HOME/log.
Running a Data Mover Script from the Command Line
To run a script from the command line:
1. Launch the command prompt.
2. Navigate to the %PS_HOME%\bin\client\winx86 directory for Windows and
$PS_HOME/bin directory for UNIX.
For example,
Windows. %pt840%\bin\client\winx86>
UNIX. $pt840/bin
3. Enter the name of the program to launch, which is PSDMTX.
For example,
Windows. %pt840%\bin|client\winx86\psdmtx
UNIX. $pt840/bin/psdmtx
4. Enter all the appropriate command line arguments.
To invoke Data Mover to run a script from the command line, you need to specify the
Data Mover executable (PSDMTX.EXE) followed by the required parameters, as shown
in the following example:
psdmtx -CT <dbtype> -CS <server> -CD <database name> -CO <user ID> -CP
<password> -CI <connect ID> -CW <connect password> -FP <Filename>
See the following section for a complete description of all the command line parameters.
5. Press ENTER.
Understanding the Command Line Parameters
The following command line arguments are available to pass to PSDMTX.EXE for running
Data Mover Scripts.
Database type. Valid values are ORACLE, INFORMIX,
SYBASE, MICROSFT, DB2, DB2ODBC, DB2UNIX.
For example,
-CT
-CT ORACLE
PEOPLESOFT PROPRIETARY
AND
CONFIDENTIAL
DATA MOVER
2-15
DATA MANAGEMENT
-CS
Server name. The name of the database server for the
database to which you're connecting. This setting is
required for some database types. For example,
-CS pt-sun05
-CD
Database name. The name of the database to connect to,
as you would enter at the PeopleSoft signon. For
example,
-CD HR840DMO
-CO
The PeopleSoft user ID to use to login. For example,
-CO TOM2
-CP
The password for the specified user ID. For example,
-CP SAWYER2
-CI
Connect ID. The ID used to connect to the database
server. For example,
-CI HUCK
-SS
Suppresses the display of the PeopleSoft splash screen.
To do so, you need to include this parameter followed by
NO. For example,
-SN NO
-SN
Suppresses the sound that plays when signing onto the
PeopleSoft system. To do so, you need to include this
parameter followed by NO. For example,
-SN NO
-FP
Filename. The name of the Data Mover script to run. For
example,
-FP $pt840/scripts/test.dms
/? or /help
Help. Shows the command line arguments and their
description in your command prompt.
Using a Parameter File
Rather than submitting the arguments manually on the command line you also have the option
of having Data Mover read a file that contains the appropriate parameters. PeopleSoft provides
a sample parm file (parameter file) for you to use as a template, which you can find in
$PS_HOME/setup directory.
If you submit a filename to Data Mover as the first parameter in the command line, Data
Mover reads the contents of the file and interprets the contents as if it were parameters entered
on the command line. For example,
2-16
DATA MOVER
PEOPLESOFT PROPRIETARY
AND
CONFIDENTIAL
DATA MANAGEMENT
pdmtx $temp/myparmfile.txt
Note. You must enter the full path to the parameter file.
Note. For security reasons, after Data Mover interprets the contents of the parm file, it
immediately deletes the parm file.
Understanding Data Mover Commands
In this section we briefly discuss each of the commands that you can use in a Data Mover
script and what you can expect them to accomplish. After reading this section you will know
all the valid Data Mover commands and SQL commands that you can include in your Data
Mover scripts.
Data Mover Commands
Data Mover commands are platform-independent and are unique to Data Mover. You can use
Data Mover commands for importing, exporting, and other tasks, such as controlling the run
environment, renaming fields and records, database security administration, and denoting
comments.
The following list presents the Data Mover commands and methods to indicate comments:
ENCRYPT_PASSWORD
Encrypts one or all users’ passwords (operator and access)
defined in PSOPRDEFN for operators.
EXPORT
Instructs Data Mover to select record information and data
from a record or records and places the result set in a file.
You can use the export file generated as input for
migrating to another platform. This file is portable
between ASCII and EBCDIC character sets, and also
supports double-byte characters.
IMPORT
Inserts data into a table or tables using the information in
an export file. If a tablespace or table does not exist, this
command creates tablespace, table, and indexes for the
record, using the information in the export file, and inserts
the data.
REM, REMARK, --
Use this to denote comment statements.
RENAME
Renames a PeopleSoft record, a field in one record, or a
field in all records.
REPLACE_ALL
A variation of the IMPORT command. If a table already
exists, use this command to drop the table and its indexes
from the database and create the table and indexes using
PEOPLESOFT PROPRIETARY
AND
CONFIDENTIAL
DATA MOVER
2-17
DATA MANAGEMENT
the information in the export file. Then, it inserts data into
the table using the information in the export file.
REPLACE_DATA
A variation of the IMPORT command. Deletes data in
existing table(s) and inserts the corresponding data from
the export file.
REPLACE_VIEW
Recreates specified views found in the database.
RUN
Executes a specified .DMS file from within a Data Mover
script. The file can not contain nested RUN commands.
SET
When followed by valid SET parameters, it forms
statements that establish the conditions under which Data
Mover executes the Data Mover and/or SQL commands
that follow.
SWAP_BASE_LANGUAG
E
Swaps all the language tables from PSRECDEFN.
SET IGNORE_ERRORS
Optional. If the command is set then all errors during the
swap base language will be ignore. Otherwise, it stops on
error.
SET BASE_LANGUAGE
Used to swap individual language tables. You should
swap individual table only when there is an error with any
of the table after the SWAP_BASE_LANGUAGE
command.
See Also
Data Mover Command Reference
SET Parameter Reference
SQL Commands
With Data Mover, you can use supported SQL commands in scripts on any supported database
platform. Except where noted otherwise (in the Standard SQL Commands topics), you can
use all the supported SQL commands with the following Data Mover SET statements:
•
SET LOG
•
SET NO COMMIT
•
SET NO TRACE
Standard SQL Commands with DMS Scripts
Data Mover supports the following standard SQL commands:
•
2-18
ALTER
DATA MOVER
PEOPLESOFT PROPRIETARY
AND
CONFIDENTIAL
DATA MANAGEMENT
•
COMMIT
•
CREATE
•
DELETE
•
DROP
Note. With DROP commands, any drop errors are ignored. The script continues, but the
errors are reported in the log.
•
GRANT
•
INSERT
Note. INSERT cannot be used with SET NO COMMIT or SET NO TRACE.
•
ROLLBACK
•
UPDATE
Important! Data Mover does not support SELECT statements, because they require a SQL
FETCH function.
Standard SQL Commands with SQL Files
Data Mover supports all SQL commands and other database specific function calls that are
supported by the database engine.
Note. Data Mover only runs files with the extension .SQL.
Non-Standard SQL Commands
Also available for use with Data Mover are some non-standard SQL commands created by
PeopleSoft—PSCOPY, STORE, and ERASE.
Note. In previous versions of PeopleSoft, we supported a command called PSCOPY, which
was an Oracle-specific command to support altering records that have a long field in an
INSERT statement subquery. Now you should be running Oracle scripts generated by the
Build feature in Application Designer through SQL*Plus.
PEOPLESOFT PROPRIETARY
AND
CONFIDENTIAL
DATA MOVER
2-19
DATA MANAGEMENT
STORE
To change COBOL SQL statements in PS_SQLSTMT_TBL, you use two non-standard,
PeopleSoft SQL commands: STORE and ERASE.
The STORE command first deletes the existing stored statement from PS_SQLSTMT_TBL,
then inserts the new statement using the following syntax:
STORE progname_type_stmtname
For example:
STORE PTPEMAIN_S_MSGSEQ
SELECT MAX (MESSAGE_SEQ), PROCESS_INSTANCE
FROM PS_MESSAGE_LOG
WHERE PROCESS_INSTANCE = :1
GROUP BY PROCESS_INSTANCE
;
ERASE
The ERASE command deletes one or all stored statements from PS_SQLSTMT_TBL. When
deleting a single statement, you use the progname_type_stmtname format as shown for
STORE, above. For example:
ERASE PTPEMAIN_S_MSGSEQ;
When deleting all SQL statements for a particular program, you include only the program
name in the command line format. For example:
ERASE PTPEMAIN;
Command Matrix
The following table shows the relationship between SQL and Data Mover commands. DDL
refers to data definition commands, which define the structure of a database. DML refers to
data manipulation commands which define the contents of a database.
2-20
Function
Command Type
Supported SQL
Commands
Data Mover
Commands
Create tables,
tablespaces, and indexes.
DDL
CREATE
IMPORT,
REPLACE_ALL
Create views.
DDL
CREATE
REPLACE_VIEW
Drop tables.
DDL
DROP
REPLACE_ALL
Modify tables.
DDL
ALTER
None
Modify PeopleSoft
records.
DDL
None
RENAME
DATA MOVER
PEOPLESOFT PROPRIETARY
AND
CONFIDENTIAL
DATA MANAGEMENT
Function
Command Type
Supported SQL
Commands
Data Mover
Commands
Insert rows.
DML
INSERT,
IMPORT,
REPLACE_ALL,
REPLACE_DATA
STORE*
Delete rows.
DML
DELETE, ERASE*
REPLACE_DATA
Update rows.
DML
UPDATE
None
Encrypt rows.
DML
None
ENCRYPT_PASSWOR
D
Select rows.
Query
None
EXPORT
Save/don’t save changes.
Transaction
COMMIT,
ROLLBACK
SET (when used with
COMMIT or NO
COMMIT)
Control/execute other
Data Mover commands.
Environment
None
SET, RUN
Denote an explanatory
statement.
Comment
None
REM, REMARK, --
* Non-standard SQL commands.
Data Mover Command Reference
This section provides the details of syntax and use for each of the Data Mover commands.
This section also covers Data Mover Command Modifiers such as AS, WHERE, and
IGNORE_DUPS, which can be used to modify certain commands.
Throughout this section, we use the following typographical conventions to distinguish
between different elements of the command statement syntax:
italic
Italic items are placeholders for arguments that your
program must supply.
...
Ellipses indicate that the preceding item or series can be
repeated any number of times.
{ }
Group of items, from which you must choose one item,
are enclosed in curly brackets.
[ ]
Optional items are enclosed in square brackets.
An upright slash separates item choices within curly and
square brackets.
|
PEOPLESOFT PROPRIETARY
AND
CONFIDENTIAL
DATA MOVER
2-21
DATA MANAGEMENT
CHANGE_ACCESS_PASSWORD
Syntax
CHANGE_ACCESS_PASSWORD <SymbolicID> <newAccessPswd>
Valid SET Parameters
LOG, NO TRACE
Required SET Parameters
None.
Use
Security administrators should use the procedure outlined in this section to reset the Access
Password and have it be transparent to users.
The CHANGE_ACCESS_PASSWORD command performs the following operations:
•
Selects the ACCESSPSWD field from PSACCESSPRFL for <SymbolicID>.
•
Changes the Access ID's database password to <newAccessPswd> (Oracle, Sybase
and Microsoft SQL Server only).
•
Updates PSACCESSPRFL for <SymbolicID> with <newAccessPswd>.
CREATE_TEMP_TABLE
Syntax
CREATE_TEMP_TABLE {record | *}
Valid SET Parameters
None.
Required SET Parameters
None.
Use
Creates temporary table images for use with Application Engine programs. To customize the
number of temporary tables you need to modify the PeopleTools Options page or updated the
PSOPTIONS table using the following SQL:
UPDATE PSOPTIONS SET TEMPTBLINSTANCE = <#>
2-22
DATA MOVER
PEOPLESOFT PROPRIETARY
AND
CONFIDENTIAL
DATA MANAGEMENT
You also need to review the number of temporary tables allotted for Application Engine
programs.
Note. This command is disabled for OS/390.DMS script generated by Database Setup due to
security issues.
See Also
PeopleTools Options
CREATE_TRIGGER
Syntax
CREATE_TRIGGER {* | <RECNAME>
Valid SET Parameters
None.
Required SET Parameters
None.
Use
Creates database triggers on the specified table.
Note. If using CREATE_TRIGGER in bootstrap mode, the system automatically activates
SET IGNORE ERROR. This enables Data Mover to continue processing until all of the view
definitions have been processed and all errors have been written to the current .LOG file (or an
error log file). This is similar to the REPLACE_VIEW behavior.
ENCRYPT_PASSWORD
Syntax
ENCRYPT_PASSWORD {userID | *};
Valid SET Parameters
LOG, NO COMMIT, NO TRACE
Required SET Parameters
None
PEOPLESOFT PROPRIETARY
AND
CONFIDENTIAL
DATA MOVER
2-23
DATA MANAGEMENT
Use
Encrypts one or all user passwords (user passwords and access passwords). When encrypting
a single user’s password, that user ID must be present in PSOPRDEFN. You can use an
asterisk instead of a name to encrypt all passwords in PSOPRDEFN.
Here’s an example of how to encrypt a single user password (FS) already listed in
PSOPRDEFN:
ENCRYPT_PASSWORD FS;
To encrypt all user passwords in PSOPRDEFN, enter:
ENCRYPT_PASSWORD *;
EXPORT
Syntax
EXPORT {record | *} [WHERE condition(s)];
See Also
Data Mover Command Modifiers.
Valid SET Parameters
LOG, NO COMMIT, NO DATA, NO TRACE, NO VIEW, OUTPUT
Note. SET NO VIEW is only valid with EXPORT *.
Required SET Parameters
None.
Note. If SET OUTPUT is not used, Data Mover writes to the default file name,
DATAMOVE.DAT.
Use
Creates a single export file containing the database contents specified—a result set that can
contain any of the following: a single PeopleSoft record, a group of records, or the entire
database. You can use the export file as input for Data Mover’s IMPORT command if you
want to migrate the data within the platform, or to another platform.
Note. This command is not available in Bootstrap mode.
2-24
DATA MOVER
PEOPLESOFT PROPRIETARY
AND
CONFIDENTIAL
DATA MANAGEMENT
Records exported using EXPORT can have a maximum of 250 total columns and no more
than two long columns.
When you export all records using EXPORT*, Data Mover orders them alphabetically, with
the exception of PSLOCK; it is the last record exported. After each record, Data Mover
indicates how many records remain. After all the tables are exported, then the views are
exported.
To export a single record, use an EXPORT command for that specific record. For example:
EXPORT PS_JOB;
Note. When specifying a particular record in the EXPORT command (as shown in the
previous example), the specified record must be a table, not a view.
To export all PeopleSoft records—including views—type:
EXPORT *;
IMPORT
Syntax
IMPORT {record | *} [IGNORE_DUPS]
[AS new_table_name];
Valid SET Parameters
All except OUTPUT
Note. IGNORE_DUPS is only valid in Bootstrap mode.
Required SET Parameters
INPUT
Use
IMPORT creates database spaces, creates non-existing records and indexes, and appends nonduplicate rows to records. It will also create the views if the export file was created using
EXPORT * and imported using IMPORT *.
Important! All duplicate row checking depends on the existence of a unique index. If no
unique indexes are created before loading the data, there is a potential for duplicate data.
In the IMPORT statement, the AS clause is only valid if you specify a particular record; it is
not valid and should not be used with IMPORT*. Also, the table name that you specify after
the just after the AS command modifier must not exceed 18 characters (including the ps_
PEOPLESOFT PROPRIETARY
AND
CONFIDENTIAL
DATA MOVER
2-25
DATA MANAGEMENT
prefix). If you do specify a table_name that exceeds 18 characters the following error will
appear: “Error: Unable to process create statement…”.
Records defined using IMPORT can have a maximum of 250 total columns, and no more than
two long columns. There are also two variations of IMPORT that you can use—
REPLACE_ALL and REPLACE_DATA.
To import a single record from an export file, use an IMPORT command for that record. For
example:
SET INPUT file_name;
IMPORT PS_JOB;
To import all PeopleSoft records from an export file, including views, type:
SET INPUT file_name;
IMPORT *;
Globalization Considerations
In previous releases, Data Mover required multiple .DAT files for base and non-base
languages. Data Mover now offers a base-language-independent method for moving
application data between databases. Data Mover loads a single DAT file, detects the target
database base language, and inserts the data into the correct base or related language table.
This means that if PeopleSoft provides a software fix, you don't need to swap the base
language before importing it into a database with a different base language. For example,
suppose a fix is sent with the base language being English (ENG) and a related language of
Japanese (JAP). In this case, you can import this file directly into a database where the base
language is JAP and the related language is ENG.
Upon EXPORT, the system adds the LANGUAGE_CD (Language Code) to the generated
DAT file. For example,
SET DAM_VERSION 8.4:1:0
SET BASE_LANGUAGE {ENG, FRA, …}
Then, when you use the IMPORT command to import the generated DAT file, the system
detects the LANGUAGE_CD in the DAT file and automatically resolves the base
language/related language issues.
Keep the following items in mind when running the IMPORT command.
•
This feature is not optional; it's enabled whenever you import a DAT file.
•
There may be some unavoidable performance impact when running the IMPORT
command.
See Also
REPLACE_ALL
REPLACE_DATA
2-26
DATA MOVER
PEOPLESOFT PROPRIETARY
AND
CONFIDENTIAL
DATA MANAGEMENT
REM, REMARK, - Syntax
REM Comments;
REMARK Comments;
-- Comments
Valid SET Parameters
Not applicable
Required SET Parameters
Not applicable
Use
Each of these three command variations denotes explanatory text in a Data Mover script.
Here are three examples explaining the use of each:
REM This example demonstrates the use of the REM command to set off script
comments. These statements can span multiple lines and must be terminated
with a valid delimiter;
REMARK
/
----
The REMARK command variation has the same restrictions as REM
This example demonstrates the use of two dashes to denote script
comments. No delimiters are required, but statements can not
exceed one line without using another double-dash.
When using a double-dash (--) in the third example, you need at least one space after the
double-dash—before the start of the actual text of the comment. Otherwise you will receive a
syntax error.
When used in conjunction with a comment prefixed by REM or REMARK, the forward-slash
delimiter (/) should be by itself on the last line of that comment. In such cases: instead of
using a forward-slash (/), you can also use a semi-colon (;) by itself on this last line. The
forward-slash (/) can also be used by itself without a REM or REMARK statement, in lieu of
blank lines, which are also allowed in a script.
RENAME
Syntax
RENAME {RECORD record | FIELD {field | record.field}} AS new_name;
Valid SET Parameters
LOG, NO COMMIT, NO TRACE
PEOPLESOFT PROPRIETARY
AND
CONFIDENTIAL
DATA MOVER
2-27
DATA MANAGEMENT
Required SET Parameters
None
Use
Renames a PeopleSoft record, a field in one record, or a field in all records.
Note. This command is not available in BootStrap mode.
Important! Using RENAME only modifies an object in the PeopleSoft tables. To write the
change to the system tables you must either use Application Designer to Alter the affected
tables (for record and field renames), or you must run TLSCOPY.SQR (for recfield renames.)
To rename a recfield, you must qualify the original name of the field with the record name. If
you don’t qualify the record name, Data Mover will try to globally change the field name in
all records.
Here’s an example of how to rename a record:
RENAME RECORD absence_hist AS absent_hist;
Here’s an example of how to globally rename a field:
RENAME FIELD effdt AS currdate;
Here’s an example of how to rename a recfield:
RENAME FIELD course_tbl.duration_days AS duration_d;
Renaming a record field is only possible through Data Mover, and you must complete the
following steps for the rename to be complete.
To rename a record field:
1. Perform the rename in Data Mover.
For example,
RENAME FIELD RECORD.FIELD AS NEWFIELD; COMMIT;
2. In Application Designer create a project which contains the record that contains the field
that you renamed, and save the project.
In the case of a subrecord field rename, the subrecord along with all tables which contain
that subrecord must be inserted into the project.
3. Select Build, Settings.
2-28
•
Select the Alter tab.
•
Check Adds and Renames.
DATA MOVER
PEOPLESOFT PROPRIETARY
AND
CONFIDENTIAL
DATA MANAGEMENT
•
Deselect Changes and Deletes.
•
Drop Column and Change Column Length do not apply so it doesn't matter what is
selected.
•
Select the Scripts tab and select desired output settings.
•
Specify an output file and click OK.
4. Select Build, Project.
•
Select Alter Tables (Create Indexes will automatically be checked).
•
Click Build.
•
Click Yes to continue the build process.
5. Run the generated SQL script using your query tool.
This adds the new field to the table(s) within the project.
To remove the old field from the table(s):
1. In Application Designer, open the project you created the previous steps.
•
Select Build, Settings.
•
Select the Alter tab.
•
Select Drop column if data present.
•
Check Deletes.
•
Deselect Adds and Renames.
•
Select the Scripts tab.
•
Give the output file a different name and click OK.
2. Select Build, Project.
•
Check Alter Tables (Create Indexes will automatically be checked).
•
Click Build.
•
Click Yes to continue the build process.
3. Run the generated SQL script using your query tool.
The old field should no longer appear on the table(s) included in the project.
PEOPLESOFT PROPRIETARY
AND
CONFIDENTIAL
DATA MOVER
2-29
DATA MANAGEMENT
REPLACE_ALL
Syntax
REPLACE_ALL {record | *}
[AS new_table_name];
Valid SET Parameters
All except IGNORE_DUPS, OUTPUT
Required SET Parameters
INPUT
Use
A variation of the IMPORT command. If a table already exists, drops the table and its indexes
from the database and creates the tables and indexes using the information in the export file.
Then, the command inserts data into the table using the information in the export file.
In the REPLACE_ALL statement, the AS clause is only valid if you specify a particular
record. It is not valid and should not be used with REPLACE_ALL *.
The table_name you specify after the AS command modifier should not have more than 18
characters (including the ps_ prefix). Specifying a table_name that is greater than 18
characters will invoke the following Error message: “Error: Unable to process create
statement…”.
Note. Records defined using REPLACE_ALL can have a maximum of 250 total columns and
no more than two long columns.
REPLACE_DATA
Syntax
REPLACE_DATA {record | *};
Valid SET Parameters
COMMIT, EXECUTE_SQL, EXTRACT, INPUT, INSERT_DATA_ONCE, LOG,
NO COMMIT, NO TRACE, NO VIEW, SIZING_SET, SPACE, START, VERSION
Required SET Parameters
INPUT
2-30
DATA MOVER
PEOPLESOFT PROPRIETARY
AND
CONFIDENTIAL
DATA MANAGEMENT
Use
A variation of the IMPORT command. Deletes data in existing table(s) and inserts the
corresponding data from the export file.
REPLACE_VIEW
Syntax
REPLACE_VIEW {view | *};
Valid SET Parameters
LOG, NO COMMIT, NO TRACE, START
Required SET Parameters
None
Note. If using REPLACE_VIEW in bootstrap mode, the system automatically activates SET
IGNORE ERROR. This enables Data Mover to continue processing until all of the view
definitions have been processed and all errors have been written to the current .LOG file.
Use
Recreates one or all specified views in the database.
RUN
Syntax
RUN dms_file_name;
Valid SET Parameters
Not applicable
Required SET Parameters
Not applicable
Use
Executes a DMS file from within a script. The specified file can contain any supported SQL
commands, Data Mover commands, or SET statements, but it can not contain any RUN
commands.
PEOPLESOFT PROPRIETARY
AND
CONFIDENTIAL
DATA MOVER
2-31
DATA MANAGEMENT
The RUN command cannot contain a directory path. The RUN command uses the same
directory as the current Data Mover script in which RUN is being used.
SET
Syntax
SET parameter_1;
SET parameter_2; ...
SET parameter_n;
Valid SET Parameters
Not applicable
Required SET Parameters
Not applicable
Use
The SET command, when combined with valid SET parameters, creates statements that
establish the conditions under which Data Mover executes a script.
A SET statement controls the processing environment for the commands in a script until
another SET statement intervenes between commands. At that point, all SET parameters are
reset to their default values. For example:
SET LOG c:\temp\new.log
SET OUTPUT c:\temp\new.dat;
/
EXPORT absence_hist;
EXPORT employee_tbl
/
SET NO DATA
/
REMARK
All other SET parameters will be reset to their default values at
this point
;
EXPORT bank_branch_tbl;
In the above script, the specified log and output files (NEW.LOG and NEW.DAT) are used
for the first two EXPORTs. Then, because SET NO DATA interrupts the script commands,
all other SET parameters are reset to their default values. So, for the third EXPORT and any
subsequent Data Mover or SQL commands, the log file used is the default log file,
DATAMOVE.LOG, and the output file used is the default output file, DATAMOVE.DAT.
See Also
SET Parameter Reference
2-32
DATA MOVER
PEOPLESOFT PROPRIETARY
AND
CONFIDENTIAL
DATA MANAGEMENT
SWAP_BASE_LANGUAGE
Syntax
SWAP_BASE_LANGUAGE <NEW LANGUAGE_CD>;
SWAP_BASE_LANGUAGE <RECNAME>;
Valid SET Parameters
Not applicable
Required SET Parameters
Not applicable
Use
Use this command when you want to install any language other than English. For instance, if
you wanted to swap English for Canadian French, enter the following:
SWAP_BASE_LANGUAGE CFR
Where 'CFR' is the new language code (LANGUAGE_CD).
The command swaps all the language tables from PSRECDEFN. Gets all table names that
contain related table, swaps one table at a time. Copies base table into the relate table, updates
related record into the base table, and then deletes related record from the related table.
If successful it will update the PSOPTIONS SET LANGUAGE_CD = new base language.
Note. Run the command SWAP_BASE_LANGUAGE <NEW LANGUAGE_CD> before
you attempt to swap the individual record names.
Note. During the initial installation, Database Setup generates a script that automatically
swaps the base language if while in the Database Setup interface you selected a base language
other than English.
SET IGNORE_ERRORS
Syntax
SET IGNORE_ERRORS;
SWAP_BASE_LANGUAGE <LANGUAGE_CD>;
Valid SET Parameters
Not applicable
PEOPLESOFT PROPRIETARY
AND
CONFIDENTIAL
DATA MOVER
2-33
DATA MANAGEMENT
Required SET Parameters
Not applicable
Use
Used in conjunction with the SWAP_BASE_LANGUAGE command.
Here's an example of how to swap one table, without the SET IGNORE_ERRORS command,
it will stop on error.
SWAP_BASE_LANGUAGE <LANGUAGE_CD>;
Here's an example of how to ignore all errors and swap all tables.
SET IGNORE_ERRORS;
SWAP_BASE_LANGUAGE <LANGUAGE_CD>;
When the SWAP_BASE_LANGUAGE command is run after SET IGNORE_ERRORS, the
PSOPTIONS SET LANGUAGE_CD will automatically be updated with new base language
even if errors were recorded.
When the command has run, you should then examine the log, and swap the individual record
names that failed using SWAP_BASE_LANGUAGE <RECNAME> command.
SET BASE_LANGUAGE
Syntax
SWAP_BASE_LANGUAGE <NEW LANGUAGE_CD>;
SET BASE_LANGUAGE <CURRENT LANGUAGE_CD>;
SWAP_BASE_LANGUAGE <RECNAME>;
Valid SET Parameters
Not applicable
Required SET Parameters
Not applicable
Use
Swap individual table is used only when there is an error with any of the table after the
SWAP_BASE_LANGUAGE <NEW LANGUAGE_CD>.
Note. Never run SET BASE_LANGUAGE <CURRENT LANGUAGE_CD>,
SWAP_BASE_LANGUAGE <RECNAME> commands before SWAP_BASE_LANGUAGE
<NEW LANGUAGE_CD>.
2-34
DATA MOVER
PEOPLESOFT PROPRIETARY
AND
CONFIDENTIAL
DATA MANAGEMENT
Data Mover Command Modifiers
The following commands allow you to modify a Data Mover command to either limit its
scope, rename the item being processed, or control error messaging.
AS
Syntax
{IMPORT | REPLACE_ALL} record
AS table_name;
Valid Data Mover Commands
IMPORT, REPLACE_ALL
Use
Changes the name of a record, then imports it. When using this modifier, keep the following
items in mind:
•
If used with an IMPORT, the record will not be imported if the table_name specified
in the IMPORT command) already exists in the database.
•
When using the AS command modifier, you can specify either the record or
table_name for the record/table specified preceding the AS. However, you must
always specify the table_name (not the record_name) for the record/table specified
following the AS. The name specified following the AS is the actual name that will
be used for the table to be created.
•
This modifier is not supported for records containing trigger definitions. All other
records with no trigger definition are allowed.
The following example imports a new record/table originally named PS_JOB and creates it as
PS_PROCESS:
IMPORT job
AS ps_process;
Also Correct:
IMPORT ps_job
AS ps_process;
Incorrect:
IMPORT ps_job
AS process;
Incorrect:
IMPORT job
AS process;
PEOPLESOFT PROPRIETARY
AND
CONFIDENTIAL
DATA MOVER
2-35
DATA MANAGEMENT
The incorrect examples are wrong because process is specified, instead of ps_process. This
means that the table created will be named PROCESS, when it should be named
PS_PROCESS to comply with the convention that all non-PeopleTools tables should be
prefixed with PS_. Therefore, ps_process—not process—should have been specified in the
last two examples above.
The table_name you specify following the AS command modifier should not have more than
18 characters (including the ps_ prefix). Specifying a table_name that is greater than 18
characters will invoke the following Error message: “Error: Unable to process create
statement…”.
When you import a record in this way, it is only created in the system tables, not in the
PeopleSoft tables. So, you must also create it in the PeopleSoft tables, such as PSRECDEFN,
by completing the following steps.
To create a table after running the IMPORT command:
1. Launch Application Designer
2. Create, or clone, the new record.
Using the Job/Process example from the previous discussion: open JOB and then select
File/Save As and rename the record to PROCESS.
Note. The PS_ does not appear in the Application Designer.
3. Select Build, Current Object.
4. On the Build dialog, select Create Tables under Build Options.
You may also want to make sure that all the appropriate options are set in the Build
Settings tabs.
IGNORE_DUPS
Syntax
SET IGNORE_DUPS;
IMPORT {record | *};
Valid Data Mover Commands
IMPORT
Use
Ignores “duplicate row” error messages from the database, which means that the IMPORT
process will continue despite any “duplicate rows” errors displayed in the output window and
2-36
DATA MOVER
PEOPLESOFT PROPRIETARY
AND
CONFIDENTIAL
DATA MANAGEMENT
log file. When IGNORE_DUPS is set, bulk loading—the ability to load more than one row at
a time—is turned off. By default, bulk loading is on and inserts many (100) rows into a table
at a time. Because turning off bulk loading slows performance, we suggest that you use this
feature only when required.
Note. SET IGNORE_DUPS is only valid in Bootstrap mode.
WHERE
Syntax
EXPORT {record | *} WHERE
condition(s)[;var#1_type,_var#1_value,var#2_type,var#2_value,...
var#n_type,var#n_value];
Important! In an EXPORT statement, the WHERE modifier must be on the same line as the
EXPORT command.
Valid Data Mover Commands
EXPORT
Use: Exports
Exports a partial set of rows from a record. The syntax and conditions of a Data Mover
WHERE clause in an EXPORT are similar to a WHERE clause in SQL. You can write the
WHERE clause with comparison operands “inline” or as bind variables. You can also use
sub-SELECTs.
Here’s an example of a WHERE clause using both an inline operand and bind variables in an
EXPORT script:
EXPORT JOB WHERE
EFFDT > :1 AND
HOURLY_RT > :2
AND GRADE = ‘ADV’;DATE,1994-01-01,NUMBER,100;
Note that there are no single or double quotation marks around the bind data, as they are not
necessary, and notice that dates are formatted as YYYY-MM-DD. The valid data types for
binding are CHAR, NUMBER, DATE, TIME, DATETIME, LONG, and IMAGE. Not all
database platforms support LONG or IMAGE data types in the WHERE clause, so you should
not use WHERE clauses with these data types.
The following operators are supported in an Import WHERE clause: =, < >, <, >,< =, > =, and
simple uses of AND and OR. For example, in the following formula, if A, B, and C are true,
or if D is true, or if E is true, then the whole statement is true:
WHERE
A = :1 AND B = :2 AND C = :3
PEOPLESOFT PROPRIETARY
AND
CONFIDENTIAL
DATA MOVER
2-37
DATA MANAGEMENT
OR D = :4
OR E = :5;NUMBER,10,NUMBER,20,NUMBER,30,NUMBER,0,NUMBER,1;
When Data Mover Issues COMMITs
Data Mover issues COMMIT statements after most successful SQL commands, except for
EXPORT * and IMPORT *. For EXPORT * and IMPORT *, Data Mover issues a COMMIT
after each record. With IMPORT *, there is a SET COMMIT n command that performs a
COMMIT after the system inserts every n rows.
If you are executing native SQL in Data Mover and no COMMITs exist in the SQL script,
Data Mover issues a COMMIT after each successful SQL statement. For example, if you run
a Data Mover script that contains three update commands and the third command fails, the
first and second update commands are committed, but the third command is not.
SET Parameter Reference
The following parameters can be appended to a SET command to create a valid SET
statement.
Throughout this section, we use the following typographical conventions to distinguish
between different elements of the command statement syntax:
italic
Italic items are placeholders for arguments that your
program must supply.
...
Ellipses indicate that the preceding item or series can be
repeated any number of times.
{ }
Group of items, from which you must choose one item,
are enclosed in curly brackets.
[ ]
Optional items are enclosed in square brackets.
The upright slash separates item choices within curly and
square brackets.
|
COMMIT
Syntax
SET COMMIT #of_rows;
Valid Data Mover Commands
IMPORT, REPLACE_ALL, REPLACE_DATA
Valid SQL Commands
None
2-38
DATA MOVER
PEOPLESOFT PROPRIETARY
AND
CONFIDENTIAL
DATA MANAGEMENT
Use
Sets the commit level only for inserting rows and not for DDL statements. If the level is set to
0, commits will only be done when all rows for a record are inserted. Due to the expense of
recompiling and rebinding after a commit, the default is 0.
CREATE_INDEX_BEFORE_DATA
Syntax
SET CREATE_INDEX_BEFORE_DATA;
Valid Data Mover Commands
IMPORT, REPLACE_ALL
Valid SQL Commands
None
Use
Creates the index before inserting rows into a record. The default method is to insert rows
into a record and then create the index.
DBSPACE
Syntax
SET DBSPACE {<old dbname>.<old spcname>} AS {<new_dbname>.<new spcname>};
Valid Data Mover Commands
IMPORT, REPLACE_ALL
Valid SQL Commands
None
Use
Note. This command is supported only on DB2 for OS/390. You use this command in place
of the SPACE command used on other platforms.
The DBSPACE command is similar to the SPACE command in use, but it is designed to
handle the combination of DBNAME.DDLSPACENAME. On DB2, the DBNAME or
DDLSPACENAME alone is not necessarily unique. However, the combination of the two
PEOPLESOFT PROPRIETARY
AND
CONFIDENTIAL
DATA MOVER
2-39
DATA MANAGEMENT
(DBNAME.DDLSPACENAME) provides a unique relationship. For example, DBSPACE
would be needed in the following scenario:
PSFSDMO.HRAPP
PSHRDMO.HRAPP
PSPTDMO.HRAPP
The wild card (*) character is permitted for the <dbname> and <spc name> parameters to
apply to all values being processed for the specific parameter in which the wild card character
is used. The following are examples of using this command to achieve one of the following:
•
To change a specific DBNAME/DDLSPACENAME combination to a single new
combination:
SET DBSPACE <old dbname>.<old spcname> AS <new dbname>.<new spcname>
•
To keep the currrent DBNAMEs the same but change the specific DDLSPACENAME
to a new name:
SET DBSPACE <*>.<old spcname> AS <*>.<new spcname>
•
To keep the current DDLSPACENAMEs the same, but change the specific
DBNAME to a new name:
SET DBSPACE <old dbname>.<*> AS <new dbname>.<*>
Warning. Because of the large number of objects delivered in the PeopleSoft logical
databases, we strongly advise that you do not override all “old” dbname or spcname values to
a single “new” dbname or spcname value when building a SYS or DMO database. The
functionality to do so, is delivered, however, and may be useful in working with smaller data
files that contain a smaller number of objects.
For large databases, the following commands are not recommended:
SET DBSPACE <*>.<*> AS <new dbname>.<new spcname>
SET DBSPACE <*>. <*> AS <*>.<new spcname>
SET DBSPACE <*>.<*> AS <new dbname>.<*>
You can use multiple SET DBSPACE statements to override the DDLSPACENAME in the
.DAT file. This enables you to override multiple databases in the same section of the script.
For example,
SET DBSPACE PSFSDMO.* AS MYFSDMO1.*;
SET DBSPACE PSFSDMOF.* AS MYFSDMO2.*;
SET DBSPACE PSFSDMOD.* AS MYFSDMO3.*;
SET DBSPACE PSFSDMOM.* AS MYFSDMO4;
2-40
DATA MOVER
PEOPLESOFT PROPRIETARY
AND
CONFIDENTIAL
DATA MANAGEMENT
DDL
Syntax
SET DDL {RECORD | INDEX | UNIQUE INDEX | SPACE} {object_name | *}
INPUT parm AS value;
Valid Data Mover Commands
IMPORT, REPLACE_ALL
Valid SQL Commands
None
Use
Substitutes values for the parameters specified in the DDL template commands. Substitutes
the parm and value placeholders for an actual parameter and its value. If an asterisk is used
instead of an object name, a SQL update on PSDDLDEFPARMS is performed on the
parameter and value upon successful completion of the IMPORT or REPLACE_ALL
command that corresponds to the SET DDL statement.
Below are some examples of DDL template SET commands from a DB2 import script:
SET DDL RECORD
*
INPUT dbname
AS pt750dg0;
SET DDL INDEX
*
INPUT stogroup
AS wps04sg;
SET DDL SPACE
*
INPUT stogroup
AS wps04sg;
EXECUTE_SQL
Syntax
SET EXECUTE_SQL [AFTER] sql_statement;
Valid Data Mover Commands
IMPORT, REPLACE_ALL, REPLACE_DATA
Valid SQL Commands
None
Use
Executes the sql_statement specified at the beginning of a transaction. Typically, this
command is used to setup a specific cursor environment before Data Mover begins processing.
For example, in DB2, use this command to set the current SetID, or for Oracle, use this
command to designate a specific rollback segment.
PEOPLESOFT PROPRIETARY
AND
CONFIDENTIAL
DATA MOVER
2-41
DATA MANAGEMENT
This command doesn’t execute for DDL SQL statements. For example, in DB2, you cannot
set the current SetID before creating spaces, tables, indexes, or views.
EXTRACT
Syntax
SET EXTRACT {COMMAND | DDL | INPUT | SPACE | OUTPUT file_name};
Valid Data Mover Commands
IMPORT, REPLACE_ALL
Valid SQL Commands
None
Use
Extracts various types of information from an export file (the .DAT file specified in the
corresponding SET INPUT command that precedes the IMPORT or REPLACE ALL
command) and writes this information to the user defined output file specified in the SET
EXTRACT OUTPUT file_name statement.
Note. You must use SET EXTRACT OUPUT before issuing any other SET EXTRACT
statements.
EXTRACT INPUT writes out any statements from the .DAT file that are associated with the
table(s) being imported. EXTRACT DDL writes out any CREATE TABLE, CREATE
INDEX, or CREATE UNIQUE INDEX statements from the .DAT file. EXTRACT
COMMAND writes out the EXPORT statements from the .DAT file.
When EXTRACT statements are issued, no SQL CREATE or INSERT statements will be
executed. The associated IMPORT or REPLACE_ALL command is not actually executed, so
no import is performed.
IGNORE_DUPS
Syntax
SET IGNORE_DUPS;
Valid Data Mover Commands
IMPORT
2-42
DATA MOVER
PEOPLESOFT PROPRIETARY
AND
CONFIDENTIAL
DATA MANAGEMENT
Note. The command “SET IGNORE_DUPS” is only valid in Bootstrap mode. This prevents
the lost of data during a Data Mover import of a language table in user mode.
Valid SQL Commands
None
Use
Ignores “duplicate row” error messages from the database; the IMPORT process will continue
despite any “duplicate row” errors displayed in the output window and log file. You can set
this command for the entire import script or by record, using IGNORE_DUPS as a command
modifier.
When IGNORE_DUPS is set, bulk loading—the ability to load more than one row at a time—
is turned off (to allow checking for duplicates, so that duplicate rows can be
ignored/bypassed). By default, bulk loading is on and inserts many (100) rows into a table at
a time. Because turning off bulk loading slows performance, we suggest that you use this
feature only when required and/or by record.
See Also
IMPORT
Data Mover Command Modifiers
INPUT
Syntax
SET INPUT file;
Valid Data Mover Commands
IMPORT, REPLACE_ALL, REPLACE_DATA
Valid SQL Commands
None
Use
Specifies the name of the exported file to import; typically this file will have a .DAT
extension, though this is not a requirement. Because this statement is required to do an
import, there is no default file.
If you don’t specify a path for this file, Data Mover searches for the file in the following
locations in the order presented:
PEOPLESOFT PROPRIETARY
AND
CONFIDENTIAL
DATA MOVER
2-43
DATA MANAGEMENT
•
The Data Mover Input Directory as defined in the Configuration Manager on the Common
tab.
•
If the Input Directory is set to blank (not set) on the Common tab, Data Mover will search
the C:\TEMP directory.
INSERT_DATA_ONCE
Syntax
SET INSERT_DATA_ONCE record;
Valid Data Mover Commands
IMPORT, REPLACE_ALL, REPLACE_DATA
Valid SQL Commands
None
Use
Instructs Data Mover to skip (bypass importing) the specified record if there is already one or
more rows in the table corresponding to that record. If the table is empty, only a single row
will be inserted.
LOG
Syntax
SET LOG file;
Note. You must specify a file name for the SET LOG statement or else a log file will not be
created. If you do not want to specify a log file name, you should omit the SET LOG
statement completely.
Valid Data Mover Commands
All
Valid SQL Commands
All
2-44
DATA MOVER
PEOPLESOFT PROPRIETARY
AND
CONFIDENTIAL
DATA MANAGEMENT
Use
Allows you to specify a user-defined filename for the log file that will be created when
running a Data Mover script or command. If the SET LOG statement is omitted completely, a
default log file will be created with the name DATAMOVE.LOG. Data Mover will write this
DATAMOVE.LOG file to the default log directory, which is determined as follows:
•
The Data Mover log directory specified on the Common tab in the Configuration
Manager.
•
If the previous setting is blank, the log file will be written to C:\TEMP.
Note. If you use the SET LOG statement but do not specify a filename and path, Data Mover
will write the user-defined log file to the default log directory according to the same rule
defined above.
When checking the DATAMOVE.LOG file in a multi-database environment, always make
sure you are examining the correct log file. At the top of the output file, check the date and
the database name to confirm.
Logging status in C:\TEMP\datamove.log
Started:
Fri Mar 17 13:47:15 2001
Data Mover Release: 8.4
Database: HR702U40
…….
Ended:
Fri Mar 17 13:47:20 2001
Successful completion
NO DATA
Syntax
SET NO DATA;
Valid Data Mover Commands
EXPORT, IMPORT, REPLACE_ALL
Valid SQL Commands
None
Use
During an export, the NO DATA command prevents data from being exported. In an import,
this command prevents data from being inserted.
PEOPLESOFT PROPRIETARY
AND
CONFIDENTIAL
DATA MOVER
2-45
DATA MANAGEMENT
NO INDEX
Syntax
SET NO INDEX;
Valid Data Mover Commands
IMPORT, REPLACE_ALL
Valid SQL Commands
None
Use
Prevents indexes from being created during an IMPORT or a REPLACE_ALL command.
NO RECORD
Syntax
SET NO RECORD;
Valid Data Mover Commands
IMPORT, REPLACE_ALL
Valid SQL Commands
None
Use
Prevents records from being created during an import.
NO SPACE
Syntax
SET NO SPACE;
Valid Data Mover Commands
IMPORT, REPLACE_ALL
Valid SQL Commands
None
2-46
DATA MOVER
PEOPLESOFT PROPRIETARY
AND
CONFIDENTIAL
DATA MANAGEMENT
Use
Prevents tablespaces from being created. This is the default setting. You can use this
statement to reset the default after executing a SET SPACE statement.
NO TRACE
Syntax
SET NO TRACE;
Valid Data Mover Commands
All
Valid SQL Commands
All except INSERT
Use
Sets the PeopleSoft trace flag (TraceSQL) in the Configuration Manager to “off” for the
commands that follow, until the next SET statement. This is the recommended method of
executing commands. This means that if SET NO TRACE is specified, then no trace file will
be created, even if you specify a Trace File in the is Configuration Manager on the Trace tab.
Commands that you run without specifying SET NO TRACE, will trace SQL if SQL tracing is
enabled in the Configuration Manager.
Note. This statement cannot be used with an INSERT command.
NO VIEW
Syntax
SET NO VIEW;
Valid Data Mover Commands
EXPORT * only, IMPORT * only, REPLACE_ALL * only, REPLACE_DATA * only
Valid SQL Commands
None
Use
Prevents views from being created.
PEOPLESOFT PROPRIETARY
AND
CONFIDENTIAL
DATA MOVER
2-47
DATA MANAGEMENT
OUTPUT
Syntax
SET OUTPUT file;
Note. You must specify a file name for the SET OUTPUT statement or else a log file will not
be created. If you do not want to specify a log file name, you should omit the SET OUTPUT
statement completely.
Valid Data Mover Commands
EXPORT
Valid SQL Commands
None
Use
Allows you to specify a user-defined filename for the output file that will be created by the
corresponding EXPORT statement. If the SET OUTPUT statement is omitted completely, a
default output file with the name DATAMOVE.DAT will be created. The location that the
output file is created is determined by the following:
•
The Data Mover Output Directory specified on the Common tab in the Configuration
Manager.
•
If the previous setting is blank, the output file will be generated to the C:\TEMP directory.
Note. If you use the SET OUTPUT statement but do not specify a filename and path, Data
Mover will write the user-defined log file to the default log directory according to the same
rule defined above.
SIZING_SET
Syntax
SET SIZING_SET n;
Valid Data Mover Commands
IMPORT, REPLACE_ALL
Valid SQL Commands
None
2-48
DATA MOVER
PEOPLESOFT PROPRIETARY
AND
CONFIDENTIAL
DATA MANAGEMENT
Use
Specifies the Sizing Set number—as defined in the DDL Model Defaults page. Default is 0.
To use this parameter, the specified sizing set must be defined in the export file.
See Also
DDL Model Defaults
SPACE
Syntax
SET SPACE old spcname AS new_spcname;
Valid Data Mover Commands
IMPORT, REPLACE_ALL
Valid SQL Commands
None
Use
Used for all operating systems other than OS/390.
Renames the default space names to customized space names. To name all record default
space names to a single space name, substitute * for a space name. For example:
SET SPACE * AS PS;
START
Syntax
SET START [AFTER] record;
Valid Data Mover Commands
IMPORT, REPLACE_ALL, REPLACE_DATA, REPLACE_VIEW
Valid SQL Commands
None
Use
Designates where in the export file to start the import process. The default is to start at the
beginning of the file. If you want to start immediately after a particular PeopleSoft record in
PEOPLESOFT PROPRIETARY
AND
CONFIDENTIAL
DATA MOVER
2-49
DATA MANAGEMENT
the file, use SET START AFTER. This SET statement is useful for restarting a script after an
error.
If the AFTER parameter is omitted, the import process starts at the record that’s specified in
the SET START statement. If the AFTER parameter is specified, the import process starts
after the record that’s specified in the SET START statement.
Note. If the same record name appears multiple times in the same .DAT file, the SET START
AFTER command begins after the last occurrence of the record name in the .DAT file.
When using the SET START command with REPLACE_VIEW and no .DAT file specified,
this designates what view in the database to start at or after. Views are created in alphabetical
order.
STATISTICS
Syntax
SET STATISTICS { ON | OFF };
Valid Data Mover Commands
IMPORT, REPLACE_ALL
Valid SQL Commands
None
Use
Turns UPDATE STATISTICS on or off. The default value is on. Turns value to off, if you
do not want to update statistics after an IMPORT. This command works only in bootstrap
mode.
VERSION
Syntax
SET VERSION sql_table.column condition;
Valid Data Mover Commands
IMPORT, REPLACE_ALL, REPLACE_DATA
Valid SQL Commands
None
2-50
DATA MOVER
PEOPLESOFT PROPRIETARY
AND
CONFIDENTIAL
DATA MANAGEMENT
Use
Verifies the version of the database for importing. For example, if you state the following:
SET VERSION PSLOCK.TOOLSREL=“8.4”
Data Mover verifies that the TOOLSREL column in PSLOCK equals 8.4. This avoids
importing an export file into the wrong database. Use the SQL table name to indicate which
PeopleSoft record to check.
Script Examples
This section shows you several example script files. Review these scripts to see how you can
use Data Mover to accomplish different tasks.
Exporting a Database
SET OUTPUT c:\temp\pt.dat;
SET LOG c:\temp\pt.log;
EXPORT *;
Building a Microsoft SQL Server Database
set log c:\temp\hcengd.log;
set input c:\HRDMO\data\hcengd.db;
set no view;
set no space;
set no trace;
import *;
update PSLOCK set OWNERID = 'ownerid';
update PSOPRDEFN set ACCESSID = 'accessid', ACCESSPSWD = 'accesspw', OPERPSWD
= '0000000000000000' where OPRTYPE = 0;
update PSACCESSPRFL set ACCESSID = 'accessid', ACCESSPSWD = 'accesspw',
VERSION = 0, ENCRYPTED = 0;
set log c:\temp\grant.log;
encrypt_password *;
Recreating All Views
SET LOG c:\temp\view.log;
REPLACE_VIEW *;
Importing with REPLACE_ALL with a Commit Level
SET INPUT c:\ptdvl\bin\exp2.dat;
PEOPLESOFT PROPRIETARY
AND
CONFIDENTIAL
DATA MOVER
2-51
DATA MANAGEMENT
SET LOG c:\ptdvl\bin\exp2.log;
SET COMMIT 2;
REPLACE_ALL employee_review;
REPLACE_ALL course_tbl
WHERE days_duration = :1 AND course_type > :2;number,1,char,C;
REPLACE_ALL absence_hist
WHERE return_dt > :1;date,1988-01-01;
Combining SQL Commands and IMPORT
SET INPUT c:\ptdvl\bin\exp2.dat;
SET COMMIT 10;
SET START AFTER course_tbl;
SET IGNORE_DUPS;
DELETE FROM ps_absence_hist WHERE emplid = '8001';
IMPORT *;
2-52
DATA MOVER
PEOPLESOFT PROPRIETARY
AND
CONFIDENTIAL
CHAPTER 3
PeopleTools Utilities
This chapter provides an overview of the PeopleTools Utilities and discusses how to:
•
Use the Administration utilities.
•
Use the Audit utilities.
•
Use the Debug utilities.
•
Use the International utilities.
•
Use the Optimization utilities.
Understanding the PeopleTools Utilities
As you work with your PeopleSoft system, you’ll find that there are some administrative tasks
that you only need to perform occasionally. These tasks include such things as maintaining
error messages and setting DDL model defaults. The PeopleTools Utilities menu is where
you’ll find tools for accomplishing some of these more infrequent tasks.
The Utilities are grouped along the following functional areas:
•
Administration
•
Audit
•
Debug
•
International
•
Optimization
The documentation the utilities matches the menu structure of the Utilities interface. For
example, the PeopleTools Options utility falls under the Administration menu in the Utilities
interface. So the documentation for PeopleTools Options can be found under the
Administration heading in this chapter.
Note. In many instance, this book refers to other PeopleBooks for the detailed documentation
for a particular utility.
PEOPLESOFT PROPRIETARY
AND
CONFIDENTIAL
PEOPLETOOLS UTILITIES
3-1
DATA MANAGEMENT
Administration Utilities
The following section covers the utilities under the Administration menu.
PeopleTools Options
Use this page to set a number of options that affect multiple PeopleTools and Applications,
such as Language Options and Change Control Settings.
PeopleTools Options page
Language Settings
Base Language Code
The base language of an application is the application’s
primary language—normally the language used most
commonly throughout the enterprise. A database can have
only one base language. All other languages translations
stored in the database are referred to as non-base
languages (or sometimes as foreign languages).
You can't change the Base Language Code setting in this
page. This field is for display purposes only. To change
your base language, use the SWAP_BASE_LANGUAGE
Data Mover command.
3-2
PEOPLETOOLS UTILITIES
PEOPLESOFT PROPRIETARY
AND
CONFIDENTIAL
DATA MANAGEMENT
The Base Language Code field box identifies the
database's base language.
Translations Change Last
Updated Information
If you have the Translations Change Last Updated
Information checkbox turned on, and you use the
PeopleTools translate utilities to translate objects, the
system updates the "Last Updated" information of the
translated object to the date/time/userid of the translation.
If it's turned off, then the date/time/userid of the object
does not change when translated.
Note. This only applies when using the page-based
PeopleTools translation utilities; the Translation
Workbench always updates the last updated information.
Sort Order Option
Select the sort order that is appropriate for your site.
See the Global Technology PeopleBook for descriptions
of the options.
General Options
Disconnect Cursors After
XX Seconds
The Disconnect Cursors After field controls the
Background Disconnect Interval. The value entered here
will act as the default for Security Administrator profiles.
Multi-Company
Organization
Turn on Multi-Company Organization if more than one
company comprises your organization.
This option affect how Application Processor displays
company related fields in search dialogs and pages. See
your HRMS documentation for more details.
Multi-Currency
The Multi-Currency setting is a system-wide switch that
enables automatic formatting of currency amount fields
that have associated currency control fields. Another
function of this setting is to globally display currency
control fields. If you turn off this option, automatic
formatting based on currency control fields is no longer
active and all currency control fields are thus hidden.
When the Multi-Currency setting is on, it also validates
user-entered currency data against the currency’s defined
decimal precision. This validation causes the system to
issue an error if a user attempts to enter a decimal
precision greater than that allowed by the currency code
definition.
Under most circumstances, you will leave Multi-Currency
selected.
Use Business Unit in
nVision
PEOPLESOFT PROPRIETARY
AND
CONFIDENTIAL
Deselect the Use Business Unit in nVision option if you’re
using an HRMS database. Otherwise, select it.
PEOPLETOOLS UTILITIES
3-3
DATA MANAGEMENT
Multiple Jobs Allowed
Selecting Multiple Jobs Allowed enables HRMS systems
to support employees holding concurrent jobs with more
than one set of enrollments.
This option affects how Application Processor displays
Employee Record # related fields in search dialogs and
pages. See your HRMS documentation for more details.
Allow DB Optimizer Trace
Typically, you turn on this trace only during periods in
which you are collecting detailed performance metrics.
When you are not tuning your performance, the DB
Optimizer trace should be turned off.
Grant Access
When adding a new operator using Security
Administrator, the system will automatically “grant” the
new operator select-level access to the three PeopleTools
SQL tables they need to log on. If you are using a SQL
security package and do not want PeopleTools Security
Administrator to perform any SQL grants, turn off Grant
Access.
Platform Compatibility
Mode
Enables you to add the capability to set a database
compatibility mode as an overall database setting forcing
developers to create applications using all platforms as the
least common denominator. This option enables
developers, who create applications for multi-platform
deployment, to catch platform-specific issues at design
time rather than during testing.
Note. This option is used mainly by PeopleSoft
development teams that need to develop applications to
run on all supported database platforms. To support
numerous database platforms, PeopleSoft needs to have a
tablespace for each physical table record definition.
If platform compatibility is enabled for a database the
system forces developers to enter a tablespace name when
saving a record definition regardless of the current
platform. If this option is disabled, you are only prompted
for a tablespace name if you are developing on a platform
that utilizes tablespaces. This prevents table record
definitions being added to the database without a
tablespace name.
Case Insensitive Searching
Enables you to enable case insensitive searching for the
PeopleSoft search records.
Note. This is not associated with the Verity search
technology.
Allow NT batch when
CCSID <>37
3-4
PEOPLETOOLS UTILITIES
Enables you to override non-MVS COBOL batch
restrictions. If your DB2/OS390 database's CCSID is
NOT 37 PeopleSoft blocks Batch COBOL from running
against OS390 Databases on NT unless you choose this
PEOPLESOFT PROPRIETARY
AND
CONFIDENTIAL
DATA MANAGEMENT
override.
Note. Even if you choose this override, if you use
%BINARYSORT() in the COBOL, the system issues an
error on Windows NT. RemoteCall COBOL can run on
NT and UNIX regardless of this option setting, even if
CCSID is NOT 37, but the system issues an error.
Refer to PeopleSoft Globalization Technology, “Sorting in
COBOL” for information on %BINARYSORT().
Style Sheet Name
All PeopleSoft applications reference the PSSTYLEDEF
style sheet by default. You can set your individual style
sheets in Application Designer, and these will override the
general style sheet for the application, which is set here.
Temp Table Instances
(Total):
The value that you specify in the Temp Table Instances
(Total) edit box, controls the total number of physical
temporary table instances that Application Designer
creates for a temporary table record definition when you
perform the Build process.
This value indicates the total number of undedicated
temporary table instances. The maximum number of
temporary table instances that you can specify is 99.
Temp Table Instances
(Online)
Enter the available online instance values.
When you invoke a process online, PeopleTools randomly
allocates a single temporary table instance number to
programX for all its dedicated temp table needs. The
higher the number of online instances defined, the less
likely it will be for two online processes to get the same
value.
Maximum App Message
Size
There is practical limit to how large a message can be.
Enter the maximum message size, this does not set
individual message definition, but defines the size for all
application messages.
Base Time Zone
Although you can display time data a number of different
ways, PeopleSoft databases store all times relative to a
system-wide base time zone. You can adjust the display
of the time that an end user sees using the Use Local Time
Zone (LTZONE) setting in PeopleTools, Personalizations.
This base time zone is the one used by the database server.
In order for PeopleSoft to properly manage time data, the
system needs to know which time zone that is. Set the
Base Time Zone to the time zone used by your database
server's clock.
Note. After changing this setting, you should reboot any
application servers connected to the database.
Note. It is critical for the correct operation of the system
PEOPLESOFT PROPRIETARY
AND
CONFIDENTIAL
PEOPLETOOLS UTILITIES
3-5
DATA MANAGEMENT
that this time zone match the time zone in which your
database is operating. Any discrepancy in the base time
zone as defined in this page and the time zone in which
the database system is operating will lead to inaccurate
time processing.
Last Help Context # Used
The Last Help Context # Used field is no longer used.
Data Field Length Checking Normally, field length validation is based on the number
of characters allowed in a field. For example, a field
defined as CHAR(10) in Application Designer will hold
ten characters, regardless of which characters you enter.
In a Unicode database, double-byte characters such as
those found in Japanese are counted the same as singlebyte characters such as those found in the Latin alphabet.
If you create a non-Unicode database, the field length in
Application Designer represents the number of bytes
permitted in the field, not the number of characters. When
the non-Unicode database uses a single-byte character set
(SBCS), you can only enter single-byte characters. So the
number of characters and the number of bytes are the
same. However, because double-byte character sets
(DBCS) typically allow a mix of single- and double-byte
characters, the number of characters allowed in a field in a
non-Unicode DBCS database will vary. This is true for
both shifting and non-shifting double-byte character sets.
For example, a if a user enters ten Japanese characters into
a field defined as CHAR(10) in Application Designer, this
string needs 20 bytes of storage in a non-shifting doublebyte character set and 22 bytes of storage in a shifting
double-byte character set. This ten-character input would
fail insertion into both these databases.
Use the Data Field Length Checking option to ensure field
length validation appropriate to your database's character
set. The valid values for the Data Field Length Checking
option are DB2 MBCS, MBCS, and Others.
Choose Others if you are using a Unicode encoded
database or a non-Unicode single-byte character set
database. This prevents special field length checking. As
discussed above, these types of databases do not require
such checking.
Choose DB2 MBCS if you are running a Japanese
database on the DB2/MVS platform. This enables field
length checking based on a shifting DBCS character set.
Choose MBCS if you are running a non-Unicode Japanese
database on any other platform. This enables field length
checking based on a non-shifting DBCS character set.
Note. The non-Unicode DBCS settings are specifically
3-6
PEOPLETOOLS UTILITIES
PEOPLESOFT PROPRIETARY
AND
CONFIDENTIAL
DATA MANAGEMENT
oriented towards Japanese language installations, as
Japanese is the only language supported by PeopleSoft in
a non-Unicode DBCS encoding. All other languages
requiring double-byte character sets are only supported by
PeopleSoft using Unicode encoded databases.
Maximum Attachment
Chunk
Controls the size of the file attachments you store in the
database. The default is 28000 kilobytes.
Upgrade Project Commit
Limit
Sets the limit on how many rows can be modified by an
upgrade project before the system issues a COMMIT
statement.
Help Options
This setting only applies to the Windows environment
(such as Application Designer) when the user presses F1
or selects Help, PeopleBooks Help while in PeopleTools.
FI Help URL
The F1 Help URL can direct users to any location on the
Web, such as a custom help system or the web site for
your company's help desk. It can be a fully qualified
URL, which is passed literally to the browser or it can
contain one or both of these system variables.
%CONTEXT_ID% is the object name or context ID of the
currently displaying page or dialog box.
%LANG_CD% is the three-letter language code for the
user's preferred language.
Ctrl-F1 Help URL
This setting only applies to the Windows environment
(such as Application Designer).
The Ctrl+F1 URL allows you to provide an alternate
location for help. For example, you may set the main F1
Help URL to the PeopleBook and the Ctrl+F1 for your
company's help site.
See Also
PeopleTools PeopleBooks: PeopleSoft Global Technology, Setting Up a Currency Amount
Field.
PeopleTools PeopleBooks: PeopleSoft Application Designer, Specifying Style Sheets.
PeopleTools PeopleBooks: PeopleSoft Application Engine, Using Temporary Tables.
PeopleTools PeopleBooks: PeopleSoft Global Technology, “Maintaining Time Zones”
PeopleTools PeopleBooks: PeopleTools Security, “Page Permissions”
PeopleTools PeopleBooks: PeopleSoft Application Engine, “Disabling the DB Optimizer
Trace”
PeopleTools PeopleBooks: PeopleSoft nVision, “PeopleSoft nVision”
PEOPLESOFT PROPRIETARY
AND
CONFIDENTIAL
PEOPLETOOLS UTILITIES
3-7
DATA MANAGEMENT
PeopleTools PeopleBooks: PeopleSoft Global Technology, “Swapping the Base Language”
PeopleTools PeopleBooks: PeopleSoft Global Technology, “Using the Translate Utilities”
Message Catalog
You add and maintain system messages using the Message Catalog page.
Message Catalog page
Message Set Number
Identifies the message set.
Description
The Message Set Description is a reference used on
reports and pages for easy identification.
Short Description
The Message Set Short Description is a reference used on
reports and pages for easy identification.
Message Number
Each message set consists of one or more rows of
messages identified by a Message Number.
Severity
You assign each message a Severity, which determines
how the message is displayed and how the component
processor responds after the user acknowledges message.
The severity levels are:
Cancel This severity should be reserved for the most
severe of messages, as when a critical error occurs and the
process must be aborted or a machine needs to be shut
down. To indicate how rarely this severity level is
appropriate, of all PeopleTools messages only five or so
have a severity level of Cancel. In almost all cases, you
will use one of the other severity levels.
3-8
PEOPLETOOLS UTILITIES
PEOPLESOFT PROPRIETARY
AND
CONFIDENTIAL
DATA MANAGEMENT
Error. Processing stopped and data can not be saved until
the Error is corrected.
Message. This is an informational message and
processing continues normally.
Warning. User can decide to either stop or continue
processing despite the error.
Message Text
In the Message Text edit box, you’ll see the message text.
Any reference to the characters %n, as in %1 or %2, will
be replaced by parameter values provided by the system.
Explanation
The Explanation text provides a more in-depth
explanation of why the message was generated and how to
fix the problem. This text appears below the Message Text
when the message displays.
PeopleSoft error messages are stored in the Message Catalog, and organized by message set
number. Each message set consists of a category of messages, ranging from PeopleTools
Message Bar Items and PeopleCode Runtime Messages to PeopleSoft Payroll and PeopleSoft
General Ledger application messages.
PeopleTools uses some messages, but the applications use the other messages, which get
called by the Error, Warning, Message Box, MsgGet, and MsgGetText built-in PeopleCode
functions.
Note. You can add your own messages and message sets to support new or customized
functionality in your system. You can also edit the messages that PeopleSoft delivers. In both
of these cases, remember that PeopleSoft reserves all message set numbers up to 20,000. If
you’ve added a message set or edited a message set with a number less than 20,000, it may be
overwritten in future upgrades.
To add a message set
1. Select Utilities, Administration, Message Catalog, and on the search page click the Add
New Value.
2. Enter the value of the new Message Set Number and click OK.
The Message Catalog page appears.
3. Enter a Description and Short Description of the type of messages this message set will
contain.
You should try to group your messages logically. For instance, create one message set for
your new budgeting application and a different one for your customized billing pages.
4. Add messages.
5. Save your work.
PEOPLESOFT PROPRIETARY
AND
CONFIDENTIAL
PEOPLETOOLS UTILITIES
3-9
DATA MANAGEMENT
To add a message
1. Open the desired message set.
2. In the Message Catalog page, click the plus sign button to add a new row.
The Message Number value will be automatically set to the next unassigned number in
the message set.
3. Select a Severity level, enter Message Text and a detailed Explanation.
4. Save your work.
See Also
PeopleTools PeopleBooks: PeopleSoft PeopleCode Reference, “MsgGet”
Translate Values
You use the Translate Values interface to maintain the values in the translate table. If allowed
by your site security administrators, power users can now learn to add their own “pick lists”
(translate values) to an application.
Translate Values page
3-10
Value
Enter the value for the translate selection.
Effective Date
Specify a date for the value to become active.
Status
Specify whether the value is active or not.
Long Name
Enter a long description for identification. There is a 30character limit.
Short Name
Enter a shorter description for identification. There is a
10-character limit.
PEOPLETOOLS UTILITIES
PEOPLESOFT PROPRIETARY
AND
CONFIDENTIAL
DATA MANAGEMENT
See Also
PeopleTools PeopleBooks: PeopleSoft Application Designer, “Using the Translate Table”
Load Application Server Cache
The Load Application Server Cache page enables you to invoke an Application Engine
program, called LOADCACHE, which pre-loads the cache for the application server. You
need to run this program only if you intend to implement shared caching on your application
server, which you configure using the ServerCacheMode parameter in the application server
configuration file.
Understanding Load Cache and Application Server Caching
Each PeopleTools server process has two types of cache: memory cache and file cache.
Memory cache is always enabled for all processes, but file cache can be configured by an
administrator. This section describes populating and using a shared file cache.
The LOADCACHE program caches all of the PeopleTools object metadata into the cache
directory you specify. This is the equivalent of having a user access every page in your
system once so that all the metadata would be stored in cache. The shared cache also contains
metadata for other application objects such as application messages and Application Engine
programs
Using the caching options the application server is recommended for optimal performance, but
the underlying benefit of pre-loading the cache and using shared cache on the application
server is predictable performance. For instance, by pre-loading your cache users don't have to
wait for the system to cache an object if it's the first the system accesses the object. Because
the cache is preloaded with all the database objects, the system retrieves all of the required
objects from the cache. This provides a significant improvement in first-time transactions and
large transactions.
If you elect to implement the shared cache option on the application server, consider the
following items:
•
You need to run the LOADCACHE program at least once. As the PeopleTools
metadata objects change, items in the shared cache are marked invalid but are not
rewritten. This includes design time changes, upgrades, patches, and so on.
•
The first time that you run the LOADCACHE program, it can take between 2-30
hours to complete. The time of the program run depends on the number of active
languages set in the PSLANGUAGES table, the size of the database, and the
performance of the machine. Subsequent program runs complete in less time if there
is already valid cache in the target cache directory, as the program is designed only to
update the changed objects after the staging directory is already loaded.
•
If you update PSSTATUS.LASTREFRESHDTTM, the system marks all items in the
shared cache as invalid and you will need to rerun LOADCACHE from scratch.
PEOPLESOFT PROPRIETARY
AND
CONFIDENTIAL
PEOPLETOOLS UTILITIES
3-11
DATA MANAGEMENT
Note. The output is not portable to different operating systems. For instance, if you generate
the cached metadata on/to a Windows NT machine, you can't copy the cache files to a UNIX
machine.
The following example graphically depicts the shared cache and the non-shared cache
architecture.
Shared Cache vs. Non-Shared Cache
Important! Shared caching can be used without running the LOADCACHE program,
however you would still need to load the cache through some other mechanism. If you do not
pre-load the cache then shared caching is equivalent to having no file cache at all. PeopleSoft
strongly recommends using the LOADCACHE program to load your file cache.
Running the LOADCACHE Program
This page enables you to run the LOADCACHE Application Engine program.
Select PeopleTools, Utilities, Administration, Load Application Server Cache.
Load Application Server Cache page
3-12
PEOPLETOOLS UTILITIES
PEOPLESOFT PROPRIETARY
AND
CONFIDENTIAL
DATA MANAGEMENT
Run Control ID
Displays the Run Control ID selected or created.
Report Manager/Process
Monitor
After you invoke the program, you can use these links to
monitor the progress of the program run.
Output Directory
Specify a directory for the program to cache the metadata.
The output directory should be a temporary, or staging,
directory, as in c:\temp. The program creates the cache
file in a cache\stage directory structure beneath the
specified temporary directory, and creates the cache file
within it.
After the program completes, copy the contents of the
temporary directory to your application server.
Note. The directory you specify as the output directory
should not be the actual \cache\share directory for an
application server domain.
After you have specified a valid output directory, click
Run to invoke the LOADCACHE program.
Run
To create and deploy a shared cache:
1. Make sure that the database that the application server runs against produces a clean
SYSAUDIT report.
If SYSAUDIT is not clean, the LOADCACHE program may fail.
2. Check your PSPRSCS.CFG file (Process Scheduler configuration file).
PSPRCS.CFG is where you specify the type of objects to cache using the
EnableServerCaching parameter. Set it to 1 or 2. The LOADCACHE program reads this
setting and caches metadata according to the value specified in the Process Scheduler
configuration.
Note. Do not enable shared caching (ServerCacheMode=1) for Process Scheduler.
3. Select PeopleTools Utilities, Administration, Load Application Server Cache.
4. Enter the appropriate Run Control ID.
The Load Application Server Cache page appears.
5. In the Output Directory, specify directory where you want the cached meta data to be
written.
6. Click Run.
The first time you run the program, the process may take 4-5 hours.
Important. Launch the program with Run Location set to Server.
PEOPLESOFT PROPRIETARY
AND
CONFIDENTIAL
PEOPLETOOLS UTILITIES
3-13
DATA MANAGEMENT
7. Shut down your application server domain.
8. Enable shared caching with the ServerCacheMode parameter (ServerCacheMode=1), and
reconfigure the domain so that the changes are reflected.
9. Copy the contents of the output directory into the \cache\share directory for the
appropriate domain.
10. Reboot your application server domain.
See Also
PeopleTools PeopleBooks: PeopleSoft Internet Architecture Administration, “Cache Settings”
Table Space Utilities
Select PeopleTools, Utilities, Administration, Table Space Utilities.
This page provides utilities used for maintaining your table spaces.
Table Space Utilities page
3-14
PEOPLETOOLS UTILITIES
PEOPLESOFT PROPRIETARY
AND
CONFIDENTIAL
DATA MANAGEMENT
Add SQL Space
SQL Space Name
Enter the name of the SQL space you want to add.
Database Name
Enter the database name into which you want to add the
space.
Comment
Enter any internal documentation required to identify the
space and its purpose.
Add
Adds the SQL space to the database.
Delete SQL Space
Existing SQL Space Name
Enter or lookup the name of the SQL space you want to
delete.
Delete
Deletes the specified SQL space.
Rename SQL Space
Existing SQL Space Name
Enter or lookup the name of the SQL space you want to
rename.
New SQL Space Name
Enter the new name for the SQL space.
Comment
Enter any internal documentation required to identify the
space and its purpose.
Rename
Renames the specified SQL space.
Table Space Management
Select PeopleTools, Utilities, Administration, Table Space Management.
These pages enable you to modify the table space definition.
Tablespace Defn Page
This page shows the identification values for the tablespace.
Tablespace List Page
This page is where you add records to a particular table space. Use the plus and minus signs
to add and delete rows from the list.
Tablespace DDL Page
This page enables you to view and override DDL parameters if needed. View the default
DDL in the Default Tablespace DDL list. You override specific parameters, if needed, in the
Override Tablespace DDL list. Enter the parameter you want to override in the Parameter
Name column, and enter your override value in the Override column.
PEOPLESOFT PROPRIETARY
AND
CONFIDENTIAL
PEOPLETOOLS UTILITIES
3-15
DATA MANAGEMENT
DDL Model Defaults
Select PeopleTools, Utilities, Administration, DDL Model Defaults.
Used to view and edit the DDL for creating tablespaces, indexes and tables. Any changes
made here are global.
DDL Model Defaults page
3-16
Platform ID
Identify the type of platform you will be running on.
Sizing Set
Specify multiple Sizing Sets if needed. Sizing Sets are a
way to maintain multiple versions of your DDL Model
statements for a particular database platform. For
example, you could have one sizing set to be used during a
development phase, when tables only have test data, and
you could have separate sizing set to be used during
production, when tables will have much more data.
Copy
Copies information from one sizing set to another.
Statement Type
The four statement types are CREATE TABLE, CREATE
INDEX, CREATE UNIQUE, and it looks like running
update statistics. Some platforms have all the statements,
some do not. For example DB2 has all four statements.
SQLServer only has CREATE TABLE and CREATE
INDEX.
Model SQL
Displays the SQL model statements.
Parameter Count
The Parameter Count is calculated based on how many
non-blank DDL parm rows you define.
PEOPLETOOLS UTILITIES
PEOPLESOFT PROPRIETARY
AND
CONFIDENTIAL
DATA MANAGEMENT
DDL Parm
The DDL Parm value is a value that the user can change.
DDL Parameter Value
The DDL Parameter value is a value that the user can
change. Here you can override the DDL parameter default
values with your own for the selected statement type. The
statement type you want to change must be open and have
the focus in the Application Designer.
For example if you want to change the DDL Parm Values
for Indexes, set the statement type to Index, then open the
record where the index is located in Application Designer,
and then change the DDL Parm Value for the index in the
chosen record.
Using the DDL Model Defaults page, you can maintain DDL model statements and default
parameters for Data Mover. The options you select on this page also apply to the Build
function in Application Designer.
Using this utility, you can:
•
Scroll through all the statement types and platforms defined in the PSDDLMODEL table.
•
Change DDL model statements.
•
Add, delete, or change DDL parameters and values.
The Platform IDs are as follows:
Number
Platform
0
SQLBase (No longer
supported)
1
DB2
2
Oracle
3
Informix
4
DB2/UNIX
5
Allbase (No longer
supported)
6
Sybase
7
Microsoft
8
DB2/400 (No longer
supported)
Note. There is no validation performed on the Model SQL statement, the DDL Parm syntax,
or the relationship between the statement and the parameters.
PEOPLESOFT PROPRIETARY
AND
CONFIDENTIAL
PEOPLETOOLS UTILITIES
3-17
DATA MANAGEMENT
See Also
PeopleTools PeopleBooks: PeopleSoft Data Management, “Data Mover”
PeopleTools PeopleBooks: PeopleSoft Application Designer, “Building SQL Tables and
Views”
Strings Table
Select PeopleTools, Utilities, Administration, Strings Table.
The Strings Table page enables you to customize the column headings in your SQR reports.
Strings Table page
String Source
Select from the following list of sources
Select RFT Long If you want the long description of the
field to be displayed in your column heading as set in the
Application Designer.
Select RFT Short if you want the short description of the
field as set in the Application Designer to be displayed in
your column heading.
Select Text to enter a custom column heading for your
report.
String ID
Use the browse button to select the string ID to be used for
your column heading in your SQR report.
Default Label
The default label will be enabled if you select the RFT
Long or RFT Short string source, otherwise, the checkbox
will be disabled.
Remember that fields can have multiple labels. Select the
Default Label option to ensure that the default label is
3-18
PEOPLETOOLS UTILITIES
PEOPLESOFT PROPRIETARY
AND
CONFIDENTIAL
DATA MANAGEMENT
used. If you do not use the field's default label, you must
select which of the field's labels to use using the label
properties button.
String Text
Enter the text for the custom column heading, This is the
text that will be displayed if you set the string source to
Text.
Width
The Width defaults to the current width of the string you
entered or selected. Be sure to update the width based on
the actual space available on your report layout to avoid
limiting a translator to an artificially short length, which is
likely to degrade the quality of their translation.
See Also
PeopleTools PeopleBooks: PeopleSoft Global Technology, “Using the Strings Table”
XML Link Function Registry
The XML Link Function Registry is used in conjunction with the XML Link technology
exclusively. This utility is documented in the XML Link PeopleBook.
See Also
PeopleTools PeopleBooks: PeopleSoft Business Interlink (XML) Guide, “Setting up the
Inbound Business Interlink Environment for an IScript Function”
Merchant Integration Utilities
There are two utilities related to the Merchant Integration technology that are provided for
upgrade support only. They are:
•
Merchant Categories
•
Merchant Profile
Refer to your previous PeopleSoft documentation for information regarding these utilities.
These utilities are not intended for any new development purposes.
TableSet IDs
Select PeopleTools, Utilities, Administration, TableSet IDs.
Use this utility to create Set IDs. Before doing so, do the following:
•
Add the SETID field (as a key field) to the record definition for that table.
•
Define a Set Control Field as the field controlling the assignment of table sets.
PEOPLESOFT PROPRIETARY
AND
CONFIDENTIAL
PEOPLETOOLS UTILITIES
3-19
DATA MANAGEMENT
TableSet Control page
SetID
Enter the SetID as defined in the record definition.
Description/Comments
Add any descriptions and comments necessary for
identification and internal documentation.
Record Group Table
Select PeopleTools, Utilities, Administration, Record Group.
Used to group record definitions for the tables you want to share, as well as any dependent
record definitions.
Record Group Table page
3-20
Description
The Record Group ID description should provide enough
information to encompass a category of related tables, not
just the table you are specifically sharing.
Short Description
Enter a short description.
Force Use of Default SetID
This will override alternate SetIDs entered so that the
default will be used.
PEOPLETOOLS UTILITIES
PEOPLESOFT PROPRIETARY
AND
CONFIDENTIAL
DATA MANAGEMENT
Record (Table) Name
This prompt list comes from a SQL view of record
definitions that are defined with that Set Control Field—
that haven't already been associated with a record group.
Record Description
Automatically populated, when the Record (Table) Name
is selected.
TableSet Control
Record Group Page
Select PeopleTools, Utilities, Administration, TableSet Control, Record Group.
Used to define which record groups will use which table set.
TableSet Control page: Record Group tab
Default SetID
This is the Set ID the system will use as you add
additional record definition groups to be shared within this
table set.
SetID
While we've set up our database to share only one
accounting-related record group, you may have multiple
record groups that you will assign default Set ID or unique
Set IDs.
Tree Page
Select PeopleTools, Utilities, Administration, TableSet Control, Tree.
Used to share Trees as well as tables and views.
PEOPLESOFT PROPRIETARY
AND
CONFIDENTIAL
PEOPLETOOLS UTILITIES
3-21
DATA MANAGEMENT
TableSet Control page: Tree tab
Default SetID
The Default Set ID you assigned this field value is
automatically displayed. If you created another tableset for
sharing trees, you can change this value.
Tree Name
Use the browse button to select from a list of only the tree
definitions that are defined with the same Set Control
Field.
SetID
Use the browse button to select the appropriate SetID
See Also
PeopleTools PeopleBooks: PeopleSoft Application Designer, “Defining Tableset Controls”
Convert Panels to Pages
Scope Page
PeopleTools, Utilities, Administration, Convert Panels to Pages, Scope.
This utility helps you update panels you have developed for previous PeopleSoft releases to
reflect the pages used for the internet architecture.
3-22
PEOPLETOOLS UTILITIES
PEOPLESOFT PROPRIETARY
AND
CONFIDENTIAL
DATA MANAGEMENT
Convert Panels to Pages page: Scope
Project List
Insert projects, containing panels you wish to convert, into
this scroll. In addition, if you are using the Apply Panel
Group Defaults option, any panel group that is contained
in projects in this scroll will be processed. Note that
exceptions may be defined see the task titled, “Project
Exceptions.”
Page List
Insert panels, that you want to convert to pages, into this
scroll.
Project Exceptions
If you want to ensure that a group of panels or panel
groups is never processed for conversion, you can insert
them into an application upgrade project and insert the
project name in this scroll.
Page Exceptions
Panels inserted into this scroll will not be processed.
See Also
PeopleSoft Upgrade documentation
Options Page
PeopleTools, Utilities, Administration, Convert Panels to Pages, Scope.
Specify the options for your conversion process.
PEOPLESOFT PROPRIETARY
AND
CONFIDENTIAL
PEOPLETOOLS UTILITIES
3-23
DATA MANAGEMENT
Convert Panels to Pages: Options page
Convert Scrolls to Scroll
Areas
If you select this option, scroll to scroll area conversions
will take place for panels with scroll bars. If this is
unchecked, no scroll to scroll area conversion will take
place.
Convert Scroll Action
Buttons to Scroll Areas
Some scroll bars may exist with scroll action buttons
already defined. This option determines whether these
scrolls should be converted or ignored. If they are
converted, the scroll action buttons are removed before the
scroll bar is converted to a scroll area.
If you select this option, scrolls with scroll action buttons
will be converted. If this options is not checked, scrolls
with scroll action buttons will be ignored.
3-24
Panels with Level 1 Scrolls
If you select this option, panels with level 1 scrolls will be
processed for scroll conversion.
Panels with Level 2 Scrolls
If you select this option, panels with level 2 scrolls will be
processed for scroll conversion.
Panels with Level 3 Scrolls
If you select this option, panels with level 3 scrolls will be
processed for scroll conversion.
Convert Level 1 Scrolls
If you select this option, level 1 scrolls will be converted
to scroll areas.
Convert Level 2 Scrolls
If you select this option, level 2 scrolls will be converted
to scroll areas.
Convert Level 3 Scrolls
If you select this option, level 3 scrolls will be converted
to scroll areas.
Max # Scrolls
This parameter is a general scroll count limit for scroll
conversion processing. For example, if this is set to 5, any
panel with more than 5 scrolls which are not invisible will
PEOPLETOOLS UTILITIES
PEOPLESOFT PROPRIETARY
AND
CONFIDENTIAL
DATA MANAGEMENT
be ignored. This is a simple way of eliminating complex
panels from automatic scroll conversion.
Apply Specific Page Size
This option is used to define whether a specific size
should be assigned to a panel. If you select this option,
the panel size defined in the drop down box will be
applied to the panel. If this is unchecked, no changes will
be made to the panel size.
Note. When you select a specific panel size, the panel
size will be applied to standard panels only (secondary
panels and sub-panels are not sized automatically).
Apply Default Style Sheet
If you select this option, the style sheet associated with a
panel is updated with a blank value, so that the panel’s
style sheet will default from
PSOPTIONS.STYLESHEETNAME (‘PSSTYLEDEF’).
Apply Frame/Horz?GrpBox If you select this option, the conversion process looks for
frames, group boxes, and horizontal rules that have no
Styles
styles associated with them, and that appear to be
associated with a specific scroll area by virtue of their
position within a scroll area. It then assigns level-specific
styles, based on the occurs level of the scroll area.
Convert Frames to
Horizontal
Horizontal lines are a new page object for PeopleSoft 8. If
you select this option, the conversion process looks for
frames on the panel with upper and lower coordinates less
than 9 grid units apart. These frames are then converted to
Horizonal Lines.
Delete All Frames
If you select this option, the process removes all frames on
the converted panel.
Note. If Convert Frames to Horizontal and Delete All
Frames are both checked, the conversion from frame to
horizontal will take place first, then any remaining frames
are deleted.
Turn On Grid 'Odd/Even
Style'
This applies to grids on a panel being converted. If you
select this option, the conversion process determines if
grids on the panel have their 'Odd/Even Style' turned on.
If it is not turned on, the conversion process will turn this
option on.
Turn On 'Show Prompt
Button'
This option applies to edit box fields that are not invisible
and are not display-only. If you select this option, the
conversion process turns on the ‘Show Prompt Button’
option for edit box fields that have it turned off.
Apply Component Defaults
This option is used to apply standard defaults to
component definitions. The defaults that are set are
dependent on the Use characteristics of the components
See Application Designer, Component Properties/Use and
Component Properties/Internet tabs.
PEOPLESOFT PROPRIETARY
AND
CONFIDENTIAL
PEOPLETOOLS UTILITIES
3-25
DATA MANAGEMENT
Turn Off 'Show Grid Lines'
This option turns off the ‘Show Grid Lines’ option for
grids that have it checked on.
Language Code
Enables you to convert panels whose language code
differs from that in PSOPTIONS. Select a language code
from the drop down menu.
Update Utilities
The Update utilities enable you to keep track of the PeopleSoft updates you've applied to your
database.
Update By Release Label
The release label refers to the official release name, such as PeopleTools 8.40.00
Updates By Update ID
The update ID refers to the patch or project name you applied to your system. The update ID
is typically the report ID for a TPRD incident.
URL Maintenance
PeopleTools, Utilities, Administration, URLs.
Use the URL Table to store URL addresses and to simplify specifying and updating URLs.
URLs saved here can be referenced from page controls such as a push button/hyperlink. The
associated URL can be either an internet or intranet hyperlink.
URL Maintenance page
3-26
Description
Users can search for URLs by description.
URL
Enter the entire URL.
PEOPLETOOLS UTILITIES
PEOPLESOFT PROPRIETARY
AND
CONFIDENTIAL
DATA MANAGEMENT
This field can be used to make notations and comments
and is not displayed elsewhere.
Comments
To add a new URL entry in the URL Table:
1. Click on the Add a New Value hyperlink.
A new page will display prompting you to enter the URL Identifier. Enter the name you want
to use to identify the new URL address.
2. Click the Add button.
The URL Maintenance page will display.
3. Enter the Description, URL, and Comment, if any.
4. Click on the Save button.
You must save the page before you can add another URL, or Update/Display existing
URL addresses.
5. Click on the Add button to add another URL.
To update or display the URL Table:
1. From the URL Maintenance search page click on the Search button.
2. Select the URL Identifier hyperlink you want to update from the Search Results table.
The URL Maintenance page opens.
3. Make your changes to the page and click the Save button.
Copy File Attachments
PeopleTools, Utilities, Administration, Copy File Attachments.
Enables you to manage the file attachments stored in your database.
PEOPLESOFT PROPRIETARY
AND
CONFIDENTIAL
PEOPLETOOLS UTILITIES
3-27
DATA MANAGEMENT
Copy File Archive page
Transfer File Attachments
Source
When you want to copy the file attachment archive from
one location to another, enter the record or directory
where the files are currently stored.
Destination
Enter the record or directory where you want to copy your
file attachment archive.
Copy
Invokes the PeopleCode function (CopyAttachment) that
copies the file attachment archive to another location.
You can copy from a file server to a database and you can
copy from a database to a file server (for example).
Remove Orphan File Attachments from Database
The accumulation of file attachments can consume a significant chunk of disk space. On a
regular basis, you should make sure that lingering, or orphaned, file attachments are deleted
from the database. Click the Delete Orphan File Attachments button to complete this task.
This button invokes the CleanAttachments PeopleCode function.
See Also
PeopleTools PeopleBooks: PeopleCode Developer's Guide, "Using Methods and Built-In
Functions," Understanding File Attachment Architecture
3-28
PEOPLETOOLS UTILITIES
PEOPLESOFT PROPRIETARY
AND
CONFIDENTIAL
DATA MANAGEMENT
Query Monitor
The Query Monitor is used to track the queries that users execute in your system. It enables
you perform such tasks as identify queries that need to have logging turned off or need to be
tuned.
See Also
PeopleTools PeopleBooks: PeopleSoft Query, “Appendix C: Query Monitor”
Sync ID Utilities
The Sync ID Utilities are used exclusively with the PeopleSoft Mobile Applications
technology.
See Also
PeopleTools PeopleBooks: PeopleSoft Mobile Agent, “Data Synchronization “
Audit Utilities
This section covers the utilities used for auditing your system's integrity.
Record Cross Reference
You use the Record Cross Reference pages to view where a record is used throughout your
application. There are two pages in this page group:
•
Pages, Views, Search Records.
•
Prompts, Defaults, PeopleCode.
Pages, Views, Search Records
This is a read-only page that shows what Projects, Menus, Pages, and Objects reference a
particular record.
PEOPLESOFT PROPRIETARY
AND
CONFIDENTIAL
PEOPLETOOLS UTILITIES
3-29
DATA MANAGEMENT
Record Cross Reference: Pages, View, and Search Records page
Prompts, Defaults, PeopleCode
In the Prompts, Defaults, PeopleCode page, the group boxes list the components that refer to
the record.
3-30
PEOPLETOOLS UTILITIES
PEOPLESOFT PROPRIETARY
AND
CONFIDENTIAL
DATA MANAGEMENT
Record Cross Reference: Prompts, Defaults, PeopleCode
Used as an Edit Table on
Lists pages that use the record for those purposes.
Used as a Default Table in
Lists pages that use the record for those purposes.
PeopleCode with Fields
from this Record
Shows where fields from this record are used in
PeopleCode.
PeopleCode referring to this
Shows all PeopleCode that references this record.
Perform System Audit (SYSAUDIT)
This utility is extensively documented elsewhere.
See Also
PeopleTools PeopleBooks: PeopleSoft Data Management, “SYSAUDIT”
Database Level Auditing Utilities
This utility is used to support our database level auditing feature.
See Also
PeopleTools PeopleBooks: Data Management, “Database Level Auditing”
PEOPLESOFT PROPRIETARY
AND
CONFIDENTIAL
PEOPLETOOLS UTILITIES
3-31
DATA MANAGEMENT
Debug Utilities
This section describes the testing utilities.
PeopleTools Test Utilities
Select PeopleTools, Utilities, Administration, PeopleTools Test Utilities.
The PeopleTools Test Utilities page enables you to test certain basic PeopleTools
functionality.
PeopleTools Test Utilities page
3-32
Remote Call Test
You use the Remote Call Test button to test your Remote
Call configuration.
Delivered Class File
The Delivered Class File button tests java PeopleCode
integration. It tests to see that java is being executed
correctly through PeopleCode. The Delivered Class File
button tests a java class that is shipped with PeopleSoft 8.
External Class File
The External Class File button tests java PeopleCode
integration. The External Class File button tests a java
class created similar to that, which a customer may wish
to create.
FTP Site
Enter the full path and password for your test file. For
example:
PEOPLETOOLS UTILITIES
PEOPLESOFT PROPRIETARY
AND
CONFIDENTIAL
DATA MANAGEMENT
FTP://YourFTPUser:YourFTPPassword@YourComputer
Name/YourDirectory/Path
Click this button to attach the file whose path you
indicated in the FTP Site.
Attached File
Replay Appserver Crash (Application Server Crash)
Enables you to recreate an application server crash with a “crash dump” file.
Select Utilities, Process, Replay Appserver Crash.
Replay Appserver Crash page
File Path
Enter the full file path for where you want the crash dump
file to be saved.
Replay File Name
Enter the name of the crash dump file, so that you can
identify it later.
Comments
Insert any comments.
Replay
Click this button to replay the crash dump file. You can
only replay the crash dump file when you are signed on to
the system using a three-tier Windows client, not while
logged into the internet architecture.
Trace PeopleCode
You use this page to change your PeopleCode tracing options while online. This page does
not affect trace options set in Configuration Manager.
Note. The Trace PeopleCode utility has largely been made obsolete by the introduction of the
PeopleCode debugger. For reasons of upgrade compatibility, we’ve left Trace PeopleCode in
place.
PEOPLESOFT PROPRIETARY
AND
CONFIDENTIAL
PEOPLETOOLS UTILITIES
3-33
DATA MANAGEMENT
Trace PeopleCode page
Trace Entire Program
Select this checkbox to show a line by line trace of the
program
Trace Start of Programs
Select this checkbox to show the starting and ending
points of the program
Trace Internal Function
Calls
Select this checkbox to show the calls to PeopleTools built
in function calls
Trace External Function
Calls
Select this checkbox to show calls to Application written
functions
Show Assignments to
Variables
Select this checkbox to show variable assignments
Show Fetched Values
Select this checkbox to show values from PeopleCode
Fetch call
Show Parameter Values
Select this checkbox to show function parameter values
Show Return Parameter
Values
Select this checkbox to show function return parameter
values
Show Stack
Select this checkbox to display the PeopleCode evaluator's
stack after each PeopleCode (internal) instruction.
List the Program
Select this checkbox to show the code of the PeopleCode
program
You use Trace PeopleCode to create a file displaying information about PeopleCode programs
processed from the time you start the trace.
Note. The Trace PeopleCode Utility decreases system performance due to the overhead that
occurs during the monitoring and recording of all PeopleCode actions.
The checkboxes on this page correspond to the options on the Trace tab in Configuration
Manager. However, the selections that appear on this page do not necessarily reflect those
made in Configuration Manager. While the Configuration Manager settings are stored in the
Windows registry and used each signon, the settings in the Utilities page only apply to the
current online session, and, once set, they override the Configuration Manager’s settings.
3-34
PEOPLETOOLS UTILITIES
PEOPLESOFT PROPRIETARY
AND
CONFIDENTIAL
DATA MANAGEMENT
The benefit of using this page to control PeopleCode tracing is that you can turn it on and off
without having to restart PeopleTools, and without resetting your Configuration Manager
settings. Keep in mind, though, your selections are not enabled until you save the page.
To enable/disable PeopleCode tracing while on line
1. Select PeopleTools, Utilities, Debug, Trace PeopleCode.
The Trace PeopleCode page appears.
2. Select/deselect the desired Options.
3. Save the page.
If you selected any of the checkboxes, the system will start writing to the trace file.
Trace SQL
You use this page to change your SQL tracing options while online. Your Configuration
Manager settings will not be affected.
Trace SQL page
Trace SQL Statement
Shows the SQL statement
Trace SQL Bind
Shows Bind values for SQL statements that have
parameter markers.
Trace SQL Cursor
Shows Connect, disconnect, commit and rollback calls
Trace SQL Fetch
Shows Fetch call for Select Statement
Trace SQL API
Shows other API calls (Execute, Describe, and so on.)
Trace SQL Set Select Buffer Shows Binds for Select columns
Trace SQL -- Database
Level
PEOPLESOFT PROPRIETARY
AND
CONFIDENTIAL
Low level tracing at the database API (ODBC, ct-lib, and
so on.)
PEOPLETOOLS UTILITIES
3-35
DATA MANAGEMENT
Trace SQL -- Manager
Level
Shows calls for Cache calls.
You use Trace SQL to monitor SQL activity on your system. You can run Trace SQL alone
or concurrent with Trace PeopleCode
The checkboxes on the Trace SQL page correspond to options on the Trace tab in the
Configuration Manager. However, the selections showing in this page do not necessarily
reflect those made in the Configuration Manager. The displayed page selections are not
enabled until you save the page.
To enable/disable SQL tracing while on line
1. Select/deselect the desired trace options.
2. Save the page.
If you selected any of the checkboxes, the system will start writing to the trace file.
Trace Page
This page is no longer actively used or maintained.
International Utilities
The following sections cover the utilities used in your Globalization efforts.
Preferences
Used to override the language selected when you signed onto the database.
International Preferences page
Language Preference
3-36
PEOPLETOOLS UTILITIES
You use the International Preferences page to temporarily
change the operator Language Preference specified in
your operator ID profile in Operator Security. This
change lasts until you exit the PeopleSoft session or
change the Language Preference again.
PEOPLESOFT PROPRIETARY
AND
CONFIDENTIAL
DATA MANAGEMENT
See Also
PeopleTools PeopleBooks: PeopleSoft Global Technology, Changing the Signon Language
While Signed On
Process Field Size
If you process currency values which require large numbers, such as Italian Lira, that require
fields longer than those included in your standard application, you can use the International
Field Size page to expand amount fields throughout your application.
After you set the appropriate lengths for a list of fields, click the Run button to launch the
batch program that performs the field size changes.
Field Name
Use the Browse button to select the field name.
Current Field Size
This is a read only field indicating the current field size as
stored in PSDBFIELDS.
Field Size - International
Enter the field size to expand (or contract) the field size
for foreign fields.
SeeAlso
PeopleTools PeopleBooks: PeopleSoft Global Technology, “Resizing Currency Fields Using
the International Field Size Report”
Time Zones
This utility has been extensively documented in the Globalization PeopleBook.
SeeAlso
PeopleTools PeopleBooks: PeopleSoft Global Technology, “Maintaining Time Zones”
PeopleTools PeopleBooks: PeopleSoft Global Technology, “Understanding Time Zones”
Manage Languages
Use the Manage Installed Languages page as a central utility to manage language information
for the currently enabled languages.
PEOPLESOFT PROPRIETARY
AND
CONFIDENTIAL
PEOPLETOOLS UTILITIES
3-37
DATA MANAGEMENT
Manage Installed Languages page
Language Code Field
Use the browse button to select the language code from
the XLATTABLE table. The language description will
appear to the right of the code field.
Installed checkbox
This checkbox is selected when a language is installed and
available to you.
Character Set field
This field is required. Use the browse button to select the
character set from the PSCHARSETS table.
Verity Locale
Enables you to match the installed language with the
appropriate Verity locale to enable proper search
capabilities within the browser.
Optimization Utilities
The Optimization utilities are documented extensively in the Optimization Framework
PeopleBook.
See Also
PeopleTools PeopleBooks: PeopleSoft Optmization Framework, “Administering Optimization
Tables”
PeopleTools PeopleBooks: PeopleSoft Optmization Framework, “Updating Solver Licenses”
3-38
PEOPLETOOLS UTILITIES
PEOPLESOFT PROPRIETARY
AND
CONFIDENTIAL
CHAPTER 4
Understanding Configuration Manager
This chapter provides a description of and instructions for using:
•
Configuration Manager.
•
Configuration Manager Interface.
•
Startup page.
•
Display page.
•
Crystal/Business Interlink page.
•
Trace page.
•
Workflow page.
•
Remote Call page.
•
Client Setup page.
•
Import/Export page.
•
Profile page.
•
Command Line Options.
•
Set up the Development Environment.
Configuration Manager
The Configuration Manager is a PeopleTool designed to simplify workstation administration
by providing a way to adjust the PeopleSoft registry settings from one central location. With
the Configuration Manager you can set up one workstation to reflect the environment at your
site, and then you can export the configuration file, which can be shared among all the
workstations at your site.
The Configuration Manager contains a variety of setting controls that allow you to set up your
workstations for connecting to the database, using workflow, and so on. It enables you to
define separate "profiles" for connecting to different PeopleSoft databases.
The following sections describe each tab in the Configuration Manager’s interface and explain
the environment settings you can specify.
PEOPLESOFT PROPRIETARY
AND
CONFIDENTIAL
UNDERSTANDING CONFIGURATION MANAGER
4-1
DATA MANAGEMENT
The Configuration Manager Interface
Configuration Manager is convenient, in that it allows you to access PeopleSoft-specific
registry settings from a central location; this saves you from hunting through the registry on
your own. It’s also easy to use due to its familiar and easy-to-use interface—a Windows
dialog box consisting of multiple tabs:
Configuration Manager
You can start Configuration Manager by double-clicking the Configuration Manager shortcut
in your PeopleSoft program group. It’s also possible to start the program online by selecting
Edit, Preferences, Configuration from within a PeopleSoft Windows application.
Folder Tabs
The various PeopleSoft configuration parameters are grouped on the dialog tabs according to
the function, feature, or PeopleTool that they control. The label on the tab identifies the kind
of parameters you can expect to find there.
Push Buttons
You’ll notice the following four buttons on the bottom of Configuration Manager:
•
4-2
OK. Clicking OK saves your settings and exits Configuration Manager.
UNDERSTANDING CONFIGURATION MANAGER
PEOPLESOFT PROPRIETARY
AND
CONFIDENTIAL
DATA MANAGEMENT
•
Cancel. Using Cancel closes Configuration Manager without saving any changes you
have made.
•
Apply. This button allows you to save your changes without exiting.
•
Help. Click Help to display documentation.
Note. The changes you make with Configuration Manager do not take effect until the next
time you start PeopleSoft.
Startup
The options on this tab enable you to customize the default values presented during the signon
process. These entries will appear on the signon screen, and users do not need to change any
values unless they do not want the defaults. You can also choose which PeopleTool or
PeopleSoft application you want to open after you sign on.
Startup Tab
PEOPLESOFT PROPRIETARY
AND
CONFIDENTIAL
UNDERSTANDING CONFIGURATION MANAGER
4-3
DATA MANAGEMENT
Signon Defaults
The options in this group enable you to customize the defaults presented to users during the
signon process. These entries will appear on the signon screen, and only need to change
values unless if they do not want the defaults. They will, of course, need to be authorized to
make any changes to the signon defaults. To show the relationship between the Startup tab
and the PeopleSoft Signon dialog, the values that appear in the previous example showing an
Informix signon appear in the following example.
PeopleSoft Signon Dialog
Database Type
This is where you select the name of the RDBMS—ORACLE, INFORMIX, and so on—that
you want to appear as a default on the PeopleSoft Signon window. You can also choose
APPSRV to log on to an application server instead of a database. For a list of the possible
choices, view the drop down list. To allow an operator to change their Database Type
selection at the signon dialog, you must select the Database Type option in the Operator
Can Override group.
Note. When you select APPSRV from the Database Type drop-down list, the Server Name,
Connect ID, and Connect Password controls will be disabled. The system obtains these
values from the application server.
4-4
UNDERSTANDING CONFIGURATION MANAGER
PEOPLESOFT PROPRIETARY
AND
CONFIDENTIAL
DATA MANAGEMENT
Application Server Name
If you selected APPSRV from the Database Type drop-down list, you then need to specify
the application server’s name in this field. You need to have already configured your
application server and registered it on the Application Servers tab.
Server Name
Enter the name of the default database server in the Server Name field. This parameter is only
enabled for Informix, Sybase, Microsoft SQL Server, and DB2, and refers to the instance to
which the user connects. This is different from previous PeopleSoft releases, where the Server
Name field referred to the Host name of the UNIX server.
•
Informix. The Server Name must be entered in lower case.
•
Microsoft SQL Server. The Server Name value is used to automatically create your
ODBC data source name.
Database Name
Enter a default Database Name. You can choose any valid PeopleSoft database name. As
with Database Type, to allow the operator to override the default selection at signon, you
must select appropriate option in the Operator Can Override group.
User ID
The User ID parameter enables you to specify the default user ID that will be used to log onto
PeopleSoft. This parameter—like all the Startup parameters—is optional.
You can use the User ID parameter in conjunction with a PSUSER module containing a userdefined logon process. The PSUSER code, if present, can evaluate and modify the User ID
value before you attempt to log on to the selected database.
Connect ID and Connect Password
The Connect ID is a shared RDBMS ID that all DB2 platforms and Informix use in place of
your PeopleSoft User ID for the logon process. If you use this feature, you need to create a
separate operating system account, or connect ID, for every user ID in the PSOPRDEFN table.
Use the Connect Password field to define a default connect ID password.
Note. The connect ID edit box needs a value or the user can't sign on to the system in a twotier environment.
See Also
Installation and Administration book and Internet Architecture Administration
Understanding PeopleSoft Security
Connect ID
PEOPLESOFT PROPRIETARY
AND
CONFIDENTIAL
UNDERSTANDING CONFIGURATION MANAGER
4-5
DATA MANAGEMENT
Numeric keypad — Enter Key tabs to next field
In Microsoft Windows applications, pressing the Enter key in a dialog box selects the default
action button. For example, in the PeopleSoft Login dialog box, pressing Enter has the effect
of clicking the OK button. Selecting this check box overrides this default behavior for the
Enter key next to the numeric keypad: instead of selecting the action button, pressing the Enter
key moves the cursor to the next field in the dialog box.
Note. This check box affects the Enter key that is part of the numeric keypad. The Enter key
on the main keyboard retains its normal behavior.
Operator Can Override
Some PeopleSoft sites make use of multiple database types and names. Using the checkboxes
in the Operator Can Override group, you can enable your operators to enter an RDBMS,
database name, or user ID other than the defaults provided at logon. Of course, in most cases,
you will use these controls to prevent users from attempting to signon onto any database other
than the default. The settings in this group work in the following manner:
Database Type
If you select Database Type, PeopleSoft assumes that you
will also want to grant the ability to override the Database
Name and User ID. So, those options will automatically
be selected. You can not deselect Database Name or
User ID without first deselecting Database Type. If you
are configuring a workstation to connect in both two-tier
and three-tier, then you must select this option. The user
will need to specify a two-tier or three-tier connection
from the PeopleSoft Signon dialog.
Database Name
If you just select Database Name, PeopleSoft assumes
that you will also want to override the User ID, and the
User ID radio button will automatically become selected
by default. However, you can deselect User ID. To
disable Database Name, the Database Type radio button
must also be disabled.
User ID
If you just want to grant a user the ability to override the
User ID submitted at logon, you can just select User ID.
None of the previous options need to be selected. You can
not disable User ID if Database Type is selected.
Cache Files
Enter the parent Directory that holds your cache file directories. For example:
C:\PS\CACHE
4-6
UNDERSTANDING CONFIGURATION MANAGER
PEOPLESOFT PROPRIETARY
AND
CONFIDENTIAL
DATA MANAGEMENT
Note. Cache files store database object information locally and are automatically downloaded
the first time you open a PeopleSoft database object or if a change has been made to the
master copy of the object on the database server. For each PeopleSoft database you use, you
have one cache file directory that stores the cache files for that database.
If you click Purge Cache Directories, a dialog will appear displaying your existing cache file
directories.
Purge Cache Directories Dialog
You can select a single directory and press Delete, or you can press Delete All to remove all
the directories. If a cache file directory is missing (after you delete it), the system will
automatically rebuild it the next time cache files are downloaded. After you delete the
appropriate cache directory, press Close to return to the Startup tab.
Display
The Display tab allows you to customize the appearance of your PeopleSoft Graphic User
Interface (GUI). For instance, you can adjust the width and height of your pages to fit in with
the other elements on your desktop.
PEOPLESOFT PROPRIETARY
AND
CONFIDENTIAL
UNDERSTANDING CONFIGURATION MANAGER
4-7
DATA MANAGEMENT
Display Tab
Language
In the Language drop-down list, specify which language you want to display on your
PeopleSoft pages. The default setting is English.
Note. Your choices are not limited to the languages that appear in the drop down list. For
example, you can customize your applications so that they appear in another language,
however, you will not be able to switch to that other language through the Configuration
Manager. You will have to switch languages by manually changing the registry setting.
Page Display
You have the option to customize the way the PeopleSoft pages appear on the screen. You
can adjust the entire display size or just the page height and width.
4-8
UNDERSTANDING CONFIGURATION MANAGER
PEOPLESOFT PROPRIETARY
AND
CONFIDENTIAL
DATA MANAGEMENT
Display Size, Width and Height
You specify the Display Size (in pixels) of your screen. This will affect the default size of the
PeopleSoft window—as displayed in the corresponding Width and Height fields. The dropdown list provides four options:
•
640 X 480 (Window size defaults to 640 x 448)
•
800 X 600 (Window size defaults to 800 x 576)
•
1024 X 768 (Window size defaults to 1024 x 744)
•
Custom (You can manually set default window size by specifying Width and Height
values)
Note. Changing these parameters will not affect a window which is already open. And, if
either value is either blank or zero, the values will be reset to the 640 X 480 Display Size.
Page Sizing
You can specify the way pages are displayed if they were designed for a different size window
than is opened. You have the following two options:
•
SCALE. Pages are scaled to fit the window as necessary. For example, if your Display
Size is set to 640 X 480 and you open a page designed to display in an 800 X 600
window, the page controls will be scaled down so that all page information appears.
Conversely, if you open a 640 x 480 page in a larger window, the page controls will be
scaled to fill the window completely.
•
CLIP. This setting ensures that page controls are always displayed in their normal size.
However, if a page is too large for the window, the page information will be clipped along
the right and bottom edges of the window. Of course, window scroll bars will be
displayed so that you can view the remainder of the page.
Show Panel in Navigator
Select this check box if you want to see the navigator tree view and the page view at the same
time.
Highlight Popup Menu Fields
The Highlight Popup Menu Fields check box allows you to specify whether the fields that
have an associated popup menu will be highlighted to alert users to its existence. By default,
this option will be disabled. In most cases, it’s a good idea to show users what fields contain
popup menus. The visual cue that denotes a popup menu is a black rectangle surrounding the
perimeter of a page control. The PeopleCode Developer’s Guide contains more information
about popup menus.
PEOPLESOFT PROPRIETARY
AND
CONFIDENTIAL
UNDERSTANDING CONFIGURATION MANAGER
4-9
DATA MANAGEMENT
Show Database Name
The Show Database Name check box feature is especially useful if you are running multiple
instances of PeopleTools. It enables the following options:
•
When you have a PeopleSoft page open, you have the option to have the database name to
which you are connected appear in the Status bar, which is located at the bottom of the
page. If you select the Show Database Name, option, the Status bar will show the
database name to which you are connected in addition to what normally appears: the
current page name and the activity. For example, the Status bar might read PTDMO, Job
Data 1, Add—in that order.
•
Also, when you select Show Database Name, you will be able to see the database to
which you are connected in the PeopleTools icon that appears in the Windows NT or
Windows 95 Task bar when you have minimized a PeopleTools instance.
Note. In both cases, the database name may appear abbreviated to fit on the provided space
for text.
Font
You have the option to customize the way the PeopleSoft text appears on the screen.
You specify the font by clicking on the Font… button to bring up a standard font selection
pop-up menu. Select the font you want from that menu.
Font
4-10
UNDERSTANDING CONFIGURATION MANAGER
PEOPLESOFT PROPRIETARY
AND
CONFIDENTIAL
DATA MANAGEMENT
Business Process Display
You have three display options for the Business Process Display:
•
On—The Navigator will appear with each menu group you open.
•
Off—The Navigator will not be displayed. The user will have to launch the Navigator
manually.
•
First—The Navigator will only appear on the very first instance of PeopleSoft. After that,
the subsequent instances will not display the Navigator.
Crystal/Business Interlink
This tab provides access to the necessary settings for Crystal Reports in the PeopleSoft
environment and for business interlinks.
Crystal Tab
PEOPLESOFT PROPRIETARY
AND
CONFIDENTIAL
UNDERSTANDING CONFIGURATION MANAGER
4-11
DATA MANAGEMENT
Crystal Options
If you have Crystal installed locally on the workstation, the Crystal EXEs Path will be
populated automatically. But, if you have Crystal installed on a network drive, then the
Crystal EXEs Path parameter should be set to reflect the location of the Crystal Reports
executables. For example:
n:\hr800\bin\client\winx86\crystal
Since you can create customized reports with Crystal, the Default Crystal Reports option
allows you to specify the default location of such reports. If this option does not apply to your
site’s Crystal implementation, you can disregard this parameter.
When you select Use Trace during execution, Crystal will write the trace statements to a log
file you specify in Trace File field.
See Also
Crystal Reports
Your Crystal Reports User Manual
Business Interlink Driver Options
In the Business Interlink Directory box, enter the complete path to the directory that contains
the drivers that business interlinks use to communicate with external systems.
Trace
The Trace tab allows you to select the tracing options for various parts of the PeopleTools
system, such as SQL statements, PeopleCode, and Application Engine. If you are involved
with tuning your PeopleSoft system and improving the online performance, you will want to
make yourself familiar with this tab. You can also set these trace options through the
PeopleTools Utilities page. Keep in mind that when you change the settings and options in
the Configuration Manager, the new settings will only take effect the next time you launch
PeopleTools.
4-12
UNDERSTANDING CONFIGURATION MANAGER
PEOPLESOFT PROPRIETARY
AND
CONFIDENTIAL
DATA MANAGEMENT
Trace Tab
PeopleTools Trace File
The default filename for the PeopleTools Trace File is DBG1.TMP. The system writes the
file to the following directories:
•
On Windows: %TEMP% directory.
•
On UNIX: $PS_HOME/log/dbname.
To specify a different PeopleTools Trace File
1. From the Trace tab in Configuration Manager, click the button on the right side of the
PeopleTools Trace File edit box; a standard Open dialog appears.
2. Navigate to and select the new trace file.
3. Click Open.
The field will now display the path and filename.
PEOPLESOFT PROPRIETARY
AND
CONFIDENTIAL
UNDERSTANDING CONFIGURATION MANAGER
4-13
DATA MANAGEMENT
Workflow
The Workflow tab is where you specify the options and locations that are related to the
Workflow implementation at your site. Electronic Workflow allows you to keep track of and
assign tasks within business processes automatically.
Workflow Tab
See Also
PeopleSoft Workflow
Detach Directory
This is where you specify the directory into which PSNOTES.EXE detaches any file
attachments on the forms it receives. This is also where PSNOTES.EXE places any files that
it does not deliver to the Message Agent.
4-14
UNDERSTANDING CONFIGURATION MANAGER
PEOPLESOFT PROPRIETARY
AND
CONFIDENTIAL
DATA MANAGEMENT
Maximum Worklist Instances
To set limits on the amount of worklist instances or entries that will display when viewing
worklists, use the Maximum Worklist Instances control. The default value set at installation
is 250. If you do not want any rows returned, leave the edit box blank.
Mail Protocol
If you want to incorporate email into your Workflow scheme, and most likely you will, the
Mail Protocol group is where you specify which mail protocol your site uses. PeopleSoft
supports the following protocols:
•
MAPI, or Mail API, is a programming interface that allows you to send and receive mail
over the Microsoft Mail messaging system. If this is the mail protocol that your site uses,
select this option to configure your client to perform PeopleSoft Workflow email
generation.
•
VIM, or Vendor Independent Messaging Interface, is a programming interface that
enables you to send and receive email over a VIM-compliant messaging system, such as
cc:Mail. If this is the mail protocol that your site uses, select this option to configure your
client to perform PeopleSoft Workflow email generation.
Mail DLL Path
After you have specified what Mail Protocol your site uses, enter the location of the mail
DLL. For example:
C:\Windows\System
Remote Call
Some of PeopleSoft’s applications make use of Tuxedo’s Remote Call feature, which invokes
data-intensive transactions on a remote server. This helps to alleviate heavy processing on the
client.
PEOPLESOFT PROPRIETARY
AND
CONFIDENTIAL
UNDERSTANDING CONFIGURATION MANAGER
4-15
DATA MANAGEMENT
Remote Call Tab
Timeout
Timeout refers to the time after which Remote Call will terminate the child COBOL process.
The default is 50 seconds. Set the appropriate time for your site.
Debugging Options
You have the following options regarding Remote Call debugging:
•
Redirect Output. Specify whether the stdout/stderr of the child COBOL process should
be directed to a file. The default is NO.
•
Support COBOL Animation. This allows you save the COBOL input file so that you
can reuse it with COBOL animator. The default is NO.
Show Window State
This option allows you to specify how you want the window state of the child COBOL
process to appear on the desktop. You can choose the following:
4-16
•
Normal. Appears like a DOS window on the desktop.
•
Minimized. Appears as an icon on the task bar.
UNDERSTANDING CONFIGURATION MANAGER
PEOPLESOFT PROPRIETARY
AND
CONFIDENTIAL
DATA MANAGEMENT
•
Hidden. Runs unseen in the background.
Shared Flags
Specify whether or not to disable the DB Stats feature, which is the %UpdateStats meta SQL
construct. . This applies to Application Engine programs.
See Also
PeopleTools PeopleBooks: PeopleSoft Application Engine, “Using Meta SQL and
PeopleCode”, %UpdateStats
Client Setup
As part of the PeopleSoft installation process the workstations need to be configured to run
successfully with your PeopleSoft system. The Client Setup tab is where you select many of
the options that will affect workstations as well as invoke the Client Setup process. For
example, on this tab you choose which shortcuts will appear on a workstation desktop. Keep
in mind that this is not the only tab that contains essential values for the PeopleSoft
workstation. You should also make sure that all of the tabs reflect the correct values for your
site, especially the Startup tab and the Process Scheduler tab for the Default profile.
Client Setup Tab
PEOPLESOFT PROPRIETARY
AND
CONFIDENTIAL
UNDERSTANDING CONFIGURATION MANAGER
4-17
DATA MANAGEMENT
Shortcut Links
•
Application Designer. Adds the icon for the main PeopleTools development
environment.
•
Configuration Manager. Adds the PeopleSoft Configuration Manager shortcut, which
will allow you to edit registry settings relevant to PeopleSoft.
•
Data Mover. Adds a shortcut that will launch Data Mover.
•
Uninstall Workstation. Adds the Uninstall Workstation shortcut, which uninstalls the
most recent Client Setup.
•
PeopleTools RPT Converter. This shortcut calls a stand-alone program that converts
your RPT files from the format PeopleSoft used in previous releases to the PeopleTools 7
format. You only need to run this program if you are upgrading from previous versions of
PeopleTools.
•
NVision. This shortcut causes an nVision menu item to be added to the PeopleSoft 8
menu group in the Windows Start menu.
Note. We recommend that you back up your previous RPT files before you run the converter
program, which significantly alters them.
•
SQA Robot Setup. Adds a shortcut to the SQA setup program. You can use the SQA
Robot to test the applications you develop. See your SQA documentation for installation
instructions.
ODBC Setup
You need to specify one or both of the ODBC Setup options to run PeopleSoft Open Query.
Read the information regarding each option and decide the appropriate action for your site.
•
Install ODBC Driver Manager 3.0. This installs the Microsoft ODBC drivers that you
need to run in conjunction with the PeopleSoft ODBC Driver to enable PeopleSoft Open
Query. If you already have the Microsoft ODBC drivers installed on your client, this is an
optional component.
Note. If you already have the Microsoft ODBC drivers installed, you will overwrite your
current driver. Client Setup installs the ODBC Driver Manager version 3.0.2822. Any
preceding versions of the ODBC driver will be overwritten, and any versions higher than
3.0.2822 will not be overwritten.
•
4-18
Install PeopleSoft ODBC Driver. You need to install this driver to enable PeopleSoft
Open Query.
UNDERSTANDING CONFIGURATION MANAGER
PEOPLESOFT PROPRIETARY
AND
CONFIDENTIAL
DATA MANAGEMENT
Install Workstation
You must have this check box enabled to engage the Client Setup function. Only select the
check box after you have made sure that all the appropriate selections are specified on all the
Configuration Manager tabs. If you do not have it checked, Client Setup will not run. After
you click the check box, you must then click either OK or Apply.
Import/Export
The Import/Export tab allows you to export, or save to file, the specified environment
settings, and to import previously exported settings. This is useful when you plan to configure
multiple workstations to have similar settings.
Import/Export Tab
Export to a File
As stated in the directions that appear on the tab, Export to a File will write current
configuration settings to a file. This is useful when you want to set up multiple workstations
with similar or exact environment settings. When you click Export to a File a regular Save
dialog appears. Make note of the filename you give the configuration file.
PEOPLESOFT PROPRIETARY
AND
CONFIDENTIAL
UNDERSTANDING CONFIGURATION MANAGER
4-19
DATA MANAGEMENT
Note. Always make sure to click Apply before you export a file. This way you’ll make sure
the exported configuration file reflects the current settings in case you have made any changes.
Import from a File
Import from a File provides the opposite service as Export to a File. Where as Export to a
File allows you to save your current configuration settings to a file, Import from a File
allows you to import previously saved configurations on other workstation. By importing a
previously saved configuration file you will override all the current environment settings.
When you click Import a File a normal Open dialog will appear. Navigate to the directory
containing the appropriate configuration file, select the proper file, and click Open.
Profile
The Profile tab enables you to define one or more user profiles, each of which specifies
connection parameters and file location information for a PeopleSoft installation.
Many PeopleSoft installations include multiple databases that users need to connect to in order
to perform different tasks. For example, you may have one database for tracking financial
information such as expense reports and another database for HR processes such as benefits
enrollment. Each of these databases has its own set of supporting files—SQR reports, COBOL
processes, and so on. PeopleTools locates these files by referring to the Windows registry. By
defining multiple profiles, you can tell PeopleTools to use different directory paths depending
on which database the user is connecting to.
4-20
UNDERSTANDING CONFIGURATION MANAGER
PEOPLESOFT PROPRIETARY
AND
CONFIDENTIAL
DATA MANAGEMENT
Profile Tab
When you first open the Configuration Manager, the Profile tab displays a single profile
named Default. To set the parameters for this profile, highlight it and click the Edit button. To
create a new profile, click the Create button. The Edit Profile dialog box appears.
Like the Configuration Manager itself, Edit Profile is a tabbed dialog box. The sections below
describe each of the tabs.
You have the option of setting up multiple Configuration Manager profiles. Profiles give you
a way of setting up a workstation to configure the workstation to access multiple PeopleSoft 8
applications.
Each workstation must have a default profile. The default profile is used when the user signs
on to a database or application server that isn’t listed in any profile. If the workstation requires
only one set of profile settings, then no profiles other than the default profile need to be
defined.
The profiles are set for the Windows workstation, and will be shared by all workstation users.
Note. This feature makes it unnecessary to set up Windows shortcuts for switching among
applications, as was recommended in previous versions of PeopleTools.
PEOPLESOFT PROPRIETARY
AND
CONFIDENTIAL
UNDERSTANDING CONFIGURATION MANAGER
4-21
DATA MANAGEMENT
Database/Application Server
The Database/Application Servers tab is where you specify the configured databases and
application servers associated with this profile. When a user enters one of these databases or
application servers in the PeopleSoft Signon dialog box, PeopleTools uses the registry
settings associated with this profile.
Note. You can assign multiple databases and application servers to a single profile. However,
each database and application server must be assigned to only one profile. If you try to add a
database to a second profile, Configuration Manager asks you if you want to remove it from
the previous profile and add it to the current one.
Database/Application Server Tab
Before you enter a database or application server on this tab, you should have already installed
and configured it as documented in the PeopleSoft Installation and Administration book for
your RDBMS.
Application Server Name
Enter a name for an application server that you have configured. This is the name that will
appear in the drop-down list on the PeopleSoft Signon screen. We recommend that you
choose a name that’s intuitive for your site.
4-22
UNDERSTANDING CONFIGURATION MANAGER
PEOPLESOFT PROPRIETARY
AND
CONFIDENTIAL
DATA MANAGEMENT
Note. The name you choose for an application server must not exceed 24 characters.
Machine Name or IP Address
Enter the IP Address or the resolvable server name of the application server you specified in
the Application Server Name field. You specified the IP Address in the [Workstation
Listener] section of your PSAPPSRV.CFG file when you installed your PeopleSoft
application server. For example, you could enter:
207.135.65.20
or
sp-hp32
Port Number
Enter the Port Number for the application server you specified in the Application Server
Name field. You specified the Port Number in the [Listener] section of your
PSAPPSRV.CFG file when you installed and configured the application server. A port
number is an arbitrary number between 0 and 9999 that is determined by site specifications.
The following is a sample Port Number:
7999
TUXEDO Connect String
The TUXEDO Connect String is designed for advanced configuration to support dynamic load
balancing. You can specify a free-form connect string that allows a client to connect to
another application server in case another is either down or being used to full capacity. The
following sections provide the description of and syntax for the connect string options.
PEOPLESOFT PROPRIETARY
AND
CONFIDENTIAL
UNDERSTANDING CONFIGURATION MANAGER
4-23
DATA MANAGEMENT
Round Robin Load
Balance
This option specifies multiple application servers to which
the client will arbitrarily connect. The odds being that
each application server will receive an equal number of
connections. To specify the round robin, use the following
syntax (where ip = IP Address and port = port number):
(//ip1:port1|//ip2:port2|//ipn:portn)
You can specify the IP Address using either dotted
notation or by using the server’s DNS name. Regardless
of which convention you use to enter the address, the
slashes (//) preceding the IP Address are required.
If the application server selected is unavailable, your
connection attempt will fail and the system will not try to
connect you to the other application servers defined within
the parentheses.
Spaces must not be embedded in any part of the
connection string. PeopleSoft will automatically remove
embedded spaces before storing the value in the registry.
Round Robin with
Failover
Similar to Round Robin Load Balance, this option allows
you to define a failover connection string. To specify this
option, use the following syntax (where ip = IP Address
and port = port number):
(//ip1:port1|//ip2:port2),(//ip3:port3)
If the application server selected from the first group of
parentheses (ip1 and ip2) is unavailable, the system will
automatically attempt to connect to an application server
defined in the second group (ip3). If that application
server fails, the system will attempt to connect to the next
group to the right, sequentially.
If multiple application servers are defined within any
group, the system will round-robin between them. If the
selected application server fails, the system will attempt to
connect to the next application server to the right, if any.
The following are three separate examples, showing a
range usage:
(//sp-ibm01:8000|//sp-ibm02:8000),(//spnt01:8000)
(//208.136.78.88:8000|//208.136.78.88:8050|//208
.136.78.88:8080)
(//sp-sun01:8000),(//sp-sun02:8000),(//spsun03:8000)
Note. The Tuxedo Connect String can not exceed 1000
characters.
4-24
UNDERSTANDING CONFIGURATION MANAGER
PEOPLESOFT PROPRIETARY
AND
CONFIDENTIAL
DATA MANAGEMENT
Set and Delete Buttons
When you click Set, your application server information is displayed in the grid at the top of
the dialog. You can then enter a new Application Server Name and setup a different server.
Note. The settings that you enter in the grid are not saved until you press Apply or OK. If
you press Cancel, without first pressing Apply or OK, you will lose all the information in the
grid.
To remove an application server configuration, select its Application Server Name in the
grid and click Delete.
See Also
PeopleTools Installation Guide for your platform
Internet Architecture Administration
Process Scheduler
The Process Scheduler tab allows you to specify all of the directories that are associated with
your Process Scheduler jobs, such as your SQR and COBOL directories.
PEOPLESOFT PROPRIETARY
AND
CONFIDENTIAL
UNDERSTANDING CONFIGURATION MANAGER
4-25
DATA MANAGEMENT
Process Scheduler Tab
General
4-26
PeopleSoft Home Directory
This field contains the value of your high-level PeopleSoft
directory, such as: N:\EPM80
Crystal Reports
In this field enter the path to \CRWRTPATH where
Crystal sends your reports.
Output Directory
Optional directory used with Output Destination field
when scheduling a Process Scheduler request.
Log Directory
The directory for SQR, COBOL, and Process Scheduler
log files.
Temp Directory
In this field enter the path to your temporary directory.
This is where you will find log files and other output files.
For example: C:\TEMP
Database Drivers
In this field enter the path to \DBBIN where your
Database drivers reside.
Word Executables
Directory
This field points to your Microsoft Word executables. For
example: N:\APPS\OFFICE95\WINWORD
UNDERSTANDING CONFIGURATION MANAGER
PEOPLESOFT PROPRIETARY
AND
CONFIDENTIAL
DATA MANAGEMENT
Redirect Output
The Redirect Output check box allows you to redirect
the onscreen COBOL DISPLAY statements to a log file.
If you leave the check box deselected you will just see the
onscreen messages. Having the messages sent to a log file
is useful for debugging purposes. The log file will be
created in %TEMP%\PS_HOME\DBNAME directory.
In addition to the output generated by COBOL DISPLAY
statements, the log file will also contain any errors
generated by the COBOL Run Time System.
Note. To use the Application Engine debug feature, you must deselect the Redirect Output
check box.
Application Engine
Select this check box to enable the Application Engine
command-line debugger.
Debug
Warning! Select the Debug check box only when you are testing and troubleshooting clientside processes. If you select Debug and submit a process request to the server, the process will
hang, waiting for a user command.
Disable Restart
Select this check box to disable the Application Engine
restart feature, which enables you to restart an abnormally
terminated Application Engine program. With Disable
Restart selected, Application Engine programs start from
the beginning.
The Disable Restart option is useful during debugging. It
should not be selected in a production environment.
SQR
SQR Executables
In this field enter the path to the \SQRBIN where your
SQR executables reside.
SQR Flags
In this field, enter the SQR Flags that the Process
Scheduler should pass on the command line to the SQR
executables. The following SQR flags are required for
launching SQR reports:
-i specifies the path to SQC files.
-m specifies the path to the ALLMAXES.MAX file.
-f specifies the output path.
-o directs log messages to the specified file.
PEOPLESOFT PROPRIETARY
AND
CONFIDENTIAL
UNDERSTANDING CONFIGURATION MANAGER
4-27
DATA MANAGEMENT
-ZIF sets full path to the and name of the SQR
initialization file, SQR.INI.
SQR Report Search
Enter the directory paths the SQR executable should use
to locate SQR reports. SQR Report Search 1 will be
searched first, followed by SQR Report Search 2, and so
on.
COBOL
COBOL Executables
In this field enter the path to \CBLBIN—where your
COBOL executables reside.
nVision
PeopleSoft nVision refers to a number of registry settings to determine where it should look
for files and how it should operate. PeopleSoft Query Link, the feature that enables you to
send PeopleSoft Query output to a spreadsheet, also refers to these settings.
nVision Tab
4-28
UNDERSTANDING CONFIGURATION MANAGER
PEOPLESOFT PROPRIETARY
AND
CONFIDENTIAL
DATA MANAGEMENT
Space between Query Columns
This parameter sets the number of blank Excel characters that PeopleSoft Query Link places
between query output columns. To eliminate column spacing, set Space between Query
Columns to 0 (zero).
Directory Paths
These fields allow you to specify the locations of the directories that are associated with your
nVision jobs.
Customization Macros
This parameter specifies the directory containing macros
for PeopleSoft nVision and Query Link. It is usually
%PS_HOME%\EXCEL.
Report Layouts
Specifies the location of your PeopleSoft nVision layout
fields.
Drilldown Layouts
Specifies the location of your PeopleSoft nVision
Drilldown files, usually
\NVISION\LAYOUT\DRILLDOWN.
Report Instance
Specifies which directory in which nVision places report
instances. For example:
C:\user\nVision\instance
Query Templates
Specifies where to look for the QUERY.XLT file. This
file defines the Excel styles used to format your output.
The default is the \MacroDir folder.
Style Sheets
Specifies the location where the NVSUSER Style Wizard
locates nPlosion style sheets.
See Also
PeopleTools PeopleBooks: PeopleSoft nVision
PEOPLESOFT PROPRIETARY
AND
CONFIDENTIAL
UNDERSTANDING CONFIGURATION MANAGER
4-29
DATA MANAGEMENT
Common Tab
Common Tab
Sybase Packet Size
This option allows you to specify a TCP Packet Size. The minimum value is 512 and the
maximum value is 65538. The default packet size will be 512. If you make any changes to
the packet size, make sure that you make the corresponding changes to the Sybase server.
Your Sybase reference manuals and the “Tuning” chapter in the Installation and
Administration for Sybase book Sybase contains more information about TCP packet sizes.
Application Designer Image Conversion
When you upgrade to newer version of PeopleTools, you’ll need to convert images to a new
format, which may require more storage space. If the images exceed the record size limit of
your platform, you can shrink the images to conform to this limit. When doing so, you have
the following options:
•
4-30
Convert and Shrink Images to Platform Limit. This option will both convert and
shrink images to fit your selected database platform limit, as shown in the Image Size
Limit field.
UNDERSTANDING CONFIGURATION MANAGER
PEOPLESOFT PROPRIETARY
AND
CONFIDENTIAL
DATA MANAGEMENT
•
Convert and Shrink Images to Image Size Limit. This option applies of you are
upgrading to a different database platform. Select this option, and specify the correct
value in the Image Size Limit field.
•
Don’t Convert, but Shrink Images to Image Size Limit. This option is useful for
images that have already been converted, but you just need to convert them so they meet
the platform size limits.
Data Mover Directories
The following section describe the Data Mover settings that you can control through
Configuration Manager.
Input Directory
Use this field to specify the directory where Data Mover should search for its input data (.DB)
files. When running a Data Mover script, if no explicit path is specified for the file named in
the set input lines, then Data Mover will search directories for the database file in the
following order.
1. Specified output directory.
2. C:\TEMP
Output Directory
Specifies the directory where your Data Mover scripts will be created. The default is
PS_HOME\DATA.
Log Directory
This parameter specifies the location of your Data Mover log files. The default is
PS_HOME\DATA.
See Also
PeopleTools PeopleBooks: Data Mover
Command Line Options
In addition to the tab interface, the Configuration Manager also offers the command line
options described in this section. They may be useful while implementing your PeopleSoft
system and for some everyday tasks like signon. The syntax for the Configuration Manager
command line options is as follows:
pscfg -<command>
For example,
pscfg -import:n:\config\hr800.cfg
PEOPLESOFT PROPRIETARY
AND
CONFIDENTIAL
UNDERSTANDING CONFIGURATION MANAGER
4-31
DATA MANAGEMENT
Import File
To import configuration settings from a named file, enter:
-import:<filename>
Export File
To export the current configuration settings, enter:
-export:<filename>
Run Client Setup
To run Client Setup, enter:
-setup
Note. The -setup command must be used in conjunction with the -import switch if you are
setting up a new workstation.
Run Client Setup “Quietly”
To run Client Setup “quietly” without displaying any messages or dialog boxes, enter:
-quiet
Note. All of the output messages will be written to a log file: %temp%\PSINSTAL.LOG.
Install ActiveX controls
To register ActiveX controls, enter:
-activex
Note. ActiveX controls are registered during Client Setup. –activex allows you to register the
ActiveX controls without running the entire Client Setup.
Install Crystal runtime files
To install Crystal runtime files, enter:
-crystal
4-32
UNDERSTANDING CONFIGURATION MANAGER
PEOPLESOFT PROPRIETARY
AND
CONFIDENTIAL
DATA MANAGEMENT
Install MMS DSN
To install MMS DSN, enter:
-dsn
Disable ODBC Driver Manager Installation
This command is only valid when used in conjunction with the -setup command. This
disables the installation of the Version 3.0 ODBC Drivers during the Client Setup process.
Use this command when you do not wish the Version 3.0 ODBC drivers to be installed on the
client workstation when using the -setup option.
-noodbc
Disable PeopleSoft ODBC Driver Installation
This command is only valid when used in conjunction with the -setup command. It disables
the installation of the PeopleSoft ODBC Driver during the Client Setup process. Use this
command when you do not wish the PeopleSoft ODBC driver to be installed on the client
workstation when using the -setup option.
-nopsodbc
Uninstall Workstation
To clear the PeopleSoft settings from the registry or uninstall the PeopleSoft workstation,
enter:
-clean
The -clean command will remove the following items from the workstation:
•
PeopleSoft registry settings.
•
All cache files from the current \CACHE directory.
•
Shortcut links.
•
PeopleSoft program group.
Make sure that removing all of these items is acceptable before you issue the -clean
command.
Help
To view the Configuration Manager’s command line options online, enter:
-help
PEOPLESOFT PROPRIETARY
AND
CONFIDENTIAL
UNDERSTANDING CONFIGURATION MANAGER
4-33
DATA MANAGEMENT
or
-?
Setting up the Development Environment
Most end users will use workstations equipped with supported web browsers, but with no
special PeopleSoft software installed. At the same time, the “traditional” Windows client—
now called the PeopleTools Development Environment—is still supported, and is primarily
used as a development environment.
The PeopleTools Development Environment runs on Windows NT 4.0, Windows 95,
Windows 98, and Windows 2000. This chapter describes how to configure these Windowsbased clients using Configuration Manager. As before, such clients can connect to the
PeopleSoft database directly using client connectivity software (a two-tier connection), or
through a PeopleSoft application server (a three-tier connection).
Verify <PS_HOME> Access
The workstation must have access to the file server <PS_HOME> directory (that is, the highlevel directory to which the PeopleSoft files were installed) and have a drive mapped to the
directory. The workstation user(s) must have read access to the <PS_HOME> directory.
Verify Connectivity
As mentioned, database connectivity is required on all Windows-based clients that will be
making a two-tier connection to the database. A two-tier connection is required if any of the
following is true:
•
The user will be signing on to the application in two-tier.
•
The user will be running Data Mover scripts.
•
The user will be running COBOL and SQR batch processes on the client.
Verify Supporting Applications
PeopleSoft requires that a number of supporting applications be installed on any Windowsbased client on which batch processes will be run locally.
SQR
On Windows-based clients, you have the option of installing SQR locally, or mapping to a
copy installed on the file server. Because SQR does not require any local registry settings, you
can execute SQR from any Windows-based client once SQR been installed to a shared
4-34
UNDERSTANDING CONFIGURATION MANAGER
PEOPLESOFT PROPRIETARY
AND
CONFIDENTIAL
DATA MANAGEMENT
directory. Installing SQR locally will result in improved performance; over a slow network
connection the improvement will be significant.
Crystal Reports
Optionally install Crystal Reports on Windows-based two-tier clients. As with SQR, you have
the option of installing Crystal locally, or mapping to a copy installed on the file server.
Because Crystal does not require any local registry settings, you can execute Crystal from any
two-tier client once Crystal been installed to a shared directory. Installing Crystal locally will
result in improved performance; over a slow network connection the improvement will be
significant.
Crystal Reports requires that you install the PeopleSoft ODBC driver on the workstation
where Crystal processes are executed.
Microsoft Office
Install Microsoft Office on any two-tier client that will be running nVision or Microsoft Word
batch processes. Microsoft Office must be installed locally, because it requires registry
settings.
Understanding the User Settings
Configuration Manager includes the following tabs for setting options for each workstation
user. If multiple users will be signing on to the workstation, you may need to set these options
once for each user.
•
Startup. Controls the default values that appear in the PeopleSoft signon screen, as
well as the location of the PeopleSoft cache on the client.
•
Display. Controls your language preference, the display size of PeopleSoft page
groups, as well as other display options.
Note. In PeopleTools 8.1, the language setting in Configuration Manager determines your
language preference for your PeopleTools Development Environment, regardless of the
operator language preference.
•
Crystal/Business Interlink. Specifies the locations of Crystal Reports executables
and default location for Crystal Reports generated via PeopleSoft Query; the latter
must be a directory to which the user has write access. This tab also specifies the
location of Business Interlink drivers.
•
Trace. Controls SQL, PeopleCode, Application Engine, Message Agent, and
PeopleSoft API trace options.
PEOPLESOFT PROPRIETARY
AND
CONFIDENTIAL
UNDERSTANDING CONFIGURATION MANAGER
4-35
DATA MANAGEMENT
Running Client Setup
Note. Prior to running Client Setup, you should create all the profiles you need.
The Client Setup tab does the following:
•
Installs a PeopleSoft program group on the workstation.
•
Sets up a Microsoft SQL Server system data source name using the server and
database name information from the Startup tab.
•
Installs the PeopleSoft ODBC driver required for Open Query and Crystal Reports.
•
Installs Crystal Reports DLLs on the workstation.
•
Configures a PeopleSoft ODBC data source name.
These Client Setup functions are performed when you press OK or Apply from Configuration
Manager only if the Install Workstation check box on the Client Setup tab is selected.
Note. Any files installed by Client Setup on the workstation from the file server, including
ODBC driver files, use the paths specified in the default profile.
To run Client Setup
1. Select the Client Setup tab.
2. In the Group Title text box enter the name of the program group for the icons you want
on the client workstation.
You can call the program group anything you want, but we will refer to it by its default
name, PeopleSoft 8.4.
3. Select check boxes to create shortcut links for any PeopleSoft applications that you wish
to access from the workstation.
When you run Client Setup, it will uninstall any existing shortcuts in the PeopleSoft 8
program group, and install shortcuts for the applications you have selected. If you
subsequently want to install or uninstall shortcuts, you can always re-run Client Setup.
4. Select the Install PeopleSoft ODBC Driver check box if you wish to install the
PeopleSoft ODBC driver and set up a user ODBC data source name required by
PeopleSoft Open Query and by Crystal Reports.
5. Select the Install Workstation check box.
This check box determines whether Client Setup runs when you click Apply or OK in
Configuration Manager. If this box is not selected, Client Setup will create or update
settings in the registry, but it won’t set up the PeopleSoft 8 program group, or install local
DLLs.
4-36
UNDERSTANDING CONFIGURATION MANAGER
PEOPLESOFT PROPRIETARY
AND
CONFIDENTIAL
DATA MANAGEMENT
6. Click Apply to run Client Setup and apply the other Configuration Manager settings.
•
You can press ODBC Administrator to directly access the Microsoft ODBC
Administrator to verify the installation and configuration of the ODBC DSN.
•
If you install the ODBC Driver Manager 3.5, reboot the workstation after running
Client Setup.
7. To view a list of the files installed and actions taken by Client Setup, you can open the
psinstal.log file in your Temp directory.
Note. The Uninstall Com Components pushbutton removed registry entries related to
the components used in three-tier debugging. These registry entries are also removed as
part of running Uninstall workstation.
PEOPLESOFT PROPRIETARY
AND
CONFIDENTIAL
UNDERSTANDING CONFIGURATION MANAGER
4-37
CHAPTER 5
Data Archiving
This chapter contains an overview of the PeopleTools Archive Data utility as well as covers
the following topics:
•
Archive Designer.
•
Archive Data.
•
Archive Processes.
•
Archive Reports.
•
Tips and Techniques.
Understanding Data Archiving
PeopleSoft systems create and maintain volumes of data. Often the data in your online tables
is no longer required. However, you don't want to simply delete the data just to make room
for new data. Managing this historical data is a time-consuming challenge for many database
administrators. However, unless you create an archiving strategy, databases increase to
unmanageable sizes. Also, removing the historical data from your online tables can improve
overall performance.
PeopleTools Data Archival enables you to select the rows of data you no longer need in your
online system and store these rows in history/staging tables or in a flat file format. Keeping
the data in the system in history/staging tables keeps the data available for queries and
reporting.
Also, you have the option to archive data directly to a flat file for long-term storage if the
historical data is no longer needed for reporting. You may consider exporting the data to flat
files and delete it completely from the system.
Warning!! The Archive Data Tool is a powerful tool. Improper use may result in data loss or
corruption of the database. It is strongly recommended that only those who are trained for and
familiar with the archiving process should use the Data Archiving Tool.
PEOPLESOFT PROPRIETARY
AND
CONFIDENTIAL
DATA ARCHIVING
5-1
DATA MANAGEMENT
Determining an Archive Strategy
Determining an archiving strategy is essential for using the Data Archiving Tool efficiently.
This strategy strongly depends on how the archived data will be utilized. The table below
highlights the aspects of the two available archiving strategies.
Table Archiving Strategy
Flat File Archiving Strategy
Utilizes history tables for storing
archived data.
Archives data straight to a flat file.
Allows reporting & queries from history
tables.
Requires secondary step to delete
archived data from online tables.
Deletes the archived data directly from
the online tables.
Efficient one-step archiving process.
No additional database storage space
required.
Requires additional database space.
The two strategies offer different approaches to archiving. The History Table Archiving
Strategy requires history tables for temporary storage, while the Flat File Archiving Strategy
offers archiving in one simple step. The system is designed to provide as much flexibility as
possible. By reviewing your business requirements, you will be able to decide on which
strategy best fits your business needs.
Note. Before deciding which archiving strategy to use, please review this entire document so
that you are familiar with all of the archiving features.
Archiving to Tables
Archiving to history tables involves the use of tables that your create for the sole purpose of
storing archived data. It is up to you to determine whether this archived data should be stored
in these history tables temporarily or for long-term.
By definition, history tables are identical copies of the online tables with the exception of an
additional column: PSARCH_ID. The system uses this key field to denote when a piece of
data was archived and to uniquely identify it. Some PeopleSoft applications deliver history
tables pre-built for use in common archiving processes. However, if you design a custom
archiving scheme, you'll need to create the history tables using Application Designer.
The following illustration depicts the steps involved with archiving to history tables.
5-2
DATA ARCHIVING
PEOPLESOFT PROPRIETARY
AND
CONFIDENTIAL
DATA MANAGEMENT
1
Online Tables
History Tables
Staging Tables
2
3
CSV
File
4
Archiving to Staging Tables
Step
Description
1
In step 1, data is moved into the history tables. This is known as the selection process. This
will allow you to query the selected data for information and delete them from the online
tables.
2
If you accidentally delete the data from the online tables, there is a process to restore the
data back from the history tables. Step 2 shows this rollback process.
3
When you no longer need to reference the data from the history tables, you can move them
to flat files and delete them completely from the system. Step 3 shows this export process.
4
If necessary, you can return the archived data back into the system using staging tables.
Staging tables are often identical to online tables, but they are not necessarily true replicas.
This import process is shown as step 4 in the above diagram.
History Table Considerations:
•
History tables generally reside on the same database as the online tables, however,
they can exist in a separate database, as well. If the history tables reside in a separate
database, you need to setup database links using the proprietary methods for your
RDBMS.
•
After the archive process moves the data into the history table, you have two options:
deleting the archived data from the online tables, or leaving the archived rows in the
online tables such that the data exists in parallel.
Staging Table Considerations:
•
Staging tables a exact duplicates as the online tables. They do not contain the
PSARCH_ID column.
•
Once you import data into the staging tables, you can't rollback the data into the
online tables.
PEOPLESOFT PROPRIETARY
AND
CONFIDENTIAL
DATA ARCHIVING
5-3
DATA MANAGEMENT
Archiving to Flat Files
You can also archive data directly from online tables to flat files. When you are ready to
archive your data and you no longer need to reference them from the online tables, you can
extract them to flat files.
The data is stored in the Comma Separated Values (CSV) format, which enables a portable
representation of the online tables and data.
Note. The data is deleted from the online tables as the data is being archived.
The following diagram depicts the steps involved in archiving to flat files.
1
Online Tables
CSV
File
2
Staging Tables
Archiving data to flat files
Step
Description
1
Export the selected online rows to a CSV file.
2
If you need to access your archived data in the future, you can restore the data into staging
tables. Step 2 shows this import process.
Using Archive Designer
The Archive Designer is used to create and maintain your archive project. When you create a
new archive project, you identify it using the archive ID. This archive ID is then used in the
various archive processes discussed later. The following section covers the interface that you
use to design archive templates, or projects.
The following section covers the interface that you use to design archive templates, or
projects.
Record Criteria Page
The process of archiving data begins with the creation of an archiving template, or project,
which logically groups all of the online tables that are to be archived into a single entity. You
associate the online table with its history table counterpart, and you select the fields to archive
and the criteria by which to archive.
Select PeopleTools, Archive Data, Archive Designer, Record Criteria.
5-4
DATA ARCHIVING
PEOPLESOFT PROPRIETARY
AND
CONFIDENTIAL
DATA MANAGEMENT
Record Criteria Page
Archive ID
An Archive ID is used to identify a group of transactions
as an archive definition during the archiving process.
Description
Description of the archive. 30-character limit.
Archive to Flat File
Enables the user to archive the project directly to a flat file
and bypass the history tables.
Copy Archive ID
Allows the current archive project to be copied to a new
Archive ID. This is equivalent to a "Save As." All tables,
criteria, and other criteria are copied to the new Archive
ID.
Archiving Record
Table to be archived. You can request multiple tables
within one Archive ID.
History Record
History tables are copies of the online table with the
additional PSARCH_ID field. This is where the archived
data is stored.
Copy Table
Copies all criteria to a new row in the existing Archive ID.
Useful if you are dealing with multiple tables.
Go to Request Page
Transfer to the Archiving Process page.
Go to Report Page
Transfer to the Report Request page.
FieldName
Columns in the online tables to specify archive criteria.
Specifying the fields and adding the conditions is
comparable to the WHERE clause in a SQL statement.
Operator
=, <>, <, >, <=, >=, LIKE, NOT LIKE
PEOPLESOFT PROPRIETARY
AND
CONFIDENTIAL
DATA ARCHIVING
5-5
DATA MANAGEMENT
Value to Match
Column value to match against, as in 07/01/1999
or$75,000.
You can also use special parameter markers in the format
of %PSPARMnn% where nn can be any number. For
example, valid parameter markers could be
%PSPARM1% or %PSPARM18%.
When the system generates the SQL statement,
%PSPARMnn% is embedded in to the SQL statement and
substituted with values entered using the run control
pages. One example of implementing this is to create an
archive project based on a business unit and then enter the
actual business unit at run time.
Note. Parameter markers cannot be implemented with
DATE fields.
A/O
Toggle between AND and OR. This button is only visible
if you have added multiple lines to the field list.
Join Record Criteria Page
If there are dependencies from other tables in the archiving project, such as parent/child
relationships, you must insert the criteria that are based from the parent tables into this page.
This can also be done by clicking on the Copy Parent Table button. For this to work correctly,
the parent, table criteria must already exist on the Archiving Project panel. You can specify
multiple levels, such as grand parent-to-parent, grand parent-to-parent-to child, and so on.
PeopleTools, Archive Data, Archive Designer, Join Record Criteria.
Join Record Criteria
5-6
DATA ARCHIVING
PEOPLESOFT PROPRIETARY
AND
CONFIDENTIAL
DATA MANAGEMENT
Archiving Record
The table to be archived.
Copy Parent Record
Allows the criteria that exist in the parent record on the
Record Criteria page to be copied easily to the child tables
on the Join Record Criteria page. When you click this, an
edit box appears to the right that you use to select the
parent table.
Record Name
Table to be joined. You can request multiple table joins
per archiving table. The two tables must share common
keys.
Field Name
Columns in the online tables to specify archive criteria.
Operator
=, <>, <, >, <=, >=, LIKE, NOT LIKE.
Value to Match
Column value to match. See Record Criteria discussion
for description of using parameter markers.
A/O
Change And to Or, and vice versa.
SQL Designer Page
The SQL Designer page is useful for generating and editing the SQL that will be used to
perform the archive process. In addition, you can count the number of rows that will be
affected by the current archive process, import or export SQL, and check for duplicate rows
that the SQL is affecting.
Note. The buttons on this page depend on what your access privileges are and what the
current archive is. To access this page, complete the required information on the previous two
pages.
Select PeopleTools, Data Archival, Archive Designer, SQL Designer.
PEOPLESOFT PROPRIETARY
AND
CONFIDENTIAL
DATA ARCHIVING
5-7
DATA MANAGEMENT
SQL Designer Page
Generate SQL
5-8
Produces the SQL statements for the current record. The
following types of SQL are created:
•
The Archive/Delete from the online tables (Archive
Delete).
•
Remove data from history tables (Remove from
History).
•
Rollback (Archive Rollback).
•
The SELECT that moves rows from the online table to
the history table (Archive Selection).
•
The SQL is stored in PS_ARCH_SQL_LNG by
archive ID.
Count Rows
Returns the row count of what the generated SQL will
affect.
Chk Dup Rows
(Check Duplicate Rows)
Checks to see if an incorrect join will cause duplicate rows
to be archived.
Edit SQL
Allows the user to modify the generated SQL. If you edit
and save the SQL, a flag will be used to identify that the
SQL is User-Modified and not System Generated. When
you modify the SQL and save it, the text above the edit
box indicates that the SQL has been altered from the
original, system-generated SQL.
DATA ARCHIVING
PEOPLESOFT PROPRIETARY
AND
CONFIDENTIAL
DATA MANAGEMENT
Allows the user to execute the generated SQL. Typically,
this button is designed for the developer of the archive ID.
After the archive ID is developed, an Application Engine
program executes the SQL.
Run SQL
Working with the Archives
This section covers:
•
Archive Security
•
Archive Utilities
Archive Security Page
This page enables you to grant access rights to the permission lists that use Archive Data.
The permission lists you add need to exist already in PeopleTools Security. The permission
list must be the primary permission list for the user profile in order for the user to have access
to the command button.
Select PeopleTools, Archive Data, Archive Security.
Archive Security Page
Permission List
Add the permission list(s) to which you want to grant
Archive Data access.
Can Generate SQL?
Allows the user to generate SQL on the SQL Designer
page in Archive Designer. The generate SQL button will
be displayed on the SQL Designer page of Archive
Designer.
Can Edit SQL?
Allows the user to edit, import, and export SQL on the
SQL Designer page in Archive Designer.
PEOPLESOFT PROPRIETARY
AND
CONFIDENTIAL
DATA ARCHIVING
5-9
DATA MANAGEMENT
Can Run SQL?
Allows the user to execute SQL on the SQL Designer
page in Archive Designer.
Can Purge Audit?
Allows the user to purge the audit history on the
Archiving Audit page.
Note. You also need access to the Archive Processes before you can run any of the archive
processes. PeopleTools delivers a process group ARCHALL that should be added to the
appropriate permission list using PeopleTools Security.
Archive Utilities Page
The Archive Utilities page allows quick archive project administration. These operations
include copying, renaming, deleting, exporting and importing.
Note. These options are mainly included for upgrade compatibility.
Select PeopleTools, Archive Data, Archive Utilities.
Archive Utilities Page
Archiving Event
Select the action you want to perform. The description for
each action appears in the box to the right.
Archive ID
Add the Archive ID that you want to copy, rename, delete,
or generate a Data Mover script for.
New Archive ID
Add the new Archive ID. Only applies to copying and
renaming archive projects.
Working with Data
The following sections cover the following:
5-10
DATA ARCHIVING
PEOPLESOFT PROPRIETARY
AND
CONFIDENTIAL
DATA MANAGEMENT
•
Data Finder page.
•
Data Input page.
•
Data Output page.
Data Finder Page
This page enables you to find data in your online system that meets your criteria. If the data
appears, you can then immediately create an archive project.
PeopleTools, Archive Data, Find Data
Find Data Page
Field Name
Enter the name of the field that you want to find a match
for.
Match Type
Specify whether the match between the field value and the
match value should be equal or “like.” The options are ‘=’
and LIKE.
Value to Match
Enter the value for the system to search for within the
specified field name.
Find Data
After you have entered the desired criteria, click Find Data
for the system to begin searching your online data.
Record
Shows the record containing the rows that meet the
criteria.
Row Count
The number of rows in the record that meet the criteria.
PEOPLESOFT PROPRIETARY
AND
CONFIDENTIAL
DATA ARCHIVING
5-11
DATA MANAGEMENT
Key
Signifies if the field is a key field in the record.
Build
Click this checkbox to include this record in the generated
archiving project. This box is checked automatically if the
field is a key field.
Data Transfer Input Page
Select PeopleTools, Archive Data, Transfer Data, Transfer Input.
Data Transfer Input
5-12
Field Name
Enter the name of the field you want to find a match for.
Match Type
Specify whether the match between the field value and the
match value should be equal or “like.” The options are ‘=’
and LIKE.
Value to Match
Enter the value for the system to search for within the
specified field name.
Record
Shows the record containing the rows that meet the
criteria.
Row Count
The number of rows in the record that meet the criteria.
Key?
Signifies if the field is a key field in the record.
Build?
Click this checkbox to include this record in the generated
script. This box is checked automatically if the field is a
key field.
Create Data Mover Export
Script
Check this checkbox to enable the system to create a Data
Mover Export script.
DATA ARCHIVING
PEOPLESOFT PROPRIETARY
AND
CONFIDENTIAL
DATA MANAGEMENT
Data Mover File Path
Defines the file path of the Data Mover files in the
generated script.
Data Mover Export File
Name
Defines the export file name in the generated script.
Data Mover Import File
Name
Defines the import file name in the generated script.
Delete Before Import
If this check box is checked, the generated script includes
a DELETE statement that includes the user specified
criteria in the WHERE clause. The DELETE statement
appears before the Data Mover IIMPORT statement.
Note. The generated Data Mover script will be populated in the second page of this
component (Data Transfer Output).
Data Transfer Output Page
Enables you to view and edit the Data Mover script generated from the Data Transfer Input
page.
Select PeopleTools, Archive Data, Transfer Data, Transfer Output.
Data Transfer Output page
The generated script contains two Data Mover scripts: one to export the data and one to import
the data.
PEOPLESOFT PROPRIETARY
AND
CONFIDENTIAL
DATA ARCHIVING
5-13
DATA MANAGEMENT
To run the script using Data Mover, you need to copy the generated script to an editor
(Notepad, for example), and then save it as a DMS file.
Running Data Archival Processes
This section covers the options and processes related to building archives.
Archive Data Page
Once you have created an archive project, you can begin the archiving process. This is when
the system moves the data from your online tables.
PeopleTools, Archive Data, Archive Data.
Archive Data Page
5-14
Archive ID.
Enter a previously created Archive ID.
Auto Fill Records.
Once you’ve selected an Archive ID, clicking on this
button will display all the tables included in the archive
project.
Archive Process.
Select which archive process you want to run:
DATA ARCHIVING
•
Selection copies the data from the online tables to the
history tables.
•
Rollback copies the data back from the history tables
PEOPLESOFT PROPRIETARY
AND
CONFIDENTIAL
DATA MANAGEMENT
to the online tables.
•
Delete deletes the data from the online tables.
•
Remove from History deletes the data from the history
tables.
Commit Processing
Enables the 'Commit After' option, which specifies how
many rows of data the system processes before issuing a
database commit. Otherwise, the system issues a commit
after each record has been processed.
Go to Project Page.
Transfer to the Archive Designer interface.
Pre/Post AE Processing
If you have any custom Application Engine programs that
you want to run against your data prior to the archiving
and/or after the archiving, specify the appropriate
program(s) here.
•
Pre AE. This is the program that runs before the
archiving process.
•
Post AE. This is the program that runs after the
archiving process.
Do
Check box indicating if the table should be processed at
run time
Table Names.
The tables containing the data to be archived.
History Tables.
The tables where the system stores the archived data.
Run Time Parameters
If your archive process contains the runtime parameter
markers (%PSPARMnn%), specify a value that the system
should substituted into the SQL statement at run time.
Archive Online to Flat Files Page
This page enables you to export data from online tables to flat files.
PeopleTools, Archive Data, Archive Online to Flat Files.
PEOPLESOFT PROPRIETARY
AND
CONFIDENTIAL
DATA ARCHIVING
5-15
DATA MANAGEMENT
Archive Online to Flat Files Page
Note. This archive process deletes the data from the online tables immediately after the
system has exported it to the flat files.
5-16
Run
Exports the data to the flat files.
Archive ID
Enter a previously created Archive ID.
Auto Fill Records
Once you’ve selected an Archive ID, clicking on this
button will display the table names. In addition, the user
needs to specify the path where the data will be exported.
Go to Project Page
Transfers control to the Archive Designer page.
Pre/Post AE Processing
If you have any custom Application Engine programs that
you want to run against your data prior to the archiving
and/or after the archiving, specify the appropriate
program(s) here.
•
Pre AE. This is the program that runs before the
archiving process.
•
Post AE. This is the program that runs after the
archiving process.
Do
Specify whether to process this table or not by selecting
the check box.
File Path
Enter the path and file names to which the data for each
table will be written. Each table can have unique filename
and destination.
DATA ARCHIVING
PEOPLESOFT PROPRIETARY
AND
CONFIDENTIAL
DATA MANAGEMENT
Run Time Parameters
If your archive process contains the runtime parameter
markers (%PSPARMnn%), specify a value that the system
should substitute into the SQL statement at run time.
Export History to Flat Files Page
Enables you to export the data from history tables to flat files.
Select PeopleTools, Archive Data, Export History to Flat Files
Export History to Flat Files Page
Run
Exports the data in the history table to the designated flat
file.
Archive ID
Enter a previously created Archive ID.
Auto Fill Records
Once you’ve selected an Archive ID, clicking on this
button will display the table names. In addition, the user
needs to specify the path where the data will be exported.
Table Name
Name of the table that will be processed. Clicking on the
Auto Fill Records button populates this field.
File Path
Enter the path and file names where the data will be
exported for each table.
Import From Flat Files Page
Use this page to restore archived data back to your system into staging tables.
PEOPLESOFT PROPRIETARY
AND
CONFIDENTIAL
DATA ARCHIVING
5-17
DATA MANAGEMENT
Select PeopleTools, Archive Data, Import From Flat Files.
Import From Flat Files Page
Run
Imports the data in the flat file into the designated staging
table.
Number of rows to be
processed before commit to
DB
Add the number of rows you want the program to process
before the program issues a COMMIT.
File Path
Specify the path and the name of the file containing the
data you want to import into the database.
Table Name
Enter the staging table name where the program is to
insert the data from the import file.
Running Data Archival Reports and Audits
The following sections cover:
•
Running archive reports
•
Running audit reports
Archive Report Page
Before running the Archive process, PeopleSoft recommends that you generate reports to
verify the data you are archiving before deleting it from the online tables. This report lists the
Archive ID definitions, which consist of the following:
5-18
•
Archiving tables.
•
Selection criteria.
DATA ARCHIVING
PEOPLESOFT PROPRIETARY
AND
CONFIDENTIAL
DATA MANAGEMENT
•
Dependency criteria (criteria from other tables).
•
SQL that will run each of the archiving processes.
These definitions also help you create your own reports through PeopleSoft Query.
Select PeopleTools, Archive Data, Archive Report.
Archiving Report Page
Archive ID
Select an existing Archive ID
Go to Project Page
Takes you to the Archive Designer Interface
File Path
Specify where the generated report is to be saved on the
batch server.
Audit Report Page
The Archiving Audit Panel is useful for viewing all processes that have been executed in the Data
Archiving Tool. In addition, you can delete the audit if you have the necessary access privileges.
Note. The Purge Audit button will not be displayed if the user does not have proper access.
Select PeopleTools, Archive Data, Audit Report.
PEOPLESOFT PROPRIETARY
AND
CONFIDENTIAL
DATA ARCHIVING
5-19
DATA MANAGEMENT
Audit Report Page
Archive Operator Class
(Role)
Choose which user/role to audit.
Archiving Event
Choose which Archive Event to audit from the dropdown
list.
Archive ID
Choose which Archive ID to audit.
From/To Date
Enter the range of dates that you want to audit
File Path
Specify where the generated report is to be saved on the
batch server.
Print SQL?
Select this checkbox if you want the SQL statements for
each of the archiving processes printed in the report.
Audit Inquire Page
This page enables you to view the audit results online rather than waiting for the output from
the batch process.
PeopleTools, Archive Data, Audit Archiving.
5-20
DATA ARCHIVING
PEOPLESOFT PROPRIETARY
AND
CONFIDENTIAL
DATA MANAGEMENT
Audit Inquire page
Add your criteria in the provided edit boxes, click View Audit, and view the results arranged
by column.
Archiving Tips and Techniques
The following sections provide additional information to help you get started using the
archiving features.
Understanding Business Requirements
It is very important to come up with a business strategy before archiving the data. First, you
must identify the tables you want to archive. This includes identifying all of the parent/child
tables associated to these tables. Failing to identify all of the related tables can cause
corruption to the database. Next, you must know exactly which data you want to archive. It is
important to recognize which rows are safe to be removed from the online tables. A factor to
remember when doing an archive is to remove only the data that are not required to maintain
the day-to-day business and reporting.
Let’s use General Ledger (GL) for an example. GL contains the greatest amount of data to be
archived since it is the module where the majority of reporting is required. There are two sets
of data types that need to be maintained: balance information, and transactional information.
Balance information is retained in the Ledger records. You may require balance information
for online and reporting purposes to be available for a 3-year period. On the other hand,
transactional data is maintained in the journal header and line tables. Perhaps you may require
1 year of transactional data to be retained in the system for online purposes and 3 years to be
retained for reporting purposes.
Any data beyond the above time frames for balances and transactions can be archived and will
only be accessed through reports. The data can be archived to history tables, or as flat files to
secondary storage devices. If data were to be archived into history tables, the data would still
be available online for reporting purposes. However, it could not be viewed through pages
without customizations. In addition, reports would need to be modified to access the data in
history tables. Archiving to secondary storage devices is generally used for long-term data
retention. This option is preferred for data that are rarely retrieved, and is usually performed
to satisfy legal requirements.
PEOPLESOFT PROPRIETARY
AND
CONFIDENTIAL
DATA ARCHIVING
5-21
DATA MANAGEMENT
Creating History Tables
Before you run the archiving process, you must create/ build the history tables first.
You are required to build one history table for each table to be archived. The history table
must be identical to the archive table, with an extra column PSARCH_ID.
The following example uses the JRNL_HEADER.
To build a history table:
1. Open Application Designer.
2. Open the JRNL_HEADER table.
3. Select File, Save As and name the history table your custom name, such as
JRNL_HEADER_HST.
4. When prompted to copy the PeopleCode associated to the table, click No.
5. Click Insert > Field and insert the PSARCH_ID field.
6. Save the Record.
7. Build the table by using the Build, Current Object option.
•
Select the following Build Options: Create Tables and Create Indexes.
•
Select the following Build Execute Options: Execute and Build script.
•
Click Build.
Archiving to Flat File
This process deletes the data from the online table and writes the data to a flat file.
To complete the flat file archiving process:
1. Design Business Archiving Strategy
2. Create an archive project and turn on the Archive to Flat File checkbox.
3. Generate the SQL on the SQL Designer page.
4. Run the Archive Project Report Definition.
Create PS/Query reports (or use your favorite SQL Tool) to verify the data.
5. Run the Archive Online Tables to Flat Files indicating to which file the system writes the
data.
5-22
DATA ARCHIVING
PEOPLESOFT PROPRIETARY
AND
CONFIDENTIAL
DATA MANAGEMENT
Archiving from Online to History Table Process
This process copies the data from the online table to the history tables using the selection
process and then removes the data from the online tables using the delete process.
To complete the online to history table process:
1. Create an Archive Project.
Create a project (with a unique Archive ID) that identifies the tables/rows that are to be
archived.
2. Run archiving reports.
Print an archive project definition report to help you verify the data you have selected to
archive.
3. Run Archive Data with the Archive Process Selection.
Based on the Archive ID, run the selection process. This copies the data the rows for
archiving to the history tables.
4. Run Archive Data with the Archive Process Delete.
This removes the data from the online tables. Do this only when you are confident that
the archived data has been successfully stored in the history tables.
Rolling Back History Table Data
To roll back history table data:
1. Run Archive Data with the Archive Process Rollback.
This copies the data back from the history tables to the online tables. You use this when
the data was accidentally deleted from the online tables, and it has already been archived
to the history tables.
2. Run Archive Data with the Archive Process Remove from History.
If the Archive Selection has been run, and it you selected the wrong set of data to be
copied to history tables, run the Remove from History process to remove the misplaced
data. This returns you to the state where you started prior to the archive selection process.
PEOPLESOFT PROPRIETARY
AND
CONFIDENTIAL
DATA ARCHIVING
5-23
DATA MANAGEMENT
Archiving from History Table to a Flat File
To archive from history table to a flat file:
1. Run Export History to Flat Files.
This process copies the data to the flat files.
2. Run Archive Data with the Archive Process Remove from History.
This deletes the data from the history tables. Only run this process after you have verified
that the data has been successfully archived to flat files.
Restoring Archived Data from Flat Files
To restore archived data from flat files:
1. Run Archive Audit Report for the Batch History Process.
This report lists the definition of the history tables at the time the data was archived. This
report provides the names of the flat files that contain the data.
2. Create Staging Tables.
The staging table is a clone of the online table. The Import process imports the data from
the flat files into staging tables.
3. Run Import for Flat Files Process.
4. Run the programs to populate the tables from the flat files.
Understanding Commits
For both batch and online execution, the Archive Selection, Remove from History, Rollback,
and Delete Processes issue commits after each record has been processed unless a commit
level has been specified otherwise.
Gaining Increased Performance
For better performance and increased speed during archiving processes, try dropping the
indexes before inserting data from online tables into history tables.
5-24
DATA ARCHIVING
PEOPLESOFT PROPRIETARY
AND
CONFIDENTIAL
DATA MANAGEMENT
Modifying Indexes
Your database platform may have a limitation to the number of columns an index can contain.
Some have a restriction of 16 columns for an index. If the table that you want to archive
already has 16 keys, then you cannot add another key (PSARCH_ID) to the corresponding
history table.
The first option for solving this situation is to use the Flat File Archiving Strategy. The
second option for solving this situation is to create the history table with the PSARCH_ID as a
non-key field. For this situation, it is recommended that you either have different history
tables for different archiving projects, or you have a strategy of purging the history tables prior
to executing the selection process of another archiving project.
PEOPLESOFT PROPRIETARY
AND
CONFIDENTIAL
DATA ARCHIVING
5-25
CHAPTER 6
PeopleSoft CTI
This document covers the PeopleSoft Computer Telephony Integration (CTI) console. The
intended audience of this document includes the following:
•
System administrators who need to install and configure PeopleSoft CTI.
•
End users, or call agents, who use PeopleSoft CTI to complete work tasks.
This chapter contains an overview section and covers the following topics:
•
PeopleSoft CTI’s role within the overall PeopleSoft 8 Media Connect for Genesys
CTI solution.
•
PeopleSoft CTI installation and configuration.
•
Using PeopleSoft CTI.
Note. As a licensee of PeopleTools, you are licensed to use the base portal technology, which
is limited to navigation to licensed PeopleSoft applications. If you want to register additional
non-PeopleSoft content, you must license PeopleSoft Enterprise Portal. CRM customers have
access to CTI functionality by default. To use CTI outside of PeopleSoft CRM you must
license PeopleSoft Enterprise Portal.
Understanding PeopleSoft CTI
PeopleSoft Computer Telephony Integration enables you to integrate your PeopleSoft
applications with your call center. PeopleSoft CTI offers the following benefits:
•
Seamlessly integrates your PeopleSoft application with the Genesys CTI Framework
to improve agent productivity. “Agents” refer to the individuals who interact with
your customers using CTI.
•
Requires only that you install a supported web browser on the agent's workstation.
•
Enables agents to take advantage of browser-based call management and automatic
population of PeopleSoft transaction pages with the relevant customer data associated
with an incoming call.
PEOPLESOFT PROPRIETARY
AND
CONFIDENTIAL
PEOPLESOFT CTI
6-1
DATA MANAGEMENT
Understanding the Components
The PeopleSoft CTI console works together with the IVR (Interactive Voice Response)
system, the Genesys CTI Framework, an Automatic Call Distributor (ACD), and your
PeopleSoft application. When a customer calls, the caller enters information using the IVR
system. The PBX/ACD system then routes the call to the Genesys T-Server. The T-Server
converts the customer's entries into key fields and sends the key information to the PeopleSoft
CTI console, which opens the relevant customer record and PeopleSoft transaction page.
PeopleSoft System
Application
Server
Web Server
Database
Agents
PeopleSoft
Page
CTI
Console
CTI
Applet
Customers
Genesys
CTI Framework
PBX
(Switch)
IVR
Third Party CTI Configuration
Overview of the PeopleSoft Media Connect system
6-2
PEOPLESOFT CTI
PEOPLESOFT PROPRIETARY
AND
CONFIDENTIAL
DATA MANAGEMENT
See Also
PeopleTools PeopleBook: PeopleCode Reference, "Internet Script Classes (iScript)"
Understanding the PeopleSoft CTI Console
The PeopleSoft CTI console enables agents to manage their phone sets from their browsers.
The CTI console launches a browser when Genesys associates a URL with an incoming call.
The browser that the system launches is called a “popup window." The popup window
contains the PeopleSoft application page and relevant data for the incoming call. A mini
console appears at the bottom of every popup window. The mini console allows the agent to
manage calls without having to return to the main console.
The CTI console uses a Java applet that runs within the web browser to communicate directly
with Genesys. The CTI console communicates to the Java Applet using JavaScript. The
applet is delivered in a file called pCti.cab that is approximately 500KB. The applet resides in
the browser cache to reduce network traffic and improve response time.
See Also
Using PeopleSoft CTI
Required Genesys Components
PeopleSoft assumes that you already have a functioning Genesys system configured at your
site. PeopleSoft does not ship any Genesys products. You need a Genesys T-Server installed
and configured before you begin installing your PeopleSoft CTI system.
In addition, your PeopleSoft application may require the following CTI components to attach
data to incoming calls:
•
Genesys Strategy Builder or Interaction Router or equivalent.
•
An IVR supported by Genesys and capable of passing call data to Genesys.
Note. The Genesys Configuration Server is an optional but supported component.
Note. For detailed information regarding specific versions that PeopleSoft supports, refer to
the PeopleSoft Platforms database on Customer Connection.
See Also
Genesys Product Documentation
PEOPLESOFT PROPRIETARY
AND
CONFIDENTIAL
PEOPLESOFT CTI
6-3
DATA MANAGEMENT
Required Java Runtime Environment
PeopleSoft CTI Console requires the following:
•
Microsoft Internet Explorer 5.0 or greater.
•
Microsoft virtual machine (Microsoft VM) installed on a supported Microsoft
Windows workstation.
Java applets run within a Java Virtual Machine (JVM) that uses a ‘sandbox’ to restrict
access to what they can do. In order for the PeopleSoft CTI Applet to open a network
connection to the Genesys system rather than back to the web server that downloaded it,
PeopleSoft has attached a digital signature to the applet.
The digital signature protects the applet against tampering, and it requires the agent to grant
permission to run the applet. When doing so, agents need to indicate whether such permission
should be granted to any code signed by PeopleSoft for all subsequent sessions or just for the
current session only. You need to instruct your end users to select the appropriate option for
your site.
Installing and Configuring PeopleSoft CTI
This section describes how to install and configure the PeopleSoft CTI system. This
information assumes that you already have a functioning Genesys system installed and
configured at your site.
Installing PeopleSoft CTI
When you run the PeopleSoft Internet Architecture setup program, the PeopleSoft CTI files
are installed automatically to your web server in the following location:
•
WebLogic
bea\wlserver6.1\config\peoplesoft\applications\PORTAL\ps\pCti
•
Websphere
C:\Apps\WebSphere\AppServer\installedApps\peoplesoft\PORTAL\ps\pCti
Note. You do not need to select any additional options from the install program "wizard."
The CTI files are installed by default.
Once you've run the PeopleSoft Internet Architecture setup program, you need to enable the
PeopleSoft CTI console and configure the system as discussed in the following sections.
See Also
PeopleTools Installation Guide for your platform
6-4
PEOPLESOFT CTI
PEOPLESOFT PROPRIETARY
AND
CONFIDENTIAL
DATA MANAGEMENT
Genesys Product Documentation
Enabling PeopleSoft CTI
To configure the PeopleSoft CTI to work with the PeopleSoft Portal, you need to enable
PeopleSoft CTI in the Personalize Content page. This involves checking PeopleSoft CTI in
the PeopleSoft Applications list.
Personalize Content Page
By doing so, the PeopleTools CTI content appears as shown below.
PEOPLESOFT PROPRIETARY
AND
CONFIDENTIAL
PEOPLESOFT CTI
6-5
DATA MANAGEMENT
PeopleSoft CTI with the Portal
See Also
PeopleTools PeopleBooks: Portal Technology, “Introducing PeopleSoft Portal Technology”
CTI Configuration Page
Select PeopleTools, CTI Configuration, CTI.
On this page, you create CTI configurations. A CTI Configuration contains all the information
required for a user to be able to connect to a specific Genesys T-Server or Configuration
Server.
6-6
PEOPLESOFT CTI
PEOPLESOFT PROPRIETARY
AND
CONFIDENTIAL
DATA MANAGEMENT
CTI Configuration Page
Configuration ID
Displays the name you gave the configuration when you
created it. The name can't be modified once created.
Configuration Name
Add a descriptive name to help identify the configuration.
Switch Name
Choose from one of the supported switches. Currently, the
supported switches are: Siemens, Nortel, Avaya and
Aspect.
Number of Extensions
Number of extensions or directory numbers associated
with the telephone.
Number of Lines
Number of lines associated with each extension.
Lines on Console
Currently, the CTI console supports two lines. The only
supported configurations are two extensions with one line
each or one extension with two lines.
Genesys Configuration
Server
Directs the CTI console to get data required for
connecting to the T-Server from a Configuration Server
instead of from the PeopleSoft database. Using a
Configuration Server is transparent to the user/agent.
When the agent activates the console, it requests a list of
available T-Servers from the Configuration Server, and
then the console sequentially attempts to connect to each
T-Server in that list until it establishes a connection. If it
reaches the end of the list without connecting to a TServer, an error is returned to the agent.
Note. If you select this option, the Application User
group box appears at the bottom of this page.
PEOPLESOFT PROPRIETARY
AND
CONFIDENTIAL
PEOPLESOFT CTI
6-7
DATA MANAGEMENT
Host Name or IP Address
Enter the host name or IP address for the Genesys TServer or Configuration Server.
Port Number
Enter the Port number on which the T-Server or
Configuration Server listens.
CTI Application Name and
Enter the Genesys Application Name and enter the
Genesys password required for signing on to the
application specified as the CTI Application.
CTI Application Password
Application User Name and
Application User Password
Enter the appropriate application user name and password
for the Genesys system.
To create a new configuration:
1. Select PeopleTools, CTI Configuration, CTI.
2. On the Find an Existing Value search page click Add a New Value.
3. On the Add New Value page, enter a Configuration ID.
There is a four-character limit.
4. Click Add.
Shared Phone Book
Select PeopleTools, CTI Configuration, CTI, Shared Phone Book.
On this page, you can manage a list of frequently dialed phone numbers for a specific CTI
configuration. These numbers appear when an agent connected to that CTI configuration
selects the drop-down list when dialing a number from the CTI console. This saves the agents
from manually entering frequently dialed numbers when making outbound calls.
Note. Phone lists are updated on the CTI Console only after the CTI applet launches. To
refresh phone lists, refresh the browser and reactivate the console.
Shared Phone Book Page
6-8
PEOPLESOFT CTI
PEOPLESOFT PROPRIETARY
AND
CONFIDENTIAL
DATA MANAGEMENT
Phone Number
Enter frequently dialed phone numbers associated with
this configuration.
Type
Select either DN or Queue.
•
DN. (Directory Number) This number identifies a
telephone set on a PBX or in the public network. The
caller dials this number to establish a connection to
the addressed party. The DN can be a local PBX
extension (a local DN) or a public network telephone
number
•
Queue. Directory Number identifying an ACD queue
or group. Calls to a group are distributed to agents
belonging to the group, according to ACD algorithms.
You can add a description for the telephone number to
make the console drop-down list more intuitive
Description
CTI Agent Configuration Page
Select PeopleTools, CTI Configuration, Agent.
CTI Agent Configuration Page
Refers to the PeopleSoft User ID of the agent.
User ID
Agent Info
Effective Date
Enter the date on which the current configuration should
become active.
CTI Agent ID
Refers to the Genesys user ID of the agent.
Agent Password
Enter the password the agent uses to sign on to Genesys.
PEOPLESOFT PROPRIETARY
AND
CONFIDENTIAL
PEOPLESOFT CTI
6-9
DATA MANAGEMENT
Queue
Enter the name of the queue you want to assign to an
agent. Use the Queue Configuration page to associate a
queue with a Directory Number identifying an ACD
group.
Configuration ID
Select the name of the configuration that you want to
associate with the agent. The Configuration ID is the
name of the configuration you created using the CTI
Configuration page.
Trace Level
For Trace Level you have the following options:
•
0-None. Disables tracing.
•
1-Informational. Traces agent actions, such as dialing
out, transfers, and so on.
•
2-Debug. Used to troubleshoot crashes and other
major errors. If you every need to open a PeopleSoft
GSC case regarding a CTI issue, include a level 2Debug trace.
Trace information is written to the browser’s Java
Console, which must be enabled.
In Internet Explorer, you enable the Java Console by
selecting Tools, Internet Options, Advanced, Java, Java
Console.
You view the Java Console by selecting View, Java
Console. To clear the console, press C on your keyboard.
Phone Book Page
Select PeopleTools, CTI Configuration, Agent, Phone Book.
On this page, you can manage a list of frequently dialed telephone numbers for a specific CTI
agent. These numbers appear when that agent selects the drop-down list box for a number to
dial in the CTI console. This saves the agents having to manually enter frequently dialed
numbers when making outbound calls.
Note. Phone lists are updated on the CTI Console only after the CTI applet launches. To
refresh phone lists, refresh the browser and reactivate the console.
Phone Number Page
6-10
PEOPLESOFT CTI
PEOPLESOFT PROPRIETARY
AND
CONFIDENTIAL
DATA MANAGEMENT
Phone Number
Enter frequently dialed telephone numbers associated with
a particular agent.
Type
Select either DN or Queue.
• DN. (Directory Number) This number identifies a
telephone set on a PBX or in the public network.
The caller dials this number to establish a
connection to the addressed party. The DN can be
a local PBX extension (a local DN) or a public
network telephone number
•
Queue. Directory Number identifying an ACD
queue or group. Calls to a group are distributed to
agents belonging to the group, according to ACD
algorithms.
You can add a description for the telephone number to
make the console drop-down list more intuitive for the
agent.
Description
Personalization Page
Select PeopleTools, CTI Configuration, Agent, Personalization.
Use this page to personalize the popup windows’ timing, size, and position on the desktop as
well as the position of the floating console.
Personalization Page
PEOPLESOFT PROPRIETARY
AND
CONFIDENTIAL
PEOPLESOFT CTI
6-11
DATA MANAGEMENT
Popup Window
Popup Mode
Enables you to configure when the popup window
appears. You can have it appear after the call is answered,
or you can have it appear when there is an incoming call.
If it appear before the call is answered, this enables the
agent to determine if they should answer the call based on
the information displayed in the popup.
Top
Specifies the top position, in pixels. This value is relative
to the upper-left corner of the screen.
Left
Specifies the left position, in pixels. This value is relative
to the upper-left corner of the screen.
Height
Specifies the height of the window, in pixels. The
minimum value is 100.
Width
Sets the width of the window, in pixels. The minimum
value is 100.
Floating Console
Top
Specifies the top position, in pixels. This value is relative
to the upper-left corner of the screen.
Left
Specifies the left position, in pixels. This value is relative
to the upper-left corner of the screen.
Queue Configuration Page
Select PeopleTools, CTI Configuration, Queue.
Use this page to add queues for agents.
Queue Configuration Page
6-12
Queue
Directory Number identifying an ACD group. Calls to a
group are distributed to ACD agents belonging to that
group, according to ACD algorithms.
Queue Description
Enables you to add a brief description of the queue.
PEOPLESOFT CTI
PEOPLESOFT PROPRIETARY
AND
CONFIDENTIAL
DATA MANAGEMENT
Miscellaneous Page
Select PeopleTools, CTI Configuration, Miscellaneous.
The Miscellaneous page contains a parameter that enables you to redirect the base URL for
users without a Genesys User ID. By doing so, these users do not see the CTI console when
signing onto PIA.
Use Default Screen Popup
URL
Enter the URL that users should see by default when the
popup launches.
Default Screen Popup URL
If the previous setting is selected, enter the URL value for
the default URL.
Important! Do not enter the URL that is the same as the URL that users will use to connect
to PeopleSoft. The URL entered on the Miscellaneous tab needs to be a URL for a separate
PeopleSoft (PIA) site. You create a separate site by installing PeopleSoft (PIA) into a separate
directory on your web server. The additional PeopleSoft site needs to point to the same
PeopleSoft domain.
Demo: Outbound Call Page
Select PeopleTools, CTI Configuration, Demo: Outbound Call.
The Outbound Call page is an example of how you can customize an application page to allow
a user to direct the CTI Console to dial a telephone number displayed on that page. The
outbound calling demonstration works only when the CTI console is enabled and the user has
registered with Genesys.
Phone Number
Enter the telephone number you want to dial. This field
accepts numeric digits only. Do not enter special
characters, such as “-“, “.”, and so on.
Dial
Click this link to dial the telephone number you entered.
Setting up Genesys for Popup Windows
During the setup of the Genesys server, you must create certain user-defined variables that are
attached to each incoming call. These variables are then sent to the PeopleSoft CTI
application providing instructions on which PIA page displays for the agent. This data is
typically created and attached to the call using the Genesys Strategy Builder.
The PeopleSoft CTI can launch and populate transaction pages in the following ways:
•
PeopleSoft CTI formats a URL for the browser with a specific target PeopleSoft
menu, component, and page. This method can only be used if you are not using the
Portal, and have only one database.
PEOPLESOFT PROPRIETARY
AND
CONFIDENTIAL
PEOPLESOFT CTI
6-13
DATA MANAGEMENT
•
PeopleSoft CTI opens the transaction page using an iScript. This method must be
used if you are using more than one database or operating your PeopleSoft system
with a portal. The iScript communicates with the targeted database to populate the
appropriate transaction page with the caller's data. For more information on iScripts,
refer to the PeopleCode PeopleBooks.
Note. The Genesys connection ID is stored in the query string as a variable named "callID."
The Genesys ANI call property is stored in the query string as a variable named "otherDN".
You can access this variable using PeopleCode as part of the screen pop.
PeopleSoft CTI retrieves the data it needs to determine how to launch popup windows from
one of two places:
•
Default URL for all calls.
•
The calls attached data keys.
Using the URL Based on Attached Data Keys
ICTYPE
Represents the type of PeopleSoft service being called,
either a panel (page) or a script. If the ICTYPE is set to
Panel, then the following three attached data variables
must be set:
•
MENU. The name of the menu within PeopleSoft
containing the destination component.
•
Market. The market property of the target
component
•
PANELGROUP Name or Component. The
target component name in the PeopleSoft
Application.
If the ICTYPE is set to Script, then the attached
following data variable, needs to be set:
ICScriptProgramName. This represents the location of
the iScript, which is executed through the screen pop.
DESCR1
Definable data for descriptive purposes only. You can
add any descriptive information that might be useful to
the agent. This information displays in the control bar.
For example, you may want the agent to be aware of
the customer's priority status, as in "Gold Customer."
Application Specific Data
Any other attached data keys that are sent to the CTI
console by the Genesys telephony server, such as
customer number, are passed to the target application
page as parameters.
The parameters are separated from the PeopleSoft URL
by a question mark (?). Parameters are separated from
other parameters by an ampersand (&). If you are
6-14
PEOPLESOFT CTI
PEOPLESOFT PROPRIETARY
AND
CONFIDENTIAL
DATA MANAGEMENT
using iScripts, you can use the GetParameter methods
to read the parameters in your PeopleCode. If you
choose to use ICPanels instead, the parameters are used
as the key list.
Refer to your PeopleSoft application documentation for
specific instructions on any other attached data keys
that must be passed to the CTI console by Genesys.
Sample Default URL
The following example shows a sample URL.
http://<<machinename>>/servlets/iclientservlet/<<sitename>>/?ICType=Panel&Menu
=UTILITIES&Market=GBL&PanelGroupName=CTI_HANDLER">
Supporting Single Signon
PeopleSoft CTI offers single signon. The console connects to Genesys using the Genesys user
ID and password retrieved from the PeopleSoft database.
Implementing "Free Seating"
When users sign on, they do not need to reenter telephone extensions and other user
information if they have used the workstation before and the relevant information for the
telephone associated with that workstation has not changed.
PeopleSoft enables free seating by maintaining a cookie on the workstation.
Troubleshooting
The following items identify some common issues and their solutions.
•
If the CTI console’s state becomes inconsistent with that of the telephone, do one of
the following:
Use the phone set to manage the call, and once you have released the call, either
disregister and reregister using the
button.
Click the browser’s Refresh button to re-set the console.
•
If the CTI Console system loses track of the program state, it returns to a neutral status
showing both lines available. In this case, use the phone set to manage the call as
opposed to using the CTI Console. Once you have released the call, you may need to
de-register from and reregister with Genesys.
PEOPLESOFT PROPRIETARY
AND
CONFIDENTIAL
PEOPLESOFT CTI
6-15
DATA MANAGEMENT
•
If agents attempt to activate the CTI Console, and get an error message indicating that
there is already an active console (and there isn't), clear the PeopleSoft CTI cookies
stored in the browser’s cache.
•
If the agents activate the CTI console, but do not get the agent’s Register button
, this indicates that the applet could not communicate with Genesys. Check
that the CTI configuration data such as the host name and port number are correct and
that the Genesys servers are online.
•
If you receive an unexpected error and intend to log an incident with PeopleSoft,
include the browser’s Java Console output with the incident.
•
In general, ensure that agents have valid Genesys agent IDs associated with their
PeopleSoft user IDs.
•
If, when logging on to CTI for the first time, you do not see the security warning
described in the Using PeopleSoft CTI section, the system may be installed
incorrectly.
•
If the agents activate the CTI console, but do not get the agent’s Register button
(
), this may indicate one of the following:
The applet could not communicate with Genesys. Check that the CTI
configuration data such as the host name and port number are correct and that the
Genesys servers are online.
You do not have rights to install the applet or some other CTI component on your
workstation (security restrictions). Contact your system administrator.
Using PeopleSoft CTI
Note. The following section is intended for PeopleSoft CTI end users—the call agents.
This section contains an overview discussion and covers the following topics:
•
Understanding the PeopleSoft CTI interface.
•
Signing on.
•
Working with the control bar.
•
Answering calls and using the call features.
Overview
PeopleSoft CTI is a browser-based call management system that helps call agents work more
efficiently with customers. PeopleSoft CTI integrates your Genesys CTI system and your
PeopleSoft applications. It exchanges data between the CTI system and your PeopleSoft
6-16
PEOPLESOFT CTI
PEOPLESOFT PROPRIETARY
AND
CONFIDENTIAL
DATA MANAGEMENT
applications so that the system automatically fills PeopleSoft transaction pages with the
appropriate customer information—the information related to the caller.
With PeopleSoft CTI, you can perform the following tasks:
•
Operate two lines or two extensions.
•
Answer incoming calls.
•
Release Calls.
•
Put a caller on hold.
•
Monitor call status.
•
Access PeopleSoft applications.
•
Transfer callers.
•
Initiate conference calls.
•
Place an outbound call.
Understanding the Interface
The PeopleSoft CTI interface consists of two main components:
•
Main console.
•
Mini console.
Popup Window
PeopleSoft CTI Main Console
(floating)
PeopleSoft Application Page
populated with
caller information
Mini Console
PeopleSoft CTI Main Console and Mini Console
The main console enables you to perform actions related to the general CTI system, such as
connecting to the Genesys system, selecting a call action, selecting an extension, and so on. In
PEOPLESOFT PROPRIETARY
AND
CONFIDENTIAL
PEOPLESOFT CTI
6-17
DATA MANAGEMENT
PIA, the main console appears at the bottom of your browser. In the Portal, the console is
activated from within your homepage, but runs in a separate window.
The mini console appears in a popup window when you have an incoming call. The popup
window also shows the PeopleSoft application transaction page containing the current caller's
information. The mini console only contains options that apply to the current call. When you
release a call, the system deactivates the mini-console.
Getting Started
Getting started with PeopleSoft CTI is a three-step process that involves the following:
•
Signing on to PeopleSoft.
•
Specifying your extension information.
•
Connecting to the Genesys system.
The first time you access PeopleSoft CTI, a Security Warning dialog box may appear
prompting you to "trust" information from PeopleSoft. You need to indicate "Yes."
Security Warning
Note. If you have any questions or concerns about this warning, contact your system
administrator.
To sign on to PeopleSoft CTI:
1. On the Peoplesoft signon page, enter your PeopleSoft user ID and password as you
normally do to sign on to PeopleSoft.
6-18
PEOPLESOFT CTI
PEOPLESOFT PROPRIETARY
AND
CONFIDENTIAL
DATA MANAGEMENT
2. On the control bar at the bottom of the PeopleSoft homepage, set your configuration by
doing the following:
•
Make sure that your agent ID appears beneath the Agent ID label.
•
Make sure that the appropriate queue name appears beneath the Queue label. Queues
are discussed in a subsequent section.
•
If you are signing on from a workstation with a different extension, specify the current
extension(s) in the Extension edit boxes.
•
Press the Activate button to sign on to Genesys.
Notice that the control bar is replaced by the PeopleSoft CTI main console.
Note. You can't activate two CTI consoles on one workstation. An error message appears
if you attempt to do this.
3. On the Main Console, click the
button to register with the Genesys system.
When the red 'X' on the button becomes a green check mark, you are registered with
Genesys. In most cases, this should not take more than 10-15 seconds.
Using the CTI Console with the Portal
If PeopleSoft CTI is enabled in your personalized content, the CTI registration bar appears at
the bottom of the PeopleSoft homepage.
PEOPLESOFT PROPRIETARY
AND
CONFIDENTIAL
PEOPLESOFT CTI
6-19
DATA MANAGEMENT
CTI Registration Bar on Portal Homepage
Change any registration parameters if necessary and click Set, or Activate (depending on your
version). After doing so, a floating console opens in a new window. The floating console
appears as follows:
Floating Console in Portal
Important! Do not close the floating console unless you wish to terminate your connection to
Genesys.
6-20
PEOPLESOFT CTI
PEOPLESOFT PROPRIETARY
AND
CONFIDENTIAL
DATA MANAGEMENT
After you sign on to PeopleSoft CTI, the main console appears at the bottom of your screen.
The control bar is always visible at the bottom of your screen so that you can access it easily at
any time.
PeopleSoft Main Console
Register (button)
Enables you to register and de-register with Genesys. The
button acts as a toggle switch. When the green checkmark
appears, you are registered; when the red 'X' appears you
are not registered.
Lines
By clicking the radio button to the left of the telephone
icon, you activate the associated line. The icon you select
determines the active line. All call actions you choose
apply only to the active line. The color of the icon reveals
the activity on the line. The colors are:
•
Blue. Inactive.
•
Red. Ringing.
•
Green. On call.
•
Yellow. On hold.
Select Call Action
Select actions related to calls, including Answer, Hold,
and Transfer. Which call action options appear depends
on your current status. For instance, the Hold call action
is only valid while you are on the line with a caller. Call
action options are discussed in detail in the following
section.
Status
Shows the agent status, as in Ready or Not Ready (to
receive calls). It can also show Ready/DND (Do Not
Disturb) if the agent is not using a Queue.
Q:
If the agent belongs to an ACD group, the group appears
here.
(Queue)
Genesys Messages
Informational messages from Genesys appear in the right
corner of the CTI Console. Examples of such messages
are “Dialing”, “Connected” and “Released.” These
messages do not persist.
Note. Error messages appear in separate windows.
Call Duration
The system tracks the amount of time spent on calls for
each line.
Incoming Call Information
Reveals data attached to incoming calls. This is the
information that enables the right PeopleSoft transaction
page to open containing the correct caller's information.
PEOPLESOFT PROPRIETARY
AND
CONFIDENTIAL
PEOPLESOFT CTI
6-21
DATA MANAGEMENT
Understanding Call Actions
The Select Call Action drop-down list contains all of the options you have for handling calls.
Depending on the status of the agent and/or the telephone line, certain selections from the
drop-down list are not available.
After you select a call action there are two buttons, Go and Cancel, that appear to the right of
the Select Call Action drop-down list. Go executes the selected call action, and Cancel stops
the call action you executed.
The following list contains the call actions:
Dial
When you are in Agent Ready or Agent Not Ready mode,
you can call another party.
Answer Call
Answers an incoming call. The Answer Call button
displays and flashes only when there is an incoming call
that is waiting to be answered.
Transfer Mute
Transfers the caller to the desired number without
speaking to the intended recipient. A dialog appears
enabling you to enter the extension of the person to which
you want to transfer the caller.
Note. This action is not supported on Aspect switches.
6-22
Transfer
Transfers the caller to the desired number. You will have
the opportunity to speak with the recipient before
transferring the caller. A dialog appears enabling you to
enter the extension of the person to which you want to
transfer the caller.
Conference
Enables you to add one or more individuals to your call.
Hold
Places the caller on hold.
Retrieve
Takes the caller out of hold status. Displays only when
the caller is on Hold.
Release
Disconnects the caller. This option is only available as a
selection once a call is answered.
DND
Do not disturb. This option is available when the
extension is not associated with a queue
Ready
Opposite of DND. This option is available when the
extension is not associated with a queue.
Agent Ready
Indicates the agent is ready to receive incoming calls. This
option is available when the extension is associated with a
queue and the status bar reads “Agent Not Ready.”
Agent Not Ready
Stops incoming calls. This option is available when the
extension is associated with a queue and the status bar
reads “Agent Ready.”
PEOPLESOFT CTI
PEOPLESOFT PROPRIETARY
AND
CONFIDENTIAL
DATA MANAGEMENT
Note. You can transfer to or initiate a conference call with individuals who are not enabled to
access PeopleSoft CTI. Their phone rings, but keep in mind that they do not get the popup
screen showing customer data.
Answering a Call
Once you have logged on to PeopleSoft CTI, you are ready to receive calls. For each
incoming ACD call to your extension, the telephone extension icon turns red. Once you have
accepted a call, the system does not send you more incoming calls until you have completed
the current call.
To answer a call:
1. Click the radio button to the left of the telephone icon that has turned red.
The answer option is automatically selected as the current option in the drop-down list
when there is an incoming call.
2. Click Go.
The popup browser launches with the appropriate PeopleSoft transaction page displayed.
The system determines which page to display based on caller information sent by the
Genesys system.
Once you have answered a call, you enter the not available status.
Transferring a Caller
Occasionally you need to transfer callers to other agents. PeopleSoft CTI supports two types
of transfers:
•
Transfer Mute. This option enables you to transfer a call without speaking to the
target agent prior to transferring the call.
•
Transfer. This option is also known as a "consultative" transfer, which means you
consult with the target agent prior to transferring the call.
To perform a Transfer Mute:
1. Make sure the appropriate telephone line is selected and green.
2. From the Select Call Action drop-down list select TransferMute.
3. In the Phone No. edit box, select the number you want to dial.
PEOPLESOFT PROPRIETARY
AND
CONFIDENTIAL
PEOPLESOFT CTI
6-23
DATA MANAGEMENT
The drop-down list contains all the numbers from the shared phonebook and agent phone
book. If the number you want to dial does not appear, click Dial other number and
manually enter the number.
4. Click Go.
This connects the caller to the new agent and releases your line.
The system prompts the recipient of the transfer that it is transferring a call from your
extension. When the recipient accepts the transfer, the PIA screen connected to the
caller’s case opens as it did for you when you first received the call.
To perform a Transfer (consultative):
1. Make sure the appropriate telephone line is selected and green.
2. From the Select Call Action drop-down list select Transfer.
3. In the Phone No. edit box, select the number you want to dial.
The drop-down list contains all the numbers from the shared phonebook and agent phone
book. If the number you want to dial does not appear, click Dial other number and
manually enter the number.
4. Click Go.
When using one extension with two lines, the outbound call you make to the agent to
whom you are transferring the incoming call gets initiated on your second line and the
incoming call gets placed on hold. Once the outbound call is established you can consult
with the recipient and place that call on hold. To complete the transfer, you need to go
back to the first line and select Complete and click Go. This will release the call on the
second line and transfer the call on the first line to the recipient of the transfer.
When using two extensions each with one line, the CTI Console does not have access to
the outbound call to the intended recipient of the transfer. Once the outbound call is
established you can consult with the recipient. You do not have to toggle between the two
lines, and do not have the ability to put the recipient on hold.
5. To complete the transfer, select Complete and click Go.
Initiating Conference Calls
If you find that you need the assistance of other agents to answer a caller's questions, you can
use the conference feature to include the appropriate agent(s) on a call.
To initiate a conference call:
1. Make sure the appropriate telephone line is selected and green.
2. From the Select Call Action drop-down list select Conference.
6-24
PEOPLESOFT CTI
PEOPLESOFT PROPRIETARY
AND
CONFIDENTIAL
DATA MANAGEMENT
3. From the drop-down list of all numbers from the shared and agent phone books, select a
number to be dialed.
If the number is not there, select Dial other number to get an edit box and enter the
number to be dialed.
4. Click Go.
The system notifies the target agent of the incoming call (conference). The PeopleSoft
page associated to the caller’s case opens for the target agent as it did for you when you
first received the call.
This feature depends upon two parameters set up by the administrator:
•
CTI Configuration, Miscellaneous, Default Screen Popup URL.
•
CTI Configuration, Agent, Personalization:Screen Popup Mode.
If the default URL for screen popup is set and the Screen popup mode is 0 (popup when
incoming) for the second Agent, the agent gets the screen popup as soon as the call is
transferred.
If the Screen popup is set to 1(popup after answer), the screen pops up only after the first
agent completes the transfer/conference call. However if the default URL for the screen
popup is not set then it doesn’t matter whether the mode is 0 or 1. In that case, the second
Agent gets the screen popup only after the first Agent completes the transfer/conference
call.
When using one extension with two lines, the outbound call you make to the agent to
whom you are inviting to the conference gets initiated on your second line and the
incoming call gets placed on hold. Once the outbound call is established you can consult
with the third party, and place that call on hold. To complete the conference, you need to
go back to the first line and select Complete and click Go. This releases the call on the
second line and starts the conference on the first line.
When using two extensions each with one line, the CTI Console does not have access to
the outbound call to the third party. Once the outbound call is established you consult
with the target agent. You do not have to toggle between the two lines, and do not have
the ability to put the recipient on hold. To start the conference, select Complete and click
Go.
5. After consulting with the target agent, select Complete from the Select Call Action dropdown list, and click Go.
Working with the Hold Status
Putting calls on hold and retrieving calls on hold is likely to be the call action you perform
most.
PEOPLESOFT PROPRIETARY
AND
CONFIDENTIAL
PEOPLESOFT CTI
6-25
DATA MANAGEMENT
To place a call on hold:
1. Make sure the appropriate telephone line is selected and green.
2. From the Select Call Action drop-down list select Hold.
3. Click Go.
To retrieve a call on hold:
1. Make sure appropriate telephone line is selected and yellow.
The retrieve option is automatically selected as the current option in the drop-down list
when there is a call on hold.
2. Click Go.
Disconnecting a Caller
After you have finished with a call in the mini console, follow this procedure to release the
call.
To release a call:
1. Make sure you no longer require the call to remain active.
2. On the mini console control bar, select Release from the Lines drop-down list.
3. Click Go.
The system automatically places you in "wrap-up" mode, which enables you to regroup
before accepting more incoming calls. Technically, when in "wrap-up" mode, your status
is Agent Not Ready. When you are ready to accept incoming calls, select Agent Ready.
Switching "Agent Ready" Status
Your agent status determines whether you can receive incoming calls.
To activate "Agent Ready" status:
1. From the Select Call Action drop-down list, select Agent Ready.
When you are ready, the system routes incoming calls to your extension(s).
6-26
PEOPLESOFT CTI
PEOPLESOFT PROPRIETARY
AND
CONFIDENTIAL
DATA MANAGEMENT
To activate "Do Not Disturb" status:
Note. This status is not available to agents associated with an ACD queue.
1. From the Select Call Action drop-down list, select DND.
With Do Not Disturb, your extension/s will not accept incoming calls.
To activate "Agent Not Ready" status:
Note. This status applies only to agents associated with an ACD queue.
1. From the Select Call Action drop-down list, select Agent Not Ready.
This status is typically used when an agent is at their desk, but temporarily unable to
receive calls. While you are not ready, the system routes calls to other available agents.
Dialing an Outbound Call
You can use PeopleSoft CTI to place a call, while the agent status is either Agent Ready or
Agent Not Ready.
Note. If you have multiple extensions assigned to you, do not call one of your extensions
from the other.
To place an outbound call:
1. Make sure you are in Agent Ready or Agent Not Ready status.
2. Click the radio button next to the telephone icon representing a free line.
For example, if you had a customer on hold on one line, you select the icon for the second
line.
3. From the Select Call Action drop-down list select Dial.
4. From the drop-down list showing all numbers from the shared and agent phone books,
select a number to be dialed.
If the number is not there, select “Dial other number” to get an edit box and enter the
number to be dialed.
5. Click Go.
PEOPLESOFT PROPRIETARY
AND
CONFIDENTIAL
PEOPLESOFT CTI
6-27
DATA MANAGEMENT
As with any other call you receive, you have access to all the call actions for calls you
initiate. You can transfer the person you’ve called, place the line on hold, or initiate a
conference with another party.
Note. The system places you in Agent Not Ready status until you release the call.
See Also
Phone Book
Shared Phone Book
Completing a Call
When you disconnect, or release, a call from the mini console, the system disconnects you
from the Genesys system, and the mini console becomes disabled (grayed out). However, the
PeopleSoft page remains active so that you can finish updating information if needed.
When you become available to accept incoming calls depends upon how your system
administrators have set up your Genesys system. Genesys has a setting known as "wrap-up
time," which allows an agent a certain amount of time to update the previous caller's
information or regroup before accepting more calls.
Using Hotkeys
To help you easily select options with PeopleSoft CTI, PeopleSoft offers the following
hotkeys. Hotkeys are combinations of keyboard buttons you can press instead of using a
mouse.
6-28
Hotkey
Description
ALT + R
Registers your phone extensions with the Genesys
system.
ALT + 1
Makes Extension 1 the active line.
ALT + 2
Makes Extension 2 the active line.
ALT + S
Presents a list of applicable call actions for you to
select.
ALT + P
Presents a list of frequently called telephone
numbers for you to select.
ALT + G
Enables you to execute a call action.
ALT + C
Enables you to cancel a call action.
ALT + Z
Enables you to check agent status.
PEOPLESOFT CTI
PEOPLESOFT PROPRIETARY
AND
CONFIDENTIAL
DATA MANAGEMENT
Viewing Your Information on the Agent Info Page
Select PeopleTools, CTI Configuration, Agent Information.
The Agent Info page is a read-only page intended to display an agent’s CTI information.
Agent Information Page
User ID
The agent's PeopleSoft User ID.
Agent ID
The agent's Genesys ID.
Queue
Reveals the queue to which an agent is assigned.
Configuration ID
Reveals the Configuration ID associated with the agent.
To view agent information:
1. Select PeopleTools, Configure CTI, Agent Information.
2. On the Find an Existing Value search page, enter the appropriate User ID in the Search by
edit box.
3. Click Search.
PEOPLESOFT PROPRIETARY
AND
CONFIDENTIAL
PEOPLESOFT CTI
6-29
CHAPTER 7
Transaction Set Editor
Note! Transaction Set Editor should not be your tool of choice for future development.
PeopleSoft intends to move existing current processes from Transaction Set Editor to
Application Engine in future releases.
The PeopleSoft Transaction Set Editor (TSE) provides a batch approach to high-volume
editing of application transaction tables. Using TSE, you can apply all the PeopleSoftinherent table edits to tables created outside of a PeopleSoft application, and then your
PeopleSoft system can use those tables. The Transaction Set Editor supports the following
table edits:
•
Date Range edits
•
Prompt Table edits
•
Field Required edits
•
Translate Table edits
•
Yes/No edits
We’ve designed the TSE record edit process to be integrated into your COBOL batch edit
programs. Your programs can make calls to the TSE modules as needed.
This chapter describes the procedures necessary to design PeopleSoft application batch edit
processes for standardized database table edit functions. Specifically, it describes how
Transaction Set Editor handles the following:
•
Record edits
•
Log tables
•
API services and edits
Understanding Transaction Set Editor
Two important requirements are necessary to provide TSE program interface:
PEOPLESOFT PROPRIETARY
AND
CONFIDENTIAL
TRANSACTION SET EDITOR
7-1
DATA MANAGEMENT
•
The batch edit process must have the ability to apply all PeopleSoft record-based field
edits. This record edit process is the primary function of the Transaction Set Editor,
and is necessary to support any tables not subject to the “inherent” online page-based
field validations.
•
The record edit process must provide the ability to interface directly with TSE record
edit functions during the application-specific edit processes. The TSE Application
Program Interface (TSE/API) functions enable calling applications to retrieve current
edit requests and provide consistent error table logging functions across all batch edit
requests.
We’ve designed the TSE record edit process to be integrated into your COBOL batch edit
programs through a call to the TSE modules for each user-defined transaction set. Each set
edit request defines a group of related transaction records requested to be edited by a single
SQL statement “set” process. COBOL batch edit programs can request specific TSE record
edit functions as follows:
•
Apply one or more of the PSRECFIELD defined field edits, based on the Application
Designer defined values for that edit table.
•
Update each application edit table row that fails a requested field-level edit, setting a
column “flag” value to represent the user-defined edit error status in tables with error
checking columns.
•
Log all field-level edit errors, and optionally edit-level (specific to each edit error
type), and/or set-level (specific to each transaction set) edit errors, to user defined TSE
log tables.
Additionally, application programs can request specific TSE/API functions to:
•
Retrieve Application Designer key field and attribute information.
•
Retrieve the SQL predicate (WHERE clause) that defines your current transaction set.
•
Generate and execute dynamic SQL statements to insert TSE Log table entries based
on application-specific edit requests.
For more information on these services see TSE API Services
TSE Record Edits
The TSE record edit process depends on an application edit “request” passed from the calling
program. After validating the request, dynamic SQL statements are created based on edits
defined through the Application Designer for the transaction record. This section covers the
basic steps required to integrate the TSE record edit process into your application.
7-2
TRANSACTION SET EDITOR
PEOPLESOFT PROPRIETARY
AND
CONFIDENTIAL
DATA MANAGEMENT
Step 1 Define Batch Transaction Records
If the requested edit table is already defined to your PeopleSoft application, the requirements
for this step are satisfied. If, however, your edit table definitions have not been defined to the
Application Designer, you must first build (or Copy/Save As) the record structure, and then
create the database tables.
Step 2 Reference the Edit Program Template
This program shell provides the basis for defining all tasks necessary to build your application
set-edit request and call the TSE edit process. PSPAEDIT calls a second program template,
PSPAAPPL, to demonstrate specific TSE/API call requirements.
Step 3 Define the Application TSE Log Records
If TSE log-mode is requested (see TSE Process Modes below), edit error rows are inserted
into the field-level TSE log table for each field-edit error. Optionally, edit-level errors and
set-level errors are logged to their corresponding TSE Log tables. See the attached set of
sample TSE Log table definitions. Otherwise, if Log-mode is not requested, Log tables do not
need to be defined.
Step 4 Create an Application Edit Request Record Definition
Optionally, use Application Designer to create an application edit request record definition,
then to define the related edit request page. These definitions enable you to define multiple
application edit requests, generating multiple TSE transaction set-edit requests, to be
processed in a single batch job cycle.
TSE Record Edit Types
The application edit program’s call to request TSE record edits will provide, if requested, the
following edits against the application edit table:
•
Date Range edit. Each date field defined with a “reasonable-date” edit must contain
a value within a plus-or-minus 30-day range of the requested as-of-date.
•
Prompt Table edit. For each edit table field defined with a Prompt table edit, the
field value, if defined as “required,” must exist (and be “effective-dated,” if
applicable) within the defined Prompt table. If edit field is not defined as required,
value can be blank (character field types) or zero (numeric field types).
•
Field Required edit. Each field defined as required must be non-blank (if charactertype), non-zero (if numeric-type) or non-null (if date-type). All key fields and all
fields with any of the previously-defined edits will not be re-edited as “required”
fields.
•
Translate Table edits. Each required field value with a Translate table reference
must find a matching value in XLATTBL.
•
Yes/No edit. Each “Yes/No”-defined edit field value must contain only ‘Y’ or ‘N’.
PEOPLESOFT PROPRIETARY
AND
CONFIDENTIAL
TRANSACTION SET EDITOR
7-3
DATA MANAGEMENT
TSE Process Modes
There are two fundamental modes that determine how TSE record edit errors are to be
processed. Table rows with field edit errors can be “flagged” in error (Update-mode); or
specific edit error fields can be “logged” (Log-mode) to TSE Error Log tables for future
reference or reporting. These modes are not mutually exclusive, so you might implement
them through one of these three strategies:
TSE Update-mode
Record edit errors are processed by updating the requested error flag on the table being edited
(application edit table) with a user-specified (or default edit-type) value. The online retrieval
of these flagged rows will then re-edit all page data enterable fields by activating the
PeopleCode SetReEdit function, highlighting specific field errors for online correction.
TSE Log-mode
Record edit errors are processed by inserting rows into the requested TSE Log tables. These
tables can then be queried for batch error reporting and/or joining with the application edit
table for online error retrieval and correction.
7-4
TRANSACTION SET EDITOR
PEOPLESOFT PROPRIETARY
AND
CONFIDENTIAL
DATA MANAGEMENT
Combination TSE Update/Log-modes
The application edit process can request only Update-mode for all TSE record edits against
one or more edit tables, updating all rows in error. It would then call the TSE/API function
(API Log) to subsequently log only application-based edit errors to the TSE Log tables. The
flagged edit table errors and the related application edit errors, if any, can then be joined by
PeopleCode to retrieve only those records with edit errors, displaying related edit error
messages within a page scroll section.
Although you can request both Update and Log-mode options for TSE record edits, this
strategy results in additional processing overhead. Consider these factors to determine the
most appropriate process mode for your situation:
Issue
What to Consider
Performance
On many database platforms, the processing overhead incurred by
SQL table row inserts (Log-mode) can be somewhat higher than that
of row updates (Update-mode). In addition, Update-mode requests
can exclude all previously-flagged rows in error from subsequent
transaction set-edit requests.
Online Error Correction
Used in conjunction with the PeopleCode SetReEdit function, Updatemode rows flagged in error can be retrieved in online error correction
with the re-edit of all page-enterable fields. This provides a fieldlevel method of identifying the edit errors without incurring the
overhead of generating Log-mode detail.
Detail Reporting
TSE Log entries provide a high-level of batch detail reporting
capability without requiring additional edit table joins. Log table
columns are user-defined; any edit table field can be included in the
field-level TSE Log table definition. Also, all edit errors are defined
by specific field name and value, with full table key fields included.
Users can then create a reporting strategy to manage and produce
reports from these Log tables, thereby providing some significant
advantages for off-line analysis and batch correction of high-volume
transaction edit errors.
PEOPLESOFT PROPRIETARY
AND
CONFIDENTIAL
TRANSACTION SET EDITOR
7-5
DATA MANAGEMENT
TSE Environmental Requirements
Before using the Transaction Set Editor, you must setup your environment properly. This
process entails:
•
Including copy code members in application edit programs.
•
Setting PTCTSEDT parameters.
•
Checking for and eliminating reserved TSE fields in application calling programs.
The tables in this section provide information on these procedures.
Copy Code Members
The following copy code members must be included in your application edit programs to pass
the required COBOL 01-level definitions to the TSE edit process:
Member
Description
SQLRT
Copy member PSCSQLRT: SQL communication.
TSEDT
Copy member PTCTSEDT: Transaction set edit request area
(defined below).
LOGMS
Copy member PTCLOGMS: Message log control area.
COLUMN-SETUP
Standard COBOL API column name definitions for Select predicate
to define transaction set request columns.
COLUMN-DATA
Column name values for COLUMN-SETUP entries.
TSEDT-SETUP
Standard API column field values that define the size and type of the
columns in the SQL Select/Where predicate. Each TSEDT set
(setup/data) must be associated with the corresponding COLUMN
defined above.
TSEDT-DATA
Column data values for TSEDT-SETUP entries. These values
specify which rows in the transaction table are considered part of the
current transaction set.
PTCTSEDT Parameters
Copy members PSCSQLRT and PTCLOGMS provide the standard PeopleSoft SQL interface
and message logging services, respectively. To request the TSE record edit process, you must
set the following parameters, defined in copy code member PTCTSEDT, before the call to
PTPTSEDT:
7-6
Parameter
Description
ACTION-TSE-EDITS
Perform record edits.
APPL-FIELD-ARRAY
Not applicable to TSE record edit requests.
TRANSACTION SET EDITOR
PEOPLESOFT PROPRIETARY
AND
CONFIDENTIAL
DATA MANAGEMENT
Parameter
Description
EDIT-TYPE-FLAGS
Application edit-type request flags, based on Application
Designer-defined field use (USEEDIT) edits. See EditType Flags.
MESSAGE-NBR
Not applicable to TSE record edit requests (value set by
TSE).
MESSAGE-PARMARRAY
Not applicable to TSE record edit requests.
MESSAGE-SET-NBR
Not applicable to TSE record edit requests (value set by
TSE).
REQUEST-ACTION
Type of Application calling program request to TSE.
Required, no default:
REQUEST-FLAGS
Application request flags. See Application Request Flags.
TSE-AS-OF-DATE
Date used to validate reasonable date range and effective
date (EFFDT). Required, no default.
TSE-DESCR
Description of edit request from calling program. If blank,
defaults to “(BATCH TRANSACTION SET-EDIT).”
TSEDT-WHERECLAUSE
Not applicable to TSE record edit requests.
TSE-ERRLOGNAME
Name of the TSE Log table prefix. If blank and Log-mode
is requested, defaults to “TSE_LOG.” This name is used to
define the set of TSE Log tables to select/insert edit error
rows as follows:
(TSE_LOG)_SET—Transaction set-level; one edit error
entry (row) is inserted per transaction set request.
(TSE_LOG)_EDT—Field edit level; one entry for each
type of error.
(TSE_LOG)_FLD—Field edit level; one entry per each edit
field in error.
TSE-FLAGNAME
Defines Update-mode request by specifying the edit table
column name to update when edit errors are found. If nonblank, Update-mode is implied. Required for Updatemode, no default.
TSE-FLAGVALUE
If Update-mode, this value is used to update the edit table
“flag” column (defined by TSE-FLAGNAME) for each edit
table row in error.
TSE-JOBID
Unique batch transaction edit job identifier. If blank,
defaults to “(SET-EDIT).”
TSE-PROCINSTANCE
Current batch Run ID (Process Instance) from FTPRUNID.
Required, will default to LOGMS value of
PROCESS_INSTANCE.
PEOPLESOFT PROPRIETARY
AND
CONFIDENTIAL
TRANSACTION SET EDITOR
7-7
DATA MANAGEMENT
Parameter
Description
TSE-PROGRAMNAME
Name of application calling program. If blank, defaults to
“(PROGNM).”
TSE-RECNAME
Name of the application edit table (or View name)
containing transaction sets to be edited.
Required, no default.
TSE-REQUESTPARMS
Not applicable to TSE record edit requests.
Application Request Flags
The flag names listed in this table are used in conjunction with the REQUEST-FLAGS
parameter in PTCTSEDT.
Flag
Definition
Default Value
ERRLOG-SET
If “Y”, insert TSE Log set-level rows
(TSE_LOG_SET).
N
ERRLOG-EDIT
If “Y”, insert TSE Log edit-level rows
(TSE_LOG_EDIT).
N
ERRLOG-FLD
If “Y”, insert TSE Log field-level rows
(TSE_LOG_FLD).
N
FIRST-ERROR
If “Y”, all rows found to contain any field edit
errors will be excluded from any subsequent fieldlevel set-edits.
Y
ERRLOGCOUNT
If “Y” and Update-mode requested, return count of
the number of rows in error from each set edit
request. If Log-mode, return count of the total
number of field-level edit errors from each set-edit
request.
N
EDITFOREIGN
If “Y”, the edit table is assumed to have been
created external to PeopleSoft online (Application
Designer) functions and therefore all character and
numeric field types must contain non-null (blank or
zero) values. However, all field columns defined
by the set-edit request are excluded from this
additional edit.
N
Edit-Type Flags
The flag names listed in the following table are used in conjunction with the
EDIT-TYPE-FLAGS parameter in PTCTSEDT.
7-8
Flag
Definition
Default Value
TYPEDATERANGE
If “Y”, perform date check for reasonable value
(within 30 days of AS-OF-DATE value). Note:
During online page entry, date range errors produce
only a warning.
N
TRANSACTION SET EDITOR
PEOPLESOFT PROPRIETARY
AND
CONFIDENTIAL
DATA MANAGEMENT
Flag
Definition
Default Value
TYPEPROMPTTBL
If “Y”, perform edit to validate field value against
Prompt table values, if specified. If field not
required, character fields of spaces and numeric
fields of zeros are not included in this edit.
Y
TYPEREQUIRED
If “Y”, perform edit to require character field type
values to be non-blank, date values non-null, and
numeric values non-zero.
Y
TYPEXLATTBL
If “Y”, perform edit to validate field value against
defined Translate table values. If field not
required, character fields of spaces and numeric
fields of zeros are not included in this edit.
Y
TYPE-YESNO
If “Y”, perform edit to require field value to be
only “Y” or “N”.
Y
Reserved TSE Fields
The following fields are established by TSE and are, therefore, not to be modified by the
application calling programs:
Field
Description
TSE-RETURNED
Values returned by TSE to calling program:
RETURN-STATUS
Returned status from last call to PTPTSEDT.
TSE-ERROR-COUNT
The number of transaction edit errors found (TSE
Log Field records inserted) during set edit request.
Valid only if the RETURN-STATUS is blank.
TSEDT-CHECK
Internally used to validate integrity of LINKAGESECTION copy members.
Log Tables
The following sections describe the log tables associated with the Transaction Set Editor.
Set-Level Log
A typical TSE Log set-level table (TSE_LOG_SET) definition would contain (but not be
limited to) the following column name fields (note required fields):
Column Name
Definition
KEY
Required
TSE_JOBID
Unique batch transaction edit job identifier.
Y
Y
TSE_PROC_INSTANC
E
Current batch Process Instance.
Y
Y
PEOPLESOFT PROPRIETARY
AND
CONFIDENTIAL
TRANSACTION SET EDITOR
7-9
DATA MANAGEMENT
Column Name
Definition
KEY
Required
TSE_SET_NBR
Transaction set sequence number that
uniquely identifies this TSE-Log set-edit
request.
Y
Y
TSE_PROGRAM_NA
ME
Name of application calling program.
N
N
TSE_RECNAME
Name of the application transaction edit
table.
N
Y
TSE_AS_OF_DATE
Date used to validate reasonable date ranges
and effective-date (EFFDT) checking.
N
Y
TSE_DESCR
Calling program’s description of transaction
set-edit request.
N
N
TSE_ERROR_COUNT
If Update-mode, total number of transaction
edit errors found (that is, TSE Log fieldlevel rows inserted) during set edit request.
If Log-mode, total number of transaction
rows in error during set edit request.
N
N
(Transaction Set Keys)
Application-defined predicate (SQL
Select/Where clause) FIELDNAMEs follow
the last required TSE field above. These
fieldnames identify the transaction set and
should match the fieldnames passed to
PTPTSEDT (defined in linkage section
COLUMN-DATA buffer). For example, if
the application request is to select WHERE
BUSINESS_UNIT = ‘NEWGN’, then
column name BUSINESS_UNIT is defined
here in the TSE Log Set table definition
(column value is supplied by PTPTSEDT
during SQL set-edit request).
N
N
Note. Each character (CHAR) field type is limited by program array tables to 30 characters in
length.
Edit-Level Log
A typical TSE Log edit-level table (TSE_LOG_EDT) definition would contain the following
columns:
7-10
Column Name
Definition
KEY
Required
TSE_JOBID
Unique batch transaction edit job
identifier.
Y
Y
TRANSACTION SET EDITOR
PEOPLESOFT PROPRIETARY
AND
CONFIDENTIAL
DATA MANAGEMENT
Column Name
Definition
KEY
Required
TSE_PROC_INSTANCE
Current batch Process Instance.
Y
Y
TSE_SET_NBR
Transaction set sequence number that
uniquely identifies this TSE-Log setedit request.
Y
Y
TSE_EDIT_TYPE
Field edit-type, based on Application
Designer-defined PSRECFIELD edits
(USEEDITS).
Y
Y
TSE_ERROR_COUNT
Number of transaction edit errors found
for each edit-type during record setedit.
N
N
MESSAGE_NBR
Message number within message set
(value of TSE MESSAGE_SET_NBR
is “104”).
N
N
Field-Level Log
A typical TSE Log field-level table (TSE_LOG_FLD) definition would contain the following
columns:
Column Name
Definition
KEY
Required
TSE_JOBID
Unique batch transaction edit job identifier.
Y
Y
TSE_PROC_INSTAN
CE
Current batch Process Instance.
Y
Y
TSE_SET_NBR
Transaction set sequence number that
uniquely identifies this TSE-Log set-edit
request.
Y
Y
TSE_EDIT_TYPE
Field edit-type, based on Application
Designer-defined PSRECFIELD edits
(USEEDITS).
Y
Y
TSE_FIELDNAME
The name of the edit table field found to
contain this edit error.
Y
Y
(Key field entries)
Application transaction edit table key
FIELDNAMEs that uniquely identify each
error field’s row. For example, the GL
JRNL_HEADER table edit would require
BUSINESS_UNIT, JOURNAL_ID,
JOURNAL_DATE, and UNPOST_SEQ
column names in the Error Log Field table
definition.
Y
PEOPLESOFT PROPRIETARY
AND
CONFIDENTIAL
TRANSACTION SET EDITOR
7-11
DATA MANAGEMENT
TSE API Services
The following sections describe the API options available with the Transaction Set Editor.
Services Provided
Application edit modules can request the following additional services through the TSE
Application Program Interface (TSE/API):
Program (Action) To Call
Service Provided
PTPTFLDW
Format field values into SQL statement
compatible string, depending on type, length, and
value of field.
PTPTSEDT
Based on value of REQUEST-ACTION:
ACTION-TSE-LOG Perform application
defined edit (API Log) requests to insert TSE
Log table rows.
ACTION-TSE-WHERE Build a SQL-Where
clause based on the currently defined transaction
set request.
PTPTSUSE
Translate the PSRECFIELD use-edit flags from
binary word format to single character (flag
value) format.
String Field Conversions
Convert String Values to Dynamic SQL-String Format.
By defining field value, type, and length variables in PTCTFLDW, a call to module
PTPTFLDW will convert the input field value as follows:
1. Convert embedded single-quotes to (SQL/API required) double-quotes (character field
types).
2. Zero-padding/truncation of numeric fields based on defined field length.
3. Enclose string literal values within single quotes (character/date types).
7-12
TRANSACTION SET EDITOR
PEOPLESOFT PROPRIETARY
AND
CONFIDENTIAL
DATA MANAGEMENT
4. Define end-of-string with low-value byte.
Logging Application Errors
TSE Application-Edit Log (API Log)
This TSE/API function provides the application edit process with a direct interface to the TSE
field-level Log table. Under TSE Log-mode, application edit errors are logged to the TSE Log
table within the same logical group as the TSE record edit errors were logged. Once the
application edit program completes its own dynamic SQL call request, the entire SQL
predicate string is moved to TSEDT-WHERE-CLAUSE and passed to PTPTSEDT, where the
appropriate SQL request statement is generated to insert edit error rows into the field-level
TSE Log table. If the application does not require a set-edit request for a given field/record
edit, a single row insert (SQL-INSERT-ROW) should be requested.
TSE Parameters for API Logging
To request the API Log process, the following parameters, defined in copy code member
PTCTSEDT, must be set before the call to PTPTSEDT:
Parameter
Description
ACTION-TSE-LOG
API Log request to SQL-Insert TSE Log table
entries.
APPL-FIELD-ARRAY
Specify up to ten TSE Log column names with
values to override during Log-mode SQLstatement build. Note: Required for all column
name fields on single-row insert requests. No
defaults, ignored if blank:
BUILD-WHERE
SQL-INSERT
Retrieve current SQL-Where clause.
Based on specific edit requirement, specify
multiple-row SQL set-edit or single-row SQLInsert.
Change default TSE Log group by overriding the
set number value for TSE Log table inserts.
Specify value for single-row insert request (or to
override set-edit request) for edit field column.
TSE-SET-NBR
TSE-FIELDNAME
PEOPLESOFT PROPRIETARY
AND
CONFIDENTIAL
TRANSACTION SET EDITOR
7-13
DATA MANAGEMENT
7-14
Parameter
Description
EDIT-TYPE-FLAGS
Not applicable to API Log requests.
FIELDNAME
FIELDVALUE
Fieldname of TSE Log table column to override.
Override-column value.
MESSAGE-NBR
Specify message number value for MESSAGESET-NBR. Include 88-level copy member here, if
desired. No default.
MESSAGE-PARM
MESSAGE-TYPE
Value of message text variable.
Defines MESSAGE-PARM value as either a literal
(default) or a fieldname.
MESSAGE-PARM-ARRAY
Specify up to three values for error message text
variables. Each value will be inserted into the
corresponding TSE Log table columns
MESSAGE-PARM, MESSAGE-PARM2, and/or
MESSAGE-PARM3. No defaults, ignored if
blank.
MESSAGE-SET-NBR
Specify the application-based message set number
to be inserted into the TSE Log table.
Corresponds to values defined in MESSAGEPARM-ARRAY. No default.
REQUEST-ACTION
Type of Application calling program request to
TSE.
Required, no default:
REQUEST-FLAGS
Application request flags. See Request Flags for
API Logging.
TSE-AS-OF-DATE
Date retained from current TSE record edit
request. Required, no default.
TSE-DESCR
Description of edit request from calling program,
retained from current TSE record edit request. If
blank, defaults to “(BATCH TRANSACTION
SET-EDIT).”
TSEDT-WHERE-CLAUSE
Input buffer to pass SQL-Where clause edit
statement. Output buffer to receive SQL-Where
clause for current set-edit request. No default.
TSE-ERRLOGNAME
Name of the TSE Log table prefix, retained from
current TSE record edit request. If blank, defaults
to “TSE_LOG.” This name is used by API Log
request to define the field-level TSE Log table to
Select/Insert edit error rows per application edit
request.
TSE-FLAGNAME
Not applicable to API Log requests.
TSE-FLAGVALUE
Not applicable to API Log requests.
TRANSACTION SET EDITOR
PEOPLESOFT PROPRIETARY
AND
CONFIDENTIAL
DATA MANAGEMENT
Parameter
Description
TSE-JOBID
Unique batch transaction edit job identifier,
retained from current TSE record edit request. If
blank, defaults to “(SET-EDIT).”
TSE-PROC-INSTANCE
Current batch Run ID (Process Instance) from
FTPRUNID, retained from current TSE record edit
request. Required, will default to LOGMS value
of PROCESS_INSTANCE.
TSE-PROGRAM-NAME
Name of application calling program, retained
from current TSE record edit request. If blank,
defaults to “(PROGNM).”
TSE-RECNAME
Name of the application edit table (or View name)
against which the edit request is to be performed.
Required, no default.
TSE-REQUEST-PARMS
API Log request parameters. Required, no
defaults:
WHERE-PTR
WHERE-BUF
SQL-Where clause pointer value.
SQL-Where clause buffer (null-terminated string).
Request Flags for API Logging
Name
Definition
Default
Value
ERRLOG-SET
Not applicable to API Log
requests.
N
ERRLOGEDIT
Not applicable to API Log
requests.
N
ERRLOG-FLD
Insert TSE Log field-level rows
based on each API Log request,
value retained from current
TSE record edit request.
N
FIRST-ERROR
Not applicable to API Log
requests.
Y
ERRLOGCOUNT
Not applicable to API Log
requests.
N
EDITFOREIGN
Not applicable to API Log
requests.
N
Reserved TSE Fields for API Logging
The following fields are established by TSE and are, therefore, not to be modified by the
application calling programs:
PEOPLESOFT PROPRIETARY
AND
CONFIDENTIAL
TRANSACTION SET EDITOR
7-15
DATA MANAGEMENT
Field
Description
TSERETURNED
Values returned by TSE to calling program:
RETURN-STATUS
Returned status from last API Log request
TSE-ERROR-COUNT
Not applicable to API Log requests.
TSEDT-CHECK
Internally used to validate integrity of LINKAGE-SECTION copy
members.
Note the sample API call to PTPTSEDT in program PSPAAPPL, section TA000-INSERTTSELOG. Calling parameters are established near the end of section DC000-EDIT-APPLFIELDA with a perform of DC400-SET-TSE-PARMS. All parameters set in PTCTSEDT
will be retained throughout the edit process, therefore the application programs need set many
parameters only once, then reset only those necessary for a given edit request. Note that the
BUILD-WHERE-NO parameter is set to prevent rebuilding of the SQL-Where clause, which
is not necessary at this point (it was already retrieved in prior ACTION-TSE-WHERE call to
PTPTSEDT).
If the SQL-Where clause is requested for the API Log function (BUILD-WHERE-YES is set
to TRUE), the current set-edit definition is used to create and append the SQL-Where to the
application edit request (TSEDT-WHERE-CLAUSE), returning the entire SQL-Where clause
string following the API call. Section DC000 then defines the remaining edit-specific
parameters before the perform of TA000-INSERT-TSELOG. TSELOG-BAD-FIELD
represents an 88-level definition in COPY member PSCATLOG, which relates to the TSE
Log table message text variables (initialized here before the API call). If a fieldname is
desired in a message parameter field, the MESSAGE-FIELDNAME variable must be set to
TRUE. This is necessary in MESSAGE-PARM (1) to distinguish column names (FIELDA)
from the default, column literals.
Application edits may also be specific to a single edit table record, rather than a group of
records edited by each set-edit request. This example is shown in program PSPAAPPL,
section DE000-EDIT-APPL-FIELDB. By setting the variable SQL-INSERT-ROW to TRUE,
the application requests that a single row be inserted into the field-level TSE Log table, rather
than the default multiple-row (set-edit) insert requests. Because one or more TSE Log table
field values are derived from the edit table SQL sub-Select statement for each set-edit request,
single-row insert requests must provide specific values (literals rather than column names) for
each of these fields before the API call. These values are provided by moving the associated
fieldnames and field values into APPL-FIELD-ARRAY in PTCTSEDT.
7-16
TRANSACTION SET EDITOR
PEOPLESOFT PROPRIETARY
AND
CONFIDENTIAL
DATA MANAGEMENT
Building a WHERE Clause
Retrieve SQL-Where Clause
The TSE edit process builds dynamic SQL statements based on the requested record set
request. This transaction set is specifically qualified by the SQL-Where clause, which is
requested by calling PTPTSEDT with the TSE/API request ACTION-TSE-WHERE. The
null-terminated Where clause string returned in TSEDT-WHERE-CLAUSE can then be
included in the application module’s own dynamic SQL statements for subsequent application
set-edit requests.
To request the current SQL-Where clause from TSE/API, specify the appropriate REQUESTACTION, defined in copy code member PTCTSEDT, as follows:
Field
Description
REQUEST-ACTION
Type of Application calling program request to
TSE. Required, no default.
ACTION-TSEWHERE
Retrieve the current SQL Where-clause string.
All other parameters in PTCTSEDT should remain unchanged. See the example call to
retrieve the SQL-Where clause in sample program PSPAAPPL, section DA000-APPL-SETEDITS.
UseEdit Flag Translation
TSE/API: Retrieve Application Designer Flags
By passing the USEEDIT value from the edit table PSRECFIELD definition (copy member
PTCTSUSE) to program PTPTSUSE, the application can retrieve the translated values for all
Application Designer use-edit values. These values define application key and edit-field
attributes useful to the application edit process (See USEEDIT-FLAGS in PTCTSUSE).
PEOPLESOFT PROPRIETARY
AND
CONFIDENTIAL
TRANSACTION SET EDITOR
7-17
DATA MANAGEMENT
Internal Documentation
Program Module Flow
PTPTSEDT is the main control module for PS/BTP batch edit processing. It manages the
program flow of control across all Application Designer-based field edits per application
calling program request. A summary description of the main program and called sub modules
are as follows (listed by internal TSE calling sequence):
7-18
Program Module
Description
PTPTSEDT
Provide control logic to apply Application Designer-defined field
edits against all columns in requested application transaction edit
tables. Through calls to the following sub-programs, each
requested set of table rows are selected by and set-edited against
each record’s field attribute (USEEDIT) values. If appropriate,
status/error messages are logged and a row count of edit errors is
passed back to the application calling edit program.
PSPSQLRT
Provide COBOL interface to SQL run-time processing.
PTPLOGMS
Provide message logging interface to MESSAGE_LOG table
functions.
PTPTSREQ
Validate all application request parameters passed to PTPTSEDT
through copy member PTCTSEDT. All set-edit definition
qualifiers passed through PS column/data array table format are
also validated. All undefined parameter values are defaulted, if
applicable, and TSE Log table name suffixes are appended.
PTPTSTBL
Retrieve PSRECFIELD definitions for the requested application
edit table, extracting specific column-level information for creating
the necessary array tables used to build dynamic SQL statements.
PTPTSUSE
Convert decimal USEEDIT value into corresponding flags that
represent each Application Designer-based field edit (date-range,
field required, prompt and translate table validations, and yes/no
edit).
PTPTLREC
Retrieve PSRECFIELD definitions for the requested TSE Log
tables, extracting specific column-level information for creating
array tables used to build dynamic SQL statements.
PTPTSUPD
Update internal array tables based on current set-edit request
parameters.
PTPTFLDW
Validate fieldvalue types and, if necessary, string field double
quotes, enclose character strings in quotes, and/or format numeric
field types.
PTPDYSQL
Provide COBOL interface to dynamic SQL statement validation
and execution.
TRANSACTION SET EDITOR
PEOPLESOFT PROPRIETARY
AND
CONFIDENTIAL
DATA MANAGEMENT
Program Module
Description
PTPTSFLD
Controls all TSE Log field-level set-edit processing. For each
requested type of edit and against each table column that qualifies,
calls modules PTPTSWHR, PTPTSWHE, and PTPTSLOG to build
dynamic SQL statement and perform record edits.
PTPTSWHR
Build dynamic SQL-WHERE clause based on array table definition
of set request.
PTPTSWHE
Build SQL-WHERE clause segment based on the specific field edit
to be performed.
PTPDTWRK
Perform platform-specific date field computations and validation.
PTPTSLOG
Build SQL statement from program array tables to update the
application edit table and/or insert TSE Log table rows with calls to
PTPDYSQL.
PTPTSSET
For each requested type of edit and against each table column that
qualifies, build dynamic SQL-INSERT and/or UPDATE statements
from internal array tables. When passed to PTPDYSQL, these SQL
requests perform global field-level set-editing against multiple rows
of the transaction edit table, inserting error exception rows into the
field-level TSE Log table.
PTPSETAD
Establishes address ability between data areas used to define SQL
column values and/or bind variables, as defined by the PS interface
(SQLSI) to PSPSQLRT.
PTPTSCNT
If requested, dynamic SQL statements are created to insert TSE Log
table rows at the edit (by edit type) and/or set (by set request)
levels. These entries include an error row count (if Update-mode)
or an error column count (if Log-mode) at each level.
Narrative
During program initialization, all parameters passed in member PTCTSEDT are validated
through a call to the request-validation module PTPTSREQ, where default values are set, as
necessary. Each setup column value passed in TSEDT-SETUP and TSEDT-DATA, if any, is
retrieved and validated, then stored in an array to define the SQL Select/Where set-edit
criteria. If there are no errors, each corresponding setup column name in COLUMN-SETUP
and COLUMN-DATA is retrieved, validated, and stored in the same array as the column
values.
Module PTPTSTBL is called to retrieve all Application Designer (PSRECFIELD) definitions
for the requested application edit table. Specific field attributes are stored in related array
tables, then module PTPTSUSE is called to translate field use values into additional array
table entries, as follows:
•
FIELDNAME—Table column name.
•
FIELDTYPE—Table column field type.
•
KEYFIELD—Flag to indicate table key field definition.
PEOPLESOFT PROPRIETARY
AND
CONFIDENTIAL
TRANSACTION SET EDITOR
7-19
DATA MANAGEMENT
•
USEEDIT—Flags to define each field’s Application Designer-based edits.
•
EDITTABLE—Prompt table name (PROMPTTBL), if applicable.
For each field’s specific Application Designer defined edit (USEEDIT) value greater than
zero, the decimal value is extracted and decoded into its hex equivalent to determine each field
edit to be applied as follows:
•
DATERANGEEDIT—Reasonable date range edit.
•
EDITTABLE—Field table prompt edit.
•
REQUIRED—Field value is required.
•
EDITXLAT—Translate table edit.
•
YESNO—Yes/No field edit.
If Log-mode (TSE Log table row inserts) is requested and the Application Designer
definitions have not previously been retrieved, module PTPTLREC is called to select TSE
Log table definitions and their column names/attributes, storing the appropriate variables in
separate array tables for each level (SET, EDIT, and FIELD) of logging requested. Module
PTPTSUSE is again called to translate field attributes for each TSE Log table. The internal
array tables are then updated with corresponding values from the parameters passed in
PTCTSEDT for all “TSE_”-prefixed fieldnames. As necessary, module PTPTFLDW is called
to provide field formatting (for example, stringing quotes around character field values,
determining end of string, and so on).
Module PTPTSFLD is called to manage all field-level edit processing. It calls PTPTSWHR to
build the WHERE clause that defines the transaction set. It then calls PTPTSWHE to generate
the WHERE clause segment that identifies each specific type of edit requested. This module
calls PTPTSUSE, if necessary, and PTPDTWRK, to support platform-specific date routines.
Finally, PTPTSFLD requests the update/insert activity through module PTPTSLOG.
If requested, the edit process will then call program PTPTSSET to optionally build a dynamic
SQL statement to insert a TSE Log Set table row that identifies the transaction set edit request.
Each edit table array entry is then examined and, if applicable, used to build additional
dynamic SQL statements to edit multiple transaction rows, based on the set criteria and the
request for TSE Log table Inserts and/or edit table Updates. If edit error rows were
subsequently inserted into the TSE Log Field table, a related TSE Log Edit table row is
inserted, if requested. Processing errors are logged and edit results, if any, are returned to the
application calling program. Note the following General Ledger application example.
General Ledger Example
If Update-mode is specified against the GL Journal Header table, a single SQL-Update
statement is dynamically “strung” together to apply the multiple-row edit against each table
column with a target field-edit type. The SQL-Where clause is built from the requested
TSEDT-SETUP/DATA column names/values, appended to the Update statement, and passed
to the dynamic SQL program, PTPDYSQL, for processing, as shown in the following Yes/No
field edit:
7-20
TRANSACTION SET EDITOR
PEOPLESOFT PROPRIETARY
AND
CONFIDENTIAL
DATA MANAGEMENT
UPDATE PS_JRNL_HEADER A
SET JRNL_HDR_STATUS = 'E'
WHERE (BUSINESS_UNIT = 'NEWGN'
AND JOURNAL_ID = '300DPTXP'
AND JOURNAL_DATE = '1993-01-31'
AND UNPOST_SEQ = 00)
AND JRNL_HDR_STATUS <> 'E'
AND BALANCED_FLAG NOT IN ('Y','N')
The value of the error flag column, defined by TSE-FLAGNAME of TSEDT, is set to the
value passed in FLAGVALUE. If no value was specified, the error flag value is set to one of
the following letters:
•
D—Date range edit.
•
P—Prompt Table edit.
•
R—Required Field edit.
•
X—Translate Table edit.
•
Y—Yes/No Field edit.
If Log-mode is requested, a similar SQL-Insert/Select statement is created to select/edit the
specific set of rows for each field edit type, inserting edit error rows into the requested TSE
Log Field table, as in the following Journal Line table example:
INSERT INTO PS_TSE_LOG_FLD
(TSE_JOBID, TSE_PROC_INSTANCE, TSE_SET_NBR,
TSE_EDIT_TYPE, TSE_FIELDNAME, BUSINESS_UNIT,
JOURNAL_ID, JOURNAL_DATE, UNPOST_SEQ, JOURNAL_LINE)
SELECT 'GLJRNLEDIT',999,1,'Y','BALANCED_FLAG',
BUSINESS_UNIT, JOURNAL_ID, JOURNAL_DATE,
UNPOST_SEQ, JOURNAL_LINE
FROM PS_JRNL_LN
WHERE (BUSINESS_UNIT = 'NEWGN'
AND JOURNAL_ID = '300DPTXP'
AND JOURNAL_DATE = '1993-01-31'
AND UNPOST_SEQ = 00)
AND JRNL_LINE_STATUS <> 1
AND BALANCED_FLAG NOT IN ('Y','N')
If SetID is defined as one of the Prompt table key fields, a call to program PTPSHARE
provides for table sharing. The returned value can be included for SetID validation, along
with any required Effective date/status validation for both Prompt and Translate table edits, as
follows:
... WHERE (BUSINESS_UNIT = 'NEWGN'
AND JOURNAL_ID = '300DPTXP'
AND JOURNAL_DATE = '1993-01-31'
PEOPLESOFT PROPRIETARY
AND
CONFIDENTIAL
TRANSACTION SET EDITOR
7-21
DATA MANAGEMENT
AND UNPOST_SEQ = 00)
AND NOT EXISTS
(SELECT 'X' FROM PS_SOURCE_TBL X
WHERE SOURCE = A.SOURCE
AND SETID = 'NEWGN'
AND EFFDT =
(SELECT MAX(EFFDT) FROM PS_SOURCE_TBL
WHERE SOURCE = X.SOURCE
AND SETID = X.SETID
AND EFFDT <= '1992-06-01')
AND EFF_STATUS = 'A');
Important. The WHERE clause is built using SETID = X.column, where column is SETID
or, if not found, then BUSINESS_UNIT. If none of these columns can be found in the prompt
table, then no SetID clause will be included for that column set-edit.
If an edit error count is requested, a subsequent SQL-Select statement is built and executed in
module PTPTSCNT. If in Update mode, the generated statement returns a count of the total
number of application edit table rows with an edit error of any type. If in Log-mode, the
return count represents the total number of field edit-error columns (number of rows in TSE
Log Field table with same TSE_SET_NBR value).
If the returned count is greater than zero, and TSE Log Edit-level processing is requested, a
related “parent” row is inserted into the TSE_LOG_EDT table. If Set-level processing is
requested, a related “grandparent” row is inserted into the TSE_LOG_SET table.
Finally, the error count and set-edit error status value are passed back from program
PTPTSEDT to the calling application program through copy member PTCTSEDT. All other
fatal processing error conditions (such as SQL errors, array table overflows, and string errors)
are logged under standard TSE message numbers (message set 104) with a call to
PTPLOGMS, and PTPTSEDT is terminated, as applicable.
TSE Messages
The following messages are defined in member PTCTMSGS, and are generated by the TSE
process (MESSAGE_SET_NBR “104”):
Msg
Num
COBOL Reference Name
Programs
1
MSGID-CALL-FORMAT
(All)
Text:
TSE Program call format error: module
PTPTxxxx, member xxxxx.
Reason: A called module was unable to validate all Linkage section
copy member coremarks (that is, source changes to copy members
are not in sync across all compiled program modules).
7-22
TRANSACTION SET EDITOR
PEOPLESOFT PROPRIETARY
AND
CONFIDENTIAL
DATA MANAGEMENT
Msg
Num
COBOL Reference Name
Programs
2
MSGID-REQUEST-ERROR
PTPTSREQ
PTPTSTBL
Text:
TSE Request parameter in error:
xxxxxxxxxxxxxxxxxxxx.
Reason: One or more required set-edit request parameters passed in
copy member PTCTSEDT is not valid.
3
MSGID-SQL-STMT-OVERFLOW
(PTCTSTRE)
PTPTFLDW
PTPTSCNT
PTPTSFLD
PTPTSSET
PTPTSWHE
Text:
TSE Dynamic SQL statement/buffer overflow:
module PTPTxxxx, process xxxxx.
Reason: The size of the dynamic SQL statement buffer has been
exceeded while attempting to build the requested statement.
4
MSGID-TABLE-OVERFLOW
(PTCTARRO)
PTPTFLDW
PTPTLREC
PTPTSFLD
PTPTSTBL
PTPTSWHE
Text:
TSE Program array table overflow: module
PTPTxxxx, process xxxxx.
Reason: An internal program array buffer is not large enough to
contain the maximum number of requested entries.
5
MSGID-RECFLD-NOTFOUND
Text:
PTPTSLOG
Record xxxxxxxxxxxxxxx not defined.
Reason: TSE was unable to retrieve PSRECFIELD definitions for
the requested table.
6
MSGID-SETID-NOTFOUND
PTPTSTBL
Text:
TSE SetID value not found in record
xxxxxxxxxxxx.
Reason: The SetID value for the requested application table was not
found to have an entry in the PS record definitions (PSRECFIELD
table).
7
MSGID-PROMPT-KEYS
PTPTSWHE
Text:
TSE Prompt table validation could not find
all required keys for record xxxxxxxxxxxxxxx.
8
MSGID-EDIT-DATERANGE
PEOPLESOFT PROPRIETARY
AND
CONFIDENTIAL
PTPTSFLD
TRANSACTION SET EDITOR
7-23
DATA MANAGEMENT
Msg
Num
COBOL Reference Name
Programs
Text:
TSE Date range edit; value not within
reasonable as-of-date range.
9
PTPTSFLD
MSGID-EDIT-PROMPTTBL
Text:
TSE Prompt table edit; value not found in
Prompt table.
10
PTPTSFLD
MSGID-EDIT-REQUIRED
Text:
TSE Required field edit; value of required
field is blank or zero.
11
PTPTSFLD
MSGID-EDIT-XLATTABLE
Text:
TSE Translate table edit; value not found in
Translate table.
12
PTPTSFLD
MSGID-EDIT-YESNO
Text:
TSE Yes/No edit; value of field not “Y” or
“N”.
7-24
TRANSACTION SET EDITOR
PEOPLESOFT PROPRIETARY
AND
CONFIDENTIAL
CHAPTER 8
Database Level Auditing
PeopleSoft provides trigger-based auditing functionality as an alternative to the record-based
auditing provided by Application Designer. Some countries require that you audit changes to
certain data, while some companies take it upon themselves to audit who is making changes to
sensitive data. This level of auditing is not only for maintaining the integrity of your data, but
it is also a heightened security measure. PeopleSoft takes advantage of database triggers
(offered by most RDBMS vendors), and when a user makes a change to a specified field you
are monitoring, the changed data "triggers" the audit.
The information that a trigger records could include the user that made a change, the type of
change made, when the change was made, and so on. Because the trigger records the user ID
of the user modifying the base table, it is essential that you have the Enable DB Monitoring
parameter set in PSADMIN.
Note. Also, note that this feature is not supported for Informix or DB2 UDB.
Note. If you implement trigger-based auditing, be aware that there is an unavoidable amount
of additional overhead associated with auditing. This overhead can effect your system’s
overall performance.
The components involved with database level auditing are:
•
Base Record(s). The base record is the record that you want to monitor, or audit, as
in PS_ABSENCE_HIST. Presumably, the base record contains fields that you want
to monitor. PeopleSoft recommends limiting the auditing of tables to the application
tables and avoid auditing PeopleTools tables.
•
Audit Record. The audit record is a custom record that you create with Application
Designer. It stores the audit information for the fields on the base record that the
trigger collects. Audit records begin with an AUDIT_ prefix.
•
Trigger. The trigger is the mechanism that a user invokes upon making a change to a
specified field. The trigger stores the audit information in the audit table. PeopleSoft
provides a means by which you can create triggers. A sample name for a trigger
might me PS_ABSENCE_HIST_TR.
Note. If you modify the record definition of the base record, then you must modify to the
audit record and recreate the associated trigger.
PEOPLESOFT PROPRIETARY
AND
CONFIDENTIAL
DATABASE LEVEL AUDITING
8-1
DATA MANAGEMENT
Creating Audit Record Definitions
This discussion assumes that you already have an existing application table that you want to
audit.
To audit a record using triggers, you must create a record definition and SQL table in which
you store audit information. When creating the audit record, remove any attributes such as
PARENT records, Query Security Records, and PeopleCode.
The easiest way to create an audit table is to open the record definition of the base record that
you wish to audit. Save it as a new record, prefaced with AUDIT_.
Note. When you create a new audit record definition, be sure to name it with an AUDIT_
prefix. Some processes, such as the Employee ID Change and Employee ID Delete in
PeopleSoft HRMS product line, make changes to certain fields, such as EMPLID. These
processes will not affect any record definitions that begin with the AUDIT_ prefix, leaving
your audit data secure.
Remove the all edit and key attributes from the newly saved record. Add to the top of the
audit record the following three special audit-specific fields:
•
AUDIT_OPRID
•
AUDIT_STAMP
•
AUDIT_ACTN
Make these fields required and keys. The following table explains the purpose of each auditspecific field.
Important. When you add these fields to your audit record, add them in the same order that
they appear in the following table.
Audit Field Name
Purpose
AUDIT_OPRID
Identifies the user who caused the system to trigger the
audits—either by performing an add, change, or delete to an
audited field.
AUDIT_STAMP
Identifies the date and time the audit was triggered.
AUDIT_ACTN
Indicates the type of action the system audited. Possible
action values include:
I
D
B
A
Row Inserted.
Row Deleted.
Row Updated, Snapshot before update.
Row Updated, Snapshot after update.
The audit table does not have to include all the columns of the base table. In fact, for
performance reasons, it's best to only include those fields in your audit record that are deemed
8-2
DATABASE LEVEL AUDITING
PEOPLESOFT PROPRIETARY
AND
CONFIDENTIAL
DATA MANAGEMENT
"sensitive" or significant. When adding fields to your audit record, PeopleSoft recommends
that you conform to the order that they appear in the base record.
Note. This functionality allows SQL Server requirement of not including ntext, text columns
in the trigger syntax. Oracle also has a requirement to exclude longs from audit records.
The following example compares the base table to the audit table, showing the audit-specific
fields and the fields that are to be audited in the audit table.
Base Table PS_ABSENCE_HIST
Audit Table
PS_AUDIT_ABSENCE
AUDIT_OPRID
AUDIT_STAMP
AUDIT_ACTN
EMPLID
EMPLID
ABSENCE_TYPE
ABSENCE_TYPE
BEGIN_DT
RETURN_DT
DURATION_DAYS
DURATION_HOURS
REASON
REASON
PAID_UNPAID
EMPLOYER_APPROVED
COMMENTS
Note. Text and image fields are not allowed for the Comments field. For Microsoft SQL
Server 7 the AUDIT_OPRID field should be defined to accept NULL values.
Once you save the record definition, you need to run the SQL Build procedure to build the
SQL table in your RDBMS.
The following is an example of a SQL script for an audit record that would audit the
PS_ABSENCE_HIST table:
-- WARNING:
--- This script should not be run in Data Mover.
It may contain platform
-- specific syntax that Data Mover is unable to comprehend.
Please use the
-- SQL query tool included with your database engine to process this script.
-USE PT8A
PEOPLESOFT PROPRIETARY
AND
CONFIDENTIAL
DATABASE LEVEL AUDITING
8-3
DATA MANAGEMENT
go
SET IMPLICIT_TRANSACTIONS ON
go
IF EXISTS (SELECT 'X' FROM SYSOBJECTS WHERE TYPE = 'U' AND NAME =
'PS_AUDIT_ABSENCE') DROP TABLE PS_AUDIT_ABSENCE
go
CREATE TABLE PS_AUDIT_ABSENCE (AUDIT_OPRID CHAR(8) NULL,
AUDIT_STAMP PSDATETIME NOT NULL,
AUDIT_ACTN CHAR(1) NOT NULL,
AUDIT_RECNAME CHAR(15) NOT NULL,
EMPLID CHAR(11) NOT NULL,
ABSENCE_TYPE CHAR(3) NOT NULL,
BEGIN_DT PSDATE NULL,
RETURN_DT PSDATE NULL,
DURATION_DAYS SMALLINT NOT NULL,
DURATION_HOURS DECIMAL(2,1) NOT NULL,
REASON CHAR(30) NOT NULL,
PAID_UNPAID CHAR(1) NOT NULL,
EMPLOYER_APPROVED CHAR(1) NOT NULL)
--
COMMENTS TEXT NULL) Text and Image Fields are not allowed
go
COMMIT
Go
If COMMENTS is not allowed during the actual creation of the audit table you should drop
the column or not choose the column when creating the audit table definition.
PeopleSoft recommends that you delete the generated index script. Deleting the index
eliminates the possibility of the duplicates causing trigger to fail.
Working with Auditing Triggers
A trigger is a database level object that the system initiates based on a specified event
occurring on a table. Most RDBMS platforms support a form of database triggers.
Defining Auditing Triggers
Select PeopleTools, Utilities, Audit, Update Database Level Auditing.
The Audit Triggers page contains the following options.
8-4
DATABASE LEVEL AUDITING
PEOPLESOFT PROPRIETARY
AND
CONFIDENTIAL
DATA MANAGEMENT
Audit Record Name
Use the Browse button to search the PSRECDEFN table.
The Audit name must exist before a trigger can be created.
Trigger name
By default the system names audit triggers using the
following naming convention <base record>_TR
For example, ABSENCE_HIST_TR
Audit Options
Select from the options Add, Change or Delete.
Create Trigger Statement
The statement is populated when the Generate Code
button is clicked. You can customize the script if you
need to. It depends on your preference. One of the
following sections contains RDBMS information to help
you view the contents of the script.
Generate Code
Click this button when you have completed the above
fields in order to generate the Trigger Statement.
To define an audit trigger
1. Select PeopleTools, Utilities, Audit, Update Database Level Auditing.
2. Click Add a New Value.
3. Enter an existing base record.
4. Once in the Audit Trigger page you need to choose the record to hold the auditing data,
the audit record.
5. Select the events to audit, as in when data is added, changed, or deleted. You can select
all of the options.
6. Click the Generate Code.
This generates the SQL that ultimately creates the trigger.
7. Click Save.
All of this information—Record Name, Audit Record Name, Trigger Name, and Create
Trigger Statement—get saved to the PeopleSoft table, PSTRIGGERDEFN.
Perform these steps for each trigger you want to create. After you have created all the
trigger statements, then you create and run the trigger script, which is described in the
following section.
Creating and Running the Auditing Triggers Script
After you have created and modified all of your trigger statements, you need to create and run
the trigger script against your database to physically create the triggers.
Select PeopleTools, Utilities, Audit, Perform Database Level Auditing.
PEOPLESOFT PROPRIETARY
AND
CONFIDENTIAL
DATABASE LEVEL AUDITING
8-5
DATA MANAGEMENT
Run Audit Triggers page
Create All Triggers
If you select this checkbox, the Application Engine writes
the Create Trigger statement to a file for every row in
PSTRIGGERDEFN.
Create Triggers on
Specify the particular table that the Trigger statement
should be created for.
To create and run a trigger script
1. Select PeopleTools, Utilities, Auditing, Perform Database Level Auditing.
This displays the Run Audit Triggers page.
2. Indicate the triggers that you want to be included in the script, all in PSTRIGGERDEFN
or just those related to a specific table.
3. Click Run.
This process invokes an Application Engine program that writes the Create Trigger
statement to a file for every row in PSTRIGGERDEFN that you selected (all or for a
specific table).
The system writes the file to the location determined by the run location of the process. If
run on the server the file is created in the PS_SRVRDIR directory. If run on a Windows
Workstation the file is created in the directory specified by the %TEMP% environment
variable.
The file name is TRGCODEX.SQL where X represents a digit determined by the number
of files by the same name that already exist in the output directory.
4. After you have created the SQL script, use your native SQL utility to run the script against
your database.
Deleting Auditing Triggers
If you find that you no longer need a trigger you created, delete it using the following steps.
8-6
DATABASE LEVEL AUDITING
PEOPLESOFT PROPRIETARY
AND
CONFIDENTIAL
DATA MANAGEMENT
To delete a trigger
1. Select PeopleTools, Utilities, Audit, Update Database Level Auditing.
2. Open the trigger you want to delete.
3. Uncheck all the Audit options Add, Change, and Delete.
4. Click Generate Code.
5. Click Save.
6. Drop the trigger name from the database.
Viewing Audit Information
Viewing the data in the audit record is important. That's why you're storing the information.
Because the information resides in a table within your RDBMS, you can extract it and
manipulate it to suit your reporting needs. This section provides samples of how the
information appears in an audit record and some sample queries you can construct with
PS/Query.
The following example presents the contents of PS_AUDIT_ABSENCE after a trigger test.
AUDIT_OPRID AUDIT_STAMP
AUDIT_ACTN EMPLID
ABSENCE_TYPE BEGIN_DT
----------- --------------------------- ---------- ----------- ------------ ------------------------BARNEY07
2000-01-11 16:25:13.380
I
GORD
CNF
1981-09-12 00:00:00.000
BARNEY07
2000-01-11 16:25:36.123
B
8001
CNF
1981-09-12 00:00:00.000
BARNEY07
2000-01-11 16:25:36.123
B
8001
CNF
1983-03-02 00:00:00.000
BARNEY07
2000-01-11 16:25:36.123
B
8001
CNF
1983-08-26 00:00:00.000
BARNEY07
2000-01-11 16:25:36.133
A
8001
VAC
1981-09-12 00:00:00.000
BARNEY07
2000-01-11 16:25:36.133
A
8001
VAC
1983-03-02 00:00:00.000
BARNEY07
2000-01-11 16:25:36.133
A
8001
VAC
1983-08-26 00:00:00.000
BARNEY07
2000-01-11 16:25:40.790
D
GORD
CNF
1981-09-12 00:00:00.000
RETURN_DT
DURATION_DAYS DURATION_HOURS REASON
PAID_UNPAID
--------------------------- ------------- -------------- ------------------------------ ----------1981-09-26 00:00:00.000
14
.0
1981-09-26 00:00:00.000
14
.0
None
P
P
1983-03-07 00:00:00.000
6
.0
P
1983-09-10 00:00:00.000
13
2.0
P
1981-09-26 00:00:00.000
14
.0
P
1983-03-07 00:00:00.000
6
.0
P
1983-09-10 00:00:00.000
13
2.0
1981-09-26 00:00:00.000
14
.0
P
None
P
EMPLOYER_APPROVED COMMENTS
----------------- ----------------------------Y
This is the comments field
Y
Y
Y
Y
PEOPLESOFT PROPRIETARY
This is an update
AND
CONFIDENTIAL
DATABASE LEVEL AUDITING
8-7
DATA MANAGEMENT
Y
This is an update
Y
This is an update
Y
Note. For Microsoft SQL Server 7 the AUDIT_OPRID field value will be NULL.
Creating Queries to View Audit Records Details
One way to view the information is to use PS/Query. This section provides some sample
queries that show the type of information you can expect to view. This section assumes a
working knowledge of PS/Query.
Specifically this section shows samples for the following queries:
•
List all audit records in PS_AUDIT_ABSENCE
•
List all audit records in PS_AUDIT_ABSENCE for a specified OPRID
•
List all audit records in PS_AUDIT_ABSENCE that contain invalid OPRID
•
List all audit records in PS_AUDIT_ABSENCE for a specified time period.
Creating an Access Group
First, it helps in tracking audit records to create an Access Group in Tree Manager that
contains all audit records. This makes it easier to access the audit records under Query.
Creating an Access Group
8-8
DATABASE LEVEL AUDITING
PEOPLESOFT PROPRIETARY
AND
CONFIDENTIAL
DATA MANAGEMENT
See Also
PeopleTools PeopleBooks: PeopleSoft Tree Manager, Creating Trees
Listing All Audit Records in PS_AUDIT_ABSENCE
Select all the fields from AUDIT_ABSENCE. There are no extra criteria to add.
Query Criteria
The SQL is as follows.
Query SQL
The results are as shown.
Query Results
PEOPLESOFT PROPRIETARY
AND
CONFIDENTIAL
DATABASE LEVEL AUDITING
8-9
DATA MANAGEMENT
Listing All Audit Records for a Specified User ID
This query is similar to the previous one but with the following criteria added.
Query Criteria
The prompt for AUDIT_OPRID is defined as follows.
Query Run-time Prompt Dialog
Set up a prompt for User ID against the PSOPRDEFN table. That way when you run the
query you can specify a particular User ID. In this case, the query focuses on User ID VP1.
Specifying a User ID
The results for the example appear below.
8-10
DATABASE LEVEL AUDITING
PEOPLESOFT PROPRIETARY
AND
CONFIDENTIAL
DATA MANAGEMENT
Viewing Query Results
Listing All Audit Records Containing an Invalid OPRID
This query is similar to the previous but you specify different criteria.
Query Criteria
Right click on Expression 2.
Viewing Query Properties
The subquery selects distinct User ID from PSOPRDEFN. The SQL for the query should look
like the following.
PEOPLESOFT PROPRIETARY
AND
CONFIDENTIAL
DATABASE LEVEL AUDITING
8-11
DATA MANAGEMENT
Query SQL
The results of the query are as follows:
Query Results
Listing All Audit Records For a Specified Time Period
This query contains the same fields as in the previous queries above, just different criteria.
Query Criteria
Set the run-time prompts to reflect the following.
Run-time Prompt
8-12
DATABASE LEVEL AUDITING
PEOPLESOFT PROPRIETARY
AND
CONFIDENTIAL
DATA MANAGEMENT
The prompts for the AUDIT_STAMP need to have the type changed from date/time to date.
This enables the query to take advantage of the calendar control as a prompt mechanism.
The results of the query are as follows.
Query Results
Microsoft SQL Server Trigger Information
The following information applies to Microsoft SQL Server triggers.
Note. Microsoft SQL Server Limitation - Image and Text Columns in tables can’t be selected
from the trigger tables INSERTED and DELETED.
Microsoft SQL Server: Trigger Syntax
To audit INSERTS, UPDATES, and DELETES of your records use trigger with the following
format:
Replace the names in bold Italics with the appropriate names for the trigger you are
constructing.
CREATE TRIGGER PS_ABSENCE_HIST_TR ON PS_ABSENCE_HIST
FOR DELETE , INSERT , UPDATE
AS
SET NOCOUNT ON
DECLARE @XTYPE CHAR(1), @OPRID CHAR(8)
SET @OPRID = NULL
The code in brackets below will only be generate on SQL Server 2000 platforms.
Context_info is new functionality in SQL Server 2000.
[SELECT @OPRID = substring(cast(context_info as
char(128)),1,(charindex(',',cast(context_info as char(128)))-1))
FROM master..sysprocesses
WHERE spid = @@spid]
-- Determine Transaction Type
PEOPLESOFT PROPRIETARY
AND
CONFIDENTIAL
DATABASE LEVEL AUDITING
8-13
DATA MANAGEMENT
IF EXISTS (SELECT * FROM DELETED)
BEGIN
SET @XTYPE = 'D'
END
IF EXISTS (SELECT * FROM INSERTED)
BEGIN
IF (@XTYPE = 'D')
BEGIN
SET @XTYPE = 'U'
END
ELSE
BEGIN
SET @XTYPE = 'I'
END
END
-- Transaction is a Delete
IF (@XTYPE = 'D')
BEGIN
INSERT INTO PS_AUDIT_ABSENCE
(AUDIT_OPRID,AUDIT_STAMP,AUDIT_ACTN,
EMPLID,ABSENCE_TYPE,BEGIN_DT,RETURN_DT,DURATION_DAYS,DURATION_HOURS,REASON,PAI
D_UNPAID,EMPLOYER_APPROVED)
SELECT @OPRID,getdate(),'D',
EMPLID,ABSENCE_TYPE,BEGIN_DT,RETURN_DT,DURATION_DAYS,DURATION_HOURS,REASON,PAI
D_UNPAID,EMPLOYER_APPROVED FROM deleted
END
-- Transaction is a Insert
IF (@XTYPE = 'I')
BEGIN
INSERT INTO PS_AUDIT_ABSENCE
(AUDIT_OPRID,AUDIT_STAMP,AUDIT_ACTN,
EMPLID,ABSENCE_TYPE,BEGIN_DT,RETURN_DT,DURATION_DAYS,DURATION_HOURS,REASON,PAI
D_UNPAID,EMPLOYER_APPROVED)
SELECT @OPRID,getdate(),'I',
EMPLID,ABSENCE_TYPE,BEGIN_DT,RETURN_DT,DURATION_DAYS,DURATION_HOURS,REASON,PAI
D_UNPAID,EMPLOYER_APPROVED FROM inserted
END
-- Transaction is a Update
IF (@XTYPE = 'U')
BEGIN
-- Before Update
INSERT INTO PS_AUDIT_ABSENCE
(AUDIT_OPRID,AUDIT_STAMP,AUDIT_ACTN,
EMPLID,ABSENCE_TYPE,BEGIN_DT,RETURN_DT,DURATION_DAYS,DURATION_HOURS,REASON,PAI
D_UNPAID,EMPLOYER_APPROVED)
SELECT @OPRID,getdate(),'B',
8-14
DATABASE LEVEL AUDITING
PEOPLESOFT PROPRIETARY
AND
CONFIDENTIAL
DATA MANAGEMENT
EMPLID,ABSENCE_TYPE,BEGIN_DT,RETURN_DT,DURATION_DAYS,DURATION_HOURS,REASON,PAI
D_UNPAID,EMPLOYER_APPROVED FROM deleted
-- After Update
INSERT INTO PS_AUDIT_ABSENCE
(AUDIT_OPRID,AUDIT_STAMP,AUDIT_ACTN,
EMPLID,ABSENCE_TYPE,BEGIN_DT,RETURN_DT,DURATION_DAYS,DURATION_HOURS,REASON,PAI
D_UNPAID,EMPLOYER_APPROVED)
SELECT @OPRID,getdate(),'A',
EMPLID,ABSENCE_TYPE,BEGIN_DT,RETURN_DT,DURATION_DAYS,DURATION_HOURS,REASON,PAI
D_UNPAID,EMPLOYER_APPROVED FROM inserted
END
Microsoft SQL Server: Capturing Text/Image Columns
If you wish to audit text or image columns with SQL Server you will have to manually alter
the trigger scripts that are generated. The trigger scripts generated via the online pages do not
support text or image columns. Below is an example of how a join against the base table can
capture the value of the COMMENTS field after an insert, or update is performed.
CREATE TRIGGER PS_ABSENCE_HIST_TR ON PS_ABSENCE_HIST
FOR DELETE , INSERT , UPDATE
AS
SET NOCOUNT ON
DECLARE @XTYPE CHAR(1), @OPRID CHAR(8)
SET @OPRID = NULL
The code in brackets below will only be generate on SQL Server 2000 platforms.
Context_info is new functionality in SQL Server 2000.
[SELECT @OPRID = substring(cast(context_info as
char(128)),1,(charindex(',',cast(context_info as char(128)))-1))
FROM master..sysprocesses
WHERE spid = @@spid]
IF EXISTS (SELECT * FROM DELETED)
BEGIN
SET @XTYPE = 'D'
END
IF EXISTS (SELECT * FROM INSERTED)
BEGIN
IF (@XTYPE = 'D')
BEGIN
SET @XTYPE = 'U'
END
ELSE
BEGIN
PEOPLESOFT PROPRIETARY
AND
CONFIDENTIAL
DATABASE LEVEL AUDITING
8-15
DATA MANAGEMENT
SET @XTYPE = 'I'
END
END
-- Transaction is a Delete
IF (@XTYPE = 'D')
BEGIN
INSERT INTO PS_AUDIT_ABSENCE
(AUDIT_OPRID,AUDIT_STAMP,AUDIT_ACTN,
EMPLID,ABSENCE_TYPE,BEGIN_DT,RETURN_DT,DURATION_DAYS,DURATION_HOURS,REASON,PAI
D_UNPAID,EMPLOYER_APPROVED,COMMENTS)
SELECT @OPRID,getdate(),'D',
A.EMPLID,A.ABSENCE_TYPE,A.BEGIN_DT,A.RETURN_DT,A.DURATION_DAYS,A.DURATION_HOUR
S,A.REASON,A.PAID_UNPAID,A.EMPLOYER_APPROVED,''
FROM deleted A
END
-- Transaction is a Insert
IF (@XTYPE = 'I')
BEGIN
INSERT INTO PS_AUDIT_ABSENCE
(AUDIT_OPRID,AUDIT_STAMP,AUDIT_ACTN,
EMPLID,ABSENCE_TYPE,BEGIN_DT,RETURN_DT,DURATION_DAYS,DURATION_HOURS,REASON,PAI
D_UNPAID,EMPLOYER_APPROVED,COMMENTS)
SELECT @OPRID,getdate(),'I',
A.EMPLID,A.ABSENCE_TYPE,A.BEGIN_DT,A.RETURN_DT,A.DURATION_DAYS,A.DURATION_HOUR
S,A.REASON,A.PAID_UNPAID,A.EMPLOYER_APPROVED,B.COMMENTS
FROM inserted A, PS_ABSENCE_HIST B
WHERE A.EMPLID = B.EMPLID
AND A.ABSENCE_TYPE = B.ABSENCE_TYPE
AND A.BEGIN_DT = B.BEGIN_DT
END
-- Transaction is a Update
IF (@XTYPE = 'U')
BEGIN
-- Before Update
INSERT INTO PS_AUDIT_ABSENCE
(AUDIT_OPRID,AUDIT_STAMP,AUDIT_ACTN,
EMPLID,ABSENCE_TYPE,BEGIN_DT,RETURN_DT,DURATION_DAYS,DURATION_HOURS,REASON,PAI
D_UNPAID,EMPLOYER_APPROVED,COMMENTS)
SELECT @OPRID,getdate(),'B',
A.EMPLID,A.ABSENCE_TYPE,A.BEGIN_DT,A.RETURN_DT,A.DURATION_DAYS,A.DURATION_HOUR
S,A.REASON,A.PAID_UNPAID,A.EMPLOYER_APPROVED,''
FROM deleted A
-- After Update
INSERT INTO PS_AUDIT_ABSENCE
(AUDIT_OPRID,AUDIT_STAMP,AUDIT_ACTN,
8-16
DATABASE LEVEL AUDITING
PEOPLESOFT PROPRIETARY
AND
CONFIDENTIAL
DATA MANAGEMENT
EMPLID,ABSENCE_TYPE,BEGIN_DT,RETURN_DT,DURATION_DAYS,DURATION_HOURS,REASON,PAI
D_UNPAID,EMPLOYER_APPROVED,COMMENTS)
SELECT @OPRID,getdate(),'A',
A.EMPLID,A.ABSENCE_TYPE,A.BEGIN_DT,A.RETURN_DT,A.DURATION_DAYS,A.DURATION_HOUR
S,A.REASON,A.PAID_UNPAID,A.EMPLOYER_APPROVED,B.COMMENTS
FROM inserted A, PS_ABSENCE_HIST B
WHERE A.EMPLID = B.EMPLID
AND A.ABSENCE_TYPE = B.ABSENCE_TYPE
AND A.BEGIN_DT = B.BEGIN_DT
END
Microsoft SQL Server Trigger Maintenance
The following commands may be helpful when administering triggers.
List all triggers in a Database
SELECT name
FROM sysobjects WHERE type = ’TR’
List the Trigger Definition
sp_helptext TRIGGERNAME
List Trigger Information
sp_helptrigger BASE TABLE NAME
Returns the type or types of triggers defined on the specified table for the current database.
sp_help TRIGGERNAME
Reports information about a database object (any object listed in the sysobjects table), a userdefined data type, or a data type supplied by Microsoft SQL Server.
To remove a trigger
drop trigger TRIGGERNAME
To modify an existing trigger
ALTER trigger …
See full definition in SQL Server Books Online.
Alters the definition of a trigger created previously by the CREATE TRIGGER statement.
Disable Trigger
ALTER TABLE table
trigger_name[,...n]}
PEOPLESOFT PROPRIETARY
AND
CONFIDENTIAL
| {ENABLE | DISABLE} TRIGGER
{ALL |
DATABASE LEVEL AUDITING
8-17
DATA MANAGEMENT
{ENABLE | DISABLE } TRIGGER - Specifies that trigger_name is enabled or disabled.
When a trigger is disabled it is still defined for the table; however, when INSERT, UPDATE
or DELETE statements are executed against the table, the actions in the trigger are not
performed until the trigger is reenabled.
•
ALL. Specifies that all triggers in the table are enabled or disabled.
•
trigger_name. Specifies the name of the trigger to disable or enable.
Sybase Trigger Information
The follow information applies to Sybase triggers.
Sybase Trigger Syntax
The following example shows the syntax for creating triggers on Sybase
CREATE TRIGGER PS_ABSENCE_HIST_TR
ON PS_ABSENCE_HIST
FOR INSERT, UPDATE, DELETE AS
BEGIN
DECLARE @XTYPE CHAR(1), @OPRID CHAR(8)
IF EXISTS (SELECT 'X' FROM deleted)
SELECT @XTYPE = 'D'
IF EXISTS (SELECT 'X' FROM inserted)
BEGIN
IF (@XTYPE = 'D')
SELECT @XTYPE = 'U'
ELSE
SELECT @XTYPE = 'I'
END
SELECT @OPRID = substring(clientname, 1, charindex(',', clientname) - 1)
FROM master..sysprocesses
WHERE spid = @@spid
-- Transaction is a Delete and the Delete Part of an Update
IF (@XTYPE = 'D') OR (@XTYPE = 'U')
BEGIN
IF (@XTYPE = 'U')
SELECT @XTYPE = 'B'
INSERT INTO PS_AUDIT_ABSENCE
(AUDIT_OPRID,AUDIT_STAMP,AUDIT_ACTN,
8-18
DATABASE LEVEL AUDITING
PEOPLESOFT PROPRIETARY
AND
CONFIDENTIAL
DATA MANAGEMENT
EMPLID,ABSENCE_TYPE,BEGIN_DT,RETURN_DT,DURATION_DAYS,DURATION_HOURS,REASON,PAI
D_UNPAID,EMPLOYER_APPROVED)
SELECT @OPRID, getdate(), @XTYPE,
EMPLID,ABSENCE_TYPE,BEGIN_DT,RETURN_DT,DURATION_DAYS,DURATION_HOURS,REASON,PAI
D_UNPAID,EMPLOYER_APPROVED
FROM deleted
END
-- Transaction is a Insert and the Insert Part of an Update
IF (@XTYPE = 'I') OR (@XTYPE = 'B')
BEGIN
IF (@XTYPE = 'B')
SELECT @XTYPE = 'A'
INSERT INTO PS_AUDIT_ABSENCE
(AUDIT_OPRID,AUDIT_STAMP,AUDIT_ACTN,
EMPLID,ABSENCE_TYPE,BEGIN_DT,RETURN_DT,DURATION_DAYS,DURATION_HOURS,REASON,PAI
D_UNPAID,EMPLOYER_APPROVED)
SELECT @OPRID,getdate(), @XTYPE,
EMPLID,ABSENCE_TYPE,BEGIN_DT,RETURN_DT,DURATION_DAYS,DURATION_HOURS,REASON,PAI
D_UNPAID,EMPLOYER_APPROVED
FROM inserted
END
END
Sybase Trigger Maintenance
The following topics reveal commands that are useful in conjunction with the trigger feature.
List all triggers in a Database
SELECT name
FROM sysobjects WHERE type = ’TR’
List the Trigger Definition
sp_helptext TRIGGERNAME
List Trigger Information
sp_help TRIGGERNAME
Reports information about a database object (any object listed in the sysobjects table), a userdefined data type, or a data type supplied by Microsoft SQL Server.
To remove a trigger
drop trigger TRIGGERNAME
PEOPLESOFT PROPRIETARY
AND
CONFIDENTIAL
DATABASE LEVEL AUDITING
8-19
DATA MANAGEMENT
Disable Trigger
ALTER TABLE table
| {ENABLE | DISABLE} TRIGGER
{ trigger_name}
{ENABLE | DISABLE } TRIGGER specifies that trigger_name is enabled or disabled. When
a trigger is disabled it is still defined for the table; however, when INSERT, UPDATE or
DELETE statements are executed against the table, the actions in the trigger are not performed
until the trigger is enabled.
•
ALL. Specifies that all triggers in the table are enabled or disabled.
•
trigger_name. Specifies the name of the trigger to disable or enable.
Oracle
The following syntax and commands may be helpful as you create and administer your
triggers.
The triggers generated on the Oracle platform reference a function that PeopleSoft delivers to
obtain the PS_OPRID. This function must be installed into the Oracle database schema for the
PeopleSoft database prior to creating the trigger. This function can be installed by executing
the following SQL as the PeopleSoft database owner ID:
$PS_HOME\scripts\getpsoprid.sql
Oracle Trigger Syntax
The following example shows the Oracle trigger syntax.
drop function GET_PS_OPRID
/
create function GET_PS_OPRID (v_client_info VARCHAR2 )
return VARCHAR2 is
i integer;
/* Title: GET_PS_OPRID
*/
/* Purpose: Retrieves the operator id (OPRID)
*/
/*
from a VARCHAR2 comma separated field
*/
/*
of the format 'OPRID,OS_USER,MACHINE'
*/
/*
If no OPRID is found, it returns '!NoOPRID'
*/
/* Limitations: (any grants, privileges, etc)
*/
/* Who: PeopleSoft Inc.
*/
/* Date: 2000-04-07
*/
begin
if ( length(v_client_info) IS NULL ) then
return('!NoOPRID');
end if;
if ( substr(v_client_info,1,1) = ',' ) then
return('!NoOPRID');
8-20
DATABASE LEVEL AUDITING
PEOPLESOFT PROPRIETARY
AND
CONFIDENTIAL
DATA MANAGEMENT
end if;
i := 1;
while ( (substr(v_client_info,i,1)) <> ',' and i < 10) loop
i := i + 1;
end loop;
if ( i > 9 ) then
return('!NoOPRID');
else
i := i - 1;
return (substr (v_client_info, 1, i));
end if;
end GET_PS_OPRID;
/
grant execute on GET_PS_OPRID to public
/
/* If Transaction is an Insert Or Update
/*
Capture After Values
*/
*/
/* If Transaction is a Delete or Update
*/
/*
*/
Capture Before Values
CREATE OR REPLACE TRIGGER PS_ABSENCE_HIST_TR
AFTER INSERT OR UPDATE OR DELETE ON PS_ABSENCE_HIST
FOR EACH ROW
DECLARE
V_AUDIT_OPRID VARCHAR2(64);
BEGIN
DBMS_APPLICATION_INFO.READ_CLIENT_INFO(V_AUDIT_OPRID);
IF :OLD.EMPLID IS NULL
THEN
INSERT INTO PS_AUDIT_ABSENCE
VALUES (
GET_PS_OPRID(V_AUDIT_OPRID) ,
SYSDATE
,
'I'
,
:NEW.EMPLID
,
:NEW.ABSENCE_TYPE
,
:NEW.BEGIN_DT
,
:NEW.RETURN_DT
,
:NEW.DURATION_DAYS
,
:NEW.DURATION_HOURS
,
:NEW.REASON
,
:NEW.PAID_UNPAID
,
:NEW.EMPLOYER_APPROVED
);
PEOPLESOFT PROPRIETARY
AND
CONFIDENTIAL
DATABASE LEVEL AUDITING
8-21
DATA MANAGEMENT
ELSE
IF :NEW.EMPLID IS NULL
THEN
INSERT INTO PS_AUDIT_ABSENCE
VALUES (
GET_PS_OPRID(V_AUDIT_OPRID) ,
SYSDATE
,
'D'
,
:OLD.EMPLID
,
:OLD.ABSENCE_TYPE
,
:OLD.BEGIN_DT
,
:OLD.RETURN_DT
,
:OLD.DURATION_DAYS
,
:OLD.DURATION_HOURS
,
:OLD.REASON
,
:OLD.PAID_UNPAID
,
:OLD.EMPLOYER_APPROVED
);
ELSE
INSERT INTO PS_AUDIT_ABSENCE
VALUES (
GET_PS_OPRID(V_AUDIT_OPRID) ,
SYSDATE
,
'B'
,
:OLD.EMPLID
,
:OLD.ABSENCE_TYPE
,
:OLD.BEGIN_DT
,
:OLD.RETURN_DT
,
:OLD.DURATION_DAYS
,
:OLD.DURATION_HOURS
,
:OLD.REASON
,
:OLD.PAID_UNPAID
,
:OLD.EMPLOYER_APPROVED
);
INSERT INTO PS_AUDIT_ABSENCE
VALUES (
GET_PS_OPRID(V_AUDIT_OPRID) ,
8-22
DATABASE LEVEL AUDITING
SYSDATE
,
'A'
,
:NEW.EMPLID
,
:NEW.ABSENCE_TYPE
,
:NEW.BEGIN_DT
,
:NEW.RETURN_DT
,
:NEW.DURATION_DAYS
,
:NEW.DURATION_HOURS
,
PEOPLESOFT PROPRIETARY
AND
CONFIDENTIAL
DATA MANAGEMENT
:NEW.REASON
,
:NEW.PAID_UNPAID
,
:NEW.EMPLOYER_APPROVED
);
END IF;
END IF;
END PS_ABSENCE_HIST_TR;
/
Oracle Trigger Maintenance
The following command may be helpful when administering your triggers.
List all triggers in a Database
SELECT TRIGGERNAME FROM USER_TRIGGERS;
Executed from Schema_owner_id
SELECT TRIGGERNAME FROM ALL_TRIGGERS;
Executed from SYSTEM
The following data dictionary views reveal information about triggers:
•
USER_TRIGGERS
SQL> descr user_triggers;
Name
Null?
Type
-------------------------------
--------
----
TRIGGER_NAME
NOT NULL
VARCHAR2(30)
TRIGGER_TYPE
VARCHAR2(16)
TRIGGERING_EVENT
VARCHAR2(26)
TABLE_OWNER
NOT NULL
TABLE_NAME
NOT NULL
VARCHAR2(30)
VARCHAR2(30)
REFERENCING_NAMES
VARCHAR2(87)
WHEN_CLAUSE
VARCHAR2(4000)
STATUS
VARCHAR2(8)
DESCRIPTION
VARCHAR2(4000)
TRIGGER_BODY
LONG
•
ALL_TRIGGERS
SQL> desc all_triggers;
Name
Null?
Type
-------------------------------
--------
----
OWNER
NOT NULL
VARCHAR2(30)
TRIGGER_NAME
NOT NULL
VARCHAR2(30)
PEOPLESOFT PROPRIETARY
AND
CONFIDENTIAL
DATABASE LEVEL AUDITING
8-23
DATA MANAGEMENT
TRIGGER_TYPE
VARCHAR2(16)
TRIGGERING_EVENT
VARCHAR2(26)
TABLE_OWNER
NOT NULL
VARCHAR2(30)
TABLE_NAME
NOT NULL
VARCHAR2(30)
REFERENCING_NAMES
VARCHAR2(87)
WHEN_CLAUSE
VARCHAR2(4000)
STATUS
VARCHAR2(8)
DESCRIPTION
VARCHAR2(4000)
TRIGGER_BODY
LONG
•
DBA_TRIGGERS
SQL> descr dba_triggers;
Name
Null?
Type
-------------------------------
--------
----
OWNER
NOT NULL
VARCHAR2(30)
TRIGGER_NAME
NOT NULL
VARCHAR2(30)
TRIGGER_TYPE
VARCHAR2(16)
TRIGGERING_EVENT
VARCHAR2(26)
TABLE_OWNER
NOT NULL
VARCHAR2(30)
TABLE_NAME
NOT NULL
VARCHAR2(30)
REFERENCING_NAMES
VARCHAR2(87)
WHEN_CLAUSE
VARCHAR2(4000)
STATUS
VARCHAR2(8)
DESCRIPTION
VARCHAR2(4000)
TRIGGER_BODY
LONG
The new column, BASE_OBJECT_TYPE, specifies whether the trigger is based on
DATABASE, SCHEMA, table, or view. The old column, TABLE_NAME, is null if the base
object is not table or view.
The column ACTION_TYPE specifies whether the trigger is a call type trigger or a PL/SQL
trigger.
The column TRIGGER_TYPE includes two additional values: BEFORE EVENT and AFTER
EVENT, applicable only to system events.
The column TRIGGERING_EVENT includes all system and DML events.
List the Trigger Definition
Select Trigger_Name,
TRIGGERNAME>;
Trigger_Body
from USER_TRIGGERS where Trigger_name=<
List Trigger Information
Select Trigger_Name, Trigger_Type, Triggering_Event, Table_Owner,Table_Name,
Referencing_Names,When_Clause, Status, Description, Trigger_Body from
USER_TRIGGERS where Trigger_name=< TRIGGERNAME>;
8-24
DATABASE LEVEL AUDITING
PEOPLESOFT PROPRIETARY
AND
CONFIDENTIAL
DATA MANAGEMENT
To remove a trigger
drop trigger TRIGGERNAME
To modify an existing trigger
On Oracle to explicitly alter a Trigger definition, user the CREATE OR REPLACE option…
see full explanation in the Oracle SQL Reference (CREATE TRIGGER)
Disable Trigger
By default, triggers are enabled when first created. Disable a trigger using the ALTER
TRIGGER statement with the DISABLE option.
For example, to disable the trigger named REORDER of the INVENTORY table, enter the
following statement:
ALTER TRIGGER Reorder DISABLE;
All triggers associated with a table can be disabled with one statement using the ALTER TABLE
statement with the DISABLE clause and the ALL TRIGGERS option. For example, to disable all
triggers defined for the INVENTORY table, enter the following statement:
ALTER TABLE Inventory
DISABLE ALL TRIGGERS;
DB2 for OS/390 Trigger Information
The following topics describe the syntax, commands, and additional tasks, such as the
assembler program, involved with DB2 OS/390 triggers.
Before the Trigger Audit can be implemented on DB2 for OS/390 there are several
components that must be implemented in the appropriate sequence.
•
Work Load Manager (WLM) must be enabled
•
Assembler module AUDIT01 must be assembled
•
User Defined Function (UDF) AUDIT01 must be defined in DB2
•
Trigger statement must be defined
Assembler Program AUDIT01 for DB2 for OS390
To implement triggers for DB2 for OS/390, you need to use an assembler program. Here's a
sample of it if needed.
AUDIT01
CEEENTRY AUTO=WORKSIZE,MAIN=YES,PLIST=OS
USING WORKAREA,R13
*
PEOPLESOFT PROPRIETARY
AND
CONFIDENTIAL
DATABASE LEVEL AUDITING
8-25
DATA MANAGEMENT
LR
R6,R1
SAVE THE PARMLIST ADDRESS
LA
R10,XIFCA
ADDRESS FOR IFI COMM AREA
LA
R9,XWQAL
ADDRESS FOR IFI QUALIFICATION AREA
*
USING IFCA,R10
USING WQAL,R9
XC
0(L'XIFCA,R10),0(R10)
CLEAR THE IFCA
XC
0(L'XWQAL,R9),0(R9)
CLEAR THE WQAL
MVC
IFCAID,=CL4'IFCA'
MVC
IFCALEN,=AL2(L'XIFCA) LENGTH OF IFCA
MVC
IFCAOWNR,=CL4'PSOFT'
MVC
WQALEYE,=CL4'WQAL' EYE CATCHER
MVC
WQALLEN,=AL2(WQALLN5)
MVC
WQALACE,=XL4'5C'
ACE TOKEN?? TO GET OUR OWN 147 ONLY
MVC
RETALEN,=F'32004'
LENGTH FOR RETURN AREA
MVC
AIFICMD,=A(READSCMD) BUILD
LA
R3,XIFCA
ST
R3,AIFCA
LA
R4,RETAREA
*
*
EYE CATCHER
*
LENGTH
*
*
THE
PARMLIST
FOR
ST
R4,ARETAREA
MVC
AIFCID,=A(XIFCID)
THE
LA
R5,XWQAL
READS
ST
R5,AWQAL
FOR
OI
AWQAL,X'80'
LA
R1,IFIPARMS
L
R15,=V(DSNWLI)
BALR
R14,R15
MVC
OPRIDLEN,=H'16'
ALWAYS RETURN 16 BYTES
MVC
OPRIDIND,=H'0'
INDICATOR FOR RESULT ALWAYS RETURNED
CLC
IFCARC1,=F'0'
RETURN CODE = ZERO
BNE
AUDIT30
NO, RETURN WITH ERROR INDCATOR
CLC
IFCABM,=F'0'
ANY DATA RETURNED
BE
AUDIT35
NO, RETURN WITH ERROR INDCATOR
LA
R4,4(,R4)
ADDRESS THE RETURNED DATA
IFI
IFCID=147
*
PARMLIST FOR READS CALL
*
*
*
*
USING QWIW,R4
8-26
DATABASE LEVEL AUDITING
PEOPLESOFT PROPRIETARY
AND
CONFIDENTIAL
DATA MANAGEMENT
CLC
QWIWLEN,=H'0'
DATA INDICATED BY IFI WRITER HDR
BE
AUDIT40
NO, RETURN WITH ERROR INDICATOR
DROP
R4
LA
R4,4(0,R4)
*
ADDRESS SELF DEFINING SECTION
USING QWA0,R4
CLC
QWA01PSO,=F'0'
PRODUCT SECTION OFFSET
BE
AUDIT50
NO, RETURN WITH ERROR INDICATOR
A
R4,QWA01PSO
ADDRESS THE STANDARD HEADER
DROP
R4
S
R4,=F'4'
*
USING QWHS,R4
CLC
QWHSLEN,=H'0'
STANDARD HEADER HAVE DATA
BE
AUDIT60
NO
MVC
HDRTYPE,QWHSTYP
SAVE TYPE IN CASE OF ERROR
CLI
QWHSTYP,QWHSHS01
STANDARD HEADER TYPE = 1
BNE
AUDIT65
NO
AH
R4,QWHSLEN
ADDRESS THE CORRELATION HEADER
DROP
R4
*
*
USING QWHC,R4
CLC
QWHCLEN,=H'0'
COORELATION HEADER
BE
AUDIT70
NO
MVC
HDRTYPE,QWHCTYP
SAVE TYPE IN CASE OF ERROR
CLI
QWHCTYP,QWHSHC02
CORRELATION HEADER TYPE = 2
BNE
AUDIT75
NO
MVC
OPRIDVAL,QWHCEUID
OPRID FROM CORRELATION HEADER
DROP
R4
EQU
*
L
R5,4(,R6)
*
*
*
AUDIT20
ADDRESS OF THE INDICATOR FOR RETURN
L
R6,0(,R6)
ADDRESS OF THE RESULT FOR RETURN
MVC
0(18,R6),OPRID
RESULT IS VARCHAR(16)
MVC
0(2,R5),OPRIDIND
INDICATE A RESULT IS RETURNED
*
CEETERM
RC=0
*
AUDIT30
PEOPLESOFT PROPRIETARY
EQU
*
MVC
OPRIDVAL(4),=CL4'RC1='
MVC
OPRIDVAL+4(4),IFCARC1
MVC
OPRIDVAL+8(4),=CL4'RC2='
AND
CONFIDENTIAL
DATABASE LEVEL AUDITING
8-27
DATA MANAGEMENT
MVC
OPRIDVAL+12(4),IFCARC2
B
AUDIT20
EQU
*
MVC
OPRIDVAL,=CL16'IFCABM=0'
B
AUDIT20
EQU
*
MVC
OPRIDVAL,=CL16'QWIWLEN=0'
*
AUDIT35
AUDIT40
AUDIT50
AUDIT60
AUDIT65
AUDIT70
AUDIT75
B
AUDIT20
EQU
*
MVC
OPRIDVAL,=CL16'QWA11PSO=0'
B
AUDIT20
EQU
*
MVC
OPRIDVAL,=CL16'NO QWHS STD HDR'
B
AUDIT20
EQU
*
MVC
OPRIDVAL,=CL16'QWHS BAD TYPE=X'
MVC
OPRIDVAL+14(1),HDRTYPE
B
AUDIT20
EQU
*
MVC
OPRIDVAL,=CL16'NO QWHC COOR HDR'
B
AUDIT20
EQU
*
MVC
OPRIDVAL,=CL16'QWHC BAD TYPE=X'
MVC
OPRIDVAL+14(1),HDRTYPE
B
AUDIT20
*
*******************************************************************
*
VARIABLE DECLARATIONS AND EQUATES
*
*******************************************************************
YREGS
PPA
CEEPPA
,
CONSTANTS DESCRIBING THE CODE BLOCK
READSCMD DC
CL8'READS'
XIFCID
DC
AL2(XIFCIDL)
DC
H'0'
RESERVED
DC
H'147'
READS FOR IFCID=147 ONLY
EQU
*-XIFCID
XIFCIDL
LTORG ,
SET LENGTH OF BLOCK
PLACE LITERAL POOL HERE
*
WORKAREA DSECT
ORG
*+CEEDSASZ
LEAVE SPACE FOR DSA FIXED PART
DS
0F
RESULT AREA FOR OPRID
OPRIDLEN DS
H
LENGTH
OPRIDVAL DS
CL16
OPRID FROM COORELATION HEADER
*
OPRID
8-28
DATABASE LEVEL AUDITING
PEOPLESOFT PROPRIETARY
AND
CONFIDENTIAL
DATA MANAGEMENT
OPRIDIND DS
H
OPRID INDICATOR FOR UDF INTERFACE
*
HDRTYPE
DS
X
DS
3X
IFIPARMS DS
0F
PARMS FOR IFI READS CALL
AIFICMD
DS
A(READSCMD)
READS COMMAND
AIFCA
DS
A(XIFCA)
IFCA COMMUNICATION AREA
*
ARETAREA DS
A(RETAREA)
RETURN AREA FOR OUR 147 IFCID
AIFCID
DS
A(XIFCID)
IFI AREA TO SELECT 147 ONLY
AWQAL
DS
A(XWQAL)
IFI QUAL AREA TO SET OUR ACEADDR
XIFCA
DS
XL(IFCEND-IFCA)
STORAGE FOR IFCA
XWQAL
DS
XL(WQALEND-WQAL)
STORAGE FOR WQAL
RETAREA
DS
0C
RETALEN
DS
F
RETRECS
DS
*
*
XL32000
WORKSIZE EQU
*-WORKAREA
*
DSNDIFCA ,
MAPPING OF IFI-COMM-AREA
DSNDWQAL ,
MAPPING OF IFCID-QUAL-AREA
DSNDQWIW ,
MAPPING OF IFI-WRITER-HEADER
DSNDQWA0 ,
MAPPING OF ACCT SELF DEFINING SECT
DSNDQWHS ,
MAPPING OF IFCID STANDARD HEADER
DSNDQWHC ,
MAPPING OF IFCID CORRELATION HEADER
CEEDSA ,
MAPPING OF THE DYNAMIC SAVE AREA
CEECAA ,
MAPPING OF THE COMMON ANCHOR AREA
END
AUDIT01
Sample JCL to compile AUDIT01
//PROC
JCLLIB ORDER=(PSHLQ.PPVVV.PROCLIB)
//AUDIT01
EXEC PSASM,PSLIST='*',MEM=AUDIT01,
//
PSCOPY= 'PSHLQ.PPVVV.COPYLIB',
//
PSSRCE= 'PSHLQ.PPVVV.SOURCE',
program Source Code
//
PSLOAD='SYS2.WLMDSND.LOAD',
for the subsystem
//
MACLIB2='CEE.SCEEMAC',
//
MACLIB3='DSN610.SDSNMACS',
//
LKEDLIB='CEE.SCEELKED',
//
LKEDLIB2='DSN610.SDSNLOAD'
--> Where you have the AUDIT
--> Load Library defined in WLM
//*
//ASM.SYSLIB
DD
DISP=SHR,DSN=&MACLIB
//
DD
DISP=SHR,DSN=&MACLIB2
PEOPLESOFT PROPRIETARY
AND
CONFIDENTIAL
DATABASE LEVEL AUDITING
8-29
DATA MANAGEMENT
//
DD
DISP=SHR,DSN=&MACLIB3
//
DD
DISP=SHR,DSN=&PSCOPY
//LKED.SYSLIB DD DISP=SHR,DSN=&LKEDLIB
//
DD DISP=SHR,DSN=&LKEDLIB2
//LKED.SYSLIN DD
//
DD
DDNAME=SYSIN
//LKED.SYSIN
DD *
INCLUDE SYSLIB(DSNRLI)
ENTRY AUDIT01
NAME AUDIT01(R)
/*
User Defined Function (External Scalar) requirements
Module Name:
AUDIT01
Description:
Upon invoked from the trigger, it makes IFI READS call to
get an operator ID and pass the information back to the caller.
Note:
This program need to run under WLM managed Address Spaces.
Module Type:
IFI READS call program.
Language Type: Assembler
Entry Point:
AUDIT01
Input:
None
Output:
Operator ID
Ext Serv:
WLMAPPLENV – WLM Application Environment
Sample DB2 Syntax to Create UDF Function AUDIT01
CREATE FUNCTION AUDIT01()
RETURNS VARCHAR(16)
EXTERNAL NAME 'AUDIT01'
NO EXTERNAL ACTION
WLM ENVIRONMENT WLMDSNZ
PARAMETER STYLE DB2SQL
LANGUAGE ASSEMBLE
;
Verifying Status of UDF Function
After the User Defined Function is created, verify that the status is STARTED using this
command:
-DIS FUNCTION SPECIFIC(PSOFT.*)
DSNX975I < DSNX9DIS DISPLAY FUNCTION SPECIFIC REPORT FOLLOWS ------- SCHEMA=PSOFT
8-30
DATABASE LEVEL AUDITING
PEOPLESOFT PROPRIETARY
AND
CONFIDENTIAL
DATA MANAGEMENT
FUNCTION
STATUS ACTIVE QUEUED MAXQUE TIMEOUT WLM_ENV
AUDIT01
STARTED
0
0
1
0 WLMDSND
DSNX9DIS DISPLAY FUNCTION SPECIFIC REPORT COMPLETE
DSN9022I < DSNX9COM '-DISPLAY FUNC' NORMAL COMPLETION
If the function is not in Started status, you can start it using the Command:
-START FUNCTION SPECIFIC(PSOFT.AUDIT01)
DB2 OS390 Trigger Syntax
A trigger for each SQL operation type, as in INSERT, UPDATE and DELETE, need to be
defined separately with a different trigger name for a given triggering table – allowable trigger
name length is 8-characters long. There is a user-defined scalar function which returns a
single-value of User ID by making an IFI READS call each time it is invoked. The following
is a sample of the trigger syntax.
CREATE TRIGGER _AUD_TRI
AFTER
INSERT ON PS_ABSENCE_HIST
REFERENCING NEW AS C_ROW
FOR EACH ROW MODE DB2SQL
INSERT INTO PS_AUDIT_ABSENCE
VALUES (PSOFT.AUDIT01(),CURRENT TIMESTAMP,'I',
C_ROW.EMPLID,
C_ROW.ABSENCE_TYPE,
C_ROW.BEGIN_DT,
C_ROW.RETURN_DT,
C_ROW.DURATION_DAYS,
C_ROW.DURATION_HOURS,
C_ROW.REASON,
C_ROW.PAID_UNPAID,
C_ROW.EMPLOYER_APPROVED);
CREATE TRIGGER _AUD_TRD
AFTER DELETE ON PS_ABSENCE_HIST
REFERENCING OLD AS C_ROW
FOR EACH ROW MODE DB2SQL
INSERT INTO PS_AUDIT_ABSENCE
VALUES (PSOFT.AUDIT01(),CURRENT TIMESTAMP,'D',
C_ROW.EMPLID,
C_ROW.ABSENCE_TYPE,
C_ROW.BEGIN_DT,
C_ROW.RETURN_DT,
C_ROW.DURATION_DAYS,
C_ROW.DURATION_HOURS,
C_ROW.REASON,
PEOPLESOFT PROPRIETARY
AND
CONFIDENTIAL
DATABASE LEVEL AUDITING
8-31
DATA MANAGEMENT
C_ROW.PAID_UNPAID,
C_ROW.EMPLOYER_APPROVED);
CREATE TRIGGER AUD_TRUB
AFTER UPDATE ON PS_ABSENCE_HIST
REFERENCING OLD AS C_ROW
FOR EACH ROW MODE DB2SQL
INSERT INTO PS_AUDIT_ABSENCE
VALUES (PSOFT.AUDIT01(),CURRENT TIMESTAMP,'B',
C_ROW.EMPLID,
C_ROW.ABSENCE_TYPE,
C_ROW.BEGIN_DT,
C_ROW.RETURN_DT,
C_ROW.DURATION_DAYS,
C_ROW.DURATION_HOURS,
C_ROW.REASON,
C_ROW.PAID_UNPAID,
C_ROW.EMPLOYER_APPROVED);
DB2 OS390 Trigger Maintenance
The following commands may be useful for administering your triggers.
List all triggers in a Database
SELECT name
FROM SYSIBM.SYSTRIGGERS
List the Trigger Definition
SELECT text FROM SYSIBM.SYSTRIGGERS WHERE NAME = <trigger name>
List Trigger Information
SELECT text FROM SYSIBM.SYSTRIGGERS WHERE NAME = <trigger name>
To remove a trigger
drop trigger TRIGGERNAME restrict
To modify an existing trigger
Alters the definition of a trigger created previously by the CREATE TRIGGER statement.
ALTER trigger …
See a complete definition in DB2 UDB for OS/390 V6.1 Books Online.
8-32
DATABASE LEVEL AUDITING
PEOPLESOFT PROPRIETARY
AND
CONFIDENTIAL
Index
SYSAUDIT
A
action button 6-22
administration
CTI 6-4
agent configuration
CTI 6-9
agent information
viewing 6-29
Agent Not Ready 6-22
agent ready 6-26
agent status 6-22
answer call 6-22
answering calls 6-23
Application Designer
integrity verification See DDDAUDIT
Application Engine
SYSAUDIT resolutions 1-8
Application Server
failover 4-23
high availability 4-23
loading cache 3-11
replaying crash 3-33
sharing cache 3-11
tracing crashes 3-33
Tuxedo connect string 4-23
workstation settings 4-22
Archive Data 5-1. See Data Archiving
Archives
working with 5-9
Archiving
data 5-1
techniques 5-21
AS 2-35
Audit
utilities 3-29
audit records 8-2
queries 8-8
audit triggers
working with 8-4
Auditing
database level 8-1
tools 1-1
audits
viewing information 8-7
Audits
column 1-2
data archiving 5-18
DDDAUDIT 1-3
DDDAUDIT.LIS 1-4
PEOPLESOFT PROPRIETARY
AND
CONFIDENTIAL
1-5
B
Bootstrap mode
in Data Mover
2-2
C
Cache Files
workstation settings 4-6
call actions
understanding 6-22
callers
disconnecting 6-26
calls
answering 6-23
transferring 6-23
CHANGE_ACCESS_PASSWORD 2-22
Client Setup
running in Configuration Manager 4-36
Column audits 1-2
Command Line
Configuration Manager 4-31
Data Mover 2-13
UNIX 2-14
Data Mover parameters 2-15
Data Mover scripts 2-15
Command modifiers
Data Mover 2-35
Commands
Data Mover 2-17, 2-20, 2-21
SQL
supported by Data Mover 2-18
COMMIT 2-38
Data Mover 2-38
computer telephony integration 6-1. See also CTI
conference calls 6-22, 6-24
Configuration
workstation 4-1
Configuration Manager 4-1
Application Servers tab 4-22
Client Setup tab 4-17
command line options 4-31
Crystal tab 4-11
display settings 4-7
Display tab 4-7
folder tabs 4-2
INDEX
1
DATA MANAGEMENT
Import/Export tab 4-19
interface 4-2
nVision tab 4-28
Other tab 4-20
Process Scheduler tab 4-25
push buttons 4-2
Remote Call tab 4-15
running Client Setup 4-36
shortcuts 4-18
signon defaults 4-3
starting 4-2
Startup tab 4-3
Trace tab 4-12
user settings 4-35
Workflow tab 4-14
Connect ID
default 4-5
Connectivity
verifying 4-34
consultative transfers 6-24
CREATE_INDEX_BEFORE_DATA
CREATE_TEMP_TABLE 2-22
CREATE_TRIGGER 2-23
CTI 6-1
administration 6-4
agent configuration 6-9
agent status 6-26
answering calls 6-23
call actions 6-22
components 6-2
conference calls 6-24
configuration 6-4
configuration interface 6-6
console 6-3, 6-19
disconnecting callers 6-26
enabling 6-5
finishing a call 6-28
free seating 6-15
Genesys components needed 6-3
hotkeys 6-28
initiating a call 6-27
interface 6-17
JRE 6-4
personalization 6-11
phone book 6-10
putting callers on hold 6-25
queues 6-12
setting popup screens 6-13
shared phone book 6-8
single signon 6-15
technical architecture 6-1
testing calls 6-13
transferring calls 6-23
troubleshooting 6-15
using 6-16
viewing agent information 6-29
D
2-39
Data
exporting 5-17
importing flat files 5-17
integrity tools 1-1
Data Mover
scripts 2-5
SQL files 2-19
Data Archiving 5-1
archive process 5-14
audits 5-18
defining criteria 5-4
designer 5-4
exporting history data 5-17
finding data 5-11
history tables 5-3
importing flat files 5-17
join records 5-6
processes 5-14
reports 5-18
security 5-9
SQL 5-7
strategy 5-2
techniques 5-21
to flat files 5-4, 5-15
to tables 5-2
transferring data 5-12
understanding 5-1
utilities 5-10
working with archives 5-9
working with data 5-10
Data Base Setup
Data Mover
using 2-10
Data Designer
Field types 1-2
Required fields 1-3
Data Mober
command line interface 2-13
Data Mover
bootstrap mode 2-2
command line parameters 2-15
command modifiers 2-35
AS 2-35
IGNORE_DUPS
WHERE
2-37
command overview 2-17
command types 2-5
commands 2-17, 2-20, 2-21
ENCRYPT_PASSWORD 2-23
EXPORT
INDEX
2
2-36
2-24
PEOPLESOFT PROPRIETARY
AND
CONFIDENTIAL
DATA MANAGEMENT
IMPORT
REM
2-25
NO RECORD
2-27
NO SPACE
2-46
2-47
REMARK
2-27
NO TRACE
RENAME
2-27
NO VIEW
REPLACE_ALL
2-30
2-46
OUTPUT
2-47
2-48
REPLACE_DATA
2-30
SIZING_SET
REPLACE_VIEW
2-31
SPACE
2-49
START
2-49, 2-50
RUN
SET
2-31
2-32
VERSION
COMMIT 2-38
creating scripts 2-7
database setup 2-10
editing scripts 2-7
ERASE 2-20
example script files 2-51
export script 2-25
exporting a database 2-25
icon setup 2-2
IMPORT command 2-25
interface 2-2
menu options 2-4
migrating a database 2-1
operating modes 2-2
overview 2-1
parameter file 2-16
preparing for an export 2-8
running scripts 2-9
running scripts from command line
scripts 2-1, 2-4
SET parameters 2-38
COMMIT 2-38
2-15
CREATE_INDEX_BEFORE_DATA
DDL
2-41
EXECUTE_SQL
EXTRACT
2-42
IGNORE_DUPS
INPUT
2-41
2-42
2-43
INSERT_DATA_ONCE
LOG
2-44
NO DATA
NO INDEX
PEOPLESOFT PROPRIETARY
AND
2-45
2-46
CONFIDENTIAL
2-44
2-39
2-48
2-50
starting 2-2
STORE 2-20
supported SQL commands 2-18, 2-19
syntax rules 2-5
toolbar options 2-4
UNIX interface 2-14
window 2-3
workstation settings 4-31
Database
Data Mover 2-1
migrating 2-1
database level auditing 8-1, 8-7
audit records 8-2
Microsoft SQL Server information 8-13
Oracle 8-20
OS/390 8-25
queries 8-8
records 8-2
Sybase 8-18
triggers 8-4
Database Level Auditing
utilities 3-31
Database Name
displaying 4-10
Database Setup
accessing 2-10
choosing applications 2-11
parameters 2-12
scripts 2-12
using 2-10
Database Type
default 4-4
DBSPACE 2-39
DDDAUDIT 1-3
.LIS 1-4
output 1-4
queries 1-4
running 1-3
DDL 2-41
definition of 2-20
DDL Model Defaults 3-16
INDEX
3
DATA MANAGEMENT
Debugging
utilities 3-32
Detach Directory 4-14
Development Environment
setting up 4-34
dialing 6-22
Display
defaults 4-7
font 4-10
pages 4-8
DML
definition of 2-20
DND 6-22
Installation
development environment
workstations 4-18
International Settings
field size 3-37
languages 3-37
setting 3-36
time zones 3-37
L
E
EDI Manager
SYSAUDIT resolutions 1-13
ENCRYPT_PASSWORD 2-17, 2-23
ERASE 2-20
EXECUTE_SQL 2-41
Export
Data Mover
preparation 2-8
EXPORT 2-17, 2-24
EXTRACT 2-42
F
File attachments
utilities 3-27
free seating 6-15
H
hold 6-22
hold status 6-25
hotkeys
CTI 6-28
I
IGNORE_DUPS 2-42
IMPORT 2-17, 2-25
initiating call 6-15, 6-27
INPUT 2-43
installation 6-4
INDEX
4
Language preference
workstation settings 4-8
Load Cache
overview 3-11
running 3-11
LOG 2-44
Log tables for Transaction Set Editor
7-9
M
Menus
SYSAUDIT resolutions 1-15
Message Catalog 3-8
Message sets
adding 3-9
Messages
adding 3-10
Microsoft SQL Server
database level auditing 8-13
N
G
Genesys
popup windows 6-13
Genesys Desktop OCX Toolkit
4-34
6-6
Navigator
enabling 4-11
NO DATA 2-45
NO INDEX 2-46
NO RECORD 2-46
NO SPACE 2-46
NO TRACE 2-47
NO VIEW 2-47
nVision
workstation settings
4-28
O
Operator
overrides 4-6
signon 4-3
Optimization Framework
SYSAUDIT resolutions 1-18
Oracle
database level auditing 8-20
OS/390
PEOPLESOFT PROPRIETARY
AND
CONFIDENTIAL
DATA MANAGEMENT
database level auditing
outbound calls
testing 6-13
OUTPUT 2-48
8-25
P
Pages
displaying 4-9
displaying in Navigator 4-9
SYSAUDIT resolutions 1-17
Parm file 2-16
PeopleBooks
printed, ordering xiv
PeopleCode
SYSAUDIT resolutions 1-20
PeopleSoft
registry settings 4-1
PeopleSoft CTI
using 6-16, 6-19
PeopleSoft Open Query
workstation settings 4-18
PeopleTools
Transaction Set Editor 7-1
Utilities 3-1
DDL Model Defaults 3-16
PeopleTools Options
3-2
Record Cross Reference
Trace PeopleCode
Trace SQL
window
3-29
3-33
3-35
3-2
PeopleTools Options page 3-2
PeopleTools Utilities
administration 3-2
audits 3-29
converting panels (upgrade) 3-22
file attachments 3-27
global utilities 3-36
international 3-36
Message Catalog 3-8
overview 3-1
record groups 3-20
software updates 3-26
strings 3-18
table set IDs 3-19
table sets 3-21
table spaces 3-14
translate values 3-10
URLs 3-26
personalization
CTI 6-11
phone book
PEOPLESOFT PROPRIETARY
AND
CONFIDENTIAL
CTI 6-8
phone pad 6-23
pop-up menu 6-22
Popup menus
highlighting 4-9
Pop-up screens
CTI 6-13
Process Scheduler
SYSAUDIT resolutions 1-22
workstation settings 4-25
Processes
data archives 5-14
PS_HOME Access
verifying 4-34
PSARCH_ID 5-3
Q
Quality Server
workstation settings
queues
configuring 6-12
4-20
R
Ready 6-22
Record Cross Reference panel 3-29
Record edit types 7-3
records
database level auditing 8-2
Records
groups 3-20
SYSAUDIT resolutions 1-27
Registry
PeopleSoft settings 4-1
Related Language
SYSAUDIT resolutions 1-28
release caller 6-22
REM 2-27
REMARK 2-27
RENAME 2-17, 2-27
REPLACE_ALL 2-17, 2-30
REPLACE_DATA 2-18, 2-30
REPLACE_VIEW 2-18, 2-31
Reports
data archiving 5-18
RUN 2-18, 2-31
S
Scripts
Data Mover 2-4, 2-5
creating 2-7
editing
2-7
INDEX
5
DATA MANAGEMENT
examples
running
2-51
2-9
Database Setup 2-12
Security
data archives 5-9
PSOPRDEFN 4-5
SYSAUDIT resolutions 1-16
SET 2-18, 2-32
SET BASE_LANGUAGE 2-18, 2-34
SET IGNORE_ERRORS 2-18, 2-33
SET parameters
Data Mover 2-38
Shortcuts
creating 4-18
signing in 6-18
Signon
connect ID 4-5
default application server 4-5
default database name 4-5
default database server 4-5
default operator ID 4-5
operator overrides 4-6
setting defaults 4-3
Signon Defaults 4-4
single signon
CTI 6-15
SIZING_SET 2-48
SPACE 2-49
SQL
data archives 5-7
SYSAUDIT resolutions 1-32
SQL Alter 1-1
Audit function 1-1
SQL Audit 1-1
START 2-49, 2-50
STORE 2-20
String Table 3-18
Supporting Applications
verifying 4-34
SWAP_BASE_LANGUAGE 2-18, 2-33
Sybase
database level auditing 8-18
Syntax
Data Mover scripts 2-5
SYSAUDIT 1-1, 1-5
.LIS 1-7
Application Engine resolutions 1-8
EDI Manager resolutions 1-13
menu resolutions 1-15
optimization framework resolutions 1-18
output 1-7
page resolutions 1-17
PeopleCode resolutions 1-20
Process Scheduler resolutions 1-22
queries 1-7
Query resolutions 1-24
INDEX
6
record resolutions 1-27
related language resolutions 1-28
running 1-7
security resolutions 1-16
SQL resolutions 1-32
tree resolutions 1-33
XLATT resolutions 1-41
System Audit See SYSAUDIT
T
Table audits 1-2
Table Space 3-14
managing 3-15
Tables
altering 1-1
TableSet
controlling 3-21
TableSet IDs 3-19
technical architecture
CTI 6-1
Three-Tier
workstation settings 4-22
Trace
PeopleCode trace settings 4-12
SQL trace settings 4-12
trace settings 4-12
Trace PeopleCode 3-33
Trace SQL 3-35
Tracing
PeopleCode 3-33
SQL 3-35
Transaction Set Editor 7-1
and COBOL 7-1, 7-6
and COBOL programs 7-2
and Data Designer 7-2
API 7-2, 7-13
API services 7-12
application edit request 7-3
application request flags 7-8
calling parameters 7-6
COBOL interface 7-18
combining Update and Log modes 7-5
copy members 7-6
copy members and parameters 7-6, 7-8
detail reporting 7-5
edit error count 7-22
edit-level log tables 7-10
environmental requirements 7-6
error flag values 7-21
field-level log tables 7-11
fields 7-9, 7-15
General Ledger example 7-20
internal documentation 7-18
log tables 7-2, 7-3, 7-9
logging application errors 7-13
Log-mode 7-4
PEOPLESOFT PROPRIETARY
AND
CONFIDENTIAL
DATA MANAGEMENT
messages 7-22
online error correction 7-5
performance considerations 7-5
process modes 7-4
program module flow 7-18
PSPAAPL 7-3
PSPAEDIT 7-3
PSRECFIELD 7-2
PTCTSEDT parameters 7-6
PTPTSEDT 7-18
record edit types 7-3
SetID 7-21, 7-22
set-level log tables 7-9
SQL Where clause 7-16, 7-17, 7-20
steps required 7-2
table sharing 7-21
understanding 7-1
Update-mode 7-4
UseEdit flag translation 7-17
WHERE clause 7-2
transfer 6-227
transfer caller 6-22, 6-23
transfer mute 6-22
Translate Values 3-10
Trees
SYSAUDIT resolutions 1-33
triggers
defining 8-4
deleting 8-6
scripts 8-5
troubleshooting
CTI 6-15
TSE See Transaction Set Editor
record edits 7-2
understanding 7-1
PEOPLESOFT PROPRIETARY
AND
CONFIDENTIAL
U
unhold 6-22
UNIX
Data Mover command line
Upgrade
converting panels to pages
image conversion 4-30
update utilities 3-26
URL
adding new entry 3-27
ID 3-27
maintenance 3-26
table 3-27
user actions 6-22
User ID
default 4-5
using PeopleSoft CTI 6-19
utilities
URL maintenance 3-26
Utilities_UTILITIES 3-1
2-14
3-22
V
VERSION
2-50
W
WHERE 2-37
Workstations
exporting settings
importing settings
installing 4-17
setting up 4-1
4-19
4-19
INDEX
7