1
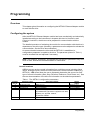
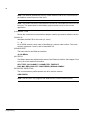
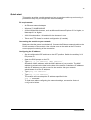
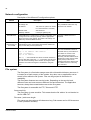
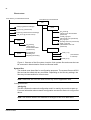
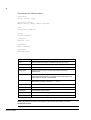
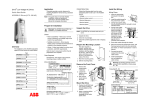
ABB Drives
User’s Manual
Ethernet Adapter Module
NETA-01
Ethernet Adapter Module
NETA-01
User’s Manual
3AFE 64605062 REV B
EN
EFFECTIVE: 13.10.2003
ã 2003 ABB Oy. All Rights Reserved.
5
Safety instructions
Overview
This chapter states the general safety instructions that must be followed when
installing and operating the NETA-01 Network Adapter module.
The material in this chapter must be studied before attempting any work on the unit.
In addition to the safety instructions given below, read the complete safety
instructions of the specific drive you are working on.
General safety instructions
WARNING! All electrical installation and maintenance work on the drive should be
carried out by qualified electricians.
The drive and adjoining equipment must be properly earthed.
Do not attempt any work on a powered drive. After switching off the mains, always
allow the intermediate circuit capacitors 5 minutes to discharge before working on
the frequency converter, the motor or the motor cable. It is good practice to check
(with a voltage indicating instrument) that the drive is in fact discharged before
beginning work.
The motor cable terminals of the drive are at a dangerously high voltage when mains
power is applied, regardless of motor operation.
There can be dangerous voltages inside the drive from external control circuits even
when the drive mains power is shut off. Exercise appropriate care when working on
the unit. Neglecting these instructions can cause physical injury or death.
Safety instructions
6
Safety instructions
7
Table of contents
Safety instructions . . . . . . . . . . . . . . . . . . . . . . . . . . . . . . . . . . . . . . . . . . . . . . . . . . . . . . . . . . . . . 5
Overview . . . . . . . . . . . . . . . . . . . . . . . . . . . . . . . . . . . . . . . . . . . . . . . . . . . . . . . . . . . . . . . . . . . . . . 5
General safety instructions . . . . . . . . . . . . . . . . . . . . . . . . . . . . . . . . . . . . . . . . . . . . . . . . . . . . . . . . 5
Table of contents . . . . . . . . . . . . . . . . . . . . . . . . . . . . . . . . . . . . . . . . . . . . . . . . . . . . . . . . . . . . . . . 7
Introduction to this manual . . . . . . . . . . . . . . . . . . . . . . . . . . . . . . . . . . . . . . . . . . . . . . . . . . . . . 11
Overview . . . . . . . . . . . . . . . . . . . . . . . . . . . . . . . . . . . . . . . . . . . . . . . . . . . . . . . . . . . . . . . . . . . . .
Intended audience . . . . . . . . . . . . . . . . . . . . . . . . . . . . . . . . . . . . . . . . . . . . . . . . . . . . . . . . . . . . . .
What this manual contains . . . . . . . . . . . . . . . . . . . . . . . . . . . . . . . . . . . . . . . . . . . . . . . . . . . . . . .
Conventions used in this manual . . . . . . . . . . . . . . . . . . . . . . . . . . . . . . . . . . . . . . . . . . . . . . . . . .
11
11
11
12
Overview . . . . . . . . . . . . . . . . . . . . . . . . . . . . . . . . . . . . . . . . . . . . . . . . . . . . . . . . . . . . . . . . . . . . 13
Overview . . . . . . . . . . . . . . . . . . . . . . . . . . . . . . . . . . . . . . . . . . . . . . . . . . . . . . . . . . . . . . . . . . . . .
The NETA-01 Ethernet Adapter module . . . . . . . . . . . . . . . . . . . . . . . . . . . . . . . . . . . . . . . . . . . . .
Compatibility . . . . . . . . . . . . . . . . . . . . . . . . . . . . . . . . . . . . . . . . . . . . . . . . . . . . . . . . . . . . . . . .
Delivery check . . . . . . . . . . . . . . . . . . . . . . . . . . . . . . . . . . . . . . . . . . . . . . . . . . . . . . . . . . . . . .
Warranty and liability information . . . . . . . . . . . . . . . . . . . . . . . . . . . . . . . . . . . . . . . . . . . . . . . .
13
13
14
15
15
Mechanical installation . . . . . . . . . . . . . . . . . . . . . . . . . . . . . . . . . . . . . . . . . . . . . . . . . . . . . . . . . 17
Overview . . . . . . . . . . . . . . . . . . . . . . . . . . . . . . . . . . . . . . . . . . . . . . . . . . . . . . . . . . . . . . . . . . . . . 17
Mounting outside the drive . . . . . . . . . . . . . . . . . . . . . . . . . . . . . . . . . . . . . . . . . . . . . . . . . . . . . . . 17
Mounting inside the drive . . . . . . . . . . . . . . . . . . . . . . . . . . . . . . . . . . . . . . . . . . . . . . . . . . . . . . . . 18
Electrical installation . . . . . . . . . . . . . . . . . . . . . . . . . . . . . . . . . . . . . . . . . . . . . . . . . . . . . . . . . . 19
Overview . . . . . . . . . . . . . . . . . . . . . . . . . . . . . . . . . . . . . . . . . . . . . . . . . . . . . . . . . . . . . . . . . . . . .
General cabling instructions . . . . . . . . . . . . . . . . . . . . . . . . . . . . . . . . . . . . . . . . . . . . . . . . . . . . . .
Earthing the module . . . . . . . . . . . . . . . . . . . . . . . . . . . . . . . . . . . . . . . . . . . . . . . . . . . . . . . . . . . .
DIP switch settings . . . . . . . . . . . . . . . . . . . . . . . . . . . . . . . . . . . . . . . . . . . . . . . . . . . . . . . . . . . . .
NETA-01 connections . . . . . . . . . . . . . . . . . . . . . . . . . . . . . . . . . . . . . . . . . . . . . . . . . . . . . . . . . . .
Ethernet connection . . . . . . . . . . . . . . . . . . . . . . . . . . . . . . . . . . . . . . . . . . . . . . . . . . . . . . . . . .
Power supply connection . . . . . . . . . . . . . . . . . . . . . . . . . . . . . . . . . . . . . . . . . . . . . . . . . . . . . .
Drive connection . . . . . . . . . . . . . . . . . . . . . . . . . . . . . . . . . . . . . . . . . . . . . . . . . . . . . . . . . . . . .
19
19
19
20
20
20
20
20
Programming . . . . . . . . . . . . . . . . . . . . . . . . . . . . . . . . . . . . . . . . . . . . . . . . . . . . . . . . . . . . . . . . . 23
Overview . . . . . . . . . . . . . . . . . . . . . . . . . . . . . . . . . . . . . . . . . . . . . . . . . . . . . . . . . . . . . . . . . . . . . 23
Configuring the system . . . . . . . . . . . . . . . . . . . . . . . . . . . . . . . . . . . . . . . . . . . . . . . . . . . . . . . . . . 23
Control locations . . . . . . . . . . . . . . . . . . . . . . . . . . . . . . . . . . . . . . . . . . . . . . . . . . . . . . . . . . . . . 23
Table of contents
8
Communication . . . . . . . . . . . . . . . . . . . . . . . . . . . . . . . . . . . . . . . . . . . . . . . . . . . . . . . . . . . . . . 25
Overview . . . . . . . . . . . . . . . . . . . . . . . . . . . . . . . . . . . . . . . . . . . . . . . . . . . . . . . . . . . . . . . . . . . .
Protocols . . . . . . . . . . . . . . . . . . . . . . . . . . . . . . . . . . . . . . . . . . . . . . . . . . . . . . . . . . . . . . . . . . . .
BOOTP . . . . . . . . . . . . . . . . . . . . . . . . . . . . . . . . . . . . . . . . . . . . . . . . . . . . . . . . . . . . . . . . . . .
DHCP . . . . . . . . . . . . . . . . . . . . . . . . . . . . . . . . . . . . . . . . . . . . . . . . . . . . . . . . . . . . . . . . . . . . .
FTP . . . . . . . . . . . . . . . . . . . . . . . . . . . . . . . . . . . . . . . . . . . . . . . . . . . . . . . . . . . . . . . . . . . . . .
HTTP . . . . . . . . . . . . . . . . . . . . . . . . . . . . . . . . . . . . . . . . . . . . . . . . . . . . . . . . . . . . . . . . . . . . .
IP . . . . . . . . . . . . . . . . . . . . . . . . . . . . . . . . . . . . . . . . . . . . . . . . . . . . . . . . . . . . . . . . . . . . . . . .
SMTP . . . . . . . . . . . . . . . . . . . . . . . . . . . . . . . . . . . . . . . . . . . . . . . . . . . . . . . . . . . . . . . . . . . . .
TCP . . . . . . . . . . . . . . . . . . . . . . . . . . . . . . . . . . . . . . . . . . . . . . . . . . . . . . . . . . . . . . . . . . . . . .
UDP . . . . . . . . . . . . . . . . . . . . . . . . . . . . . . . . . . . . . . . . . . . . . . . . . . . . . . . . . . . . . . . . . . . . . .
Higher level protocols . . . . . . . . . . . . . . . . . . . . . . . . . . . . . . . . . . . . . . . . . . . . . . . . . . . . . . . .
Quick start . . . . . . . . . . . . . . . . . . . . . . . . . . . . . . . . . . . . . . . . . . . . . . . . . . . . . . . . . . . . . . . . . . .
PC requirements . . . . . . . . . . . . . . . . . . . . . . . . . . . . . . . . . . . . . . . . . . . . . . . . . . . . . . . . . . . .
Connecting the module to your network . . . . . . . . . . . . . . . . . . . . . . . . . . . . . . . . . . . . . . . . . .
Configuring the IP address . . . . . . . . . . . . . . . . . . . . . . . . . . . . . . . . . . . . . . . . . . . . . . . . . . . .
Network configuration . . . . . . . . . . . . . . . . . . . . . . . . . . . . . . . . . . . . . . . . . . . . . . . . . . . . . . . . . . .
File system . . . . . . . . . . . . . . . . . . . . . . . . . . . . . . . . . . . . . . . . . . . . . . . . . . . . . . . . . . . . . . . . . . .
Security . . . . . . . . . . . . . . . . . . . . . . . . . . . . . . . . . . . . . . . . . . . . . . . . . . . . . . . . . . . . . . . . . . .
File structure . . . . . . . . . . . . . . . . . . . . . . . . . . . . . . . . . . . . . . . . . . . . . . . . . . . . . . . . . . . . . . .
System files . . . . . . . . . . . . . . . . . . . . . . . . . . . . . . . . . . . . . . . . . . . . . . . . . . . . . . . . . . . . . . . .
Network services . . . . . . . . . . . . . . . . . . . . . . . . . . . . . . . . . . . . . . . . . . . . . . . . . . . . . . . . . . . . . .
FTP server . . . . . . . . . . . . . . . . . . . . . . . . . . . . . . . . . . . . . . . . . . . . . . . . . . . . . . . . . . . . . . . . .
Telnet server . . . . . . . . . . . . . . . . . . . . . . . . . . . . . . . . . . . . . . . . . . . . . . . . . . . . . . . . . . . . . . .
HTTP server . . . . . . . . . . . . . . . . . . . . . . . . . . . . . . . . . . . . . . . . . . . . . . . . . . . . . . . . . . . . . . .
SSI functions . . . . . . . . . . . . . . . . . . . . . . . . . . . . . . . . . . . . . . . . . . . . . . . . . . . . . . . . . . . . . . .
E-mail client . . . . . . . . . . . . . . . . . . . . . . . . . . . . . . . . . . . . . . . . . . . . . . . . . . . . . . . . . . . . . . . .
Modbus/TCP . . . . . . . . . . . . . . . . . . . . . . . . . . . . . . . . . . . . . . . . . . . . . . . . . . . . . . . . . . . . . . . . .
Modbus/TCP addressing . . . . . . . . . . . . . . . . . . . . . . . . . . . . . . . . . . . . . . . . . . . . . . . . . . . . . .
Supported exception codes . . . . . . . . . . . . . . . . . . . . . . . . . . . . . . . . . . . . . . . . . . . . . . . . . . . .
Mailbox Interface . . . . . . . . . . . . . . . . . . . . . . . . . . . . . . . . . . . . . . . . . . . . . . . . . . . . . . . . . . . . . .
25
25
25
25
25
25
25
26
26
26
26
27
27
27
27
28
28
29
30
30
35
35
35
36
37
37
40
41
44
44
Java applets . . . . . . . . . . . . . . . . . . . . . . . . . . . . . . . . . . . . . . . . . . . . . . . . . . . . . . . . . . . . . . . . . 45
Overview . . . . . . . . . . . . . . . . . . . . . . . . . . . . . . . . . . . . . . . . . . . . . . . . . . . . . . . . . . . . . . . . . . . .
Starting up the applets . . . . . . . . . . . . . . . . . . . . . . . . . . . . . . . . . . . . . . . . . . . . . . . . . . . . . . . . . .
Configuration applet . . . . . . . . . . . . . . . . . . . . . . . . . . . . . . . . . . . . . . . . . . . . . . . . . . . . . . . . . . . .
Drives tab . . . . . . . . . . . . . . . . . . . . . . . . . . . . . . . . . . . . . . . . . . . . . . . . . . . . . . . . . . . . . . . . . .
Network tab . . . . . . . . . . . . . . . . . . . . . . . . . . . . . . . . . . . . . . . . . . . . . . . . . . . . . . . . . . . . . . . .
Dataset tab . . . . . . . . . . . . . . . . . . . . . . . . . . . . . . . . . . . . . . . . . . . . . . . . . . . . . . . . . . . . . . . .
Scanning Parameters tab . . . . . . . . . . . . . . . . . . . . . . . . . . . . . . . . . . . . . . . . . . . . . . . . . . . . .
Status applet . . . . . . . . . . . . . . . . . . . . . . . . . . . . . . . . . . . . . . . . . . . . . . . . . . . . . . . . . . . . . . . . .
Menu applet . . . . . . . . . . . . . . . . . . . . . . . . . . . . . . . . . . . . . . . . . . . . . . . . . . . . . . . . . . . . . . . . . .
Parameters applet . . . . . . . . . . . . . . . . . . . . . . . . . . . . . . . . . . . . . . . . . . . . . . . . . . . . . . . . . . .
Fault Log applet . . . . . . . . . . . . . . . . . . . . . . . . . . . . . . . . . . . . . . . . . . . . . . . . . . . . . . . . . . . . .
Datalogger applet . . . . . . . . . . . . . . . . . . . . . . . . . . . . . . . . . . . . . . . . . . . . . . . . . . . . . . . . . . .
Datasets applet . . . . . . . . . . . . . . . . . . . . . . . . . . . . . . . . . . . . . . . . . . . . . . . . . . . . . . . . . . . . .
Drive documentation . . . . . . . . . . . . . . . . . . . . . . . . . . . . . . . . . . . . . . . . . . . . . . . . . . . . . . . . .
Motor Control applet . . . . . . . . . . . . . . . . . . . . . . . . . . . . . . . . . . . . . . . . . . . . . . . . . . . . . . . . .
Table of contents
45
45
45
46
47
48
49
49
51
51
53
54
57
57
58
9
Fault tracing . . . . . . . . . . . . . . . . . . . . . . . . . . . . . . . . . . . . . . . . . . . . . . . . . . . . . . . . . . . . . . . . . . 59
Overview . . . . . . . . . . . . . . . . . . . . . . . . . . . . . . . . . . . . . . . . . . . . . . . . . . . . . . . . . . . . . . . . . . . . .
Diagnostic LEDs . . . . . . . . . . . . . . . . . . . . . . . . . . . . . . . . . . . . . . . . . . . . . . . . . . . . . . . . . . . . . . .
Installation problem . . . . . . . . . . . . . . . . . . . . . . . . . . . . . . . . . . . . . . . . . . . . . . . . . . . . . . . . . . . . .
Drive setup . . . . . . . . . . . . . . . . . . . . . . . . . . . . . . . . . . . . . . . . . . . . . . . . . . . . . . . . . . . . . . . . . . .
59
59
60
60
Technical data . . . . . . . . . . . . . . . . . . . . . . . . . . . . . . . . . . . . . . . . . . . . . . . . . . . . . . . . . . . . . . . . 61
DDCS link . . . . . . . . . . . . . . . . . . . . . . . . . . . . . . . . . . . . . . . . . . . . . . . . . . . . . . . . . . . . . . . . . . . . 61
Fieldbus link . . . . . . . . . . . . . . . . . . . . . . . . . . . . . . . . . . . . . . . . . . . . . . . . . . . . . . . . . . . . . . . . . . 62
NETA-01 . . . . . . . . . . . . . . . . . . . . . . . . . . . . . . . . . . . . . . . . . . . . . . . . . . . . . . . . . . . . . . . . . . . . . 62
Ambient conditions . . . . . . . . . . . . . . . . . . . . . . . . . . . . . . . . . . . . . . . . . . . . . . . . . . . . . . . . . . . . 63
Ambient conditions, operation . . . . . . . . . . . . . . . . . . . . . . . . . . . . . . . . . . . . . . . . . . . . . . . . . . . . . 63
Ambient conditions, storage . . . . . . . . . . . . . . . . . . . . . . . . . . . . . . . . . . . . . . . . . . . . . . . . . . . . . . 63
Ambient conditions, transportation . . . . . . . . . . . . . . . . . . . . . . . . . . . . . . . . . . . . . . . . . . . . . . . . . 63
Table of contents
10
Table of contents
11
Introduction to this manual
Overview
This chapter contains a description of the User’s manual for the
NETA-01 Ethernet Adapter module.
Intended audience
The manual is intended for the people who are responsible for installing,
commissioning and using an Ethernet Adapter module with an ABB drive. The
reader is expected to have a basic knowledge of electrical fundamentals, electrical
wiring practices, the drive, the use of the drive control panel, internet browsers, and
the Ethernet protocol.
What this manual contains
The installation and start-up of the NETA-01 Ethernet Adapter module is introduced
in this manual.
It is assumed that the drive is installed and ready to operate before starting the
installation of the adapter module. For more information on the installation and startup procedures of the drive, please refer to its user documentation.
Safety instructions are featured in the first few pages of this manual. Safety
Instructions describe the formats for various warnings and notations used within this
manual. This chapter also states the safety instructions which apply to the
installation and operation of the NETA-01 module.
Introduction to this manual contains a short description of the manual.
Overview contains a short description of the Ethernet protocol and the NETA-01
Ethernet Adapter module, a delivery checklist, and information on the
manufacturer’s warranty.
Mechanical installation contains placing and mounting instructions for the module.
Electrical installation contains wiring, DIP setting and earthing instructions.
Programming explains how to program the drive before the communication through
the adapter module can be started.
Communication contains a description of the Ethernet functions supported by the
NETA-01 module.
Java applets gives instructions on the Java applets included in the NETA-01
module.
Fault tracing describes how to diagnose the Ethernet connection during installation,
commissioning, and normal operation.
Introduction to this manual
12
Technical data contains information on physical dimensions, configurable settings
and connectors of the module.
Ambient conditions contains a specification of the ambient conditions allowed
during transportation, storage and use of the NETA-01 module.
Conventions used in this manual
Communication Module
Communication Module is a name for a device (e.g. a fieldbus adapter) through
which the drive is connected to an external serial communication network (e.g. a
fieldbus). The communication with the communication module is activated by a drive
parameter.
Datasets and Data Words
Datasets are clusters of data sent through the DDCS link between the NETA-01
module and the drive. Each dataset consists of three 16-bit words, i.e. data words.
The Control Word and the Status Word are types of data words; the contents of
some data words are user-definable. For information, see the drive documentation.
MAC ID
Every node on Ethernet network has to have a unique identifier. This node number is
called MAC ID on Ethernet (Media Access Control ID).
NETA-01 Ethernet Adapter module
The NETA-01 Adapter module is one of the optional fieldbus adapter modules
available for ABB drives. The NETA-01 module is a device through which an ABB
drive is connected to an Ethernet network.
Parameter
A parameter is an operating instruction for the drive. Parameters can be read and
programmed with the drive control panel, or through the NETA-01 module.
Telnet
Telnet is a terminal emulation program for TCP/IP networks such as the Internet. The
Telnet program runs on a computer and connects it to a server on the network.
Commands can be then entered through the Telnet program and they will be
executed as if they were entered directly on the server console.
Introduction to this manual
13
Overview
Overview
This chapter contains a short description of the NETA-01 Adapter module, a delivery
checklist, and warranty information.
The NETA-01 Ethernet Adapter module
The NETA-01 Ethernet Adapter module is an optional device for browser-based
remote monitoring of ABB drives via Ethernet. Multiple drives (up to 9) can be
connected to the network through the DDCS Branching Unit (NDBU-85/95) or using
ring topology. Through the use of the NETA-01 Ethernet Adapter module, it is
possible to
• monitor the drive
– read and adjust drive parameter values
– read status information and actual values from the drive
– set up and monitor (numerically or graphically) the data logger
– read and clear the contents of the fault log
– send e-mail event messages (max. 10)
• control the drive
– give control commands (Start, Stop, Run enable, etc.) to the drive
– feed a motor speed or torque reference to the drive
– reset a drive fault.
The adapter module is mounted onto a standard mounting rail inside or outside the
drive unit, depending on drive type and configuration. See the user’s manual of the
drive for module placement options.
Overview
14
Ethernet
ABB Drive
RJ-45 connector for Ethernet connection
DIP switches for IP address
selection.
ABB Drive
NDBU-85
MSTR
CH0
CH1
CH2
Fibre optic connectors
for connection to drive:
TXD = Transmitter
RXD = Receiver
ABB Drive
Status LEDs
(For descriptions see chapter Fault
tracing)
External power supply connection
Figure 1. Star topology link with the NBDU-85/95 and the NETA-01 Adapter module
Compatibility
The NETA-01 is compatible with:
• ACH 400
• ACS 400
• ACS 600 SingleDrive
• ACS 600 MultiDrive
• ACS 600 MotionControl (ACP 600)
• ACS 600 CraneDrive (ACC 600)
• ACS 600 Programmable
• ACS 6000
• DCS 600
• ACS 800
• ACS 1000.
Contact your local ABB representative for information on using other drive types with
the NETA-01.
Overview
15
Delivery check
The option package for the NETA-01 Ethernet Adapter module contains:
• Ethernet Adapter module, type NETA-01
• two pairs (four pieces) of fibre optic cables for connecting the adapter to the drive
• mounting rail
• this manual.
Warranty and liability information
The manufacturer warrants the equipment supplied against defects in design,
materials and workmanship for a period of twelve (12) months after installation or
twenty-four (24) months from date of manufacturing, whichever first occurs. The
local ABB office or distributor may grant a warranty period different to the above and
refer to local terms of liability as defined in the supply contract.
The manufacturer is not responsible for
• any costs resulting from a failure if the installation, commissioning, repair,
alternation, or ambient conditions of the drive do not fulfil the requirements
specified in the documentation delivered with the unit and other relevant
documentation.
• units subjected to misuse, negligence or accident
• units comprised of materials provided or designs stipulated by the purchaser.
In no event shall the manufacturer, its suppliers or subcontractors be liable for
special, indirect, incidental or consequential damages, losses or penalties.
If you have any questions concerning your ABB drive, please contact the local
distributor or ABB office. The technical data, information and specifications are valid
at the time of printing. The manufacturer reserves the right to modifications without
prior notice.
Overview
16
Overview
17
Mechanical installation
Overview
This chapter contains module mounting instructions. Depending on the drive, the
module can be installed either inside or outside the drive housing or cabinet. See the
user’s manual of the drive for module placement options.
Mounting outside the drive
Choose the location for the module. Note the following:
• The cabling instructions in chapter Electrical installation must be followed.
• The ambient conditions should be taken into account (see
Appendix B). The degree of protection of the module is IP 20.
• Observe the free space requirements for the module*) (see the figure below) and
the drive (see the drive documentation).
• Module earth is connected to the mounting rail by means of an earthing clip (see
the figure below). The mounting rail onto which the option module is to be
mounted must be earthed to a noiseless earth. If the rail is not mounted on a
properly earthed base, a separate earthing conductor must be used. The
conductor must be as short as possible and its cross-sectional area must be 6
mm2 at least. Note: No solid copper conductor may be used (stranded wire
allowed only).
Mounting instructions:
• Switch off all dangerous voltages in the enclosure that the module is to be
mounted in.
• Fasten the rail and ensure the proper earthing as described above.
• Push the module onto the rail. The module can be released by pulling the locking
spring with a screwdriver (see below).
min 10 mm
Earthing
Clip
min 10 mm
*)
Minimum of 10 mm from adjoining equipment or wall.
Mechanical installation
18
Mounting inside the drive
The work inside the drive should be carried out by a qualified electrician only.
WARNING! Pay attention to the slowly discharging voltage of the capacitor bank and
the voltages that are connected from external control circuits to the inputs and
outputs of the drive.
WARNING! Do not touch the printed circuit boards. The integrated circuits are
extremely sensitive to electrostatic discharge.
Mounting instructions:
• Stop the drive.
• Switch off the power supply of the drive and all dangerous voltages connected to
the inputs and outputs.
• Wait for five minutes to ensure that the capacitors in the intermediate circuit have
discharged.
• Remove the front cover of the drive.
• Ensure that the mains cable, motor cable and capacitor bank (UDC+ and UDC–)
are not powered.
• Locate the position for the module (see the drive documentation). Fasten the
mounting rail to its place if not already installed. Observe the free space
requirements for the module (see the figure above).
• Push the module onto the rail. The module can be released by pulling the locking
spring with a screwdriver (see the figure above).
Mechanical installation
19
Electrical installation
Overview
This chapter contains:
• general cabling instructions
• module earthing instructions
• instructions on setting the IP address
• instructions on connecting the module to the drive and to the Ethernet network.
WARNING! Before installation, switch off the drive power supply. Wait five minutes
to ensure that the capacitor bank of the drive is discharged. Switch off all dangerous
voltages connected from external control circuits to the inputs and outputs of the
drive.
General cabling instructions
Arrange the bus cables as far away from the motor cables as possible. Avoid parallel
runs. Use bushings at cable entries.
Handle fibre optic cables with care. When unplugging optic cables, always grab the
connector, not the cable itself. Do not touch the ends of the fibres with bare hands as
the fibre is extremely sensitive to dirt.
The maximum long term tensile load for the fibre optic cables is 1 N.
The minimum short term bend radius is 25 mm.
Earthing the module
The NETA-01 module earth is connected to the rail onto which the module is
mounted. If the rail is fastened to an earthed metallic assembly plate, the module is
automatically earthed, and no external earthing wire is needed. If the rail is fastened
to a base that is not earthed, the rail must be connected to the nearest earthing
terminal. However, the earthing wire should not be connected to the same terminal
as the power cable screens. (See the mounting instructions in chapter Mechanical
installation.)
Electrical installation
20
DIP switch settings
The DIP switches on the front of the NETA-01 module can be used to select the IP
address for the module.
Note: The new settings take effect only when the module is powered up for the next
time.
By default, the IP address is defined by software settings (see chapter
Communication). Setting any DIP switch to ON enables the DIP switch selection.
DIP switches 1 to 8 define the last octet of the IP address 192.168.0.xxx as a binary
number (in decimals 1 to 255), DIP switch 8 being the least significant bit.
NETA-01 connections
Ethernet connection
The network cable is connected to the RJ45 connector on the
NETA-01. The connector is internally terminated. Add a ferrite core to the PC end of
the network cable to avoid EMC disturbance caused by power cables.
Power supply connection
The NETA-01 module requires a 24 V DC power supply. Connect the supply wires to
the connector on the lower side of the module.
Pole
Description
1
+24 V DC
2
0V
Terminal designations
1
2
1
2
The power can be taken either from the drive’s internal power supply (see drive
manuals) or from a dedicated external power supply.
Drive connection
The NETA-01 module is connected to the drive using a fibre optic cable link. Consult
the drive documentation as to the corresponding terminals inside the drive. Multiple
drives are connected through the NDBU-85/95 DDCS Branching Unit or using ring
topology.
Electrical installation
21
ABB
Drive 2
DDCS
DDCS
T
T
R
R
CH1
CH0
MSTR
NDBU-x5
ABB
Drive 1
Drive 1 to
. CH0
.
.
Drive 9 to CH8
Figure 2. Fibre optic link connecting the NETA-01 to the drives through the
NDBU-85/95
ABB Drive
ABB Drive
ABB Drive
DDCS
DDCS
DDCS
T
T
T
R
R
R
Drive 1 first
in the ring.
.
.
.
Drive 9 last in the ring.
Figure 3. Fibre optic link connecting the NETA-01 to drives with ring topology
Electrical installation
22
Electrical installation
23
Programming
Overview
This chapter gives information on configuring the NETA-01 Ethernet Adapter module
to work with the drive.
Configuring the system
After the NETA-01 Ethernet Adapter module has been mechanically and electrically
installed according to the instructions in chapters Mechanical installation and
Electrical installation, the drive must be prepared for communication with the
module.
The detailed procedure of activating the module for communication with the drive is
dependent on the drive type. (Normally, a parameter must be adjusted to activate the
communication. See the drive documentation.)
As communication between the drive and the NETA-01 is established, a
configuration parameter is copied to the drive. The parameter (shown in Table 1.)
must be checked first and adjusted if necessary.
Note: The grouping, numbering, and adjustment procedure of parameters vary from
drive to drive. See the drive documentation for information.
Control locations
ABB drives can receive control information from multiple sources including digital
inputs, analogue inputs, the drive control panel and a communication module (e.g.
NETA-01). ABB drives allow the user to separately determine the source for each
type of control information (Start, Stop, Direction, Reference, Fault Reset, etc.). See
the user documentation of the drive for information on the selection parameters.
Table 1. The NETA-01 configuration parameters
Fieldbus
par. no.
1
2
3
4
Parameter name
MODULE TYPE
MAC ID
BAUD RATE
STATUS
Alternative settings
NETA-01 V1.x
1 ... 9
(0) 10/100 MBit/s
(0) SELF TEST; (1) NO CONNECT;
Default
setting
NETA-01 V1.x
1
(0) 10/100 MBit/s
Read only parameter
(2) CONNECTED; (3) TIMEOUT; (4) DUP. MAC ERR;
(5) BUS_OFF; (6) COM. ERROR;
5
PROFILE SELECTION
(7) WRONG ASMBLY
(0) ABB DRIVES
(0) ABB DRIVES
Programming
24
Note: The fieldbus parameters are only visible when the NETA-01 is connected to
the fieldbus control channel of the drive.
Note: The Default values are used when the module is connected to the drive for the
first time. The parameters in the fieldbus group must be set up for the current
application.
01 MODULE TYPE
Shows the connected communication adapter module type and its software version.
02 MAC ID
Identifies the MAC ID for the node (i.e. drive).
1…9
On a DDCS network, each node is identified by a unique node number. This node
number is between 1 and 9, and is called MAC ID.
03 BAUD RATE
The baud rate for the Ethernet interface.
10/100 MBit/s
04 STATUS
This Status parameter indicates the status of the Ethernet module. See chapter Fault
tracing for more detailed information.
SELF TEST; NO CONNECT; CONNECTED; TIME-OUT;
DUP. MAC ERR; BUS OFF; COM. ERROR; WRONG ASMBLY
05 PROFILE SELECTION
The communication profile between the drive and the module.
ABB DRIVES
Note: The NETA-01 only supports the ABB DRIVES communication profile.
Programming
25
Communication
Overview
This chapter describes the Ethernet protocols and tools used in configuring the
NETA-01.
Protocols
BOOTP
The Bootstrap Protocol (BOOTP) is a protocol that lets a network user automatically
receive an IP address and have an operating system initiated without user
involvement. BOOTP is the basis for a more advanced network manager protocol,
the Dynamic Host Configuration Protocol (DHCP).
DHCP
The Dynamic Host Configuration Protocol (DHCP) is an Internet protocol for
automating the configuration of computers that use TCP/IP. DHCP can be used to
automatically assign IP addresses, to deliver TCP/IP stack configuration parameters
such as the subnet mask and default router, and to provide other configuration
information.
FTP
The File Transfer Protocol (FTP) is a standard Internet protocol that enables a
simple and efficient way of exchanging files between computers on the Internet.
HTTP
The Hypertext Transfer Protocol (HTTP) provides a set of rules for exchanging files
(text, graphic images, sound, video, and other multimedia files) on the World Wide
Web. Relative to the TCP/IP suite of protocols, HTTP is an application protocol.
IP
The Internet Protocol (IP) is the method or protocol by which data is sent from one
computer to another on the Internet. Each computer (known as a host) on the
Internet has at least one IP address that uniquely identifies it from all other
computers on the Internet. When sending or receiving data, the message gets
divided into little chunks called packets. Each of these packets contains both the
sender's Internet address and the receiver's address.
For a working connection the IP needs three different addresses:
Each TCP/IP node on a network must have a unique IP address. The IP address
identifies each node on the network. IP addresses are written as four decimal
integers (0-255) separated by periods where each integer represents the value of
one byte (8 bits, octet) in the IP address.
Communication
26
Gateways connect individual physical networks into a system of networks. When a
node needs to communicate with a node on another network, the gateway transfers
the data between the two networks. The gateway address is given in the same
format as the IP address.
Subnet masks are used for splitting networks into subgroups, or subnets. The
subnet mask is a binary pattern that is matched up with the IP address to turn part of
the address field into a field for subnets.
SMTP
The Simple Mail Transfer Protocol (SMTP) is a TCP/IP protocol used in sending and
receiving e-mail.
TCP
The Transmission Control Protocol (TCP) provides a set of rules used along with the
Internet Protocol (IP) to send data in the form of message units between computers
over the Internet. TCP takes care of keeping track of the individual units of data
(called packets) that a message is divided into for efficient routing through the
Internet.
UDP
The User Datagram Protocol (UDP) is a communications protocol that offers a
limited number of services when messages are exchanged between computers in a
network that uses the Internet Protocol (IP). UDP is an alternative to the
Transmission Control Protocol (TCP). UDP uses the Internet Protocol to actually get
a data unit from one computer to another. UDP does not provide the division of a
message into packets and reassembling it at the other end. Specifically, UDP does
not provide sequencing of the packets that the data arrives in.
Higher level protocols
Modbus/TCP
The Modbus protocol in the module is conform to the Modbus/TCP specification 1.0.
More information about the Modbus/TCP protocol can be found at ‘http://
www.modicon.com/openmbus/index.html’.
Communication
27
Quick start
This section provides a quick example on how to get the module up and running. It
provides an easy way to configure the network settings.
PC requirements
• An Ethernet network adapter
• Windows™ 98/ME/2000/XP
• A World Wide Web browser, such as Microsoft Internet Explorer 5.5 or higher, or
Netscape 6.2 or higher
• JAVA Virtualmachine 1.0 installed for the browser in use
• Telnet and FTP clients for module configuration (if needed).
Connecting the module to your network
Make sure that the power is switched off. Connect the Ethernet network cable to the
RJ-45 connector of the module. Use a ferrite core on the cable at the PC end to
ensure proper functioning of the connection.
Configuring the IP address
• Set all configuration DIP switches to the OFF position. Switch the auxiliary 24 V
DC power on.
• Open the DOS prompt on the PC.
• Type ‘arp -s <IP address> <MAC address>’
Substitute <MAC address> with the MAC address of your module. The MAC
address is printed on the label on the side of the module. Substitute <IP address>
with the IP address you wish to use for the module. Ask your network
administrator for a free IP address.
• Type ‘ping <IP address>’
• Type ‘arp -d <IP address>’
The module will now adopt the IP address specified in the
‘arp -s’ command.
To read more about configuring the network settings, see section Network
configuration below.
Communication
28
Network configuration
Description of the different IP configuration options:
Method
Description
DIP switch
If the DIP switches are set to a value between 1 and 255, the
IP settings are:
IP address:
192.168.0.xxx (where xxx stands
for a value between 1 and 255)
Subnet mask:
255.255.255.0
Gateway address:
0.0.0.0 (No gateway set)
DHCP/BOOTP
If DHCP/BOOTP is enabled in the network configuration (see
Configuration files ‘ethcfg.cfg’ below), and the appropriate
server is found on the network, the module’s IP settings are
defined by the DHCP/BOOTP server.
Predefined in the
flash memory of
the module
If no configuration is stored in the flash memory, the module
will indicate an error on the status LED and the module will
only run the ARP protocol (see below).
ARP
Change the IP address from a PC with following commands:
arp -s <IP address> <MAC address>
ping <IP address>
arp -d <IP address>
The arp -s command will store the IP and MAC address in
the PC ARP table. When the ping command is executed, the
PC will send the message to the module, by using the MAC
address. The module changes it’s IP address to the given
one.
Note
Must be set before initialisation.
The predefined subnet can only
be used on an intranet.
A DHCP or BOOTP server is
required.
Module MAC address required.
The new IP address is stored in
the flash memory of the NETA-01.
The NETA-01 must be in the
same subnetwork as the PC.
Normally, if D-class address is not
divided into VLANs, the first three
bytes (octets) of the new IP
address must be the same as the
IP address of the PC executing
the command.
File system
The file system is a fixed-size storage area with a hierarchical directory structure. It
is located on a flash memory of the module. Any data, user or application can be
stored in files within the file system. Files can be grouped in directories for
readability.
The file system features two security levels. Depending on the security level,
different users can have access to different files and directories. The application
however, always has unrestricted access to the file system.
The file system is accessible via FTP, Telnet and HTTP.
Case sensitivity
The file system is case sensitive. This means that the file ‘abb.txt’ is not identical to
the file ‘ABB.TXT’.
File name / path name length
File names can be maximum 48 characters long. Path names can be 256 characters
in total. (filename included).
Communication
29
File size
The file size is not restricted. However, a file can not be larger than the available free
space.
Free space
There is approximately 1 mega bytes of free space available for user files.
Security
Telnet & FTP
The Telnet and FTP systems feature two security levels; Administration and Normal.
In Administration mode, the user has full access to the file system. This enables the
user to access areas of the file system, that are restricted or inaccessible in Normal
mode. The security level can be set individually for each user login.
The Normal mode is recommended for normal operation where webpages and other
settings are protected. If a valid administrator password file (See section System
files) is found, the module operates in normal mode. The FTP and Telnet servers are
enabled only if there is a subdirectory called ‘\user’. When a normal user connects
via FTP or Telnet, this directory will be their root directory. The user can not access
files outside this directory and its subdirectories.
If a user/password protection for FTP and Telnet is required in normal mode, a file
called ‘sys_pswd.cfg’ must be placed in the directory ‘\user\pswd\’, see section
System files. Files in this directory cannot be accessed from a web browser.
The Administration mode is intended for product development only. Username/
password combinations found in the administrator password file (See section
System files) gain the access to the entire file system.
HTTP
The web system features three different security levels: Administration, Privilege and
Normal.
• The Normal user has only access to monitor.
• The Privilege user has access to view and change parameters, datasets (if
enabled) and has access to the motor control applet.
• The Administrator user, in addition to above, has access to the Configuration
applet. (See section Configuration applet in chapter Java applets)
For information about the files related to the security levels, see section System files.
Files within the file system can be protected from web access through username/
password authorisation. It is also possible to configure which IP addresses and
protocols are allowed to access the module, see section System files,
‘web_accs.cfg’ and ‘ip_accs.cfg’ below.
Communication
30
File structure
Root directory in Administration Mode
Root directory in Normal Mode
user
ethcfg.cfg (Ethernet settings)
pswd
ip_accs.cfg (Allowed IPs)
sys_pswd.cfg
(Telnet & FTP Normal Mode
passwords)
normal_login.psw
(Normal web user passwords)
priv_login.psw
(Privilege web user passwords)
admin_login.psw
(Administrator web user
passwords)
telwel.cfg (Telnet welcome message)
web_accs.cfg (Access control)
pswd
ad_pswd.cfg
(Telnet & FTP
Administration Mode
password file)
applets
Java applets for
controlling and
configuring the drive(s)
email
email_1.cfg
·
·
·
(User-defined
e-mail files)
email_9.cfg
Figure 4. Structure of the file system, location of the system files and areas that can
be accessed in Administration mode and Normal mode
System files
The module uses these files for configuration purposes. The system files are ASCII
files and can be edited with any text editor. Depending on the security settings, the
files may be inaccessible for normal users.
Note: These files are not to be used to store any user or application data.
Configuration files
‘ethcfg.cfg’
This file contains the network configuration and it is read by the module at start up.
For more information about network configuration see section Network configuration
above.
Note: The module needs to be restarted for changes in this file to take effect.
Communication
31
The format of the file is the following:
Example (default settings used):
[IP address]
10.58.18.11
[Subnet mask]
255.255.255.128
[Gateway address]
10.58.18.1
[SMTP address]
0.0.0.0
SMTP address must be configured in order to be able
to send e-mails.
[DHCP/BOOTP]
ON - Enabled
OFF
OFF - Disabled
[Speed]
Auto - Default. Auto negotiation will be used.
Auto
100 - Forces the module to operate only at 100mbit
[Duplex]
Auto - Default. Auto negotiation will be used.
10 - Forces the module to operate only at 10mbit
Full - Forces the module to operate only at full duplex
Auto
Half - Forces the module to operate only at half
duplex
The contents of this file can be redirected by placing the line
‘[File path]’ on the first row, and a file path on the second.
Example:
[File path]
\user\eth_settings.cfg
In this example, the settings described above will be loaded from the file
‘user\eth_settings.cfg’. This permits normal users to access the network
configuration settings.
‘ip_accs.cfg’
It is possible to configure which IP addresses and what protocols are allowed to
connect to the module. This information is stored in the file ‘\ip_accs.cfg’. The file
contains one or several of the headers below.
[Web]
[FTP]
[Telnet]
[Modbus/TCP]
[All]
The allowed IP addresses are written under each header. The wildcard ‘*’ can be
used to allow IP address ranges. If a protocol header is not given, the system will
use the configuration set under the header ‘All’. If the ‘All’ header is not given, the
protocol will not accept any connections.
Communication
32
Example:
[Web]
10.10.12.*
10.10.13.*
[FTP]
10.10.12.*
[Telnet]
10.10.12.*
[All]
*.*.*.*
The example file above allows all IP addresses beginning with 10.10.12 to access all
protocols in the module. IP addresses beginning with 10.10.13 cannot access the
FTP and Telnet servers. The Modbus/TCP server accepts connections from every IP
address. The contents of this file can be redirected by placing the line ‘[File path]’ on
the first row, and a file path on the second.
Example:
[File path]
\my_settings\ip_access_rights.cfg
In this example, the settings described above will be loaded from the file
‘\my_settings\ip_access_rights.cfg’. (Default settings: file located in root directory, all
connections allowed.)
Note: For data security reasons, it is highly recommended to limit access to the
module to authorised IP addresses only.
Note: The module has to be restarted in order for any changes in this file to take
effect.
Password files
‘ad_pswd.cfg’ & ‘sys_pswd.cfg’
These files contain user name and password information for users in normal mode
(‘sys_pswd.cfg’) and administration mode (‘ad_pswd.cfg’). The files are located in
the directories ‘\user\pswd’ and ‘\pswd’ respectively.
These directories are protected from web browser access.
Example:
User:Password
User2:Password2
In this example, the first username is ‘User’, and the corresponding password is
‘Password’.
If no ‘:’ is present, the password will be equal to the username.
Communication
33
Example:
Username
In this example, both username and password will be ‘Username’.
Note: The default settings for ‘ad_pswd.cfg’ and ‘sys_pswd.cfg’ are admin:admin
and user:user respectively. It is highly recommended that these passwords be
changed after first use.
‘web_accs.cfg’
Files within the file system can be protected from web access through username/
password protection. To protect the files, place a file called ‘web_accs.cfg’ in the
same directory as the files to protect. All files within that directory and its
subdirectories will be protected. Multiple password files may be present in the
system, giving different users access to different files and directories.
Example:
User:Password
[Auth Name]
(Message goes here)
The optional parameter ‘Auth Name’ will be presented in the login dialog box. If it is
not given, the requested file/pathname will be presented instead.
The contents of this file can be redirected by placing the line ‘[File path]’ on the first
row, followed by a list of password files.
Example (with default settings):
[File path]
\user\pswd\admin_login.psw
\user\pswd\priv_login.psw
\user\pswd\normal_login.psw
[Auth Name]
(ABB Webmodule)
In this example, the accepted user/passwords will be loaded from the files
‘\user\pswd\admin_login.psw’, ‘\user\pswd\priv_login.psw’ and
‘\user\pswd\normal_login.psw’.
If any errors in the format of these files is detected the user name/password
protection will be ignored.
Communication
34
‘normal_login.cfg’, ‘priv_login.cfg’ & ‘admin_login.cfg’
The web pages have three different access levels.
• The normal user has only access to view.
• The privilege user has access to view and change parameters and datasets (if
enabled).
• The administrator user has access to view and change parameters and datasets
(if enabled) and has access to the configuration applets.
Place the files to the ‘\user\pswd’ directory to define users at different levels.
Example:
User:Password
[Auth Name]
(Message goes here)
The optional parameter ‘Auth Name’ will be presented in the login window.
The contents of this file can be redirected by placing the line ‘[File path]’ on the first
row, followed by a list of password files.
Note: The default settings for ‘normal_login.cfg’, ‘priv_login.cfg’ and
‘admin_login.cfg’ are normal:normal, priv:priv and admin:admin
respectively. It is highly recommended that these passwords be changed after first
use.
Other
‘telwel.cfg’
The Telnet welcome message can be changed by editing this file. It contains the new
welcome message in ASCII form.
The contents of this file can be redirected by placing the line ‘[File path]’ on the first
row, and a file path on the second.
Example:
[File path]
\my_settings\telnet_welcome_message.txt
In this example, the welcome message will be loaded from the file
‘\my_settings\telnet_welcome_message.txt’.
The default setting is “ABB Drive Web Controller” without redirection.
E-mail files (email_1.cfg, email_2.cfg ... email_10.cfg)
These files contain predefined e-mail messages and information on how and when
to send them. It is possible to have a maximum of 10 user defined e-mail files. The
files must be named ‘email_1.cfg’... ‘email_10.cfg’, and placed in the folders ‘\email’
and ‘\user\email’ respectively.
For a specification of the file format, see section E-mail client below.
Communication
35
If the SMTP server is not configured the e-mail will not be sent. See section
Configuration files ‘ethcfg.cfg’ above for SMTP configuration information.
Note: There will be no indication to the user of whether the system fails to send the
e-mail.
Network services
The NETA-01 module acts as a server on the Ethernet network. It provides HTTP,
FTP and Telnet servers and an e-mail client.
FTP server
The FTP server is used to upload/download files to the file system with standard
FTP client programs. Depending on the security settings, different parts of the file
system can be accessed by the user:
Normal user:
The user must login using a valid username/password combination. The root
directory will be the ‘\user’ directory.
Administrator:
The administrator has unrestricted access to the file system.
Telnet server
Through a Telnet client, the file system can be accessed using a command line
interface similar to MS-DOS™.
Normal user:
The user must login using a valid username/password combination. The root
directory will be the ‘\user’ directory.
Administrator:
The administrator has full access to the file system.
General commands
The following help menu can be viewed with the help command.
General commands:
help
version
exit
- Help with menus
- Display version information
- Exit station program
Also try ‘help [general|diagnostic|filesystem]’
Diagnostic commands
The following help menu can be viewed with the help diagnostic command.
Communication
36
Diagnostic commands:
arps
iface
sockets
routes
-
display
display
display
display
ARP stats and table
net interface stats
socket list
IP route table
File system commands
The following help menu can be viewed with the help filesystem command.
Filesystem commands:
dir
md
rd
cd
format
del
ren
move
copy
type
mkfile
append
-
Lists the content in a directory
Make a directory
Delete a directory
Change current directory
Format the file system
Delete a file
Rename a file or directory
Move a file or directory
Copy a file
Type the content of a file
Make a file
Append a line to a file
For commands with file names, directory names or paths the names can be written
as they are or within “ “ characters. For names with spaces “ “ must be used.
Note: The format command can only be used in the administration mode. (See
section Security above.)
HTTP server
The module features a complete web server. With the web pages created in the
module, a web browser can access the configuration of the module and control
multiple drives connected to the module.
Virtual files
The module contains a set of virtual files that can be used when building a web page
for configuration of network parameters. These virtual files can be overwritten (not
erased) by placing files with the same name in the root directory of the file system.
By using this feature it is for example possible to replace the ABB logo by uploading
a new logo named ‘\logo.gif’. It is also possible to make links from a web page to the
virtual configuration page, the link pointing to ‘\config.htm’.
Communication
37
The available virtual files are:
index.htm
Shows the contents of config.htm
config.htm
Configuration frame page
configform.htm
Configuration form page
store.htm
Configuration store page
logo.gif
ABB logo
configuration.gif
Configuration picture
boarder.bg.gif
picture
boarder_m_bg.gif
picture
Security
All files except files in the directories ‘\user\pswd\’, ‘\pswd\’ and files named
‘web_accs.cfg’ can be viewed by default. Other directories can be protected by
placing a file called ‘web_accs.cfg’ in the directory to protect. The file contains a list
of users that are allowed to browse that directory. See section Password files
‘web_accs.cfg’ above for a specification of the file format.
SSI functions
SSI functions give the web browser access to edit configuration settings and alter
data in the memory of the module. The functions can also be included in e-mails.
See the Advanced user’s manual which can be downloaded with an FTP client from
the file system of the module from the directory ‘\manual’ (not implemented at the
time of printing).
E-mail client
The e-mail client sends e-mails from the module. To send an e-mail, the IP address
of an SMTP server must be set in the ‘ethcfg.cfg’ configuration file (see section
Configuration files). Without a valid SMTP address the module will not be able to
send any e-mail messages.
Sending a predefined e-mail on data event
It is possible to send predefined e-mail messages to predefined receivers, triggered
by an event in the memory of the module. The module has a scan time of 0.5
seconds. The event must be present longer than 0.5 seconds to ensure that it is
detected by the module.
Up to 10 user defined e-mails can be triggered on different events. They are placed
in the directories ‘\user\email\’ for user configurable e-mails and ‘\email’ for non-user
configurable e-mails.
Communication
38
The files have the following format:
[Register]
Area, Offset, Type
[Register match]
Match Value, Mask, Match operand
[To]
Recipients Address
[From]
Sender Address
[Subject]
Subject line
[Headers]
Extra Headers
[Message]
Message body
Parameter
Description
Area
Source area in the memory. Possible values are ‘IN’ or ‘OUT’
Offset
Source offset in the memory, written in decimal or hexadecimal
Type
Source data type. Possible values are ‘byte’, ‘word’, and ‘long’
Match Value
Value to compare with the source data written in decimal or
hexadecimal
Mask
The module performs a logical ‘and’ on the source data and the Mask
parameter before the value is compared with the Match Value. The
value written in decimal or hexadecimal.
Match Operand
The parameter specifies how the data shall be compared with the
Match Value. Possible values are ‘<‘, ‘=’ and ‘>’.
Recipients Address
Destination e-mail address
Sender Address
Sender e-mail address
Subject line
E-mail subject (Only one line)
Extra Headers
Can be used when sending for example HTML e-mails. (Optional)
Message Body
The actual e-mail message
Note: Hexadecimal values are written in the format 0xN where ‘N’ is the
hexadecimal value.
Communication
39
The data is read in the memory from the area and offset specified by the parameters
Area and Offset. The data size to read is specified by the Type parameter. The
module performs a logical ‘AND’ between the read data and the parameter Mask.
The result is compared with the parameter Match Value. The Match Operand
specifies how to compare the data.
Note: If the [Register] or [Register match] information is changed, the
module must be powered down and then up for changes to take effect. Other
changes will take effect directly without a power cycle.
Example:
[Register]
IN, 0x0003, byte
[Register match]
0x20, 0x7F, >
[To]
[email protected]
A byte is read from the IN area, at
offset 0x0003.
The module performs a logical
<data> AND 0x7F.
If the result is greater than 0x20, the
e-mail message is sent.
[From]
[email protected]
[Subject]
Status
[Message]
All data correct.
Communication
40
Modbus/TCP
The implementation of the Modbus/TCP server is done according to the Modbus/
TCP specification 1.0. All commands according to class 0 and class 1 are
implemented and some of the class 2 commands. (See Table 2.)
The Modbus/TCP protocol allows the module to be used as an Ethernet bridge to
control the drive(s). The module can handle eight simultaneous connections.
Table 2. Supported commands
Function Code
Communication
Function Name
Class
Affects Area
Addressing
Method
1
Read coils
1
Read/Write
Bit
2
Read Input discretes
1
Read/Write
Bit
3
Read multiple registers
0
Read/Write
Word
4
Read input registers
1
Read/Write
Word
5
Write coil
1
Write
Bit
6
Write single register
1
Write
Word
7
Read exception status
1
-
-
15
Force multiple coils
2
Write
Bit
16
Force multiple registers
0
Write
Word
22
Mask write register
2
Write
Word
23
Read/Write registers
2
Read/Write
Word
41
Modbus/TCP addressing
The NETA-01 Read and Write areas can be configured to a maximum size of 2048
bytes each. When accessing these areas with Modbus commands, the addressing is
done according to the following tables.
Modbus register Write area (Modbus/TCP master to drive):
Address
Name
Information
Basic Dataset 1 (or 10) (Control Word and references)
0x400
Drive 1 – Main Control Word
0x401
Drive 1 – Reference 1
0x402
Drive 1 – Reference 2
0x403
Drive 2 – Main Control Word
0x404
Drive 2 – Reference 1
0x405
Drive 2 – Reference 2
0x406
Drive 3 – Main Control Word
Sent to each drive as Dataset 1
(or 10) and responded to by the
drives in Dataset 2 (or 11) (see
the Read area).
•••
0x41A
Drive 9 – Reference 2
Additional datasets
0x41B
1st dataset – Index 1
0x41C
1st dataset – Index 2
0x41D
1st dataset – Index 3
0x41E
2nd dataset – Index 1
0x41F
2nd dataset – Index 2
0x420
2nd dataset – Index 3
0x421
3rd dataset – Index 1
Additional datasets defined in the
Configuration applet (Dataset
tab). See also the Read area.
•••
0x456
20th dataset – Index 3
Write Parameter Command (Area 1)
0x4E0
DRIVE NUMBER
Drive number
0x4E1
GROUP WRITE
Parameter group no.
0x4E2
INDEX WRITE
Parameter index
0x4E3
DATA
Parameter value
0x4E4
Message ID
Must be unique
Communication
42
Address
Name
Information
Read Parameter Command (Area 1)
0x4E5
DRIVE NUMBER
Drive number
0x4E6
GROUP READ
Parameter group no.
0x4E7
INDEX READ
Parameter index
0x4E8
Message ID
Must be unique
Write Parameter Command (Area 2)
0x4F0
DRIVE NUMBER
Drive number
0x4F1
GROUP WRITE
Parameter group no.
0x4F2
INDEX WRITE
Parameter index
0x4F3
DATA
Parameter value
0x4F4
Message ID
Must be unique
Read Parameter Command (Area 2)
0x4F5
DRIVE NUMBER
Drive number
0x4F6
GROUP READ
Parameter group no.
0x4F7
INDEX READ
Parameter index
0x4F8
Message ID
Must be unique
Modbus register Read area (Drive to Modbus/TCP master):
Address
Name
Information
Basic Dataset 2 (or 11) (Status Word and actual values)
0x00
Drive 1 – Main Status Word
0x01
Drive 1 – Actual value 1
0x02
Drive 1 – Actual value 2
0x03
Drive 2 – Main Status Word
0x04
Drive 2 – Actual value 1
0x05
Drive 2 – Actual value 2
0x06
Drive 3 – Main Status Word
•••
0x1A
Communication
Drive 9 – Actual value 2
This dataset is the response to
Dataset 1 (or 10) (see the Write
area).
43
Address
Name
Information
Additional datasets – Response
0x1B
1st dataset – Index 1 (Response)
0x1C
1st dataset – Index 2 (Response)
0x1D
1st dataset – Index 3 (Response)
0x1E
2nd dataset – Index 1 (Response)
0x1F
2nd dataset – Index 2 (Response)
0x20
2nd dataset – Index 3 (Response)
0x21
3rd dataset – Index 1 (Response)
Response to additional datasets
defined in the Configuration
applet (Dataset tab) (see the
Write area).
•••
0x56
20th dataset – Index 3 (Response)
Scanning Parameters – Response
0xA0
Parameter 1 value
0xA1
Parameter 2 value
•••
0xCB
Parameter 44 value
0xCC
Parameter 45 value
Parameters to be scanned (and
scanning rate) are selected using
the Configuration applet.
The selected values are read
cyclically from the drive.
Write Parameter – Response (Area 1)
0xE0
WRITE_STATUS
0 = OK; 1 = Error
0xE1
Message ID
Given at 0x4E4
Read Parameter – Response (Area 1)
0xE2
READ_STATUS
0 = OK; 1 = Error
0xE3
DATA
Parameter value
0xE4
Message ID
Given at 0x4E8
Write Parameter – Response (Area 2)
0xF0
WRITE_STATUS
0 = OK; 1 = Error
0xF1
Message ID
Given at 0x4F4
Read Parameter – Response (Area 2)
0xF2
READ_STATUS
0 = OK; 1 = Error
0xF3
DATA
Parameter value
0xF4
Message ID
Given at 0x4F8
Communication
44
Supported exception codes
Exception
code
Name
Description
01
Illegal function
The module does not support the function code
in the query
02
Illegal data address
The data address received in the query is
outside the initialized memory area
03
Illegal data value
The data in the request is illegal
Mailbox Interface
Mailbox commands are explained in the Supplementary manual of the module which
is available through ABB distributors.
Communication
45
Java applets
Overview
This chapter gives instructions on using the Java applets in the NETA-01 module.
The Java applets included in the module are used to communicate with the drive or
the drives. Depending on user access level, parameters can be changed and the
drives can be configured and controlled.
Starting up the applets
After the module has been configured for the Ethernet network, use a PC to start up
a web browser and type the IP address of the module in the address field e.g.
‘http://192.168.0.10’. Press enter and login with a username and a password defined
in the password files. (See section Password files in chapter Communication.)
Configuration applet
Some of the configurable options in the module can be configured in the
Configuration applet. It contains four different tabs labelled Drives, Network, Dataset
and Scanning Parameters.
Note: Any changes made using the Configuration applet take effect only after
rebooting the module.
Java applets
46
Drives tab
Figure 5. Configuration applet, Drives tab
The Drives tab configures which drives are connected to the module. Drive 1 should
be connected to channel 1 on the NDBU-85/95, Drive 2 to the channel 2, etc. In case
ring topology is used, it is necessary to put the drives in order, starting with Drive 1
and ending the ring with the last drive number.
The ‘State’ field contains the following selections:
• Disabled: No drive connected.
• FBA DSET1: The drive uses dataset 1 as the source for control of the drive.
• FBS DSET10: The drive uses dataset 10 as the source for control of the drive.
A description of the drive can be written in the ‘Name’ field (max. 20 characters).
By default, ‘Allow dataset editing’ is unticked, meaning that manual editing of input
datasets through the Datasets applet (see below) is disabled. The applet will only
display the values currently stored in the memory of the NETA-01 module. If the
module is connected to channel CH0 of the drive, datasets are cyclically written to
the drive. If the module is connected to CH3, no datasets are written to the drive.
With ‘Allow dataset editing’ ticked, the datasets in the memory of the NETA-01 can
be manually edited through the Datasets applet, and the datasets are cyclically
written to the drive (independent of whether the module is connected to CH0 or
CH3).
The ‘Enable Motor control applet’ enables the Motor Control applet where it is
possible to start and stop the motor (see below).
Java applets
47
Network tab
Figure 6. Configuration applet, Network tab
The radio buttons under ‘Network Type’ define the DDCS network type, either Ring
or Star topology. If the star topology is selected, the NBDU Branching Unit address
must be given.
The baudrate is set to 4 MBit by default, but it can be changed to 1 MBit if the fibre
optic channels of the drives can not handle 4 MBit/s. The module sets the selected
baudrate accordingly on the drive side.
If the module is connected to the fibre optic channel CH3 of the drive, verify that the
‘Tool Channel (Ch3)’ checkbox is ticked. The sequence to scan channel 3 is less
frequent than the sequence for channel CH0, which makes the communication to
channel CH3 slower than to channel CH0. If ‘Allow dataset editing’ under the Drives
tab is not selected, no datasets are written to channel CH3.
The ‘Maximum Receive Time’ is the maximum time between two consecutive
ModBus/TCP messages. If a master writes no datasets in the time specified, the
module stops the writing of datasets to the drives. Depending on the “loss of
communication” parameter setting in the drive, the motor either stops or continues
running.
The ‘Ethernet DDCS Port’ is the DDCS server port number the applets use to
communicate with the drives. The default port number can be changed if it is already
used by another user-defined server.
Java applets
48
Dataset tab
Figure 7. Configuration applet, Dataset tab
20 additional datasets can be read from the drives in addition to the basic dataset
(FBA DSET 1 or FBA DSET 10). The additional datasets can be allocated to one or
several drives.
Note: See the Firmware Manual of the drive for information on dataset numbering.
Datasets can either be added or removed. To add a dataset, select the drive number
(Drive 1 to Drive 9), enter the dataset number and click the Insert button. By ticking
the ‘Writeable’ checkbox, the dataset is written to the drive; otherwise the dataset is
only read from the drive. To remove a dataset, select the line to be removed and
click the Remove button.
Java applets
49
Scanning Parameters tab
Figure 8. Configuration applet, Scanning Parameters tab
The Scanning Parameters feature can be used to monitor the parameters of drives
that do not support more than the basic dataset. A maximum of 45 parameters can
be monitored. The parameters can be distributed between several drives.
The ‘Time between parameter scans:’ field controls how often a parameter should be
updated from the drive. The minimum setting of this parameter is 100 ms. For
example, with the settings shown above, the module reads the parameters at 100
ms intervals, thus requiring 400 ms to update all four parameters.
Status applet
The Status applet reads the status words from the module determining whether the
drive is running properly or has faulted. The lamp button indicates green for Healthy,
red for Fault and yellow for Alarm/Warning.
The applet uses Modbus commands to read dataset 2 from the drive, which is then
stored in the memory of the module. Depending on the drive type, the drives have
the status word either in dataset 2 or in dataset 11. The dataset information has to be
configured in the Configuration applet. (See section Configuration applet above.)
Java applets
50
The drive has faulted if status word:
• bit 3 is set
• bit 15 is set
(Communication loss, e.g. broken DDCS link fibre)
• bit 7 is set or all bits are zero.
(Causes a Warning/Alarm)
Figure 9. Status Applet
The Status applet for all the drives is always visible. The drive dataset numbers and
drive names are configured in the Configuration applet.
Pressing the “light bulb” button loads the applet showing all the bits in the status
word. The display shows the meaning of each bit. The uppermost bit corresponds to
LSB, the lowermost bit to MSB.
Pressing the name of the drive loads the Menu applet where the other applets, such
as Parameters, Datasets and Logger applets, can be started.
Java applets
51
Menu applet
All the other applets can be started from the Menu applet.
Figure 10. Menu applet
Parameters applet
The drive set-up can be done using the Parameters applet.
Figure 11. Parameters applet
Java applets
52
The parameter group is selected from the drop down menu, after which all the
available parameters in that group are presented with names and values.
Note: Adaptive Programming parameters (in drives such as the ACS 800) are not
fully supported and may display incorrect values.
The values are formatted as follows:
Type
Value presentation
1. Boolean
Two display strings. ‘True’ or ‘False’.
3. Integer 16
Displays strings if any, otherwise decimal value.
4. Integer 32
Not supported.
8. Float
Floating integer shown in 2 decimals.
9. Visible
Visible string of 20 bytes.
10. Octet String
Not supported.
14. Bit String
Hex format i.e. 0x1A3F.
There are three buttons in the applet.
• The Refresh Values button updates the parameter values from the drive.
• The Close button closes the applet.
• If the user has the access to change parameter values, the Set Value button
opens a Set Value window. Otherwise the button is disabled.
Figure 12. Set Value
The applet does not accept values outside the minimum and maximum limits.
Java applets
53
Fault Log applet
The Fault Log applet reads all recent faults stored in the drive.
Figure 13. Fault Log applet
The Clear Faults button clears the fault log and uploads the fault list again from the
drive to make sure that the fault log has been cleared.
Java applets
54
Datalogger applet
The Datalogger applet utilises the internal data loggers of the drives.
Figure 14. Datalogger applet
If the drive has more than one datalogger, the logger desired can be selected with
the drop down menu. The status window is updated once a second.
Only users with privileged access can control the Datalogger.
To configure the datalogger, click the Settings button (only available when the
datalogger is stopped). To start or stop the logger, use the Start Logger or Stop
Logger buttons respectively. To reset the logger, click the Reset button. The
Information button shows the datalogger configuration.
To view the contents of the log, first click the Upload Samples button, then click the
Values button to view the log contents in numerical format or the Graph button to
view the log contents in graphical format.
Java applets
55
Datalogger initialization
Figure 15. Datalogger Initialization
The Datalogger Initialization applet is loaded by pressing the Settings button in the
Datalogger applet. It is available only for privilege and administrator users.
The applet defines
• the datalogger sample rate (Time Coefficient)
• the signals to be recorded (Add/Remove Variables)
• the amount of samples before triggering condition occurs
• the triggering condition
• the triggering reference signal (Set Trig Variable)
• the trigger level (Trig Level) and trigger level hysteresis (Trig Hyst.).
Java applets
56
Datalogger information
Figure 16. Datalogger Information
The Datalogger Information window gives an overview of how the datalogger has
been configured.
Java applets
57
Datasets applet
The Datasets applet monitors and writes (if enabled) datasets.
The output datasets at the drive are polled and updated every 500 ms. The first
dataset for all the drives is always visible. Another 20 datasets can be selected for
monitoring and editing in the Configuration applet. The values can be displayed in
either decimal or hexadecimal format.
Figure 17. Datasets applet
Writing manually to the datasets is possible if ‘Allow dataset editing’ is enabled in the
Configuration applet. If disabled, the values of the input datasets are read cyclically
from the memory of the NETA-01.
Drive documentation
This button opens an URL defined by a drive parameter. The feature is not available
for all drive types. If the URL parameter is undefined (empty), or not present in the
drive type in question, ‘www.abb.com’ is opened.
Java applets
58
Motor Control applet
The applet is available if ‘Enable Motor control applet’ is enabled in the Configuration
applet.
Figure 18. Motor Control applet
The Motor Control applet can Start/Stop and Reset the drive. The reference speed
can be set between -100% and 100%. ‘Actual Speed’ shows the integer value of
dataset 2 index 2. (See the Drive Manual for integer scaling.)
Note: When the Motor Control applet is active, scanning parameters are not
updated.
Java applets
59
Fault tracing
Overview
This chapter gives diagnostic information for finding out the root causes and
corrections to the most common problems with the NETA-01 module.
Diagnostic LEDs
3
AC
TIVE
24V
IN
LIN
KED
MB/
TCP
STAT
PWR/
DDCS RST
Description
ACTIVE
LED
Off
Not on-line / Not powered
Flashing green
A packet is received or transmitted through the Ethernet
module
Off
Not on-line / Not powered
Steady green
Module connected to Ethernet network
Off
Not on-line / Not powered
Flashing green
The number of established Modbus/TCP connections to the
module equals the number of flashes.
Off
Not powered
Flashing green
The IP address is not configured by the configuration DIP
switches.
Flashing red 1 Hz
Ethernet configuration failed
Flashing red 2 Hz
Failed to load ethernet configuration from memory.
Flashing red 4 Hz
Internal error (fatal)
STAT
MB/TCP
Mode
LINKED
The LEDs are bicolour (green/red) with white diffused lens.
Fault tracing
60
PWR/RST
DDCS
LED
Mode
Description
Off
Not powered
Flashing green
DDCS initialisation in progress
Green
DDCS communication established
Flashing red 2Hz
DDCS communication errors
Red
Drive not supported
Off
Module not powered
Green
Module powered
Flashing red
DDCS configuration failed
Red
Hardware failure
Installation problem
Verify all the connections on the module:
• Power and Ethernet cables are connected as described in chapter Electrical
installation.
• Fibre optic cables are connected on the correct fibre optic channel of the drive or
the NDBU-85/95, and the NETA-01 module.
• Check that there is a ferrite core on the Ethernet cable.
Drive setup
If the fieldbus parameter group is not shown on the drive panel:
• Enable the NETA by setting the appropriate drive parameter.
If the drive actual values can be read, but the control commands (start/stop or
reference) do not go through:
• Check that the control location parameters of the drive are set to
use the NETA as the source of the required command.
• Check that the drive is in REMOTE control.
• Check the MacID (node address number).
Fault tracing
61
Technical data
DDCS link
Compatible devices: ABB ACS/ACH 400, ACS/ACP/ACF 600, DCS 600, ACS 800,
ACS 1000 drives.
Size of the link: 2 stations
Medium: Fibre optic cable
• Construction: Plastic core, diameter 1 mm, sheathed with plastic jacket
• Attenuation: 0.31 dB/m
• Maximum Length between Stations: 10 m
• Specifications:
Parameter
Minimum
Maximum
Unit
Storage Temperature
-55
+85
°C
Installation Temperature
-20
+70
°C
50
N
Short Term Tensile Force
Short Term Bend Radius
25
mm
Long Term Bend Radius
35
mm
Long Term Tensile Load
Flexing
1
N
1000
cycles
Topology: Point-to-point
Serial communication type: Asynchronous, half Duplex
Transfer rate: 4 Mbit/s
Protocol: Distributed Drives Communication System (DDCS)
Connectors: Blue – receiver; grey – transmitter
Technical data
62
Fieldbus link
Compatible devices: Ethernet standard IEEE 802.3 and 802.3u devices
Medium: 10base-TX
• Termination: Internal
• Wiring: CAT 5 UTP, CAT 5 FTP* or CAT 5 STP* (*recommended)
• Connector: RJ-45
• Maximum segment length: 100 m
Topology: bus, star
Serial communication type: half and full Duplex
Transfer rate: 10 / 100 Mbps
Carrier protocol: TCP/IP
Application protocols:
• HTTP
• FTP
• Telnet
• Modbus/TCP
• SMTP
NETA-01
Enclosure: Plastic, dimensions 93 × 35 × 76.5 mm (H×W×D); degree of protection
IP20
Mounting: Onto a standard mounting rail
Settings: Through drive parameters and/or DIP switches
Current consumption: 80 mA at 24 V DC ±10 %
Connectors:
• Light transmitter (grey) and receiver (blue) (Hewlett-Packard Versatile Link) for
connection to the drive
• RJ-45 connector for Ethernet connection
General:
• All materials are UL/CSA approved
• Complies with EMC Standards EN 50081-2 and EN 50082-2
Technical data
63
Ambient conditions
Ambient conditions, operation
Ambient operating conditions refer to the conditions the option module is subjected
to when installed for stationary use.
Air temperature: 0 to +50 °C
Relative humidity: 5 to 95 %, no condensation allowed. Maximum allowed relative
humidity is 60 % in the presence of corrosive gases.
Contamination levels:
Chemical gases: IEC 60721-3-3, Class 3C2
Solid particles: IEC 60721-3-3, Class 3S2
Installation site altitude: 0 to 2000 m. If the installation site is above 2000 m,
contact local ABB representative.
Vibration: Max 0.3 mm (2 to 9 Hz), max 1 m/s2 (9 to 200 Hz) sinusoidal
(IEC 60068-2-6)
Shock: Max 70 m/s2, 22 ms (IEC 60068-2-27)
Ambient conditions, storage
Ambient storage conditions refer to the conditions the option module is subjected to
during storage in the protective package.
Temperature: -40 to +70 °C.
Relative humidity: Less than 95 %, no condensation allowed
Atmospheric pressure: 70 to 106 kPa
Vibration: Max 1.5 mm (2 to 9 Hz), max 5 m/s2 (9 to 200 Hz) sinusoidal
(IEC 60068-2-6)
Shock: Max 100 m/s2, 11 ms (IEC 60068-2-27)
Ambient conditions, transportation
Ambient transportation conditions refer to the conditions the option module is
subjected to during transportation in the protective package.
Temperature: -40 to +70 °C
Relative humidity: Less than 95 %, no condensation allowed.
Atmospheric pressure: 60 to 106 kPa
Vibration: Max 3.5 mm (2 to 9 Hz), max 15 m/s2 (9 to 200 Hz) sinusoidal
(IEC 60068-2-6)
Shock: Max 100 m/s2, 11 ms (IEC 60068-2-27)
Bump: Max 300 m/s2, 6 ms (IEC 60068-2-29)
Free Fall: 250 mm
Ambient conditions
64
Ambient conditions
3AFE 64605062 REV B EN
EFFECTIVE: 13.10.2003
ABB Oy
AC Drives
P.O. Box 184
FIN-00381 HELSINKI
FINLAND
Telephone
+358 10 22 11
Fax
+358 10 22 22681
Internet
http://www.abb.com
ABB Inc.
Automation Technologies
Drives & Motors
16250 West Glendale Drive
New Berlin, WI 53151
USA
Telephone
262 785-3200
800-HELP-365
Fax
262 780-5135