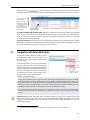
1
RTI Spreadsheet Add-in
for Microsoft® Excel®
User’s Manual
Version 5.2.0
© 2010-2015 Real-Time Innovations, Inc.
All rights reserved.
Printed in U.S.A. First printing.
June 2015.
Trademarks
Real-Time Innovations, RTI, NDDS, RTI Data Distribution Service, DataBus, Connext, Micro DDS, the RTI
logo, 1RTI and the phrase, “Your Systems. Working as one,” are registered trademarks, trademarks or
service marks of Real-Time Innovations, Inc. All other trademarks belong to their respective owners.
Copy and Use Restrictions
No part of this publication may be reproduced, stored in a retrieval system, or transmitted in any form
(including electronic, mechanical, photocopy, and facsimile) without the prior written permission of RealTime Innovations, Inc. The software described in this document is furnished under and subject to the RTI
software license agreement. The software may be used or copied only under the terms of the license
agreement.
Technical Support
Real-Time Innovations, Inc.
232 E. Java Drive
Sunnyvale, CA 94089
Phone:
(408) 990-7444
Email:
[email protected]
Website:
https://support.rti.com/
Contents
1
Welcome to Spreadsheet Add-in for Microsoft Excel
1.1 Paths Mentioned in Documentation................................................................................................... 1-2
1.2 Installation Notes .................................................................................................................................. 1-3
1.3 Available Documentation..................................................................................................................... 1-3
2
Learning the Basics
2.1 The Spreadsheet Add-in Toolbar ........................................................................................................ 2-1
2.2 Starting the Add-in ............................................................................................................................... 2-2
2.3 Monitoring Topics ................................................................................................................................. 2-3
2.3.1 Filter Expression Details ............................................................................................................ 2-6
2.4 Subscribing to Data ............................................................................................................................... 2-8
2.5 Publishing Data ....................................................................................................................................2-11
2.5.1 Creating a Publication Table ....................................................................................................2-11
2.5.2 Filling in the Data to be Published ......................................................................................... 2-12
2.5.3 Publishing the Data .................................................................................................................. 2-13
2.6 Monitoring Built-in Topics................................................................................................................. 2-14
2.7 Integration with Extensible Types .................................................................................................... 2-16
2.8 Providing Type Definitions in XML ................................................................................................. 2-19
2.8.1 Storing the Type Definitions where the Add-in Expects Them ......................................... 2-19
2.8.2 Creating a Topic Monitor using XML Types......................................................................... 2-20
2.8.3 Creating a Publication via XML.............................................................................................. 2-21
3
Configuring the Spreadsheet Add-in
3.1 Configuration Parameters.................................................................................................................... 3-1
3.2 Changing Data Refresh Frequency (Throttle Interval) and Auto-Publish Rate........................... 3-7
3.2.1 Update Frequency for Subscribing Cells................................................................................. 3-7
3.2.2 Auto Publish Frequency ............................................................................................................ 3-7
3.3 Using Different Domains at the Same Time ...................................................................................... 3-8
4
Visual Basic for Applications (VBA) Functions for the Spreadsheet Add-in
4.1 Enabling Visual Basic Support ............................................................................................................ 4-1
4.2 Supported VBA Functions ................................................................................................................... 4-2
4.3 Using VBA Functions ........................................................................................................................... 4-2
A
Troubleshooting
A.1 License Management ........................................................................................................................... A-1
iii
A.2 Changing the Excel Throttle Interval, RTDThrottleInterval .......................................................... A-2
A.3 Spreadsheet Add-in does not Appear in Excel ADD-INS Tab ...................................................... A-3
A.3.1 Enabling Spreadsheet Add-In After Recovering from a Loading Error ............................ A-3
A.4 Spreadsheet Add-in Appears Unresponsive in Excel 2013 ............................................................ A-3
B
Subscribing to Data with Real-Time Data (RTD) Function
C
Entity Creation and Destruction
D
Controlling File Locations with Registry Settings
iv
Chapter 1
Welcome to Spreadsheet Add-in for Microsoft
Excel
Welcome to RTI® Spreadsheet Add-in for Microsoft Excel. This revolutionary component of RTI Connext™ DDS allows you to rapidly analyze, visualize, and respond to your real-time data, transforming information into intelligent action and ultimately business value. This powerful tool
leverages ubiquitous Microsoft Excel technology to radically increase the productivity of both
analysts and decision makers by decreasing the amount of time and effort that stand between
the arrival of information and the actions taken in response to that information.
Traditionally, data analysis involves recording the data, post-processing it (perhaps with handcoded programs), and creating static summaries and reports by hand. Only then can the data be
visualized, understood, and acted upon. Not only is this process slow and expensive, the information may be obsolete by the time the report is ready. To get real-time data visualization and
analysis, you have to invest in expensive custom tooling—often an impractical option at the user
or the operator level.
Spreadsheet Add-in for Microsoft Excel is different. Your queries, formulas, and charts aren't part of a
static report: they operate on live data that is continually updated in real time. You can even
republish the results of your analysis as it changes, making it instantly available to team members and other applications. There are no custom applications to deploy, administer, or be
trained on: all of this happens within the Microsoft Excel application that you know and use
already.
With Spreadsheet Add-in for Microsoft Excel, application developers can truly enable data-centric
design and focus on putting the data on the network, leaving the visualization aspect to the data
consumers. Dashboards can be created at deployment time and customized according to the
needs of the data consumer.
By leveraging a well-known and widely-used technology such as Excel, you can build alerts,
correlate multiple streams of real-time data, process and analyze high-volume event streams to
uncover opportunities and threats as they happen, not after the fact.
You can easily validate, cleanse, and enrich real-time data, and inject data back into the network,
since Spreadsheet Add-in for Microsoft Excel can work both as a subscriber and a publisher.
Wizards make it simple to create publications and subscriptions using a point-and-click interface.
Key Benefits of Spreadsheet Add-in for Microsoft Excel
❏ Allows spreadsheets to participate seamlessly as peers on a distributed network DataBus™ along with applications written in C, C++, Java, .Net and Ada; Complex Event
Processing (CEP) engines; databases; and mobile and embedded devices.
❏ Supports data injection (write back)
1-1
Paths Mentioned in Documentation
❏ Provides low-latency, real-time analytics and data visualization
❏ Allows introspection, status and health monitoring of Connext DDS applications
❏ Self-contained within an Excel Add-in, requires no separate service or gateway or custom integration code
1.1
Paths Mentioned in Documentation
The documentation refers to:
❏ <NDDSHOME>
This refers to the installation directory for Connext DDS.
The default installation paths are:
• User without Administrator privileges:
<your home directory>\rti_connext_dds-version
• User with Administrator privileges:
C:\Program Files\rti_connext_dds-version
You may also see $NDDSHOME or %NDDSHOME%, which refers to an environment
variable set to the installation path.
Wherever you see <NDDSHOME> used in a path, replace it with your installation path.
When using a command prompt to enter a command that includes the path C:\Program
Files (or any directory name that has a space), enclose the path in quotation marks. For
example:
“C:\Program Files\rti_connext_dds-version\bin\rtiddsgen”
or if you have defined the NDDSHOME environment variable:
“%NDDSHOME%\bin\rtiddsgen”
1-2
Installation Notes
1.2
Installation Notes
Spreadsheet Add-in for Microsoft Excel can be installed with the Connext DDS bundles. When running the installer, make sure you check the 'Yes' button when prompted:
If you want to install at a later time or you forgot to check the 'Yes' option in the installation dialog, you can use the Spreadsheet Add-in standalone installer at any time. This installer is in
<NDDSHOME>\resource\installers\spreadsheet_addin\rti_spreadsheet_addin-<version>.exe.
1.3
Available Documentation
Spreadsheet Add-in for Microsoft Excel documentation includes:
❏
Getting Started Guide (RTI_Spreadsheet_Addin_GettingStarted.pdf)—Highlights the
benefits of Spreadsheet Add-in for Microsoft Excel. It also walks you through a short demonstration and a tutorial, so you can quickly see the benefits of using Spreadsheet Add-in for
Microsoft Excel.
❏
Release Notes (RTI_Spreadsheet_Addin_ReleaseNotes.pdf)—Describes system require-
ments and compatibility, as well as any version-specific changes and known issues.
❏
User’s Manual (RTI_Spreadsheet_Addin_UsersManual.pdf)—Describes how to configure
Spreadsheet Add-in for Microsoft Excel and provides details on each feature.
1-3
Chapter 2
Learning the Basics
If Spreadsheet Add-in for Microsoft Excel has been set up correctly for the current user, it will load
automatically when Excel starts up and you will see a brief message about the add-in being initialized in the status bar at the bottom of the Excel window. If you do not see that message or
there is an error, see Troubleshooting (Appendix A).
2.1
The Spreadsheet Add-in Toolbar
The Spreadsheet Add-in toolbar is your starting point for all of the add-in’s functionality. To see
the Spreadsheet Add-In toolbar, select the Add-Ins tab on the Ribbon.
The commands in the toolbar are summarized below:
RTI Config
❏ Opens a dialog for setting configuration parameters. See Chapter 3 for details.
RTI Monitor Topic
❏ Opens a dialog for creating a subscription table to monitor all instances or a subset of the
instances of a specific topic. See Section 2.3 for details.
This command is only enabled after you have selected Start Add-in.
RTI Add Subscription
❏ Opens a dialog for creating a subscription row to monitor one single instance of a specific
topic. See Section 2.4 for details.
This command is only enabled after you have selected Start Add-in.
RTI Add Publication
❏ Opens a dialog for creating a publication table to publish samples of a specific topic. See
Section 2.5 for details.
This command is only enabled after you have selected Start Add-in.
2-1
Starting the Add-in
RTI Publish Now
❏ Publishes samples in all publication tables now if necessary.
By default, only changed samples will be published. However, you can configure the
add-in so that all samples are published regardless of whether they have been changed
or not. See Section 2.5 for details.
This command is only enabled after you have selected Start Add-in.
RTI Update Now
❏ Checks subscriptions to see if they need to be refreshed with new data.
By default, all subscriptions will be refreshed periodically and automatically if new data
is available. However, you can use this button to force immediate refresh of new data.
It is also possible to create special subscriptions that will not be automatically updated
and can only be updated manually. This button can be used to refresh all special subscriptions that require manual update. See Section 2.3 for details.
By default, this button refreshes all subscriptions in all worksheets in the current Excel
instance. However, you can also configure the add-in so that this button will only update
all the regular automatic-update subscriptions in all worksheets, plus the manual-update
subscriptions in the current worksheet only. See Section 3.1 for details.
This command is only enabled after you have selected Start Add-in.
RTI Monitor Domain
❏ Opens a dialog for creating a table to monitor one kind of discovered entities. See
Section 2.6 for details.
This command is only enabled after you have selected Start Add-in.
Start/Stop RTI Add-in
❏ Starts/stops the add-in. Other than
, no other commands in the toolbar are
enabled until the add-in has been started. See Section 2.2 for details.
2.2
Starting the Add-in
The add-in is not functional until you start it.
Start Microsoft Excel and open a workbook. To use the add-in, you must have an open workbook.
Before starting the add-in, make sure you know the domain ID of the application you want to
communicate with. The add-in must use the same domain ID as the application; it uses domain
ID 0 by default. If you need to use a domain ID other than 0, select
and change the
domain ID in that dialog. (For a complete description of the RTI Config dialog, see Chapter 3:
Configuring the Spreadsheet Add-in.)
Once the add-in is set up to use the correct domain ID, simply click
from the
Spreadsheet Add-in toolbar (or
in the RTI Config dialog) to start discovering other Connext DDS applications in the same domain.
2-2
Monitoring Topics
If the add-in is started correctly, the domain ID will appear in the lower right corner of the
Spreadsheet Add-in toolbar. The other toolbar commands also become enabled.
Running on domain 0
When you start the add-in, it looks for the license file. You may see a window appear with information about the license file—you can close this window. If you get a license error instead, the
add-in will not be functional. (For more information on the license file, see License Management
(Appendix A.1).)
The
add-in
will
look
for
<your
home
directory>\rti_workspace\<version>\user_config\spreadsheet_addin. If this folder doesn’t exist, it will create it and copy necessary files into it.
Note: When the add-in starts, it will create DDS entities and generate network traffic. For infor-
mation on when these entities are created and destroyed, see Entity Creation and Destruction
(Appendix C).
Once the add-in is started, you’re ready to publish or subscribe to data. See these sections for
details:
❏
❏
❏
❏
❏
2.3
Monitoring Topics (Section 2.3)
Subscribing to Data (Section 2.4)
Publishing Data (Section 2.5)
Monitoring Built-in Topics (Section 2.6)
Integration with Extensible Types (Section 2.7)
Monitoring Topics
The RTI Topic Monitor feature subscribes to a specific topic. You can subscribe to all instances
of a topic, or a subset of instances, by filtering based on key fields. Instances are displayed in
separate rows in a worksheet. When new instances are discovered, new rows are automatically
added to the worksheet.
From the Spreadsheet Add-in toolbar, select
Topics.
, then select one of the Available
2-3
Monitoring Topics
For example:
Fields in the selected topic’s data type
Available
topics
Optional filters specifying
which instances of the
topic you want to
monitor. Available for
“key” fields only.
Where to place
the new topic
monitor table
Controls whether the topic monitor table
will get updates automatically or manually
How many historical values
to display for each instance.
Available Topics
❏ These are the topics that have been discovered in the domain you selected in the RTI
Config dialog.
Fields
❏ Use the checkboxes under Fields to select which fields in the topic’s data type you want
to monitor. By default, all the fields in the data type are selected.
The Special fields correspond to fields in the Sample Info data structure, which provides
meta information about data that is received. The #source_timestamp is the time the
sample was sent; the #reception_timestamp is when it was received. You can use these
fields to see when a sample was sent or received. The #reception_sequence_number is
the counter of messages received in the topic. (Note: the count of "messages" could be
individual samples or batches.) By default, none of the special fields are selected.
Each selected field will appear in a column in the worksheet. If your data type has more
than 256 fields, you will not be able to select all of them. This limit is imposed by Excel,
which has a maximum table size of 65,536 rows by 256 columns. The starting location of
the table may also limit how many fields you can select (see the Location section below).
You may see more than one type with the same name. In this case, one type is the base
type and others are extended versions of the base type—see Integration with Extensible
Types (Section 2.7). You can only select one type at a time.
2-4
Monitoring Topics
Optional Display Filters
❏ This is only a display filter—all the samples for the topic are still received, but only the filtered instances are displayed. If you want to receive fewer samples per topic based on a
filter, you will need to use the content-filtered topic instead. (See Chapter 3 for details on
content filtered topics.)
Filter expressions are defined by Microsoft .Net Framework regular expressions and can
be specified for each key field of the Topic’s data type. See Filter Expression Details (Section 2.3.1).
To match all values for a key field, leave the filter blank (default behavior) or specify "=.*"
(this is the regular expression string for wildcard matching).
You can also modify the filter after the table has been created by selecting the cell in the
table header that contains the filter expression (such as cell A2 in the example on page 26).
For filtering to occur properly, the filtered key field must be selected for display. (See the
Fields section above for how to select a field for display.)
Location
❏ Choose where the instances will be populated—in the currently selected cell or a new
worksheet. By default, the new worksheet option is selected.
Keep in mind that each time a new instance is received, a new row (or rows) will be
added at the bottom of the topic monitor table. Therefore, the height of the table may
grow over time.
Like all tables created by the add-in, no new rows or columns are inserted into the worksheet. Instead, the content of the existing cells are overwritten, with the top left corner of
the table be at the current cell if the “Current cell” option is selected.
Excel’s maximum table size (noted in the Location section above) may restrict where you
can start the topic monitor table. For instance, you cannot select a cell in the 255th column and put a table wider than 1 column there.
Max. History Depth
❏ The indicates the number of historical values to be displayed for each instance. It cannot
be larger than the depth field in the DataReader’s History QoS, as specified in the current
QoS profile (see Chapter 3 for how to select a QoS profile). Default value of Max. history
depth is 1.
Two QoS profiles are provided with Spreadsheet Add-in for Microsoft Excel: DefaultProfile
(with depth = 4) and NoHistoryProfile (with depth = 1). By default, DefaultProfile is
used and therefore Max. history depth is limited to 4.
Setting a high value for the Max. history depth can cause Excel to slow down quite a bit,
especially if you are displaying a lot of fields from the data type and instances are published at a high rate.
If you set Max. history depth greater than 1, some rows in the Topic Monitor table may
show values of “#DATA N/A”. That means not enough samples have been received yet
to fill up all the historical values for that instance.
Manual Update
❏ By default, this checkbox is not checked and the subscription table is refreshed automatically on a periodic basis if new data or new instances are available. (See Changing Data
Refresh Frequency (Throttle Interval) and Auto-Publish Rate (Section 3.2).)
2-5
Monitoring Topics
Check the Manual update checkbox if you want to manually update the subscription
table on a controlled manner instead. A manually updated subscription table will only be
updated when you click the RTI Update Now button. A manually updated subscription
table will be marked as (M) in the table header (cell A1 in the following screenshot), and
the cell’s RTD function will contain the “MANUAL:<sheetname>” parameter. (See Subscribing to Data with Real-Time Data (RTD) Function (Appendix B).)
By default, clicking the RTI Update Now button will update all subscriptions in all
spreadsheets of the current Excel instance. However, you can modify the behavior
through an add-in configuration parameter, so that clicking on the RTI Update Now button will update all automatic-update subscriptions in all worksheets, plus the manualupdate subscriptions in the current worksheet only. See Chapter 3 for details.
When you click Create topic monitor, the add-in creates a topic monitor table—either in the currently selected cell or in a new worksheet (depending on your Location option). For example:
Three rows of table header.
Number of rows in table = number of
instances received * max. history depth.
Samples for the same instance will be
grouped together, with the latest
sample for that instance shown first. The
number of rows may increase over time
as new instances are received.
}
}
(M) indicates a “manual-update’ subscription
}
Cell A2 is a Filter
Each selected field in the data type appears in its
own column. Darker colored column headers
indicate key fields.
Deleted instances appear in red.
When is the table refreshed?
❏ If the topic monitor table is created without the Manual update option, data in the topic
monitor table is refreshed periodically if new samples are received, and the periodic
check interval is limited by the throttle interval settings. See Chapter 3 for details.
❏ If the topic monitor is created with the Manual update option, data in the topic monitor
table is only refreshed if you click the RTI Update Now button in the Spreadsheet Addin toolbar (if you have configured the RTI Update Now button to only update manualupdate subscriptions in current worksheet, then the topic monitor table will be refreshed
only if it is in the current worksheet when the button is pressed). (See the Manual Update
section above.)
To remove a topic monitor table: Delete the worksheet or the whole topic monitor table. If you
want to keep the existing cells to keep getting updates for existing instances but not receive any
new instances, delete the header cell (such as cell A1 in the above screenshot).
If you see a red row: This means the instance has been deleted by the publisher, or the instance
has not be updated according to the contract, and therefore is considered ‘not alive’ (refer to the
RTI Connext DDS Core Libraries User’s Manual regarding ‘not alive’ instances).
If you want to know when the actual reader that subscribes to the topic is created/deleted
behind the scenes, see Entity Creation and Destruction (Appendix C).
2.3.1
Filter Expression Details
A filter expression must begin with one of the operators in Table 2.1.
2-6
Monitoring Topics
The = and != comparators are followed by an expression supported within the full .NET regular
expression syntax. The other comparators can only be followed by an actual string or numerical
value. (See the examples in Table 2.3.)
You can combine filters for the same key field using the logical operators in Table 2.2.
Table 2.1
Filter Comparator Operators
Operator
Table 2.2
Behavior
=
Equals
!=
Not equal
<
Less than
>
Greater than
<=
Less than or equal to
>=
Greater than or equal to
Filter Logical Operators
Operator
Table 2.3
Behavior
AND
True if and only if both expressions are true
OR
True if one or both expressions are true
XOR
True if exactly one of the expressions is true
Example Filter Expressions
Filter Expression
=.*
Explanation
Matches all.
Example matches:
IBM
IB
=IB.*
IBB
IBBBBBM
IBMCALL20090310
The above list is not the entire universe of matches for the filter
expression, simply an example subset.
!=IB.*
Matches any value that does not match the previous expression
(above examples)
< 20090101
Based on the field type, matches values if the compare is less than
20090101. If the field is a numeric field (e.g., long, double), the comparison is numeric; if the field is a string field, the comparison is
alphabetic.
> 20080101
Based on the field type, matches values if the compare is greater
than 20080101. If the field is a numeric field (e.g., long, double), the
comparison is numeric; if the field is a string field, the comparison is
alphabetic.
> 20080101 AND < 20090101
Matches any values where both conditions are true
Matches any values where the first and second expressions both
> 20080101 AND < 20090101 OR
evaluate to true or the third expression evaluates to true. Note the
=20100315
grouping of expressions.
2-7
Subscribing to Data
❏ Without a filter expression for any key field, the topic monitor table subscribes to all data
for the Topic. This is equivalent to a wildcard expression that matches everything (=.*).
❏ Spaces and commas are not allowed in the regular expression after the comparators. If
you want to include a space in your regular expression after the = or != comparators, use
\W to match any single non-word character. For example, the following matches any
value that has “good match” in the field, requiring a space between the words “good”
and “match”:
=good\wmatch
❏ Whitespace is required around the logical operators (AND, OR, XOR). Any whitespace
around the comparators or logical operators will not be treated as part of the expression.
The expression ends when whitespace is encountered (see the examples in Table 2.3).
❏ Filters are always evaluated from left to right. Parentheses are not supported.
❏ Docs for the Regular expression class can be found at the following Microsoft web site:
http://msdn.microsoft.com/en-us/library/hs600312.aspx
❏ For additional information about regular expressions, the following web site may be useful: http://www.regular-expressions.info/dotnet.html
❏ If you provide a filter expression for a key field, that key field must be selected for display.
If the filtered field is not displayed, the filter for the key field will not be applied. (See the
Fields section in Monitoring Topics (Section 2.3) for how to select a field for display.)
2.4
Subscribing to Data
Section 2.3 showed you how to subscribe to data for multiple instances of a topic. If you only
want to subscribe to one specific instance of a topic, use the RTI Add Subscription feature. The
main difference in these two features is that a topic monitor table may grow over time as new
instances are discovered. A subscription is always a single row and does not grow because it is
only subscribing to one specific instance.
First, select a cell in the worksheet where you want the subscription to begin. Then, from the
Spreadsheet Add-in toolbar, select
.
2-8
Subscribing to Data
Click one of the Available Topics, then select the fields you want to display.
Available
topics
Fields in the
selected
topic’s
data type
Use 0 to
see the
most
recent
sample
Desired
value for key
field
Controls
whether the
subscription
will get
updates
automatica
lly or
manually
Available Topics
❏ These are the topics that have been discovered in the domain you selected in the RTI
Config dialog.
Fields
❏ You may see more than one type with the same name. In this case, one type is the base
type and others are extended versions of the base type—see Integration with Extensible
Types (Section 2.7). You can only select one type at a time.
❏ Use the checkboxes under Fields to select which fields in the topic’s data type you want
to monitor. By default, no fields in the data type are selected.
❏ The Special fields correspond to fields in the Sample Info data structure, which provides
meta information about data that is received. The #source_timestamp is the time the
sample was sent; the #reception_timestamp is when it was received. You can use these
fields to see when a sample was sent or received. The #reception_sequence_number is
the counter of messages received in the topic. (Note: the count of "messages" could be
individual samples or batches.) By default, none of the special fields are selected.
❏ Each selected field will appear in a column in the worksheet. If your data type has more
than 256 fields, you will not be able to select all of them. This limit is imposed by Excel,
which has a maximum table size of 65,536 rows by 256 columns.
❏ Excel’s maximum table size (noted above) may restrict where you can start the subscription. For instance, you cannot select a cell in the 255th column and put a subscription
wider than 1 column there.
2-9
Subscribing to Data
Key values
❏ If the topic’s data type has a key, you must specify value(s) for the key—this is how you
specify which instance of the topic you want to subscribe to.
❏ Exact values must be entered. Strings are case sensitive. Wildcards and regular expressions are not permitted.
History position
❏ The history position of a subscription is the "age" of the sample you want to get from the
reader queue. History position 0 will give you the most recent sample, 1 will give you the
next most recent one, up to N (history depth - 1) for the oldest one. The default value for
history position is 0.
❏ The history position value is limited by the depth field in the DataReader’s History QoS,
as specified in the current QoS profile (see Chapter 3 on how to select a QoS profile).
• Two QoS profiles are provided with Spreadsheet Add-in for Microsoft Excel: DefaultProfile
(with depth = 4) and NoHistoryProfile (with depth = 1). By default, DefaultProfile is
used and therefore History position is limited to a value of 3.
Manual Update
❏ By default, this checkbox is not checked, and the subscription is automatically refreshed
on a periodic basis if new data is available. (See Chapter 3 for how to control the periodic
refresh rate.)
Check the Manual update checkbox if you want to manually update the subscription in
a controlled manner instead. A manual-update subscription is only updated when you
click the RTI Update Now button in the Spreadsheet Add-in toolbar. The cells in a manual-update subscription will contain an RTD function with the “MANUAL:<sheetname>” parameter. (See Subscribing to Data with Real-Time Data (RTD) Function
(Appendix B).)
By default, clicking the RTI Update Now button will update all subscriptions in all
spreadsheets of the current Excel instance. However, you can modify the behavior
through the add-in configuration parameter, so that clicking on the RTI Update Now
button will update all automatic-update subscriptions in all worksheets, plus the manual-update subscriptions in the current worksheet only. See Chapter 3 for details.
When you click
currently selected cell:
, the add-in creates a subscription in the worksheet, starting in the
RTD function
x
y
shape size
There is a cell for each field selected in the Create Subscription dialog and an RTD function for
each cell (see Subscribing to Data with Real-Time Data (RTD) Function (Appendix B)). No table
header is created and there is always just a single row.
Notice that the subscription is created by overwriting existing cells in the worksheet—no new
row is inserted into the worksheet.
2-10
Publishing Data
If the cells in the subscription row are showing “#DATA N/A”, that means no data has been
received for the instance that you have subscribed to.
When is a subscription refreshed?
❏ If the subscription is created without the Manual Update option selected, data in the subscription is periodically checked for update if a new sample is received for the instance,
and the periodic check interval is limited by the throttle interval settings. See Chapter 3
for details.
❏ If the subscription is created with the Manual Update option selected, data in the subscription is only refreshed when you click the RTI Update Now button in the Spreadsheet Add-in toolbar (if you have configured the RTI Update Now button to only update
manual-update subscriptions in current worksheet, then the subscription will be
refreshed only if it is in the current worksheet when the button is pressed). (See the Manual Update section above).
To delete a subscription: Each cell of the subscription can be deleted individually.
If you want to know when the actual reader that subscribes to the instance of the topic is created/deleted behind the scenes, see Entity Creation and Destruction (Appendix C).
2.5
Publishing Data
The previous two sections describe how to subscribe to data; this section describes how to publish
data from an Excel worksheet.
There are three steps:
1. Creating a Publication Table (Section 2.5.1)
2. Filling in the Data to be Published (Section 2.5.2)
3. Publishing the Data (Section 2.5.3)
2.5.1
Creating a Publication Table
To begin, select a cell (or a range of cells) in the worksheet where you want the publication to be.
Then, from the Spreadsheet Add-in toolbar, select
.
Click a topic from the list on the left,
then select the fields that you want to
fill in. Unselected fields will still be
published, but will be set to their
default values (numerical fields will
be set to 0, strings will be empty). By
default, all fields in the data type are
selected.
You may see more than one type with
the same name. In this case, one type
is the base type and others are
extended versions of the base type—
see Integration with Extensible Types
(Section 2.7). You can only select one
type at a time.
2-11
Publishing Data
When you click
worksheet. For example:
, the add-in creates a publication table at the selected cell(s) in the
The table contains
three rows of table
header.
}
}
Each row holds the
data for one sample.
}
Each selected field in the data type appears in its own
The publication table is a range of cells that represent a topic—each row will be a sample, with a
column for each field that you want to fill in.
To Control the Publication Table Size:
The number of rows in the table depends on what is selected on the worksheet when you first
click
.
❏ If only one cell is selected (the default case), a table with a height of seven is created,
allowing you to enter four samples.
❏ If two or three rows are selected, a table with a height of four will be created, allowing
you to enter one sample.
❏ If four or more rows are selected, the table height will match the rows that you have
selected.
The number of columns in the table depends on the number of fields you select for the topic. If
your data type has more than 256 fields, you will not be able to select all of them. This limit is
imposed by Excel, which has a maximum table size of 65,536 rows by 256 columns. This limit
may restrict where you can start the publication. For instance, you cannot select a cell in the
255th column and put a publication wider than 1 column there.
The table size is fixed once the publication is created, and it will not change over time.
Like all tables created by the add-in, no new rows or columns are inserted into the worksheet.
Instead, the content of the existing cells are overwritten, with the top left corner of the table at
the current cell.
To remove a publication table: Delete the worksheet or the whole table.
If you want to know when the actual writer that publishes the topic is created/deleted behind
the scenes, see Entity Creation and Destruction (Appendix C).
2.5.2
Filling in the Data to be Published
Once you have the table, you can fill in the cells as desired either by explicitly entering values in
the cells, or by entering valid Excel formulas. You can even use references to subscriber cells
elsewhere in the Excel workbook.
If you leave a sample row unfilled, that sample will not be published.
2-12
Publishing Data
2.5.2.1
Working with Unions
Unions require that a field is selected among the possible ones; this is done by setting a value in
the discriminator cell, <field name>_d. You can set this cell to different values. For example:
enum EnumType {
ENUM_1,
ENUM_2,
ENUM_3
};
union EnumTypeUnion switch (EnumType) {
case ENUM_1:
long enum1Field;
case ENUM_2:
double enum2Field;
default:
short enum3Field;
};
union CharacterUnion switch(char) {
case 'a':
short aShort;
default:
char defaultChar;
};
union LongUnion switch(long) {
case 42:
float float42;
default:
double defaultDouble;
};
There are several ways to specify the selected field:
❏ Set the name of the field directly in the discriminator cell. For example, to select
enum3Field this name can be set directly as the discriminator value.
❏ To select the default field of a union (e.g. enum3Field in EnumTypeUnion, defaultChar
in CharacterUnion, or defaultDouble in LongUnion), leave the value of the discriminator cell empty, or set it to the string "default".
❏ If the union is based on an enumeration type, like the type EnumTypeUnion above, you
can specify the desired enumerator directly, as text. For instance, setting the discriminator cell to ENUM_1 will cause the field enum1Field to be published.
❏ If the union is based on a character, setting the discriminator cell to a simple character
will select the associated field. In the CharacterUnion example above, setting the cell to
"a" will select the field aShort.
❏ If the union is based on a numeric type, such as a long, you can set the discriminator to a
numeric value. For example, in type LongUnion, setting the field to 42 will result in
selecting field float42.
❏ If the union is based on the boolean type, you can use the values true and false. The case
won't matter, although Excel automatically converts the strings true or false to upper
case.
2.5.3
Publishing the Data
There are two ways to publish data from the table:
❏ To manually publish the data one time, select
(from the Spreadsheet Add-in
toolbar).
2-13
Monitoring Built-in Topics
❏ To automatically publish the data at a constant rate, set a timer:
a. From the Spreadsheet Add-in toolbar, select
.
b. Set the Auto publish timer (in milliseconds) as desired.
Note: The interval must be greater than or equal to the RTDThrottleInterval value set
in the registry (see Changing the Excel Throttle Interval, RTDThrottleInterval (Section
A.2)). Otherwise, the add-in will automatically set the auto publish timer equal to
RTDThrottleInterval.
c. Press Start and Close.
By default, a sample is published only if any cell in the row for that sample has changed since
the last time it was published. However, you can change this behavior by changing the add-in
configuration parameter, so that filled-in samples are published regardless of whether the sample has changed since the last time it was published. See Chapter 3 for details.
Hint: If you want to verify that the data was published, you can use a topic monitor (see
Section 2.3).
2.6
Monitoring Built-in Topics
The add-in must discover and keep track of remote entities, such as new participants, publications or subscriptions in the domain. This information may also be important to the application
itself, which may want to react to this discovery information, or else access it on demand. To
support these needs, the add-in provides built-in Topics that you can use to access this discovery
information.
You can use a ‘built-in topic monitor’
to display built-in topics for discovered publications, subscriptions, and
participants.
Note: Only remote entities appear in
builtin topics. Entities created by the
same participant (in this case, the
Spreadsheet Add-in for Microsoft Excel
application) will not appear in the builtin topic.
From the Spreadsheet Add-in toolbar,
select
, then select one of
the builtin topics (publications, subscriptions, or participants) from the
drop-down list box.
Builtin topic
❏ There are three types of builtin topics that provide discovery information about three different entity kinds: Publications, Subscriptions and Participants.
Level of detail
❏ The level of detail (basic, advanced, or full) controls how much data (how many columns) will be shown in the builtin topic monitor table.
See the Connext DDS API Reference HTML documentation on builtin topic data for
details of the meaning of these fields.
2-14
Monitoring Built-in Topics
• Basic:
• Publications/Subscriptions builtin topic:
Host IP, Creation timestamp, Deletion timestamp, Entity kind, Topic, Type
• Participants builtin topic:
Host IP, Creation timestamp, Deletion timestamp, Participant name, Product version, RTPS version
• Advanced: includes all basic information, plus:
• Publications builtin topic:
Reliability, durability, partition, ownership, ownership strength, liveliness, liveliness lease duration, deadline
• Subscriptions builtin topic:
Reliability, durability, partition, ownership, liveliness, liveliness lease duration,
deadline, contentfilter
• Participants builtin topic:
RTPS vendor ID, User data, Property QoS, DDS Builtin endpoints, Default unicast
locators
• Full: includes all advanced information, plus:
• Publications builtin topic:
Durability_service, latency_budget, lifespan, destination_order, presentation,
user_data,
topic_data,
group_data,
property_qos,
unicast_locators,
product_version, rtps_protocol_version, rtps_vendor_id, disable_positive_acks
• Subscriptions builtin topic:
Time_based_filter, latency_budget, destination_order, presentation, user_data,
topic_data, group_data, property_qos, unicast_locators, multicast_locators,
product_version, rtps_protocol_version, rtps_vendor_id, disable_positive_acks
• Participants builtin topic: Same information as advanced level.
Location
❏ Choose where the instances will be populated—in the currently selected cell or a new
worksheet. By default, the new worksheet option is selected.
❏ Keep in mind that each time a new entity is discovered, a new row will be added at the
bottom of the builtin topic monitor table. Therefore, the height of the table may grow
over time.
❏ Like all tables created by the add-in, no new rows or columns are inserted into the worksheet. Instead, the content of the existing cells are overwritten, with the top left corner of
the table at the current cell if the “Current cell” option is selected.
❏ Excel limits the table size to 65,536 rows by 256 columns. This limit may restrict where
you can start the builtin topic monitor table. For instance, you cannot select a cell in the
255th column and put a builtin topic monitor table there to show Full details.
2-15
Integration with Extensible Types
When you click
, the add-in creates a builtin topic monitor table--either in the
currently selected cell or in a new worksheet (depending on your Location option). For example:
Two rows for the
table header
}
One row for each
entity discovered
so far. The number
of rows may
increase over time
as new entities are
discovered.
}
Deleted entities
appear in red.
Number of columns depends on the level of detail selected.
To remove a builtin topic monitor table: Delete the worksheet or the whole builtin topic monitor
table. If you want to keep the existing cells for information on entities that are already discovered, but not receive any new entities’ discovery information, delete the header cell—this will
stop the table from being updated.
If you see a red row: This means we have detected that the entity has been deleted by the remote
application, or the discovery information for that entity has not be updated according to the contract, and therefore the entity is no longer consider to be alive.
2.7
Integration with Extensible Types
Some of the add-in’s dialogs1 display a list of
available topics. When you select a topic, you
will see its data type and the fields within
that data type.
In the Fields section, you may see more than
one type with the same name. This indicates
that the applications you are communicating
with are using the Extensible Types feature in
Connext DDS. With this feature, there may be
more than one ‘version’ of a data type: a base
type and one or more extended types.
What are Extensible Types?
Connext DDS includes partial support for the "Extensible and Dynamic Topic Types for DDS"
specification from the Object Management Group (OMG). With Extensible Types, more than
one version of the same type can be found in the DDS cloud. This support allows systems to
define data types in a more flexible way, and to evolve data types over time without giving up
portability, interoperability, or the expressiveness of the DDS type system.
You can learn more in the RTI Connext DDS Core Libraries Getting Started Guide Addendum for
Extensible Types. The OMG specification is available here: http://www.omg.org/spec/DDSXTypes/.
Important Note: When using one of the available versions of a type, if you want to select a different version of the type, you must first stop the Add-in and delete the tables/cells that are
using the currently selected type. (To stop the Add-in, click the "Stop RTI Add-in" or use the
"RTI Config" dialog.)
1. The dialogs for Add Subscription, Add Publication, and Monitor Topic list the available topics.
2-16
Integration with Extensible Types
Let’s consider an example using RTI Shapes Demo1 (which is also used in the tutorial in the Getting Started Guide). Shapes Demo can publish/subscribe to either a simple (base) Shape type or an
extended Shape type. Both types have the same type name: ShapeType. The extended version
includes the same data as the base type, plus two more fields: fillKind and angle.
Suppose you are running one instance of Shapes Demo that is set up to publish blue squares with
the base Shape type and a second instance of Shapes Demo that is set up to publish red squares
with the extended Shape type. The Shapes Demo windows might look like these:
As indicated in the Data Type column, Shapes Demo on the left is publishing the base Shape
type, while the one of the right is publishing an extended version. Note, however, that each
instance of Shapes Demo is publishing a data type named ShapeType. The Data Type column
just helps you know which version is being used.
In the Add Subscription dialog, if you
select Square on the left (under Topics),
you will see “ShapeType” twice on the
right (under Fields).
If you expand both ShapeTypes, you will
see that one of them has two more fields
than the other (fillKind and angle): this is
the extended version of ShapeType.
You can only select one of the displayed
versions at a time. See “Important Note:”
on page 2-16.
If you choose the extended version and select “Create subscription”, the results will look like
this:
Notice that the fillKind and
angle for the blue square are set
1. Extensible types are only supported in Shapes Demo version 5.0 and higher.
2-17
Integration with Extensible Types
to default values. That’s because the blue square wasn’t published with these fields, since it was
published with the base version of ShapeType.
However, if you were to create a subscription using the
base version of ShapeType, the extra fields for the red
square (fillKind and angle) are ignored, as seen to the
right.
In the following example we use Spreadsheet Add-in to
publish a red square using the extended version of ShapeType. One instance of Shapes Demo is subscribing to squares and is configured to use the base
version of ShapeType; we’ll call this the Base Subscriber. The other instance of Shapes Demo is
subscribing to squares and is configured to use the extended version; we’ll call this the Extended
Subscriber. The following image shows that the Extended Subscriber gets all the information
(including fillKind and angle), while the Base Subscriber ignores the extra fields.
Base Subscriber
Extended Subscriber
2-18
Providing Type Definitions in XML
Similarly, when publishing the simple Shape type, the ExtendedSubscriber will set default values for the missing fields, resulting in both Shapes Demo instances drawing the same square (the
default FillKind is solid and the default rotation is no rotation).
Base Subscriber
2.8
Extended Subscriber
Providing Type Definitions in XML
You can select the type to be published or subscribed to via an XML type definition. This can be
useful when you want to be perfectly sure about which version of an extensible type the add-in
will use. It is also handy to be able to publish or subscribe without having to wait for discovery
to happen.
2.8.1
Storing the Type Definitions where the Add-in Expects Them
Once you have a valid XML type definition, you have to copy it to a special location where
Spreadsheet Add-in will read and parse them during start up. This location is: <your home directory>\rti_workspace\user_config\spreadsheet_addin\type_library
(for
details
on
rti_workspace, see Paths Mentioned in Documentation (Section 1.1)). At first, this directory may
not exist and you'll have to create it manually. Copy all type definitions you want to use to this
location and start Excel.
Note: Spreadsheet Add-in doesn't re-check for new files once it has been started. If you want to
add new type definitions after starting Excel, stop the add-in, exit Excel, copy the new type definitions or change the existing ones, and restart Excel. The new or updated type definitions will
appear in the type-selection dialogs.
2-19
Providing Type Definitions in XML
2.8.2
Creating a Topic Monitor using XML Types
To create a Topic Monitor using XML types, click on the RTI Monitor Topic button
. In the dialog that appears, switch to the XML Types tab on top. You'll see the
following dialog:
Select the type definition you want to use to create the Topic. A description of the type definition's attributes will appear on the right. Write down the topic name. Optionally, write down the
type name, too. If no explicit type name is provided, the default type name taken from the type
definition will be used. You can also select the length of the sequences and strings defined with
no bounds. When done, click on click on the Create Topic Monitor button
Note: Spreadsheet Add-in does not integrate with unbounded sequences and strings.Therefore
you need to select a default length for them. Also note that the XML Type selector does not support optional display filters like in the discovery type selector.
2-20
Providing Type Definitions in XML
2.8.3
Creating a Publication via XML
To create a Topic Publication table using XML types, click on the RTI Add Publication button
. In the dialog that appears, switch to the XML Types tab on top. You'll see the
following dialog:
Select the type definition you want to use to create the Topic. A description of the type definition's attributes will appear on the right in the Type description section. Write down the topic
name. Optionally, write down the type name too. If no explicit type name is provided, the
default type name taken from the type definition will be used. You can also select the length of
the sequences and strings defined with no bounds. When done, click on the Create publication
button
.
Note: Spreadsheet Add-in doesn't integrate with unbounded sequences and strings. Therefore,
you need to select a default length for them.
2-21
Chapter 3
Configuring the Spreadsheet Add-in
This chapter describes:
❏ Configuration Parameters (Section 3.1)
❏ Changing Data Refresh Frequency (Throttle Interval) and Auto-Publish Rate (Section 3.2)
❏ Using Different Domains at the Same Time (Section 3.3)
3.1
Configuration Parameters
Spreadsheet Add-in for Microsoft Excel has several configuration parameters, as described in
Table 3.1. They apply to all open workbooks that use the add-in.
Table 3.1
Configuration Parameters
Parameter
Description
Domain ID
Identifies the domain to which the instance of Spreadsheet Add-in for Microsoft Excel belongs.
Each domain represents a separate data ‘communication plane’ isolated from other domains.
This value must match the domain ID of the application that you want to communicate with.
This is an integer value, 0 or higher. The default is 0. Each Excel instance can only belong to
one domain. If you want to use multiple domains, refer to Section 3.3.
Peer Hosts
Peer descriptors of potential participants that you want the add-in to try to communicate
with. For example:
“shmem;udpv4://239.255.0.1;udpv4://127.0.0.1;5@udpv4://foo”
See the RTI Connext DDS Core Libraries User’s Manual or API Reference HTML documentation
for details on formatting peer descriptors.
Sets the Quality of Service (QoS) policies for all the entities created by the add-in.
A QoS library and profile are written in XML format. QoS can be specified per entity kind, or
even based on topic name. The XML file containing the QoS library and profile must exist
either in <path to user_config>\EXCEL_QOS_PROFILES.xml, or in the file that is specified in the NDDS_QOS_PROFILES environment variable (unless a non-default location is
specified in the registry setting; see Appendix D: Controlling File Locations with Registry SetQoS library and tings for details).
profile
To open the QoS file under My Documents, select the RTI Config button in the RTI Spreadsheet Add-in toolbar, and then click Open QoS File. The XML file is read-only when Excel
starts. If you have made changes to the file after Excel has started, you will need to close and
restart Excel for the changes to take effect.
See the RTI Connext DDS Core Libraries User’s Manual for details regarding QoS library and
profile formats.
3-1
Configuration Parameters
Table 3.1
Configuration Parameters
Parameter
Description
Throttle interval
How long to wait before refreshing the received real-time data for all automatic-update subscriptions. This is both (a) the minimum time between cell updates and (b) the maximum time
after data is first received before the cell is updated.
This value must be greater than or equals to the RTDThrottleInterval value as set in the registry. See Changing the Excel Throttle Interval, RTDThrottleInterval (Section A.2) for details.
How often to automatically publish data from a publication. This value must be greater than
or equals to the RTDThrottleInterval value as set in the registry. See Changing the Excel Throtpublish tle Interval, RTDThrottleInterval (Section A.2) for details.
The auto publish timer is stopped automatically every time the RTI service is stopped. If you
restart Connext DDS, you may need to restart the auto publish timer.
Auto
timer
Behavior at start up—whether or not the RTI service should be started (if it is not already running) when a workbook with a configuration worksheet is loaded.
RTI
Service Starting the RTI service creates a DomainParticipant, starts discovery of types and topics, and
startup policy
starts any defined subscriptions or publications. This will generate network traffic. For information on when these entities are created and destroyed, please see Appendix C: Entity Creation and Destruction.
This is an advanced feature.
Typically, memory that is no longer in use will be freed up automatically by the add-in when
Forced garbage there is a need. In some special cases, if data is updated at very high rate, or if there is still
collect rate
available memory in your system, the add-in may not free unused memory as fast as you may
want it to. This parameter allows you to control how fast the unused memory should be freed
up.
Manual update Controls if the RTI Update Now button will update (a) all manual-update subscriptions, or (b)
applies to cur- only the manual-update subscriptions in the current worksheet. (All automatic-update subrent sheet only
scriptions will be updated regardless).
Controls if both the Auto publish timer and the RTI Publish Now button will publish samPublish changed
ples only if they have been changed since the last time they were published, or will publish
data only
regardless of whether the sample has changed or not.
Verbosity
Level of logging. See Table 3.3.
Overwrite
file
log
Specifies if the log file should be overwritten every time Excel starts.
Log file
Full path for the location of the file for logging information for the add-in.
Content filters
Defines filters for given topics, based on the content of the sample of the given data type.
These filters, if any, apply to any subscription of the specified topic name. For
example: “Type1=ShapeType Topic1=Square Filter1=x>100”
See the RTI Connext DDS Core Libraries User’s Manual regarding content filter expression syntax.
There are up to three ways to set these parameters:
❏
From a configuration file. The configuration file follows the usual Microsoft Windows .ini
file syntax. The file is read when Excel starts. This file is located in <path to
user_config>\RTIExcelAddin.ini, unless a non-default location is specified in the registry setting (see Appendix D: Controlling File Locations with Registry Settings for
details). To open this file, select
in the RTI Spreadsheet Add-in toolbar, then
click Open Configuration File.
❏
From special cells in a saved workbook. Configuration parameters can be specified in an
Excel worksheet. You can automatically create a worksheet with all the configuration
cells based on the current configuration.
3-2
Configuration Parameters
To do so, select
in the RTI Spreadsheet Add-in toolbar, and select
.
❏
From the configuration dialog. To open this dialog, select
in the RTI Spreadsheet Add-in toolbar. Note: Not all parameters can be changed in the dialog.
Each of the configuration methods is intended to be used in a different way, as described in
Table 3.2.
Table 3.3 on page 3-4 summarizes how to define each parameter using the three methods.
Figure 3.2 on page 3-6 shows an auto-generated configuration sheet.
Table 3.2
Configuration Methods
Method
Configuration file
Typical Use
Default configuration. Applies every time Excel is started, unless you open a workbook with configuration cells. In that case, the parameters present on the sheet will override those in the configuration file. Use the configuration file method for blank workbooks, for testing, or for saved
workbooks that do not require a specific configuration. See the sample file in Figure 3.1. Once
Excel is started, changes in the configuration file have no effect. If you want the changes in the
configuration file to take effect, close Excel and restart it.
Configuration for a saved workbook. This method allows you to deploy a workbook as if it was an
application and to save the configuration you need for the application to work properly. To create
a configuration worksheet based on the current configuration, select the “Create Configuration
Sheet” button in the RTI Config dialog.
See Figure 3.2 on page 3-6.
Cells in a
If a Connext DDS application has not been started, values specified in the configuration worksheet
configuration are loaded when the configuration worksheet is opened. The loaded values will be used for all
worksheet
workbooks in this Excel instance.
If a Connext DDS application is already started, opening the configuration worksheet has no effect.
Once the configuration worksheet is opened, changes in the configuration worksheet have no
effect. If you want the changes in the configuration worksheet to take effect, stop Connext DDS,
close the configuration worksheet, and open the configuration worksheet again to reload the values.
Configuration dialog
Use this dialog to change the configuration at run time. This configuration is not persistent and
not all values can be changed at run time.
The RTI Config dialog can be used to change some parameters at run time. Some parameter
changes require that the RTI service is not running, while others can be changed any time and will
take effect right away.
Only fields that you are allowed to change (depending on whether or not the RTI service is running) will be enabled in the dialog. If a parameter is not available in the RTI Config dialog, it
means it cannot be changed at run time.
See Figure 3.3 on page 3-8.
3-3
Configuration Parameters
Table 3.3
Configuration Parameters
Configuration Method
Parameter
Fileb
Default a
Cells in a Configuration
Worksheet c
Dialog
1000 (force garbage
collection
after every 1000
refresh of data)
Forced
[Config]
garbage colForcedGCRate=<n>
lect rate
RTIDDS_CONFIG_FORCED_GC_RATE N/A
Manual
[Config]
update
applies
to ManualUpdateCurrentcurrent sheet Sheet=<yes|no>
only
No
(manual
RTIDDS_CONFIG_MANUAL_UPDATE Stop Connext DDS
update applies to
before changing.
_CURRENT_SHEET
all sheets)
Publish
changed
data only
[Config]
RTDDS_CONFIG_ALWAYSPUBLISH
AlwaysPublish=<yes|no>
No
(publish
Stop Connext DDS
changed
data
before changing.
only)
Domain ID
[DDSConfig]
DomainId = <n>
RTIDDS_CONFIG_DOMAINID
Stop Connext DDS
0
before changing.
Peer hosts
[DDSConfig]
PeerHost =
<peer1>[,<peer2> …]
RTIDDS_CONFIG_PEERHOSTS
None
Stop Connext DDS
default
before changing.
QoS)
(uses
DDS
QoS Library
[DDSConfig]
QoSLibrary = <name>
RTIDDS_CONFIG_QOSLIBRARY
None
Stop Connext DDS
default
before changing.
QoS)d
(uses
DDS
QoS
Profile
[DDSConfig]
QosProfile = <name>
RTIDDS_CONFIG_QOSPROFILE
None
Stop Connext DDS
default
before changing.
QoS)e
(uses
DDS
Throttle
interval
[DDSConfig]
ThrottleInterval =<ms>
RTIDDS_CONFIG_
THROTTLEINTERVAL
Can be changed
anytime.
See 200 ms
Section 3.2.
Auto
publish
timer
[DDSConfig]
RTIDDS_CONFIG_
AutoPublishTimer=<ms> AUTOPUBLISHTIMER
Can be changed
before the auto
publish timer has 0 (Off)
started.
See
Section 3.2.
DDS startup
[DDSConfig]
RTIDDS_CONFIG_AUTOSTARTDDS
AutoStartDDS=<yes|no>
N/A
No
[Logging]
Verbosity=<n> (n=0..4)
N/A
3
N/A
yes
Verbosity
Overwrite
log file
RTIDDS_CONFIG_VERBOSITY
0—No messages3—Like 2, plus information about Entities
1—Errors4—Debugging messages
2—Errors and warnings
[Logging]
OverwriteLogfile=<yes|no>
RTIDDS_CONFIG_LOGFILE
3-4
Configuration Parameters
Table 3.3
Configuration Parameters
Configuration Method
Parameter
Log file
Content
filters
Fileb
[Logging]
LogFile=<full path of log RTIDDS_CONFIG_OVERWRITELOG
file>
[ContentFilteredTopics]
Type<i> = <type name>
Topic<i> = <topic name>
Filter<i> =
<filter expression>
Default a
Cells in a Configuration
Worksheet c
Dialog
N/A
RTIDDS_CONTENTFILTER_TYPE<i>,
RTIDDS_CONTENTFILTER_TOPIC<i>, N/A
RTIDDS_CONTENTFILTER_FILTER<i>
<My
Documents>\RTI
Spreadsheet
Add-in
for
Microsoft Excel
<version>\RTIExcelAddin.log
(unless specified
in a registry setting.
See
Appendix D:
Controlling File
Locations
with
Registry Settings
for details)
None
<i> starts at 1 and goes up incrementally
a. The ‘Default’ column shows the default value that is used if it is not specified by any of the three configuration methods.
b. To make changes in the configuration file, use this format: [Category] Parameter=value.
c. These cell names appear in the worksheet automatically when you click “Create Configuration Sheet” from the RTI Config dialog.
d. The default value of the QoS library in the shipped configuration file is “DefaultLibrary”.
e. The default value of the QoS profile in the shipped configuration file is “DefaultProfile”.
3-5
Configuration Parameters
Figure 3.1
Sample Configuration File
[Config]
ForcedGCRate=1000
ManualUpdateCurrentSheet=no
AlwaysPublish=no
[DDSConfig]
DomainId=54
PeerHost=shmem;udpv4://239.255.0.1;udpv4://127.0.0.1;5@udpv4://foo
QosLibrary=MyQosLib
QosProfile=MyQosProfile
ThrottleInterval=100
AutoPublishTimer=0
AutoStartDDS=no
[Logging]
Verbosity=3
OverwriteLogfile=yes
LogFile=c:\RTIExcelAddin.log
[ContentFilteredTopics]
Type1=ShapeType
Topic1=Square
Filter1= x > 100
Type2=ShapeType
Topic2=Circle
Filter2= y < 100
Figure 3.2
Generated Configuration Worksheet
3-6
Changing Data Refresh Frequency (Throttle Interval) and Auto-Publish Rate
3.2
Changing Data Refresh Frequency (Throttle Interval) and AutoPublish Rate
3.2.1
Update Frequency for Subscribing Cells
In general, a subscription that is created behind the scenes will continuously receive all samples.
However, the refresh frequency of the subscribing cell in the spreadsheet is limited by the throttle interval. If the data is received at a higher (faster) rate than is defined by this interval, some of
the received samples may not be displayed, or may be displayed at a later time.
The throttle interval value must be greater than or equals to the RTDThrottleInterval value set
in the registry (see Changing the Excel Throttle Interval, RTDThrottleInterval (Section A.2)).
Otherwise, the add-in will automatically set the Throttle Interval equal to RTDThrottleInterval.
The amount of time between updating subscribing cell values is:
max(Excel’s RTDThrottleInterval, RTI Spreadsheet Add-in's throttle interval, time since
data was last received)
Tip: If you have a high rate of incoming data and a large number of subscription cells, you may
need a higher interval (a lower refresh rate) to prevent Excel from slowing down excessively.
To dynamically change the Throttle Interval, select
toolbar.
3.2.2
from the RTI Spreadsheet Add-in
Auto Publish Frequency
If the auto-publisher timer is on, the auto-publish timer interval controls how often data is automatically published. If you are changing the value of the data faster than the auto-publish timer,
only some of the samples will be published, and samples may be published at a later time than
when you changed it.
The auto-publish interval must be greater than or equal to the RTDThrottleInterval value set in
the registry (see Changing the Excel Throttle Interval, RTDThrottleInterval (Section A.2)). Otherwise, the add-in will automatically set the auto-publish timer equal to RTDThrottleInterval.
The amount of time between publishing cell values is:
max(Excel's RTDThrottleInterval, RTI Spreadsheet Add-in's auto-publish timer interval,
time since the cell was last changed or published, depending on the “Publish changed
data only” setting)
You can dynamically change the auto-publish timer by selecting
sheet Add-in toolbar. See Figure 3.3.
from the RTI Spread-
3-7
Using Different Domains at the Same Time
Figure 3.3
Configuration Dialog
Throttle interval
Auto publish
timer interval
3.3
Using Different Domains at the Same Time
You can work with different configurations (and therefore, different domain IDs) at the same
time, by using different Excel instances. Each Excel instance is a separate process that can manage one or more workbooks. Every workbook in the same Excel instance will have the same configuration.
If you open a workbook from Windows Explorer and there is an Excel instance already running,
the workbook will be attached to that Excel instance. This may look as if the Excel instance is
unresponsive (see Appendix A: Spreadsheet Add-in Appears Unresponsive in Excel 2013).
Therefore, if you want a workbook to use a different configuration, open a new Excel instance
(run Excel.exe again) and then open the workbook in the new Excel instance.
3-8
Chapter 4
Visual Basic for Applications (VBA) Functions
for the Spreadsheet Add-in
Some of the buttons in the Spreadsheet Add-in toolbar perform one-time actions. These buttons
do not open an associated dialog box.
This chapter describes how to use macro functions written in Visual Basic for Applications
(VBA) to perform the same actions as these buttons:
4.1
Enabling Visual Basic Support
A
sample
Visual
Basic
script
is
provided
in
<NDDSHOME>\resource\app\lib\i86Win32VS2008\DDS2ExcelModule.bas.
this
file:
To use the provided VBA functions in Excel:
1. Open Visual Basic Editor:
In Excel, under the Developer tab, click Visual Basic. (If you don’t see the Developer tab:
right-click in the ribbon, select Customize the Ribbon..., select the Developer tab, and
click OK.)
2. Select Tools, References... in the Visual Basic menu to open the VBA Project References
dialog. Select the checkbox for DDS2Excel. Click OK.
3. In the Project window in Visual Basic on the top left, right-click VBAProject and select
Import File... from the pop-up menu to import the sample Visual Basic script from
<NDDSHOME>\resource\app\lib\i86Win32VS2008\DDS2ExcelModule.bas.
4. The DDS2ExcelModule should now be added to the VBAProject. You can close the
Visual Basic Editor.
The VBA functions in the module imported from Spreadsheet Add-in for Microsoft Excel are now
ready to be used.
4-1
Supported VBA Functions
4.2
Supported VBA Functions
Table 4.1 summarizes the supported VBA functions in the DDS2ExcelModule.
Table 4.1
4.3
Supported Visual Basic Functions in the shipped DDS2ExcelModule
Function
Typical Use
StartDDS()
Starts the add-in, just like the behavior of the Start RTI Add-in button in the RTI
Spreadsheet Add-in toolbar. See Section 2.1 for details.
StopDDS()
Stops the add-in, just like the behavior of the Stop RTI Add-in button in the RTI
Spreadsheet Add-in toolbar. See Section 2.1 for details.
UpdateNowDDS()
Checks all DDS automatic-update subscriptions to see if they need to be
refreshed with new data. The behavior of this function on manual-update subscriptions depends on whether the add-in is configured to update all manualupdate subscriptions, or configured to update only the manual subscriptions in
the current worksheet. See Chapter 3 for details.
The behavior of this function is the same as the RTI Update Now button in the
RTI Spreadsheet Add-in toolbar.
PublishNowDDS()
Checks all publications to see if data needs to be published. The behavior of this
function depends on whether the add-in is configured to publish a sample only if
it has changed since the last time it was published, or configured to publish the
sample regardless of whether it has changed or not. See Chapter 3 for details.
The behavior of this function is the same as the RTI Publish Now button in the
RTI Spreadsheet Add-in toolbar.
UpdateCurrentSheetNowDDS()
Checks all DDS automatic-update subscriptions for updates. For manual-update
subscriptions, only those in the current worksheet will be checked.
GroupUpdateNowDDS(
group As String)
Checks all DDS automatic-update subscriptions for updates. For manual-update
subscriptions, only those whose worksheet name matches the one specified by
the parameter of this function will be checked. If an empty string is specified (""),
this function will update all subscriptions in all worksheets.
Using VBA Functions
The add-in VBA functions are like any other VBA functions. You can call the functions directly
in any Excel cell by entering the formula =DDS2ExcelModule.<function_name()> in any cell.
The function is called when the formula is executed. You can also call these functions from any
other Excel VBA script, or create GUI buttons and call the VBA function in the button click
event.
4-2
Appendix A
A.1
Troubleshooting
License Management
Spreadsheet Add-in for Microsoft Excel requires a license file, which you will receive via email from
RTI.
If you want to use RTI Launcher1 to start Spreadsheet Add-in for Microsoft Excel2:
By default, Launcher looks for the license file rti_license.dat in the top-level directory
where you installed Connext DDS. If you choose to save the license file elsewhere, you
can configure Launcher to look in a different location by using its Configuration tab.
Otherwise:
Save the license file in any location of your choice. When Spreadsheet Add-in for Microsoft
starts, it will look in these locations until it finds a valid license:
Excel
1. The file rti_license.dat in the directory <your home directory>\rti_workspace\version .
2. The file specified in the environment variable RTI_LICENSE_FILE, which you may set to
point to the full path of the license file, including the filename (for example,
C:\RTI\my_rti_license.dat).
3. The file rti_license.dat in the current working directory.
4. The file rti_license.dat in the directory specified by the environment variable
NDDSHOME.
As Spreadsheet Add-in for Microsoft Excel attempts to locate and read your license file, you may
(depending on the terms of the license) see a window with messages with details about your
license—you may close the window.
If the license file cannot be found or the license has expired, Spreadsheet Add-in for Microsoft Excel,
will not initialize and you will not be able to use the add-in.
If you have any questions about license installation, please contact [email protected].
1. Launcher is a convenient GUI-based tool that can start and configure all of your Connext DDS components, including Spreadsheet Add-in for Microsoft Excel.
2. Even if your distribution of Connext DDS Professional is not license-managed, you always need a license file to run
Spreadsheet Add-in for Microsoft Excel.
A-1
Changing the Excel Throttle Interval, RTDThrottleInterval
A.2
Changing the Excel Throttle Interval, RTDThrottleInterval
This section describes changes that Spreadsheet Add-in for Microsoft Excel makes to RTDThrottleInterval in the registry, a parameter that determines how fast Excel updates real-time data streams.
By default, Excel uses a value of 2 seconds for RTDThrottleInterval. The installer for Spreadsheet
Add-in for Microsoft Excel changes RTDThrottleInterval in the registry to 100 milliseconds. This
value affects all real-time data feeds that you may be using in Excel.
If you need a different value for RTDThrottleInterval, you can change it as follows:1
Microsoft Excel 2010:
1. Open the Windows registry editor.
• On a Windows XP system, select Start, Accessories, Run and enter “regedit”.
• On a Windows 7 or later system, select Start and type “regedit”.
2. Go to the following key: HKEY_CURRENT_USER, Software, Microsoft, Office, <your
version of Microsoft Office>, Excel, Options.
3. Look up the entry RTDThrottleInterval and change its value as needed (in milliseconds).
4. Close the registry editor.
Microsoft Excel 2013:
1. Open Excel.
2. Open the Visual Basic Editor, by clicking Visual Basic Editor from the Developer Tab
3. Open the Immediate window in View, Inmediate Window.
4. Type the following and press ENTER:
Application.RTD.ThrottleInterval = 100
5. Verify that it is set correctly, by typing this line in the Immediate window:
? Application.RTD.ThrottleInterval
RTDThrottleInterval is the upper limit for the rate at which all data will be updated in Excel
(that is, it is the smallest update interval). This value cannot be changed dynamically and
applies to all data.
If you want to adjust the throttle interval for updating DDS data only, it can be changed after
Spreadsheet Add-in for Microsoft Excel has been installed. To lower the update rate for DDS data in
all worksheets, set the DDS-specific data throttle interval to a value larger than RTDThrottleInterval.
The maximum rate (minimum interval) at which DDS data can be automatically published is
also limited by RTDThrottleInterval. This auto-publish rate can also be adjusted after Spreadsheet Add-in for Microsoft Excel has been installed.
See the Spreadsheet Add-in for Microsoft Excel User's Manual for details on adjusting the DDS data
send and receive rate.
1. We recommend to create a backup before doing any modification on Windows’ registry.
A-2
Spreadsheet Add-in does not Appear in Excel ADD-INS Tab
A.3
Spreadsheet Add-in does not Appear in Excel ADD-INS Tab
After installing Spreadsheet Add-in for Microsoft Excel, you should see it in the Excel ADD-INS tab.
If you do not, here are some possible reasons why and how to fix them:
❏ Missing language package: Because of Microsoft issue KB320369 (http://support.microsoft.com/kb/320369), Spreadsheet Add-in for Microsoft Excel will not work at all in computers with a locale other than English (United States). To fix this issue, you need to install a
Microsoft Office Language Pack for the corresponding locale in the client machine. See
the Spreadsheet Add-in for Microsoft Excel Release Notes for more details.
❏ Date set to Non-US format: If your system’s Region and Language format is not set to
English (United States), the add-in will not show up. To verify and/or change the format: From the Start menu, select Control Panel; Clock, Language, and Region; Change
the date, time, or number format. If the format is not English (United States), use the
Format list to select this setting.
❏ Missing license: Follow the instructions in License Management (Section A.1) to install
the license in a correct location.
A.3.1
Enabling Spreadsheet Add-In After Recovering from a Loading Error
When a COM Add-in is disabled once by Excel, it will remain disabled until manually reenabled. This could likely happen because of an error when loading any COM Add-in.
To re-enable Spreadsheet Add-in for Microsoft Excel:
1. Open the FILE menu in Excel and select Options.
2. In the window that will pop-up, go to Add-Ins.
3. In the drop-down menu labeled as Manage, select COM Add-Ins and click Go....
4. A new window will show up with a list of the COM Add-ins installed, and with a check
box indicating whether the Add-in is enabled or not.
a. If RTI Spreadsheet Add-in for Microsoft Excel is unchecked, check it and click OK.
A.4
Spreadsheet Add-in Appears Unresponsive in Excel 2013
When using Spreadsheet Add-in with Excel 2013, you may find that the Add-in bar looks unresponsive. This may be caused by have several workbooks open at the same time. If you look at
the workbook that was opened first, you will see Spreadsheet Add-in responding as expected.
This is due to a change in Microsoft Excel policy regarding process and thread management.
To open several workbooks and have Spreadsheet Add-in be responsive in all of them, you will
need to manually force each workbook to be run in individual instances of Excel 2013. There are
two ways to open individual instances of Excel: from the taskbar or desktop icon, or from a command prompt.
To open individual instances of Excel using the taskbar or desktop icon:
1. Right-click the Excel 2013 icon on your desktop or taskbar, keeping the ALT key pressed.
2. Without releasing the ALT key, click on the “Microsoft Excel 2013” option from the context menu.
3. You will see a prompt asking if you want to open Excel as a new instance. Choose YES.
A-3
Spreadsheet Add-in Appears Unresponsive in Excel 2013
4. Once the new Excel instance is up and running, open an existing workbook or create a
new one.
5. Repeat these steps for each workbook you need.
To open individual instances of Excel from a command prompt:
1. From the command prompt, run EXCEL /X &. (The /X option forces the creation of a new
instance.)
2. Once the new Excel instance is up and running, open an existing workbook or create a
new one.
3. Repeat these steps for each workbook you need.
A-4
Appendix B
Subscribing to Data with Real-Time Data
(RTD) Function
The most basic and flexible way to subscribe to data for a cell is to use the RTD function in Excel
=RTD(<ProgID>, <server>, <param1>, [<param2>],...)
The RTD function is the building block for most of the features in Spreadsheet Add-in for Microsoft
It is used as follows:
Excel.
=RTD("dds2excel.connect",,
"TYPE:<type_name>", "TOPIC:<topic_name>",
"TYPENAME:<type_version_name>",
"FIELD:<field_name1>"
[,"KEY:<field_name2>=<value2>"[,
"KEY:<field_name3>=<value3>" …]]
[,”MANUAL:<sheet_name>”])
The first parameter is the program ID of Spreadsheet Add-in for Microsoft Excel, “dds2excel.connect”.
The second parameter is blank. RTD uses this as the name of the server where the add-in should
be run. Since we want to run locally, we leave it blank.
The remaining parameters combine to define a piece of real-time data. There may be up to 38 of
these parameters.
Notice that there is a TYPE parameter and a TYPENAME parameter. The TYPENAME refers to
the name for a specific type-definition of a data type, as defined using any of the type-definition
languages provided with Connext DDS (such as IDL or XML).
For example, suppose you have this type defined in IDL:
struct TypeName1 {
long aField;
}
Along with a second, extended type:
struct TypeName2 : TypeName1 {
double extendedField;
}
To subscribe to the first type, use “TYPE:TypeName1” and “TYPENAME:TypeName1”. To subscribe to the second type, use “TYPE:TypeName1” and “TYPENAME:TypeName2”. For more
information, see Integration with Extensible Types (Section 2.7).
B-1
As another example, consider the RTI Shapes Demo application, which can publish/subscribe to
either ShapeType and ShapeTypeExtended. In both cases, the type registered with Connext DDS
is “ShapeType”, but they are defined in IDL with different names, like this.
enum ShapeFillKind {
SOLID_FILL,
TRANSPARENT_FILL,
HORIZONTAL_HATCH_FILL,
VERTICAL_HATCH_FILL
};
struct ShapeType
{
string<128> color; //@key
long x;
long y;
long shapesize;
};
struct ShapeTypeExtended : ShapeType {
ShapeFillKind fillKind;
float angle;
};
The following function will subscribe to instances of the topic Square, of type ShapeType, whose
key field, color, is PURPLE. This cell will show the value of the field x.
=RTD("dds2excel.connect",,
"TYPE:ShapeType","TOPIC:Square", "TYPENAME:ShapeTypeExtended",
"FIELD:x","KEY:color=PURPLE")
The RTD function is case-sensitive (for example, color=PURPLE is different than color=Purple).
Do not use quotation marks within the expression.
The optional “MANUAL” parameter in the RTD function can be used to indicate that the cell
will be updated manually only when the RTI Update Now button is pressed, instead of periodically being refreshed with new data. The <sheet_name> followed by the optional MANUAL
parameter in the RTD function is filled in automatically with the name of the worksheet in
which the cell resides, either when Connext DDS is first started or when the RTD function is created by the subscription. The sheet name information is used if the RTI Update Now button is
configured to refresh manual-update subscriptions in the current sheet only. (If you copy a manual-update cell from one sheet to another, the RTD function will contain the wrong sheet-name
unless you manually modify the RTD function, or you restart Connext DDS.) See Chapter 3 for
information on manual-update subscriptions.
You can use references to a cell containing the RTD function just like any other cell—for charts,
other formulas, etc.
B-2
Appendix C
Entity Creation and Destruction
The following table explains when Spreadsheet Add-in for Microsoft Excel creates and destroys the
entities it uses.
All entities are created with the QoS values as specified in the RTIDDS_CONFIG_QOSLIBRARY
and RTIDDS_CONFIG_QOSPROFILE configuration parameters. (The QoS library and profile
are either in <path to user_config>\EXCEL_QOS_PROFILES.xml or in a file that is specified in
the NDDS_QOS_PROFILES environment variable, unless the location of the XML file is hardcoded in the registry setting. See Appendix D for details).
This
Entity ...
Is Created ...
When the Connext DDS application starts.
This can happen two ways:
DomainParticipant
❏ When Excel is started and a
workbook is opened—if the
“auto-start DDS” option is
enabled.
Is Destroyed ...
When the Connext DDS application stops.
This can happen two ways:
❏ When Excel is closed.
❏ When you stop Connext DDS.
❏ When you start Connext DDS.
When the DomainParticipant is created.
Subscriber
There is only one Subscriber per DomainParticipant.
When the DomainParticipant is deleted.
Just before the first sample is published.
Publisher
There is only one Publisher per DomainParticipant.
C-1
This
Entity ...
Is Created ...
When any of these occur:
❏ A topic monitor for Topic T is created.
❏ An RTD function for Topic T is
DataReader
for Topic T
entered.
❏ If there is no active topic monitor
for Topic T: when the last RTD
function for Topic T is deleted.
❏ If there is no RTD function for
Topic T: when the last topic monitor for Topic T is deleted.
❏ Connext DDS starts and there are
❏ When the DomainParticipant is
one or more topic monitors, subscriptions, or RTD functions for
Topic T.
deleted (which can happen either
when Connext DDS is stopped or
when Excel is closed).
There is at most one DataReader per Topic.
DataWriter
for Topic T
Is Destroyed ...
Note: Each cell created by a topic monitor or
subscription is an RTD function.
Just before a sample of Topic T is first pubWhen the Publisher and DomainParticipant
lished.
are deleted.
There is at most one DataWriter per Topic.
C-2
Appendix D
Controlling File Locations with Registry
Settings
When Spreadsheet Add-in for Microsoft Excel is first loaded as Excel starts up, there are three files
that the add-in will be accessing:
❏ The add-in configuration file
❏ The file(s) containing QoS libraries and profiles
❏ The log file for recording add-in specific information
By default, the add-in will access these files in the user’s profile under <path to user_config>.
However, it is possible to change the default location of these files by changing the registry settings. This can be useful if you want to make sure everyone uses the same configuration.
Table D.1 summarizes the default filename in the user’s profile and the corresponding registry
setting that can be used to change the default location.
Table D.1
Default Filenames and Registry Settings
File
Default filename under
My Documents\RTI Spreadsheet Add-in
for Microsoft Excel <version>
String value under Registry key
Software\RTI\ExcelPlugin
to overwrite default file location a
Configuration
file
RTIExcelAddin.ini
IniFile
Qos
fileb
EXCEL_QOS_PROFILES.xml
QosProfiles
RTIExcelAddin.log
LogFile
Profiles
Log file
a. The registry key contains string values that contain the full path of each file, including file name. The registry keys
can be specified either in HKEY_LOCAL_MACHINE or HKEY_CURRENT_USER (the former has higher precedence).
b. If the registry key for the QoS Profile file is not specified, other than just reading the QoS profiles and libraries in the
file under the user’s profile default location, we also look for the file specified in the NDDS_QOS_PROFILES environment variable. If the registry key for the QoS profile is specified, only the file specified in the registry key will be
read—the NDDS_QOS_PROFILES environment variable will have no effect.
To modify/add the registry, go to the Windows Start menu and select Accessories, Run. Type
regedit. This will open the registry editor, where you can add/modify a registry key and the
string value within a registry key.
When Excel starts up and Spreadsheet Add-in for Microsoft Excel is loaded, the add-in first looks for
the registry keys under HKEY_LOCAL_MACHINE. If the registry key for the file is not found,
D-1
it will then look under HKEY_CURRENT_USER. If the registry key for the file is still not found,
the default location under the user’s profile is assumed. The three files can be specified independently in the registry.
By default, the installer for Spreadsheet Add-in for Microsoft Excel does not write any of these values
in the registry. Therefore, the files are loaded from the user’s profile by default.
D-2