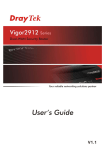
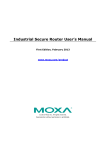
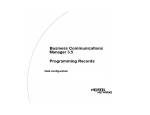
1
SHS 3830 Quick Installation Guide
3 The procedure of connection
1 Unpacking
Unpack the items. Your package should include:
2. One
1 Unpacking
SHS 3830
One external power adaptor
INPUT: AC100V~240V, 50/60Hz 0.8A
OUTPUT: DC 12V, 2.0A
One RJ-45 cable
If items are missing or damaged, notify your
Avadesign representative. Keep the carton and
packing material.
2 How to configure your SHS 3830
1
1.
DC power adapter to SHS 3830.
1. Plug inUnpacking
2. Connect the SHS 3830 WAN port RJ45 modular
jack to ADSL/CABLE Modem Ethernet port with
the RJ45 cable.
3. Connect the SHS 3830 LAN port RJ45 modular
jack to HUB/SWITCH LAN port by RJ45 cable.
4. Connect PC LAN card port to HUB/SWITCH LAN
port.
5. Plug in AC power cord to power source.
You can follow this flow chart before you start to
configure SHS 3830.
START
4 Open web browser
1
Power on SHS 3830
Connect LAN cable to PC
Log on
UN=admin, PW=admin
Type
default IP address http://192.168.1.254 in
4. the Unpacking
the address bar of the Chrome browser to open web
configuration.
Then enter default user name and password. The
user name and password both are admin then click
“Login” button on the screen.
5 WAN configure
To make SHS 3830 work smoothly you have to
3.
1 Unpacking
set up some basic and advance configurations
that include router and IP-PBX features.
The first, you have to configure WAN and LAN IP
for network enable.
There are two WAN ports for the SHS 3830. You
can select “WAN configure” in the menu bar on
the left side of screen to configure WAN1/WAN2
as shown below.
Please key in 192.168.1.254
WAN configure
WAN setting
LAN configure
LAN setting
IP-PBX setting
Save & reboot
Create Group
Subscribers
SIP Trunk
Dial Plan
SIP status
Queue
Paging
Preview
After Login SHS 3830 you will see the screen as
right side, and there are ten main categories, you
can click on each category to extend detail items.
There are three kinds of WAN types to let you
select for each WAN port:
1. Dynamic IP - connect to Cable Modem.
2. PPPoE - connect to Dial up DSL
3. Static IP - Connect to Leased DSL
For more information, please refer to section
2.5.1 of the SHS 3830 user manual.
www.avadesign.com.tw
6 LAN configure
7 IP-PBX setting
LAN configure
includes two functions. One
6.
1 Unpacking
At first, you need to create call group. The step by
5.
Unpacking
step to set up call group, subscribers, SIP trunk,
Dial plan and so on, please refer to section 2.5.3
of the SHS 3830 user manual.
configures LAN port. Include DHCP. The other set
the DHCP Reserved IP.
Congratulations on purchasing the SHS 3830.
The SHS 3830 is an embedded server that provides
IP-PBX functions and two WAN ports Router features.
Quick Installation Guide version V1.1 27-01-2015
LAN Configure function configures the LAN ports
- IP address
- Subnet Mask
- DHCP.
You can choose using DHCP server or not, the
Dynamic Host Configuration Protocol (DHCP)
allows the SHS 3830 to dynamically assign IP
addresses to network devices. Dynamic IP
assignment alleviates the need for the network
administrator to maintain and monitor IP address
assignments and simplifies IP use because the IP
addresses are automatically and dynamically
assigned when a station powers-on. You will need
to indicate the range of DHCP server and DNS
address if you enable DHCP server function.
When enable DHCP Server in “From”, ”TO”
field, user assigns class A,B,C IP which suit for
network topology. Fill in local DNS Server IP
address in “DNS Address” field, you can ask your
local ISP to provide this information.
Avadesign Technology Co. Ltd.
For more information, please refer to section
2.5.2 of the SHS 3830 user manual.
1
There are twelve categories in the
IP-PBX function. User can click on
each category to extend detail items.
Subscribers
Group
Queue
Paging
SIP Trunk
Dial Plan
Preview
SIP status
Download Log
Download CDR
Debug Capture
Update IP-PBX
Hardware Load Default
If you need to reset the settings of the SHS 3830 to
factory default values or back to latest configuration
file, please follow the description step by step.
1. Plug in the power code and then press on the
Factory Reset button 3 seconds
2. Release the Factory Reset button.
3. The SHS 3830 will load the default settings or
back to latest configuration file and do self-test
4. Complete the reset procedure.
Please be careful. Do not press the Factory Reset
button unless you want to clear the current data.