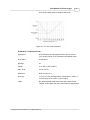
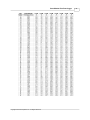
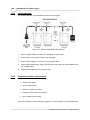
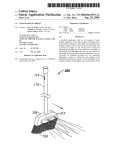
1
IMPORTANT!
SmartReader Plus Data Loggers
Reference Guide
Copyright © 2010 ACR Systems Inc. All Rights Reserved.
Distributed by MicroDAQ.com, Ltd.
www.MicroDAQ.com
(603) 746-5524
SmartReader Plus Data Loggers
Copyright © 2010 ACR Systems Inc. All Rights Reserved.
All rights reserved. No parts of this work may be reproduced in any form or by any means
- graphic, electronic, or mechanical, including photocopying, recording, taping, or
information storage and retrieval systems - without the written permission of ACR
Systems Inc.
Products that are referred to in this document may be either trademarks and/or registered
trademarks of the respective owners. The publisher and the author make no claim to
these trademarks. For more information regarding trademarks, see the "Trademark
Notices" section of this manual.
ACR Systems Inc. assumes no responsibility for errors or omissions, or for damages
resulting from the use of information contained in this document or from the use of
programs and source code that may accompany it. In no event shall the publisher and the
author be liable for any loss of profit or any other commercial damage caused or alleged
to have been caused directly or indirectly by this document.
Distributed by MicroDAQ.com, Ltd.
www.MicroDAQ.com
(603) 746-5524
TRADEMARK NOTICES
SmartReader Plus is a Registered Trademark of ACR Systems Inc.
Distributed by MicroDAQ.com, Ltd.
www.MicroDAQ.com
(603) 746-5524
LIMITED WARRANTY
ACR Systems Inc. warrants the hardware to be free from defects in workmanship and
components for one year from the date of purchase, provided they are not abused or
subjected to detrimental conditions.
Software is warranted for one year from the date of purchase, to operate in accordance
with its programmed instructions. It is not warranted to be error-free. If the product does
not perform in accordance with this Limited Warranty, ACR will at its discretion, either
repair or replace the product free of charge. There will, however, be a charge for freight
and Canadian Customs clearance (if applicable). Any replacement hardware or software
will be warranted for the remainder of the original warranty period. To the maximum
extent permitted by applicable laws, ACR Systems Inc. disclaims all other warranties,
either expressed or implied, including but not limited to, implied warranties of fitness for a
particular application. In no event shall ACR Systems Inc. be liable for any
inconveniences, loss, damages, etc., whatsoever arising out of the use of this product.
ACR's policy is not to proceed with any repairs or replacement unless first discussed with
ACR's Technical Support Analysts and an RMA (Return Material Authorization) number is
issued.
Distributed by MicroDAQ.com, Ltd.
www.MicroDAQ.com
(603) 746-5524
Contents
I
Table of Contents
Section I SmartReader Plus Data Logger
1
1 Introduction
............................................................................................................................................
to SmartReader Plus Data Loggers
1
Features
...........................................................................................................................................................
1
Description ...........................................................................................................................................................
1
Programmed ...........................................................................................................................................................
Operation
2
How SmartReader
...........................................................................................................................................................
Plus Loggers Take Readings
2
...........................................................................................................................................................
How to Use SmartReader
Plus Loggers
3
...........................................................................................................................................................
Specifications
5
Product Approvals
...........................................................................................................................................................
7
2 SmartReader
............................................................................................................................................
Plus Software Driver
8
Logger Status...........................................................................................................................................................
9
.................................................................................................................................................
Logger Sampling
10
Fast Sampling
.................................................................................................................................................
10
Logger Memory.................................................................................................................................................
11
Logger Alarms .................................................................................................................................................
14
Delay Before
.................................................................................................................................................
First Call
15
Delay Between
.................................................................................................................................................
Calls
15
Delay After.................................................................................................................................................
Backup
16
Baud Rate .................................................................................................................................................
17
Alarm Dialout
.................................................................................................................................................
String
18
Logger Channels
...........................................................................................................................................................
19
.................................................................................................................................................
Channel Information
19
Channel Alarms.................................................................................................................................................
21
.................................................................................................................................................
Channel Calibration
21
Logger Connection
...........................................................................................................................................................
Settings
22
3 SmartReader
............................................................................................................................................
Plus 1 Temperature Logger
26
Description ...........................................................................................................................................................
26
...........................................................................................................................................................
26
Setup
4 SmartReader
............................................................................................................................................
Plus 2 Temperature & Relative Humidity Logger
28
Description ...........................................................................................................................................................
28
...........................................................................................................................................................
28
Accessories...........................................................................................................................................................
29
Troubleshooting
...........................................................................................................................................................
30
Relative Humidity
...........................................................................................................................................................
Calibration
31
Specifications
...........................................................................................................................................................
31
Setup
5 SmartReader
............................................................................................................................................
Plus 3 Current, Voltage and Temperature Logger
33
Description ...........................................................................................................................................................
33
Setup to Measure
...........................................................................................................................................................
Current
34
Copyright © 2010 ACR Systems Inc. All Rights Reserved.
Distributed by MicroDAQ.com, Ltd.
www.MicroDAQ.com
(603) 746-5524
II
SmartReader Plus Data Loggers
Voltage Channels
...........................................................................................................................................................
35
...........................................................................................................................................................
Current Probes
and Accessories
36
...........................................................................................................................................................
Specifications
36
Troubleshooting
...........................................................................................................................................................
37
6 SmartReader
............................................................................................................................................
Plus 4 Pressure, Temperature and RH Logger
38
Description ...........................................................................................................................................................
38
Setup
...........................................................................................................................................................
39
Pressure Calibration
...........................................................................................................................................................
40
Specifications
...........................................................................................................................................................
41
7 SmartReader
............................................................................................................................................
Plus 4 Low Pressure Differential and Temperature Logger
42
Description ...........................................................................................................................................................
42
Setup
...........................................................................................................................................................
42
...........................................................................................................................................................
SRP4 LPD Pressure
Specifications
43
8 SmartReader
............................................................................................................................................
Plus 5 Thermocouple Logger
44
Description ...........................................................................................................................................................
44
Setup
...........................................................................................................................................................
44
Use
...........................................................................................................................................................
44
...........................................................................................................................................................
Specifications
46
...........................................................................................................................................................
Manual Calibration
46
9 SmartReader
............................................................................................................................................
Plus 6 Thermocouple Logger
47
Description ...........................................................................................................................................................
47
Setup
...........................................................................................................................................................
47
Use
...........................................................................................................................................................
48
Specifications
...........................................................................................................................................................
48
Manual Calibration
...........................................................................................................................................................
49
10 SmartReader
............................................................................................................................................
Plus 7 Process Signal Logger
50
Description ...........................................................................................................................................................
50
Setup
...........................................................................................................................................................
50
...........................................................................................................................................................
Choosing Input
Channels
52
Customizing...........................................................................................................................................................
Input Ranges
53
Selecting Transducers
...........................................................................................................................................................
and Transmitters
57
Specifications
...........................................................................................................................................................
58
11 SmartReader
............................................................................................................................................
Plus 8 Eight-Channel Temperature Logger
60
Description ...........................................................................................................................................................
60
...........................................................................................................................................................
Setup and Use
60
12 SmartReader
............................................................................................................................................
Plus 9 Pulse Logger
62
Description ...........................................................................................................................................................
62
...........................................................................................................................................................
How the SmartReader
Plus 9 Counts
62
Setup and Use
...........................................................................................................................................................
63
Copyright © 2010 ACR Systems Inc. All Rights Reserved.
Distributed by MicroDAQ.com, Ltd.
www.MicroDAQ.com
(603) 746-5524
Contents
III
Specifications
...........................................................................................................................................................
63
13 SmartReader
............................................................................................................................................
Plus 10 RTD Temperature Logger
65
Description ...........................................................................................................................................................
65
Setup
...........................................................................................................................................................
65
...........................................................................................................................................................
Specification
of RTD Channels
66
14 Conservation
............................................................................................................................................
Logger Temperature, RH and 5V Input Logger
67
Description ...........................................................................................................................................................
67
Setup
...........................................................................................................................................................
68
Accessories...........................................................................................................................................................
68
...........................................................................................................................................................
Relative Humidity
Calibration
68
...........................................................................................................................................................
Troubleshooting
69
Specifications
...........................................................................................................................................................
69
15 APPENDIX
............................................................................................................................................
A Monitoring Resistance and Switch Status
71
...........................................................................................................................................................
Measuring Resistance
71
Monitoring Switch
...........................................................................................................................................................
Status
71
16 APPENDIX
............................................................................................................................................
B Temperature and Relative Humidity Calibration
73
Temperature...........................................................................................................................................................
and Relative Humidity Calibration
73
...........................................................................................................................................................
Thermistor Calibration
73
...........................................................................................................................................................
Relative Humidity
Calibration
76
17 APPENDIX
............................................................................................................................................
C Thermistor Temperature Probes
79
...........................................................................................................................................................
Thermistor Temperature
Probes
79
...........................................................................................................................................................
What are Thermistors?
79
ET Series Temperature
...........................................................................................................................................................
Probes
79
Setup and Use
...........................................................................................................................................................
80
Specifications
...........................................................................................................................................................
81
...........................................................................................................................................................
Resistance vs.
Temperature Tables
85
...........................................................................................................................................................
Custom Probes
90
18 APPENDIX
............................................................................................................................................
D Typical SmartReader Plus 3 Connection Diagram
91
...........................................................................................................................................................
AC Current and
AC Voltage Recording
91
...........................................................................................................................................................
AC Voltage Transducer
Specifications
92
19 APPENDIX
............................................................................................................................................
E Sample Rates
94
How a Data Logger
...........................................................................................................................................................
Stores Readings
94
Sample Rate...........................................................................................................................................................
Tables
94
20 APPENDIX
............................................................................................................................................
F Connecting Multiple Loggers
100
...........................................................................................................................................................
Network Configurations
100
Basic Network
...........................................................................................................................................................
101
...........................................................................................................................................................
Modular Network
102
...........................................................................................................................................................
Shielded Network
103
Connection...........................................................................................................................................................
Problems and Solutions
103
Copyright © 2010 ACR Systems Inc. All Rights Reserved.
Distributed by MicroDAQ.com, Ltd.
www.MicroDAQ.com
(603) 746-5524
IV
SmartReader Plus Data Loggers
105
Index
Copyright © 2010 ACR Systems Inc. All Rights Reserved.
Distributed by MicroDAQ.com, Ltd.
www.MicroDAQ.com
(603) 746-5524
WELCOME
Congratulations on your purchase of a SmartReader Plus data logger. We are confident
that you will find it to be a most valuable and useful tool for your data collection
applications.
This Reference Guide is designed to be used hand-in-hand with TrendReader 2.0
software and frequently refers to TrendReader 2.0 conventions and procedures. To get
the most from your logger, please take time to familiarize yourself with TrendReader 2.0
and its Reference Guide.
For important information on how all SmartReader Plus data loggers work and how to use
them, read the Introduction to SmartReader Plus chapter. It will give you an overview of
how the loggers work and how to configure them for your application. Next, read the
chapter that deals specifically with the type of SmartReader Plus logger you have.
Distributed by MicroDAQ.com, Ltd.
www.MicroDAQ.com
(603) 746-5524
1
SmartReader Plus Data Loggers
SECTION 1 SmartReader Plus Data Logger
1.1
Introduction to SmartReader Plus Data Loggers
SmartReader Plus data loggers are easy-to-use, battery-powered data loggers. Pocket-sized
and rugged, they can be used in a wide range of environmental and industrial applications.
Different SmartReader Plus models are available to directly measure and record variables
such as temperature, relative humidity, pressure, electric current, analog voltage, current loop
and pulses. Each model can reliably record time-based data for later analysis by
TrendReader software.
TrendReader software must be installed and ready to run prior to making use of the setup
instructions in this section of the guide.
1.1.1
Features
SmartReader Plus data loggers share many common features that make them useful tools for
data collection:
·
·
·
·
·
·
·
·
·
·
Pocket-sized
Solid-state components - no moving parts
Low-power microprocessor controlled circuitry
12-bit high resolution readings
Precision on-board thermistor temperature sensor (except the SmartReader Plus 9)
High capacity lithium battery
Quartz clock crystal
Magnetic backing and secure locking hole
Rugged die-cast Noryl® case
Convenient terminal block connector
Figure 1: SmartReader Plus data loggers
1.1.2
Description
SmartReader Plus loggers can run continuously, constantly measuring and recording readings
from any enabled channel. They can also start logging at a specified time. Self-powered by a
Copyright © 2010 ACR Systems Inc. All Rights Reserved.
Distributed by MicroDAQ.com, Ltd.
www.MicroDAQ.com
(603) 746-5524
SmartReader Plus Data Logger
2
long-life lithium battery that will provide years of reliable operation, your SmartReader Plus can
work independently from any external power supply or computer. When you are ready to look
at the data it has collected, it can transfer all information to your computer through the use of
TrendReader software.
Main Components
The main components of the SmartReader Plus data loggers include:
· a memory chip that has the capacity to store up to 1 million readings (see
Specifications)
· a microcontroller and 12-bit analog-to-digital converter (A/D) that converts all input
signals to digital values
· a quartz clock crystal that accurately keeps track of time and regulates the taking of
readings
· an accurate on-board thermistor (except the SmartReader Plus 9) that the logger uses
to measure ambient temperature via changes in resistance
· a lithium battery that provides power to the logger and internal or external sensors
1.1.3
Programmed Operation
SmartReader Plus data loggers run according to settings that you program. These
pre-selected settings are stored in the logger's memory and instruct it to:
·
·
·
·
·
1.1.4
take readings at regularly spaced intervals either at slow or fast sample rates
take readings from specific channels that you enable
associate each channel with an equation in TrendReader software
start readings with or without a delay
take readings continuously, or stop when memory is full
How SmartReader Plus Loggers Take Readings
Each SmartReader Plus data logger (except the SmartReader Plus 9) has an on-board
thermistor that you can use to record ambient temperature. Depending on which SmartReader
Plus model you have, you can turn this temperature-monitoring capability on or off using
software. You can also record other information by connecting sensors, transducers or
external circuitry to the plug-in terminal block.
SmartReader Plus data loggers can record readings in two selectable modes:
1. First-in, First-out (FIFO)*. In this mode the logger continues to take readings when its
memory is full (to make room, it discards the oldest reading every time it adds a new
one). Thus, the memory will contain a "sliding window" of information.
2. Stop when Full. The logger stops recording when its memory is full.
* Not available in "Fast Mode."
You can set the time interval at which your logger saves readings using TrendReader
software. The sample rate you select will apply to all enabled channels. At a sample rate of
eight seconds, one reading is taken every eight seconds and saved to memory. As you slow
Copyright © 2010 ACR Systems Inc. All Rights Reserved.
Distributed by MicroDAQ.com, Ltd.
www.MicroDAQ.com
(603) 746-5524
3
SmartReader Plus Data Loggers
the sample rate the logger begins to average readings before saving them to memory. To do
this the logger takes a reading every eight seconds, but instead of transferring this directly to
the logger's memory, it stores the readings in a buffer (a temporary memory) where it is
retained until the sampling interval is over.
When you backup a logger's data to your computer, the correct time and date are referenced
to each reading. All readings are then individually time and date stamped and processed by
an equation associated with each logger channel. The result is a collection of accurate
time-based data ready for detailed graphing and analysis.
1.1.5
How to Use SmartReader Plus Loggers
Using your SmartReader Plus data logger for most applications is a simple process. With
proper planning, setup and installation of your data logger, you can be assured that the
information you collect will be both correct and useful. The following provides general
procedures for using SmartReader Plus data loggers. For additional and specific information
on these steps, refer to the chapter in this manual that deals with your particular SmartReader
model.
Planning
Proper planning is the key to successful data logging. Time spent in this stage will help you
save time and frustration later. To help you plan, answer these questions:
·
·
·
·
What exactly do I want to measure?
Where is the best place to measure?
How long do I want to monitor for?
Should other variables be monitored simultaneously?
Setup
To set up your SmartReader Plus data logger you must first have TrendReader software
installed and running on your computer. You can then configure your logger with various
options by talking to it via the interface cable.
Set Sample Rate
Always confirm the sample rate (how often the logger saves readings) to make sure it will be
acceptable for your application. You can alter the frequency at which your SmartReader Plus
logger records readings by changing the sample rate. You can choose rates from 8 seconds
to 8 hours in the normal mode. In Fast Read mode, you can select between 0.04 seconds and
2 minutes, with the use of an external power supply or battery pack. The sample rate chosen
will apply to all the active channels on the logger.
To help determine which sample rate you should choose, answer these questions:
· How long do I need to record data?
· How much time will elapse between when I retrieve the logger and download the data to
my computer (for example, the trip back to the office)?
· How often do readings need to be taken?
NOTE: To activate readings in the Fast Read mode, an external power source
Copyright © 2010 ACR Systems Inc. All Rights Reserved.
Distributed by MicroDAQ.com, Ltd.
www.MicroDAQ.com
(603) 746-5524
SmartReader Plus Data Logger
4
must be connected to the data logger.
Making External Connections
If you are using your SmartReader Plus data logger to monitor external modules, sensors, or
circuitry, make sure the connections are tight. Also, make sure the terminal block is snapped
securely into the logger.
For permanent applications, wiring connections can first be made to the logger's removable
terminal block. The terminal block can then be attached (with glue for example) to a
permanent fixture. When it comes time to analyze data, the logger can simply be unplugged
from the terminal block and brought back to your computer. After backing up the data, the
logger can be returned and plugged back into the terminal block. Extra terminal blocks are
available from your sales representative. When unplugging the terminal block from your
logger, use care to pull it straight out so as not to break the plastic casing.
Enable Channels
Always make sure that you have enabled and verified the correct channels for your
application. This is very important as it can be distressing to find out later that the information
you hoped to collect was from an inactive channel. You can selectively enable additional
channels in your SmartReader Plus as required. However, in order to avoid using logger
memory unnecessarily, disable any channels which are not required.
Clear Memory
Before starting a logging session, clear the logger's memory. This will help to keep the
collected files smaller as well as decrease the time needed to backup the logger later. Note
that clearing the memory is automatic if you save setup changes (for example, assign different
equations, change sample rate, etc.).
Test
You can directly read the values that your SmartReader Plus data logger is sensing using the
Realtime capability of TrendReader software. This test gives you the opportunity to check
your logger setup and make any necessary changes before starting the logging session.
Label
If you are working with more than one data logger, label each logger, identifying the task and
location before you distribute them throughout a building or system. To do this, you can simply
use a shipping tag. Later, when you retrieve them to graph their data, you will know what each
graph refers to.
Mounting
Use the magnetic backing to conveniently mount your logger on metal surfaces like ductwork
or electrical control cabinets. If you are concerned about theft, lock your logger to a
permanent fixture using the locking tab or take advantage of its small size and hide it
completely out of view. Because SmartReader Plus loggers are so light, you can use special
mounting fasteners like Velcro® to attach them to almost any surface. Make sure your
logger's mounting method will last the full length of your logging session.
Do not rely on the logger's magnetic strip for adhesion if the mounting surface is uneven,
unstable or above 65°C (150°F).
Copyright © 2010 ACR Systems Inc. All Rights Reserved.
Distributed by MicroDAQ.com, Ltd.
www.MicroDAQ.com
(603) 746-5524
5
SmartReader Plus Data Loggers
Cold or Humid Environments
Make sure that the environment you will be placing your logger into will be acceptable by
referring to the Specifications in this chapter. If conditions are not adequate for the logger,
consider using a protective enclosure. For humid conditions you can protect your logger
simply by placing it in a zip-lock plastic bag.
When you place your SmartReader Plus logger in a cold environment, make sure
condensation will not settle on the logger when you bring it back into warmer surroundings,
such as an office. The best way of preventing moisture is to place the logger in a container
and include a desiccant (a material that absorbs moisture). When you bring your logger back
to your computer, leave the logger in the container until it has had a chance to warm up to the
surrounding temperature. You can then take it out and analyze it.
Keep Track
Make sure you keep a record of where you have placed each logger in a building or system
plan. You will save time looking for them when your data gathering session is over. Also,
keep track of when you placed the loggers in the area you are monitoring. This will help when
producing graphs on your computer. It may be helpful to label (shipping tag) each logger so
you can properly identify and differentiate it from other loggers.
Analysis
After sufficient time has passed for the logger to obtain a representative profile of data, it is
time to analyze the information. If you are retrieving the logger from the field, bring it back
immediately to your computer for analysis.
In order to analyze your SmartReader Plus logger's data, you must first transfer a backup copy
of its data to your computer. To do this, see Backup in the TrendReader guide. After
transferring your information to the computer, the data is automatically copied to disk and time
and date stamped.
You can find a detailed description of all software functions in the TrendReader guide.
1.1.6
Specifications
General
Size:
107 x 74 x 22mm (4.2" x 2.9" x 0.9")
Weight:
110g (3.75 oz.)
Case Material:
Noryl® Plastic
Operating Limits:
-40 to 70°C (-40 to 158°F) and 0 to 95% Relative Humidity
(non-condensing)
Clock Accuracy:
±2 seconds/day
Battery:
3.6 Volt Lithium, 1 Amp-hour
Copyright © 2010 ACR Systems Inc. All Rights Reserved.
Distributed by MicroDAQ.com, Ltd.
www.MicroDAQ.com
(603) 746-5524
SmartReader Plus Data Logger
6
Memory Sizes:
Model
Readings
Bytes
32 KB
21,500
32 KB
128 KB
87,000
128 KB
1.5 MB
1,048,000
1.5 MB*
*See specific model for availability.
Sampling Methods:
1. Continuous (First-in, First-out)*
2. Stop when full (Fill-then-stop)
*Not available with sample rates faster than 8 seconds.
Sample Rates:
User-selectable rates from 25 per second to every 8 hours.
(BP-101 battery pack required for sample rates less than 8
seconds).
Resolution:
12-bit (1 part in 4096)
Power Consumption:
5 to 10 microamps (continuous)
Battery Life:
Ten years (under normal use) factory replaceable.
External Connector:
Removable screw-type terminal strip with Common (-)
connection.
Resistance to X-rays:
Tested for protection against a 160kV 150mA-sec. dose @
38" FFD (about 100times that of an X-ray machine). Tested
for protection against Gamma Ray (equivalent to 0.137-1.38
megavolts) IR192-28 curies @ 30-second exposure source to
object distance 5".
Internal Temperature Sensor*
Type:
NTC thermistor; 10k ohms at 25°C (77°F)
Range:
-40 to 70°C (-40 to 158°F)
Accuracy:
±0.2°C between 0 to 70°C (±0.3°F between 32 and 158°F)
Resolution:
0.03°C (0.05°F) at 25°C (77°F)
Better than 0.07°C (0.12°F) between -25 and 70°C (-13 and
158°F)
Better than 0.13°C (0.23°F) between -40 and -25°C (-40 and
-13°F)
Equation:
Use Equation 45 in TrendReader software
Specifications are subject to change without notice.
* The SmartReader Plus 9 does not have an on-board temperature sensor.
Copyright © 2010 ACR Systems Inc. All Rights Reserved.
Distributed by MicroDAQ.com, Ltd.
www.MicroDAQ.com
(603) 746-5524
7
1.1.7
SmartReader Plus Data Loggers
Product Approvals
Meets Part 15 for Digital Devices of the Code of Federal Regulations of the Federal
Communications Commission (FCC). Meets Class A radiated and conducted emission
requirements of Section 2 of the Radio Interference Regulations of Communications Canada,
IEC801-2, 3, 4 and EN55011 covering ESD, RFI Immunity, EFT/Burst and Radiated
Emissions respectively for the Commission of the European Communities (CE).
Copyright © 2010 ACR Systems Inc. All Rights Reserved.
Distributed by MicroDAQ.com, Ltd.
www.MicroDAQ.com
(603) 746-5524
SmartReader Plus Data Logger
1.2
8
SmartReader Plus Software Driver
TrendReader software uses a software driver to communicate with SmartReader Plus data
loggers. The software driver takes the form of two windows. The Status window, shown when
you contact the logger, is used to display the settings currently stored in the data logger. The
Setup window, shown when you select Edit Setup, is used to alter the current settings and
apply the changes to the data logger. The settings are divided into two main sections: Status
and Channels. Status contains information about sampling, memory and alarms. Each
channel of the logger contains information about the description, equation and Realtime value,
alarms, and calibration associated with the channel. You can control the level of detail that
you see for the settings by clicking on the "+" and "-" buttons at the left side to expand and
collapse the nodes.
When you want to clear the logger's memory and start a new logging session with new
parameters, select Edit Setup from TrendReader. In the Edit Logger Setup window, make
any necessary changes. To implement your changes, you can either click on Apply or OK.
OK will implement the changes and close the window whereas Apply will leave the window
Copyright © 2010 ACR Systems Inc. All Rights Reserved.
Distributed by MicroDAQ.com, Ltd.
www.MicroDAQ.com
(603) 746-5524
9
SmartReader Plus Data Loggers
open, thereby allowing you to make changes in other features.
NOTE: SmartReader Plus data loggers can be connected together in a network.
For information on networks, see Appendix F Connecting Multiple Loggers.
1.2.1
Logger Status
When you contact the logger, the logger status is displayed. The Status line indicates whether
the data logger is actively logging, waiting to start or dormant. If you set up the logger with no
delay, it will immediately start logging and the status will show the number of readings, or
samples, that have been taken. If you want to have the logger wait before it starts logging, set
the start time accordingly. The Status subsections are Sampling, Memory, and Alarms.
Copyright © 2010 ACR Systems Inc. All Rights Reserved.
Distributed by MicroDAQ.com, Ltd.
www.MicroDAQ.com
(603) 746-5524
SmartReader Plus Data Logger
1.2.1.1
10
Logger Sampling
The sample rate is the frequency with which a logger takes readings. The Sampling
subsection indicates if the data logger is performing in a regular or fast sampling mode and
what the sample rate is. In normal sampling, the rates available are from once every 8
seconds to once every 8 hours, while in fast sampling, the rates can be as quick as 25 times
per second.
To set the logger for regular sampling, click on the Mode field and select Normal. To set the
sample rate, click on the desired time unit and select the value from the drop-down list as
shown. Note that millisecond sample rates are only applicable with fast sampling.
To find out more about sample rates and to view a set of sample rate tables, see Appendix E
Sample Rates.
1.2.1.1.1
Fast Sampling
With the fast sampling mode, you can select sample rates from 0.04 seconds (25 readings per
second) to 2 minutes. An external power source, such as an active computer communications
port, power supply or battery pack, is required to operate the logger. The only memory mode
available is "Stop When Full".
Copyright © 2010 ACR Systems Inc. All Rights Reserved.
Distributed by MicroDAQ.com, Ltd.
www.MicroDAQ.com
(603) 746-5524
11
SmartReader Plus Data Loggers
*Note that the logger will stop recording (go dormant) when you communicate with it.
Therefore, if you want to perform fast sampling with the logger connected to your
computer, you need to turn off Realtime.
To ensure that the logger takes data at the correct time, it is best to use the delayed start
feature. The logger will begin to take readings when you connect the power source, providing
the start delay has expired. Otherwise, the logger will start when the start delay times out if it
has external power applied to it prior to the timing out of the start delay. Therefore, you need
to set the start delay long enough for you to have time to save the setup and, if necessary,
disconnect the logger and connect the battery pack or power supply. If you disconnect the
logger, first set a delay of at least 16 seconds, then disconnect the logger within 8 seconds for
proper operation.
When you are using sample rates as short as 0.04 seconds, you can run out of logger
memory very quickly (two active channels at 0.04 seconds gives you 7 minutes and 10
seconds of memory). It is important that you do not waste any logger memory by starting the
logger too soon or by leaving unused channels active.
To set the logger for fast sampling, click on the Mode field and select Fast. Next, click on the
desired time unit and select the value from the drop down list.
1.2.1.2
Logger Memory
The Memory subsection indicates how the data is stored in memory and what the start and
end times (or capacity) are for the data logging. In the FIFO (First In, First Out) mode, the
logger continually stores data and when the memory limit is reached, the new readings start to
overwrite the oldest readings. In this method, the logger is always collecting data, but only
saves the most recent data in its memory. In the Stop When Full mode, when the memory
limit is reached, the logger stops recording.
The capacity, or length of time for data capture of the logger is determined by the logger
model, the number of active channels, and the sampling rate. Loggers come in 3 memory
models: 32KB, 128KB, and 1.5MB. (If you want, you can choose to use only a portion of the
available memory when you select the end time for the data capture). To find out more about
how the capacity is affected by the sample rate and active channels, see Appendix E Sample
Rates.
To set how the logger stores its data, click on the Usage field and select FIFO or Stop When
Copyright © 2010 ACR Systems Inc. All Rights Reserved.
Distributed by MicroDAQ.com, Ltd.
www.MicroDAQ.com
(603) 746-5524
SmartReader Plus Data Logger
12
Full.
To set when the logger will start recording click on the Start Time field. Next, click on the
small button that appears at the right. This will pop up a form allowing you to set the date and
time. Highlight the date or time and enter the appropriate value. You can also click on the
drop-down list arrow to bring up a calendar. You can set the logger's starting time for up to 6
days, 1 hour, and 39 minutes ahead.
To set how long to record, click on the End Time field. Next, click on the small button that
Copyright © 2010 ACR Systems Inc. All Rights Reserved.
Distributed by MicroDAQ.com, Ltd.
www.MicroDAQ.com
(603) 746-5524
13
SmartReader Plus Data Loggers
appears at the right. This will pop up a form allowing you to set the date and time or the
capacity. Just like entering the start time, you can highlight the date or time and enter the
appropriate value or you can also click on the drop-down list arrow to bring up a calendar. If
you want to record a specific number of readings, simply drag the usage bar to adjust the
number of readings to take.
Copyright © 2010 ACR Systems Inc. All Rights Reserved.
Distributed by MicroDAQ.com, Ltd.
www.MicroDAQ.com
(603) 746-5524
SmartReader Plus Data Logger
1.2.1.3
14
Logger Alarms
Alarms are used to indicate when any reading has exceeded preset alarm thresholds. When
an alarm condition occurs, the logger dials the stored number, typically for a phone or a pager,
and leaves the remote site's phone number as a message. As such, alarms are very useful
for monitoring loggers installed at remote locations. Note that alarms must be enabled for
each channel that is monitored. Other than a modem, no special equipment is needed for
Alarm Dialout. See the TrendReader guide for information on how to set up a modem at a
remote site.
If the remote logger will be dialing a telephone number, the receiving telephone will need to
have caller ID in order to display the remote site's number since a voice message is not left.
When you see that the remote site has called, you can call the site to find out which logger
caused the alarm.
If the remote logger will be dialing a pager, you can include a code, such as the logger's serial
number, along with the phone number. This helps to identify which logger initiated the alarm
call. However, in order to be able to do this, you must choose a pager system that accepts
touch-tone codes that can be displayed on the pager. Since there can be many loggers on a
network, being able to identify the logger that initiated the alarm can save quite a bit of time.
To respond to an alarm, you first need to dial into the site and back up the logger. Next, fix the
problem that caused the alarm. Finally, reactivate the alarm by clearing the logger. As a
precaution, you should regularly test the alarm system to ensure that if an alarm is triggered,
the logger will dial the correct phone number.
To prevent false dialing, there is a delay after the logger is setup before alarms become
enabled. Note that alarms do not operate in the fast sampling mode. If you enable alarms,
fast sample mode is disabled. Alternatively, if you enable fast sampling, the alarms are
disabled.
The alarm parameters are discussed in the following sections. In order to set any of the alarm
parameters, alarms must first be enabled.
Copyright © 2010 ACR Systems Inc. All Rights Reserved.
Distributed by MicroDAQ.com, Ltd.
www.MicroDAQ.com
(603) 746-5524
15
1.2.1.3.1
SmartReader Plus Data Loggers
Delay Before First Call
The Delay Before the First Call is the length of time that a logger will wait before dialing out
once an alarm condition has occurred. If you do not want the remote logger to dial out
immediately when one or more of its channels go into an alarm condition, you can set the Call
Delay to designate the number of seconds the logger has to wait before dialing. The
maximum time for this delay is 2040 seconds.
The alarm condition must exist for the entire delay time, otherwise the logger will not dial out.
If the logger comes out of an alarm condition during the call delay period, the delay timer will
stop and will start again from zero at the next alarm event. This is useful in limiting temporary
or false alarm triggering.
To set this delay, click on the Delay Before First Call field and enter the value.
1.2.1.3.2
Delay Between Calls
The Delay Between Calls is the time between successive calls. A logger will continue to dial
out after every delay period as long as an alarm condition exists and has not been
acknowledged by backing up the logger.
Copyright © 2010 ACR Systems Inc. All Rights Reserved.
Distributed by MicroDAQ.com, Ltd.
www.MicroDAQ.com
(603) 746-5524
SmartReader Plus Data Logger
16
To set this delay, click on the Delay Between Calls field and enter the value.
1.2.1.3.3
Delay After Backup
The Delay After Backup is the period of time that the alarm feature is temporarily disabled
after the logger has been backed up. The delay begins when you acknowledge the alarm by
backing up the logger that dialed out. The Delay After Backup deactivates the alarm, giving
you time to fix the problem that caused the alarm. The maximum delay is 720 minutes. When
you look at the logger status window (not in Edit Logger Setup) you will see the time counted
down. Note that the time shown may be slightly inaccurate if you Realtime the logger.
If the delay period elapses and the alarm condition still exists, the logger will dial out again. To
bypass the Delay After Backup period (if you have fixed the alarm problem but there is time
remaining on the delay which is preventing the alarm from being activated), you can clear the
logger to clear this delay.
Copyright © 2010 ACR Systems Inc. All Rights Reserved.
Distributed by MicroDAQ.com, Ltd.
www.MicroDAQ.com
(603) 746-5524
17
SmartReader Plus Data Loggers
To set this delay, click on the Delay After Backup field and enter the value.
1.2.1.3.4
Baud Rate
The Baud Rate determines the data rate that the logger uses to communicate with the modem
that performs the dialing out. The baud rates available range from 1200 to 57,600.
To set the baud rate, click on the Baud Rate field and select the value from the drop-down list.
Copyright © 2010 ACR Systems Inc. All Rights Reserved.
Distributed by MicroDAQ.com, Ltd.
www.MicroDAQ.com
(603) 746-5524
SmartReader Plus Data Logger
1.2.1.3.5
18
Alarm Dialout String
The Alarm Dialout String contains the phone number to dial, along with any modem
commands or messages. To set this string, click on the Alarm Dialout String field and enter
the value.
Calling a Telephone
Remember that the telephone receiving the alarm call must have caller ID to display the
remote site's phone number, otherwise you will have no way of knowing where the call came
from.
1.
The first part of the string contains a dial command for the modem. If the phone line at
the remote site has tone dial, type ATDT. If the phone line has plus dial, type ATDP.
2.
After the dial command, type the number of the telephone that is to receive the alarm call.
For example, if you wanted a logger to dial a number from a tone dial phone line you would
type: ATDT 123-555-2222
Calling a Pager
In order to include a code that will identify the logger that called the phone number, you must
choose a pager system that accepts touch-tone codes that can be displayed on the pager.
1.
First type the modem's dial command ATDT.
2.
After the dial command, type the number of the pager that is to receive the alarm call.
3.
After the pager number and before the identifying code, there must be a pause to allow
the receiving station to answer. Enter this pause by typing commas. (For most modems
each comma causes a pause of two seconds).
4.
Type a code that will identify the logger.
Copyright © 2010 ACR Systems Inc. All Rights Reserved.
Distributed by MicroDAQ.com, Ltd.
www.MicroDAQ.com
(603) 746-5524
19
SmartReader Plus Data Loggers
For example, if you want to dial a pager number, pause for several seconds, and then send
the serial number of the data logger, you would type: ATDT 123-555-2222,,,,,12345
1.2.2
Logger Channels
The Channels section indicates what channels are enabled (there is a check mark beside the
channel number) and provides information specific to each channel. When you enable a
channel on a logger, it becomes an active channel and it continually records readings and
stores them in the logger's memory. You should disable any channels you are not using so
that there is as much memory as possible available for the active channel(s). The Channel
subsections are Information, Alarms, and Calibration.
1.2.2.1
Channel Information
When you contact the logger, the logger status is displayed. The Channel line gives the
description and the Realtime value, if Realtime is turned on. The Realtime value is based on
the equation that you select for the channel.
The equation is selected in the Setup window but is shown in the Status window only as a
tool-tip. To see the equation point your cursor over the channel and it will show the channel
type and equation.
In the Setup window, a channel type tool-tip is displayed when the cursor is pointed over a
channel.
Copyright © 2010 ACR Systems Inc. All Rights Reserved.
Distributed by MicroDAQ.com, Ltd.
www.MicroDAQ.com
(603) 746-5524
SmartReader Plus Data Logger
20
To set the description, click on the Description field and enter the name.
The logger collects and stores raw data readings. An equation is used to transform the raw
data into measurement units, such as °C, with the current reading shown as a Realtime value.
You can use built-in equations or you can create your own custom equations. See Equations
in the TrendReader guide for further information. To set the equation, click on the Equation
field and select the equation from the drop-down list. To help you select the proper equation,
the Realtime value using the currently selected equation is shown. *
Some channels compensate their output by using the value of another channel. For example,
the calculated value for an RH channel depends on the reading of the RH sensor and the
value of the temperature channel. In such cases, the compensation channel must output in
the correct units. In the case of RH, for example, the temperature channel must output in
units of temperature. Using units of byte counts, switch status, or resistance will give invalid
results.
* Note that if a custom equation is not available when Edit Setup... is selected (e.g.: deleted)
then the equation will be shown as unknown. If a new equation is not selected the Realtime
value will not display correctly. If the logger is backed up the channel will be disabled then
changes to the equation can be made in the graph using the Lines Tab in Graph Settings.
Copyright © 2010 ACR Systems Inc. All Rights Reserved.
Distributed by MicroDAQ.com, Ltd.
www.MicroDAQ.com
(603) 746-5524
21
1.2.2.2
SmartReader Plus Data Loggers
Channel Alarms
The Alarm subsection shows the high and low alarm thresholds and whether the high and low
alarms are enabled. See Logger Alarms for a description of the logger alarms. To set each
alarm, first enable the alarm, then click on the Alarm field and enter the value.
For some channels, such as RH, the sensor output depends on the temperature and the
equation needs to compensate for this. When setting the alarms, you also need to enter the
expected operating temperature in the Comp. Temperature field.
Note that the default high and low alarm values will be displayed when the alarms are enabled.
When you enter alarm values between the high and low range the enabled alarms be saved
upon Apply or closing the window.
1.2.2.3
Channel Calibration
The Calibration subsection shows the Low, Mid, High, and Ext calibration values. These
values are used to adjust the readings of the logger in order to make the output more
accurate. To set each calibration value, click on the appropriate calibration field and enter the
value.
Copyright © 2010 ACR Systems Inc. All Rights Reserved.
Distributed by MicroDAQ.com, Ltd.
www.MicroDAQ.com
(603) 746-5524
SmartReader Plus Data Logger
1.2.3
22
Logger Connection Settings
If you are using a wireless or RF modem, with an RFA adapter cable, then you will have to
change the Cable type and possibly the Block size.
Cable Type
1. If you have not yet saved a connection setting for the RF modem, select the Connections
view in the Shortcuts Bar of TrendReader. Otherwise skip to step 4.
2. Select the COM port to which the RF modem is attached.
3. Click Add Connection Settings and enter in the name of the connection setting.
4.
5.
6.
Select the Connection Settings view in the Shortcuts Bar of TrendReader.
Select the RF modem connection setting.
Click Edit Connection Settings to bring up the connection settings dialog box.
7.
Click on the Preferred Loggers field to pop up the Preferred Loggers form.
Copyright © 2010 ACR Systems Inc. All Rights Reserved.
Distributed by MicroDAQ.com, Ltd.
www.MicroDAQ.com
(603) 746-5524
23
SmartReader Plus Data Loggers
8.
Select only the SRPLogger. Click OK.
Copyright © 2010 ACR Systems Inc. All Rights Reserved.
Distributed by MicroDAQ.com, Ltd.
www.MicroDAQ.com
(603) 746-5524
SmartReader Plus Data Logger
9.
24
Click on the SRPLogger node.
10. Click on the Cable Type field to pop up the Cable Type form and select the RFA cable.
Copyright © 2010 ACR Systems Inc. All Rights Reserved.
Distributed by MicroDAQ.com, Ltd.
www.MicroDAQ.com
(603) 746-5524
25
SmartReader Plus Data Loggers
Click OK.
Block Size
The Block size you use depends on the buffer size of your modem minus the overhead of the
logger, which is 14. For example, if your RF modem has a block size of 256, then a
reasonable value for the Block size would be 240.
11. Click on the Block Size field to pop up the Block Size form and enter in the value. Click
OK.
You may have to experiment with the Block size to maximize throughput since smaller block
sizes transmit less data but usually have fewer retries.
Copyright © 2010 ACR Systems Inc. All Rights Reserved.
Distributed by MicroDAQ.com, Ltd.
www.MicroDAQ.com
(603) 746-5524
SmartReader Plus Data Logger
1.3
26
SmartReader Plus 1 Temperature Logger
The SmartReader Plus 1 is an easy-to-use logger for recording temperature in a wide range of
applications such as HVAC testing/balancing, property management studies, and
transportation of perishable goods.
Figure 1-1: SmartReader Plus 1
1.3.1
Description
The SmartReader Plus 1 has an on-board thermistor temperature sensor and an external
temperature sensor channel for remote measurements with an optional probe.
1.3.2
Setup
Make sure to enable each channel you want to use. If you are not using a channel, disable it in
order to save memory.
Channel
Description
Equation
0
Internal Temperature
45
2
External Temperature
Appendix C
Accessories
The SmartReader Plus 1 Temperature Logger can be used with ET series temperature probes
(refer to Appendix C Thermistor Temperature Probes or any NTC thermistor data). To use an
external temperature probe, simply connect the two wires to the terminals marked "Temp.
Sensor" and activate the external temperature channel. Note, the polarity does not matter
when connecting thermistor leads. If you are using shielded cable (recommended for cable
extensions), terminate the shield wire by connecting it to the lower of the two "Temp. Sensor"
terminals (the common terminal).
Copyright © 2010 ACR Systems Inc. All Rights Reserved.
Distributed by MicroDAQ.com, Ltd.
www.MicroDAQ.com
(603) 746-5524
27
SmartReader Plus Data Loggers
Other Applications
For information on how you can monitor resistance or switch status with your SmartReader
Plus 1, refer to Appendix A Monitoring Resistance and Switch Status.
Copyright © 2010 ACR Systems Inc. All Rights Reserved.
Distributed by MicroDAQ.com, Ltd.
www.MicroDAQ.com
(603) 746-5524
SmartReader Plus Data Logger
1.4
28
SmartReader Plus 2 Temperature & Relative Humidity Logger
A self-contained "air-quality" logger, the SmartReader Plus 2 can be used easily in a wide
variety of applications to collect temperature and relative humidity data.
Figure 2-1: SmartReader Plus 2
1.4.1
Description
The SmartReader Plus 2 includes an on-board thermistor temperature sensor and a plug-in
RH Sensor plus two input channels for an optional remote temperature and relative humidity
probe.
How It Works
The relative humidity sensor in the SmartReader Plus 2 is a processed plastic wafer. This
wafer is actually a laser-trimmed, capacitive thin-film relative humidity sensor.
Changes in relative humidity cause the surface capacitance of the polymer film to vary. The
SmartReader Plus 2 gauges this capacitance by passing a small electric current through it and
measuring the relative voltage drop. Because the response of the sensor is temperature
dependent, a temperature reading is always taken at the same time as the humidity reading.
That way, when the logger's information is backed up into your computer, TrendReader
software can automatically factor in the right compensation values when it calculates the
percentage of Relative Humidity (in % RH). The result is an accurate set of
automatically-generated and temperature-compensated relative humidity readings.
1.4.2
Setup
Make sure to enable each channel you want to use. If you are not using a channel, disable it
in order to save memory.
Channel
Description
Equation
Copyright © 2010 ACR Systems Inc. All Rights Reserved.
Distributed by MicroDAQ.com, Ltd.
www.MicroDAQ.com
(603) 746-5524
29
SmartReader Plus Data Loggers
0
Internal Temperature
45
1
Internal Relative Humidity
71
2
External Temperature
Appendix C
3
External Relative Humidity
71
NOTE: When you activate either RH channel, you must also enable its
corresponding temperature channel, as well, in order to temperature compensate
the RH sensors.
Precautions
The SmartReader Plus 2's RH Sensor is designed for long-term trouble-free performance, but
there are a few precautions to keep in mind to maximize the benefit it can give you.
· Never expose the sensor to organic solvents or ionic-laden liquids. Any chemical
compound that attracts polymers may affect the sensor.
· The RH sensor is particularly susceptible to contamination by sulfur gases and sulfur
compounds. DO NOT SMOKE NEAR THE LOGGER!
· Always return your SmartReader Plus 2 to a re-sealable plastic bag during non-use to
maximize the in-calibration life of the RH sensor.
1.4.3
Accessories
You can obtain replacement RH Sensors, remote temperature probes, temperature and
relative humidity probes for use with your SmartReader Plus 2.
ET Series Temperature Sensors
The ET series of temperature sensors are thermistor probes that can be used easily with your
SmartReader Plus 2 for remote temperature measurements. The advantage of these probes
is that they can be used for a wide range of temperatures, are more versatile (they can be
used to record fluid temperatures) and their small size permits them to be easily inserted into
hard-to-get-at-locations (such as in ductwork or under pipe insulation).
To use an ET temperature probe with your SmartReader Plus 2 you must first enable the
logger's external temperature channel. Connect the remote temperature probe by attaching
one wire (of the two wire probe) to the channel marked Temperature and the other wire to the
terminal marked Common. For more information on ET series thermistor probes, refer to:
Appendix C Thermistor Temperature Probes.
EH-020A Temperature and Relative Humidity Probe
The EH-020A is a four-wire probe with a temperature and relative humidity sensor. For
field-mounting convenience, it also has a magnetic backing and a security eyelet. To use the
EH-020A with your SmartReader Plus 2, you must enable the logger's external temperature
and humidity channels. To connect the EH-020A probe to your SmartReader Plus 2, follow
instruction notes packed with each RH probe set -- see Figure 2-2.
Copyright © 2010 ACR Systems Inc. All Rights Reserved.
Distributed by MicroDAQ.com, Ltd.
www.MicroDAQ.com
(603) 746-5524
SmartReader Plus Data Logger
30
Figure 2-2: EH-020A Connection
The EH-020A is applicable for measurements between -20 and 40°C (-4 and 104°F) and 10 to
90% RH.
The accurate measurement of temperature and humidity depends primarily on the information
supplied by a particular sensor. SmartReader Plus 2 data loggers use temperature and
humidity sensors with rugged qualities designed for minimal or no maintenance (under normal
operating conditions).
The SmartReader Plus 2's on-board thermistor is chemically stable and not significantly
affected by aging. It will typically drift less than 0.1°C over a period of several years. The
relative humidity sensor, although subject to accuracy degradation when exposed to
contaminants and/or extreme environmental conditions, will drift typically less than 1% per
year (under clean conditions). You should check your RH sensor periodically and, if
necessary, recalibrate or replace it.
1.4.4
Troubleshooting
If you are getting what appear to be wrong readings, consider the following before recalibrating
the sensors. Sensors sample the atmosphere (or medium) in the immediate vicinity of the
sensors themselves. The physical state of the atmosphere and its degree of uniformity and
turbulence will limit the validity of a measurement at some distance from the sensor. This
becomes especially apparent for the measurement of ambient temperature and relative
humidity.
In a room, temperature and RH levels may vary dramatically from location to location. Such
factors as air stratification, drafts and proximity to heat or humidity sources (people,
equipment, moisture, solar gain, etc.) can contribute to a wide variance in conditions even
within a small confined area. The individual sensors associated with your SmartReader Plus 2
measure and record temperature and RH only in one location. They do not, in any way,
represent an overall reading.
If you decide to check the calibration of your SmartReader Plus 2 RH sensor using a Sling
Psychrometer, keep in mind the following:
· Any instrument that requires a person to be present at, or in very close proximity to the
RH sensor in order to get a reading, will have a measurement error introduced to it.
Copyright © 2010 ACR Systems Inc. All Rights Reserved.
Distributed by MicroDAQ.com, Ltd.
www.MicroDAQ.com
(603) 746-5524
31
SmartReader Plus Data Loggers
That is because the body readily gives off heat and moisture that is especially
noticeable at lower RH levels.
· The time taken between slinging the psychrometer and reading it can exhibit several
degrees of inaccuracy in the wet bulb reading. Air currents around the body, whether it
is slung in the shade of a building or in sunlight, not knowing how to tie the wet sock, its
condition, and the purity of water used, all contribute to error. In addition, interpolating
the data from a psychrometric chart can add another 2 to 4% to the accumulative error.
1.4.5
Relative Humidity Calibration
Each relative humidity sensor has been individually calibrated in an environmental chamber
with standards traceable to the National Institutes of Standards and Technology (NIST).
The SmartReader Plus 2 and the EH-020A probe are supplied with a calibration certificate
which provides calibration values. These calibration values must be entered and stored in the
logger during initial setup. If your RH sensor is out of calibration, you can simply replace it with
a new one.
NOTE: A straight replacement of the RH sensor will introduce an additional +2%
tolerance on the RH accuracy. Calibration of the RH channel with the new RH
sensor is recommended.
In the event that you wish to confirm the RH calibration of your sensor, you can perform your
own field test. Refer to Appendix B Temperature and Relative Humidity Calibrations for more
information on RH testing.
Interchangeable replacement RH sensors for loggers are available through your dealer. For
best accuracy, it is recommended these be calibrated together with the logger - consult your
ACR representative for price and availability of this service. Replacement EH-020A modules
which are pre-calibrated are available through your dealer.
1.4.6
Specifications
Relative Humidity Sensor & EH-020A
Type:
Capacitive thin polymer film
Range:
0 to 95% (non-condensing)
Accuracy:
±3% RH from 10 to 90% (-20 to 40°C [-4 to 104°F])
Resolution:
Better than 0.04% between 25 and 60% RH at 25°C (77°F)
Response Time:
Adequate ventilation reduces the response time which is
approximately five minutes in still air.
Environmental Conditions:
The RH sensor is relatively immune to chemical
contamination but when exposed to extreme environmental
conditions, accuracy degradation could result. For long-term
stability and reliable readings, the sensor should not be
subjected to liquid immersion or exposed to high
concentrations of organic solvents, corrosive agents, sulfur
gases and strong acids or bases. Dust settling on the sensor
surface will not affect sensor performance except possibly to
Copyright © 2010 ACR Systems Inc. All Rights Reserved.
Distributed by MicroDAQ.com, Ltd.
www.MicroDAQ.com
(603) 746-5524
SmartReader Plus Data Logger
32
decrease the speed of response.
Chemical Tolerances:
Limits for different chemical groups
1. Organic solvents typically 1,000...10,000 ppm
2. Corrosive agents (strong acids S02, H2SO4, Cl2, HCl,
H2S etc.) typically 1...10 ppm
3. Weak acids typically 100...1,000 ppm
4. Bases typically 10,000...100,000 ppm
Specifications are subject to change without notice.
Copyright © 2010 ACR Systems Inc. All Rights Reserved.
Distributed by MicroDAQ.com, Ltd.
www.MicroDAQ.com
(603) 746-5524
33
1.5
SmartReader Plus Data Loggers
SmartReader Plus 3 Current, Voltage and Temperature Logger
The SmartReader Plus 3 is a versatile equipment performance logger. It monitors and
records AC current and voltage.
Figure 3-1: SmartReader Plus 3
1.5.1
Description
The SmartReader Plus 3 has four current-monitoring channels, three 0-5 VDC inputs for
connection to AC voltage transducers, and one internal thermistor temperature channel. The
current-monitoring channels are used with external clamp-on-current probes to measure and
record alternating current.
The following current probes from Amprobe Instruments are compatible with the SmartReader
Plus 3:
· A60FL and A70FL for 60Hz power systems
· A65FL and A75FL for 50Hz operation
Use of these probes allows you to measure alternating current of conductors without the need
for breaking circuitry. For information on current ranges and resolutions possible with the
SmartReader Plus 3, refer to the Specifications in this chapter.
Current Channel Operation
The SmartReader Plus 3 measures electric current through external current probes. Each
current probe is a transformer with its internal coil serving as the secondary winding and the
current-carrying conductor being measured serving as the primary winding. The output of the
probe (which is the input to the SmartReader Plus 3) is conditioned through internal circuitry.
The probe produces an output of approximately 260 microamps full scale for each range
available on the current probe. Readings from the current probe are scaled into amperage
units through equations (in TrendReader software) that match the current probe and its range
setting.
Copyright © 2010 ACR Systems Inc. All Rights Reserved.
Distributed by MicroDAQ.com, Ltd.
www.MicroDAQ.com
(603) 746-5524
SmartReader Plus Data Logger
1.5.2
34
Setup to Measure Current
The procedure for setting up your SmartReader Plus 3 is as follows:
1.
Connect one or more current probes, specified above, to the current channel inputs on
your SmartReader Plus 3. Make sure to observe polarity when making connections.
Connect the current probe's red (+) wire to the channel's "+ Red" input. Connect the
current probe's black wire to the channel's "- Black" input.
Figure 3-2: Current Probe Connection
2.
Adjust the range setting on the current probe(s) to suit your application. A good way to
verify a conductor's maximum range is to check the circuit breaker or fuse rating. Set the
range on your current probe to suit. Since the probes do not give predictable readings
below 10% in any range, always choose the lowest range possible to encompass the full
range of data you want to record.
3.
Make sure to enable each channel you want to use. If you are not using a channel,
disable it in order to save memory.
Channel
Description
Equation
0
Internal Temperature
45
1
Current 1
64
2
5 Volt DC
18
3
Current 2
64
4
5 Volt DC
18
5
Current 3
64
6
5 Volt DC
18
Copyright © 2010 ACR Systems Inc. All Rights Reserved.
Distributed by MicroDAQ.com, Ltd.
www.MicroDAQ.com
(603) 746-5524
35
SmartReader Plus Data Loggers
7
Current 4
64
A60FL / A65FL
Switch
Range
Equation
5
0.5 to 5 A
63
25
2.5 to 25 A
64
100
10 to 100 A
65
250
25 to 250 A
66
A70FL / A75FL
Switch
Range
Equation
10
1 to 10 A
67
50
5 to 50 A
68
250
25 to 250 A
69
500
50 to 500 A
70
Precautions
1. DANGER: High voltage may be present! Do not clamp a current probe around a
conductor without the logger connected to it. This avoids sparking and prevents the
connectors from prematurely deteriorating.
1.5.3
2.
The SmartReader Plus 3 is to be used only with approved current probes from Amprobe
Instruments (A60FL, A70FL, A65FL and A75FL). These probes provide low voltage DC
current in proportion to the signal being measured. DO NOT use any other probe unless
approved by ACR in writing.
3.
The SmartReader Plus 3 can record current in accordance with the ranges available on
the A60FL, A65FL, A70FL and A75FL probes. Always make sure the current you will be
recording will fall into the appropriate range you set on the current probe.
Voltage Channels
The SmartReader Plus 3 is equipped with three 0-5V DC voltage channels. These channels
allow the user to monitor 3-phase AC voltage. AC voltage is monitored by connecting AC
voltage transducers to the 5V channels.
(See Appendix D Typical SmartReader Plus 3 Connection Diagram for more information).
These transducers will provide a DC output proportional to the AC input. The equation editor
in TrendReader software allows displaying this in units of AC voltage. The current and voltage
graphs can also be multiplied together to obtain a graph of VA.
Copyright © 2010 ACR Systems Inc. All Rights Reserved.
Distributed by MicroDAQ.com, Ltd.
www.MicroDAQ.com
(603) 746-5524
SmartReader Plus Data Logger
1.5.4
36
Current Probes and Accessories
Each SmartReader Plus 3 has four pairs of input connections for use with the Current Probes
from Amprobe Instruments. These clamps can be used with a number of accessories to fit
most typical applications.
Low Currents
To log very low currents (such as monitoring the operation of electrical appliances), the probe
can be used with a Line Splitter. The Amprobe A47L Energizer multiplies the signal to the
logger by ten times over a range of 0.1 to 15A. It also allows effective splitting of a two-line
conductor, allowing measurements without the need to enter electrical panels or junction
boxes.
For European applications, Amprobe's model A47CL is available with screw-in European
round prongs, two extra British-type prongs and a British fuse plug adapter. Contact your local
ACR representative for pricing and delivery of this product.
High Currents
You can monitor current ranges higher than those available on a standard probe by using it
with an additional transformer. For this purpose Amprobe Instruments has available their
Amptran® CT50-2 a 50-to-1 transformer (to monitor currents up to 3000 amps). Contact your
ACR representative for availability of this probe.
Extending Probe Lead Lengths
The lead length of the Amprobe probes can be extended by splicing in up to 225m (750 ft.) of
2-conductor 18-gauge copper wire.
1.5.5
Specifications
Current Channel Ranges:
With A60FL / A65FL current probes: 5, 25, 100, 250 Amps
With A70FL / A75FL current probes: 10,50, 250, 500 Amps
To monitor current ranges up to 3000 Amps, the CT50-2
probe (a 50 to 1 current transformer) can be used in
conjunction with the A60FL or the A70FL.
Voltage Channels:
0-5 V DC
Input Impedance:
Typically > 1 M Ohms
Accuracy
Current Channels:
±3.0% of full scale above 10% of range
Voltage Channels:
±0.5% of full scale
Copyright © 2010 ACR Systems Inc. All Rights Reserved.
Distributed by MicroDAQ.com, Ltd.
www.MicroDAQ.com
(603) 746-5524
37
1.5.6
SmartReader Plus Data Loggers
Troubleshooting
The SmartReader Plus 3 seems to give wrong readings. What is wrong?
· If the graphs seem incorrect, check the equation number assigned to the graph file.
This equation number must correspond to the model number and setting of the current
probe used. Refer to Setup in this chapter for a table of equations to use with the
various current probes and settings.
· If your Realtime readings seem incorrect, check the equation number assigned to the
logger channel you are viewing. Make sure it corresponds to the model number and
active setting of the current probe you are using.
· If your equation numbers are correctly assigned and you are still getting incorrect
readings, it may be because you are measuring currents below 10% of the range. To
correct this, make sure the range setting on the probe is at the lowest possible range
that will encompass the readings you are interested in. For example, do not use the
250 amp range for recording currents below 25 amps. However, if the readings
fluctuate widely (for example, the difference between the day and night time power
consumption), it may be necessary to attach two probes -- one on a high range and the
other on a low range.
Copyright © 2010 ACR Systems Inc. All Rights Reserved.
Distributed by MicroDAQ.com, Ltd.
www.MicroDAQ.com
(603) 746-5524
SmartReader Plus Data Logger
1.6
38
SmartReader Plus 4 Pressure, Temperature and RH Logger
The SmartReader Plus 4 is a general purpose logger that can monitor pressure, temperature
and in some models, relative humidity.
Figure 4-1: SmartReader Plus 4
1.6.1
Description
There are two models of the SmartReader Plus 4 data logger:
· The Standard Model. This model is a four-channel logger with internal pressure and
temperature sensors and an optional EH-020A module for recording relative humidity
and temperature remotely. This model is available for different ranges (refer to
Specifications).
Figure 4-2: SmartReader Plus 4 with EH-020A
Copyright © 2010 ACR Systems Inc. All Rights Reserved.
Distributed by MicroDAQ.com, Ltd.
www.MicroDAQ.com
(603) 746-5524
39
SmartReader Plus Data Loggers
· The Low Pressure Model. This model has an internal pressure channel with 0 to 10"
water column sensor and an internal temperature sensor.
1.6.2
Setup
Using the Standard Pressure Channel
1. If you are going to measure pressure, you will need the appropriate fittings to tie into the
system or equipment you intend to monitor.
2.
Use TrendReader software to enable the pressure channel. Then assign the correct
pressure equation for the model you are using.
Channel
Description
Equation
0
Internal Temperature
45
2
External Temperature
Appendix C
3
External Relative Humidity
71
4
Standard Model
see below
Pressure Models
The following table describes the models available and includes the range over which they can
be used, the resolution of readings they will provide and the equation you should assign to the
pressure channel.
Range
Resolution
Gauge
Absolute
Equation
10" H20 (2.5kPa)
0.006" H20 (0.0015
kPa)
SRP-004-010
n/a
37
±10" H20 Differential
0.006"H20 (0.0015
kPa)
SRP-004-LPD
n/a
37
0 to 5 PSI (30kPa)
0.003 PSI (0.02kPa)
SRP-004-5G
n/a
20
0 to 30 PSI (200kPa)
0.015 PSI (0.1kPa)
SRP-004-30G
SRP-004-30A
8
0 to 100 PSI (700kPa) 0.05 PSI (0.35kPa)
SRP-004-100G SRP-004-100A
22
0 to 150 PSI
(1000kPa)
SRP-004-150G
104
0.05 PSI (0.5 kPa)
n/a
Pressure Measurement Precautions
The SmartReader Plus 4 is designed for long-term, trouble-free performance but there are a
few precautions to keep in mind to maximize the benefit it can give you.
· The pressure sensor in the SmartReader Plus 4 is compatible with non-corrosive gases
and dry air. It is not to be used for liquid pressure measurements.
EH-020A Temperature and Relative Humidity Probe
The EH-020A is a four-wire probe with a temperature and relative humidity sensor. For
field-mounting convenience, it also has a magnetic backing and a security eyelet. To use the
EH-020A with your SmartReader Plus 4, you must enable the logger's external temperature
Copyright © 2010 ACR Systems Inc. All Rights Reserved.
Distributed by MicroDAQ.com, Ltd.
www.MicroDAQ.com
(603) 746-5524
SmartReader Plus Data Logger
40
and humidity channels. To connect the EH-020A probe to your SmartReader Plus 4, follow
instruction notes packed with each RH probe set -- see Figure 4-2.
Remote Thermistor Temperature Probe
You can monitor temperature remotely using an ET series temperature probe with your
SmartReader Plus 4 by connecting the probe's two wires to the Temperature and Common
terminals. Make sure the External Temperature channel is activated and the proper equation
is selected.
1.6.3
Pressure Calibration
The pressure sensor, although subject to accuracy degradation when exposed to
contaminants and/or extreme environmental conditions, will drift typically less than 1%/year
(under clean conditions). You should check your SmartReader Plus 4 periodically and, if
necessary, recalibrate the pressure sensor. In the event that you wish to confirm the pressure
calibration of your SmartReader Plus 4 logger, you can perform your own calibration using the
adjustment provisions explained in TrendReader software.
The recommended method of calibration is to use a pneumatic pressure calibrator with a
preferred accuracy of at least 0.1% full scale.
Procedure
The procedure to calibrate is as follows:
1.
Activate the pressure and temperature monitoring channels on your SmartReader Plus 4
if not already enabled.
2.
Set the LOW, MID and HIGH calibration values to zero.
3.
With the input port on the pressure sensor left unconnected (open to ambient), record the
pressure reading you see (it should be close to zero if you are using a gauge sensor or
close to atmospheric pressure if you are using an absolute sensor).
4.
Subtract the pressure reading you recorded in step 3, from zero for the gauge sensor or
from calibrator reading for the absolute sensor, and enter it for the Low calibration
adjustment.
5.
Connect the logger's pressure sensor to the calibrator, ensuring all connections are
completely airtight.
6.
Adjust the calibrator to produce a test pressure equal to the full scale range of the logger
and record the pressure reading.
7.
Subtract the pressure reading you recorded in step 6, from the full scale range of the
sensor (the calibrator reading should be the same), and enter it for the Mid calibration
adjustment.
8.
Save the calibration changes to the logger.
NOTE: The value of the Ext. column is factory adjusted and should not be
changed.
Copyright © 2010 ACR Systems Inc. All Rights Reserved.
Distributed by MicroDAQ.com, Ltd.
www.MicroDAQ.com
(603) 746-5524
41
1.6.4
SmartReader Plus Data Loggers
Specifications
The following specifications apply to the pressure sensors used in the SmartReader Plus 4:
Type:
Silicon piezoresistive strain gauge
Max. Pressure:
4 x FS
Media:
Noncorrosive gases and dry air
Temp. Range:
Operating:
Compensated:
-40 to 70°C (-40 to 158°F)
0 to 70°C (32 to 158°F)
Accuracy:
0.5% FS @ 25°C (77°F)
Thermal:
10" H20
5 PSI
30 PSI
100 PSI
over Compensated Range
±3% FS
±1.5% FS
±0.5% FS
±0.5% FS
Linearity:
10" H20
5 PSI
30 PSI
100 PSI
best fit straight line
±0.1% FS
±0.25% FS
±0.1% FS
±0.1% FS
Hysteresis & Repeatability:
10" H20
5 PSI
30 PSI
100 PSI
±0.2% FS
±0.2% FS
±0.05% FS
±0.05% FS
Long-Term Stability: per year
10" H20
5 PSI
30 PSI
100 PSI
±0.5% FS
±0.1% FS
±0.1% FS
±0.1% FS
Specifications are subject to change without notice.
Copyright © 2010 ACR Systems Inc. All Rights Reserved.
Distributed by MicroDAQ.com, Ltd.
www.MicroDAQ.com
(603) 746-5524
SmartReader Plus Data Logger
1.7
42
SmartReader Plus 4 Low Pressure Differential and
Temperature Logger
The SmartReader Plus 4 is a logger that can monitor low gauge and differential pressures and
temperature.
Figure 4-3: SmartReader Plus 4 Low Pressure Differential
1.7.1
Description
The SmartReader Plus 4 LPD is a two-channel data logger with internal pressure and
temperature sensors. The low-pressure sensor is built into the logger and is capable of
measuring low gauge and differential pressure.
1.7.2
Setup
The logger is shipped with two pieces of permanent protective tubing covering the external
ports. Never remove these tubes; attach extension tubes to this permanent protective tubing.
1.
Connect the interface cable to the logger and to the serial port of your computer.
2.
Run TrendReader to communicate with the logger. (The logger has been shipped
calibrated and with the appropriate equation. See below for pressure ranges and their
equation numbers.)
3.
In the SmartReader Plus window, check that the values in the logger match those on the
calibration card.
4.
Select the sample rate you require.
NOTE: In Realtime mode the logger reads and displays the pressure every eight
seconds. If the sample rate is greater than eight seconds, the average value for
the sample interval is stored (based on eight-second readings). (Refer to the
Copyright © 2010 ACR Systems Inc. All Rights Reserved.
Distributed by MicroDAQ.com, Ltd.
www.MicroDAQ.com
(603) 746-5524
43
SmartReader Plus Data Loggers
TrendReader guide for more information.)
5.
1.7.3
Save the new setup.
SRP4 LPD Pressure Specifications
Type:
Silicon piezoresistive strain gauge
Max. Pressure:
Four times full scale
Media:
Non-corrosive gases and dry air
Temp. Range:
Operating:
Compensated:
-40 to 70°C (-40 to 158°F)
0 to 70°C (32 to 158°F)
Thermals Accuracy:
±0.5% FS (over compensated range)
Nonlinearity:
±0.05% FS (best fit straight line)
Hysteresis and Repeatability:
±0.05% FS (typical)
Long Term Stability:
±0.5% FS
Pressure Ranges and their Equations
Range in W.C.
Equation
Accuracy
-0.5 to +0.5"
13
± 0.05"
-1 to +1"
13
± 0.05"
-2 to +2"
88
± 0.05"
-5 to +5"
89
± 0.1"
-10 to +10"
37
± 0.1"
Copyright © 2010 ACR Systems Inc. All Rights Reserved.
Distributed by MicroDAQ.com, Ltd.
www.MicroDAQ.com
(603) 746-5524
SmartReader Plus Data Logger
1.8
44
SmartReader Plus 5 Thermocouple Logger
The SmartReader Plus 5 Thermocouple Logger can monitor and record temperatures from J,
K, T, S or E type thermocouples.
Figure 5-1: SmartReader Plus 5
1.8.1
Description
The SmartReader Plus 5 has two external thermocouple temperature channels and one
internal thermistor channel.
For information on temperature ranges and resolutions applicable for the different types of
thermocouples you want to use, refer to the Specifications section.
1.8.2
Setup
The internal thermistor temperature channel for the SmartReader Plus 5 is used to simulate a
reference junction for the thermocouples - it must always be enabled.
1.8.3
Channel
Description
Equation
0
Internal Temperature
45
3
Thermocouple 1
see SmartReader Plus 5 Specifications
5
Thermocouple 2
see SmartReader Plus 5 Specifications
Use
1.
Connect a J, K, T, S or E type thermocouple to one or more channels. Make sure that
you observe polarity when making connections. To do this, connect a thermocouple's
negative wire (usually red) to the "-" terminal of the channel you want to use. Connect the
Copyright © 2010 ACR Systems Inc. All Rights Reserved.
Distributed by MicroDAQ.com, Ltd.
www.MicroDAQ.com
(603) 746-5524
45
SmartReader Plus Data Loggers
other (positive) wire to the "+" terminal. The following table lists the ANSI color code for
the thermocouple wires:
Thermocouple Type
Positive (+) Wire
Negative (-) Wire
J
White
Red
K
Yellow
Red
T
Blue
Red
S
Black
Red
E
Violet
Red
Figure 5-2: SmartReader Plus 5 Thermocouple Connection
2.
Connect the logger to your computer and run TrendReader. Select the equation number
for each active thermocouple channel (refer to the Specifications section).
3.
Check that you have the thermocouple's polarity correct by warming its tip. You will see
the Realtime temperature increase if the wires are connected correctly. If the
temperature decreases, reverse the connections.
NOTE: The inputs are not isolated from each other (they use the same common
"-" terminal internally). This means that the thermocouple tips cannot be touching
each other. If they are touching or are fastened to a conducting surface like a
metal frame, some looping can occur and the readings may fluctuate. They must
be insulated or prevented from making contact with each other electrically. Do
not use grounded thermocouples.
Copyright © 2010 ACR Systems Inc. All Rights Reserved.
Distributed by MicroDAQ.com, Ltd.
www.MicroDAQ.com
(603) 746-5524
SmartReader Plus Data Logger
1.8.4
46
Specifications
Accuracy:
±0.5% of range plus resolution
Thermocouple
Range
Resolution
Equation
J
-50 to 600°C
(-55 to 1100°F)
0.30°C (0.55°F)
50
K
-100 to 1150°C
(-145 to 2100°F)
0.50°C (0.90°F)
52
T
-200 to 400°C
(-325 to 750°F)
0.40°C (0.75°F)
54
S
0 to 1450°C
(32 to 2642°F)
1.0°C (1.8°F)
74
E
-50 to 680°C
(-58 to 1250°F)
0.24°C (0.44°F)
90
Specifications are subject to change without notice.
1.8.5
Manual Calibration
A simple way to manually adjust the calibration values on a SmartReader Plus 5 thermocouple
logger follows. For each active channel:
1.
Install the thermocouple and set the proper equation number for that thermocouple
type. Set the TrendReader software into Realtime mode.
2.
Using a valid low reference temperature (as low as possible), observe the Realtime
reading and adjust the Low calibration value until the logger displays the reference
temperature.
3.
Using a valid high reference temperature (as high as possible), observe the Realtime
reading and adjust the Mid calibration value until the logger displays the reference
temperature.
To obtain the best results from the calibration, set the reference temperatures as far apart as
possible.
Copyright © 2010 ACR Systems Inc. All Rights Reserved.
Distributed by MicroDAQ.com, Ltd.
www.MicroDAQ.com
(603) 746-5524
47
1.9
SmartReader Plus Data Loggers
SmartReader Plus 6 Thermocouple Logger
The SmartReader Plus 6 Thermocouple Logger can monitor and record temperatures from J,
K, T, S or E type thermocouples.
Figure 6-1: SmartReader Plus 6
1.9.1
Description
The SmartReader Plus 6 has seven external thermocouple temperature channels and one
internal thermistor temperature channel for cold-junction compensation.
1.9.2
Setup
The internal thermistor temperature channel for the SmartReader Plus 6 is used to simulate a
reference junction for the thermocouples - it must always be enabled.
Channel
Description
Equation
0
Internal Temperature
45
1
Thermocouple 1
see SmartReader Plus 6 Specifications
2
Thermocouple 2
see SmartReader Plus 6 Specifications
3
Thermocouple 3
see SmartReader Plus 6 Specifications
4
Thermocouple 4
see SmartReader Plus 6 Specifications
5
Thermocouple 5
see SmartReader Plus 6 Specifications
6
Thermocouple 6
see SmartReader Plus 6 Specifications
7
Thermocouple 7
see SmartReader Plus 6 Specifications
Copyright © 2010 ACR Systems Inc. All Rights Reserved.
Distributed by MicroDAQ.com, Ltd.
www.MicroDAQ.com
(603) 746-5524
SmartReader Plus Data Logger
1.9.3
48
Use
1.
Connect a J, K, T, S or E type thermocouple to one or more channels. Make sure that
you observe polarity when making connections. To do this, connect a thermocouple's
negative wire (usually red) to the "-" terminal of the channel you want to use. Connect the
other (positive) wire to the "+" terminal. The following table lists the ANSI color code for
the thermocouple wires:
Thermocouple Type
Positive (+) Wire
Negative (-) Wire
J
White
Red
K
Yellow
Red
T
Blue
Red
S
Black
Red
E
Violet
Red
2.
Connect the logger to your computer and run TrendReader. Select the equation number
for each active thermocouple channel (refer to the Specifications section).
3.
Check that you have the thermocouple's polarity correct by warming its tip. You will see
the Realtime temperature increase if the wires are connected correctly. If the temperature
decreases, reverse the connections.
NOTE: The inputs are not isolated from each other (they use the same common
"-" terminal internally). This means that the thermocouple tips cannot be touching
each other. If they are touching or are fastened to a conducting surface like a
metal frame, some looping can occur and the readings may fluctuate. They must
be insulated or prevented from making contact with each other electrically. Do
not use grounded thermocouples.
1.9.4
Specifications
Accuracy:
± 0.5% of range plus resolution
Thermocouple
Range
Resolution
Equation
J
-50 to 600°C
(-55 to 1100°F)
0.30°C (0.55°F)
50
K
-100 to 1150°C
(-145 to 2100°F)
0.50°C (0.90°F)
52
T
-200 to 400°C
(-325 to 750°F)
0.40°C (0.75°F)
54
S
0 to 1450°C
(32 to 2642°F)
1.0°C (1.8°F)
74
E
-50 to 680°C
(-58 to 1250°F)
0.24°C (0.44°F)
90
Specifications are subject to change without notice.
Copyright © 2010 ACR Systems Inc. All Rights Reserved.
Distributed by MicroDAQ.com, Ltd.
www.MicroDAQ.com
(603) 746-5524
49
1.9.5
SmartReader Plus Data Loggers
Manual Calibration
A simple way to manually adjust the calibration values on a SmartReader Plus 6 thermocouple
logger follows. For each active channel:
1.
Install the thermocouple and set the proper equation number for that thermocouple
type. Set the TrendReader software into Realtime mode.
2.
Using a valid low reference temperature (as low as possible), observe the Realtime
reading and adjust the Low calibration value until the logger displays the reference
temperature.
3.
Using a valid high reference temperature (as high as possible), observe the Realtime
reading and adjust the Mid calibration value until the logger displays the reference
temperature.
To obtain the best results from the calibration, set the reference temperatures as far apart as
possible.
Copyright © 2010 ACR Systems Inc. All Rights Reserved.
Distributed by MicroDAQ.com, Ltd.
www.MicroDAQ.com
(603) 746-5524
SmartReader Plus Data Logger
1.10
50
SmartReader Plus 7 Process Signal Logger
A multi-channel, multi-purpose logger, the SmartReader Plus 7 provides a versatile means of
logging a wide variety of measurement signals. It features seven input channels configured
for easy interface with common transducer and transmitter outputs.
Figure 7-1: SmartReader Plus 7
1.10.1
Description
The SmartReader Plus 7 can measure and record data from five separate channels of analog
DC voltage covering the ranges of 0 to 200 millivolts, 0 to 2.5 volts, 0 to 5 volts and 0 to 10
volts and from two DC current channels covering the range of 0 to 25 milliamps.
How the SmartReader Plus 7 Works
Voltage channels use a pre-amplifier to provide a high input impedance and adjust the signal
for maximum resolution by the A/D converter. All digital values are converted to their proper
engineering units by equations in TrendReader software.
Current flow through a loop is logged by measuring the voltage drop across an internal 20 ohm
input resistor. This voltage drop is amplified to use the full range of the A/D converter. The
digital values are then processed into engineering units by an equation in TrendReader
software.
1.10.2
Setup
This section provides guidelines to follow to get you started with your SmartReader Plus 7.
1.
The first step in using your SmartReader Plus 7 is to decide what information, or
parameters, you want to log. For example, you may simply wish to replace an existing
hard-wired 4-20mA chart recorder or, instead, monitor from a special multiple-transducer
circuit that you have assembled.
Copyright © 2010 ACR Systems Inc. All Rights Reserved.
Distributed by MicroDAQ.com, Ltd.
www.MicroDAQ.com
(603) 746-5524
51
SmartReader Plus Data Loggers
2.
Determine what sensors, transducers or transmitters you need to do the job (if not
already present). Compatible transducers for monitoring temperature, relative humidity,
pressure, speed, and many more variables are available through a wide variety of
vendors (see Selecting Transducers and Transmitters).
3.
Modify the channels externally (using resistors), if required, for maximum resolution (see
Customizing Input Ranges).
4.
Write a Custom Equation to convert the internal A/D converter readings from the
transducer or circuit you want to monitor into the proper engineering units required (for
example, a 4-20mA signal representing 0 to 10,000 l/min). For help writing these
equations refer to the TrendReader guide.
5.
Decide how you are going to power your transducers (if required). You can, for example,
use a standard power supply and create a circuit like that shown in Figure 7-2.
Figure 7-2: Transducer Power Supply Connection
6.
Connect your transducers or transmitters and check operation by observing the Realtime
value displayed by TrendReader software. If you can, try to exercise your transducers
(make them change their output) to ensure that everything works. If it does, then you are
ready to place your assembly in the field to start logging.
Channel
Description
Equation
0
Internal Temperature
45
1
25 mA
6
2
25 mA
6
3
200 mV
19
4
2.5 V
7
5
5V
18
6
5V
18
7
10 V
17
Copyright © 2010 ACR Systems Inc. All Rights Reserved.
Distributed by MicroDAQ.com, Ltd.
www.MicroDAQ.com
(603) 746-5524
SmartReader Plus Data Logger
52
Avoiding Ground Loops
Take special care to avoid ground loop problems when you use your SmartReader Plus 7. A
ground loop can occur when there is more than one path to ground in your logger-transducer
circuit. Ground loops can damage your SmartReader Plus 7 as well as your transducers. To
avoid ground loop problems in your SmartReader Plus 7 circuit:
1.
Do not use more than one grounded power supply to excite your transducers.
2.
Do not connect your logger to your computer for Realtime readings unless:
· your computer is battery-operated (i.e. not grounded) or
· your transducer power supply is not grounded.
If you must use more than one grounded power supply in your SmartReader Plus 7 circuit,
each transducer you use must be isolated. If you must use non-isolated transducers, then you
must use a Signal Repeater/Loop Isolator between the transducer output and the
SmartReader Plus 7 input.
Wiring Notes and Considerations
1. The SmartReader Plus 7 has four common inputs (labeled "Common"). These are not
isolated from each other and can be used as the negative "-" connection for the power
supply (or battery) and any of the transducers being logged by the SmartReader Plus 7.
1.10.3
2.
The 200mV channels "float" when no connection is made to them. They can be expected
to read a positive voltage when left unconnected. When connected, however, they will
read the correct input voltage.
3.
The 25mA channels read positive current only. Make sure to observe polarity. If you are
using both channels simultaneously, ensure that both 4-20mA transmitters operate with
their negative (-) terminals tied together.
Choosing Input Channels
The SmartReader Plus 7 has seven external input channels to use in your particular
applications.
The resolution of your SmartReader Plus 7 logger is twelve bits. This means that it can
resolve analog signals into 4096 discrete steps. All channels have a resolution of 0.025% full
scale (1/4096 x 100%) which produces a very detailed graph in most applications.
The SmartReader Plus 7 can be used for measuring signals with a full scale output as low as
20mV on the 200mV channel (this translates to 1 part in 410 which is better than eight bit
resolution); this is useful for Wheatstone bridge type transducers which typically have a full
scale output in the tens of millivolts.
WARNING: The 200mV channel is more sensitive to noise signals generated by
the environment the logger is placed into - shielded cables should be used.
Copyright © 2010 ACR Systems Inc. All Rights Reserved.
Distributed by MicroDAQ.com, Ltd.
www.MicroDAQ.com
(603) 746-5524
53
SmartReader Plus Data Loggers
1.10.4
Customizing Input Ranges
The standard input ranges on the SmartReader Plus 7 should be suitable for most process
signal applications but occasionally you may require measurement of non-standard input
levels where resolution is a primary concern. Ranges can be adapted easily by using either
one or two external resistors. TrendReader software has Equation functions that can be used
to scale the data to the new input levels.
The table below lists several possible input signal ranges and the recommended channels to
use. It also lists alternative channels that can be used for additional simultaneous monitoring
capability. These alternative channels will, however, require external resistors.
Range
Standard
Alternative
0 to 500 mV
2.5 V
200mV
0 to 1V
2.5 V
200mV
0 to 2V
2.5 V
200mV
0 to 3V
5V
2.5V, 200mV
0 to 6V
10 V
5V, 2.5V, 200mV
0 to 20V
10 V
5V, 2.5V, 200mV
0 to 2mA
25 mA
200mV
4 to 20mA
25 mA
2.5V, 200mV
0 to 50mA
n/a
25mA, 5V
0 to 100mA
n/a
25mA, 10V
In the above table, the Range column lists examples of input signals that you may wish to
monitor using your SmartReader Plus 7. The Standard column lists the channel you would
normally choose to monitor that particular signal. The Alternative column lists other channels
that can be used to monitor the same input signals. In most cases, these channels will need
to be fitted with external resistors.
The resistor value that you will require to modify each SmartReader Plus 7 input channels is
selected by inserting your special input requirements into a simple equation. The following
sections detail these equations and the method of tying in these resistors.
10 Volt Channel
The 10 volt channel can be modified to span higher ranges (greater than 10 volts DC) by
adding a single resistor to the "10V" terminal shown in Figure 7-3. The value of the resistor
(R) can be calculated by following the formula below, based on the desired voltage input range
(Ein):
R = 102,000 x Ein - 1,020,000
For example, if you wish to measure up to 20 volts, the resistor value should be:
102,000 x 20 - 1,020,000 = 1,020,000 ohms
NOTE: It is recommended to use resistors with a resistance tolerance of 1% or
better.
Copyright © 2010 ACR Systems Inc. All Rights Reserved.
Distributed by MicroDAQ.com, Ltd.
www.MicroDAQ.com
(603) 746-5524
SmartReader Plus Data Logger
54
Since you will not always be able to get the exact resistor value that you calculated, you can
determine the logger's actual input range by plugging the value of the resistor (R) you obtain
back into the equation. For example, if the closest resistor you could obtain was 1.05M ohms,
then the actual voltage input range would be:
Ein = (R + 1,020,000) / 102,000
(1,050,000+1,020,000) / 102,000 = 20.29V
This value will be needed when it comes time to create your own custom equation using
TrendReader software.
Figure 7-3: Extended Voltage Range on 10V Channel
You can also easily convert the 10V channel to measure 0 to 100mA current simply by putting
a 100 ohm resistor (minimum rating: 2 watts) between the "10V" and "Common" terminals.
5 Volt & 2.5V Channels
The 5 volt and 2.5 volt channels can be modified to span higher ranges (greater than 5 and 2.5
volts DC respectively) by adding a single resistor, in the same way as shown for a 10V
channel in Figure 7-3 to the "5V" and "2.5V" terminals. The value of the resistor (R) can be
calculated by the following equations, based on the desired voltage input range (Ein). A final
Range can be determined to write a custom equation in TrendReader software.
Terminal
Resistor (R)
Range
5V
R = 202,000 x Ein - 1,010,000
Ein = (R + 1,010,000) / 202,000
2.5 V
R = 408,000 x Ein - 1,020,000
Ein = (R + 1,020,000) / 408,000
200mV Channel
The 200mV channel can be modified to span higher ranges (greater than 200mV DC) by
adding two resistors to the input terminals as shown in Figure 7-4. The value of the resistor
Copyright © 2010 ACR Systems Inc. All Rights Reserved.
Distributed by MicroDAQ.com, Ltd.
www.MicroDAQ.com
(603) 746-5524
55
SmartReader Plus Data Loggers
marked "10k" must be 10,000 ohms ±1% or better.
Figure 7-4: Modified 200mV Channel
The value of the resistor (R) and final Range can be calculated with the following equations:
R = 40,000 x Ein - 10,000
Ein = (R + 10,000) / 40,000
25mA Channel
The 25 milliamp channel can be modified to span higher ranges (greater than 25mA DC) by
adding a single resistor across the input terminals as shown in Figure 7-5. The value of the
resistor (R) can be calculated by the following the formula below, based on the desired current
input range (Iin) in mA**:
R = 500 / (Iin - 25)
** Where: 500 = max input voltage in mV
25 = max current input in mA
Make sure the resistor can withstand at least twice the power you will be sending it. To
calculate this, use the following equation:
P = 2 ´ Iin2 ´ R
Where:
P = Minimum Power Rating of resistor (in watts)
Iini= Maximum amperage expected through resistor (in Amps)
R = Resistor value (in ohms)
For example, a 20 ohm resistor calculated to measure currents up to 50mA will require a
Copyright © 2010 ACR Systems Inc. All Rights Reserved.
Distributed by MicroDAQ.com, Ltd.
www.MicroDAQ.com
(603) 746-5524
SmartReader Plus Data Logger
56
power rating greater or equal to 0.1 watts. Therefore, a quarter watt resistor will do fine.
Figure 7-5: Modified 25mA Channel
You can also modify the 200mV channel to log current loop signals with greater sensitivity than
the two 25 mA channels. Put a 100 ohm resistor across the "200mV" and "Common"
terminals and you will be able to log currents from 0 to 2.0mA with approximately ten times the
resolution of the 25mA channels. The equation to use to determine the other current (Iin)
ranges, in milliamps, is:
R = 200 / Iin
Resistors
Resistors that can be used with the SmartReader Plus 7 are readily available at most
electronic parts supply stores. Ask for precision 1% metal film resistors with a temperature
coefficient of less than 500ppm. The most common ones are quite small and made in the
form of a cylinder with axial leads. To show the value of the resistor, either there is:
· a color code painted on each resistor in the form of bands
· a number (followed by a letter) stamped on them
For resistors with a tolerance of 2% or looser, there are four bands or three number digits
while the resistors that are 1% or better have five rings or four number digits. In the case of
1% values the first three digits or rings correspond to the resistors value and the fourth digit or
band is the number of zeros to be added. The fifth band or letter indicates the manufacturer's
tolerance of the resistor. For example, a 30,900 ohms resistor would be shown as orange,
black, white, red, black or "3092F".
Color
Number
Tolerance
Letter
Black
0
1%
F
Brown
1
2%
G
Red
2
Copyright © 2010 ACR Systems Inc. All Rights Reserved.
Distributed by MicroDAQ.com, Ltd.
www.MicroDAQ.com
(603) 746-5524
57
SmartReader Plus Data Loggers
Orange
3
Yellow
4
Green
5
Blue
6
Violet
7
Grey
8
White
9
Gold
5%
J
Silver
10%
K
None
20%
WARNING: Using resistors with tolerances looser than 1%, poor temperature
coefficients and long-term drift characteristics will create undesirable
measurement errors.
1.10.5
Selecting Transducers and Transmitters
A transducer is defined as a device that receives energy from one system and retransmits it, in
a different form, to another system. A transmitter is a term usually reserved for transducers in
a current loop circuit. In this section, the terms transducer and transmitter will be used
interchangeably.
For a transducer to be useful, the retransmitted signal must be compatible with standard
instrumentation. For the SmartReader Plus 7 logger, this can be either in the form of an
analog DC voltage or current.
Many compatible transducers exist for measuring such variables as temperature, relative
humidity, pressure, speed, pH and more. You can obtain these from a wide variety of
manufacturers or distributors. An extensive listing of sensors and companies is published
yearly by Sensors Magazine.
To figure out what to look for when choosing transducers, it is helpful to know a few technical
terms and how they relate to use with your SmartReader Plus 7 logger.
Excitation Voltage
This term refers to the input voltage that a transducer requires in order for it to work properly.
It is either specified as a range (for example, 9 to 30 volts DC) or a specific voltage (for
example, 10 volts DC). When a range is specified, it means you can use an unregulated
power supply (such as a battery) as long as voltages within the range are provided. Usually, if
a specific voltage is required, it means you require a regulated power supply.
When an unregulated power supply is specified for the excitation voltage, a regulated one may
also be used. The reverse, however, is not true. Millivolt pressure transducers, for example,
usually require regulated power supplies.
Maximum Impedance
An important consideration when choosing transducers is the requirement for input or loop
Copyright © 2010 ACR Systems Inc. All Rights Reserved.
Distributed by MicroDAQ.com, Ltd.
www.MicroDAQ.com
(603) 746-5524
SmartReader Plus Data Logger
58
impedance. This simply refers to how much resistance your instrumentation (for example, the
SmartReader Plus 7) can have before it will begin to cause problems. For voltage inputs, a
very high impedance is usually required (greater than 10k ohms). This prevents the
unnecessary draining of current from the transducer circuit. The SmartReader Plus 7's
voltage inputs are all high impedance (greater than 1M ohms).
For current loop inputs, it is advantageous to have a very low impedance (the SmartReader
Plus 7's current channels have a low 20 ohm impedance). This helps to minimize the voltage
requirements and power consumption of the circuit. Check the specifications for the
transducers you intend to use to ensure the SmartReader Plus 7's input impedance is
acceptable.
Two-Wire Transmitters
Two-wire transmitters are transducers that form part of a current loop circuit. They vary the
current flow in accordance with changes in the variable which they are sensing. Most two-wire
transmitters have a 4-20mA output.
Three-Wire Transducers
Three-wire transducers have three connections: a supply (excitation) voltage input (V+IN), an
output voltage (V+OUT) and a common (COM-). You can usually tell if a transducer is 3-wire
by reviewing the wiring diagram and looking for a single common connection.
Four-Wire Transducers
Four-wire transducers fall into two categories: line-type and Wheatstone bridge types. No
more than one line-type transducer can be attached to a SmartReader Plus 7 unless it has an
isolated output (no electrical connection to the line). More than one bridge-type transducer
can only be hooked to a SmartReader Plus 7 if each has an isolated power supply.
Output
The specified output of a transducer or transmitter will determine whether it is compatible for
use with your SmartReader Plus 7. Some of the most popular transducer outputs (such as 0
to 2.5V or 0 to 5V DC) are directly compatible with the logger. The most popular transmitter
output is 4 to 20mA which can easily be used with the SmartReader Plus 7.
1.10.6
Specifications
Voltage and Current Inputs
Ranges:
0 to 2.5 volts DC
0 to 5 volts DC
0 to 10 volts DC
0 to 200mV DC
0 to 25mA
Resolution:
0.025% (12-bit)
Accuracy:
±0.5% full scale
Input Impedance:
>1 megohm (all voltage channels)
20 ohms (0 to 25mA channels)
Copyright © 2010 ACR Systems Inc. All Rights Reserved.
Distributed by MicroDAQ.com, Ltd.
www.MicroDAQ.com
(603) 746-5524
59
SmartReader Plus Data Loggers
Overload Protection:
Voltage channels: ±40V
Current channels: ±70mA
(both are reverse-polarity protected)
Transducer Restrictions:
The use of one power supply common only is recommended to
avoid ground loops or use loop isolators.
Specifications are subject to change without notice.
Copyright © 2010 ACR Systems Inc. All Rights Reserved.
Distributed by MicroDAQ.com, Ltd.
www.MicroDAQ.com
(603) 746-5524
SmartReader Plus Data Logger
1.11
60
SmartReader Plus 8 Eight-Channel Temperature Logger
The SmartReader Plus 8 is a versatile logger for recording temperatures in a wide range of
environmental and industrial applications. It can record up to eight temperature channels
simultaneously.
Figure 8-1: SmartReader Plus 8
1.11.1
Description
The SmartReader Plus 8 has seven external temperature channels (for remote temperature
probes) and one internal thermistor sensor.
1.11.2
Setup and Use
The following procedure will help you prepare your SmartReader Plus 8 for your temperature
monitoring applications.
1.
Setup and activate the channels you intend to monitor using TrendReader software.
Disable any channels you are not going to use to conserve memory.
2.
If you are using external channels, make sure to use thermistor sensors appropriate for
the measurements you want to take (for assistance, please refer to Appendix C
Thermistor Temperature Probes). Also, confirm that the equation number you are using
for each of your probes is correct.
3.
To connect remote temperature probes (two-wire), simply connect one lead into an active
channel (labeled 1 to 7) and the other into a terminal marked "Common". It does not
matter which lead goes to which terminal. You can connect more than one thermistor
probe lead to the same Common terminal. For example, Figure 8-2 shows two external
probes connected to channels 2 and 3 sharing the same Common terminal. If you are
using a thermistor probe with shielded cable, terminate the shield wire by connecting it to
Copyright © 2010 ACR Systems Inc. All Rights Reserved.
Distributed by MicroDAQ.com, Ltd.
www.MicroDAQ.com
(603) 746-5524
61
SmartReader Plus Data Loggers
any Common terminal.
Figure 8-2: Connecting External Temperature Probes
Accessories
The ET Series Temperature sensors are thermistor probes that can be used easily with your
SmartReader Plus 8 for remote temperature measurements. The advantage of these probes
is that they can be used for a wide range of temperatures, are very versatile (they can be used
to record liquid or surface temperatures) and their small size permits them to be placed in
hard-to-get-at locations such as in ductwork or under pipe insulation.
For more information on choosing and using thermistor probes, refer to Appendix C
Thermistor Temperature Probes.
You can purchase additional screw-type terminal block connectors for your SmartReader Plus
8. These make it easy to permanently install sensors around buildings and systems. Simply
wire them to the unconnected blocks and when you are ready to collect data, you can simply
plug in your SmartReader 8 logger. For analysis, you can just unplug it again without having to
disconnect any sensors.
Other Applications
For information on how you can monitor resistance or switch status with your SmartReader
Plus 8, refer to Appendix A Measuring Resistance and Switch Status.
Copyright © 2010 ACR Systems Inc. All Rights Reserved.
Distributed by MicroDAQ.com, Ltd.
www.MicroDAQ.com
(603) 746-5524
SmartReader Plus Data Logger
1.12
62
SmartReader Plus 9 Pulse Logger
The SmartReader Plus 9 is a two-channel multi-purpose counter and logger. With it you can
monitor a wide variety of measurement parameters.
Figure 9-1: SmartReader Plus 9
1.12.1
Description
Featuring two input channels configured for easy interface with common switch and
transducer outputs, the SmartReader Plus 9 has the capability to count and record voltage
pulses and switch contact closure frequency. The SmartReader Plus 9 does not have an
internal temperature channel.
1.12.2
How the SmartReader Plus 9 Counts
The SmartReader Plus 9 has two channels. The channels can count the opening and closing
of external switch contacts and/or the occurrence of DC voltage pulses. Each channel has a
selectable slow or fast input. The SmartReader Plus 9 can only count pulses from one input at
a time on each channel.
The pulse logger can count up to 4095 switch contact closures or pulses over any sampling
interval. For example, if you select a sixteen second sampling interval, the SmartReader Plus
9 can record a maximum of 255 closures per second (4095/16). If the number of closures or
pulses exceeds 4095 during a sampling interval, the logger will record a count of 4095 for that
interval.
The logger keeps track of the number of times a switch opens and closes by continuously
maintaining a voltage potential across the input terminals. Every time the voltage changes
from high to low (i.e. switch closing) and back to high again (i.e. switch opening), the logger
increments its internal counter.
Counting voltage pulses (also called logic inputs) is similar to counting switch contacts, only
Copyright © 2010 ACR Systems Inc. All Rights Reserved.
Distributed by MicroDAQ.com, Ltd.
www.MicroDAQ.com
(603) 746-5524
63
SmartReader Plus Data Loggers
instead of the logger supplying the voltage potential, the logger detects the voltage level of the
pulse. The pulse must have a low level voltage less than 0.5 volts DC and the high level
voltage must be from 4.5 to 24 volts DC.
The minimum pulse length and minimum interval between pulses must be 2 milliseconds for
the slow input and 10 microseconds for the fast input. For the SmartReader Plus 9 to register
a count, the input voltage must go from a low level to a high level and back again to a low
level.
1.12.3
Setup and Use
The following steps will guide you through the procedure of setting up and using your
SmartReader Plus 9 Pulse Logger.
1.
Always make sure that the circuit you want to monitor is compatible to use with the logger
before connecting it. Refer to the Specifications section for details on the type of
switches and logic signals that will work. Key things to note are:
· If you are going to be monitoring the opening and closing of switches, there must not be
a power source connected to the contacts (the contacts must be "dry").
· If you wish to monitor a circuit that produces pulsed signals, then the low level must fall
between 0 and 0.5 volts DC and the high level must be between 4.5 volts and 24 volts
DC.
· The frequency of the pulses or contact closures that you want to monitor must not
exceed the maximum capability of the SmartReader Plus 9 which is 4095 over any
sampling period.
2.
3.
1.12.4
Set the mode of operation of your SmartReader Plus 9 in TrendReader.
Channel
Description
Equation
0
Pulse Input 1
81
1
Pulse Input 2
81
Connect your switches or signals to check the operation of the logger by viewing the
Realtime reading while generating pulses. If the value increments, then you are ready to
start logging in the field.
Specifications
Pulse Inputs
Range:
4095 pulses/sample period
Accuracy:
±1 pulse/sample period
Absolute Max. Voltage:
+24/-22 volts DC
Input Impedance:
>1.0M for Vin<5V;
Copyright © 2010 ACR Systems Inc. All Rights Reserved.
Distributed by MicroDAQ.com, Ltd.
www.MicroDAQ.com
(603) 746-5524
SmartReader Plus Data Logger
64
>4.0K for Vin>5V
Min. Pulse Width
50% Duty Cycle:
Slow input:2 milliseconds
Fast input:10 microseconds
Restrictions:
Maximum frequency over sample interval must not exceed
channel range (the total count will stop at 4095)
Connections:
Removable screw-type terminal strip
Switch Inputs
Input-type:
Uncommitted "dry" contacts (relay or switch)
Excitation:
5 microamps contact current
3.6 volts open circuit
Contacts:
Sealed gold-plated recommended
Voltage Input
Input-type:
Active logic signals
Input Voltage:
0 to 0.5 volts DC low
4.5 to 24 volts DC high
Specifications are subject to change without notice.
Copyright © 2010 ACR Systems Inc. All Rights Reserved.
Distributed by MicroDAQ.com, Ltd.
www.MicroDAQ.com
(603) 746-5524
65
1.13
SmartReader Plus Data Loggers
SmartReader Plus 10 RTD Temperature Logger
The SmartReader Plus 10 is a temperature logger with four channels: an internal thermistor
channel and three external channels specifically designed for use with RTD (Resistance
Temperature Detector) temperature probes.
Figure 10-1: SmartReader Plus 10
1.13.1
Description
Two, three, and four-wire RTDs may be used with the SmartReader Plus 10, however,
four-wire RTDs produce the highest accuracy. RTDs with a Temperature Coefficient
Resistance (TCR) of 0.00385 can be used with this data logger.
1.13.2
Setup
1.
Connect the RTDs to the terminal strip. The connection varies depending on the type of
RTD used:
NOTE: For the best results, connect the jumper wire as closely as possible to
the probe.
2.
Run TrendReader software.
3.
In the setup window, assign equation numbers as follows:
For results in temperature:
Copyright © 2010 ACR Systems Inc. All Rights Reserved.
Distributed by MicroDAQ.com, Ltd.
www.MicroDAQ.com
(603) 746-5524
SmartReader Plus Data Logger
66
For the internal channel, use equation 45
For the 100 ohm probes, use equation 86
For the 1000 ohm probes, use equation 87
For results in resistance (ohms):
For the internal channel, use equation 45
For the 100 ohm probes, use equation 84
For the 1000 ohm probes, use equation 85
NOTE: Even equation numbers are for 100 W probes and odd equation
numbers are for 1000 W probes.
4.
1.13.3
Adjust the remaining setup options as desired then save the setup.
Specification of RTD Channels
The following specifications are for:
4-Wire Platinum 100 Ohm @ 0° C & TCR = 0.00385
4-Wire Platinum 1000 Ohm @ 0° C & TCR = 0.00385
Description:
+SIG Input Impedance:
-SIG Input Impedance:
Excitation Current
Value:
>1 Meg. ohms
>1 Meg. ohms
<=1mA
Temp. Range
(100 & 1000 W probes):
-230 to 300°C (-382 to 572°F)
Accuracy ** (100 & 1000 W):
± 0.3°C (0.54°F) + resolution or
± 0.06 % full scale + resolution
Resolution (100 W & 1000 W): ± 0.14°C (±0.25°F)
Resistance Range (100 W):
Accuracy ** (100 W):
5 to 210 W
± 0.13 W + resolution or
± 0.06 % full scale + resolution
Resistance Range (1000 W):
Accuracy ** (1000 W):
50 to 2100 W
± 1.3 W + resolution or
± 0.06 % full scale + resolution
Resolution (100 W):
Resolution (1000 W):
± 0.05 W
± 0.5 W
* For internal channel specifications, please see Common Specifications for
SmartReader Plus loggers
** Temperature compensated for the range of -20 to 80°C (-4 to 176°F)
Copyright © 2010 ACR Systems Inc. All Rights Reserved.
Distributed by MicroDAQ.com, Ltd.
www.MicroDAQ.com
(603) 746-5524
67
1.14
SmartReader Plus Data Loggers
Conservation Logger Temperature, RH and 5V Input Logger
The Conservation Logger is a self-contained temperature and relative humidity logger with two
external channels for use with a variety of sensors.
Figure 11-1: Conservation Logger
1.14.1
Description
The Conservation Logger is designed to monitor temperature and humidity (internal or
external) and determine if the readings measured are out of tolerance based on preset
thresholds. It is equipped with an LED light that will flash its alarm if measurements raise
above or below set limits.
Alarm Flash Mode
When the Alarm Flash mode is selected the logger will check the current sample and
determine if it is above or below the high or low alarm threshold values. If the sample is out of
tolerance then the logger will start a delay timer to allow the environment to return to normal
limits. If the environment does not return to normal limits the alarm will be triggered and the
Alarm LED will begin to flash.
Once an alarm is triggered it is locked and will not clear until the logger is cleared or set up.
Flash Delay
The Flash Delay is the maximum allowable period of time (based on sample periods) for a
channel to be out of tolerance before alarming. The Flash Delay is started when a channels
current sample is found to be out of the preset alarm limits. Once the delay timer is started it
will count down from the preset number of samples to zero. When zero is reached the alarm
will be locked and the Alarm LED will begin to flash.
The Flash Delay timer will be reset if the channel that reported the alarm returns to normal
operating conditions (within the preset tolerances) before the timer reaches zero.
If a threshold is crossed again the delay timer will restart.
Copyright © 2010 ACR Systems Inc. All Rights Reserved.
Distributed by MicroDAQ.com, Ltd.
www.MicroDAQ.com
(603) 746-5524
SmartReader Plus Data Logger
1.14.2
68
Setup
Make sure to enable each channel you want to use. If you are not using a channel, disable it
in order to save memory.
Channel
Description
Equation
0
Internal Temperature
45
1
Internal Relative Humidity
71
2
External 5VDC
18
3
External 5VDC
18
NOTE: When you activate the RH channel, you must also enable its
corresponding temperature channel, as well, in order to temperature compensate
the RH sensors.
Precautions
The Conservation Logger's RH Sensor is designed for long-term trouble-free performance, but
there are a few precautions to keep in mind to maximize the benefit it can give you.
· Never expose the sensor to organic solvents or ionic-laden liquids. Any chemical
compound that attracts polymers may affect the sensor.
· The RH sensor is particularly susceptible to contamination by sulfur gases and sulfur
compounds. DO NOT SMOKE NEAR THE LOGGER!
· Always return your Conservation Logger to a re-sealable plastic bag during non-use to
maximize the in-calibration life of the RH sensor.
1.14.3
Accessories
You can obtain replacement RH Sensors, remote temperature probes, temperature and
relative humidity probes for use with your Conservation Logger.
The Conservation Logger can also be combined with the Telaire 7001 Handheld Monitor.
1.14.4
Relative Humidity Calibration
Each relative humidity sensor has been individually calibrated in an environmental chamber
with standards traceable to the National Institutes of Standards and Technology (NIST).
The Conservation Logger is supplied with a calibration certificate which provides calibration
values. These calibration values must be entered and stored in the logger during initial setup.
If your RH sensor is out of calibration, you can simply replace it with a new one.
NOTE: A straight replacement of the RH sensor will introduce an additional +2%
tolerance on the RH accuracy. Calibration of the RH channel with the new RH
sensor is recommended.
In the event that you wish to confirm the RH calibration of your sensor, you can perform your
own field test. Refer to Appendix B Temperature and Relative Humidity Calibrations for more
information on RH testing.
Copyright © 2010 ACR Systems Inc. All Rights Reserved.
Distributed by MicroDAQ.com, Ltd.
www.MicroDAQ.com
(603) 746-5524
69
SmartReader Plus Data Loggers
Interchangeable replacement RH sensors for loggers are available through your dealer. For
best accuracy, it is recommended these be calibrated together with the logger - consult your
ACR representative for price and availability of this service.
1.14.5
Troubleshooting
If you are getting what appear to be wrong readings, consider the following before recalibrating
the sensors. Sensors sample the atmosphere (or medium) in the immediate vicinity of the
sensors themselves. The physical state of the atmosphere and its degree of uniformity and
turbulence will limit the validity of a measurement at some distance from the sensor. This
becomes especially apparent for the measurement of ambient temperature and relative
humidity.
In a room, temperature and RH levels may vary dramatically from location to location. Such
factors as air stratification, drafts and proximity to heat or humidity sources (people,
equipment, moisture, solar gain, etc.) can contribute to a wide variance in conditions even
within a small confined area. The individual sensors associated with your Conservation
Logger measure and record temperature and RH only in one location. They do not, in any
way, represent an overall reading.
If you decide to check the calibration of your Conservation Logger RH sensor using a Sling
Psychrometer, keep in mind the following:
· Any instrument that requires a person to be present at, or in very close proximity to the
RH sensor in order to get a reading, will have a measurement error introduced to it.
That is because the body readily gives off heat and moisture that is especially
noticeable at lower RH levels.
· The time taken between slinging the psychrometer and reading it can exhibit several
degrees of inaccuracy in the wet bulb reading. Air currents around the body, whether it
is slung in the shade of a building or in sunlight, not knowing how to tie the wet sock, its
condition, and the purity of water used, all contribute to error. In addition, interpolating
the data from a psychrometric chart can add another 2 to 4% to the accumulative error.
1.14.6
Specifications
Temperature Sensor
Type:
NTC Thermistor
Range:
-40 to 70°C(-40
Accuracy:
+/- 0.2°C over the range of 0 to 70°C
(+/- 0.3°F over the range of 32 to 158°F)
Resolution:
0.03°C at 25°C (0.05°F at 77°F);
better than 0.07°C (0.12°F) between -25 and 70°C (-13 and
158°F);
better than 0.13°C (0.23°F) between -40 and -25°C (-40 and
-13°F)
RH Sensor
Type:
to 158°F)
Capacitive thin polymer film
Copyright © 2010 ACR Systems Inc. All Rights Reserved.
Distributed by MicroDAQ.com, Ltd.
www.MicroDAQ.com
(603) 746-5524
SmartReader Plus Data Logger
70
Range:
0 to 95% RH
Accuracy:
±3% RH from 10 to 90% (-20 to 40°C [-4 to 104°F])
Resolution:
Better than 0.04% RH between 25 and 60% RH at 25°C
(77°F)
Environmental Conditions:
The RH sensor is relatively immune to chemical
contamination but when exposed to extreme environmental
conditions, accuracy degradation could result. For long-term
stability and reliable readings, the sensor should not be
subjected to liquid immersion or exposed to high
concentrations of organic solvents, corrosive agents, sulfur
gases and strong acids or bases. Dust settling on the sensor
surface will not affect sensor performance except possibly to
decrease the speed of response.
Chemical Tolerances:
Limits for different chemical groups
1. Organic solvents typically 1,000...10,000 ppm
2. Corrosive agents (strong acids S02, H2SO4, Cl2, HCl,
H2S etc.) typically 1...10 ppm
3. Weak acids typically 100...1,000 ppm
4. Bases typically 10,000...100,000 ppm
External Sensors(2):
Range:
Any two sensors with a 0-5 VDC output
Specifications are subject to change without notice.
Copyright © 2010 ACR Systems Inc. All Rights Reserved.
Distributed by MicroDAQ.com, Ltd.
www.MicroDAQ.com
(603) 746-5524
71
1.15
SmartReader Plus Data Loggers
APPENDIX A Monitoring Resistance and Switch Status
Monitoring Resistance
and Switch Status
1.15.1
Measuring Resistance
You can also use your SmartReader Plus 1, 2, 4 and 8 model loggers to monitor resistance,
instead of just temperatures. This capability allows you to monitor devices other than just
thermistors (for example, potentiometers, level indicators or any other device that varies
resistance in accordance with a known parameter).
To use the thermistor temperature channel on your SmartReader Plus logger to measure
resistance, you must change the channel's equation number to the one for resistance. To do
this, select Equation 44 - Resistance when setting up the logger in TrendReader software.
The highest resolution of the resistance measurements occurs at a 10k ohms midpoint.
1.15.2
Monitoring Switch Status
You can also use your SmartReader Plus 1, 2, 4 and 8 model loggers to record the status of
uncommitted mechanical switch contacts (see Figure A-1). The switch you want to monitor
must be a "dry" contact, which means that it must have no connection to any type of voltage,
power or ground.
To use the thermistor temperature channel on your SmartReader Plus data logger to monitor
switch status, you must change the channel's equation number to the one for switch status.
To do this, choose Equation 41 - Switch Status when setting up the logger using
Copyright © 2010 ACR Systems Inc. All Rights Reserved.
Distributed by MicroDAQ.com, Ltd.
www.MicroDAQ.com
(603) 746-5524
SmartReader Plus Data Logger
72
TrendReader software.
Figure A-1: Monitoring Switch Status
When monitoring the status of a switch with your data logger, keep in mind that the logger will
not detect more than one change per sample period. For this reason, use a fast sample rate if
you expect the switch to open and close frequently.
The type of graph produced when monitoring switch status is a square wave that rises to a
maximum value when the switch is closed, and falls to a minimum value when the switch is
open.
Copyright © 2010 ACR Systems Inc. All Rights Reserved.
Distributed by MicroDAQ.com, Ltd.
www.MicroDAQ.com
(603) 746-5524
73
1.16
SmartReader Plus Data Loggers
APPENDIX B Temperature and Relative Humidity Calibration
Temperature and
Relative Humidity
Calibration
1.16.1
Temperature and Relative Humidity Calibration
This chapter provides instructions on how you can recalibrate your RH modules, EH-020A
External Temperature and Relative Humidity probes and any thermistor temperature probes.
1.16.2
Thermistor Calibration
If you do not have accurate resistance-temperature data on your thermistors (available with all
interchangeable types) and want to calibrate your own, or simply want to confirm sensor
accuracy, you can perform a simple calibration procedure that will give you the right
information.
List of Materials
Here is a list of items you will need:
·
·
·
·
·
an accurate thermometer, preferably one with 0.1°C increments or better
a bucket
crushed or chipped ice
a pot of boiling water
a digital multimeter, preferably one with 0.1% resolution or better
Test Procedure
Make sure the thermistors and leads you want to test are properly potted (waterproofed),
insulated or otherwise protected against moisture. You should not dip an unprotected
thermistor in water since the water will short the leads and produce false readings. For this
procedure use Equation 44.
1.
Label each thermistor sensor so that later you can easily match it to the calibration
equations you produce.
2.
Allow the thermistor and thermometer to stabilize at room temperature around 25°C
(77°F). Record both temperature and resistance readings, being careful not to handle
both devices. This is the Mid calibration point data.
3.
Fill the bucket with the crushed or chipped ice. Add water so that it overflows. Add more
ice until it is tightly packed right to the bottom of the bucket (allowing water to overflow).
Copyright © 2010 ACR Systems Inc. All Rights Reserved.
Distributed by MicroDAQ.com, Ltd.
www.MicroDAQ.com
(603) 746-5524
SmartReader Plus Data Logger
74
4.
Insert the thermometer and the thermistor probes into the bucket ensuring that they do
not touch the side or bottom of the bucket. Make sure the thermistor probes' leads are
long enough for you to easily take resistance readings.
5.
Cover the bucket with foam chips or another suitable insulating material. Let sit for at
least five minutes while the temperature stabilizes and the thermistor has a chance to
respond. Add more ice periodically, as before, ensuring that it is tightly packed to the
bottom of the bucket each time. The goal is to keep the thermistor completely
submerged in the ice slurry until it reaches 0°C (32°F).
6.
Measure and record the resistance of the thermistor probe from the logger and the
temperature from the thermometer. This is the Low temperature calibration point value.
7.
Now insert the thermistor probe into a pot of water at room temperature and bring to a
boil. Record the resistance of the thermistor probe. This is the High calibration point
value 100°C (212°F).
8.
With TrendReader software, create a thermistor equation (using the equation wizard)
from the Equation Menu. Save the equation to the logger.
CAUTION: To avoid damaging your thermistors, when calibrating, make sure you
do not introduce the sensors to rapid changes in temperature (for example, from
ice bucket right into the boiling water).
Calibration Procedure for Temperature Equation 45
This procedure describes how to calibrate equation 45 in TrendReader software.
Normally, you would calibrate a sensor by exposing it to 3 temperatures (0, 25 and 100°C) and
entering the difference of (Measured Temperature - Actual Temperature) as Low, Mid and
High calibration values. This works fine for our ET-016 temperature probes. Unfortunately,
this is not possible for internal sensors since the electronics on the data logger cannot
withstand a temperature of 100°C. You can simulate the calibration at 0, 25 and 100°C by
creating a custom thermistor curve based on temperatures of 0, 25 and 60°C, extrapolating
the curve to 100°C, and using that value for normal calibration.
TrendReader Procedure:
1.
Write a resistance equation
Create a custom equation of the form:
SRC = Source0
if SRC < 1 then SRC = 1
if SRC > 254 then SRC = 254
R = 10000 * SRC / (255 - SRC)
Answer0 = R
Save this equation.
2.
Set the internal temperature channel of the logger to the resistance equations
Setup the logger, change the equation number to that of the resistance equation, and
save changes. Sample rate should be fairly long (about 5 minutes is good). All
calibration values on the internal channel should be set to zero.
3.
Expose the logger to three known temperatures
For 0°C, put the logger in a watertight bag and place in ice water bath. Alternatively,
Copyright © 2010 ACR Systems Inc. All Rights Reserved.
Distributed by MicroDAQ.com, Ltd.
www.MicroDAQ.com
(603) 746-5524
75
SmartReader Plus Data Loggers
place in refrigeration chamber of known temperature.
For 25°C, place logger in insulated box at a known temperature close to 25°C.
For 60°C, place the logger in a watertight bag and place in a warm water bath of known
temperature.
For all the rest, let the logger sit for about 2 hours to acclimatize. Record the times and
the known temperature for each.
4.
Download the logger
After the tests are done, download the logger and graph the data. You should see 3 flat
spots on the resistance curve which correspond to the times of the temperature tests.
Record the value of each of the three spots.
5.
Generate a thermistor equation
From the Equation Menu, create a thermistor equation (using the equation wizard). Enter
the low, mid and high temperatures and the corresponding resistances. Generate the
equation.
6.
Revise the Logger File
Revise the logger file and change the equation of the internal temperature channel from
your resistance equation to the new Thermistor Equation.
7.
Graph the file
Make sure the units are in Celsius. Check to make sure that the three flat spots occur at
the known temperatures.
8.
Add three compound lines
On the graph, add the three compound lines. Each line should use the Thermistor
equation you just created. For each of them, set the Source0 variable to Constant. The
value of Constant should be 16.24 for the first line, 127.5 for the second line and 195.194
for the third line. These values correspond to the byte value that corresponds to 100, 25,
0°C under equation 45.
9.
Show the graph as a table
Expand the data section of the graph to view the data points. Note the value of each of
the three compound lines. The first line should be close to 100°C, record that
temperature as T3. The second line should be close to 25°C, record that temperature as
T2. The last line should be close to zero, record that temperature as T1.
10. Calculate the Low, Mid and High Calibration constants
The Low value should be equal to T1
The Mid value should be equal to T2 - 25
The High value should be equal to 100 - T3
11. Final check
Revise the logger file again. This time, set the equation to 45 and enter the new
calibration constants. Save the file under a new name. Open this new file and the first
file (using the custom thermistor equation) into the same graph. Both lines should match
perfectly.
12. Calibrate the logger
Enter the new calibration values into the logger, set the equation to 45 and save the new
changes.
Copyright © 2010 ACR Systems Inc. All Rights Reserved.
Distributed by MicroDAQ.com, Ltd.
www.MicroDAQ.com
(603) 746-5524
SmartReader Plus Data Logger
1.16.3
76
Relative Humidity Calibration
If you want to confirm the calibration of your RH sensor or EH-020A Temperature and Relative
Humidity probe, you can simply return it to your authorized sales representative or perform
your own field test using the special adjustment provisions in TrendReader software.
Recommended methods of calibration include using an accurate relative humidity test
chamber or by mixing saturated salt solutions. Both tests are performed at an ambient room
temperature of 20 to 25°C (68 to 77°F).
RH Chamber Test
If you intend to use a Relative Humidity Test Chamber for your calibration, make sure it has
been recently tested to within ±1%. The procedure to calibrate is as follows:
1.
Set up your humidity data logger with a sample rate of 20 seconds, and equation 81 on
the RH channels. Make sure you have selected Normalized Byte data units. If you are
calibrating an EH-020A module, ensure it is properly connected to the logger, and the
external RH and temperature channels are enabled.
2.
Start the test chamber at 5% RH and place your logger (SmartReader Plus 2 or 4) or
EH-020A probe into the test chamber. Wait 20 minutes.
3.
Adjust the chamber to 20% RH and wait for 20 minutes. The wait is necessary to ensure
the chamber has adequate time to settle in at the desired level.
4.
Adjust the chamber to 80% RH and wait an additional 20 minutes.
5.
Remove your logger or RH module from the test chamber and backup the recorded
information to your computer. If you are working with more than one logger, use the
serial number as the file name to help match the data with the logger when you make
calibration adjustments.
6.
Call up the graph on your computer using TrendReader. The profile you see should
reflect the test you have just performed.
7.
Zoom in on the section that relates to the 20% RH level in the test chamber. Use the
mouse to find the byte value recorded during the latter part of the test (refer to step 3).
Record this as the "bL" reading.
8.
Zoom in on the section that relates to the 80% RH level in the test chamber. Again, use
the mouse to find the byte value recorded at the end of the test (refer to step 4). Record
this value as the "bH" reading.
9.
Switch to the Setup window in TrendReader software.
10. Use the following equation to calculate the "Low" calibration adjustment value:
Low = (63 x bL - 170 x bH) / 428
11. For the "High" calibration adjustment value use the following equation:
High = 40 x (-107 / (bH - bL) - 1)
12. Now enter the same values by revising the logger file and view the corrected graphs.
Copyright © 2010 ACR Systems Inc. All Rights Reserved.
Distributed by MicroDAQ.com, Ltd.
www.MicroDAQ.com
(603) 746-5524
77
SmartReader Plus Data Loggers
13. If the results are satisfactory, save the calibration changes to the logger (remember to set
the RH channel's equation number back to 71).
Saturated Salt Test
Using saturated salt solutions is the most accurate field technique for RH calibration.
To check your humidity data logger with saturated salt solutions, gather the following
equipment and materials:
Wide mouth canning jars, 1000ml with metal lids
#9 stoppers (Fisher #14-130N)
Powder Funnel (Fisher #10-346-5B)
Long Stem Funnel (Fisher #10-325D)
Cardboard or wooden box
Styrofoam chips (or other insulating material)
Reagent grade salts:
1. LiCl (anhydrous), 75gm (Fisher #L-121)
2. MgCl2 x 6H2O, 150gm (Fisher #M-33)
3. NaCl, 50gm (Fisher #S-271)
· De-ionized or distilled water, 75ml for each solution
·
·
·
·
·
·
·
Prepare for the saturated salt test by following these steps:
1.
Use the powder funnel to carefully place the salt into the center of the jar bottom.
2.
Slowly pour the water onto the mound of salt, using the long stem funnel, taking care not
to splash any water or salt onto the inner walls of the jar.
3.
Gently swirl the saturated solution. If the salt dissolves entirely, with no crystals remaining
on the bottom, the solution is not saturated and more salt must be added. There must be
crystals remaining on the bottom but they must not be exposed above the water level.
4.
Put a nail through the jar lid and bend into a small hook. Tape the head of the nail (or
use rubber cement) to create an airtight seal of the opening. The logger with RH sensor
(or EH-020A) can be inserted into the jar by first hanging it on the nail loop then screwing
on the lid to the jar.
5.
The saturated salt solutions should be kept in a well insulated environment to minimize
any temperature changes. The equilibrium RH over saturated salt solutions is only
slightly temperature dependent. However, for close calibration work to 5% RH or better, it
is important to keep the temperature of the salt solution and the air space above it
identical. To ensure this, the temperature of the lab should be constant.
To perform the saturated salt test, follow these steps:
1.
Setup your relative humidity logger with a sample rate of 20 seconds and equation 81 on
the RH channel(s). Make sure you have selected Normalized Byte data units.
2.
Place the jars into the box with 1 to 2 inches of Styrofoam chips on the bottom, then fill all
remaining air spaces between the jars and the interior spaces of the box with the chips.
3.
Cover the box with cardboard in which 6cm (2.5") diameter holes have been cut to allow
access to the tops of the jars for insertion of the logger or RH module.
Copyright © 2010 ACR Systems Inc. All Rights Reserved.
Distributed by MicroDAQ.com, Ltd.
www.MicroDAQ.com
(603) 746-5524
SmartReader Plus Data Logger
78
4.
Place the logger with sensor or EH-020A module into the jar containing the LiCl solution
(RH = 11%) overnight to eliminate any hysteresis effects.
5.
Quickly insert the logger (or module) into the next solution by swapping the lids.
Transfers should always be made in the direction of higher RH conditions. The jar
should be well sealed. Allow at least two hours to get within three percent of the
equilibrium RH. Repeat for next solution.
Salt
MgCl2
NaCl
RH
33%
75%
6.
Call up the graph on your computer using TrendReader software. The profile you see
should reflect the test you have just performed.
7.
Zoom in on the section that relates to the 33% RH level in the test chamber. Use the
mouse to find the byte value recorded during the latter part of the minimum two hour test
portion (refer to step 5). Record this as the "bL" reading.
8.
Zoom in on the section that relates to the 75% RH level in the test chamber. Again, use
the mouse to find the byte value recorded at the end of the minimum two hour test (refer
to step 5). Record this value as the "bH" reading.
9.
Switch to the Setup window in TrendReader software.
10. Use the following equation to calculate the "Low" calibration adjustment value:
Low = (71 x bL - 145 x bH) / 296
11. For the "High" calibration adjustment value use the following equation:
High = 40 x (-74/ (bH - bL) - 1)
12. Now enter the same values by revising the logger file and view the corrected graphs.
13. If the results are satisfactory, save the calibration changes to the logger (remember to set
the RH channel's equation number back to 71).
Copyright © 2010 ACR Systems Inc. All Rights Reserved.
Distributed by MicroDAQ.com, Ltd.
www.MicroDAQ.com
(603) 746-5524
79
1.17
SmartReader Plus Data Loggers
APPENDIX C Thermistor Temperature Probes
Thermistor Temperature
Probes
1.17.1
Thermistor Temperature Probes
The SmartReader Plus 1, 2, 4 and 8 data loggers can record temperature from a wide variety
of external thermistor temperature probes. You can use the standard thermistor probes ACR
makes available or you can use your own.
1.17.2
What are Thermistors?
Thermistors are temperature-sensitive resistors. The most common are those classified as
the NTC (Negative Temperature Coefficient) type, which, at high temperatures, have a
relatively low electrical resistance. At low temperatures their resistance is much higher. In
between, the resistance varies with temperature at a predictable rate that can be made linear
by a mathematical equation (refer to Equations in the TrendReader guide).
Thermistors provide a rugged, highly stable and accurate means of measuring temperature.
They can be used for very low temperature applications down to -80°C (-112°F) or with special
probe configurations, in environments up to 450°C (850°F).
Thermistors with consistent properties, for a given type, are readily available. These
interchangeable thermistors can be substituted without recalibrating the logger.
1.17.3
ET Series Temperature Probes
The ET Series External Temperature Probes provide added versatility to the temperature
measuring capabilities of your SmartReader Plus 1, 2, 4 and 8 data loggers. Accurate,
interchangeable and suitable for various defined temperature ranges, they interface easily to
the terminal connector block on each logger. Each ET Series Temperature Probe consists of a
NTC thermistor potted into the tip of a short length of stainless steel tubing.
Equations
Each ET series thermistor probe is associated with a standard linearizing equation in
TrendReader software. The equation converts the resistance values of the thermistor to
accurate temperature readings, depending on the specific characteristics of the thermistor
type.
Why the Different Types?
Individual thermistor types are most effectively used over specific and defined temperature
Copyright © 2010 ACR Systems Inc. All Rights Reserved.
Distributed by MicroDAQ.com, Ltd.
www.MicroDAQ.com
(603) 746-5524
SmartReader Plus Data Logger
80
ranges in order to maximize measurement accuracy and resolution. In addition, some
thermistor probes are constructed to accommodate special environmental or application
conditions.
There are six different types of ET Series Temperature Probes available that cover a wide
range of operation.
· ET-016 General Purpose Temperature Probe is best suited for general purpose
temperature measurements centered on ambient room temperature.
· ET-004 Low Temperature Probe is ideal for sub-zero temperature measurements and
consists of a handle with a stainless steel penetration probe (it can be used, among
other applications, to monitor semi-solid frozen foods).
· ET-081 High Temperature Probe is best suited for higher temperature centered on
77°C (170°F).
· ET-086 Oven Temperature Probe is designed for even higher measurement centered
on 150°C (300°F).
· ET-016-STP is used to monitor skin temperature on human and animals.
· ET-016-SMP is used to measure pipe surface temperature. It wraps around any pipe
less than 2" in diameter.
If your needs for temperature measurement do not quite fit the ET series profile, you may
consider using a different type of probe. The Custom Probes section in this chapter describes
how you can work with other commercially-available thermistor probes from many different
suppliers.
1.17.4
Setup and Use
ET series thermistor probes are easy to use and setup with your loggers. To make a probe
work with your particular logger, follow the instructions for using remote thermistor probes in
the chapter that deals with your SmartReader Plus model. After connecting your thermistor,
make sure:
· the proper temperature equation is loaded for each enabled channel. If you do not use the
correct equation, you will end up producing misleading readings.
· to check the operation of your external probes before heading out in the field by viewing the
Realtime values in TrendReader software.
Probe
Range
Equation
ET-016
-35 to 95°C (-30 to 200°F)
45
ET-004
-60 to 55°C (-75 to 130°F)
46
ET-081
10 to 170°C (50 to 335°F)
47
ET-086
70 to 255°C (155 to 490°F)
48
Copyright © 2010 ACR Systems Inc. All Rights Reserved.
Distributed by MicroDAQ.com, Ltd.
www.MicroDAQ.com
(603) 746-5524
81
SmartReader Plus Data Loggers
Extending Cable Lengths
If you find the standard length of your ET Series Temperature Probe cable is not long enough
for your intended application, you can extend the cable yourself up to 30m (100ft). Use
2-conductor 22-gauge shielded wire. To prevent measurement errors, make sure the
connections are properly insulated and well protected from moisture.
Applications
The ET Series Temperature Probes lend themselves to a wide range of applications. For
example, to log temperatures from pipes, you can insert your ET Probe into an existing
thermometer well or strap the tip of the probe to the pipe for a surface conduction temperature
(for best thermal conductivity, epoxy the probe tip directly to the pipe and replace the pipe
insulation back over top). You can also easily measure duct temperatures by simply drilling a
hole in the duct and inserting your ET probe.
1.17.5
Specifications
ET-016 General Purpose Probe
Description:
NTC thermistor and cable potted into the end of a 25mm (1")
long by 5mm (3/16") diameter cylindrical stainless steel tip.
Equation:
45
R25 Value:
10k ohms
Range:
-35 to 95°C (-30 to 200°F)
Max. Temp.:
150°C (300°F)
Resolution:
Refer to Figure C-1
Accuracy:
±0.2°C (±0.36°F) from the temperature values listed in Table
C-1 over the range of 0 to 70°C (32 to 158°F)
±0.5°C (±0.9°F) from -35 to 0°C (-30 to 32°F)
±0.5°C (±0.9°F) from 70 to 120°C (158 to 248°F)
Cable:
6m (20ft) standard length with a Teflon® protective jacket;
Copyright © 2010 ACR Systems Inc. All Rights Reserved.
Distributed by MicroDAQ.com, Ltd.
www.MicroDAQ.com
(603) 746-5524
SmartReader Plus Data Logger
82
red and black leads are stripped and tinned.
Figure C-1: ET-016 Probe Resolution
ET-016: Extended exposure to temperatures above 70°C may result in permanent
resistance drift, resulting in loss of ±0.2°C tolerance over the 0 to 70°C temperature
range. Extended exposure to temperatures below 0°C may result in some mechanical
damage due to thermal contraction effects.
ET-004 Low Temperature Probe
Description:
NTC thermistor and cable potted into the end of a 89mm (3½
") long tapered stainless steel penetration tip with 89mm (3½
") long by 19mm (¾") diameter tapered plastic handle.
R25 Value:
2,252 ohms
Equation:
46
Range:
-60 to 55°C (-75 to 130°F)
Resolution:
Refer to Figure C-2
Accuracy:
±0.2°C (±0.4°F) from 0 to 55°C (32 to 130°F)
±0.6°C (±1.1°F) from -50 to -30°C (-58 to -22°F)
±0.3°C (±0.54°F) from -30 to 0°C (-22 to 32°F)
Cable:
3m (10ft) standard length with Teflon® protective jacket; red
Copyright © 2010 ACR Systems Inc. All Rights Reserved.
Distributed by MicroDAQ.com, Ltd.
www.MicroDAQ.com
(603) 746-5524
83
SmartReader Plus Data Loggers
and black leads are stripped and tinned.
Figure C-2: ET-004 Probe Resolution
ET-081 High Temperature Probe
Description:
NTC thermistor and cable potted into the end of a 22mm
(7/8") long by 5mm (3/16") diameter nickel-plated eyelet.
R25 Value:
100k ohms
Equation:
47
Range:
10 to 170°C (50 to 335°F)
Max. Temp.:
190°C (375°F)
Resolution:
Refer to Figure C-3
Accuracy:
±0.5°C (0.9°F) from the temperature values listed in Table
C-1 over the range of 10 to 170°C (50 to 335°F)
Cable:
6m (20ft) standard length with twisted-pair Teflon® insulated
Copyright © 2010 ACR Systems Inc. All Rights Reserved.
Distributed by MicroDAQ.com, Ltd.
www.MicroDAQ.com
(603) 746-5524
SmartReader Plus Data Logger
84
wire; red and white leads are stripped and tinned.
Figure C-3: ET-081 Probe Resolution
ET-086 Oven Temperature Probe
Description:
NTC thermistor and cable potted into the end of a 22mm
(7/8") long by 5.5mm (7/32") diameter nickel-plated eyelet.
R125 Value:
26,266 ohms
Equation:
48
Range:
70 to 255°C (155 to 490°F)
Max. Temp.:
275°C (525°F)
Resolution:
Refer to Figure C-4
Accuracy:
±1°C (1.8°F) from the temperature values listed in Table C-1
over the range of 70 to 255°C (155 to 490°F)
Cable:
6m (20ft) standard length with twisted-pair moisture-proof
Teflon®- coated glass yarn wire; white leads are stripped and
Copyright © 2010 ACR Systems Inc. All Rights Reserved.
Distributed by MicroDAQ.com, Ltd.
www.MicroDAQ.com
(603) 746-5524
85
SmartReader Plus Data Loggers
tinned.
Figure C-4: ET-086 Probe Resolution
1.17.6
Resistance vs. Temperature Tables
The following table lists the Resistance vs. Temperature characteristics of the ET series
thermistor probes as they relate to use with the SmartReader Plus 1, 2, 4 and 8 loggers.
For each thermistor probe model the table documents the complete set of temperature
readings and corresponding thermistor resistances possible for the logger's eight most
significant bits. The 12-bit reading values are normalized to a full scale value of 255; this
allows the same equation to be used for both 8 and 12 bit loggers. The least significant bit of
the 12-bit value is weighted 0.062 (255/4095).
Copyright © 2010 ACR Systems Inc. All Rights Reserved.
Distributed by MicroDAQ.com, Ltd.
www.MicroDAQ.com
(603) 746-5524
SmartReader Plus Data Logger
86
Table C-1: Temperature-Resistance Values for ET Series Probes
Copyright © 2010 ACR Systems Inc. All Rights Reserved.
Distributed by MicroDAQ.com, Ltd.
www.MicroDAQ.com
(603) 746-5524
87
SmartReader Plus Data Loggers
Copyright © 2010 ACR Systems Inc. All Rights Reserved.
Distributed by MicroDAQ.com, Ltd.
www.MicroDAQ.com
(603) 746-5524
SmartReader Plus Data Logger
88
Copyright © 2010 ACR Systems Inc. All Rights Reserved.
Distributed by MicroDAQ.com, Ltd.
www.MicroDAQ.com
(603) 746-5524
89
SmartReader Plus Data Loggers
Copyright © 2010 ACR Systems Inc. All Rights Reserved.
Distributed by MicroDAQ.com, Ltd.
www.MicroDAQ.com
(603) 746-5524
SmartReader Plus Data Logger
1.17.7
90
Custom Probes
Obtaining thermistors through specialty suppliers allows you wider flexibility in the number of
possible probe assemblies for your specific applications. That way, if you have a special
surface, penetration, pipe well or immersion sensing applications, you can usually get
off-the-shelf or even custom probes to suit. Contact your dealer for recommendations.
Writing Your Own Thermistor Equations
Each thermistor temperature probe you use with SmartReader Plus data loggers must be
associated with a standard or custom equation in TrendReader software. This equation
translates the internal digital logger readings for the specific thermistor, or thermistor type, into
the units of your choice (e.g. degrees Celsius or Fahrenheit).
TrendReader software includes a function that can automatically create custom equations for
use with your own thermistors. See Equations in the TrendReader guide.
Copyright © 2010 ACR Systems Inc. All Rights Reserved.
Distributed by MicroDAQ.com, Ltd.
www.MicroDAQ.com
(603) 746-5524
91
1.18
SmartReader Plus Data Loggers
APPENDIX D Typical SmartReader Plus 3 Connection
Diagram
Typical SmartReader Plus 3
Connection Diagram
1.18.1
AC Current and AC Voltage Recording
ACR Systems stocks voltage transducers. These devices connect directly to AC voltage
sources, and produce a linear output of 0-5V DC directly proportional to the input voltage.
They are average-sensing transducers calibrated to indicate the RMS voltage.
We stock two models: a 120V single-phase model, and a 480V 3-phase model.
Figure D-1: 480V Power Systems
Copyright © 2010 ACR Systems Inc. All Rights Reserved.
Distributed by MicroDAQ.com, Ltd.
www.MicroDAQ.com
(603) 746-5524
SmartReader Plus Data Logger
1.18.2
92
AC Voltage Transducer Specifications
Voltage Input
Single phase
3-phase
Nominal:
120V
480V
Range:
0-150V
0-600V
Overload Continuous:
180V
600V
Burden per Element:
2.5VA at 120V
2.5VA at 480V
Rated Output (RO):
0-5VDC
Can be changed to 0-1mA by removing the 5k
ohms resistor
Accuracy:
±(0.15% Reading + 0.1% RO)
Temp Effect on Accuracy:
Load with 0-1mA Output:
±0.01% / °C
0-10,000 ohms
Load with 0-5VDC Output:
5M ohms minimum
Output Ripple Peak:
< 0.25% RO
Response Time:
< 400 ms to 99%
Standard Calibration
Adjustments:
±10% of reading
Frequency Range:
Stability (per year):
60Hz
±0.25% RO Non-Accumulative
Operating Humidity:
0-95% Non-Condensing
Dielectric Withstand:
1500 VRMS at 60Hz
Isolation:
Complete Input/Output/Case
Surge Withstand:
ANSI/IEEE C37.90.1
Maximum Net Weight:
VT110A2-RS:
3588-2-RS:
14oz, (0.4kg)
28oz, (0.8kg)
Approximate Dimensions:
VT110A2-RS:
3.1"W X 2"D X 4.1"H
79 X 51 X 104mm)
Copyright © 2010 ACR Systems Inc. All Rights Reserved.
Distributed by MicroDAQ.com, Ltd.
www.MicroDAQ.com
(603) 746-5524
93
SmartReader Plus Data Loggers
3588-2-RS:
4.4"W x 3.8"D x 4.7"H
(112 x 97 x 119mm)
Figure D-2: 120V Voltage Transducer
Figure D-3: 480V Voltage Transducer
Copyright © 2010 ACR Systems Inc. All Rights Reserved.
Distributed by MicroDAQ.com, Ltd.
www.MicroDAQ.com
(603) 746-5524
SmartReader Plus Data Logger
1.19
94
APPENDIX E Sample Rates
Sample Rates
1.19.1
How a Data Logger Stores Readings
The sample rate of your data logger is the frequency with which it stores readings in its
memory. A selected sample will apply for all channels on a SmartReader Plus.
If you set your data logger's sample rate to eight seconds, it reads its input channels and
stores the readings once every eight seconds. If you choose a sample rate longer than eight
seconds, the logger still reads its input channels once every eight seconds, and stores an
averaged reading at the end of the sample interval you have chosen.
For example, if you use a two-minute sample rate, the data logger takes fifteen separate
readings over each two-minute interval. At the end of each two-minute interval, the logger
calculates the average of the fifteen readings, and stores that average in its memory.
1.19.2
Sample Rate Tables
The following tables list the maximum time spans over which your SmartReader Plus will
record readings. The time spans depend on the number of channels enabled and the length
of the sample rate. A SmartReader Plus-32K has a memory capacity of 21,500 readings. A
SmartReader Plus-128K can store 87,000 readings and a 1.5 MB version can store 1,048,000
readings.
In each table, the Sample Rate column lists the available sample rates. The Days, Hours,
Minutes and Seconds columns list the time spans over which your logger will record readings
at each sample rate.
For example, a SmartReader Plus-32K with two channels enabled, using a sample rate of ten
minutes, will store readings for 74 days, 15 hours and 40 minutes. After that time, depending
on how it was set up, the logger will either continue to take readings and replace the oldest
readings with the new readings, or it will stop taking readings.
Table F-1: SmartReader Plus-32K Sample Rate - One Channel Enabled
Sample Rate
Days
Hours
Minutes
Seconds
0.04 sec.
0
0
14
20
0.1 sec.
0
0
35
50
0.2 sec.
0
1
11
40
0.5 sec.
0
2
59
10
1 sec.
0
5
58
20
Copyright © 2010 ACR Systems Inc. All Rights Reserved.
Distributed by MicroDAQ.com, Ltd.
www.MicroDAQ.com
(603) 746-5524
95
SmartReader Plus Data Loggers
2 sec.
0
11
56
40
5 sec.
1
5
51
40
8 sec.
1
23
46
40
20 sec.
4
23
26
40
1 min.
14
22
20
0
2 min.
29
20
40
0
5 min.
74
15
40
0
10 min.
149
7
20
0
30 min.
447
22
0
0
1 hr.
895
20
0
0
2 hrs.
1791
16
0
0
4 hrs.
3583
8
0
0
Table F-2: SmartReader Plus-32K Sample Rate Table - Two Channels Enabled
Sample Rate
Days
Hours
Minutes
Seconds
0.04 sec.
0
0.1 sec.
0
0
7
10
0
17
55
0.2 sec.
0
0
35
50
0.5 sec.
0
1
29
35
1 sec.
0
2
59
10
2 sec.
0
5
58
20
5 sec.
0
14
55
50
8 sec.
0
23
53
20
20 sec.
2
11
43
20
1 min.
7
11
10
0
2 min.
14
22
20
0
5 min.
37
7
50
0
10 min.
74
15
40
0
30 min.
223
23
0
0
1 hr.
447
22
0
0
2 hrs.
895
20
0
0
4 hrs.
1791
16
0
0
Table F-3: SmartReader Plus-32K Sample Rate - Three Channels Enabled
Sample Rate
0.04 sec.
Days
Hours
Minutes
Seconds
0
0
4
46
Copyright © 2010 ACR Systems Inc. All Rights Reserved.
Distributed by MicroDAQ.com, Ltd.
www.MicroDAQ.com
(603) 746-5524
SmartReader Plus Data Logger
0.1 sec.
0
0
11
56
0.2 sec.
0
0
23
53
0.5 sec.
0
0
59
43
1 sec.
0
1
59
26
2 sec.
0
3
58
53
5 sec.
0
9
57
13
8 sec.
0
15
55
33
20 sec.
1
15
48
53
1 min.
4
23
26
40
2 min.
9
22
53
20
5 min.
24
21
13
20
10 min.
49
18
26
40
30 min.
149
7
20
0
1 hr.
298
14
40
0
2 hrs.
597
5
20
0
4 hrs.
1194
10
40
0
96
Table F-4: SmartReader Plus-32K Sample Rate - Four Channels Enabled
Sample Rate
Days
Hours
Minutes
Seconds
0.04 sec.
0
0
3
35
0.1 sec.
0
0
8
57
0.2 sec.
0
0
17
55
0.5 sec.
0
0
44
47
1 sec.
0
1
29
35
2 sec.
0
2
59
10
5 sec.
0
7
27
55
8 sec.
0
11
56
40
20 sec.
1
5
51
40
1 min.
3
17
35
0
2 min.
7
11
10
0
5 min.
18
15
55
0
10 min.
37
7
50
0
30 min.
111
23
30
0
1 hr.
223
23
0
0
2 hrs.
447
22
0
0
4 hrs.
895
20
0
0
Copyright © 2010 ACR Systems Inc. All Rights Reserved.
Distributed by MicroDAQ.com, Ltd.
www.MicroDAQ.com
(603) 746-5524
97
SmartReader Plus Data Loggers
Table F-5: SmartReader Plus-32K Sample Rate - Five Channels Enabled
Sample Rate
Days
Hours
Minutes
Seconds
0.04 sec.
0
0
2
52
0.1 sec.
0
0
7
10
0.2 sec.
0
0
14
20
0.5 sec.
0
0
35
50
1 sec.
0
1
11
40
2 sec.
0
2
23
20
5 sec.
0
5
58
20
8 sec.
0
9
33
20
20 sec.
0
23
53
20
1 min.
2
23
40
0
2 min.
5
23
20
0
5 min.
14
22
20
0
10 min.
29
20
40
0
30 min.
89
14
0
0
1 hr.
179
4
0
0
2 hrs.
358
8
0
0
4 hrs.
716
16
0
0
Table F-6: SmartReader Plus-32K Sample Rate - Six Channels Enabled
Sample Rate
Days
Hours
Minutes
Seconds
0.04 sec.
0
0
2
23
0.1 sec.
0
0
5
58
0.2 sec.
0
0
11
56
0.5 sec.
0
0
29
51
1 sec.
0
0
59
43
2 sec.
0
1
59
26
5 sec.
0
4
58
36
8 sec.
0
7
57
46
20 sec.
0
19
54
26
1 min.
2
11
43
20
2 min.
4
23
26
40
5 min.
12
10
36
40
10 min.
24
21
13
20
30 min.
74
15
40
0
1 hr.
149
7
20
0
Copyright © 2010 ACR Systems Inc. All Rights Reserved.
Distributed by MicroDAQ.com, Ltd.
www.MicroDAQ.com
(603) 746-5524
SmartReader Plus Data Logger
2 hrs.
298
14
40
0
4 hrs.
597
5
20
0
98
Table F-7: SmartReader Plus-32K Sample Rate - Seven Channels Enabled
Sample Rate
Days
Hours
Minutes
Seconds
0.04 sec.
0
0
2
2
0.1 sec.
0
0
5
7
0.2 sec.
0
0
10
14
0.5 sec.
0
0
25
35
1 sec.
0
0
51
11
2 sec.
0
1
42
22
5 sec.
0
4
15
57
8 sec.
0
6
49
31
20 sec.
0
17
3
48
1 min.
2
3
11
25
2 min.
4
6
22
51
5 min.
10
15
57
8
10 min.
21
7
54
17
30 min.
63
23
42
51
1 hr.
127
23
25
42
2 hrs.
255
22
51
25
4 hrs.
511
21
42
51
Table F-8: SmartReader Plus-32K Sample Rate - Eight Channels Enabled
Days
Hours
Minutes
Seconds
0.04 sec.
Sample Rate
0
0
1
47
0.1 sec.
0
0
4
28
0.2 sec.
0
0
8
57
0.5 sec.
0
0
22
23
1 sec.
0
0
44
47
2 sec.
0
1
29
35
5 sec.
0
3
43
57
8 sec.
0
5
58
20
20 sec.
0
14
55
50
1 min.
1
20
47
30
2 min.
3
17
35
0
Copyright © 2010 ACR Systems Inc. All Rights Reserved.
Distributed by MicroDAQ.com, Ltd.
www.MicroDAQ.com
(603) 746-5524
99
SmartReader Plus Data Loggers
5 min.
9
7
57
30
10 min.
18
15
55
0
30 min.
55
23
45
0
1 hr.
111
23
30
0
2 hrs.
223
23
0
0
4 hrs.
447
22
0
0
Copyright © 2010 ACR Systems Inc. All Rights Reserved.
Distributed by MicroDAQ.com, Ltd.
www.MicroDAQ.com
(603) 746-5524
SmartReader Plus Data Logger
1.20
100
APPENDIX F Connecting Multiple Loggers
Connecting Multiple Loggers
1.20.1
Network Configurations
SmartReader Plus data loggers can be connected in three network configurations:
· the Basic Network
· the Modular Network
· the Shielded Network
The Basic Network can accommodate up to three loggers and a total cable length of 100 feet
(30m). The Modular and Shielded Networks can accommodate up to ten loggers and a total
cable length of 1000 feet (300m). The Shielded Network is used in electrically noisy
environments.
The table below shows the equipment needed for each network.
Network
Configuration
Basic Network
Maximum Total Computer/
# of
Cable
Modem
Loggers Lengt Connection
h
3
Modular
Network
10
Shielded
Network
10
100 ft.
(30m)
IC-101
Interface
Cable
IC-101 Plug
1000 ft. and YA-201
(300m)
Modular
Y-adaptor
1000 ft.
(300m)
IC-101
Interface
Cable
Network
Cable
CB-020
20 ft. (6m)
Extension
Cable
Modular
Flat
Cable
Shielded
Cable
External
Logger
Power to Last
Connection
Logger
s
YA-200
Y-Adaptor
Cable
Optional*
YA-201
Modular
Y-Adaptor
(except to
last logger)
PS-201
Network
Power
Supply
and YA-200
Y-Adaptor
YA-200
Y-Adaptor
Cable
PS-201
Network
Power Supply
*PS-201 Network Power Supply may be required for some computers or modems.
Note that once the hardware has been set up you will need to set up a Network List for the
loggers you are going to connect.
Copyright © 2010 ACR Systems Inc. All Rights Reserved.
Distributed by MicroDAQ.com, Ltd.
www.MicroDAQ.com
(603) 746-5524
101
1.20.2
SmartReader Plus Data Loggers
Basic Network
The Basic Network accommodates a maximum of three loggers.
Figure G-1: Basic SmartReader Plus Network
1.
Insert Y-adaptor cables (YA-200) into each logger except the last one on the network.
2.
Connect the first logger to your computer (or remote modem) using the IC-101 interface
cable. If you are connecting to a modem, refer to the TrendReader guide for information
on how to set up a modem.
3.
Connect the loggers together with extension cables (CB-020).
Copyright © 2010 ACR Systems Inc. All Rights Reserved.
Distributed by MicroDAQ.com, Ltd.
www.MicroDAQ.com
(603) 746-5524
SmartReader Plus Data Logger
1.20.3
102
Modular Network
The Modular Network accommodates a maximum of ten loggers.
Figure G-2: Modular SmartReader Plus Network
1.
Insert a Y-adaptor cable (YA-200) into the last logger on the network.
2.
Insert a Modular Y-adaptor (YA-201) into:
3.
·
the plug portion of the IC-101 Interface Cable
·
each logger except the last one on the network
·
one end of the last logger's Y-adaptor cable
Cut and crimp the Modular Flat Cable.
NOTE: Do not use modular cable crimped for telephone use as the wiring will be
"mirror image". Instead, crimp your own jacks using a "straight through" wiring
method.
4.
Connect the IC-101 to the first logger, and all the loggers to each other, using Modular
Flat Cable.
5.
Connect the Network Power Supply (PS-201) to the last logger using the available end of
the Y-adaptor cable.
6.
Plug the power supply into an electrical outlet.
Copyright © 2010 ACR Systems Inc. All Rights Reserved.
Distributed by MicroDAQ.com, Ltd.
www.MicroDAQ.com
(603) 746-5524
103
1.20.4
SmartReader Plus Data Loggers
Shielded Network
The Shielded Network accommodates a maximum of ten loggers.
Figure G-3: Shielded SmartReader Plus Network
1.20.5
1.
Insert Y-adaptor cables (YA-200) into each logger on the network.
2.
Connect the IC-101 Interface Cable to the first logger.
3.
Connect all the loggers to each other, using shielded cable.
4.
Connect the Network Power Supply (PS-201) to the last logger using the available end of
the Y-adaptor cable.
5.
Plug the power supply into an electrical outlet.
Connection Problems and Solutions
Network communication can be affected by:
·
network cable length
·
type of network cable
·
number of loggers on network
·
interference from electrical equipment
·
lack of external power supply
If you have problems communicating with loggers on a network please try the following steps:
Copyright © 2010 ACR Systems Inc. All Rights Reserved.
Distributed by MicroDAQ.com, Ltd.
www.MicroDAQ.com
(603) 746-5524
SmartReader Plus Data Logger
104
1.
Slow the baud rate.
2.
Use the PS-201 Power Supply connected to the last logger on the network, or anywhere
along the line, wherever the lone voltage may sag below 4.5VDC.
3.
Reroute the cable (to avoid electrical interference).
4.
Use shielded cable.
Copyright © 2010 ACR Systems Inc. All Rights Reserved.
Distributed by MicroDAQ.com, Ltd.
www.MicroDAQ.com
(603) 746-5524
105
SmartReader Plus Data Loggers
Index
-S-
-A-
SmartReader Plus
Sample Rates 94
AC Current 91
Alarms 8
AC Voltage
Approvals 1
Transducer 33, 91
Calibration 8
Channel Alarms 21
-C-
Channel Calibration 21
Calibration 73
Channel Information 19
Connecting Multiple Loggers 100
Channels 8, 19
Count 62
Data Logger 1
Current 50
Description 1
Probe 33
-DData Logger 1
-EEH-020A 28, 38, 42, 73
ET Series
ET-004 Low Temperature Probe 79
ET-016 General Purpose Probe 79
ET-081 High Temperature Probe 79
ET-086 Oven Temperature Probe 79
Dialout 8
Fast 8
Fast Sampling 10
Features 1
Introduction 1
Logger 1
Logger Alarms 14
Logger Connection Settings 22
Memory 8, 11
Operation 1
Readings 1
Sampling 8, 10
-L-
Setup 8
Logger 1
Software 8
LPD
Specifications 1
Low Pressure Differential 42
Status 8, 9
Unknown Equation 19
-N-
SmartReader Plus 1 26
Network 100
SmartReader Plus 10 65
-PPressure
Sensor 38, 42
Process Signal 50
Pulse 62
SmartReader Plus 2 28
SmartReader Plus 3 33
SmartReader Plus 4 38
SmartReader Plus 4 LPD 42
SmartReader Plus 5 44
SmartReader Plus 6 47
-R-
SmartReader Plus 7 50
Resistance 71
SmartReader Plus 8 60
RH
SmartReader Plus 9 62
Probe 28, 38, 42, 73
SRP 1
Relative Humidity 28, 38, 42, 73
Switch 71
Relative Humidity Probe 28, 38, 42, 73
RH 73
Sensor 28, 38, 42
RTD
Resistance Temperature Detector 65
Contact 62
-TTemperature 44, 47
Probe 26, 28, 38, 42, 60, 65, 73, 79
Thermistor 26, 60, 73, 79
Copyright © 2010 ACR Systems Inc. All Rights Reserved.
Distributed by MicroDAQ.com, Ltd.
www.MicroDAQ.com
(603) 746-5524
Index
106
Thermocouple
E Type 44, 47
J Type 44, 47
K Type 44, 47
S Type 44, 47
T Type 44, 47
Transducer 50
Transmitter 50
-VVoltage 33, 50
Copyright © 2010 ACR Systems Inc. All Rights Reserved.
Distributed by MicroDAQ.com, Ltd.
www.MicroDAQ.com
(603) 746-5524
Distributed by MicroDAQ.com, Ltd.
www.MicroDAQ.com
(603) 746-5524
ACR Systems Inc.
Building 210 - 12960 84th Ave.
Surrey, British Columbia, Canada V3W 1K7
Telephone: (604) 591-1128
North American Toll Free: 1-800-663-7845
Fax: (604) 591-2252
General Enquiries Email: [email protected]
Sales Department Email: [email protected]
Customer Service Email: [email protected]
www.acrsystems.com
Distributed by MicroDAQ.com, Ltd.
www.MicroDAQ.com
(603) 746-5524