1
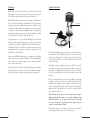
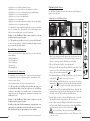
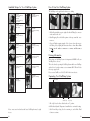
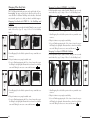
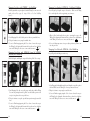
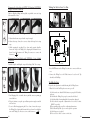
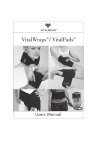
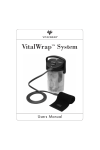
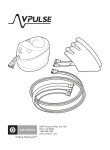
VitalWrap™ System Users Manual Thank you for purchasing our VitalWrap System. Dedicated to becoming the leader in durable medical equipment, VitalWear, Inc. develops and markets affordable thermal and compression therapy systems for use in accelerating the recovery of anyone who has experienced an injury and wants more control in their personal treatment. Please read this instruction manual completely prior to using the unit to ensure reliable and safe operation. VitalWrap System Introduction 2 VitalWrap System Specifications 3 Warranty 4 System Operation 5 Notes, Cautions And Warnings 6 Safety Symbols And Warnings 6 Unpackaging Information 8 Indications & Contraindications 8 Operating Instructions 11 Available VitalWraps for Your System 12 How To Use Your VitalWrap System 13 Wrapping Other Body Parts 14 Tubing Set Instructions for Use 19 Troubleshooting 19 Cleaning The Control Unit 21 Cleaning The Wrap 21 Storage 22 Notes 23 1 VitalWrap System Introduction VitalWrap System Specifications A significant number of Americans suffer from some type of persistent or recurrent acute pain sufficient to significantly impact their lives. The VitalWear VitalWrap System is a patented technology that applies a unique combination of cooling, heating and compression to the human body, providing a range of key benefits: Physical • Combination of compression, heating, moist heat, and/or cooling therapy to the affected body part at any desired temperature between 40ºF and 105ºF, Thermal System • Compression via a proprietary VitalWrap providing for greater fluid management in the injured area, • Continuous thermal therapy to minimize tissue damage and scarring, to reduce pain and discomfort, and to reduce dependency on pain medication, • Variable and rapidly changeable temperature control allows for extended application minimizing the risk of skin/nerve damage and for uniquely beneficial treatments such as Contrast Therapy, • Safe and effective for both the professional practitioner and individual user, • A portable injury therapy system that is affordable, easy to use at a clinic, home or at work, • Universal personal wraps convenient, familiar, and easy to apply to the body, conforming comfortably to the major joints and muscles, Size (approximately) Weight (dry) Single Tubing Set Control System Type Range Contrast therapy transition time Operating period Thermal Cutout Circulating System Reservoir Capacity Reservoir Fluid Flow Rate (through VitalWrap) Maximum Pressure Electrical System Voltage Internally fused Leakage Current Operating Environment Atmospheric Pressure Humidity Temperature 8”diameter x 13.5”H (20.3cm x 34.3cm) 5 lbs. (2.27 kg) 10.5 ft. (3.2m) Manual user control 40°F to 105°F (4.4°C to 40.6°C) 1 minute typical from extremes in temperature range 2-6 hours typical continuous use 45°C 1.1 gallons (4.1 liters) Ice water 5.5 gph (21 lph) 18 psi 120Vac, 60Hz, model VIT-00002 or 220-240Vac, 50Hz, model VIT-00123 120 Vac, 60Hz, 300W F1, F2: 125V, 4A F3: 125V, 300mA 220-240Vac, 50Hz, 3.15A F1, F2: 250V, 2.5A F3: 250V, 300mA Under 300µA Transport & Storage Environment Applications for the VitalWrap System: Regulator y Orthopedics and Obstetrics General Procedures Type of Equipment Chiropractics Chronic Joint Pain Regulator y Approvals Compliance Physical Therapy Emergency Medicine Plastic and Reconstructive Procedures Arthritis Sports Medicine/ Athletics Pregnant Women and New Mothers Designed to help reduce pain and swelling, the VitalWrap cooling, heating and compression therapy system can be used from the earliest stages of post-operative recovery, through rehabilitation, to postrecovery home use for treatment of pain and residual swelling. 2 Classification 525 to 795 mmHg 30% to 70% relative non-condensing 10°C to 40°C • Applications cover treatment of chronic pain or injury of back, knee, hip, foot and ankle, hand and wrist, shoulder, elbow, chest, breast, face and jaw, head, neck, and other specific applications. Atmospheric Pressure Humidity Temperature 179 to 760 mmHg 10% to 95% 0°C and +50°C Class I Equipment Type BF UL2601-1: Standard for Medical Equipment Part 1: General Requirements for Safety. CAN/CSA-C22.2 no. 601.1-M90: Medical Electrical Equipment Part 1: General Requirements for Medical Electrical Equipment. IEC 60601-1: Part 1: General Requirements for Safety. The Thermal Wrap System, Model VIT-00002 has also been evaluated to and found to meet the requirements of Clause 42, found in IEC 60601-2-35, Medical Electrical Devices, Particular requirements for the safety of blankets, pads and mattresses, intended for heating in medical use. VITALWEAR™ and VITALWRAP™ are registered trademarks of VitalWear, Inc. Covered by US Patents: 7,211,104 & 7,191,798 3 Warranty System Operation VitalWear, Inc. guarantees this product free from defects in material and workmanship for a period of 1 year from the date of purchase except as noted below. This warranty extends only to the original retail purchaser. This VitalWear product warranty does not cover damage caused by misuse or abuse; accident; the attachment of any unauthorized accessory; alteration to the product; or any other conditions whatsoever that are beyond the control of VitalWear. VitalWear shall not be responsible for any type of incidental, consequential or special damages. All implied warranties, including but not limited to those implied warranties of fitness and merchantability, are limited in total duration of 1 year from the original purchase date. To obtain warranty service on your VitalWear VitalWrap System, either hand deliver or mail the unit and your dated sales receipt (as proof of purchase) to VitalWear, Inc. (384 Oyster Point Blvd., Suite 16, South San Francisco, CA 94080-6523). Be sure to include the serial number of your unit and your phone number on any correspondence. If you have any questions, please call VitalWear Inc. at 1-800-553-4081. Upon receipt, VitalWear will repair or replace, as appropriate, your VitalWrap System and return it to you, postpaid. Warranty is solely through VitalWear Service Center. Service of this product by anyone other than VitalWear Service Center voids warranty. This warranty provides you with specific legal rights. You may have additional rights, which may vary from state to state. Because of individual state regulations, some of the above limitations and exclusions may not apply to you. control unit thermal wrap tubing set The VitalWear VitalWrap System is comprised of a control unit, a tubing set and a thermal wrap. This VitalWrap is the part of the system that you actually apply to the body to provide cooling and compression therapy. The wrap can be applied to virtually any area of the body that can be treated with a compressive bandage. Setting up the system is a simple three-step process. (1) The user first fills the portable, leak-proof container of the control unit with ice and water, (2) then applies the VitalWrap around the injured area and secures it with its Velcro™ closure, and (3) finally, attaches the control unit to the wrap via the tubing set. Once the control unit is turned on, cooled or warmed fluid is passed through the tubing set from the control unit to the wrap. The fluid is then circulated through the wrap, drawing heat from or applying to the body and deeply cooling or heating the body part. The fluid is then passed back through the tubing set to the control unit where it is re-cooled or re-warmed and then re-circulated back to the wrap. When using this system, please check the skin where the wrap is applied periodically. Discontinue use if continued numbness, skin discoloration, blisters, etc. are present. Please refer to your health care professional prior to applying this system and/or using the system for extended periods of time. The benefit of compression can continue even if the user chooses to disconnect the tubing set from either the control unit or the wrap. 4 5 Notes, Cautions And Warnings Periodically check skin where wrap is applied for skin discoloration, numbness, blisters, etc., which can indicate a potential burn. If detected, discontinue use and consult a physician. Notes, cautions and warnings are used to highlight certain operating procedures and recommendations. A Note indicates a special procedure, an exception to normal operation or something else of specific interest to the reader. Notes are preceded by the word “Note” in italics. Close supervision is necessary when this appliance is used by, on, or near children, invalids, or disabled persons. This appliance should not be used by or on children without parental supervision. The Caution or Warning symbol precedes an operational step that could damage the instrument if the user does not take certain precautions. Cautions or Warnings are located in the main text, are preceded by a Caution or Warning statement and are accompanied by this symbol in the left margin. Use this appliance only for its intended use as described in this manual. DO NOT use attachments not recommended by the manufacturer. Never operate this appliance if it has a damaged cord or plug, if it is not working properly, if it has been dropped or damaged, or dropped into water. Caution: risk of electric shock. Important Safety Instructions Read all instructions before using. This equipment has been tested and found to comply with the limits for medical devices to the IEC 60601-1. Follow local governing ordinances and recycling plans regarding disposal or recycling of device components. Grounding reliability can only be achieved when the equipment is connected to an equivalent receptacle marked ‘hospital only’ or ‘hospital grade’. When using an electrical appliance, especially when children are present, basic safety precautions should always be followed. Safety Symbols And Warnings DANGER –To reduce the risk of electric shock: 1. Always unplug this appliance from the electrical outlet immediately after using and before cleaning. 2. DO NOT use while bathing or in a shower. 3. DO NOT place or store appliance where it can fall or be pulled into a tub or sink. DO NOT place in or drop into water or other liquid. 4. DO NOT reach for a product that has fallen into water. Unplug immediately. An appliance should never be left unattended when plugged in. Unplug from outlet when not in use, and before putting on or taking off parts. 6 ~ Type BF Applied part complying with IEC 60601-1 and UL 60601-1 to provide protection against electric shock. Alternating current. “ON” (power: connection to the mains). “OFF” (power: disconnection to the mains). 1. Ensure the top of the appliance is properly installed and the handle is fully engaged prior to carrying the appliance. 2. DO NOT carry this appliance by supply cord or use cord as a handle. 3. Keep the cord away from heated surfaces. 4. Never operate the appliance without the Fluid Canister, the Top Assembly, the Tubing Set, and the Wrap completely connected. 5. Never operate the appliance with any foreign objects in the Fluid Canister. 6. Never drop or insert any object into any opening. 7. To disconnect, turn off power (“O” position), then remove plug from outlet. 8. Use cooling surfaces carefully. Do not use over insensitive skin areas or in the presence of poor circulation. The unattended use of cooling by children or incapacitated persons may be dangerous. Consult your physician. 9. DO NOT stand on or in the appliance. 10. Do not use while sleeping or drowsy. 11. Do not place the appliance or operate the appliance while it is on a surface more than 3 feet above the floor. 12. Unplug this product before filling. Fill with water and ice only. Do not overfill. 13. Do not operate without water. 14. Do not operate with hot water. 7 15. Do not place the Tubing Set, Power cord or use any wrap other than the Cervical (neck) wrap around the neck. 16. Do not cast over wrap. Casting over the VitalWrap & Tubeset may restrict necessary air circulation and it’s proper operation. 17. VitalWear products do not contain natural rubber latex, nor is natural rubber latex added as part of the production process. VitalWear does not have an authorized service center. However, if this appliance is still under warranty, return it to the VitalWear Consumer Service Department at 1.800.553.4081 in U.S. or 650.553.4100. Please refer to VitalWear for proper disposable of this product Unpackaging Information Your VitalWrap System is 100% Quality Tested. When unpackaging your new system: • it is normal to find moisture in the VitalWrap fluid canister due to Quality Testing, and Please ensure the Dip Tube caps are removed prior to operating your new VitalWrap System. You may find fluid in the Dip Tube caps due to Quality Testing. Remove Dip Tube Caps During some air freight shipments in pressurized containers, the VitalWrap System may develop a vacuum between the top and fluid canister due to the anti-spill seal. If this does occur, insert a flat, blunt object such as a large paper clip between the top and fluid canister to overcome the seal. Please contact VitalWear at 1.800.553.4081 in U.S. or 650.553.4100 if this is not effective. Indications and Contraindications General Indications for Cold Therapy There are general indications for using cold therapy across the body and in various situations: 8 • First aid after trauma, • Relief of pain, • Fever reduction, • Control of bleeding, • Prevention or reduction of swelling of traumatic origin, • Prevention or reduction of inflammation, • Decrease of muscle guarding and spasm, • Temporary reduction of spasticity. Cold is preferred during treatment of acute injury, sub-acute injury where swelling persists, and acute stages of inflammation. General Indications for Heat Therapy There are general indications for using heat therapy across the body and in various situations: • Pain relief, • Reduction of muscle spasm, • Increase of local blood flow, • Facilitate tissue healing, • Prepare stiff joints and muscle for exercise. Contraindications for Cold Therapy Users should be aware of situations where cold therapy may not be appropriate, detrimental to a specific condition or otherwise contraindicated for use: • Users with specific cold sensitivity symptoms such as: — Cold uticaria, — Cryoglobulinemia, — Raynaud’s syndrome, — Proximal cold hemoglobinuria, — Vasospastic disease, — Cold hypersensitivity, — Compromised local circulation. Users should take caution in applying cold therapy over open sores and abrasions. At a minimum these areas should be cleaned and bandaged. Casting over the VitalWrap & Tubeset may restrict necessary air circulation and it’s proper operation. When using this system, please check the skin where the wrap is applied periodically. Discontinue use if continued numbness, skin discoloration, blisters, etc. are present. Please refer to your health care professional prior to applying this system and/or using the system for extended periods of time. Contraindications for Heat Therapy Users should be aware of situations where heat therapy may not be appropriate, detrimental to a specific condition or otherwise contraindicated for use: 9 • Application over area that lack thermal sensation, • Application over areas affected by vascular insufficiency or disease, • Application over areas of recent hemorrhage or potential hemorrhage, • Application over areas of known malignancy, • Application over areas of acute inflammation, • Application over areas of infection, • Application over areas where liniments or heat rubs have been recently applied, • Application over areas of significant swelling. Operating Instructions Use VitalWear’s VitalWrap System for relief from pain and swelling due to injury or aches and pains. Setting Up Your VitalWrap System Users should take caution in applying heat therapy over open sores and abrasions. At a minimum these areas should be cleaned and bandaged. Areas subject to infection should not be exposed to heat therapy. Casting over the VitalWrap & Tubeset may restrict necessary air circulation and it’s proper operation. 1 2 3 4 5 6 Note: Thermal therapy should not be used for persons with Raynaud’s or other vasospastic disease, cold hypersensitivity, heat hypersensitivity or compromised local circulation. General Indications for Compression There are general indications for using compression across the body and in various situations: • Edema/lymphedema, • Venous insufficiency, • Post sclerotherapy, • Venous ulcers, • Thrombophlebitis. 1. Open it Up: Rotate the handle down to unlock and remove the Top Assembly. Take it Off: Remove the Top Assembly and place it down carefully on a counter top so that the Fluid Canister can be filled. 2. Take it off: Remove the Dip Tube caps on the dip tubes. Contraindications for Compression 3. Fill it Up: For Cold and Contrast Therapy, fill Fluid Canister with ice and water to a level above the line marked minimum fill ( ), but do not fill above the line marked maximum fill ( ). Users should be aware of situations where compression may not be appropriate, detrimental to a specific condition or otherwise contraindicated for use: 4. For Maximum Duration of Cold Therapy: Fill with ice to the line marked maximum fill ( ) and then water to the same line. • Arterial occlusive disease, • Any circumstance where increased venous return is desired. 5. For Heat Therapy Only: Fill with water to a level above the line marked minimum fill ( ) but do not fill above the line marked maximum fill ( ). You do not need to put ice in the fluid canister for heat therapy. Note: When operating, the VitalWrap will apply additional compression as the fluid bladder inflates. Adjust the compression of your VitalWrap so that it is comfortable. Users should be aware of situations where compression may not be appropriate, detrimental or otherwise contraindicated for use. Casting over the VitalWrap & Tubeset may restrict necessary air circulation and it’s proper operation. Consult your physician. Not all treatments are appropriate in every patient, and you should have a discussion with your doctor to determine which treatments are appropriate for your condition. 10 Referenced: “Thermal Agents in Rehabilitation” 3rd ed. Susan L. Michlovitz. 6. Cover it Up: Place the Top Assembly on the Fluid Canister. Rotate the Top Assembly so that it aligns and sits in the Fluid Canister notch. Then, raise the Handle to lock the Top Assembly onto the Fluid Canister. 7. Plug In: Plug the electrical cord into the DC Appliance Jack located on the Top Assembly and connect the appliance to the electrical source. 8. Connect Them: Connect the Tubing Set to the Fluid Connector located on the Top Assembly. Align the Orientation Dots as shown. Press BOTH buttons on the tubeset connector to connect & disconnect ( ). 9. Power it Up & Prime: Turn on the unit and prime the wrap for a minimum of 3min on maximum cold before each use. Then you are ready to use your system. 11 ON OFF . Available Wraps for Your VitalWrap System How To Use Your VitalWrap System The VitalWrap can be applied on the skin or over clothing. VIT-00001 Assembly, VitalWrap, 6x60” width VIT-00118 Assembly, VitalWrap, 8x72” width VIT-00255 Assembly, VitalWrap, 4x48” width VIT-00397 Assembly, VitalWrap, Medium Knee VIT-00398 Assembly, VitalWrap, Ankle VIT-00388 Assembly, VitalWrap, Back 1 2 3 1. Roll it: Begin with the wrap in a tight roll, with the Tubing Set connector on the outside of the roll. 2. Start Wrapping: Place the bladder portion of the wrap around the treatment area. 3. Secure it: Finish wrapping using the Velcro closure. Connect the wrap to the Tubing Set by aligning the Orientation Dots as shown. Press both buttons on the tubeset connector to connect and disconnect ( ). VIT-00119 Assembly, VitalWrap, Shoulder VIT-00394 Assembly, VitalWrap, Wrist VIT-00122 Assembly, VitalWrap, Cervical VIT-00395 Assembly, VitalWrap, Large Shoulder Priming Information VIT-00392 Assembly, VitalWrap, Large Knee VIT-00396 Assembly, VitalWrap, Dual Hand This can be done by operating the VitalWrap System with the new VitalWrap attached for at least three minutes set to maximum COLD. This will allow the wrap to properly fill. When using your VitalWrap System it is important to PRIME or fill your VitalWrap before each use. Please contact VitalWear at 1.800.553.4081 if this is not effective. VIT-00094 Carrying Bag VIT-00648 Assembly, VitalWrap, Hip Operating Your VitalWrap System on/off switch 1 2 105˚f (small dots) 40˚f (big dots) 3 1. Fire it Up: Press the Power Switch to the on “I” position. 2. Chill it Out: Adjust the Temperature Control Knob to a comfortable setting. Please contact us to find out about the latest VitalWraps that may be right for you. 12 3. Refill it and Keep Going: Save the remaining ice and refill the Fluid Canister to continue. 13 Wrapping Other Body Parts Wrapping Your Hip with VIT00001 – 6in VitalWrap The 6” VitalWrap included with your system can be applied to the calf, knee, hamstring/thigh, hip, upper and lower back, abdomen, and chest. Please contact VitalWear for additional VitalWraps for the shoulder, elbow, hand/ wrist, foot/ankle, sports bra, face, head, jaw and neck and athletic support. Roll it: Begin with the wrap in a tight roll, with the Tubing Set connector on the outside of the roll (see page 13, image 1-“How to Use Your VitalWrap System”). Wrapping Your Back with VIT00118 – 8in VitalWrap and VIT00388 Roll it: Begin with the wrap in a tight roll, with the Tubing Set connector on the outside of the roll (see page 13, image 1-“How to Use Your VitalWrap System”). 1 2 3 1. Start Wrapping: Place the bladder portion of the wrap around the treatment area. 2. Wrap it: Continue to wrap snugly around the hip. 1 2 3 1. Start Wrapping: Place the bladder portion of the wrap around the treatment area. 2. Wrap it: Continue to wrap snugly around the waist. 3. Secure it: Finish wrapping using the Velcro closure. Connect the wrap to the Tubing Set by aligning the Orientation Dots as shown. Press both buttons on the Tubing Set connector to connect and disconnect ( ). Wrapping Your Hip with VIT00648 VitalWrap Roll it: Begin with the wrap in a tight roll, with the Tubing Set connector on the outside of the roll (see page 13, image 1-“How to Use Your VitalWrap System”). 3. Secure it: Finish wrapping using the Velcro closure. Connect the wrap to the Tubing Set by aligning the Orientation Dots as shown. Press both buttons on the Tubing Set connector to connect and disconnect ( ). 1 2 3 1 2 3 1. Start Wrapping: Place the bladder portion of the wrap around the treatment area. 1. Start Wrapping: Place the bladder portion of the wrap around the treatment area. 2. Wrap it: Continue to wrap snugly around the waist. 2. Wrap it: Continue to wrap snugly around the hip. 3. Secure it: Finish wrapping using the Velcro closure. Connect the wrap to the Tubing Set by aligning the Orientation Dots as shown. Press both buttons on the Tubing Set connector to connect and disconnect ( ). 3. Secure it: Finish wrapping using the Velcro closure. Connect the wrap to the Tubing Set by aligning the Orientation Dots as shown. Press both buttons on the Tubing Set connector to connect and disconnect ( ). 14 15 Wrapping Your Knee with VIT00001 – 6in VitalWrap Wrapping Your Hand with VIT00396 – Dual Hand VitalWrap Roll it: Begin with the wrap in a tight roll, with the Tubing Set connector on the outside of the roll (see page 13, image 1-“How to Use Your VitalWrap System”). Place it: Begin by placing the wrap on a flat surface. Make sure the Tubing Set is on the right side of the wrap pointing away from user. 1 1 2 3 1. Start Wrapping: Place the bladder portion of the wrap around the knee. 2. Wrap it: Continue to wrap snugly around the knee. 2 1. Wrap it: Place hands inside the wrap after connecting the wrap to the Tubing Set by aligning the Orientation Dots as shown. Press both buttons on the Tubing Set connector to connect and disconnect ( ). 3. Secure it: Finish wrapping using the Velcro closure. Connect the wrap to the Tubing Set by aligning the Orientation Dots as shown. Press both buttons on the Tubing Set connector to connect and disconnect ( ). 2. Secure it: Adjust temperature of wrap or adjust positions to optimize comfort and pain relief. Wrapping Your Knee with VIT00392 (Large) & VIT00397 (Medium) Knee VitalWrap Loop it: Begin by unfolding your wrist wrap. Wrapping Your Wrist with VIT00394 – Wrist VitalWrap Unfold it: Begin by unfolding the wrap and detaching all the Velcro straps. 1 1 2 3 1. Start Wrapping: Place the center of the wrap onto the knee with the Tubing Set connector pointing down the leg. Make sure the bladder portion of the wrap is facing down and is on top of the knee. 2. Wrap it: Continue to wrap the top and bottom portion snugly around the knee. 2 3 1. Start Wrapping: Put thumb through loop and hang the wrap off the palm of the hand. Make sure the Tubing Set connector points towards user. 2. Wrap it: Continue to wrap snugly around the wrist. 3. Secure it: Finish wrapping using the Velcro closure. Connect the wrap to the Tubing Set by aligning the Orientation Dots as shown. Press both buttons on the Tubing Set connector to connect and disconnect ( ). 3. Secure it: Finish wrapping using the Velcro closure. Connect the wrap to the Tubing Set by aligning the Orientation Dots as shown. Press both buttons on the Tubing Set connector to connect and disconnect ( ). 16 17 Wrapping Your Shoulder with VIT00119 (Medium) & VIT00395 (Large) Shoulder VitalWrap Tubing Set Instructions for Use Slip it on: Begin by sliding arm through the wrap with the connector facing down towards the elbow. 1 2 *ÀiÃÃÊLÕÌÌÃÊÌÊ>ÌV ÊEÊÕ>ÌV 1 2 3 1. Adjust the underarm strap so that the wrap fits snugly. 2. Adjust chest strap. It may be necessary to adjust back strap before using wrap. 3. Finish wrapping by attaching Velcro closure under opposite shoulder. Connect the wrap to the Tubing Set by aligning the Orientation Dots as shown. Press both buttons on the Tubing Set connector to connect and disconnect ( ). Wrapping Your Foot/Ankle with VIT00398 – Foot & Ankle VitalWrap Unfold it: Begin by unfolding the wrap and detaching all the Velcro straps. ÊÌÊLi`ÊÌÊÕ>ÌV 1. Press BOTH buttons on the Tubing Set connector to connect and disconnect. 2. Connect the Tubing Set to the Fluid Connector located on the Top Assembly and VitalWrap. Troubleshooting Frequently asked questions in troubleshooting the VitalWrap System. 1. What do I do if the VitalWrap does not seem to get cold? 1 2 3 1. Start Wrapping: Place foot inside the wrap with the connector pointing up towards the knee. 2. Wrap it: Continue to wrap the top and bottom portion snugly around the ankle and foot. 3. Secure it: Finish wrapping using the Velcro closure. Connect the wrap to the Tubing Set by aligning the Orientation Dots as shown. Press both buttons on the Tubing Set connector to connect and disconnect ( ). 18 A) Check to make sure that the Fluid Canister was properly filled with ice and water. B) Check that the Tubing Set is properly connected and latched. C) Check that fluid is flowing through the System and not obstructed. D) Check that the temperature adjustment knob is set fully clockwise (BLUE largest dot). E) Repeat priming of the wrap. Refer to Operating Instructions. F) Check that the Dip Tube caps are removed prior to operation. G) Check that power is applied. H) Refer to Service if these actions are ineffective. 19 Cleaning the Control Unit 2. What do I do if the Tubing Set does not connect to the VitalWrap or control unit? A) Check to make sure that the indictor dots are aligned. B) Check to make sure no foreign objects block the fluid connector. C) Refer to Service if these actions are ineffective. 3. What do I do if the system does not turn on? A) Check power connection. B) Check that the Tubing Set is properly connected and latched. C) Check that fluid is flowing through the System and not obstructed. D) Wait 20 minutes and cycle power. E) Refer to Service if these actions are ineffective. 4. What do I do if the system is not pumping any fluid through the wrap? A) Make sure power is ON. B) Unit Procedures: a) Unplug tubing set from unit. b) Locate a small blunt tool (such as paper clip, end of a pen, or a pen cap). c) Use small blunt tool to depress left connector for 30 to 60 seconds. Pumping should commence. 2. Fill the empty Fluid Canister to the MAX fill line with fresh, room temperature water. 3. Replace top assembly, electrical cord, and raise handle to lock. 4. Turn system ON for 10 minutes with setting on maximum COLD. 5. Empty canister and follow directions under “Storage” on page 22. 6. Repeat these actions periodically. Cleaning the Wrap The VitalWrap can be washed in a conventional laundry machine.* Notice the following cleaning instructions on the VitalWrap. 30° Machine Wash Cold Do Not Iron Delicate/Gentle Cycle Do Not Dry Clean Do Not Bleach Do Not Wring Line Dry In Shade *VitalWear recommends a maximum of three machine washes per VitalWrap. D) Wrap Procedures: a) Use a small blunt tool to depress left connector of wrap with dot facing up for 30 to 60 seconds. b) Reconnect tubing set to unit and wrap. Pumping should resume. 2a 20 1. Remove electrical cord, fold down handle, and remove top assembly. C) Tubing Set Procedures: a) Unplug tubing set from unit and wrap by depressing tabs on top and bottom of connector. b) With dot facing up, depress left connector with small blunt tool for 30 to 60 seconds. c) Repeat on opposite end. To clean your VitalWear System, please follow these simple steps: 2 b, 2c 3 b, 3 c 4a Users should not use cleaning or decontamination methods different from those recommended by the manufacturer without first checking with the manufacturer that the proposed methods will not damage the equipment. 4b 21 Storage 1. Turn it Off: Switch the appliance off and remove the electrical cord from the power source and from the Appliance Inlet. 2. Keep Dry: DO NOT immerse the appliance in water. 3. Coil It: Wrap and secure the electrical cord. 4. Disconnect It, Part 1: Disconnect the Tubing Set from the control unit. 5. Open It Up: Remove the top assembly and gently lay it on its side. 6. Pour it Out: Hold the Fluid Canister by the handle with one hand and underneath with the other hand. Pour the water and any remaining ice out of the Fluid Canister from the opposing lip from the ice strainer. 7. Dry it Out: Simply dry the dip tubes with a soft absorbent cloth. 8. Disconnect It, Part 2: Remove the Tubing Set from the wrap. 9. Lock it Up: Wrap and secure the Tubing Set. 10. Roll it Up: Dry and then roll or fold the wrap for storage. 11. Last Step: Store wrap in the canister or with the system in the carrying bag. Care and Maintenance of Your VitalWrap System (Or Things You Must Remember!!!) • YOU MUST Place the VitalWrap Unit in a safe, cool and dry place when not in use. • YOU MUST wipe with a soft, damp cloth. DO NOT use abrasive cleaner. AND NEVER submerge the unit in any liquid. Keep away from all solvents and harsh detergents. • DO NOT attempt to repair this VitalWrap Unit. There are no user-serviceable parts. • To store YOU MUST always disconnect the electrical cord, the Tubing Set from the top assembly and the wrap when not in use. 22 Velcro™ is a registered trademark of Velcro Industries B.V. Photographs ©Bang 2006 and ©JohnKraus 2004 Notes: ______________________________________________________ ____________________________________________________________ ____________________________________________________________ ____________________________________________________________ ____________________________________________________________ ____________________________________________________________ ____________________________________________________________ ____________________________________________________________ ____________________________________________________________ ____________________________________________________________ ____________________________________________________________ ____________________________________________________________ ____________________________________________________________ ____________________________________________________________ ____________________________________________________________ ____________________________________________________________ ____________________________________________________________ ____________________________________________________________ ____________________________________________________________ ____________________________________________________________ ____________________________________________________________ ____________________________________________________________ ____________________________________________________________ ____________________________________________________________ ____________________________________________________________ ____________________________________________________________ ____________________________________________________________ ____________________________________________________________ ____________________________________________________________ ____________________________________________________________ ____________________________________________________________ ____________________________________________________________ ____________________________________________________________ ____________________________________________________________ ____________________________________________________________ ____________________________________________________________ ____________________________________________________________ ____________________________________________________________ ____________________________________________________________ ____________________________________________________________ ____________________________________________________________ ____________________________________________________________ 23 Notes: ______________________________________________________ ____________________________________________________________ ____________________________________________________________ ____________________________________________________________ ____________________________________________________________ ____________________________________________________________ ____________________________________________________________ ____________________________________________________________ ____________________________________________________________ ____________________________________________________________ ____________________________________________________________ ____________________________________________________________ ____________________________________________________________ ____________________________________________________________ ____________________________________________________________ ____________________________________________________________ ____________________________________________________________ ____________________________________________________________ ____________________________________________________________ ____________________________________________________________ ____________________________________________________________ ____________________________________________________________ ____________________________________________________________ ____________________________________________________________ ____________________________________________________________ ____________________________________________________________ ____________________________________________________________ ____________________________________________________________ ____________________________________________________________ ____________________________________________________________ ____________________________________________________________ ____________________________________________________________ ____________________________________________________________ ____________________________________________________________ ____________________________________________________________ ____________________________________________________________ ____________________________________________________________ ____________________________________________________________ ____________________________________________________________ ____________________________________________________________ ____________________________________________________________ ____________________________________________________________ 24 25 Put a Wrap on Pain SM VitalWear, Inc. 384 Oyster Point Blvd. Suite 16 South San Francisco, CA 94080-1968 www.vitalwear.com 1.800.553.4081 in U.S. or 650.553.4100 Part number: 00033 Rev J