1
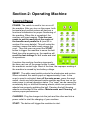
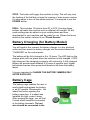
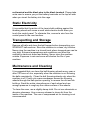
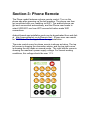
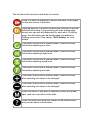
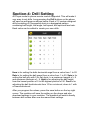
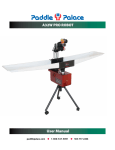
SPINSHOT player
USER MANUAL
Section-1: Before Using Machine
Introduction
Thank you for purchasing a SPINSHOT tennis ball machine. This
manual contains important information concerning the proper use and
care of your ball machine. Please read your owner’s manual
completely before operating your machine.
Tennis Balls To Be Used
Please take note that brand new tennis balls are not recommended to
be used especially during first ten hours of break-in period. The ink
and waxy coating on brand new tennis balls can leave a slick coating
on the new ball throwing wheels, resulting in inconsistent ball throws.
It is best to use balls that are slightly used to reduce the potential for
developing the slick coating on the wheels.
The consistency of ball throws will depend on the consistency of the
tennis balls being used. A mixture of new and old balls will produce
inconsistent throws. Inconsistent ball throws may also be caused by
excess dirt and ink build up on throwing wheels. Cleaning the ball
throwing wheels as described in the section “Maintenance and
Cleaning” will restore consistent performance.
Important Warnings
WARNING: Do not reach or look into the ball exit hole without turning
the main power off and only after both wheels come to a complete
stop.
WARNING: Do not stand closer than 10 meters in front of the ball
machine when the power is on.
WARNING: Do not place balls or foreign objects into the ball hopper
while the power is on. It could cause a jam and damage the feeder
motor.
WARNING: The overloading of balls into the ball hopper may result in
the feeder becoming jammed. It is suggested that no more than 120
balls be put inside the ball hopper.
WARNING: Do not use machine while it is raining or in water. Do not
use wet tennis balls.
Section-2: Operating Machine
Control Panel
POWER: The switch is used to turn on or off
the machine. After you turn on the power, both
horizontal and vertical motors will perform a
functional initialization for proper functioning of
the machine. When this is completed, the
machine will keep beeping. Then the user
needs to put the machine at the centre of
the baseline and parallel to it (see Q3 in
section-6 for more details). This will make the
machine, sweep the balls evenly across the
court. Then the user can press the START
button to trigger the machine to serve the ball.
Each time after powering up, the machine will
recall the last settings for drill mode and start
its operations.
If anytime the machine functions improperly,
the user can turn off the power button to reset
the machine’s control logic. Most of the time, the improper working of
the machine is caused by low battery voltage.
RESET: The white reset switch protects the electronics and motors.
When activated, this switch pops out approximately 6 mm. In the
event a reset is activated, turn off the main power, press the reset
switch, check any balls jammed inside machine and then turn on the
main power to normal operation status. The “reset” can be caused by
excessively dirty or slick ball throwing wheels, which can prevent the
wheels from properly grabbing the ball. Cleaning the ball throwing
wheels as described in the section “Maintenance and Cleaning” will
restore proper performance.
CHARGER: Plug the charger into the jack and the other end into a
power outlet to start the charging of your machine.
START: The button will trigger the machine to start.
STOP: The button will trigger the machine to stop. This will only stop
the feeding of the ball but not stop the running of main service motors.
If a user wants to turn off the whole machine, it is required to use the
POWER button.
DRILL: This includes 12 buttons from D1 to D12. Pressing these
buttons will make the machine work in different drill modes. All drill
mode settings can be edited on your mobile phone and then
downloaded to your machine and be ready for use. Please find more
details in the section referred to as “Phone Remote”
Battery Charging (for Battery Model)
You will need to first connect the battery charger to a live electrical
outlet and then insert the battery charger into the socket labeled as
“CHARGER” on the control panel.
The battery will be fully charged in 8 to 15 hours. The LED light on the
charger pack will turn green when the machine is fully charged. If LED
light stays red, the charging process is still continuing. A fully charged
battery will provide approximately 2-3 hours of practice time. Higher
ball speed requires more power and therefore will drain the battery
faster.
It is very important to CHARGE THE BATTERY IMMEDIATELY
AFTER EACH USE.
Battery Cage
The battery cage enables the user to
easily install and replace the battery
or an AC module. Disassemble the
wheel first before opening the
battery cage door. If a wheel was
installed too tight, screw it down.
After opening the cage, you will find
2 wires which should be connected
to the battery terminals. The red
wire should be connected to the
red terminal and the black wire to the black terminal. Please take
extra care to ensure you put the battery terminals on the top left side
when you insert the battery into the cage.
Static Electricity
It is possible that the action of the tennis balls rubbing against the
throwing wheels will cause a small static electric shock when you
touch the control panel. To eliminate this, connect a wire from the
control panel to the court surface.
Transporting and Storage
Remove all balls and close the ball hopper before transporting your
SPINSHOT ball machine. Store the machine in a clean, dry location.
Never store the machine in a closed trunk where temperatures can be
very high. Extreme temperatures and conditions can affect the
machine’s electronic board and battery. Never store the machine
outside. Exposure to rain and snow will shorten the life of your
machine.
Maintenance and Cleaning
It is suggested that you clean the ball throwing wheels every year or
after 150 hours of use, especially when the machine is not throwing
the balls consistently. Clean the ball throwing wheels only when the
machine is off. Firmly rub coarse sandpaper across the throwing
wheels through the ball ejection opening, to remove the dirt and ink
build-up. Sand the entire circumference of each wheel and use
enough pressure to rough-up the rubber surface of the wheels.
To clean the case, use a slightly damp cloth. Do not use chemicals or
abrasive cleansers. Use a vacuum cleaner to clean dirt from the
inside of the machine. The use of compressed air for cleaning is not
recommended.
Section-3: Phone Remote
The Player model features a phone remote control. Turn on the
phone app after powering up the ball machine. The phone can then
get connected with your machine via WIFI. The android phone can
get such connection automatically, and the iPhone user needs to
select USR-WIFI-xxx from WIFI access list before make WIFI
connections.
Android based app installation code can be downloaded from web link
at http://www.spinshot.co.uk/Remote.html . iPhone user can search
for "Drill Maker" in the Apple Store for app installation.
The main control menu for phone remote is shown as below. The top
left corner is showing the connection status, and the top right corner
is showing the drill mode or manual mode. The right bottom corner is
showing the machine’s power supply voltage. For normal working
conditions, this voltage should be over 11 V.
The list below will introduce each button’s function.
Press it to start the machine to service the balls. Press again
to stop the service of the balls.
Pressing different D buttons will allow the machine to provide
different drill modes. Long pressing will enter setting page
where user can edit all parameters for each shot. In setting
page, the drill setting can be downloaded to machine by
clicking save button. See section “Drill Setting” for more
details.
This button is effective in manual mode. Press this button
first before adjusting spin level.
This button is effective in manual mode. Press this button
first before adjusting height level.
This button is effective in manual mode. Press this button
first before adjusting speed level.
This button is effective in manual mode. Press this button
first before adjusting feed rate.
This button is effective in manual mode. Press this button
after selecting the values to be changed.
This button is effective in manual mode. Press this button
after selecting the values to be changed.
Press this button if you want to manually control the speed,
spin, feed rate or position of the balls
Press this button will show the version of the machine and
also provide button introductions
Section-4: Drill Setting
All Player model is phone remote control supported. This will make it
very easy to set drills. Long pressing the Drill buttons on the phone
will open an edit page as shown below. Each of 12 custom designed
drills consisting of 6 sequential shots in a designated pattern
combining ball height, ball angle, ball speed, ball spin and feed rate.
Each value can be edited to create your own drills.
Horz is for setting the balls horizontal angel from a value from 1 to 20.
Rate is for setting the ball speed from a value from 1 to 20. Spin is for
setting the ball spin with 0 for flat shots, to a maximum topspin of + 9
and maximum backspin of - 9. Hght is for adjusting the ball height
from the lowest position of 0 to the highest position of 50. Feed is for
adjusting the ball feed intervals from 10 for no interval, down to 1 with
a 9-second interval.
After you program the values, press the save button on the top right
corner. The machine will save the setting on the phone and also
download settings to your machine. The machine will switch directly
between drill modes after user has saved their settings.
The user needs to understand that the serving wheels can speed up
faster than they can slow down. If the user wants to set fast shots
followed by slow shots, it is required to set at long feed intervals, to
give the machine more time to slow down, or input more speed
changes. Take as an example, if #1 shot is set at speed level of 19,
and the customer wants to set #2 shot at a speed level of 16, the user
can either set the feed rate to a lower level such as 4 which will then
give 6 seconds for the machine to slow down, or the user can set the
#2 shot with a speed level of 1, which will then make the machine
slow down more quickly.
Section-5: Warranty
Warranty Period
The warranty service is free for materials and workmanship for a
period of one year from date of original purchase except for the
battery, which is warranted for three months.
Scope of Warranty
This warranty covers all defects in material and workmanship. The
following are not covered by the warranty:
◇
◇
◇
◇
Units damaged by accident, misuse, abuse and neglect
Units modified by unauthorized personnel
Units damaged during shipment
Battery damage
Section-6: Question and Answers
Question 1: Why does the reset button pop out and turn off the
machine?
Answer: It is very possible, because the ball got jammed inside the
machine and blocks the normal operation of the service wheels.
Question 2: My machine is battery powered. Can I upgrade it to
support main power?
Answer: Yes, you can change the battery to main power module.
Question 3: Why does my machine always serve balls across the
right side line, when I set the horizontal position to 20?
Answer: That is because you did not properly place the direction of
the machine after powering it on. Placing the machine slightly to the
left, should correct this problem.
Question 4: Why do the balls get jammed inside the top hopper?
Answer: The machine does not support to use flat balls such as the
training balls for kids. It is no problem for the machine to shoot flat
balls, but when a user put many such flat balls inside the ball hopper,
it can make the balls jam.
Question 5: After we have created a new drill and verified that drill,
will that be stable, next time when I use the same drill?
Answer: Yes, you can use the drills that you save on the phone or
machine. It is very stable if you use the same batch of balls. Please
don’t forget to charge the battery after each use. A flat battery can
make the ball machine less powerful and impact its stability.
Question 6: I see from the website that a phone remote is an option.
Will that be an optional part for the player model?
Answer: No, the phone remote feature is a standard part for the
player model. It is optional only for the Plus model.
Question 7: In Manual mode, can we adjust the horizontal direction of
the machine?
Answer: Yes! After you press M button to enter manual mode, if you
press + or - button directly, that will make you adjust the horizontal
direction of the machine.
Question 8: We understand that Lobster Elite Grand V LE provides a
feature for a user to define custom drills allowing the location of the
ball to be defined by the user. Why is it that the SPINSHOT-PLAYER
machine was not designed in the same way?
Answer: It is true that Lobster Grand V model can define the direction
of each ball. They use software that relies on the ball height, ball
angle and ball speed to define the ball location. The Grand V Model
does not allow however to define the ball height and angle directly.
When a customer tries to define the ball location, its speed setting will
be very limited. The big advantage of the technology being used by
The Spinshot Player model is it gives much more flexibility to define
each shot of the ball while user have access to define height, angel
and ball speed separately.