1
DIGITAL WATCHDOG
User Manual
www.dwcc.tv
DW Spectrum User Manual
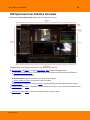
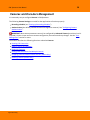
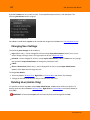
Contents
Table of Contents
Working with DW Spectrum
1
Opening
...................................................................................................................................
and Closing DW Spectrum Client
1
Connecting
...................................................................................................................................
to DW Spectrum via Web-Client
3
Launching
...................................................................................................................................
DW Spectrum in Compatibility Mode
4
Connecting
...................................................................................................................................
to Enterprise Controller and Working Offline
6
Introducing
...................................................................................................................................
User Roles
9
DW Spectrum
...................................................................................................................................
User Interface Overview
10
Main Menu .......................................................................................................................................................... 12
13
Show ing and..........................................................................................................................................................
Hiding Side Panels
..........................................................................................................................................................
13
Tabs and Layouts
..........................................................................................................................................................
14
Context Menu
..........................................................................................................................................................
15
Item s on Layouts and Scene
..........................................................................................................................................................
18
Working w ith Resource Tree and Renam ing Resources
..........................................................................................................................................................
21
Search
..........................................................................................................................................................
22
Playback Panel
..........................................................................................................................................................
23
Full Screen and Window Mode
..........................................................................................................................................................
23
Getting Context Help
Customizing
...................................................................................................................................
Look and Feel of DW Spectrum
24
DW Spectrum
...................................................................................................................................
Quick Start
26
Obtaining
...................................................................................................................................
and Activating DW Spectrum Licenses
27
Obtaining
...................................................................................................................................
and Configuring Media Server’s Additional Settings (Admin Only)
30
..........................................................................................................................................................
32
Configuring Media
Server Storages (Adm in Only)
..........................................................................................................................................................
33
Deleting Media
Server (Adm in Only)
..........................................................................................................................................................
34
Monitoring Media
Servers (Adm in Only)
Cameras
...................................................................................................................................
and Encoders Management
36
..........................................................................................................................................................
37
View ing Full Cam
era List
..........................................................................................................................................................
39
Adding Cam eras
and Encoders
.........................................................................................................................................................
39
Discovering
Cameras Automatically
.........................................................................................................................................................
40
Disabling Automatic
Discovery (Admin Only)
.........................................................................................................................................................
41
Adding Cameras
and Encoders Manually (Admin Only)
.........................................................................................................................................................
44
Adding RTSP
or HTTP Streams as Cameras (Admin Only)
..........................................................................................................................................................
45
Setting Up Cam
eras
46
Setting up .........................................................................................................................................................
Analog Cameras
47
Renaming .........................................................................................................................................................
Cameras (Admin Only)
.........................................................................................................................................................
49
Obtaining Camera’s
IP, MAC, Firmw are and Model
.........................................................................................................................................................
50
Configuring
Audio on Camera
.........................................................................................................................................................
51
Configuring
Camera's Authentication
.........................................................................................................................................................
52
Forcing Aspect
Ratio for Cameras
53
Setting Up.........................................................................................................................................................
Fish-Eye Cameras
56
Setting up .........................................................................................................................................................
PTZ on PTZ and Fish-Eye Cameras
.........................................................................................................................................
58
Saving and Restoring
PTZ Positions
......................................................................................................................................... 62
Setting Up PTZ Tours
.........................................................................................................................................
66
Home Positions and
Tours for PTZ and Fish-Eye Cameras
67
Setting up .........................................................................................................................................................
Recording Schedule
.........................................................................................................................................
68
Dual Stream Recording
Specifics (RADASS)
.........................................................................................................................................
68
Modifying Recording
Schedule
Digital Watchdog
DW Spectrum User Manual
Contents
.........................................................................................................................................
72
Copying Recording
Schedule betw een Cameras
73
Setting up .........................................................................................................................................................
Motion Mask and Motion Sensitivity
.........................................................................................................................................................
76
Configuring
Proprietary Camera Parameters
......................................................................................................................................... 77
Resetting Camera
.........................................................................................................................................
78
Upgrading Camera's
Firmw are
.........................................................................................................................................................
79
Adjusting Secondary
Stream Quality
Preventing DW Spectrum from Changing Camera Streaming Settings
......................................................................................................................................................... 80
(Admin Only)
81
Setting Sam e..........................................................................................................................................................
Param eters for Multiple Cam eras
..........................................................................................................................................................
83
Sw apping Cam
eras betw een Media Servers (Adm in Only)
84
Deleting Cam..........................................................................................................................................................
eras (Adm in Only)
Configuring
...................................................................................................................................
Events and Actions (Admin Only)
85
.......................................................................................................................................................... 88
Tracked Events
Setting up .........................................................................................................................................................
Schedule for Tracking Events
89
Motion on .........................................................................................................................................................
Camera
90
Camera Disconnection/Malfunction
......................................................................................................................................................... 92
Storage Failure
......................................................................................................................................................... 95
Netw ork Issue
......................................................................................................................................................... 96
Camera IP.........................................................................................................................................................
Conflict
96
Input Signal
.........................................................................................................................................................
on Camera
97
Media Server
.........................................................................................................................................................
Failure
98
Media Servers
.........................................................................................................................................................
Conflict
99
EC Connection
.........................................................................................................................................................
Lost
99
Licenses are
.........................................................................................................................................................
not Configured
99
E-mail is not
.........................................................................................................................................................
Set for Users
100
E-Mail Server
.........................................................................................................................................................
is not Configured
100
Error w hile
.........................................................................................................................................................
Sending E-Mail
100
Storages.........................................................................................................................................................
are not Configured
101
Media Server
.........................................................................................................................................................
Started
101
102
Actions that..........................................................................................................................................................
DW Spectrum Can Do
Notifications
......................................................................................................................................................... 103
Visual Event
.........................................................................................................................................................
Indication
107
Mail Notifications
......................................................................................................................................................... 108
Configuring Mail.........................................................................................................................................
Server for E-Mail Notifications
110
Start Recording
.........................................................................................................................................................
on Camera
112
Start Panic
.........................................................................................................................................................
Recording
114
Trigger Camera
.........................................................................................................................................................
Output
115
Play Sound
......................................................................................................................................................... 117
Repeat Sound
......................................................................................................................................................... 119
Say Text......................................................................................................................................................... 121
Write to Log
......................................................................................................................................................... 121
.......................................................................................................................................................... 122
Default Rules
..........................................................................................................................................................
123
View ing Events
Log
User...................................................................................................................................
Management
126
..........................................................................................................................................................
126
Creating New
User (Adm in Only)
..........................................................................................................................................................
127
Changing User
Settings
..........................................................................................................................................................
127
Deleting User
(Adm in Only)
Layout
...................................................................................................................................
Management
128
..........................................................................................................................................................
129
Creating New
Layout
.......................................................................................................................................................... 131
Setting up Layouts
Adding Items
.........................................................................................................................................................
to Layouts
132
Removing.........................................................................................................................................................
Item(s) from Layouts
134
Using Backrounds
.........................................................................................................................................................
(Maps or Plans) on Layout (E-Mapping)
135
Digital Watchdog
DW Spectrum User Manual
Contents
138
Adjusting.........................................................................................................................................................
Layout’s Appearance
Selecting Items ......................................................................................................................................... 139
140
Zooming w hile .........................................................................................................................................
Working w ith Layouts
140
Moving and Sw.........................................................................................................................................
apping Items w ithin Scene
142
Resizing Items .........................................................................................................................................
w ithin Scene
......................................................................................................................................... 143
Using Fit In View
.........................................................................................................................................
144
Changing Distance
betw een Items
.........................................................................................................................................
144
Changing Cell Aspect
Ratio
.........................................................................................................................................................
145
Zoom Window
s
......................................................................................................................................................... 146
Locking Layouts
.........................................................................................................................................................
147
Working w
ith Several DW Spectrum Window s
......................................................................................................................................................... 148
Saving Layouts
..........................................................................................................................................................
149
Assigning Layouts
to Users (Adm in Only)
..........................................................................................................................................................
149
Deleting Layouts
(Adm in Only)
150
Opening and..........................................................................................................................................................
Closing Saved Layouts
Backing
...................................................................................................................................
up and Restoring DW Spectrum Database
151
Playback
...................................................................................................................................
in DW Spectrum
152
..........................................................................................................................................................
153
Watching Cam
eras in DW Spectrum
154
CPU and .........................................................................................................................................................
Bandw idth Saving during Playback (RADASS)
.........................................................................................................................................................
156
Navigating
through Archive and Live
.........................................................................................................................................
158
Pan-Temporal Time
Line
.........................................................................................................................................
160
Navigating through
Several Cameras Synchronously
.........................................................................................................................................................
161
Searching
through Archive
Using Calendar......................................................................................................................................... 161
.........................................................................................................................................
163
Performing Smart
Motion Search
.........................................................................................................................................
165
Using Thumbnails
for Better Navigation
......................................................................................................................................... 166
Preview Search
168
Playing Back..........................................................................................................................................................
Local Files in DW Spectrum
.........................................................................................................................................................
168
Local files
structure in Resource Tree
.........................................................................................................................................................
169
Configuring
Media Folders
171
Opening .........................................................................................................................................................
Local Files Outside of Media Folders
.........................................................................................................................................................
171
Navigating
Through Local Files
.......................................................................................................................................................... 171
Forensic Analysis
.........................................................................................................................................................
172
Expanding
Items to Fullscreen
Zoom ......................................................................................................................................................... 172
Rotate ......................................................................................................................................................... 173
.........................................................................................................................................................
174
De-w arping
Fish-Eye Cameras
.........................................................................................................................................
177
De-w arping Screenshots
Taken from Fish-Eye Cameras
......................................................................................................................................................... 180
Image Enhancement
Exporting .......................................................................................................................................................... 182
.........................................................................................................................................................
183
Single Camera
Export
.........................................................................................................................................
183
Exporting Recorded
Region from Single Camera
186
View ing Videos.........................................................................................................................................
Exported from Single Camera
.........................................................................................................................................................
187
Multi-Video
Export
.........................................................................................................................................
188
Exporting Layout
in Multi-Video Format
......................................................................................................................................... 191
View ing Multi-Videos
.........................................................................................................................................
192
Changing Multi-Videos
after Export
193
Checking.........................................................................................................................................................
the Validity of Exported Videos
......................................................................................................................................................... 195
Taking Screenshots
..........................................................................................................................................................
196
Adjusting Volum
e
..........................................................................................................................................................
196
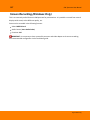
Tours
Screen
...................................................................................................................................
Recording (Windows Only)
197
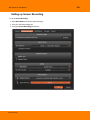
..........................................................................................................................................................
198
Setting up Screen
Recording
Digital Watchdog
DW Spectrum User Manual
Contents
200
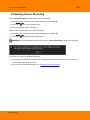
Perform ing ..........................................................................................................................................................
Screen Recording
Upgrading
...................................................................................................................................
DW Spectrum
201
Troubleshooting and Contacting Support
202
Diagnosing
...................................................................................................................................
Offline Cameras
203
Restoring
...................................................................................................................................
Broken Archive
204
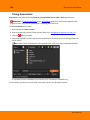
Providing
...................................................................................................................................
Remote Access
205
Recording
...................................................................................................................................
Issue
205
Collecting
...................................................................................................................................
Logs
206
Collecting
...................................................................................................................................
Additional Information
207
Glossary
Digital Watchdog
209
1
DW Spectrum User Manual
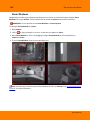
Working with DW Spectrum
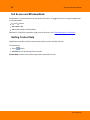
Opening and Closing DW Spectrum Client
A few different ways are available to launch the application:
Windows
From desktop: DW Spectrum shortcut icon.
From Start Menu: Start –> Programs –> Digital Watchdog –> DW Spectrum.
Directly from the installed folder:
For x86 default is C:\Program Files(x86)\Digital Watchdog\DW Spectrum\Client\1.5
\1.4\DW Spectrum Launcher.exe
For x64 default is C:\Program Files\Digital Watchdog\DW Spectrum\Client\DW
Spectrum Launcher.exe
Linux
Using DW Spectrum shortcut icon.
Directly from the installed folder: /opt/digitalwatchdog/dwspectrum/Client/1.4/DW
Spectrum Launcher.exe
To close DW Spectrum Client:
Click on the "
" button located in the top right corner
Go to Main Menu –> Exit (or press Alt+F4).
Digital Watchdog
DW Spectrum User Manual
2
It is possible to set up DW Spectrum Client to launch at start. To proceed:
1. Open Main Menu and go to System Settings.
2. Select Run Application when PC boots up (see Misc section).
3. Click OK when done or Cancel to discard changes.
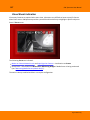
IMPORTANT. In order to display video and graphics properly, it is important to have most current video
drivers installed. If video drivers are not installed, the following will be displayed:
Finally, DW Spectrum Client can detect PC configuration automatically. If CPU and/or graphic adapter are
too weak to render all graphics, the configuration mode will be activated.
This mode restricts the following Client functionality:
Only one video can be viewed in the same time
No notifications in Client (see Notifications)
All animations are turned off.
Digital Watchdog
3
DW Spectrum User Manual
Connecting to DW Spectrum via Web-Client
DW Spectrum Web Client allows connecting to DW Spectrum from any PC via web browser. The following
browsers are supported:
Internet Explorer 9
Google Chrome
Mozilla (not recommended)
To access Web Client do one of the following:
If DW Spectrum Client is not installed on the PC:
1. Run the web browser.
2. Enter the following URL:
https://<IP>:<PORT>/web ( <IP> and <Port> are IP Address and port of Enterprise Controller).
For instance, to open Web Client on a local computer, use https://localhost:7001/web.
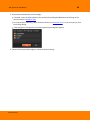
If DW Spectrum Client is installed on the PC and connected to Enterprise Controller:
go to Resource Tree, Right Click on the System node and select Open Web Client... (available for
Admin Only)
open Main Menu and choose Open Web Client...
After DW Spectrum Web Client opens , enter login and password.
The following operations are supported:
Browsing the Cameras list (on the left-hand side)
Viewing Camera (only one Camera can be viewed simultaneously)
Browsing archive on Camera (incl. Calendar Search)
Digital Watchdog
DW Spectrum User Manual
4
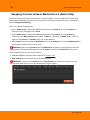
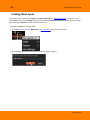
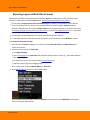
Launching DW Spectrum in Compatibility Mode
It is necessary sometimes to connect to Enterprise Controller with different versions. A good example
would be when DW Spectrum is installed at multiple sites (home, work, etc.) and only one installation is
upgraded. In this particular case, Enterprise Controllers will have different versions and one Client should
connect to another Enterprise Controller (Client at home connects to Enterprise Controller at work).
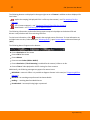
Enterprise Controllers of different versions are highlighted in red in login dialog:
In this case, the following message will appear:
By clicking OK, the application will restart in compatibility mode.
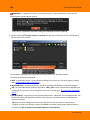
In some instances, it may be necessary to download additional files for compatibility pack. In this
particular instance, the following message will be displayed:
Once download is completed, restart is suggested.
Digital Watchdog
5
DW Spectrum User Manual
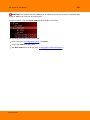
IMPORTANT. It is not possible to connect to the next version of Enterprise Controller at the moment:
In this case it is important to upgrade DW Spectrum to its current version.
Note: DW Spectrum recalls the Enterprise Controller it was lastly connected to and automatically
suggests compatibility mode for the next launch.
IMPORTANT. If some of the components such as Enterprise Controller, Media Servers or Client have
different versions installed, it may cause potential issues. When Client is connected to EC, all component
versions are checked. The following will appear if the component versions differ from one another:
It is recommended to have the same version installed on all system components.
Digital Watchdog
6
DW Spectrum User Manual
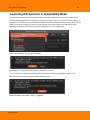
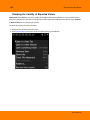
Connecting to Enterprise Controller and Working
Offline
In order to gain access to Media Server and Cameras, a user must be connected to Enterprise Controller
(EC).
The connection to Enterprise Controller can be established by pressing the Connect button (
via Main Menu –> Connect to (Another) Server.
The current connection status is indicated by the color of the Connect button:
– connected
– disconnected
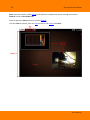
The connection dialog is displayed as follows:
Digital Watchdog
or
) or
7
DW Spectrum User Manual
DW Spectrum provides a powerful mechanism that can auto-discover Enterprise Controllers in local
network. The easiest way to connect to EC is to use one of the auto-discovered EC.
To use predefined connections, click on the drop-down list. By default ,*Last Used Connection* is
recommended:
Note: the computer EC is installed on may have several network interfaces. In this case, any available
is displayed on the Auto-Discovered ECs list.
Note that Enterprise Controllers with different versions are discovered automatically as well. However,
they will be displayed in red. It is possible to connect to them in a compatibility mode (see "Launching
DW Spectrum in Compatibility Mode").
Connection details can also be inputted manually. The following values must be entered:
Host – IP Address or name of the computer EC is installed on ( localhost or 127.0.0.1 for All-in-One
installation).
Port – IP Port for access to EC ( 7001 by default).
Login and Password to connect to EC. If connecting for the first time, "admin" should be used as a
login name. Use the same password that was set up during the initial installation.
To check connectivity to EC, press Test. If ok, access is granted. The following may cause connection
errors:
EC is not available:
specified IP Address is incorrect or inaccessible
specified port is incorrect
EC is stopped
login and/or password are incorrect
EC and Client are incompatible with each other (different customizations).
To save login details, select the Auto-Login option on the bottom. When Client is launched again, it will
connect to the EC automatically through the pre-established login and password combination.
Digital Watchdog
DW Spectrum User Manual
8
To save and restore connection details:
If current connection details are used, press Save and create a connection name to store, which will
appear in the drop-down list next time a user logs in.
To delete details of a stored connection, select it from the drop-down list and press Delete.
If the last connection was not properly saved, the software will use its connection data from the next
launch (* Last Used Connection *).
Note: passwords are not stored in saved connection details.
To log out, go to Main Menu and choose Logout.
If Client is not connected to Enterprise Controller, a user can only access Local Files (see “Playing Back
Local Files in DW Spectrum”).
To connect to a different EC under a different user, open the login window and enter new EC coordinates
or login credentials. If canceled, the current user will still be connected to Enterprise Controller.
Digital Watchdog
9
DW Spectrum User Manual
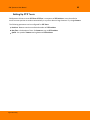
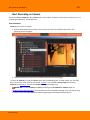
Introducing User Roles
There are three types of user roles in DW Spectrum:
Owner (user with "admin" login). Unlimited control. This user cannot be deleted.
Administrator. Full control, except:
Change Super Administrator (admin) settings
Delete or change own role
Viewers (Live Viewer, Viewer, Advanced Viewer). Limited control. A viewer cannot:
Manage users (except for changing their own password).
See servers and all connected cameras. Only the cameras assigned by the administrator are visible.
Change predefined layouts (layouts can be changed, but cannot be saved); however, it is possible
to configure and save own layouts based on available resources (assigned cameras and local files).
Additional permissions can be assigned to users to be able to operate with available cameras (assigned
by Administrator):
View archive, perform search and forensic analysis
Perform export from archives
Set up cameras
Set up PTZ on cameras.
If none of these permissions are assigned, a user can only view live videos on available cameras.
IMPORTANT. If any action or graphical element described in this document is not available to a specific
user level, the following will apply (Admin only). If the action described in this document is unavailable
to certain roles, it will be indicated in the corresponding topic.
The following represents a standard flow:
1. Super Administrator creates and configures all layouts for own use.
2. Super Administrator creates several users with a Viewer role.
3. Super Administrator creates and configures layouts for each Viewer.
4. Viewer logs into DW Spectrum and is only able to work with assigned layouts and cameras.
Digital Watchdog
DW Spectrum User Manual
10
DW Spectrum User Interface Overview
DW Spectrum User Interface (UI) includes the following main controls:
Scene (main view). Displays video items from cameras or local files.
Tab Navigator (top Panel). It contains Main Menu, Tabs and the following buttons:
Connect/Disconnect button. This button indicates the current connection status and allows to
connect or disconnect from EC.
Window Buttons (go/exit fullscreen, minimize, close window)
Screen Recording button. Starts/stops screen recording
Playback Panel (located on the bottom Panel). Used for playing back local videos and live streams.
Resource Tree (left Panel). Contains all servers, cameras, local files, users and layouts available to the
current user.
Notifications (right Panel). Contains notifications about system events.
Digital Watchdog
11
DW Spectrum User Manual
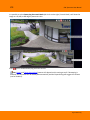
Scene represents space for video Items can be placed on. DW Spectrum allows viewing streams from
Cameras as well as Local Video Files.
Items are placed on Scene and can be saved as Layouts.
If several Tabs are opened, then each Tab contains its own Layout with Items:
Digital Watchdog
DW Spectrum User Manual
12
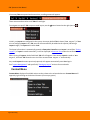
Main Menu
Main Menu allows users to gain access to various DW Spectrum features quickly and intuitively. Main
Menu can be opened by clicking on the logo at the upper left corner:
Main Menu contains the following items:
Connect to (Another) Server – allows
connecting/disconnecting to/from
Enterprise Controller (see "Connecting to
Enterprise Controller and Working
Offline")
Logout New:
Tab – creates an empty tab in Tab
Navigator (see "Tabs")
Window – opens a new window of DW
Spectrum (see "Working with Multiple
DW Spectrum Windows")
User – creates a new user (see "User
Management").
Open – opens and plays back Local Files (see "Playing Back Local Files in DW Spectrum"):
File – opens Local Video File
Folder – opens all Local Video Files in the selected folder and plays them back simultaneously (max
24 files for x86 and max 64 files for x64).
Save Current Layout and Save Current Layout as... – the currently displayed on the scene layout
("Saving Layouts").
Start/Stop Screen recording (see "Screen Recording (Windows Only)").
Go to/Exit Fullscreen (see "Full Screen and Window Mode").
System Settings – setup DW Spectrum.
Exit.
Digital Watchdog
13
DW Spectrum User Manual
Showing and Hiding Side Panels
Side Panels are extremely useful, though may be hidden by a user if needed. The
Panels as well as Hide Panel Context Menu item.
buttons show/hide
If an item is expanded to fullscreen (see "Expanding Items to Fullscreen"), all Panels slide off the screen
and disappear.
To bring Panel back, click on
.
Additionally, both left and right sliding menu panels can be pinned ( ):
If Pinned: side Panels are always visible. If a panel is hidden manually, it will not reappear
automatically.
If Unpinned: Panel is only visible when the cursor is on. As soon as a user clicks off the Panel, the
panel will disappear. Panel can reappear if a user points or clicks on
.
F11 hides all Panels. To undo, press F11 again or use Esc (toggle Fullscreen will also apply if hit Esc).
Tabs and Layouts
Tabs are used to make layout navigation easier. Each Tab hosts a separate Layout. Tabs function very
similar to any Internet browser.
The following actions can be performed with Tabs:
Open a new tab:
Tab Navigator’s Context Menu –> New Tab (Ctrl+T)
Main Menu –> New –> Tab
Close a specific Tab: Tab’s Context Menu –> Close (Ctrl+W)
Keep one Tab open – Tab’s Context Menu –> Close All but This
Change the tab order – switch position by dragging and dropping a tab in the desired order.
IMPORTANT: A warning message will appear every time Tab is modified, suggesting to the user to save
changes. See “Saving Layouts”.
Digital Watchdog
DW Spectrum User Manual
14
If too many Tabs are opened at the same time, scrolling arrows will appear:
These arrows can be used to scroll Tabs left and right.
To navigate to a specific Tab or open a saved layout, use the button located on the right (next to
):
Initially, no Layouts are configured in the system. An empty default Tab is shown (“New Layout”). If User
tries to configure Layout in this Tab, asterisk will automatically be added to the caption (indicating a
Layout change). The Layout will remain local.
The layout information is automatically passed to Enterprise Controller once Layout is saved (See “Saving
Layouts”). If Layout is saved successfully, it will be displayed in Resource Tree under the current User.
When closing all Layouts, the default blank Tab will still appear. If the current Layout is saved as “New
Layout”, the blank Tab located next to it will be renamed “New Layout 1” automatically.
Any saved Layouts that were previously opened, will appear automatically once User logs in.
See "Layout Management" and specifically "Setting up Layout" sections for more details.
Context Menu
Context Menu displays all available actions as they relate to the selected element. Context Menu will
appear by right-clicking on the desired element (or on empty space).
Digital Watchdog
15
DW Spectrum User Manual
Items on Layouts and Scene
Video Item represents video recorded by a camera that can be played back within DW Spectrum.
Items displayed on Scene offer total video manipulation, a variety of features, streaming data and other
related information.
Local videos are displayed as follows:
The file name is displayed in the upper left corner of Local Video Item.
The following buttons are displayed in the upper right corner of Local Video Item:
– Image Enhancement
– create Zoom Window (see Zoom Windows)
– take screenshot fron the item (see Taking Screenshots)
– Rotation (see "Rotate")
– Information: displays additional information about the current stream (see below)
– Close (removes the item from the current layout)
Digital Watchdog
DW Spectrum User Manual
16
Streams from cameras are displayed as follows:
The following information is displayed in the upper left corner of the camera item:
Camera Name
Current Recording Mode (Camera may be recording differently depending on its schedule):
– Recording Always (green circle)
– Motion Recording (red circle)
– Low Resolution - always, High Resolution - only while in motion (red circle crossed green)
– Not Recording (grey circle)
For more information on recording settings, see "Setting up Recording Schedule".
Digital Watchdog
17
DW Spectrum User Manual
The following buttons are displayed in the upper right corner of Camera in addition to those displayed for
local video:
– applies de-warping (is displayed if this is a fish-eye lens camera) – see "De-warping Fish-Eye
Cameras"
– PTZ (if camera supports) – see "Setting up PTZ on PTZ and Fish-Eye Cameras"
– Smart Search – see "Performing Smart Motion Search".
The following information can be useful during camera setup to help adjust to the desired FPS and
bitrate. It may also be useful for monitoring local files.
To view item information, click on located in the top right corner of the item. To view information on
multiple items at a time, select Items (see "Selecting Items"), open Context Menu and choose Show Info
(Alt+i).
The following data will appear on the bottom:
Current Resolution of the stream
Current FPS of the stream
Current Bitrate
Current stream Codec (H264 or MJPEG)
Current Resolution (if Dual-Streaming is enabled for the camera): Hi-Res or Lo-Res
Current Time of video playback or LIVE if viewing live from a camera
Additionally, the following messages may appear for camera items:
NO SIGNAL – camera is offline. It is possible to diagnose Camera in this case (see "Diagnosing Offline
Cameras").
NO DATA – no recording was performed. No data available.
Loading... – awaiting data from Media Server
Unauthorized – incorrect/missing login or password
Digital Watchdog
DW Spectrum User Manual
18
Working with Resource Tree and Renaming Resources
Resource Tree is a convenient tool to display, search and manage available resources within the
application. The format of Resource Tree depends on the current user's permission level.
Resource Tree is displayed on the left Panel. It can be resized by dragging the right edge to the left or
right.
Depending on a user level (see "Introducing User Roles") it may contain different elements. For
Administrators, Resource Tree is displayed as follows:
Servers (admin only) – a list of servers
registered in the system. Server IP
addresses are also displayed (if the
corresponding setting is enabled).
Note: Media Server can have several
network interfaces, so different IP
addresses may be displayed.
Cameras. Cameras are displayed under
Servers (admin only) and Layouts. If a
camera appears on more than one layout,
the camera will be listed multiple times
in Resource Tree.
The following indicators are displayed on
the left:
– a camera is in recording mode
– recording is set up for the camera, but
not recording at the moment.
Additionally Cameras' IP addresses are
displayed (if the setting is enabled, see
below).
If Camera is experiencing network issues
over the past minute,
is displayed.
See "Camera Disconnection/Malfunction"
for details.
Digital Watchdog
19
DW Spectrum User Manual
Recorders (admin only). Displayed under Servers (admin only) and contains several channels
(represented as Cameras).
Users (Administrator can view several users in Resource Tree).
Layouts. Contains resources (cameras and local files). Owned by users and displayed under each user.
Local Files. Contains the following:
Video files
Images
Exported Video Files (see “Exporting”)
Exported Multi-Video Files and their contents: Cameras, or Local Files (see “Exporting the Layout in
Multi-Video Format"
Screen Recordings (see “Screen Recording”)
Screenshots (see “Taking a Screenshot”).
When hovering over Camera with a mouse cursor, a thumbnail of a frame taken from the Camera will
appear:
Items that are currently placed on Scene are highlighted in bold in Resource Tree. A selected (focused)
Item it has the“>” mark in both Server and Layout sections.
To enable/disable displaying IP addresses in Resource Tree:
1. Open Main Menu and go to System Settings
2. Select/clear the flag in Show IP in Tree option (Look and Feel section).
Digital Watchdog
DW Spectrum User Manual
20
Viewer's Resource Tree is shown as the following (see
picture at the right-hand side):
If Client is not connected to Enterprise Controller, only
Local File names are visible.
The following actions can be performed in Resource Tree:
Expanding/collapsing a tree node (+/- on keypad)
Scrolling (if the tree contains multiple elements)
Multi-Selection. Shift to select multiple items and
hold Ctrl to select/deselect items individually.
Drag and drop. An efficient way to organize and
configure resources in the tree. The following
chapters will further explain the drag and drop
capabilities.
Search.
Almost any resource (except Local Files) can be renamed by Administrator in Resource Tree. To rename a
resource, simply select it and:
Left-Click on it again (like Windows Explorer).
Right-Click for Context Menu and choose Rename (or press F2):
Digital Watchdog
21
DW Spectrum User Manual
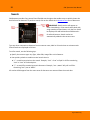
Search
DW Spectrum provides fast, powerful and flexible search engine that enables users to quickly locate the
desired items on demand. To perform search, click on the Search tab in Resource Tree next to Resources.
IMPORTANT: Search results will appear on
Scene immediately. If the search comes back with
a high number of found items, only the first 24 will
be displayed for x86 architecture and 64 results for x64 architecture. Search results are
automatically added to the current scene.
Type any three consecutive characters from a resource name, MAC or IP into the box to activate search.
Search results are displayed as follows:
To refine search, use the following tips:
Specify the resource type: Any Type, Video Files, Image Files or Live Cameras.
Use special symbols to combine several search criteria:
“+” – to add a new criteria to the search. Example, “out” + “100” will pull in all files containing
“out” or “100” in file description.
“\” – to avoid files containing certain characters. Example, “out \hdtv” will pull in all files
containing “out”, but no “hdtv”.
All results will disappear from the scene once all characters are removed from the search box.
Digital Watchdog
DW Spectrum User Manual
22
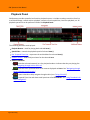
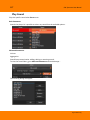
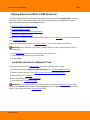
Playback Panel
DW Spectrum provides powerful and intuitive playback system. It includes seamless transition from live
to archived footage, smooth archive playback, extensive search capabilities, local files playback, etc. All
playback operations can be performed within the Playback Panel:
The following elements are displayed:
Playback Buttons – used for playing back selected Item(s)
Speed Slider – controls the playback speed of selected Item(s)
Pan-Temporal Time Line – represents the archived data for selected Item(s)
Volume Control – used to adjust volume for the selected Item
Additional Buttons:
– switches selected camera(s) to a live playback mode or indicates that they are playing live.
See "Navigating through Archive and Live"
– performs time synchronization of all cameras displayed on Scene. See "Navigating through
Several Cameras Synchronously"
– opens calendar to help navigate through archive (see "Using Calendar")
– expands Time Line and shows small previews called Thumbnails. See "Using Thumbnails for
Better Navigation".
Digital Watchdog
23
DW Spectrum User Manual
Full Screen and Window Mode
DW Spectrum is recommended to be operated in full screen. To toggle full screen or bring the application
to a window mode:
and
buttons
Alt + Enter or Esc
F11 (all side panels will be hidden).
Moreover it is possible to expand a single item on fullscreen. See "Expanding Items to Fullscreen".
Getting Context Help
DW Spectrum provides intuitive context help system on each interface element.
To invoke help:
1. Press
button.
2. Left-Click on the desired interface elements.
Context Help contains links to other topics that can be useful as well.
Digital Watchdog
DW Spectrum User Manual
24
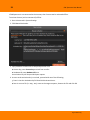
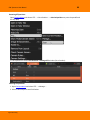
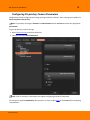
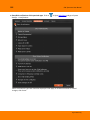
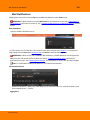
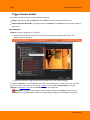
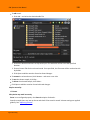
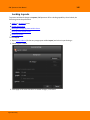
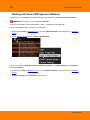
Customizing Look and Feel of DW Spectrum
DW Spectrum provides a number of ways to customize user interface. To start, open Main Menu and
explore Look and Feel options (located in System Settings tab):
Digital Watchdog
25
DW Spectrum User Manual
The following settings can be changed:
Tour sequence cycle time – time between cycling items in Tour Mode (see "Tours")
Show IP in tree – display IP camera and recorder addresses in Resource Tree
Timeline mode – display time when viewing recorded footage (server time or local time)
Skin – desired interface color scheme (Dark or Light)
Language – interface localization.
Click OK when done or Cancel to discard changes. If the changes require restart, the corresponding
warning will be displayed. Once the changes are applied, the software will suggest to restart
automatically:
All changes will apply after restart.
Digital Watchdog
DW Spectrum User Manual
26
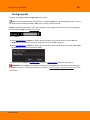
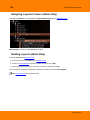
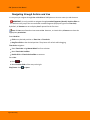
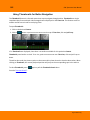
DW Spectrum Quick Start
This section provides recommendations on system settings for DW Spectrum to be configured properly.
First, a sufficient number of Licenses should be obtained and activated (see “Obtaining and Activating DW
Spectrum Licenses (Admin Only)”).
Then, Storages on each Media Server should be configured (see “Configuring Media Server Storages
(Admin Only)”).
All Cameras should be properly set up (see “Camera Managemnent”). Same with Recording Settings (see
“Setting up Recording Schedule (Admin Only)”).
Once completed, it becomes possible to create multiple Users, configure Layouts for them and more.
Digital Watchdog
27
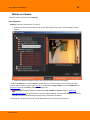
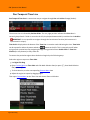
DW Spectrum User Manual
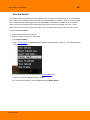
Obtaining and Activating DW Spectrum Licenses
DW Spectrum’s license policy is quite simple. Each Camera requires License. The application has no
camera count restrictions.
The License allows viewing and recording of a single IP or Analog Camera. Cameras can be viewed live
without Licenses allowing for an unlimited number of Cameras to be connected and viewed live at no
charge.
Note: If recording is enabled for Camera, License is considered used even if recording is not
performed. Recording is required to capture Motion Detection and Input Detection events on Camera.
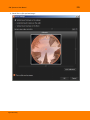
For instance, the following screenshot illustrates the situation that all Cameras are offline and not
recording. However recording is enabled on four Cameras (marked by ):
In this case 4 Licenses are being used.
See also "Setting up Recording Schedule".
DW Spectrum comes with four Trial Licenses automatically. Trial Licenses are active only a certain amount
of time.
Digital Watchdog
DW Spectrum User Manual
To activate Trial Licenses:
1. Open Main Menu –> System Settings.
2. Go to Licenses tab.
3. Click Activate Trial License.
If Trial License is about to expire, the corresponding warning will appear.
To get additional Licenses, contact the local Digital Watchdog customer service at
completeipsolution.com.
To activate License Key over the Internet:
1. Select the Licenses tab in System Settings.
2. Automatic activation via Internet must be selected.
3. Enter License Key and click Activate License.
Digital Watchdog
28
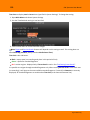
29
DW Spectrum User Manual
If DW Spectrum is not connected to the Internet, then licenses can be activated offline.
To activate License (trial or commercial) offline:
1. Go to Licenses tab in System Settings.
2. Click Manual Activation.
3. Copy Hardware ID and email to completeipsolution.com
License Key: paste License key received from reseller.
Hardware ID: paste Hardware ID here.
An activation key will be provided upon request.
4. As soon as the activation key is received, proceed with one of the following:
Paste it into the Activation Key field and click Activate License.
Save it as a text file (i.e. key.txt), move to the target computer, browse the file and click OK.
Digital Watchdog
DW Spectrum User Manual
30
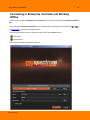
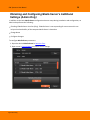
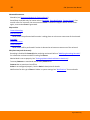
Obtaining and Configuring Media Server’s Additional
Settings (Admin Only)
In addition to the basic Media Server configuration that are setup during installation and configuration, an
Admin also performs the following:
Checking if Media Server is online (Ping). If Media Server is not responding for some reason this can
help to check availability of the computer Media Server is hosted on
Change Name
Configure Storages.
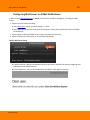
To configure Media Server parameters:
1. Open the desired Media Server in Resource Tree.
2. Open server’s Context Menu and choose Server Settings.
Digital Watchdog
31
DW Spectrum User Manual
The following Media Server parameters can be checked and configured:
Name – can be changed here or in Resource Tree
IP Address – cannot be changed. Displayed in Resource Tree as well if the corresponding setting is
enabled (see "Working with Resource Tree and Renaming Resources")
Port – cannot be changed from the client
Ping – check availability of the computer Media Server is hosted on
Storages – see "Configuring Media Server Storages (Admin Only)"
Rebuild Archive Index – restore recorded footage if moved. See "Restoring Broken Archive".
Digital Watchdog
DW Spectrum User Manual
32
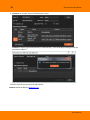
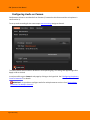
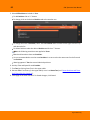
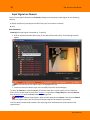
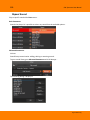
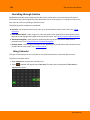
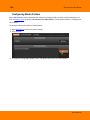
Configuring Media Server Storages (Admin Only)
DW Spectrum provides an easy and flexible storage management policy. Each Media Server can use
unlimited number of local and network Storages. If more than one Storage is used, Media Server will
automatically balance the space consumption. The more free space the storage has, the higher the usage
intensity will be.
Storage is considered to be a separate hard disk partition. If a partition has more than 100 Gb of free
space, DW Spectrum uses it automatically.
Additionally it is possible to add network storages.
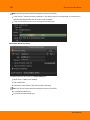
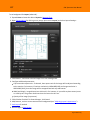
To configure Media Server Storages:
1. Open the Server Settings.
2. Go to Storages:
As displayed above, the computer has 2 partitions and only disk D is used for storage because disk C
has less than 100 Gb of free space.
3. To select Storage to be used check In Use flag
Digital Watchdog
33
DW Spectrum User Manual
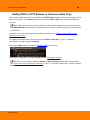
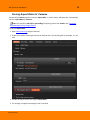
4. To add External Storage, click Add and enter the storage Samba path:
IMPORTANT. If using Network Storage, the computer Media Server is installed on must have nonpassword read-write access to the Samba share. The most convenient way is to mount it as local disk
(via Samba).
5. Click OK. At this point, all Storages will be checked for validity and ability to write to. If the drive has
insufficient space, a warning will appear.
The Storage structure on the partition is as follows: <drive>/DW Spectrum
Media/$Resolution/$MAC/$YYYY/$MM/$DD/$HH:
$Resolution:
hi_quality – full resolution streams
lo_quality – low resolution streams
$MAC – MAC address of the recorded device
$YYYY – Recorded Year
$MM – Recorded Month
$DD – Day
$HH – Hour
IMPORTANT. 5 GB of free space is always preserved on Storage.
Deleting Media Server (Admin Only)
In some instances, it may be necessary to delete Media Server from the system.
Note: Media Server can only be deleted when offline.
To delete Media Server, locate it in Resource Tree, Right-Click for Context Menu and select Delete.
IMPORTANT. All cameras that are hosted on this specific server will be deleted as well. Recorded data
will be kept in server’s storages.
Media Server will automatically be registered in EC, discover all Cameras and start operating once it is
back online. The deleted camera's archive will remain available. It will be required to perform all storage
settings and configure all discovered Cameras again.
Digital Watchdog
DW Spectrum User Manual
34
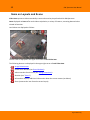
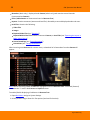
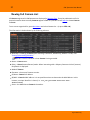
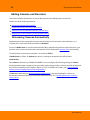
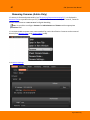
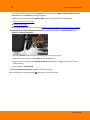
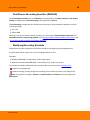
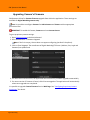
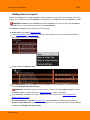
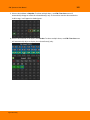
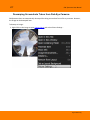
Monitoring Media Servers (Admin Only)
DW Spectrum enables users to perform monitoring the health of Media Servers in the real-time mode. To
proceed, perform one of the following:
Drag Media Server from Resource Tree to Scene
Open Media Server's Context Menu and choose Monitor (Monitor in a New Tab or Window).
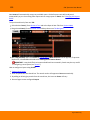
The information is displayed as follows:
Uptime (the time since the server is started)
CPU Load
Memory Usage (RAM)
Hard disk partitions usage (C: and D: in this case)
Network Interfaces Usage
Digital Watchdog
35
DW Spectrum User Manual
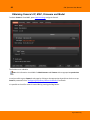
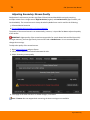
To enable/disable graphs check/uncheck them. If hover with a mouse cursoe on a check, the
corresponding graph will be clearly visible, the rest-ones will be faded:
User can perform standard manipulations with Monitoring Item: move, resize, swap, duplicate etc (see
"Items on Layouts").
To stop monitoring, remove the corresponding item from Scene.
Multiple Media Servers can be monitored simultaneously.
Digital Watchdog
DW Spectrum User Manual
36
Cameras and Encoders Management
It is extremely easy to configure Cameras in DW Spectrum.
The following Camera Settings are crucial for the application to function properly:
Recording schedule (see "Setting up Recording Schedule")
Authentication (the default password has been changed for cameras). See "Configuring Camera
Authentication ".
IMPORTANT. Most camera parameters can only be configured by Advanced Viewer (permission level is
required). A basic viewer can access camera configuration, but cannot make any changes. See the "User
Management" section for more.
The section describes the following functions related to Cameras:
Viewing Full Camera List
Adding Cameras and Encoders
Setting Up Cameras
Setting Same Parameters for Multiple Cameras
Swapping Cameras between Media Servers (Admin Only)
Deleting Cameras (Admin Only)
Digital Watchdog
37
DW Spectrum User Manual
Viewing Full Camera List
All Cameras registered in DW Spectrum are displayed in Resource Tree. If may be problematic to find a
particular camera when too many Cameras appear in Tree. It is possible to use Search to locate Cameras
on Scene.
To use a more organized list, open Main Menu and select Camera List... (or press CTRL + M).
The information is broken down by the following columns:
Recording – recording of Camera (Not recording, Continuous, Motion only, Motion + Lo-Res). See
"Setting up Recording Schedule".
Note: this is not an indication on how Camera is being recorded.
Name – Camera name.
Driver – Camera's manufacturer/maker. When interacting with a 3rd party Cameras via Onvif protocol,
OnvifDevice is displayed.
Model of Camera.
Firmware – the current firmware version.
IP/Name – Camera's IP address.
ID/MAC – Camera's MAC address. It is not possible at times to determine the MAC address. In this
instance, a unique identifier is shown (i.e. urn_uuid_207f19b2-d5a6-407f-8fec6265a311058b)
Server – the Media Server Camera is hosted on.
Digital Watchdog
DW Spectrum User Manual
38
The following tools are available to manage Camera List:
Sort data by column. Left Click on column's header.
Filter data. Type the filter sub-string into the Search String field (on the top). The results will be
refresh as typing. To disable filtering, clear the sub-string.
Select several rows from the table. Drag the mouse, use CTRL + Click/Up/Down arrows, or Shift +
Click/Up/Down arrows. Use CTRL + A to select all Cameras.
Open one or several Cameras. Select the desired Cameras, open Context Menu and choose Open,
Open in New Tab, Open in New Window.
Rename Cameras. Select Camera, open Context Menu and choose Rename.
Viewing Camera's event history. Select Camera, open Context Menu and choose Check Camera
Issues... Event History form will open and filtering against the selected Camera will apply.
Delete one or multiple Cameras. Select the desired Cameras, open Context Menu and choose Delete.
Go to Cameras Settings. Select the desired Cameras, open Context Menu and choose Camera
Settings...
Export data from one or multiple Cameras to an external file. Select the desired Cameras, open
Context Menu and choose Export Selected to File... Select file name and format. The following formats
are supported:
HTML File
CSV file (text file with delimiters). This file type can easily be imported into Microsoft Excel.
Copy one or several rows to clipboard. Select the desired rows, open Context Menu and choose Copy
Selection to Clipboard. The data can be pasted into any text editor or Microsoft Excel.
Digital Watchdog
39
DW Spectrum User Manual
Adding Cameras and Encoders
This section provides information on how to add cameras to the DW Spectrum resource list.
Choose one of the following methods:
Discovering Cameras Automatically
Disabling Automatic Discovery (Admin Only)
Adding Cameras and Encoders Manually (Admin Only)
Adding RTSP or HTTP Streams as Cameras (Admin Only).
Discovering Cameras Automatically
DW Spectrum provides a powerful and easy-to-use mechanism for automatic camera discovery. It is
required that a camera should be accessible via Broadcast.
As soon as Media Server is started and connected to EC, it automatically performs camera discovery in its
network. Once a camera is discovered, its parameters will be displayed in Resource Tree automatically.
If a camera does not transmit media data, it is marked as Offline.
If Media Server is offline, all Cameras the server is hosting are switched to the offline status
automatically.
Once Camera is discovered, <%PRODUCT NAME%> tries to configure the following settings on Camera:
the best possible image settings for the main video stream (best possible resolution and FPS) and optimal
ones for the secondary stream (240p to 320p, 2 to 7 FPS). To disable this feature, see "Preventing DW
Spectrum from Changing Camera Streaming Settings".
If Camera was deleted (see "Deleting Cameras (Admin Only)") and connected again, it will be rediscovered. Disable this feature to avoid auto camera discovery. See "Disabling Automatic Discovery
(Admin Only)".
Digital Watchdog
DW Spectrum User Manual
40
Disabling Automatic Discovery (Admin Only)
Once Camera is discovered, the only way to delete it is to unplug it from the network (see "Deleting
Cameras (Admin Only)"). However, if Camera is plugged back again, it will be re-discovered. To avoid this
it is possible to disable this feature:
1. Open Main Menu and go to System Settings –> Server.
2. Uncheck Enable camera auto discovery in the Camera Management section.
3. When finished, press OK to apply or Cancel to discard settings.
IMPORTANT. Once the feature is disabled, new cameras will no longer be auto-discovered, only added
manually.
Digital Watchdog
41
DW Spectrum User Manual
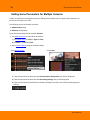
Adding Cameras and Encoders Manually (Admin Only)
If Camera or Encoder is not accessible via broadcast (usually if it is located in a different network), it will
not be discovered automatically. In this case DW Spectrum provides an ability to add Camera manually.
For instance, it can be useful if Camera or Encoder is located in a different network or can even be
accessed via Internet only. It is also possible to add several Cameras simultaneously by scanning a range
of IP addresses.
To add one or more Cameras/Encoders:
1. Right-Click on server in Resource Tree and open Context Menu.
2. Choose Add Camera(s)... The following view will appear:
Digital Watchdog
DW Spectrum User Manual
42
3. Choose one of the following:
To add a single Camera, enter camera's Address (IP or Host Name the Camera can be resolved on)
IMPORTANT.DW Spectrum allows adding Cameras by IP Address, Host Name or Generic RTSP/HTTP
Link (advanced). See "Adding RTSP or HTTP Streams as Cameras (Admin Only)".
To add several Cameras at once, select Subnet Scan:
4. Enter the desired IP range to start scanning. By default, addresses 0-255 of the same subnet are
suggested. As a result, the entire specified network will get scanned for Cameras.
6. Specify authentication parameters in Login and Password fields (if needed).
7. Specify Discovery Port if needed. Most Cameras are discovered on port 80, so it is better to leave on
Auto setting.
8. Press Scan to initiate search. This can take a lengthy period of time (especially if IP Range is being
scanned).
Digital Watchdog
43
DW Spectrum User Manual
9. If Cameras are located, they will be displayed in order.
If Camera is already registered (manually or automatically), it will be displayed though cannot be
selected for addition:
10.Select desired cameras and click Add selected.
Cameras should be added to Resource Tree.
Digital Watchdog
DW Spectrum User Manual
44
Adding RTSP or HTTP Streams as Cameras (Admin Only)
Some camera models are not fully compatible with Onvif Profile S; therefor, will not work properly in DW
Spectrum. However, if such Cameras can provide streams by RTSP or HTTP, they can still be viewed and
recorded.
Note: to add, it is important to check if a particular camera model supports this option plus know the
exact RTSP/HTTP URL of the stream. This information can be found in camera's guide or by contacting the
manufacturer.
To add the stream use the standard manual addition procedure (see "Adding Cameras and Encoders
Manually (Admin Only)").
First, Make sure Subnet Scan is unchecked, then enter RTSP or HTTP URL (i.e. rtsp://<camera
IP>:554/hi_stream) instead of Camera IP.
Once added, Camera will be displayed in Resource Tree as follows way:
It can now be configured as any regular IP Camera (see "Setting Up Cameras").
Note: only one stream can be added per Camera, so Dual-Streaming benefits will not be available
(see "Dual Stream Recording Specifics (RADASS)"). Lastly, if resolution is greater than 720*576, software
motion detection will not be available.
Digital Watchdog
45
DW Spectrum User Manual
Setting Up Cameras
It is possible to configure Cameras for Administrators and Viewers that have the appropriate access
Permission. Administrators can configure all cameras and Viewers can only use the ones that are assigned
to them by Administrators.
A user can locate Camera Settings from Camera's Context Menu.
From Resource Tree:
From Scene:
The following actions can be performed when configuring Camera Parameters:
Renaming Cameras
Obtaining Camera’s IP, MAC , Firmware and Model
Configuring Audio on Camera
Configuring Camera's Authentication
Forcing Aspect Ratio for Cameras
Setting up PTZ on PTZ and Fish-Eye Cameras
Setting Up Fish-Eye Cameras
Setting up Recording Schedule
Setting up Motion Mask and Motion Sensitivity
Configuring Proprietary Camera Parameters
Adjusting Secondary Stream Quality
Forcing Aspect Ratio for Cameras.
Digital Watchdog
DW Spectrum User Manual
46
Setting up Analog Cameras
Typically, Analog Cameras are connected to via Analog Recorders. Each Recorder has a number of
channels that indicates the number of Analog Cameras it can handle. If Recorder is plugged into the
network, it can either be discovered automatically or added manually (see "Adding Cameras and
Encoders"). Encoder with discovered channels looks as the following:
The following types of Analog Cameras are supported:
Analog Cameras plugged into Encoder. Those cameras act like regular Cameras: it is possible to
configure Recording Schedule for them as well as Motion Detection.
Analog Cameras plugged into Recorder. Those cameras are recorded somewhere else so DW Spectrum
only pulls the desired stream from the recorder. It is not possible to configure Recording Scheduleand
Motion Detection for those Cameras.
Digital Watchdog
47
DW Spectrum User Manual
Renaming Cameras (Admin Only)
If a camera is discovered automatically (see "Discovering Cameras Automatically"), it is displayed in
Resource Tree as a predefined sequence ("model"or "manufacturer + model"). For instance, 10005 for
Arecont Vision cameras or DWC-MD421D for Digital Watchdog.
Note: It is possible to configure Cameras for Administrators and Viewers with an appropriate
permission level.
It is recommended to rename same camera models for easier identification. Cameras can be renamed
directly from Resource Tree using Context Menu (or F2):
or in camera settings:
Digital Watchdog
DW Spectrum User Manual
48
IP-addresses are added to a camera name automatically and are non-editable. It is possible to deactivate
displaying IP addresses in Resource Tree.
Digital Watchdog
49
DW Spectrum User Manual
Obtaining Camera’s IP, MAC, Firmware and Model
To obtain Camera's IP and MAC, open camera settings and go to General:
The fields are non-editable.
Note: this information is available for Administrators and Viewers with an appropriate permission
level.
It may be useful to go to Camera's web page by clicking on the appropriate hyperlink to check or set up
Camera's parameters. See "Configuring Proprietary Camera Parameters" for details.
It is possible to check if a camera is accessible by pressing the Ping button.
Digital Watchdog
DW Spectrum User Manual
50
Configuring Audio on Camera
DW Spectrum allows to record audio from Cameras (if camera has this feature and the microphone is
connected to it).
To set up audio recording for the camera open camera settings and go to General:
To enable/disable audio enable or disable the corresponding flag. The settings are applied right after
Apply or OK are clicked.
It may be useful to go to Camera's web page by clicking on the hyperlink. See "Configuring Proprietary
Camera Parameters" for details.
IMPORTANT. It is possible to configure audio for multiple cameras at a time. See “Setting Same
Parameters for Multiple Cameras”.
Digital Watchdog
51
DW Spectrum User Manual
Configuring Camera's Authentication
All Cameras come with a predefined login and password combination. During the discovery process, DW
Spectrum attempts to use manufacturer’s default credentials to access a camera.
However, default login and passwords may vary between models/lines or can be changed deliberately,
which prevents DW Spectrum from accessing Cameras and acquiring media streams. As a result, Camera is
shown as Unauthorized (
view a live stream:
) in Resource Tree. The following message will appear if a user attempts to
UNAUTHORIZED
Please check authentication information in camera settings.
Note: It is possible to configure Cameras for Administrators and Viewers that have the appropriate
permission level.
To get Camera working it is necessary to setup Authorization Parameters:
1. Open Camera Settings and go to Network.
2. Enter Login and Password in the Authentication section and click Apply or OK. To discard changes,
click Cancel.
IMPORTANT. It is possible to configure same authentication credentials for several cameras
simultaneously. See “Setting Same Parameters for Multiple Cameras”.
Digital Watchdog
DW Spectrum User Manual
52
Forcing Aspect Ratio for Cameras
Occasionally, Cameras report an incorrect Aspect Ratio. In such instance, DW Spectrum automatically
corrects Aspect Ratio for Cameras.
Note: this correction will require transcoding if exporting videos from Camera. See "Exporting
Recorded Region from Single Camera".
To specify Aspect Ratio:
1. Open Camera Settings and go to General.
2. Enable Force aspect ratio flag and select the desired ratio. The following AR are available: 1:1, 4:3,
16:9.
3. Disable the flag to restore the original Aspect Ratio.
4. The settings are applied once Apply or OK are clicked.
Digital Watchdog
53
DW Spectrum User Manual
Setting Up Fish-Eye Cameras
DW Spectrum provides advanced capabilities to operate with fish-eye cameras. Such cameras use a
specific type of lens that can cover a much larger viewing area. This particular type of lens warps a picture
and a de-warping algorithm must be enabled to display the picture correctly:
Note: It is possible to configure Cameras for Administrators and Viewers with an appropriate
permission level.
Digital Watchdog
DW Spectrum User Manual
54
In order for DW Spectrum to distinguish cameras with fish-eye lens, the following configuration must be
performed:
1. Open Camera Settings and go to General.
2. Check This is a fish-eye lens camera to activate the Dewarping tab:
Digital Watchdog
55
DW Spectrum User Manual
3. Go to the Dewarping tab to select the following parameters:
Camera's orientation - type of de-warping algorithms based on orientation.
Calibration - to avoid de-warping artifacts, it is important to position the calibration circle within
the Camera's view as accurately as possible. First, try Auto Calibration, then manually adjust the
viewing range (if needed):
Use scrollers to move the circle horizontally or vertically (or drag it with a mouse)
Use a mouse wheel to resize the circle
Camera's view angle.
Note: It is recommended to keep Camera on Scene to monitor any image changes while
adjusting settings.
4. Click Apply or OK when finished. To discard changes, click Cancel.
Once Camera is established as a fish-eye camera, de-warping can be performed. See "De-warping FishEye Cameras" for details.
Digital Watchdog
56
DW Spectrum User Manual
Setting up PTZ on PTZ and Fish-Eye Cameras
DW Spectrum provides a smart and intuitive way for setting up PTZ on Cameras, in addition to easy
controls for PTZ on Fish-Eye Cameras and Screenshots (see "De-warping Fish-Eye Cameras").
PTZ on PTZ Cameras can be set by either Administrator or Viewer (a corresponding permission level is
required – see "User Management"). PTZ on Fish-Eye Cameras/Screenshots is accessible to all users.
This feature is available for PTZ Cameras if:
It is supported by the Camera model (Onvif Cameras only)
Camera is in Live mode
If the requirements are met,
will display on the corresponding camera item.
These restrictions do not apply to Fish-Eye Cameras and Screenshots.
The following PTZ modes are available:
Simple (Zoom only). Refer to the following image:
Use + and - buttons to zoom in/out.
Regular (Zoom and Point). Refer to the following image:
Digital Watchdog
57
DW Spectrum User Manual
Use + and - buttons to zoom in/out. Left-Click on the center circle, Hold Left Mouse Button and move
the cursor to move Camera to the desired position.
Additionally, if Camera supports Absolute Move, the following features will be available:
Save and restore PTZ positions
Setting Up PTZ Tours
Setting Up Home Positions or Tours (see "Home Positions and Tours for PTZ and Fish-Eye Cameras")
Extended (Zoom, Point and additional features). Requires the support for Absolute Move from
Camera and custom integration:
In this case Camera allows moving and zooming as in previous case, plus:
Move to a certain position – Left Click to the desired position
Zoom to a certain range – Hold Left Mouse Button and draw the rectangle to zoom into (see the
above picture)
Full Zoom Out – Double Click.
Fish-Eye Cameras/Screenshots support full PTZ functionality.
After all settings are configured press
once again to hide PTZ controls.
Digital Watchdog
DW Spectrum User Manual
58
Saving and Restoring PTZ Positions
In addition to standard PTZ controls, DW Spectrum allows for managing of predefined PTZ positions. It is
basically possible to set up several points, tilt and zoom presets and restore them with only two clicks or
one hot key.
Then PTZ presets can be used for composing PTZ Tours (see "Setting Up PTZ Tours") or serve as a Home
Position (see "Home Positions and Tours for PTZ and Fish-Eye Cameras").
Note: It is possible to configure PTZ on Cameras for Administrators and Viewers with the appropriate
permission level.
The following is possible:
Saving PTZ positions (simple):
1. Set up a desired PTZ Position on Camera using PTZ Controls (see "Setting up PTZ on PTZ and Fish-Eye
Cameras")
2. Open Context Menu and select PTZ... -> Save Current Position...
Digital Watchdog
59
DW Spectrum User Manual
3. Type a desired preset name.
4. If needed, select a hot key for preset (0-9).
Saving and Editing PTZ positions (advanced):
1. Open Context Menu and select PTZ... -> Manage. The following form will appear:
2. Move the form aside, so that the item and its PTZ controls are fully accessible (as shown at the picture
above).
3. Set up a desired PTZ Position on Camera using PTZ Controls (see "Setting up PTZ on PTZ and Fish-Eye
Cameras").
4. Click Save Current Position.
5. To edit positions set Hotkey and Name if necessary.
6. Set Home Position if necessary (see "Home Positions and Tours for PTZ and Fish-Eye Cameras")
7. Click Apply or OK when finished. To discard changes, click Cancel.
Digital Watchdog
DW Spectrum User Manual
60
Restoring PTZ positions:
Open Context Menu and choose PTZ... -> Go to Position... -> <Desired position> or press the predefined
hot key (0-9).
It is also possible to restore PTZ Positions in Manage PTZ window (Go to Position):
Deleting PTZ positions:
1. Open Context Menu and select PTZ... -> Manage ...
2. Select a desired preset and Click Delete.
Digital Watchdog
61
DW Spectrum User Manual
IMPORTANT. If Position is included in Tour, the deletion may make this Tour invalid.
3. Click Apply or OK when finished. To discard changes, click Cancel.
Digital Watchdog
DW Spectrum User Manual
62
Setting Up PTZ Tours
DW Spectrum allows to create PTZ Tours. PTZ Tour is a sequence of PTZ Positions. It may be useful to
move from one position to another automatically in a cycle to observe large locations by a single Camera.
The following parameters can be configured for PTZ Tours:
Positions. Tour can contain an unlimited number of PTZ Positions.
Stay Time - the duration of time for Camera to stay on PTZ Positions.
Speed - the speed of Camera moving between PTZ Positions.
Digital Watchdog
63
DW Spectrum User Manual
To configure PTZ Tours:
1. Open Context Menu and select PTZ... -> Manage. The following window will appear:
2. Move the form aside, so that the item and its PTZ controls are fully accessible (as shown at the
picture above).
3. Make sure the list of positions contains a minimum of two positions.
4. Click Create Tour. A new item will appear in the bottom section:
Digital Watchdog
DW Spectrum User Manual
Digital Watchdog
64
65
DW Spectrum User Manual
5. Select PTZ Positions to include in Tour:
To add Position click on "+" button
To change, click on the desired Position and select another one:
To change the order of Positions, select desired Position and use arrows on the right to move it up
and down the list.
To delete Position select the desired Position and click on "-" button.
Note: the following restrictions are applied to Tours:
Tour should contain at least two Positions.
It is not recommended to use the same Positions in a row or select the same ones for the first and
last Position.
Warning appears if Tour has several identical positions.
6. Set Stay Time and Speed for each Position.
7. Test Tour by clicking Start Tour in the upper table.
8. Rename Tour if necessary (in the upper table) or set it as Home Tour (see "Home Positions and Tours
for PTZ and Fish-Eye Cameras").
9. Click Apply or OK when finished. To discard changes, click Cancel.
Digital Watchdog
DW Spectrum User Manual
66
Home Positions and Tours for PTZ and Fish-Eye Cameras
DW Spectrum allows setting Home Position or Tour for any PTZ or Fisheye Camera. Home Position or Tour
will be activated on Camera automatically in the following cases:
If there is no active PTZ Tour
If PTZ Position is not changed for Camera for 2 minutes.
To set up Home Position or Tour for Camera:
1. Configure the desired Position (see "Saving and Restoring PTZ Positions") or Tour (see "Setting Up PTZ
Tours").
2. Open PTZ Positions and Tours management dialog:
3. Choose the desired Position or Tour on top and check Home.
Note: only one Position or Tour can be active.
4. Click Apply or OK when finished. To discard changes, click Cancel.
Digital Watchdog
67
DW Spectrum User Manual
Setting up Recording Schedule
To record Camera, Recording Schedule must be set up first.
Note: It is possible to configure Cameras for Administrators and Viewers with an appropriate
permission level.
Note: To record one camera, License is required. See “Obtaining and Activating DW Spectrum Licenses
(Admin Only)”. Even if recording is not performed immediately, the License will still be considered as
used.
The recording schedule specifies the following recording parameters:
Recording Type:
Record Always
Motion Only – records only when motion occurs. Motion recording may require for the camera to
support motion detection.
Motion + Lo-Res Always – by default, a camera is set to record at low resolution unless motion
occurs, at which point it switches recording to high resolution automatically. High resolution
recording requires dual streaming (if supported by camera). See "Dual Stream Recording Specifics
(RADASS)"
Motion Mask and Motion Sensitivity may need to be configured as well (see "Setting up Motion Mask
and Motion Sensitivity").
FPS
Quality
Note: FPS and Quality recording settings will affect live stream viewing as well. For example, if 1 FPS
and Low Quality are set in the recording schedule, DW Spectrum will stream live as per selected settings
even if the camera is capable of more. If recording is not set, DW Spectrum will stream live at Maximum
FPS and Quality.
Those settings are applied to Recording Schedule. See "Modifying Recording Schedule" for details.
Digital Watchdog
DW Spectrum User Manual
68
Dual Stream Recording Specifics (RADASS)
Some Recording Parameters may need Motion to be supported by the Camera. Motion + Low Quality
Always recording requires Dual-Streaming to be supported by Camera.
If Dual-Streaming is supported, the second stream settings are set automatically based on the main
recording settings:
2 to 7 FPS
320p to 480p
Not only is the second stream used for recording, it is also used for Software Motion Detection and
bandwidth and CPU saving during playback. See "Setting up Motion Mask and Motion Sensitivity" and
"CPU and Bandwidth Saving during Playback (RADASS)".
Modifying Recording Schedule
DW Spectrum provides a powerful and flexible schedule for configuring recording parameters.
A specific date and time can be set in the recording schedule as well.
Examples:
Workdays 8AM-8PM – record Always, 24 FPS, high quality
Weekends and Workdays 8PM-8AM – record motion only, 10 fps, low quality
The cameras recorded by Media Servers are marked with a small red circle in Resource Tree:
– camera in recording mode
– camera recording is setup, though not recording at the moment (a license is still being used)
Note: It is possible to configure Cameras for Administrators and Viewers that have appropriate
permissions.
Digital Watchdog
69
DW Spectrum User Manual
To set up Recording Schedule:
1. Open Camera Settings and go to Recording:
IMPORTANT. If Media Server and Client are in different time zones the schedile displays Server
Time.
2. Click Enable Recording. Check the number of licenses used. If the number is insufficient, click Get
More Licenses and proceed with activation.
Click on Display FPS on Grid and Display Quality on Grid to show/or hide FPS and quality in grid cells.
Digital Watchdog
DW Spectrum User Manual
70
3. Select Recording Mode:
Record Always
Motion Only – recording will start if motion occurs. To specify a range for motion recording, use
Record before motion and Record after motion selectors. Motion detection must be supported by
the camera (Software or Hardware).
Motion + Low Quality Always – low quality stream is recorded always and is switched to high
quality streaming once in case of any motion. To use this recording setting, make sure the camera
supports dual-streaming.
If not the following will be displayed:
Do not Record
4. Select Recording Quality
5. Select FPS
IMPORTANT. If making any changes to image parameters for Camera is prohibited for DW Spectrum,
then FPS and Recording Quality changes will not take effect. See "Preventing DW Spectrum from
Changing Camera Streaming Settings (Admin Only)" for details.
6. As soon as all the parameters are selected, click on Schedule Grid:
Click and Drag to select multiple cells
Click on hour to select an entire column
Click on weekday to select an entire row
Click Schedule Grid's top left corner to select all cells
Note: to select same values, hold Alt and click on the cell to choose a recording mode, FPS and values.
7. Repeat to set another recording for different cells
8. If Motion Recording is set, it is possible to adjust Pre-recording and Post-Recording intervals (the time
range between the start and end of motion recording).
9. Click Apply or OK when finished. To discard changes, click Cancel.
In case of insufficient licenses, the following warning will appear:
Enable Recording flag will be disabled; however, all schedule settings will be saved.
Digital Watchdog
71
DW Spectrum User Manual
Example:
Workdays 8AM-8PM – Record Always, 24 FPS, High
Workdays 8PM-8AM – Motion + Low Quality Always, 24 FPS, Medium
Weekends – record motion only, 10 fps, Low
IMPORTANT. Make sure to apply all recording selections to the schedule once selected (recording
type, FPS and quality). The following message will appear in case the selection is not applied.
Digital Watchdog
DW Spectrum User Manual
72
Copying Recording Schedule between Cameras
If Recording Schedule is already set up on Camera it may be needed to copy the settings to a different
one. For instance, if a new camera is plugged in it is much more convenient than set up a schedule
separately.
To copy Recording Schedule:
1. Open Camera the schedule should be copied from, go to Camera Settings -> Recording:
2. Click on the Copy Schedule button. The following form will be opened:
3. Check desired Cameras the schedule should be copied to. To select all Cameras on specific Server
check it. To filter search use the Filter box. Filter criteria is the same as search (see "Search"). If hover
with a mouse cursor on Camera, the actual picture from this Camera will be displayed on the right.
Note: additional Licenses may be needed. See "Obtaining and Activating DW Spectrum Licenses"
for details.
4. Click Apply or OK when finished. To discard changes, click Cancel.
Digital Watchdog
73
DW Spectrum User Manual
Setting up Motion Mask and Motion Sensitivity
In order to detect motion more properly and accurately, DW Spectrum provides a powerful and flexible
Motion Detection configuration. For example, if a camera is pointed at a parking lot, motion mask can be
set on all the surrounding areas that are not targeted for recording. In this case, any motion appearing in
the areas surrounding the main target area, will not trigger motion detection and recording.
IMPORTANT. This particular feature in DW Spectrum works only if the selected camera supports
Motion Detection.
The following Motion Detection types are supported:
Hardware Motion Detection – implemented on Cameras directly. In this case only motion mask can be
configured. To configure additional parameters it may be necessary to go to Camera Settings web
page (see "Configuring Proprietary Camera Parameters").
Software Motion Detection is performed on Media Server. It consumes more resources, though it
provides better and more flexible motion detection. In this case, it is possible to set up unlimited
number of motion regions and adjust its sensitivity. Software Motion Detection requires DualStreaming supported by Camera. If supported, Software Motion Detection is set automatically
(excluding Arecont Vision cameras).
Digital Watchdog
DW Spectrum User Manual
74
To set up Motion Detection:
1. Open Camera Settings and go to Motion:
If red zones appear on the grid during motion, Motion Detection is supported. Red cells indicate the
level of motion (the higher the motion level, the brighter the cells).
2. Select the type of motion detection (Hardware or Software). If none are active, the camera does not
support Motion Detection at all.
3. Select Sensitivity on the slider. 0 is motion mask (minimal sensitivity, motion will not be detected on
the selected region); 9 is the highest sensitivity.
Digital Watchdog
75
DW Spectrum User Manual
4. Select the desired regions the sensitivity will be applied to:
Click and Drag to select a single region
Ctrl + Click and Drag to add another region
Click on a region to fill it with desired sensitivity
To set Motion Mask just Click and Drag. There is no need to adjust Motion Sensitivity.
5. Repeat for each desired sensitivity. Use Reset Motion Regions to start over.
The above picture illustrates the following:
the area marked in grey will not capture motion (Motion Mask)
the green area will capture motion with very low sensitivity
top right and bottom left corners will capture motion with standard sensitivity
for other regions, the sensitivity will be high.
6. Click Apply or OK when finished. To discard any changes, click Cancel.
It is possible to set up motion directly from camera’s web page. For this purpose, use Camera Motion Web
Page link on the Motion tab.
Digital Watchdog
DW Spectrum User Manual
76
Configuring Proprietary Camera Parameters
DW Spectrum allows configuring basic image settings inside the software. These settings are available for
Onvif-compliant cameras only.
Note: It is possible to configure Cameras for Administrators and for Viewers that have the appropriate
permissions.
To go to proprietary camera settings:
1. Open Camera settings and select Advanced.
2. Configure desired Camera Parameters:
Note: If the list is empty, Camera does not support configuring (not Onvif-Compliant).
All settings are applied immediately. Best practice is to leave a video Item on the Scene while configuring
its parameters.
Digital Watchdog
77
DW Spectrum User Manual
Other proprietary camera parameters such as Authorization, Network Settings etc. can be configured
directly from camera’s web page.
1. Open Camera settings and select General.
2. Enter Authentication Parameters if the camera requires authentication (Admin only).
3. Click on Web Page. The browser will open camera’s web page.
Web page may be inaccessible because it can be located on a different network. To check camera
accessibility, press the Ping button prior to opening the web page.
Additionally, the following can also be performed:
Resetting Camera
Upgrading Camera's Firmware.
Resetting Camera
DW Spectrum allows for cameras to be reset to factory defaults. These settings are available for Onvifcompliant cameras only.
Note: It is possible to configure Cameras for Administrators and Viewers with an appropriate
permission level.
To go to proprietary camera settings:
1. Open Camera settings and select Advanced.
2. Go to Maintenance.
Note: If the list is empty, Camera does not support configuring (not Onvif-Compliant).
3. Choose one of the following:
System Reboot – reboot Camera and save settings
Soft System Factory Default – reboot Camera and restore all settings related to the image
Hard System Factory Default – reboot Camera and restore all settings (Network, Authorization, etc).
The reboot is performed instantly once selected.
It is also possible to reboot Camera from its Web Page. See "Configuring Proprietary Camera Parameters".
Digital Watchdog
DW Spectrum User Manual
78
Upgrading Camera's Firmware
DW Spectrum allows for Cameras Firmware upgrade from within the application. These settings are
available for Digital Watchdog cameras only.
Note: It is possible to configure Cameras for Administrators and Viewers with an appropriate
permission level.
IMPORTANT. To enable this feature, Camera must have Internet Access.
To go to proprietary camera settings:
1. Open Camera settings and select Advanced
2. Go to Maintenance –> Firmware Upgrade
Note: If the list is empty, Camera does not support configuring (not Onvif-Compliant).
3. Click on Check Upgrade. The coordinates of Digital Watchdog FTP Server (Address, Port, Login and
Password) are predefined.
4. If a camera has Internet access, the application will check for any available upgrades automatically.
5. If a newer version of firmware is found, click OK to run upgrades. The application will automatically
reboot once upgrades are completed.
It is possible to upgrade Camera Firmware from its Web Page. See "Configuring Proprietary Camera
Parameters" for details.
Digital Watchdog
79
DW Spectrum User Manual
Adjusting Secondary Stream Quality
DW Spectrum's architecture provides significant CPU and network bandwidth savings by acquiring
multiple streams from a single camera: High Resolution (regular) and Low Resolution (approximately x10
less bandwidth). The second stream is always decoded by Media Server and is used for the following:
Software Motion Detection
CPU and Bandwidth Saving during Playback (RADASS)
The quality of the second stream is set automatically, however, it is possible for User to adjust the quality
of the stream.
IMPORTANT. Higher quality of the second stream provides for a much better look and feel (especially
on larger monitors), but can significantly increase CPU load on Media Server. It is not recommended to
change these settings.
To adjust the quality of the second stream:
1. Open Camera Settings and go to Expert.
2. Check I have read the manual and understand the risks.
3. Adjust Secondary stream quality.
4. Click Apply or OK when finished. To discard changes, click Cancel.
Note: If Camera does not support dual-streaming, the above settings are unavailable.
Digital Watchdog
DW Spectrum User Manual
80
Preventing DW Spectrum from Changing Camera Streaming
Settings (Admin Only)
Once Camera is discovered, <%PRODUCT NAME%> attempts to configure the following settings on
Camera: the best possible image quality for the main video stream (best possible resolution and FPS) and
optimal quality for the secondary stream.
In some cases it may be necessary to set up custom stream settings on Cameras. <%PRODUCT NAME%>
allows this as well.
IMPORTANT. In this case DW Spectrum can record Camera with specified settings only. It will not be
possible to set up FPS and Quality when configuring Recording Schedule (see "Modifying Recording
Schedule").
To disable automatic adjustment for one or multiple Cameras:
1. Stop recording of the desired Cameras and close them.
2. For each Camera go to its Web Page and set all desired image settings.
3. Select one or multiple Cameras, then open Camera Settings and go to Expert.
4. Check I have read the manual and understand the risks.
5. Check Keep camera streams' and profiles' settings.
6. Click Apply or OK when finished. To discard changes, click Cancel.
To disable automatic adjustment for all Cameras:
1. Disable recording for all cameras and close them (if opened for viewing).
2. For each Camera go to its Web Page and set desired image settings.
3. Open Main Menu and go to System Settings –> Server.
4. Remove Enable automatic camera settings optimization flag.
5. Click OK when done or Cancel to discard changes.
Digital Watchdog
81
DW Spectrum User Manual
Setting Same Parameters for Multiple Cameras
In order to simplify the configuration process, DW Spectrum enables users to apply same parameters to
more than one camera at a time.
The following can be performed as a batch:
Authentication setup
Schedule configuration
To set the same parameters for multiple Cameras:
1. Use Multi-Selection to select desired cameras:
In Resource Tree, hold Ctrl or Shift and Click
On Scene – use Ctrl and Click
2. Open Context Menu and go to Camera Settings.
From Resource Tree:
From Scene:
If the selected cameras share the same Authentication Credentials, they will be displayed.
If the selected cameras share the same Recording Settings, they will be displayed.
If the selected cameras have different Enable recording field values, the field will be displayed as
follows:
Digital Watchdog
DW Spectrum User Manual
82
3. Set the desired parameters and click Apply.
If needed, a user can add a camera to the selection by holding the Ctrl button and clicking on the
desired camera in Resource Tree.
To set up another camera(s), select the desired camera in Resource Tree. It is not necessary to close
the settings dialog.
If the changes are not applied, the following warning message will appear:
4. When finished, press OK to apply or Cancel to discard settings.
Digital Watchdog
83
DW Spectrum User Manual
Swapping Cameras between Media Servers (Admin Only)
If too many cameras are used on the network, it may be helpful to set up an additional server for load
balancing and redundancy purposes. If several servers are set up on the same network, it is possible to
perform manual load-balancing.
This is how camera swapping works:
1. Step 1: Media Server is connected to EC and starts discovering Cameras. As soon as Cameras are
discovered, they will appear in the Client.
2. Step 2: Media Server is connected to EC and starts discovering Cameras. As soon Cameras are
discovered, their MAC Addresses are checked. If Camera is registered on Media Server, it will not
appear in the Client and a “Disabled” flag is set in the database.
3. Once Camera is moved to another Media Server, it becomes Enabled in the second Media Server and
automatically disables itself in the first one.
IMPORTANT. When moving Camera from one Media Server to another, recording will be restarted
automatically (with predefined parameters). Also, Archive is seamlessly combined from all servers.
To move camera(s) from one server to another:
1. Hold Ctrl or Shift to select the desired cameras in Resource Tree
2. Drag and drop the selected cameras to the desired server
IMPORTANT. In order to move Camera from one Media Server to another, the cameras must be
discovered by both servers. If not, the following warning will appear:
Digital Watchdog
DW Spectrum User Manual
84
Deleting Cameras (Admin Only)
IMPORTANT. Camera must be offline (unplugged from the network) to be deleted.
To delete Camera(s):
1. Expand the Media Server hosting the desired server in Resource Tree.
2. Find and select Camera.
3. Right-Click for Context Menu and choose Delete (or the Del button on a keyboard).
4. Click Yes to confirm.
If Camera is back online, it will start working immediately. Recorded archive will be available as well;
however, a user will need to reconfigure Camera as its settings have been erased. To prevent this from
happening, User must disable automatic discovery. See "Disabling Automatic Discovery (Admin Only)" for
details.
Digital Watchdog
85
DW Spectrum User Manual
Configuring Events and Actions (Admin Only)
DW Spectrum provides powerful and flexible event bus than can be used for simple and intuitive
programming of any algorithm.
Algorithms are a set of Rules. Each Rule is a combination of Event-Action. As soon as Event is fired up, DW
Spectrum triggers the appropriate Action.
The following events and actions are supported:
Events:
Actions:
Motion on Camera
Notifications
Camera Disconnection/Malfunction
Visual Event Indication
Storage Failure
Mail Notifications
Network Issue
Start Recording on Camera
Camera IP Conflict
Start Panic Recording
Input Signal on Camera
Trigger Camera Output
Media Server Failure
Play Sound
Media Servers Conflict
Speak.
EC Connection Lost
Licenses are Not Configured
E-mail is not Set for Users
Storages are not Configured.
Every Event that has occurred is automatically saved in system's Event Log. If no Rules are active, only
system issues will be saved. See "Viewing Events Log" for details.
IMPORTANT. Some default Rules are already configured. See "Default Rules" for details. It is possible
to reset all Rules configurations to default settings. To reset, click on Reset Default Rules and Apply or
OK. All previously configured Rules will be discarded.
Digital Watchdog
DW Spectrum User Manual
86
To configure Rules:
1. Do one of the following:
To configure Global Rules: open Main Menu and go to Alarm/Event Rules (or press CTRL + E). It is
possible to configure Rules for specific Camera(s). To proceed, type the desired Camera name, IP or
MAC address into the Filter box. Only Rules that are applied to a corresponding Camera will be
displayed.
To configure Rules for a single Camera: open Camera's Context Menu and select Camera Rules or
open Camera Settings, then click Camera Rules...
The following dialog will open:
2. To add a new Rule, click Add. To delete an existing-one, click Delete.
Digital Watchdog
87
DW Spectrum User Manual
3. Once added, Rule should be configured.
Select Event on the left-hand side that needs to be monitored. See "Tracked Events" for more
information
Select Action on the right-hand side that needs to be performed once Event occurs. Refer to
"Actions" for details
Specify basic parameters for Event and Action. Click on Source or Target column in the Rule row and
choose the desired value.
IMPORTANT. If some fields are missing or incorrect, Rule is considered invalid. In this case, it will
turn red:
Set Aggregation period. Once set, all Actions will be executed once per the specified period. If
not, Actions will be executed every time Events occur. Applies to Notifications, Mail Notifications,
Play Sound, Speak.
If any additional configuration is needed, click Advanced... The advanced settings will be displayed
on the bottom. Those settings differ from each other depending on Events/Actions that are being
configured. See this chapter for more information on a specific Event/Action.
Add Comments for Rule if needed.
4. Set or clear the flag (on the left-hand side of each Rule) to enable or disable it.
5. As soon as all configurations are done, click Apply to accept changes or Cancel to discard. Click OK to
apply changes and close the form.
IMPORTANT. If any Rule is considered invalid, the warning displayed below will appear. If apply the
changes, incorrect Rules will be disabled.
Digital Watchdog
DW Spectrum User Manual
88
Tracked Events
DW Spectrum can react as soon as a particular Event occurs.
Every tracked event may have its own parameters. Refer to the particular Event description for more
information:
Motion on Camera
Camera Disconnection/Malfunction
Storage Failure
Network Issue
Camera IP Conflict
Input Signal on Camera
Media Server Failure
Media Servers Conflict
EC Connection Lost
Licenses are not Configured
E-mail is not Set for Users
E-Mail Server is not Configured
Storages are not Configured
Media Server Started.
As soon as Event occurs, the Action can be performed. See "Actions".
Additionally, Events can be tracked based on the schedule. For instance, Motion can be tracked only on
weekends and Input Signal – at 8PM-8AM. See "Setting up Schedule for Tracking Events" for details.
Finally, all Events are recorded in Log. See "Viewing Events Log" and "Write to Log".
Digital Watchdog
89
DW Spectrum User Manual
Setting up Schedule for Tracking Events
Events can be tracked based on the schedule. For instance, Motion can be tracked only on weekends and
Input Signal – at 8PM-8AM.
The schedule can be configured as advanced parameters for the desired Event:
1. Open Event Advanced Parameters by clicking on Advanced on the Alarm/Event Rules form. The
advanced settings will be displayed on the bottom.
2. Click on Schedule... The following form will be displayed:
3. Select On or Off to enable/disable monitoring in particular cells.
4. Click on Schedule Grid:
Click and Drag to select multiple cells
Click on hour to select an entire column
Click on weekday to select an entire row
Click Schedule Grid's top left corner to select all cells
The above example shows that the event is tracked on workdays (Sun-Fri) since 8AM till 8PM.
By default, events are always tracked.
Digital Watchdog
DW Spectrum User Manual
90
Motion on Camera
Occurs if motion is detected on Camera(s).
Basic Parameters
Camera(s) motion is detected on. To specify:
1. Click on Any Camera at the desired row on the Alarm/Event Rules form. The following form will
appear:
2. Check the cameras to detect motion, then click OK (Cancel will discard changes).
To select all Cameras on a specific Server, set the flag on it. To filter search, use the Filter box. Filter
criterias are the same as search (see "Search"). It is possible to Drag'n'Drop the selected Cameras from
Resource Tree onto the Event's advanced settings form.
IMPORTANT. To detect motion, recording must be enabled on Camera. Refer to "Modifying
Recording Schedule" for information on how to enable recording. If the selected Camera is not being
recorded, then the corresponding message will be displayed (see above).
If cameras are not specified, motion will be detected on all the cameras that support it.
Digital Watchdog
91
DW Spectrum User Manual
Advanced Parameters
Schedule (see "Setting up Schedule for Tracking Events").
Starts/Stops. Available only for instant actions (Send Mail, Show Notification, Camera Output). If no
motion occurs for 3 seconds, the current motion Event is considered stopped. When motion occurs
again, a new motion Event is generated.
May result in
Camera Recording.
Panic Recording.
These actions are performed while motion is taking place on at least one camera out of the selected.
Send Mail.
Show Notification.
Camera Output.
These actions will be performed if motion is detected on at least one camera out of the selected.
Why Event may work incorrectly
Recording is disabled for Camera(s) that are being monitored. Refer to "Modifying Recording Schedule"
for information on how to enable recording for Camera.
Motion Mask is not set properly. See "Setting up Motion Mask and Motion Sensitivity".
Too many Cameras are monitored and too many Events occur.
Cameras that are monitored are offline.
Action is not configured properly. See the Action's description for details.
Notifications for this type of Event is hidden in system settings. See "Notifications" for more details.
Digital Watchdog
92
DW Spectrum User Manual
Camera Disconnection/Malfunction
Occurs if Camera(s) is/are disconnected for whatever reason (network, Camera malfunction etc.). Camera
is considered disconnected if no data is received for 10 seconds. Once data is received from Camera, the
status is automatically changed back to Online.
If Camera is experiencing network issues over a minute, then
is appear in Resource Tree.
Additional Events may occur as well and may help to investigate the issue:
Network Issue. This means that network is unable to transfer data between Camera and Media Server,
which may be the reason why a camera goes offline.
Media Server Failure. If Media Server is down, all hosted Cameras drop offline.
Camera IP Conflict. If another Camera with the same IP enters the network, one of these two Cameras
will go offline.
Media Servers Conflict. If a new Media Server is connected to another Enterprise Controller on the
same network and pulls data from the same Cameras, then some Cameras may drop offline because
they may not provide several streams simultaneously.
Digital Watchdog
93
DW Spectrum User Manual
Basic Parameters
Camera(s). To specify:
1. Click on Any Camera at the desired row on the Alarm/Event Rules form. The following form will
appear:
Digital Watchdog
DW Spectrum User Manual
94
2. Check the cameras to track, then click OK (Cancel will discard changes).
To select all Cameras on a specific Server, set the flag on it. To filter search, use the Filter box. Filter
criteria are the same as search (see "Search"). It is possible to Drag'n'Drop the selected Cameras from
Resource Tree onto the Event's advanced settings form.
If Cameras are not specified, all Cameras will be monitored.
Advanced Parameters
Schedule (see "Setting up Schedule for Tracking Events").
May result in
Send Mail.
Show Notification.
Camera Output.
Why Event may work incorrectly
Too many Cameras are monitored and too many Events occur.
Cameras being monitored are offline.
Action is not configured properly. See the Action's description for details.
Notifications for this type of Event is hidden in system settings. See "Notifications" for more details.
Digital Watchdog
95
DW Spectrum User Manual
Storage Failure
Occurs if Media Server is unable to write data on one or more Storages. This may be caused by the
following:
Hard disk malfunction.
Insufficient rights. The permission to write on disk or recorded folder may be restricted by the
computer Administrator.
Hard disk is too slow: too many cameras are recorded and hard disk cannot record on such speed. It
may be useful to add another hard disk drive.
Disk is full. By default, Media Server writes data to disk in a circular pattern: as soon as free disk space
falls below 5 Gb, oldest data will erase automatically. However, if the disk is full by any foreign data
and free space is less than 5 Gb, Media Server writes data on disk and erases it immediately. In this
particular case, the following Event occurs.
If no Storages are selected to write to, Storages are not Configured is fired up.
Basic Parameters
None
Advanced Parameters
Schedule (see "Setting up Schedule for Tracking Events").
Why Event may work incorrectly
Notifications for this type of Event is hidden in system settings. See "Notifications" for more details.
Digital Watchdog
DW Spectrum User Manual
96
Network Issue
Occurs if network is unable to transfer data between Camera and Media Server and packet loss is
detected. That may cause for frame rate to drop on Camera(s). If no frames are received from Camera for
10 seconds, Camera is considered offline. Camera Disconnection/Malfunction event is then generated in
this particular case.
Basic Parameters
None
Advanced Parameters
Schedule (see "Setting up Schedule for Tracking Events").
Why Event may work incorrectly
Notifications for this type of Event is hidden in system settings. See "Notifications" for more details.
Camera IP Conflict
Occurs If another Camera with the same IP has entered the network, resulting in one of these two
Cameras to go offline. Camera Disconnection/Malfunction event is then generated in this particular case.
Basic Parameters
None
Advanced Parameters
Schedule (see "Setting up Schedule for Tracking Events").
Why Event may work incorrectly
Notifications for this type of Event is hidden in system settings. See "Notifications" for more details.
Digital Watchdog
97
DW Spectrum User Manual
Input Signal on Camera
Occurs if input signal is detected on Camera(s). DW Spectrum may detect input signals on the following
cameras:
ONVIF-compliant (input support via ONVIF may vary from camera to camera)
Axis.
Basic Parameters
Camera(s) the input signal is detected on. To specify:
1. Click on Any Camera at the desired row on the Alarm/Event Rules form. The following form will
appear:
Note: Cameras that do not support input, are highlighted in red.
2. Check the cameras to detect input, then click OK (Cancel will discard changes).
To select all Cameras on a specific Server, click on the check box. To filter search, use the Filter box.
Filter criteria are the same as search (see "Search"). It is possible to Drag'n'Drop the selected Cameras
from Resource Tree onto the Event's advanced settings form.
IMPORTANT. To detect input signals, input must be supported on Camera. If the selected Camera
does not support input, then the corresponding message will be displayed (see above).
If do not specify the particular cameras, then input signal will be detected on all the cameras that
support input.
Digital Watchdog
DW Spectrum User Manual
98
Advanced Parameters
Schedule (see "Setting up Schedule for Tracking Events").
Starts/Stops. Available only for instant actions (Send Mail, Show Notification, Camera Output).
May result in
Camera Recording.
Panic Recording.
These actions will be performed while input signal is taking place on at least one camera out of the
selected.
Send Mail.
Show Notification.
Camera Output.
These actions will be performed once input signal is detected on at least one camera out of the
selected.
Why Event may work incorrectly
Motion is not supported on Camera(s) that is being monitored.
Too many Cameras are monitored and too many Events occur.
Cameras that are being monitored are offline.
Action is not configured properly. See the Action's description for details.
Notifications for this type of Event is hidden in system settings. See "Notifications" for more details.
Media Server Failure
Occurs if Media Server is down (either hardware/software issue or manual shutdown). In this case, all
hosted on Media Server Cameras are dropped offline.
Basic Parameters
None
Advanced Parameters
Schedule (see "Setting up Schedule for Tracking Events").
Why Event may work incorrectly
Notifications for this type of Event is hidden in system settings. See "Notifications" for more details.
Digital Watchdog
99
DW Spectrum User Manual
Media Servers Conflict
Occurs if a new Media Server is connected to another Enterprise Controller on the same network and
pulls data from same Cameras. In this case, some Cameras may drop offline because they may not provide
several streams simultaneously. This results in Camera Disconnection/Malfunction Event.
Basic Parameters
None
Advanced Parameters
Schedule (see "Setting up Schedule for Tracking Events").
Why Event may work incorrectly
Notifications for this type of Event is hidden in system settings. See "Notifications" for more details.
EC Connection Lost
Occurs if connection to Enterprise Controller is lost for whatever reason (network issue or EC is down). In
this case, the connection icon in the top right corner becomes red ( ) and Notification is displayed.
If User clicks on the notification, then login dialog will automatically open. See "Connecting to Enterprise
Controller and Working Offline".
This notification will hide automatically as soon as the connection is restored.
Why Event may work incorrectly
Notifications for this type of Event is hidden in system settings. See "Notifications" for more details.
Licenses are not Configured
Occurs if no Licenses are activated. In this case, Notification is displayed.
In this case, it is not possible to record Cameras and view Analog Cameras.
If User clicks on the notification, then license dialog will automatically open. See "Obtaining and
Activating DW Spectrum Licenses".
This notification will hide automatically as soon as one License is activated.
Why Event may work incorrectly
Notifications for this type of Event is hidden in system settings. See "Notifications" for more details.
Digital Watchdog
DW Spectrum User Manual
100
E-mail is not Set for Users
Occurs if E-Mail address is not set up:
Viewer is notified if an email address is not configured.
Administrator is notified if a User does not have an email address specified.
In this case, Notification will be displayed.
If click on the notification, User's mail settings dialog will open. See "Changing User Settings".
If User does not have an e-mail address, that user is unable to receive mail notifications.
This notification will hide automatically as soon as all email addresses are configured (for Admin) or
individual email address is set (Viewer).
Mail Notifications may not work if E-Mail Server is not configured. In this case, Error while Sending E-Mail
notification will appear.
Why Event may work incorrectly
Notifications for this type of Event is hidden in system settings. See "Notifications" for more details.
E-Mail Server is not Configured
Occurs if E-Mail Server is not configured. In this case, Notification is displayed.
If E-Mail Server is not configured, mail notifications cannot not be sent.
If click on the notification, Mail Server settings dialog will open. See "Mail Notifications" for details.
This notification will hide automatically as soon as all E-Mail Server parameters are configured.
Mail Notifications may not work if E-mail is not Set for Users. In this case, Error while Sending E-Mail
notification will appear.
Why Event may work incorrectly
Notifications for this type of Event is hidden in system settings. See "Notifications" for more details.
Error while Sending E-Mail
Occurs when E-Mail Notification fails. In this case, Notification is displayed.
If click on the notification, Mail Server settings dialog will open. See "Mail Notifications" for details.
Digital Watchdog
101
DW Spectrum User Manual
Storages are not Configured
Occurs if no Storages are selected (recording flag might have been removed accidentally).
In this case, Notification is displayed.
If Storages are not configured, it is not possible to record Cameras.
If click on the notification, storage configuration dialog will open. See "Configuring Media Server Storages
(Admin Only)".
This notification will hide automatically once Storage has a recording flag set up.
Why Event may work incorrectly
Notifications for this type of Event is hidden in system settings. See "Notifications" for more details.
Media Server Started
Occurs when any Media Server registered in the system has started.
Basic Parameters
None
Advanced Parameters
Schedule (see "Setting up Schedule for Tracking Events").
Why Event may work incorrectly
Notifications for this type of Event are hidden in system settings. See "Notifications" for more details.
Digital Watchdog
DW Spectrum User Manual
102
Actions that DW Spectrum Can Do
DW Spectrum reacts differently to each Event. The result is called Action. Each Action that is fired up by
the software may have its own parameters. Refer to the particular Action description for more
information:
Notifications
Visual Motion Indication
Mail Notifications
Start Recording on Camera
Start Panic Recording
Trigger Camera Output
Play Sound
Repeat Sound
Speak
Write to Log.
See "Tracked Events" for detailed information on Events.
Digital Watchdog
103
DW Spectrum User Manual
Notifications
DW Spectrum provides a powerful
notification mechanism for notifying Users of
Events that occur. When Event occurs, right
Panel starts blinking (the color varies
depending on the importance of the
notification). Notification Types:
System Messages (red) – something is not
properly configured. Can be fixed.
Warnings () – critical event (Camera
disconnected, Media Server failure, etc).
Notifications – non-critical events
(motion, input signal, etc).
If a user opens the panel, the following will
be displayed (on the right):
Digital Watchdog
104
DW Spectrum User Manual
It is possible to perform the following:
Obtain additional information by hovering over the notification with a mouse cursor. The information
will appear on the left:
Motion Detection and Input Signals – the frame from Camera the Event occurred at and additional
information. Click on the notification or additional information to open Camera to view its archive
for event specifics.
Network Issue on Camera – the last frame received from Camera and additional information. Click
on the notification or additional information to open Camera Settings.
Issues related to System Messages – additional information. Click on the notification to go to the
appropriate dialog.
When clicking on notification or detailed information, the corresponding action will be performed:
Motion or Input on Camera – Camera will be opened in a new Tab.
Camera IP Conflict – Camera's Web Page will be opened in a browser
Camera Network Issue – Camera's Settings form will be opened
Media Server Failure or Storage Issue – Server Settings form will be opened
E-Mail Issue – E-Mail Server Settings form will be opened
License Issue – License Form will be opened
Connection is Lost – connection dialog will be opened
Media Server Conflict – no action
Close the notification. Either Right Click or hover over with a mouse cursor to obtain additional
information and click on the cross sign in the top right corner. Green and yellow notifications will
eventually disappear.
View Event Log. Click on
.
Go to Event Settings. Click on
Digital Watchdog
.
105
Show/Hide notifications of this particular type. Click on
Settings –> Notifications:
DW Spectrum User Manual
or Open Main Menu and go to System
Select notifications types that should be displayed. Click Apply or OK when finished. To discard
changes, click Cancel.
Digital Watchdog
DW Spectrum User Manual
Basic Parameters
Type of Users notifications are displayed to:
All users
Administrators only.
Advanced Parameters
Aggregation Period
May be caused by
All Events.
Why Action may work incorrectly
Some notifications are disabled.
Event is not configured properly. See Event description for details.
Digital Watchdog
106
107
DW Spectrum User Manual
Visual Event Indication
If too many Cameras are opened at the same time, it becomes very difficult to locate a specific Camera
when Event occurs. DW Spectrum provides a powerful and intuitive way to highlight a specific object on
Scene if Event occurs:
The following Events are indicated:
Motion on Camera Network Issue and Input Signal on Camera – visualization on Camera
Server Issue – visualization on Media Server Monitoring Widget if Media Server is being monitored
(see "Monitoring Media Servers (Admin Only)").
The action is always enabled and does not require configuration.
Digital Watchdog
DW Spectrum User Manual
108
Mail Notifications
DW Spectrum can send E-mails to Users or to additional addresses when Events occur.
IMPORTANT. E-Mails cannot be sent if E-Mail Server is not configured. In this case, E-Mail Server is
not Configured notification is shown up. See "Configuring Mail Server for E-Mail Notifications" for more
details.
Basic Parameters
Users the E-Mails should be sent to:
To filter search, use the Filter box. Filter criteria is the same as search (see "Search"). It is possible to
Drag'n'Drop selected Users from Resource Tree onto Action's advanced settings form.
IMPORTANT. E-Mails will be sent to Users' E-Mail addresses. If E-Mail address is not configured for
User, then the user cannot receive E-Mails (see above). E-mail is not Set for Users notification is
generated in this case. See "Changing User Settings" for information on how to set up E-Mail for User.
Note: To send E-Mails to additional addresses, see advanced parameters.
Advanced Parameters
Additional Recipients – additional E-Mail addresses to send notifications to. Several recipients must
be separated by the ";" symbol.
Aggregation.
Digital Watchdog
109
DW Spectrum User Manual
Note: Click on Global Email Settings to configure E-Mail Server parameters.
As soon as event occurs, a mail notification is sent as follows:
E-Mail message about motion on Camera containing the link that opens Web-Client, starts playing the
camera at this particular moment.
May be caused by
All Events.
Why Action may work incorrectly
E-Mail Server is not configured. In this case, E-Mail Server is not Configured notification will appear. See
"Configuring Mail Server for E-Mail Notifications" for more details.
Event is not configured properly. See Event description for details.
Digital Watchdog
DW Spectrum User Manual
110
Configuring Mail Server for E-Mail Notifications
In order to send Mail Notifications on Events, E-Mail Server should be configured. To configure E-Mail
Server:
1. Choose from one of the following:
Open Main Menu and go to System Settings –> Server
Open advanced parameters of any Email notification on Alarm/Events Rules form and click Global
Email Settings...
2. Choose quick or advanced E-Mail Server setup (see below for reference).
3. When finished, press OK to apply or Cancel to discard settings.
Quick E-Mail Server Setup
E-Mail/Password – address and password of the mail account, which will be used for outgoing mail.
DW Spectrum will handle the rest.
System Signature – name of the DW Spectrum installation. Will appear as follows:
Digital Watchdog
111
DW Spectrum User Manual
Note: click Test to ensure that the settings are correct. If test fails:
If the result is "Cannot test such parameters", the domain name is not supported. It is necessary to
switch to Advanced mode and set up the server manually.
If the result is different, the error message will be displayed:
Advanced E-Mail Server Setup
The parameters are the same as in Simple Setup plus:
SMTP Server: E-Mail server address
Port – SMTP Port
Connection type: (Secure (TLS), Secure (SSL), Unsecure).
Note: click Test to ensure that the settings are correct. If test fails:
Try a different SMTP Port
Try a different connection type.
Digital Watchdog
DW Spectrum User Manual
112
Start Recording on Camera
Starts recording on Camera(s) when Event occurs. For instance, if Motion is detected on Cameras 1, 2 or 4,
recording on Cameras 4, 5 and 6 will start.
Basic Parameters
Camera(s) to record. To specify:
1. Click on Select at least one camera in the desired row on the Alarm/Event Rules form. The
following form will appear:
2. Check the cameras to record, then click OK (Cancel will discard changes).
To select all Cameras on a specific Server, check the corresponding box. To filter search, use the Filter
box. Filter criteria is the same as search (see "Search"). It is possible to Drag'n'Drop the selected
Cameras from Resource Tree onto the Action's advanced settings form.
IMPORTANT. To record Camera on Event, recording must be enabled on Camera. Refer to
"Modifying Recording Schedule" for information on how to enable recording. If the "Recording" flag
is not set on the selected Camera, the following message will be displayed (see above).
Digital Watchdog
113
DW Spectrum User Manual
Advanced Parameters
Quality and fps – target recording parameters for Camera(s). If Camera's maximum FPS is lower than
specified, maximum FPS will be acquired.
Post-recording – the time it takes for the recording to be performed after the event is f complete.
May be caused by
Motion on Camera
Input Signal on Camera.
Why Action may work incorrectly
Recording is not enabled on Camera. Refer to "Modifying Recording Schedule" for information on how
to enable recording.
Event is not configured properly. See the Event description for details.
Digital Watchdog
DW Spectrum User Manual
Start Panic Recording
Starts Panic Recording when Event occurs.
Panic Recording mode switches Recording Settings for all Cameras to maximum FPS and Quality.
Note: if Recording is not enabled for Camera, Panic Recording will not be activated.
Current Panic Recording status can be viewed:
in Recording Schedule (see "Modifying Recording Schedule")
in server's settings (see "Obtaining and Configuring Media Server’s Additional Settings (Admin
Only)").
Basic Parameters
None.
Advanced Parameters
None.
May be caused by
Motion on Camera
Input Signal on Camera.
Why Action may work incorrectly
Event is not configured properly. See Event description for details.
Digital Watchdog
114
115
DW Spectrum User Manual
Trigger Camera Output
It is possible to generate output via two different methods:
Output – generates output on Camera(s) while Event occurs and stops when Event ends.
Camera output for 30 seconds – generates output on Camera(s) when Event occurs and stops output in
30 seconds.
Basic Parameters
Camera(s) output is triggered on. To specify:
1. Click on Select at least one camera in the desired row on the Alarm/Event Rules form. The
following form will appear:
2. Check the cameras to trigger output, then click OK (Cancel will discard changes).
To select all Cameras on a specific Server, check the corresponding box. To filter search, use the Filter
box. Filter criteria is the same as search (see "Search"). It is possible to Drag'n'Drop the selected
Cameras from Resource Tree onto the Action's advanced settings form.
IMPORTANT. To trigger output signals, output must be supported on Camera. If the selected
Camera does not support output, then the corresponding message will be displayed (see above).
Digital Watchdog
DW Spectrum User Manual
116
Advanced Parameters
Output ID – reserved for multi-channel recorder support.
Auto-reset in (sec) – if checked, the output will be reset automatically after the specified period of time.
Aggregation Period (for Camera output for 30 seconds)
May be caused by
Any events – Camera output for 30 seconds.
Motion on Camera and Input Signal on Camera – synchronous output. Output stops when motion or
input are stopped.
Why Action may work incorrectly
Output is not supported on some Cameras.
Output and Camera output for 30 seconds are slightly different.
Event is not configured properly. See Event description for details.
Digital Watchdog
117
DW Spectrum User Manual
Play Sound
Plays the specific sound when Event occurs.
Basic Parameters
Sound to be played. It is possible to select any sound from the available options:
Advanced Parameters
Volume
Aggregation
Sound library customization: adding, editing or removing sounds.
To view the sound library, go to Advanced Parameters and click Manage...
The following dialog will appear:
Digital Watchdog
DW Spectrum User Manual
118
To add sound:
1. Click Add... and select the desired audio file.
2. Choose the duration and set it to Clip sound up to. The audio file will be cut to the specified
duration.
3. Choose Custom Title for the selected sound. If not specified, the file name will be used as the title
by default.
4. Click Open to add the sound or Cancel to discard changes.
To rename the selected sound, click Rename... and enter a new title
To test the chosen sample, click Play...
To delete the selected sample, click Delete...
Click Open to add the sound or Cancel to discard changes.
May be caused by
All Events.
Why Action may work incorrectly
Event is not configured properly. See Event description for details.
Sound is muted. Open any item on Scene and check if the sound is muted. Volume settings are applied
globally. See "Adjusting Volume".
Digital Watchdog
119
DW Spectrum User Manual
Repeat Sound
Plays a specific sound while Event occurs.
Basic Parameters
Sound to be played. It is possible to select any sound from the available options:
Advanced Parameters
Volume
Sound library customization: adding, editing or removing sounds.
To go to sound library go to Advanced Parameters and click Manage...
The following dialog is displayed
Digital Watchdog
DW Spectrum User Manual
120
To add a sound:
1. Click Add... and select the desired audio file.
2. Choose the duration and set it to Clip sound up to. The audio file will be cut to the specified
duration.
3. Choose Custom Title for the selected sound. If not specified, the file name will be used as the title
by default.
4. Click Open to add the sound or Cancel to discard changes.
To rename the selected sound, click Rename... and enter a new title
To test the chosen sample, click Play...
To delete the selected sample, click Delete...
Click Open to add the selected sound or Cancel to discard changes.
May be caused by
Motion on Camera
Input Signal on Camera.
Why Action may work incorrectly
Event is not configured properly. See Event description for details.
Sound is muted. Open any item on Scene and check if the sound is muted. Volume settings are applied
globally. See "Adjusting Volume".
Digital Watchdog
121
DW Spectrum User Manual
Say Text
Pronounces specific text when Event occurs.
Basic Parameters
Text to pronounce:
Advanced Parameters
Aggregation
May be caused by
All Events.
Why Action may work incorrectly
Event is not configured properly. See Event description for details.
Sound is muted. Open any item on Scene and check if the sound is muted. Volume settings are applied
globally. See "Adjusting Volume".
Write to Log
Writes the record to Log when Event occurs.
By default, all Events mentioned in Rules are written to Log. However, in some cases it may be necessary
to disable all notifications but certain types of Events in Log. In this instance, create Rule with this
particular type of Action.
Basic Parameters
None
Advanced Parameters
Aggregation
May be caused by
All Events.
Why Action may work incorrectly
Event is not configured properly. See Event description for details.
Digital Watchdog
DW Spectrum User Manual
122
Default Rules
As soon as DW Spectrum is installed, default Rules are set up.
The following Events
Camera Disconnection/Malfunction
Storage Failure
Network Issue
Camera IP Conflict
Media Server Failure
Media Servers Conflict
will result in
Notifications to all Users (no more than once per 30 seconds).
Mail Notifications for admin. To receive mail notifications, E-Mail Server must be configured (see
"Configuring Mail Server for E-Mail Notifications") with e-mail address specified for admin (see
"Changing User Settings").
Write to Log.
Digital Watchdog
123
DW Spectrum User Manual
Viewing Events Log
Each event that occurs in DW Spectrum is stored in Event Log. Event Log makes it easy to navigate through
past activity or diagnose Camera or Server. To view the log, proceed with one of the following:
Open Main Menu and go to Event Log (Ctrl + L)
Open Notification Panel on the right and click
.
To view Events that occurred on a particular Camera: open Camera's Context Menu and choose Check
Camera Issues...
The data is broken down by the following columns:
Date/Time – date and time the event occurred
Event – the name of the event
Source – the resource that initiates the event: Camera (Motion Detection, Input Signal, etc) or Server
(Storage Failure, Server Failure, etc).
The Action that is performed when Event occurs.
Target – the recipient of the action: Users or Cameras.
Description – any additional information. If Motion is detected, then hyperlink is provided. When
clicking on hyperlink, the Camera will open in a new Layout and start playing back from the moment
Motion occurred.
Digital Watchdog
DW Spectrum User Manual
124
The following tools are available to manage Camera List:
Sort data by column. Left Click on column's header.
Filter data. Select filter conditions on the top:
Start and End Date – only the events that occurred during a particular period of time are displayed
(the current day by default)
Event type – displays a specific type of events only
Camera – displays events on a particular camera only (applies to Motion, Input and Camera Issues)
Action type – specific events caused by certain types of actions are displayed
To remove all filter conditions, click Clear Filter or open Context Menu and select Clear Filter.
To show events that are related to a particular source, locate the actual event, open Context Menu
and select Filter Similar Rows.
Select multiple rows from a table. Drag the mouse, use CTRL + Click/Up/Down arrows, or Shift + Click/
Up/Down arrows. Use CTRL + A to select all records.
All Camera options (open, rename, diagnose, etc.). To access the cameras, Select Camera and open
Context Menu.
All Media Server options (monitor, configure, diagnose, etc.). To access Media Servers, Select Media
Server and open Context Menu.
Export data from one or multiple rows to an external file. Select the desired rows, open Context
Menu and select Export Selected to File... Choose a file name and format. The following formats are
supported:
HTML File
CSV file (text file with delimiters). This file type can easily be imported into Microsoft Excel.
Copy one or several rows to clipboard. Select the desired rows, open Context Menu and select Copy
Selection to Clipboard. The data can be pasted into any text editor or Microsoft Excel.
Digital Watchdog
125
DW Spectrum User Manual
It is possible to view the event log on a specific Camera or Media Server.
Camera: open Camera's Context Menu (on Scene, in Resource Tree, etc.) and select Check Camera
Issues...
Server Diagnostics: open Server's Context Menu (on Scene, in Resource Tree, etc.) and select Server
Diagnostics...
Event Log will open and a filter will apply (Source - desired Camera or Media Server).
Digital Watchdog
DW Spectrum User Manual
126
User Management
DW Spectrum provides a simple way to manage Users: there are only three roles in the System: Super
Administrators, Administrators and Viewers (can be configured as Live Viewer, Viewer, Advanced
Viewer). See “Introducing User Roles” for details.
The following options are provided for users management:
Creating New User (Admin Only)
Changing User Settings
Deleting User (Admin Only).
Creating New User (Admin Only)
To create User:
1. Do one of the following:
Open Main Menu and go to New –> User
Right-Click on Users in Resources Tree and
choose New.
2. Enter user settings:
Login and Password – user credentials.
IMPORTANT: login and password are case
sensitive.
Email – this address will be used for E-Mail
notifications. If it is not set the user will not be
able to receive such notifications. See "Mail
Notifications".
Access Rights – Administrator or Viewer. See
“Introducing User Roles” for more details.
Digital Watchdog
127
DW Spectrum User Manual
By default Viewer can only view live video. To setup additional permissions, click Advanced. The
following Permissions can be assigned:
3. Click OK to create a user.
Once User is established, Layouts can be created and assigned to this User. See “Creating New Layout”.
Changing User Settings
The following User Settings can be modified:
Login (Admin only) – can be changed for all users except Super Administrator (admin). Also, a user
cannot change own login name. The login name can be set in Resource Tree.
Password – can be changed for all users, except Super Administrator ( admin). Viewer can only change
own password. Super Administrator can change his password as well.
E-Mail.
Role and Permissions (Admin only) – can be changed for all users, except Super Administrator
( admin). Also, User cannot change own role.
To change User Details:
1. Select any User in Resource Tree, Right-Click on Context Menu and choose User Settings.
2. Change the desired fields and click OK (or Cancel to close the form).
Deleting User (Admin Only)
It is possible to delete any User, except Super Administrator. A User cannot delete own profile. To
delete, locate the desired User in Resource Tree, Right-Click for Context Menu and choose Delete (or
press DEL).
IMPORTANT. All associated Layouts will automatically be deleted along with the User.
Digital Watchdog
DW Spectrum User Manual
128
Layout Management
Layouts are a powerful and flexible way to represent video data in DW Spectrum. Layout can contain an
unlimited number of videos: Cameras, Local videos or Images, which are not restricted in terms of
location, size or orientation.
Initially, Layout is created and configured by Administrator. It can then be assigned to Viewers. Viewers
can create its own Layouts based on the available Resources (Cameras and Local files).
The following Layout Management actions are described in this section:
Creating New Layout
Setting up Layouts
Assigning Layouts to Users (Admin Only)
Deleting Layouts (Admin Only)
Opening and Closing Saved Layouts.
Digital Watchdog
129
DW Spectrum User Manual
Creating New Layout
The simplest way to create new Layout is to open a new Tab (see “Tabs and Layouts”). However in this
case Layout will be created locally and will not be saved on Enterprise Controller and will not be restored
after next login. Layouts should be saved for future use.
To create new Layout for specific User:
1. Find User in Resource Tree, Right-Click on Context Menu and choose New Layout:
2. Enter Layout’s Name and click OK (Cancel will discard all changes):
Digital Watchdog
DW Spectrum User Manual
130
3. New Layout will be created and displayed in Resource Tree. A new Tab will automatically appear:
There are several ways to set up Layouts:
Set Up Own Layouts:
1. Open a new Tab, configure Layout and save.
2. Locate own User in Resource Tree, create new Layout using Context Menu and save.
Setting up Layouts for other Users:
1. Find the desired User in Resource Tree, create new Layout using Context Menu and save.
2. Open a new Tab, configure and save Layout, then associate with the desired User (See “Assigning
Layouts to Users (Admin Only)”).
Digital Watchdog
131
DW Spectrum User Manual
Setting up Layouts
This section provides detailed instructions on how to configure layouts:
Adding Items to Layouts
Removing Item(s) from Layouts
Using Backrounds (Maps or Plans) on Layout (E-Mapping)
Adjusting Layout’s Appearance
Zoom Windows
Locking Layouts
Working with Multiple DW Spectrum Windows
Saving Layouts.
IMPORTANT. Viewers cannot change Layouts. Also it is not possible to change Locked Layouts.
Digital Watchdog
DW Spectrum User Manual
132
Adding Items to Layouts
More than one Item can be added to Layout at a time regardless of their source (live cameras, local video,
images, etc.). DW Spectrum allows 24 Items to be displayed on the x86 architecture and 64 Items – on x64.
IMPORTANT. Viewers cannot add Items to predefined Layouts. They can only open and add Items to
new Tabs. Also it is not possible to add cameras to Locked Layouts.
To add Item(s) to Layout, choose from one of the following:
Double-Click on the Item in Resource Tree
Invoke Context Menu in Resource Tree and select Open. Multiple items can be selected and added
(Ctrl + Shift and select the desired Items).
Drag and drop from Resource Tree
Ctrl + Drag and Drop items onto Scene – duplicates Item(s).To avoid duplication, release Ctrl and hit
Esc, while holding the left mouse button.
IMPORTANT. Hold Ctrl or use the mouse to draw a selection of multiple Items on Scene. To select
all Items on Scene, use Ctrl + A. Refer to “Selecting Items” for more information.
Open Local file(s) or Folder – they will be added to the current layout (see “Opening Local Files
Outside of Media Folders”)
Ctrl + Drag and Drop from Scene to Resource Tree – dropped Items will automatically be added to
Layout (use Multi-Selection to selection more than one item). To prevent duplication, release Ctrl and
hit Esc while holding the left mouse button.
Digital Watchdog
133
DW Spectrum User Manual
New Items will automatically occupy any available space. Grid cell aspect ratio will be adjusted
automatically as per the existing item aspect ratio to occupy space on Scene. See "Changing Cell Aspect
Ratio".
To open items directly from new Tab:
Select desired Item(s) from Resource Tree and select Open in New Tab from Context Menu
Drag selected Item(s) from Resource Tree and drop them onto Tab Navigator
Ctrl + Drag and Drop items from Scene to Tab Navigator (Multi-Selection can be applied). To prevent
duplication, release Ctrl and hit Esc while holding the left mouse button.
IMPORTANT. It may be difficult to locate and add each item manually. Search may be very useful
in configuring a new layout (see "Search").
How to configure a layout using Search:
1. Create a new Layout.
2. Enter keywords into the Search box. The search results will appear on Scene automatically.
3. By adding or deleting keywords from the search box, the items on Scene will vary.
4. Do not forget to save configured Layout.
Digital Watchdog
DW Spectrum User Manual
134
Removing Item(s) from Layouts
IMPORTANT. Viewers cannot change Layouts that are assigned by Administrators. They can only open
new Tabs and add/remove Items, but cannot save. Also it is not possible to add cameras to Locked
Layouts.
To remove Item(s) from Layout on Scene:
1. Select desired item(s) on Scene.
2. Proceed with one of the following:
Click
to remove single Item
Open Context Menu and select Remove from Layout (or hit Del) to remove all selected Items
To remove Item(s) from Layout in Resource Tree:
1. Expand Users and locate the desired Layout in Resource Tree.
2. Select desired Item(s) under specified Layout. Multi-Selection can be applied (see “Working with a
Resource Tree”).
3. Open Context Menu and select Remove from Layout (or hit Del).
4. Confirm deletion by clicking Yes.
Note: grid cell aspect ratio will be adjusted automatically as per the existing item aspect ratio to
occupy space on Scene. See "Changing Cell Aspect Ratio".
Digital Watchdog
135
DW Spectrum User Manual
Using Backrounds (Maps or Plans) on Layout (E-Mapping)
DW Spectrum offers an ability to change background for Layouts. A schematic map or a building plan can
be chosen as the background behind cameras for easy camera location and information accessability to
Users.
IMPORTANT. Viewers cannot change Layouts. It is also not possible to change Locked Layouts.
Digital Watchdog
DW Spectrum User Manual
To set background for Layout (simple):
1. Open the desired picture on Scene.
2. Right-Click on the image to open Context Menu and select Set as Layout Background:
Digital Watchdog
136
137
DW Spectrum User Manual
To set background for Layout (advanced):
3. Expand Users to locate the desired Layout in Resource Tree.
4. Open Context Menu (by clicking on any empty space within Layout) and select Layout Settings...
5. Click Browse... and select a desired image file to set as background.
6. Configure additional parameters:
Crop to monitor aspect ratio – if selected, then aspect ratio of the image will be adjusted according
to the monitor. For instance, if monitor resolution is 1920x1080 (16:9) and image resolution is
1920x1200 (16:10), then the image will be cropped from both top and bottom.
Width and Height – image dimensions within cells. For instance, it is possible to place twenty items
on a 5x4 layout. The greater the dimensions the lesser the cells are.
Opacity of the image (in percents).
5. Click OK when finished. To discard changes, click Cancel.
6. Add, Remove, resize or move cameras across background (see "Adjusting Layout’s Appearance").
7. Lock Layout if needed.
8. Do not forget to Save Layout.
Digital Watchdog
DW Spectrum User Manual
Adjusting Layout’s Appearance
Any video manipulation can be performed in the application to customize Layout:
Selecting Items
Zooming while Working with Layouts
Moving and Swapping Items within Scene
Resizing Items within Scene
Using Fit-In-View
Changing Distance between Items
Changing Cell Aspect Ratio
It’s recommended to first make an item selection and configure the look on Scene.
IMPORTANT. Viewer is allowed to perform any operations, except changing Locked Layouts.
Digital Watchdog
138
139
DW Spectrum User Manual
Selecting Items
Click on Item(s) to select. The selected Items will expand on the screen. To bring it back to normal, click
again. Arrow keys may be used to scroll through Items.
To select more than one Item:
Click and Drag over Items with a mouse to draw a selection.
Hold Ctrl and Click on several Items. Click again to remove selection. Click without Ctrl to discard the
current selection.
Use Ctrl + A to select all Items on Scene.
Click and Drag mouse holding Shift to bring the selected items to Scene.
The selected items are outlined or filled with a color:
See also how to select Item(s) in "Resource Tree".
Digital Watchdog
DW Spectrum User Manual
140
Zooming while Working with Layouts
There are several ways to Zoom while working with DW Spectrum.
Zoom whole Layout - Use ALT + Mouse Wheel
Zoom while a single Item is Fullscreen - Use Mouse Wheel (see "Zoom")
PTZ/Fisheye Zoom - use "+" and "-" buttons on Item (see "Setting up PTZ on PTZ and Fish-Eye
Cameras").
Moving and Swapping Items within Scene
Scene consists of cells. Each cell may contain one Item. The initial aspect ratio of a cell is 16:9 but it can be
changed to 4:3 (see "Changing Cell Aspect Ratio").
IMPORTANT.It is not possible to change Locked Layouts.
In order to move Item, Click on it and Drag it to a new position (grid cell borders are visible while in
motion). Multiple items can also be moved.
If the desired position is already occupied, Items will be swapped (if possible).
Digital Watchdog
141
DW Spectrum User Manual
If swapping is not possible, the target cell will be marked red:
If bigger Item is being replaced by a smaller one, they will swap sizes as well as positions.
Digital Watchdog
DW Spectrum User Manual
142
Resizing Items within Scene
IMPORTANT. It is not possible to change Locked Layouts.
Resizing items is an easy operation in DW Spectrum. To resize, select the edge on Item, Click and Drag the
mouse to resize.
Item is resized according to its proportions, so it can occupy 1, 4, 9 cells etc.
If resizing is possible, the new cells are highlighted in green:
Digital Watchdog
143
DW Spectrum User Manual
If resizing is not possible, the cells will appear red:
In this case the best practice is:
1. Move the entire Scene using a Right-Click Drag.
2. Resize an Item to occupy the available space.
OR
3. Move the desired Item away from the rest of Items
4. Resize the Item to occupy the available space.
Using Fit In View
This feature allows users to revert the view to maximum in order to view all Items conveniently. This can
also be used when zooming or moving the entire Scene.
Fit In View can be performed by Double-Clicking on any empty space on Scene (or by Right-Clicking on
Context Menu and selecting Fit in View).
Also Fit In View is performed automatically if:
Change in view mode: Window or Fullscreen (see "Full Screen and Window Mode")
Change in DW Spectrum window size.
Digital Watchdog
DW Spectrum User Manual
144
Changing Distance between Items
This feature is used when multiple Items need to be stitched together or positioned closer to each other.
A good example is a panoramic view derived from four individual single-sensor cameras to compose a 180
degree view.
To adjust the distance between Items, use Change Cells Spacing Context Menu item or Ctrl + Mouse
Wheel on Scene:
IMPORTANT. If aspect ratio of an item is not 4:3 or 16:9 the extra space will remain.
Changing Cell Aspect Ratio
Cameras provide video in 4:3, 16:9 or custom format. Grid cells aspect ratio is changed dynamically per
item's aspect ratio to occupy Scene space.
This feature is used to occupy Scene space efficiently: cell aspect ratio should be equal (or similar) to
Camera aspect ratio.
Additionally, the aspect ratio of cells can be changed manually. To proceed, use Change Cell Aspect Ratio
Context Menu item (invoke Context Menu on any empty space on Scene):
Digital Watchdog
145
DW Spectrum User Manual
Zoom Windows
DW Spectrum provides a great feature that allows users to create an unlimited number of digital Zoom
Windows for a single Camera. These windows can be placed on Layouts and saved for future use.
IMPORTANT. It is not possible to use Zoom Windows on Locked Layouts.
To configure Zoom Window for Camera:
1. Open Camera.
2. Click on
to drag a rectangle on an item. A new item will appear on Scene.
3. Move Zoom Window or resize it by dragging its edges. Zoom Window can be moved between
Cameras on Scene.
4. To close Zoom Window, close the corresponding item.
Note: it may be very convenient to use Zoom Windows of fish-eye Cameras. See "De-warping Fish-Eye
Cameras" for more information.
Digital Watchdog
DW Spectrum User Manual
146
Locking Layouts
To prevent accidental changes to Layouts, DW Spectrum offers a locking capability. Once locked, the
following cannot be performed:
Adding or Removing items
Change Background
Moving and Swapping Items within Scene
Resizing Items within Scene
Deleting Layouts.
To lock Layout:
1. Open Context Menu (click on any empty space wtihin Layout) and select Layout Settings...
2. Check Layout is locked.
3. Click Apply or OK when finished. To discard changes, click Cancel.
Digital Watchdog
147
DW Spectrum User Manual
Working with Several DW Spectrum Windows
It is possible to set up Layouts on multiple DW Spectrum windows in a multi-monitor environment.
IMPORTANT. This feature is not supported on Mac OS.
To open a new window, click on Main Menu –> New –> Window (or press Ctrl + N).
Also selected Items may be opened in a new window:
1. Select desired Items in Resource Tree or on Scene (Multi-Selection can be applied, see "Selecting
Items").
2. Invoke Context Menu and select Open in New Window.
Finally, it is possible to drag Items from one window to another (only Administrators can drag Items to
predefined Layouts):
1. Select desired Items in Resource Tree or on Scene (Multi-Selection can be applied, see "Selecting
Items").
2. Hold Ctrl and Drag selected Items to a new window.
Digital Watchdog
DW Spectrum User Manual
148
Saving Layouts
To retain any changes made to Layout, User must save it.
Note: current playback position and selection is saved for Layout as well. After DW Spectrum is closed,
all saved layouts that were opened in Tabs prior to closing, will be restored.
Layout should always be saved in case of any changes. If any changes are made, an asterisk will appear in
the corresponding Tab and in Resource Tree:
To save Layout:
Open Context Menu on Scene (on empty space) and select Save Current Layout (or press Ctrl + S).
Layout will be saved to the previously assigned file name (the Tab’s caption).
Open Context Menu on Scene (on empty space) and select Save Current Layout As (or press Ctrl + Alt +
S). Layout will be saved as specified by User:
Find the desired Layout in Resource Tree, invoke for Context Menu and select Save Layout.
IMPORTANT. Saved Layout is activated immediately (if running on multi-machines, all saved changes
to Layout will reflect on all machines identically). Refer to “Opening and Closing Saved Layouts” for more
information.
Digital Watchdog
149
DW Spectrum User Manual
Assigning Layouts to Users (Admin Only)
To duplicate Layout for another User(s), Drag and Drop Layouts within Resources Tree:
Administrator can then modify Layouts as needed.
Deleting Layouts (Admin Only)
To delete Layout from Resource Tree:
1. Find and select desired Layout(s) in Resource Tree.
2. Invoke on Context Menu and choose Delete Layout (or press Del).
3. Accept deletion by clicking on Yes or press Cancel to discard all changes.
If the layout that is opened on another computer is deleted, all items will disappear.
Note: Locked Layouts cannot be deleted!
Digital Watchdog
DW Spectrum User Manual
150
Opening and Closing Saved Layouts
As User logs into DW Spectrum, all existing Layouts are listed in Resource Tree. To open an existing
Layout, find the desired layout in Resource Tree and perform one of the following:
Drag and Drop Layout from Resource Tree to Scene:
Open Context Menu and choose Open Layout (or press Enter).
To open multiple Layouts, select the desired layouts in Resource Tree (using Multi-Selection) and do one
of the following:
Drag selection to Scene.
Open Context Menu and choose Open Layouts.
Layouts will be opened in separate Tabs. If Tab already contains this Layout, it will not be opened again.
Note: after DW Spectrum is closed, all saved Layouts opened in Tabs will be restored when User logs
back in.
Digital Watchdog
151
DW Spectrum User Manual
Backing up and Restoring DW Spectrum Database
DW Spectrum provides simple mechanism to perform backup and restore of system settings. It is done by
backing up the DW Spectrum database as a single file. Database contains all system configuration.
IMPORTANT. It is recommended to perform restore operation on the same computer backup has been
saved.
To back up DW Spectrum database:
1. Open Main Menu and go to System Settings.
2. Go to the Server tab.
3. Click Create Backup... The window will open. Choose the desired location on the local file system to
save the backup then click Save.
To restore DW Spectrum settings from backup:
1. Open Main Menu and go to System Settings.
4. Go to the Server tab.
5. Click Restore from Backup... The window will open. Choose the backup file then click Open.
6. If click OK, database will be restored.
IMPORTANT. It may be necessary to restart Media Servers and DW Spectrum Clients after restore.
Digital Watchdog
DW Spectrum User Manual
152
Playback in DW Spectrum
DW Spectrum offers a smooth playback feature. See "Playback Panel" for more information on Playback
interface.
The following can be played back:
Cameras (see "Watching Cameras in DW Spectrum"). It is possible to view archive and live in Time Line
among other features helping User to perform search archived footage.
Local files: Video Files, Images (see "Playing Back Local Files in DW Spectrum").
The following operations can be performed in addition to playback:
Forensic Analysis
Exporting
Adjusting Volume
Tours
All operations described in this section do not require administrative privileges. However, some
operations may require certain permissions. See "Introducing User Roles" for details.
Digital Watchdog
153
DW Spectrum User Manual
Watching Cameras in DW Spectrum
DW Spectrum provides a powerful and easy camera playback engine that enables users to quickly find a
video fragment, perform forensic analysis, capture screenshots and export video in just a few clicks.
This section provides a detailed description on camera playback. The following operations can be
performed:
Navigating through Archive and Live
Searching through Archive
Note: It it recommended to read the following section prior to moving on to the next step: "CPU and
Bandwidth Saving during Playback (RADASS)".
Lastly, videos can be displayed in a slide-show mode. See "Tours" for more details.
Digital Watchdog
DW Spectrum User Manual
154
CPU and Bandwidth Saving during Playback (RADASS)
DW Spectrum's architectures provides significant CPU and network bandwidth savings by acquiring
multiple streams from a single camera: High Resolution (regular) and Low Resolution (approximately 10
times less bandwidth). If there is not enough bandwidth between Client and Media Server to display the
High Resolution stream while viewing a camera, then the camera is automatically switched to Low
Resolution mode.
In case of insufficient CPU, a user may experience difficulties with displaying too many videos
simultaneously (examples: running over 20 full high resolution videos at the same time, fast forwarding
multiple full high definition videos at the x16 speed, etc.). In this instance, cameras are switched to a Low
Resolution stream. As a result, CPU will yield a much smoother playback.
Additionally, it is possible to choose resolution manually. To do so, Right-Click on Scene's empty space
and choose Change Resolution... The changes are applied once to the entire Layout and will be reverted
back to Auto whenever a user re-opens Layout.
Note: this feature requires support of camera dual-streaming.
Digital Watchdog
155
DW Spectrum User Manual
Lastly, DW Spectrum offers significant bandwidth savings by auto-pausing video. If viewing video from
Camera in fullscreen, the video will be paused due to inactivity after a certain period of time. To set this
option, open Main Menu and check Auto Pause Video, then set the desired time interval:
Digital Watchdog
DW Spectrum User Manual
156
Navigating through Archive and Live
It is very easy to navigate through Live and Archive in DW Spectrum. Here are some tips and shortcuts.
IMPORTANT. It is only possible to navigate through recorded fragments (chunks). Position Slider to
the dark area will jump to the next available recorded fragment (displayed in green on Time Line).
By default, all Cameras are set to display Live if opened for the first time.
Note: all Users are allowed to view cameras Live. However, to view Archive, Viewers must have the
appropriate permissions.
Search Archive:
Click on any desired position on Time Line or Time Scale.
Drag Time Slider to the desired position. The picture will refresh while dragging.
Time Scale navigation:
Zoom Time Scale using Mouse Wheel for finer selection
Move Time Scale Scrollbar
Double Click on Time Scale Scrollbar to zoom out
Go to Live:
Press
or L
Move Position Slider all the way to the right
Play/Pause: Press
Digital Watchdog
or Space
157
DW Spectrum User Manual
Fast Forward or Rewind:
Press
or Ctrl + Right Arrow to increase speed
Press
or Ctrl + Left Arrow to decrease speed
Available speeds on play: -16x, -8x, -4x, -2x, 1x, 2x, 4x, 8x, 16x
Available speeds op pause: -2x, -1x, -0.5x, -0.25x, 0x, 0.25x, 0.5x, 1x, 2x
Use Speed Slider: very left position is -16x (-2x on pause), very right one – 16x(2x on Pause)
Click on Speed Slider to change speed temporarily and then revert to 1x (0x on Pause)
Drag Speed Slider to change speed permanently (or use Mouse Wheel on Speed Slider)
If Rewinding while in Live mode, the position will be switched to Archive
If Fast Forwarding while viewing archive, camera(s) will be switched to Live if the very right position is
reached.
Previous/Next Frame (Pause only):
Press
or Ctrl + Right Arrow to skip to the next frame
Press
or Ctrl + Left Arrow to skip to the previous frame
Use Mouse Wheel on Speed Slider when on Pause
Previous/Next Recorded Fragment:
Press
or Ctrl + Right Arrow to skip to the next frame
Press
or Ctrl + Left Arrow to skip to the previous frame
Useful sections:
Pan-Temporal Time Line
Navigating through Several Cameras Synchronously.
Digital Watchdog
DW Spectrum User Manual
158
Pan-Temporal Time Line
Pan-Temporal Time Line is a convenient way to navigate through Live and Archive footage (below).
The current time is indicated by Position Slider. The very right position indicates that Live video is
currently played back. If slider is moved to the left, the playback automatically is switched to the Archive.
IMPORTANT. It is not possible to navigate through the last minute of archive (this increment is
represented in stripes).
Time Scale is displayed on the bottom of the Time Line. It contains marks indicating the time. Time Scale
can be zoomed in and out by mouse wheel or
buttons at the left. This is extremely useful when
trying to find a particular event navigating through a long period of time. Double Click on Time Line
Scroller (the very bottom) to fully zoom out.
To zoom to the particular region select the desired region by the following ways:
Select the region to export on Time Scale:
Use Right Click Drag
Open Context Menu on Time Scale and click Mark Selection Start (or press “[”), then Mark Selection
End (or press “]”)
To clear selection, use the corresponding Context Menu item
Adjust the region to export by dragging edges.
Then open Context Menu on the Time Line and choose Zoom to Selection.
Digital Watchdog
159
DW Spectrum User Manual
Time Line can display Local or Server time (specified in System Settings). To change the setting:
1. Open Main Menu and choose System Settings
2. Use the Timeline Mode setting in Look and Feel:
3. Click OK when done or Cancel to discard changes.
Note: Export and Preview Search features will depend on this settings as well. This setting does not
affect Recording Schedule (always based on Media Server Time).
Time Line’s color indicators:
Black – empty space (no recording took place in this period of time)
Green – represent recorded fragments
Red – motion regions. Displayed only if Smart Search is active. See “Performing Smart Search”.
It is possible to navigate through recorded fragments only. When moving Position Slider to the black area
(no recording), it will jump to the next available recorded fragment. If several live Cameras are currently
displayed, all recorded fragments are combined on Time Line (in the lower All Cameras line).
Digital Watchdog
160
DW Spectrum User Manual
Navigating through Several Cameras Synchronously
DW Spectrum provides a powerful engine that enables users to navigate through multiple cameras: if
several Cameras are displaying at the same time, they can be synchronized.
If User performs search, fast forward, rewind or search by frame – each
camera will be synchronized.
However, recording may be set up differently. If no recording took place
over a certain period of time, NO DATA will appear on the camera view.
Recorded fragments are displayed on the Time Line in two rows:
The upper row displays fragments for Camera selected on Scene
The lower row – for all Cameras displayed on Scene
It is possible to disable Synchronization (press
button). If no Item is selected, the selection will
move to the previously selected item, which will become the only item affected by playback controls
(seek, speed etc).
Thus, if Synchronization is disabled, it is possible to seek each Camera in a different position. In this case
Time Line displays positions for all Cameras played back (see blue markers on the picture):
If User selects Camera on Scene and enables Synchronization again, all other cameras will get
synchronized with the selected Camera (Position and Speed will be synchronized).
Digital Watchdog
161
DW Spectrum User Manual
Searching through Archive
DW Spectrum provides many features that make archive search faster, more convenient and intuitive.
Since archive may contain significant video data (taken over several months), it is crucial to minimize the
time spent by a user on searching a particular event.
The following search methods are introduced:
Calendar – pan temporal time line can zoom in on selected date to make search easier (see "Using
Calendar").
Smart Motion Search – select a region on video and allow for the application to automatically refine
the archive and highlight the fragments that involved motion. See "Performing Smart Motion Search".
Thumbnail Navigation – small previews are displayed on top of the Time Line to help locate a
particular scene. See "Using Thumbnails for Better Navigation".
Preview Search – select a region and allow for the application to provide videos that represent a time
period based on time stamps. See "Preview Search".
Using Calendar
This type of search helps the user to locate an event that took place on a particular date and time.
To perform a calendar search:
1. Open Camera that contains the archived event.
2. Press
. Calendar will appear above Time Line. The dates that are displayed on Time Line are
highlighted in green:
Digital Watchdog
DW Spectrum User Manual
162
3. Select a desired date in Calendar. To select multiple dates , use CTRL. Time Line zoom will
automatically change to reflect the selected date(s) only. If the archive contains data outside the
visible range, it will appear in shaded green:
4. Select a desired hour in the upper part Calendar. To select multiple hours, use CTRL. Time Line zoom
will automatically adjust to display the selected hour(s) only.
Digital Watchdog
163
DW Spectrum User Manual
Performing Smart Motion Search
Smart Motion Search enables User to perform fast and intuitive archived motion search.
To perform Smart Motion Search, select the desired region and DW Spectrum will display all fragments
that contain motion throughout the archive (scanning through a yearly archive only takes a few seconds).
IMPORTANT. Smart Motion Search in DW Spectrum assumes the selected Camera supports Motion
Detection. It is important to perform motion setup as well. See "Setting up Motion Mask and Motion
Sensitivity".
To perform Smart Motion Search:
1. Open Motion Grid on the camera:
use Camera’s Quick Button (
)
open Camera's Context Menu and choose Motion Grid (or select it and press Alt + G)
Motion Grid will appear:
Note: if red fragments appears in motion zones, Motion Detection is supported by Camera.
2. Select the region the motion should be searched on:
Hold Shift, Left Click and Drag:
Ctrl + Click and Drag to add another region
Click and Hold Left Mouse Button or use Context Menu (Clear Motion Selection) to clear all regions.
IMPORTANT. Motion will not be visible and detected on a region marked as Motion Mask.
Digital Watchdog
DW Spectrum User Manual
164
As soon as the region is selected, Time Line will be populated with red bars. Each bar indicates recording
period that contains motion.
IMPORTANT. Navigation in Time Line is possible by red fragments only until Smart Motion Search is
off.
To disable Smart Motion Search, clear all regions in Motion Grid or disable pressing the
Context Menu Hide Motion Grid or Alt + G).
Digital Watchdog
button (or use
165
DW Spectrum User Manual
Using Thumbnails for Better Navigation
The Thumbnail feature is a fast and convenient way to navigate through archive. Thumbnails are single
snapshots taken from archived video footage that are displayed on the Time Line. This feature serves as
another useful forensic tool for analyzing video.
To open Thumbnails:
1. Click on the desired Camera.
2. Click on
button or point a mouse cursor over the top of Time Line, click and pull it up:
If no Thumbnails are displayed, then there is no archive available for this particular Camera.
Thumbnails panel can be re-sized. To re-size, point a mouse cursor over Time Line, click and pull it up or
down.
The white dots under the pictures point on the exact archive place where the shot has been taken. When
clicking on Thumbnail, the current playback position will jump to the corresponding spot in the archive.
To close Thumbnails, press
again or pull the Thumbnails Panel down.
See also "Preview Search".
Digital Watchdog
DW Spectrum User Manual
166
Preview Search
This feature helps to search data through large archives. It breaks the selected range of time into smaller
time increments and displays these increments as separate Items. For instance, it breaks a month period
into ten 3-days periods displaying them as separate Items, which makes it possible to locate a specific
event in one of these periods (then breaking this period into nine 8-hour periods and so on). Finally
location of a specific event in archive may take 3-5 such iterations for initial period of several months.
To perform Preview Search:
1. Select the desired camera on Scene.
2. Select the region to export on Time Scale:
Use Right-Click Drag
Open Context Menu on Time Scale and click Mark Selection Start (or press “[”), then Mark Selection
End (or press “]”)
To clear selection, use the corresponding Context Menu item
Adjust the region by dragging edges to export
To make zooming easier, zoom on Time Line using a Mouse Wheel
Digital Watchdog
167
DW Spectrum User Manual
3. Invoke Context Menu and choose Preview Search.
New Tab will be opened. The Tab contains several Items representing the selected Camera in
different periods.
If click on Items, the selection on Time Line will display the particular period in archive related to the
selected Item.
If the selection does not contain archive data this feature is not available.
4. Locate the period of time the desired event took place and select appropriate Tab.
5. Repeat steps 1-3 on the desired Item on Preview Search Tab to refine search.
It is also possible to perform the following actions in Preview Search Tab:
Navigate through archive
Thumbnail Navigation
Smart Motion Search
Calendar Search
Tours
Screenshot
Export.
Digital Watchdog
DW Spectrum User Manual
168
Playing Back Local Files in DW Spectrum
In addition to powerful camera playback engine DW Spectrum can also act as Media Center: it can play
back almost any file. Most major codecs and most major containers are supported. This section
contains detailed description of Local Files playback:
Local files structure in Resource Tree
Configuring Media Folders
Opening Local Files Outside of Media Folders
Navigating Through Local Files.
Additionally it is possible to export fragments from video files (see "Exporting") and to take screenshots
(see "Taking Screenshot").
Finally, all features described in the "Forensic Analysis" section can be applied to local files.
IMPORTANT. Some video files may contain 5.1 sound stream. In order to play back those files on
stereo speakers:
1. Open Main Menu and choose System Settings in the General tab.
2. Check Downmix Audio from 5.1 to 2.1 Channels.
3. Restart Client.
Local files structure in Resource Tree
All local files are displayed in Resource Tree under the Local node, which include:
Files that are located in DW Spectrum Media Folders (see “Configuring Media Folders”)
Recently opened local files (see “Opening Local Files Outside of Media Folders”)
Exported files (see “Exporting”)
Screen Recordings (see “Screen Recording”)
Screenshots (see "Taking Screenshot").
IMPORTANT. All files except the ones in media folders, are displayed in Resource Tree until DW
Spectrum is restarted. When saving or restoring Layout that contains Items located outside the media
folders, they will get restored in Resource Tree as well.
Digital Watchdog
169
DW Spectrum User Manual
Configuring Media Folders
When DW Spectrum starts, it automatically indexes local media folders in order to find and display local
files in Resource Tree. By default, the current user's video folder (C:\Users\$User\Videos) is configured as
media folder.
To configure unlimited number of media folders:
1. Open Main Menu and choose System Settings.
2. Go to General.
3. If needed to change Main Media Folder, click Browse and choose the desired path.
Digital Watchdog
DW Spectrum User Manual
170
4. Configure Extra Media Folders:
To add extra media folder click Add… and choose the desired path.
It is possible to perform standard files and folders operations in this form (similar to Windows
Explorer).
To delete an extra media folder, select the folder from the list and click Remove.
5. Click OK when finished (or Cancel to discard changes).
As soon as media folders are configured, DW Spectrum should be restarted. Then files from the specified
media folders will be visible in Resources Tree (under the Local node). It is possible to place such
resources in Layouts. Search is also available for Local Files.
See also "Opening Local Files Outside of Media Folders".
Digital Watchdog
171
DW Spectrum User Manual
Opening Local Files Outside of Media Folders
It is possible to open Local Files outside Media Folders and thus are not visible in Resource Tree.
Use one of the following:
Drag-n-Drop one or several video files from Windows Explorer to DW Spectrum window
Drag-n-drop a folder containing video files from Windows Explorer to DW Spectrum window
Open Main Menu and choose Open –> File(s)… (or use Ctrl + O) then choose the file(s) to be opened
Open Main Menu and choose Open –> Folder… then choose a folder to be opened
Invoke Context Menu on Scene (on empty space) and choose Open –> Folder…, then choose a folder to
be opened.
Any opened files will be shown in Resource Tree until DW Spectrum is restarted. If restore Layout that
contains Items located outside of Media Folders they will be restored in Resource Tree as well.
Navigating Through Local Files
Navigation through Local Files very similar to the navigation through Camera archive, except:
All items are not synchronized (Sync is always disabled)
No Live for Local Files
Time Line is not colored (no recorded or motion regions).
and
buttons move position to the beginning or to the end of the file.
All other operations (seek, play, pause, ff/rew, etc.) are described in details in "Navigating through
Archive and Live".
IMPORTANT. If Scene contains both Cameras and Local Files, Cameras are played back synchronously
and Local Files – independently.
Forensic Analysis
DW Spectrum provides a wide number of features for forensic analysis of recorded streams. This section
explains how to perform forensic analysis in the application:
Expanding Items to Fullscreen
Zoom
Rotate
De-warping Fish-Eye Cameras
Image Enhancement.
Digital Watchdog
172
DW Spectrum User Manual
Expanding Items to Fullscreen
In order to perform forensic analysis, it is recommended to switch the desired Item to Fullscreen.
To toggle Fullscreen, proceed with one of the following:
Double Click on the desired Item on Scene
Open Context Menu and select Maximize Item/Restore Item (or press Enter)
When in Fullscreen mode, all Side Panels are hidden. Use
icons for panels to appear.
If several Cameras are displayed simultaneously, then the recorded fragments are combined on Time
Line. If User switches Item to Fullscreen, only recorded fragments related to the selected Item are visible.
Note: it is possible to expand Items to Fullscreen sequentially (like slide-show). See "Tours" for more
information.
Zoom
Zoom is extremely useful when it comes to working with high resolution Cameras. It is possible to Zoom
in on single Item in Fullscreen or whole Layout if needed.
To Zoom in/out:
use a Mouse Wheel which will only Zoom on the area that has a cursor over it
use “+”/”-” keys (zoom relatively to the center of the Scene).
To move the zoomed Item, use either Left or Right Mouse Button. If Layout is zoomed, Left Mouse Button
is reserved for Item drag. In this case, use Right Mouse Button.
To restore the initial size of an item, use Double Click.
To zoom on the entire Layout, use ALT + Mouse Wheel
Digital Watchdog
173
DW Spectrum User Manual
Rotate
Rotation can be performed using Item’s Quick Button (
rotate Item on Scene:
). Just Click and Hold Item and Drag the Mouse to
It is possible to use Item's Context Menu (Rotate to...):
Finally it is possible to rotate Item while holding Alt (Left Click and Drag mouse). Release when finished.
To perform incremental rotation (using 30 degrees step), hold Ctrl while rotating (with Alt or
when finished.
). Release
Digital Watchdog
174
DW Spectrum User Manual
De-warping Fish-Eye Cameras
DW Spectrum provides a dewarping feature to be able to view fish-eye cameras. To activate this feature
on Cameras, dewarping must be configured for Camera. See "Setting Up Fish-Eye Cameras".
After all configurations are completed, the
button will appear on the Camera Item:
Once clicked, the button will activate dewarping and enable the following controls:
Left-Click on the item, Hold Left Mouse Button and move the cursor to move Camera on the desired
position.
Use + and - buttons to zoom in/out
Move to a certain position – Left Click on the desired position.
DW Spectrum does not perform any dewarping when taking screenshots from FIsh-Eye Lens Cameras.
However, the image can be dewarped later. See "De-warping Screenshots Taken from Fish-Eye Cameras".
Digital Watchdog
175
DW Spectrum User Manual
It is possible to select Dewarping Panoramic Mode (the circle on the right). Once clicked, it will show the
image as a 90, 180, or 360 degree panoramic view:
Press
again to disable dewarping and hide controls.
Note: Export and Taking Screenshots features will depend on this setting as well: if dewarping is
enabled, the screenshot will be dewarped automatically and the Export dialog will suggest this feature
(can be disabled).
Digital Watchdog
DW Spectrum User Manual
176
It is important to place Zoom Windows on the originally warped camera:
As displayed above, all zoom windows are dewarped automatically. Configure the zoom windows and
Save Layout.
Note: this feature can be applied to images as well.
Digital Watchdog
177
DW Spectrum User Manual
De-warping Screenshots Taken from Fish-Eye Cameras
DW Spectrum does not automatically dewarp while taking screenshots from a fish-eye camera. However,
the image can be dewarped later.
To dewarp an image:
1. Right-Click on the image to open Context Menu and select Picture Settings...
Digital Watchdog
DW Spectrum User Manual
2. Check This is a fish-eye lens image :
Digital Watchdog
178
179
DW Spectrum User Manual
3. Set the following parameters:
Camera's orientation - type of de-warping algorithms based on orientation.
Calibration - to avoid de-warping artifacts, it is important to position the calibration circle within
the Camera's view as accurately as possible. First, try Auto Calibration, then manually adjust the
viewing range (if needed):
Use scrollers to move the circle horizontally or vertically (or drag it with a mouse)
Use a mouse wheel to resize the circle
Camera's view angle.
Note: It is recommended to keep image on Scene to monitor any image changes while adjusting
settings.
4. Click Apply or OK when finished. To discard changes, click Cancel.
Once a screenshot is determined to be as a fish-eye screenshot, dewarping can be performed as usual (
button on the image). See "Dewarping Fish-Eye Cameras" for details.
Digital Watchdog
180
DW Spectrum User Manual
Image Enhancement
To enhance the image on darker scenes, DW Spectrum offers Image Enhancement. Not only can this
feature be applied to Cameras, it can also enhance local files and pictures as well.
To activate Image Enhancement, click on the
button located on the item:
Note: Export and Taking Screenshots features will depend on this setting as well: if dewarping is
enabled, the screenshot will be dewarped automatically and the Export dialog will suggest this feature
(can be disabled).
Digital Watchdog
181
DW Spectrum User Manual
To adjust additional settings:
1. Invoke Context Menu and select Image Enhancement… (or use Alt + J). The following dialog will open:
2. Click Enable enhancement and configure desired parameters:
Gamma – the lesser the value, the lighter the image will be. Set Auto for recommended values.
Black and White Levels (information is located in the Histogram section). Refrain from cutting too
much of left or right areas on the histogram – this will result in losing important graphical
information.
Click Restore Defaults to reset settings.
3. Click Apply or OK when finished. To discard changes, click Cancel.
Note: in most cases, it is not necessary to perform any additional adjustments.
Digital Watchdog
DW Spectrum User Manual
182
Exporting
DW Spectrum provides powerful and flexible Export capabilities. It is possible to perform Export in
different formats, Export several videos simultaneously and perform synchronous playback of such
videos, add metadata to exported videos etc.
Existing Export options:
Single Camera Export. Allows exporting to AVI and MKV formats. Adds time stamps to exported video
(start and end time).
Multi-Video Export. Allows exporting to proprietary format (should be played by DW Spectrum) as
well as executable bundle (can be viewed on every WIndows computer). Export is performed with
additional metadata (time stamps, recorded fragments data, motion etc).
Checking the Validity of Exported Videos
Taking Screenshots.
Note: Export are available to Administrators and Viewers that have appropriate permissions.
Digital Watchdog
183
DW Spectrum User Manual
Single Camera Export
This section provides detailed information on how to export video from a single Camera's archive or Local
Video File:
Exporting Recorded Region from a Single Camera
Viewing Videos Exported from a Single Camera
See the "Multi-Video Export" section for more information on exporting video from several Cameras or
Local Files simultaneously.
Exporting Recorded Region from Single Camera
DW Spectrum supports Export in two media formats: Matroska (mkv) and avi. These formats are
supported by most players (additional codecs may be required for playback).
Export can also be done for Local Video Files.
To Export:
1. Select the desired Item on Scene (Camera or Local Video File).
2. Select the region to export on Time Scale:
Use Right Click Drag
Open Context Menu on Time Scale and click Mark Selection Start (or press “[”), then Mark Selection
End (or press “]”)
To clear selection, use the corresponding Context Menu item
Adjust the region to export by dragging edges
To make zooming easier, zoom Time Line using a Mouse Wheel
3. Invoke Context Menu and choose Export Selected Range:
Digital Watchdog
DW Spectrum User Manual
184
If the selection does not contain archive data, this feature is not available. If the selection starts with
empty archive (see the screenshot above), the exported footage will start from the first available frame
(empty archive will not be exported). If the selection contains empty archive in the middle, it will still
be exported and not show when viewing the exported footage.
IMPORTANT. If a long period of time is selected for export, export may be slightly delayed. In this
case, the following warning will appear:
In this case, it is possible to continue working with DW Spectrum while exporting.
4. Choose the desired file name, format and location and click Save (Cancel will close the dialog and no
exported data will be saved):
Digital Watchdog
185
DW Spectrum User Manual
IMPORTANT. If Image Enhancement, Forcing Aspect Ratio or De-warping were applied to the
exported source, it will be suggested to the user to keep these settings (may be disabled if needed).
Additionally, it is also possible to render date and time on the video (Timestamps dropdown list).
However, these settings will require transcoding on client, so may take a longer period of time with
slightly decreased quality and increased processor load up to 100% during export. These settings are not
applied for the EXE format.
File and folder operations are performed in the same manner as in Windows Explorer.
The following formats are supported:
AVI is more widely used, but the codec remains intact (H264). To view exported videos in other
players may require additional codecs. Additionally some codecs are not allowed in AVI format. A
warning message will appear. This is a default format.
MKV is a more advanced format, but may not be played back on some devices (ex: home media
players). It does not restrict video and audio content.
EXE is used for distributing videos to the users who do not have any codecs or media players installed.
As soon as this executable is started, new Client instance is run and plays back the exported video. In
this case, the data on motion and recorded fragments is also exported.
IMPORTANT. Files produced with the x64 version of software will only be viewable on Windows x64;
however, x86 can be viewed on any architecture.
As soon as export is finished, the video will be available in Local Files in Resource Tree:
IMPORTANT. This resource will be available until Client restarts. To make it available permanently,
save the exported video to DW Spectrum Media Folder (see “Configuring Media Folders”) or create and
save a Layout that would contain this video.
Also, see the "Viewing Videos Exported from a Single Camera" section for more information.
Digital Watchdog
DW Spectrum User Manual
186
Viewing Videos Exported from Single Camera
As soon as export is finished, the extracted video clip will be available in Local Files in Resource Tree.
Note that AVI and MKV files are shown as a single record and EXE file - as Folder containing exported
Camera:
It is possible to open either an EXE file (it will be displayed in new Tab) or open a camera - it will be
displayed as single Item.
When the exported file is opened, Time Line will display the exported time range:
If EXE bundle is opened, then the recorded fragments and motion will be displayed on the Time Line as
well:
Note: start and end time points differ from a regular Local File. It is the start and end time of the
exported fragment. When viewing information, the time will be displayed in Item's bottom right corner.
Digital Watchdog
187
DW Spectrum User Manual
Multi-Video Export
This section provides detailed information on how to export video from a single Camera's archive or Local
Video File:
Exporting the Layout in Multi-Video Format
Viewing Multi-Videos
Changing Multi-Videos after Export.
Also, see the "Single Camera Export" section for information on exporting video from a single Camera or
Local File.
Digital Watchdog
DW Spectrum User Manual
188
Exporting Layout in Multi-Video Format
DW Spectrum provides a powerful feature to perform Export in a proprietary format, which has many
benefits in comparison to standard Export (see "Exporting Recorded Region from Camera"):
It is possible to export several videos simultaneously (for instance, it is possible to export the last
hour of recording from five cameras). The exported files are saved as regular Layout and can be
opened in DW Spectrum. The exported Multi-Video can be navigated through as any other layout (see
"Navigating through several cameras synchronously"), perform Smart Motion Search, etc. It is possible
even do Multi-Video Export from Multi-Video.
It is possible to export additional information (recorded chunks and motion).
It is possible to prepare a bundled version that can be run and viewed on clean Windows systems.
To do Export in proprietary format:
1. Place the desired Items on Scene. A user cannot export Local Video Files into Multi-Videos, but
cannot mix the two.
2. Select the export region on Time Scale:
Use Right Click Drag
Open Context Menu on Time Scale and click Mark Selection Start (or press “[”), then Mark Selection
End (or press “]”)
To clear selection, use the corresponding Context Menu item
Adjust the export region by dragging edges
For easier zoom, scroll the Mouse Wheel on Time Line.
3. Open Context Menu and choose Export Multi-Video:
If the selection contains empty archive on Camera, it will be exported and NO DATA will be shown
when viewing the exported clip.
Digital Watchdog
189
DW Spectrum User Manual
IMPORTANT. If a long period of time is selected for export, it may cause delays. In this case, the
following warning message will appear:
In this case, it is possible to continue working with DW Spectrum while exporting.
4. Choose the desired file name, format and location and click Save (Cancel will close the dialog and no
exported data will be saved):
File and folder operations are performed in the same manner as in Windows Explorer.
The following formats are supported:
NOV – a proprietary format. Can be opened by DW Spectrum Client only. Can be changed if needed
(see "Changing Multi-Video after Export").
NOV (Read-Only) – a proprietary format. Should be opened by DW Spectrum. Cannot be changed.
EXE – an executable bundle (platform dependent – x86 or x64). Can be opened without DW Spectrum
installed on the computer. Can be changed in the future if needed (see "Changing Multi-Video after
Export").
EXE (Read-Only) – a proprietary format (platform dependent – x86 or x64). An executable bundle. Can
be opened without DW Spectrum installed on the computer. Should be opened by DW Spectrum.
Cannot be changed.
EXE is used for distributing videos to the users who do not have any codecs or media players
installed. As soon as the bundle is started, the Client is run and it plays back the exported video. In
this case, the data on motion and recorded fragments is also exported.
Digital Watchdog
DW Spectrum User Manual
190
IMPORTANT. Files produced with the x64 version of software will only be viewable on Windows x64;
however, x86 can be viewed on any architecture.
As soon as export is finished, Multi-Video will be available in local files:
The following operations can be performed:
View videos (see "Viewing Multi-Videos") as Layouts
View single Items from the videos
Edit Multi-Videos if not read-only (see "Changing Multi-Video after Export").
Digital Watchdog
191
DW Spectrum User Manual
Viewing Multi-Videos
After performing Multi-Video Export, the exported file is displayed in local files as follows:
The following operations can be performed:
View a single camera from Multi-Video. Perform actions described in "Adding Items to Layouts".
Open entire Multi-Video. It will be opened as a regular Layout on a separate Tab. Perform actions
described in "Opening and Closing Saved Layouts".
Delete items from Multi-Video. See "Changing Multi-Video after Export".
When Multi-Video is opened, the following standard features can be performed:
Navigation through archive
Thumbnail Navigation
Preview Search
Smart Motion Search
Calendar Search
Tours
Screenshots
Single Camera Export
Export (incl. Multi-Video Export)
Checking the Validity of Exported Videos
Layout Reconfiguration
Forensic Analysis.
Any capabilities possible with Cameras can also be performed with Multi-Videos in DW Spectrum.
Digital Watchdog
DW Spectrum User Manual
192
Changing Multi-Videos after Export
DW Spectrum offers many possibilities when working with Multi-Videos. A user can do almost everything
as with regular Layout:
Add or remove Items. For instance, if Multi-Video was exported from 10PM to 11PM and a new
camera was added, it would get synchronized with other cameras and be displaying in the same
archive (10PM – 11PM). See "Adding Items to Layouts" and "Removing Item(s) from Layouts".
Note: Local Files are not allowed in Multi-Videos
Adjusting Layout Look and Feel (move, swap, resize, rotate). See "Adjusting Layout’s Appearance".
Save modified Multi-Video. One restriction is applied: it is not possible to mix Local Videos and
Cameras in a single Multi-Video. Same as Layouts (see "Saving Layouts"), but can be performed by
Viewers.
Note: Multi-Video can be saved with a read-only flag (modifications will not be saved).
Digital Watchdog
193
DW Spectrum User Manual
Checking the Validity of Exported Videos
Watermark allows Users to check for validity of footage to determine whether or not any modifications
were ever performed to the native footage. Any videos exported by DW Spectrum (either single Cameras
or Multi-Videos) can be checked for validity.
To check the validity of exported videos:
1. Bring the desired video onto the scene
2. Open Context Menu and select Check File Watermark (or press Alt + C)
Digital Watchdog
DW Spectrum User Manual
3. If the file is in its original state, the check will succeed:
4. If any modifications took place, the check will fail:
Digital Watchdog
194
195
DW Spectrum User Manual
Taking Screenshots
Screenshot can be taken from both Cameras and Local Video Files to PNG or JPG output formats.
IMPORTANT. If Image Enhancement and/or De-warping capabilities were initially applied to the
exported source, they will be retained while rendering the screenshot.
To take Screenshot from a video:
1. Select the desired Item on Scene.
2. Seek to the desired position (frame seek will help). See "Navigating through Archive and Live".
3. Click the
button on the item.
4. Choose the desired file name and location and click Save (Cancel will close the dialog and data will
not be saved):
Note: check Include Timestamp to insert playback time in the screenshot (enabled by default).
It is possible to place timestamps on screenshots (use Timestamps dropdown list).
File and folder operations are performed in the same manner as in Windows Explorer.
Digital Watchdog
DW Spectrum User Manual
196
Once saved, Screenshot will be available in Local Files within Resource Tree:
IMPORTANT. This resource will be available until Client restarts. To make it available permanently,
save the exported video in the DW Spectrum Media Folder (see “Configuring Media Folders”) or create
and save a Layout that would contain this video.
Adjusting Volume
To adjust Volume, use one of the following:
Use Volume Slider (at the right of the Time Line)
Use a Mouse Wheel above the slider
Use Ctrl + Up/Down
Use
button or use “P” key to mute/unmute.
IMPORTANT. The volume level will affect the following system Actions: Speak, Play Sound and
Repeat Sound. Note: notifications will not be heard if on mute.
Tours
If several Items are opened on Scene, this feature will provide the ability to automatically switch to the
next Item in a Fullscreen mode (like slide show). To start Tour:
1. Select several Items (see "Adding Items to Layouts")
2. Open Context Menu and select Start Tour (or press Alt+T)
To stop Tour, Double-Click or press any key.
To change sequence speed (the frequency in between Items during Tour):
1. Open Main Menu and go to System Settings
2. Specify the desired delay (in seconds) in Sequence Cycle Time.
Digital Watchdog
197
DW Spectrum User Manual
Screen Recording (Windows Only)
This is an extremely useful feature in DW Spectrum for presentations. It is possible to record from several
displays with sound, select different quality, etc.
Screen can be recorded in the following formats:
Video: MPEG4 Part 2
Audio: Stereo (Lame Audio Codec)
Container: AVI
IMPORTANT. It is necessary to have a powerful processor and video adapter to do screen recording.
See recommended configuration in the installation guide.
Digital Watchdog
DW Spectrum User Manual
Setting up Screen Recording
To set up Screen Recording:
1. Open Main Menu and choose System Settings.
2. Go to the Screen Recording tab.
3. Configure Screen Recording parameters:
Digital Watchdog
198
199
DW Spectrum User Manual
Temporary Folder – the folder that stores temporary files. FIles are stored during recording, then
are copied to a specified folder to be saved.
IMPORTANT. This folder should be accessible and writable.
Capture Mode: Fullscreen (if several monitors are installed the desired one should be chosen) or
Application Window (only DW Spectrum window will be recorded).
Disable Aero – select this option to enhance performance. If chosen, once Screen Recording is in
progress, Windows Aero will be turned off.
Capture Cursor – select this checkbox if a mouse cursor needs to be visible during recording.
Resolution – select screen resolution. The lower the resolution, the higher the performance.
Encoder Quality – select Performance for best performance. Select Best for best quality.
Primary and Secondary device – select sound devices to enable audio. Audio will get mixed from
both devices. The best practice is to select master from the sound card as primary and microphone
as secondary. In this case, both sounds from DW Spectrum (i.e. video clips) and microphone will be
recorded simultaneously.
4. Click OK when done or Cancel to discard changes.
Digital Watchdog
DW Spectrum User Manual
200
Performing Screen Recording
To run Screen Recording, proceed with one of the following:
Open Main Menu and select Start Screen Recording (or press Alt + R)
Click on the
icon in the top right corner.
Screen recording will start in 3 seconds.
When finished, proceed with one of the following:
Open Main Menu and select Stop Screen Recording (or press Alt + R)
Click on the
icon again in the top right corner.
IMPORTANT. If audio parameters are setup incorrectly, Screen Recording will display the following
error:
In this case it is necessary to do the following:
1. Set up audio card parameters in Windows, check and select default recording devices. Then try to
record sound in Windows Recorder.
2. Set up Screen Recorder Parameters (see "Setting up Screen Recording").
Digital Watchdog
201
DW Spectrum User Manual
Choose the desired file name and location and click Save (Cancel will close the dialog and data will not be
saved):
File and folder operations are performed in the same manner as in Windows Explorer.
As soon as the file is saved, it will be available in local files:
IMPORTANT. This resource will be available until Client restarts. To make it available permanently,
save the exported video to DW Spectrum Media Folder (see “Configuring Media Folders”) or create and
save a Layout that would contain this video.
Upgrading DW Spectrum
DW Spectrum offers automatic upgrades. Whenever a new version is released the following notification
will appear:
To avoid further notifications, check Don't notify again about this update.
If the notifications have been disabled, it is possible to check for update manually. To do so, open Main
Menu and click on Check for Updates...
Digital Watchdog
DW Spectrum User Manual
202
Troubleshooting and Contacting Support
The following issues can be resolved manually:
If Camera is not working properly, a user should always diagnose it. See "Diagnosing Offline Cameras"
for more information.
If archive is lost, DW Spectrum will restore it. See "Restoring Broken Archive" for details.
To contact support, use the following link: [email protected]
When posting an issue, it is necessary to describe the problem as detailed as possible. It is useful to
provide additional information such as log files, network configuration, etc. If possible please provide
administrator login credentials as well.
To expedite investigation, it's best to Provide Remote Access. If remote access cannot be provided for
security reasons, the following steps should be taken in creating a support ticket:
Recording Issue
Collecting Logs
Collecting Additional Information.
Digital Watchdog
203
DW Spectrum User Manual
Diagnosing Offline Cameras
Sometimes cameras are displayed in Resource Tree, but are marked with a
sign. When opening such
camera, it will display NO SIGNAL. DW Spectrum will then prompt the user to perform more thorough
diagnostics.
IMPORTANT. Run diagnostics prior to contacting support.
Diagnostics can be invoked by pressing on the item:
Once complete, reasons and recommended actions will be displayed:
Follow instructions to resolve the issue. If unsuccessful, contact support (see "Troubleshooting and
Contacting Support"). Click Copy to Clipboard and paste the data into the message prior to sending it to
support.
Digital Watchdog
DW Spectrum User Manual
204
Restoring Broken Archive
DW Spectrum uses a specific directory on each network drive. However, sometimes archive is moved for
various reasons (ex, a hard drive was replaced, hard drive's letter was changed. etc), possibly resulting in
a complete removal of archive from the system.
DW Spectrum can easily restore the lost archive. To perform archive restoration:
1. Open the Server Settings.
2. Click on Rebuild Archive Index.
3. The process can take a long time. Click Yes to proceed.
Restoration can be canceled in any moment.
If the window is closed, the restoration will continue running in the background.
The system can continue recording while the archive is being restored.
Digital Watchdog
205
DW Spectrum User Manual
Providing Remote Access
The best possible way to help investigate an issue is to provide remote access via one of the following
applications:
Team Viewer (http://www.teamviewer.com)
Citrix GoTo Meeting (https://www.citrix.com/products/gotomeeting/overview.html)
VNC: RealVNC (https://www.realvnc.com/), TightVNC (http://www.tightvnc.com/), UltraVNC (http://
www.uvnc.com/)
RDP (Windows Remote Desktop). Requires Public IP.
For Linux Mac it is possible to open SSH access. Requires Public IP.
Finally Public IP is necessary for the following investigations:
Ability to connect remotely to the system and debug issue on the client side (EC should be accessible
via Internet)
Camera issues investigations. For this purpose Camera should be accessible via Internet by Public IP.
Recording Issue
If it is not possible to provide remote access for security reasons, a supporting video clip can help
understand and investigate the issue. To create a video clip:
1. Set up Screen Recording: select desired screen and microphone settings (see "Setting up Screen
Recording").
2. Record a narrated (preferred) video explaining the issue (see "Performing Screen Recording").
3. Attach the video to the support ticket.
Digital Watchdog
DW Spectrum User Manual
206
Collecting Logs
The following logs must be provided as part of a support ticket:
System Logs
Media Server Logs
Client Logs.
To obtain System Logs:
1. Open Event Log form (see "Viewing Events Log").
2. Choose <Any Event>, <Any Camera>, <Write To Log> filters.
3. Open Context Menu and choose Select All (or press Ctrl+A).
4. Open Context Menu and choose Export Selection to Flie.
5. Save the file and attach to the support ticket.
To obtain Media Server Logs:
1. Right click on the desired Media Server, open Context Menu and choose Server Logs... The log will
open up in browser.
2. Copy all text (CTRL+A) and paste it into a new text file.
3. Repeat this for all Media Servers (if necessary).
4. Save the file and attach to the support ticket.
To obtain Client Logs:
1. Open Main Menu, go to System Settings... -> General tab.
2. Right click on the desired Media Server, open Context Menu and choose Server Logs... The log will
open up in browser.
3. Click Browse Logs in Misc section. Log file (log_file.log) will open in Explorer.
4. Copy the file and attach to the support ticket.
Digital Watchdog
207
DW Spectrum User Manual
Collecting Additional Information
Required information:
Hardware used
DW Spectrum components and drivers versions
External Libraries versions.
Digital Watchdog
DW Spectrum User Manual
To obtain this information, open Main Menu and select About (or press F1). The following form will
appear:
Digital Watchdog
208
209
DW Spectrum User Manual
The information on network configuration is also important and should be provided to Support Team in
addition to other details.
This information can be acquired by standard Windows tools (i.e.) ipconfig, but DW Spectrum provides a
much more simple and intuitive way.
To obtain network configuration, open Main Menu and choose System Settings. Network configuration is
displayed the Network Interfaces section of the General tab:
Glossary
DW Spectrum Server Components – DW Spectrum Media Server and Enterprise Controller.
Administrator – a user that configures DW Spectrum.
Archive – video and audio data recorded from cameras.
Aspect Ratio (AR) – video dimensions. Most commonly used are: 4:3 and 16:9.
Bitrate – number of bytes per second. Used to measure video stream.
Client – the software used to connect to servers and view video streams.
Codec – video or audio compression.
Dual Streaming – enables a camera to provide two separate streams simultaneously, yielding bandwidth
and processor savings on Client (see RADASS).
Export – allows to export a video footage from archive. Exported video can be viewed on any device.
FPS – Frames per Second. Used to measure video stream.
GPU – Graphic Processing Unit. The processor installed on the video card.
HTTP – Hyper Text Transfer Protocol. Some cameras use this protocol to stream video.
Item – video or image on Scene.
Layout – saved video items and their position, size and orientation.Used to present surveillance
information to DW Spectrum user.
Live – ability to view cameras live in real-time mode.
Digital Watchdog
DW Spectrum User Manual
210
Media Server Port – used by Media Server to process requests for recorded fragments and video data
from DW Spectrum Client.
Motion Detection – indicates whether or not any motion occurred within camera's viewing zone.
Motion Mask – the area in viewing zone that does not trigger Motion Detection.
Multi-Video Export – an ability to backup several videos in a proprietary format or executable bundle.
Onvif – a unified protocol used for communication with cameras. See http://www.onvif.org/.
OS – Operating System.
Preview Search – breaks down a period of time into smaller video segments. Example: a month broken
into ten 3-day periods displaying them as separate video segments. Eases search of large archives.
Private (cameras) Network – the network used to transmit data from cameras to Media Server. It is not
accessible from outside.
Public (Intranet) Network – the network used to connect to Media Server from outside. It can be used for
either connecting Media Server to Enterprise Controller or configuring Server Components. It may or may
not be connected to the Internet.
Public IP – IP Address that can be accessed from the Internet.
PTZ – Point, Tilt, Zoom (a camera must support PTZ for the feature to be used)
Resources – cameras, Media Servers, local video files, users and layouts.
RADASS – Resolution and Algorithmic Data Adaptive Scaling System. Enables dynamic switching of
resolution to yield bandwidth savings and optimize processor load. Requires Dual-Streaming to be
supported by the Cameras used.
RTSP – Real Time Streaming Protocol. Some cameras use this protocol to stream video.
RTSP Port – the port used by Media Server to process requests for media streams from DW Spectrum
Client.
Digital Watchdog
211
DW Spectrum User Manual
Server – the computer that DW Spectrum Media server is installed on.
Smart Motion Search – an ability to search by motion within the selected range. DW Spectrum will
provide fragments with motion occurred in the specified region.
Super Administrator – an initial user with full access to DW Spectrum (his login is admin). This user cannot
be deleted.
Sync – ability to play back several cameras simultaneously.
Thumbnails – small snapshots of recorded footage. Used in searching for specific scenes.
URL – Uniform Resource Locator is a specific character string that constitutes a reference to an Internet/
Intranet resource. Used to establish connection to Enterprise Controller.
Viewer – a user with a limited access to DW Spectrum (not permitted to change configuration).
Watermark – used to check validity of exported files. If a file was modified or altered in any way,
watermark will fail.
Digital Watchdog
DIGITAL WATCHDOG
CONTACT US:
[email protected]
(813) 888.9555
www.dwcc.tv