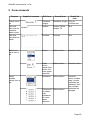
1
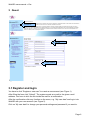
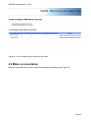
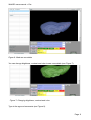
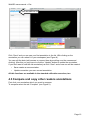
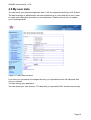
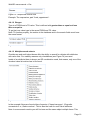
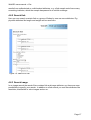
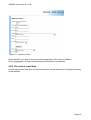
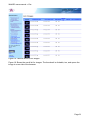
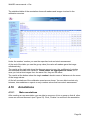
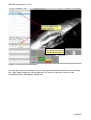
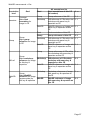
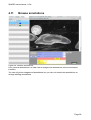
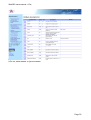
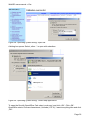
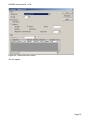
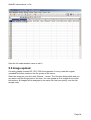
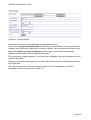
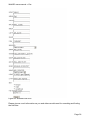
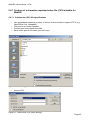
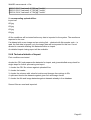
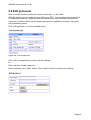
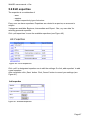
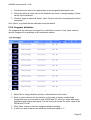
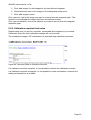
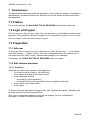
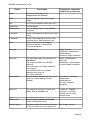
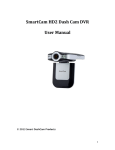
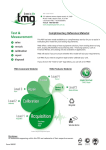
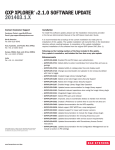
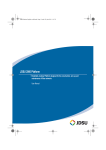
WebGR users manual v1.0a
WebGR
User's manual
The WebGR Consortium
(http://webgr.wiki.azti.de)
Page 1
WebGR users manual v1.0a
Table of contents
1 Applications' web address..................................................................................................3
2 User groups and rights.......................................................................................................3
2.1 User role rights...........................................................................................................3
2.2 Participant role rights..................................................................................................4
3 Guest..................................................................................................................................5
3.1 Register and login.......................................................................................................5
4 Reader (Quick start/Training exercise)..............................................................................6
4.1 Training calibration exercise.......................................................................................6
4.2 Make an annotation ...................................................................................................8
4.3 Compare and copy other readers annotations.........................................................11
4.4 Leave the training.....................................................................................................12
4.5 My user data.............................................................................................................13
4.6 Search function.........................................................................................................14
4.6.1 General usage of search forms.........................................................................14
4.6.1.1 Text fields...................................................................................................14
4.6.1.2 Ranges.......................................................................................................15
4.6.1.3 Multiple search selects...............................................................................15
4.6.2 Search fish.........................................................................................................16
4.6.3 Search image....................................................................................................16
4.6.4 Search user.......................................................................................................17
4.6.5 The search result lists........................................................................................18
4.7 Workshop list............................................................................................................21
4.8 My Calibration exercises...........................................................................................22
4.9 Calibration exercise statistics...................................................................................22
4.10 Annotations.............................................................................................................23
4.10.1 Make annotations............................................................................................23
4.10.2 Annotation levels of a calibration exercise......................................................25
4.11 Browse annotations................................................................................................27
5 Data manager..................................................................................................................28
5.1 Show attributes.........................................................................................................28
5.2 Download attribute CSV file......................................................................................30
5.3 Image upload ...........................................................................................................33
5.4 Batch image upload (import)....................................................................................36
5.4.1 Upload...............................................................................................................36
5.4.2 Manual association of CSV file columns to system attributes..........................37
5.4.3 System checks before import............................................................................38
5.4.4 Import................................................................................................................38
5.4.5 Conditions for an import....................................................................................39
5.4.5.1 CSV file......................................................................................................39
5.4.5.2 Image files..................................................................................................39
5.4.6 Converting other image formats with IrfanView................................................39
5.4.7 Creation of a character separated value file (CSV) suitable for WebGR..........41
5.4.7.1 Software and CSV file specifications.........................................................41
5.4.7.2 Further CSV file specifications...................................................................42
5.4.7.3 Data headings............................................................................................42
5.4.7.4 Datasets.....................................................................................................42
5.4.8 Technical details of import.................................................................................44
5.5 Edit protocols............................................................................................................45
5.6 Edit expertise............................................................................................................46
Page 2
WebGR users manual v1.0a
6 Workshop manager..........................................................................................................47
6.1 Workshop..................................................................................................................47
6.1.1 Start new workshop...........................................................................................47
6.1.2 Workshop information.......................................................................................48
6.1.2.1 Calibration exercise statistics.....................................................................48
6.1.2.2 Link repository............................................................................................48
6.1.2.3 File repository.............................................................................................48
6.2 Start new calibration exercise...................................................................................48
6.2.1 Main settings.....................................................................................................48
6.2.2 Shown attributes................................................................................................49
6.2.3 Participants........................................................................................................49
6.2.3.1 Add participants..........................................................................................50
6.2.3.2 Remove participants..................................................................................50
6.2.3.3 Assign values to participant(s)...................................................................50
6.2.4 Imageset attributes............................................................................................51
6.2.5 Calibration exercise final notes.........................................................................52
7 Administrator....................................................................................................................53
7.1 Preface......................................................................................................................53
7.2 Login and logout.......................................................................................................53
7.3 Preparation...............................................................................................................53
7.3.1 Edit user............................................................................................................53
7.3.2 Edit attribute descriptor.....................................................................................53
7.3.2.1 Attributes....................................................................................................53
7.3.2.2 Units...........................................................................................................55
7.3.2.3 Value lists...................................................................................................55
7.3.3 Further preparation............................................................................................55
8 FAQ..................................................................................................................................56
9 Form elements.................................................................................................................58
10 Abbreviations..................................................................................................................59
Page 3
WebGR users manual v1.0a
1 Applications' web address
You can find the Beta version of WebGR - Web services for support of Growth and
Reproduction Studies under the URL:
http://preview.webgr.zadi.de/
The web address is dependent of your installation of WebGR, so your contact partner will
be your local system admininstator.
•
Start your browser Firefox version 3.
•
Enter the adress. After that the WebGR application website should be visible.
•
For further using make sure the latest Flash plugin is installed.
2 User groups and rights
The user rights are divided into two levels of availability. The first level is the user level. A
user is true for the whole application. The second level is the participant level. A participant
is only true for one calibration exercise.
2.1 User role rights
group 1 (guest)
-
can visit public part (start page, contact or Terms of service)
-
create own new account (user)
group 2 (reader)
-
succeed rights from guest
-
login into the non-public part
-
make temporary annotations / private calibration exercise
-
search for images, annotations or fish
group 3 (data manager)
-
succeed rights from reader
-
upload, edit and delete own image files and fish data
-
edit own fish and image optional parameter
-
administrate the keys (maturity, stage)
group 4 (workshop manager)
-
succeed rights from data-manager and coordinator
-
edit own workshop settings
-
declare WebGR reference annotation for his expertise
-
create new calibration exercise
Page 4
WebGR users manual v1.0a
group 5 (admin)
-
succeed rights from each workshop manager and data manager
-
administrate the whole application
-
administrate users / user roles
-
start new workshop and set a new manager
2.2 Participant role rights
The participant role rights are always limited by the expertise of the user; these roles deal
only with participants.
group 6 (trainee)
-
succeed rights from reader
-
create and edit own annotations
-
read all workshop results
-
declare group accepted annotations
group 7 (expert)
-
succeed rights from trainee
-
upload, edit and delete own image files and fish data
group 8 (coordinator)
-
succeed rights from data manager and expert
-
administrate participants (add, remove participants and admin their role membership)
-
declare calibration-exercise annotations
-
upload information files (pdf-files, links)
-
edit own calibrations settings
-
declare WebGR reference annotations
Page 5
WebGR users manual v1.0a
3 Guest
1. Click here
2. Fill out
3. Click Submit
Figure 1: Start screen and registration form
3.1 Register and login
You have to click “Register a new user” to create a new account (see Figure 1).
After filling the form click “Submit”. The system sends an e-mail to the given e-mail
address. You have to click the link inside the mail for a confirmation.
After the confirmation click any function on the menu, e.g. “My user data” and log-in into
WebGR with your new account (see Figure 2).
Click on “My user data” to change your personal settings and password if you want to.
Page 6
WebGR users manual v1.0a
4 Reader (Quick start/Training exercise)
Every confirmed user gets the status „Reader“. Now you can be invited to calibration
exercises.
In the meantime you can search the database for fishes and images and run training
calibration exercises.
Figure 2: Log-in into WebGR
4.1 Training calibration exercise
Choose the training calibration exercise you want to look at (see Figure 3).
Note: If you want to continue an old exercise click on “My calibration exercises”. You will
see it in the list.
Page 7
WebGR users manual v1.0a
Figure 3: Select training calibration exercise
You get a list of image-sets grouped by protocol, where you can create training calibration
exercises. Choose one training calibration exercise (see Figure 4).
Note: If there are no references for a expertise, then a training calibration exercise is
not available per definition.
Page 8
WebGR users manual v1.0a
Figure 4: List of image-sets grouped by key table
4.2 Make an annotation
Now you can start the exercise inside the annotation interface (see Figure 5).
Page 9
WebGR users manual v1.0a
Zoom / Maximize
Tabs
Own annotations list
Attributes list
Coordinate input
Image back/forward
Graphic control panel
Annotation action
More info
textual input
Figure 5: The annotation interface with explanations
You start your annotations with choosing “annotation” and just clicking on the image. You
will see a red cross. (see Figure 6). The number of dots you make is counted (see Figure
5, textual input).
Page 10
WebGR users manual v1.0a
Figure 6: Make an annotation
You can change brightness, contrast and color to see more details (see Figure 7).
Figure 7: Changing brightness, contrast and color
Type in the age and comments (see Figure 8).
Page 11
WebGR users manual v1.0a
Own annotations list
Figure 8: Saved annotation
Click “Save” and you can see your first annotation in the list. With clicking on the
annotation you can reload it in your workspace (see Figure 8).
You can edit the dots (add crosses or remove them by scrolling over the crosses and
clicking). After this you only have to click the “Update”-button to update the annotation.
If you don't want to edit the old annotation just click “Save” and a new one will be created.
•
Save creates a new annotation.
•
Update overwrites your own current annotation.
All this functions are available in the standard calibration exercises, too.
4.3 Compare and copy other readers annotations
First click your annotation which you want to compare.
To compare select the tab “Compare” (see Figure 9).
Page 12
WebGR users manual v1.0a
Tabs
Selected annotation
Dots of the two annotations
All annotations list
Figure 9: Compare annotations
Click another annotation. You can control-click to select several annotations.
If you want to modify your own or another public annotation from the “all annotations” list
click the “copy”-button in this row. All settings are loaded now. Modify the annotation and
click “Save” to create a new annotation. Go back to tab “Annotation” to see that you have a
new annotation.
All this functions are available in the standard calibration exercises, too.
Note: If you want to discuss or compare with other users you must join a group (more
about this at chapter “User”).
4.4 Leave the training
Click „Exit“.
If you leave the training your exercises will be saved and you can start it the next time by
clicking on “my calibration exercises”. This list contains all your exercises. All your data
and Workshops are available at the start screen, too (see Figure 10).
Page 13
WebGR users manual v1.0a
4.5 My user data
You can check your personal expertises here. Click the expertises and then click „Submit“.
The data manager or administrator can add expertises at any time and will do so in order
to create new calibration exercises for new expertises. Please return to here to update
your knowledge skills.
Figure 10: User data functions
From here you can search the images that only you uploaded and the fish data sets that
only you created.
You can change your password.
You can delete your user account. The data that you provided will be stored anonymously.
Page 14
WebGR users manual v1.0a
4.6 Search function
Additionaly a search function is applied for you. Here you can search for calibration
exercises, fishes, images or users.
Figure 11: search functions
In detail you have the possibility to contain your search with appointing the search
attributes.
The attributes you can choose are different for the diverse searches. You can choose
between a search for “and” and “or”. You can also contain your search by enter limitate
subjects or select the Institutes you want to search in.
In the other searches are also functions to specialize your search application (see Figure
15, Figure 16 and Figure 17).
4.6.1 General usage of search forms
4.6.1.1 Text fields
Placeholders and wildcards are not supported. MySQL's LIKE is used with wildcards
before it and behind it.
Page 15
WebGR users manual v1.0a
Figure 12: Simple text search field
Example: The expression „part“ finds „appartment“.
4.6.1.2 Ranges
Type in a FROM and a TO value. This is defined with greater than or equal and less
than or equal to.
To get just one value type in the same FROM and TO value.
Note: To function properly, the entries in the database and in the search fields must have
the same format.
Figure 13: FROM and TO text search fields
4.6.1.3 Multiple search selects
Checkboxes and multi select boxes offer the ability to search for objects with attributes
with value lists. For usability reasons only checkboxes (see Figure 14) are used.
Inside of an attribute there is always an OR-combination used, that means, only one of the
checked value list entries has to be found.
Figure 14: Multicheckbox search field
In the example fishes are found either of species „Clupea harengus“, „Engraulis
encrasicolus“ or „Gadus morhua“. This is also the case for multi value attributes.
Note: In some search results you will find one and the same object multiple times. This
Page 16
WebGR users manual v1.0a
results from multiselected or multichecked attributes, e.g. a fish sample could have many
examining institutes, which the sample has passed in an otolith exchange.
4.6.2 Search fish
Here you can search a certain fish or a group of fishes by one ore more attributes. E.g.
physical attributes like length and weight can be used here.
Figure 15: Search for fish
4.6.3 Search image
In an image search the search filter contains fish and image attributes, so there are more
possibilities to specify your search. In addition to a fish search you can filter attributes like
resolution, black/white or color images and so on.
Page 17
WebGR users manual v1.0a
Figure 16: Search for image
4.6.4 Search user
It is possible to search for a special expertise here to get a list of the knowledge carriers.
Page 18
WebGR users manual v1.0a
Figure 17: Search for user
Check details if you want to list the personal expertises of the users in addition.
Due to aggregation of these values ordering of this field is not possible.
4.6.5 The search result lists
In most cases result lists from successful searches can be ordered by clicking the heading
of the attribute.
Page 19
WebGR users manual v1.0a
Figure 18: Search result list for calibration exercises
In some columns of the dataset the data is clickable when presented as a link, e.g. written
in blue or purple.
Before and after the result rows actions like edit or delete can be shown as clickable links.
The Figure 18 shows the result list for calibration exercises. In the first column you see the
available actions that depend on the object and your authorisation in WebGR. The shown
workshop name is clickable and gets you to the workshop details. The protocol is also
clickable and opens the protocol file.
Page 20
WebGR users manual v1.0a
Figure 19: Search result list for images
Figure 19 Shows the result list for images. The thumbnail is clickable, too, and opens the
image in a new tab of the browser.
Page 21
WebGR users manual v1.0a
Figure 20: Search result list for users
In case you use a search in context of an action like add participants radio buttons or
check boxes are available in front of each row. With the check boxes you can select
certain objects and execute an action for all selected objects like adding the users to the
participants list of a calilbration exercise (see Figure 20).
4.7 Workshop list
You can search for workshops with „My workshops“ and „Search“→ „List all workshops“.
To show the information about a workshop, click „info“ in the designated workshop row.
Page 22
WebGR users manual v1.0a
Figure 21: Workshop list
4.8 My Calibration exercises
By clicking on “My calibration exercises” you see a list with all calibration exercises you are
invited in or all your training exercises you started before.
Click “annotate” to start the annotation interface. See Annotations.
Click “browse annotations” to show the already available annotations. See Browse
annotations.
4.9 Calibration exercise statistics
Click on statistics in the designated calibration exercise row to view the statistical tables.
The statistical reports include:
• annotations
• list of the participants
• list of the images and the connected fish data
• definition of the calibration exercise
Within the statistical tables click „download as CSV-file“ to download a Comma-Separated
Values-file to process with Spreadsheet software like Calc or Excel or statistical software.
Page 23
WebGR users manual v1.0a
The statistical table of the annotation shows all readers and images involved in the
calibration exercise.
Figure 22: Statistics of calibration exercise annotations
Under the readers' number you see the expertise level and stock assessment.
At the end of the table you see the group value (the value all readers gave the image
collaboratively)
The results at the right side show the Average percent errror, the coefficient of variation
and standard deviation and variance. These values are aggregated for fishes, so in
case you look at two images from the same fish, they are the same.
The results at the bottom show the single readers' absolut mean of distances to the mean
of the image values.
At first all annotations of the calibration exercise are shown. You are able to select only
trainees, intermediates or experts or only readers values that have stock assessment.
4.10
4.10.1
Annotations
Make annotations
After creating an new annotation you are able to announce it into a group so that all other
users can see and discuss it (see Figure 23). Click „Finalize“ to announce the annotation.
Page 24
WebGR users manual v1.0a
The „Group“ level shows
only group annotations
Figure 23: Announce the annotation
You can also copy an annotation from any other group member and work on it by clicking
the “copy” button inside the „all annotations“ list. Now you can save it as your own
annotation without deleting the original one.
Page 25
WebGR users manual v1.0a
4.10.2
•
•
•
Annotation levels of a calibration exercise
The calibration exercise defines the protocol and expertise.
If the calibration exercise is set to non-comparable, the group reference/workshopreference/WebGR reference modes are not available and the „all annotations list“ is
not shown. The calibration exercise can be changed to comparable in the
meantime.
The following table shows and explains the different annotation levels, the goal of
the level and the possible kinds of annotations.
All annotations list
Annotation
level
Goal
Kind of
annotation
Explanation
Possible
number
of annotations
Page 26
WebGR users manual v1.0a
All annotations list
Annotation
level
Annotate
Group
Goal
Personal:
Make final
annotation for
image in CE
Final
Final annotations of this CE
(all readers)
0...n
Group
Group reference of this CE
0...1
Workshop
WS-reference of CEs within this 0...1
workshop with same key &
expertise as CE
WebGR
WebGR reference of image with 0...1
same key & expertise as this
CE
Final
Final annotations of this CE
0...n
Group
Group reference of this CE
0...1
Group:
Workshop
Make group
reference for image
in CE
WebGR
Group
WS-ref.
WebGRref.
Group:
Make workshopWorkshop
reference for image
for this key &
expertise
WebGR
Workshop
Group:
Make WebGRreference for image
WebGR
(system-wide) for
this key & expertise
WS-reference of CEs within this 0...1
workshop with same key &
expertise as CE
WebGR reference of image with 0...1
same key & expertise as this
CE
Group references of CEs within 0...n
this workshop with same key &
expertise as this CE
WS-reference of CEs within
workshop with same key &
expertise as this CE
0...1
WebGR reference of image with 0...1
same key & expertise as this
CE
Workshop references of image
with same key & expertise as
thisCE
0...n
WebGR reference of image
0...1
with same key & expertise as
this CE
Page 27
WebGR users manual v1.0a
4.11
Browse annotations
Figure 24: Browse annotations
Click „Browse annotations“ to load a set of images with annotations into the annotation
interface.
You can only show images and annotations but you can not create new annotations or
change existing annotations.
Page 28
WebGR users manual v1.0a
5 Data manager
The data manager succeeds all rights from reader. Additional functions are: upload, edit
and delete own images files and fish data, edit own fish and image parameter and also
administrate the expertises and protocols (see Figure 25).
Additional functions
Figure 25: Additional functions for data managing
5.1 Show attributes
Click on show attributes to get a list of all attributes that are available in the system. Fish
and image attributes are available in the edit forms, the search forms and the result lists,
so they have a huge effect on the system.
Page 29
WebGR users manual v1.0a
Figure 26: Attribute descriptor list
Click on „show details“ to get the details.
Page 30
WebGR users manual v1.0a
Figure 27: Details of attribute
Note: If the value that you want to import for a specific attribute is not listed here,
the import for this datarows is not possible.
It's possible to edit the details and edit and add entries to the value list, if you have
sufficient rights. See edit attributes.
5.2 Download attribute CSV file
It's possible to download a blank CSV file with only the available attributes as headings.
Click „Download attribute CSV file“.
Page 31
WebGR users manual v1.0a
Figure 28: Operating system dialog "Open file"
A dialog box opens. Select „other...“ in open with selectbox.
Figure 29: Operating system dialog: "Select help application"
To open the file with OpenOffice Calc select „scalc.exe“ and click „OK“. Click „OK“.
OpenOffice starts. Choose characterset „Unicode (UTF-8)“, leave everything else and click
„OK“.
Page 32
WebGR users manual v1.0a
Figure 30: OpenOffice text import
The file opens.
Page 33
WebGR users manual v1.0a
Figure 31: OpenOffice CSV file
Save the file under another name to edit it.
5.3 Image upload
Currently graphic formats GIF, JPG, PNG are supported. In every case the original
uploaded file will be stored on the file system of the server.
Select an image on your drive with „Search...“-button. The file open dialog starts and you
can select one file and go back to the form. You can upload up to 4 images at once with
this buttons. All images will be assigned to the same fish, that you specify over the fish
sample code.
Page 34
WebGR users manual v1.0a
Figure 32: Upload images
In the form all (active) image attributes are available to fill out.
Type in the existing fish sample code exactly as you used it before. Or type in a new fish
sample code. Select the image files you want to upload. You can add several files at once.
Select the subject and type of structure of the image. If you need more subjects,
subjects can be added over the attribute descriptor.
Fill out the other image attributes. If you need more attributes, they can be added over the
attribute descriptor.
Please give as much information as you and others would need for searching and finding
the image later.
Click the „Save“ button. If the fish sample code is not in the database, you will be
prompted to add a new fish (see Figure 33).
Page 35
WebGR users manual v1.0a
Figure 33: Add/edit fish form
Please give as much information as you and others would need for searching and finding
the fish later.
Page 36
WebGR users manual v1.0a
5.4 Batch image upload (import)
With the import functionality you can import fish data, image data and image files at once.
You can create data in the system without using the forms. This batch import could need
preparation of your existing data. This basically means reformating the data in a spread
sheet, e.g.
•
renaming of headers to match the system
•
deleting of unit or percent signs in the value cells
•
adding required columns and data.
The import procedure contains:
•
creation of CSV file
•
upload of CSV file and images
•
before import check
•
import of data and image files
•
after import check
5.4.1 Upload
Figure 34: Select files screen from operating system (here Windows)
1. Generate the files (see below)
Page 37
WebGR users manual v1.0a
2. click „batch import“ to start the procedure
3. Click „Add file(s)...“
4. Operating system screen: Navigate to your source directory and choose your files
to upload (import.csv and image files).
Note: You can select multiple files with control-click (= select single element) and
shift-click (= select all elements until...).
5. Click „Open“.
6. The files are in the list now; select and click „Remove file(s)“ if you selected too
much files.
7. Click „Upload file(s)“ to upload the listed files.
5.4.2 Manual association of CSV file columns to system attributes
For the manual association of CSV file columns to system attributes you can choose the
destination field in a table.
For supporting the association the select boxes are preset where there are equal column
names provided in the CSV file.
Select the destination attribute (system) for each of the source attribute (file).
Note: For more information about the attributes click „show attributes“ before your import.
If you need more destination attributes, the Admin can add new ones to the system.
If you want to ignore the column (e.g. a temporary column for calculations or a value not
needed in the system) leave the select box on „--ignore--“.
A assocation setting is not storable.
Page 38
WebGR users manual v1.0a
Figure 35: associate CSV file columns to system attributes manually
5.4.3 System checks before import
The several checks with the CSV file and the image files will be reported to the user. There
are different boxes for different fields.
If an initial error occurs (invalid CSV file) there will be a message.
If an error occurs you will see which check has this erroreous data in the result code.
Erroreous data columns and rows will not be imported.
If an warning occurs the data will be processed but perhaps the user expected something
different.
If the results code states success, the specific check was all successful.
5.4.4 Import
If the test results showed no error, you are able to click „Import“.
Only valid datasets will be imported.
Click „Exit“
Page 39
WebGR users manual v1.0a
Important: Once imported fishes/images will not be extended. That means if you upload
datasets again, e.g. with more columns or information provided, the data of existing
datasets is neither overwritten nor extended. Unintentionally imported fishes and images
must be deleted before importing again.
In case of image data and image files you will get a warning, if images for the specific fish
(identified over FISH SAMPLE CODE)
•
are already existing
•
are existing with the filename provided.
For the start you can
•
generate a blank spread sheet with the current attributes (all required and optional
fish and image attributes)
◦
•
use „Download attribute CSV“
look up the available attributes and value lists in the system.
5.4.5 Conditions for an import
An import set consists in a CSV (character separated values) file and corresponding image
files.
5.4.5.1 CSV file
For detailed information about the CSV file look at 5.4.7 Creation of a character separated
value file (CSV) suitable for WebGR.
5.4.5.2 Image files
Supported image formats:
•
JPEG
•
GIF
•
PNG
Currently TIFF is NOT supported. Either NOT supported is Photoshop or other graphic
utility program files.
Image size: Images can be very big (several megabyte and megapixel), the images will be
shrinked.
Image file names: Theoretically image names can be repeated in another import, but this
is not recommended for identifying and export reasons.
5.4.6 Converting other image formats with IrfanView
We suggest, you use IrfanView (we use version 3.98 here) on Windows to convert the
images to copies in JPG-format, all at once automatically. The original files, e.g. TIFF-files,
will not be overwritten.
(IrfanView is able to rotate single images and read much other image file formats, too.)
It's freeware for non-commercial use, please download under: http://www.irfanview.net/
IrfanView is running under Linux, too, with Wine.
Page 40
WebGR users manual v1.0a
1. Start IrfanView.
2. Click "File"->"Batch Conversion".
3. Navigate into image directory; you should see all the image files in the list container.
4. Click "Use this directory as output" to store the jpg-images in the same directory, so you
won't have to create another one.
5. Choose Output format: "JPG - JPEG Format".
6. For highest quality click "Options".
7. Click the slider setting "Save quality" to outer right to 100, leave all other settings.
8. Click "OK".
9. Finally click "Start" and the images will be converted.
10. After the conversion is finished, close IrfanView.
Page 41
WebGR users manual v1.0a
5.4.7 Creation of a character separated value file (CSV) suitable for
WebGR
5.4.7.1 Software and CSV file specifications
•
•
•
•
Use spreadsheet software or editor of choice; it must be able to export UTF-8 (e.g.
OpenOffice Calc, Notepad2).
First row must contain headers.
Further rows must contain the data.
Save under specific file name (not test1.csv)
Figure 36: Operating system: Save as...
•
choose CSV.
Figure 37: OpenOffice CSV save settings
Page 42
WebGR users manual v1.0a
•
•
•
•
•
•
File name must be import.csv
CSV file (character set) must be UTF-8 coded (as is the application
scripts/database).
Field separator must be comma (,).
Text delimiter (enclosures) must be double quotation marks (“).
Check „cell content as presented“.
Click OK
5.4.7.2 Further CSV file specifications
Note: If you use OpenOffice Calc, you don't need to know this, because this is handled in
the spreadsheet software.
After one dataset line break is used.
Line break within a cell content is only possible, when the cell content is enclosed within
text delimiters.
For line break allowed control characters are LF (Unix systems etc.) or CR LF (Microsoft
Windows systems etc.).
For NULL no character is written. Example: 4711,, means „4711“, NULL, NULL.
5.4.7.3 Data headings
For the possible headings click „Show attributes“ in WebGR.
1. The image file names must match the entries in column
IMAGE_ORIGINAL_FILENAME.
2. The fish sample code must be in the column FISH_SAMPLE_CODE.
3. The CSV headers must match data columns in the system for fishes and images in
the system.
4. The CSV headers must be unique
It's possible to have completely other headings in the CSV file (straight export from
other system). Either you rename them to match the WebGR schema or you
associate them manually inside the import.
5.4.7.4 Datasets
For the attribute details on click „Show attributes“->“show detail“ in WebGR.
•
Date format: YYYY-MM-DD (a MySQL standard)
•
Date time format: YY-MM-DD HH:MM:SS (a MySQL standard)
•
Time format: HH:MM:SS (a MySQL standard)
•
Latitude/Longtitude format: G (decimal)
◦
right: -10.0987
◦
wrong: -10 5.922
◦
wrong: -10 5 55.3
◦
wrong: S 10 1.016 W 10 5.922
Page 43
WebGR users manual v1.0a
•
Decimal separator sign : . (point, like 9876.54) (a MySQL standard)
•
Thousands separator sign: NOT USED
◦
right: 1000000
◦
wrong: 1 000 000
◦
wrong: 1,000,000
1. The data fields (cells) for select fields (e.g. subject) or multiple select fields must
match existing value lists for the given attribute. This can require to transform coded
data from source coding to destination coding. If the value is not required it can be
left empty.
Examples:
1. „1“ = female or „f“ = female ==> „female“
2. „GR“ or „Griechenland“ ==> „Greece“
2. The cells for numbers must only countain a number, no unit, percent signs, degree
signs, quotation or double quotations signs, monetary signs or other additional
information.
•
right: -19.9
•
right: 19.90
•
wrong: -19.9°
•
wrong: EUR 19.90
3. The cells for numbers must be in the right destination unit, e.g. gallon, hektoliter
must be transformed to liter, miles to kilometer, cm to mm.
4. The cells must be in the right coding standard, if there is an coding standard
assigned with the attribute, e.g. Area could have coding standard from ICES/NAFO.
5. The datasets have to be valid against the image and fish attributes (like in the
context of a form). E.g. a required value can not be empty.
Example:
1.a) data in spread sheet presentation (extract):
H Sam ple ye ar H Fish length FISH_SAM PLE_CODE Fis h le ngth sim ple Text IM AGE_ORIGINAL_FILENAM E s ubje ct
2000
19
50
19 test beta3 1
i50.jpg
otolith
2000
17
52
17 test beta3 2
i52.jpg
otolith
2000
15
53
15 test beta3 3
i53.jpg
otolith
2000
14
54
14 test beta3 4
i54.jpg
otolith
Table 1: import data in spread sheet presentation (extract)
1. b) same data in CSV representation:
"H Sample year","H Fish length","FISH_SAMPLE_CODE","Fish length","simple
Text","IMAGE_ORIGINAL_FILENAME","Image resolution","subject"
2000,19,50,19,"test beta3 1","i50.jpg","otolith"
Page 44
WebGR users manual v1.0a
2000,17,52,17,"test beta3 2","i52.jpg","otolith"
2000,15,53,15,"test beta3 3","i53.jpg","otolith"
2000,14,54,14,"test beta3 4","i54.jpg","otolith"
2. corresponding uploaded files:
import.csv
i50.jpg
i52.jpg
i53.jpg
i54.jpg
All the conditions will be tested before any data is imported to the system. The results are
reported to the user.
If a dataset with a new image and an existing fish – checked with fish sample code – is
read, the fish data is ignored, only the image data will be imported for this row. It's not
allowed to overwrite existing fish datasets within an import.
An detailed import closing report will be available.
5.4.8 Technical details of import
First conditions are tested.
checks the CSV and prepares the datasets for import, and gives detailled arrays back for
single steps for further processing and report
1. checks the CSV file column against uploaded files
2. checks the header
3. checks the columns with value list entries and changes from strings to IDs
4. splits and checks the datasets against given fish and image format
5. checks the fish and image datasets against datasets already in the database
Second files are read and imported.
Page 45
WebGR users manual v1.0a
5.5 Edit protocols
Note: In earlier versions „protocols“ where named „key“ or „key table“.
With this feature you can upload protocol files (e.g. PDF). You can select one protocol file
in a calibration exercise. Users can see and call this file in their calibration exercise list.
A protocol is used to define the processing and goal of a calibration exercise. A protocol
has a describing name.
Click „Edit protocols“ to see the available keys.
Figure 38: List of protocols
Click „edit“ in designated key row to edit the settings.
Or
Click „add key“ to add a new key.
After completion click „Save“ button. Click „Cancel“ button to cancel your settings.
Figure 39: Edit protocol
Page 46
WebGR users manual v1.0a
5.6 Edit expertise
The expertise is a combination of
• area
• species
• subject respectively type of structure
Every user can have expertises. Expertises are related to a species, an area and a
subject.
3 stages are available: Beginner, Intermediate and Expert.. See „my user data“ for
selecting personal expertise.
Click „edit expertises“ to see the available expertises (see Figure 40).
Figure 40: List of expertises
Click „edit“ in designated expertise row to edit the settings. Or click „add expertise“ to add
a new expertise.
After completion click „Save“ button. Click „Cancel“ button to cancel your settings (see
Figure 41).
Figure 41: Add/edit expertise
Page 47
WebGR users manual v1.0a
6 Workshop manager
6.1 Workshop
6.1.1 Start new workshop
A workshop is an event where a group of people discuss the criteria used to classify a
biological structure, commonly otoliths or gonads, with the aim of getting a better
agreement among them for one species.
A calibration exercise may be followed by a workshop and further calibration exercises will
take place within a workshop. Only the administrator is allowed to start a new or delete a
workshop and set a new manager.
Click „start new workshop“.
Figure 42: Add workshop form
Fill out the form.
The available items in the selectboxes (e.g. Location, shown in Figure 42, and Institution)
can be extended by the admin.
The default workshop manager is you. to select another user.
•
Click on „change ws manager“
•
Click „Search user“ → (if necessary enter filter criteria) → „Search“ button.
•
Click the radio button next to the user in the designated user row.
•
Click „set as workshop manager“. You are redirected to the workshop edit form.
After completion click „Save“ button.
Page 48
WebGR users manual v1.0a
6.1.2 Workshop information
To show the information about a workshop, click „List workshops“ → „info“ in the
designated workshop row.
6.1.2.1 Calibration exercise statistics
Click on statistics in the designated calibration exercise row to view the statistical tables.
See calibration exercise statistics.
6.1.2.2 Link repository
Click on „add link“ to add a new web link for the workshop for additional workshop
information.
6.1.2.3 File repository
Click on „add file“ to add a new file for the workshop for additional workshop information.
Enter a desciption, select a file and click the „Save“ button.
6.2 Start new calibration exercise
The following chapters describe how to set up a calibration exercise including the main
settinigs, the participants and the definition and building of a image set.
6.2.1 Main settings
Click „List workshops“ → „edit“ in the designated workshop row → „start new calibration
exercise“.
Enter a name and description and click the „Save“ button. Now you can edit the details.
Page 49
WebGR users manual v1.0a
Figure 43: Edit calibration exercise form
•
Choose an existing protocol or add a new protocol. See edit protocol.
•
Choose an existing expertise or add a new expertise. See edit expertise.
•
Check „Show comparable other user/group annotations/references“ if you want to
show the other users annotations in the annotation interface or do not check if it's a
blind test.
•
Check „Allow adding images to image set at random“ if you want to be able to add
images to the image set at random.
•
After completion click „Save“ button.
6.2.2 Shown attributes
Select the attribute you want to show in the annotation module. Click the „Add attribute to
list“ button. To remove a certain attribute again, click „Remove attribute“ next to the
designated attribute.
6.2.3 Participants
To add, edit or remove participants click „Edit participants...“.
Page 50
WebGR users manual v1.0a
Assign values form
Figure 44: Edit participants form
6.2.3.1 Add participants
Click „Search user(s) to add“ → (if necessary enter filter criteria) → „Search“ button
Check the boxes next to the users in the designated user rows. Click „Add to participants“
button.
6.2.3.2 Remove participants
Check the boxes next to the participants in the designated participant rows. Click „Remove
from participants“ button.
6.2.3.3 Assign values to participant(s)
With this special form you can apply settings to all checked participants at once.
Page 51
WebGR users manual v1.0a
1. Check the boxes next to the participants in the designated participant rows.
2. Check the attribute boxes next to the attributes you want to assign/reassign. Select
values for the attributes.
3. Click the „Apply to selected“ button. Note: Current values for the participants will be
overwritten.
Click „Back“ to go back the the calibration exercise details.
6.2.4 Imageset attributes
The imageset is the selection of images for an calibration exercise. Only these exercise
specific images will be available in the annotation module.
Figure 45: List of images, images already assigned have readonly check mark
1. Select fish or image attribute and click „Add attribute to list“ button.
2. Enter or select value(s) for the attribute. In the case of simple number fields
(integer/decimal) you are able to enter FROM and TO value for ranges with larger
than/equal and smaller than/equal. For the exact value enter the same value in the
FROM and TO field.
3. Click „Save“ button to save the imageset attribute settings.
4. In case you want to have more attributes combined repeat 1.-3.
Page 52
WebGR users manual v1.0a
5. Click „add images“ to add images for the now defined imageset.
6. Check the boxes next to the images in the designated image rows.
7. Click „add images“ button.
Click „remove“ next to the image you want to remove from the imageset again. This
function is not available for images that have annotations already.
Click „remove attribute“ next to the attribute you want to remove from the imageset
attributes again.
6.2.5 Calibration exercise final notes
Please make sure you set key, expertise, comparable and imageset to your needs.
Calibration Exercises with incomplete settings will not be shown.
The workshop manager / CE coordinator can start and stop calibration exercises.
Figure 46: start/stop state in calibration exercise
If a calibration exercise is started, it is not possible to delete the calibration exercise.
If a calibration exercise is stopped, it is not possible to make annotations. However the
reading of annotations is possible.
Page 53
WebGR users manual v1.0a
7 Administrator
The administrator can parametrise the application to the institutions needs. It is possible to
add attributes, add and edit value lists, that are used for the search and edit forms within
the application.
7.1 Preface
For security reasons, the BACK BUTTON OF BROWSER isn't allowed in all forms.
7.2 Login and logout
Click on any menu item to login. Login with your username = e-mail address and personal
password. The password is stored encrypted, so it's not possible to read out, only to reset.
Click on „Logout“ below the menu items to logout.
7.3 Preparation
7.3.1 Edit user
To set a new role to a user you have to edit the user. Click „Search user“ → (if necessary
enter filter criteria) → „Search“ button, click „edit“ in designated user row, choose role in
role select and click „Save“ button. Choose data-manager or ws-manager.
If necessary, click BACK BUTTON OF BROWSER twice and repeat.
7.3.2 Edit attribute descriptor
7.3.2.1 Attributes
Attributes are used in many places in the application...
• if you add or edit an image or fish (edit form)
• if you search an image or fish (search form)
• in the calibration exercise
◦ as saved list („show attributes“)
◦ as saved filter form with saved filter values („imageset attributes“)
• in the search result (result table)
• in the import
To add or edit meta data fields to image or fish, click „Attribute description“. Attributes can
be used and seen in search and edit forms.
Click „edit“ in designated attribute row to edit the settings. Or Click „add attribute
descriptor“ to add a new attribute descriptor.
Page 54
WebGR users manual v1.0a
Detail
Description
Restriction, constraint
Admin has to take care
owner
Only owner and admin can
change/delete the attribute.
name
The used name in input, forms and
tables.
unit
A unit for the attribute value (see unit).
description
The discription
default value
Enter a „default value“ for a prefilled
form field.
is required
Check if field has to be filled out in edit
forms.
is standard
Check if field has high priority in form
(is shown first). See sequence, too.
active
Check to allow general usage (if
attribute is shown in search/edit
forms/result tables).
data type
The data type
integer if select,
multiselect, radiobuttons,
multicheckbox
boolean if single checkbox
form type
The input type resp. form element in
edit forms
Use single checkbox for YES/NO
selection.
Use radio button for single selection
from long list.
Use multicheckbox for multiple
selection from long list.
See Form elements.
select, radiobuttons if
value list
multiselect, multicheckbox
if value list and is multiple
has valuelist
Decide wether attribute has free value
(open) or certain defined values
(closed).
on if select, multiselect,
radiobuttons,
multicheckbox
off if text, textarea,
checkbox
sequence
The sequence number in forms and
tables. See is standard, too.
1=highest... 999999...=
very low, 0 = lowest,
number can be used
multiple times.
is multiple
Object has multiple values for this attribute.
show in list
Decide wether search result table
shows this attribute/value.
attribute group
The object which the attribute belongs
to. E.g. the fish form, the image form
fish, image, system
Page 55
WebGR users manual v1.0a
After completion click „Save“ button.
7.3.2.2 Units
„UNIT“ is an special system attribute that is available for all attributes and that shows up
after the attributes in forms. One attribute can have only one unit.
7.3.2.3 Value lists
If the attribute has an value list (box „has valuelist“ is checked), you can edit the possible
values.
Click „Add value list“ or „Edit value list“. Edit the current values and click „Update“ button.
Or enter new entry and click „Add“ button.
After completion click „Back“.
7.3.3 Further preparation
For further steps see the chapters for editing protocols (page 46) and editing expertises
(page 47).
Page 56
WebGR users manual v1.0a
8 FAQ
•
Pictures are of low quality on my screen, difficult to see rings
•
did you try zooming?
•
For Image Q1-17_1 nothing happens if I press copy WS
•
two things can cause this. For the first there are no annotations made in the
reference and for the second the annotations where exactly at the same positions as your
annotations. But there is also a bug, for some situations the program makes automatically
a annotation at the point 0,0
•
How do I return to the main page after finishing?
•
click “My CE”
-Search gives error message: Nothing found! There are no results for your search.
-Try less filters.
What does a certain input field mean?
Please ask the administrator about the definition of the meta data.
•
What happens if I press ‘Save as’? There is no option to define any name, so why is
the button ‘Save’ not available? –we assume that save is only to save an existing
annotation and save as is meant to save a new annotation. Why do we need two buttons?
In both cases we overwrite an annotation – an empty one or a filled. If this can be
combined in one button this would be nice.
•
"save as" means save as new annotation and "save" means update the current
annotation
•
What happens when using the refresh (all annotations) button?
•
this function is only interesting for long-lasting CE sessions, then you have the
possibility to see instantly the new annotation from the other readers which have been
made in the meantime.
•
Do we have the possibility to test the higher permission levels? E.g. are we able to
upgrade a final reading to a workshop agreed annotation? The coordinator is able to
manage this, please ask them.
•
Is it possible to see my personal information (e.g. permission levels etc.) without
having to leave the calibration exercise?
•
On the bottom of the first tab “fish / image” you see your participant role. What other
information do you want to see?
•
How can we close the session and return to the menu? (now we use ‘back’ but this
is not the way we think is appropriate).
•
its ok, but you can use the button “My CEs”
Page 57
WebGR users manual v1.0a
•
Permissions: If someone is in a calibration exercise, this person should not be
allowed to see the reference annotation because otherwise you’ll never have a proper
calibration exercise.
•
You can setup this in the CE administration interface.
Page 58
WebGR users manual v1.0a
9 Form elements
Purpose
Graphical example
Edit form
Search form
Result list
form
Check yes or
no
Checkbox
(single)
Checkbox (single) 1=on or
0=off/not set
Free text
field, also for
numbers,
dates, times
Textbox
Textbox FROM
Textbox TO
Text
Free text
field with line
break
Textarea
Textarea
Text
Select one
value from a
set
Select
Multicheckbox
Value list value
Radio
Multicheckbox
button
(easier than
Select, but
more space
required)
Value list value
Multiselect
Value list
value, multiple
rows, normal
attributes are
repeated / one
row, multiple
attributes are
grouped
Select
multiple
values from a
set
Multicheckbox
Multicheckb Multicheckbox
ox (easier
than
Multiselect,
but more
space
required)
Page 59
WebGR users manual v1.0a
10 Abbreviations
Specific project WebGR abbreviations
CE = calibration exercise
CS = calcified structure
TE =
WS = workshop (formerly used in WebGR)
WK = workshop (used in real life)
General project abbreviations
berliOS = Berlin Open Source, as seen as domain name in URLs, communication
plattform for users, developers, and service providers of open source software
BLE = Bundesanstalt für Landwirtschaft und Ernährung
CSV = Comma (/Character) separated values
FK = Foreign key
GUID = Globally unique
ID = Identity (number/key)
PDF = Portable document format
PK = Primary key
URL = Unique resource locator
ZADI = as seen as domain name in URLs: Zentralstelle für Agrardokumentation und
-information (former government institute, integrated as Gruppe 42 (group 42) into the
Bundesanstalt für Landwirtschaft und Ernährung)
Page 60