1
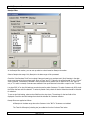
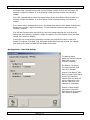
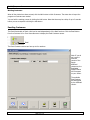
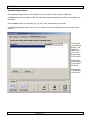
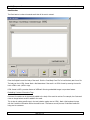
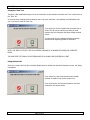
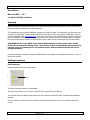
M & M Enterprises, Inc. Document Revision: 1 User Manual Mark and Mail – v2.1 For Retail Pro v8.52 and Above Overview M&M’s Mark and Mail modification allows you to easily Mark Customer records based on a variety of criteria and then send emails to Customers with email addresses. This modification uses the Persits ASPEmail component to send the emails. This component is a dll and must be installed (and registered) on every system that will be using Mark and Mail. One version of ASPEmail is free and can be downloaded from www.Persits.com. There is also a premium version of ASPEmail with additional features that is available for a fee. Mark and Mail will operate with both versions. When the premium version is installed, the premium features are available in Mark and Mail. See the Mark and Mail User Manual for more information. IMPORTANT NOTE: If your SMTP server requires Authentication (in other words, a User ID and Password are required for sending email) , the premium version of the ASPEmail component will be required. There is a licensing fee for the premium version. Please consult the Persits web site for pricing information. Everything needed for installation except the ASPEmail DLL is provided in the MMMarkMail-VVvv.zip file. (VVvv is the version number). Marking Customers POS>Customers Select the Mark button from the side menu. Mark The Mark Customers screen will be displayed. There are three sections to this screen: Customer Filter, Receipt Filter and Marking. The Customer Filter and Receipt Filter sections set the criteria that determine which Customers are selected for marking. The Mark section is where you set the values the Customer Mark fields are set to if the Customer meets the criteria. Page 1 of 14 M & M Enterprises, Inc. Document Revision: 1 Customer Filter In the Customer Filter section you can set up criteria for Customer selection based on the Zip Code, Last Sale Date, Store Credit, Charge Balance, Customer UDF field or Customer Aux field. To use a field for selection purposes, check the checkbox and enter either a single value or range of values. For Zip Code, the From and To values are used as entered. (They are not converted to numeric values). If only a “From” value is entered, the field must be greater than or equal to the “From” value for the Customer to be selected. If only a “To” value is entered, the field must be less than or equal to the “To” value for the Customer to be selected. To match against a UDF field, select the UDF field from the drop down. If UDF1 or UDF2 are selected, the From and to values are dates. For all other UDF fields, the From and To values are text. To match against an Aux field, select the Aux field from the drop down. When the Aux field is selected, the Aux field settings appear in the box to the right. You can then check the settings are you want to use. If the Customer’s aux field setting matches any one of the checked settings, the Customer is selected. Customer filters are applied in an “AND” sequence. For example, if Last Sale Date and Store Credit are checked, the Customer must meet the Last Sale Date AND Store Credit criteria to be selected. Page 2 of 14 M & M Enterprises, Inc. Document Revision: 1 Receipt Filter In the Receipt Filter section, you can set up selection criteria based on Receipt information. Select a Receipt date range. Only Receipts in the date range will be processed. Check the “Use Purchase Total” box to select Customers based on a purchase total. (Only Receipts in the date range count toward to the purchase total). Enter a “From” and “To” value for the purchase total. If only a “From” value is entered, Customers are selected if their purchase total is greater than or equal to the “From” value. If only a “To” value is entered, Customers are selected if their purchase total is less than or equal to the “To value. Line item DCS, VC or Aux field settings can also be used to select Customers. To select Customers by DCS, check the DCSes that are valid for selection. To select by Vendor Code, check all Vendor Codes that should be included for selection. To use an Aux field setting, select an Aux field from the drop down. The settings for the Aux field will be displayed. Check the Aux field settings that should be included for Customer selection. Receipt filters are applied as follows: All Receipts in the data range where the Customer is the “Bill To” Customer are included. The Total of all Receipts (including tax) are added to form the Purchase Total value. Page 3 of 14 M & M Enterprises, Inc. Document Revision: 1 If Purchase Total is checked and the total of all the Receipts is within the Purchase Total range, the Customer is eligible for selection. If no other Receipt criteria have been entered, the Customer is selected. If any DCS is checked and any item in the Receipt range has any of the DCSes that are checked, the Customer is eligible for selection. If no other Receipt criteria have been entered, the Customer is selected. If any Vendor Code is checked and any item in the Receipt range has any of the Vendor Codes that are checked, the Customer is eligible for selection. If no other Receipt criteria have been entered, the Customer is selected. If an Aux field is select and the Aux field of any item in the Receipt range has any of the Aux field settings that are checked, the Customer is eligible for selection. If no other Receipt criteria have been entered, the Customer is selected. If more than one criteria has been entered the Customer must meet all the criteria in order to be selected. For example, if Purchase Total, DCSes and Vendor Codes have been entered, the Customer must meet the Purchase Total AND DCS AND Vendor Code criteria. Marking Section – Mark Field Settings The Marking section determines how the Customer Mark fields are set if a Customer is selected. The default is “No Action”. This means the Mark field value is not changed. Select the “Set Mark(x)” radio button to cause a Mark field to be set if the Customer is selected. Enter the value you want the field set to in the text box. Mark fields are a maximum of 4 characters. Select the “Reset Mark(x)” radio button to cause the Mark field to be set to blank if the Customer is selected. Page 4 of 14 M & M Enterprises, Inc. Document Revision: 1 Marking Customers When all the criteria have been entered, click the Mark button to Mark Customers. The status bar wil report the progress as Customers are marked. You can halt the marking process by clicking the Halt button. Note that there may be a delay of up to 2 seconds before you see a response to clicking the Halt button. Emailing Customers The Email functionality of Mark n Mail can be used independently of the Mark functions. Click the Email button from the Customer List or Form View side menu to display the Email Customers screen. Email The Email Customers screen can have up to four sections: Note: If you do not have the Premium version of the Persits ASPEmail component, the Embedded Images section will not appear on your screen. The available Email features are determined by the ASPEmail version. Page 5 of 14 M & M Enterprises, Inc. Document Revision: 1 Mark Settings Section In the Mark Settings section you enter the Mark field criteria that determine whether or not an email is sent to the Customer. If the Mark1 and Mark2 settings are blank, emails are sent to all Customers (with an email address). If only Mark1 has en entry, then an email is sent if the Customer’s Mark1 field matches the Mark1 entry. If only Mark2 has en entry, then an email is sent if the Customer’s Mark2 field matches the Mark2 entry. If both fields have an entry then the AND/OR radio buttons determine how the entries are combined. With AND selected, the Mark1 AND Mark2 entries must match the Customer’s Mark1 and Mark2 fields. With OR selected, the Mark1 OR Mark2 entries must match the Customer’s Mark1 OR Mark2 field (respectively). Email Settings Section The Email Settings section is used to enter the parameters needed to send the emails. Fields with (Opt) next to them are optional. Fields marked with an asterisk (*) are only visible if you have the Premium version of ASPEmail. Page 6 of 14 M & M Enterprises, Inc. Document Revision: 1 Host – the name of the SMTP server. Required. Example: smtp.isp.net From (Email) – the email address the emails are sent from. Required. Example: [email protected] From (Name) – the name you would like associated with the email address. Optional. Example: Our Company BCC To – an email address that is added to every outgoing email as a BCC (Blind Carbon Copy). How this is displayed to the Recipient varies with the email client being used. Optional. Example: [email protected] Reply To – an email address that appears as the “Reply To” address. How this is displayed to the Recipient varies with the email client being used. Optional. Example: [email protected] Attachment – you can attach a file to each outgoing email by either entering or browsing for the file. Optional. Priority – select the Priority. The default is Normal. Send Individual Emails/Send Bulk Using BCC – This setting determines how emails are sent. If “Send Individuals Emails” is selected, then each selected Customer receives their own email with their email address as the “To” address. If “Send Bulk Using BCC” is selected, then up to 50 Customers are added to the BCC list and then the email is sent. This is a very important setting for a couple of reasons. First, sending individual emails to thousands of Customers can place a tremendous load on the email server. However (as you will see), it is possible to have Customer information (such as name, address, etc.) dynamically embedded in the email text at runtime. SMTP User ID/Password – these fields are only available with the Premium version of ASPEMail and are only used if the SMTP server requires authentication. Use Queuing – this feature is also only available with the Premium version of ASPEmail. If Use Queuing is enabled, then the ASPEmail component queues the emails. The emails are sent by the EmailAgent.exe utility. (This utility is part of the ASPEmail download). Please see the ASPEmail documentation for more information. IMPORTANT NOTE: Using queuing can significantly reduce the time spent in the Mark n Mail modification itself because the ASPEmail component is not actually sending each email. Page 7 of 14 M & M Enterprises, Inc. Document Revision: 1 Embedded Images Section The Embedded Images section is only available if you are using the Premium version of ASPEmail. Embedded images are only used for HTML email where any images referenced by the HTML are included in the email itself. Each embedded image is an image file (.gif, .jpg, etc.) and is referenced by a content ID. In the Embedded Images section you can enter or browse for a list of image files and enter the content ID for each file. The file name can be entered directly in the Image File section or you can use the Browse button to find the file. Content ID is entered directly in the Content ID column. Click Add Row to add another row to the list. Page 8 of 14 M & M Enterprises, Inc. Document Revision: 1 Email Section The Email section is where the actual email that will be sent is entered. Enter the Subject line and the body of the email. Click the “Load Body From File” to load the body text from a file. The body can be in HTML format. Mark n Mail determines if the email is in HTML format by scanning the text for both <HTML> and </HTML> tags. HTML format is NOT a premium feature of ASPEmail. But using embedded images is a premium feature. Embedding Customer Information Tags Customer information can be dynamically added to the body of the email at runtime. For example, the Customer’s name or charge balance could be added to the email. This is done by placing specific tags in the text (whether regular text or HTML). Mark n Mail replaces the tags with the Customer’s information before the email is sent. This feature can only be used if individual emails are being sent to customers. Page 9 of 14 M & M Enterprises, Inc. Document Revision: 1 The available tags are: <FirstName> <LastName> <Title> <FullName> <Company> <Address1> <Address2> <Address3> <Zip> <Phone1> <Phone2> <Info1> <Info2> <Note> <StoreCredit> - This is the customer’s current amount of store credit formatted as x.xx (for example 125.23). <CreditLimit> - This is the customer’s credit limit formatted as x.xx (for example 1000.00). <CreditBalance> - This is the customer’s credit balance formatted as x.xx (for example 342.67). <UDF1> - UDF1 is formatted as mm/dd/yyyy <UDF2> - UDF2 is formatted as mm/dd/yyyy <UDF3> <UDF4> <UDF5> <UDF6> <UDF7> <UDF8> <Aux1> <Aux2> <Aux3> <Aux4> <Aux5> <Aux6> <Aux7> <Aux8> <Aux9> <Aux10> <Aux11> <Aux12> Saving and Opening Packages The Save and Open buttons allow you to save and then re-use entire email setups. This includes the settings from every section as well as the Subject and Body of the email. To Save a package, click the Save button. The Save Package dialog will be displayed: Page 10 of 14 M & M Enterprises, Inc. Document Revision: 1 If this package has already been saved, the name would appear here. A list of saved packages appears here. To save a package either enter the package name in the text box or (if there is a list of package names) select one from the list. Click OK to Save the package. Click Cancel to return to the Email Customers screen. Click the Load button from the Email Customers screen to load an existing package. The Load Package dialog will be displayed: Names of packages that have been previously saved appear in the Select Package area. Select a package and click OK to open the package. (The OK button is enabled when there are packages available). Page 11 of 14 M & M Enterprises, Inc. Document Revision: 1 Sending Emails Click the Send Sample button to send a sample email. This allows you to see what your customers will be receiving. The email is sent to the “From” address. If the body contains any Customer information tags, an eligible Customer’s data is used for the tag replacement. Click the Send Emails button to send the emails. Progress information is displayed in the Status box. Once Send Emails is selected, the Halt button becomes active. You can click Halt to stop the process. When the Halt button is clicked, a confirmation dialog is displayed (there can be a delay before you see this dialog; this is normal): Click the Yes button to halt. The Save “Sent” List dialog will be displayed (see below). If you click no, emails will continue to be sent. Errors and Retry Dialog If there is an error sending an email, the Retry dialog is displayed: The error is displayed along with the email address that generated the error. Click Yes to Retry. Click No to stop sending emails. If No is selected, the Save “Sent” List dialog is displayed. Page 12 of 14 M & M Enterprises, Inc. Document Revision: 1 Saving the “Sent” List The Mark ‘n Mail modification keeps a list of the Customer’s to whom emails have been sent. This is referred to as the “Sent” list. In the case where sending emails is halted or there is an error and Retry is not selected, the modification asks you if you want to save the “sent” list: If you click Yes, the list of emails that have been sent is saved. This list can be used the next time you send emails to skip the Customers that have already received emails. In other words, this is a method of resuming sending emails without duplicating emails to Customers. NOTE: THE SENT LIST IS NOT TIED TO A SPECIFIC PACKAGE (IF A PACKAGE IS LOADED) OR A SPECIFIC EMAIL. THE SAVE SENT LIST DIALOG IS NOT DISPALAYED IF ALL EMAILS ARE SUCCESSFULLY SENT. Using the Sent List If there is a saved “sent” list when the Send Emails button is clicked from the Email Customers screen, this dialog is displayed: If you select Yes, then Customers who have already received an email will not receive another one. If you click No then all Customers (based on the Mark constraints) will receive emails. Page 13 of 14 M & M Enterprises, Inc. Document Revision: 1 Viewing the “Sent” List Whenever emails have been sent and the process was successful, halted or had an error, the Show “Sent” List button will be available on the Email tab. Click the Show “Sent” List button to view the list of Customers that received emails. Page 14 of 14