1
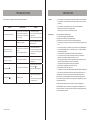
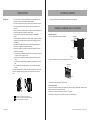
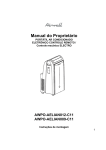
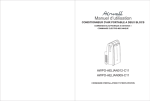
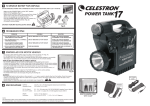
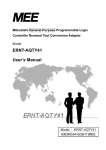
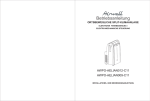
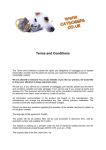
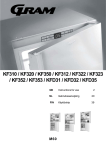
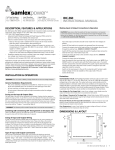
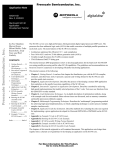
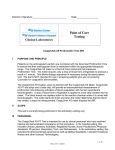
Owners’ Manual
PORTABLE SPLIT AIR CONDITIONER
ELECTRONIC REMOTE CONTROL /
ELECTRO MECHANICAL CONTROL
AWPO-AELIAN012-C11
AWPO-AELIAN009-C11
INSTALLATION AND OPERATING INSTRUCTIONS
SUMMARY
1. SUMMARY.........................................................................................................1
2. PRINCIPLES OF OPERATION......................................................................... 1
3. SAFETY LABELS OF THE UNIT..................................................................... 2
4. STRUCTURE.................................................................................................... 3
5. OPERATING METHODS...................................................................................4
USAGE NOTICE........................................................................................... 4
FUNCTIONS OF DISPLAY AND PANEL....................................................... 5
6. NAMES AND FUNCTIONS OF REMOTE CONTROL...................................... 7
7. ACCESSORIES AND INSTALLATION OF HEAT EMISSION DUCT............... 7
8. CARE AND MAINTENANCE............................................................................ 9
9. TROUBLESHOOTING..................................................................................... 11
10.USER NOTICES .............................................................................................12
11.AFTER SALE SERVICE .................................................................................14
12.INSTALLATION AND MAINTENANCE OF HEALTH FILTER.........................14
SUMMARY
SAFETY LABELS OF THE UNIT
This MOBILE AIR CONDITIONER is a small, portable air conditioner. It has the functions of cooling, drying and
separate ventilation, can be moved as necessary and at will. It is fit for home and office use, especially for a house with
many rooms. With its compact configuration, excellent workmanship, elegant appearance, it looks like a stationary
Mercedes Benz car. It is convenient to move, energy efficient, and has a low noise level.
Note: Please read this manual carefully before operating the unit, the manual is used for reference and the technical
parameters are subject to change without notice.
PRINCIPLE OF OPERATION
Using the upper motor, the indoor airflow passing through the evaporator becomes a cooled wind, but with the
help of lower motor, the airflow of indoor passing through the condenser becomes a heated wind. There are two duct
systems designed in its structure. The heated wind is discharged by the rear outlet, and the cooled wind is discharged
by the front outlet.
Your safety and the safety of others are very important
e have provided many important safety notices in this manual and on your appliance. Always read and obey all
W
safety messages.
This is the safety alert symbol.
This symbol warns you of the potential hazards that can kill or hurt you or others.
All safety notices will follow the safety alert symbol and either the word "DANGER" or "WARNING."
These words mean:
DANGER
You can be killed or seriously injured if you do not immediately
follow instructions.
WARNING
You can be killed or seriously injured if you do not follow
instructions.
All safety notices will tell you what the potential hazard is, how to reduce the chance of injury, and what will
happen if the instructions are not followed.
The principle of operation
Cooled wind
Upper motor
Evaporator
Airflow 1
Capillary
Lower motor
Heated wind
Airflow 2
Condenser
1 SUMMARY
SAFETY LABELS OF THE UNIT 2
STRUCTURE
OPERATING METHODS
USAGE NOTICE
Front
The working range of COOL mode and DRY mode is 16°C (61 °F) - 30°C (86°F).
The Max cooling operation temperature for the air conditioner is 35 °C (95°F) .
Air outlet
Unpacking the Air Conditioner
WARNING
Handle
Control panel
Excessive Weight Hazard
■Use two or more people to move and install the air conditioner.
■Failure to do so can result in back or other injury.
Remove packaging materials
■Remove and properly dispose of the packaging materials. Remove tape and glue residue from surfaces before
turning on the air conditioner. Rub a small amount of liquid dish soap over the adhesive with your fingers. Wipe with
warm water and dry the air conditioner.
■Do not use sharp instruments, rubbing alcohol, flammable fluids, or abrasive cleaners to remove tape or glue. These
products can damage the surface of your air conditioner.
Location requirements:
Rear
• The appliance shall be installed in accordance with national wiring regulations.
• The appliance is for indoor use only, but may not be installed in a laundry room.
• Place the air conditioner on a smooth, level floor that is strong enough to support the unit.
• Allow at least 12 inches (50 cm) of air space on all sides of the unit for good air ventilation.
Upper air inlet grille
Heated air emission
vent
12" (50 cm)
min.
12" (50 cm)
min.
Lower air inlet grille
• Place the unit in an area where the temperature will not fall below 18°C (65°F ). The coils will be covered with frost
at temperatures below 18°C(65°F) and this may reduce performance.
Power cord
3 STRUCTURE
NOTE: The portable air conditioner has casters for easy movement, but it should only be rolled on smooth, flat
surfaces. Do not attempt to roll the portable air conditioner on a carpet or over objects.
OPERATING METHODS
4
OPERATING METHODS
USAGE NOTICE
Electrical Requirements
OPERATING METHODS
Control panel and the function
WARNING
Electrical Shock Hazard
■Plug into a grounded 3-prong outlet.
■Do not remove ground prong.
■Failure to follow these instructions can result in
death, fire, or electric shock.
■Do not use an extension cord.
■Do not use an adapter.
■Power supply must be suitable for the rated voltage and have a special circuit for AC, and diameter of the power cord
should be large enough.
■A time-delay fuse or time-delay circuit breaker is recommended.
■All wiring must comply with local and national electrical codes and should be installed by a qualified electrician. If you
have any questions, contact a qualified electrician.
■The wiring operation must be performed by the professional personnel by following national regulations. There must
be an electric leakage protection switch and magnetic and heat drop-off air switch with enough capacity in a fixed
circuit. Do not connect earth wire to water pipe or gas pipe. When the air conditioner is not used, please pull out the
power plug or cut off power supply.
1."ON/OFF" key
Press once to start and press once again to stop the unit.
2."MODE" key
Press this button to change the operation mode in order of:
COOL→ DRY→ FAN→ COOL
3."◄""►" key
In "COOL" mode press "◄" once, the SET TEMP. will decrease. Press " ►" once, the SET TEMP. will increase by
1oC (1oF). The SET TEMP. can be selected from 16oC (61oF) to 30oC (86oF).
COOL mode 1) To select a location near the door and window, install the heat emission duct.
2) Press "MODE" key to select "COOL" mode.
3) Press "◄" or " ►" key to set the suitable temp16°C(61 °F)~30°C(86°F).
CAUTION
When the unit is running in the COOL mode, in order to maintain a good cooling effect, please pay
more attention to:
1) If there is direct sunlight near the window, please use the curtain to shield it.
2) Do not use other heat sources in the air conditioned room.
DRY mode
Please close the door and window, in order to obtain a better dehumidifying effect:
Press the "MODE" key, select "DRY" mode, the unit will run in "DRY" mode. At this time, the upper
motor runs at the low speed and its speed is not adjustable.
Names and Functions Remote Controller
COOL mode
DRY mode
LED screen
FAN mode
MODE key
ON/OFF key
"
5 OPERATING METHODS
""
" key
OPERATING METHODS 5
ACCESSORIES AND INSTALLATION OF HEAT EMISSION DUCT
ACCESSORIES AND INSTALLATION OF HEAT EMISSION DUCT
Wrong installation is shown in the following
figure (If the pipe is bent too much, it could
easily cause a malfunction.)
• Length range of heat emission duct should
be 50~150 cm. It is recommended to use
it with shortest length.
• When installed, the emission duct should
be as flat as possible. Do not extend the
pipe or connect it with other exhaust pipe,
which would cause abnormal operation.
Correct installation is as shown in figure
(When installing it on a wall, height of wall
should be about 40 -130cm from floor).
130cm
PARTS INCLUDED
Front plastic pipe end
Rear plastic pipe end
Flexible Emission Duct
If duct is to be bent, please install it by considering following the dimensions.
Window Emission Adapter
55cm
55cm
7 ACCESSORIES AND INSTALLATION EMISSION DUCT
ACCESSORIES AND INSTALLATION OF HEAT EMISSION DUCT
8
CARE AND MAINTENANCE
Portable unit
CARE AND MAINTENANCE
Cleaning the air
conditioner
There are casters at the bottom of the
unit. It can be moved around room
very conveniently, as necessary.
Air inlet grille
Please use a cloth that is slightly moistened with water whose temperature is below 40°C
(104°F) (or soapy water or water with cleanser) after wiping off dirt. Do not use gasoline, diesel
oil or similarsubstance to clean the unit. Before cleaning, please pull out the power plug.
WARNING
Before maintenance, please pull out
the power plug and cut off power
supply to avoid electric shock.
Clean the air filter Performance of the unit will decrease if there is too much dust collected, so clean it at least
once every two weeks.
Filter support
Disassembly,
cleaning
9 CARE AND MAINTENANCE
• Pull out filter support and take out filter.
• Wash the filter alone, spray it clean (e.g. by shower attachment) and shake it, or immerse it
into the mild soapy water, then dry it in the shade.
CARE AND MAINTENANCE 10
TROUBLESHOOTING
USER NOTICES
If a malfunction occurs, please check the following before maintenance:
Troubles
The air conditioner does not start.
Possible Causes
1. Insert the power plug tightly.
The power plug is not inserted tightly.
2. Have an electrician replace the power
The fuse is broken.
Is TIMER ON in operation?
Although it was set to COOL
mode, there is no cool wind.
Although it was set to DRY
mode, there is no cool wind.
1. The room temp. is lower than the set
temp.
2. The evaporator has frosted over.
plug or socket.
3. Have an electrician replace the fuse.
Cancel the "SET TIMER" operation or to
wait until auto running.
1. This is a normal phenomenon.
2. Unit is running in defrosting mode, it
will resume running in original mode
after defrosting.
1. Unit is running in defrosting mode, it
1. The evaporator is frosted over.
will resume running in original mode
after defrosting.
Cut off power supply, after 10 minutes,
The LED displays " ".
1. Low voltage over current protection.
turn on the unit, if " " still
appears, please call the maintenance
man.
1. Drain out water through drainage
The LED displays "
".
The water tank is full.
• Do not install the unit in a sealed place, and keep well ventilated, to avoid malfunctions.
• Do not install the unit where it will be exposed to direct sunlight, in order to avoid loss
of efficiency.
• Do not install the unit in a damp place, which may cause electrical leakage.
• Please do not install the unit in the following places:
Places with gas, fire, oil or where a malfunction may occur.
Wrong places
Please pay attention the following people:
1) Young children, medically compromised people.
2) People who have difficulty in expressing themselves.
3) People who are very tired, drunk or who have taken sleep medication.
• Do not step on or put anything on the top of the unit; it will slow and a malfunction may
occur.
• Do not expose the body to a cold wind for a long time; this can cause health problems.
• The unit should be placed about 1 m or more away from a TV, or it will be affected by
its electromagnetic radiation.
• The air inlet/outlet must not be obstructed, for this will cause a malfunction.
• Do not insert your hands or a stick into the air inlet or outlet. Pay more attention
especially to young children, otherwise an accident may occur.
• If the supply cord is damaged, it must be replaced by the manufacturer or its service
agent or a similarly qualified person in order to avoid a hazard.
• The appliance must be positioned so that the plug is accessible.
• Static air pressure in pipeline range must be 0 Pa to 25 Pa.
• Rated parameter for FUSE: 250V AC, 3.15A
• The appliance of conforms to GPC09AE-K3NNA7A GWP:R410A(R32/125:50/50):1900.
• When water level switch works for water filling, water volume inside the tank is 1.2L.
Solutions
The power supply is not connected well.
Power plug or socket is malfunctioning.
Location
hose.
2. If the malfunction persists, please call
the maintenance man.
This appliance is not intended for use by persons (including children) with reduced
physical, sensory or mental capabilities, or lack of experience and knowledge, unless
they are under supervision or instruction concerning the use of the appliance by a person
responsible for their safety.
Children should be supervised to ensure that they do not play with the appliance.
GPC09AE-K3NNA7A can be connected only to a supply with system impedance of no
more than 0.328 ohms. If case necessary, please consult your electricity supply authority
for system impedance information.
11 TROUBLESHOOTING
USER NOTICE 12
USER NOTICES
Wrong places
• Do not tilt or overturn. If an abnormal phenomenon occurres, please pull out the
power plug at once, and ask the dealer to check and maintain.
• Do not use an insecticide or other sprays, which may cause deformation or cracks.
• Check the User Manual for the sentences below and the marking label for the
"waste bin".
• Meaning of crossed-out wheeled dustbin: do not dispose of electrical appliances as
unsorted municipal waste, use separate collection facilities.
• Contact your local government for information regarding available disposal
systems.
• If electrical appliances are disposed of in landfills of dumps, hazardous substances
can leak into the groundwater and get into the food chain, damaging your health
and well-being.
• When replacing old appliances with new ones, the retailer is legally obligated to
take back your old appliance for disposal free of charge.
• Disposal of this appliance in domestic household waste is prohibited. There are
several options for disposal:
a) The municipality has established collection systems, where electronic waste can
be disposed of free of charge to the user.
b) When buying a new product, the retailer will take back the old product free of
charge.
c) The manufacturer will take back the old appliance for disposal at no cost to the
user.
d) As old products contain valuable resources, they can be sold to scrap metal
dealers.
Unregulated disposal of waste in forests and landscapes endangers your health when
hazardous substances leak into the ground- water and find their way into the food
chain.
AFTER SALE SERVICE
• If any quality problems or any other problems arise, please contact the local dealer.
Installation and Maintenance of Health Filter
Installation Instruction
1. Press and pull outwards handles of air inlet grille
Health filter
Handle
Air inlet
grille
Filter
Fig. a
2. Place the health filter evenly on the air inlet grille as shown in Fig. b.
Health filter
Fig. b
3. Reinsert the mounted air inlet grille with filter into unit.
■ Cleaning instructions
Take out the health filter before cleaning and reinstall it after cleaning according to the installation instructions. Note
that active charcoal cannot be cleaned with water.
Let filter dry in the shade or sun after cleaning, but do not dry by wiping.
The health filter commonly has a usage lifetime of one year under normal conditions.
DISPOSAL: Do not dispose of this product as
unsorted municipal waste. Separate collection of such
waste for special treatment is necessary.
13 USER NOTICE
INSTALLATION AND MAINTENANCE OF HEALTH FILTER 14