1
Tufts University
School of Engineering
Department of Electrical and Computer Engineering
EE193 – Project Final Report
Movement Detection using Contiki and Android
Name:
Submitted to:
Zengxu Yang & Wei-Tse Sun
Prof. Chang
Movement Detection using Contiki and Android
Part I - Contiki
Zengxu Yang
December 18, 2014
Contents
1 Introduction
4
1.1
Falling detection . . . . . . . . . . . . . . . . . . . . . . . . . . . . . . . . . . . . . . . .
4
1.2
6LoWPAN . . . . . . . . . . . . . . . . . . . . . . . . . . . . . . . . . . . . . . . . . . . .
4
1.3
Contiki
. . . . . . . . . . . . . . . . . . . . . . . . . . . . . . . . . . . . . . . . . . . . .
4
1.4
Z1 motes
. . . . . . . . . . . . . . . . . . . . . . . . . . . . . . . . . . . . . . . . . . . .
5
2 Project network configuration
5
2.1
Basic configuration . . . . . . . . . . . . . . . . . . . . . . . . . . . . . . . . . . . . . . .
5
2.2
Configure the virtual machine network . . . . . . . . . . . . . . . . . . . . . . . . . . . .
7
2.3
Setting up virtual machine guest OS . . . . . . . . . . . . . . . . . . . . . . . . . . . . .
7
2.4
Setting up remote computer OS . . . . . . . . . . . . . . . . . . . . . . . . . . . . . . . .
8
2.5
Analyze packets using Wireshark . . . . . . . . . . . . . . . . . . . . . . . . . . . . . . .
9
3 Compiling a Contiki program
9
3.1
Contiki version . . . . . . . . . . . . . . . . . . . . . . . . . . . . . . . . . . . . . . . . .
9
3.2
GCC compiler . . . . . . . . . . . . . . . . . . . . . . . . . . . . . . . . . . . . . . . . . .
9
3.3
GNU make . . . . . . . . . . . . . . . . . . . . . . . . . . . . . . . . . . . . . . . . . . . 10
3.3.1
Rules . . . . . . . . . . . . . . . . . . . . . . . . . . . . . . . . . . . . . . . . . . 10
3.3.2
Variables . . . . . . . . . . . . . . . . . . . . . . . . . . . . . . . . . . . . . . . . 10
3.3.3
Automatic variables . . . . . . . . . . . . . . . . . . . . . . . . . . . . . . . . . . 11
2
3.4
3.3.4
Special variables . . . . . . . . . . . . . . . . . . . . . . . . . . . . . . . . . . . . 11
3.3.5
Source code path . . . . . . . . . . . . . . . . . . . . . . . . . . . . . . . . . . . . 11
3.3.6
Pattern rules . . . . . . . . . . . . . . . . . . . . . . . . . . . . . . . . . . . . . . 11
3.3.7
Implicit rules . . . . . . . . . . . . . . . . . . . . . . . . . . . . . . . . . . . . . . 11
3.3.8
Debugging . . . . . . . . . . . . . . . . . . . . . . . . . . . . . . . . . . . . . . . . 12
Z1 websense makefile . . . . . . . . . . . . . . . . . . . . . . . . . . . . . . . . . . . . . . 12
3.4.1
Generating target ELF file
. . . . . . . . . . . . . . . . . . . . . . . . . . . . . . 12
3.4.2
Uploading to a Z1 mote . . . . . . . . . . . . . . . . . . . . . . . . . . . . . . . . 17
3.4.3
TUNSLIP6 . . . . . . . . . . . . . . . . . . . . . . . . . . . . . . . . . . . . . . . 18
4 Movement detection on Z1 motes
18
4.1
ADXL345 accelerometer . . . . . . . . . . . . . . . . . . . . . . . . . . . . . . . . . . . . 18
4.2
Main architecture . . . . . . . . . . . . . . . . . . . . . . . . . . . . . . . . . . . . . . . . 21
4.3
Code implementation . . . . . . . . . . . . . . . . . . . . . . . . . . . . . . . . . . . . . . 22
4.4
ADXL345 sensor processing . . . . . . . . . . . . . . . . . . . . . . . . . . . . . . . . . . 23
4.5
Web communication . . . . . . . . . . . . . . . . . . . . . . . . . . . . . . . . . . . . . . 25
4.6
Memory map . . . . . . . . . . . . . . . . . . . . . . . . . . . . . . . . . . . . . . . . . . 25
4.7
Compile and running . . . . . . . . . . . . . . . . . . . . . . . . . . . . . . . . . . . . . . 25
4.8
Falling detection patterns . . . . . . . . . . . . . . . . . . . . . . . . . . . . . . . . . . . 26
4.9
Virtual machine settings for USB . . . . . . . . . . . . . . . . . . . . . . . . . . . . . . . 26
4.10 Flash the Z1 mote through USB . . . . . . . . . . . . . . . . . . . . . . . . . . . . . . . 27
5 Web server
28
5.1
Install Tomcat . . . . . . . . . . . . . . . . . . . . . . . . . . . . . . . . . . . . . . . . . 28
5.2
PostgreSQL database . . . . . . . . . . . . . . . . . . . . . . . . . . . . . . . . . . . . . . 29
5.3
Deploy Ruiling’s program . . . . . . . . . . . . . . . . . . . . . . . . . . . . . . . . . . . 29
6 CoAP
30
7 Problems and planned improvement
30
3
Acknowledgement
1
1.1
30
Introduction
Falling detection
Falling is a major hazard for body injury or death if not treated timely. Elderly people are vulnerable
for falling because of the weakness of their body.
As the MEMS technology progresses rapidly, the low power, inexpensive and high precision accelerometers have become more and more popular and is widely used for vehicles, smartphones. Some of
the newly developed accelerometers have 3-axis detections and can be used to detect different pattern
of movement on wearable devices. For example, the ADXL345 accelerometer developed by Analog
Devices[1].
1.2
6LoWPAN
Internet has profoundly changed the way people communicate. Internet is based on the TCP/IP
protocol suite. With TCP/IP protocol suite, a lot of heterogeneous networks can talk with each other.
IPv6 is the next generation of Internet that greatly expands the current IPv4 based protocols. As
IPv4 has only 32 bit addresses, it cannot deal with the exponential expansion of Internet, especially
the demand of Internet of Things of connecting a large number of nodes. IPv6 has 128 bit addresses
and can support nearly infinite number of connected nodes.
The TCP/IP protocol is also demanding for the embedded systems. It often requires an operating
system to run the full protocol suite, and it needs more resources than most of the inexpensive, low
power embedded systems. Nonetheless, the benefit of running TCP/IP protocol suite on those systems
is great as it is the most widely supported and expandable network protocol.
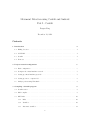
The 6LoWPAN is an IETF standard that tries to resolve this conflict. It is well suited to resource
limited embedded systems that can be used for Internet of Things. 6LoWPAN has a similar layered
structure as the TCP/IP protocol suite, as shown in Figure 1:
1.3
Contiki
Contiki is open source software: Contiki can be freely used both in commercial and non-commercial
systems and the full source code is available.
Contiki provides powerful low-power Internet communication. Contiki supports fully standard IPv6
and IPv4, along with the recent low-power wireless standards: 6LoWPAN, RPL, CoAP. With Contiki’s
ContikiMAC and sleepy routers, even wireless routers can be battery-operated.
Contiki runs on a range of low-power wireless devices, many of which can be easily purchased online[2].
For this project, we use the Zolertia Z1 motes which are supported by Contiki.
4
Figure 1: IP and 6LoWPAN protocol stacks
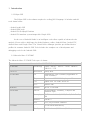
1.4
Z1 motes
The Zolertia Z1 is a low-power wireless sensor network mote. It features a second generation MSP430F2617
low power microcontroller with[3]:
• a 16-bit RISC CPU @16 MHz clock speed.
• built-in clock factory calibration.
• 8 KB RAM.
• 92 KB Flash memory.
• IEEE 802.15.4 compliant CC2420 transceiver operates at 2.4 GHz with an effective data rate of
250 Kbps.
• a digital programmable accelerometer ADXL345.
• a digital temperature sensor TMP102.
Although Z1 has 92kB Flash memory, only the addresses below 64kB can be used now because of the
limitations of compiler or boot loader.
2
2.1
Project network configuration
Basic configuration
We need to access the Z1 motes on the Internet in order to let them communicate with the web server.
5
computer
border router
VirtualBox
Z1 mote
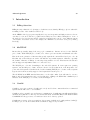
Figure 2: Project configuration
The basic configuration is shown in Figure 2.
The whole system includes:
1. One computer that runs Linux operating system.
2. An Oracle VirtualBox virtual machine runs on the Linux computer.
3. One Z1 mote that is connected to the computer using a USB cord. It is used as a border router.
4. One Z1 mote wirelessly connected to the border router.
We install a Oracle VirtualBox virtual machine that runs Instant Contiki on the Linux computer. The
Instant Contiki is a Contiki development environment that consists of:
1. 32 bit Ubuntu 12.04 Linux operating system.
2. MSPGCC 4.7.0 toolchain for compiling, system library, and linking.
3. OpenJDK for compiling and running Cooja simulator.
4. Python for running Contiki tools.
6
5. GNU make for project management.
6. Contiki 2.6 and 2.7 source code.
7. Cooja simulator.
2.2
Configure the virtual machine network
The best way to access the virtual machine remotely is configuring the virtual machine network to
bridged mode. We use VirtualBox as our virtual machine. The default network configuration is NAT
mode. Go to Devices-Network-Network Settings...-Adapter 1, beside “Attached to:”, choose “Bridged
Adapter”. Beside “Name”, choose the interface that you use to get online for your computer. Normally
it is “wlan0” for wireless and “eth0” for wired. Also check the “Cable Connected”. This should be
done before running the Ubuntu 12.04 guest OS.
2.3
Setting up virtual machine guest OS
Z1 motes are accessed through the border router. In Cooja we use the SLIP protocol to establish a
point-to-point connection to the Internet by executing:
cd /home/user/contiki/examples/ipv6/rpl-border-router
make connect-router-cooja TARGET=sky
It adds a virtual network interface called tun0. At the end of this command we are providing a
prefix of aaaa::1/64, which enables the device to pick its own IPv6 address using Stateless Address
Auto-configuration (SLAAC). It is important to note that this means the prefix needs to use a /64
mask.
When first connected to a network, a host sends a link-local router solicitation multicast request for its
configuration parameters; routers respond to such a request with a router advertisement packet that
contains Internet Layer configuration parameters.
On Ubuntu 12.04 in the virtual machine, edit file /etc/sysctl.conf by running
sudo nano /etc/sysctl.conf
uncomment the line (remove the starting #)
net.ipv6.conf.all.forwarding=1
to enable IPv6 packet forwarding. Then run
sudo sysctl -p
sudo nano /etc/radvd.conf
This creates an empty file. Copy
7
interface eth0 {
## (Send advertisement messages to other hosts)
AdvSendAdvert on;
## IPv6 subnet prefix
prefix bbbb::/64 {
AdvOnLink on;
AdvAutonomous on;
};
};
to the file and execute:
sudo /etc/init.d/radvd start
It then starts normally.
After radvd is started, all computers on the same LAN with our computer that Cooja runs receive the
advertised router information and auto-configure their IPv6 addresses with prefix bbbb::. Run
/sbin/ifconfig eth0
and write down the IPv6 address with prefix bbbb. Mine is
bbbb::a00:27ff:fe8d:4867
2.4
Setting up remote computer OS
Next we set up the remote computer OS. As our virtual machine network is in bridged mode, our host
computer is considered a remote computer on LAN. We cannot directly access the motes because we
do not have the routing information yet.
We plan to add a new route on one computer in the LAN. First we check if our computer has received
the advertised address.
Check the network interface card by /sbin/ifconfig eth0, and get
zengxu@desktop1:~$ /sbin/ifconfig eth0
eth0
Link encap:Ethernet HWaddr d4:3d:7e:97:22:90
inet addr:192.168.0.104 Bcast:192.168.0.255 Mask:255.255.255.0
inet6 addr: 2601:6:7e80:aa9:d63d:7eff:fe97:2290/64 Scope:Global
inet6 addr: fd5c:3ea0:7a43::6ed/128 Scope:Global
inet6 addr: fe80::d63d:7eff:fe97:2290/64 Scope:Link
inet6 addr: fd5c:3ea0:7a43:0:d63d:7eff:fe97:2290/64 Scope:Global
inet6 addr: bbbb::d63d:7eff:fe97:2290/64 Scope:Global
UP BROADCAST RUNNING MULTICAST MTU:1500 Metric:1
RX packets:327 errors:0 dropped:0 overruns:0 frame:0
TX packets:337 errors:0 dropped:0 overruns:0 carrier:0
collisions:0 txqueuelen:1000
RX bytes:68258 (66.6 KiB) TX bytes:48365 (47.2 KiB)
8
So we get the new address, which is bbbb::d63d:7eff:fe97:2290/64.
As we need a route to access the aaaa::/64 network and that can only be forwarded by the bridged
eth0 interface in our virtual machine, We manually add the routing to the network aaaa::/64 used
by the 6LoWPAN network.
sudo /sbin/route -A inet6 add aaaa::/64 gw bbbb::a00:27ff:fe8d:4867
which means we use the eth0 interface in the virtual machine as our gateway to aaaa::/64 network.
Do a ping6 to test it:
zengxu@desktop1:~$ ping6 aaaa::212:7401:1:101
PING aaaa::212:7401:1:101(aaaa::212:7401:1:101) 56 data bytes
64 bytes from aaaa::212:7401:1:101: icmp_seq=1 ttl=63 time=8.63
64 bytes from aaaa::212:7401:1:101: icmp_seq=2 ttl=63 time=8.54
64 bytes from aaaa::212:7401:1:101: icmp_seq=3 ttl=63 time=8.23
64 bytes from aaaa::212:7401:1:101: icmp_seq=4 ttl=63 time=7.89
2.5
ms
ms
ms
ms
Analyze packets using Wireshark
In Cooja, click “Tools-Radio Messages-Analyzer”, choose “6LoWPAN Analyzer with PCAP”. This will
generate a PCAP file which is the traffic log of all the packets. After finishing running your simulation,
open Wireshark, then open the PCAP file under the directory /home/user/contiki/tools/build.
We can then use Wireshark to check every packet with detailed information on all layers.
For the neighbor discovery and RPL protocols, Wireshark can be used to analyze the ICMPv6 RPL
Control packets, for example, DIS, DIO, DAO packets.
3
3.1
Compiling a Contiki program
Contiki version
There are 2 Contiki versions in the Instant Contiki virtual machine. 2.6 in /home/user/contiki and
2.7 in /home/user/contiki-2.7.
3.2
GCC compiler
We use GCC to compile Contiki. Please note that for the MSP430 targets, the vanilla GCC only
supports it in version 4.9 or higher. There is an MSPGCC project that provides MSP430 target
support for old versions like 4.6.3 or 4.7.0. Also only MSPGCC 4.7.0 or higher supports large memory
space (above 64 kB). Also, compiling with MSPGCC 4.6.3 does not get the correct serial port output.
9
3.3
GNU make
The Contiki project uses GNU make to manage the compiling process. Usually the makefile is called
Makefile. One makefile can include other makefiles by using:
include filenames
3.3.1
Rules
The basic structure of a makefile is one or multiple rules like the following:
target: prerequisites
recipe
Each recipe must begin with a tab character. This syntax tells make that the characters that follow
the tab are to be passed to a subshell for execution. The recipe of a rule consists of one or more shell
command lines to be executed, one at a time, in the order they appear.
There are several different kinds of rules:
Explicit rules indicate a specific target to be updated if it is out of date with respect to any of its
prerequisites.
Pattern rules uses wildcards instead of explicit filenames.
Implicit rules are either pattern rules or suffix rules found in the rules database built-in to make.
Static rules are like regular pattern rules except they apply only to a specific list of target files.
Suffix rules were make’s original means for writing general rules. They are considered obsolete in
GNU make.
The order of rules is not significant, except for determining the default goal: the target for make to
consider, if you do not otherwise specify one. The default goal is the target of the first rule in the first
makefile. If the first rule has multiple targets, only the first target is taken as the default.
GNU make does its work in two distinct phases. During the first phase it reads all the makefiles,
included makefiles, etc. and internalizes all the variables and their values, implicit and explicit rules,
and constructs a dependency graph of all the targets and their prerequisites. During the second phase,
make uses these internal structures to determine what targets will need to be rebuilt and to invoke
the rules necessary to do so.
When invoking make, you usually specify a target as an argument. If you do not specify an argument,
then make will use the default target as the argument. The default is the first target that is not started
with a dot. By convention, we use all target, although it could be anything.
3.3.2
Variables
You can define your own variables in your makefile. Variables are all global, and they can only be used
after definition.
10
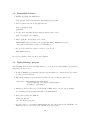
3.3.3
Automatic variables
Automatic variables are set by make after a rule is matched. Some of the common automatic variables:
$<
$@
$^
The name of the first prerequisite.
The file name of target of the rule.
The name of all the prerequisites, with spaces between them.
Its very important that you recognize the limited scope in which automatic variable values are available:
they only have values within the recipe. In particular, you cannot use them anywhere within the target
list of a rule; they have no value there and will expand to the empty string. Also, they cannot be
accessed directly within the prerequisite list of a rule. A common mistake is attempting to use $@
within the prerequisites list; this will not work. However, there is a special feature of GNU make,
secondary expansion, which will allow automatic variable values to be used in prerequisite lists.
3.3.4
Special variables
Some special variables are used:
MAKEFILE_LIST
3.3.5
Contains the name of each makefile that is parsed by make, in the order in which it was parsed.
Source code path
The general search path VPATH is used to specify the paths that make searches when looking for source
code. We can also use vpath to be more fine grained and efficient:
vpath pattern directory-list
3.3.6
Pattern rules
If you write multiple pattern rules with exactly the same target and prerequisites (not necessarily the
same recipe) then only the last one will be executed. But make does not report any errors in such
situations.
If only the target is the same then only the first one that can be executed (e.g. the prerequisites exist)
is executed.
3.3.7
Implicit rules
Implicit rules tell make how to use customary techniques so that you do not have to specify them in
detail when you want to use them. For example, there is an implicit rule for C compilation. File names
determine which implicit rules are run. For example, C compilation typically takes a .c file and makes
a .o file. So make applies the implicit rule for C compilation when it sees this combination of file name
endings.
To allow make to find a customary method for updating a target file, all you have to do is refrain from
specifying recipes yourself. Either write a rule with no recipe, or dont write a rule at all. Then make
11
will figure out which implicit rule to use based on which kind of source file exists or can be made.
In general, make searches for an implicit rule for each target, and for each double-colon rule, that has
no recipe. A file that is mentioned only as a prerequisite is considered a target whose rule specifies
nothing, so implicit rule search happens for it.
Some of the mostly commonly used implicit rules:
Linking a single object file n is made automatically from n.o by running the linker via the C
compiler as:
$(CC) $(LDFLAGS) n.o $(LOADLIBES) $(LDLIBS)
Compiling C programs n.o is made automatically from n.c with:
$(CC) $(CPPFLAGS) $(CFLAGS) -c
3.3.8
Debugging
Invoke make with -n argument to just print out the commands without actually executing them. The
-p argument dumps the internal database including all the variables. The --debug option can also be
used for debugging.
3.4
3.4.1
Z1 websense makefile
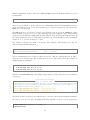
Generating target ELF file
We take the examples/z1/ipv6/z1-websense/Makefile as an example. This is the makefile we will
use for our movement detection. We use the default rule all to compile, link and generate the final
ELF file z1-websense.z1. Its prerequisite is z1-websense:
1
all: z1-websense
2
3
CONTIKI=../../../..
4
5
6
WITH_UIP6=1
UIP_CONF_IPV6=1
7
8
SMALL=1
9
10
APPS += webserver webbrowser
11
12
13
14
15
CFLAGS += -DPROJECT_CONF_H=\"project-conf.h\"
CONTIKI_SOURCEFILES += wget.c
PROJECTDIRS += ../../../ipv6/rpl-border-router
PROJECT_SOURCEFILES += httpd-simple.c
16
17
include £(CONTIKI)/Makefile.include
12
18
19
20
$(CONTIKI)/tools/tunslip6:
$(CONTIKI)/tools/tunslip6.c
(cd $(CONTIKI)/tools && $(MAKE) tunslip6)
21
22
23
connect-router:
$(CONTIKI)/tools/tunslip6
sudo $(CONTIKI)/tools/tunslip6 aaaa::1/64
24
25
26
connect-router-cooja:
$(CONTIKI)/tools/tunslip6
sudo $(CONTIKI)/tools/tunslip6 -a 127.0.0.1 aaaa::1/64
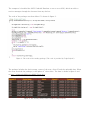
It sets UIP_CONF_IPV6=1, which includes IPv6 support in uIP protocol stack.
This file includes other makefiles. The included makefile list:
MAKEFILE_LIST := Makefile \
../../../../Makefile.include \
Makefile.target \
../../../../core/net/rime/Makefile.rime \
../../../../core/net/mac/Makefile.mac \
../../../../core/net/Makefile.uip \
../../../../core/net/rpl/Makefile.rpl \
../../../../apps/webserver/Makefile.webserver \
../../../../apps/webbrowser/Makefile.webbrowser \
../../../../platform/z1/Makefile.z1 \
../../../../platform/z1/Makefile.common \
../../../../cpu/msp430/Makefile.msp430
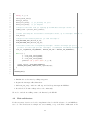
One major makefile is Makefile.include. It sets several variables:
1. Checks if saved target file Makefile.target exists. If it exists then uses the variable TARGET
defined in it. The variables $(TARGET)=z1 as we set in the target makefile.
2. Checks if saved custom file Makefile.z1.defines exists. If it exists then uses the definitions
there.
3. Checks whether the OS is Windows or Mac OS X/Linux/UNIX and set the variable HOST_OS
accordingly.
4. Sets OBJECTDIR=obj_z1.
5. Includes core/net/rime/Makefile.rime.
6. Includes core/net/mac/Makefile.mac.
7. Includes core/net/Makefile.uip.
8. Includes core/net/rpl/Makefile.rpl.
9. Sets target_makefile to platform/z1/Makefile.z1 and includes it. It then includes platform/z1/Makefile.comm
further includes cpu/msp430/Makefile.msp430.
10. In cpu/msp430/Makefile.msp430, because we do not use IAR, it defaults to GCC. It then sets
the compiling toolchain to the gcc msp430 cross compiler. As:
13
cpu/msp430/Makefile.msp430
114
115
116
117
118
119
120
121
122
GCC
CC
LD
AS
AR
NM
OBJCOPY
STRIP
BSL
=
=
=
=
=
=
=
=
=
1
msp430-gcc
msp430-gcc
msp430-as
msp430-ar
msp430-nm
msp430-objcopy
msp430-strip
msp430-bsl
11. Sets source file searching path vpath.
Two pattern rules set every target two prerequisits at the end of this file:
269
270
271
272
Makefile.include
# Cancel the predefined implict rule for compiling and linking
# a single C source into a binary to force GNU make to consider
# the match-anything rule below instead.
%: %.c
273
274
275
276
277
278
# Match-anything pattern rule to allow the project makefiles to
# abstract from the actual binary name. It needs to contain some
# command in order to be a rule, not just a prerequisite.
%: %.$(TARGET)
@
The first pattern rule does not have a recipe. The purpose is to cancel the implicit rule. The second
pattern rule has an empty recipe. The purpose here seems to not generate the real target but to make
sure the prerequisit z1-websense.z1 being generated.
As CUSTOM_RULE_LINK is defined near the end of Makefile so the rules for target z1-websense.z1 on
line 253 is defined and executed because CUSTOM_RULE_LINK has not been defined here yet.
253
254
255
256
%.$(TARGET): %.co $(PROJECT_OBJECTFILES) $(PROJECT_LIBRARIES) contiki-$(TARGET).a
$(TRACE_LD)
$(Q)$(LD) $(LDFLAGS) $(TARGET_STARTFILES) ${filter-out %.a,$^} \
${filter %.a,$^} $(TARGET_LIBFILES) -o $@
The target z1-websense.z1 is the final target, so the recipe in this rule is for linking object files. Note
that it places archives to the last of all prerequisites when linking. This rule has several dependencies.
We explain each one.
First one is %co. This is a pattern and it has its own pattern rule:
235
236
237
%.co: %.c
$(TRACE_CC)
$(Q)$(CC) $(CFLAGS) -DAUTOSTART_ENABLE -c $< -o $@
14
This pattern rule compiles the object files from C source files. So in this example, it compiles
the object file z1-websense.co from z1-websenso.c. Please note that this rule defines a macro
AUTOSTART_ENABLE as its compiling argument. This enables the autostart processes in the z1-websense.c
to be defined as not empty. For further explanations, please see section 4.3.
The second one is PROJECT_OBJECTFILES. This is defined as:
87
PROJECT_OBJECTFILES = ${addprefix $(OBJECTDIR)/,${call oname, $(PROJECT_SOURCEFILES)}}
where oname is a variable defined as:
83
oname = ${patsubst %.c,%.o,${patsubst %.S,%.o,$(1)}}
which means substitute any file n.c or n.S to n.o. As we defined PROJECT_SOURCEFILES=httpd-simple.c,
we then have PROJECT_OBJECTFILES=obj_z1/httpd-simple.o. Then we use the pattern rule:
226
227
228
%.o: %.c
$(TRACE_CC)
$(Q)$(CC) $(CFLAGS) -c $< -o $@
to compile httpd-simple.c to obj_z1/httpd-simple.o. As httpd-simple.c is not in the current directory, make uses the search path defined in vpath to find it. Actually it is in examples/ipv6/rpl-border-router.
But in cpu/msp430/Makefile.msp430 this variable is appended as:
162
PROJECT_OBJECTFILES += ${addprefix $(OBJECTDIR)/,$(CONTIKI_TARGET_MAIN:.c=.o)}
The :.c=.o part is called a substitution reference to variables, which is actually an abbreviation for use
of the patsubst expansion function. CONTIKI_TARGET_MAIN is defined in platform/z1/Makefile.common
as:
24
CONTIKI_TARGET_MAIN = contiki-z1-main.c
File contiki-z1-main.c is under platform/z1. So PROJECTFILES actually has two files: httpd-simple.o
and contiki-z1-main.o. They will be put in directory obj_z1.
The third one is PROJECT_LIBRARIES. This cannot be found anywhere. So it is empty.
The fourth one is contiki-z1.a. This is an archive file with its own rule:
243
244
245
contiki-$(TARGET).a: $(CONTIKI_OBJECTFILES)
$(TRACE_AR)
$(Q)$(AR) $(AROPTS) $@ $^
15
where CONTIKI_OBJECTFILES is defined as:
87
CONTIKI_OBJECTFILES = ${addprefix $(OBJECTDIR)/,${call oname, $(CONTIKI_SOURCEFILES)}}
The variable CONTIKI_SOURCEFILES is defined and appended in multiple files. We list the definitions
in the order they appear.
In example/z1/ipv6/z1-websense/Makefile:
13
CONTIKI_SOURCEFILES += wget.c
In core/net/rime/Makefile.rime:
19
20
21
22
23
24
25
26
CONTIKI_SOURCEFILES += $(RIME_BASE) \
$(RIME_SINGLEHOP) \
$(RIME_MULTIHOP) \
$(RIME_MESH) \
$(RIME_COLLECT) \
$(RIME_RUDOLPH) \
$(RIME_CHAMELEON) \
$(RIME_UIP6)
In core/net/mac/Makefile.mac:
1
2
CONTIKI_SOURCEFILES += cxmac.c xmac.c nullmac.c lpp.c frame802154.c sicslowmac.c nullrdc.c nullrdc-no
CONTIKI_SOURCEFILES += framer-nullmac.c framer-802154.c csma.c contikimac.c phase.c
In core/net/rpl/Makefile.rpl:
1
2
CONTIKI_SOURCEFILES += rpl.c rpl-dag.c rpl-icmp6.c rpl-timers.c \
rpl-mrhof.c rpl-ext-header.c
In Makefile.include:
73
78
104
CONTIKIFILES = $(SYSTEM) $(LIBS) $(NET) $(THREADS) $(DHCP) $(DEV)
CONTIKI_SOURCEFILES += $(CONTIKIFILES)
CONTIKI_SOURCEFILES += $(APP_SOURCES) $(DSC_SOURCES)
16
In cpu/msp430/Makefile.msp430:
44
CONTIKI_SOURCEFILES
+= $(CONTIKI_TARGET_SOURCEFILES)
So contiki-z1.a is the system library and contains most of the system files of Contiki.
The final process for the target is:
msp430-gcc -Wl,--defsym -Wl,__P1SEL2=0x0041 -Wl,--defsym -Wl,__P5SEL2=0x0045 \
-mmcu=msp430f2617 -Wl,-Map=contiki-z1.map -Wl,--gc-sections,--undefined=_reset_vector__,\
--undefined=InterruptVectors,--undefined=_copy_data_init__,--undefined=_clear_bss_init__,\
--undefined=_end_of_init__ z1-websense.co obj_z1/httpd-simple.o obj_z1/contiki-z1-main.o \
contiki-z1.a -o z1-websense.z1
The linker deletes intermediate files after successfully linking. We can keep those files for debugging
purposes. Just use those files as prerequisites for the special target .SECONDARY.
Both obj_z1/httpd-simple.o and obj_z1/httpd.o contain the function symbol httpd_init, but
because the latter is archived in the file contiki-z1.a, this symbol is resolved to the object file
httpd-simple.o. Also because the latter is an archive file, the linker won’t report a multiple definition
error like when detecting identical symbols in multiple object files.
3.4.2
Uploading to a Z1 mote
The rule for uploading to a Z1 mote is %.upload. It is defined in platform/z1/Makefile.common as:
94
95
96
97
%.upload: %.ihex
cp $< $(IHEXFILE)
@echo $(MOTES)
$(MAKE) z1-reset z1-upload
The prerequisite is defined in cpu/msp430/Makefile.msp430 as:
187
188
%.ihex: %.$(TARGET)
$(OBJCOPY) $^ -O ihex $@
Intel HEX (ihex) is a file format that conveys binary information in ASCII text form. It is commonly
used for programming microcontrollers, EPROMs, and other types of programmable logic devices.
In a typical application, a compiler or assembler converts a program’s source code (such as in C or
assembly language) to machine code and outputs it into a HEX file. The HEX file is then imported
by a programmer to ”burn” the machine code into a ROM, or is transferred to the target system for
loading and execution[4].
17
These rules show that the z1-websense.ihex file is generated using msp430-objcopy, and this file is
copied to tmpimage.ihex for flashing.
The variable MOTES is the device name for the mote. We can specify it when operating a specific mote,
for example:
make z1-websense.upload MOTES=/dev/ttyUSB0
3.4.3
TUNSLIP6
The tool tunslip6 is used to connect the border router to the outside world. As we run make connect-router
it actually executes:
sudo $(CONTIKI)/tools/tunslip6 aaaa::1/64
23
The tunslip6 is compiled from tools/tunslip6.c. Let’s analyze this file. It does such things:
1. Sets default parameters: baud rate as 115200, no flow control.
2. Parses command-line options and set parameters accordingly. Like baud rate, host name, device
file, etc.
3. As we do not provide host address here (unlike in Cooja), it tries to open /dev/ttyUSB0 by
calling devopen.
4. Calls stty_telos to set parameters for the opened serial device.
4
4.1
Movement detection on Z1 motes
ADXL345 accelerometer
The ADXL345 accelerometer is produced by Analog Devices. It is a small, thin, ultralow power, 3-axis
accelerometer with high resolution (13-bit) measurement at up to ±16 g.
ADXL345 has several interrupts that look interesting. There are single tap and double tap interrupts,
and a free fall interrupt that is generated when there is a free fall detected, also activity and inactivity
interrupts for detecting moving and non-moving. The registers and interrupts are defined as:
186
187
188
platform/z1/dev/adxl345.h
/* Reference definitions, should not be changed */
/* adxl345 slave address */
#define ADXL345_ADDR
0x53
189
190
191
192
/* ADXL345 registers */
#define ADXL345_DEVID
0x00
// read only
/* registers 0x01 to 0x1C are reserved, do not access */
18
193
194
195
196
197
198
199
200
201
202
203
204
205
206
207
208
209
210
211
212
213
214
215
216
217
218
219
220
221
#define
#define
#define
#define
#define
#define
#define
#define
#define
#define
#define
#define
#define
#define
#define
#define
#define
#define
#define
#define
#define
#define
#define
#define
#define
#define
#define
#define
#define
ADXL345_THRESH_TAP
ADXL345_OFSX
ADXL345_OFSY
ADXL345_OFSZ
ADXL345_DUR
ADXL345_LATENT
ADXL345_WINDOW
ADXL345_THRESH_ACT
ADXL345_THRESH_INACT
ADXL345_TIME_INACT
ADXL345_ACT_INACT_CTL
ADXL345_THRESH_FF
ADXL345_TIME_FF
ADXL345_TAP_AXES
ADXL345_ACT_TAP_STATUS
ADXL345_BW_RATE
ADXL345_POWER_CTL
ADXL345_INT_ENABLE
ADXL345_INT_MAP
ADXL345_INT_SOURCE
ADXL345_DATA_FORMAT
ADXL345_DATAX0
ADXL345_DATAX1
ADXL345_DATAY0
ADXL345_DATAY1
ADXL345_DATAZ0
ADXL345_DATAZ1
ADXL345_FIFO_CTL
ADXL345_FIFO_STATUS
0x1D
0x1E
0x1F
0x20
0x21
0x22
0x23
0x24
0x25
0x26
0x27
0x28
0x29
0x2A
0x2B
0x2C
0x2D
0x2E
0x2F
0x30
0x31
0x32
0x33
0x34
0x35
0x36
0x37
0x38
0x39
/* ADXL345 interrupts */
#define ADXL345_INT_DISABLE
#define ADXL345_INT_OVERRUN
#define ADXL345_INT_WATERMARK
#define ADXL345_INT_FREEFALL
#define ADXL345_INT_INACTIVITY
#define ADXL345_INT_ACTIVITY
#define ADXL345_INT_DOUBLETAP
#define ADXL345_INT_TAP
#define ADXL345_INT_DATAREADY
0X00
0X01
0X02
0X04
0X08
0X10
0X20
0X40
0X80
// read only
// read only
//
//
//
//
//
//
read
read
read
read
read
read
only,
only,
only,
only,
only,
only,
LSByte
MSByte
LSByte
MSByte
LSByte
MSByte
X, two’s complement
X
Y
X
Z
X
// read only
222
223
224
225
226
227
228
229
230
231
232
// used for disabling interrupts
While checking the map file, we find that the ADXL345 interrupts use vector addresses 0xFFE4. The
interrupt service routine ISR is defined as:
63
cpu/msp430/isr compat.h
#define ISR(a,b) interrupt(a ## _VECTOR) b(void)
After macro expansion, it becomes
interrupt(PORT1_VECTOR) port1_isr(void)
19
This is an MSPGCC extension. The macro PORT1_VECTOR is defined in file msp430f2617.h provided
by msp430-libc.
#define PORT1_VECTOR
(0x0024) /* 0xFFE4 Port 1 */
There are two paramters for the free fall detection: minimal time threshold and maximal acceleration
threshold. When at rest, the accelerometer measures 1g acceleration towards the ground, and in a free
falling, the acceleration is 0.
The FREE_FALL bit is set when acceleration of less than the value stored in the THRESH_FF register
(Address 0x28) is experienced for more time than is specified in the TIME_FF register (Address 0x29)
on all axes (logical AND). The FREE_FALL interrupt differs from the inactivity interrupt as follows: all
axes always participate and are logically ANDed, the timer period is much smaller (1.28 sec maximum),
and the mode of operation is always dc-coupled.
The default free fall time in Contiki 2.7 is 160 ms. The default free fall threshold is 563 mg, also
defined in platform/dev/adxl345.h.
167
168
#define ADXL345_THRESH_FF_DEFAULT
#define ADXL345_TIME_FF_DEFAULT
0x09
0x20
// 563 mg
// 160 ms
The free fall interrupt service routine is called accm_ff_cb. This is a callback function. It will be
called after a free fall interrupt. Before using them we need to first register them. For example, in
examples/z1/test-adxl345.c:
181
182
183
/* Register the callback functions for each interrupt */
ACCM_REGISTER_INT1_CB(accm_ff_cb);
ACCM_REGISTER_INT2_CB(accm_tap_cb);
The macro ACCM_REGISTER_INT1_CB actually points the function pointer accm_int1_cb to the function
accm_ff_cb:
129
130
131
132
133
134
platform/z1/dev/adxl345.h
/* Macros for setting the pointers to callback functions from the interrupts.
The function will be called with an uint8_t as parameter, containing the interrupt
flag register from the ADXL345. That way, several interrupts can be mapped to
the same pin and be read from the */
#define ACCM_REGISTER_INT1_CB(ptr)
accm_int1_cb = ptr;
#define ACCM_REGISTER_INT2_CB(ptr)
accm_int2_cb = ptr;
The function pointer accm_int1_cb is defined in the accelerometer driver file platform/dev/adxl345.c.
The basic process of accelerometer in examples/z1/test-adxl345.c in the process accel_process:
165
166
PROCESS_THREAD(accel_process, ev, data) {
PROCESS_BEGIN();
20
{
167
int16_t x, y, z;
168
169
serial_shell_init();
shell_ps_init();
shell_file_init(); // for printing out files
shell_text_init(); // for binprint
170
171
172
173
174
/* Register the event used for lighting up an LED when interrupt strikes. */
ledOff_event = process_alloc_event();
175
176
177
/* Start and setup the accelerometer with default values, eg no interrupts enabled. */
accm_init();
178
179
180
/* Register the callback functions for each interrupt */
ACCM_REGISTER_INT1_CB(accm_ff_cb);
ACCM_REGISTER_INT2_CB(accm_tap_cb);
181
182
183
184
/* Set what strikes the corresponding interrupts. Several interrupts per pin is
possible. For the eight possible interrupts, see adxl345.h and adxl345 datasheet. */
accm_set_irq(ADXL345_INT_FREEFALL, ADXL345_INT_TAP + ADXL345_INT_DOUBLETAP);
185
186
187
188
while (1) {
x = accm_read_axis(X_AXIS);
y = accm_read_axis(Y_AXIS);
z = accm_read_axis(Z_AXIS);
printf("x: %d y: %d z: %d\n", x, y, z);
189
190
191
192
193
194
etimer_set(&et, ACCM_READ_INTERVAL);
PROCESS_WAIT_EVENT_UNTIL(etimer_expired(&et));
195
196
}
}
PROCESS_END();
197
198
199
200
}
1. Initialize the accelerometer by calling accm_init.
2. Register the interrupt callback functions.
3. Call accm_set_irq to enable free fall, tap, and double tap interrupts in ADXL345.
4. Read the X, Y, Z axis readings each second continuously.
We need to send the free falling events to the Internet by 6LoWPAN.
4.2
Main architecture
For the movement detection, we decide to implement it based on the Z1 websense code and ADXL345
test code. The Z1 websense is a simple web server running on top of the IPv6 contiki stack on Z1
21
motes to provide sensor values, and with a RPL border router to bridge the sensor network to Internet.
The C source file is examples/z1/ipv6/z1-websense.c.
The ADXL345 test code is used for testing the functionality of ADXL345 under Contiki.
We thus take out the ADXL345 test code and add it to the Z1 websense file to make the accelerometer
reading can be visited on the web server. We remove the serial shell from the ADXL345 test code as
it is too big to fit in the ROM after combining two modules. We do not need to change the makefile.
After compiling and linking, a MSP430 ELF file called z1-websense.z1 will be generated. Let’s first
analyze this file.
There are some initialization code at first (mostly provided by the compiler), then it jumps to the
main function provided by platform/z1/contiki-z1-platform.c. From the main function, all the
processes and kernel functions are scheduled, and device drivers loaded.
4.3
Code implementation
There are 3 processes in the movement detection code. They are web_sense_process, accel_process,
and status_process. They are automatically started after booting the motes.
57
58
59
examples/z1/ipv6/z1-websense.c
PROCESS(web_sense_process, "Sense Web Demo");
PROCESS(accel_process, "Test Accel process");
PROCESS(status_process, "Status handling process");
60
61
AUTOSTART_PROCESSES(&web_sense_process, &accel_process, &status_process);
The definition of web_sense_process process’ thread is:
159
160
161
162
163
PROCESS_THREAD(web_sense_process, ev, data)
{
static struct etimer timer;
PROCESS_BEGIN();
cc2420_set_txpower(31);
164
165
166
sensors_pos = 0;
process_start(&webserver_nogui_process, NULL);
167
168
169
170
etimer_set(&timer, CLOCK_SECOND * 2);
SENSORS_ACTIVATE(battery_sensor);
SENSORS_ACTIVATE(temperature_sensor);
171
172
173
174
while(1) {
PROCESS_WAIT_EVENT_UNTIL(etimer_expired(&timer));
etimer_reset(&timer);
175
176
177
battery1[sensors_pos] = get_mybatt()*1000;
temperature[sensors_pos] = get_mytemp();
22
sensors_pos = (sensors_pos + 1) % HISTORY;
178
}
179
180
PROCESS_END();
181
182
}
This process:
1. calls cc2420_set_txpower to set the radio transmission power.
2. starts another process webserver_nogui_process that sets up the web server.
3. activates the battery and temperature sensors.
4. gets the values of the battery and temperature sensors every 2 seconds.
The main function mainly:
1. Initializes the MSP430 CPU and all peripheral devices.
2. Starts all autostart processes by calling autostart_start. It further calls process_start for
each autostart process.
3. Starts the scheduler loop.
4.4
ADXL345 sensor processing
Use interrupts to detect falling, moving. ADXL345 calculates the vector sum of all 3 axes and compares
the vector sum with predefined thresholds. We use 313mg for the maximal acceleration and 160ms for
the minimal duration.
The function process_poll is used to set the flag needspoll in the PCB. Polling is the way to make a
process run from an interrupt. The process_poll function is the only function in the process module
that is safe to call from preemptive mode[5].
370
371
372
373
374
375
376
377
378
379
380
core/sys/process.c
void
process_poll(struct process *p)
{
if(p != NULL) {
if(p->state == PROCESS_STATE_RUNNING ||
p->state == PROCESS_STATE_CALLED) {
p->needspoll = 1;
poll_requested = 1;
}
}
}
To send the status information to the web server, we modify the callback functions of the interrupts
to add status information:
23
224
examples/z1/ipv6/z1-websense.c
/* accelerometer free fall detection callback */
225
226
227
228
229
230
231
232
233
234
void
accm_ff_cb(uint8_t reg){
status = "FALL";
process_post(&status_process, status_event, NULL);
printf("~~[%u] Freefall detected! (0x%02X) -- ", ((uint16_t) clock_time())/128, reg);
print_int(reg);
}
/*---------------------------------------------------------------------------*/
/* accelerometer tap and double tap detection callback */
235
236
237
238
239
240
241
242
243
244
245
246
247
248
249
250
void
accm_tap_cb(uint8_t reg){
process_post(&status_process, status_event, NULL);
if(reg & ADXL345_INT_DOUBLETAP){
status="RUNNING";
printf("~~[%u] DoubleTap detected! (0x%02X) -- ", ((uint16_t) clock_time())/128, reg);
} else if(reg & ADXL345_INT_TAP){
status="WALKING";
printf("~~[%u] Tap detected! (0x%02X) -- ", ((uint16_t) clock_time())/128, reg);
} else{
status="MOVING";
printf("~~[%u] Move detected! (0x%02X) -- ", ((uint16_t) clock_time())/128, reg);
}
print_int(reg);
}
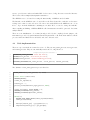
We also use y axis values to detect sitting and standing. We think the user is standing if y < −200,
sitting if y > −100. The 3 axes values are read constantly every second.
319
320
321
322
323
324
325
326
327
328
329
330
331
332
333
334
335
336
examples/z1/ipv6/z1-websense.c
while (1) {
x = accm_read_axis(X_AXIS);
y = accm_read_axis(Y_AXIS);
z = accm_read_axis(Z_AXIS);
//
printf("x: %d y: %d z: %d\n", x, y, z);
if(strncmp(status,"",1) == 0){
if(y < -200){
process_post(&status_process, status_event, NULL);
status = "STANDING";
}
if(y > -100){
process_post(&status_process, status_event, NULL);
status = "SITTING";
}
}
etimer_set(&et, ACCM_READ_INTERVAL);
PROCESS_WAIT_EVENT_UNTIL(etimer_expired(&et));
}
24
4.5
Web communication
A mote connects to the Internet through the border router. The ideal way to communicate with the
web server on the Internet is to send an HTTP request packet whnever a certain movement is detected.
But as sending HTTP request has not be fully implemented, we resort to a hack (courtesy to Tolga)
that exploits the <img> tag. We use Tolga’s web server for this purpose.
<img src="http://tolgazeybek.ddns.net:8083/
?devicename=Zengxu&status=STATUS">
The implementation is to modify the html header to let it refresh every 3 seconds to auto reload the
new sensor status:
91
examples/z1/ipv6/z1-websense.c
static const char *TOP = "<html><head><meta http-equiv=\"refresh\" content=\"3\"><title>Contiki Web S
and the generate_chart function to point to our web server:
100
101
102
103
104
105
106
107
108
109
examples/z1/ipv6/z1-websense.c
static void
generate_chart(void)
{
blen = 0;
ADD("<img src=\"http://tolgazeybek.ddns.net:8083/?"
"devicename=Zengxu&"
"status=%s",
status);
ADD("\">");
}
4.6
Memory map
For MSP430 MCUs, the addressable memory space is 128 KB. As per the hardware manual, all MSP430
devices with more than 64 KB memory has a MSP430X core.
A rough map of MSP430F2617:
RAM: 0x1100-0x30FF. Flash: 0x3100-0x19FFF.
The interrupt vector space is 0xFFC0-0xFFFF. The reset vector is 0xFFFE.
Because the limited memory in Z1 motes, be sure to check your code not to exceed the memory limit.
Your code can sometimes be optimized if it is too large. The website of Contiki introduces several
methods for code optimization.
4.7
Compile and running
We need to first flash the MAC addresses of our motes. For example:
25
make clean
make burn-nodeid.upload nodeid=158 nodemac=158
make z1-reset && make login
Every mote should have a unique address.
Then we flash the border router.
cd examples/ipv6/rpl-border-router
make TARGET=z1 savetarget
make border-router.upload
make connect-router
A virtual network interface tun0 will be created.
Then, under the contiki virtual machine, open a terminal, run:
cd contiki/examples/z1/ipv6/z1-websense
make TARGET=z1 savetarget
make z1-websense.upload
make z1-reset && make login
This flashes the Z1 mote that is used for movement detection and runs the application.
4.8
Falling detection patterns
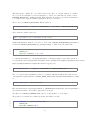
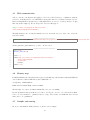
A real falling is a movement that has a distinct pattern[1]. There are 4 stages in a falling movement
as shown in the 4 red boxes in Figure 3.
1. Start of the fall: The vector sum of acceleration will be significantly less than 1 g.
2. Impact: After experiencing weightlessness, the human body will impact the ground or other
objects. There will be a large spike of acceleration.
3. Aftermath: After falling, there will generally be a period of motionless.
4. Comparing before and after: After a fall, the individual’s body will be in a different orientation
than before, so the static acceleration in three axes will be different from the initial status before
the fall.
We can get a more accurate falling detection algorithm if we can use all the above information.
4.9
Virtual machine settings for USB
Below is my configuration under Linux. If you use Windows or Mac OS X host operating systems, the
configuration of VirtualBox will be slightly different. Please consult the VirtualBox user manual on
their website.
You need to be in the vboxusers group to be able to auto detect USB devices in VirtualBox. Run:
26
Figure 3: Falling Detection
sudo adduser yourname vboxusers
Log out and log in again.
If you need USB 2.0 support, you need to install Oracle VM VirtualBox Extension Pack.
Start VirtualBox, in “Settings-USB”, enable USB by checking “Enable USB controller”. Then click
the icon with a small plus sign and then choose the “Silicon Labs Zolertia Z1 (0107)”. This is the USB
device for the Z1 motes. VirtualBox can use it after it is in the USB filter list.
4.10
Flash the Z1 mote through USB
Start your Contiki virtual machine with Z1 mote connected by a USB cord. The Z1 mote USB port
is a simulated serial port with device file named usually /dev/ttyUSB0. Open a terminal and add
yourself to the dialout group to have writable access to the USB serial device. Run:
sudo adduser user dialout
Then log out and log in to make it effect.
Open a terminal in Contiki virtual machine, run:
cd contiki/examples/hello-world
27
make hello-world.upload
If you see the lights in your mote flash then the image should be successfully burned into the Z1 mote.
5
Web server
This is for installing web service on the Contiki virtual machine which runs Ubuntu Linux 12.04. The
following steps provide a working environment. As this is the simplest way of making sure everything
works smoothly without worrying about different operating systems and configurations, compiling,
priviledges problems, etc.
5.1
Install Tomcat
To install Tomcat, make sure your computer is connected to the Internet, then open a terminal and
run:
sudo
sudo
sudo
sudo
apt-get
apt-get
apt-get
apt-get
update
remove openjdk-6*
install openjdk-7-jdk
install tomcat7 tomcat7-admin tomcat7-examples
Edit the Tomcat user configuration file with
sudo nano /etc/tomcat7/tomcat-users.xml
and add the following before the last line:
<role rolename="manager-gui"/>
<user username="twl" password="twl" roles="manager-gui"/>
Then run
sudo service tomcat7 restart
to restart the Tomcat 7 service.
Launch the firefox browser and enter localhost:8080. If everything is OK you will see the welcome
page of Tomcat. Then you can click the link “manager webapp” under “tomcat7-admin” in this page.
When asked about user name and password, type “twl” and “twl”.
In the /manager page you can deploy your program by using “WAR file to deploy”.
28
5.2
PostgreSQL database
1. Install PostgreSQL and JDBC driver:
sudo apt-get install postgresql libpostgresql-java-jdbc
2. Create a password for the PostgreSQL database:
sudo -u postgres psql
\password
3. Log into the PostgreSQL database using the password just created:
psql -U postgres -h localhost
4. After logging into PostgreSQL, create a table:
CREATE TABLE devices (device_id integer NOT NULL, UNIQUE(device_id),
user_name varchar(40), protocol varchar(80));
5. If your created table is not what you want, you can drop it.
DROP TABLE devices;
Do not forget putting a semicolon after each command.
5.3
Deploy Ruiling’s program
After installing Tomcat and PostgreSQL database, you can start deploying Ruiling’s program and
registering your new devices.
1. Download Ruiling’s program named my_web_app.war which is a compressed Java web archive
to a directory and extract it.
2. Edit the file dbcheck.jsp and change the password to the one that you just created:
connection = DriverManager.getConnection(
"jdbc:postgresql://localhost:5432/postgres",
"postgres", "password");
3. Still in the extracted directory, copy the installed JDBC driver to the web app by running:
cp /usr/lib/java/postgresql-jdbc4-9.1.jar WEB-INF/lib
4. Delete and repackage the WAR file:
rm my_web_app.war
jar -cvf my_web_app.war *
5. In your browser, go to localhost:8080/manager and deploy the newly generated WAR file. You
will then be able to add devices to the database from your browser.
29
6
CoAP
Constrained Application Protocol (CoAP) is a software protocol intended to be used in very simple
electronics devices that allows them to communicate interactively over the Internet. It is particularly
targeted for small low power sensors, switches, valves and similar components that need to be controlled
or supervised remotely, through standard Internet networks. CoAP is an application layer protocol that
is intended for use in resource-constrained internet devices, such as WSN nodes. CoAP is designed
to easily translate to HTTP for simplified integration with the web, while also meeting specialized
requirements such as multicast support, very low overhead, and simplicity[6].
The CoRE group has designed CoAP with the following features in mind:
• RESTful protocol design minimizing the complexity of mapping with HTTP.
• Low header overhead and parsing complexity.
• URI and content-type support.
• Support for the discovery of resources provided by known CoAP services.
• Simple subscription for a resource, and resulting push notifications.
• Simple caching based on max-age.
The mapping of CoAP with HTTP is also defined, allowing proxies to be built providing access to
CoAP resources via HTTP in a uniform way.
7
Problems and planned improvement
• The IMG hack we use is awkward and slow. The delay can be 5 to 6 seconds and the new
sensor information could be lost while waiting for the page refreshment. We plan to use direct
HTTP requests instead of the IMG hack. This requires us to write HTTP requests using TCP
communication. The IMG hack is awkward and slow.
• There is an interrupt sharing problem prevents us from using more interrupts other than the 3
interrupts provided in the test code. Debug and solve the interrupt sharing problem.
• The falling detection is simple and could be confused with other movements. Improve the detection algorithm to make it more accurate. The falling analysis in section 4.8 is a good direction.
• The web communication method used in our project is still crude. There are standards for more
scalable and future proof ways. We plan to investigate CoAP method for RESTful web sensor
management.
Acknowledgement
We want to thank Prof. Chang for his creative idea of movement detection on the 6LoWPAN and
Android from which the project was born. Tolga Zeybek for his help in web server setting up and
Android code study. Ruiling Gao for her work on the web server setting up and communication skills.
And all the classmates of EE193 for their hard work for improving this project and making it a solid
platform for future works.
30
References
[1] Ning Jia. Detecting human falls with a 3-axis digital accelerometer. Analog Dialogue, 43(7):43–50,
2009.
[2] Contiki OS Website. Contiki introduction. http://www.contiki-os.org/, 2014.
[3] Zolertia Z1 Website. Z1 platform brochure.
Zolertia-Z1-Brochure.pdf, 2014.
http://zolertia.com/sites/default/files/
[4] Wikipedia. Intel hex. http://en.wikipedia.org/wiki/Intel_HEX, 2014.
[5] Contiki OS Wiki.
Processes, 2014.
Contiki processes.
https://github.com/contiki-os/contiki/wiki/
[6] Wikipedia. Constrained application protocol. http://en.wikipedia.org/wiki/Constrained_
Application_Protocol, 2014.
31
Content
1. Introduction …………………………………………………………………………… 1
1.1 Eclipse IDE ………………………………………………………………………… 1
1.2 Motorola Moto G XT1045 ……………………………………………………… 1
1.3 ANDY Android Emulator ………………………………………………………
2
2. Project Network Configuration ……………………………………………………
2
3. The Fall Detector Algorithm …………………………………………………………
4
3.1 The accelerometer sensor ………………………………………………………
4
3.2 The Thresholds ……………………………………………………………………
4
3.3 The Weight of The Data …………………………………………………………
4
3.4 The Weight of Angle ……………………………………………………………
5
3.5 Define Human Activities …………………………………………………………
5
4. Test and Result …………………………………………………………………………
7
5. Improvement In the Future …………………………………………………………
7
5.1. The activities are different from people to people…………………………
7
5.2. The environment will change …………………………………………………
8
5.3 The sensor is not enough ………………………………………………………
8
5.4 Barrier of our fall detector ………………………………………………………
8
Reference……………………………………………………………………………………
9
Reference