1
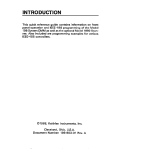
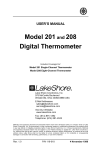
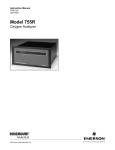
User’s Manual
Model DRC-80
Digital Cryogenic
Thermometer
Obsolete Notice:
This manual describes an obsolete Lake Shore product. This manual is a copy from our archives
and may not exactly match your instrument. Lake Shore assumes no responsibilityfor this manual
matching your exact hardware revision or operational procedures. Lake Shore is not responsible
for any repairs made to the instrument based on information from this manual.
Lake Shore Cryotronics, Inc.
575 McCorkle Blvd.
Westerville, Ohio 43082-8888USA
Internet Addresses:
[email protected]
[email protected]
Visit Our Website:
www.lakeshore.com
Fax: (614)891-1392
Telephone: (614)891-2243
Methods and apparatus disclosed and described herein have been developed solely on company funds of Lake Shore Cryotronics, Inc.
No government or other contractual support or relationship whatsoever has existed which in any way affects or mitigates proprietary
rights of Lake Shore Cryotronics, Inc. in these developments. Methods and apparatus disclosed herein may be subject to U.S. Patents
existing or applied for. Lake Shore Cryotronics, Inc. reserves the right to add, improve, modify, or withdraw functions, design
modifications, or products at any time without notice. Lake Shore shall not be liable for errors contained herein or for incidental or
consequential damages in connection with furnishing, performance, or use of this material.
Obsolete Manual
July 1981
Table of Contents
I.
11.
General Information
1.1 Introduction
1.2 Description
1.3 Major Assemblies Supplied
1.4 Ordering of Replacement or Additional Sensors
1
Installation
2.1 Introduction
2.2 Initial Inspection
2.3 Power Requirements
2.4 Grounding Requirements
2.5 Installation
2.6 Repackaging for Shipment
4
4
4
4
4
III. Operating Instructions
3.1 Introduction
3.2 Controls, Indicators, Connectors
3.3 Temperature Readout
3.4 Analog Output of Temperature
3.4.1
Field Installation of DRC Options - 8022 and 8025
3.5 Standard DT-500DRC and DT-500CU-DRC-36 Curves
3.6 Rack Mounting the DRC-80
3.7 The 10-Sensor Selector Switch
3.8 Remove Parallel BCD Output Option
3 . 9 IEEE Interface Option
3.9.1
General IEEE Specifications & Operation
3.9.2 Specific Operation of the DRC8-IEEE Interface,
Model 8024
3.9.3
Sample Programming
3.9.4
Field Installation of DRC-IEEE, Model 8024
IV.
V.
VI.
Theory of Operation
4.1 Introduction
4.2 Detailed Description
4.2.1 Power Supplies
4.2.2 Precision Constant Current Source and Front
Panel Switching
4.2.3 A/D Converter and Microprocessor System
4.2.4
Software - DRC-80 Cryogenic Thermometer
4.2.5 Digital Display Board
Calibration and Troubleshooting
5.1 Introduction
5.2 Test Equipment
5.3 General Remarks
5.4 Instrument Calibration
5.4.1 Current Source
5.4.2 A/D Converter
5.4.3 Adjustment of Output Buffer
5.4.4 DRC8-L/A Option Model 8025
5.5 Instrument Tests
DRC-80 Replaceable Parts List
1
2
3
5
7
7
8
13
13
13
13
13
15
18
18
19
20
21
22
22
22
23
23
24
26
27
27
27
27
27
28
28
28
28
31
ii
Table of Illustrations
Figure 1.1
Model DRC-80 Digital Cryogenic Thermometer
Figure 2.1
Sensor, Cable, and Monitor Connections
6
Table 3.1
Entry Number Correlation
7
Figure 3.1
DRC-80 Front Panel
9
Figure 3.2
DRC-80 Rear Panel
9
Table 3.2
DT-500DRC(D curve) Voltage-Temperature
Characteristic
10
Figure 3.3
Model DRC-80 shown with RM-3H Rack
Mounting Hardware
14
Figure 3.4
Model DRC-80 and SW-10A shown with RM-3H
Rack Mounting Hardware
14
Figure 3.5
Model DRC-80 and SW-10A Rear View showing RM-3H
Rack Mounting Hardware and Umbilical Cord
Connections
14
Table 3.3
SW-10A Connector Detail
16
Table 3.4
BCD Temperature Output
Figure 3.6
DRC80-IEEE-488, Model 8024, Panel Layout
21
Figure 4.1
Software Flow Diagram for DRC-80 Digital
Thermometer
25
Table 5.1
DRC-80 Signals Associated with Fig. 5.1
29
Figure 5.1
DRC-80 Signals
30
Figure 6.1
DRC-80 Power Supply Schematic
36
Figure 6.2
DRC-80 Main Board Schematic
37
Figure 6.3
DRC-80 Main Board Component Layout
38
Figure 6.4
DRC-80 Display Schematic
39
Figure 6.5
DRC-80 BCD-L/A, Model 8022/25, Schematic
40
Figure 6.6
DRC-80 BCD-L/A, Model 8022/25, Component Layout
41
Figure 6.7
DRC-80 IEEE-488, Model 8024, Schematic
42
Figure 6.8
DRC-80 IEEE-488, Model 8024, Component Layout
43
- Model
8022
iv
17
iii
Specifications, DRC-80 Thermometer
Input:
Temperature Range: 1.4 t o 330K with standard DRC
Sensor ( t o 380K with other Sensors).
Sensor: Silicon Diode (order separately). DT-500-DRC,
DT-500CU-DRC-36 or any calibrated DT-500 Series Diode.
See below for proper response curve.
Sensor Input: Dual-sensor input. 4-terminal input for each
sensor. Selection is via front-panel pushbuttons.
Sensor Excitation: 10-microampere current source. Stability ±0.005%.
Sensor Response Curve: Domestic US units require Sensor
Curve "D". Export units require Sensor Curve "E". Sensor
curves subject to change, refer to manual for proper curve
when reordering Sensors. Curves to match existing Sensors available on special request. See also DRC-Precision
Option.
Input Resistance: Greater than 1000 megohms.
Maximum Sensor Power Dissipation: 25µW at 4.2K
Temperature Readout:
Display: 4-digit, 1.1cm (0.43") LED shows temperature
directly in Kelvin.
Resolution: 0.1 K. "Scale Expand" increases resolution to
0.01 K for temperatures below 30K. 0.05K from 30K to 100K
(no increase in accuracy).
Accuracy (20-25°Cambient): ±0.5K at 4K and 77K, ±1 .OK at
330K with standard Sensor. See DRC-Precision Option for
accuracy with Lake Shore calibrated Sensor.
Temperature Coefficient (10-20°C and 25-45° ambient):
±0.01K/°C.
Response Time: Less than 1 second to rated accuracy.
General:
Monitor Output: Buffered output of Display Sensor voltage
(additional outputs listed below as options).
Dimensions, Weight: 216mm wide x 102mm high x 330mm
deep (8.5 in x 4 i n x 13 in). Style L. half-rack package. Net
weight 3.6 kg (7.9 Ibs).
Power: 90-110, 105-125, or 210-250VAC (switch-selected),
50 or 60Hz.
Accessories Supplied: Mating connectors for sensor inputs
and monitor, instruction manual.
FIGURE 1.1
Options and Accessories Available:
Model8022. Parallel BCD output for DRC-80. TTL compatible. Provides BCD output of temperature i n Kelvin and
Sensor selected (either from front-panel or optional
SW-10A) .
Model 8024. IEEE-488 output for DRC-80. Provides digital
output of temperature in Kelvin and Sensor selected
(either from front-panel or optional SW-10A).
Model8025. Analog output proportional to Kelvin temperaturefor use with recordersorother readouts. 10mV/K at < 10
ohm output resistance (field installable) .
Model 8022/25. Combination of 8022 (BCD output) and
8025 (Analog output) installed in same u n i t .
Model SW-10A. 10-Sensor Selector Switch for use with
DRC Thermometer or Controller. Push-button selection of
any one of up to 10 sensors. Connects t o Sensor "B"
position of instrument. Sensor selected is also identified
via 8022 or 8024 digital interfaces. Dimensions: 216mm
wide x 102mm high x 330mm deep (8% in x 4 in x 13 in).
Style L half-rack package .
Model RM-3H. Rack mounting hardware to mount either
one or two Style L half-rack unit(s) in standard 3%" rack
space.
DRC-Precision Option: Custom-programmed read-onlymemory for DRC instruments which improves specified
accuracy to 0.1 K or better over a given calibration range.
Any DT-500 Series Silicon Diode Sensor can be utilized.
Requires that an appropriate calibration be purchased for
the Sensor. Specify Sensor input position (A o r B or 1-10 on
SW-10A) to assure proper location of calibration within
PROM. First calibration stored .
Subsequent calibrations stored in same PROM .
Model DT-500-DRC Sensor. Silicon Diode Temperature
Sensor for DRC-80 (1.5mm diameter ×4.1mm long). Specify
response curve .
Model DT-500CU-DRC-36. Silicon Diode Temperature
Sensor for DRC-80 (8mm diameter x 3.3mm thick with
mounting hole). Specify response curve.
Model D R C - 8 0 Digital C r y o g e n i c Thermometer
iv
SECTION I
General Inf o rma t i on
1.1
Introduction
The following is a description of the DRC-80 Cryogenic Digital
Thermometer. The DRC-80 Series of instruments is designed to be used with
the Model DT-500-DRC and DT-500CU-DRC-36 silicon diode sensors manufactured
by Lake Shore Cryotronics, Inc.
Several different diode sensor curves are available for use with this
instrument. When ordering replacement sensors, care must be taken to assure
that the correct sensor curve is specified. Multiple curves are needed so
that Lake Shore can assure the customer that replacement sensors will be
available at any time in the future. For details, please see Section 1.4.
1.2
Description
The DRC-80 Series is comprised of completely self-contained units
providing direct digital readout in Kelvin temperature units and, for the
controllers, temperature control by direct analog comparison between the
sensor voltage and an analog equivalent of the digital temperature set point.
The DRC-80 displays temperature to 0.1 Kelvin over its operating range of
1-400 Kelvin for normal operation. In the scale expand mode, the resolution
is 0.01 Kelvin below 30 Kelvin and 0.05 Kelvin from 30K to 100 Kelvin.
The specified range of operation is 4.0 to 380K* utilizing standard
DRC series sensors which have been pre-selected to provide uniform characteristics over this range. These sensors conform to the standard table (see
Table 3.3) to 0.5K or better below 77K and better than 1 Kelvin above 77K.
The instrument, however, displays down to 1K although accuracy is only specified above 4K. Pre-selection allows the DRC-80 Series to be used with the
DT-500-DRC and DT-500CU-DRC-36 sensors without adjustments of any kind. Since
the standard sensors are interchangeable, the instruments may be used to read
out any number of sensors with equal accuracy when selected through an appropriate switch such as the SW-10A.
The DRC-80 has dual sensor inputs.
panel pushbuttons.
Sensor selection is made via front-
As a standard feature, all units are equipped with buffered analog
output of the display sensor voltage. This allows the instrument user the
ability to record the display sensor voltage versus time or to use a digital
voltmeter to measure the display sensor voltage directly. Since this output
‘ i s buffered, a high input impedance recorder or voltmeter is not required.
*If possible, temperatures above 330K should be avoided with DRC Series
sensors since these sensors may slightly shift their values below 20K
i f heated above 330K.
-1-
If the sensor is calibrated by the user or by Lake Shore Cryotronics, Inc.,
temperature may be determined to approximately 10mK.
Five options are available with the DRC-80 Series of instruments.
One option is an analog signal which is proportional to temperature
(Model 8025) and has a sensitivity of 10 mV/K.
A second option is a ten-position switch S W - 1 0 A for multiple sensor
readout. This switch is a separate half-rack box which plugs into the Sensor
"B" position of the DRC-80. The sensor selected is also identified via digital interface of the DRC-80, if present.
Another option is a custom cut PROM (DRC-Precision Option) which corresponds to the calibration curve of the customer's DT-500 Series sensor. A
combination of a calibration and custom cut PROM will increase display accuracy to better than .1 Kelvin over the calibrated range. Please note that any
sensor may be used with this option, i.e., the customer is not restricted to
the DRC Series sensors.
There are two computer options available; each will output the displayed
temperature and sensor selected from the SW-10A. The Model 8022 is in a
parallel BCD format while the Model 8024 is in the popular IEEE-488 format.
The DRC-80 Series is designed around an 3870 microprocessor and associated support circuits. The DRC curve is stored in a PROM which can handle up
to 32 break points. The data consists of a table of temperature and voltage
associated with each break point. These straight line segments can generate
the DRC curve to an accuracy of better than 0.1 Kelvin over the entire temperature range (4.0 - 400 K).
1.3
Major Assemblies Supplied
The DRC-80 Series includes as standard equipment, in addition to the
digital thermometer-controller, the following:
A. Operating and Servicing Manual
B. Two five Pin Plugs for Temperature Sensor Cables
C. One seven Pin Plug for Monitor of Sensor Output Voltage and the
DRC8-L/A option
Model DT-500 Series silicon diodes are not supplied as part of the
DRC-80 instrument.
Complete Specifications, Accessory Equipment and Customs Options are
listed in the front of the Manual.
-2-
1.4
Ordering of Replacement or Additional Sensors
Two different sensor configurations are available for use with the
Model DRC-80 Series instruments. These are the DT-500-DRC and the DT-500CUDRC-36 sensors. Their description is included elsewhere in this manual. All
sensor configurations are available if the diode is calibrated and a special
PROM is cut.
More than one curve presently exists which can be used with the DRC-80
Series instruments. If additional sensors are ordered for use with your
instrument, you must be certain to order the correct curve so that your
instrument will have its stated accuracy. The proper curve may, be determined
in one of the following ways:
A . Specify the sensor serial number that is currently being used
with the instrument (serial number is found on the end of the
plastic box in which the sensor was received).
B. Specify the serial number of your instrument. Our records will
indicate with which sensor the instrument is compatible.
C. Remove the top of your instrument and observe the indicator on
the PROM.
D. The fourth way is to measure the diode voltage at 4.2K and
give this value to Lake Shore Cryotronics, Inc. when reordering sensors.
-3-
This Page Intentionally Left Blank
SECTION II
Installation
2.1
Introduction
This section contains information and instructions necessary for the
installation and shipping of the model DRC-80 Cryogenic Thermometer. Included
are initial inspection instructions, power and grounding requirements, installation information and instructions for repackaging for shipment.
2.2
Initial Inspection
This instrument was electrically and mechanically inspected prior to
shipment. It should be free from mechanical damages, and in perfect working
order upon receipt. To confirm this, the instrument should be inspected visually for obvious damage upon receipt and tested electrically by use to detect any
concealed damage. Be sure to inventory all components supplied before discarding any shipping materials. If there is damage to the instrument in transit, be sure to file appropriate claims with the carrier, and/or insurance
company. Please advise the company of such filings. In case of parts' shortages, please advise the company. The standard Lake Shore Cryotronics warranty
is given on the title page.
2.3
Power Requirements
Before connecting the power cable to line voltage, insure that the instrument is of the proper line voltage and fused accordingly. The line voltage and
fuse are shown on the rear panel of the instrument.
The line voltage can be changed by switching line voltage selector switch
(S2 - Figure 6.3 DRC-80 Component Layout) located on the main printed circuit
board of the unit.
Nominal permissible line voltage fluctuation is ±10% at 50 to 60 Hz.
2.4
Grounding Requirements
To protect operating personnel, the National Electrical Manufacturer's
Association (NEMA) recommends, and some local codes require, instrument panels
and cabinets to be grounded. This instrument is equipped with a threeconductor power cable which, when plugged into an appropriate receptacle,
grounds the instrument.
2.5
Installation
The DRC-80 Thermometer is all solid state and does not generate significant heat. It may therefore be rack mounted in close proximity to other equipment in dead air spaces. The heat from such adjacent equipment should not
subject the thermometer to an ambient temperature in excess of 50°C (122°F).
-4-
As with any precision instrument, it should not be subjected to the shock and
vibrations which usually accompany high vacuum pumping systems.
The recommended cable diagrams for the sensor diodes are shown in Figure
2.1 (a). The use of a four wire diode connection is highly recommended to
avoid introducing lead IR drops which will occur if the alternate two lead
sensor cable connection is used. For example, for a two lead connection, every
25 ohms of cable resistance corresponds to a .1 K error above 30 Kelvin. The
alternate wiring scheme shown in Figure 2.1 (b) may be used for the diode in
less critical applications where lead resistance can be kept small. The indicated shielding connections are the recommended standard practice to avoid ground
loops.
2.6
Repackaging for Shipment
Before returning an instrument to the factory, should repair be necessary, please discuss the malfunction with a factory representative. He may be
able to suggest several field tests which will preclude returning a satisfactory instrument to the factory when the malfunction is elsewhere. If it is
indicated that the fault is in the instrument after these tests, the representative will provide shipping and labeling instructions for returning it.
When returning an instrument, please attach a tag securely to the
instrument itself (not on the shipping carton) clearly stating:
A. Owner and Address
B. Instrument Model and Serial Number
C. Malfunction Symptoms
D. Description of External Connections and Cryostats
If the original carton
plastic bag, place in carton
controls, and close carton.
mailing labels and "FRAGILE"
is available, repack the instrument in a
using original spacers to protect protruding
Seal lid with paper or nylon tape. Affix
warnings.
-5-
FIGURE 2.1
Sensor, C a b l e , a n d Monitor Connections
-6-
This Page Intentionally Left Blank
SECTION III
Operating Instructions
3.1
Introduction
This section contains a description of the operating controls and
their adjustment under normal operating conditions, and typical controller
applications. These instructions are based upon the instrument having been
installed as outlined in Section II. The diode polarity a s shown in Figure
2 . 1 (a), in particular, must be correct.
3.2
Controls, Indicators, Connectors
The operating controls, indicators and connectors on the DRC-80
instrument's front and rear panels are shown in Figures 3 . 1 , and 3 . 2 .
The numbers with leaders to various controls in the figures are keyed
to the entries in Table 3 . 1 .
Table 3 . 1
-
Entry Number Correlation
1
POWER
A.C. line switch (ON/OFF) (Display serves
as indicator light).
2
Scale Expand
With button out, the display reads to 0.1K
at all temperatures; with button in detent
position, temperature reads to 0 . 0 1 K below
30K, 0.05K between 30K and 100K, and to 0.1K
above 1 0 0 K .
3
Sensor B
Selects Sensor B.
4
Sensor A
Selects Sensor A.
5
NO LABEL
Digital temperature display located behind
filter panel. Sensor displayed depends on
sensor selected.
6
NO LABEL
A.C. line cord
7
Fuse
A.C. line fuse
8
Sensor A
Sensor input lead terminals (Pin A, I+,
Pin E, V+, Pin B, I-, Pin D , V-, Pin H,
Shield).
-7-
Monitor
Analog output of sensor voltage (0-2.5v,
Pin A ) and optional linear analog output
of temperature(0-4V, Pin C). Pin B is
ground for sensor voltage while Pin D
is ground for L / A output.
10
Sensor B
Same as Sensor A
11
Interface
BCD input of set point/output of
temperature. Also I E E E interface port.
9
3.3
Temperature Readout
The sensor(s) and heater should be installed following the suggestions listed in the "Installation and Application Notes for Cryogenic
Sensors" brochure in Section VIII.
Connect the sensor(s) to the instrument following the diagram in
Figure 2 . 1 .
Depress the power switch and observe that the display shows the
proper temperature relative to the sample temperature.
The sensor and readout display should follow the curve in Table 3 . 2 .
This curve illustrates typical values expected of the DT-500-DRC or DT-500CUDRC-36 sensors.
If the diode or lead wires are shorted, the display will read ----.
If the diode is connected backwards, the display will read 4 2 8 . 0 for all
curves. In the case of an open current or voltage lead, the display will
slowly drift higher in temperature. The curves and appropriate PROM markings are given below:
Curve
PROM U13
0
Version 3
A
Version 6
B
Version 2
D
Version 4
E
Version 5
If the instrument or sensor does not agree with values listed in
the table, within the accuracy of the system, consult sections on installation and/or section on troubleshooting to determine the cause and cure
of the malfunction.
-8-
FIGURE 3.1
FIGURE 3 . 2
DRC-80
DRC-80
F r o n t Panel
R e a rP a n e l
-9-
T a b l e 3.2
DT-500DRC (D) Voltage-Temperature Characteristic
30
29
1.4
1.5
1.6
1.7
1.8
2.5984
2.5958
2.5932
2.5906
2.5880
1.9
2.0
2.2
2.4
2.6
2.5854
2.5828
2.5735
2.5643
2.5551
2.8
3.2
3.4
3.6
2.5458
2.5366
2.5226
2.5086
2.4946
3.8
4.0
4.2
4.4
4.6
2.4807
2.4667
2.4527
2.4387
2.4247
4.8
5.5
6.0
6.5
2.4108
2.3968
2.3618
2.3269
2.2919
7.0
7.5
8.0
8.5
9.0
2.2570
2.2220
2.1871
2.1521
2.1172
9.5
12.0
13.0
2.0909
2.0646
2.0119
1.9592
1.9066
14.0
15.0
16.0
17.0
18.0
1.8338
1.7610
1.6984
1.6359
1.5646
3.0
5.0
28
10.0
11.0
27
26
25
-10-
DT-500DRC (D) Voltage-Temperature Characteristic
23
19.0
20.0
21.0
22.0
23.0
1.4932
1.4219
1.3505
1.3006
1.2507
22
21
20
19
24.0
25.0
26.0
27.0
28.0
1.2114
1.1720
1.1486
1.1308
1.1190
29.0
30.0
32.0
34.0
36.0
1.1116
1.1058
1.0970
1.0902
1.0850
38.0
40.0
45.0
50.0
55.0
1.0798
1.0746
1.0633
1.0520
1.0407
12
60.0
65.0
70.0
75.0
80.0
1.0287
1.0166
1.0046
.99172
.97890
11
85.0
90.0
95.0
.96609
.95327
.93987
.92647
.91307
24
18
17
16
15
14
13
100.0
105.0
110.0
10
115.0
120.0
125.0
130.0
.89966
.88626
.87286
.85946
.84606
135.0
140.0
145.0
150.0
155.0
.83228
.81850
.80472
.79094
.77716
-11-
DT-500DRC (D) Voltage-Temperature Characteristic
9
8
7
6
5
4
3
2
1
160.0
165.0
170.0
175.0
180.0
.76338
.74961
.73582
.72170
.70757
185.0
190.0
195.0
200.0
205.0
.69344
,67931
.66518
.65105
.63693
210.0
215.0
220.0
225.0
230.0
.62280
.60867
.59455
.58080
.56707
235.0
240.0
245.0
250.0
255.0
.55334
.53960
.52649
.51337
.50026
260.0
265.0
270.0
275.0
280.0
.48714
.47403
.46057
.44711
.43365
285.0
290.0
295.0
300.0
305.0
.42019
.40613
.39208
.37802
.36397
310.0
315.0
320.'0
325.0
330.0
.34940
.33482
.32025
.30568
.29111
335.0
340.0
345.0
350.0
355.0
.27654
,26197
.24739
.23325
.21911
360.0
365.0
370.0
375.0
380.0
.20497
.19083
.17774
.16464
.15155
-12-
Table 3.2
DT-500DRC (El) Voltage-Temperature Characteristic
1.4
1.5
1.6
1.7
1.8
2.6591
2.6567
2.6542
2.6518
2.6494
1.9
2.0
2.2
2.4
2.6
2.6470
2.64k6
2.6355
2.6265
2.6175
2.8
3.0
3.2
3.4
3.6
2.6084
2.5994
2.5868
2.5742
2.5616
3.8
4.0
4.2
4.4
4.6
2.5490
2.5364
2.5221
2.5077
2.4934
4.8
5.0
5.5
6.0
6.5
2.4791
2.4648
2.4290
2.3932
2.3574
26
7.0
7.5
8.0
8.5
9.0
2.3216
2.2858
2.2500
2.2142
2.1784
25
9.5
10.0
11.0
12.0
13.0
2.1516
2.1247
2.0708
2.0170
1.9632
24
14.0
15.0
16.0
17.0
18.0
1.9011
1.8390
1.7769
1.7148
1.6527
30
29
28
27
-10-
DT-500DRC ( E l ) Voltage-Temperature Characteristic
23
19.0
20.0
21.0
22.0
23.0
1.5724
1.4922
1.4120
1.3317
1.2831
22
21
20
19
18
24.0
25.0
26.0
21.0
28.0
17
16
15
14
13
29.0
30.0
32.0
34.0
36.0
1.1150
1.1080
1.0981
1.0909
1.0848
38.0
40.0
45.0
50.0
55.0
1.0797
1.0746
1.0630
1.0515
1.0399
60.0
65.0
70.0
75.0
77.35
80.0
1.0284
1.0159
1.0035
0.9911
0.9849
0.9780
12
11
10
9
8
1.2357
1.1877
1.1559
1.1365
1.1239
85.0
90.0
95.0
100.0
105.0
0.9649
0.9518
0.9388
0.9257
0.9122
110.0
115.0
120.0
125.0
130.0
0.8988
0.8853
0.8718
0.8584
0.8449
135.0
140.0
145.0
150.0
155.0
0.8311
0.8173
0.8035
0.7896
0.7758
-11-
DT-500DRC
(El) Voltage-Temperature Characteristic
160.0
165.0
170.0
175.0
180.0
0.7620
0.7482
0.7344
0.7202
0.7060
185.0
190.0
195.0
200.0
205.0
0.6918
0.6777
0.6635
0.6493
0.6351
210.0
215.0
220.0
225.0
230.0
0.6210
0.6068
0.5926
0.5789
0.5651
235.0
240.0
245.0
250.0
255.0
0.5514
0.5377
0.5246
0.5115
0.4984
260.0
265.0
270.0
275.0
280.0
0.4853
0.4722
0.4588
0.4454
0.4320
2
285.0
290.0
295.0
300.0
305.0
0.4186
0.4045
0.3904
0.3763
0.3622
1
310.0
315.0
320.0
325.0
330.0
0.3476
0.3330
0.3184
0.3038
0.2893
7
6
5
4
3
-12-
3.4
Analog Output of Temperature
The analog output of temperature takes the display temperature and
converts it to an analog signal which has a sensitivity o f 10 mV/K under
normal operation. Under scale expand, this signal increases to 100 mV/K
below 100K due to the movement of the decimal point. The analog output
voltage is located on the monitor connector (Key 9 of Figure 3.2).
3.4.1 Field Installation of DRC Options - 8022 and 8025
The installation of either the Model 8022 option (Parallel BCD) or
8025 (10 mV/K) can be done as follows:
1) Remove instrument cover.
2) Insert the model 8022125 option board into instrument
JE connector (the instrument has its edge card
connector configured such that the option board
can only be inserted in one way).
3) Take 50 pin ribbon connector, with mounting plate
attached, and place it in Interface opening, 54 (after
any existing plate is removed).
Note: Ribbon cable is only present for Model 8022 option.
4) Connect black (or green) and white wires of option
board to 7 pin rear panel connector 53. White
goes to pin C and black (or green) goes to pin D.
5) Replace instrument cover.
3.5
Standard DT-500DRC-and DT-500CU-DRC-36 Curves
The standard DT-500-DRC and DT-500CU-DRC-36 curve is explained in
Section 3.3. The Tables include a list of PROM sensor voltages and breakpoints used in the linearization of the DRC curve to arrive at the correct
temperature readout.
3.6
Rack Mounting the DRC-80
The DRC-80 cryogenic thermometer can be rack mounted with the RM-3H
rack mounting hardware as shown in Figure 3.3. This hardware kit also
allows the mounting of two style L half-rack units as shown in Figures 3.4
and 3.5.
3.7
The 10-Sensor Selector Switch
The 10-Sensor Selector Switch includes an umbilical which ties to
the DRC-80 main printed circuit board (via a 16-pin ribbon cable header
which plugs into internal socket JC (see Figure 6.3, DRC-80 Component
-13-
FIGURE 3.3
FIGURE 3.4
FIGURE 3.5
Model DRC-80 shown with RM-3H Rack Mounting Hardware.
Model DRC-80 and SW-10A shown with RM-3H Rack Mounting Hardware.
Model DRC-80 and SW-10A Rear View showing RM-3H Rack Mounting Hardware
and Umbilical Cord Connections.
-14-
Layout) and a cable to connect the selected sensor leads to the DRC-80
(Sensor plug B is Key 10 of Figure 3.2).
The SW-10A is supplied with an 18" cable which is shielded and has
male 5-pin amphenol connectors at each end (see Figure 3.5, SW-10A Option).
This cable connects between J11 of the SW-10A and the B sensor plug of
the DRC-80. Sensors are connected to the SW-10A via printed circuit edge
J10. A 36-pin edge card connector and hood has been supplied with the
SW-10A Connectors to this edge J10 are given in Table 3.3. The hood
mechanical assembly is given in Figure 6.9, SW-10A Hood Assembly.
Provisions have been made in the DRC-80 for setting the switch position which the instrument will see (S6).
Since the software of the DRC-80
allows for calibrated curves to be programmed into the 10 positions of the
SW-10A a specific curve (or position) can be called up through the use of
S6.
BO (LSB) of
S6 is actually four switches ( 4 position dip switch).
switch position is between pins 1 and 8 and B 3 (MSB) is between pins 4 and
5.
As an example, if the customer had precision options in positions 1 ,
2 and 3 of the DRC-80 and wanted to use dip switches to call up the curves
(instead of the SW-10A umbilical), he could insert a four station dip
switch and turn on or off the desired position.
Switch S6 should not be used in conjunction with 16 pin header JC of
the SW-10A The location for S6 is an 8 pin socket placed near J C (see
Fig. 6.3 , DRC-80 Component Layout).
3.8
Remote Parallel BCD Output Option
The BCD option consists of a 16 bit parallel output of temperature
along with a scale expand bit to indicate decimal point, and a 4 bit output of switch position from the SW-10A
Table 3.4 can be used for output line coding. The BCD out is handled
through connector 54 (denoted on back panel as INTERFACE), a 50 pin connector on the rear panel of the instrument.
Data latches internal to the instrument provide a 1-2-4-8 code using
positive logic with standard TTL levels of 0.4 volts or less for low
(logic 0) and 2.4 volts or higher for the high (or 1) state under full
load conditions. The drivers are sufficient to drive two standard loads,
3.2 mA, in the low state.
The sensor temperature output is externally gated through the use
of an internally generated data valid pulse.
-15-
Table 3.3
SW-10A CONNECTOR DETAIL
Function
Shield
IV+
V-
I+
V+
VI+
V+
VI+
V+
VI+
V+
V-
I+
V+
V-
I+
V+
VI+
V+
VI+
V+
VI+
V+
VI+
Sensor
Edge Connector C o n t a c t
A11
A11
1
A
1
1
3
2
2
2
3
3
3
4
4
4
5
5
5
6
6
6
7
7
7
8
8
8
9
9
9
10
10
10
1
2
B
C
D
4
E
F
5
H
J
6
K
L
7
M
N
8
P
R
9
S
T
10
U
V
11
17
18
12
-16-
Table 3 . 4
BCD TEMPERATURE OUTPUT - MODEL DRC-SERIES
REMOTE OUTPUT
BCD TEMPERATURE
OUTPUT
BCD TEMPERATURE
OUTPUT
1
800180
2
33
Data V a l i d
34
Ground
3
400/40
4
35
36
SW-B2
5
2001 2 0
6
37
Trend B i t
1 - .01
0 - .1
SW-B3
7
100110
8
39
Not used
40
9
8018
10
11
4014
12
13
201 2
14
15
101 1
16
17
81.8
18
19
41.4
20
21
21.2
22
23
11.1
24
25
. 8 / . 08
26
27
.4/. 04
28
29
. 2 / . 02
30
SW-B0
31
.1/.01
32
SW-B1
38
41
42
43
44
45
46
47
48
49
Not used
50
+ 5V
Not used
-17-
3.9
IEEE Interface Option
The IEEE interface option available for the DRC-80 fully complies
with the IEEE standard 488-1978 and incorporates the functional, electrical
and mechanical specifications of the standard.
3.9.1
General IEEE Specifications and Operation
The following discussion covers the general operation of the IEEE-488
interface. For a more detailed description of signal level and interaction,
refer to the IEEE Std. 488-1978 publication "IEEE Standard Digital Interface for Programmable Instrumentation".
All instruments on the interface bus must be able to perform the
interface functions of TALKER, LISTENER, or CONTROLLER. A TALKER transmits
data onto the bus to other devices. A LISTENER receives data from other
devices through the bus. Some devices perform both functions. The
CONTROLLER- designates to the devices on the bus which function to perform.
The IEEE works on a party line basis with all devices on the bus
connected in parallel. ALL the active circuitry of the bus is contained
within the individual devices with the cable connecting all the devices in
parallel to allow the transfer of data between all devices on the bus.
There are 16 signal lines contained on the bus and consist of:
A) 8 Data Lines
B) 3 Byte Transfer Control Lines
C) 5 General Interface Management Lines
The data lines consist of 8 signal lines that carry data in a bit
parallel, byte serial format. These lines carry universal commands,
addresses, program data, measurement data, and status to all the devices
on the bus. The controller designates the functions of the units on the
bus by setting the ATN line low (true) and sending talk or listen addresses on the DATA lines. When the ATN line is low, all devices listen to the
DATA lines. When the ATN line goes high (false), then the devices addressed to send or receive data perform their functions while all others ignore
the DATA lines.
Transfer of the information on the data lines is accomplished through
the use of three signal lines: DAV (Data Valid), NRFD (Not Ready For Data),
and NDAC (Not Data Accepted). These signals operate in an interlocking
handshake mode. The two signal lines, NRFD, and NDAC are each connected in
a logical AND to all devices connected to the bus. The DAV is sent by the
talker and received by listeners while the NRFD and NDAC are sent by listeners back to the talker.
The General Interface Management Lines manage the bus and control
the orderly flow of commands on the bus. The IFC (Interface Clear) message
-18-
b a s i c a l l y clears t h e i n t e r f a c e t o a known s t a t e a p p r o p r i a t e t o t h e d e v i c e
b e i n g a d d r e s s e d . SRQ ( S e r v i c e Request) i s used by a d e v i c e t o i n d i c a t e t h e
need f o r a t t e n t i o n o r s e r v i c e and t o r e q u e s t an i n t e r r u p t i o n of d a t a flow.
REN (Remote Enable) i s used t o s e l e c t between two s o u r c e s of d e v i c e d a t a
( a s a n example: f r o n t p a n e l o r rear p a n e l c o n t r o l s on a measurement d e v i c e ) .
EOI (End or I d e n t i f y ) i n d i c a t e s t h e end of a m u l t i p l e b y t e t r a n s f e r sequence,
o r a l o n g w i t h t h e ATN l i n e , e x e c u t e s a p o l l i n g sequence.
The f o l l o w i n g t a b l e shows c a b l e c o n n e c t o r c o n t a c t w i r i n g f o r t h e IEEE488 bus :
Contact
1
2
3
4
5
6
7
8
9
10
11
12
Note:
3.9.2
Signal Line
D101
DI02
DI03
DI04
EOI (24)
DAV
NRFD
NDAC
IFC
SRQ
ATN
SHIELD
Contact
13
14
15
16
17
18
19
20
21
22
23
24
Signal Line
DI05
DI06
DI07
DI08
REN ( 2 4 )
Gnd (6)
Gnd ( 7 )
Gnd (8 )
Gnd ( 9 )
Gnd (10)
Gnd (11)
Gnd (LOGIC)
Gnd(n) r e f e r s t o t h e s i g n a l ground r e t u r n of t h e
r e f e r e n c e d c o n t a c t . EOI and REN r e t u r n on cont a c t 24.
S p e c i f i c O p e r a t i o n of t h e DRC8-IEEE I n t e r f a c e , Model 8024
The DRC-8-IEEE Model 8024 p r o v i d e s a d i g i t a l o u t p u t of t e m p e r a t u r e i n
K e l v i n , a s w e l l a s t h e s t a t u s of t h e f r o n t p a n e l s w i t c h e s and SW-10 s w i t c h
p o s i t ion.
Address and f u n c t i o n s e l e c t i o n are made v i a a s w i t c h package l o c a t e d
on t h e rear p a n e l of t h e DRC-80 ( s e e F i g u r e 3.6, DRC-IEEE P a n e l L a y o u t ) .
P o s i t i o n s 4-8 of t h e s w i t c h a r e t h e a d d r e s s s w i t c h e s f o r t h e i n t e r f a c e w i t h
4 b e i n g t h e most s i g n i f i c a n t b i t and 8 b e i n g t h e l e a s t s i g n i f i c a n t b i t .
A s a n example: w i t h s w i t c h e s 5 , 6 , and 7 ON ( o r down), and s w i t c h e s 4 and 8
OFF ( o r u p ) , t h e a d d r e s s s e l e c t e d i s 1 4 ( o r E b a s e 1 6 ) . The DRC-80 I E E E
I n t e r f a c e i s a t a l k e r o n l y . The t a l k mode c a n b e d e - s e l e c t e d by t u r n i n g
s w i t c h 3 ON ( o r down).
Switch p o s i t i o n 1 i s used t o s e l e c t t h e o r d e r in which t h e o u t p u t
d e l i m i t e r s are p u t o n t o t h e IEEE b u s . The f o l l o w i n g t a b l e g i v e s t h e d e l i m i t e r o r i e n t a t i o n versus switch position:
-19-
Switch 1 P o s i t i o n
D e l i m i t e r Order
(Delm
1)(Delm
2 )
Up (OFF)
Down (ON)
(LF)
(CR)
(CR)
(LF)
The u s e of t h i s s w i t c h a l l o w s t h e DRC8-IEEE t o i n t e r f a c e t o c o n t r o l l e r s
which a c c e p t b o t h forms of d e l i m i t e r s t o t e r m i n a t e i n p u t s t r i n g s . NOTE:
t h e a d d r e s s s w i t c h e s a r e updated on power up o n l y . The a d d r e s s and del i m i t e r o r i e n t a t i o n i s r e a d o n l y when t h e i n s t r u m e n t i s t u r n e d on. Any
change i n t h e a d d r e s s s w i t c h w h i l e t h e i n s t r u m e n t i s on w i l l b e i g n o r e d .
The
The DRC8-IEEE t r a n s m i t s and r e c e i v e s a l l c h a r a c t e r s i n ASCII.
c a b l e c o n n e c t o r meets IEEE-488, 1978 s t a n d a r d s and i s p o l a r i z e d f o r p r o p e r
cable insertion.
I n t h e t a l k e r mode t h e i n t e r f a c e o u t p u t s s w i t c h s e t t i n g s , f r o n t
p a n e l s e t t i n g s , and d i s p l a y t e m p e r a t u r e .
The d a t a i s o u t p u t i n t h e form
of two s t r i n g v a r i a b l e s . A f t e r e a c h of t h e v a r i a b l e s i s o u t p u t , d e l i m i t e r s
DELM 1 and DELM 2 a r e t r a n s m i t t e d .
A f t e r t h e second v a r i a b l e , t h e l a s t
d e l i m i t e r h a s t h e EO1 l i n e s e t f o r end of t r a n s m i s s i o n .
NOTE:
I n programming f o r a n i n p u t from t h e DRC8-IEEE i n t e r f a c e
two s t r i n g v a r i a b l e s must b e used ( o r r e a d i n t o t h e computer) o r t h e i n t e r In outputting data
f a c e w i l l hang up, w a i t i n g t o o u t p u t a l l of t h e d a t a .
t o an a r r a y , t h e a r r a y must have enough e l e m e n t s t o a l l o w t h e i n p u t of
b o t h v a r i a b l e s from t h e DRC8-IEEE i n t e r f a c e ( i n t h i s c a s e t h e number of
elements i s 13).
S i n c e t h e r e are two sets of d e l i m i t e r s o u t p u t , and most computers
u s e t h e s e d e l i m i t e r s t o t e r m i n a t e s t r i n g v a r i a b l e s , t h e need f o r two s t r i n g
v a r i a b l e s arises. An example of a t r a n s m i s s i o n i s a s f o l l o w s :
Format f o r Data
Format L i m i t s ( X )
Front Panel
XX(DELM1) (DELM2)
0-9,
Temperature
XXXX.XX (DELM1) (DELM2)
numberics o n l y
Function
A-F
The two f r o n t p a n e l c h a r a c t e r s a r e o u t p u t i n a packed f o r m a t w i t h
The f r o n t p a n e l i n d i c a t o r s
i n d i v i d u a l b i t s r e p r e s e n t i n g a p i e c e of d a t a .
are d e n o t e d a s f o l l o w s :
-20-
Bit
a)
B i t s 1-4
SW-10 A D i s p l a y Sensor s w i t c h s e t t i n g s w i t h
b i t 1 b e i n g t h e Least S i g n i f i c a n t B i t and
b i t 4 b e i n g t h e Most S i g n i f i c a n t B i t .
b)
Bit 5
N /A
c)
Bit 6
N /A
d)
Bit 7
D i s p l a y Sensor
e)
Bit 8
NOTE:
S c a l e EXPAND Mode
0
A
1
B
0 Button Out (Normal)
1 Button I n (Expanded S c a l e ) *
The expanded scale b i t i s s e t o n l y i f t h e b u t t o n i s i n and
t h e d i s p l a y t e m p e r a t u r e i s below 1 0 0 . 0 ° K .
A c h a r t which shows t h e p u s h b u t t o n i n f o r m a t i o n and c o r r e s p o n d i n g
o u t p u t c h a r a c t e r i s shown below.
( T h i s i s d a t a r e p r e s e n t e d by t h e f i r s t
c h a r a c t e r of t h e P a n e l i n f o r m a t i o n v a r i a b l e , o r b i t s 5-8 above.)
output
Character
Bit
Representation
Expanded
Scale
Display
Sensor
0
0000
NO
A
4
0100
NO
B
8
1000
YES
A
C
1100
YES
B
The SW-10A s w i t c h p o s i t i o n i s r e p r e s e n t e d by t h e c h a r a c t e r s 1-9,
and A.
The 1-9 s t a n d s f o r p o s i t i o n s 1 t h r u 9, t h e A s t a n d s f o r p o s i t i o n
10. The s w i t c h p o s i t i o n i n f o r m a t i o n i s o n l y p r e s e n t f o r t h e B d i s p l a y
s e n s o r . When t h e A p o s i t i o n i s s e l e c t e d as d i s p l a y s e n s o r , t h e p o s i t i o n
i s r e t u r n e d as zero.
(When t h e r e i s no p o s i t i o n p r e s e n t f o r t h e B
d i s p l a y s e n s o r , t h e s w i t c h p o s i t i o n i s r e t u r n e d as z e r o . )
An example of t h e p a n e l i n f o r m a t i o n f o r a DRC i n s t r u m e n t t h a t i s
i n t h e expanded scale mode, h a s B as d i s p l a y s e n s o r , and h a s an SW-10A
p o s i t i o n of 2 would look l i k e : C2.
switch
A n example f o r a t r a n s m i s s i o n f o r a n i n s t r u m e n t which h a s :
1 of t h e IEEE a d d r e s s s w i t c h up a t power on, s c a l e expand b u t t o n i n , A a s
d i s p l a y s e n s o r , no SW-10A i n p u t , and a d i s p l a y of 24.06°K would l o o k l i k e :
80(LF) (CR)0024.06(LF) (CR)
EOI SET ON FINAL (CR)
-21-
3.9.3.
Sample Programming
T h i s s e c t i o n c o n t a i n s some sample programming f o r t h e DRC8-IEEE
o p tion.
Commodore Pet/CBM 2001
3.9.3.1
S e t t h e a d d r e s s s w i t c h t o 6 by p u t t i n g a d d r e s s s w i t c h e s 6 and 7
down; 8, 5 and 4 up. Make s u r e s w i t c h 3 i s up ( o f f ) t o a l l o w t h e DRC8-IEEE
t o talk.
S e t s w i t c h 1 up ( o f f ) t o s e l e c t (LF)(CR) as t h e d e l i m i t e r
o r i e n t a t i o n . NOTE: The a d d r e s s s w i t c h i s updated o n l y on power up. Conn e c t t h e CBM I E E E c a b l e t o t h e DRC8-IEEE i n t e r f a c e .
Turn on t h e PET and
e n t e r t h e program below, i n c l u d i n g l i n e numbers, by p r e s s i n g t h e RETURN
k e y a f t e r e v e r y l i n e . A f t e r e n t e r i n g t h e program, t y p e RUN and p r e s s t h e
RETURN key.
The d i s p l a y w i l l t h e n r e t u r n t h e d a t a from t h e i n s t r u m e n t .
10
20
30
40
50
60
PRINT"PANEL
";P$
PR1NT"TEMPERATURE"; T$
END
70
80
3.9.3.2
OPEN2.6
INPUT#2, P$, T$
CLOSE2
PRINT
PRINT
HP-85
S e t t h e a d d r e s s s w i t c h t o 6 by p u t t i n g a d d r e s s s w i t c h e s 6 and 7
down; 8 , 5 and 4 up. Make s u r e s w i t c h 3 i s up ( o f f ) t o a l l o w t h e DRC8-IEEE
t o talk.
S e t s w i t c h 1 down (on) t o s e l e c t (CR)(LF) a s t h e d e l i m i t e r o r i e n t a t i o n . NOTE: The a d d r e s s s w i t c h i s u p d a t e d o n l y on power up. Connect
Turn on t h e u n i t and
t h e DRC8-IEEE t o t h e I E E E i n t e r f a c e of t h e HP-85.
e n t e r t h e program below, i n c l u d i n g l i n e numbers, by p r e s s i n g t h e END L I N E
key a f t e r e v e r y l i n e . P r e s s t h e RUN key. The d i s p l a y w i l l t h e n r e t u r n
t h e d a t a from t h e i n s t r u m e n t .
10
20
30
40
50
60
3.9.3.3
ENTER706;P$,T$
PRINT
PRINT
PRINT"PANEL
";P$
PRINT"TEMPERATURE" ;T$
END
HP-9845B
S e t t h e a d d r e s s s w i t c h t o 6 by p u t t i n g a d d r e s s s w i t c h e s 6 and 7
down; 8 , 5 and 4 up. Make s u r e s w i t c h 3 i s up ( o f f ) t o a l l o w t h e DRC8-IEEE
t o talk.
S e t s w i t c h 1 down (on) t o s e l e c t (CR)(LF) as t h e d e l i m i t e r o r i e n t a t i o n . NOTE: The a d d r e s s s w i t c h i s u p d a t e d o n l y on power up.
Connect
t h e DRC8-IEEE t o t h e 98034A I E E E i n t e r f a c e of t h e 9845B. Turn on t h e u n i t
and e n t e r t h e program below, i n c l u d i n g l i n e numbers, by p r e s s i n g t h e STORE
-21A-
key a f t e r e a c h l i n e i s e n t e r e d . P r e s s t h e RUN key.
t h e n r e t u r n t h e d a t a from t h e i n s t r u m e n t .
10
20
30
40
50
60
70
3.9.3.4
DIMP$[5],T$[10]
ENTER706;P$ ,T$
PRINT
PRINT
PRINT"PANEL
"
The d i s p l a y w i l l
;P$
PRINT"TEMPERATURE";T$
END
HP-9825A
S e t t h e a d d r e s s s w i t c h t o 6 by p u t t i n g a d d r e s s s w i t c h e s 6 and 7
down; 8 , 5 and 4 up. Make s u r e s w i t c h 3 i s up ( o f f ) t o a l l o w t h e DRC8IEEE t o t a l k .
S e t s w i t c h 1 down (on) t o s e l e c t (CR)(LF) as t h e d e l i m i t e r
orientation.
NOTE:
The a d d r e s s s w i t c h i s updated o n l y on power up.
Connect t h e DRC8-IEEE t o t h e 980348 IEEE i n t e r f a c e of t h e 98258. Turn
on t h e u n i t and e n t e r t h e program below by p r e s s i n g t h e STORE key a f t e r
The p r i n t e r w i l l r e a d t h e d a t a
e a c h l i n e i s typed. P r e s s t h e RUN key.
from t h e i n s t r u m e n t .
0 dim P $ [ 5 ] , T $ [ 1 0 ]
1 r e d 706,P$,T$
2
3
4
3.9.3.5
p r t P$
p r t T$
end
HP-9835A
S e t t h e a d d r e s s s w i t c h t o 6 by p u t t i n g a d d r e s s s w i t c h e s 6 and 7
down; 8, 5 and 4 up. Make s u r e s w i t c h 3 i s up ( o f f ) t o a l l o w t h e DRC8IEEE t o t a l k .
S e t s w i t c h 1 down (on) t o s e l e c t (CR)(LF) as t h e d e l i m i t e r
o r i e n t a t i o n . NOTE: The a d d r e s s s w i t c h i s updated o n l y on power up.
Connect t h e DRC8-IEEE t o t h e 980348 i n t e r f a c e of t h e HP-35A.
Turn on t h e
u n i t and e n t e r t h e program below by p r e s s i n g t h e STORE key a f t e r e a c h l i n e
i s typed.
P r e s s t h e RUN key. The d i s p l a y w i l l r e t u r n t h e d a t a from t h e
instrument.
10
20
30
ENTER706;P$,T$
PRINT
PRINT
40
PRINT"PANEL
";P$
PR1NT"TEMPERATURE"; T$
END
50
60
-21B-
3.9.4
F i e l d I n s t a l l a t i o n of DRC-IEEE,
Model 8024
The DRC8-IEEE Model 8024 is e a s i l y f i e l d i n s t a l l e d as f o l l o w s :
1) Remove i n s t r u m e n t c o v e r .
2)
Remove b l a n k p l a t e from I n t e r f a c e opening, 54.
3)
P l u g 24 p i n u m b i l i c a l i n t o DRC-80 board c o n n e c t o r J D
( s e e F i g . 6 . 3 , DRC-80 Component Layout).
4)
Place Model 8024 board i n t h e u n i t and i n s t a l l w i t h
screws.
(Component s i d e up).
5)
Replace i n s t r u m e n t c o v e r .
Cable Connect ion
1
Select switch
F i g u r e 3.6 DRC80-IEEE
Panel Layout
-21C-
This Page Intentionally Left Blank
SECTION IV
Theory of Operation
4.1
Introduction
The Lake Shore DRC-80 is the ideal Cryogenic Thermometer for lab or
system use. Its features, options, and accessories enable it to handle
routine measurements or complex multi-point monitoring assignments with
equal ease.
Its wide measurement range covers the spectrum of most cryogenic
temperature needs. The dual-sensor input enables two sensors to be used
concurrently, either for verification or for monitoring temperature at
different points. This multi-input capability can be further expanded
with the Model SW-10A, 10-position Selector Switch which conveniently
mounts side-by-side with the 80 in a standard 3½'' rack opening. Sensor
selection is via front-panel pushbuttons.
The display sensor voltage is fed to an Analog-to-Digital converter
pair (A/D), where it is converted to a digital voltage signal proportional
to the sensor voltage. The multiplexed BCD outputs from the A / D are
sampled and verified by the microprocessor. The microprocessor executes
a program which takes the sampled sensor voltage and, using break point
voltage and temperature information stored in a tabulor array, calculates
the associated Kelvin temperature to better than 0.01 Kelvin. The microprocessor then outputs the temperature information to the display board.
The decoder/driver decodes this temperature data, latches the information and drives the display digits.
The sensor display voltage is also available as a buffered output
through the monitor plug on the rear of the instrument.
The microprocessor also controls the BCD and IEEE options.
4.2
Detailed Description
A detailed description of the operation of the DRC instrument is
outlined in the following sections. The Figures required for each section will be denoted in that discussion.
4.2.1
Power Supplies
Please refer to Figure 6 . 1 (Schematic #1) for the following discussion. There are four different power supplies incorporated in the
DRC-80 instrument. The main power transformer, TX1, has split primaries for 115 or 230 volt AC operation. The slide switch, S 2 , selects
the proper line voltage.
-22-
The first secondary is output through leads 1 and 3. This secondary
is rectified by CR1 and a floating 15 volt supply is obtained through
C1, C5, and the positive 15 volt regulator U1. This supply is used to
power the constant current source for the diode.
The second secondary, through leads 2, 4, and 6, is a full wave
bridge rectified by CR2-5. A +15 volt supply is generated by C2, C6 and
a positive 15 volt regulator U2. The negative 15 volt supply is generated by C3, C7 and voltage regulator U3. Both these supplies are used in
the A/D converter, the buffer section, and the L/A option.
The third secondary is through leads 8, 10, and 12 and is full wave
rectified by CR6-7. The five volt supply that is used by the TTL IC's
is formed by C4, C8, and a 5 volt positive voltage regulator U4.
4.2.2 Precision Constant Current Source and Front Panel Switching
A 10µA floating constant current source is used to excite either
Sensor A or B depending on the switch position chosen by the front panel
switches, S5 (Sensor A) or S 4 (Sensor B).
A precision reference voltage is generated by an internally stabilized precision voltage reference (U5) and resistor R1 which determines
the bias current for the zener reference. Resistor R6 has a nominal 499K
value so that when the voltage picked off the stable reference is close
to 4.99V, the output current determined by the operational amplifier (U6)
and the output FET(U7) will be exactly 10pA with a compliance voltage
greater than 10V.
The 10µA current is directed to Sensor A or Sensor B by the switch
S5. Switch S 4 directs the positive sensor voltage of Sensor A or B to
the A/D converter pair. Note that both the Sensor A and Sensor B low
voltage terminals are tied together to analog ground. Therefore, the
I- return of the current source will be slightly below ground (by a few
millivolts, depending on lead resistance). Since S5 and S 4 are interlocking switches, the switch S 4 is used to tell the microprocessor which
sensor has been selected. This information is important to the microprocessor only if a calibrated sensor is present or if a SW-10A tenposition switch option is present in Sensor position B.
Switch S3 indicates to the microprocessor whether or not scale
expand below 100K is desired.
Switch S1 is the ON-OFF switch.
display board.
Power ON is indicated by a lighted
4.2.3 A/D Converter and Microprocessor System
The analog-to-digital convertor consists of a high input impedance
precision 4% digit I.C. pair (8052A/7103A, U12 and U10) that produces
a BCD output that is accurate to ±1 count over its entire 40,000 count
-23-
range. The 7103A (U10) runs on a 50K Hz clock cycle generated by a 7555
clock (U11) and its associated components (R11, R12, and C11). This
clock frequency allows for one reading every 0.8 seconds.
The digital
output signal is in a bit-parallel, byte serial form. The A/D converter
output is multiplexed by U14 and U15 and input to the microprocessor.
In addition to the A/D voltage information, the microprocessor
inputs the sensor-selected, scale expand switch position, and in the case
of the SW-10A, the position selected. The microprocessor outputs temperature information in BCD form to the display as well as to the options
(BCD or IEEE), if present. If a ten-position switch is also present,
the sensor position selected is also output to the option (BCD or IEEE).
The microprocessor system used in the DRC-80 is a 38P70 which
utilizes a piggy-back memory architecture. A 3870µp was originally a
mask-memory part with the user tied to one program form when the part
was fabricated. The piggy-back variation of the part allows for variable
memory space (between 8K and 64K of PROM) to be placed on the top of the
µp. This allows all lines that were used for addresses and data to be
used for Input/Output.
The microprocessor unit (MPU) has an internal RAM scratchpad memory
used for programming. The unit uses an internally generated clock which
is derived from the resistor fro R21 (and C21 if needed). The MPU has 4
8-bit bi-directional ports used for communication to and from the processor. Two of these ports, Port 0 and 5, are used for internal control
of the instrument (A/D input, BCD temperature output to BCD L/A option
and display, and internal housekeeping). The remaining two ports, Port 1
and 4, are used for option access (IEEE-488).
4.2.4 Software - DRC-80 Cryogenic Thermometer
Figure 4.1 is a flow chart of the major steps in the cryogenic
thermometer program. When the instrument is turned on, the program does
a power ON reset and starts the software program at the beginning. At
this point, the program initializes internal registers to be used in
the program. The program first checks for an A/D converter overrange
and then inputs multiplexed A/D information. When the A/D tells it
there is fresh data ready, (the program loops until the A/D information
is ready), the program then verifies that no illegal characters are
present and stores the reading.
The program then inputs display sensor information. There is one
standard curve for the instrument and there are a maximum of twelve
additional curves. There can be a calibrated curve for Sensor A , B,
and ten different switch positions generated by the SW-10A. The program,
through the use of some internal identifiers, determines the proper curve
to be used.
Once the curve is determined, the proper Voltage-Temperature Break
-24-
FIGURE 4 . 1
Software Flow Diagram f o r DRC-80 D i g i t a l Thermometer
-25-
Point is determined. The program finds the correct break point for
temperature determination by checking each breakpoint voltage to see
if it is lower than the input voltage. As the break point is found,
the temperature is calculated using the following equation:
T
=
(VBp - VAD)
*
dT
+ TBP
dV
where :
T
VBP
is temperature in K
is break point voltage
VAD
is input voltage
dT(SBp)
dV
is slope between successive break points
TBP
is break point temperature
After the correct temperature has been calculated, the program
looks to see if the instrument is in the scale expand mode. In this
mode, the front panel display converts to a resolution of .01K below
30K and 0.05K between 30K and 100K. The temperature data is output in
a bit-parallel, digit-serial form and is latched into the display board.
4.2.5 Digital Display Board
The display board receives its data in a bit-parallel/digit-serial
form. The information is latched into the display decoder/driver, U101,
which drives the display digits DS1-4.
Control of the decimal point is carried out by the BCD/decimal
decoder/driver, U102. This driver receives its information directly
from the microprocessor.
-26-
This Page Intentionally Left Blank
SECTION V
Calibration and Troubleshooting
5.1
Introduction
This section contains the instructions for calibrating and troubleshooting the DRC-80 instrument.
5.2
Test Equipment
A high input impedance digital voltmeter and oscilloscope, and a
precision resistor connected to simulate the diode wired according to
Figure 2.1 (b) are normally sufficient to test and calibrate the DRC-80
instrument.
5.3
General Remarks
On installation, one of the major problems is an improperly connected temperature sensing diode. It is advised that other portions of the
cryogenic system be tested before the instrument is troubleshooted. Some
checks that could be made are:
1) Open or shorted sensor leads (especially in an area of
frequent disassembly).
2) Leakage paths between heater and sensor leads that induce
electrical feedback in addition to thermal feedback.
If the malfunction points toward the instrument, more detailed tests
should be made.
5.4
Instrument Calibration
The DRC-80 has been factory calibrated. If a recalibration is needed, the following procedure should be followed. Please refer to the
component layout for the DRC-80, Figure 6.3 for the following discussion:
5.4.1 Current Source
A precision resistor of not less than .01% tolerance should be
connected across pins A and B (Figure 2.1) of the A Sensor socket. A
high input impedance voltmeter connected across the precision resistor
should measure a voltage equal to 10 microamperes times the value of the
resistor. For example, a 100K ohm ±.01% resistor should read 1.0000
volts within 100 µvolts. If recalibration is needed, the voltage across
the 100K resistor can be adjusted by varying resistor R3.
-27-
5.4.2 A/D Converter
To adjust the A/D converter, a voltage needs to be applied across
pins E and D (Figure 2.1) of the display sensor connector. A variable
200K resistor hooked up as in Fig. 2.1 (a), or precision voltage source
in place of the diode areideal ways to generate this voltage. If a resistor is used, it should be varied until one of the breakpoint voltages,
indicated in the Voltage-Temperature Characteristic Table is generated;
(A high impedance voltmeter must be used for this adjustment). After an
appropriate voltage is obtained, the display should be calibrated by adjusting trimpot R16 until the display reads the correct temperature. If
a precision voltage source is used, a breakpoint voltage should be dialed
in and the display should be calibrated as above. A breakpoint temperature above 40K should be used since the voltage sensitivity with tempera°
ture is lower at the higher temperatures (2.5 mV/°K) than for temperatures
below 30K.
5.4.3 Adjustment of Output Buffer
With a constant voltage fed into the instrument, place a voltmeter
between pins A & B of connector 53. U 9 i s a buffer of input voltage and
should have an output equal to input. R 4 is varied to obtain the proper
buffered signal.
5.4.4 DRC8-L/A Option Model 8025 (if present)
The output of the DRC8-L/A Model 8025 is 10 mV/K in the normal disº
play mode. In other words, 100.0 K on the display corresponds to a
1.0000V output between pins C and D of monitor connector 53. To recalibrate the option, two adjustments need to be made. With a low temperature
°
on the display (e.g., 22.0 K), adjust the offset adjustment potentiometer
R89 (see Fig. 6. , DRC-80 BCD L/A Layout) until the output corresponds
to 10 mV/K. Then take the display to a higher temperature (e.g., 300 °K).
Adjustment of Gain Potentiometer R88 will bring the output to 10 mV/K.
The procedure may need one more iteration, that is, go to the low temperature on the display, adjust the offset, then adjust the gain.
5.5
Instrument Tests
The first check to be made would be to check the input line fuse.
The type of fuse and line voltage are shown on the rear panel of the
instrument. If the input line voltage and sensor input voltage have been
checked, the following sequence should be followed:
1) Check all power supplies for proper operation.
can be noted on Fig. 6.3, DRC-80 Parts Layout.
The voltages
2) Check for the waveforms at the following pins and refer to
Fig. 5.1 for waveforms.
-28-
S i g n a l p a t h s s h o u l d a l s o b e checked.
I f s i g n a l s are p r e s e n t a t
s o u r c e components and n o t a t d e s t i n a t i o n components, a p r i n t e d c i r c u i t
problem r e q u i r i n g a r e p a i r of t h e p r i n t e d c i r c u i t f o i l may b e r e q u i r e d .
C o n t i n u i t y c h e c k s between p o i n t s w i l l t u r n up any unwanted open c i r c u i t s
i n s i g n a l paths.
I f t h e s i g n a l s a t t h e component p i n s o u t l i n e d i n Table 5.1 a r e
p r e s e n t , and a problem s t i l l e x i s t s , a f a c t o r y r e p r e s e n t a t i v e s h o u l d b e
contacted.
Table 5.1
DRC-80 S i g n a l s A s s o c i a t e d w i t h F i g u r e 5.1
Signal
Function
a)
P i n 1 2 of U10
or
P i n 3 of U 1 1
Clock s i g n a l of A/D c o n v e r t e r .
The
f r e q u e n c y s h o u l d b e a b o u t 50K Hz.
I f n o t p r e s e n t , r e p l a c e U 1 1 . Also
check R12, R11, and C 1 1 .
b)
P i n 1 4 of U12
I n t e g r a t e d s i g n a l of A/D t o d e t e r mine t h e c o u n t p e r i o d .
The p e r i o d
s h o u l d b e a b o u t .35 s e c o n d s , I f
n o t p r e s e n t , check U10 and U 1 1 .
c)
P i n 7 of U10
T h i s i s a D.C. l e v e l t h a t i s t h e
reference voltage for t h e i n t e grator.
The v a l u e should be
between 1 . 4 and 1.8 v o l t s .
I f not
p r e s e n t , check U12. Also check
r e s i s t a n c e s t r i n g R15-18 f o r
p r o p e r v a l u e and o p e r a t i o n .
d)
A/D
The d i g i t d r i v e s ( P i n s 1 9 , 24, 25,
26, and 2 7 ) are p o s i t i v e g o i n g
p u l s e s and l a s t f o r 200 c l o c k
pulses.
The s c a n sequence i s D 5
(MSD), D4, D3, D2, and D 1 (LSD).
The BCD p i n s ( p i n s 20-23) are
p o s i t i v e g o i n g s i g n a l s t h a t go on
s i m u l t a n e o u s l y w i t h t h e d i g i t device.
I f n o t p r e s e n t , and s i g n a l s
a ) , b ) , and c ) are c o r r e c t , r e p l a c e
Output
of U10
Wave Form
See
Figure
5.1
on f o l l o w i n g
Page
u10.
e)
P i n 2 of U13
T h i s i s t h e µP c l o c k s i g n a l .
This
i s g e n e r a t e d by a n e x t e r n a l RC network w i t h t h e h e l p of t h e main
processor.
I f n o t present, check
R 2 1 , C21, and U13 f o r p r o p e r
operation.
-29-
Figure 5.1
DRC-80 A/D Typical Output S i g n a l s
-30-
SECTION VI
DRC-80
REPLACEABLE PARTS LIST
CAPACITORS
c1
c2
c3
c4
c5
C6
c7
C8
c9
c10
c11
c12
C13
C14
C15
C16
C17
C18
C19
c20
c21
c22
470 µf
470 µf
470 µf
2700 µf
.1 µf
.1 µf
.1 µf
.68 µf
150 µf
.0015 µf
330 pf
.68pf
1.5 µf
330 pf
.33 µf
.68 µf
.68 µf
.68 µf
.33 µf
.68 µf
18 pf
.1 µf
35v
3 5v
3 5v
25V
100v
100v
100v
100v
500V
100v
500V
100v
25V
500V
100v
100v
100v
100v
100v
100v
500V
100v
E. AL.
E. AL.
E. AL.
E. AI.
Poly.
Poly.
Poly.
Poly.
Mica D.
Mylar
Mica. D
Poly.
Tan.
Mica D.
Mylar
Poly.
Poly.
Poly.
Mylar
Poly.
Mica D.
Poly.
CONNECTORS
J1
J2
J3
J4
JA
5 Pin Socket
(Sensor A)
5 Pin Socket
(Sensor B)
7 Pin Socket
BCD Out/IEEE Out
(Interface)
10 Contact PC Mount
(Display Board)
Amphenol 126-218
(mates with 126-217)
Amphenol 126-218
(mates with 126-217)
Amphenol 126-198
(mates with 126-195)
Lake Shore
Cryotronics, Inc.
AMP MOD II 3-86018-5
(mates to JG)
-31-
CONNECTORS
JB
JC
JD
JE
JG
JH
JL
10 Contact PC Mount
(Display Board
14 Pin IC Socket
(SW-10 Input of
switch position)
16 Pin IC Socket
(IEEE Micro Interface)
24 Contact Edge Card
(BCD/L-A Option)
10 Contact PC Mount
(To Display Board)
10 Contact PC Mount
(To Display Board)
12 Contact PC Mount
(Power Transformer)
AMP MOD II 3-86018-5
(mates to JH)
Cambion
703-5314-01-04-12
Cambion
703-5316-01-04-12
TRW 50-24B-10
AMP MOD II 87228-5
(mates to J A )
AMP MOD II 81228-5
(mate to JB)
AMP 350213-1
(mates to 1-480
287-0)
DIODES
CR1
CR2
CR3
CR4
CR5
CR6
CR7
CR8
CR9
CR10
Silicon
Silicon
Silicon
Silicon
Silicon
Silicon
Silicon
Silicon
Silicon
Silicon
DS1
7 Segment LED
(Least significant LED)
7 Segment LED
(2nd Significant Digit)
7 Segment LED
(3rd Significant Digit)
7 Segment LED
(Most Significant Digit)
DS2
DS3
DS4
IN4006
IN4006
IN4006
IN4006
IN4006
MR501
MR501
IN743A
IN743A
IN4148
Hewlett-Packard 5082-7651
Hewlett-Packard 5082-7651
Hewlett-Packard 5082-7651
Hewlett-Packard 5082-7651
-32-
INTEGRATED CIRCUITS
u1
u2
u3
u4
u5
U6
u7
U8
u9
u10
u11
u12
U13
U14-15
15V Positive
Voltage Regulator
15V Positive
Voltage Regulator
15V Negative
Voltage Regulator
5V Positive
Voltage Regulator
Temp. Stabilizer Voltage
Reference (Current Source)
Operational Amplifier
F.E.T. (Current Source
Driver)
Not Present
Operational Amplifier
A/D Converter
Building Block
Timer Circuit
A/D Converter
Building Block
Microprocessor Unit
Tri-S t ate
4-line to 4-line
Multiplexers
7815
7815
7915
7805
LM399H
LM308N
3N163
0P07EJ
71C03
7555
8052
381270
Plus Prom
(Memory Dependent)
74LS257
MISCELLANEOUS
Main Fuse
3 AG, Slow Blow
90V-125:3/4A
210V-250V:4/10A
Fuseholder
TX1
Bussmann MDL 3/4
Bussmann MDL 4/10
Littlefuse 342004A
Power Transformer
LSCI Supplied
TX696-107
Power Cord 115V
CEE Color Coded 230V
Strain Relief
Belden 17236
Belden 17740C
H.H. Smith 939
Heat Sink for U 4
Aavid 60130-020B
-33-
RESISTORS
1% ¼W
Mt.F.
1% ¼w
Mt.F.
I Source Adjust.
Operational Amplifier Adjust
1% ¼w
Mt.F.
1% ¼w
Mt.F.
R10
R11
R12
R13
R14
R15
R16
R17
R18
R19
R20
R21
R22
R23
R24-27
3.74K
10K
5K Trimpot
20K Trimpot
4.75K
499K
Not Present
Not Present
Not Present
4.75K
10K
33.2K
36.5K
301K
1.18K
5K Trimpot
196 ohm
107 ohm
121K
121K
19.6K
4.75K
10 ohm
4.7K
1% ¼w
Mt.F.
1% ¼W
Mt.F.
1% ¼W
Mt.F.
1% ¼W
Mt.F.
1% ¼W
Mt.F.
1% ¼W
Mt.F.
A/D Adjust
1% ¼W
Mt.F.
1% ¼W
Mt.F.
1% ¼W
Mt.F.
1% ¼W
Mt.F.
1% ¼W
Mt.F.
1% ¼W
Mt.F.
1% ¼W
Mt.F.
4 Element Resistance Network
R101
R102-105
3.74K
330 ohm
Mt.F.
1% ¼W
4 Element Resistance Network
R1
R2
R3
R4
R5
R6
R7
R8
SWITCHES
s1
s3
s4
s5
Power Switch
Scale Expand Switch
Sensor B
Sensor A
LSCI
LSCI
LSCI
LSCI
Supplied,
Supplied,
Supplied,
Supplied,
s2
S6
115/230 Switch
Not Present
Switchcraft
DRC-80
DRC-80
DRC-80
DRC-80
-34-
D R C - 8 0 BCD L / A
REPLACEABLE PARTS LIST
CAPACITORS
.033 f
.68 €
.68 f
.68 f
C56
C57
C58
c59
l0OV
1oov
1oov
1oov
Mylar
Poly.
Poly.
Poly.
CONNECTOR
J4
50 p i n PC Mount Header
T&B Ansley
609- 50 2 2 M
INTEGRATED CIRCUITS
U51
U52
U53
U54
U56
U61
U62
U63
BCD,
BCD,
BCD,
BCD,
BCD
74LS175
74LS175
74LS175
74LS175
74123
OP15FJ
DAC HP16D
7 420
L/A
LIA
LIA
LIA
only
LIAo n l y
L/A only
BCD, L / A
RES I STORS
R76
R86
R 87
R88
R89
2 MEG
2 MEG
511K
50K Trimpot
50K Trimpot
1%tw
1%kw
1%tw
M t .F.
M t .F.
Mt.F.
-3 5-
This Page Intentionally Left Blank