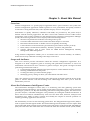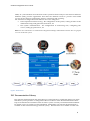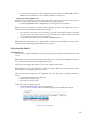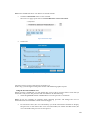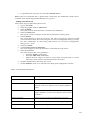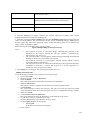
1
Oracle® Communications Performance Intelligence Center ProPerf Configuration User’s Guide Release 10.0 E55891 Revision 01 May 2014 Oracle Communications Performance Intelligence Center ProPerf Configuration User’s Guide, Release 10.0 Copyright © 2003, 2014, Oracle and/or its affiliates. All rights reserved. This software and related documentation are provided under a license agreement containing restrictions on use and disclosure and are protected by intellectual property laws. Except as expressly permitted in your license agreement or allowed by law, you may not use, copy, reproduce, translate, broadcast, modify, license, transmit, distribute, exhibit, perform, publish, or display any part, in any form, or by any means. Reverse engineering, disassembly, or decompilation of this software, unless required by law for interoperability, is prohibited. The information contained herein is subject to change without notice and is not warranted to be error-free. If you find any errors, please report them to us in writing. If this is software or related documentation that is delivered to the U.S. Government or anyone licensing it on behalf of the U.S. Government, the following notice is applicable: U.S. GOVERNMENT RIGHTS Programs, software, databases, and related documentation and technical data delivered to U.S. Government customers are "commercial computer software" or "commercial technical data" pursuant to the applicable Federal Acquisition Regulation and agency-specific supplemental regulations. As such, the use, duplication, disclosure, modification, and adaptation shall be subject to the restrictions and license terms set forth in the applicable Government contract, and, to the extent applicable by the terms of the Government contract, the additional rights set forth in FAR 52.227-19, Commercial Computer Software License (December 2007). Oracle America, Inc., 500 Oracle Parkway, Redwood City, CA 94065. This software or hardware is developed for general use in a variety of information management applications. It is not developed or intended for use in any inherently dangerous applications, including applications that may create a risk of personal injury. If you use this software or hardware in dangerous applications, then you shall be responsible to take all appropriate fail-safe, backup, redundancy, and other measures to ensure its safe use. Oracle Corporation and its affiliates disclaim any liability for any damages caused by use of this software or hardware in dangerous applications. Oracle and Java are registered trademarks of Oracle and/or its affiliates. Other names may be trademarks of their respective owners. Intel and Intel Xeon are trademarks or registered trademarks of Intel Corporation. All SPARC trademarks are used under license and are trademarks or registered trademarks of SPARC International, Inc. AMD, Opteron, the AMD logo, and the AMD Opteron logo are trademarks or registered trademarks of Advanced Micro Devices. UNIX is a registered trademark of The Open Group. This software or hardware and documentation may provide access to or information on content, products, and services from third parties. Oracle Corporation and its affiliates are not responsible for and expressly disclaim all warranties of any kind with respect to third-party content, products, and services. Oracle Corporation and its affiliates will not be responsible for any loss, costs, or damages incurred due to your access to or use of third-party content, products, or services. 2 ProPerf Configuration User’s Guide Table of Contents Table of Contents Table of Contents .............................................................................................................................. iii List of Figures ...................................................................................................................................... v List of Tables ....................................................................................................................................... v Chapter 1: About this Manual....................................................................................................... 1 Overview ............................................................................................................................................. 1 Scope and Audience ........................................................................................................................... 1 About the Performance Intelligence Center ...................................................................................... 1 PIC Documentation Library ................................................................................................................. 2 Common instructions ......................................................................................................................... 3 Chapter 2: Understanding ProPerf Configurations ......................................................................... 4 Overview ............................................................................................................................................. 4 Accessing and logging into NSP .......................................................................................................... 4 ProPerf's Functionality........................................................................................................................ 5 Opening ProPerf ................................................................................................................................. 5 The ProPerf GUI .................................................................................................................................. 6 Page Layout .................................................................................................................................... 6 Dashboard Layout .......................................................................................................................... 6 Dashboard Columns ................................................................................................................... 6 Dashboard and panel Links ........................................................................................................ 7 Dashboard Display.......................................................................................................................... 7 ProPerf Configuration GUI .................................................................................................................. 7 Panel List Display ............................................................................................................................ 7 Panel list configuration Symbol ................................................................................................. 8 View children Button ................................................................................................................. 8 Panel list Table Layout ............................................................................................................... 8 Chapter 3: Using ProPerf Configuration ........................................................................................ 9 Overview ............................................................................................................................................. 9 Working with Dashboards .................................................................................................................. 9 Creating a Dashboard ..................................................................................................................... 9 Modifying a Dashboard ................................................................................................................ 10 Deleting a Dashboard ................................................................................................................... 10 iii ProPerf Configuration User’s Guide Table of Contents Using the Dashboard Toolbar....................................................................................................... 10 Choosing a Date ....................................................................................................................... 10 Viewing in Real-time ................................................................................................................ 10 Using the Zoom function ......................................................................................................... 10 Using the Previous and Next view ........................................................................................... 11 Working with Panels ......................................................................................................................... 11 Panel display List .......................................................................................................................... 11 Using the Previous and Next view ........................................................................................... 12 Adding a line Chart Pane .......................................................................................................... 13 Adding a bar Chart Pane .......................................................................................................... 14 Setting Pie Chart Parameters ................................................................................................... 15 Unselecting (deleting) Data Sources ........................................................................................ 16 Modifying a Panel Record ........................................................................................................ 16 Deleting a Panel Record ........................................................................................................... 16 Creating legend Items .................................................................................................................. 16 Displaying a legend item List ................................................................................................... 17 Defining KPI Data Sources ........................................................................................................ 17 Modifying the panel Order ...................................................................................................... 19 Modifying privacy Settings....................................................................................................... 20 Printing the Dashboard ............................................................................................................ 20 iv ProPerf Configuration User’s Guide List of Figures and Tables List of Figures Figure 1: PIC Overview ............................................................................................................................ 2 Figure 2: NSP Application Board with ProPerf And ProPerf Configuration Icons ................................... 5 Figure 3: ProPerf Main Page ................................................................................................................... 6 Figure 4: Dashboard Screen With 2,1 Configuration .............................................................................. 7 Figure 5: Panel List Page ......................................................................................................................... 8 Figure 6: Parent/Child Tables .................................................................................................................. 8 Figure 7: Add Dashboard Screen............................................................................................................. 9 Figure 8: Selected Dashboard ............................................................................................................... 11 Figure 9: Panel List Page ....................................................................................................................... 12 Figure 10: Panel Settings Screen-General Tab ...................................................................................... 12 Figure 11: Child Records List Screen ..................................................................................................... 17 Figure 12: KPI Configuration Screen ..................................................................................................... 17 Figure 13: Graphical Properties Tab ..................................................................................................... 19 Figure 14: Panel Settings Screen ........................................................................................................... 19 List of Tables Table 1: Y-Axis Attribute Descriptions .................................................................................................. 13 Table 2: Xdr Configuration Settings ...................................................................................................... 18 Table 3: Attribute Descriptions ............................................................................................................. 19 v ProPerf Configuration User’s Guide Chapter 1: About this Manual Overview ProPerf Configuration is a specific-purpose application that is part of Tekelec's IAS system. The ProPerf Configuration application enables operators to view performance and quality indicators in real-time or using historical data, with a dynamic display of curves and graphs. Performance or quality indicators, calculated with xDRs, are provided by the probes and/or defined with the ProTraq application. The data is stored into statistical sessions within remote applications such as IXP or DataServer and managed using Centralized Configuration Manager (CCM). The following indicators can be displayed in ProPerf Configuration: SS7 network performance indicators according to ITU Q.752 Customer traffic indicators based on ISUP and links analysis in real-time Real-time indicators based on Traffic or IP service Quality monitoring Load indicators on IN-transactions (per link and reprocessed for all links per SCP) INAP, MAP, CAP transaction efficiency, duration, operation, and global title Volume, efficiency, split of cause values for GPRS Session Management, Mobility Management, SMS management Using ProPerf Configuration enables you to see failures and overloads instantly. In addition, trends can be easily estimated according to the shape of the curve. Scope and Audience This user's manual provides information about the ProPerf Configuration application. It is designed to be both a beginners' guide to working with performance indicators as well as an intermediate and advanced user's reference to general concepts. This guide is designed around performing common tasks such as: Understanding ProPerf dashboard and panel layouts to create statistical sessions Working with dashboards and panels Creating line charts, pie charts and bar graphs Modifying privacy settings to share your information with other users Take a few minutes to browse through these tasks and become acquainted with the layout of this guide to become familiar with the headings and subheadings that allow you to find the information you need. About the Performance Intelligence Center The Performance Intelligence Center (PIC) is a monitoring and data gathering system that provides network performance, service quality and customer experience - across various networks, technologies, protocols, etc. Beyond monitoring performance and gathering data, the solution also provides analytics, actionable intelligence and potentially an intelligent feedback mechanism. It allows Service Providersto simultaneously look across the Data Link, Network, Transport and Application layer traffic to better correlate and identify the impact of network problems on revenue generating applications and services. PIC functionality is based on the following general flow. The Integrated Message Feeder (IMF) is used to capture SS7 and SigTran traffic. The Probed Message Feeder (PMF) is used to capture both SS7 and IP traffic. Both products forward Probe Data Units (PDUs) to the Integrated xDR Platform (IXP). The IXP stores this traffic data and correlates the data into detailed records (CDRs, IPDRs, 1 ProPerf Configuration User’s Guide TDRs, etc.). The IXP then stores the data on the system for future analysis. The Network Software Platform (NSP) provides applications that mine the detailed records to provide value-added services such as network performance analysis, call tracing and reporting. PIC centralized configuration tasks fall into one of two categories: Data Acquisition and Processing - the configuration of the probes, routing of PDUs to the xDR builder setup, KPI generation, data feeds, etc. PIC System Administration - the configuration of monitoring sites, configuring PIC servers, setting up permissions, etc. Note: For more information see Centralized Configuration Manager Administration Guide. This is a graphic overview of the PIC system. Figure 1: PIC Overview PIC Documentation Library PIC customer documentation and online help are created whenever significant changes are made that affect system operation or configuration. Revised editions of the documentation and online help are distributed and installed on the customer system. Consult your NSP Installation Manual for details on how to update user documentation. Additionally, all customer documentation is available on the Oracle Technology Network (OTN). Release Notes are available on OTN with 2 ProPerf Configuration User’s Guide each new release of software. The Release Notes list the PRs that have been resolved in the current release and the PRs that are known to exist in the current release. Listed below is the entire PIC documentation library of User’s Guides. • • • • • • • • • • • • • • • • • • • • Security Guide NSP Security User’s Guide Alarm Forwarding User’s Guide ProAlarm Viewer User’s Guide ProAlarm Configuration User’s Guide Centralized Configuration Manager Administration Guide Customer Care User’s Guide ProTraq User’s Guide ProPerf User’s Guide ProPerf Configuration User’s Guide System Alarms User’s Guide ProTrace User’s Guide Data Feed Export User’s Guide Audit Viewer Administration Guide ProDiag User’s Guide SigTran ProDiag User’s Guide Reference Data User’s Guide Exported Files User’s Guide Scheduler User’s Guide Quick Start User’s Guide Common instructions For instructions about customer support, basic workflow and common features across application (browser compatibility, login/logout, user preferences…) please refer to Quick Start Guide for which a link can be found on the banner of each web page. 3 Chapter 2: Understanding ProPerf Configurations Overview ProPerf is a specific-purpose application that is part of Tekelec's IAS system. ProPerf makes it possible for you to view performance indicators in real-time and from historical data with a display of curves and graphs. These indicators, calculated with message-based counters are provided by the probes and/or defined by the ProTraq application. Data is stored in statistical sessions organized as matrix of column and line filter results. This matrix defines cells named KPI (Key Performance Indicators). ProPerf is based on a dashboard concept, that is, a single-page display of multiple KPI's in associated charts and tables (set up in Panels), determined according to predefined layouts. ProPerf offers two main dashboard functions: Dashboard Editing - Allows you to configure a dashboard to display as an independent page and automatically refresh it in real-time. Note: Accessible to users in the group NSPConfigPowerUser. Dashboard Display - Allows you to use global settings to display a dashboard, to specific properties of the KPI's used. Note: Accessible to users in the group NSPBusinessUser. Accessing and logging into NSP To access and log into NSP, follow these steps: Open your Web browser. In the Address bar, type the following Uniform Resource Locator (URL) for NSP: http://nspserver/nsp , where the nspserver is the IP address of NSP. Note: NSP only supports versions of IE 7.0 or later and Firefox 3.6 or later. Before using NSP, turn off the browser pop up blocker for the NSP site. The NSP login screen opens. Note: Before you can start NSP, you must first have a userid and password assigned to you by your NSP system administrator. Type your username assigned to you in the Username field. Type your password in the Password field. Click OK. The NSP Application Board opens. Click on the ProPerf Configuration icon to open the application. 4 ProPerf's Functionality ProPerf has two major functions, they are: Editing - enables you to perform the following: o Create a dashboard o Create a panel (line chart, bar chart, pie chart or table) o Define xDRs to be displayed o Data source as source session, column and line o Display properties for a chart, like color, symbols, etc. Display - enables you to perform the following: o Leave a dashboard in a new page o Print or save a dashboard page o Zoom in or out to change the Reference Duration of the current view o View historical data for a given date and time o View the dashboard in real-time Opening ProPerf ProPerf is part of the NSP Toolkit and is opened from the NSP Platform. Note: To log into ProPerf, you must first have an Network Software Platform (NSP) userid and password. For more information contact your network administrator. Once you have logged into NSP, the NSP Application Board opens shown in Figure 2: NSP Application Board with ProPerf And ProPerf Configuration Icons. There are two entry points into the ProPerf application, the ProPerf icon under the Application label and the ProPerf Configuration icon under the Configuration label. The ProPerf application only allows the user to display predefined dashboards and use the dashboard toolbar. The ProPerf Configuration application allows you to create and configure dashboards. Figure 2: NSP Application Board with ProPerf And ProPerf Configuration Icons To view a dashboard, click the ProPerf icon under the Application heading. To configure or create a dashboard clicks the ProPerf Configuration icon under the Configuration 5 heading. The ProPerf Main page opens displaying the Dashboard list shown in Figure 3: ProPerf Main Page. Figure 3: ProPerf Main Page The ProPerf GUI ProPerf has the same look and similar functionality as all applications in the NSP Toolkit. Note: Do not use the Function Keys (F1 through F12) when using the NSP. Function keys work in unexpected ways. For example, the F1 key will not open NSP help but will open help for the browser in use. The F5 key will not refresh a specific screen, but will refresh the entire session and will result in a loss of any entered information. Page Layout The page is divided into the following: Links to applications, configuration applications and surveillance - located in the top left-hand corner. Menu bar - contains two menus: o Your Dashboard - that shows dashboards you created or ones that you have been given access to. o Help - has two options o Help - that provides an online help system o About - that provides basic information about the current ProPerf release. Toolbar - that provides navigation and function buttons. Note: For other GUI features refer to the NSP Platform Guide. Dashboard list - a table that lists the configured xDR sessions (in panels). For more information on using the Dashboard, see Using the Dashboard Toolbar.. Dashboard Layout As mentioned in the section above, Dashboards are presented in table format. The table has seven columns. Dashboard Columns Name - shows the name of the dashboard Description - shows the description, (if any), of the dashboard Layout - shows the panel configuration in columns and rows, for example, 1x3 means one column and three row layout. 1,2 means one row has one column and the second row has two columns. There are eight possible configurations. Content - shows how many panels are presently in the dashboard configuration Owner - shows who created the dashboard Created - shows when the dashboard was created 6 Dashboard and panel Links The Name and Panel columns are links. Clicking on these links opens the Dashboard configuration and Panel List pages respectively. Dashboard Display Note: You can only view dashboards that you are authorized to view. For more information see the chapters on Privacy in the NSP Administrator's Guide. To display a dashboard click the Name. The Dashboard opens in a separate page. An example of a dashboard with a 2,1 configuration is shown in Figure 4: Dashboard Screen With 2,1 Configuration. Figure 4: Dashboard Screen With 2,1 Configuration Note: Real-time dashboards are automatically refreshed according to default settings. Note: Resulting graph displays an exact value as tooltips when cursor is on a point of a curve. ProPerf Configuration GUI The ProPerf Configuration GUI has all of the functionality of the ProPerf application (viewing dashboards) as well as the dashboard configuration and panel functionality. Panel List Display The panel list page also has a GUI and table format similar to the Dashboard page shown in Figure 5: Panel List Page. Note: The Panel List display can only be accessed using the ProPerf Configuration application. 7 Figure 5: Panel List Page Panel list configuration Symbol The Panel list page shows the current panel configuration in the upper right half of the page. This icon will change if the panel configuration changes. View children Button The Panel list toolbar has a View Children button that opens the sessions that belong to a record. Figure 6: Parent/Child Tables shows an example of the Panel list page with Parent/Child tables. Figure 6: Parent/Child Tables Panel list Table Layout There are four columns in the Panel table. Name - that shows the name of the panel. Duration - shows the time that will be measured. Type - shows the layout (table, line chart, bar chart, pie chart). Rank - will show what order the panel is in the whole configuration. 8 Chapter 3: Using ProPerf Configuration Overview This section describes the procedures used in ProPerf. These descriptions include: Viewing dashboards in historical and real-time display Using the zoom function Using the previous and next view Working with Dashboards This section describes the procedures used in creating, modifying and deleting ProPerf dashboards. Creating a Dashboard To create a new dashboard follows these steps: In the dashboard list toolbar, click Add record. Figure 7: Add Dashboard Screen The Add dashboard screen opens shown in Figure 7: Add Dashboard Screen. The following table describes the attributes you choose on the Dashboard settings page: Type in the Name of the dashboard. Note: Special characters are not allowed for title. Use only standard alphanumerical characters and "_" and "." (Optional) Type in a Description of the dashboard. Select the Layout. Click Apply. The dashboard record appears in the Dashboard page. 9 Proceed to "Panel display List" in this new dashboard. Modifying a Dashboard Follow these steps to modify an existing dashboard. Select the dashboard to be modified. Click Name to open the Dashboard Settings screen. Make the necessary modifications. Click Apply. The changes are saved to the system. Note: To view the changes in the table, click the Refresh button. Deleting a Dashboard Follow these steps to delete an existing dashboard. Select the dashboard to be deleted. Click Delete. Click OK at the prompt. The dashboard and all panels associated with that dashboard are deleted. Using the Dashboard Toolbar You can use the dashboard toolbar to zoom in and out (to change the reference duration), choose the display date, view previous and next time periods in historical data, and chose the real-time or historical view. Choosing a Date You can choose a date to display information from a historical record by doing the following: Select the history button. The date input screen appears. Enter the date and time or select it from the calendar tool. Click OK. The information in the chart is updated to display historical data for the new date. Note: If the display period of a graph includes the time when there is a switch between Daylight Savings Time and Standard Time the data after the change may be offset by one hour. Viewing in Real-time If you are currently viewing historical data, you can switch to the real-time display by doing the following: Select the real-time button. The information in the chart is updated with the real-time data. Note: When a dashboard is first opened its default viewing mode is real-time. Note: If the display period of a graph includes the time when there is a switch between Daylight Savings Time and Standard Time the data after the change may be offset by one hour. Using the Zoom function When viewing data as a line chart, you can you can zoom in or out to change the time duration for the current view. You can zoom in to 1% of the current configured duration and out to 400% of the current configured duration. To use the zoom function does the following: Select the zoom in button to see shorter time duration, or the zoom out button to see a larger duration. Each successive click of the zoom in or out button will result in the view being updated one increment shorter or larger. The information in the chart is updated with the new time duration and the new reference duration is displayed in the toolbar. 10 To reset the zoom factor to the configured duration select the “reset zoom” button. Note: The zoom function is only available with the line chart view. Using the Previous and Next view When viewing a dashboard, you can modify the view to show previous data or next data (in historical view). To use the previous and next function do the following: Select the previous button or next button to see the previous or next data. Note: If you are currently in real-time mode selecting previous will change the view to historical mode and automatic refresh will not happen. For line chart views, the view will shift by 3/4 of the current time duration to display the previous or next data in the view. For Data Tables, Pie Charts and Bar charts, the view will shift to the previous or next period. To get back to the real-time view select the real-time button. Note: If the new calculated date is greater than current time, the dashboard switch back to real-time mode, refreshing data automatically every period. Working with Panels Panel display List Once you have created a dashboard, you can create panels to obtain the information from xDR sessions. Note: xDR sessions are discovered using CCM. Refer to the Centralized Configuration Manager User's Guide for information on managing xDR sessions. These panels will supply the data for you to view, organize, and report. Note: Statistics sessions must already be created in ProTraq. Refer to the ProTraq User's Guide for information on managing statistics sessions. Panels are the basic component of a dashboard. There are three types of panels available in ProPerf: Line charts (multiple session allowed) Bar chart (one session only) Pie chart (one session only) Follow these steps to display a panel. Select the dashboard that will have the panel(s). Figure 8: Selected Dashboard shows a dashboard page with a dashboard selected. Figure 8: Selected Dashboard 11 Note: New dashboards show "No Panel" in content column Click the content link in the Content column. The Panel List page opens shown in Error! Reference source not found.. Figure 9: Panel List Page Click Add Figure 10: Panel Settings Screen-General Tab The Panel Settings screen opens shown in Figure 3-4. In this step you can begin to add panel records with different graphic layouts. Using the Previous and Next view When viewing a dashboard, you can modify the view to show previous data or next data (in historical view). To use the previous and next function do the following: Select the previous button or next button to see the previous or next data. Note: If you are currently in real-time mode selecting previous will change the view to historical mode and automatic refresh will not happen. For line chart views, the view will shift by 3/4 of the current time duration to display the previous or next data in the view. For Data Tables, Pie Charts and Bar charts, the view will shift to the previous or next period. 12 To get back to the real-time view select the real-time button. Note: If the new calculated date is greater than current time, the dashboard switch back to real-time mode, refreshing data automatically every period. Adding a line Chart Pane Follow these steps to add a table panel record. Type in the Name. Select the graphic outlay to Line Chart. Select the Rank. This is the position where the Panel is located in the dashboard. Select the Offset time. This option is used to compare current data to past data in another panel. Click Continue. The screen changes to show the Datasource tab. This screen has the discovered xDR sessions that have been discovered using the Centralized Configuration Manager (CCM). For more information on discovering xDR sessions see Centralized Configuration Manager User s Guide. Select the session. Click Use this session as datasource. The screen changes to show the datasource on the bottom on the screen. Select the X-axis tab. The screen displays the x-axis parameters. o Select the X grid (vertical grid). o Select the Time scale (X duration). o Defines the time range of X-Axis for a line chart. Last date/time or Current date/time will be selected. The duration unit is one hours. Click the Y Axis tab to open the Y Axis screen. Set the attributes on the Y axis tab of the line chart panel configuration window. Table 1: Y-Axis Attribute Descriptions Attribute Description Y-grid Displays a horizontal grid if checked Scale name Displays a title for the default (left) y-axis, and selects a scale by name if an optional scale is defined (default is "left") Auto scale Allows the software to calculate the default (left) y-axis range. Otherwise, minimum and maximum values should be filled in. Minimum scale value Defines the minimum value of the default (left) y-axis range. Maximum scale value Defines the maximum value of the default (left) y-axis range. Second scale Displays an optional right y-axis in the chart 13 Second scale name Displays a title for the optional right y-axis and selects a scale by name (default is "right") Auto scale Allows the software to calculate the optional right y-axis range. Otherwise, minimum and maximum values should be filled in. Minimum second scale value Defines the minimum value of the optional right y-axis range. Maximum second scale value Defines the maximum value of the optional right y-axis range. • Click the Labels tab to apply a label to the session. Labels are available if the session contains additional text fields for ProTraq TOP. • Select the appropriate data columns and enter the formatting string that specifies how the values will be separated. The recommended syntax for the formatting string is %n$s and an invalid syntax may lead to no displayed values. If the formatting syntax is not defined, the values will be separated by spaces. When entering the formatting string, use the syntax %[col_index$][width][.precision]conversion where: o The optional col_index is a decimal integer indicating the position of the argument in the selected column list. The first column is referenced by the second by "2$", and so on. o The optional width is a non-negative decimal integer indicating the minimum number of characters to be written to the output. o The optional precision is a non-negative decimal integer usually used to restrict the number of characters. o The required conversion is a character indicating how the argument should be formatted. A lowercase "s" returns the string as it is and an uppercase "S" returns the string in upper case letters. • Click Apply to save changes. The panel appears in the Panel list. Adding a bar Chart Pane To set the display parameters for a bar chart, follow these steps: Type in the Name. Select the graphic outlay to Bar Chart. Select the Rank. This is the position where the Panel is located in the dashboard. Select the Offset time. This option is used to compare current data to past data in another panel. Click Continue. The screen changes to show the Datasource tab. This screen has the discovered xDR sessions that have been discovered using the Centralized Configuration Manager (CCM). Select the session. Click Use this session as datasource. The screen changes to show the datasource on the bottom on the screen. To add more sessions, repeat previous steps. Click the X-Axis tab to open the Panel Settings screen. Set the X-grid attributes on the screen. o Select x grid. If selected a vertical grid is displayed. Select Values 14 o o Select Lines (fields) that display the X-Axis values as the line selection in the statistics session. Select Columns that display the X-Axis values as the column selection in the statistics session-with simple count Note: The X axis selections are defined in discrete values. The legend items are applied to each value in the selection. Click the Y-Axis tab to open the attribute screen. Select the attributes for the Y-axis. Click the Labels tab to apply a label to the session. Labels are available if the session contains additional text fields for ProTraq TOP. Select the appropriate data columns and enter the formatting string that specifies how the values will be separated. The recommended syntax for the formatting string is %n$s and an invalid syntax may lead to no displayed values. If the formatting syntax is not defined, the values will be separated by spaces. When entering the formatting string, use the syntax %[col_index$][width][.precision]conversion where: o The optional col_index is a decimal integer indicating the position of the argument in the selected column list. The first column is referenced by the second by "2$", and so on. o The optional width is a non-negative decimal integer indicating the minimum number of characters to be written to the output. o The optional precision is a non-negative decimal integer usually used to restrict the number of characters. o The required conversion is a character indicating how the argument should be formatted. A lowercase "s" returns the string as it is and an uppercase "S" returns the string in upper case letters. Click Apply to save your settings. The panel record is saved to show a bar chart. Setting Pie Chart Parameters To set the display parameters for a bar chart, follow these steps: Click Add in the Panel List page. Type in the Name. Select the graphic outlay Pie as the type. Select the Rank. This is the position where the Panel is located in the dashboard. Select the Offset time. This option is used to compare current data to past data in another panel. Click Continue. The screen changes to show the Datasource tab. This screen has the discovered xDR sessions that have been discovered using the Centralized Configuration Manager (CCM). Select the session. Click Use this session as datasource. The screen changes to show the datasource on the bottom on the screen. To add more sessions, repeat steps 7-8. Select the Values tab. The screen changes to show the columns for the panel. Set the line or column values. o Line values define the pie slices as columns for a line to be selected in the line list of the statistics session. o Column values define pie slices as lines for a column to be selected in the column list of the statistics session. 15 Click the Labels tab to apply a label to the session. Labels are available if the session contains additional text fields for ProTraq TOP. Select the appropriate data columns and enter the formatting string that specifies how the values will be separated. The recommended syntax for the formatting string is %n$s and an invalid syntax may lead to no displayed values. If the formatting syntax is not defined, the values will be separated by spaces. When entering the formatting string, use the syntax %[col_index$][width] [.precision] conversion where: o The optional col_index is a decimal integer indicating the position of the argument in the selected column list. The first column is referenced by the second by "2$", and so on. o The optional width is a non-negative decimal integer indicating the minimum number of characters to be written to the output. o The optional precision is a non-negative decimal integer usually used to restrict the number of characters. o The required conversion is a character indicating how the argument should be formatted. A lowercase "s" returns the string as it is and an uppercase "S" returns the string in upper case letters. Click Apply. The settings are saved to the panel list. Unselecting (deleting) Data Sources You can unselect an xDR session in a Panel record by follow these steps. Select the Panel record to be modified. Click Modify. Click the Datasource tab. Click unselect but the xDR session you want to delete. Click Apply. The changes are saved to the system. Modifying a Panel Record Follow these steps to modify a panel record. Select the Panel record to be modified. Click Modify. Make the appropriate changes. Click Apply. The changes are saved to the system. Deleting a Panel Record Follow these steps to delete a panel record. Select the Panel record to be modified. Click Delete. Click OK at the prompt. The record is deleted. Creating legend Items For a charting panel, some legend items need to be defined in order to apply graphic properties specific to that item, such as color, symbol, etc. These properties are applied to these two items: A precise KPI (line chart or pie chart) - which is a key point indicator identified by a column and a line in the selected statistics session (in panel definition) 16 A KPI set (bar chart) - which are key point indicators identified by a line or a column and respectively selected columns or lines of a session (in panel definition) Displaying a legend item List Each charting panel has children records associated with it. To display an item list, follow these steps: Select the record. Click Show child to open the child list screen shown in Figure 11: Child Records List Screen. Figure 11: Child Records List Screen Defining KPI Data Sources Follow these steps to define a KPI data source. In a child record, click Add record to open the KPI configuration screen shown in Figure 12: KPI Configuration Screen. Figure 12: KPI Configuration Screen 17 Note : Only the numerical KPI field will be listed here , for example IMEI type (which can contains ‘A’,’B’,..) will not appear here Select the Datasource tab and set the following attributes that are described in Table 2: Xdr Configuration Settings. Table 2: Xdr Configuration Settings Attribute Description Name Name to be displayed in the legend for this KPI Statistical Session Selects a statistical session if multiple sessions have been selected in the panel settings (only for a line chart) Line Selects a line in the statistical session. This attribute does not appear for bar charts or pie charts if the line values have been defined in the panel settings. Column Selects a column in the statistical session. This attribute does not appear for bar charts or pie charts if the column values have been defined in the panel settings Note: Special characters are not allowed for name. Use only standard alphanumerical characters and "_" and "." Select Graphical properties tab to open this screen shown in Figure 13: Graphical Properties Tab. 18 Figure 13: Graphical Properties Tab Select the graphic attributes for the datasource described in Table 3: Attribute Descriptions. Table 3: Attribute Descriptions Attribute Description Axis side If an optional second Y axis has been defined (only for bar charts or line charts), you may select which axis to use. Color Selects color Width Defines line thickness (only for line charts) Symbol type Defines the symbol used at the value location Symbol size Defines the symbol size in pixels Click Apply to save your settings. Modifying the panel Order If you would like the information of a specific record organized differently, you can modify the panel order. In this way the most pertinent information is presented first. To change the panel order, follow these steps.: Select the record you want by using the Navigation buttons. Click Edit record to open the panel shown in Figure 14: Panel Settings Screen. Figure 14: Panel Settings Screen Select the new position of the panel by using the corresponding attribute. Click Apply to save your settings. 19 Note: If the new rank is below the old one, every panel in between will be automatically shifted up. Otherwise, panels between these ranks will be automatically shift down. Modifying privacy Settings In order to modify access rights of a dashboard, follow these steps: Select the record you want by using the Navigation buttons. Click Roles, the Change Privacy page opens. Give the following access privileges according registered roles. o x : allows to display dashboard o w : allows to modify settings o r: allows to view dashboard in list and corresponding settings lists Note: A user belongs to one or more groups, each of these being mapped to one or more roles (by default one group=one role). Printing the Dashboard To print dashboard: Select the web browser Print menu (right click for context menu). Follow the web browser standard instructions for printing a document. 20