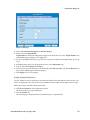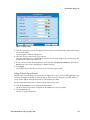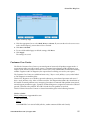
1
DIH 1.2
NSP Security User Guide
910-6512-001 Revision A
August 2012
Copyright 2011 – 2012 Tekelec. All Rights Reserved. Printed in USA.
Legal Information can be accessed from the Main Menu of the optical disc or on the
Tekelec Customer Support web site in the Legal Information folder of the Product Support tab.
Table of Contents
Chapter 1: About This Help Text.......................................................6
Overview....................................................................................................................................7
Scope and Audience.................................................................................................................7
About the Diameter Intelligence Hub (DIH)........................................................................7
Setting User Preferences...............................................................................................8
Customer Care Center............................................................................................................15
DIH Documentation Library.................................................................................................17
Locate Product Documentation on the Customer Support Site.......................................18
Diameter Intelligent Hub (DIH) - Copyright, Notice, Trademarks, and Patents..........18
Chapter 2: About NSP Security........................................................20
NSP Security Principles..........................................................................................................21
Security Menu and Toolbar...................................................................................................21
Security Components.............................................................................................................23
Users..............................................................................................................................23
Roles..............................................................................................................................24
Profiles..........................................................................................................................28
NSP Security Model................................................................................................................28
Profile 1.........................................................................................................................29
Profile 2.........................................................................................................................29
Chapter 3: Using the Security Application....................................30
Overview..................................................................................................................................31
Opening the Security Application........................................................................................31
Managing Users.......................................................................................................................31
Viewing Users..............................................................................................................31
Adding Users...............................................................................................................32
Modifying Users..........................................................................................................33
Removing Users..........................................................................................................33
Managing Privacy Roles.........................................................................................................34
Viewing Privacy Roles................................................................................................34
Creating Privacy Roles...............................................................................................34
Modifying Privacy Roles............................................................................................35
Removing Privacy Roles............................................................................................35
910-6512-001 Revision A, August 2012
ii
Managing Profiles...................................................................................................................35
Viewing Profiles..........................................................................................................36
Creating Profiles..........................................................................................................36
Modifying Profiles......................................................................................................37
Removing Profiles.......................................................................................................37
Managing Object Privacy.......................................................................................................37
Viewing Data Objects.................................................................................................39
Setting Default Privileges for Objects.......................................................................39
Changing Object Privacy............................................................................................39
Managing Login......................................................................................................................40
Configuring Password Requirements......................................................................40
Resetting User Passwords..........................................................................................41
Setting Access Level....................................................................................................41
Monitoring Purchased Tokens (Licenses)...............................................................41
Setting the Security Notice.........................................................................................42
Transferring Ownership.........................................................................................................43
Changing Overall Ownership...................................................................................43
Changing Ownership by Object................................................................................43
Importing and Exporting User Data....................................................................................44
Importing User Data ..................................................................................................44
Exporting User Data ..................................................................................................44
Exporting Profiles .......................................................................................................45
Exporting Roles ..........................................................................................................45
910-6512-001 Revision A, August 2012
iii
List of Figures
Figure 1: Time Formatting Page..........................................................................................................9
Figure 2: Directory Page.....................................................................................................................10
Figure 3: Mapping Page.....................................................................................................................11
Figure 4: Point Code Tab....................................................................................................................12
Figure 5: CIC Page...............................................................................................................................13
Figure 6: Alarms Page.........................................................................................................................14
Figure 7: Privacy Page........................................................................................................................15
Figure 8: User Matrix..........................................................................................................................24
Figure 9: Profile Overview.................................................................................................................29
Figure 10: Privacy Roles Settings Window......................................................................................35
Figure 11: Filter User Access Window.............................................................................................41
Figure 12: Security Notice Window..................................................................................................42
Figure 13: Privacy Owner Change Window...................................................................................43
Figure 14: Sample CSV File (for Users)............................................................................................44
910-6512-001 Revision A, August 2012
iv
List of Tables
Table 1: Display Menu........................................................................................................................21
Table 2: Action Menu..........................................................................................................................22
Table 3: File Menu...............................................................................................................................22
Table 4: Help Menu.............................................................................................................................22
Table 5: Security Toolbar Icons.........................................................................................................22
Table 6: Authorization Role Map for Applications........................................................................25
Table 7: Authorization Role Map for Configuration Applications..............................................26
Table 8: Authorization Role Map for Surveillance Applications.................................................27
Table 9: Application Privacy Roles...................................................................................................27
Table 10: Columns in the Users table...............................................................................................32
Table 11: Privacy Role Columns.......................................................................................................34
Table 12: Columns in Profiles Page .................................................................................................36
Table 13: Privacy Dependencies in NSP..........................................................................................38
Table 14: Configure and Execute a Query.......................................................................................38
Table 15: Configure and Display a ProPerf Dashboard................................................................38
Table 16: Associate A ProTraq Configuration................................................................................38
Table 17: View Alarms in Map..........................................................................................................38
Table 18: Columns in Objects List.....................................................................................................39
Table 19: Password Settings...............................................................................................................40
910-6512-001 Revision A, August 2012
v
Chapter
1
About This Help Text
Topics:
•
•
•
•
•
•
•
Overview.....7
Scope and Audience.....7
About the Diameter Intelligence Hub (DIH).....7
Customer Care Center.....15
DIH Documentation Library.....17
Locate Product Documentation on the Customer
Support Site.....18
Diameter Intelligent Hub (DIH) - Copyright,
Notice, Trademarks, and Patents.....18
910-6512-001 Revision A, August 2012
6
About This Help Text
Overview
The Network Software Platform (NSP) Security Application enables the user to manage user access
at login to the NSP Platform and user access to data through profile and role definitions.
Scope and Audience
This help text provides information about Security concepts. It is designed as a guide for the system
administrator or the user who is in charge of setting up users, groups, and roles in NSP.
About the Diameter Intelligence Hub (DIH)
The Diameter Intelligent Hub (DIH) is used to monitor a LTE network. DIH also creates a small
hardware "footprint" for customers who administer 3G and 4G diameter networks. The DIH:
• Is a single blade server and storage blade collocated within a single or dual Diameter Signaling
Router (DSR) enclosure(s).
• Provides filtering, data feed, tracing, decoding, and SNMP functions.
• Enables the selective collection and storage of diameter traffic within one or more instances of PMF
and IXP.
• Provides nodal diameter troubleshooting.
• Provides data export for diameter messages.
• Supports both IPv4 and IPv6 traffic simultaneously.
• Provides KPI tracking using ProTrace application as well as viewing KPIs in graphic format using
ProPerf dashboard configured at installation.
• Provides filtering for alarms using ProTraq Cell filter (see system alarms online help).
• Uses diameter protocol exclusively.
Note: The DIH system can use other protocols if the Diameter mode has not been selected and
system is in Standard mode. (Default setting is Standard mode. For more information on selecting
Diameter mode, see Centralized Configuration Manager Administration online help, "Setting
System to Diameter Mode."
The Diameter Protocol
The diameter protocol has evolved from the Radius protocol and enables diameter applications to
extend the base protocol by adding new commands and/or attributes, such as those for use of the
Extensible Authentication Protocol (EAP).
The diameter protocol provides for an Authentication, Authorization, and Accounting (AAA)
framework that overcomes the limitations of RADIUS, (a protocol that handles AAA and EAP), which
cannot effectively deal well with remote access, IP mobility and policy control. The Diameter protocol
defines a policy protocol used by clients to perform Policy, AAA and Resource Control. This allows
a single server to handle policies for many services.
910-6512-001 Revision A, August 2012
7
About This Help Text
As mentioned above, Diameter protocol provides AAA functionality, but in addition it is made more
reliable by using TCP and SCTP instead of UDP. The Diameter protocol is further enhanced by the
development of the 3rd Generation Partnership Project (3GPP) IP Multimedia Subsystem (IMS).
Through the use of extensions, the protocol was designed to be extensible to support Proxies, Brokers,
Strong Security, Mobile-IP, Network Access Servers (NASREQ), Accounting and Resource Management.
Setting User Preferences
Users can set User Preferences that apply across all the NSP applications. These include
•
•
•
•
•
•
•
Time specifications (date format, time zone, etc.)
Directory names (for exporting, uploading, and downloading)
Enumeration values (numerals vs. text)
Point code specifications
CIC specifications
Default alarm colors
Default object privacy privileges
Setting Time Format
Follow these steps to set the time format:
1. Click User Preferences on the Application board.
The User Preferences page is displayed.
2. Click the Time tab.
The Time page is displayed. The red asterisk denotes a required field.
Note: Use the tips on the page to help you configure the time format.
910-6512-001 Revision A, August 2012
8
About This Help Text
Figure 1: Time Formatting Page
3. Enter the format for these time-related displays.
• Date format
• Time format
• Date and time fields
4. Select the formats for these time-related displays by using the drop-down arrow.
• Duration fields
• Time zone
Note: You must choose your time zone to get local time.
5. If you want to reset the time-related displays to default settings, click Reset for Time. (The bottom
Reset button resets all the tabbed pages to default settings.)
6. Click Apply to save settings.
Setting Directory Preferences
Use the User Preferences feature to set the Export, Upload and Download directory paths for your
system. These paths define where xDR’s, dictionary files and other elements are stored.
Follow these steps to set the directory preferences.
910-6512-001 Revision A, August 2012
9
About This Help Text
1. Click User Preferences on the Application board.
The User Preferences page is displayed.
2. Click the Directory tab.
The Directory page is displayed. The red asterisk denotes a required field.
Figure 2: Directory Page
3. Type in the following:
• Export directory
• Upload directory
• Download directory
4. If you want to reset the directories to default settings, click Reset for Directory. (The bottom Reset
button resets all the tabbed pages to default settings.)
5. Click Apply to save your settings.
Setting Mapping Preferences
You can set the Mapping settings using the User Preferences feature.
Follow these steps to set Mapping preferences.
1. Click User Preferences in the Application board.
The User Preferences page is displayed.
2. Click the Mapping tab .
The Mapping page is displayed.
910-6512-001 Revision A, August 2012
10
About This Help Text
Figure 3: Mapping Page
3. Check Translate ENUM values to display text instead of numerals.
Enumeration is used by xDRs to display text values instead of numeric. (For example, rather than
showing the numeral for Alarm Severity, the user interface will show the actual word, such as
"Major" or "Critical." )
4. Check Point Code to Node Name to display the custom (user-defined) name of the node. Otherwise,
the Point Code value is displayed.
5. Check Link Short Name to Long Name to display the custom (user-defined) link name or the Eagle
link name. Otherwise, the short name is displayed, which is the name that begins with an asterisk
(*).
6. To reset the Mapping values to the default, click Reset for Enumeration. (The bottom Reset button
resets all the tabbed pages to default settings.)
7. Click Apply to save the changes.
Setting Point Code Preferences
The User Preferences feature enables you to set the Point Code preferences for your system. A Point
Code is a unique address for a node (Signaling Point), used to identify the destination of a message
signal unit (MSU).
Follow these steps to set the Point Code preferences.
1. Click User Preferences in the Application board.
The User Preferences page is displayed.
2. Click the Point Code tab.
The Point Code page is displayed. The red asterisk denotes a required field.
910-6512-001 Revision A, August 2012
11
About This Help Text
Figure 4: Point Code Tab
3. Select either Hexadecimal display or Decimal display.
4. Select or de-select Split format.
If Split format is checked, the Bit groups settings in the box below are active. If Split format is not
checked, Bit groups settings are not applicable.
5. If you selected Split format above, go to the next step. If you did not select Split format, go to step
Step 8.
6. In the Bit groups panel, use the drop-down box to select the Separation type .
7. Type in values for Groups 0-3.
8. To reset the point code preferences to default settings, click Reset for Point code. (The bottom
Reset button resets all the tabbed pages to default settings.)
9. Click Apply to save your settings.
Setting CIC Preferences
The Circuit Identification Code (CIC) provides a way to identify which circuit is used by the Message
Signaling Unit ( MSU). This is important in ProTrace applications. Use the User Preferences feature
to set the CIC settings for your system.
Complete these steps to set the CIC preferences:
1. Click User Preferences in the Application board.
The User preferences page is displayed.
2. Click the CIC tab.
The CIC page is displayed. The red asterisk denotes a required field.
910-6512-001 Revision A, August 2012
12
About This Help Text
Figure 5: CIC Page
3. Select either Hexadecimal display or Decimal display.
4. Select or de-select Split format.
If Split format is checked, the Bit groups settings in the box below are active. If Split format is not
checked, Bit groups settings are not applicable.
5. If you selected Split format above, go to the next step. If you did not select Split format, go to step
Step 8.
6. In the Bit groups panel, use the drop-down box to select Separation type..
7. Type in values for Group 0 and Group 1.
8. If you want to reset CIC preferences to the default, click Reset for CIC. (The bottom Reset button
resets all the tabbed pages to default settings.)
9. Click Apply to save your settings.
Setting Alarms Preferences
Use the Alarms tab in User Preferences to define the default colors that indicate alarm severity. The
colors are displayed in the Perceived Severity column of alarms tables and on object icons in maps.
Follow these steps to modify alarm status colors.
1. Click User Preferences in the Application board.
The User preferences page is displayed.
2. Click the Alarms tab.
The Alarms page is displayed. The red asterisk denotes a required field.
910-6512-001 Revision A, August 2012
13
About This Help Text
Figure 6: Alarms Page
3. Click the color palette (icon on the right side of the screen) associated with the alarm status color(s)
you want to modify.
A pop-up palette window is displayed.
4. Click the color you want for the type of alarm.
The color palette pop-up is closed and the color box for the alarm displays the selected color. The
number for the color is also displayed.
5. If you want to reset the Alarm preferences to the default, click Reset for Alarmlist. (The bottom
Reset button resets all the tabbed pages to default settings.)
6. Click Apply .
The changes do not take effect until you log out of and in again to NSP.
Setting Default Object Privacy
All NSP users can set default access privileges for Objects (data) they create in NSP applications. An
owner has full rights to modify or delete the object . Other users are assigned to a Profile and have
access to these Objects through that Profile’s associated Privacy Roles.
To enter the default Object Privacy (data) settings, follow these steps:
1. Click User preferences in the Application board menu.
The User Preferences window is displayed. The Time tab is active by default.
2. Click the Privacy tab .
The Privacy page is displayed.
910-6512-001 Revision A, August 2012
14
About This Help Text
Figure 7: Privacy Page
3. Click the appropriate box to select Read, Write, or eXecute. If you want the role to have no access
to the selected object(s), ensure that no box is checked.
4. Click Save as default.
5. To reset all the tabbed pages to default settings, click Reset.
6. Click Apply.
The settings are saved.
Customer Care Center
The Tekelec Customer Care Center is your initial point of contact for all product support needs. A
representative takes your call or email, creates a Customer Service Request (CSR) and directs your
requests to the Tekelec Technical Assistance Center (TAC). Each CSR includes an individual tracking
number. Together with TAC Engineers, the representative will help you resolve your request.
The Customer Care Center is available 24 hours a day, 7 days a week, 365 days a year, and is linked
to TAC Engineers around the globe.
Tekelec TAC Engineers are available to provide solutions to your technical questions and issues 7
days a week, 24 hours a day. After a CSR is issued, the TAC Engineer determines the classification of
the trouble. If a critical problem exists, emergency procedures are initiated. If the problem is not critical,
normal support procedures apply. A primary Technical Engineer is assigned to work on the CSR and
provide a solution to the problem. The CSR is closed when the problem is resolved.
Tekelec Technical Assistance Centers are located around the globe in the following locations:
Tekelec - Global
Email (All Regions): [email protected]
• USA and Canada
Phone:
1-888-FOR-TKLC or 1-888-367-8552 (toll-free, within continental USA and Canada)
910-6512-001 Revision A, August 2012
15
About This Help Text
1-919-460-2150 (outside continental USA and Canada)
TAC Regional Support Office Hours:
8:00 a.m. through 5:00 p.m. (GMT minus 5 hours), Monday through Friday, excluding holidays
• Caribbean and Latin America (CALA)
Phone:
USA access code +1-800-658-5454, then 1-888-FOR-TKLC or 1-888-367-8552 (toll-free)
TAC Regional Support Office Hours (except Brazil):
10:00 a.m. through 7:00 p.m. (GMT minus 6 hours), Monday through Friday, excluding holidays
• Argentina
Phone:
0-800-555-5246 (toll-free)
• Brazil
Phone:
0-800-891-4341 (toll-free)
TAC Regional Support Office Hours:
8:00 a.m. through 5:48 p.m. (GMT minus 3 hours), Monday through Friday, excluding holidays
• Chile
Phone:
1230-020-555-5468
• Colombia
Phone:
01-800-912-0537
• Dominican Republic
Phone:
1-888-367-8552
• Mexico
Phone:
001-888-367-8552
• Peru
Phone:
0800-53-087
• Puerto Rico
Phone:
1-888-367-8552 (1-888-FOR-TKLC)
• Venezuela
910-6512-001 Revision A, August 2012
16
About This Help Text
Phone:
0800-176-6497
• Europe, Middle East, and Africa
Regional Office Hours:
8:30 a.m. through 5:00 p.m. (GMT), Monday through Friday, excluding holidays
• Signaling
Phone:
+44 1784 467 804 (within UK)
• Software Solutions
Phone:
+33 3 89 33 54 00
• Asia
• India
Phone:
+91 124 436 8552 or +91 124 436 8553
TAC Regional Support Office Hours:
10:00 a.m. through 7:00 p.m. (GMT plus 5 1/2 hours), Monday through Saturday, excluding
holidays
• Singapore
Phone:
+65 6796 2288
TAC Regional Support Office Hours:
9:00 a.m. through 6:00 p.m. (GMT plus 8 hours), Monday through Friday, excluding holidays
DIH Documentation Library
DIH customer documentation and online help are created whenever significant changes are made
that affect system operation or configuration. Revised editions of the documentation and online help
are distributed and installed on the customer system. Consult your NSP Installation Manual for details
on how to update user documentation. Additionally, a Release Notice is distributed on the Tekelec
Customer Support site along with each new release of software. A Release Notice lists the PRs that
have been resolved in the current release and the PRs that are known to exist in the current release.
Listed is the entire DIH documentation library of online help.
• Centralized Configuration Manager Administration Online Help
• Alarm Forwarding Administration Online Help
910-6512-001 Revision A, August 2012
17
About This Help Text
•
•
•
•
•
•
•
Diagnostic Utility Administration Online Help
ProTrace Online Help
System Alarms Online Help
ProPerf Online Help
ProTraq Configuration Online Help
Data Feed Export Online Help
System Alarms Online Help
Locate Product Documentation on the Customer Support Site
Access to Tekelec's Customer Support site is restricted to current Tekelec customers only. This section
describes how to log into the Tekelec Customer Support site and locate a document. Viewing the
document requires Adobe Acrobat Reader, which can be downloaded at www.adobe.com.
1. Log into the Tekelec Customer Support site.
Note: If you have not registered for this new site, click the Register Here link. Have your customer
number available. The response time for registration requests is 24 to 48 hours.
2. Click the Product Support tab.
3. Use the Search field to locate a document by its part number, release number, document name, or
document type. The Search field accepts both full and partial entries.
4. Click a subject folder to browse through a list of related files.
5. To download a file to your location, right-click the file name and select Save Target As.
Diameter Intelligent Hub (DIH) - Copyright, Notice, Trademarks, and
Patents
©
2012 Tekelec
All Rights Reserved
Printed in U.S.A.
Notice
Information in this documentation is subject to change without notice. Unauthorized use, copying, or
translation of this documentation can result in civil or criminal penalties.
Any export of Tekelec products is subject to the export controls of the United States and the other
countries where Tekelec has operations.
No part of this documentation may be reproduced, translated, or transmitted in any form or by any
means, electronic or mechanical, including photocopying or recording, for any purpose without the
express written permission of an authorized representative of Tekelec.
Other product names used herein are for identification purposes only, and may be trademarks of their
respective companies.
910-6512-001 Revision A, August 2012
18
About This Help Text
RoHS 5/6 - As of July 1, 2006, all products that comprise new installations shipped to European Union
member countries will comply with the EU Directive 2002/95/EC "RoHS" (Restriction of Hazardous
Substances). The exemption for lead-based solder described in the Annex will be exercised. RoHS 5/6
compliant components will have unique part numbers as reflected in the associated hardware and
installation manuals.
WEEE - All products shipped to European Union member countries comply with the EU Directive
2002/96/EC, Waste Electronic and Electrical Equipment. All components that are WEEE compliant
will be appropriately marked. For more information regarding Tekelec's WEEE program, contact your
sales representative.
Trademarks
TEKELEC, EAGLE, G-Flex, G-Port, and CAMIANT are registered trademarks of Tekelec. The Tekelec
logo, A-Port, EAGLE 5, EAGLE 5 ISS, IP7, IP7 Secure Gateway, V-Flex, ngHLR, BLUESLICE, and
Subscriber Data Server (SDS) are trademarks of Tekelec. All other trademarks are the property of their
respective owners.
Patents
This product may be covered by one or more of the following U.S. and foreign patents:
U.S. Patent Numbers:
6,456,845; 6,765,990; 6,968,048; 7,043,001; 7,155,512; 7,206,394; 7,215,748; 7,231,024; 7,286,516; 7,286,647;
7,401,360; 7,706,343; 7,844,033; 7,860,799;
Foreign Patent Numbers:
None.
910-6512-001 Revision A, August 2012
19
Chapter
2
About NSP Security
Topics:
•
•
•
•
NSP Security Principles.....21
Security Menu and Toolbar.....21
Security Components.....23
NSP Security Model.....28
910-6512-001 Revision A, August 2012
20
About NSP Security
NSP Security Principles
The Network Software Platform (NSP) Security application provides the means to authorize user
access to NSP applications and features and to maintain data integrity. The Security application enables
the System Administrator to apply the following:
• Authentication (System Access) - Makes sure users are who they claim to be. Authentication is
controlled by
• User IDs created in an underlying LDAP directory or an external LDAP database
• Passwords
• Authorization (Application Access) - Makes sure the user has access only to specified applications
or features within applications. Several mechanisms are used: system operating mode, token
availability, and role definitions.The user must first be authenticated. Each user is identified by a
profile, which contains that user’s authorization role.
• Privacy (Data Access) - Protects the sensitive data objects from unauthorized use by assuring that
only users with the appropriate Read/Write/Execute privileges gain access.
Note: NSP employs a Web-based interface to control system access. This facility controls
• User login and logout
• NSP Administrator's ability to force disconnect and set access level
• Tekelec Customer Service's setting values for purchased user tokens (licenses)
Security Menu and Toolbar
For details about what these Menu options and toolbar icons provide, see Using the Security Application.
Table 1: Display Menu
Menu Option
Description
Users
Displays the list of users with user name, description, email address, profile,
restricted access status, date and time of last login, and number of active
sessions. From this page, you can perform actions such as add users, modify
existing users, and unlock accounts.
Privacy roles
Displays the list of Privacy roles, including description, number of users
in that role, and number of objects to which that role has access.
Profiles
Displays the list of defined Profiles, with description and the number of
users within each profile
Objects
Displays the list of objects within NSP, including the type of object, owner,
and the date created.
910-6512-001 Revision A, August 2012
21
About NSP Security
Table 2: Action Menu
Menu Option
Description
Password settings
Displays a dialog for configuring password criteria. Examples are number
and type of characters, lifetime of the password (before it must be changed),
and whether the password is generated automatically or manually.
Filter access
Displays a dialog to define which subset of users can access NSP during
times of restricted access.
Transfer ownership
Displays a dialog to change ownership for all of an individual's objects.
Manage tokens
Dislays a read-only dialog that shows the number of purchased tokens
(licenses) and the maximum number allowed per user.
Security notice
Displays a dialog for security text to be used on the login page.
Table 3: File Menu
Menu Option
Description
Import
Displays a dialog for importing files of user definitions, passwords, email
addresses, roles, and profiles. This feature is especially beneficial in
importing bulk loads of user information.
Export users
Displays a dialog for generating a list of existing NSP user definitions,
passwords, email addresses, and profiles.
Export profiles
Displays a dialog for generating a list of existing NSP profiles with
descriptions and associated roles.
Export roles
Displays a dialog for generating a list of existing NSP roles and their
descriptions.
Table 4: Help Menu
Menu Option
Description
User manual
Opens on-line help text for the NSP application in use.
About security
Provides version and copyright information about NSP as well as contact
information for Tekelec support.
Table 5: Security Toolbar Icons
Icon or Field
Description
Navigation arrow - use to move back and forth among records. This example
is the arrow to move to the next record. Other combinations of arrows move
to the next page, final record, etc.
Add Record - adds a record to the list
910-6512-001 Revision A, August 2012
22
About NSP Security
Icon or Field
Description
Edit Record - modifies the selected record
Delete Record - deletes the selected record
Filter - displays a dialog enabling you to define filters for the list of users
Unlock - unlocks the selected user account
Reset password - resets the selected user's password. Resetting can be by
manually entering a new password or by having the system automatically
generate a password.
Logout - logs the selected user out of the application.
Refresh - resets the display to include the most current data
Records per Page - sets the number of records to view per page
Change Records per Page - resets display to include the number of Records
per Page
Record Number/Total Number of Records - shows the number of the
selected record / total number of records available
Count on Demand - provides the total number of records in the database
Privacy - modifies the privacy settings of the selected object
Owner - changes the owner of the selected object
Note: Do not use the Function Keys (F1 through F12) when using NSP. Function keys work in
unexpected ways. For example, the F1 key does not open NSP help but opens the help for the browser
in use. The F5 key does not refresh a specific screen, but refreshes the entire session and results in a
loss of any entered information.
Security Components
Users
From the system’s viewpoint, each user has a unique identity. This identity is created by combining
a user id and a password. A user can be a person or a software entity, such as a Java client.
910-6512-001 Revision A, August 2012
23
About NSP Security
When users are added to the PIC system, the system administrator assigns each user a password and
a user profile. Authorization roles and privacy roles are assigned to a user profile. The Authorization
roles and privacy roles control the level of user access to NSP applications, features, and data objects.
Passwords are typically alphanumeric, with a minimum and maximum number of characters.
This guide explains security procedures performed by the NSP Administrator.
Roles
Roles used to define application and feature access are:
• Pre-defined - Roles used to establish access to application resources. These are mapped to
NSP-defined users in LDAP (Users, Power Users and Managers).
• Organizational - Roles defined by the customer. These are defined as global roles (for example:
GPRS, UMTS, PSTN, Lyon, Mulhouse, and so on).
NSP Security involves two types of roles: Authorization Roles and Privacy Roles.
Authorization Roles
In NSP, there are ten pre-defined user Authorization roles: The NSP Administrator is the supervisory
role that can assign roles to other users. In addition, the NSP Administrator has all the privileges of
the other roles.
Figure 8: User Matrix
NSP’s user policy divides Authorization roles into a matrix of families and levels, which are assigned
to profiles at the time of profile creation. The role families are
• Application (Business)- provides full or partial access to ProPerf and ProTrace.
• Configuration - provides full or partial access to the following applications: ProPerf, ProTraq,
Alarm Forwarding, and DataFeed.
• Surveillance (Monitoring) - provides access to System Alarms, Diagnostic Utility.
The role levels, which define the degree of privilege in application access, are
910-6512-001 Revision A, August 2012
24
About NSP Security
• User - Allows user access to object data
• Power User - Allows user access to NSP application critical functions
• Manager - Allows a user to manage NSP applications
These tables map authorization roles to specific functions in each application in the NSP toolbox. (The
X denotes the role that can perform the related function. An empty cell means that role cannot perform
the function.)
Table 6: Authorization Role Map for Applications
Application
Feature
Authority
Business
Manager
Business
Power User
Business
User
ProTrace
Sessions
List/Execute
X
X
X
Queries
List/Execute
X
X
X
Edit/Add/Delete
X
X
Upload
X
X
Download
X
X
Delete
X
X
Roles
Change
X
X
PDUs
xDR Layout (View)
X
Field Hiding
X
xDR Layout (View)
X
Field Hiding
X
xDR Layout
X
Field Hiding
X
Trace
Start
X
xDR
View
X
X
X
Field Hiding
X
X
X
Results
Full decoding
Decoded SMS
X
X
X
X
ProPerf
Dashboard
view
List/Execute
X
X
X
ProDiag
Counters
View
X
X
X
Reset
X
910-6512-001 Revision A, August 2012
X
25
About NSP Security
Table 7: Authorization Role Map for Configuration Applications
Application
Feature
Authority
Configuration
Manager
Alarm
Forwarding
Configuration
All
X
ProTraq
Start
Configurations
Consult
X
Create
X
Update
X
Change Rights
X
Delete
X
Consult
X
Set
X
Activate
X
Deactivate
X
Change Rights
X
Delete
X
Create
X
Modify
X
Delete
X
Export
X
Consult
Applying
Configurations
ProTraq
Historical
Historical
Protraq
ProPerf
Dashboard
Configuration
CCM
Host,
Application,
Session, Site,
Dictionary
Applying
Configurations
DataFeed
All functions
910-6512-001 Revision A, August 2012
Configuration
Power User
Configuration
User
X
X
X
X
X
X
X
Create
X
X
Update
X
X
Delete
X
X
Consult
X
X
Modify
X
Delete
X
Activate
X
Deactivate
X
Set
X
Delete
X
All
X
X
26
About NSP Security
Table 8: Authorization Role Map for Surveillance Applications
Object
Feature
Authority
Monitor
Manager
Monitor
Power User
Monitor User
System
Alarms
Alarm
List
X
X
X
Terminate
X
X
Diagnostic
Utility
Counters
View
X
X
Reset
X
X
Privacy Roles
Privacy roles establish the levels of access to the data objects used by the applications. Profiles link
users to privacy roles, which in turn are linked to read/write/execute permissions for the data objects.
A given object can offer different permission levels to different roles and indirectly to different profiles.
Object-data access privileges (read/write/execute) imply the following:
• Read (R)- Users can only view an object in a list. They cannot modify or add information in any
way.
• Write (W) - Users can modify an object. Write includes read access. This also covers privacy
privileges for that object.
• Execute (X) - Users can view, modify, or delete an object in a list
This information is used at the programming level with user authorization roles to define user profiles.
Table 9: Application Privacy Roles
Application
Object Class
eXecute
Write
Read
ProTrace
xDR session
Open session
N/A
View session in list
Session view
Open all sessions
N/A
View in list tree. (See
privacy dependencies
in Managing Object
Privacy.)
Link view
Open all sessions
N/A
View in list tree. (See
privacy dependencies
in Managing Object
Privacy.)
Queries
Execute query
Modify query
View and read query
Save it with a new
name
ProTraq Config Apply/
activate/...
Modify
View configuration
Statistic
sessions
N/A
View session in list
ProTraq
Configuration
910-6512-001 Revision A, August 2012
Open session
27
About NSP Security
Application
Object Class
eXecute
Write
Read
Alarms
N/A
N/A
(See privacy
dependencies in
Managing Object
Privacy.)
ProPerf
Dashboard
View dashboard
Modify config
View panel & KPI list
in dashboard
Alarm
Forwarding
Filters
N/A
N/A
N/A
Centralized
Configuration
Manager
Host
Run discover
Modify & delete
View attributes
Applications,
Run discover
Modify & delete
Data Server
(when applicable)
MSW, ICP, IMF
View attributes
xDR session
Modify & delete
View attributes
Dictionary,
N/A
Protocol, Stack
N/A
N/A
Session View
N/A
Modify & delete
View attributes
Link View
N/A
Modify & delete
View attributes
Network
Elements
N/A
Modify & delete
View attributes
Monitoring
Groups
N/A
Modify & delete
View attributes
N/A
Profiles
Profiles are structures that make it easier to grant users access to NSP applications and data structures.
A user is assigned to one profile, which defines the Authorization role and Privacy role for that user.
Authorization roles define the user's access to NSP applications and its features. Privacy roles link
users to NSP data objects.
NSP Security Model
Profiles map users to privacy and authorization roles. Before users can access NSP applications and
data, the following must be defined:
• Users
• Each user is assigned to a profile
• Roles
• In profiles, privacy roles must be associated with users (data object access)
910-6512-001 Revision A, August 2012
28
About NSP Security
• In profiles, authorization roles must be associated with users (application/feature access)
Figure 9: Profile Overview shows two different profiles linked to two separate sets of users in the
hypothetical NET department. The NET department manages SS7 network surveillance. Some users
need to perform configuration tasks and other users need to run pre-defined queries and pre-defined
dashboards. For more on the hypothetical application of the NSP Security Model, see Profile 1 and
Profile 2.
Figure 9: Profile Overview
Notes:
• A role can be mapped to more than one profile.
• A profile should include, at the minimum, one role for application/feature access and one role for
data access.
• Many users can share the same profile.
For information on setting up Security in NSP, see “Using the Security Application."
Profile 1
Profile - PrfNetManager
Access Control privileges - for authorization roles NSPConfigManager and NSPBusinessManager.
(These roles have almost no restriction on feature access.)
Privacy role - PrivNET
Profile 2
Profile - PrfNetUsers
Access Control privileges - for authorization role NSPBusinessUser. (Users with this profile can execute
queries on sessions and can view dashboards.)
Privacy role - PrivNET
910-6512-001 Revision A, August 2012
29
Chapter
3
Using the Security Application
Topics:
•
•
•
•
•
•
•
•
•
Overview.....31
Opening the Security Application.....31
Managing Users.....31
Managing Privacy Roles.....34
Managing Profiles.....35
Managing Object Privacy.....37
Managing Login.....40
Transferring Ownership.....43
Importing and Exporting User Data.....44
910-6512-001 Revision A, August 2012
30
Using the Security Application
Overview
NSP Security features are created and managed directly through the Web interface using the Security
application. Once profiles, roles, and users have been defined, you can configure Privacy settings for
the data.
Users must be authenticated to use NSP. A user is an individual or a group that has a unique userid
and password.
Note: Do not use the Function Keys (F1 through F12) when using NSP. Function keys work in
unexpected ways. For example, the F1 key does not open NSP help but opens the help for the browser
in use. The F5 key does not refresh a specific screen, but refreshes the entire session and results in a
loss of any entered information.
Opening the Security Application
To open the NSP Security application, follow these steps:
Note: NSP only supports versions of IE 7.0 or later and Firefox 3.6 or later. Before using NSP, turn
off the browser pop up blocker for the NSP site.
1. Log in to NSP.
The Application Board is displayed.
2. Click the Security icon.
The Security application is opened and the Users page is displayed.
Managing Users
In the NSP Security application, you can manage users by
•
•
•
•
Viewing users
Adding users
Modifying users
Removing users
For more information about the role of users in NSP Security, see “Users.”
Viewing Users
The NSP Administrator can see a list of all defined users on the Users page.
In the Security menu, select Display ➤ Users.
The Users page is displayed.
Note: The Users page is the default view when the Security application is activated.
910-6512-001 Revision A, August 2012
31
Using the Security Application
Table 10: Columns in the Users table
Column Name
Description
User Name
The user's name as defined when the record is
created.
Description
A brief explanation entered when the record is
created.
Mail
The user's email address
Profile
The profile to which the user is assigned. For
more information, see Managing Profiles.
Access Status
Restricted access (user allowed to log in NSP
under controlled access conditions). This status
is useful for troubleshooting.
Built-in (profile cannot be modified).
Locked (too many invalid login attempts).
Use the unlock button to reset.
Inactive (password is expired). Use the reset
password botton to reset.
Externally managed user.
Last Login
Date and time stamp for user's most recent login.
Sessions
Number of tokens the current user has in use.
Adding Users
The NSP Administrator can add users for the NSP applications. Complete these steps to create a new
user.
1. In the Security menu, select Display ➤ Users.
The Users page is displayed.
2.
Click the Add Record icon.
The User settings window is displayed.
3. Enter the name of the user in the Name field.
The system allows a maximum of 30 alphanumeric characters. Special characters (e.g., + or *) are
not allowed, with the exception of a period (.) or hyphen (-).
4. Type the password in the Password field.
910-6512-001 Revision A, August 2012
32
Using the Security Application
You can make up a password or click the Automatic password icon
password.
for a system-generated
5. Enter the same password in the Confirm Password field.
6. Enter a description (optional) for the user.
The system allows a maximum of 255 alphanumeric characters.
7. Enter the email address for the user.
8. Assign a user profile from the Profile drop-down menu.
9. If the user should have restricted access, check the Restricted access box.
10. Click Apply to save the data.
You are returned to the User page, and the new user record is displayed at the bottom of the Users
list.
Modifying Users
The NSP Administrator can modify existing user records.
1. In the Security menu, select Display ➤ Users.
The Users page is displayed.
2. Select the user record to be modified.
3.
Click the Edit Record icon.
The User settings window is displayed with data fields populated.
4. Make the necessary changes to the record.
See Adding Users for an explanation of the fields.
5. Click Apply.
The record displayed in the list reflects the changes.
Removing Users
The NSP Administrator can remove user records. Complete these steps to remove a user.
Note: A user who owns objects cannot be deleted until the ownership is transferred. The following
error message is displayed: "Unable to delete an owning user (try to transfer ownership)." To transfer
ownership, see Changing Object Privacy.
1. In the Security menu, select Display ➤ Users.
The Users page is displayed.
2. In the Users list, select the User record to be removed.
3.
Click the Delete Record icon.
4. Click OK at the prompt.
The record for that User is deleted from the Users list.
910-6512-001 Revision A, August 2012
33
Using the Security Application
Managing Privacy Roles
The NSP Security application supports Privacy Role management through the following activities:
•
•
•
•
Viewing Privacy Roles
Adding Privacy Roles
Modifying Privacy Roles
Removing Privacy Roles
For more information about profiles in NSP Security, see “Managing Object Privacy."
Viewing Privacy Roles
The NSP Administrator can view all defined Privacy Roles. Complete this action to open the Privacy
roles page:
In the Security menu bar, select Display ➤ Privacy Roles
Table 11: Privacy Role Columns
Column Name
Description
Role
The name of the privacy role as defined when the
record is created.
Description
A brief summary entered when the record is
created.
Users
The number of users granted this role through
their profiles.
Objects
The number of data objects linked to this role.
Creating Privacy Roles
The NSP Administrator can add new Privacy Roles. Complete these steps to create a Privacy Role:
1. In the Security menu bar, select Display ➤ Privacy roles.
The Privacy role page is displayed.
2.
Click the Add Record icon
.
The Privacy role settings window is displayed.
3. Enter the Name of the Privacy role.
4. Enter a Description. (optional).
5. Click Apply to save the Privacy role data.
You are returned to the Privacy roles page, where the new record is listed.
910-6512-001 Revision A, August 2012
34
Using the Security Application
Modifying Privacy Roles
The NSP Administrator can modify existing Privacy Role records. Complete these steps to modify a
privacy role:
1. In the Security menu bar, select Display ➤ Privacy roles.
The Privacy roles page is displayed.
2. Select the User record to be modified.
3.
Click the Edit Record icon
.
The Privacy roles settings window is displayed with data fields populated.
Figure 10: Privacy Roles Settings Window
4. Make the necessary modifications.
5. Click Apply to save the updated information.
You are returned to the Privacy roles page, where the the list reflects the changes.
Removing Privacy Roles
The NSP Administrator can remove Privacy Roles. Complete these steps to remove a privacy role:
1. Select Display ➤ Privacy roles .
The Privacy roles page is displayed.
2. Select the User record to be removed.
3. Click the Delete Record icon.
4. Click OK at the prompt.
The Privacy roles list is modified to remove the record.
Managing Profiles
The NSP Security application supports Profile management through the following activities:
• Viewing Profiles
• Adding Profiles
910-6512-001 Revision A, August 2012
35
Using the Security Application
• Modifying Profiles
• Removing Profiles
For more information about profiles in NSP Security, see “Profiles.”
Viewing Profiles
The NSP Administrator can view all defined profiles.
Select Display ➤ Profiles .
The Profiles list is displayed.
The three columns in the Profiles page are described below:
Table 12: Columns in Profiles Page
Column Name
Description
Profile Name
The name given to the profile when the record
is created
Description
A brief summary entered when the record is
created
Users
The number of users assigned to each profile
Creating Profiles
The NSP Administrator can create new profiles. Authorization roles and privacy roles are assigned
to a profile in the system (but are not visible in the profile record in the Profiles listing). Complete
these steps to create a profile:
1. In the Security menu bar, select Display ➤ Profiles .
2.
Click the Add Record icon
.
The Profile settings window is displayed with the General page active by default.
3. Enter the profile Name.
The system allows a maximum of 30 alphanumeric characters. Special characters (e.g., + or *) are
not allowed, with the exception of a period (.) or hyphen (-).
4. Enter a Description (optional).
5. Click the Roles tab.
The Roles page is displayed.
6. In the Authorization section, click the box beside the appropriate Authorization role(s) for the
profile.
Authorization roles are predefined by the system.
7. In the Privacy section, click the box(es) beside the appropriate Privacy role(s) for the profile.
Privacy roles are defined in “Creating Privacy Roles”
8. Click the Applications tab.
The Applications page is displayed.
910-6512-001 Revision A, August 2012
36
Using the Security Application
9. Click the box beside any applications to which this profile should not have access.
10. Click Apply to save the profile data.
The new record is displayed at the bottom of the Profiles list.
Modifying Profiles
The NSP Administrator can modify existing profile records. Complete these steps to modify a profile:
1. In the Security menu bar, select Display ➤ Profiles.
2. Select the record to be modified.
3.
Click the Edit Record icon
.
The Profile settings window is displayed.
4. Make the necessary modifications.
See Creating Profiles for information on the options in the Profile settings window.
5. Click Apply to save the updated information.
The record, with changes, is displayed in the list.
Removing Profiles
The NSP Administrator is permitted to remove profile records. Complete these steps to remove a
profile.
1. In the Security menu bar, select Display ➤ Profiles.
2. Select the record in the list to be modified.
3.
Click the Delete Record icon
.
4. Click OK at the prompt.
The profile is deleted.
Managing Object Privacy
When a user tries to access an object in an NSP application, NSP checks access rights. Access rights
are established by one of the following:
• System defaults (RWX for owner and administrator), or
• Settings customized by the object owner
Note: R=Read, W=Write, and X=eXecute.
Privileges for one object are automatically calculated based on other related objects. One change in
Privacy for an object can be cascaded to many others. Thus, to perform a task, you may have to verify
privileges of multiple objects. This chain of Privacy is called "Privacy dependencies."
910-6512-001 Revision A, August 2012
37
Using the Security Application
Table 13: Privacy Dependencies in NSP
Object
Dependency
Node
Signaling Point (SP)
Signaling Point
Connected Linksets
Network View
Contained XDR session or view
Statistic session
ProTraq configuration
Protraq alarms
ProTraq configuration
The following tables list the cases in which there is a Privacy dependency.
Note: If a case is not listed in one of the tables, the object just depends on Simple Privacy.
Table 14: Configure and Execute a Query
Object
Configure
Execute
Comment
Session
R
R+X
Applies to all sessions of the view if the
view is used
Query
R+W
R+X
N/A
Table 15: Configure and Display a ProPerf Dashboard
Object
Configure
Execute
Comment
Dashboard
R+W
R+X
N/A
Session
R
R
N/A
Table 16: Associate A ProTraq Configuration
Object
Configure
Comment
ProTraq
Configuration
R+W
N/A
Session
R
N/A
IXP
R
N/A
Table 17: View Alarms in Map
Object
View
Comment
Map
R+X
N/A
Managed Object
R
N/A
910-6512-001 Revision A, August 2012
38
Using the Security Application
Viewing Data Objects
The NSP Administrator can display summary records for all defined data objects. When data objects
are created in NSP applications (for example, traffic classifications in Centralized Configuration
Manager), the Security application adds the object records to a list. When the owner removes that
object, the object's record is removed from the list. Perform this action to view a list of data objects.
Select Display ➤ Objects.
Table 18: Columns in Objects List
Column Name
Description
Object
The name of the object as defined when the record is created.
Type
A brief summary entered when the record is created.
Owner
The user who creates the object or to whom ownership is transferred. The owner
has full access privileges to that record.
State
The status of the object: M=Modified, N=Normal, O=Obsolete.
Created
Date stamp showing when the object was created.
Setting Default Privileges for Objects
See Setting Default Object Privacy.
Changing Object Privacy
The NSP Administrator and data object owners can modify existing Object Privacy settings using the
Security application. The Administrator has access to all listed objects. The owner has access to those
records which identify him or her as the owner.
Complete these steps to change data Object access privileges.
1. In the Security menu bar, select Display ➤ Objects.
The Objects page is displayed.
2. Select the Object record or records.
If you are using Internet Explorer, you can select multiple records by pressing CTRL while selecting
the records.
3.
Click the Privacy icon.
The Change privacy window is displayed.
Note: If an individual record is selected, the current settings are shown. If multiple records are
selected, the initial view of the settings shows unselected boxes because the individual settings
vary.
4. Click the box for the appropriate Privacy setting .
5. Click Apply to save the changes.
910-6512-001 Revision A, August 2012
39
Using the Security Application
Managing Login
The NSP Security Application supports user authentication in the following activities:
•
•
•
•
Configuring passwords
Setting restricted access groups
Monitoring purchased tokens (licenses)
Setting the Security notice
For more information about user authentication, see “ NSP Security Model."
Configuring Password Requirements
The NSP Administrator can set password requirements for the NSP system, including number and
type of characters, lifetime of the password before it must be changed, and whether it is generated
manually or automatically. Complete these steps to set password requirements.
1. In the Security Menu, select Action ➤ Password Settings .
The Password settings dialog is displayed.
2. Enter the appropriate values in the fields. The options are described in this table.
Table 19: Password Settings
Field or Option
Explanation
Minimum length
Minimum number of characters for password; must be at least 8.
Check quality
Defines what aspects of the password the system should check: default
is to check on password length and strong is to check length, mix of
characters, and history. "Mix" must include uppercase and lowercase
letters, numbers, and special characters. "History" check means the
password has not been used for the last x times.
History size
Number of previously used passwords to check for (in Check quality).
Minimum age
Minimum delay between two password changes. (To change the
password again, the user must wait at least this amount of time.)
Maximum age
Password lifetime before it expires.
Grace period
Delay for changing expired password. After the password expires, the
grace period allows the user to login, but requires the password to be
changed. After the password expires, and after the grace period expires,
the user will not be able to login (the account is locked).
Expire warning
Time (prior to password expiration) when the user begins to get warning
notices.
Mode
Defines whether a password (initial or reset) is set manually or
automatically.
Must change
Denotes whether a password (initial or reset) is temporary. A temporary
password must be reset when the user first uses it.
910-6512-001 Revision A, August 2012
40
Using the Security Application
3. To save the new settings to the system, click Apply.
Resetting User Passwords
The NSP Administrator uses the Security ➤ Users page in NSP to reset passwords.
Complete these steps to reset a password.
1. In the Security Users page, click a User Name in the list of Users .
2.
Click the reset password icon
.
The Password Reset dialog is displayed with the current user Name already filled in.
3. Type the password in the Password field.
You can make up a password or click the Automatic password icon
password.
for a system-generated
4. Type the same new password in the Confirm password field.
5. Click Apply.
The change takes effect the next time the user logs in to NSP.
Setting Access Level
This procedure gives the NSP Administrator the ability to restrict access to the NSP system at login.
Users with restricted access can use the system even when access is being controlled. Complete these
steps to set the access level for a user.
1. In the Security menu, select Action ➤ Filter access .
The Filter user access window is displayed.
Figure 11: Filter User Access Window
2. To restrict access, select Restricted access users in the drop-down menu. To allow unrestricted
access, select All users in the drop-down menu. (All users is the default.)
3. Click Apply.
The change takes effect the next time the user logs in to NSP.
Monitoring Purchased Tokens (Licenses)
The NSP Administrator can view system settings for the number of purchased tokens (licenses), the
maximum number of tokens allowed per user, and the session timeout. These tokens are assigned to
910-6512-001 Revision A, August 2012
41
Using the Security Application
active sessions and control the number of simultaneous users. The session timeout setting ranges from
15 minutes to 8 hours. The session timeout default setting is 1 hour.
Note: The information in the Tokens window cannot be modified in this window. This is a view-only
window.
To view the Tokens dialog, perform the following steps:
1. In the Security menu, select Action ➤ Manage tokens.
The Tokens dialog is displayed.
2. Click Close to close the window.
Forcing Disconnect
The NSP Administrator is able to free user tokens (licenses) by forcing disconnection of users.
1. In the Security Users page, select the user to be disconnected .
2.
Click the Logout icon
in the Security toolbar to disconnect the user from the active NSP
session.
The disconnected user’s screen displays an error message on its next Web update. The system
returns the session’s tokens to the token pool.
Setting the Security Notice
The NSP Administrator can modify the Security Notice, which is displayed on the login page.
1. In the Security menu, select Action ➤ Security Notice .
The Security notice window is displayed.
Figure 12: Security Notice Window
2. Enter the appropriate text in the Notice field.
3. Click Apply.
The notice is saved and is displayed at the bottom of the NSP login screen for all users.
Note: The system allows only 255 alphanumeric characters.
910-6512-001 Revision A, August 2012
42
Using the Security Application
Transferring Ownership
The NSP Administrator can change ownership for one or more data objects owned by a particular
user. For example, an individual has left the company and a different employee needs to take over all
the objects.
The NSP Administrator can also change the ownership for a selected object or objects. For example,
an individual has shifted responsibilities and another employee needs to take over the affected rights.
Changing Overall Ownership
The NSP Administrator can change ownership for all of an individual's objects.
To change the owner Privacy rights, complete the following steps.
1. In the Security menu bar, select Action ➤ Transfer ownership.
The Privacy owner change window is displayed.
Figure 13: Privacy Owner Change Window
2. Select the current owner from the Current Owner drop-down list.
3. Select the new owner from theNew Owner drop-down list..
4. Click Apply .
The changes are saved. All of the previous owner's objects are now under new ownership.
Changing Ownership by Object
To change the owner Privacy rights by object, follow these steps:
1. In the Security menu bar, select Display ➤ Objects.
The Objects list is displayed.
2. Select the object record or records for which the ownership is to be changed.
3.
Click the Owner icon.
The Privacy owner change window is displayed.
4. Select the new owner from the New Owner drop-down list.
5. Click Apply .
The changes are saved. Ownership for the selected record(s) is changed.
910-6512-001 Revision A, August 2012
43
Using the Security Application
Note: This procedure is different from changing all objects from one owner to another. See Changing
Overall Ownership.
Importing and Exporting User Data
The NSP Security application enables the NSP Administrator to import user data, including user
definitions, passwords, email address, roles, and profiles. The Security application also enables
exporting of these types of data. The imported and exported data are in Comma-Separated Values
(CSV) format.
Importing User Data
To import User data, follow these steps.
Note: If you have added user data to the CSV file, you must first open the file in a text editor and
delete the extra commas at the end of the row for that user data. Then you can import the file. (Excel
adds the commas, but they are not visible in Excel.)
1. Select File ➤ Import in the Security Menu.
The Import security data dialog is displayed.
2. Click Browse beside Users data file. This is a required field.
A browsing dialog is displayed.
3. Find and select the CSV file you want to import.
NAME;DESCRIPTION;PASSWORD;MAIL;PROFILE
Blake;;myPwd;[email protected];nspAdmin
Figure 14: Sample CSV File (for Users)
4. Repeat steps Step 2 and Step 3 to find and select a Roles file and Profiles file, if you want to import
these.
5. Click Apply.
A message is displayed indicating that the import is in process. The files are added to the user
information in the database.
Exporting User Data
To export User Data, which includes user definitions, passwords, email addresses, and profiles, perform
these steps:
1. Click File ➤ Export users in the NSP Security menu.
A File Download dialog is displayed with options to Open, Save, or Cancel.
2. Click the appropriate option.
If you choose to Open the file, the User data is displayed in CSV format. You can then save the file.
A dialog is displayed for you to choose where the file will be saved.
910-6512-001 Revision A, August 2012
44
Using the Security Application
Exporting Profiles
To export existing NSP Profiles, which include Profile descriptions and associated roles, perform these
steps:
1. Click File ➤ Export profiles in the NSP Security menu.
A File Download dialog is displayed with options to Open, Save, or Cancel.
2. Click the appropriate option.
If you choose to Open the file, the Profile data is displayed in CSV format. You can then save the
file. If you choose to Save the file, a dialog is displayed for you to choose where the file will be
saved.
Exporting Roles
To export existing NSP Roles and their descriptions, perform these steps:
1. Click File ➤ Export roles in the NSP Security menu.
A File Download dialog is displayed with options to Open, Save, or Cancel.
2. Click the appropriate option.
If you choose to Open the file, the Role data is displayed in CSV format. You can then save the file.
If you choose to Save the file, a dialog is displayed for you to choose where the file will be saved.
910-6512-001 Revision A, August 2012
45