1
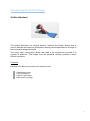
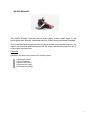
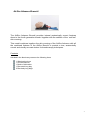
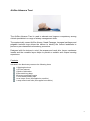
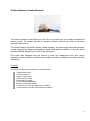
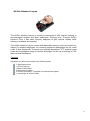
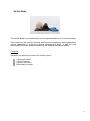
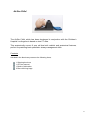
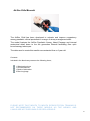
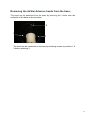
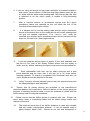
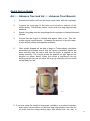
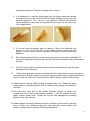
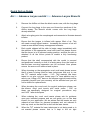
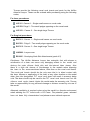
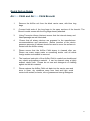
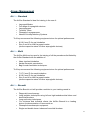
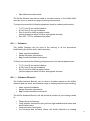
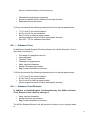
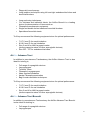
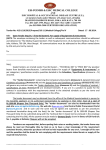
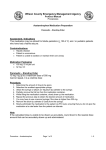
AirSim Range User Manual Version 4:5 Table of Contents Introduction Introducing the AirSim range 2 3 Quick set up guides AirSim Standard, Multi & Bronchi 17 AirSim Advance 18 AirSim Advance Bronchi 18 AirSim Advance Crico 20 AirSim Advance Crico Bronchi 20 AirSim Advance Traci 23 AirSim Advance Traci Bronchi 23 AirSim Advance Combo 26 AirSim Advance Combo Bronchi 26 AirSim Advance Larynx 29 AirSim Baby 31 AirSim Pierre Robin 32 AirSim Child 33 AirSim Child Bronchi 33 Airway management 34 Care and maintenance 42 Warranty 43 1 Introduction Designed and produced by TruCorp, the AirSim range brings highly realistic and fully functional airway training systems to the market. The main and most important component of the AirSim range is the unique AirSim airway. This is a faithful reproduction of the human airway anatomy and as such is invaluable as a training aid to facilitate the learning and development of airway management skills for all health professionals. The innovated development and manufacture approach used makes the AirSim airway unique. The main features of the AirSim Airway which makes it unique include; The airway is moulded from a master which was created from data collected from a CT scan of a person. The one piece mould together with the sophisticated dipping procedure during manufacture makes possible much of the realism offered. Integrated one functionality. piece and seamless construction for real life 2 Introducing the AirSim Range AirSim Standard The AirSim Standard, our original product, features the AirSim Airway and is used to educate and improve competency among clinical specialists in a range of basic airway management skills. The novel neck construction allows the head to be moved and secured in a number of positions. This ranges from the standard “sniffing” position to more difficult scenarios. Contents Included in the black carry case are the following items 1 Shipping brochure 1 CD user manual 1 Bottle of lubrication 3 Blue adult lung bags 3 AirSim Multi The AirSim Multi features the AirSim Airway and Nasal Passage, providing realism and functionality to offer the user tactile feedback. The novel neck construction allows the head to be moved and secured in a number of positions. This ranges from the standard “sniffing” position to more difficult scenarios. Contents Included in the black carry case are the following items 1 Shipping brochure 1 CD user manual 1 Bottle of lubrication 3 Blue adult lung bags 4 AirSim Bronchi The AirSim Bronchi features internal anatomically correct detail down to the fourth generation Bronchi, combined with the AirSim Airway and Nasal Passage. The model provides exceptional detail in both internal and external features; the carina, the bronchus and bronchioles can be clearly identified through the use of a fibre optic laryngoscope. Contents Included in the black carry case are the following items 1 Shipping brochure 1 CD user manual 1 Bottle of lubrication 1 Blue adult lung bag 2 Blue baby lung bags 5 AirSim Advance The AirSim Advance features the AirSim Airway and Nasal Passage providing a realistic manikin to educate and improve competency among clinical specialists in a range of airway management skills. The ‘real feel’ high quality silicone material used on the AirSim Advance is both durable and realistic allowing for a life like training experience. Contents Included in the black carry case are the following items 1 Shipping brochure 1 CD user manual 1 Bottle of lubrication 3 Blue adult lung bags 6 AirSim Advance Bronchi The AirSim Advance Bronchi provides internal anatomically correct features down to the fourth generation bronchi together with the addition of the ‘real feel’ skin covering. This model combines together the skin covering of the AirSim Advance with all the combined features of the AirSim Bronchi to provide a true, anatomically correct and visually accurate trainer for bronchoscopy techniques. Contents Included in the black carry case are the following items 1 Shipping brochure 1 CD user manual 1 Bottle of lubrication 1 Blue adult lung bag 2 Blue baby lung bags 7 AirSim Advance Crico The AirSim Advance Crico features the AirSim Airway and Nasal Passage for education in a range of airway management skills. An anatomically accurate simulated cricoid, laryngeal cartilages and tracheal rings allows the trainee to identify the correct landmarks to perform a cricothyroidotomy procedure. The model was designed with the trainee in mind, the wraparound neck skin, larynx membrane inserts and the reusable crico larynx helps to provide a realistic and unique learning experience. Contents Included in the black carry case are the following items 1 Shipping brochure 1 CD user manual 1 Bottle of lubrication 3 Blue adult lung bags 1 roll of airway sealing tape 30 Larynx membrane inserts 1 Crico larynx cover (as supplied on manikin) 1 wrap around neck skin (as supplied on manikin) 8 AirSim Advance Traci The AirSim Advance Traci is used to educate and improve competency among clinical specialists in a range of airway management skills. The anatomically correct AirSim Airway, Nasal Passage, laryngeal cartilages and palpable tracheal rings allows the trainee to identify the correct landmarks to perform a percutaneous tracheostomy procedure. Designed with the trainee in mind, the wraparound neck skin, larynx membrane inserts and the reusable larynx helps to provide a realistic and unique learning experience. Contents Included in the black carry case are the following items 1 Shipping brochure 1 CD user manual 1 Bottle of lubrication 3 Blue adult lung bags 30 Larynx membrane inserts 1 roll of airway sealing tape 1 traci larynx cover (as supplied on manikin) 1 wrap around neck skin (as supplied on manikin) 9 AirSim Advance Combo The AirSim Advance Combo combines the uniquely constructed AirSim airway with the enhanced addition of simulated cricoid, tracheal rings and laryngeal cartilage. This combination of features delivers a high quality solution for realistic needle/ surgical Cricothyroidotomy and Percutaneous Tracheostomy training. Contents Included in the black carry case are the following items 1 Shipping brochure 1 CD user manual 1 Bottle of lubrication 3 Blue adult lung bags 1 roll of airway sealing tape 30 Larynx membrane inserts 1 Combo larynx cover (as supplied on manikin) 1 wrap around neck skin (as supplied on manikin) 10 AirSim Advance Combo Bronchi The AirSim Advance Combo Bronchi is the ‘All in one’ trainer for your airway management training needs, the model provides a complete solution without the need to purchase separate task trainers. The model features the AirSim Airway, Nasal passage, an anatomically accurate simulated cricoid, laryngeal cartilages and palpable tracheal rings with the addition of a bronchi which gives anatomical details down to the fourth generation. The model was designed with the trainee in mind, the wraparound neck skin, larynx membrane inserts and the reusable larynx helps to provide a realistic and unique learning experience. Contents Included in the black carry case are the following items 1 Shipping brochure 1 CD user manual 1 Bottle of lubrication 1 Blue adult lung bag 2 Blue baby lung bags 1 roll of airway sealing tape 30 Larynx membrane inserts 1 combo larynx cover (as supplied on manikin) 1 wrap around neck skin (as supplied on manikin) 11 AirSim Advance Larynx The AirSim Advance Larynx is uniquely constructed to offer realistic training in microlaryngeal surgical and laser techniques. Evolving from Trucorp’s AirSim Advance Crico it has been uniquely designed to give optimal realism while training in a theatre environment. The AirSim Advance Larynx comes with disposable silicone vocal cord inserts for training in surgical techniques for removing cancerous pathologies on the vocal cords. It also comes with Trucorp’s new specially developed “TLT” material vocal cords which highlight a range of cancers and polyps for the use of training in CO2 laser removal techniques. Contents Included in the black carry case are the following items 1 Shipping brochure 1 CD user manual 1 Bottle of lubrication 3 Blue adult lung bags 3 overlay neck skins ( 1 supplied on model and two spare) 1 of each type of silicone insert 12 AirSim Baby The AirSim Baby is an anatomically correct representation of a 6 month old baby. This model can be used to educate and improve competency among paediatric clinical specialists in a range of airway management skills. It has the most anatomically accurate airway available on the medical simulation market. Contents Included in the black carry case are the following items; 1 Shipping brochure 1 CD user manual 1 Bottle of lubrication 2 Blue baby lung bags 13 AirSim Pierre Robin The AirSim Pierre Robin has been developed in collaboration with the Children’s Hospital Los Angeles to highlight difficult airway management techniques on a 6 month old baby with Pierre Robin Sequence. The models anatomically correct airway allows the trainee to identify congenital defects including significant Mandibular Hypoplasia, Glossoptosis, Cleft palate and bifid uvula. Contents Included in the black carry case are the following items; 1 Shipping brochure 1 CD user manual 1 Bottle of lubrication 2 Blue baby lung bags 14 AirSim Child The AirSim Child, which has been developed in conjunction with the Children’s Hospital Los Angeles is based on true CT data. This anatomically correct 6 year old has both realistic and anatomical features, perfect for practicing basic paediatric airway management skills. Contents Included in the black carry case are the following items; 1 Shipping brochure 1 CD user manual 1 Bottle of lubrication 2 Blue child lung bags 15 AirSim Child Bronchi The AirSim Child has been developed to educate and improve competency among paediatric clinical specialists in a range of airway management skills. The model features the AirSim Paediatric Airway, Nasal Passage and internal anatomical detail down to the 4th generation Bronchi facilitating fibre optic bronchoscopy techniques. The data used to create this manikin was extracted from a 6 year old. Contents Included in the black carry case are the following items; 1 Shipping brochure 1 CD user manual 1 Bottle of lubrication 2 Blue lung bags PLEASE NOTE THAT MOUTH TO MOUTH RESUSCITATION TRAINING IS NOT RECOMMENDED ON THESE MODELS AS THE AIRWAY AND LUNGS ARE NOT DISPOSABLE OR REPLACEABLE. 16 Quick Set up Guide AirSim Standard, Multi and Bronchi 1. Remove the AirSim unit from the black carrier case, with the lung bags. 2. Connect the lung bags to the open end bronchus sections of the AirSim airway. The Bronchi model comes with the lung bags already attached. 3. Attach a lung bag onto the oesophageal end connector to illustrate stomach inflation. 4. Ensure that the tongue is inflated with approx 20ml of air. This will create normal lingual tension. Increasing the amount of air will create a more difficult airway management scenario. 5. The neck can be adjusted and locked using the ‘Wing nut’ tensioner. Using this neck lock system, the head can be accurately placed in the ‘sniffing’ position. 6. Using Trucorp’s silicone lubricant ensure that the internal airway is well lubricated including the tongue, hard palate, back of the mouth and epiglottis. If appropriate ensure that the nasal passage is lubricated. 7. Ensure that all airway devices are prepared to the manufactures recommendations and instructions. Before insertion of the device generous amounts of lubricant should be used to cover the surfaces in contact with the AirSim airway. 8. Please ensure that the AirSim airway is cleaned after use. Please use warm soapy water or something similar until all visible foreign matter and residue is removed. 9. Please replace the AirSim unit back into the carrier case and store in clean, dry conditions away from heat and light; avoid contact with metals, solvents, oils or greases and strong detergents. 17 Quick Set up Guide AirSim Advance and AirSim Advance Bronchi 1. Remove the AirSim unit from the black carrier case, with the lung bags. 2. Connect the lung bags to the open end bronchus sections of the AirSim airway. The Bronchi model comes with the lung bags already attached. 3. Attach a lung bag onto the oesophageal end connector to illustrate stomach inflation. 4. Ensure that the tongue is inflated with approx 20ml of air. This will create normal lingual tension. Increasing the amount of air will create a more difficult airway management scenario. 5. Using Trucorp’s silicone lubricant ensure that the internal airway and Nasal passage are well lubricated. 6. Ensure that all airway devices are prepared to the manufactures recommendations and instructions. Before insertion of the device generous amounts of lubricant should be used to cover the surfaces in contact with the AirSim airway. 7. Please ensure that the AirSim airway is cleaned after use. Please use warm soapy water or something similar until all visible foreign matter and residue is removed. 8. The head and neck skin of the models are made from durable and very elastic polyurethane material. It can be cleaned using a lightly soaped, damp cloth. Please do not use and detergents or cleaning agents on the skin material or the airway. 9. Please replace the models unit back into the carrier case and store in clean, dry conditions away from heat and light; avoid contact with metals, solvents, oils or greases and strong detergents. 18 Removing the AirSim Advance heads from the base; The head can be detached from the base by removing the 3 bolts from the underside of the base as shown below. 3 2 1 The head can be reattached to the base by attaching screws in positions 1 & 2 before attaching 3. 19 Quick Set up Guide AirSim Advance Crico and AirSim Advance Crico Bronchi 1. Remove the AirSim unit from the black carrier case, with the lung bags. 2. Connect the lung bags to the open end bronchus sections of the AirSim airway. The Bronchi model comes with the lung bags already attached. 3. Attach a lung bag onto the oesophageal end connector to illustrate stomach inflation. 4. Ensure that the tongue is inflated with approx 20ml of air. This will create normal lingual tension. Increasing the amount of air will create a more difficult airway management scenario. 5. Each model shipped will be able to begin a Cricothyroidotomy procedure immediately but please ensure that the Larynx membrane inserts are fitted correctly onto the larynx and that the larynx is aligned on the airway correctly. The Larynx should be pushed up tight against the sternum as shown below. When the model is positioned into the sniffing position the pre cut holes will align up correctly and the model will be ready for use. 20 6. If you are using the model for bag mask ventilation or tracheal intubation and need a visual inflation of the blue lung bags please cover the pre cut holes with the white airway sealing tape. Also ensure that the skin is attached to all the velcro points to enable a fully functioning product. 7. After a nominal amount of procedures ensure that the Larynx membrane inserts are replaced as this will affect the feel of the Cricothyroid membrane upon incision 8. It is advised not to use the sealing tape and the larynx membrane sheets at the same time on the model as this will cause wastage and not give the desired experience. T h e L a r y n x c a n easily be removed and another larynx membrane insert can be inserted into the larynx for the next user. (see images below) 9. If you are using the sealing tape cut approx 5-6cm and attached over the pre cut Cric hole in the airway. Please ensure that the airway is clean and dry before attaching the tape to ensure secure tape adhesion. 10. Each replaceable neck skin can be easily removed and a new piece attached and we hope that it will last up to 25 times before needing replaced. To ensure a completed fully functional neck skin, all velcro locations must be attached to the skin. 11. Using Trucorp’s silicone lubricant ensure that the internal airway and the nasal passage is well lubricated. 12. Ensure that all airway devices are prepared to the manufactures recommendations and instructions. Before insertion of the device generous amounts of lubricant should be used to cover the surfaces in contact with the AirSim airway and Cricothyroid membrane. 13. Please ensure that the AirSim airway is cleaned after use. Please use warm soapy water or something similar until all visible foreign matter and residue is removed. 14. The head and neck skin of the AirSim Advance is made from durable and very elastic polyurethane material. It can be cleaned using a lightly soaped, damp cloth. Please do not use and detergents or 21 cleaning agents on the skin material. 15. Please replace the AirSim Advance Crico unit back into the carrier case and store in clean, dry conditions away from heat and light; avoid contact with metals, solvents, oils or greases and strong detergents Trucorp provide the following spare parts for the AirSim Advance Crico. These can be ordered while purchasing using the following codes; RSN1005 Wrap around Neck Skin Attachments (pack of 5) LA2000 Replaceable Crico Larynx- Anatomical Larynx containing the Thyroid Cartilage, pre cut Cricothyroid membrane and Cricothyroid cartilage. ST1000 Sealing Tape- Sealing tape used to cover the pre cut holes on the airway to allow bag mask ventilation and visible lung bags inflation. LMS2050 Larynx Membrane inserts (pack of 50) – Larynx Membrane inserts are used to replicate the Cricothyroid membrane while attached into the replaceable larynx. This interchangeable part can be rotated to get further uses. SFT1005 Subcutaneous Fat Tissue (pack of 5) 22 Quick Set up Guide AirSim Advance Traci and AirSim Advance Traci Bronchi 1. Remove the AirSim unit from the black carrier case, with the lung bags. 2. Connect the lung bags to the open end bronchus sections of the AirSim airway. The Bronchi model comes with the lung bags already attached. 3. Attach a lung bag onto the oesophageal end connector to illustrate stomach inflation. 4. Ensure that the tongue is inflated with approx 20ml of air. This will create normal lingual tension. Increasing the amount of air will create a more difficult airway management scenario. 5. Each model shipped will be able to begin a Tracheostomy procedure immediately but please ensure that the Larynx membrane inserts are fitted correctly onto the larynx and that the larynx is aligned on the airway correctly. The Larynx should be pushed up tight against the sternum as shown below. When the model is positioned into the sniffing position the pre cut holes will align up correctly and the model will be ready for use. 6. If you are using the model for bag mask ventilation or tracheal intubation and need a visual inflation of the blue lung bags please cover the pre cut holes with the airway sealing tape. Also ensure that the skin is 23 attached to all the velcro points to enable a fully functioning product. 7. After a nominal amount of procedures ensure that the Larynx membrane inserts are replaced as this will affect the feel of the Tracheal cartilage upon incision 8. It is advised not to use the sealing tape and the larynx membrane sheets at the same time on the model as this will cause wastage and not give the desired experience. T h e L a r y n x c a n easily be removed and another larynx membrane insert can be inserted into the larynx for the next user. (see images below) 9. If you are using the sealing tape cut approx 5-6cm and attached over the pre cut traci hole in the airway. Please ensure that the airway is clean and dry before attaching the tape to ensure secure tape adhesion. 10. Each replaceable neck skin can be easily removed and a new piece attached. To ensure a completed fully functional neck skin, all velcro locations must be attached to the skin. 11. Using Trucorp’s silicone lubricant ensure that the internal airway and the nasal passage is well lubricated. 12. Ensure that all airway devices are prepared to the manufactures recommendations and instructions. Before insertion of the device generous amounts of lubricant should be used to cover the surfaces in contact with the AirSim airway and the Tracheal rings. 13. Please ensure that the AirSim airway is cleaned after use. Please use warm soapy water or something similar until all visible foreign matter and residue is removed. 14. The head and neck skin of the AirSim Advance Traci is made from durable and very elastic polyurethane material. It can be cleaned using a lightly soaped, damp cloth. Please do not use and detergents or 24 cleaning agents on the skin material 15. Please replace the AirSim Advance Traci unit back into the carrier case and store in clean, dry conditions away from heat and light; avoid contact with metals, solvents, oils or greases and strong detergents TruCorp provide the following spare parts for the AirSim Advance Traci. These can be ordered while purchasing using the following codes; RSN1005 Wrap around Neck Skin Attachments (pack of 5) TT200 Replaceable Traci Larynx- Anatomical Larynx containing the Thyroid Cartilage and pre cut tracheal ring. ST1000 Sealing Tape Sealing tape used to cover the pre cut holes on the airway to allow bag mask ventilation and visible lung bags inflation LMS2050 Larynx Membrane inserts (pack of 50) – Larynx Membrane inserts are used to replicate the Tracheal cartilage while attached into the replaceable larynx. This interchangeable part can be rotated to get further uses. SFT1005 Subcutaneous Fat Tissue (pack of 5) 25 Quick Set up Guide AirSim Advance Combo and AirSim Advance Combo Bronchi 1. Remove the AirSim unit from the black carrier case, with the lung bags. 2. Connect the lung bags to the open end bronchus sections of the AirSim airway. The Bronchi model comes with the lung bags already attached. 3. Attach a lung bag onto the oesophageal end connector to illustrate stomach inflation. 4. Ensure that the tongue is inflated with approx 20ml of air. This will create normal lingual tension. Increasing the amount of air will create a more difficult airway management scenario. 5. Each model shipped will be able to begin a Cricothyroidotomy and a tracheostomy procedure immediately but please ensure that the Larynx membrane inserts are fitted correctly onto the larynx and that the larynx is aligned on the airway correctly. The Larynx should be pushed up tight against the sternum as shown below. When the model is positioned into the sniffing position the pre cut holes will align up correctly and the model will be ready for use. 6. If you are using the model for bag mask ventilation or tracheal intubation and need a visual inflation of the blue lung bags please cover the pre cut holes with the airway sealing tape. Also ensure that the skin is attached to all the velcro points to enable a fully functioning product. 7. After a nominal amount of procedures ensure that the Larynx membrane inserts are replaced as this will affect the feel of the Cricothyroid 26 membrane and/or the Tracheal cartilage upon incision. 8. It is advised not to use the sealing tape and the larynx membrane sheets at the same time on the model as this will cause wastage and not give the desired experience. T h e L a r y n x c a n easily be removed and another larynx membrane insert can be inserted into the larynx for the next user. (see image below) 9. If you are using the sealing tape cut approx 5-6cm and attached over the pre cut Cric and Traci hole in the airway. Please ensure that the airway is clean and dry before attaching the tape to ensure secure tape adhesion. 10 . Each replaceable neck skin can be easily removed and a new piece attached. To ensure a completed fully functional neck skin, all velcro locations must be attached to the skin. 11. Using Trucorp’s silicone lubricant ensure that the internal airway and the nasal passage is well lubricated. 12. Ensure that all airway devices are prepared to the manufactures recommendations and instructions. Before insertion of the device generous amounts of lubricant should be used to cover the surfaces in contact with the AirSim airway and the Tracheal ring. 13. Please ensure that the AirSim airway is cleaned after use. Please use warm soapy water or something similar until all visible foreign matter and residue is removed. 14. The head and neck skin of the AirSim Advance Combo is made from durable and very elastic polyurethane material. It can be cleaned using a lightly soaped, damp cloth. Please do not use and detergents or cleaning agents on the skin material 15. Please replace the AirSim Advance Combo unit back into the carrier case and store in clean, dry conditions away from heat and light; avoid contact with metals, solvents, oils or greases and strong detergents 27 TruCorp provide the following spare parts for the AirSim Advance Combo. These can be ordered while purchasing using the following codes; RSN1005 Wrap around Neck Skin Attachments (pack of 5) CL200 Replaceable Combo Larynx- Anatomical Larynx containing the Thyroid Cartilage, pre cut cricothryoid membrane, cricothryoid cartilage and a pre cut tracheal ring. ST1000 Sealing Tape- Sealing tape used to cover the pre cut holes on the airway to allow bag mask ventilation and visible lung bags inflation LMS2050 Larynx Membrane inserts (pack of 50) – Larynx Membrane inserts are used to replicate the Tracheal cartilage and the Cricothyroid membrane while attached into the replaceable larynx. This interchangeable part can be rotated to get further uses. SFT1005 Subcutaneous Fat Tissue (pack of 5) 28 Quick Set up Guide AirSim Advance Larynx and AirSim Advance Larynx Bronchi 1. Remove the AirSim unit from the black carrier case, with the lung bags. 2. Connect the lung bags to the open end bronchus sections of the AirSim airway. The Bronchi model comes with the lung bags already attached. 3. Attach a lung bag onto the oesophageal end connector to illustrate stomach inflation. 4. Ensure that the tongue is inflated with approx 20ml of air. This will create normal lingual tension. Increasing the amount of air will create a more difficult airway management scenario. 5. Each model shipped will be able to begin usage immediately with the addition of the appropriate vocal cord insert but please ensure that the larynx is in its secured resting position, and that the skin is attached to all the Velcro points to enable a fully functioning product. 6. Ensure that the shelf accompanied with the model is secured and positioned correctly so that it is facing away from the head so that the laser securing apparatus can be mounted. Also please ensure the screw nut is secured and in place. 7. When choosing on the appropriate vocal cord insert please ensure that if a laser is being used for laser techniques that only to use the TLT material serial codes – LVC. This material has been tested to not give out toxic fumes upon Co2 laser ablation and is safe to use. Using a CO2 laser on the silicone surgical inserts will be potentially harmful and your warranty will be affected and you will not be viable for replacements. 8. When choosing the vocal cord for surgical techniques please use the silicone vocal cord inserts with serial codes - SVC as these are specifically designed for surgical procedures only and NOT laser techniques. 9. When ordering the vocal cord inserts please ask for guidance upon your intended purpose and we can guide you on the best inserts for your application. We do advise that the inserts are only ordered as and when for demand purposes and not ordered to build up stock as the shelf life is short on the laser inserts. 10. When the TLT material for laser techniques is not being used or is not needed please ensure that is it kept in the air tight 29 container. The material can dry out rapidly if not stored correctly or left open. We also advise not ordering/delivering the vocal cord inserts until a week or two before you’re intended purpose based on this fact. Your warranty will be affected if the TLT inserts have found to be stored incorrectly. 11. To insert the vocal cords peel back the neck skin, remove the larynx cover and in the space provided in the larynx place the appropriate vocal cords. Ensuring that the lower location point lines up with the location hole in the larynx. Re-attach the larynx cover and secure the neck skin into please at all the Velcro locations. 12. Full care is needed when using the laser on the model and that only the vocal cord area with the TLT material is used for ablation. 13. Using Trucorp’s silicone lubricant ensure that the internal airway and Nasal passage is well lubricated if used for airway management. (If applicable) 14. Ensure that all airway devices are prepared to the manufactures recommendations and instructions. Before insertion of the device generous amounts of lubricant should be used to cover the surfaces in contact with the AirSim airway. 15. Please ensure that the AirSim airway is cleaned after use. Please use warm soapy water or something similar until all visible foreign matter and residue is removed.. 16. The head and neck skin of the AirSim Advance Larynx is made from durable and very elastic polyurethane material. It can be cleaned using a lightly soaped, damp cloth. Please do not use and detergents or cleaning agents on the skin material 17. Please replace the AirSim Advance Larynx unit back into the carrier case and store in clean, dry conditions away from heat and light; avoid contact with metals, solvents, oils or greases and storing detergents 30 Trucorp provide the following vocal cord inserts and parts for the AirSim Advance Larynx. These can be ordered while purchasing using the following codes; For laser procedures. LVC-C1 -Cancer 1 – Single small cancer on vocal cords LVC-P2- Polyp 2 - Two small polyps opposing on the vocal cords LVC-C2 – Cancer 2 – One single large Tumour For Surgical procedures SVC-C1 - Cancer 1 – Single small cancer on vocal cords SVC-P2 - Polyp 2 - Two small polyps opposing on the vocal cords SVC-C2 - Cancer 2 – One single large Tumour LAR200 - Larynx cover RS1005 - Overlaying Neck Skin Attachments (pack of 5) Disclaimer: The AirSim Advance Larynx has materials that with misuse or misdirection of a laser can cause very damaging effects to the model and destroy the outer silicone facial skin and the internal latex airway. Also there is a high risk chance of fire damage to the models when exposing the laser to the areas mentioned above, other than on the vocal cord inserts. The vocal cord inserts should be the only area that is in direct contact with the laser. Misuse or application of the laser at any other location on the model other than the designated TLT vocal cord insert will result in warranty being void. The laser should only be used for the TLT vocal cord inserts and not the silicone vocal cords inserts. Again this would make the warranty void. Trucorp take no responsibility for any personal damage or distress caused by mis use of the model Adequate ventilation is required when using the model in a theatre environment when ablating the TLT inserts with a CO2 laser. The potential gases released have not been fully characterized and please ensure minimal exposure. 31 Quick Set up Guide AirSim Baby and AirSim Pierre Robin 1. Remove the AirSim Baby and AirSim Pierre Robin from the black carrier case, with blue lung bag 2. Connect both ends of the lung bags to the open sections of the bronchi 3. Using Trucorp’s silicone lubricant ensure that the internal airway and Nasal passages are well lubricated. 4. Ensure that all airway devices are prepared to the manufactures recommendations and instructions. Before insertion of the device generous amounts of lubricant should be used to cover the surfaces in contact with the AirSim airway. 5. Please ensure that the AirSim Baby and Pierre Robin airway is cleaned after use. Please use warm soapy water or something similar until all visible foreign matter and residue is removed. 6. The head and neck skin of the AirSim Baby and Pierre Robin is made from durable and very elastic polyurethane material. It can be cleaned using a lightly soaped, damp cloth. Please do not use and detergents or cleaning agents on the skin material. 7. Please replace the AirSim Baby and Pierre Robin unit back into the carrier case and store in clean, dry conditions away from heat and light; avoid contact with metals, solvents, oils or greases and strong detergents 32 Quick Set up Guide AirSim Child and AirSim Child Bronchi 1. Remove the AirSim unit from the black carrier case, with blue lung bags 2. Connect both ends of the lung bags to the open sections of the bronchi. The Bronchi model comes with the lung bags already attached. 3. Using Trucorp’s silicone lubricant ensure that the internal airway and Nasal passage are well lubricated. 4. Ensure that all airway devices are prepared to the manufactures recommendations and instructions. Before insertion of the device generous amounts of lubricant should be used to cover the surfaces in contact with the AirSim airway. 5. Please ensure that the AirSim Child airway is cleaned after use. Please use warm soapy water or something similar until all visible foreign matter and residue is removed. 6. The head and neck skin of the AirSim Child is made from durable and very elastic polyurethane material. It can be cleaned using a lightly soaped, damp cloth. Please do not use and detergents or cleaning agents on the skin material. 7. Please replace the AirSim Child unit back into the carrier case and store in clean, dry conditions away from heat and light; avoid contact with metals, solvents, oils or greases and strong detergents 33 Airway Management AirSim Standard The AirSim Standard is ideal for training in the use of: • • • • • • Laryngeal Masks Full range of supraglottic devices Laryngoscopes Tracheal Tubes Fibreoptic Laryngoscopes Needle Cricothyroidotomy Systems TruCorp recommend the following equipment sizes for optimal performance: • • 8.0-9.0 mm ID for oral intubation Size 3 and 4 for LMA laryngeal masks (similar respective sizes for other supraglottic devices) AirSim Multi The AirSim Multi can be used in the training of all the procedures facilitated by the AirSim Standard with the addition of: • • • Naso–tracheal intubation Awake fibreoptic examination Bag & mask ventilation techniques. TruCorp recommend the following equipment sizes for optimal performance: • • • 7.0-7.5 mm ID for nasal intubation 8.0-9.0 mm ID for oral intubation Size 3 and 4 for LMA laryngeal masks (similar respective sizes for other supraglottic devices) AirSim Bronchi The AirSim Bronchi unit will provide a solution to your training needs in: • • • • • • Diagnostic bronchoscopy. Lung isolation techniques using left and right endobronchial tubes and bronchial blockers. Lung suctioning techniques. For clinicians and industrial clients, the AirSim Bronchi is a leading choice for demonstration of items such as: Fibreoptic bronchoscopic equipment. Single and double lumen tubes and bronchial blockers. 34 • Specialised bronchial stents. The AirSim Bronchi can also be used in a similar manner to the AirSim Multi and can cover an extensive range of training requirements. Trucorp recommend the following equipment sizes for optimal performance: • • • • 7.0-7.5 mm ID for nasal intubation 8.0-9.0 mm ID for oral intubation Size 3 and 4 for LMA laryngeal masks (similar respective sizes for other supraglottic devices) Size 35F - 37F for endobronchial tubes. AirSim Advance The AirSim Advance can be used in the training of all the procedures facilitated by the AirSim multi, which includes; • • • Naso–tracheal intubation Awake fibreoptic examination Bag & mask ventilation techniques. TruCorp recommend the following equipment sizes for optimal performance: • • • 7.0-7.5 mm ID for nasal intubation 8.0-9.0 mm ID for oral intubation Size 3 and 4 for LMA laryngeal masks (similar respective sizes for other supraglottic devices) AirSim Advance Bronchi The AirSim Advance Bronchi can be used in a similar manner to the AirSim Advance and can cover an extensive range of training requirements including; • • • Naso–tracheal intubation Awake fibreoptic examination Bag & mask ventilation techniques. The AirSim Advance Bronchi unit will provide a solution to your training needs in: • • • • Diagnostic bronchoscopy. Lung isolation techniques using left and right endobronchial tubes and bronchial blockers. Lung suctioning techniques. For clinicians and industrial clients, the AirSim Bronchi is a leading 35 choice for demonstration of items such as: • • • Fibreoptic bronchoscopic equipment. Single and double lumen tubes and bronchial blockers. Specialised bronchial stents. TruCorp recommend the following equipment sizes for optimal performance: • • • • 7.0-7.5 mm ID for nasal intubation 8.0-9.0 mm ID for oral intubation Size 3 and 4 for LMA laryngeal masks (similar respective sizes for other supraglottic devices) Size 35F - 37F for endobronchial tubes. AirSim Advance Crico In addition to Needle/Surgical Cricothryoidotomy the AirSim Advance Crico is also ideal for training in; • • • • • • • Full range of supraglottic devices Laryngoscopes Tracheal Tubes Fibreoptic Laryngoscopes Naso–tracheal intubation Awake Fibreoptic examination Bag & mask ventilation techniques. TruCorp recommend the following equipment sizes for optimal performance: • • • 7.0-7.5 mm ID for nasal intubation 8.0-9.0 mm ID for oral intubation Size 3 and 4 for LMA laryngeal masks (similar respective sizes for other supraglottic devices) AirSim Advance Crico Bronchi In addition to Needle/Surgical Cricothryoidotomy the AirSim Advance Crico Bronchi is also ideal for training in; • • • Naso–tracheal intubation Awake fibreoptic examination Bag & mask ventilation techniques. The AirSim Advance Bronchi unit will provide a solution to your training needs in: 36 • • Diagnostic bronchoscopy. Lung isolation techniques using left and right endobronchial tubes and bronchial blockers. • • Lung suctioning techniques. For clinicians and industrial clients, the AirSim Bronchi is a leading choice for demonstration of items such as: Fibreoptic bronchoscopic equipment. Single and double lumen tubes and bronchial blockers. Specialised bronchial stents. • • • TruCorp recommend the following equipment sizes for optimal performance: • • • • 7.0-7.5 mm ID for nasal intubation 8.0-9.0 mm ID for oral intubation Size 3 and 4 for LMA laryngeal masks (similar respective sizes for other supraglottic devices) Size 35F - 37F for endobronchial tubes. AirSim Advance Traci In addition to percutaneous Tracheostomy the AirSim Advance Traci is also ideal for training in; • • • • • • • Full range of supraglottic devices Laryngoscopes Tracheal Tubes Fibreoptic Laryngoscopes Naso–tracheal intubation Awake Fibreoptic examination Bag & mask ventilation techniques. TruCorp recommend the following equipment sizes for optimal performance: • • • 7.0-7.5 mm ID for nasal intubation 8.0-9.0 mm ID for oral intubation Size 3 and 4 for LMA laryngeal masks (similar respective sizes for other supraglottic devices) AirSim Advance Traci Bronchi In addition to percutaneous Tracheostomy the AirSim Advance Traci Bronchi is also ideal for training in; • • Full range of supraglottic devices Laryngoscopes 37 • • • • • Tracheal Tubes Fibreoptic Laryngoscopes Naso–tracheal intubation Awake Fibreoptic examination Bag & mask ventilation techniques. The AirSim Advance Traci Bronchi unit will provide a solution to your training needs in: • • • • • • • Diagnostic bronchoscopy. Lung isolation techniques using left and right endobronchial tubes and bronchial blockers. Lung suctioning techniques. For clinicians and industrial clients, the AirSim Bronchi is a leading choice for demonstration of items such as: Fibreoptic bronchoscopic equipment. Single and double lumen tubes and bronchial blockers. Specialised bronchial stents. AirSim Advance Combo The AirSim Advance Combo is ideal for training in; Needle and surgical cricothyroidotomy Percutaneous tracheostomy Double naso-tracheal intubation Bag and Mask ventilation techniques Full range of supraglottic devices Direct laryngoscopy Endotracheal tube insertion Awake fibre optic examination Single lung isolation techniques Combi tube insertion Video laryngoscopy (including Sellick Manoeuvre) Naso gastric tube insertion techniques TruCorp recommend the following equipment sizes for optimal performance: 7.0-7.5 mm ID for nasal intubation 8.0-9.0 mm ID for oral intubation Size 3-5 for LMA laryngeal masks Similar respective sizes for other supraglottic devices AirSim Advance Combo Bronchi The AirSim Advance Combo Bronchi is ideal for training in; Needle and surgical cricothyroidotomy 38 Percutaneous tracheostomy Double naso-tracheal intubation Diagnostic bronchoscopy Lung isolation techniques Lung suctioning techniques Bag and Mask ventilation techniques Full range of supraglottic devices Direct laryngoscopy Endotracheal tube insertion Awake fibre optic examination Single lung isolation techniques Combi tube insertion Video laryngoscopy (including Sellick Manoeuvre) Naso gastric tube insertion techniques TruCorp recommend the following equipment sizes for optimal performance: 7.0-7.5 mm ID for nasal intubation 8.0-9.0 mm ID for oral intubation Size 3-5 for LMA laryngeal masks Similar respective sizes for other supraglottic devices AirSim Advance Larynx and Advance Larynx Bronchi The AirSim Advance Larynx can be used in the training of all laser techniques for removing cancerous pathologies on the vocal cords using a Co 2 laser. Applicable Co2 laser companies are to be used for this application. On top of this the model can still be used to facilitate procedures, which includes; • • • • • • • • Full range of supraglottic devices Laryngoscopes Tracheal Tubes Fibreoptic Laryngoscopes Needle/Surgical Cricothryoidotomy Naso–tracheal intubation Awake Fibreoptic examination Bag & mask ventilation techniques. TruCorp recommend the following equipment sizes for optimal performance: • • • 7.0-7.5 mm ID for nasal intubation 8.0-9.0 mm ID for oral intubation Size 3 and 4 for LMA laryngeal masks (similar respective sizes for other supraglottic devices) 39 AirSim Baby The AirSim Baby can be used in the training of all the procedures facilitated by infant airway management, which includes; • • • Naso–tracheal intubation Positive pressure ventilation. Bag & mask ventilation techniques. • Endotracheal intubations. TruCorp recommend the following equipment sizes for optimal performance: • Size 3.5 - 4 tracheal tubes • Size 1 for LMA laryngeal masks (similar respective sizes for other supraglottic devices) • Size 1 for video laryngoscopes AirSim Pierre Robin The AirSim Pierre Robin can be used in the training of all the procedures facilitated by a difficult infant with congenital defects for airway management, which includes; • • • • Naso–tracheal intubation Positive pressure ventilation. Bag & mask ventilation techniques. Endotracheal intubations. TruCorp recommend the following equipment sizes for optimal performance: • • • Size 3.5 - 4 tracheal tubes Size 1 for LMA laryngeal masks (similar respective sizes for other supraglottic devices) Size 1 for video laryngoscopes AirSim Child The AirSim Child can be used in the training of all the procedures facilitated by child airway management, which includes; • • • • Naso–tracheal intubation Positive pressure ventilation. Bag & mask ventilation techniques. Endotracheal intubations. TruCorp recommend the following equipment sizes for optimal performance: 40 • • • Size 5.5 - 6 oro-tracheal tubes, size 4.5 - 5.0 naso-tracheal tubes Size 2 for LMA laryngeal masks (similar respective sizes for other supraglottic devices) Size 2 for video laryngoscopes AirSim Child Bronchi The AirSim Child Bronchi can be used in the training of all the procedures facilitated by child airway management as well as Fibreoptic intubation techniques, features includes; Naso–tracheal intubation Positive pressure ventilation. Bag & mask ventilation techniques. Endotracheal intubations. Diagnostic Bronchoscopy Lung isolation techniques using left and right endobronchial tubes and bronchi blockers Lung suction techniques Fibre optic bronchoscopic equipment use Single and double lumen tubes Specialised bronchial stents TruCorp recommend the following equipment sizes for optimal performance: • Size 5.5 - 6 oro-tracheal tubes, size 4.5 - 5.0 naso-tracheal tubes • Size 2 for LMA laryngeal masks (similar respective sizes for other supraglottic devices) • Size 2 for video laryngoscopes 41 Care and Maintenance Cleaning and Storage Store in clean, dry conditions away from heat and direct sunlight; avoid contact with metals, solvents, oils or greases and strong detergents. Thoroughly wash the AirSim airway in warm water. Please use warm soapy water or something similar until all visible foreign matter and residue is removed. Mild detergents or enzymatic cleaning agents may be used on the airway in accordance with the manufacturer's instructions and at the proper dilution. The detergent must not contain skin or mucous membrane irritants. Clean the device using a small soft bristle brush (approximately ½ inch or 12.5mm in diameter). Gently insert the brush through the airway, taking care not to damage the material. Extra care must be taken when cleaning around the vocal cords. Thoroughly rinse the airway in warm flowing tap water to remove cleaning residues. Carefully inspect the device to ensure that all visible foreign matter has been removed. The head and neck skin of the AirSim Advance heads are made from durable and very elastic polyurethane material. It can be cleaned using a lightly soaped, damp cloth. Please do not use and detergents or cleaning agents on the skin material. Please DO NOT USE any of the following when cleaning the AirSim product range Germicides, disinfectants, glutaraldehyde (e.g. Cidex®), Ethylene cleaners oxide, or chemical agents phenol-based cleaners or such as iodine-containing Such substances are absorbed by the AirSim materials, resulting in exposure of the user to unnecessary risk and possible deterioration of the device. Do not use a device that has been exposed to any of these substances. NB. IT IS IMPORTANT THAT GENEROUS AMOUNTS OF TRUCORP LUBRICANT IS USED DURING AIRWAY AND DEVICE INTERVENTIONS. 42 Warranty TruCorp warrants this unit to be free of defects in materials and workmanship and to give satisfactory service for a period of 1 year from the date of delivery. The TruCorp warranty can now provide an additional 2nd or 3rd year warranty onto the products which will ensure full model repairs and returns and any other issues with the model at an extra premium price. Please contact sales for more details. This ensures that our customers receive maximum coverage on each product. If the unit should malfunction it must be returned to the factory for evaluation. Upon examination by TruCorp, if the unit is found to be defective it will be repaired or replaced at no charge. However this warranty is VOID, if the unit shows evidence of having been tampered with or shows evidence of having been damaged by excessive heat, the use of sharp instruments, misapplication, misuse or other operating conditions outside of TruCorp’s control. Components which wear or are damaged by misuse are not warranted and will charged if repair has been approved. Before returning any models please contact TruCorp. To avoid delays please ensure the following information is available 1. Returnee’s name, address and phone number. 2. Model and serial numbers 3. Repair instructions with potential issues (with images if possible) 4. Apparatus/devices and number of uses on the model Please direct all warranty and repair requests/inquires to The Mount Business Park 2 Woodstock Link, Belfast, BT6 8DD [email protected] and/or [email protected] Tel: +44 (0) 28 9073 7281 Fax: +44 (0) 28 9073 7282 Every precaution for accuracy has been taken in the preparation of this manual, however, TruCorp neither assumes responsibility for any omissions or errors that may appear nor assumes liability for any damages that result from the use of the product in accordance with the information contained in the manual. 43