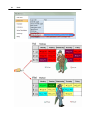
Download Untis MultiUser

Transcript
2
Table of Contents
I Introduction
4
II HTML-based output options
4
1 Info timetable
...................................................................................................................................
dialogue
4
Start date
.......................................................................................................................................................... 5
Output settings.......................................................................................................................................................... 6
Output
.......................................................................................................................................................... 6
2 Static HTML
...................................................................................................................................
output
7
'Static HTML' tab
.......................................................................................................................................................... 10
'Tim etable' tab
.......................................................................................................................................................... 11
'Substitutions'
..........................................................................................................................................................
tab
13
'Navigation' tab
.......................................................................................................................................................... 15
'Elem ent selection'
..........................................................................................................................................................
tab
18
3 Monitor
...................................................................................................................................
HTML output
18
'Monitor HTML'
..........................................................................................................................................................
settings
19
Split screen and
..........................................................................................................................................................
ticker
21
Refresh tim es.......................................................................................................................................................... 22
Integrating additional
..........................................................................................................................................................
HTML files
23
4 Auto export
...................................................................................................................................
static HTML & monitor HTML
25
III Sending timetables by e-mail
26
1 E-mail...................................................................................................................................
settings
26
2 Sending
...................................................................................................................................
e-mails
28
Specifying the..........................................................................................................................................................
date
30
Mailing lesson
..........................................................................................................................................................
allocation
32
Mailing substitution
..........................................................................................................................................................
lists
32
Mailing the substitutions
..........................................................................................................................................................
statem ent
33
E-m ail m essage
.......................................................................................................................................................... 34
3 Including
...................................................................................................................................
additional attachments
35
IV Sending subst. messages by SMS/e-mail
38
1 Settings
................................................................................................................................... 40
V Database export
41
VI Untis in info mode
42
1 Requirements
................................................................................................................................... 43
2 Setting
...................................................................................................................................
up window groups
44
3 Setting
...................................................................................................................................
up the info terminal
44
Creating a shortcut
.......................................................................................................................................................... 44
Info mode ......................................................................................................................................................... 47
Changing the ..........................................................................................................................................................
displayed w indow group
48
Contents
3
Deactivating printing
.......................................................................................................................................................... 48
4 Untis ...................................................................................................................................
MultiUser in info mode
49
VII Application notes
51
1 HTML...................................................................................................................................
settings in the timetable
51
2 General
...................................................................................................................................
HTML Settings
51
3 Notes...................................................................................................................................
for web designers
52
Output files for
..........................................................................................................................................................
'static HTML'
53
Design m odifications
..........................................................................................................................................................
using CSS
53
Output files for
..........................................................................................................................................................
'm onitor HTML'
53
4 Technical
...................................................................................................................................
description of database export
55
date.txt
.......................................................................................................................................................... 55
tim e.txt
.......................................................................................................................................................... 55
teacher.txt .......................................................................................................................................................... 56
class.txt
.......................................................................................................................................................... 56
room .txt
.......................................................................................................................................................... 56
student.txt .......................................................................................................................................................... 56
lesson.txt
.......................................................................................................................................................... 57
supervision.txt
.......................................................................................................................................................... 57
Exam ple: representation
..........................................................................................................................................................
of a tim etable
58
Index
0
3
4
1
Untis
Introduction
The timetable is the organisational focus of any school.
That is why it is important to keep all teachers and students informed of any changes that can be
caused for example by blocked rooms or absent classes and teachers.
The traditional means of informing those affected was by notices, i.e. printed lists, posted at central
points in the school, accessible to everyone involved.
The info timetable module is a set of software tools with which you can publish a school's complete upto-date timetable via the school's own network to every computer in the school, or via the Internet.
The info timetable module offers you several additional independent solutions for publishing up-to-date
information:
2
·
HTML-based output for the latest timetables
·
Monitor HTML output for student monitors
·
Untis info mode
·
Database export for processing the latest data subsequently
·
Automatic e-mail distribution of the latest timetables, lessons, substitutions and substitution
statements
·
Automatic text message (SMS) distribution of the latest substitutions
HTML-based output options
This info timetable option allows static HTML pages containing the desired information to be output at
the press of a button. These pages can then be opened with any web browser. Please refer to the HTML
timetable settings chapter as well as chapter "Timetables in HTML format" in the user manual for more
details on the layout of the displayed timetable.
As far as handling is concerned both HTML output options for the info timetable (complete timetable
information with navigation and monitor display without navigation) are so similar that the following
section first describes the similarities. After that the individual possibilities of both options are dealt with.
2.1
Info timetable dialogue
The “Info timetable” dialogue is the actual control window for outputting HTML files and can be accessed
from the modules menu via menu item “Info timetable” option or via the “Info timetable” toolbar icon.
The dialogue contains four tabs: Static HTML , Monitor HTML , Database and WebUntis
Tip: WebUntis
For more information concerning our WebUntis range of products please contact your nearest Untis
partner or visit our website at www.grupet.at .
HTML-based output options
2.1.1
5
Start date
As the timetables and substitution lists that are exported contain up-to-date information it is important to
specify a starting date defining which week to begin with. Untis provides the following pre-defined date
options to assist input:
6
Untis
·
2.1.2
Beg. of school year : the date defined under "Settings | School data" as the beginning of the
school year
·
Current date : today's date
·
Date of scheduling : the date entered via "Settings | Calendar"<I>
·
Last date : the date that an export was last performed.
Output settings
HTML output for the Internet usually contains varying (generally somewhat less) information than output
for internal networks. Teacher terminals should only display teacher timetables or cover data while
students only require data that is relevant for them.
The info timetable module therefore enables you to create different configurations with which you can
define and save the type and amount of output information Please refer to chapters Static HTML and
Monitor HTML to learn how these settings can be defined.
Clicking on a row in the grid and then on the <Edit> button displays a dialogue where you can specify
the details for the relevant output setting. Alternatively, you can also display this dialogue by doubleclicking on a row, or by via the button with the three dots within the row.
2.1.3
Output
Once you have selected the desired output configurations by checking the relevant boxes in the “Active”
column you can start the export by clicking on the <Export> button.
HTML-based output options
7
The “Delete output folder ” box allows you to determine whether the the contents of the target folder
should be deleted before output is performed.
Caution:
When you choose this option the output directory is emptied, i.e. not only earlier info-output will be
deleted but ALL files in the directory.
2.2
Static HTML output
This type of output enables you to output all the latest timetables of your school in HTML at the press of
a button. A navigation bar is automatically output which you can use to switch between the timetables of
the exported elements (classes, teachers, rooms, subjects and student timetables).
We will start straightaway with an example to demonstrate how easy and quick it is to perform this type
of export:
·
Open file demo.gpn.
·
Click on the <Info timetable> toolbar icon.
·
Click on the <Edit> button.
8
Untis
·
Specify a valid export directory.
·
On the “Timetable” tab, check the elements ‘Classes’, ‘Teachers’ and ‘Rooms’ .
HTML-based output options
·
Confirm your input with <OK>.
·
Click the <Export> button.
9
The export directory that you specified now contains both the complete HTML pages required for display
as well as the default.htm file. Provided there is a web browser installed on your computer you can view
the output by double-clicking on this file.
In order to publish this output in your intranet, for example, place the directory containing the export files
in a shared server directory or on a web server. If you have an external web server you can upload the
data to the directory using an FTP application.
The following pages contain a detailed description of the options open to you for making adjustments to
"static HTML" output.
10
2.2.1
Untis
'Static HTML' tab
After selecting an output configuration from the list in the "Info timetable" dialogue and clicking <Edit>
you can make changes to the settings for HTML output in the subsequent dialogue.
Define a meaningful name and specify how many weeks from the start date should be exported. This is
also where the export directory is specified.
You cannot export weeks beyond the end of the school year, i.e. you can only export a maximum of 3
weeks if there are only 3 weeks left. Please refer to chapter Navigation tab on for a description of the
field "Weeks on the top directory level"
Term-based output of timetables
By default, static HTML is output on a weekly basis. You can use the check box “One timetable per
term (instead of per week)” to specify that timetables should be exported on a term-by-term basis.
HTML-based output options
11
The "Maximum number of weeks" field can be used to restrict the number of terms to be output (0 = all
terms up to the end of the school year). The export begins with the term containing the start date.
2.2.2
'Timetable' tab
After the general settings have been made you can specify how the timetables should be output in more
detail.
Timetable formats section
This is where you can define which timetables as a general rule you wish to output. For example, if your
information system is only intended to be used by students in the break area you will usually not export
teacher timetables.
Clicking on a button to the right of the individual element types displays a window in which you can
specify which timetable format should be output. The selected format is displayed as the label for each
of the buttons.
We recommend that you create your own timetable formats for each of the different information outputs.
Please refer to the chapter on "Timetable display" in the user manual for more details on creating
formats.
12
Untis
Note:
Please bear in mind that there is the possibility in timetable mode to distribute timetables without
substitution information.
Please note that the legend is a part of the format information and is therefore also exported in the HTML
timetable.
You can activate/deactivate the legend in the details for printing. You can find the print details under
"Details" in print selection or on the "General" tab under <Timetable settings>.
Please refer to chapter Application notes for further details on adapting an existing format.
Output of break supervisions
In addition to the information about which timetables should be exported in which format, if you use the
break supervisions module you can also output the supervision plan by checking the 'Corridors' option.
HTML-based output options
13
Output of substitution data
If you use the cover planning module all timetables will be exported with the latest information by default
However, you can suppress current substitution data by opening the info timetable dialogue in Untis
mode and unchecking the box "Timetables with substitution data".
2.2.3
'Substitutions' tab
In addition to the various timetable formats you can – if you use the cover planning module – output
substitution lists containing the day-to-day changes in the timetable, for example if a teacher is ill or a
class is on an excursion.
Similar to the way in which you define the output timetables , you can select which substitution lists you
wish to export by default (classes, teachers) and also define in which predefined formats this will occur.
14
Untis
You can also specify whether the output lists should contain all the elements concerned or whether
each element should be output individually.
Restricting the number of substitution days
Cover plans are not normally created for a whole week in advance but for just a couple of days. Untis
therefore allows you to restrict the number of substitution days.
To do this, check the "Daily display" box on the "Substitutions" tab and set how many days should be
output. An entry of 0 will output substitutions for the whole week.
HTML-based output options
15
Note: Output of the first week
If you select e.g. a Wednesday as the start date and wish to output 4 days, these days will be counted
from Wednesday. Irrespective of this, Monday and Tuesday of the first week will also be output.
2.2.4
'Navigation' tab
You can also influence the automatically generated navigation option. On the "Navigation" tab under "List
of elements with full names" you can specify for which elements the full names rather than the short
names should be output.
The 'Navigation' tab is located to the right of the 'Substitutions' tab – simply click on the right arrow.
16
Untis
This is useful for example when outputting information for teacher terminals when the teacher
abbreviations are not in general use.
Vertical navigation bar
The navigation toolbar is displayed horizontally by default in the static HTML output. You can choose to
output the bar vertically using the "Vertical navigation bar" selection box,
When the "Vertical navigation bar" box is checked you can also adjust the width.
If you have the course scheduling or student timetable modules you can use the "List students by class"
check box to have students grouped by class
HTML-based output options
17
Data protection
In many schools sensitive data (e.g. teacher timetables) must be protected against unauthorised
access. This requirement necessitates that all data which need a password in order to be accessed
must be stored in one directory.
When exporting "Static HTML" to the selected target directory the system automatically creates
subfolders. The "Weeks on the top directory-level" check box can be used to influence the structure of
the stored data.
If this box is checked, a sub-directory will be created for each week’s output; the directory name is equal
to the number of the week in question. This (weekly) directory then contains further folders named C
(class timetables), F (subject timetables), G (substitution lists for corridors), R (room timetables), S
(student timetables), T (teacher timetables), V (substitution lists for teachers) and W (substitution lists
for classes).
If this option is not selected, all element folders are saved at the top level and the level below contains
the folders with the week numbers.
The figure below makes the difference clear:
18
Untis
How a directory (with its sub-directories) can be password-protected very much depends on the
webserver and the operating system used. If you have questions concerning this topic, please contact
your network administrator.
2.2.5
'Element selection' tab
You can limit what is output using the "Element selection" tab.
In the "Include elements" section you can restrict export to a particular department, while the section
directly below can be used to exclude elements with a specific statistics code.
2.3
Monitor HTML output
It is of course not always possible to make a computer with keyboard and mouse available in areas to
which many people have access. A solution requiring absolutely no manual intervention is required,
similar to the flight information boards at an airport.
HTML-based output options
19
Note:
The figure shows the info timetable output integrated with the 'Digitales Schwarzes Brett' (DSB) [digital
noticebaord].
With monitor output, the info timetable module provides the possibility of outputting this kind of freeformat substitution list in HTML format in order to make the required information available at different
terminals.
With this type of output the pages automatically scroll forward - no input or operating devices are
needed.
This section describes how to use this output option including all the settings.
2.3.1
'Monitor HTML' settings
Just likestatic HTMLoutput you can save different settings under different names. Please refer to
chapter Info timetable dialogue section for more information.
After selecting one of the output settings and clicking the <Edit> button a dialogue is displayed in which
you can make all the settings for monitor output.
Give all saved output a self-documenting name (e.g. or "Break room") using the 'Name' field.
By clicking the button to the right of 'Cover format' you can select the format from the substitution
windows defined during cover planning for the list output. The button is labelled with the selected format.
20
Untis
Output date
As a general rule Untis outputs substitution data for the day defined as start date in the Info timetable
dialogue . However, if several output configurations are saved it can make sense to have a different date
from the start date in some outputs, for example when one monitor should display only today's
substitution lists and another only those scheduled for tomorrow.
Use the field "Output date (days after start date)" to influence which date should be the first day output
in this output configuration. If you have defined e.g. 22 September as the start date and enter 2 in the
output date field, the output will begin with 24 September.
HTML-based output options
21
Furthermore, you can use the field "No. of days" to specify for how many days the output should
contain.
2.3.2
Split screen and ticker
You can display different types of information on one screen. For example, the left half of the screen can
display substitution data for today while the right half displays substitution data for tomorrow. The
necessary settings are made on the 'Special' tab.
The example shows two output settings: 'Today' and 'Tomorrow'.
The output for 'Today' is for one day - the current output day. The output for 'Tomorrow' also displays one
day - the day after the current output day.
The output for 'Today' is displayed in the left half of the screen. The second monitor format is 'Tomorrow'.
The output for 'Tomorrow' is displayed in the right half of the screen. There is no second monitor format in
this case.
Note:
Please note that the monitor format "Tomorrow" is not checked in the figure. All settings are made in the
format 'Today'. If 'Tomorrow' were checked, it would also be output in addition to the split screen and
might overwrite parts of the main format 'Today'.
22
Untis
Ticker
If you wish to display additional information to the substitution data, use the settings in the 'Ticker' input
section, which you will also find on the 'Special' tab'.
2.3.3
Refresh times
As mentioned previously, the output HTML pages scroll forwards automatically. Use the "Refresh time
[sec]" and "Refresh time (empty page) [sec]" fields to specify how long the display of pages with and
without content should last.
HTML-based output options
23
Daily comments
By default the daily comments (that can also be defined in cover planning for any date desired) are
displayed on the first page of each day. Use the check box "Daily comment(s) on every page" to specify
that these comments should be output on each page.
Export
After defining an export directory and confirming with <OK>, you can launch the export of the HTML
pages according to your specifications with the <Export> button. The HTML files are prepared and
exported in a numbered sequence and named subst_NNN.htm (where NNN stands for 001, 002, ...).
2.3.4
Integrating additional HTML files
It is sometimes necessary to embed additional HTML files into the monitor output if e.g. an
announcement for an annual school event is to be displayed on its own page. The procedure is
described below:
1.) Under 'Settings | Miscellaneous' enter a directory path after 'HTML files' on the 'Directories' tab.
24
Untis
2.) In the folder specified in step 1), create an additional directory with the name 'info monitor' and copy
all the HTML pages you created (ending in *.htm or *.html) into it. These additional files must be valid
HTML pages and must not contain the <meta http-equiv="refresh"...> tag.
Tip: Restrict attachment files to one setting
For example, if you have created an output setting called 'Break room' and another called 'Staff room'
and wish to export additional files just for 'Break room', create an additional sub-folder called 'Break
room' in the folder defined in step 2) and copy your data into it.
The data will now be automatically included in the sequence of monitor output.
HTML-based output options
25
Tip: Specifying the sequence of additional files
If you are including several files and wish to specify the sequence, number the HTML pages in the
desired order, i.e. File_01.htm, File_02.htm, ...
2.4
Auto export static HTML & monitor HTML
The output of “Static HTML” and “Monitor HTML” can be automatically triggered when certain fixed
events occur. To specify this, access the "Autoinfo" tab under "Settings | Miscellaneous".
26
Untis
Using the selection boxes you can define whether export should occur when the file is saved or closed,
at a certain time or after a certain number of minutes (starting with the current system time)
Checking the “Messages prior to export” box results in a query being displayed before the actual export.
3
Sending timetables by e-mail
This option allows the latest timetables to be sent to teachers and – if necessary – students. For this,
Untis uses an e-mail program that is already locally installed or a mail server that can be reached on the
network. Each teacher or student only receives his/her own personal timetable as an HTML file attached
to the e-mail.
3.1
E-mail settings
The teacher’s or student’s e-mail address must be entered in the e-mail field in the appropriate master
data record.
The basic settings for e-mail distribution can be found on the "E-Mail" tab under "Settings |
Miscellaneous".
Sending timetables by e-mail
27
If the computer where Untis is running already has a functioning e-mail application installed such as
Outlook Express or Outlook, sending e-mails from Untis will work without any further settings having to
be made as Untis will automatically activate the appropriate mail system automatically.
In this case you will see e-mails in the usual manner as sent e-mails in your e-mail application. Untis
supports both mail interfaces MAPI (e.g. for Microsoft Outlook) and Simple MAPI (e.g. for Microsoft
Outlook Express). In order for Untis to be able to use your mail application to send e-mails it must
support one of these e-mail interfaces and Untis must also be defined in your system settings as
standard e-mail application. (You can find this setting under Windows 7 under "Start | Default
programs").
If you have your own mail server, you can also use Untis to send e-mails. In this case you must select
the SMTP setting and add the name (or IP address) of a mail server that you have access to, e.g.
mail.my-school.org and your own e-mail address (e.g. [email protected] ). Select SMTP as mail
system. If your server requires authentication before sending you can also enter the user name and
password on this tab.
28
Untis
Activating the “Keep a log file” option results in Untis writing a line with the most important data for each
e-mail sent in a log file. On modern operating systems such as Windows 7 Untis writes the log data by
default to a file named "untis.mail.log" in the directory C:\Documents and Settings\<username>\
Application Data \Untis. <username> is your user name in the system. Under older operating systems
you will find the “untis_mail.log” file in the Untis program directory.
Tip: Opening the log file
Click on the “Log file” heading to open the log file quickly.
3.2
Sending e-mails
You launch the dispatch of e-mails from the menu item "File | E-mail" or by selecting the <E-Mail> icon
from the main toolbar. If this field is not displayed you can activate the info timetable toolbar by rightclicking on the main toolbar.
You can specify whether to send timetables, lesson allocations, substitution lists or substitution
statements by selecting the appropriate tab.
In the dispatch window you can select those teachers and students who are to be sent a personal
Sending timetables by e-mail
29
timetable via e-mail by clicking the <Select> button.
Caution:
This selection only displays teachers and students for whom an e-mail address has been defined in the
master data.
If you are sending teacher timetables you can check the “Send class timetable” box to send each
teacher the timetable for the class(es) which he/she is class teacher of. A corresponding entry must
have been made in the “Class teacher” field in the class master data.
As with all other timetable output, you can also specify the format for the output of the timetables. Click
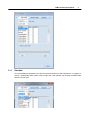
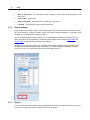
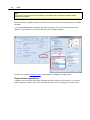
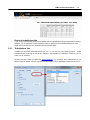
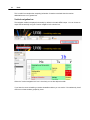
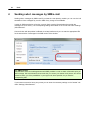
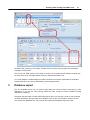
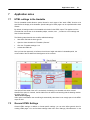
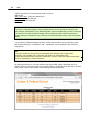
30
Untis
the button to the right of the <Select> button and choose a timetable format from the selection list that
is then displayed. The selected format is displayed as the label for each of the buttons.
3.2.1
Specifying the date
You have two possibilities to determine the period for which the timetables should be sent:
1.
If you select a date from the calendar, a timetable will be sent for the chosen week.
Sending timetables by e-mail
31
Tip: Sending substitution data
You can use the calendar in both Untis mode and substitution mode. If dispatch is launched in
substitution mode the latest information and all substitution data are included. If you launch e-mail
dispatch in Untis mode the substitution data are not included in the timetable.
2.
Date of the timetable: This options allows you to send timetables for the period which is defined
in the timetable settings of the format concerned, which could be for a whole school year or a whole
term. This field can only be activated in Untis mode.
32
3.2.2
Untis
Mailing lesson allocation
Lesson allocations can be dispatched to all teachers or to specific teachers via the 'Lessons' tab. The
format used can be changed using the same process described in the previous chapter.
3.2.3
Mailing substitution lists
If you use the cover planning module, substitution lists can also be sent to any teacher in the same way
as described in the other examples.
Sending timetables by e-mail
33
You can set the “Only teachers with changes” option to specify that only teacher timetables containing
at least one change to the regular timetable should be sent.
3.2.4
Mailing the substitutions statement
When the cover planning module is used substitution statements can also be sent electronically. In
addition to selecting the addressee(s), it is also possible to specify the time range for the statement.
34
3.2.5
Untis
E-mail message
There are fields available for the e-mail subject and message. You have the possibility of using the
following wildcards:
· ^d= timetable date (e.g. 13.9.2007
· ^a= current date and time (e.g. 15.03.2008 09:33)
· ^s= teacher / student short name
· ^I= teacher / student long name
· ^f= teacher / student first name
· ^t= teacher's title
Clicking on the <Send> button launches the e-mail dispatch process.
Any errors that might occur are recorded in the log file. You can view this file by clicking on the <Log
Sending timetables by e-mail
35
file> button.
The log file contains the following information:
1. Date: send date and time
2. Short name: short name of the teacher or student to whom the e-mail was sent
3. Recipient's e-mail address
4. Subject line of the e-mail
5. Transmission status: OK or, if applicable, error number and error message in the case of
problems
3.3
Including additional attachments
You can attach any file you wish to the e-mail in addition to the HTML timetables. These files must have
the teacher’s short name as name and can have any extension, e.g. Holmes.pdf for a teacher with the
short name Holmes.
All files that are to be sent as attachments must be in the directory specified for “E-mail attachments” on
the “Directories” tab under “Settings | Miscellaneous”. When sending e-mails Untis checks this folder
and attaches any files it finds with the corresponding short name of the teachers that are being sent an
e-mail. Teacher “Holmes” therefore receives not just his timetable data but also the file “Holmes.pdf”.
36
Untis
Sending timetables by e-mail
37
Including attachments to all teachers / students
In addition to timetables, you can also send any files you wish to all teachers and students. To do this,
first create a folder “teacher” for teachers and “student” for students containing the files that you wish to
send. These two folders must be in the directory specified for "E-mail attachments" on the "Directories"
tab under "Settings | Miscellaneous".
38
4
Untis
Sending subst. messages by SMS/e-mail
Sending subst. messages by SMS/e-mail If you have the cover planning module you can use the info
timetable to inform colleagues by e-mail or SMS of any change to the timetable.
In order for SMS transmission to function correctly Untis must be informed about the provider the
messages are to be sent by. The corresponding settings are entered on the “E-mail” tab under “Settings
| Miscellaneous”.
Communication with the provider is effected via an http interface and you can enter the appropriate URL
for the transmission of messages in the SMS section of the window.
Tip: SMS providers
Gruber&Petters have concluded agreements with SMS providers in order to obtain a favourable price per
SMS message. We would therefore recommend that you contact your nearest Untis partner, who will be
pleased to inform you of the possibilities in your region and, where possible, let you have the
corresponding URL.
If your Internet connection has a proxy server you can enter the necessary settings on the “Internet” tab
under “Settings | Miscellaneous”.
Sending subst. messages by SMS/e-mail
39
Teachers' telephone numbers can be entered in the mobile telephone number field in teacher master
data.
The format for entering the mobile telephone number (e.g. country code/area code/number) depends on
the individual provider. Please contact your nearest Untis partner if you require assistance.
The actual transmission of SMS and/or e-mail starts when you click the <Messages>
toolbar icon. If
this icon is not displayed, right-click on the main toolbar to activate the info timetable toolbar.
40
Untis
You will now see a list beginning from the set calendar date showing all changes in the timetable.
Besides substitutions and cancellations, these also include events, releases and break supervisions.
Untis automatically generates a text for each substitution, which you can, if you wish, change by
double-clicking on the “Text” field.
Furthermore, the “sent” column indicates whether this substitution message has already been sent. The
“SMS” and “E-mail” fields allow you to determine the dispatch method.
The <Send> button starts transmission.
As with timetable transmission by e-mail, Untis writes a line in a log file that contains the most
important data for each message when substitution messages are sent. You can open this file with the
<Log-file> button and check whether transmission has worked correctly.
4.1
Settings
Numerous settings can be made for the transmission of substitution messages. These can be found on
the “Substitution messages” tab under “Modules | Cover planning | Settings”
In the “Send message” section you define which substitution events should be listed in the substitution
message window. The selection boxes “Only new substitutions” and “Only messages” refer to the fields
with the same name that can be checked in the substitutions window. “Only messages not yet sent”
refers to those events that have not yet been sent by SMS or e-mail and have therefore not yet caused
the “sent” box in the substitution messages window to be activated.
Sending subst. messages by SMS/e-mail
41
The field “Event is within (n) school days” indicates how many days from the output date substitution
messages should be sent.
The “E-mail” and “SMS” options in the “Notify via” section can be used to specify whether the fields with
the same name in the messages window should by default be activated or not.
If no e-mail address or mobile telephone number is entered in the teacher master data the notification
method fields will in any case be deactivated in the messages window.
5
Database export
This info timetable function can be used to export data from Untis for further processing by other
applications. If you use the cover planning module the data contain the latest timetable including
substitution scheduling.
The export data are output in simple ASCII (text) files for which you can write a script in order to display
the latest timetable or to import them into a database. Click on the <Info timetable> toolbar icon and
then activate the “Database” tab. This is where all the settings for database export are made.
42
Untis
In the upper section of the window you can specify an export directory where the output will be saved.
As the timetables and substitution lists that are exported contain up-to-date information it is important to
specify a starting date defining which week to begin with. Untis provides assistance for input allowing
access to the following fixed data:
·
Beginning of school data: the date defined under "Settings | School data" as the beginning of the
school year
·
Current date: today's date
·
Date of scheduling: the date entered via “Settings | Calendar”
·
Last date: the date that an export was last performed.
After defining the number of weeks to be exported (here 4), you can launch the export process by
clicking on the <Export> button. For a technical description of the exported data please refer to
chapterTechnical description of database export.
6
Untis in info mode
Untis in info mode offers a further possibility for publishing current timetables in your network.
This method makes the typical Untis windows available to the user. These windows can communicate
with one another and allow teacher, class and room timetables to be displayed simultaneously without
the user being able to modify any data in the school file.
The following figure is a schematic representation of how the info mode can be used at three info
Untis in info mode
43
terminals:
In contrast to the HTML-based info timetable, where Units generates HTML files, the concept of Untis in
info mode is based on the fact that Untis is installed on each computer where the timetable can be
queried (info terminals) accessing the actual .gpn file used by the scheduler.
This difference is in certain circumstances extremely important from the point of view of data security.
Whereas HTML files contain only those timetable data that you decide to publish, the .gpn file contains
all data, sometimes including sensitive data that can be read bypassing Untis.
Untis is launched on the info terminals with a parameter that enables it to be run in info mode, which
allows timetables to be easily queried but which does not permit any data to be modified.
Caution:
It is technically quite possible to start Untis in normal mode with all the consequences for data security.
Appropriate network parameters must be set to ensure data security.
6.1
Requirements
The following requirements must be met in order for the desired information to be displayed on the
individual info terminals:
44
6.2
Untis
·
Untis must be installed on each computer where the timetable is to be displayed (e.g. in the staff
room).
·
It must be possible to access the timetable and substitution planners' current file from every info
terminal.
Setting up window groups
You can decide which information - i.e. which Untis windows in which order - should be displayed on the
info terminals. This is determined with the help of window groups in the timetable and substitution
planners' current file.
In order to create window groups, first arrange the windows that you wish to save next to each other in a
clear order. Then select 'Windows | Window groups' from the main menu A window will open allowing
you to arrange the window group.
Note:
If you create a window group for info mode, you must give name each group 'Info[char]' where [char]
stands for a digit 1-9 or a letter A-Z. Please note that the first letter “I” of Info must be in upper case.
The predefined window groups supplied with the system are called Info1 through Info4, with the two
groups Info1 and Info2 being configured for (standard) Untis mode and Info3 and Info4 for substitution
mode. can of course modify these predefined window groups at any time.
6.3
Setting up the info terminal
It is necessary to create a new shortcut on the desktop (or in a folder) on the info terminal in order to
launch Untis.
6.3.1
Creating a shortcut
·
·
Right-click on an empty space on the desktop.
Select “New | Shortcut” from the context menu.
Untis in info mode
45
The shortcut target must be the Untis program. An additional parameter must be entered in order for the
application to run in info mode.
·
Select <Browse> and create the shortcut to the file Untis.exe. Alternatively you can enter the path
manually.
46
Untis
Provided you did not change the default path when you installed Untis, the path for the 2014 application
version should look as follows:
C:\Program Files\Untis\2014\Untis.exe
In order for the application to run in info mode the path to the desired file and the name of the window
group must be added. This could look as follows:
C:\Untis\Demo_Info.gpn,Info1
The complete path is therefore as follows:
C:\Program Files\Untis\2014\Untis.exe
C:\Untis\Demo_Info.gpn,Info1
where C:\Untis\Demo_Info.gpn is the name (including path) of the file that is to be displayed and Info1 is
the name of the window group that is to be used for display. Please note that there is no space before
the ,Info1 parameter.
If you did not install Untis in the default path proposed you must enter the path you defined instead of
C:\Program Files\Untis\2014\Untis.exe
Untis in info mode
47
· Click on <Continue>
· Enter 'Info timetable' as name and click on <OK>.
·
6.3.1.1
Now launch Untis in info mode by clicking on the icon.
Info mode
When Untis is launched in info mode, the .gpn file is checked at regular to intervals to see if changes
have been made and if so it is reloaded.
Tip: Changing the reload time
A .gpn file read in info mode is checked for changes at 10-second intervals This interval can be modified
in the untis.ini file in the Windows directory. Simply add the following line to the [info]section:
ReloadTime=time [sec]
Replace [sec] with the number of seconds that Untis should wait before re-checking.
The display in info mode differs from that in Untis mode in several respects:
48
Untis
·
The toolbar in the main window has only a small number of icons.
·
No toolbar is displayed in any of the individual windows.
·
The master data windows have no form view.
Communication between the individual windows works in the same way that you are accustomed to in
Untis. If you click on a teacher in the master data view you will see his/her timetable displayed in the
teacher timetable.
You are familiar with almost all the icon functions in the toolbar from the Untis-mode. The only new icon
is <Refresh screen>, which restores the windows to their original positions (e.g. after windows have been
closed).
If substitution mode is active this also sets the date to the current date automatically.
There is a small difference in the print functionality. In info mode it is only possible to make general
settings in the print selection dialogue. For example, you can choose between portrait and landscape
format but you can only print the current timetable.
6.3.2
Changing the displayed window group
You can specify any window group between Info1 and Info9 or InfoA and InfoZ as the info parameter.
·
Right click on the shortcut just created and select “Properties” from the context menu.
·
On the shortcut tab change the entry in the target field to e.g.
C:\Program Files\Untis\2014\Untis.exe
C:\Untis\Demo_Info.gpn,Info5
and confirm with <OK>.
·
6.3.3
Now restart Untis (in info mode) by double-clicking the “Info timetable” icon.
Deactivating printing
You only need to check the corresponding box in the window groups window in order to deactivate
printing.
·
Select menu item “Windows | Window groups”.
Untis in info mode
·
49
Check the box "No print-out (info)" for e.g. Info1.
This results in the <Print> icon being removed from the info timetable toolbar.
6.4
Untis MultiUser in info mode
Info mode also works when you use the MultiUser version of Untis. Whereas the single-user version
requires the path to the file in the command line, the multi-user version requires the school, school year
and version, separated by ~ and preceded by "DB".
Instead of
C:\Untis\Demo_Info.gpn,Info1
you would enter
DB~myschool1~2013-2014~1,Info1
This is the same name that can be found in the list of most recently opened files (see figure).
50
Untis
Caution:
Certain special characters, e.g. the slash in school year must be replaced by a hyphen for technical
reasons. We recommend that you refer to the list of recently opened files.
When Untis MultiUser first starts in info mode, the system checks whether there is a user or user group
with the name “Info”. If not, the user and group are automatically created (without password). This user is
then used to log in from all info terminals.
Both the user and user group can be edited just like any other user (group).
More than one info user
If info mode is run on several computers with the same user, logging the user off from one terminal will of
course log the user off from all terminals. Untis therefore allows you to launch info mode on different
computers using any user name you like. To do this simply specify the user and password in the
command line as well:
DB~myschool1~2013-2014~1,Info1 /user=sampleuser /pw=samplepassword
Tip: Automatic login in standard mode
If the window group is not specified in the command line, Untis MultiUser will start in standard mode, the
login dialogue will be skipped and the user defined will be automatically logged in to the database.
Application notes
7
Application notes
7.1
HTML settings in the timetable
51
The info timetable module allows a special format for each output of the “static HTML” function to be
specified for the display of the timetable. Special settings for HTML pages can be specified within these
formats.
By default, all settings made in the timetable are included in the HTML output. This applies to all the
elements that can be seen in the timetable (subject, teacher, room ...) but also to colour settings and
fonts for those elements.
The following steps describe how to define additional settings:
·
Start Untis and load the demo.gpn file
·
Open the class timetable via “Timetable | Classes”
·
Click the <Timetable settings> icon
·
Activate the HTML tab
Here you have the opportunity to influence the minimum height and width of a timetable period, the
column width of the row labels and the alignment of the contents.
If the option 'Entire width of the cell' is unchecked, the lettering in a timetable cell will be centred
whereas if the option is checked, the full width of the cell will be used ensuring that the lettering reaches
the edge of the cell.
Allow word wrapping
If this option is activated a new row will begin automatically when there is not enough space in the HTML
output for text.
7.2
General HTML Settings
General HTML settings In addition to format-specific settings you can also define general rules for
creating HTML pages. You can find these settings under menu item “Settings | Miscellaneous” on the
52
Untis
"HTML" tab.
This option allows you to specify the position of the navigation controls for the HTML output from the
Untis standard application as well as the position of the footer for all HTML output.
If you are acquainted with HTML you can define properties for the <Body> and <Table> tags in the
“HTML-Timetables” section of the window. As soon as these input fields contain anything, the
corresponding tags will include only those properties that you define and the usual standard definitions
will be ignored.
If you are unsure what to enter in these fields it is advisable to leave them empty and use the standard
Untis settings.
7.3
Notes for web designers
If you output HTML with the info timetable module, HTML files will be used that store the layout of the
individual pages. The files are available as so-called templates in the Untis directory (e.g. C:\program
files\Untis\2014) and can be tailored to match your school’s ‘corporate design’.
In addition to the definition of the HTML page layout the files with the .thtm extension contain wildcards
that Untis replaces with various values during export. These wildcards are defined in the format <LIN=@
[wildcard]> , with the following variables being used for [wildcard] :
prg
ver
dat
tim
abt
he1
= program
= version
= date
= time
= department
= heading1 from menu item "Reports | Settings"
Application notes
he2
sm1
sm2
naw
chs
53
=
=
=
=
heading2 from menu item "Reports | Settings"
line1 of the school description defined in the licence data
line2 of the school description defined in the licence data
width of the navigation bar defined in the field of the same name
on the "Navigation" tab in static HTML
= the following header is output in all template files:
<meta http-equiv=“Content-Type“ content=“text/html; charset=@chs “>
The character set is important for the correct display of different sets of characters and can therefore be
changed using the “chs” variable. This variable is pre-allocated by Untis depending on the language
version. However, you can also specify this in the untis.ini file (by default in the Windows user directory)
in the [Info] section with the following entry:
PageEncoding=<chs>
7.3.1
Output files for 'static HTML'
The contents of the individual files are as follows:
default.thtm : Definition of the frame used with a horizontal navigation bar
default_02.thtm : Definition of the frame used with a vertical navigation bar
fuss.thtm : Footer containing by default the address of Gruber&Petters
navbar_h.thtm : Horizontal navigation bar
navbar_v.thtm : Vertical navigation bar
selclass_h.thtm : Fragment for navigation bar for class-by-class selection (horizontal)
selclass_v.thtm : Fragment for navigation bar for class-by-class selection (vertical)
title.thtm : Header containing the Untis version used, the school name and the export date (horizontal
navigation bar)
title_02.thtm : Header containing the Untis version used, the school name and the export date (vertical
navigation bar)
welcome.thtm : Home page with welcome message
7.3.2
Design modifications using CSS
As the HTML pages assign each day to a class whose definition is stored centrally in the file untisinfo.
css , you can quickly and easily make modifications to the design of “static HTML” for all HTML files..
7.3.3
Output files for 'monitor HTML'
subst_monitor.thtm : Structure of substitution list
monitormaster.thtm : Master template for screen sections with frames
This template includes sections enclosed in brackets @@[<Condition> and @@]<Condition>. Such
sections are only included in the output if the condition is true.
Example:
@@[noticker
54
Untis
<HTML code which is only executed when there is no ticker>
@@[noticker
plain_monitor.thtm : Frame for substitution list
subst_title.thtm : Frame with title
ticker.thtm: Frame for ticker bar
Tip:
If you wish to customise templates, create a separate directory for this and enter the directory path
under 'Settings | Miscellaneous | Files | HTML templates'. Copy the template that you wish to customise
to this directory and make the desired changes. When creating info output, Untis first searches the
template directory for templates and only if it does not find them there will it search in the Untis program
directory.
You can specify a different template file for each monitor output format by copying the subst_monitor.
thtm file and renaming it to <formatname>.thtm. <formatname> must correspond to the name of the
output format.
Note:
If you wish to define your own format for monitor output when using the ticker or split screen
functionality, copy template plain_monitor.thtm and rename it to <formatname>.thtm.
The page with the frame layout can also be customised. To do this, rename the copied monitormaster.
thtm file to <formatname>_monitormaster.thtm.
By modifying these files you can easily influence the way the HTML output is displayed and so, for
example, tailor it to match the layout of your school's website. A modification of the font size for "monitor
HTML" output is also a simple matter, as the following example demonstrates:
Application notes
55
Caution:
All template files as well as the untisinfo.css file are defined in HTML or CSS code. Be sure to make
changes only if you are acquainted with these browser languages.
You can also set the name of the initial page that is used (from 'Default.htm') in the untis.ini file. Within
Untis you can open this file via '? | Open Untis.ini ...'. Find the [Info] section and add a line 'Startpage=
[desired name].
Example:
[Info]
Startpage=index.html
7.4
Technical description of database export
Exporting databases with the info timetable module automatically creates ASCII (text) files, as described
below.
Please refer to the chapterDatabase exportfor a description of how to perform an export.
7.4.1
date.txt
date.txt (date period)
Contains one data record for each week for which the timetable data are available.
Fields :
1 char - calendar week, e.g. 36
2 char - day and month of the Monday in this week, e.g. 4.9.
3 date - full date of the month in the form YYYYMMDD e.g. 20130904
4 char - school week, e.g. 1
Example :
36
7.4.2
4.9.
20130904
1
time.txt
time.txt (times)
Contains one data record for each period in the Untis timetable grid
Fields :
1 byte - number of the weekday (Monday = 1, Sunday = 7)
2 byte - number of lesson periods, e.g. 8
3 byte - number of the period, e.g. 4
4 char - time when the period begins (HHMM), e.g. 1045
5 char - time when the period ends (HHMM), e.g. 1130
Example :
1
8
4
1045
1130
56
7.4.3
Untis
teacher.txt
teacher.txt (teacher name)
Contains one data record for every teacher at the school
Fields :
1 char - teacher (short) name, e.g. New
2 char - teacher long name, e.g. Newton
3 char - teacher first name, e.g. Isaac
Example :
New
7.4.4
Newton
Isaac
class.txt
class.txt (class name)
Contains one data record for every class in the school
Fields :
1 char - class (short) name, e.g. 1a
2 char - class long name, e.g. "Class 1a (Gauss)"
Example :
1a
7.4.5
Class 1a (Gauss)
room.txt
room.txt (room name)
Contains one data record for every room in the school
Fields :
1 char - room (short) name, e.g. R1a
2 char - room long name, e.g. "Classroom 1a"
Example :
R1a
7.4.6
Classroom 1a
student.txt
student.txt (student name - only in connection with the student timetable or course scheduling module)
Contains one data record for every student at the school
Fields :
1 char - student
2 char - student
3 char - student
4 char - student
5 char - student
(short) name, e.g. Kip
long name, e.g. Kipling
first name, e.g. Rudyard
number, e.g. 1907
class, e.g. 10a
Example :
Kip
Kipling Rudyard
1907
10a
Application notes
7.4.7
57
lesson.txt
lesson.txt (timetable data)
Contains one or more data records for each lesson period in the period of time exported. The records are
output sorted by teacher, weekday and period. The sequence of teachers corresponds to the sequence
of teachers in the teacher master data.
Fields :
1 char - teacher (short) name, e.g. New
2 byte - number of the weekday (Monday = 1, Sunday = 7)
3 byte - number of the period, e.g. 3
4 char - subjects (short) name, e.g. Mat
5 char - room (short) name, e.g. R2a
6 int -internal Untis lesson number (= 0 if this lesson is not a regular lesson), e.g. 90
7 byte code: currently not used
8 char - class (short) name, e.g. 2a
9 char(53) - week flags: a flag for each calendar week (the first character is for the first calendar week
etc.)
no data were output for this week
0
lesson is not held this week
1
lesson is held this week
x
lesson does not apply this week
Example 1 :
New
1
3
Mat
R2a
90
0
2a
—————————————————1101x1111111———
Explanation for example 1 : On Monday (=1) teacher New takes class 2a in the third period for subject
Mat in room R2a. Lessons were exported for 12 weeks
(110111111111). The first week is calendar week 36. This lesson is not held in week 38. The lesson
does not apply in week 40.
Example 2 :
Arist
1
4
SportM Th2
73
0
1a
—————————————————1111———————
Arist
1
4
SportM Th2
73
0
1b
—————————————————1111———————
Rub
1
4
SportK Th1
73
0
1a
—————————————————1111———————
Rub
1
4
SportK Th1
73
0
1b
—————————————————1111———————
Explanation for example 2 : In the fourth period on Monday teachers Arist and Rub have classes 1a and
1b for sport. The two teachers take different subjects that indicate that Arist gives a sports lesson for
girls and Rub a sports lesson for boys.
The lessons for four weeks were exported beginning in calendar week 36.
7.4.8
supervision.txt
supervision.txt (break supervisions)
Contains one data record for each break supervision in the period of time exported. Records are exported
58
Untis
for the basic break supervision timetable and for break supervision substitutions.
Fields:
1
int
7.4.9
2
3
4
5
byte
char
char
char
6
byte
if field 6 = 0, number of the weekday (Monday=1, Sunday=7, e.g. 1
if field 6 <> 0, then the date (YYYYMMDD)
number of the period, e.g. 3
corridor short name, e.g. corr1
teacher (short) name, e.g. New
empty if field 6 = 0
if field 6 = 1, (short) name of the substitute teacher,
e.g. Gauss
0 for the basic break supervision timetable
1 for a break substitution
2 when no break supervision takes place
Example: representation of a timetable
Preparation: create a table 'lesson' to accommodate the lesson structure and import the lesson data into
the table.
create table lesson
(
teacher char(20),
day
tinyint,
period tinyint,
subject char(20),
room char(20),
lessonid
int,
flag
int,
class char(20),
week char(53)
);
If for example a timetable for teacher New for week 37 is to be displayed, you can issue the following
SQL statement to find the data records required:
Select * from lesson where teacher = ‘New’ and not (mid(week, 37, 1) = ‘0’);
The required data for every possible period (i.e. periods 1 through 8 from Monday to Friday) can now be
found in the result of the database query.
The week flag for the 37th week indicates whether lessons take place or whether they are not applicable.
If the timetable is to be represented without any particular flag indicating whether lessons apply or not,
the data records can be ignored when week flag = x.
59
Endnotes 2... (after index)
Back Cover