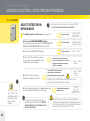
1
PROSEGUR PROVIEW +
USER MANUAL
PROSEGUR PROVIEW +
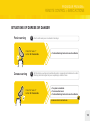
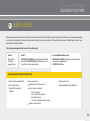
RECOMMENDATIONS
i
It is important that all the users of the alarm system take a little time to learn the basic functions of the control elements: keypad, remote control, control
panel and cards.
How your alarm system is used.
When leaving your home, ensure the system is fully activated.
This action should become a habit.
Before activating the system, ensure that all means of entry to
the home are properly closed.
Use the peripheral connection when:
• remaining within the house, you wish to have the alarm system
activated at the points of entry.
• when you are not at home, leave animals or other items that
might trigger the alarm system by chance inside.
Use the partial activation when you want to protect some areas
and exclude others from the alarm system.
Identifying each of the alarm system’s users is important. Therefore,
we recommend assigning each user with a different code.
For further information, please call our customer service
department at: 902 202 999.
General recommendations
Do not hang objects that might hinder the
detectors’ coverage given that they will be
less effective.
We recommend cleaning the equipment with
a damp cloth and not using abrasive products
or dusters.
Following the instructions in this guide is
important. Only Prosegur staff can manipulate
and perform maintenance on the system.
Prevent the alarm being triggered because of:
• sudden changes in temperature.
• air currents that cause curtains to move or
decorative objects to fall.
PROSEGUR PROVIEW +
SUMMARY
2
Recommendations
4-5
Introduction to the equipment
6
7
8-9
Keypad
Description
Basic actions
10
11
12-13
Remote control
Description
Basic actions
14
15
16
Proximity card
Basic keypad actions
Basic external reader actions
17
Alarm trigger situation
19
Alarm system's advanced functions
PROSEGUR PROVIEW +
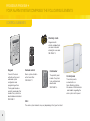
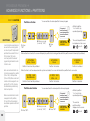
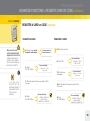
YOUR ALARM SYSTEM COMPRISES THE FOLLOWING ELEMENTS
CONTROL ELEMENTS
Proximity cards
Programmed to
activate and deactivate
your alarm instead of
entering the user code.
SEE PAGE 15.
Keypad
Remote control
Transmits the basic
activation actions and
advanced system
configuration and
programming actions.
The keypad includes a
proximity card reader that
enables the system to be
deactivated and activated
SEE PAGE 7.
Basic system activation
action transmitter.
SEE PAGE 11.
Card reader
The proximity card
enables the system
to be activated and
deactivated.
SEE PAGE 16.
N.B.:
The alarms system elements may vary depending on the type of contract.
4
Control panel
The control panel is
connected to our
Alarm Monitoring Centre.
We receive all the information
and incidents regarding the
alarm system via this panel.
PROSEGUR PROVIEW +
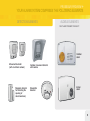
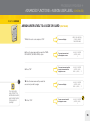
YOUR ALARM SYSTEM COMPRISES THE FOLLOWING ELEMENTS
DETECTION ELEMENTS
AUDIBLE ELEMENTS
SEE "ALARM TRIGGER" ON PAGE 17.
Outdoor
alarm
Movement detector
(with or without camera)
Magnetic detector
for detecting the
opening of
doors/windows)
Outdoor movement detector
with camera
Smoke/fire
detector
Indoor
alarm
5
PROSEGUR PROVIEW +
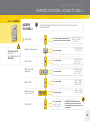
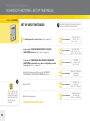
KEYPAD
PROSEGUR PROVIEW +
KEYPAD > DESCRIPTION
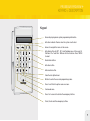
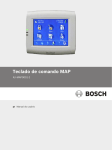
Keypad
Screen displaying alarm system programming information.
Activation indicator. Flashes when the system is activated.
Arrows to navigate the menu on the screen.
Activation buttons for SP 1, SP 2 and Perimeter areas. In the event of
Partitions: PA=1 and PA=2. Buttons with two functions. Press TWICE
to select.
Deactivation button.
Activation button.
Authorisation button.
Clear the last digit entered.
Buttons to enter the user and programming codes.
Press to exit from the option seen on screen.
Card reader area.
Press for 2 seconds to activate the emergency buttons.
Panic, Doctor and Fire emergency buttons.
7
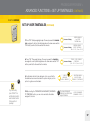
PROSEGUR PROVIEW +
KEYPAD > BASIC ACTIONS
KEYPAD
i
Full activation
1. Press "OK".
ADVANCED
FUNCTIONS
ON PAGE 19.
i
The partial activation
modes "SP1", "SP2"
and "Perimeter"
indicate the different
areas to be activated
that were configured
initially by the person
that installed the alarm
system. For more
information contact the
Client Management
Centre on 902 202 999.
!
Before switching from
a fully activated
to a partially activated
alarm system you
must always deactivate
your alarm.
8
Partial activation
Activates all areas of the alarm system.
2. Enter your code
(for example, "0000").
i
The keypad will make
several beeping sounds
indicating that the
alarm will be activated
in a few seconds.
3. Press "OK".
LEAVE THE AREAS
WHERE THE ALARM
IS ACTIVATED.
Activates the selected areas and excludes the unselected areas from the alarm system.
The keypad will
make several beeping
sounds indicating that the
alarm will be activated in
a few seconds.
2. SP1 Partial activation.
1. Press "OK".
2. SP2
partial
activation.
2. Select the area
to be activated.
Deactivating
the system
2. Perimeter activation
i
4. Enter your code
(for example, "0000").
3. Press
the "OK" button.
Depending on how it is
programmed, it can be
silently activated.
("night activation").
5. Press "OK".
LEAVE THE AREA
WHERE THE ALARM
IS ACTIVATED.
Deactivates the system regardless of how it is activated: fully or partially.
YOU CAN NOW
ACCESS THE
DEACTIVATED AREA.
1. Press
the "OK" button.
2. Enter your code
(for example, "0000").
3. Press "OK".
i
PROSEGUR PROVIEW +
KEYPAD > BASIC ACTIONS
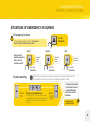
SITUATIONS OF EMERGENCY OR DURESS
!
Emergency buttons
Press for
To activate the direct emergency buttons, first you must
press the "PANIC" button for two seconds.
Panic:
2 seconds.
Doctor:
Next press the
desired emergency
button for two
seconds as well:
The alarm
will not
sound.
Press for
2 seconds.
Duress warning
1. Press
"OK".
i
Fire:
The alarm
will not
sound.
Press for
2 seconds.
The alarm
will sound.
Press for
2 seconds.
With this function you will appear to deactivate the system in an apparently normal fashion and our
Alarm Monitoring Centre will recognise that you are experiencing a situation of duress.
2. Enter your modified code.
(for example, "0001". If your code ends in nine, you
must enter zero. If your user code is 0000 you should
enter 0001, the result of adding 1 to the last digit of
your code).
3. Press
the "OK"
button.
• The system is deactivated.
• The alarm will not sound.
• The Alarm Monitoring
Centre will receive the
notification.
YOU CAN NOW ACCESS
THE DEACTIVATED AREA.
9
PROSEGUR PROVIEW +
REMOTE CONTROL
PROSEGUR PROVIEW +
REMOTE CONTROL > DESCRIPTION
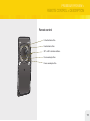
Remote control
Full activation button.
Deactivation button.
SP1 or SP2 activation buttons.
Panic warning button.
1
2
Duress warning button.
11
PROSEGUR PROVIEW +
REMOTE CONTROL > BASIC ACTIONS
REMOTE
CONTROL
Full activation
!
You must press the
buttons quickly. The
remote control will beep
twice to confirm. If it
does not beep twice,
press the button again.
If the remote control
beeps for 4 seconds
straight it is indicating
that one of the detectors
has identified movement
or is open. Check and
re-activate.
i
Activates all areas of the alarm system.
• The remote control will beep twice to confirm your action.
• The remote control will make several beeping sounds indicating that
the alarm will be activated in a few seconds.
1. Press the "OK"
button.
Partial activation i
LEAVE THE AREAS WHERE THE ALARM IS ACTIVATED.
Activates the selected areas and excludes the unselected areas from the
alarm system.
• The remote control will beep twice to confirm your action.
• The remote control will make several beeping sounds indicating that
the alarm will be activated in a few seconds.
LEAVE THE AREAS WHERE THE ALARM IS ACTIVATED.
1. Press the button for the area
to be connected.
Deactivating
the system
i
Deactivates the system regardless of how it is activated: fully or partially.
• The remote control will beep twice to confirm your action.
1. Press the "OFF" button once.
12
YOU CAN NOW ACCESS THE DEACTIVATED AREA.
PROSEGUR PROVIEW +
REMOTE CONTROL > BASIC ACTIONS
SITUATIONS OF DURESS OR DANGER
Panic warning
i
Press the button when you are in a situation of real danger.
Press the "area 1"
button for 2 seconds.
Duress warning
i
• The Alarm Monitoring Centre will receive the notification.
With this function you will appear to deactivate the system in an apparently normal fashion and our Alarm
Monitoring Centre will recognise that you are experiencing a situation of duress.
Press the "area 2"
button for 2 seconds.
• The system is deactivated.
• The alarm will not sound.
• The Alarm Monitoring Centre will receive the notification.
YOU CAN NOW ACCESS THE DEACTIVATED AREA.
13
PROSEGUR PROVIEW +
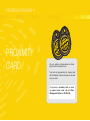
PROXIMITY
CARD
You can activate and deactivate the Alarm
System with the proximity card.
They work by approaching the Keypad and
the Card Reader, and do not require you to enter
your user code.
If you lose a proximity card or need
to request more cards call our Client
Management Centre on: 902 202 999.
PROSEGUR PROVIEW +
PROXIMITY CARD > BASIC ACTIONS
KEYPAD
i
Full activation
Activates all areas of the alarm system.
Place the card on the keypad's card reader.
• The remote control will beep twice to confirm your action.
• The keypad will beep several times in order to indicate the time you have
LEAVE THE AREAS WHERE THE ALARM IS ACTIVATED.
Deactivating
the system
Card
reader
area
i
Deactivates the system regardless of how it is activated:
fully or partially.
Place the card on the keypad's card reader.
• The remote control will beep twice to confirm your action.
YOU CAN NOW ACCESS THE DEACTIVATED AREA.
15
PROSEGUR PROVIEW +
PROXIMITY CARD > BASIC ACTIONS
THE CARD
READER
i
Full activation
Activates all areas of the alarm system.
Place the card on the keypad's card reader for two seconds.
Full activation.
Indicator lights
The reader will beep several times in
order to indicate the time you have.
Card
reader
area
1. Identify the detector
causing the incident on
the screen by pressing
the "OK" button.
2. Resolve the incident
where the detector is
located.
Deactivating
the system
i
!
Activation error.
The two lights are green for 5 seconds and then turn off to indicate that the
activation has been interrupted because an incident has been detected.
3. Press "OK" and the
alarm will be reactivated.
4. If the incident persists
press "ESC NO"and the
alarm will be reactivated.
LEAVE THE AREAS WHERE THE
ALARM IS ACTIVATED.
Deactivates the system regardless of how it is activated: fully or partially.
Place the card on the keypad's card reader for two seconds.
Deactivation complete.
YOU CAN NOW ACCESS THE
DEACTIVATED AREA.
16
Triggered alarm detected.
1. Check the
keypad's screen
to see where the
alarm has been
triggered.
2. Press "OK" to confirm
you know the alarm
that has been triggered.
YOU CAN NOW ACCESS
THE DEACTIVATED AREA.
!
PROSEGUR PROVIEW +
i ALARM TRIGGER SITUATION
An alarm is triggered for different reasons, but only when it is activated:
Movement is detected
by one of the
alarm system's detectors.
Improper manipulation
of the detectors.
By the users, by sending a panic/
duress signal.
When an alarm is triggered, our Alarm Monitoring Centre will act in compliance with current legislation in force:
1. The user will be
contacted by
telephone.
2. They will be
asked to supply
their code word.
3. We will confirm whether
the alarm has been
triggered by chance or if
it is a real alarm.
4. We shall proceed as
per the type of service
contracted.
PROSEGUR PROVIEW +
ALARM TRIGGER SITUATION
FROM THE KEYPAD
Deactivate the system:
Identify the cause of the alarm trigger from
the information that appears on screen:
!
If "sabotaje" (sabotage)
appears on the screen:
call our Client Management
Centre: 902 202 999`
The Client Management
Centre will act pursuant to the
current legislation in force.
18
1. Press
"OK".
!
2. Enter your code
(for example, "0000").
3. Press
"OK".
1. Press
the "OK"
button.
The detector that has
been triggered will
appear on screen:
Z 1 or 2 or 3 or 4 or the
name of the detector.
1. Press "ESC NO"
to cancel the incident.
If the alarm is triggered and you do not confirm it on the keypad, the system will not allow you to reactivate the system.
PROSEGUR PROVIEW +
ADVANCED FUNCTIONS
i USER LEVELS
We recommend each user to have and use their own code to interact with the alarm system. Each code is linked to a user level and, depending
on the level associated with the code, the user will be able to access all or only part of the protected area, have different times to do so, view
the incidents and other actions.
The system is designed to link users to 3 function levels:
Level 1:
Level 2:
Level 3 (Administrator level):
Reserved for
Prosegur
programming.
FUNCTIONS ALLOWED: Activating and deactivating
the system. RESTRICTIONS: Scheduled access to
FUNCTIONS ALLOWED: Activating and deactivating
the system. Code programming.
the system, programming.
RESTRICTIONS: None.
Level 3 functions (Administrator level):
• Alarm system operating test.
• List of daily events.
• View the last recorded
incident.
• Access card/code.
Register new codes or cards.
• Alarm parameters.
• Deactivating/Activating detectors.
Set up codes and cards:
• for a user level.
• for a limited time period.
• for specific areas.
• for some authorised alarm modes.
Delete a card or code.
19
PROSEGUR PROVIEW +
ADVANCED FUNCTIONS > PARTITIONS
FROM THE KEYPAD
You can activate the desired partition from any keypad.
Partition activation
The keypad will
make several beeping
sounds indicating that the
alarm will be activated in
a few seconds.
PARTITIONS
2. Enter your code
(for example, "0000").
LEAVE THE AREA
WHERE THE ALARM
IS ACTIVATED.
The selected partitions will
be displayed on the screen
A set of detection areas that work
as a whole. Your security system
can be set up with 2 independent
partitions that are called PA1 and
PA2 by default. The technician must perform the relevant
programming beforehand in order
for this to work.
1. Press
"OK".
Each user code/card/remote control must be assigned to a partition
(PA1 or PA2) or both partitions
(PA1 and PA2).When a code/card/
remote control is assigned to one
partition (PA1 or PA2), all activation/deactivation operations only
affect such partition.
When the time to exit has elapsed and the system is activated, the screen will indicate the partition that is connected.
or
or both
When activation is started, the screen will display the partition that is being activated with the partition name followed by A (activated).
ACTIVATING
PA1=A PA2=A
ACTIVATING
PA1=A
ACTIVATING
PA2=A
Partition 1 and 2 are fully activated.
Partition 1 activated.
Partition 2 activated.
Fri 07/01 14:24
PA1=A PA2=A L:1s
Fri 07/01 14:24
PA1=A L:1s
Fri 07/01 14:24
PA2=A L:1s
Partition 1 and 2 are fully activated.
Partition 1 activated.
Partition 2 activated.
Partition deactivation
You can deactivate the desired partition from any keypad.
The keypad will
make several beeping
sounds indicating that the
alarm will be activated in
a few seconds.
When a code/card/remote control
is assigned to both partitions,
PA1 and PA2, all the activation/
deactivation operations affect both
partitions.
1. Press "OK".
20
3. Press
"OK".
4. Select partition
1 or 2 or both, by
repeatedly pressing.
2. Enter your code
(for example, "0000").
3. Press "OK".
LEAVE THE AREA
WHERE THE ALARM
IS ACTIVATED.
4. Select partition
1 or 2 or both, by
repeatedly pressing.
The selected
partitions will be
displayed on the screen
or
or both
PROSEGUR PROVIEW +
ADVANCED FUNCTIONS > ACCESS TO LEVEL 3
FROM THE KEYPAD
ACCESS
TO LEVEL 3
i
1. Press "OK".
!
If you have any queries,
please contact
our Client Management Centre:
902 202 999.
You must first identify yourself as a level 3 user in order to be able to change your alarm
system's configuration.
The screen will display: the date, the time, the Lun 14/11 (Mon 14/11) 12:05
DESARM. (DEACTIVATE)
system status and the access level. For example:
NIVEL (LEVEL) : 1
NIVEL DE ACCESO
(ACCESS LEVEL)
1
2. Press the down arrow.
The screen will display:
3. Press "OK".
The screen will display:
NIVEL DE ACCESO
(ACCESS LEVEL)
NIVEL (LEVEL): 1
4. Press the down
arrow twice.
The screen will display:
NIVEL DE ACCESO
(ACCESS LEVEL)
NIVEL (LEVEL): 3
5. Press "OK".
The screen will display:
INTRO. (INSERT)
TARJETA/ (CARD/)
CODIGO (CODE)
6. Enter your code
(for example, "0000").
The screen will display:
The screen will display:
7. Press "OK".
NIVEL DE ACCESO
(ACCESS LEVEL)
3
INTRO. (INSERT)
TARJETA/ (CARD/)
****
OPERATION SUCCESSFUL! The system has
recognised you as a level 3 user. From now on
you can select the functions you wish to control as
an administrator.
21
PROSEGUR PROVIEW +
ADVANCED FUNCTIONS > REGISTER CARD OR CODE
FROM THE KEYPAD
REGISTER A CARD or CODE
1. Identify yourself as a level 3 user
(steps on page 21).
The screen will display:
2. Press the down arrow until you reach
the "TARJETA/CODIGO ACCESO"
(ACCESS CODE/CARD) option.
The screen will display:
TARJETA/ (CARD/)
CODIGO ACCESO
(ACCESS CODE)
3. Press "OK".
The screen will display:
REGISTRAR UN(A)
(REGISTER A)
TARJ. (CARD) /
CODIGO (CODE)
4. Press "OK".
The screen will display:
INTRO. (INSERT)
TARJETA (CARD/) /
CODIGO (CODE)
!
When you enter a new
code it will automatically be
assigned level 3 user status.
To assign it another level you
must do so via the "Asignar
nivel de usuario" (Assign user
level) option, see PAGE 24.
i
To go back a step, press
"ESC NO". You will therefore
be able to select another
function that you ruled out
previously.
(CONTINUES ON THE NEXT PAGE)
22
NIVEL DE ACCESO
(ACCESS LEVEL)
3
PROSEGUR PROVIEW +
ADVANCED FUNCTIONS > REGISTER CARD OR CODE (CONTINUED)
FROM THE KEYPAD
REGISTER A CARD or CODE
(CONTINUED)
REGISTER A CARD:
!
When you enter a new
code it will automatically be
assigned level 3 user status.
To assign it another level you
must do so via the "Asignar
nivel de usuario" (Assign user
level) option, see PAGE 24.
i
To go back a step,
press "ESC NO". You
will therefore be able to
select another function
that you ruled out
previously.
5. Place the card on the
keypad's card reader.
REGISTER A CODE:
Two beeps indicate that
the card has been read
5. Enter the new code.
The screen will display
6. Press
the "OK" button.
The screen will display
Nombre de codigo
(Code name)
7. Enter the name of the user you wish to link to
the card.
8. Press
the "OK" button.
The screen will display:
NOMBRE INTRODUCIDO
(NAME ENTERED)
MEMORIZADO (MEMORISED)
6. Press "OK".
CONFIRMAR CODIGO
(CONFIRM CODE)
7. Enter the new
code again.
The screen will display
Nombre de codigo
(Code name)
8. Enter the name of the user you wish to link
to the code.
9. Press
the "OK" button.
The screen will display:
NOMBRE INTRODUCIDO
(NAME ENTERED)
MEMORIZADO (MEMORISED)
23
PROSEGUR PROVIEW +
ADVANCED FUNCTIONS > ASSIGN USER LEVEL
FROM THE KEYPAD
ASSIGN USER LEVEL TO A CODE OR CARD
1. Identify yourself as a level 3 user
(steps on page 21).
2. Access the "ACCESS
CARD/CODE" (steps 2 and 3 on page 22).
NIVEL DE ACCESO
(ACCESS LEVEL)
3
The screen will display:
The screen will display:
REGISTRAR UN(A) (REGISTER A)
TARJ. (CARD) / CODIGO (CODE)
3. Press the down arrow until you reach
the "CONFIGURAR TARJ./CODIGO"
(CONFIGURE CARD/CODE) option.
The screen will display:
4. Press "OK".
The first of the users registered
on the system will be displayed on
screen, preceded by "01".
CONFIRMAR.
TARJ. (CONFIRM CARD) /
CODIGO (CODE)
01: CODIGO****
(01: CODE**** PRO1)
i
To go back a step, press
"ESC NO". You will therefore
be able to select another
function that you ruled out
previously.
5. Press the down arrow until you see the user
for which you wish to change the set-up.
The existing users will be
displayed on the screen:
6. Press "OK".
The screen will display:
(CONTINUES ON THE NEXT PAGE)
24
04: CODIGO****
(04: CODE****NAME)
CONFIRMAR.
(CONFIRM) CODIGO (CODE)
PROSEGUR PROVIEW +
ADVANCED FUNCTIONS > ASSIGN USER LEVEL (CONTINUED)
FROM THE KEYPAD
ASSIGN USER LEVEL TO A CODE OR CARD
7. Enter this user's code and press "OK".
The screen will display:
8. Press the down arrow until you reach the "NIVEL
DE ACCESO" (ACCESS LEVEL) option.
The current user access level
will be displayed on screen:
To go back a step,
press "ESC NO". You
will therefore be able to
select another function
that you ruled out
previously.
MODIFICAR NOM.TARJ.
/ CODIGO (MODIFY
CARD/CODE NAME)
NIVEL DE ACCESO
(ACCESS LEVEL)
2
The current user access level that
is ready to be amended will be
displayed on screen:
NIVEL DE ACCESO
(ACCESS LEVEL)
NIVEL (LEVEL) : 2
10. Press the down arrow until you reach the
access level you wish to assign.
The screen will display:
NIVEL DE ACCESO
(ACCESS LEVEL)
NIVEL (LEVEL) : 3
11. Press "OK".
The new user access level will
be displayed on screen:
9. Press "OK".
i
(CONTINUED)
NIVEL DE ACCESO
(ACCESS LEVEL)
3
25
PROSEGUR PROVIEW +
ADVANCED FUNCTIONS > SET UP TIMETABLES
FROM THE KEYPAD
SET UP USER TIMETABLES
i
To go back a step,
press "ESC NO". You
will therefore be able to
select another function
that you ruled out
previously.
26
i
Timetables during which the user is authorised to
activate and deactivate the alarm system.
NIVEL DE ACCESO
(ACCESS LEVEL)
NIVEL (LEVEL) : 3
1. Identify yourself as a level 3 user (steps on page 21).
The screen will display:
2. Access the "TARJETA/CODIGO ACCESO" (ACCESS
CARD/CODE) function (steps 2 and 3 on page 22).
The screen will display:
3. Access the "CONFIGURAR TARJ./CODIGO" (CONFIGURE
CARD/CODE) option and the user whose configuration you wish
to set up (steps 3 to 7 on page 24).
CONFIRMAR.
The screen will display: TARJ. (CONFIRM CARD) /
CODIGO (CODE)
4. Press the down arrow until you see the "HORARIOS
AUTORIZADOS" (AUTHORISED TIMETABLES) option.
The screen will display:
HORARIOS (TIMETABLES)
AUTORIZADOS
(AUTHORISED)
5. Press "OK".
The screen will display:
VER/MODIFICAR
(VIEW/MODIFY)
HORARIOS (TIMETABLES)
6. Press the down arrow.
The screen will display:
REGISTRAR NUEVO
(REGISTER NEW)
HORARIOS (TIMETABLES)
(CONTINUES ON THE NEXT PAGE)
REGISTRAR UN(A)
(REGISTER A) TARJ.
(CARD) / CODIGO (CODE)
PROSEGUR PROVIEW +
ADVANCED FUNCTIONS > SET UP TIMETABLES (CONTINUED)
FROM THE KEYPAD
SET UP USER TIMETABLES (CONTINUED)
7. Press "OK". Start by assigning the day of the week you want the timetable
to be assigned to start on. By switching between the down arrow and the
"OK" button you will set the time and then the minutes.
8. Press "OK". Then assign the day of the week you want the timetable to
be assigned to end. By switching between the down arrow and the "OK"
button you will set the time and then the minutes.
i
To go back a step,
press "ESC NO". You
will therefore be able to
select another function
that you ruled out
previously.
9. Confirmation will shortly be displayed on the screen that the
timetable has been memorised and the system will give you the
option to register a new timetable.
10. By selecting the "VER/MODIFICAR HORARIO" (VIEW/MODIFY TIMETABLE) option you can check and delete timetables
assigned to the user.
The screen will display:
EMPEZAR HORARIO
The screen will display:
(START TIMETABLE)
Mar= 13.15 (Tues= 13:15)
TERMIN. (END) HORARIO
The screen will display:
(TIMETABLE)
Jue= 19:30 (Thur= 19:30)
HORARIO
MEMORIZADO!
(TIMETABLE MEMORISED!)
i
EMPEZAR HORARIO
Lun (START
TIMETABLE Mon)
The screen will display the
following if a user has not been
assigned timetables:
REGISTRAR NUEVO
(REGISTER NEW)
HORARIOS (TIMETABLES)
ACCESO PERMANENTE
(PERMANENT ACCESS!)
27
PROSEGUR PROVIEW +
ADVANCED FUNCTIONS > AREAS THAT CAN BE DEACTIVATED
FROM THE KEYPAD
ASSIGN AREAS THAT CAN BE
DEACTIVATED
To go back a step, press
"ESC NO". You will
therefore be able to
select another function
that you ruled out
previously.
28
Areas that a user can access by activating
and deactivating the alarm system.
1. Identify yourself as a level 3 user (steps on page 21).
The screen will display:
NIVEL DE ACCESO
(ACCESS LEVEL)
NIVEL (LEVEL) : 3
2. Access the "TARJETA/CODIGO ACCESO" (ACCESS
CARD/CODE) function (steps 2 and 3 on page 22).
The screen will display:
REGISTRAR NUEVO
(REGISTER NEW)
HORARIOS (TIMETABLES)
The screen will display:
CONFIGURAR.
(CONFIGURE)
TAR. (CARD) /
CODIGO (CODE)
3. Access the "CONFIGURAR TARJ./CODIGO"
(CONFIGURE CARD/CODE) option and the user
whose configuration you wish to change (steps 3 to
7 on page 24).
i
i
4. Press the down arrow until you see the "ZONAS
DESARMADAS" (DEACTIVATED AREAS) option.
(CONTINUES ON THE NEXT PAGE)
The screen will display:
ZONAS DESARMADAS
(DEACTIVATED AREAS)
PROSEGUR PROVIEW +
ADVANCED FUNCTIONS > AREAS THAT CAN BE DEACTIVATED (CONTINUED)
FROM THE KEYPAD
ASSIGN AREAS THAT CAN BE DEACTIVATED (CONTINUED)
5. Press "OK".
The areas will be displayed on screen
and their status is shown below: D =
"Deactivate area lock" (the user can
activate and deactivate the alarm system
in this area) and A= "Activate area lock"
(the user cannot activate and deactivate
the alarm system in this area).
6. To change an area from "D" status to
"A" status, press the relevant number key.
For example: by pressing "2" and "4", the
status for areas 2 and 4 will change from
"D" to "A".
The new "D" or "A" status for each area
for this user will be displayed on screen.
7. Press "OK".
The screen will display:
ZONAS: (AREAS) 1234
ESTADO: (STATUS) DDDD
By default, users can activate
and deactivate all the areas
as long as the configuration
remains unchanged.
i
ZONAS: (AREAS) 1234
ESTADO: (STATUS) ADAD
In this example, the option of activating and deactivating the system
in areas 2 and 4 has been locked (status "A") for this user code.
i
To go back a step, press
"ESC NO". You will
therefore be able to
select another function
that you ruled out
previously.
ZONAS (DEACTIVATED)
DESARMADAS (AREAS)
29
PROSEGUR PROVIEW +
ADVANCED FUNCTIONS > DETECTORS IN BYPASS MODE
FROM THE KEYPAD
SELECT DETECTORS IN
BYPASS MODE
i
Detectors, selected by area, that a user can deactivate ("BYPASS"
mode) only for the next time the alarm is activated.
1. Identify yourself as a level 3 user(steps on page 21).
The screen will display:
NIVEL DE ACCESO
(ACCESS LEVEL)
NIVEL (LEVEL) : 3
2. Access the ALARM PARAMETERS function.
Press the down arrow until you reach the "PARÁMETROS DE
ALARMA" (ALARM PARAMETERS) option. Press "OK".
The screen will display:
PARAMETROS ALARMA
(ALARM PARAMETERS)
3. Access the "CONFIG. BYPASS" function.
The screen will display:
4. Press "OK". The first detector is shown
on screen. Press the down arrow to see the
different detectors in each area.
i
To go back a step,
press "ESC NO". You
will therefore be able to
select another function
that you ruled out
previously.
30
5. When the detector you want to
deactivate is displayed, press "OK".
Each detector in each area will be shown in
order and its status below each one: if it is blank,
the detector is activated. If the word appears
"BYPASS", it is deactivated:
The word "BYPASS" will appear under the
selected detector. This detector will be
deactivated the next time the system is activated:
When the system is activated, all the detectors will
be activated except the deactivated ones. When the
deactivated detectors are deactivated, they will
become activated again.
BYPASS
ZI: (AREA 1) CAMARA
(CAMERA) 1
ZI: (AREA 1) CAMARA
(CAMERA) 1
BYPASS
By default, unless the configuration is changed, a user can bypass
and cancel the bypass for any detector in any area.
6. Once the areas or detectors to be bypassed have been
selected, press the "ESC NO" key for 5 seconds.
i
!
CONFIG.
!
The initial default information will be
displayed on screen:
MIE (WED.)
01/03 19:43
DESARM NIVEL:
(DEACTIVATE LEVEL) 1
The BYPASS mode for a detector can be deactivated without
activating and deactivating the system. The steps above just need
to be repeated, except that in step 5, selecting the detector, leave
the lower part blank by pressing the "OK" button.
www.prosegur.es
902 202 999
Authorised by General Directorate of Police under number 112.