1
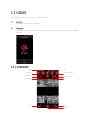
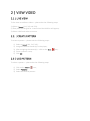
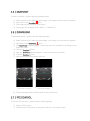
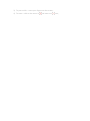
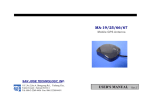
INSTEK DIGITAL
CCMobile
USER MANUAL
SOFTWARE VERSION 1.0.19
NVR Version: 5.3.3-3820
DOCUMENT VERSION V1.2 | JULY 2015
©2015 Good Will Instrument Co., Ltd. All rights reserved.
Under the copyright laws – this manual may not be copied, in whole or part – without the
written consent of Good Will Instrument Co., Ltd.
Every effort has been made to ensure that information in this manual is accurate. Good Will
Instrument Co., Ltd. Makes no expressed or implied warranty of any kind assumes no
responsibility for errors or omissions. No liability is assumed for incidental or consequential
damages arising from the use of the information or products contained herein. Features and
specifications are subject to change without notice.
Good Will Instrument Co., Ltd.
7-1, Zhongxing Road
Tucheng District – New Taipei City
236 – Taiwan
TEL: +886 2 2268 9939
FAX: +886 2 2268 9355
http://www.instekdigital.com
July 2015
1 | HOME
On CCMobile home screen – you see two features:
1)
NVR List
Click NVR List to enter CCMobile.
2)
Language
CCMobile support the following languages English, Traditional Chinese and Simplified
Chinese.
1.2 | OVERVIEW
1x1
Menu
Playback
Snapshot
Play
2x2
Save pattern
Download
2x3
Live
Stop
Horizontal view.
1.1 | SETUP AND CONFIGURE
To setup and configure the NVR – please take the following steps:
1) Enter CCMobile;
2) Click on the Menu icon;
3) Click on Device Configuration;
4) To manually add a NVR – click on the Add
5) Enter the following information:
• Name;
• IP-address;
• Command port;
• RTSP port;
• User name;
• Password.
icon;
Note: the default command port number is 59999 and RTSP port number is 554. In case you
login externally or 3G/4G – please alter these port numbers.
1.2 | Network Setup:
Using internal network to connect to the NVR
To get connected to Instek Digital’s NVR – select Menu (top-left button) and Device
Configuration. Click the add button – type the NVR Name, IP-address/Domain Name,
Command Port(59999), RTSP Port(554), User Name and Password and click the confirm
button.
Using 3G or 4G to connect to the NVR
When you are using 3G or 4G make sure to configure the router. Open the Command
port(59999) and RTSP port(554) in order for the smartphone and/or tablet to communicate
with the NVR.
For example,
NVR1 command port : 192.168.0.100:59999 / router ( 168.95.1.250:n)
Type “n” in CC Mobile as command port
NVR1 command port : 192.168.0.100:554 / router ( 168.95.1.250:n+1)
Type “n+1” in CC Mobile as RTSP port
Type router IP( as above example, the public IP will be 168.95.1.250 )
Then you can use 3G or 4G to link to the router's address, the preset port will be transfer into
the port in internal private LAN.
2 | VIEW VIDEO
2.1 | LIVE VIEW
To live view surveillance videos – please take the following steps:
1) Select a layout (1x1, 2x2 and 2x3);
2) Then press on the grid for 1 second and the NVR list will appear;
3) Select a NVR and select a camera.
2.2. | CREATE PATTERN
To create a pattern – please take the following steps:
1) Select a layout (1x1, 2x2, 2x3);
2) Assign the desired camera(s) to the player;
3) After assigning the camera(s) – click on the Save
4) Enter a pattern name;
5) Click OK.
2.3 | USE PATTERN
To select a pattern – please take the following steps:
1) Click on the Menu
icon;
2) Select Patterns;
3) Select the desired pattern.
icon;
2.4 | PLAYBACK VIEW
To view recorded videos – please take the following steps:
1) Select a player;
2) You will notice that the player will be highlighted by a green edge;
3) Press the player once more and the menu bar will appear;
4) Click on the Magnifying glass
icon;
5) The Seek time window will appear;
6) Select the date and time and press the Confirm
7) Now the player will show the selected video;
8) To pause the playback – click the Pause
9) To stop the playback – click the Stop
icon;
icon;
icon;
10) To go back to live view – click the Live view
icon.
2.5 | SNAPSHOT
To take a snapshot – please take the following steps:
1) Select a player and it will get a green edge – press again till the menu bar appears;
2) Now click on the Snapshot
icon;
3) The image will be stored on your device.
4) You can get the image(s) under “Menu”-> “Media File”
2.6 | DOWNLOAD
To download videos – please take the following steps:
1) Select a player and it will get a green edge – press again till the menu bar appears;
2) Now click on the Download
icon;
3) The Start Time window appears – select the start time and date by scrolling up and
down the menu;
4) Click the Confirm
icon;
5) Now the End Time window appears – select the end time and date;
6) Click the Confirm
icon;
7) Now the downloading process will start;
Download in Progress
Download Complete
8) The downloaded video will be stored on the local device.
2.7 | PTZ CONTROL
To control PTZ cameras – please take the following steps:
1) Select a PTZ camera;
2) Double click on the player, so the player will be in full-screen mode;
3) To pan and tilt – move your finger over the screen;
4) To zoom – click on the zoom-in
and zoom-out
icon;