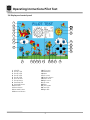
1
Operating Instructions Pilot Test
Maico Diagnosticsi7625 Golden Triangle DriveiEden Prairie, MN 55344iToll Free 888.941.4201
Maico Diagnostic GmbHiSalzufer 13/14i10587 Berlin, GermanyiTelephone ++030 70 71 46 50
Operating Instructions Pilot Test
TABLE OF CONTENTS
WARRANTY ................................................................................................................................... 1
1 Instrument description................................................................................................................. 2
2 Unpacking and inspection ........................................................................................................... 3
2.1 External inspection .............................................................................................................. 3
2.2 Unpacking........................................................................................................................... 3
3 Installation and setup ................................................................................................................. 4
3.1 Where to set up .................................................................................................................. 4
3.2 How to set up ..................................................................................................................... 4
3.3 Calibrating the device.......................................................................................................... 4
3.4 Display and control panel .................................................................................................... 5
4 Basics related to hearing disorders .............................................................................................. 6
4.1 Speech reception level .......................................................................................................... 6
4.2 Hearing disorders ................................................................................................................ 6
4.3 Incidence of hearing loss ..................................................................................................... 7
5 Performing the test .................................................................................................................... 8
5.1 Preparing the child .............................................................................................................. 8
5.2 Testing the right ear ............................................................................................................ 8
5.3 Testing the left ear ............................................................................................................ 10
5.4 Testing both ears (binaural) ................................................................................................ 10
5.5 Evaluation of the test ........................................................................................................ 10
5.6 Changing the test language .............................................................................................. 10
5.7 Adjusting volume of monitor earpiece ............................................................................... 10
6 Performing pure tone screening tests........................................................................................ 11
6.1 Preparation for the test ..................................................................................................... 11
6.2 Testing the right ear .......................................................................................................... 11
6.3 Testing the left ear ............................................................................................................ 12
6.4 Evaluation of the test results.............................................................................................. 12
7 Set up the Pilot Test for your individual needs ........................................................................... 13
8 Care and maintenance of the instrument.................................................................................. 16
9 Technical data and accessories.................................................................................................. 17
10 Troubleshooting ..................................................................................................................... 19
11 After-sales service and calibration ........................................................................................... 20
11.1 After-sales service............................................................................................................ 20
11.2 Calibration ...................................................................................................................... 20
11.3 Shipping instructions for calibration and repair ................................................................ 21
12 Safety regulations................................................................................................................... 22
i
Operating Instructions Pilot Test
13 List for subjective instrument check ........................................................................................ 23
14 Thermal printer set-up………………………………………………………………………………. 24
14.1 Description of the unit...…………………………………………………………..……..…... 24
14.2 Safety warnings……......…………………………………………………………..…….….... 26
14.3 Installation……………...…………………………………………………………..…….……. 26
15 Using the thermal printer………………………………………………………………………….... 24
15.1 Turning the printer on and off.……………………………………………………..……….. 27
15.2 Inserting paper into the printer……….…………………………………………..…….……. 27
15.3 Removing paper from the printer……………………………………………..…….…......... 27
15.4 Paper feed……………...…………………………………………………………..…….….... 27
15.5 Self-test….……………...…………………………………………………………..…….…… 28
15.6 Printing……………...…………………………………………………………..…….……..... 29
15.7 Cleaning……………...…………………………………………………………..…….……… 29
15.8 Troubleshooting…...…………………………………………………………..…….….......... 29
15.8.1 LED Indications...…………………………………………………………..…….…........ 29
15.8.2 Problem-solving...…………………………………………………………..…….…....... 30
15.9 Spare parts list………………………………………………………………………………..... 31
ii
Operating Instructions Pilot Test
WARRANTY
This warranty is extended to the original purchaser of the Pilot Test, through the authorized Special
Instrument Distributor from whom it was purchased. This warranty covers defects in material and
workmanship for a period of one year from date of delivery of the Pilot.
Should the Pilot Test require service due to a defect in material or workmanship, Maico, at its
option, will repair or replace the instrument at no charge except for transportation to and from the
point of service. It is the purchaser’s responsibility to return the Pilot Test to the Maico Special
Instrument Distributor from whom it was purchased or directly to Maico after receiving a return
authorization.
This warranty does not cover breakage or failure caused by tampering, misuse, carelessness,
accident or modification. The warranty is void if the instrument is serviced by other than an
authorized Maico Special Instrument Service Center.
NOTE:
Specifications in this manual are in effect at the time of printing. Maico reserves the right to
modify or change specifications or design at any time without notice or incurring obligation.
WARNING:
The Pilot Test is designed to be used with a hospital grade outlet. Injury to personnel or
damage to equipment can result when a three-prong to two-prong adapter is connected
between the power plug and an AC outlet or extension cord.
1
Operating Instructions Pilot Test
1 Instrument description
The Pilot Test will revolutionize the way you interact with your young patients. Our products are
designed to put children at ease, allowing you to make a diagnosis quickly, easily and accurately.
Due to the possibilities of future language and speech development delays, it is imperative to
screen children at the youngest possible age. In 1962, the Mayo Clinic developed the first “speech
reception audiometer” to evaluate preschool children. The rationale was that very young children
have short attention spans and exhibit problems with comprehending the abstract directions
associated with traditional pure tone audiometery. Anyone who has tried to administer pure tone
audiometry screening to young children is very aware of the problems and inefficiencies.
In comparison, speech recognition screening incorporates simple, non-threatening directions. The
child is asked to listen to a series of two syllable “spondee” words at different decibel levels. The
levels automatically decrease in 5 dB increments from 50 dB to 15 dB so there is no need to adjust
levels or change settings. The child responds by pointing to the appropriate picture on the picture
board. The operator records each response on the score sheet. A complete screening of both ears
can take less than four minutes—significant savings in time and money. The Pilot also features a
built-in manual screening audiometer for other age groups and comes standard with bilingual
Spanish/English word lists.
2
Operating Instructions Pilot Test
2 Unpacking and inspection
2.1 External inspection
Your Pilot Test was carefully inspected and packed for shipping. However, it is good practice to
thoroughly inspect the outside of the shipping container for signs of damage. If any damage is
noted, please notify the carrier immediately.
2.2 Unpacking
Remove the upper layer of packing material from the top of the instrument. Carefully lift the
instrument from the shipping carton and remove the plastic bag. Inspect the case for signs of any
damage. Notify the carrier immediately if any signs of mechanical or physical damage are found
will ensure that a proper claim is made. Save all packing materials so that the claim adjuster can
inspect them as well. When the adjuster has completed the inspection, notify your Maico Special
Instrument Distributor.
Save all the original packing materials and the shipping carton so the instrument can be
properly packaged if it needs to be returned for service or calibration.
Open the box containing the Pilot Test and check to see that you have the following items:
• Digital Pilot Test
• Large picture board – English words
• Large picture board – Spanish words
• Small picture review sheet – English words
• Small picture review sheet – Spanish words
• Operator score pad – English
• Operator score pad - Spanish
• Power cord
• TDH-39 headset
• Patient response switch
• Operator earphone
• Operating manual with warranty card
• Calibration certificate
A carrying case is also available for your Pilot. If you haven’t purchased a carrying case, be sure to
save the box your unit came in. It has been specially designed to protect it during transportation.
Please check that all items listed above are received in good condition. If any items are missing or
damaged, immediately notify your Maico Special Instrument Distributor.
3
Operating Instructions Pilot Test
3 Installation and setup
3.1 Where to set up
A quiet room furnished with a desk or table is ideal for using the Pilot Test. If a separate room is
not available, try to locate an area with minimal noise and distractions. Remember: background
or ambient noise can distract the child and affect the results of the test.
Electro-medical instruments emit strong electromagnetic fields (e.g., microwave-radiotherapy
devices) which can influence the function of this device. Therefore, do not use those types of
instruments in close proximity to the Pilot Test.
The test room should be at normal room temperature (15º C/59º F to 35º C/95º F), and the
instrument should be turned on about 10 minutes before the first measurement.
When placing the picture board on the table, make sure the child being screened can comfortably
point to the pictures on the picture board. The board has been specially designed with panels on
both sides to decrease visual distractions for the child.
3.2 How to set up
Setup is accomplished in four easy steps:
1. Plug the power cord into the rear panel.
2. Plug the power cord into a grounded outlet.
3. Connect the red (right) plug of the headphone into the socket marked “R” and the blue
(left) plug into the socket marked “L” on the rear of the device.
4. Connect the monitor phone (if required) to the socket marked “Monitor” on the rear of the
device.
Turn on the Pilot with the switch at the rear of the device. The right ear is selected – the red LED is
illuminated. The device is in stand-by mode now and the group LED is illuminated.
3.3 Calibrating the device
The instrument and headphones are a set. Because the headphones have been calibrated to this
particular instrument, use of other transducers is not recommended. If one of the acoustic
transducers has been replaced, the instrument must be recalibrated or the measurements will be
incorrect.
4
Operating Instructions Pilot Test
3.4 Display and control panel
1
2
3
4
5
25
20
24
23
6
7
22
21
20
19
8
9
1 Left LED
2 Group 1 LED
3 Group 2 LED
4 Group 3 LED
5 Group 4 LED
6 Pilot Test LED
7 Group button
8 Start/stop LED
9 Start/stop button
10 Pause LED
11 Pause button
12 Last word button
13 Next word button
15 16 17
10 11 12 13 14
14 LCD screen
15 EAR button
16 Menu
17 Left cursor
18 Stimulus button
19 Down cursor
20 Right cursor
21 Up cursor
22 Enter
23 Tone button
24 Tone LED
25 Right LED
5
18
Operating Instructions Pilot Test
4 Basics related to hearing disorders
The hearing threshold is the lowest sound level a person can hear. This threshold is measured in
dB (decibels). As a result of large-scaled mass screenings the hearing threshold of young normalhearing people is defined as 0 dBHL. Index HL is short for hearing level. So, a hearing threshold of
0 dBHL is called normal and means that there is no hearing loss. On the other hand, a threshold of
70 dBHL would indicate poorer hearing since sound is heard only when its intensity is 70 dB higher
than normal. In the reverse case of a negative value (e.g., -10 dBHL) the hearing is even better than
normal.
The hearing threshold is measured using pure tones (sine wave) with frequencies from about
125 Hz up to 8000 Hz with adults and 250 Hz up to 4000 Hz with children. These pure tone
audiometric tests are rather time-consuming and require high concentration and cooperation of
the tested person. So the tests can be difficult, especially with children. To find out if there is a
hearing disorder, it is not necessary to start the examination with a pure tone audiometric test but
instead by checking the hearing threshold below a certain limiting level using a screening test. If
the patient’s hearing threshold is below that limit, normal hearing is indicated. If the hearing
threshold exceeds the limit, or there are other concerns or indications, the patient should be
referred for further audiological examination.
4.1 Speech reception level
The level at which a patient can understand spoken language can be a valuable screening tool,
especially with young children. This speech reception level of children can be determined easily by
the Pilot Test. The Pilot Test offers screening test procedures using multisyllabic words with eight
test levels from 50 to 15 dBHL.
While the screening test is easy to facilitate with the Pilot, results may still be unreliable if the
following factors are in play:
• disturbing noise in the test room
• insufficient cooperation by the patient
• poor power of concentration on the part of the patient
• the patient did not comprehend the test procedure
• the measuring instrument is not functioning
4.2 Hearing disorders
Hearing disorders entail different effects on children and adults. An adult may have sustained a
mild hearing loss of 35 dBHL without being conscious of the disorder. That is because he/she has
more experience with the redundancy (i.e., information abundance) of speech and thus is able to
add non-heard parts of words or even sentences automatically and unconsciously. With children,
particularly at the preschool age, a similarly mild hearing loss can be critical for further speech and
language development. The capability of realizing the complicated rules of speech and transferring
them to his/her own development of speech can be highly restricted.
6
Operating Instructions Pilot Test
Reasons for a hearing loss can be:
• malfunction of the outer or middle ear (conductive loss)
• malfunction of the inner ear (sensory loss)
• malfunction of the neural pathway (neural loss)
Sensory and neural losses can be caused by many different factors, including congenital disorders,
ototoxic medications, disease or infection, and exposure to excessively loud sounds. With children,
the most widespread reason for problems with hearing is a loss caused by disorders of sound
conduction. Mostly this is temporary and varying within rather wide limits. The hearing loss can
differ from day to day by 5 to 30 dB. Reasons for this can be:
• excessive production of ear wax
• disorder of ventilation of the middle ear
• inflammation/infection of the middle ear (otitis media)
A chronic inflammation of the middle ear can cause a permanent impairment of the ear if it
remains untreated!
4.3 Incidence of hearing loss
Studies show that one out of every thousand children is born with a serious sensory or neural
hearing disorder. Two more children are diagnosed during early childhood. Much more frequently,
a conductive type hearing loss is found. Otitis media is the most widespread disease during infancy
and childhood and thus the most frequent reason for consulting a pediatrician. Over 90% of all
the children are diagnosed with otitis media once or several times. The World Health Organization
(WHO) states that otitis media is the worldwide number-one-reason for hearing loss during
childhood. Author Dr. Jerry Northern, in his book Hearing in Children supposes that 30% of all the
children under the age of eleven suffer from an ear infection and therefore have a certain degree
of hearing loss. If the hearing loss remains untreated a delay in speech development is inevitable.
7
Operating Instructions Pilot Test
5 Performing the test
5.1 Preparing the child
The child will first need to learn the correct names for the pictures. This can often be accomplished
by having a parent help the child in the waiting room while they are waiting for the health care
professional to administer the test. Instruct the child to point to each picture and identify it. To be
sure the child understands, ask the child to identify the pictures in the same manner as the
screening test, i.e., “Point to the bathtub; show me the airplane, etc.” A small laminated sheet
with words is provided with this unit to assist in the process of identifying the pictures.
Once you are confident that the child understands, tell the child that when the test starts the pilot
needs his/her help and will ask some questions. The best way to prepare a child is to pretend that
he/she is going to play the “Pilot Game.” This will reduce the anxiety associated with screening.
Introduce the headset by telling the child that in order to help the pilot, he/she must put on the
headphones – just like pilots wear – so that they can hear each other.
NOTE: Place the red earphone on the right ear.
The headset needs to fit snuggly (make sure the child’s hair and/or glasses are away from the ear).
Explain that the pilot will ask where a picture is and he/she should point to it on the large picture
board. The child should be told that the voice will start out loud and get softer, so he/she must
listen very carefully.
You are ready to begin.
5.2 Testing the right ear
Press the L/R button (15) (located on the butterfly) and the green LED (located on the bird in the
right corner) will light up. On the display the letter “R” is shown. The test will start with words
“GROUP 1” indicated by the green LED located on the airplane. Next, the first test word picture
will appear on the screen along with the starting level (50 dB).
By pressing the GROUP (7) button, you can choose which set of sentences to run on the test. There
are four test sets. Press the START/STOP (9) button to start the test. "Test Running" shows on the
display.
The test will begin with the introduction: “Let’s look at the pictures.” Next, the first test sentence
will play at a level of 50 dBHL. If the patient points to the picture on the picture board that
corresponds to the sentence, mark the corresponding field in column R on the audiogram pad with
a . That means the answer was correct.
If the answer was wrong, mark the field with an ⌧. If there was no response at all, mark the field
with "NR.”
8
Operating Instructions Pilot Test
The test will go on to the next sentence and the volume level decreases to 45 dBHL. Continue to
mark the answers as described above. Each successive sentence will decrease in volume as shown
in the following chart.
Sentence
1
2
3
4
5
6
7
8
9
10
Level
50
45
40
35
30
25
20
15
15
15
You can also record the test results by pressing the ENTER (22) button if the patient signals his/her
understanding and points to the corresponding picture on the picture board. The level is saved
under results beside the respective ear. The result is then shown on the display. While the level
decreases, the displayed test results will remain the same unless the hearing is confirmed by
pressing the ENTER (22) button again. The test results change according to this confirmation. The
level at which the patient correctly understood the sentence is shown beside the respective ear on
the display. You can also write these results on the score pad.
You can interrupt the test at any time by pressing the blue PAUSE button (11) (located on the
kite). The green PAUSE LED will light up and "Test Pause" will be indicated on the display.
To restart the test, press the PAUSE button (11) again. The green PAUSE LED turns off and the last
test sentence will repeat.
You can skip or repeat test sentences by pressing the ► (13) or the ◄ (12) buttons. This only
functions while the test is running.
Press the START/STOP (19) button to end the test. The next training group will automatically be
entered.
Repeat the test with the next word group if the child does not understand two successive test
sentences. If the patient fails again, refer the child for further audiometric examination.
9
Operating Instructions Pilot Test
5.3 Testing the left ear
To test the left ear, press the L/R button (located on the butterfly) until the left LED (located on the
bird) illuminates. The letter L will be displayed on the screen.
Choose a different test group for the left so that the patient does not get too familiar with the
test. Do this by pressing the GROUP button (7). The group you chose will be indicated on the
display. Complete the test in the same manner as the right ear. Mark the test results in the L
column of the evaluation pad.
Additional testing can be performed by using the other groups of test sentences. The pause
between the test sentences in groups 1 and 2 is three seconds, whereas the pause in groups 3 and
4 is five seconds. Groups 3 and 4 are recommended especially for patients with a longer reaction
time.
5.4 Testing both ears (binaural)
To test both ears at once, press the L/R button (15) until the LEDs in both the left and right birds
light up and on the display the letter B appears on the screen. Complete the test in the same
manner as the right ear. Mark the test results in the B column of the evaluation pad.
Please note that the test results of a binaural test are typically a little better than the test results of
a single ear. Binaural testing must first be enabled in the Pilot Menu.
5.5 Evaluation of the test
The test results are marked on the audiogram pad whereas on the display the best test results of
the respective ear (Left, Right, Both) are also saved.
NOTE: Most states define a normal hearing level for speech recognition screening at 25 dBHL.
However, it is recommended that you check with your state or the American Speech-LanguageHearing Association (ASHA) for specific requirements.
Press the GROUP button (7) for two seconds in order to delete the results on the display and to
start a test for a new patient. The screen will prompt you with: “Delete Data? Yes/No.” Confirm
your choice by pressing the appropriate button. For hygienic reasons the ear cushions of the
headphone should be cleaned after finishing the examination.
5.6 Changing the test language
To change the language of the instructions the child hears during the test, press MENU (16). Move
the arrow key (19) down until Pilot Speech Language is highlighted and press ENTER (22). The next
screen will show you the language options that are programmed into the Pilot. Press the down
arrow key until the language you wish to select is highlighted and press ENTER (22). You can now
start the test.
5.7 Adjusting volume of monitor earpiece
Press the ▲ (21) or the ▼ (19) buttons to increase and decrease the volume through the monitor
earpiece while the Pilot test is in progress.
10
Operating Instructions Pilot Test
6 Performing pure tone screening tests
This test investigates the hearing threshold of the patient and also offers a frequency-specific test
result.
6.1 Preparation for the test
The patient should sit at least one meter from the instrument. Place the headphones on the
patient: red side on the right ear, blue side on the left ear and make sure that they are secure.
Adjust the headband of the headphones so that the transducers are at the correct angle facing the
auditory canal. Put the monitor phone on your ear. Normally you should start the test with the
right ear. The right LED on the front panel (located in the bird at the right) will light.
6.2 Testing the right ear
Press the TONE button (located in the sun) in order
to start with the audiometric test. On the display
you will see a blank audiogram or table. The
following procedure is based on the basic screen
that appears. Chapter 7 will instruct you how to
customize the set up.
The TONE LED will light up. The test starts at 1 kHz
with a sound level of 20 dB. A tone will be
presented when you press the STIMULUS button
(18). As soon as the button is pressed, the
STIMULUS field on the display is highlighted. If the
field is already highlighted when starting the test,
the Interruption Mode is selected.
Figure 1A: Audiogram at 20 dB
The tone is presented as cross-hairs in the audiogram view (Figure 1A). The horizontal axis indicates
the frequencies (250 Hz - 8 kHz) and the vertical axis indicates the levels at which the test tone is
given.
Frequency of the tone being presented in the table
view is indicated by the column in which the cursor
is located. The level of the signal is displayed as a
numerical value under the current test frequency
(Figure 1B).
By pressing either the ◄ button (17) or the ►
button (20), the frequencies can be selected. Start
the test at 1 kHz. If the patient does not react,
increase the test level while pressing the ▲ button
(21). In order to decrease the test level, press the ▼
button (19). The chosen test level is shown on the
display.
11
Figure 1B – Table at 20 dB
Operating Instructions Pilot Test
When the patient pushes the patient response switch to signal that he/she just heard the test tone,
the RESPONSE field is highlighted on the display. When the patient’s hearing threshold is
established, or screening protocol has been met, press the ENTER key to store the result on the
screen. The level and frequency of the response is highlighted by an “O” for the right ear in the
audiogram view. The response in the table view is stored as a numerical value in the row for the
right ear.
The cross-hairs automatically go on to the next
frequency. The test begins at 0 dB again. Save the
patient’s response by pressing the ENTER button
(22). The measurements are connected by a line in
the audiogram view (Figure 2).
Proceed with the test as described above for 1
kHz up to 8 kHz. The next measured points will be
reflected on the table. After saving the results at 8
kHz, the cross-hairs automatically return to the
test results at 1 kHz.
Figure 2
Retest the results at 1 kHz. The patient is now
trained and a better result can be expected. Select the low frequencies by pressing the ◄ button
and measure the hearing threshold at low tones.
After finishing the test, the hearing threshold is now visible. By pressing the ◄ or ►button you
can now go from one test result to the other. The test level at which the patient signaled hearing
each tone is indicated on the display.
6.3 Testing the left ear
Now select the left ear by pressing the L/R ear button (15). The green LED will light up (located in
the bird at the left). The LEFT field is highlighted on the display. Repeat the hearing threshold test
as described for the right ear above. The saved thresholds are indicated with an “X” for the left ear
in the audiogram view and as a numerical value for the left ear in the table view.
6.4 Evaluation of the test results
The test results can now be recorded on the audiogram pad. By pressing either the ◄ or ► button
you can now go from one result to the next. The test level at which the patient signaled hearing
each tone is indicated on the display.
NOTE: Most states define a normal hearing level for a pure-tone screening as 20 dBHL. However,
it is recommended that you check with your state or the American Speech-Language-Hearing
Association (ASHA) for specific guidelines.
Press the TONE button (23) for two seconds in order to delete the results on the display and to
start a test for a new patient. The screen will prompt you with: “Delete Data? Yes/No.” Confirm
your choice by pressing the appropriate button. For hygienic reasons the ear cushions of the
headphone should be cleaned after finishing the examination.
12
Operating Instructions Pilot Test
7 Set up the Pilot Test for your individual needs
The Pilot Test is pre-configured for most requirements. If you still require some functions to be set
up for your individual needs, enter the user menu. After having set the changes they are saved in
the device. The settings remain unchanged even if the device has been switched off.
Press the MENU button (16). By pressing the ▲
(21) or ▼ button (19), the different menu
options can be chosen. The selected menu is
highlighted. Press the ENTER button (22) to
choose the respective submenu and to select,
confirm and save the new setting.
User Menu
Pilot Speech Language
Pilot Menu
Audiometry Submenu
Start with…
Display Language
Device Information
PC or Printer
Display Contrast
Reset to Default
Press the MENU button (16) again to exit the
respective menu or user menu (Figure 3). After
leaving the user menu you will return to the test
you last selected. The possible settings of the
Pilot Test are as follows:
▲▼ Change Item
Enter: Select item
Menu: Return
Pilot Speech Language
The words of the Pilot Test will be played back
Figure 3
with the selected language. Two languages are
programmed in the Pilot Test. The choices are English or Spanish.
Pilot Menu:
Pilot Menu (Figure 4)
This menu sets how the Pilot Test is performed.
The following settings are possible:
Pilot Menu
Binaural Presentation: ON/OFF
OFF means that the option to measure the
Binaural Presentation
hearing of both ears is switched off.
Output (Air Conduction/Free Field)
Output: Air Conduction/Free Field
Fast Pilot Test
The test will be carried out either by
Show Results
Print Size
headphones (insert phones) or loudspeaker.
Fast Pilot Test: ON/OFF
ON will start the test at 25 dB, OFF will
▲▼ Change Item
start the test at 50 dB.
Enter: Select item
Menu: Return
Show Results: ON/OFF
Scored results will or will not be displayed
Figure 4
on the test screen. If PRINT is selected in PC
or PRINT option in the User Menu, results will always be displayed.
Print Size: Short/with pictures
Printout will be numerical data only (short) or will display all pictures of Pilot Test.
13
Operating Instructions Pilot Test
Audiometry Submenu (Figure 5)
Covers all settings of performing audiometry
tests.
Audiometry submenu
Display Audiogram
The following settings are possible:
Go to next freq. after saving
Display Audiogram: Table/Audiogram
Level after frequency change
The audiogram is displayed either as a
Save Data with
diagram or table.
Advanced Settings
Go to next frequency after saving: ON/OFF
If this function is switched off, the next
▲▼ Change Item
frequency has to be selected by pressing
Enter: Select item
Menu: Return
◄ or ►.
Level after frequency change:
Figure 5
Remaining: The test level remains if the
frequency has been changed.
Return to -10/0 dB: The next frequency will be measured at a start level of -10 dB.
- Decrease of 30 dB: The test level of the next frequency is decreased by 30 dB of the
last level of the test.
Save Data with: Stim/Enter
Choose if the data will be saved by pressing the ENTER button or the STIMULUS button.
The Advanced Settings screen (Figure 6) displays
additional audiometry settings.
Advanced frequency selection: Allows only
specific frequencies to be displayed and
tested from the audiometer test screen.
Choose On/Off for each individual
frequency. The 1000 Hz frequency is
turned on by default and cannot be
turned off by the user.
Pulse Tone as Default: ON/OFF
Direction of level button: Cursor button for level
increase up/down. This function sets the
direction of the button ▼ (decreasing/up
in level) ▲ (increasing/down in level) or
vice versa.
Advanced Settings
Advanced Frequency Selection
Pulse Tone as Default
Direction of Level Button
▲▼ Change Item
Enter: Select item
Menu: Return
Figure 6
Attention: Saving data with STIMULUS button is only possible if you have set up the
function interrupter mode instead of presenter mode (setting).
14
Operating Instructions Pilot Test
Additional items on the User Menu screen (Figure 3) include:
Start with ...
The test you would like to start with will be selected after turning on the device: either Pilot
Test or Tone Audiometry
Display language
The language of the instructions shown on the display can be selected. English, Spanish,
German and French are available as operating languages.
Device information:
General information can be found here, e.g., software version, serial number, and
quantity of tests.
PC or Print:
Select Print (serial) or PC data transfer
Display contrast:
By pressing the ▼ (19) or ▲ button (21), the display can be adapted to your personal
requirements. Press the ENTER button (22) to confirm your selection.
Reset to Default:
Returns all settings to factory default settings.
15
Operating Instructions Pilot Test
8 Care and maintenance of the instrument
Disconnect the main cables before cleaning!
To clean the instrument, headphones and accessories use a soft cloth dampened with a little warm
soapy water; no alcohol-based cleaner should be used.
The ear cushions of the headphones can be detached for cleaning. To remove the ear cushion, pull
it gently from the earphone. To assemble the cleaned or changed cushion, press it on the
earphone and make sure that it sits properly. The sound outlet hole must be exactly in the middle
of earphone.
During cleaning, make sure that no liquids run into the switches, headphone capsules or
loudspeaker openings.
To maximize the service life of your audiometer and accessory equipment, we suggest the
following:
1. Turn off the instrument overnight.
2. Wipe the headset cords, ear cushions and casing occasionally with a cloth dampened (not
dripping wet) with warm water. Dry with a soft cloth.
3. Leave the accessories such as the headset, power supply module, and operator earphone
permanently connected to the audiometer to minimize strain on the connections. It is not
necessary to disconnect accessories that are not in use while performing other tests. Should
it be necessary to disconnect cords, always grasp the barrel of the plug — never pull the
cords. Never drop or snap the headphones together. Mechanical shock may change the
earphone’s electrical and operational characteristics and require recalibration of the Pilot.
4. Cover the audiometer at the end of each day to minimize dust collection.
5. Avoid sharply bending or twisting any of the cords. Although they are designed to be highly
flexible, rough treatment may cause damage. Broken or defective cords can cause crackling
noise and intermittent or weak operation in the headset. Headset cords may be replaced
without recalibrating the audiometer.
16
Operating Instructions Pilot Test
9 Technical data and accessories
Pilot Speech Test test signal:
Hearing level:
Speech signal source:
Tone Audiometer audiometer class:
Test signal:
Test frequencies:
Hearing level:
Air conduction headset TDH 39:
Presenter mode:
Electrical safety:
Main voltage:
Power consumption:
Warm up time:
Environment conditions:
Dimensions:
Weight:
Connection plugs:
Main
middle=protection earth
Serial interface
Universal serial interface
Monitor phone Sleeve=
Patient response switch
Loudspeaker (optional)
Headset right (red)
Headset left (blue)
Speech
15, 20, 25, 30, 35, 40, 45, 50 dBHL
MP3 sound file
4 ANSI S3.6
Pure tone
250, 500 Hz, 750 Hz, 1, 1.5, 2, 3, 4, 6, 8 kHz
adjustable in 5 dB steps
- 10 dBHL to 100 dBHL
Tone will be presented when pressing the STIMULUS
button.
EN 60601-1 class I
100 to 240 V~ ±10 % / 50/60 Hz
10 VA
> 10 min after power on
+15º C to +35º C / +59º F to +95º F (operation)
+5º C to +50º C / +41º F to +122º F (storage)
max. humidity 90% (storage and operation)
WxDxH: 30 x 25 x 6 cm / 11.8" x 9.8" x 2.4"
1.3 kg / 2.86 lbs
Connections
left/right=main
1=GND, 2=RX, 3=TX
USB 1.1
Mass, Tip=Output
Sleeve=Mass, Tip=Input
Sleeve=Mass, Tip=Output
Sleeve=Mass, Tip=Output
Sleeve=Mass, Tip=Output
17
Specification
100...240 V~, 50/60 Hz
RS 232 C
ZA= 10 S, UA= 35 mVeff
RI= 500 S
ZA= 8 S, UA= 3.5 Veff
ZA= 8 S, UA= 3.5 Veff
ZA= 8 S, UA= 3.5 Veff
Operating Instructions Pilot Test
Calibration values:
AC-Headphone
Force 4-5 N
Reference equivalent
threshold according to
ANSI S3.6
25.5
11.5
7
9
10
9.5
15.5
13
19.5
Frequency (Hz)
250
500
1000
2000
3000
4000
6000
8000
Speech
Standard accessories:
Part # 708
Digital Pilot Test
Part # 1162-9902 Large picture board – English words
Part # 1162-9906 Large picture board – Spanish words
Part # 1162-9903 Small picture review sheet – English words
Part # 1162-9910 Small picture review sheet – Spanish words
Part # 1162-0416 Operator score pad – English
Part # 1162-0417 Operator score pad - Spanish
Part # 1025-2067 Power cord
Part # 1034-38
TDH-39 headset
Part # 4687
Patient response switch
Part # 1034-2003 Operator earphone
Part # 1162-0415 Operating manual with warranty card
Calibration certificate
Consumables:
Operator score pad – English
Operator score pad – Spanish
Please contact Maico Diagnostics at (888) 941-4201 to reorder.
18
Operating Instructions Pilot Test
10 Troubleshooting
If your instrument is no longer working properly, please check the following points:
Lamps do not light up:
- Is the power switch on?
- Is the power cord plugged in correctly in the power connector?
- Is the wall outlet working?
No sound from headphone:
- Is the headphone cable plugged correctly in socket?
- Is the lead loose or defective?
No sound from monitor:
- Is the cable plugged in correctly to the socket?
- Is the lead loose or defective?
If your instrument still does not work properly after this short check, please consult your dealer or
send the instrument to your dealer or a service center. Please include a detailed description of
faults.
19
Operating Instructions Pilot Test
11 After-sales service and calibration
11.1 After-sales service
The Pilot Test may be repaired and serviced only by your dealer or by a service center
recommended by your dealer. We urgently advise you against attempting to rectify any faults
yourself or commissioning non-experts to do so.
In the event of repair during the guarantee period, please enclose evidence of purchase with the
instrument.
In order to ensure that your instrument works properly, the Pilot Test should be checked and
calibrated at least once a year. This check has to be carried out by your dealer.
When returning the instrument for repairs it is essential to send the headphones, as well. Send the
device to your dealer or to a service center authorized by your dealer. Please include a detailed
description of faults. In order to prevent damage in transit, please use the original packing if
possible when returning the instrument.
11.2 Calibration
The optimum length of time between calibrations for audiometers varies, depending upon the
treatment given the instrument and the headphones. It is recommended that the instrument have
a laboratory calibration at least once every year. Since rough handling, such as dropping the
headphones, can easily cause calibration errors it is advisable to establish a biological calibration
check as soon as you receive the instrument.
Should you feel at a later date that the audiometer’s calibration might be in error, perform a
biological check on a known ear. If all retests show major changes, calibration is probably in error.
All repairs and calibrations should be completed at an authorized Maico Special Instruments
Distributor service center. This assures the use of quality materials by trained and experienced
technicians using the proper, accurate equipment.
Maico Special Instruments Distributors are located in major cities throughout the world. To
minimize costs and time delays, contact the Distributor that you purchased the instrument from. If
you don’t know who that is, or need to find the Distributor closest to you, contact the factory at:
Maico Diagnostics
7625 Golden Triangle Drive
Eden Prairie, MN 55344
Toll free 888-941-4201
Phone 952-941-4200
Fax 952-903-4200
20
Operating Instructions Pilot Test
Customers outside of North America and South America may contact:
Maico Diagnostic GmbH
13/14 Salzufer
10587 Berlin, Germany
Phone ++030 70 71 46 50
Fax ++030 70 71 46 99
11.3 Shipping instructions for calibration and repair
In the event it becomes necessary to return the instrument for calibration or repair, please follow
these instructions:
1. Place the instrument in the original shipping carton, using the packaging provided. Be sure
to include all accessories, as they are required for proper calibration.
2. Enclose an explanatory letter describing the service you require, carefully detailing any
operational problems. Be sure to include your name, phone number, the serial number and
your full return address for return shipping.
3. Ship, prepaid, to your Maico Special Instrument service center.
NOTE: Warranty service is provided by your authorized Maico Special Instruments Distributor.
DO NOT ATTEMPT TO REMOVE THE INSTRUMENT CASE YOURSELF.
THIS SHOULD BE DONE ONLY BY AN AUTHORIZED MAICO SERVICE
TECHNICIAN.
21
Operating Instructions Pilot Test
12 Safety regulations
Electrical safety:
The Maico Pilot Test is constructed to comply with protection class I of the international standard
IEC 601-1 (EN 60601-1).
The instrument is not intended for operation in areas with an explosion hazard.
Measuring security:
To guarantee that the instrument works properly, the instrument has to be checked and calibrated
at least once a year.
The service and calibration must be performed by an authorized service center. In accordance with
the regulations of the EU Medical Directive, Maico is not liable if these checks are not completed.
Device control:
The user of the instrument should perform a subjective instrument check once a week. This check
can be completed following the list for subjective instrument check (see next page).
A possible malfunction of the instrument will be better investigated if you copy the list, complete it
once a week and store it in your files.
22
Operating Instructions Pilot Test
13 List for subjective instrument check
Model:
Serial #:
Test person:
□
□
□
□
□
- All keys can be pressed easily
- All the cords are disentangled
- Connectors and cables are intact
- Cushions of the headphone are cleaned
- Cushions of the headphone are undamaged
Test subject:
Level (dBHL)
Sentence from
Group 1
50
45
40
35
30
25
20
15
15
15
… high chair
… rainbow
… bathtub
… hotdog
… fire truck
… sandbox
… toothbrush
… sailboat
… baseball
… cupcake
Test person’s
answers today
RIGHT EAR
Test person’s
answers today
LEFT EAR
Test person’s
answers last
session
RIGHT EAR
Test person’s
answers last
session
LEFT EAR
If the difference between today's and last answer of the test person is 10 dB or more on the same
ear, perhaps the Pilot Test needs service!
Tested:
Date:
23
Operating Instructions Pilot Test
14 Thermal printer set-up
The thermal printer is an optional addition to the Pilot Test.
14.1 Description of the unit
1. Cover
2. Printer Roller
3. Paper Guiding Rib
4. Lever
5. Thermal Head
6. Printer mechanism
7. Paper Storage
3
4
5
2
6
7
A. LED Indicator
B. ON/OFF Line Button
C. Paper Feed Button
1
A
B
C
24
Operating Instructions Pilot Test
D. Power Input Connector
E. Serial Communication Connector
F. Serial Communication Plugs
D
E
F
25
Operating Instructions Pilot Test
14.2 Safety warnings
Please be aware of the following safety instructions.
•
This machine is designed to print on thermal paper only.
•
The manufacturer is not liable for damage caused by improper or incorrect use of the unit.
•
The thermal head (5) is delicate and can get hot. Do not touch this part.
•
Always keep the unit dry. Do not touch the unit when your hands or fingers are damp.
•
In the event of breakdown or faulty operation, turn the unit off and do not tamper with it.
For repairs, contact technical support at Maico Diagnostics.
•
The thermal printer can only be used with main voltage. The instruments are not
intended for operation in areas with an explosion hazard.
14.3 Installation
After unpacking the unit, make sure it is complete and undamaged. If you encounter any
problems, contact technical support at Maico Diagnostics.
1. Place the appliance on a work surface away from water taps, basins and sources of heat.
Check the polarity and the voltage level on the power supply. The voltage in the connector
should range between 6VDC to 9VDC. AC input: 100-240 V, 1.0 A, 50-60 Hz.
2. Connect the power supply to the thermal printer.
3. Connect the serial communication plugs to the printer and the Pilot Test. Use the data
transfer connecting cable supplied with the unit.
26
Operating Instructions Pilot Test
15 Using the thermal printer
15.1 Turning the printer on and off
Turn the printer on
• If the printer is off, press the Paper Feed button (C). The LED (A) will light up.
• If the printer is on stand-by, press the ON/OFF button (B).
Stand by
• Press the ON/OFF button (B). The LED (A) will flash.
Turn the printer off
• Press the ON/OFF button (B) for more about three seconds. The LED (A) will turn off.
15.2 Inserting paper into the printer
Manual load
1. Open the cover (1) of the printer.
2. Lift the green lever (4) in the printer.
3. Place the end of the paper, with the heat sensitive side down, under the roller (2) of the
printer.
4. Slide the paper past the roller. Place your fingers on the positions of the paper guiding ribs
(3).
5. Put the green lever down again.
6. Place the roll of paper in the paper storage (7).
7. Close the cover of the printer, so that the end of the paper sticks out the unit.
Automatic load
1. Make sure the printer is on or in stand-by.
2. Open the cover (1) of the printer.
3. Place the end of the paper, with the heat sensitive side down, under the roller (2) of the
printer.
4. The printer-roller starts to rotate and pulls the paper through the printer.
5. Place the roll of paper in the paper storage (7).
6. Close the cover of the printer, so that the end of the paper sticks out the unit.
15.3 Removing paper from the printer
1. Open the cover (1).
2. Lift the green lever (4) in the printer.
3. Gently pull the roll of paper back until the paper is completely out of the printer.
15.4 Paper feed
1. Make sure the printer is on or in stand-by.
2. Press the Paper Feed button (C) until the paper has reached the length you require.
27
Operating Instructions Pilot Test
15.5 Self-test
1. Turn the printer is off.
2. Make sure there is thermal paper in the printer.
3. Press both the Paper Feed (C) button and the ON/OFF button (B) for more about three
seconds.
4. The printer will print the following:
Firmware
Revision
Printer type
8x16 Internal
Character
12x20
Internal
Character
28
Operating Instructions Pilot Test
15.6 Printing
1. Turn the printer is on.
2. Make sure there is thermal paper in the printer.
3. In the Pilot Test user manual display, highlight “PC or Printer” and then select Printer.
Choose one of the following print commands from your Pilot Test:
1. For printouts in the Audiometry Mode, hold the yellow TONE button for about two seconds.
Select “Print,” “Print and delete” or “delete.” Results from both the Audiometry and Pilot
Test will be printed.
2. For printouts in the Pilot Test Mode, hold the blue GROUP button longer for about two
seconds. Select “Print,” “Print and delete” or “delete.” Results from both the Audiometry
and Pilot Test will be printed.
15.7 Cleaning
Before performing any cleaning operations, the machine must be disconnected from any power
supply and data. Do not use solvents or abrasive detergents to clean the printer. A soft damp cloth
will suffice.
When cleaning the inside of the cover, only use dry cloth or a small vacuum cleaner.
WARNING: DO NOT TOUCH THE PRINTING MECHANISM; PRINTER ROLLER OR THERMAL HEAD!
15.8 Troubleshooting
15.8.1 LED indications:
LED indication
LED does not illuminate
Meaning
Printer status is “OFF”
Action
Turn the printer “ON” by
pressing the “Paper Feed”
button
LED is always “ON”
LED flashes 1 time during
cycle
Printer status is “ON”
Printer status is “Stand By”
Turn the printer “ON” by
pressing the “ON/OFF” Line
Button (B)
LED flashes 2 time during
cycle
LED flashes 3 time during
cycle
LED flashes 4 time during
cycle
Lever in the printer is “UP”
Press the lever down
End of paper
Put new paper in the
printer
Check your Power supply if
it corresponds to the value
of 5V to 8,5 V.
Cool down the printer.
Over/Under Voltage or
Temperature
29
Operating Instructions Pilot Test
15.8.2 Problem-solving
Problem
LED does not illuminate
Printer does not print
Cause
Printer status is “OFF”
Action
Turn the printer “ON” by
pressing the “Paper Feed”
button
Power supply is not
connected
Check all the connections
of your power supply.
Printer is not connected
Serial jacks are
interchanged
No paper in the printer
Check all the connections
and signs of your power
supply
Put paper in the printer
Lever is up
Put lever down
The paper goes through the The printer is printing on
printer but there is nothing the wrong site of the paper
on it
30
Replace the paper with the
thermal side to the printing
head of the printer.
Operating Instructions Pilot Test
15.9 Spare parts list
Qty:
1
1
1
1
1
Description
Thermal printer
Blue overlay for thermal printer
Data transfer connecting cable
Thermal printing paper
Power supply
Part number
1149-1044
1087-2012
1025-2068
5529
1149-1046
31
1162-0414 REV. B
10/05